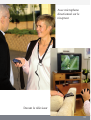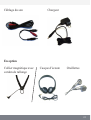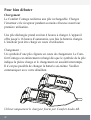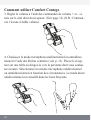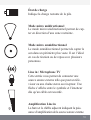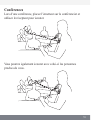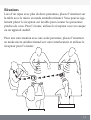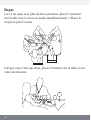
1
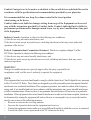
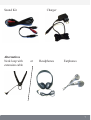
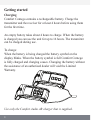
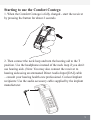
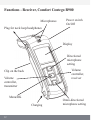
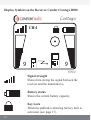
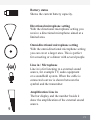
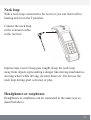
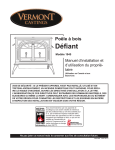
Comfort Contego
User Manual
Please read the User Manual
before using this product.
Comfort Contego T900
Transmitter
Comfort Contego R900
Receiver
DO NOT USE the COMFORT CONTEGO
if you have a CARDIAC PACEMAKER
The Comfort Contego could cause the
Pacemaker to malfunction.
Comfort Contego is not to be used as a substitute to the ear-aid devices and should be used in
accordance with the specifications and recommendations provided by your physician.
It is recommended that user keep the volume control in the lowest position
when turning on the device.
Comfort Audio is not liable for damages arising from usage of the Equipment not in accordance with the instructions provided by Comfort Audio. Comfort Audio shall not be liable for
performance problems and/or damages caused in any way by user’s modification of any part
of the Equipment
Industry Canada, Operation is subject to the following two conditions:
(1) this device may not cause interference, and
2) this device must accept any interference, including interference that may cause undesired
operation of the device.
Federal Communications Commission Statement, This device complies with part 15 of the
FCC Rules. Operation is subject to the following two conditions:
(1) this device may not cause harmful interference, and
(2) this device must accept any interference received, including interference that may cause
undesired operation.
WARNING!
Changes or modifications not expressly approved by the party responsible for
compliance could void the user’s authority to operate the equipment
NOTE:
This equipment has been tested and found to comply with the limits for a Class B digital device, pursuant
to Part 15 of the FCC Rules. These limits are designed to provide reasonable protection against harmful
interference in a residential installation. This equipment generates, uses and can radiate radio frequency
energy and, if not installed and used in accordance with the instructions, may cause harmful interference
to radio communications. However, there is no guarantee that interference will not occur in a particular
installation. If this equipment does cause harmful interference to radio or television reception, which can
be determined by turning the equipment off and on, the user is encouraged to try to correct the interference by one or more of the following measures:
-- Reorient or relocate the receiving antenna.
-- Increase the separation between the equipment and receiver.
-- Connect the equipment into an outlet on a circuit different from that to which the receiver is connected.
-- Consult the dealer or an experienced radio/TV technician for help.
Le mode d’emploi en français débute page 36
Contents
Page
Introduction
This is included 4-5
6-7
Getting started 8 - 11
Charging 8
Functions - receiver
12 - 14
Functions - transmitter 14 - 15
Menu
16 - 17
Symbols receiver
18 - 19
Symbols transmitter20 - 21
Radio range and channels22
Using the neck loop/headphones
23
Areas of use
Conversations 24
Lectures25
In a shop 26
Meetings27
Dinner 28
At home29
In the car 30
Watching TV 31
Special functions32
Troubleshooting33
Safety instructions34
Service, guarantee and technical data35
Introduction
Congratulations on your choice of the Comfort Contego. In the bag you
will find everything you need to improve your grasp of speech in all kinds
of situations. It is easy to use and works regardless of whether you have
a hearing aid or not. The sound is transmitted digitally which gives an
extremely good speech reception. Comfort Contego is almost impossible
to intercept as the receiver and transmitter are paired using a coded key.
Please read through the instructions for use before you use the product.
For conversations
at home or at work
Watching TV
At a restaurant
With a directional
microphone on the
receiver.
This is included
Carrying Case
Receiver - Contego R900
Transmitter - Contego T900
Sound Kit
Alternatives
Neck loop with extension cable
Charger
or
Headphones
Earphones
Getting started
Charging
Comfort Contego contains a rechargeable battery. Charge the
transmitter and the receiver for at least 4 hours before using them
for the first time.
An empty battery takes about 4 hours to charge. When the battery
is charged you can use the unit for up to 16 hours. The transmitter
can be charged during use.
To charge:
When the battery is being charged the battery symbol on the
display blinks. When the battery symbol is full Comfort Contego
is fully charged and charging ceases. Changing the battery without
the assistance of an authorized dealer will void the Limited
Warranty.
Use only the Comfort Audio AB charger that is supplied.
Starting to use the Comfort Contego
1. When the Comfort Contego is fully charged - start the receiver
by pressing the button for about 2 seconds.
2. Then connect the neck loop and turn the hearing aid to the T
position. Use the headphones instead of the neck loop if you don’t
use hearing aids. (Note: You may also connect the receiver to
hearing aids using an attenuated Direct Audio Input [DAI] cable
– consult your hearing health care professional. Coclear Implant
recipients: Use the audio accessory cable supplied by the implant
manufacturer.
3. Picking up sound via the built in microphones in the receiver.
Set the audio level by means of the right hand volume controller
(see page 12) (Note! Start listening at a low volume. if the volume
is not set on the lowest position, the sound could potentially cause
harm to the user’s hearing.)
Select the directional or omni-directional microphone with the arrow buttons in the middle (see page 12). Place the receiver on a table or aim it at the person you want to listen to. Choose directional
or omni-directional settings depending on the situation. Normally
in noisy surroundings directional setting is preferred.
10
4. Picking up sound by means of transmitter.
When the distance between you and the speaker /sound source is
longer, let the person you want to hear use the transmitter.
Set the audio level by means of the left hand volume controller.
(see page 12) (Note! Start listening at a low volume)
(When the transmitter or receiver is turned on, the most recent settings for volume and microphone type are automatically selected)
11
Functions - Receiver, Comfort Contego R900
Microphones
Plug for neck loop/headphones
Power switch
On/Off
Display
Directional
microphone
setting
Volume
controller,
receiver
Clip on the back
Volume
controller,
transmitter
Menu/OK
Charging
12
Omni-directional
microphone setting
Functions R900
The most important functions can be accessed without needing to
go into the menu. (For menu see page 16.)
Volume controller receiver
(internal microphones)
By pressing the plus sign you
increase the volume on the
receiver microphone
By pressing the minus sign
you decrease the volume on
the receiver microphone
Directional microphone
With the uppermost arrow
you select the directional
microphone
Omni-directional
microphone
With the lower arrow you
select the omni-directional
microphone
13
Functions Receiver R900
Volume controller
(transmitter)
By pressing the plus sign you
increase the volume from the
transmitter microphone.
By pressing the minus sign
you decrease the volume from
the transmitter microphone.
Functions Transmitter T900
Line in unattached
Line in attached
Directional microphone
With the uppermost arrow
you select the Uni-directional microphone.
By pressing the uppermost
arrow you increase the
line in amplification.
Omni-directional microphone
With the lower arrow you
select the omni-directional
microphone.
14
By pressing the lower arrow you decrease the line
in amplification.
Functions - Transmitter, Comfort Contego T900
Microphones
On/off
Line in
Display
Directional
microphone
setting
Clip on the back
Menu/OK
Charging
Omni-directional
microphone setting
15
Menu Receiver and transmitter
The functions in the menus are the same for both the receiver and
the transmitter.
Press and hold the Menu/OK button for a short moment to access
the menu:
Menu/OK
Receiver
Transmitter
Choices displayed on the transmitter:
Back
Channel
Pairing
Line in
Language
Key lock
Choices on the receiver:
Back
Pairing
Language
Key lock
You select the function by navigating
up or down with the arrow buttons
To make a selection, press Menu/OK
To return, also press Menu/OK
16
Receiver
Transmitter
Channel settings
The transmitter and receiver are set on the same channels when you
receive the product. To change channels choose Channel in the menu
and press OK, navigate between the channels by using the arrows up
and down. To choose a channel press OK.
Pairing
In order to use the receiver and the transmitter they must be paired.
(When you receive them they are already paired). Confirm that both
the transmitter and receiver are charged and ON. Press MENU key
on the transmitter and receiver. Scroll to PAIR and press OK (Menu
Key). A new menu will show. Press pair. The unit will display
“Wait for receiver/transmitter”. Press OK on the transmitter. In a few
seconds the Units will PAIR and display “Pairing Complete”.
Line in
Here you choose if you want to use a external sound source. When
you receive the Contego it is on “Line in” (The microphone setting
is only to be used if you use our accessory TV-microphone)
Language
Select the language with the arrows. Press OK.
Key lock
When you are in the menu selection “Lock Keys” and press Menu/
OK you lock the keys. To unlock them press the up and down
arrow keys simultaneously.
17
Display Symbols on the Receiver, Comfort Contego R900
Contego
CH:1
9
9
R900
Signal strength
Shows how strong the signal between the
receiver and the transmitter is.
Battery status
Shows the current battery capacity.
Key Lock
When the padlock is showing the key lock is
activated. (see page 17).
18
9
Volume transmitter
The bar display and
the number beside it
show the volume on
the transmitter.
9
Volume receiver
The bar display and
the number beside it
show the volume on
the receiver.
Directional microOmni-directional
phone setting
microphone setting
With the directional
With the omni-direcmicrophone setting
tional microphone
you receive a direcsetting you can cover
tional microphone
a larger area.
aimed at a limited
CH:1
area.
Channel
The number shows which channel
the receiver is set on. (The receiver
and transmitter must be on the same
channel in order to be able to work
together.) When the exclamation
Transmission
mark “!” is displayed it means that
Shows that there is contact
you are transmitting on a frequency
between the receiver and the that you must apply for permission
transmitter. If the receiver
to use. (Comfort Audio is not liable for
and transmitter are too near unauthorized use of radio waves, such as,
but not limited to: interferences with police
one another “Too close” is
communication, or strategic communicadisplayed
tion, military installations etc.)
19
Display Symbols Transmitter, Contego T900
Contego
CH:1
9
T900
CH:1
Channel
The number shows which channel the receiver is
set on. When the exclamation mark “!” is displayed it means that you are transmitting on a frequency that you must apply for permission to use.
Key Lock
When the padlock is displayed the key lock is
activated (see page 17)
20
Battery status
Shows the current battery capacity.
Directional microphone setting
With the directional microphone setting you
receive a directional microphone aimed at a
limited area.
Omni-directional microphone setting
With the omni-directional microphone setting
you can cover a larger area. This is perfect
for a meeting or a dinner with several people.
Line in / Microphone
Line in is for listening to a external sound
source, for example TV, audo equipment
or a soundfield system. When the cable is
connected a arrow is shown between the
symbol and the transmitter.
Amplification Line in
The bar display and the number beside it
show the amplification of the external sound
source.
9
21
Radio range and channels
The aerials for the transmitter and receiver are built in. The range
is up to 25 meters. This can vary depending on the kind of environment you are in.
Like all radio transmitters Comfort Contego communicates on
special channels. If you use two transmitters on the same channel
there will be an interference.
Other electronic equipment can also interfere with the radio transmissions.
The channel that you use in your country is perhaps not permitted
abroad. Always get in touch with your hearing aid provider in your
country in order to find out which channels are permitted in different countries.
Comfort Audio is not liable for unauthorized use of radio waves,
such as, but not limited to: interferences with police communication, or strategic communication, military installations etc.
22
Neck loop
With a neck loop connected to the receiver you can listen with a
hearing aid set on the T position.
Connect the neck loop
or the extension cable
to the receiver:
Injuries may occur if loop gets caught. Keep the neck loop
away from objects representing a danger like moving machineries,
steering wheel while driving, elevator doors etc. Do not use the
neck loop during sport activities or play.
Headphones or earphones
Headphones or earphones can be connected in the same way as
described above.
23
Areas of use - Choosing the microphone setting
Conversations
Put the transmitter on the person you want to listen to. Select the
directional setting on the transmitter and aim it at the person’s
mouth. Use the receiver with headphones or a hearing aid to listen.
With the help of the extension cable you can have the receiver in
your pocket.
24
Lectures
At a lecture you put the transmitter on the lecturer and use the
receiver to listen.
You can also listen to the people next to you with the help of the
receiver.
25
In a shop - short distances
When the distance between you and the person you want to hear is
short or it is just a quick meeting, you can use the receiver on the
directional setting and aim it at the person you want to hear. In a
café or similar situation you can also place the receiver on the table
and listen.
This is an easy and simple way to use the Comfort Contego.
26
Meetings
In a meeting with more than two people you put the transmitter
in its omni-directional setting on the table. The receiver can also
be placed on the table in order to listen to those nearest you. You
use the receiver with headphones or neck loop and hearing aid to
listen.
On a one-to-one conversation you set the transmitter to the directional setting on the other person and you use the receiver to listen.
27
Dinner
At a dinner with more than two people put the transmitter in its
omni-directional setting on the table. You use the receiver to listen
with.
On a one-to-one conversation put the transmitter on the table or on
the person you want to hear.
28
At home
Put the transmitter on the person you want to hear. Set it to omnidirectional with the microphone aimed upwards. Use the receiver
to listen.
29
In the car
In a car it is almost always noisy. Regardless of whether you are a
passenger or the driver you can hear what others in the car have to
say with the help of Comfort Contego. Put the transmitter on the
person you want to hear (Set it to directional with the microphone
aimed upwards.) Use the receiver to listen.
NOTE!
The use of headphones or
earphones while driving a car
or any other vehicle may limit
or prevent the perception of
surrounding noises and cause
accidents.
If there are more people in the car you can let the people on the
backseat use the transmitter. The person you want to hear in the
front seat uses the receiver. You listen by using headphones or
neck loop and hearing aid.
30
Watching TV
In order to be able to hear the TV or other sources of sound you
can use the sound kit. You can then listen with the receiver.
A
Connect the cable (A) between
the TV and the socket on the
Contego transmitter (T900).
(Make sure the transmitter is set
on “Line in”)
With the help of the built in microphone in the receiver you can
also listen to people sitting next
to you on the sofa.
31
Special functions
Add a receiver / more receivers
In order to add an additional receiver go
into the menu on the extra receiver, Choose Pair.
Then go into the menu of the transmitter. Choose Pair and press
OK. Pair complete!
The new receiver can then be used to listen with.
Tip: - -
32
More than one receiver can be paired at the same time.
Instead of using the transmitter menu you can pair by
pushing two quick times on the menu button on the
transmitter.
Troubleshooting
Transmitter and receiver do not start.
Charge the transmitter and the receiver. Remember that you must
hold the ON/OFF button in for 2 seconds in order to start Comfort
Contego. If it still does not work - check the charger is connected
to the mains. Contact your retailer to change the battery.
Poor speech reception
The distance between the transmitter and the receiver is too long.
The distance between the microphone and the person speaking can
also be too long.
Poor range and interference
In certain environments consisting of concrete, iron and metal
plates, the range can be reduced. There can also be interfering
equipment nearby. Change channel.
If you change channel on the transmitter the receiver must be on
and within the transmitters range to follow the channel switch.
NOTE
If you use a hearing aid make sure that it is working and that it
is in the T setting. Always make sure that the receiver and the
transmitter are paired.
33
Important Safety Instructions
Not following the Important Safety Instructions, or trying to repair
and/or tampering the Equipment without the assistance of an
authorized technician will void the Limited Warranty. Comfort Audio
is not liable for any damages arising out of such unauthorized uses,
repairs, and/or tampering.
1) Read these instructions.
2) Keep these instructions.
3) Heed all warnings.
4) Follow all instructions.
5) Do not use this apparatus near water, it may damage the product.
6) Clean only with dry cloth, otherwise you could damage the product.
7) Install in accordance with the manufacturer’s instructions. If not, it may
damage the product.
8) Do not use or install near any heat sources such as radiators, heat registers, stoves, or other apparatus (including amplifiers) that produce heat.
9) Protect the power cord from being walked on or pinched particularly at plugs,
convenience receptacles, and the point where they exit from the apparatus.
10) Only use attachments/accessories specified by the manufacturer.
11) Unplug this apparatus during lightning storms or when unused for
long periods of time.
12) Refer all servicing to qualified service personnel. Servicing is required
when the apparatus has been damaged in any way, such as power-supply
cord or plug is damaged, liquid has been spilled or objects have fallen into
the apparatus, the apparatus has been exposed to rain or moisture, does not
operate normally, or has been dropped.
!
34
Service and guarantee
Comfort Audio AB provides a comprehensive guarantee for two years after the date of delivery. This covers all manufacturing faults. Headphones,
earbuds and cables are warranted under normal use for thirty days from
date of purchase. Faults caused by careless use or opening the Comfort
Contego are not covered by the guarantee.
Accessories and spare parts
Spare parts and accessories can be ordered (see pages 6-7 for pictures.)
You are always welcome to contact your nearest retailer if there is anything you are unsure about.
The weights, dimensions, capacities, performance ratings and other data in Comfort Audio’s brochures, prospectus, circulars, advertisements, price lists and instructions sheets are mentioned only
as general information. They are only approximate and shall not bind Comfort Audio.
Technical data
Type of transmitter
Digital modulation, with encryption
Range
- 25 m
Size
22 x 45 x 98 mm
Weight
60 g
Frequency range
904 - 926 MHz
Channels
38
Antenna
Built in
Operating time
- 16 hours
Battery
Rechargeable Li-Ion
Charging time
4 hours
Microphones
Built in, directional and omni-directional
Input
Line in / Microphone
35
Mode d’emploi Comfort Contego
Sommaire
Page
Pour bien débuter Chargement Fonctions : Récepteur
Fonctions : Émetteur Menu
Symboles : Récepteur
Symboles : Émetteur
42 - 45
42
46 - 48
48 - 49
50 - 51
52 - 53
54 - 55
Portée radio et canaux
Utilisation d’un collier Magnétique/d’un casque d’écoute
56
57
57
Domaines d’utilisation
Conversations Conférences
Dans un magasin Réunions
Repas Chez soi
En voiture Devant la télévision 58
59
60
61
62
63
64
65
Fonctions spéciales
Recherche de pannes
Consignes de sécurité
Maintenance et garantie
Fiche technique
66
67
68
68
69
Introduction37 - 39
Matériel fourni 40 - 41
36
Introduction
Félicitations pour avoir choissi le Comfort Contego. Vous trouverez
dans la mallette tout ce dont vous avez besoin pour améliorer en
toutes circonstances l’intelligibilité vocale. Les appareils fournis
sont simples à utiliser et s’adaptent facilement, que vous soyez ou
non appareillé. Grâce à leur transmission numérique, ils fournissent
une intelligibilité optimale de la parole. Le Comfort Contego empêche pratiquement toute interception d’une conversation puisque le
couplage entre le récepteur et l’émetteur s’opère par clé codée. Lisez
entièrement le mode d’emploi de l’appareil avant toute utilisation.
37
Au restaurant
Conversations chez
soi ou au travail
38
Avec microphone
directionnel sur le
récepteur
Devant le téléviseur
39
Matériel fourni
Mallette
Récepteur : Contego R900
40
Émetteur : Contego T900
Câblage du son
Chargeur
En option
Collier magnétique avec
cordon de rallonge
Casque d’écoute
Oreillettes
41
Pour bien débuter
Chargement
Le Comfort Contego renferme une pile rechargeable. Chargez
l’émetteur et le récepteur pendant au moins 4 heures avant leur
première utilisation.
Une pile déchargée prend environ 4 heures à charger. L’appareil
offre jusqu’à 16 heures d’autonomie, une fois la batterie chargée.
L’émetteur peut être chargé en cours d’utilisation.
Chargement :
Un symbole d’une pile clignote en cours de chargement. Le Comfort Contego est entièrement rechargé dès que le symbole de la pile
indique la pleine charge et le chargement est aussitôt interrompu.
Il n’est pas possible de changer la batterie soi-même. Veuillez
communiquer avec votre détaillant.
Utilisez uniquement le chargeur fourni par Comfort Audio AB.
42
Comment utiliser le Comfort Contego
1. Une fois que le Comfort Contego ait complètement été chargé,
allumez le récepteur en pressant l’interrupteur pendant environ 2
secondes.
2. Raccordez ensuite le collier magnétique au récepteur du
Comfort Contego et mettez votre appareil auditif sur la position T.
Au lien d’un collier magnétique et d’un appareil auditif, vous pouvez utiliser un casque d’écoute sur le récepteur.
43
Comment utiliser Comfort Contego
3. Régler le volume à l’aide des commandes de volume + et – situés sur le côté droit du récepteur. (Voir page 12) (N.B : Commencez l’écoute à faible volume)
4. Choisissez le mode microphone unidirectionnel ou omnidirectionnel à l’aide des flèches centrales (voir p. 12). Placez le récepteur sur une table ou dirigez-le vers la personne dont vous souhaitez écoutez. Sélectionnez les modes microphone unidirectionnel
ou omnidirectionnel en fonction des circonstances. Le mode micro
unidirectionnel est conseillé dans les lieux bruyants.
44
Comment utiliser le Comfort Contego
5. En cas de distance importante entre une personne qui est la
source sonore ou d’une utilization dans un lieu bruyant, laissez
votre interlocuteur utiliser l’émetteur.
6. Le volume de l’émetteur se règle à l’aide des touches + et
- situées sur le côté gauche du récepteur. (Voir page 12) (N.B :
commencez l’écoute à faible volume)
(Les derniers réglages du volume et du mode microphone sont
sauvgardés automatiquement dès la mise en marche de l’émetteur
ou du récepteur)
45
Fonctions du récepteur du Comfort Contego R900
Prise pour collier magnétique ou casque d’écoute
Microphones
On/Off
Fenêtre d’
affichage
Mode microphone unidirectionnel
Pinces à ceinture au dos
Volume,
émetteur
Menu/OK
Chargement
46
Volume,
récepteur
Mode microphone omnidirectionnel
Fonctions R900
Les fonctions indispensables sont accessibles sans avoir recours au
menu. (Prière de se reporter à la page 16)
Volume du récepteur
(Microphone interne)
Appuyer sur la touche
portant un plus pour
monter le volume du microphone du récepteur.
Appuyer sur la touche
portant un moins pour
réduire le son du microphone du récepteur.
Mode unidirectionnel
La flèche du haut vous
permet de sélectionner
le mode micro unidirectionnel.
Mode omnidirectionnel
La flèche du bas vous
permet de sélectionner le
mode micro omnidirectionnel.
47
Fonctions du récepteur R900
Volume de l’émetteur
Appuyer sur la touche
portant le plus pour monter le volume du microphone de l’émetteur.
Appuyer sur la touche
portant le moins pour
réduire le son du microphone de l’émetteur.
Fonctions de l’émetteur T900
Entrée son désactivée
Entrée son activée
Mode unidirectionnel
La flèche du haut vous
permet de sélectionner
le mode micro unidirectionnel.
La fleches du haut vous
permet d’augmenter l’amplification du son entrant
dans l’émetteur.
Mode omnidirectionnel
La flèche du bas vous
permet de sélectionner le
mode micro omnidirectionnel.
La flèche du bas vouspermet de réduire l’amplification du son entrant dans
l’émetteur.
48
Fonctions de l’émetteur Confort Contego T900
Microphones
Entrée du son
On/Off
Fenêtre d’affichage
Mode micro
unidirectionnel
Pinces à ceinture au dos
Menu/OK
Chargement
Mode micro omnidirectionnel
49
Menu récepteur et émetteur
Pour accéder au menu, appuyez sur la touche Menu/OK
pour un instant.:
Menu/OK
Récepteur
L’émetteur affiche alors les
options suivantes :
Retour
Canal
Couplage
Entrée
Langue
Verrouillage
Emetteur
Choix du récepteur :
Retour
Couplage
Langue
Verrouillage
Naviguez avec les flèches pour
sélectionner une fonction.
Récepteur
Pour confirmez votre choix, appuyez sur Menu/OK.
Pour retourner en arrière, appuyez aussi sur Menu/OK.
50
Emetteur
Canal
A la livraison, l’émetteur et le récepteur sont réglés sur le même canal. Pour
changer de canal, allez sous la rubrique <<Canal>> dans le menu de l’émetteur. Faites défiler les canaux à l’aide des flèches. Pour sélectionner un canal,
appuyez sur OK. Les canaux 1, 2 et 3 sont des canaux autorisés dans de
nombreux pays européens. Les autres canaux fonctionnent aussi mais sont
soumis à des autorisations. (Voir page 32)
Couplage
Le récepteur et l’émetteur doivent être couplés pour pouvoir fonctionner ensemble. (A la livraison, l’émetteur et le récepteur sont couplés ensemble). Pour
opérer le couplage, choisissez « Couplage » dans le menu du récepteur. Appuyez sur OK pour effectuer le couplage. L’affichage indique alors « En attente
de l’émetteur ». Allez dans le menu de l’émetteur et sélectionner la fonction
Couplage. Appuyez sur OK et le message « Couplage effectué » s’affiche
alors.
Entrée
Cette option permet d’utiliser une source sonore externe. Comme un téléviseur ou une chaîne stéréo. Le Contego est réglé par défaut sur « Entrée
son ». (Le mode microphone ne doit être choisi que si vous utilisez notre
accessoire Microphone TV)
Langue
Sélectionnez la langue à l’aide des fleches. Appuyez sur OK
Verrouillage
Pour verrouiller les touches de l’appareil, sélectionnez l’option verrouillage et appuyez sur OK Pour les débloquer, maintenez pressées
simultanément les flèches haut et bas.
51
Symboles: affichages récepteur Contego R900
Contego
CH:1
9
9
R900
Puissance du signal
Indique la puissance du signal entre le récepteur et l’émetteur.
État de charge
Indique la charge restante de la pile.
Verrouillage
L’affichage du cadenas indique que le verouillage des touches est activé. (Voir page 17)
52
9
Volume émetteur
La barre et le chiffre
adjacent indiquent
le volume sonore de
l’émetteur.
Volume récepteur
La barre et le chiffre
adjacent indiquent le niveau sonore du récepteur.
9
Mode micro unidirectionnel
Le mode micro
unidirectionnel
permet de capter
le son en direction d’une zone
resteinte.
Mode omnidirectionnel
Mode du microphone
Le mode omnidirectionnel
permet de capter le son
dans un périmètre plus
vaste.
CH:1
Emission
Indique que la liaison entre
le récepteur et l’émetteur est
effectuée. Si le récepteur et
l’émetteur sont trop proches
l’un de l’autre, l’affichage
indique « Too close »
Canal
Le chiffre indique le canal sur
lequel le récepteur est réglé. (Le
récepteur et l’émetteur sont réglés
sur le même canal afin d’interfonctionner) Si un point d’exclamation « ! » apparaît, c’est que la
fréquence choisie est soumise à
une demande d’autorisation.
53
Symboles : Affichage Emetteur Contego T900
Contego
CH:1
9
T900
CH:1
Canal
Le chiffre indique le canal sur lequel l’émetteur
est réglé. Si un point d’exclamation « ! » apparaît, c’est que la fréquence choisie est soumise
à une demande d’autorisation.
Verrouillage
L’affichage du cadenas indique que le verrouillage des touches est activé. (Voir page 17)
54
État de charge
Indique la charge restante de la pile.
Mode micro unidirectionnel
Le mode micro unidirectionnel permet de capter en direction d’une zone restreinte.
Mode micro omnidirectionnel
Le mode omnidirectionnel permet de capter le
son dans un périmètre plus vaste. Il est l’idéal
en cas de réunion ou de repas avec plusieurs
personnes.
Line in / Microphone TV
Cette entrée vous permet de connecter une
source sonore externe telle que pour un téléviseur ou une chaîne stereo au récepteur. Une
flèche s’affiche entre le symbole et l’émetteur
dès qu’un câble est raccordé.
9
Amplification Line in
La barre et le chiffre adjacent indiquent la puissance d’amplification de la source sonore externe.
55
Portée radio et canaux
Les antennes sont intégrées au récepteur et à l’émetteur. La portée
de la radio va jusqu’à 25 mètres. La portée peut néanmoins variée
en fonction de l’environnement dans lequel se propage l’onde.
Comme tous les émetteurs radio, le Comfort Contego émet sur des
canaux spéciaux. L’utilisation d’un même canal pour deux émetteurs entraîne des perturbations.
D’autres appareils électroniques peuvent aussi perturber les transmissions radio.
Le canal que vous utilisez dans votre pays n’est peut-être pas autorisé à l’étranger. Renseignez-vous donc auprès de votre établissement de soins auditifs pour savoir quels sont les canaux autorisés
dans différents pays.
Les canaux 1 à 3 sont autorisés dans la plupart des pays européens.
56
Collier magnétique
Un collier magnétique raccordé au récepteur Permet d’écouter
avec un appareil auditif mis en position T.
Raccordez votre collier magnétique ou votre cordon de rallonge au
récepteur :
Casque d’écoute ou oreillettes
Casque à écouteurs et les oreillettes se raccordent comme indiqué
ci-dessus.
57
Domaines d’utilisation : choix du mode microphone
Conversations
Placez l’émetteur sur la personne que vous voulez écouter. Choisissez le mode micro unidirectionnel sur l’émetteur et dirigez celui-ci vers la bouche de votre interlocuteur. Pour l’écouter, utilisez
le récepteur avec un casque ou un appareil auditif. Grâce au cordon
de rallonge, vous pouvez placer le récepteur dans votre poche.
58
Conférences
Lors d’une conférence, placez l’émetteur sur le conférencier et
utilisez le récepteur pour écouter.
Vous pourrez également écouter avec celui-ci les personnes
proches de vous.
59
Dans un magasin (distance courte)
Lorsque votre interlocuteur est proche de vous ou en cas de brève
rencontre, vous pouvez utiliser le récepteur en mode micro unidirectionnel et le diriger vers la personne que vous écoutez. Au café
ou autre établissement de ce genre, vous pouvez également placer
le récepteur sur la table pour écouter.
C’est un moyen simple et commode d’utiliser le Comfort Contego.
60
Réunions
Lors d’un repas avec plus de deux personnes, placez l’émetteur sur
la table avec le micro en mode omnidirectionnel. Vous pouvez également placer le récepteur sur la table pour écouter les personnes
proches de vous. Pour l’écoute, utilisez le récepteur avec un casque
ou un appareil auditif.
Pour une conversation avec une seule personne, placez l’émetteur
en mode micro unidirectionnel sur votre interlocuteur et utilisez le
récepteur pour l’écouter.
61
Repas
Lors d’un repas avec plus de deux personnes, placez l’émetteur
sur la table avec le micro en mode omnidirectionnel. Utilisez le
récepteur pour l’écoute.
Lorsque vous n’êtes que deux, placez l’émetteur sur la table ou sur
votre interlocuteur.
62
Chez soi
Placez l’émetteur sur la personne que vous voulez écouter. Mettez-le en mode unidirectionnel, le microphone dirigé vers le haut.
Utilisez le récepteur pour l’écoute.
63
En voiture
L’ambiance d’une voiture est souvent bruyante. Que vous soyez
passager ou conducteur, vous pouvez grâce au Comfort Contego
entendre ce que disent les autres personnes présentes dans la
voiture. Placez l’émetteur sur la personne que vous voulez écouter.
Mettez-le en mode unidirectionnel, le microphone dirigé vers le
haut. Utilisez le récepteur pour l’écoute.
Si vous êtes au moins trois dans la voiture, vous pouvez laisser les
passagers arrière utiliser l’émetteur. La personne que vous voulez
entendre à l’avant aura le récepteur sur elle. Vous écoutez avec un
casque d’écoute ou une boucle d’induction et votre appareil auditif.
64
Devant le téléviseur
Pour écouter le téléviseur ou une autre source sonore, utilisez le
câblage du son fourni avec l’émetteur. Écoutez ensuite avec le
récepteur.
A
B
Raccordez le cordon fourni (A)
entre le téléviseur et l’émetteur
du Contego. Utilisez si besoin
l’adaptateur SCART (B). (Veillez
à ce que l’émetteur soit réglé sur
entrée : Line in)
Le microphone intégré au récepteur vous permet également
d’écouter les personnes assises
avec vous sur un canapé.
65
Fonctions spéciales
Canaux soumis à une autorisation
Si vous utilisez le canal 4 ou un canal supérieur, un point d’exclamation s’affichera suivant le numéro du canal. Ex.: CH:4 !
Cela signifie que vous utilisez un canal exigeant une autorisation.
Demandez à votre détaillant si vous pouvez utiliser la fréquence en
question dans le pays où vous vous trouverez.
Ajouter un récepteur / couplage supplémentaire
Vous pouvez sans problème utiliser plusieurs récepteurs pour
élargir votre écoute. (ex. : lors d’une visite guidée). Pour ajouter
un récepteur supplémentaire, allez dans le menu de ce récepteur.
Sélectionnez « Couplage ». Allez ensuite dans le menu de l’émetteur, sélectionnez « Couplage » puis appuyez sur OK. « Couplage
effectué! » Le nouveau récepteur est alors prêt à capter.
Conseil : - Plusieurs récepteurs peuvent être couplés
simultanément.
- Le couplage peut être activé moyennant deux pressions rapides sur la touche de l’émetteur au lieu d’aller dans le menu de celui-ci.
66
Recherche de pannes
L’émetteur et le récepteuer ne s’allument pas.
Chargez les deux appareils. N’oubliez pas que vous devez maintenir
le bouton ON/OFF pendant 2 secondes pour démarrer le Comfort
Contego. Si ça ne fonctionne toujours pas ? Vérifiez que le chargeur est
bien raccordé á une prise éléctique. Veuillez communiquer avec votre
détaillant pour changer la pile.
Mauvaise compréhension vocale
La distance entre l’émetteur et le récepteur est trop grande.
La distance entre le micro et la personne qui parle peut elle aussi
être trop importante.
Mauvaise portée et perturbations
Certains environnements comportant des murs en béton, des poutrelles métalliques ou des tôles peuvent réduire le rayon d’action
de l’appareil. Les appareils alentours peuvent aussi créer des perturbations. Pour éliminer les perturbations, changez de canal.
Si vous changez le canal de l’émetteur, assurez-vous que le récepteur est allumé et que la portée entre les deux appareils est suffisante pour permettre la permutation de canaux.
N.B. :
Si vous portez un appareil auditif : vérifiez que celui-ci fonctionne correctement et qu’il est sur la position T. Veuillez vous
assurer que l’émetteur et le récepteur soient bien couplés.
67
Consignes de sécurité importantes
1) Veillez à bien lire et comprendre ces instructions
2) Conservez ce manuel d’instructions
3) Observez tous les avertissements
4) Respectez toutes les instructions
5) N’utilisez pas les appareils près de l’eau.
6) N’utilisez qu’un chiffon sec pour le nettoyage.
7) N’utilisez que les accessoires/pièces de rechange du fabricant.
Maintenance et garantie
Comfort Audio AB offre un garantie étendue valable 2 ans à
compter de la date de livraison. Elle couvre tous les vices de
fabrication et de matériel. Les dommages dus à une mauvaise
manipulation ou à une intervention sur le Comfort Contego ne
sont pas couverts par la garantie.
Accessoires et pièces de rechange
Vous pouvez commander des pièces de rechange ou des accessoires. (Voir pages 6-7 pour les photos)
Veuillez communiquer avec votre le détaillant pour tous renseignements supplémentaires.
68
Fiche technique
Type d’émetteur
Modulation numérique, avec cryptage
Portée
- 25 m
Dimensions
22 x 45 x 98 mm
Poids
60 g
Plage de fréquences
904 - 926 MHz
Nombre de canaux
38
Antenne
Intégrée
Autonomie
- 16 heures
Pile
Li-Ion rechargeable
Temps de chargement
4 heures
Microphones
Intégrés, unidirectionnel et omnidirectionnel
Line in
Prise auililaire (pour microphone et téléviseur)
!
69
Manufactured by:
Distributed in Canada by / Distribu é par:
Supportive Hearing Systems
283 MacPherson Avenue, Toronto,
Ontario M4V 1A4 CANADA
Phone: 1-(800) 732-8804 • Fax: 1-(800) 597-3143
www.fmhearing.com
70
Comfort Audio © All rights reserved