1
3-DNS® Administrator Guide
version 4.5
MAN-0046-02
Product Version
This manual applies to version 4.5 of 3-DNS® Controller.
Legal Notices
Copyright
Information in this document is subject to change without notice.
© 2002 Dell Computer Corporation. All rights reserved.
Reproduction in any manner whatsoever without the written permission of Dell Computer Corporation is
strictly forbidden.
Trademarks used in this text: Dell and PowerEdge are trademarks of Dell Computer Corporation.
Other trademarks and trade names may be used in this document to refer to either the entities claiming the
marks and names or their products. Dell Computer Corporation disclaims any proprietary interest in
trademarks and trade names other than its own.
Copyright 1998-2002, F5 Networks, Inc. All rights reserved.
F5 Networks, Inc. (F5) believes the information it furnishes to be accurate and reliable. However, F5
assumes no responsibility for the use of this information, nor any infringement of patents or other rights of
third parties which may result from its use. No license is granted by implication or otherwise under any
patent, copyright, or other intellectual property right of F5 except as specifically described by applicable
iControl user licenses. F5 reserves the right to change specifications at any time without notice.
Trademarks
F5, F5 Networks, the F5 logo, BIG-IP, 3-DNS, iControl, GLOBAL-SITE, SEE-IT, EDGE-FX, FireGuard,
Internet Control Architecture, and IP Application Switch are registered trademarks or trademarks of F5
Networks, Inc. in the U.S. and certain other countries. All other product and company names are registered
trademarks or trademarks of their respective holders. F5 trademarks may not be used in connection with
any product or service except as permitted in writing by F5.
Export Regulation Notice
This product may include cryptographic software. Under the Export Administration Act, the United States
government may consider it a criminal offense to export this product from the United States.
Export Warning
This is a Class A product. In a domestic environment this product may cause radio interference in which
case the user may be required to take adequate measures.
FCC Compliance
This equipment generates, uses, and may emit radio frequency energy. The equipment has been type
tested and found to comply with the limits for a Class A digital device pursuant to Part 15 of FCC rules,
which are designed to provide reasonable protection against such radio frequency interference.
Operation of this equipment in a residential area may cause interference, in which case the user at his own
expense will be required to take whatever measures may be required to correct the interference.
Any modifications to this device, unless expressly approved by the manufacturer, can void the user's
authority to operate this equipment under part 15 of the FCC rules.
Canadian Regulatory Compliance
This class A digital apparatus complies with Canadian I CES-003.
3-DNS® Administrator Guide
i
Standards Compliance
The product conforms to ANSI/UL Std 1950 and Certified to CAN/CSA Std. C22.2 No. 950.
Acknowledgments
This product includes software developed by the University of California, Berkeley and its contributors.
This product includes software developed by the Computer Systems Engineering Group at the Lawrence
Berkeley Laboratory.
This product includes software developed by the NetBSD Foundation, Inc. and its contributors.
This product includes software developed by Christopher G. Demetriou for the NetBSD Project.
This product includes software developed by Adam Glass.
This product includes software developed by Christian E. Hopps.
This product includes software developed by Dean Huxley.
This product includes software developed by John Kohl.
This product includes software developed by Paul Kranenburg.
This product includes software developed by Terrence R. Lambert.
This product includes software developed by Philip A. Nelson.
This product includes software developed by Herb Peyerl.
This product includes software developed by Jochen Pohl for the NetBSD Project.
This product includes software developed by Chris Provenzano.
This product includes software developed by Theo de Raadt.
This product includes software developed by David Muir Sharnoff.
This product includes software developed by SigmaSoft, Th. Lockert.
This product includes software developed for the NetBSD Project by Jason R. Thorpe.
This product includes software developed by Jason R. Thorpe for And Communications,
http://www.and.com.
This product includes software developed for the NetBSD Project by Frank Van der Linden.
This product includes software developed for the NetBSD Project by John M. Vinopal.
This product includes software developed by Christos Zoulas.
This product includes software developed by Charles Hannum.
This product includes software developed by Charles Hannum, by the University of Vermont and Stage
Agricultural College and Garrett A. Wollman, by William F. Jolitz, and by the University of California,
Berkeley, Lawrence Berkeley Laboratory, and its contributors.
This product includes software developed by the University of Vermont and State Agricultural College and
Garrett A. Wollman.
In the following statement, "This software" refers to the Mitsumi CD-ROM driver: This software was
developed by Holger Veit and Brian Moore for use with "386BSD" and similar operating systems.
"Similar operating systems" includes mainly non-profit oriented systems for research and education,
including but not restricted to "NetBSD," "FreeBSD," "Mach" (by CMU).
In the following statement, "This software" refers to the parallel port driver: This software is a component
of "386BSD" developed by William F. Jolitz, TeleMuse.
This product includes software developed by the Apache Group for use in the Apache HTTP server project
(http://www.apache.org/).
This product includes software developed by Darren Reed. (© 1993-1998 by Darren Reed).
This product includes software licensed from Richard H. Porter under the GNU Library General Public
License (© 1998, Red Hat Software), www.gnu.org/copyleft/lgpl.html.
This product includes the standard version of Perl software licensed under the Perl Artistic License
(© 1997, 1998 Tom Christiansen and Nathan Torkington). All rights reserved. You may find the most
current standard version of Perl at http://www.perl.com.
This product includes software developed by Eric Young.
Rsync was written by Andrew Tridgell and Paul Mackerras, and is available under the Gnu Public License.
ii
This product includes Malloc library software developed by Mark Moraes. (© 1988, 1989, 1993,
University of Toronto).
This product includes open SSL software developed by Eric Young (eay@cryptsoft.com), (© 1995-1998).
This product includes open SSH software developed by Tatu Ylonen (ylo@cs.hut.fi), Espoo, Finland
(© 1995).
This product includes open SSH software developed by Niels Provos (© 1999).
This product includes SSH software developed by Mindbright Technology AB, Stockholm, Sweden,
www.mindbright.se, info@mindbright.se (© 1998-1999).
This product includes free SSL software developed by Object Oriented Concepts, Inc., St. John's, NF,
Canada (© 2000).
This product includes software developed by Object Oriented Concepts, Inc., Billerica, MA, USA
(© 2000).
This product includes RRDtool software developed by Tobi Oetiker (http://www.rrdtool.com/index.html)
and licensed under the GNU General Public License.
3-DNS® Administrator Guide
iii
iv
Table of Contents
Table of Contents
1
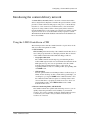
Introduction
IMPORTANT HARDWARE INFORMATION ............................................................ 1-1
Getting started ................................................................................................................. 1-1
Choosing a configuration tool ................................................................................ 1-2
Browser support ...................................................................................................... 1-3
Using the Administrator Kit ........................................................................................... 1-3
\Stylistic conventions .............................................................................................. 1-4
What is the 3-DNS Controller? ....................................................................................... 1-5
Internet protocol and network management support .............................................. 1-6
Security features ..................................................................................................... 1-6
Configuration scalability ........................................................................................ 1-6
System synchronization options ............................................................................. 1-7
Configuring data collection for server status and network path data ..................... 1-7
Redundant system configurations ........................................................................... 1-8
What’s new in version 4.5 .............................................................................................. 1-9
Automatic discovery ............................................................................................... 1-9
Easy system account and password creation .......................................................... 1-9
Enhanced synchronization ...................................................................................... 1-9
Expanded statistics ................................................................................................ 1-10
Multi-homing and firewall support ....................................................................... 1-10
Security enhancements ......................................................................................... 1-10
Finding help and technical support resources ............................................................... 1-11
2
Planning the 3-DNS Configuration
Managing traffic on a global network ............................................................................. 2-1
Understanding a basic 3-DNS configuration .......................................................... 2-1
Synchronizing configurations and broadcasting performance metrics ................... 2-2
Using a 3-DNS Controller as a standard DNS server ............................................. 2-3
Load balancing connections across the network .................................................... 2-4
Working with 3-DNS Controllers and other products ............................................ 2-4
Planning issues for the network setup ............................................................................ 2-6
Configuring the base network ................................................................................. 2-6
Defining data centers and servers ........................................................................... 2-7
Planning a sync group ............................................................................................. 2-7
Setting up communications on a 3-DNS Controller ............................................... 2-8
Choosing the 3-DNS mode ........................................................................................... 2-10
Running a 3-DNS Controller in node mode ......................................................... 2-10
Running a 3-DNS Controller in bridge mode or router mode .............................. 2-11
Planning issues for the load balancing configuration ................................................... 2-12
Using advanced traffic control features ........................................................................ 2-12
3
Using the Setup Utility
Creating the initial software configuration with the Setup utility .................................. 3-1
Connecting to the 3-DNS Controller for the first time ................................................... 3-2
Running the utility from the console or serial terminal .......................................... 3-2
Running the Setup utility remotely ......................................................................... 3-2
Using the Setup utility for the first time ......................................................................... 3-5
Keyboard type ......................................................................................................... 3-5
Root password ........................................................................................................ 3-5
Host name ............................................................................................................... 3-6
Redundant system settings ...................................................................................... 3-6
3-DNS® Administrator Guide
vii
Table of Contents
Setting the interface media type ............................................................................. 3-7
Configuring VLANs and IP addresses ................................................................... 3-7
Configuring a default gateway pool ....................................................................... 3-8
Configuring remote web server access ................................................................... 3-8
Configuring remote administrative access .............................................................. 3-9
Setting support access ........................................................................................... 3-10
Setting the time zone ............................................................................................ 3-10
Configuring NTP support ..................................................................................... 3-10
Configuring the 3-DNS mode ............................................................................... 3-11
Configuring user authentication ........................................................................... 3-11
Configuring NameSurfer for zone file management ............................................ 3-13
Running the Setup utility after creating the initial software configuration .................. 3-14
Options available only through the Setup utility menu ........................................ 3-15
4
Post-Setup Tasks
Introduction ..................................................................................................................... 4-1
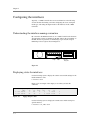
Configuring the interfaces .............................................................................................. 4-2
Understanding the interface naming convention .................................................... 4-2
Displaying status for interfaces .............................................................................. 4-2
Setting the media type ............................................................................................ 4-3
Setting the duplex mode ......................................................................................... 4-3
Working with VLANs .................................................................................................... 4-4
Default VLAN configuration .................................................................................. 4-4
Creating, renaming, and deleting VLANs .............................................................. 4-5
Configuring packet access to VLANs .................................................................... 4-7
Setting up security for VLANs ............................................................................... 4-9
Setting fail-safe timeouts for VLANs ................................................................... 4-10
Setting the MAC masquerade address .................................................................. 4-11
Configuring a self IP address ........................................................................................ 4-12
5
Essential Configuration Tasks
Reviewing the configuration tasks .................................................................................. 5-1
Setting up a basic configuration ..................................................................................... 5-2
Setting up a data center ................................................................................................... 5-3
Setting up servers ............................................................................................................ 5-5
Defining 3-DNS Controllers ................................................................................... 5-5
Defining BIG-IP systems ........................................................................................ 5-6
Defining a BIG-IP system with the 3-DNS module ............................................... 5-7
Defining a router ..................................................................................................... 5-8
Defining EDGE-FX systems .................................................................................. 5-9
Defining host servers ............................................................................................ 5-10
Configuring host SNMP settings .......................................................................... 5-12
Working with sync groups ............................................................................................ 5-13
Configuring sync groups ....................................................................................... 5-13
Setting the time tolerance value ............................................................................ 5-14
Overview of auto-configuration .................................................................................... 5-15
Configuring global variables ....................................................................................... 5-17
viii
Table of Contents
6
Configuring a Globally-Distributed Network
Understanding a globally-distributed network ............................................................... 6-1
Using Topology load balancing ...................................................................................... 6-2
Setting up a globally-distributed network configuration ................................................ 6-2
Adding data centers to the globally-distributed network configuration ................. 6-3
Adding 3-DNS Controllers to the globally-distributed network
configuration ........................................................................................................... 6-3
Adding BIG-IP systems to the globally-distributed network
configuration ........................................................................................................... 6-4
Adding wide IPs to the globally-distributed network configuration ...................... 6-5
Configuring topology records for the globally-distributed network
configuration ........................................................................................................... 6-6
Additional configuration settings and tools .................................................................... 6-7
Setting limits thresholds ......................................................................................... 6-7
Other resources ....................................................................................................... 6-8
7
Configuring a Content Delivery Network
Introducing the content delivery network ....................................................................... 7-1
Using the 3-DNS Controller in a CDN ................................................................... 7-1
Reviewing a sample CDN configuration ................................................................ 7-2
Deciding to use a CDN provider .................................................................................... 7-4
Setting up a CDN provider configuration ....................................................................... 7-5
Adding data centers ................................................................................................ 7-5
Adding 3-DNS Controllers ..................................................................................... 7-5
Adding load balancing servers ................................................................................ 7-6
3-DNS® Administrator Guide
ix
Table of Contents
Running the 3dns_add script ........................................................................................ 10-4
Verifying the configuration .......................................................................................... 10-4
Glossary
Index
x
1
Introduction
• IMPORTANT HARDWARE INFORMATION
• Getting started
• Using the Administrator Kit
• What is the 3-DNS Controller?
• What’s new in version 4.5
• Finding help and technical support resources
Introduction
IMPORTANT HARDWARE INFORMATION
References to hardware and upgrades contained in this document are
specific to F5 Networks hardware products. For information concerning the
initial deployment of your system, see the Deployment Guide that was
shipped with your system. For in-depth Dell-specific hardware information,
see the server documentation that is provided on the Resource CD and that
shipped with your system if you ordered printed documentation.
References to hardware-specific features of the F5 Networks IP Application
Switch, such as the spanning tree protocol and port mirroring, are not
supported on Dell™ PowerEdge™ hardware.
Getting started
The 3-DNS Administrator Guide is designed to help you quickly install and
configure the 3-DNS® Controller to manage your wide-area network traffic
and DNS. The Administrator Guide contains the following chapters:
3-DNS® Administrator Guide
◆
Planning the 3-DNS Configuration
This chapter describes the network and configuration planning you need
to do before you install the 3-DNS Controller in your network.
◆
Working with the Setup Utility
This chapter describes the Setup utility and its functions. The Setup
utility runs automatically the first time you turn on the 3-DNS Controller.
◆
Post-Setup Tasks
This chapter describes the base network, which includes the IP addresses,
VLANs, and network interfaces on the 3-DNS Controller.
◆
Essential Configuration Tasks
This chapter describes the software configuration tasks you must
complete, regardless of the type of wide-area traffic management you
want to configure.
◆
Configuring a Globally Distributed Network
This chapter describes the tasks you complete to set up a globally
distributed network.
◆
Configuring a Content Delivery Network
This chapter describes the tasks you complete to set up a network that
includes a CDN provider.
◆
Working with Quality of Service
This chapter describes the components of the Quality of Service load
balancing mode.
1-1
Chapter 1
◆
Working with Global Availability Load Balancing
This chapter describes the components of the Global Availability load
balancing mode.
◆
Adding a 3-DNS Controller to an Existing Network
This chapter describes the tasks you complete to configure an additional
3-DNS Controller in a network that already contains one or more 3-DNS
Controllers.
Choosing a configuration tool
The 3-DNS Controller provides several web-based and command line
administrative tools that make for easy setup and configuration. Use the
following overview to help you decide when each utility is best used.
Setup utility
The Setup utility is a wizard that walks you through the initial system setup.
The utility helps you quickly define basic system settings, such as a root
password and the IP addresses for the interfaces that connect the 3-DNS
Controller to the network. The Setup utility also helps you configure access
to the 3-DNS web server, which hosts the web-based Configuration utility,
as well as the NameSurfer™ application that you can use for DNS zone file
management.
Configuration utility
The Configuration utility is a web-based application that you use to
configure and monitor the 3-DNS Controller. Using the Configuration
utility, you can define the load balancing configuration along with the
network setup, including data centers, sync groups, and servers used for load
balancing and path probing. In addition, you can configure advanced
features such as topology settings and SNMP agents. The Configuration
utility also monitors network traffic, current connections, load balancing
statistics, performance metrics, and the operating system itself. The home
screen of the Configuration utility provides convenient access to downloads
such as the SNMP MIB, and documentation for third-party applications
such as NameSurfer.
NameSurfer application
The NameSurfer application is a third-party application that automatically
configures DNS zone files associated with domains handled by the 3-DNS
Controller. You can use NameSurfer to configure and maintain additional
DNS zone files on a 3-DNS Controller that runs as a primary DNS server.
The Configuration utility provides direct access to the NameSurfer
application, as well as the corresponding documentation for the application.
1-2
Introduction
Please note that your license allows you to manage a maximum of 100 IP
addresses in the NameSurfer application. For more information, refer to the
end-user license agreement included in your product shipment.
3-DNS Maintenance menu
The 3-DNS Maintenance menu is a command line utility that runs scripts
which assist you in configuration and administrative tasks, such as installing
the latest version of the big3d agent on all your systems, or setting up
encrypted communications in the network. You can use the 3-DNS
Maintenance menu from a console connection, from a remote shell
connection, or from the MindTerm SSH Client in the Configuration utility.
Browser support
The Configuration utility, which provides web-based access to the 3-DNS
configuration and features, supports the following browser versions:
• Netscape Navigator 4.7
• Microsoft Internet Explorer, version 5.0 or 5.5
Using the Administrator Kit
The 3-DNS Administrator Kit provides simple steps for quick, basic
configuration, and also provides detailed information about more advanced
features and tools, such as the 3dnsmaint command line utility. The
following printed documentation is included with the 3-DNS unit.
◆
Configuration Worksheet
This worksheet provides you with a place to plan the basic configuration
for the 3-DNS Controller.
The following guides are available in PDF format from the CD-ROM
provided with the 3-DNS Controller. These guides are also available from
the home screen of the Configuration utility.
3-DNS® Administrator Guide
◆
Platform Guide
This guide includes information about the physical 3-DNS unit. It also
contains important environmental warnings.
◆
3-DNS Administrator Guide
The 3-DNS Administrator Guide provides examples of common
wide-area load balancing solutions supported by the 3-DNS Controller.
For example, you can find everything from a basic DNS request load
balancing solution to a more advanced content acceleration load
balancing solution. This guide also covers general network
administration issues, such as installing the hardware and setting up the
networking configuration.
1-3
Chapter 1
◆
3-DNS Reference Guide
The 3-DNS Reference Guide provides basic descriptions of individual
3-DNS objects, such as wide IPs, pools, virtual servers, load balancing
modes, the big3d agent, resource records, and production rules. It also
provides syntax information for 3dnsmaint commands, configuration
utilities, the wideip.conf file, and system utilities.
Stylistic conventions
\
To help you easily identify and understand certain types of information, this
documentation uses the following stylistic conventions.
All examples in this documentation use only non-routable IP addresses.
When you set up the solutions we describe, you must use IP addresses
suitable to your own network in place of our sample IP addresses.
Identifying new terms
When we first define a new term, the term is shown in bold italic text. For
example, a wide IP is a mapping of a fully-qualified domain name to a set of
virtual servers that host the domain’s content.
Identifying references to products
We refer to all products in the BIG-IP product family as the BIG-IP system.
We refer to the 3-DNS Controller and the 3-DNS module as the 3-DNS
Controller. If specific configuration information relates to a specific
platform, we note the platform.
Identifying references to objects, names, and commands
We apply bold text to a variety of items to help you easily pick them out of a
block of text. These items include web addresses, IP addresses, utility
names, and portions of commands, such as variables and keywords. For
example, the nslookup command requires that you include at least one
<ip_address> variable.
Identifying references to other documents
We use italic text to denote a reference to another document. In references
where we provide the name of a book as well as a specific chapter or section
in the book, we show the book name in bold, italic text, and the
chapter/section name in italic text to help quickly differentiate the two. For
example, you can find information about topology in the 3-DNS Reference
Guide, Chapter 3, Topology.
1-4
Introduction
Identifying command syntax
We show actual, complete commands in bold Courier text. Note that we do
not include the corresponding screen prompt, unless the command is shown
in a figure that depicts an entire command line screen. For example, the
following command sets the 3-DNS Controller load balancing mode to
Round Robin:
lb_mode rr
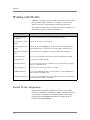
Table 1.1 explains additional special conventions used in command line
syntax.
Item in text
Description
\
Continue to the next line without typing a line break.
<
>
|
[
...
You enter text for the enclosed item. For example, if the command
has <your name>, type in your name.
Separates parts of a command.
]
Syntax inside the brackets is optional.
Indicates that you can type a series of items.
Table 1.1 Command line conventions used in this manual
What is the 3-DNS Controller?
A 3-DNS Controller is a network appliance that monitors the availability
and performance of global resources, and uses that information to manage
network traffic patterns. The 3-DNS Controller uses load balancing
algorithms, topology-based routing, and production rules to control and
distribute traffic according to specific policies. The system is highly
configurable, and its web-based and command line configuration utilities
allow for easy system setup and monitoring.
The 3-DNS Controller provides a variety of features that meet special needs.
For example, with this product you can:
• Configure a content delivery network with a CDN provider
• Guarantee multiple port availability for e-commerce sites
• Ensure wide-area persistence by maintaining a mapping between an local
DNS server and a virtual server in a wide IP pool
• Direct local clients to local servers for globally-distributed sites using
Topology load balancing
• Change the load balancing configuration according to current traffic
patterns or time of day
• Customize load balancing modes
3-DNS® Administrator Guide
1-5
Chapter 1
• Set up load balancing among BIG-IP systems, EDGE-FX Caches, and
other load-balancing hosts
• Monitor real-time network conditions
Internet protocol and network management support
The 3-DNS Controller supports both the standard DNS protocol and the
3-DNS iQuery protocol (a protocol used for collecting dynamic load
balancing information). The 3-DNS Controller also supports administrative
protocols, such as Simple Network Management Protocol (SNMP), and
Simple Mail Transfer Protocol (SMTP) (outbound only), for performance
monitoring and notification of system events. For administrative purposes,
you can use SSH, RSH, Telnet, and FTP. The Configuration utility supports
HTTPS, for secure web browser connections using SSL, as well as standard
HTTP connections.
The proprietary 3-DNS SNMP agent allows you to monitor status and
current traffic flow using popular network management tools. The 3-DNS
SNMP agent provides detailed data such as current connections being
handled by each virtual server.
Security features
The 3-DNS Controller offers a variety of security features that can help
prevent hostile attacks on your site or equipment.
◆
Secure administrative connections
The 3-DNS Controller supports Secure Shell (SSH) administrative
connections using the Mindterm SSH Client, for browser-based remote
administration, and SSH for remote administration from the command
line. The 3-DNS web server, which hosts the web-based Configuration
utility, supports SSL connections as well as user authentication.
◆
Secure iQuery communications
Crypto versions of the 3-DNS Controller also support Blowfish
encryption for iQuery communications between the 3-DNS Controller
and other systems running the big3d agent.
◆
TCP wrappers
TCP wrappers provide an extra layer of security for network connections.
Configuration scalability
The 3-DNS Controller is a highly scalable and versatile solution. You can
configure the 3-DNS Controller to manage up to several hundred domain
names, including full support of domain name aliases. The 3-DNS
1-6
Introduction
Controller supports a variety of media options, including Fast Ethernet, and
Gigabit Ethernet; the 3-DNS Controller also supports multiple network
interface cards that can provide redundant or alternate paths to the network.
Note
If you use NameSurfer to manage your DNS zone files, you can configure
only up to 100 IP addresses and domain names.
System synchronization options
The 3-DNS Controller sync group feature allows you to automatically
synchronize configurations from one 3-DNS Controller to any other 3-DNS
Controller in the network, simplifying administrative management. The
synchronization feature offers a high degree of administrative control. For
example, you can set the 3-DNS Controller to synchronize a specific
configuration file set, and you can also set which 3-DNS Controllers in the
network receive the synchronized information and which ones do not.
Configuring data collection for server status and network path data
The 3-DNS platform includes the big3d agent, which is an integral part of
3-DNS load balancing. The big3d agent continually monitors the
availability of the servers that the 3-DNS Controller load balances. It also
monitors the integrity of the network paths between the servers that host the
domain, and the various local DNS servers that attempt to connect to the
domain. The big3d agent runs on any of the following platforms: 3-DNS
Controller, BIG-IP systems, EDGE-FX Cache, and GLOBAL-SITE
Controller. Each big3d agent broadcasts its collected data to all of the
3-DNS Controllers in your network, ensuring that all 3-DNS Controllers
work with the latest information.
The big3d agent offers a variety of configuration options that allow you to
choose the data collection methods you want to use. For example, you can
configure the big3d agent to track the number of router hops (intermediate
system transitions) along a given network path, and you can also set the
big3d agent to collect host server performance information using the SNMP
protocol. For further details on the big3d agent, refer to the 3-DNS
Reference Guide, Chapter 5, Probing and Metrics Collection.
Redundant system configurations
A redundant system is essentially a pair of 3-DNS units, with one operating
as the active unit that responds to DNS queries, and the other one operating
as the standby unit. If the active unit fails, the standby unit takes over and
begins to respond to DNS queries while the other 3-DNS unit restarts and
becomes the standby unit.
3-DNS® Administrator Guide
1-7
Chapter 1
The 3-DNS Controller actually supports two methods of checking the status
of the peer system in a redundant system:
◆
Hardware-based fail-over
In a redundant system that has been set up with hardware-based fail-over,
the two units in the system are connected to each other directly using a
fail-over cable attached to the serial ports. The standby unit checks on the
status of the active unit once every second using this serial link.
◆
Network-based fail-over
In a redundant system that has been set up with network-based fail-over,
the two units in the system communicate with each other across an
Ethernet network instead of going across a dedicated fail-over serial
cable. The standby unit checks on the status of the active unit once every
second using the Ethernet.
Note
In a network-based fail-over configuration, the standby 3-DNS unit
immediately takes over if the active unit fails. If a client has queried the
failed 3-DNS unit, and not received an answer, it automatically re-issues the
request (after 5 seconds) and the standby unit, functioning as the active unit,
responds.
Monitoring the 3-DNS Controller and the network
The 3-DNS Controller includes sophisticated monitoring tools to help you
monitor the 3-DNS Controller, the traffic it manages, and the Internet. The
following monitoring tools are available on the 3-DNS Controller: the
Statistics screens, the Internet Weather Map, and the Network Map. All of
these tools are in the Configuration utility.
Comparing a 3-DNS Controller to a BIG-IP system
A 3-DNS Controller load balances traffic for a globally-distributed network,
and a BIG-IP system load balances traffic for a local area network. While
both systems provide load balancing, one of the significant differences
between the BIG-IP system and the 3-DNS Controller is that the 3-DNS
Controller responds to DNS requests issued by an LDNS on behalf of a
client, while the BIG-IP system provides connection management between a
client and a back-end server.
1-8
Introduction
Once the 3-DNS Controller returns a DNS answer to an LDNS, the
conversation between the LDNS and the 3-DNS Controller ends, and the
client connects to the IP address returned by the 3-DNS Controller. Unlike
the 3-DNS Controller, the BIG-IP system sits between the client and the
content servers. It manages the client’s entire conversation with the content
server.
What’s new in version 4.5
The 3-DNS Controller, version 4.5 offers the following major new features
in addition to many other enhancements.
Automatic discovery
The 3-DNS Controller can now automatically collect and add the virtual
server configuration information for any BIG-IP systems and host servers in
the 3-DNS Controller configuration. The Discovery setting has three levels:
OFF, ON, and ON/NO DELETE. For more information on
auto-configuration and the Discovery setting, see Overview of
auto-configuration, on page 5-16.
Easy system account and password creation
With this release, the 3-DNS Controller now offers one screen, in the
web-based Setup utility, where you can set the passwords for the three
system accounts: root, admin, and support. On this screen, you can also
specify whether to allow command line access, web access, or both for the
support account. You can view the User Access screen by opening the Setup
utility from the home screen. For more information on user accounts and
system accounts, see Chapter 6, Administration and Monitoring, in the
3-DNS Reference Guide.
Enhanced synchronization
The configuration synchronization process for the 3-DNS Controller has
been updated and improved. The controller no longer relies on the syncd
daemon for synchronization. Instead, synchronization occurs automatically,
based on file timestamps, whenever you make any type of change to the
configuration. The 3-DNS Controller also polls any Link Controllers that
you have in your network, and synchronizes the link information across the
sync group. Note that working with sync groups remains the same.
3-DNS® Administrator Guide
1-9
Chapter 1
Expanded statistics
The statistics screens on the 3-DNS Controller have been enhanced and
expanded. You can now view statistics for the following objects:
• The Detailed Wide IP Statistics screen, available from the Wide IP
Statistics screen, now displays information about virtual servers in the
context of the wide IP pools of which they are members.
• The Link Statistics screen displays information about any router links
you have configured.
• The P95 Billing Estimate statistics screen displays graphs of your actual
bandwidth usage compared to your purchased bandwidth if you have
links configured, or your network has both 3-DNS Controllers and Link
Controllers in it.
• The Internet Weather Map statistics screen now displays information for
both the data centers and the links in your network.
• The Disabled Objects statistics screen now displays these additional
objects: wide IPs, pools, and virtual servers.
For details on each of these screens, refer to the online help for that screen.
Multi-homing and firewall support
The 3-DNS Controller now supports multiple links to the Internet and
network address translations for firewalls. You can designate one or more
self IP addresses and translations for the controller itself, as well as for any
BIG-IP systems, host servers, or routers that are configured as part or the
controller’s network. For information on working with the self IP addresses
and network address translations, refer to the online help for the Self IP List,
which is available from the toolbar for each server type.
Security enhancements
You can now use the Setup utility to configure a remote LDAP or RADIUS
authentication server. With this feature, you no longer need to directly edit
configuration files to set up your LDAP or RADIUS authentication server.
This release of the 3-DNS Controller also expands the number of user roles
that you can assign to user accounts for the purpose of user authorization. In
addition to the standard Full Read/Write, Partial Read/Write, and Read-Only
access levels, you can now define which user interface an administrator uses
to access the 3-DNS Controller (the Configuration utility, the command line
interface, or the iControl interface). These user authorization roles are stored
in the local LDAP database on the 3-DNS Controller, and are designed to
operate in concert with centralized LDAP and RADIUS authentication.
For details on user authorization and managing user accounts, see Managing
user accounts, in Chapter 6, Administration and Monitoring, in the 3-DNS
Reference Guide.
1 - 10
Introduction
Finding help and technical support resources
You can find additional technical documentation about the 3-DNS
Controller in the following locations:
◆
Release notes
Release notes for the 3-DNS Controller are available from the home
screen of the Configuration utility. The release note contains the latest
information for the current version, including a list of new features and
enhancements, a list of fixes, and a list of known issues.
◆
Online help for 3-DNS features
You can find help online in three different locations:
• The Configuration utility home screen has PDF versions of the guides
included in the Administrator Kit. 3-DNS software upgrades may
replace the guides with updated versions as appropriate.
• The Configuration utility has online help for each screen. Click the
Help button on the toolbar.
• Individual commands have online help, including command syntax
and examples, in standard UNIX man page format. Type the
command followed by -h or -help, and the 3-DNS Controller displays
the syntax and usage associated with the command. You can also type
man <command> to display the man page for the command.
◆
Third-party documentation for software add-ons
The Configuration utility contains online documentation for the
third-party software included with the 3-DNS Controller, including the
NameSurfer application.
◆
Technical support through the World Wide Web
The Dell Support website at support.dell.com provides the latest
technical documentation.
Note
All references to hardware platforms in this guide refer specifically to
systems supplied by F5 Networks, Inc. If your hardware was supplied by
another vendor and you have hardware-related questions, please refer to
the documentation from that vendor.
3-DNS® Administrator Guide
1 - 11
Chapter 1
1 - 12
2
Planning the 3-DNS Configuration
• Managing traffic on a global network
• Planning issues for the network setup
• Choosing the 3-DNS mode
• Planning issues for the load balancing configuration
• Using advanced traffic control features
Chapter 2
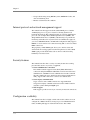
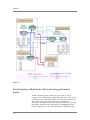
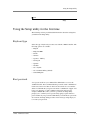
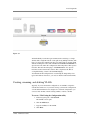
Figure 2.1 A sample network layout showing data paths
Synchronizing configurations and broadcasting performance
metrics
3-DNS Controllers typically work in sync groups, where a group of
controllers shares load balancing configuration settings. In a sync group, any
system that has new configuration changes can broadcast the changes to any
other system in the sync group, allowing for easy administrative
maintenance. To distribute metrics data among the systems in a sync group,
the principal 3-DNS Controller sends requests to the big3d agents in the
network, asking them to collect specific performance and path data. Once
2-2
Planning the 3-DNS Configuration
the big3d agents collect the data, they each broadcast the collected data to
all systems in the network, again allowing for simple and reliable metrics
distribution.
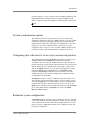
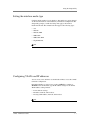
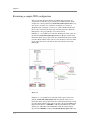
Using a 3-DNS Controller as a standard DNS server
When a client requests a DNS resolution for a domain name, an LDNS
sends the request to one of the 3-DNS Controllers that is authoritative for
the zone. The 3-DNS Controller first chooses the best available virtual
server out of a pool to respond to the request, and then returns a DNS
resource record to the requesting local DNS server. The LDNS server uses
the answer for the period of time defined within the resource record. Once
the answer expires, however, the LDNS server must request name resolution
all over again to get a fresh answer.
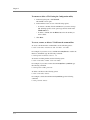
Figure 2.2 DNS name resolution process
3-DNS® Administrator Guide
2-3
Chapter 2
Figure 2.2 illustrates the specific steps in the name resolution process.
1. The client connects to an Internet Service Provider (ISP) and queries
the local DNS server to resolve the domain name
www.siterequest.com.
2. If the information is not already in the LDNS server’s cache, the
local DNS server queries a root server (such as InterNIC’s root
servers). The root server returns the IP address of the DNS systems
associated with www.siterequest.com, which in this case runs on
the 3-DNS Controller.
3. The LDNS then connects to one of the 3-DNS Controllers to resolve
the www.siterequest.com name. The 3-DNS Controller uses a load
balancing mode to choose an appropriate virtual server to receive
the connection, and then returns the virtual server’s IP address to the
LDNS.
4. The LDNS caches the answer from the 3-DNS Controller, and
passes the IP address to the client.
5. The client connects to the IP address through an ISP.
Load balancing connections across the network
Each of the load balancing modes on the 3-DNS Controller can provide
efficient load balancing for any network configuration. The 3-DNS
Controller bases load balancing on pools of virtual servers. When a client
requests a DNS resolution, the 3-DNS Controller uses the specified load
balancing mode to choose a virtual server from a pool of virtual servers. The
resulting answer to this resolution request is returned as a standard A record.
Although some load balancing configurations can get complex, most load
balancing configurations are relatively simple, whether you use a static load
balancing mode or a dynamic load balancing mode. More advanced
configurations can incorporate multiple pools, as well as advanced traffic
control features, such as topology or production rules.
For more information on specific load balancing modes, see Chapter 2, Load
Balancing in the 3-DNS Reference Guide. For more information on load
balancing configurations, review the sample configurations in Chapter 6,
Configuring a Globally-Distributed Network, and Chapter 7, Configuring a
Content Delivery Network. If you are unfamiliar with the 3-DNS Controller,
you may also want to review Chapter 5, Essential Configuration Tasks.
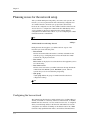
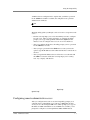
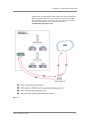
Working with 3-DNS Controllers and other products
The 3-DNS Controller distributes connections across a group of virtual
servers that run in different data centers throughout the network. You can
manage virtual servers from the following types of products:
◆
2-4
BIG-IP systems
A BIG-IP virtual server maps to a series of content servers.
Planning the 3-DNS Configuration
◆
EDGE-FX systems
An EDGE-FX virtual server maps to cached content that gets refreshed at
frequent intervals.
◆
Generic host
A host virtual server can be an IP address or an IP alias that hosts the
content.
◆
Other load balancing hosts
Other load balancing hosts map virtual servers to a series of content
hosts.
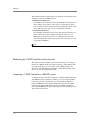
Figure 2.3 illustrates the hierarchy of how the 3-DNS Controller manages
virtual servers.
Figure 2.3 Load balancing management on a 3-DNS Controller
3-DNS® Administrator Guide
2-5
Chapter 2
Planning issues for the network setup
After you finish running the Setup utility, and connect each system to the
network, you can set up the network and load balancing configuration on
one 3-DNS Controller, and let the sync group feature automatically
broadcast the configuration to the other 3-DNS Controllers in the network.
You do not have to configure the 3-DNS Controllers individually, unless
you are planning an advanced configuration that requires different
configurations for different data centers, or you are configuring the 3-DNS
Controllers from the command line.
Tip
If you are configuring additional 3-DNS Controllers in a network that
already has a 3-DNS Controller in it, please review Chapter 10, Adding a
3-DNS Controller to an Existing Network.
During the network setup phase, you define four basic aspects of the
network layout, in the following order:
• Base network
The base network includes the interfaces, VLANs, and trunks for the
network topology. Configuring the base network installs the 3-DNS
Controller in your physical network.
• Data centers
Data centers are the physical locations that house the equipment you use
for load balancing.
• Data center servers
The data center servers that you define in the network setup include the
3-DNS Controller, BIG-IP systems, EDGE-FX systems, and host
systems that you use for load balancing and probing.
• Sync group
A sync group defines the group of 3-DNS Controllers that shares
configuration settings.
Note
During the setup phase of configuration, we recommend that you connect to
the 3-DNS Controller from a remote workstation from which you can
complete the remaining configuration tasks using the web-based
Configuration utility.
Configuring the base network
The 3-DNS Controller interfaces and the related topics of self IP addresses,
VLANs, and trunks are collectively referred to, in this manual, as the base
network. The base network, or at least an initial version of it, is configured
when you run the Setup utility for the first time. The initial base network
configuration also includes such things as the default route for the 3-DNS
Controller, fully qualified domain names, and certificate information that
2-6
Planning the 3-DNS Configuration
can only be configured using the Setup utility or its components. (To make
changes to other base network components, such as domain names, default
routes, and certificate information, refer to Chapter 3, Using the Setup
Utility, which describes the Setup utility and its various components.)
A 3-DNS usually has two network interfaces. Each active interface must be
configured with a VLAN membership, and each VLAN must have a self IP
address. Note that most 3-DNS configurations require only one interface,
VLAN, and self IP address. However, if you are configuring the 3-DNS
Controller in bridge mode or router mode, you may need to configure two
(or more) interfaces, depending on your network requirements. For more
information on configuring the base network, refer to Chapter 4, Post-Setup
Tasks.
Defining data centers and servers
In the 3-DNS configuration, it is important that you define all of your data
centers before you begin defining the data center servers. This is because
when you define a server, you specify the data center where the server runs.
(You do this by choosing a data center from the list of data centers you have
already defined.) To define a data center, you need only specify the data
center name. To define a server, however, you need to specify the following
items:
• Server type (3-DNS Controller, BIG-IP system, EDGE-FX system,
router, or host)
• Server IP address (or shared IP alias for redundant systems)
• Name of the data center where the server runs
• The big3d agent factories (on 3-DNS Controller, BIG-IP system, and
EDGE-FX systems only)
• Virtual servers managed by the server (BIG-IP system, EDGE-FX
system, and host systems only)
• SNMP host probing settings (hosts only)
Note
One important aspect of planning your network setup is to decide how to set
up the big3d agent, and which ports you need to open for communications
between the systems in your network. See the 3-DNS Reference Guide,
Chapter 5, Probing and Metrics Collection, for help with determining how
both of these issues affect your installation.
Planning a sync group
A sync group is a group of 3-DNS Controllers that share configuration
information. In a sync group, a principal 3-DNS Controller issues requests
to the big3d agents on all the other systems to gather metrics data. Both the
principal 3-DNS Controller and the receiver 3-DNS Controllers in the sync
3-DNS® Administrator Guide
2-7
Chapter 2
group receive broadcasts of metrics data from the big3d agents. All
members of the sync group also receive broadcasts of updated configuration
settings from the 3-DNS Controller that has the latest configuration changes.
When you define the sync group, you select the sync group members from
the list of 3-DNS Controllers you have already defined. The sync group lists
the 3-DNS Controllers in the order in which you selected them. The first
3-DNS Controller in the list becomes the principal 3-DNS Controller. The
remaining 3-DNS Controllers in the list become receivers. If the principal
3-DNS Controller becomes disabled, the next 3-DNS Controller in the list
becomes the principal 3-DNS Controller until the original principal 3-DNS
Controller comes back online.
Understanding how a sync group works
The sync group feature synchronizes individual configuration files, such as
wideip.conf, and other files that store system settings. You have the option
of adding files to the synchronization list.
The 3-DNS Controllers in a sync group operate as peer servers. At set
intervals, the syncd utility compares the time stamps of the configuration
files earmarked for synchronization on all of the 3-DNS Controllers. If the
time stamp on a specific file differs between 3-DNS Controllers, the 3-DNS
Controller with the latest file broadcasts the file to all of the other 3-DNS
Controllers in the group.
Understanding how the time tolerance variable affects a sync group
The time tolerance variable is a global variable that defines the number of
seconds that the time setting on one 3-DNS Controller can be ahead or
behind the time setting on another 3-DNS Controller. If the difference
between the times on the systems is greater than the time tolerance, the time
setting on the 3-DNS Controller running behind is reset to match the 3-DNS
Controller with the most recent time. For example, if the time tolerance is 5
seconds, and one 3-DNS Controller is running 10 seconds ahead of the
other, the 3-DNS Controller running behind has its time reset to match the
one running 10 seconds ahead. If the second system was running only 2
seconds ahead of the other, the time settings would remain unchanged. The
values are 0, 5, and higher (values of 1-4 are automatically set to 5, and 0
turns off time synchronization). The default setting is 10 seconds.
The time setting on 3-DNS Controllers is important because a 3-DNS
Controller compares time stamps on files when deciding whether to
synchronize files with other 3-DNS Controllers in the sync group.
Setting up communications on a 3-DNS Controller
There are three different communication issues that you need to resolve
when you set up communication between the 3-DNS Controllers running in
your network.
2-8
Planning the 3-DNS Configuration
◆
3-DNS Controllers communicating with other 3-DNS Controllers
To allow 3-DNS Controllers to communicate with each other, you must
set up ssh and scp utilities.
◆
3-DNS Controllers communicating with BIG-IP systems and
EDGE-FX systems
To allow the 3-DNS Controller to communicate with BIG-IP systems
and EDGE-FX systems, you address the same ssh issues.
◆
3-DNS Controllers communicating with big3d agents
To allow communications between big3d agents and the 3-DNS
Controller, you need to configure iQuery ports on any 3-DNS
Controllers, BIG-IP systems, and EDGE-FX systems that run the big3d
agent.
Setting up communication between crypto and non-crypto systems
The 3-DNS Controllers in your network need to communicate with each
other in order to synchronize configuration and performance data. If you use
exclusively crypto 3-DNS Controllers (those that use the SSH protocol) the
communication tools set up by the Setup utility are all you need.
If your network is a mixed environment, that is, composed of both crypto
and non-crypto systems, you need to enable the rsh and rcp utilities on the
crypto systems. Though the rsh and rcp utilities come pre-installed on the
crypto systems, you must explicitly enable these utilities. You can enable
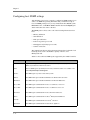
the utilities using the Setup utility. Table 2.1 shows the ports and protocols
used for SSH and RSH communications between crypto and non-crypto
systems.
From
To
Protocol
From
Port
To
Port
Connection
Crypto
Crypto
TCP
<1024
22
SSH/SCP
Crypto
Non-crypto
TCP
<1024
514
RSH/RCP
Non-crypto
Crypto
TCP
<1024
514
RSH/RCP
Non-crypto
Non-crypto
TCP
<1024
514
RSH/RCP
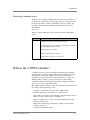
Table 2.1 SSH and RSH communications ports and protocols
Setting up data collection with the big3d agent
The big3d agent collects performance information from other 3-DNS
Controllers, BIG-IP systems, and EDGE-FX systems on behalf of the
3-DNS Controller you are configuring. The 3-DNS Controller then uses this
performance data for load balancing. The big3d agent uses factories to
manage the data collection. For detailed information on configuring the
3-DNS® Administrator Guide
2-9
Chapter 2
big3d agent, managing the factories, opening the UDP ports, and working
with firewalls, review Chapter 5, Probing and Metrics Collection, in the
3-DNS Reference Guide.
Choosing the 3-DNS mode
The 3-DNS Controller can run in one of three modes: node, bridge, or
router. The base network configuration changes depending on which mode
you choose. The following sections describe the three modes and provide
basic configuration examples.
Running a 3-DNS Controller in node mode
Node mode is the traditional way to configure the 3-DNS Controller. The
benefits of running the 3-DNS Controller in node mode are as follows:
• You can replace your name servers with 3-DNS Controllers.
• You can use the 3-DNS Controller as the authoritative DNS server for
your domain.
• You can manage your DNS zone files with NameSurfer.
When you replace your DNS servers with 3-DNS Controllers, you can use
the extensive wide-area traffic management capabilities of the 3-DNS
Controller in conjunction with the standard DNS protocol. When the 3-DNS
Controller receives a request that matches a wide IP, it routes that request to
the best virtual server in your network. When a 3-DNS Controller receives a
non-matching request, that request is handled by the BIND utility (named)
that is running on the 3-DNS Controller.
When you configure the 3-DNS Controller to be authoritative for your
domain, you can easily manage DNS zone files using NameSurfer, a
browser-based, third-party application included on the 3-DNS Controller.
When you define wide IPs in the Configuration utility, the NameSurfer
application automatically makes the appropriate additions to the zone files.
The changes are then broadcast to the other 3-DNS Controllers in your
network.
Note
If you configure wide IPs from the command line, you need to make the
corresponding zone file changes from the command line.
2 - 10
Planning the 3-DNS Configuration
Using the 3-DNS synchronization features
If you use the advanced synchronization features of the 3-DNS Controller,
we strongly recommend that you configure each 3-DNS Controller to run as
authoritative for the domain. This type of configuration offers the following
advantages:
• You can change zone files on any one of the 3-DNS Controllers in the
network and have those changes automatically broadcast to all of the
other systems in the network.
• Each 3-DNS Controller has the most up-to-date zone files, providing you
one or more layers of redundancy.
• The NameSurfer application automatically controls the addition,
configuration, and deletion of zone files.
Importing BIND files to NameSurfer during an initial installation
During the initial configuration, you can specify that the 3-DNS Controller
import any existing BIND files from your name server to the 3-DNS
Controller. During the initial configuration, you can also designate
NameSurfer as the primary name server for your domain. This forces
NameSurfer to automatically format your BIND files in the NameSurfer
format. For more information, refer to the NameSurfer documentation
available from the home screen in the Configuration utility.
Running a 3-DNS Controller in bridge mode or router mode
Running the 3-DNS Controller in bridge mode or router mode offers the
following benefits:
• You gain the wide-area traffic management capabilities of the 3-DNS
Controller without disrupting your current DNS system.
• In an enterprise, you can install, configure, and test the 3-DNS Controller
before you add the system to your production environment.
• You do not use NameSurfer to manage your zone files.
• You can load balance requests across two separate IP networks.
When you configure the 3-DNS Controller in bridge mode, you install the
3-DNS Controller into your network so that all DNS requests are intercepted
by the 3-DNS Controller before they are sent to your name server for
resolution. Based on the content of the request, the 3-DNS Controller does
one of the following:
• If the request matches a wide IP managed by the 3-DNS Controller, the
system responds to the request with the best available virtual server in
your network.
• If the request does not match any wide IPs managed by the 3-DNS
Controller, the system forwards the request to the DNS server for
resolution.
3-DNS® Administrator Guide
2 - 11
3
Using the Setup Utility
• Creating the initial software configuration with the
Setup utility
• Connecting to the 3-DNS Controller for the first
time
• Using the Setup utility for the first time
• Running the Setup utility after creating the initial
software configuration
Using the Setup Utility
Creating the initial software configuration with the
Setup utility
Once you install and connect the hardware and obtain a license, the next step
in the installation process is to turn the system on and run the Setup utility.
The Setup utility defines the initial configuration settings required to install
the 3-DNS Controller into the network. You can run the Setup utility
remotely from a web browser, or from an SSH or Telnet client, or you can
run it directly from the console.
Before you connect to the unit, we recommend that you gather the list of
information outlined in the configuration worksheet provided with the
3-DNS Controller. Note that the screens you see are tailored to the specific
hardware and software configuration that you have. For example, if you
have a stand-alone system, the Setup utility skips the redundant system
screens.
Once you have configured the base network elements with the Setup utility,
you might want to further enhance the configuration of these elements. For
additional information about these configuration tasks, see Chapter 4,
Post-Setup Tasks.
The license file installed on the system must be compatible with the latest
version of the 3-DNS software before you run the Setup utility. If it is not,
you must update the license using the registration key provided to you by
your vendor. If you do not have a registration key, please contact your
vendor to obtain one. If you choose to continue without obtaining a license,
the 3-DNS software will not be fully functional.
3-DNS® Administrator Guide
3-1
Chapter 3
Connecting to the 3-DNS Controller for the first time
The Setup utility prompts you to enter the same information, whether you
run the utility from a web browser, or from the command line. If you run the
utility from the console, no reboot is necessary; if you run the utility from
the web, the unit reboots automatically; if you run the utility from an SSH
client, we recommend that you reboot the unit after you complete the setup.
This reboot automatically removes the default IP address and root password
provided specifically for the purposes of running the Setup utility remotely.
The 3-DNS software replaces the default IP address and root password with
the password and IP addresses that you define while running the utility.
Running the utility from the console or serial terminal
Before you can run the Setup utility from either the console or a serial
terminal, you must first log in. Use the following default user name and
password to log in.
Username: root
Password: default
After you log in, you can start the utility directly from the console or serial
terminal by typing the command setup.
Running the Setup utility remotely
You can run the Setup utility remotely only from a workstation that is on the
same LAN as the unit. To allow remote connections for the Setup utility, the
3-DNS software comes with two pre-defined IP addresses, and a pre-defined
root password. The default root password is default, and the preferred
default IP address is 192.168.1.245. If this IP address is unsuitable for your
network, the 3-DNS software uses an alternate IP address, 192.168.245.245.
However, if you define an IP alias on an administrative workstation in the
same IP network as the 3-DNS Controller, the unit detects the network of
the alias and uses the corresponding default IP address.
Once the utility finishes and the system reboots, these default IP addresses
are replaced by the information that you entered in the Setup utility.
Setting up an IP alias for the default IP address before you start the unit
You must set up an IP alias for your remote workstation before you turn on
the unit and start the Setup utility. The remote workstation must be on the
same IP network as the unit. If you add this alias prior to booting up the
3-DNS Controller, the unit detects the alias and uses the corresponding
address.
3-2
Chapter 3
4. On the Configuration Status screen, click Setup Utility.
5. Fill out each screen using the information from the Setup utility
configuration list. After you complete the Setup utility, the 3-DNS
Controller reboots and uses the new settings you defined.
Note
You can rerun the Setup utility from a web browser at any time by clicking
the Setup utility link on the welcome screen.
Starting the utility from the command line
You can run the command line version of the Setup utility from the console
or serial terminal, or from a remote SSH client, or from a Telnet client.
To start the Setup utility from the console
1. At the login prompt, type root for the user name, and default for the
password.
2. At the 3-DNS prompt, type the following command to start the
command-line based Setup utility.
setup
3. Fill out each screen using the information from the Configuration
worksheet. After you complete the Setup utility, the 3-DNS
Controller uses the new settings you defined.
To start the Setup utility from the command line from a remote
administrative workstation
1. Start an SSH client on a workstation connected to the same IP
network as the internal VLAN of the unit. (See Chapter 4,
Post-Setup Tasks, for information on downloading the SSH client
from the 3-DNS Controller.)
2. Type the following command, where <default IP> is the IP address
in use on the 3-DNS internal VLAN.
ssh <default IP>
3. At the login prompt, type root for the user name, and default for the
password.
4. At the 3-DNS prompt, type the following command to start the
command-line based Setup utility.
setup
5. Fill out each screen using the information from the Configuration
worksheet. After you complete the Setup utility, reboot the 3-DNS
Controller by typing the following command:
reboot
3-4
Using the Setup Utility
Note
You can rerun the Setup utility at any time using the setup command.
Using the Setup utility for the first time
The following sections provide detailed information about the settings that
you define in the Setup utility.
Keyboard type
Select the type of keyboard you want to use with the 3-DNS Controller. The
following options are available:
• Belgian
• Bulgarian MIK
• French
• German
• Japanese - 106 key
• Norwegian
• Spanish
• Swedish
• US + Cyrillic
• US - Standard 101 key (default)
• United Kingdom
Root password
A root password allows you command line administrative access to the
3-DNS Controller. We recommend that the password contain a minimum of
6 characters, but no more than 32 characters. Passwords are case-sensitive,
and we recommend that your password contain a combination of upper- and
lower-case characters, as well as numbers and special characters (for
example, !@#$%^&*). Once you enter a password, the Setup utility
prompts you to confirm your root password by typing it again. If the two
passwords match, your password is immediately saved. If the two passwords
do not match, the Setup utility provides an error message and prompts you
to re-enter your password.
3-DNS® Administrator Guide
3-5
Chapter 3
Host name
The host name identifies the 3-DNS Controller itself. Host names must be
fully qualified domain names (FQDNs). The host portion of the name must
start with a letter, and must be at least two characters. The FQDN must be
less than or equal to 256 characters, but not less than 1 character. Each label
part of the name must be 63 characters or fewer. Only letters, numbers, and
the characters underscore ( _ ), dash ( - ), and period ( . ) are allowed. For
example:
<host 63 characters or less>.<label 63 characters or less>.net
You should only change the host name of the system with the Setup utility.
Editing /etc/hosts, or using the hostname command to change the host name
renders the system inaccessible.
Redundant system settings
There are three types of settings you need to define for redundant systems:
unit IDs, fail-over IP addresses, and fail-over type.
Unit IDs
The default unit ID number is 1. If this is the first unit in the redundant
system, use the default. When you configure the second unit in the system,
type 2. These unit IDs are used for active-active redundant configuration.
Choosing a fail-over IP address
A fail-over IP address is the IP address of the unit that takes over if the
current unit fails. Type in the IP address configured on the internal interface
of the other 3-DNS unit in the redundant system.
Fail-over type
There are two types of fail-over to choose from: hard-wired fail-over, and
network fail-over. Choose hard-wired fail-over if you plan to connect the
units together with the fail-over cable provided with the redundant system.
Choose network fail-over if you plan to use the network that the units are
connected to for fail-over functionality.
Note
Hard-wired fail-over is only available if the platform supports hard-wired
fail-over.
3-6
Using the Setup Utility
Setting the interface media type
Configure media settings for each interface. The media type options depend
on the network interface card included in your hardware configuration. The
Setup utility prompts you with the settings that apply to the interface
installed in the unit. The 3-DNS Controller supports the following types:
• auto
• 10baseT
• 10baseT, FDX
• 100baseTX
• 100baseTX, FDX
• Gigabit Ethernet
Note
For best results, choose the auto setting. In some cases, devices configured
for the auto media are incompatible, and the proper duplex setting will not
be negotiated. In these cases you may need to set the media settings to the
same speed and duplex on this device and the corresponding switch or host.
Check your switch or hub documentation for this information.
The Setup utility lists only the network interface devices that it detects
during system boot. If the utility lists fewer interface devices than you
expected, a network adapter may have come loose during shipping. Check
the LED indicators on the network adapters to ensure that they are working
and are connected.
Configuring VLANs and IP addresses
You can create a new VLAN or use the default VLANs to create the 3-DNS
Controller configuration.
Determine whether you want to have security enabled for a VLAN, or
disabled for the VLAN. Then, type the IP address settings for the VLAN.
The IP address settings include:
• Port Lockdown settings
• IP address, netmask, and broadcast
• Floating self IP address, netmask, and broadcast
Note
We recommend that you set the floating self IP address as the default route
for target devices, such as servers. The floating self IP address is owned by
the active unit in an active/standby configuration.
3-DNS® Administrator Guide
3-7
Chapter 3
Note
The IP address of the external VLAN is not the IP address of your site or
sites. The IP addresses of the sites themselves are specified by the virtual IP
addresses associated with each virtual server you configure.
Assigning interfaces to VLANs
After you configure the VLANs that you want to use on the 3-DNS
Controller, you can assign interfaces to the VLANs. If you use the default
internal and external VLANs, we recommend that you assign at least one
interface to the external VLAN, and at least one interface to the internal
VLAN. The external VLAN is the one on which the 3-DNS Controller
receives connection requests. The internal VLAN is typically the one that is
connected to the network of servers, firewalls, or other equipment that the
3-DNS Controller load balances.
Associating the primary IP address and VLAN with the host name
After you assign interfaces to VLANs, and if you have more than one
VLAN defined, you can choose one VLAN/IP address combination as the
primary IP address to associate with the unit host name.
Configuring a default gateway pool
If a 3-DNS Controller does not have a predefined route for network traffic,
the unit automatically sends traffic to the pool that you define as the default
gateway pool. You can think of the default gateway pool as a pool of default
routes. Typically, a default gateway pool is set to two or more gateway IP
addresses. If you type more than one default gateway IP address, the
additional gateways provide high availability for administrative
connections. The first address you type becomes the default route. If a
gateway in the default gateway pool becomes inactive, existing connections
through the inactive gateway are routed through another gateway in the
default gateway pool. If you type one IP address, no pool is created, and that
address is entered as the default route.
All default gateway IP addresses you add to the default gateway pool must
be in the same IP network as the 3-DNS Controller.
Configuring remote web server access
The 3-DNS web server provides the ability to set up remote web access on
each VLAN. When you set up web access on a VLAN, you can connect to
the web-based configuration utility through the VLAN. To enable web
access, specify a fully qualified domain name (FQDN) for each VLAN. The
3-8
Using the Setup Utility
3-DNS web server configuration also requires that you define a password
for the admin user. If SSL is available, the configuration also generates
authentication certificates.
Note
If the host name portion of the FQDN is greater than 64 characters, the
3-DNS software cannot use it for the web server FQDN.
The Setup utility guides you through a series of screens to set up remote web
access.
• The first screen prompts you to select the VLAN you want to configure
for web access. After you select an interface to configure, the utility
prompts you to type a fully qualified domain name (FQDN) for the
interface. You can configure web access on one or more interfaces.
• After you configure the interface, the utility prompts you for a password
for the admin user account.
• After you type a password for the admin user account, you have the
option to type the IP addresses from which web-interface connections are
allowed.
• After you type the IP addresses that are allowed to access the unit with
the admin account, the certification screen prompts you for country,
state, city, company, and division.
If you ever change the IP addresses or host names on the 3-DNS interfaces,
you must reconfigure the 3-DNS web server and the portal to reflect your
new settings.
You should add users, or change passwords for existing users, only through
the Configuration utility.
If you have modified the remote web server configuration outside of the
Configuration utility, be aware that some changes may be lost when you run
the Setup utility. This utility overwrites the httpd.conf file and the
openssl.conf file.
Configuring remote administrative access
After you configure remote web access, the Setup utility prompts you to
configure remote command line access. On most 3-DNS units, the first
screen you see is the Configure SSH screen, which prompts you to type an
IP address for SSH command line access. If SSH is not available, you are
prompted to configure access through Telnet, RSH, and FTP instead.
3-DNS® Administrator Guide
3-9
Chapter 3
When the Setup utility prompts you to enter an IP address for
administration, you can type a single IP address or a list of IP addresses,
from which the 3-DNS Controller will accept administrative connections
(either remote shell connections, or connections to the web server on the
3-DNS Controller). To specify a range of IP addresses, you can use the
asterisk (*) as a wildcard character in the IP addresses.
The following example allows remote administration from all hosts on the
192.168.2.0/24 network:
192.168.2.*
Note
For administration purposes, you can connect to the 3-DNS floating self IP
address, which always connects you to the active unit in an active/standby
redundant system. To connect to a specific unit, connect directly to the IP
address of that 3-DNS unit.
Setting support access
Next, the Setup utility prompts you to set up a support access account. If you
would like to activate a support access account to allow your vendor access
to the 3-DNS unit, type a password for the support account. Next, select the
access type you want for the support account.
Setting the time zone
Next, you need to specify your time zone. This ensures that the clock for the
3-DNS Controller is set correctly, and that dates and times recorded in log
files correspond to the time zone of the system administrator. Scroll through
the list to find the time zone at your location. Note that one option may
appear with multiple names. Select the time zone you want to use, and press
the Enter key to continue.
Configuring NTP support
You can synchronize the time on the unit to a public time server by using
Network Time Protocol (NTP). NTP is built on top of TCP/IP and assures
accurate, local timekeeping with reference to clocks located on the Internet.
This protocol is capable of synchronizing distributed clocks, within
milliseconds, over long periods of time. If you choose to enable NTP, make
sure UDP port 123 is open in both directions when the unit is behind a
firewall.
3 - 10
Using the Setup Utility
Configuring the 3-DNS mode
The 3-DNS Controller can run in three different modes: node, bridge, and
router.
◆
Node mode
The node mode is the traditional installation of the 3-DNS Controller.
The 3-DNS Controller replaces a DNS server in a network and uses the
DNS server’s IP address. All DNS traffic is directed at the 3-DNS
Controller because it is registered with InterNIC as authoritative for the
domain. In node mode, you usually run BIND on the system to manage
DNS zone files. In node mode, you may also use the NameSurfer
application available to manage your zone files.
◆
Bridge mode
In bridge mode, the 3-DNS Controller acts as an IP bridging device by
forwarding packets between two LAN segments (usually on the same IP
subnet). The system usually has one IP address, and is installed between
the router or switch, and the authoritative DNS server. The 3-DNS
Controller does not replace the authoritative DNS server.
The 3-DNS Controller filters all DNS packets that match wide IPs, and
forwards the remaining packets to the authoritative DNS server for
resolution. Note that this may be the preferred method of using the
3-DNS Controller because you do not have to replace the authoritative
DNS server, and you can perform out-of-band testing before you deploy
3-DNS software upgrades.
◆
Router mode
In router mode, the 3-DNS Controller acts as a router by forwarding
packets between two different IP subnets. You can put the 3-DNS
Controller anywhere in the network topology so that packets destined for
the authoritative DNS server have to pass through it. Router mode
requires at least two IP addresses and two VLANs. Router mode is
probably most useful for Internet service providers (ISPs) that want to
redirect traffic to local content servers. For example, by using the 3-DNS
Controller in router mode, an ISP can redirect requests for
ads.siterequest.net to a local ad server.
Configuring user authentication
When you run the Setup utility, you can configure authentication for 3-DNS
user accounts either through an external LDAP or RADIUS server, or
locally on the 3-DNS Controller. The following sections describe these two
authentication options.
Note
The root and admin accounts are always authenticated locally.
3-DNS® Administrator Guide
3 - 11
Chapter 3
Using the local LDAP database only
When you run the Setup utility, you are not required to configure an external
LDAP or RADIUS database to manage user authentication. Instead, you can
use the default authentication mechanism, which is the 3-DNS Controller’s
local LDAP database. In this case, the local LDAP database manages not
only authorization for your 3-DNS users, but also authentication. All users
subsequently attempting to log on to a 3-DNS Controller must enter a user
name and password, which are checked against user data stored in the local
database. If the user name and password are found and verified in that
database, the user is authenticated.
Configuring the unit to use an external LDAP or RADIUS server
When you run the Setup utility, you can configure an external (remote)
server, either LDAP or RADIUS, to manage user authentication for the
3-DNS Controller. When you choose this configuration option, all users
subsequently attempting to log on to a 3-DNS Controller must enter a user
name and password, which are checked against user data stored in that
external database. If the user name and password are found and verified in
that database, the user is authenticated.
Note
In the event that authentication fails with an external LDAP or RADIUS
server, you can log in with accounts locally, such as the root and admin
accounts.
Configuring external LDAP authentication
When you configure the unit to use an external LDAP server for user
authentication, you need the following information:
• The IP address of the LDAP server, or the IP address of the primary
server if you have more than one LDAP server.
• The base distinguished name of each LDAP server. This name must be
the same for each server.
• Optionally, the user name of the account that you want to bind to the
LDAP server as the search account. The search account is a read-only
account used to do searches. This account must be able to access
passwords. If you have more than one LDAP server, this account must be
the same on each server.
• If you configure an LDAP search account, you need the password for
that account. If you have more than one LDAP server, you must use the
same search account and password.
• After you configure external authentication, you need to set the
authorization level, or role, for each user you want to allow to access the
controller. You can do this after you complete the Setup utility. Add an
account and role for each user in the User Administration screen of the
Configuration utility. Since the external authentication server handles the
password authentication, you do not need to enter a password for these
3 - 12
Using the Setup Utility
users. For detailed instructions on setting roles for users, see Managing
user accounts, in Chapter 6, Administration and Monitoring, in the
3-DNS Reference Guide.
Configuring external RADIUS authentication
When you configure the unit to use an external RADIUS server for user
authentication you need the following information:
• The IP address of the RADIUS server, or the IP address of the primary
server and secondary server if you have more than one RADIUS server.
• The port configured for RADIUS traffic on your RADIUS server.
Typically, the port configured for RADIUS is port 1645, the traditional
RADIUS port, or port 1812, the new official RADIUS port.
• The primary RADIUS secret, and if you have a secondary RADIUS
server, the secondary RADIUS secret.
• After you configure external authentication, you need to set the
authorization level, or role, for each user you want to allow to access the
controller. You can do this after you complete the Setup utility. Add an
account and role for each user in the User Administration screen of the
Configuration utility. Since the external authentication server handles the
password authentication, you do not need to enter a password for these
users. For detailed instructions on setting roles for users, see Managing
user accounts, in Chapter 6, Administration and Monitoring, in the
3-DNS Reference Guide.
Configuring NameSurfer for zone file management
You can configure NameSurfer to handle DNS zone file management. We
strongly recommend that you configure NameSurfer to handle zone file
management by selecting NameSurfer to be the master on the unit. If you
select NameSurfer as the master, NameSurfer converts the DNS zone files
on the system, becomes the authoritative DNS, and automatically processes
changes and updates to the zone files. (You can access the NameSurfer
application directly from the Configuration utility for the 3-DNS
Controller.)
In the final series of the Setup utility screens, you choose whether to have
NameSurfer handle DNS zone file management on the 3-DNS Controller. If
you configure the 3-DNS Controller in node mode, we strongly recommend
that you configure NameSurfer to handle zone file management. If you
designate NameSurfer as the primary name server, NameSurfer converts the
DNS zone files on the system, becomes the authoritative DNS, and
automatically processes changes and updates to the zone files. (You can
access the NameSurfer application directly from the Configuration utility).
To open the NameSurfer application
1. In the navigation pane, click NameSurfer.
The NameSurfer home screen opens.
3-DNS® Administrator Guide
3 - 13
Chapter 3
2. Edit the zone file information as required.
For help with the NameSurfer application, click Help in the
NameSurfer navigation pane.
Note
Remember that if you run the 3-DNS Controller in bridge or router mode,
the system is not authoritative for any domains, so the NameSurfer
application is not available to manage any zone files.
Running the Setup utility after creating the initial
software configuration
You normally run the Setup utility when the system is first installed as part
of the installation procedure. However, you can also use the command line
Setup utility to change existing settings at any time. This section describes
running the Setup utility to change settings after you run it initially.
To run the Setup utility from the command line, type in the following
command:
setup
After you complete the initial configuration, the Setup utility presents a
menu of individual configuration options.
The Setup utility menu is divided into two different sections, Required and
Optional. The Setup utility includes the following required configuration
options:
• Set the default gateway pool
• Configure VLANs and networking
• Set host name
• Configure web servers
• Set the root password
The following configuration selections are optional:
• Configure DNS
• Configure FTP
• Set keyboard type
• Define time servers
• Configure NameSurfer
• Initialize the iControl portal
• Configure RSH
• Configure SSH
3 - 14
Using the Setup Utility
• Configure Telnet
• Set time zone
• Remote authentication
• License activation
• Configure remote access (for configuration synchronization)
• Set support access
lqq I N I T I A L
S E T U P
M E N U qqqqqqqqqqqqqqqqqqqqqqqqqqqqqqqqqqqqqk
x
x
x
Choose the desired configuration function from the list below.
x
x
x
x
(A) Configure all services
(R) Steps for redundant systems
x
x
x
x
REQUIRED
x
x
(E) Set default gateways
(V) Configure VLANs & networking
x
x
(H) Set host name
(W) Configure web servers
x
x
(P) Set root password
x
x
x
x
OPTIONAL
x
x
(C) Remote authentication
(O) Configure remote access
x
x
(D) Configure DNS
(S) Configure SSH
x
x
(F) Configure FTP
(T) Configure Telnetd
x
x
(I) Initialize iControl portal
(U) Configure RSH
x
x
(K) Set keyboard type
(Y) Set support access
x
x
(L) License Activation
(Z) Set time zone
x
x
(M) Define time servers
(Q) Quit
x
x
(N) Configure NameSurfer
x
x
x
x
Enter Choice:
x
mqqqqqqqqqqqqqqqqqqqqqqqqqqqqqqqqqqqqqqqqqqqqqqqqqqqqqqqqqqqqqqqqqqqqqqqqqqqqj
Figure 3.1 The Setup utility menu
Options available only through the Setup utility menu
This section contains descriptions of options that are available only through
the Setup utility menu. These options include:
• Initializing the iControl portal
• Configuring RSH
• Configuring Telnet
• Configuring FTP
Initialize the iControl portal
This option is available in the menu only after you create the initial software
configuration. Select this option to configure the CORBA ports (IIOP and
FSSL). This option prompts you for a list of IP addresses or host names you
3-DNS® Administrator Guide
3 - 15
Chapter 3
want to embed as objects in the portal object reference. Typically, in a
redundant system, this list includes the fail-over IP address of the other
3-DNS unit in the redundant system.
This option prompts you to set the portal to use IP addresses instead of DNS
names. If the portal is set to use IP addresses, the 3-DNS Controller does not
have to do a DNS lookup.
In addition to these settings, you can change the following iControl portal
settings:
• The security mode of the portal. You can allow the portal to handle
non-secure requests.
• The name of the portal object reference file.
• The portal PID file name.
Configuring RSH
This option is available only in the menu after you create the initial software
configuration. Use this option to configure the remote shell (rshd) server.
This utility prompts you for an IP address from which administrators may
access the 3-DNS Controller. You can use wildcard characters (*) to include
all addresses from a specific part of the network. This utility also prompts
you to create a support account for access by technical support.
If inetd is not currently configured, this utility configures inetd for the
remote shell server (rshd). If the service port for rsh is closed, this utility
opens the service port to permit rsh connections to the system.
Configuring Telnet
Use this option to configure the Telnet server only on a 3-DNS Controller.
The Setup utility prompts you to configure each service independently. This
allows you to enable Telnet.
The utility prompts you for a configuration address for each service from
which administrators may access the 3-DNS Controller. You can use
wildcard characters (*) to include all addresses from a specific part of the
network. This utility also prompts you to create a support account for access
by technical support.
If inetd is not currently configured, this utility configures inetd for the
requested services. If the ports for Telnet are closed, this utility opens the
ports to permit Telnet connections to the 3-DNS Controller.
Configuring FTP
Use this option to configure FTP on the 3-DNS Controller. The Setup utility
prompts you for an IP address from which administrators may access the
3-DNS Controller with FTP. You can use wildcard characters (*) to include
all addresses from a specific part of the network. This utility also prompts
you to create a support account for access by technical support.
3 - 16
Using the Setup Utility
If the service port for FTP is closed, this utility opens the service port to
permit FTP connections to the 3-DNS Controller.
Although you can configure FTP and Telnet on a 3-DNS Controller, we
recommend that you leave these services disabled, for security reasons.
3-DNS® Administrator Guide
3 - 17
Chapter 3
3 - 18
4
Post-Setup Tasks
• Introduction
• Configuring the interfaces
• Working with VLANs
• Configuring a self IP address
Post-Setup Tasks
Introduction
Setting up the base network for the 3-DNS Controller means configuring
elements such as the 3-DNS Controller host name, a default gateway pool,
interface media settings, and VLANs and self IP addresses. Configuration
tasks for the BIG-IP base network are performed using the Setup utility. For
information on using the Setup utility, see Chapter 3, Using the Setup
Utility.
Once you have configured the base network elements with the Setup utility,
you might want to further enhance the configuration of these elements. This
chapter provides the information you need to perform these additional
configuration tasks. You can perform these tasks using either the
Configuration utility or the bigpipe command line utility.
Elements you might want to further configure after running Setup are:
◆
Interfaces
You can set the media type and the duplex mode for an interface, as well
as display interface status.
◆
VLANs
VLAN options include tagging, and assigning interfaces to VLANs. In
addition, you can group separate VLANs together for the purpose of
bridging packets between them.
◆
Self IP addresses
You can change self IP addresses or create any number of additional self
IP addresses for a VLAN.
◆
Additional host names
You can insert additional host names and IP addresses for network
devices into the /etc/hosts file. For example, you can insert host names
for the IP addresses that you will assign to virtual servers, and host
names for standard devices such as your routers, network interface cards,
and servers.
◆
General networking
You can configure a default route, as well as dynamic routing, DNS, and
email.
Note
Once you have configured the base network, you can configure the
high-level network. Examples of elements you configure as part of the
high-level network are: Pools, rules, proxies, and network address
translation (SNATs and NATs).
3-DNS® Administrator Guide
4-1
Chapter 4
Configuring the interfaces
Typically, a 3-DNS Controller has two network interfaces. The following
sections describe the naming convention, displaying the status, setting the
media type, and setting the duplex mode for the interfaces in the 3-DNS
Controller.
Understanding the interface naming convention
By convention, the Ethernet interfaces on a 3-DNS Controller take the name
<s>.<p> where s is the slot number of the NIC, and p is the port number on
the NIC. For the 2U platform, slot numbering is top-to-bottom, and port
numbering is left-to-right as shown in Figure 4.1.
Expansion Slot
Expansion Slot
Expansion Slot
1.1
Port 1
1.2
Port 2
Port
designator
Figure 4.1 Rear view of a 3-DNS Controller with two interface ports
Displaying status for interfaces
Use the following syntax to display the current status and the settings for the
installed interface cards:
b interface show
Figure 4.2 is an example of the output you see when you issue this
command.
interface
1.1 UP
2.1 UP
speed
Mb/s
100 HD
100 HD
pkts
in
0
20
pkts
out
213
25
pkts
drop
0
0
pkts
coll
0
0
bits
in
0
28.6K
bits errors trunk STP
out
74.2K
0
33.9K
0
Figure 4.2 The bigpipe interface show command output
Use the following syntax to display the current status and the setting for a
specific interface.
b interface <if_name> show
4-2
Post-Setup Tasks
Setting the media type
You can set the media type for the interface card either to the specific media
type or to auto for auto detection. If the media type is set to auto and the
card does not support auto detection, the default type for that interface is
used, for example 100BaseTX.
Use the following syntax to set the media type:
b interface <if_name> media <media_type> | auto
(Default media type is auto.)
Note
If the 3-DNS Controller is inter-operating with an external switch, the
media setting should match that of the switch. To accomplish this, it is best
to specify the setting explicitly, and not rely on automatic detection using
auto.
Setting the duplex mode
You can set duplex mode to full or half duplex. If the media type does not
allow duplex mode to be set, this is indicated by an onscreen message. If
media type is set to auto, or if setting duplex mode is not supported for the
interface, the duplex setting is not saved to bigip.conf.
Use the following syntax to set the duplex mode:
b interface <if_name> duplex
full | half | auto
(Default mode is auto.)
Note
If the 3-DNS Controller is inter-operating with an external switch, the
media setting should match that of the switch. To accomplish this, it is best
to specify the setting explicitly, and not rely on automatic detection using
auto.
3-DNS® Administrator Guide
4-3
Chapter 4
Working with VLANs
A VLAN is a grouping of separate 3-DNS Controller networks that allows
those networks to behave as if they were a single local area network,
whether or not there is a direct ethernet connection between them.
The 3-DNS Controller offers several options that you can configure for a
VLAN. These options are summarized in Table 4.1.
Option
Description
Create a default VLAN
configuration
You can use the Setup utility to create a default VLAN configuration.
Create, rename, or delete
VLANs
You can create, rename, or delete a VLAN.
Configure packet access to
VLANs
Through an option called tagging, you can direct packets from multiple VLANs to a
specific 3-DNS interface, or direct traffic from a single VLAN to multiple interfaces.
Manage the L2 forwarding
table
You can edit the L2 forwarding table to enter static MAC address assignments.
Create VLAN groups
You can create a VLAN group to allow layer 2 packet forwarding between VLANs.
Set VLAN security
You can set port lockdown by VLAN.
Set fail-safe timeouts
You can set a fail-safe timeout on a VLAN. You can use a fail-safe timeout to trigger
fail-over in a redundant system.
Set self IP addresses
You can set one or more self IP addresses for VLANs.
Set MAC masquerade
You can use the MAC masquerade to set up a media access control (MAC) address
that is shared by a redundant system.
Configure VLAN mirroring
You can configure the 3-DNS Controller to replicate packets received by a VLAN and
send them to another VLAN or set of VLANs.
Table 4.1 Configuration options for VLANs
Default VLAN configuration
By default, the Setup utility configures each interface on the 3-DNS
Controller as a member of a VLAN. The 3-DNS Controller identifies the
fastest interfaces, makes the lowest-numbered interface in that group a
member of the VLAN external, and makes all remaining interfaces
members of the VLAN internal.
4-4
Post-Setup Tasks
Figure 4.3 Simple VLAN configuration for a 3-DNS Controller
VLAN flexibility is such that separate IP networks can belong to a single
VLAN, while a single IP network can be split among multiple VLANs. (The
latter case allows the 3-DNS Controller to be inserted into an existing LAN
without renaming the nodes.) The VLANs named external and internal are
separate networks, and in the configuration shown they behave like separate
networks. The networks belonging to VLAN internal are also separate
networks, but have been made to behave like a single network. This is
accomplished using a feature called VLAN bridging.
Your default VLAN configuration is created using the Setup utility. On a
typical unit with two interfaces, you create an internal and external VLAN.
Creating, renaming, and deleting VLANs
Typically, if you use the default configuration, one VLAN is assigned to
each interface. However, if you need to change your network configuration,
or if the default VLANs are not adequate for a network configuration, you
can create new VLANs, rename existing VLANs, or delete a VLAN.
To create a VLAN using the Configuration utility
1. In the navigation pane, click Network.
The VLANs screen opens.
2. Click the Add button.
3. Type the attributes for the VLAN.
4. Click Done.
3-DNS® Administrator Guide
4-5
Chapter 4
To rename or delete a VLAN using the Configuration utility
1. In the navigation pane, click Network.
The VLANs screen opens.
2. In the VLANs screen, use one of the following options:
• To rename a VLAN, click the VLAN name you want to change.
The VLAN properties screen opens. Type the new name in the
VLAN name box.
• To delete a VLAN, click the Delete button for the VLAN you
want to delete.
3. Click Done.
To create, rename, or delete a VLAN from the command line
To create a VLAN from the command line, use the following syntax:
b vlan <vlan name> interfaces add <if name> <if name>
For example, if you want to create a VLAN named myvlan that contains the
interfaces 1.1 and 1.2, type the following command:
b vlan myvlan interfaces add 1.1 1.2
To rename an existing VLAN, use the following syntax:
b vlan <vlan name> rename <new vlan name>
For example, if you want to rename the VLAN myvlan to yourvlan, type
the following command:
b vlan myvlan rename yourvlan
To delete a VLAN, use the following syntax:
b vlan <vlan name> delete
For example, to delete the VLAN named yourvlan, type the following
command:
b vlan yourvlan delete
4-6
Post-Setup Tasks
Configuring packet access to VLANs
The 3-DNS Controller supports two methods for sending and receiving
packets through an interface that is a member of one or more VLANs. These
two methods are:
◆
Port-based access to VLANs
Packets are accepted for a VLAN because the packets have no tags in
their headers and were received on an interface that is a member of a
VLAN. With this method, an interface is configured as an untagged
member of the VLAN. Packets sent out through untagged interfaces
contain no tag in their header.
◆
Tag-based access to VLANs
Packets are accepted for a VLAN because the packets have tags in their
headers and the tag matches the VLAN identification number for the
VLAN. With this method, an interface is configured as a tagged member
of the VLAN. Packets sent out through tagged interfaces contain a tag in
their header.
The sending/receiving method used by a VLAN is determined by the way
that you add a member interface to a VLAN. When creating a VLAN or
modifying VLAN properties (using the Configuration utility or the bigpipe
command), you can add an interface to that VLAN as either an untagged or
a tagged interface.
The following two sections describe these two methods of providing packet
access to a VLAN.
Port-based access to VLANs
Port-based access to VLANs occurs when an interface is added to a VLAN
as an untagged interface. In this case, the interface can be added only to that
VLAN and to no others. This limits the interface to accepting traffic only
from that VLAN, instead of from multiple VLANs. To solve this problem,
3-DNS Controller allows you to configure a feature known as tagging,
described in the following section.
Tag-based access to VLANs
Tag-based access to VLANs occurs when an interface is added to a VLAN
as a tagged interface. A tagged interface can be added to multiple VLANs,
thereby allowing the interface to accept traffic from each VLAN of which
the interface is a member.
When you add an interface to a VLAN as a tagged interface, the 3-DNS
Controller associates the interface with the VLAN identification number, or
tag, which becomes embedded in a header of a packet.
Note
Every VLAN has a VLAN identification number. This identification number
is assigned to a VLAN either explicitly by a user when creating the VLAN,
or automatically by the 3-DNS Controller if the user does not supply one.
3-DNS® Administrator Guide
4-7
Chapter 4
Each time you add an interface to a VLAN, either when creating a VLAN or
modifying its properties, you can designate that interface as a tagged
interface. A single interface can therefore have multiple tags associated with
it.
The result is that whenever a packet comes into that interface, the interface
reads the tag that is embedded in a header of the packet. If the tag in the
packet matches any of the tags associated with the interface, the interface
accepts the packet. If the tag in the packet does not match any of the tags
associated with the interface, the interface rejects the packet.
Important
You should use VLAN tagging only if you are running the 3-DNS Controller
in bridge mode.
Configuration procedures
You configure tag-based access to VLANs using either the Configuration
utility or the bigpipe vlan command. You can configure tag-based access
either when you create a VLAN and add member interfaces to it, or by
modifying the properties of an existing VLAN. In the latter case, you simply
change the status of one or more member interfaces from untagged to
tagged.
To create a VLAN that supports tag-based access using the
Configuration utility
Creating a VLAN that supports tag-based access means creating the VLAN
and then adding one or more tagged interfaces to it.
1. In the navigation pane, click Network.
The VLAN screen opens.
2. Click the Add button.
The Add VLAN screen opens.
3. On the Add VLAN screen, type the VLAN name.
4. In the Tag box, you can optionally specify a VLAN ID number. If
you do not provide one, the 3-DNS Controller assigns a default
number.
5. In the Resources box, specify any tagged interfaces by selecting the
appropriate interface numbers from the Interface Number list and
clicking tagged >>.
6. Configure the other VLAN options.
7. Click Done.
4-8
Post-Setup Tasks
To configure tag-based access on an existing VLAN using the
Configuration utility
Configuring tag-based access on an existing VLAN means changing the
existing status of one or more member interfaces from untagged to tagged.
1. In the navigation pane, click Network.
The VLAN screen opens.
2. Click the VLAN name in the list.
The properties screen for that VLAN opens.
3. In the Resources box, move any untagged interfaces from the
Current Interfaces list to the Interface Number list.
4. Specify any tagged interfaces by selecting the appropriate interface
numbers from the Interface Number list and clicking tagged >>.
5. Click Done.
To create a VLAN that supports tag-based access from the
command line
1. Type the bigpipe vlan command, specifying a VLAN name, the tag
keyword, and a VLAN ID number. The following example creates
the VLAN external with a VLAN ID of 1209.
b vlan external tag 1209
2. Add the interfaces to the VLAN external as tagged interfaces. This
is done by specifying the VLAN name, the tagged keyword, and the
interfaces to be tagged. For example:
b vlan external interfaces add tagged 4.1 5.1 5.2
The effect of this command is to associate a tag with interfaces 4.1 and 5.1,
which in turn allows packets with that tag access to the external VLAN.
The above procedure adds multiple tagged interfaces to a single VLAN.
However, you can also add a single tagged interface to multiple VLANs.
This results in a single interface having more than one tag associated with it.
For example, the following commands add the tagged interface 4.1 to the
two VLANs external and internal:
b vlan external interfaces add tagged 4.1
b vlan internal interfaces add tagged 4.1
Setting up security for VLANs
You can lock down a VLAN to prevent direct connection to the 3-DNS
Controller through that VLAN. You can override this lockdown for specific
services by enabling the corresponding global variable for that service. For
example:
b global open_ssh_port enable
3-DNS® Administrator Guide
4-9
Chapter 4
To enable or disable port lockdown using the Configuration
utility
1. In the navigation pane, click Network.
The VLAN screen opens.
2. Click the VLAN name in the list.
The properties screen for that VLAN opens.
3. To enable port lockdown, click a check in the Port Lockdown box.
To disable port lockdown, clear the Port Lockdown check box.
4. Click Done.
To enable or disable port lockdown from the command line
To enable port lockdown, type:
b vlan <vlan_name> port_lockdown enable
To disable port lockdown, type:
b vlan <vlan_name> port_lockdown disable
Setting fail-safe timeouts for VLANs
For redundant 3-DNS units, you can enable a failsafe mechanism that will
fail over when loss of traffic is detected on a VLAN, and traffic is not
restored during the fail-over timeout period for that VLAN. You can enable
a fail-safe mechanism to attempt to generate traffic when half the timeout
has elapsed. If the attempt is successful, the fail-over is stopped.
To set the fail-over timeout and arm the fail-safe using the
Configuration utility
1. In the navigation pane, click Network.
The VLAN screen opens.
2. Click the VLAN name in the list.
The properties screen for that VLAN opens.
3. Check the Arm Failsafe box, and specify the timeout in seconds in
the Timeout box.
4 - 10
Post-Setup Tasks
To set the fail-over timeout and arm the fail-safe from the
command line
Using the vlan command, you may set the timeout period and also arm or
disarm the fail-safe.
To set the timeout, type:
b vlan <vlan_name> timeout <timeout_in_seconds>
To arm the fail-safe, type:
b vlan <vlan_name> failsafe arm
To disarm the fail-safe, type:
b vlan <vlan_name> failsafe disarm
Setting the MAC masquerade address
You can share the media access control (MAC) masquerade address
between 3-DNS units in a redundant system. This option has the following
advantages:
• Increased reliability and failover speed, especially in lossy networks
• Interoperability with switches that are slow to respond to the network
changes
• Interoperability with switches that are configured to ignore network
changes
Note
For sensible operation, you must set the MAC masquerade address to be the
same on both the active and standby units. To do this, configure the shared
MAC address manually, by editing the bigip_base.conf file on both units.
Do not use the bigpipe config sync command.
The MAC address for a VLAN is the MAC address of the first interface to
be mapped to the VLAN, typically 4.1 for external, and 5.1 for internal.
You can view the interfaces mapped to a VLAN using the following
command:
b vlan show
You can view the MAC addresses for the interfaces on the 3-DNS
Controller using the following command:
b interface show verbose
Use the following syntax to set the MAC masquerade address to be shared
by both 3-DNS units in the redundant system.
b vlan <vlan_name> mac_masq <MAC_addr>
3-DNS® Administrator Guide
4 - 11
Chapter 4
Find the MAC address on both the active and standby units, and pick one
that is similar but unique. A safe technique for selecting the shared MAC
address follows.
Suppose you want to set up mac_masq on the external interfaces. Using the
b interface show command on the active and standby units, you note that
their MAC addresses are:
Active: 3.1 = 0:0:0:ac:4c:a2
Standby: 3.1 = 0:0:0:ad:4d:f3
In order to avoid packet collisions, you now must choose a unique MAC
address. The safest way to do this is to select one of the addresses, and
convert the MAC address to a locally administered address using 0x40 for
the first byte. (The 0x40 byte indicates the logical operator OR.)
In this example, either 40:0:0:ac:4c:a2 or 40:0:0:ad:4d:f3 would be a
suitable shared MAC address to use on both 3-DNS units in the redundant
system.
The shared MAC address is used only when the 3-DNS Controller is in
active mode. When the unit is in standby mode, the original MAC address of
the network card is used.
If you do not configure mac_masq on startup, or when transitioning from
standby mode to active mode, the 3-DNS Controller sends gratuitous ARP
requests to notify the default router and other machines on the local Ethernet
segment that its MAC address has changed. See RFC 826 for more details
on ARP.
Note
The MAC masquerade information is stored in the bigip_base.conf file.
Configuring a self IP address
A self IP address is an IP address mapping to one or more VLANs and their
associated interfaces on a 3-DNS Controller. You assign a self IP address to
each interface on the unit as part of the initial configuration, and you also
assign a floating (shared) alias for units in a redundant system. You can
create additional self IP addresses for health checking, gateway failsafe,
routing, or other purposes. You create additional self IP addresses using
either the Configuration utility or using the self command in the bigpipe
utility. (See the 3-DNS Reference Guide, Appendix B, bigpipe Command
Reference, for more information on the self command.)
To add a self IP address to a VLAN using the Configuration
utility
1. In the navigation pane, click Network.
The VLANs screen opens.
2. Click the Self IP Addresses tab.
4 - 12
Post-Setup Tasks
3. Click the Add button.
4. In the IP Address box, type the self IP address to be assigned.
5. In the Netmask box, type an optional netmask.
6. In the Broadcast box, type an optional broadcast address.
7. If you want to configure the self IP address as a floating address,
check the Floating box.
8. If you want to enable the address for SNAT auto-mapping, check
the SNAT Automap box.
9. In the VLAN box, type the name of the VLAN to which you want to
assign the self IP address.
10. Click Done.
To add a self IP address to a VLAN from the command line
Use the following syntax:
b self <addr> vlan <vlan_name> [ netmask <ip_mask> ][ broadcast <broadcast_addr>] [unit
<id>]
You can add any number of additional self IP addresses to a VLAN to create
aliases. For example:
b self 11.11.11.4 vlan external
b self 11.11.11.5 vlan external
b self 11.11.11.6 vlan external
b self 11.11.11.7 vlan external
Also, any one self IP address may have floating enabled to create a floating
alias that is shared by both units of a redundant system:
b self 11.11.11.8 floating enable
Assigning a self IP address to an interface automatically maps it to the
VLAN of which it is a member. Assigning a self IP address to an interface
not mapped to an untagged VLAN produces an error message.
3-DNS® Administrator Guide
4 - 13
Chapter 4
4 - 14
5
Essential Configuration Tasks
• Reviewing the configuration tasks
• Setting up a basic configuration
• Setting up a data center
• Setting up servers
• Working with sync groups
• Overview of auto-configuration
• Configuring global variables
Essential Configuration Tasks
Reviewing the configuration tasks
Once you have completed the Setup utility, you set up the network and load
balancing aspects of the 3-DNS Controller. The 3-DNS Controller has three
essential configuration tasks that all users must complete, regardless of the
chosen load balancing solution.
◆
Configure the physical aspects of your load balancing network, which
includes the following:
• Data centers
• Data center servers and their virtual servers
• Communications between the 3-DNS Controller and other servers
• 3-DNS synchronization (if you have more than one 3-DNS Controller
in your network)
3-DNS® Administrator Guide
◆
Configure the logical aspects of your load balancing network, including
wide IPs and pools
◆
Configure the global load balancing modes and global variables
5-1
Chapter 5
Setting up a basic configuration
Each 3-DNS Controller in the network setup must have information
regarding which data center houses specific servers, and with which other
3-DNS Controllers it can share configuration and load balancing
information. A basic network setup includes data centers, servers, and one
sync group. Once you have the basic network components configured on
your 3-DNS Controller, you can set up the wide IPs you need for managing
your load balancing. We recommend that you review the load balancing
solutions in the remaining chapters of this guide before you configure the
wide IPs.
The following sections describe the various elements of a basic network:
◆
Data centers
Data centers are the top level of your network setup. We recommend that
you configure one data center for each physical location in your global
network. The data center element of your configuration defines the
servers (3-DNS Controllers, BIG-IP systems, EDGE-FX systems, hosts,
and routers) that reside at that location.
A data center can contain any type of server. For example, in Figure 5.1
on page 5-4, the Tokyo data center contains a 3-DNS Controller and a
host, while the New York and Los Angeles data centers contain 3-DNS
Controllers and BIG-IP systems.
For information about configuring data centers, see Setting up a data
center, on page 5-3.
◆
Servers
The data center servers that you define in the network setup include
3-DNS Controllers, BIG-IP systems, EDGE-FX systems, hosts, and
routers. You define the 3-DNS Controllers that manage load balancing to
the BIG-IP systems, EDGE-FX systems, and hosts, and you also define
the virtual servers that are managed by the servers. Virtual servers are the
ultimate destination for connection requests.
For information about configuring servers, see Setting up servers, on
page 5-5.
◆
Sync groups
Sync groups contain only 3-DNS Controllers. When setting up a sync
group, you define which 3-DNS Controllers have the same configuration.
In most cases, you should define all 3-DNS Controllers as part of the
same sync group.
For information about configuring sync groups, see Working with sync
groups, on page 5-13.
◆
5-2
Wide IPs
After you define virtual servers for your BIG-IP systems, EDGE-FX
systems, and hosts, you need to define wide IPs to specify how
connections are distributed among the virtual servers. A wide IP maps a
Essential Configuration Tasks
domain name to a pool of virtual servers, and it specifies the load
balancing modes that the 3-DNS Controller uses to choose a virtual
server from the pool.
When a local DNS server requests a connection to a specific domain
name, the wide IP definition specifies which virtual servers are eligible
to answer the request, and which load balancing modes to use in
choosing a virtual server to resolve the request.
For information about configuring wide IPs and choosing load balancing
modes, please refer to Chapter 2, Load Balancing, in the 3-DNS
Reference Guide.
◆
Global variables
You can configure global variables that apply to all servers and wide IPs
in your network. However, the default values of the global variables
work well for most situations, so configuring global variables is optional.
For information about configuring global variables, see Configuring
global variables, on page 5-17.
Setting up a data center
The first step in configuring your 3-DNS network is to create data centers. A
data center defines the group of 3-DNS Controllers, BIG-IP systems,
EDGE-FX systems, and host systems that reside in a single physical
location. For each data center that contains a 3-DNS Controller or a BIG-IP
system, you can also define a router. Figure 5.1 on page 5-4 shows an
example of a data center.
The advantage of grouping all systems from a single physical location into
one data center in the configuration is to allow path information collected by
one server to be shared with all other servers in the data center. The 3-DNS
Controller uses the big3d agent to collect path and metrics information
about the other servers, and their virtual servers, in the data center. The
3-DNS Controller then applies path metrics results to all the virtual servers
in the data center when making load balancing decisions.
Note
You must configure at least one data center before you can add servers to
the 3-DNS configuration.
3-DNS® Administrator Guide
5-3
Chapter 5
Figure 5.1 Example of a multiple data center setup
When you add servers to the network setup, you assign the servers to the
appropriate data centers.
To configure a data center using the Configuration utility
1. In the navigation pane, click Data Centers.
2. On the toolbar, click Add Data Center.
The Add New Data Center screen opens.
3. Add the new data center settings. For help on defining data centers,
click Help on the toolbar.
The data center is added to your configuration.
4. Repeat this process for each data center in your network.
Note
To configure a data center from the command line, refer to Appendix A,
3-DNS Configuration File, in the 3-DNS Reference Guide.
5-4
Essential Configuration Tasks
Setting up servers
There are five types of servers you can configure on a 3-DNS Controller:
3-DNS Controllers, BIG-IP systems, EDGE-FX systems, hosts, and routers.
At the minimum, your network includes one 3-DNS Controller, and at least
one server (BIG-IP system, EDGE-FX system, or host) that it manages.
This section describes how to set up each server type (3-DNS Controller,
BIG-IP system, EDGE-FX system, host, and router) that makes up your
network. The setup procedures here assume that the servers are up and
running in the network, and that they already have virtual servers defined (if
the server manages virtual servers). Note that 3-DNS Controllers and routers
do not manage virtual servers.
Important
If you are adding a BIG-IP Link Controller to the 3-DNS configuration, you
add the Link Controller as a BIG-IP system. If you want the 3-DNS
Controller to be aware of and manage the links on the Link Controller, then
you add the Link Controller as a 3-DNS system, also.
Defining 3-DNS Controllers
The purpose of defining a 3-DNS Controller in the configuration is to
establish in which data center the 3-DNS Controller resides and, if
necessary, to change big3d agent settings. Before you add other 3-DNS
Controllers to the configuration, you should add the 3-DNS Controller you
are configuring to its own configuration. By adding any additional 3-DNS
Controllers to the configuration, you make those 3-DNS Controllers
available so that you can add them to a sync group.
Note
Please review Chapter 10, Adding a 3-DNS Controller to an Existing
Network, if you are configuring more than one 3-DNS Controller in your
network.
To define a 3-DNS Controller using the Configuration utility
1. In the navigation pane, expand the Servers item, then click 3-DNS.
2. On the toolbar, click Add 3-DNS.
The Add New 3-DNS screen opens.
3-DNS® Administrator Guide
5-5
Essential Configuration Tasks
To add virtual servers using the Configuration utility
1. In the navigation pane, expand the Servers item, and then click
BIG-IP.
2. In the table, find the BIG-IP system that you just added.
3. Click the entry in its BIG-IP Virtual Servers column.
4. On the toolbar, click Add Virtual Server.
The Add Virtual Server to BIG-IP screen opens.
5. Add the new virtual server settings. For help on adding virtual
servers, click Help on the toolbar.
Repeat this process for each virtual server you want to add to this
BIG-IP system.
Note
For details on how to configure a BIG-IP system from the command line,
refer to Appendix A, 3-DNS Configuration File, in the 3-DNS Reference
Guide.
Defining a BIG-IP system with the 3-DNS module
In the 3-DNS configuration, you treat the BIG-IP system and the 3-DNS
Controller module as if they were separate devices. You can add the two
server types either by using the Configuration utility or by editing the
wideip.conf file. The following instructions describe how to add a BIG-IP
system with the 3-DNS Controller module, with the name
combo.siterequest.net and the IP address 192.168.100.100, to the
configuration.
Before you define a BIG-IP system with the 3-DNS Controller module in
the 3-DNS configuration, you should have the following information:
• The name and IP address of the BIG-IP system
• The name and IP address of the 3-DNS Controller
To add a BIG-IP system with the 3-DNS Controller module using
the Configuration utility
1. In the navigation pane, expand the Servers item, and then click
BIG-IP.
The BIG-IP List screen opens.
2. On the toolbar, click Add BIG-IP.
The Add BIG-IP screen opens.
3. In the BIG-IP Name box, type combo.siterequest.net.
4. In the BIG-IP IP Address box, type 192.168.100.100.
3-DNS® Administrator Guide
5-7
Chapter 5
5. Add the rest of the settings as needed.
Note: When you have finished defining the BIG-IP system, you can
add the 3-DNS Controller module to the configuration.
6. In the navigation pane, expand the Servers item, and then click
3-DNS.
The 3-DNS List screen opens.
7. On the toolbar, click Add 3-DNS.
The Add 3-DNS screen opens.
8. In the 3-DNS Name box, type combo.siterequest.net.
9. In the 3-DNS IP Address box, type 192.168.100.100.
10. Add the rest of the settings as needed.
Note
For details on how to configure a BIG-IP system with the 3-DNS Controller
module from the command line, refer to Appendix A, 3-DNS Configuration
File, in the 3-DNS Reference Guide.
Defining a router
Routers do not manage virtual servers, rather they manage the links to the
Internet for your network. Before you define a router in the 3-DNS
configuration, you should have the following information:
• The name of the router
• The IP address of the router (this is the gateway IP address)
• The IP addresses of the links that the router manages
Note
If you have a Link Controller or BIG-IP system in your network, the
auto-configuration process adds the routers to the configuration for you.
Note, however, that for BIG-IP systems, auto-configuration adds only one
router per data center. Use the following procedure only if you have
auto-configuration turned off.
To define a router using the Configuration utility
1. In the navigation pane, expand the Servers item, then click
Routers.
2. On the toolbar, click Add Router.
The Add New Router screen opens.
5-8
Essential Configuration Tasks
3. Add the new router settings. For help on defining a router, click
Help on the toolbar.
Note
For details on how to configure a router from the command line, refer to
Appendix A, 3-DNS Configuration File, in the 3-DNS Reference Guide.
Defining EDGE-FX systems
An EDGE-FX system can be either an EDGE-FX Cache, or a
GLOBAL-SITE Controller. Before you define any EDGE-FX systems, you
should have the following information:
• The IP address of the system itself
• The IP address and service name or port number of each virtual server
managed by an EDGE-FX Cache
Important
Auto-configuration automatically collects the virtual server configuration
information for any EDGE-FX systems you may have in your network. For
more information about auto-configuration, see Overview of
auto-configuration, on page 5-15.
To define an EDGE-FX system using the Configuration utility
1. In the navigation pane, expand the Servers item, then click
EDGE-FX.
2. On the toolbar, click Add EDGE-FX.
The Add New EDGE-FX screen opens.
3. Add the new EDGE-FX system settings. Note that if you want the
3-DNS Controller to discover the EDGE-FX system’s virtual
servers, select ON for the Discovery setting. (For help on defining
EDGE-FX systems, click Help on the toolbar.)
4. Click Add when you have finished configuring the initial settings
for the EDGE-FX system.
The controller adds the EDGE-FX system information to the
configuration.
Important
Auto-configuration collects the virtual server information for any
EDGE-FX systems you have in your network, if you turn on Discovery when
you add the EDGE-FX system to the configuration. For more information
about auto-configuration, see Overview of auto-configuration, on page
5-15.
3-DNS® Administrator Guide
5-9
Chapter 5
If you do not turn on Discovery when you add the EDGE-FX system to the
configuration, then use the following procedure to add virtual servers to the
EDGE-FX definition in the configuration.
To add virtual servers using the Configuration utility
1. In the navigation pane, click Servers, then click EDGE-FX.
2. In the table, find the EDGE-FX system that you just added.
3. Click the entry in its EDGE-FX Virtual Servers column.
4. On the toolbar, click Add Virtual Server.
The Add Virtual Server to EDGE-FX screen opens.
5. Add the new virtual server settings. For help on adding virtual
servers, click Help on the toolbar.
Repeat this process for each virtual server you want to add. Note that
GLOBAL-SITE Controllers do not manage virtual servers.
Note
For details on how to configure an EDGE-FX system from the command
line, refer to Appendix A, 3-DNS Configuration File, in the 3-DNS
Reference Guide.
Defining host servers
A host is an individual network server or server array controller other than a
3-DNS Controller, BIG-IP system, EDGE-FX Cache, GLOBAL-SITE
Controller, or router. Before configuring a host, you should have the
following information:
◆
Address information
The IP address and service name or port number of each virtual server to
be managed by the host.
◆
SNMP information for host probing
To implement host probing and to collect performance metrics, you must
specify SNMP agent settings after you define the host server. The
settings you specify include the type and version of SNMP agent that
runs on the host, the community string, and the number of
communication attempts that you want the big3d agent to make while
gathering host metrics. SNMP agent settings for hosts are described in
Configuring host SNMP settings, on page 5-12.
Note
To fully configure host probing, you must configure the SNMP agent
settings in the host definition as previously described, set up the big3d
agents to run SNMP factories, and configure the SNMP agents on the hosts
themselves. For details, please refer to Chapter 5, Probing and Metrics
Collection, in the 3-DNS Reference Guide.
5 - 10
Essential Configuration Tasks
Important
Auto-configuration automatically collects the virtual server configuration
information for any load-balancing hosts you may have in your network
(with the exception of Cisco® LocalDirectors). For more information about
auto-configuration, see Overview of auto-configuration, on page 5-15.
To define a host using the Configuration utility
1. In the navigation pane, expand the Servers item, and then click
Host.
2. On the toolbar, click Add Host.
The Add New Host screen opens
3. Add the new host settings. Note that if you want the 3-DNS
Controller to discover the host’s virtual servers, select ON for the
Discovery setting. (For help on defining hosts, click Help on the
toolbar.)
4. Click Add when you have finished configuring the initial settings
for the host.
The controller adds the host information to the configuration.
Important
Auto-configuration collects the virtual server information for any host
systems you have in your network, if you turn on Discovery when you add
the host to the configuration. For more information about
auto-configuration, see Overview of auto-configuration, on page 5-15.
If you do not turn on Discovery (step 3, in previous procedure) when you
add the host to the configuration, then use the following procedure to add
virtual servers to the host definition.
To add more virtual servers using the Configuration utility
1. In the navigation pane, click Host.
2. In the table, find the host that you just added, and click the entry in
its Host Virtual Servers column.
3. On the toolbar, click Add Host Virtual Server.
The Add Virtual Server to Host screen opens.
4. Add the new virtual server settings. For help on adding virtual
servers, click Help on the toolbar.
Repeat this process for each virtual server you want to add to this
host.
Note
For details on how to configure a host from the command line, refer to
Appendix A, 3-DNS Configuration File, in the 3-DNS Reference Guide.
3-DNS® Administrator Guide
5 - 11
Chapter 5
Configuring host SNMP settings
After defining a host server, you need to configure its SNMP settings if you
want to use SNMP host probing. Remember that you must first set up at
least one SNMP probing factory on any 3-DNS Controller, BIG-IP system,
EDGE-FX Cache, or GLOBAL-SITE Controller that runs the big3d agent
and is in the same data center as the host.
The SNMP prober collects some or all of the following information from
hosts.
• Memory utilization
• CPU utilization
• Disk space utilization
• Packet rate (packets per second
• Throughput rate (kilobytes per second)
• Current connections
The 3-DNS Controller uses this performance information for dynamic load
balancing modes, such as Packet Rate, Quality of Service, and
Kilobytes/Second.
Table 5.1 shows the host SNMP agents supported by the 3-DNS Controller.
SNMP Agent
Description
Generic
A generic SNMP agent is an SNMP agent that collects metrics provided by object identifiers
(OIDs) as specified in the RFC 1213 document.
UCD
This free SNMP agent is provided by the University of California at Davis. It is available on the
web at http://net-snmp.sourceforge.net
Solstice
This SNMP agent is a product of Sun® Microsystems.
NTServ
This SNMP matrix agent is distributed with Microsoft® Windows NT® Server 4.0.
Win2KServ
This SNMP matrix agent is distributed with Microsoft Windows 2000 Server.
Cisco LDV2
This SNMP agent is distributed with the Cisco® LocalDirector, version 2.X.
Cisco LDV3
This SNMP agent is distributed with the Cisco LocalDirector, version 3.X.
ArrowPoint
This SNMP agent is distributed with the Cisco/ArrowPoint CSS series.
Alteon
This SNMP agent is distributed with the Alteon® WebSystems ACEdirector.
Foundry
This SNMP agent is distributed with the Foundry® ServerIron.
CacheFlow
This SNMP agent is distributed with the CacheFlow® appliances.
Table 5.1 Supported SNMP agents
5 - 12
Essential Configuration Tasks
Viewing host performance metrics
The Configuration utility displays the host metrics in the Host Statistics
screen. The 3-DNS Controller bases the advanced load balancing decisions
on packet rate, kilobytes per second, and current connections metrics, but
the Host Statistics screen displays the other metrics as well, for information
purposes.
Reviewing SNMP configuration issues
The SNMP probing feature requires that each host run an SNMP agent, and
that the hosts and the big3d agents in the data centers have open network
communication. Certain firewall configurations block SNMP
communications, and you may need to verify that the firewalls in your
network allow SNMP traffic to pass through.
In addition to properly configuring the SNMP agents on the hosts
themselves, you need to specify SNMP host probing settings in two places
in the 3-DNS configuration. First, when you define a 3-DNS Controller or
BIG-IP system, you set the big3d agent to run at least one SNMP factory.
Second, when you define the host servers, you configure specific SNMP
agent settings for each host. For example, you need to specify the type of
agent running on the host as well as the community string that allows access
to the SNMP agent. Last, you configure the SNMP agent on the host itself.
We recommend that you use the documentation originally provided with
host to configure the SNMP agent.
Note
For more information about working with the big3d agent and SNMP, refer
to Chapter 5, Probing and Metrics Collection, in the 3-DNS Reference
Guide.
Working with sync groups
A sync group defines a group of 3-DNS Controllers that synchronize their
configuration settings, metrics data, and zone files (optional). A sync group
contains a principal system and one or more receiver systems. The principal
system is the 3-DNS Controller from which the receiver systems obtain their
metrics and server statistics information. You configure a sync group from
the principal 3-DNS Controller. First list the IP address of the principal
itself. Then list the receiver 3-DNS Controllers in the order that they should
become principals if previously listed 3-DNS Controllers fail.
Configuring sync groups
The following procedures describe how to configure sync groups.
3-DNS® Administrator Guide
5 - 13
Chapter 5
To define a sync group using the Configuration utility
1. In the navigation pane, click 3-DNS Sync.
The System - Add a New Sync Group screen opens.
2. In the New Sync Group Name box, type the name of the new sync
group and click Add.
The Add a 3-DNS to a Sync Group screen opens.
3. From the list of 3-DNS Controllers, first select the 3-DNS
Controller that you want to be the principal system. Then check the
box next to each 3-DNS Controller that you want to add to the sync
group.
4. Click Add.
Note
For details on how to configure a sync group from the command line, refer
to Appendix A, 3-DNS Configuration File, in the 3-DNS Reference Guide.
Setting the time tolerance value
The time tolerance value is a global variable that defines the number of
seconds that one 3-DNS Controller's time setting is allowed to be out of
sync with another 3-DNS Controller's time setting. We recommend that you
leave the time tolerance variable at the default setting of 10.
To check the value for the time tolerance setting using the
Configuration utility
1. In the navigation pane, click System.
The System - General screen opens.
2. On the toolbar, click Timers and Task Intervals.
3. Note the value in the 3-DNS Sync Time Tolerance box, and change
it if necessary.
4. If you change this setting, click Update to save it. For more
information about the settings on this screen, click Help on the
toolbar.
To check the value for the time tolerance setting in the
configuration file
1. To ensure that the configuration files contain the same information
as the memory cache, type the following command:
3ndc dumpdb
2. Open the wideip.conf file in a text editor (either vi or pico).
3. Search for time_tolerance. If the time_tolerance sub-statement is
not in the configuration file, the default (10) is used.
5 - 14
Essential Configuration Tasks
4. Save and close the file.
5. Commit the changes to the configuration by typing:
3ndc reload
Overview of auto-configuration
The 3-DNS Controller automatically retrieves configuration details from
BIG-IP systems, hosts, and other 3-DNS Controllers that you add to the
3-DNS configuration. This process is known as auto-configuration.
Auto-configuration queries BIG-IP systems for their configuration
information, including self IP addresses and virtual servers.
Auto-configuration can also gather configuration information for host
systems that have SNMP enabled. Using auto-configuration eliminates the
repetitive tasks of entering configuration information both on the BIG-IP
systems and hosts, and on the 3-DNS Controller, thus dramatically reducing
administrative overhead.
Auto-configuration continually monitors the configurations for changes.
When you add or remove an object from a BIG-IP system, 3-DNS
Controller, or host, the change displays almost immediately in the 3-DNS
configuration. The 3-DNS Controller also synchronizes the changes among
the sync group members.
Once the 3-DNS Controller has retrieved the initial configuration, you
modify the auto-configuration settings for each server type using the
Configuration utility. Auto-configuration has three settings:
3-DNS® Administrator Guide
◆
ON
When the Discovery setting is set to ON, the 3-DNS Controller polls the
BIG-IP systems and host systems in the network every 30 seconds to
update the configuration information for those systems. Any changes,
additions, or deletions are then made to the controller's configuration.
◆
ON/NO DELETE
When the Discovery setting is set to ON/NO DELETE, the 3-DNS
Controller polls the BIG-IP system and host systems in the network
every 30 seconds to update the configuration information for those
systems. Any changes or additions are then made to the controller's
configuration. Any deletions in the configuration are ignored. This
setting is helpful if you want to take systems in and out of service
without modifying the 3-DNS configuration.
◆
OFF
When the Discovery setting is set to OFF, the 3-DNS Controller does
not collect any configuration information from the BIG-IP system and
5 - 15
Chapter 5
host systems in the network. Instead, you must make all changes to the
configuration either by using the Configuration utility, or by editing the
wideip.conf file. Note that this is the default setting.
Note
In the Configuration utility, auto-configuration is labeled Discovery.
To modify the auto-configuration setting for a BIG-IP system
using the Configuration utility
1. In the navigation pane, expand the Servers item, and then click
BIG-IP.
The BIG-IP List screen opens.
2. Click the name of the BIG-IP system for which you want to modify
the auto-configuration setting.
The Modify BIG-IP screen opens.
3. In the Discovery box, select one of the following settings: ON,
ON/NO DELETE, or OFF.
4. Click Update.
The configuration updates with the new setting.
To modify the auto-configuration setting for a host using the
Configuration utility
1. In the navigation pane, expand the Servers item, and then click
Host.
The Host List screen opens.
2. Click the name of the host for which you want to modify the
auto-configuration setting.
The Modify Host screen opens.
3. In the Discovery box, select one of the following settings: ON,
ON/NO DELETE, or OFF.
4. Click Update.
The configuration updates with the new setting.
To modify the auto-configuration setting for a 3-DNS Controller
using the Configuration utility
1. In the navigation pane, expand the Servers item, and then click
3-DNS.
The 3-DNS List screen opens.
2. Click the name of the host for which you want to modify the
auto-configuration setting.
The Modify 3-DNS screen opens.
5 - 16
Essential Configuration Tasks
3. In the Discovery box, select one of the following settings: ON,
ON/NO DELETE, or OFF.
4. Click Update.
The configuration updates with the new setting.
Configuring global variables
The global variables determine the default settings for iQuery messages,
synchronization, encryption, and default load balancing parameters. The
default values for the global variables are sufficient for most load balancing
situations.
To configure global parameters using the Configuration utility
1. In the navigation pane, click System.
The System - General screen opens. Note that global parameters are
grouped into several categories on this screen. Each category has its
own toolbar item, and online help is available for each parameter.
2. Make general global changes at the System - General screen or, to
make changes to global parameters in other categories, click the
appropriate toolbar item.
3. Add the new global settings. For help on configuring the global
settings, click Help on the toolbar.
The new global parameters are added to your configuration.
3-DNS® Administrator Guide
5 - 17
Chapter 5
5 - 18
6
Configuring a Globally-Distributed Network
• Understanding a globally-distributed network
• Using Topology load balancing
• Setting up a globally-distributed network
configuration
• Additional configuration settings and tools
Configuring a Globally-Distributed Network
Understanding a globally-distributed network
When you are familiar with your traffic patterns and are expanding into a
global marketplace, you can use the 3-DNS Controller to distribute requests
in an efficient and seamless manner using Topology load balancing. When
you use Topology load balancing, the 3-DNS Controller compares the
location information derived from the DNS query message to the topology
records in the topology statement. The system then distributes the request
according to the topology record that best matches the location information.
Figure 6.1 Topology load balancing in a globally-distributed network
3-DNS® Administrator Guide
6-1
Chapter 6
Using Topology load balancing
The Topology load balancing mode is optimal for organizations that have
data centers in more than one country or on more than one continent. The
3-DNS Controller enables topology-based load balancing by resolving DNS
requests to the geographically closest server. The traditional topology load
balancing mode, which provides basic topology mapping functionality, uses
IP subnets of virtual servers and known LDNS servers. This can result in a
very large list of IP subnets to manage when you want to map a specific
geographic region.
To simplify topology load balancing, the 3-DNS Controller contains a
classifier that maps IP addresses to geographic locations. With this
classifier, the 3-DNS Controller resolves DNS requests to the
geographically closest LDNS server at either the country or the continent
level. The system then load balances the request to virtual servers in IP
subnets, wide IP pools, or data centers.
You can set up Topology load balancing either between wide IP pools or
within a wide IP pool. For the example in Figure 6.1, we configure
Topology load balancing between wide IP pools.
Setting up a globally-distributed network
configuration
By going through the following setup tasks, you can configure the 3-DNS
Controller to process requests, using Topology, in a globally-distributed
network. This configuration is based on the following assumptions:
• You have more than one data center.
• You have a 3-DNS Controller in each data center.
• You have BIG-IP systems, or other load balancing hosts, in the data
centers.
• You want to load balance requests to the geographically closest virtual
server.
If you use a CDN for some or all of your content delivery, please refer to
Chapter 7, Configuring a Content Delivery Network, to set up this
configuration.
The following sections describe, in order, the specific configuration tasks
you perform to set up a globally-distributed network. Please review the tasks
before you actually perform them, so that you are familiar with the process.
6-2
Configuring a Globally-Distributed Network
Adding data centers to the globally-distributed network
configuration
The first task you perform is to add your data centers to the 3-DNS
configuration.
To add data centers using the Configuration utility
1. In the navigation pane, click Data Centers.
The Data Centers screen opens.
2. Click Add Data Center on the toolbar.
The Add Data Centers screen opens.
3. Add your data center information. For information and help on the
specific settings on this screen, click Help on the toolbar.
4. Repeat the previous steps to add all of your data centers to the
configuration.
Configuration notes
For the globally-distributed network configuration shown in
Figure 6.1, on page 6-1, we have added two data centers labeled
West Coast - DC and Europe - DC.
Adding 3-DNS Controllers to the globally-distributed network
configuration
Once you have added all of your data centers to the 3-DNS configuration,
you are ready to notify the 3-DNS Controller that you are configuring about
the 3-DNS Controllers in your network, including the 3-DNS Controller you
are configuring.
Note
Please note that when you are working with more than one 3-DNS
Controller, you create your entire configuration on one system and then add
the second system using the 3dns_add script. The 3dns_add script copies
the entire configuration from the first (or existing) system onto the second
(new) system, and synchronizes all of the settings. For details on
configuring additional 3-DNS Controllers in existing networks, using the
3dns_add script, see Chapter 10, Adding a 3-DNS Controller to an
Existing Network.
To add 3-DNS Controllers using the Configuration utility
1. In the navigation pane, expand the Servers item, then click 3-DNS.
The 3-DNS List screen opens.
3-DNS® Administrator Guide
6-3
Chapter 6
2. Click Add 3-DNS on the toolbar.
The Add New 3-DNS screen opens.
For information and help on the specific settings on any screen in
the Configuration utility, click Help on the toolbar.
3. Add the 3-DNS Controller information.
4. Repeat the previous steps to add any additional 3-DNS Controllers
to the configuration.
Configuration notes
For the globally-distributed network configuration shown in Figure
6.1, on page 6-1, we have a 3-DNS Controller in each data center,
West Coast - DC and Europe - DC. The system we are configuring
is labeled 3-DNS_01, and is in the West Coast - DC data center.
The additional system is in the Europe - DC data center, and is
labeled 3-DNS_02.
Adding BIG-IP systems to the globally-distributed network
configuration
Now you are ready to let the 3-DNS Controller know about any BIG-IP
systems, or other servers, that you have in your network. Remember that the
3-DNS Controller load balances requests to the virtual servers managed by
the BIG-IP systems, EDGE-FX systems, or host servers in your network. In
this example configuration, we set up BIG-IP systems. For information on
adding EDGE-FX systems or host servers to your network, please refer to
Setting up servers, on page 5-6.
The following steps outline how to add BIG-IP systems to your
configuration.
To add BIG-IP systems using the Configuration utility
1. In the navigation pane, expand the Servers item, then click BIG-IP.
The BIG-IP List screen opens.
2. Click Add BIG-IP on the toolbar.
The Add New BIG-IP screen opens.
3. Enter the BIG-IP system information, and click Next.
4. In the Data Centers screen, select the data center where the BIG-IP
system is located, and click Next.
5. In the Configure Virtual Server screen, specify the information for
the first virtual server managed by the BIG-IP system, and click
Finish.
6. To add more virtual servers to your configuration, click Add
Virtual Server on the toolbar.
6-4
Configuring a Globally-Distributed Network
7. Once you have configured your first BIG-IP system, you can repeat
the previous steps to add all of the additional BIG-IP systems to the
3-DNS configuration.
Tip
For information and help on the specific settings on any screen in the
Configuration utility, click Help on the toolbar.
Adding wide IPs to the globally-distributed network configuration
Once you have added all the physical elements to your 3-DNS
configuration, you can begin configuring wide IPs and pools for load
balancing. Before you start adding wide IPs, verify that you have configured
all the virtual servers you need for load balancing. In order to optimize the
Topology load balancing mode, you need to properly configure the wide IPs
and pools, as follows.
To add a wide IP and pool using the Configuration utility
1. In the navigation pane, click Wide IPs.
The Wide IP List screen opens.
2. Click Add Wide IP on the toolbar.
The Add a New Wide IP screen opens.
3. Specify the wide IP address, name, and port information.
4. For the Pool LB Mode, select Topology, and click Next.
The Configure Load Balancing for New Pool screen opens.
5. Specify the pool name and click Next.
The Select Virtual Servers screen opens.
6. In the Select Virtual Servers screen, check the virtual servers among
which you want the 3-DNS Controller to load balance DNS
requests, and click Finish.
The 3-DNS Controller adds the wide IP and settings to the
configuration.
7. If you want to create additional pools for load balancing, click the
name of the wide IP you just created in the Wide IPs List screen.
When the Modify Wide IP screen opens, click Add Pool on the
toolbar.
8. Repeat the previous procedure to add as many wide IPs and pools as
are required for your network.
Tip
For information and help on the specific settings on any screen in the
Configuration utility, click Help on the toolbar.
3-DNS® Administrator Guide
6-5
Chapter 6
Configuration notes
For the globally-distributed network configuration shown in
Figure 6.1, on page 6-1, we have set up one wide IP, labeled
www.siterequest.com, and we added two pools to the wide IP,
americas_pool and europe_pool. When you configure the topology
records, as explained in the next section, we designate these two
pools to process the load balancing requests based on the
geographic location of the local DNS server or client making the
request.
Configuring topology records for the globally-distributed network
configuration
You must configure topology records before the 3-DNS Controller can use
the Topology load balancing mode. The Topology load balancing mode
distributes connections after evaluating and scoring the topology records in
the topology statement. If you have no topology records in the topology
statement, or if the scores returned for two or more records are equal, the
3-DNS Controller load balances the virtual servers using the Random load
balancing mode.
The following procedure explains how to configure topology records in the
Configuration utility. For more information on how the 3-DNS Controller
uses the topology records, and how to configure topology in the wideip.conf
file, please review Chapter 3, Topology, in the 3-DNS Reference Guide.
To configure topology records using the Configuration utility
1. In the navigation pane, click Topology.
The Manage Topology Records screen opens.
2. Specify the settings for the topology records.
3. Click Add.
Tip
For information and help on the specific settings on any screen in the
Configuration utility, click Help on the toolbar.
For the globally-distributed network configuration shown in Figure 6.1, on
page 6-1, we added topology records, as shown in Figure 6.2.
//server
pool.americas_pool
pool.europe_pool
ldns
cont.North America
!cont.North America
Figure 6.2 Example of a topology statement
6-6
score
100
100
Configuring a Globally-Distributed Network
With this topology statement, in our example configuration, queries to
resolve www.siterequest.com from local DNS servers somewhere in North
America get responses from virtual servers in the pool americas_pool. All
other queries to resolve www.siterequest.com get responses from virtual
servers in the pool europe_pool.
Additional configuration settings and tools
The following optional settings and tools can help you refine your load
balancing configuration.
Setting limits thresholds
When you set limits thresholds for availability, the 3-DNS Controller can
detect when a managed server or virtual server is low on system resources,
and can redirect the traffic to another virtual server. Setting limits helps
eliminate any negative impact on a virtual server's performance of service
tasks that may be time critical, require high bandwidth, or put high demand
on system resources. The system resources for which you can set limits are:
• CPU
• Disk
• Memory
• Packet rate
• Kilobytes per second (throughput rate)
• Current connections
To set limits thresholds for BIG-IP systems
1. In the navigation pane, expand the Servers item, and click BIG-IP.
2. In the Limits Settings column of the BIG-IP system for which you
want to set limit thresholds, click the Configure Limits button
The Modify Server Limits Settings screen opens.
.
3. Check the metrics for which you want to set limits, and type values
based on your network resources. For more information and help on
this screen, click Help on the toolbar.
You can also set limits thresholds on virtual server resources. Please note
that if a server meets or exceeds its limits settings, both the server and the
virtual servers it manages are marked as unavailable for load balancing. You
can quickly review the availability of any of your servers or virtual servers
in the Statistics screens in the Configuration utility.
3-DNS® Administrator Guide
6-7
Chapter 6
Other resources
In addition to setting limits, the 3-DNS Controller provides the following
resources to help you maintain your configuration and monitor system
performance.
Monitoring system performance
The Statistics screens in the Configuration utility provide a great deal of
information about the 3-DNS Control56.2.349Fabo y can molnito
6-8
7
Configuring a Content Delivery Network
• Introducing the content delivery network
• Deciding to use a CDN provider
• Setting up a CDN provider configuration
• Ensuring resource availability
• Monitoring the configuration
Configuring a Content Delivery Network
Introducing the content delivery network
A content delivery network (CDN) is a network of clusters that includes
devices designed and configured to maximize the speed at which a content
provider's content is delivered. The purpose and goal of a content delivery
network is to cache content closer, in Internet terms, to the user than the
origin site is. Using a CDN to deliver content greatly reduces wide area
network (WAN) latency so the content gets to the user more quickly, and the
origin site servers are not overloaded and slowed by requests for content.
The fundamental WAN traffic distribution mechanism in all CDNs that we
know about is DNS.
Using the 3-DNS Controller in a CDN
The following features make the 3-DNS Controller a logical choice for the
wide-area traffic management in a CDN.
◆
CDN switching
CDN switching is the functionality of the 3-DNS Controller that allows a
user to delegate global traffic to a third-party network. The two features
of the 3-DNS Controller that make CDN switching possible are:
• Geographic redirection
The 3-DNS Controller uses the Topology load balancing mode to
redirect DNS requests based on location information derived from the
DNS query message. You can set up wide IPs so that the 3-DNS
Controller delegates DNS queries either to a data center, by
responding with A records, or to a CDN provider, by responding with
a CNAME record.
• CDN providers
We have partnered with several CDN providers to facilitate usage of
CDNs. To take advantage of these content delivery partnerships, you
can designate a pool type CNAME on the 3-DNS Controller so that
the 3-DNS Controller redirects requests to a CDN provider’s name
servers rather than to a grouping of virtual servers. For a list of our
partner CDN providers, click CDN Providers on the 3-DNS
Controller home screen.
◆
3-DNS® Administrator Guide
Resource monitoring, limits, and thresholds
The 3-DNS Controller has sophisticated monitoring screens so you can
quickly analyze the performance and availability of your network
resources. You can also set limits on physical and throughput resources
to ensure that your content is always available and none of your
resources are overtaxed.
7-1
Chapter 7
Reviewing a sample CDN configuration
The two following diagrams illustrate how DNS query resolutions for
content delivery networks are processed by the 3-DNS Controller. In the
example, the content provider for www.download.siterequest.com has two
data centers, one in San Jose, California (see Figure 7.1), and one in
Washington, DC (see Figure 7.2 on page 7-3). The 3-DNS Controllers (in
the two data centers) use the Topology load balancing mode to direct the
DNS queries to the geographically closest virtual servers.
In Figure 7.1, a local DNS server in Seattle, Washington, sends a query for
the domain www.download.siterequest.com (1A). Based on the location
information in the query packet header, the 3-DNS Controller in the content
provider’s North American data center resolves the query to the best virtual
server in that data center, and sends an A record response to the Seattle
LDNS (1B).
Figure 7.1 DNS query resolution based on Topology load balancing mode
In Figure 7.2, a local DNS server in London sends a query for the same
domain, www.download.siterequest.com (2A). Based on the location
information in the query packet header, the 3-DNS Controller in the content
provider’s North American data center responds to the London LDNS with
delegation information (a CNAME record) about the DNS for the content
delivery peer (2B). The London LDNS then sends the redirected query
(based on the CNAME record) for www.download.siterequest.com to the
7-2
Configuring a Content Delivery Network
CDN provider (2C). The CDN provider’s DNS server responds with the IP
address of the best virtual server for resolution among those in the CDN
(2D). The CDN provider’s cache servers resolve to the origin site virtual
servers for cache refreshes using a different domain name
(origin.download.siterequest.com).
Figure 7.2 DNS query resolution to content delivery network provider
3-DNS® Administrator Guide
7-3
Chapter 7
Deciding to use a CDN provider
The 3-DNS Controller is well-suited to serve as the wide-area traffic
manager (WATM) for CDNs that have many of the following attributes:
7-4
◆
The CDN provider has a global presence around the edge of the Internet.
◆
The CDN provider outsources a content delivery infrastructure to content
providers.
◆
The CDN provider is the authoritative DNS for the content provider’s
domain, and uses DNS to find a data center with CDN resources at the
edge of the network nearest to the client.
◆
The CDN provider serves all of the content provider’s traffic because the
CDN is authoritative for the content provider’s domain. Content
providers manage this by creating logical groupings of their content
under different domains. For example, an investment firm might have a
CDN host their news content at news.domain.cdn.net, while they serve
their stock quotes content with quote.siterequest.com from their
corporate data center.
◆
The CDN provider sets its billing rates based on megabits per second.
The CDN provider determines billing by collecting and processing edge
cache and server logs.
◆
The CDN provider has an infrastructure in place to manage the multitude
of geographically distributed devices.
◆
The CDN provider usually establishes some type of service level
agreement (SLA) to ensure that content is being served faster from the
CDN than from the content provider’s origin servers.
Configuring a Content Delivery Network
Setting up a CDN provider configuration
The following sections describe the specific tasks you perform to set up a
CDN provider configuration, as shown in the example configuration on
page 7-2. The tasks are as follows:
• Adding data centers
• Adding 3-DNS Controllers
• Adding load balancing servers
• Adding wide IPs and pools
• Adding a topology statement
Adding data centers
The first task you perform is to add the data centers to the configuration on
the 3-DNS Controller.
To add data centers using the Configuration utility
1. In the navigation pane, click Data Centers.
The Data Centers screen opens.
2. Click Add Data Center on the toolbar.
The Add Data Centers screen opens.
3. Add the data center information. For our example, we add the two
data centers labeled Data Center 1 and Data Center 2.
4. Repeat the previous steps to add all of your data centers to the
configuration.
Adding 3-DNS Controllers
Once you have added all of your data centers to the 3-DNS configuration,
you are ready to advise the 3-DNS Controller you are configuring about
other 3-DNS Controllers in your network.
To add 3-DNS Controllers using the Configuration utility
1. In the navigation pane, expand the Servers item, then click 3-DNS.
The 3-DNS List screen opens.
2. Click Add 3-DNS on the toolbar.
The Add New 3-DNS screen opens.
3. Add the 3-DNS Controller information.
4. Repeat the previous steps to add any additional 3-DNS Controllers
to the configuration.
3-DNS® Administrator Guide
7-5
Chapter 7
Configuration note
Please note that when you are working with more than one 3-DNS
Controller, you create your entire configuration on one system and
then add the second system using the 3dns_add script. The
3dns_add script copies the entire configuration from the first system
onto the second system, and synchronizes all of the settings. For
details on configuring additional 3-DNS Controllers in existing
networks, using the 3dns_add script, see Chapter 10, Adding a
3-DNS Controller to an Existing Network.
Adding load balancing servers
Now you are ready to let the 3-DNS Controller know about any BIG-IP
systems, EDGE-FX systems, or hosts that you have in your data centers.
The servers and virtual servers that you add to this configuration are the
servers that load balance your origin site content. For specific information
on configuring any of these server types, please review Setting up servers,
on page 5-6.
Adding wide IPs and pools
Once you have added all the physical elements to the 3-DNS configuration,
you can begin configuring wide IPs and pools for the CDN configuration. In
addition to setting up the wide IPs and pools for your origin site, you also set
up a pool for the CDN provider.
Before you start adding wide IPs, verify that you have configured all the
virtual servers you need for load balancing for your origin site. The
following instructions describe how to set up the CDN configuration shown
in Figures 7.1 and 7.2.
To add a wide IP and pool using the Configuration utility
1. In the navigation pane, click Wide IPs.
The Wide IP List screen opens.
2. Click Add Wide IP on the toolbar.
The Add a New Wide IP screen opens.
3. Add the wide IP address, name, and port information. For our
example, the wide IP name is www.download.siterequest.com.
4. For the Pool LB Mode, select Topology and click Next.
The Configure Load Balancing for New Pool screen opens.
5. In the Configure Load Balancing for New Pool screen, update these
settings:
a) Add the pool name.
For our example, the first pool name is origin.
b) Check the Use Dynamic Ratio option.
7-6
Configuring a Content Delivery Network
c) In the Load Balancing Modes, Preferred list, select Round
Trip Time.
d) In the Load Balancing Modes, Alternate list, select Packet
Rate.
e) In the Load Balancing Modes, Fallback list, select Round
Robin.
f) Accept the defaults for the rest of the settings and click Next.
The Select Virtual Servers screen opens.
6. In the Select Virtual Servers screen, check the virtual servers among
which you want the 3-DNS Controller to load balance DNS
requests, and click Finish.
The 3-DNS Controller adds the wide IP and settings to the
configuration. For our example, you would check the virtual servers
that map to the download site content in the North American data
center.
To add a CDN provider pool to the wide IP
1. In the navigation pane, click Wide IPs.
The Wide IP List screen opens.
2. In the Wide IP List screen, click 1 Pools in the Pools column for the
wide IP www.download.siterequest.com.
The Modify Wide IP Pools screen opens.
3. On the toolbar, click Add Pool.
The Configure Load Balancing for New Pool opens.
4. Update these settings:
a) Add the pool name.
For our example, the CDN provider pool name is cdn_pool.
b) In the Pool TTL box, type 60. With a longer time-to-live, an
LDNS has time to follow the CNAME record and redirect
queries to the CDN.
c) In the Dynamic Delegation, Type list, select CNAME.
d) In the Dynamic Delegation, Canonical Name box, type the
canonical name that you want the 3-DNS Controller to deliver in
the CNAME record when it redirects traffic to the CDN
provider. For our example, the canonical name is
www.download.siterequest.cdn.net. Note that the canonical
name for the CDN pool type automatically becomes an alias for
the wide IP.
5. Click Next.
The Wide IP List screen opens.
3-DNS® Administrator Guide
7-7
Chapter 7
You have now set up the load balancing and delegation pools for your
domain. The last required configuration step is to create a topology
statement.
Adding a topology statement
The topology statement contains the topology records that the 3-DNS
Controller uses to load balance DNS queries from geographically dispersed
local DNS servers. The following procedure describes how to set up a
topology statement, with two topology records, for our example.
Note
For more detailed information on working with topology on the 3-DNS
Controller, see Chapter 3, Topology, in the 3-DNS Reference Guide. For
information on setting up globally-distributed network with Topology load
balancing, see Chapter 6, Configuring a Globally-Distributed Network, in
this guide.
To set up topology records using the Configuration utility
1. In the navigation pane, click Topology.
The Manage Topology Records screen opens.
2. For the first topology record, select Continent in the upper LDNS
box.
3. In the lower LDNS box, select North America.
4. In the upper Server box, select Wide IP Pool.
5. In the lower Server box, select origin.
6. In the Weight box, type a value. For our example, we type 100.
7. Click Add.
The first topology record is added to the configuration.
8. For the second topology record, in the upper LDNS box select
Continent.
9. In the lower LDNS box, select North America.
10. Check the LDNS Not Equal box.
11. In the upper Server box, select Wide IP Pool.
12. In the lower Server box, select cdn_pool.
13. In the Weight box, type a value. For our example, we type 100.
14. Click Add.
The second topology record is added to the configuration.
7-8
Configuring a Content Delivery Network
Now you have created a topology statement for your CDN, and the 3-DNS
Controller can successfully load balance DNS queries based on the location
information derived from the DNS query message. For our example, using
the topology statement you just created, the 3-DNS Controller would direct
queries for www.download.siterequest.com that originated in North
America to the origin pool for resolution. Requests that did not originate in
North America would be directed to the CDN provider using the cdn_ pool.
Ensuring resource availability
The following resource availability settings are designed to ensure that your
content is always available and that your system resources are not overtaxed
to the point of failure. The resource availability settings you may want to use
with your CDN configuration are:
3-DNS® Administrator Guide
◆
Last resort pool
You can designate a pool as the last resort pool so in the event that all
other pools become unavailable for load balancing, the 3-DNS Controller
can direct DNS queries to the virtual servers in this pool. For information
on configuring a last resort pool, see Using the last resort pool
designation in Chapter 2, Load Balancing, in the 3-DNS Reference
Guide.
◆
Limit settings
You can set limits on system resources and throughput to enhance
availability. You can set limits for any server type, virtual servers, and
pools. For more information on setting limits, view the online help for
the Modify Limit Settings screens in the Configuration utility.
◆
ECV monitor
With an extended content verification (ECV) monitor, you can verify that
a specific file is available on the content servers for a wide IP. For more
information on ECV monitors, refer to Working with the ECV service
monitor, in the 3-DNS Reference Guide, Chapter 2, Load Balancing.
7-9
Chapter 7
Monitoring the configuration
The following resources can help you monitor your configuration and
troubleshoot problems.
7 - 10
◆
You can view performance metrics, limit settings, and other details about
your data centers, servers, virtual servers, wide IPs, and pools in the
Statistics screens in the Configuration utility. For more information on
specific Statistics screens, click Help on the toolbar.
◆
You can view your configuration using the Network Map in the
Configuration utility. You can also make modifications to the
configuration from the Network Map. Click Help on the toolbar if you
have questions on how to use the Network Map.
◆
You can review detailed information on the specific features of the
3-DNS Controller in the 3-DNS Reference Guide.
8
Working with Quality of Service
• Overview of Quality of Service
• Understanding QOS coefficients
• Customizing the QOS equation
• Using the Dynamic Ratio option
Working with Quality of Service
Overview of Quality of Service
The Quality of Service mode is a dynamic load balancing mode that
includes a configurable combination of the Round Trip Time (RTT),
Completion Rate, Packet Rate, Topology, Hops, Link Capacity, VS
Capacity, and Kilobytes/Second (KBPS) modes. The Quality of Service
mode is based on an equation that takes each of these performance factors
into account. When the 3-DNS Controller selects a virtual server, it chooses
the server with the best overall score.
The Quality of Service mode has default settings that make it easy to use:
simply specify Quality of Service as your preferred load balancing mode.
There is no need to configure Quality of Service, but if you want to change
the settings, you can customize the equation to put more or less weight on
each individual factor. The following topics explain how to use and adjust
the various settings.
3-DNS® Administrator Guide
8-1
Chapter 8
Understanding QOS coefficients
Table 8.1 lists each Quality of Service (QOS) coefficient, its scale, a likely
upper limit for each, and whether a higher or lower value is more efficient.
Coefficient
How measured
Default value
Example
upper limit
Higher or
lower?
Packet rate
Packets per second
1
700
Lower
Round trip time
Microseconds
50
2,000,000
Lower
Completion rate
Percentage of successfully
transferred packets (0-100%)
5
100%
Higher
Topology
Score that defines network
proximity by comparing server and
0
100
Higher
LDNS IP addresses (0-232)
Hops
Number of intermediate systems
transitions (hops)
0
64
Lower
Link Capacity
Bandwidth usage
30
2,000,000
Higher
VS capacity
Number of nodes up
0
20
Higher
Kilobytes/second
Kilobytes per second throughput
3
15000
Lower
Table 8.1 QOS coefficients: Default values, ranges, and limits
If you change the default QOS coefficients, keep the following issues in
mind.
8-2
◆
Scale
The raw metrics for each coefficient are not on the same scale. For
example, completion rate is measured in percentages, while the packet
rate is measured in packets per second.
◆
Normalization
The 3-DNS Controller normalizes the raw metrics to values in the range
of 0 to10. As the QOS value is calculated, a high measurement for
completion rate is good, because a high percentage of completed
connections are being made, but a high value for packet rate is not
desirable because the packet rate load balancing mode attempts to find a
virtual server that is not overly taxed at the moment.
Working with Quality of Service
• Emphasis
You can adjust coefficients to emphasize one normalized metric over
another. For example, by changing the coefficients to the values shown
in Figure 8.1, you are putting the most emphasis on completion rate.
globals {
qos_coeff_rtt 50
qos_coeff_completion_rate 100
qos_coeff_packet_rate 1
qos_coeff_topology 0
qos_coeff_hops 0
qos_coeff_lcs
qos_coeff_vs_capacity 0
qos_coeff_kbps 0
}
Figure 8.1 QOS coefficients emphasizing completion rate
In the preceding example, if the completion rates for two virtual servers are
close, the virtual server with the best packet rate is chosen. If both the
completion rates and the packet rates are close, the round trip time (RTT)
breaks the tie. In this example, the metrics for Topology, Hops, Link
Capacity, VS Capacity, and Kilobytes/Second modes are not used in
determining how to distribute connections.
Customizing the QOS equation
You can customize the QOS equation globally, meaning that the equation
applies to all wide IPs that use the Quality of Service mode. You can also
customize individual wide IPs, in which case the global QOS equation
settings are overwritten.
To modify global QOS coefficients using the Configuration utility
1. In the navigation pane, click System.
The System - General screen opens.
2. On the toolbar, click Load Balancing.
The System - Load Balancing screen opens.
3. Define the global QOS coefficients in the Round Trip Time,
Completion Rate, Hops, BIG-IP Packet Rate, Topology, Link
Capacity, VS Capacity, and Kilobytes/Second boxes.
4. Click Update.
3-DNS® Administrator Guide
8-3
Chapter 8
To modify QOS coefficients for a specific wide IP using the
Configuration utility
1. In the navigation pane, click Wide IPs.
2. In the Wide IP column, click a wide IP name.
The Modify Wide IP screen opens.
3. On the toolbar, click Modify Pool.
The Modify Wide IP Pools screen opens.
4. In the Pool Name column, click the name of a pool.
The Modify Load Balancing screen opens.
5. Define the wide IP’s QOS coefficients in the Round Trip Time,
Completion Rate, Hops, BIG-IP Packet Rate, Topology, Link
Capacity, VS Capacity, and Kilobytes/Second boxes.
6. Click Update.
To assign global QOS coefficients from the command line
1. Type the following command to ensure that the configuration files
contain the same information as the memory cache.
3ndc dumpdb
2. Open the wideip.conf file in a text editor (either vi or pico).
3. Locate or add the globals statement. The globals statement should
be at the top of the file.
4. Refer to the example syntax shown in Figure 8.2 to define a global
QOS equation. Note that Figure 8.2 shows the default values for the
QOS coefficients.
5. Save and close the file.
6. Commit the changes to the configuration by typing:
3ndc reload
globals {
qos_coeff_rtt 50
qos_coeff_completion_rate 5
qos_coeff_packet_rate 1
qos_coeff_topology 0
qos_coeff_hops 0
qos_coeff_lcs 30
qos_coeff_vs_capacity 0
qos_coeff_kbps 0
}
Figure 8.2 Sample global QOS equation
8-4
Working with Quality of Service
To assign QOS coefficients for a specific wide IP from the
command line
1. Type the following command to ensure that the configuration files
contain the same information as the memory cache.
3ndc dumpdb
2. Open the wideip.conf file in a text editor (either vi or pico).
3. Locate or add the globals statement. The globals statement should
be at the top of the file.
4. Refer to the example syntax shown in Figure 8.3 to define a wide
IP’s QOS equation. Figure 8.3 displays a wide IP definition that
overrides the global QOS equation settings shown in Figure 8.2.
5. Save and close the file.
6. Commit the changes to the configuration by typing:
3ndc reload
wideip {
address
192.168.101.50
service
"http"
name
"www.wip.siterequest.com"
ttl
60
// increase the domain default ttl
qos_coeff {
rtt
21
hops
0
completion_rate 7
packet_rate
5
topology
1
vs_capacity
0
kbps
0
}
pool {
name
"Pool_1"
ratio
2
// applies to pool_lbmode == ratio
preferred
qos
alternate
ratio
address
192.168.101.50
ratio 2
address
192.168.102.50
ratio 1
address
192.168.103.50
ratio 1
}
pool {
name
"Pool_2"
ratio
1
preferred
rr
address
192.168.102.60
ratio 2
address
192.168.103.60
ratio 1
}
}
Figure 8.3 QOS coefficient settings that override the global QOS settings
3-DNS® Administrator Guide
8-5
Chapter 8
Using the Dynamic Ratio option
When the Dynamic Ratio option is turned on, the 3-DNS Controller treats
QOS scores as ratios, and it uses each server in proportion to the ratio
determined by the QOS calculation. When the Dynamic Ratio option is
turned off (the default), the 3-DNS Controller uses only the server with the
highest QOS score for load balancing, (in which case it is a winner-takes-all
situation) until the metrics information is refreshed.
To turn on the Dynamic Ratio option using the Configuration
utility
1. In the navigation pane, click Wide IPs.
2. In the Wide IP column, click a wide IP name.
The Modify Wide IP screen opens.
3. On the toolbar, click Modify Pool.
The Modify Wide IP Pools screen opens.
4. In the Pool Name column, click the name of a pool.
The Modify Load Balancing screen opens.
5. Check Use Dynamic Ratio.
6. Click Update.
To turn on the Dynamic Ratio option from the command line
1. To ensure that the configuration files contain the same information
as the memory cache, type the following command:
3ndc dumpdb
2. Open the wideip.conf file in a text editor (either vi or pico).
3. Locate the wideip statement and the pool definition you want to
edit.
4. Add the syntax (shown in bold in Figure 8.4) to the pool definition.
5. Save and close the file.
8-6
Working with Quality of Service
6. Commit the changes to the configuration by typing:
3ndc reload
pool {
name <"pool_name">
[ ratio <pool_ratio> ]
dynamic_ratio yes
[ rr_ldns < yes | no > ]
[ rr_ldns_limit <number> ]
[ preferred < completion_rate | ga | hops | kbps | leastconn | packet_rate | qos |
random | ratio | return_to_dns | rr |
rtt | static_persist | topology | vs_capacity | null > ]
[ alternate < ga | kbps | null | random | ratio | return_to_dns | rr |
static_persist | topology | vs_capacity > ]
[ fallback < completion_rate | ga | hops | kbps | leastconn |
packet_rate | qos | random | ratio | return_to_dns | rr | rtt | static_persist |
topology | vs_capacity | null > ]
address <vs_addr>[:<port>] [ratio <weight>]
}
}
Figure 8.4 Enabling dynamic ratio in a pool configuration
3-DNS® Administrator Guide
8-7
Chapter 8
8-8
9
Working with Global Availability Load
Balancing
• Overview of the Global Availability load balancing
mode
• Configuring the Global Availability mode
Working with Global Availability Load Balancing
Overview of the Global Availability load balancing
mode
You can use the Global Availability mode in one of two ways: either to load
balance among wide IP pools, or to load balance within a wide IP pool.
When you use the Global Availability mode to load balance among pools,
the 3-DNS Controller continually sends requests to the first pool in the wide
IP. When all the virtual servers in the pool become unavailable, the pool is
marked unavailable and the 3-DNS Controller starts sending requests to the
next pool listed in the wide IP. When the first pool is available again, the
3-DNS Controller stops sending requests to the second pool, and starts
sending them to the first pool again. If you have an origin site and an
overflow network, such as a CDN, you can use Global Availability to load
balance between the two networks.
When you use the Global Availability mode to load balance virtual servers
within a pool, the load balancing works in much the same way. The 3-DNS
Controller repeatedly selects the first available virtual server in the wide IP
pool to respond to requests. If that virtual server becomes unavailable,
subsequent connections go to the next available virtual server listed in the
pool. When the first listed virtual server becomes available again, the
3-DNS Controller distributes requests to it again.
3-DNS® Administrator Guide
9-1
Chapter 9
Figure 9.1 shows the 3-DNS Controller using the Global Availability load
balancing mode.
Figure 9.1 Global Availability mode
9-2
Working with Global Availability Load Balancing
Configuring the Global Availability mode
The following sections describe how to configure the Global Availability
load balancing mode to load balance among pools and to load balance
within a pool.
To configure the Global Availability load balancing mode among
pools using the Configuration utility
1. In the navigation pane, click Wide IPs.
2. In the Wide IP column, click a wide IP name.
The Modify Wide IP screen opens.
3. In the Pool LB Mode box, select Global Availability.
4. Click Update.
5. A popup screen appears, indicating that with the Global Availability
load balancing mode you must order the pools. Click OK.
The Modify Virtual Servers screen opens.
6. In the Order column, specify the order in which you want to list the
pools for Global Availability.
7. Click Update.
To configure the Global Availability load balancing mode among
pools from the command line
1. To ensure that the configuration files contain the same information
as the memory cache, type the following command:
3ndc dumpdb
2. Open the wideip.conf file in a text editor (either vi or pico).
3. Locate the wideip statement you want to edit.
4. Define the pool load balancing mode as Global Availability:
pool_lbmode ga
5. List the pools in the wide IP in descending order of preference.
6. Save and close the file.
7. Commit the changes to the configuration by typing:
3ndc reload
To configure the Global Availability load balancing mode within
a pool using the Configuration utility
1. In the navigation pane, click Wide IPs.
2. In the Wide IP column, click a wide IP name.
The Modify Wide IP screen opens.
3-DNS® Administrator Guide
9-3
Chapter 9
3. On the toolbar, click Modify Pool.
The Modify Wide IP Pools screen opens.
4. In the Pool Name column, click the name of a pool.
The Modify Load Balancing screen opens.
5. Select Global Availability as the Preferred, Alternate, or
Fallback load balancing mode.
6. Click Update.
7. A popup screen appears, indicating that with the Global Availability
load balancing mode you must order the virtual servers. Click OK.
The Modify Virtual Servers screen opens.
8. In the Order column, specify the order in which you want to list the
virtual servers for Global Availability.
9. Click Update.
To configure the Global Availability load balancing mode within
a pool from the command line
1. To ensure that the configuration files contain the same information
as the memory cache, type the following command:
3ndc dumpdb
2. Open the wideip.conf file in a text editor (either vi or pico).
3. Locate the wideip statement you want to edit.
4. Define Global Availability as the preferred, alternate, or fallback
load balancing mode within the pool that you want to modify.
5. List the virtual servers in the wide IP in descending order of
preference.
6. Save and close the file.
7. Commit the changes to the configuration by typing:
3ndc reload
See Figure 9.2, on page 9-5, for an example of the syntax.
9-4
Working with Global Availability Load Balancing
A Global Availability configuration example
With the Global Availability load balancing mode, you can configure one
data center as your primary service provider and have several alternate
service providers on standby. In the wideip statement, list the virtual servers
in descending order of preference. The first available virtual server is chosen
for each resolution request.
Figure 9.2 shows a sample wideip definition, in the wideip.conf file, where
Global Availability is the preferred load balancing mode within a pool.
// Global availability
wideip {
address
192.168.101.50
port
80 // http
name
"cgi.wip.siterequest.com"
pool {
name
"mypool"
preferred
ga
address
192.168.101.60 //New York data center
address
192.168.102.60 //Los Angeles data center
address
192.168.103.60 //Tokyo data center
}
}
Figure 9.2 Configuring a standby data center using Global Availability
The first listed virtual server (192.168.101.60 in this example) receives all
resolution requests unless it becomes unavailable. If the first listed virtual
server does become unavailable, then the 3-DNS Controller sends resolution
requests to the second listed virtual server until the first listed virtual server
becomes available again.
3-DNS® Administrator Guide
9-5
Chapter 9
9-6
10
Adding a 3-DNS Controller to an Existing
Network
• Working with multiple 3-DNS Controllers
• Preparing to add a second 3-DNS Controller to your
network
• Running the 3dns_add script
• Verifying the configuration
Adding a 3-DNS Controller to an Existing Network
Working with multiple 3-DNS Controllers
When you are working with more than one 3-DNS Controller in your
network, and you want the systems to load balance to the same virtual
servers, you can create your entire configuration on one system and then add
the second system using the 3dns_add script. The 3dns_add script copies
the entire configuration from the first system onto the second system, and
synchronizes all of the settings between the systems. (For more information
about sync groups, see Working with sync groups, on page 5-14.)
The following sections of this chapter describe the procedures you follow to
add a 3-DNS Controller into a network that already has at least one 3-DNS
Controller configured and working properly. If you are adding the first
3-DNS Controller to your network, refer to Chapter 5, Essential
Configuration Tasks.
Important
If you are adding a second 3-DNS Controller to your network but do not
want it to be in the same sync group as your first system, or you want the
second 3-DNS Controller to load balance to a different set of virtual
servers, then do not use the 3dns_add script.
3-DNS® Administrator Guide
10 - 1
Chapter 10
Preparing to add a second 3-DNS Controller to your
network
Before you run the 3dns_add script on any additional 3-DNS Controllers
you are adding to your network, you should complete the following tasks:
◆
Physically install the second 3-DNS Controller in its data center. (For
more information on hardware installation, refer to the Platform Guide
that shipped with the unit.)
◆
Run the Setup utility on the second system. (For more information on the
Setup utility, see Chapter 3, Using the Setup Utility, or if you are running
the 3-DNS Controller module on a BIG-IP system, refer to the BIG-IP
Reference Guide.)
◆
Make the existing 3-DNS Controller aware of the IP address,
fully-qualified domain name, and data center location of the second
3-DNS Controller. (See Making the existing 3-DNS Controller aware of
the additional controller, on page 10-3.)
◆
Add the new 3-DNS Controller to the sync group of the existing 3-DNS
Controller.
Completing these tasks ensures that when you run the 3dns_add script, the
second 3-DNS Controller successfully copies the configuration information
from the first 3-DNS Controller.
If you are using a sync group, we strongly recommend that you run the
3dns_add script to add additional 3-DNS Controllers to your network. If
you do not use the script, you risk overwriting your current configuration.
Installing the hardware and running the Setup utility
You can find detailed instructions on installing the 3-DNS hardware in the
Platform Guide 520/540. You can find detailed instructions on running the
Setup utility in Chapter 3, Using the Setup Utility, in this guide. When you
have finished this part of the setup for the second system, do not make any
other changes to the configuration.
Note
If you are working with the 3-DNS Controller module on a BIG-IP system,
please refer to the BIG-IP Administrator Kit for information on installing
the hardware and running the Setup utility.
10 - 2
Adding a 3-DNS Controller to an Existing Network
Making the existing 3-DNS Controller aware of the additional
controller
Once you have installed the hardware and run the Setup utility on the new
system, you add its configuration information to the existing 3-DNS
Controller (the 3-DNS Controller that is already installed in your network).
To add the new controller to the existing controller’s
configuration using the Configuration utility
1. Add the second data center to the configuration.
a) In the navigation pane, click Data Centers.
The Data Centers screen opens.
b) Click Add Data Center on the toolbar.
The Add Data Centers screen opens.
c) Add the information for the data center where you installed the
new system, and click Update.
2. Add the second 3-DNS Controller to the configuration.
a) In the navigation pane, expand the Servers item, and click
3-DNS.
The 3-DNS List screen opens.
b) Click Add 3-DNS on the toolbar.
The Add New 3-DNS screen opens.
c) Add the information for the new system, and click Update.
3. Add the new controller to the existing controller’s sync group.
a) In the navigation pane, click 3-DNS Sync.
The System-Synchronization screen opens.
b) Click Add to Group on the toolbar.
The Add a 3-DNS to a Sync Group screen opens.
c) Check the 3-DNS Controller you just defined, and click Add.
The new controller becomes a member of the sync group of the
existing controller.
You have now successfully added the new 3-DNS Controller to the existing
system’s configuration and sync group. The following sections describe how
to run the 3dns_add script and verify the configuration.
3-DNS® Administrator Guide
10 - 3
Chapter 10
Running the 3dns_add script
You can run the 3dns_add script on the new 3-DNS Controller either by
using a remote secure shell session, or by using a monitor and keyboard
connected directly to the controller.
To run the 3dns_add script
1. At the login prompt on the new controller, type root.
2. At the password prompt, type the password you configured when
you ran the Setup utility.
3. To run the script, type 3dns_add at the command line.
The script performs the following tasks:
• Copies the existing controller’s configuration to the new
controller
• Sets up SSH communications between the new controller and
existing F5 devices in the network
• Copies the existing controller’s iQuery key to the new controller
so communications between the controller and the big3d agents
are secure
• Gives you the option of synchronizing the named.conf file and
any existing zone files
Verifying the configuration
Once the script finishes, we recommend that you verify the following
aspects of your configuration:
• Verify that each 3-DNS Controller has the necessary agents and daemons
running.
• Verify that any servers you configured are up and available to receive
load balancing requests.
• Verify that any virtual servers you configured are up and available to
respond to requests.
• Verify that any wide IPs you configured are load balancing requests as
you configured them.
You can perform these verification tasks on any of the systems in the sync
group. The following procedures describe the verification process in detail.
To verify that each 3-DNS Controller has the necessary agents
and daemons running
1. In the navigation pane, expand the Statistics item, and click 3-DNS.
The 3-DNS Statistics screen opens.
10 - 4
Adding a 3-DNS Controller to an Existing Network
2. In the Server and Big3d columns, make sure the status is up, which
is indicated by a green ball.
3. In the E/D column, make sure the systems are enabled.
4. If the status of any of your systems is down, unknown, or
unavailable, wait a few minutes and click Refresh. If status of the
systems remains down, unknown, or unavailable, contact
Technical Support for assistance.
To verify that the servers you configured are up
1. In the navigation pane, expand the Statistics item, and click Data
Centers.
The Data Centers Statistics screen opens.
2. In the Server column, make sure that the status of each server is up,
which is indicated by a green ball.
3. If the status of any of your servers is down, unknown, or
unavailable, wait a few minutes and click Refresh. If status of the
servers remains down, unknown, or unavailable, contact Technical
Support for assistance.
To verify that the virtual servers you configured are up
1. In the navigation pane, expand the Statistics item and click Virtual
Servers.
The Virtual Servers Statistics screen opens.
2. In the OK column, make sure that the status of each virtual server
you configured is up, which is indicated by a green ball.
3. If the status of any of your virtual servers is down, unknown, or
unavailable, wait a few minutes and click Refresh. If status of the
virtual servers remains down, unknown, or unavailable, contact
Technical Support for assistance.
To verify that the wide IPs are load balancing properly
At the command prompt, type the following command, where
<IP_address> is the IP address of one of your 3-DNS Controllers, and
<wideip> is the name of a wide IP in the configuration, and press Enter.
dig @<IP_address> <wideip>
3-DNS® Administrator Guide
10 - 5
Chapter 10
If the virtual servers belonging to the wide IP appear in a pattern that reflects
the load balancing mode you selected, you have successfully configured
your 3-DNS Controllers. Note that you can repeat the previous procedure
for each wide IP you configured, and each controller in the sync group.
Note
This is the only verification task that you perform from the command line.
The dig utility is part of DNS distributions. For more information on the dig
utility, type man dig at the command line to view the man page.
10 - 6
Glossary
Glossary
3-DNS Distributed Traffic Controller
The 3-DNS Distributed Traffic Controller is a wide area load distribution
solution that intelligently allocates Internet and intranet service requests
across geographically distributed network servers. The 3-DNS Distributed
Traffic Controller is also most often referred to as the 3-DNS Controller.
3-DNS Maintenance menu
The 3-DNS Maintenance menu is a command line utility that you use to
configure the 3-DNS Controller.
3-DNS web server
The 3-DNS web server is a standard web server that hosts the Configuration
utility on the 3-DNS Controller.
A record
The A record is the ADDRESS resource record that a 3-DNS Controller
returns to a local DNS server in response to a name resolution request. The
A record contains a variety of information, including one or more IP
addresses that resolve to the requested domain name.
access control list (ACL)
An access control list is a list of local DNS server IP addresses that are
excluded from path probing or hops queries.
active unit
In a redundant system, an active unit is a 3-DNS Controller that currently
load balances name resolution requests. If the active unit in the redundant
system fails, the standby unit assumes control and begins to load balance
requests.
alternate method
The alternate method specifies the load balancing mode that the 3-DNS
Controller uses to pick a virtual server if the preferred method fails. See also
fallback method, preferred method.
big3d agent
The big3d agent is a monitoring agent that collects metrics information
about server performance and network paths between a data center and a
specific local DNS server. The 3-DNS Controller uses the information
collected by the big3d agent for dynamic load balancing.
BIND (Berkeley Internet Name Domain)
BIND is the most common implementation of the Domain Name System
(DNS). BIND provides a system for matching domain names to IP
addresses. For more information, refer to
http://www.isc.org/products/BIND.
3-DNS® Administrator Guide
Glossary-1
Glossary
CDN switching
CDN switching is the functionality of the 3-DNS Controller that allows a
user to redirect traffic to a third-party network, or transparently switch
traffic to a CDN. The two features of the 3-DNS Controller that make CDN
switching possible are geographic redirection and the pool type CDN.
CNAME record
A canonical name (CNAME) record acts as an alias to another domain
name. A canonical name and its alias can belong to different zones so the
CNAME record must always be entered as a fully qualified domain name.
CNAME records are useful for setting up logical names for network
services so that they can be easily relocated to different physical hosts.
completion rate
The completion rate is the percentage of packets that a server successfully
returns during a given session.
Completion Rate mode
The Completion Rate mode is a dynamic load balancing mode that
distributes connections based on which network path drops the fewest
packets, or allows the fewest number of packets to time out.
Configuration utility
The Configuration utility is the browser-based application that you use to
configure the 3-DNS Controller.
content delivery network (CDN)
A content delivery network (CDN) is an architecture of Web-based network
components that helps dramatically reduce the wide-area network latency
between a client and the content they wish to access. A CDN includes some
or all of the following network components: wide-area traffic managers,
Internet service providers, content server clusters, caches, and origin content
providers.
data center
A data center is a physical location that houses one or more 3-DNS
Controllers, BIG-IP systems, EDGE-FX Caches, GLOBAL-SITE
Controllers, or host machines.
data center server
A data center server is any server recognized in the 3-DNS Controller
configuration. A data center server can be any of the following: a 3-DNS
Controller, a BIG-IP system, an EDGE-FX Cache, a GLOBAL-SITE
Controller, or a host.
Glossary-2
Glossary
domain name
A domain name is a unique name that is associated with one or more IP
addresses. Domain names are used in URLs to identify particular Web
pages. For example, in the URL http://www.siterequest.com/index.html,
the domain name is siterequest.com.
dynamic load balancing modes
Dynamic load balancing modes base the distribution of name resolution
requests to virtual servers on live data, such as current server performance
and current connection load.
dynamic site content
Dynamic site content is a type of site content that is automatically generated
each time a user accesses the site. Examples are current stock quotes or
weather satellite images.
ECV (Extended Content Verification)
On the 3-DNS Controller, ECV is a service monitor that checks the
availability of actual content, (such as a file or an image) on a server, rather
than just checking the availability of a port or service, such as HTTP on
port 80.
external interface
An external interface is the network interface that can be accessed across a
wide-area network (WAN). See also internal interface.
fail-over
Fail-over is the process whereby a standby unit in a redundant system takes
over when a software failure or hardware failure is detected on the active
unit.
fail-over cable
The fail-over cable is the cable that directly connects the two units in a
hardware-based redundant system.
fallback method
The fallback method is the third method in a load balancing hierarchy that
the 3-DNS Controller uses to load balance a resolution request. The 3-DNS
Controller uses the fallback method only when the load balancing modes
specified for the preferred and alternate methods fail. Unlike the preferred
method and the alternate method, the fallback method uses neither server
nor virtual server availability for load balancing calculations. See also
preferred method, alternate method.
FDDI (Fiber Distributed Data Interface)
FDDI is a multi-mode protocol for transmitting data on optical-fiber cables
at speeds up to 100 Mbps.
3-DNS® Administrator Guide
Glossary-3
Glossary
Global Availability mode
Global Availability is a static load balancing mode that bases connection
distribution on a particular server order, always sending a connection to the
first available server in the list. This mode differs from Round Robin mode
in that it searches for an available server always starting with the first server
in the list, while Round Robin mode searches for an available server starting
with the next server in the list (with respect to the server selected for the
previous connection request).
hops factory
A hops factory is a type of factory run by the big3d agent that collects hops
data about network paths.
host
A host is a network server that manages one or more virtual servers that the
3-DNS Controller uses for load balancing.
ICMP (Internet Control Message Protocol)
ICMP is an Internet communications protocol used to determine information
about routes to destination addresses, such as virtual servers managed by
3-DNS Controllers and BIG-IP systems.
internal interface
An internal interface is a network interface that can be accessed from a
local-area network (LAN). See also external interface.
iQuery
The iQuery protocol is used to exchange information between 3-DNS
Controllers, BIG-IP systems, EDGE-FX Caches, and GLOBAL-SITE
Controllers. The iQuery protocol is officially registered with IANA for
port 4353, and works on UDP and TCP connections.
Kilobytes/Second mode
The Kilobytes/Second mode is a dynamic load balancing mode that
distributes connections based on which available server currently processes
the fewest kilobytes per second.
Least Connections mode
The Least Connections mode is a dynamic load balancing mode that bases
connection distribution on which server currently manages the fewest open
connections.
load balancing methods
Load balancing methods are the settings that specify the hierarchical order
in which the 3-DNS Controller uses three load balancing modes. The
preferred method specifies the first load balancing mode that the 3-DNS
Controller tries, the alternate method specifies the next load balancing mode
Glossary-4
Glossary
to try if the preferred method fails, and the fallback method specifies the last
load balancing mode to use if both the preferred and the alternate methods
fail.
load balancing mode
A load balancing mode is the way in which the 3-DNS Controller
determines how to distribute connections across an array.
local DNS
A local DNS is a server that makes name resolution requests on behalf of a
client. With respect to the 3-DNS Controller, local DNS servers are the
source of name resolution requests. Also referred to as LDNS.
metrics information
Metrics information is the data that is typically collected about the paths
between BIG-IP systems, EDGE-FX Caches or GLOBAL-SITE Controllers,
and local DNS servers. Metrics information is also collected about the
performance and availability of virtual servers. Metrics information is used
for load balancing, and it can include statistics such as round trip time,
packet rate, and packet loss.
MindTerm SSH
MindTerm SSH is the third-party application on 3-DNS Controllers that
uses SSH for secure remote communications. SSH encrypts all network
traffic (including passwords) to effectively eliminate eavesdropping,
connection hijacking, and other network-level attacks. SSH also provides
secure tunneling capabilities and a variety of authentication methods.
name resolution
Name resolution is the process by which a name server matches a domain
name request to an IP address, and sends the information to the client
requesting the resolution.
name server
A name server is a server that maintains a DNS database, and resolves
domain name requests to IP addresses using that database.
named
The named daemon manages domain name server software.
NameSurfer
NameSurfer is the third-party application on 3-DNS Controllers that
automatically manages DNS zone files, synchronizing them with the
configuration on the 3-DNS Controller. NameSurfer automatically updates
any configuration changes that you make using the Configuration utility.
NameSurfer also provides a graphical user interface for DNS zone file
management.
3-DNS® Administrator Guide
Glossary-5
Glossary
NS record
A name server (NS) record is used to define a set of authoritative name
servers for a DNS zone. A name server is considered authoritative for some
given zone when it has a complete set of data for the zone, allowing it to
answer queries about the zone on its own, without needing to consult
another name server.
NTP (Network Time Protocol)
NTP functions over the Internet to synchronize system clocks to Universal
Coordinated Time. NTP provides a mechanism to set and maintain clock
synchronization within milliseconds.
packet rate
The packet rate is the number of data packets per second processed by a
server.
Packet Rate mode
The Packet Rate mode is a dynamic load balancing mode that distributes
connections based on which available server currently processes the fewest
packets per second.
path
A path is a logical network route between a data center server and a local
DNS server.
path probing
Path probing is the collection of metrics data, such as round trip time and
packet rate, for a given path between a requesting LDNS server and a data
center server.
persistence
On a 3-DNS Controller, persistence is a series of related requests received
from the same local DNS server for the same wide IP name. When
persistence is turned on, a 3-DNS Controller sends all requests from a
particular local DNS server for a specific wide IP to the same virtual server,
instead of load balancing the requests.
picks
Picks represent the number of times a particular virtual server is selected to
receive a load balanced connection.
pool
A pool is a group of virtual servers managed by a BIG-IP, an EDGE-FX
Cache, or a host. The 3-DNS Controller load balances among pools (using
the Pool LB Mode), as well as among individual virtual servers.
Glossary-6
Glossary
pool ratio
A pool ratio is a ratio weight applied to pools in a wide IP. If the Pool LB
mode is set to Ratio, the 3-DNS Controller uses each pool for load balancing
in proportion to the weight defined for the pool.
preferred method
The preferred method specifies the first load balancing mode that the 3-DNS
Controller uses to load balance a resolution request. See also alternate
method, fallback method.
principal 3-DNS
A 3-DNS that initiates metrics collection by the big3d agents and distributes
the metrics to other members of a sync group. See also receiver 3-DNS.
probe protocol
The probe protocol is the specific protocol used to probe a given path and
collect metrics information for the path. The probe protocols available on
the 3-DNS Controller are: ICMP, DNS_REV, DNS_DOT, UDP, and TCP.
The probe protocols that are available change based on the data center
server type.
prober
A prober is a specific thread of the big3d agent that is used for path probing
of a given set of paths.
prober factory
A prober factory is a utility that collects metrics data, such as round trip time
and packet rate, for a given path between a requesting LDNS and a data
center server. Prober factories are managed by the big3d agent, which
reports the path probing metrics to the 3-DNS Controller. Prober factories
can run on BIG-IP systems, EDGE-FX Caches, and GLOBAL-SITE
Controllers.
production rule
A production rule, on the 3-DNS Controller, can change system behavior
under specific operating conditions. For example, a production rule can
switch load balancing modes or can reroute network traffic to a specific set
of servers. Production rules are based on triggers such as time of day or
current network traffic load.
QOS equation
The QOS equation is the equation on which the Quality of Service load
balancing mode is based. The equation calculates a score for a given path
between a data center server and a local DNS server. The Quality of Service
mode distributes connections based on the best path score for an available
data center server. You can apply weights to the factors in the equation, such
as round trip time and completion rate.
3-DNS® Administrator Guide
Glossary-7
Glossary
Quality of Service load balancing mode
The Quality of Service load balancing mode is a dynamic load balancing
mode that bases connection distribution on a configurable combination of
the packet rate, completion rate, round trip time, hops, virtual server
capacity, kilobytes per second, and topology information.
ratio
A ratio is the parameter in a virtual server statement that assigns a weight to
the virtual server for load balancing purposes.
Ratio mode
The Ratio load balancing mode is a static load balancing mode that
distributes connections across an pool of virtual servers in proportion to the
ratio weight assigned to each individual virtual server.
receiver 3-DNS
A receiver 3-DNS is a system, in a sync group, that receives metrics data
that are broadcast from big3d agents, but does not initiate metrics collection.
See also principal 3-DNS.
redundant system
A redundant system is a pair of systems that are configured for fail-over. In
a redundant system, one system runs as the active unit and the other system
runs as the standby unit. If the active unit fails, the standby unit takes over
and manages resolution requests.
remote administrative IP address
A remote administrative IP address is an IP address from which a system
allows shell connections, such as SSH, RSH, or Telnet.
resolver
The resolver is the client part of the Domain Name System. The resolver
translates a program's request for host name information into a query to a
name server, and translates the response into an answer to the program's
request. See also name server.
resource record
resource record is a record in a DNS database that stores data associated
with domain names. A resource record typically includes a domain name, a
TTL, a record type, and data specific to that record type. See also A record,
CNAME record, NS record.
reverse domains
A type of DNS resolution request that matches a given IP address to a
domain name. The more common type of DNS resolution request starts with
a given domain name and matches that to an IP address.
Glossary-8
Glossary
root name server
A root name server is a master DNS server that maintains a complete DNS
database. There are approximately 13 root name servers in the world that
manage the DNS database for the World Wide Web.
Round Robin mode
Round Robin mode is a static load balancing mode that bases connection
distribution on a set server order. Round Robin mode sends a connection
request to the next available server in the order.
Round Trip Time mode
Round Trip Time mode is a dynamic load balancing mode that bases
connection distribution on which virtual server has the fastest measured
round trip time between the data center server and the local DNS server.
RTT (round trip time)
RTT is the calculation of the time (in microseconds) that a local DNS server
takes to respond to a ping issued by the big3d agent running on a data center
server. The 3-DNS Controller takes RTT values into account when it uses
dynamic load balancing modes.
secondary DNS
The secondary DNS is a name server that retrieves DNS data from the name
server that is authoritative for the DNS zone.
Setup utility
The Setup utility is a utility that takes you through the initial system
configuration process. The Setup utility runs automatically when you turn
on a 3-DNS Controller for the first time.
site content
Site content is data (including text, images, audio, and video feeds) that is
accessible to clients who connect to a given site. See also dynamic site
content, static site content.
SNMP (Simple Network Management Protocol)
SNMP is the Internet standard protocol, defined in STD 15, RFC 1157, that
was developed to manage nodes on an IP network.
sod (switch over daemon)
The sod daemon controls the fail-over process in a redundant system.
SSH
SSH is a protocol for secure remote login and other secure network services
over a non-secure network.
3-DNS® Administrator Guide
Glossary-9
Glossary
standby unit
A standby unit is a system in a redundant system that is always prepared to
become the active unit if the active unit fails.
static load balancing modes
Static load balancing modes base the distribution of name resolution
requests to virtual servers on a pre-defined list of criteria and server and
virtual server availability; they do not take current server performance or
current connection load into account.
static site content
Static site content is a type of site content that is stored in HTML pages, and
changes only when an administrator edits the HTML document itself.
subdomain
A subdomain is a sub-section of a higher level domain. For example, .com is
a high level domain, and F5.com is a subdomain within the .com domain.
sub-statement
A sub-statement is a logical section within a statement that defines a
particular element in the statement. A sub-statement begins with the
sub-statement name followed by an open brace ( { ) and ends with a closed
brace ( } ). Everything between those braces is part of the sub-statement.
Sub-statements typically define a group of related variables, such as the
calculation coefficients used in Quality of Service load balancing.
sync group
A sync group is a group of 3-DNS Controllers that share system
configurations and path metrics for data center servers and virtual servers.
Sync groups have one principal 3-DNS, and may contain one or more
receiver systems. The receiver systems obtain their configuration
information from the principal system. See also principal 3-DNS, receiver
3-DNS.
time tolerance value
The time tolerance value is the number of seconds that one 3-DNS
Controller’s clock is allowed to differ in comparison to another 3-DNS
Controller’s clock, without the two clocks being considered out of sync.
Topology mode
The Topology mode is a static load balancing mode that bases the
distribution of name resolution requests on the weighted scores for topology
records. Topology records are used by the Topology load balancing mode to
redirect DNS queries to the closest virtual server, geographically, based on
location information derived from the DNS query message.
Glossary-10
Glossary
topology record
A topology record specifies a score for a local DNS server location endpoint
and a virtual server location endpoint.
topology score
The topology score is the weight assigned to a topology record when the
3-DNS Controller is filtering the topology records to find the best virtual
server match for a DNS query.
topology statement
A topology statement is a collection of topology records.
traceroute
Traceroute is the utility that the hops factory uses to calculate the total
number of network hops between a local DNS server and a specific data
center.
TTL (Time to Live)
The TTL is the number of seconds for which a specific DNS record or
metric is considered to be valid. When a TTL expires, the server usually
must refresh the information before using it again.
unavailable
The unavailable is a status used for data center servers and virtual servers.
When a data center server or virtual server is unavailable, the 3-DNS
Controller does not use it for load balancing.
unknown
The unknown status is used for data center servers and virtual servers.
When a data center server or virtual server is new to the 3-DNS Controller
and does not yet have metrics information, the 3-DNS Controller marks its
status as unknown. The 3-DNS Controller can use unknown servers for
load balancing, but if the load balancing mode is dynamic, the 3-DNS
Controller uses default metrics information for the unknown server until it
receives live metrics data.
up
The up status is used for data center servers and virtual servers. When a data
center server or virtual server is up, the data center server or virtual server is
available to respond to name resolution requests.
virtual server
A virtual server is a specific combination of a virtual IP address and virtual
port, and is associated with a content site that is managed by a BIG-IP,
EDGE-FX Cache, or host server.
3-DNS® Administrator Guide
Glossary-11
Glossary
watchdog timer card
The watchdog timer card is a hardware device that monitors the 3-DNS
Controller for hardware failure.
wide IP
A wide IP is a collection of one or more domain names that maps to one or
more groups of virtual servers managed either by BIG-IP systems,
EDGE-FX Caches, or by host servers. The 3-DNS Controller load balances
name resolution requests across the virtual servers that are defined in the
wide IP that is associated with the requested domain name.
WKS (well-known services)
Well-known services are protocols on ports 0 through 1023 that are widely
used for certain types of data. Some examples of some well-known services
(and their corresponding ports) are: HTTP (port 80), HTTPS (port 443), and
FTP (port 20).
WKS record
A WKS record is a DNS resource record that describes the services usually
provided by a particular protocol on a specific port.
zone
In DNS terms, a zone is a subset of DNS records for one or more domains.
zone file
In DNS terms, a zone file is a database set of domains with one or many
domain names, designated mail servers, a list of other name servers that can
answer resolution requests, and a set of zone attributes, which are contained
in an SOA record.
Glossary-12
Index
Index
C
/etc/hosts file 4-1
3-DNS Maintenance menu
about 1-3
3-DNS modes
configuring 3-11
3dns_add script
about 10-1
and sync groups 10-1
running the script 10-4
verifying the configuration 10-4
A
A records 2-3
active-active configurations
and unit ID numbers 3-6
additional systems
configuring 10-1
admin user account 3-9
administrative access
IP addresses allowed 3-9
Administrator Kit, PDF versions 1-11
authentication server 1-10
auto configuration
overview 5-15
auto-configuration 1-9, 5-6
B
base network, planning 2-6
basic configuration
adding a 3-DNS Controller 5-5
adding a BIG-IP system 5-6
adding data centers 5-3
adding EDGE-FX systems 5-9
adding hosts 5-10
configuring global variables 5-17
creating a sync group 5-13
setting up 5-2
big3d agent
about 1-7
broadcasting 2-1
configuring 2-9
sample configuration 2-1
BIG-IP Cache Controller, selecting 3-5
BIG-IP Fire Guard, selecting 3-5
BIG-IP LB, selecting 3-5
BIG-IP system
compare to 3-DNS Controller 1-8
defining 5-6
bridge mode
about 3-11
browsers, supported versions 1-3
3-DNS® Administrator Guide
CDN
configuration example 7-2
configuring 7-5
delegating DNS queries 7-2
described 7-1
managing with 3-DNS 7-1
using pool type CDN 7-1
using topology load balancing 7-1
CDN configuration
adding 3-DNS Controllers 7-5
adding a topology statement 7-8
adding data centers 7-5
adding pool type CDN 7-7
adding servers 7-6
adding wide IPs and pools 7-6
monitoring 7-10
using a last resort pool 7-9
CDN providers
described 7-1
resolving DNS queries 7-3
CDN switching 7-1
centralized authentication 1-10
certificates
configuration information 3-8
command line utility. See 3-DNS Maintenance menu
command syntax, conventions 1-5
configuration
adding to 5-5
configuration planning 2-6
configuration tasks
using a remote workstation 2-6
configuration tools, choosing 1-2
Configuration utility
about 1-2
and supported browser versions 1-3
configurations, verifying 10-4
configuring FTP access 3-16
configuring rshd 3-13
connections, administrative 3-10
content delivery network. See CDN
content servers
default route 3-7
D
data center 5-3
data center servers
in the network configuration 2-6
data centers
about 2-6
adding a 3-DNS Controller 10-1
configuring 5-3
default configuration
user name 3-2
Index-1
Index
default IP addresses
alternate address 3-2
and IP alias 3-3
overview 3-2
preferred address 3-2
default root password 3-2
default route configuration 3-8
discovery 5-16
modifying 5-15
settings for 5-15
Discovery setting 1-9
DNS
master servers 2-3
root servers 2-4
DNS queries
delegating to CDN providers 7-2
documentation 1-11
domain names, maximum supported 1-6
duplex mode 4-3
Dynamic Ratio
about 8-6
configuring 8-6
using with QOS mode 8-6
E
EDGE-FX system
configuring 5-9
EDGE-FX systems
defining 5-9
encryption
and crypto systems 5-17
and global variables 5-17
enabling 5-17
F
fail-over
hardware-based 1-8
network-based 1-8
fail-over IP addresses, setting 3-6
features of 3-DNS 1-5
firewalls 1-10
FQDNs
enabling web access 3-8
G
geographic redirection 7-1
Global Availability mode
about 9-1
configuring 9-3
configuring standby data centers 9-5
load balancing among pools 9-3
global variables
configuring 5-17
enabling encryption 5-17
Index-2
globally-distributed network
adding 3-DNS Controllers 6-3
adding BIG-IP systems 6-4
adding data centers 6-3
configuring 6-2
using Topology load balancing 6-2
GLOBAL-SITE Controller
See EDGE-FX system
H
hardware-based fail-over 1-8
help, online 1-11
host names
BIG-IP host name 3-6
changing 3-9
primary IP address 3-8
host servers
defining 5-10
host SNMP settings
configuring 5-12
hosts
and probers 5-10, 5-12
and supported SNMP agents 5-12
configuring 5-10
viewing statistics 5-13
hosts file, adding host names 4-1
httpd.conf file
and Setup utility 3-9
I
iControl 3-15
interface access methods 4-7
interface media settings 3-7
interface naming convention 4-2
interfaces
and multiple VLANs 4-7
naming convention 4-2
internal VLANs 3-3
Internet protocols 1-6
IP addresses
and NameSurfer 1-2
changing 3-9
configuring default route 3-8
configuring fail-over 3-6
for default configuration 3-2
IP alias, for default IP address 3-3
iQuery protocol
about 1-6
K
keyboard type, setting 3-5
Index
L
P
last resort pool
using in a CDN configuration 7-9
LDAP 1-10
LED indicators 3-7
limits settings
modifying thresholds 6-7
load balancing modes
Global Availability 9-3
Quality of Service 8-1
Topology 6-2
load balancing, using pools 2-4
P95 Billing Estimate 1-10
packets
access to VLANs 4-7
password
creating for system and user accounts 1-9
passwords 3-2
default configuration 3-2
PDF versions, Administrator Kit 1-11
pools 2-4
portal 3-15
principal 3-DNS
about 2-2, 5-13
adding a system to sync group 10-3
planning sync groups 2-7
probers
and hosts 5-10, 5-12
product selection 3-5
production rules 2-12
M
MAC addresses 4-11
setting MAC masquerade 4-2
MAC masquerade 4-11
media access control. See MAC addresses
media options 1-7
media type
setting 4-3
setting the duplex mode 4-3
metrics
and hosts 5-12
collecting from hosts 5-12
Microsoft Internet Explorer 1-3
multiple links 1-10
N
name resolution 2-3, 2-4
NameSurfer
about 1-2
configuring 3-13
managing DNS zone files 2-10
maximum supported IP addresses 1-2
naming conventions
for interfaces 4-1
Netscape Navigator 1-3
network adapters 3-7
network address translations 1-10
network configuration
configuring rsh 2-9
configuring ssh 2-9
network management tools 1-6
Network Time Protocol (NTP) 3-10
network-based fail-over 1-8
node mode
about 3-11
O
online help 1-11
openssl.conf file 3-9
3-DNS® Administrator Guide
Q
QOS coefficients
about 8-2
and wide IPs 8-4
configuring 8-3
considerations 8-2
QOS equation
modifying 8-3
syntax 8-4
Quality of Service mode
about 8-1
and default settings 8-1
understanding QOS coefficients 8-2
using Dynamic Ratio 8-6
R
RADIUS 1-10
receiver 3-DNS
about 5-13
planning sync groups 2-7
redundant systems 1-8
active-active configurations 3-6
choosing fail-over IP addresses 3-6
floating self IP alias 3-7
sharing MAC addresses 4-12
unit ID numbers, setting 3-6
release notes 1-11
remote shell. See RSH
resource thresholds
setting limits 6-7
root password
setting 3-5
router
defining 5-8
Index-3
Index
routers, host names 4-1
RSH
configuring 3-16
rsh utilities 2-9
S
sample 3-DNS configuration 2-1
sample configuration
big3d agent communications 2-1
scalability 1-6
security features 1-6
self IP address, about 4-12
self IP addresses
and translations 1-10
for target devices 3-7
server performance
monitoring 6-8
server types 5-5
servers
defining 2-7
defining a 3-DNS Controller 5-5
defining a BIG-IP system 5-6
defining additional 3-DNS Controllers 10-1
defining in the configuration 5-5
See also data center servers
setup command 3-2
Setup utility 1-2
configuring 3-DNS mode 3-11
configuring NameSurfer 3-13
default IP address access 3-3
default password 3-2
NTP support 3-10
purpose of 4-1
rerunning from a web browser 3-4
rerunning from the command line 3-5
running from a browser 3-3
running from an ssh client 3-4
running from the command line 3-4
running from the console 3-2
system settings defined 3-1
single physical location 5-3
SMTP 1-6
SNMP 1-6
and host prober 5-12
host prober 5-10
SNMP agents
and supported hosts 5-12
SNMP host probing 5-12
SNMP MIB 1-2
SNMP prober 5-12
SSH
MindTerm SSH console 1-6
ssh utilities 2-9
SSL 1-6
statistics screens 1-10
Index-4
stylistic conventions 1-4
sync group
about 1-7, 2-8
and 3dns_add script 10-1
and time tolerance variable 2-8
and zone files 2-11
broadcasting configurations 2-6
configuring 5-13
defined 2-7
planning 2-6
planning configurations 2-7
sample configuration 2-2
sync groups
and additional systems 10-1
configuring 5-13
defined 5-13
synchronization 1-9
synchronized files
and time tolerance variable 2-8
and zone files 2-11
system accounts 1-9
system resources
about 6-7
setting limits 6-7
T
tagged interfaces
defined 4-7
tags
embedding in packet headers 4-7
technical support 1-11
time tolerance value
setting 5-14
time tolerance variable 5-14
about 2-8
and sync groups 2-8
time zone, configuring 3-10
Topology load balancing
about 2-12
using in a CDN 7-8
using in a global network 6-2
topology records
configuring 6-6
topology statement
configuring topology records 6-6
using in a CDN 7-8
traffic
restricting through tagged interfaces 4-7
restricting through untagged interfaces 4-7
U
unit ID numbers 3-6
untagged interfaces
defined 4-7
User Access screen 1-9
Index
user accounts 1-9
user authorization 1-10
user authorization roles 1-10
utilities
3-DNS Maintenance menu 1-3
Configuration 1-2
Setup 1-2
V
virtual servers
and host names 4-1
availability settings 6-7
defining 2-7
VLAN access methods 4-7
VLAN groups 4-9
VLAN IDs 4-7
vlangroup command 4-9
VLANs
configuring in Setup utility 3-7
default IP address 3-3
interfaces, assigning 3-8
managing 4-5
self IP address 3-7
W
web server access
adding user accounts 3-9
changing passwords 3-9
configuring 3-8
wide IPs
and DNS zone files 2-10
and QOS coefficients 8-4
wide-area traffic manager (WATM) 7-4
Z
zone file management
using NameSurfer 1-2
zone files
configuring 3-13
synchronizing 3-DNS Controllers 2-11
3-DNS® Administrator Guide
Index-5