1
MASTER USER’S GUIDE
LOC Technology
apricot
MITSUBISHI ELECTRIC
Microsoft and MS-DOS are registered trademarks, and Windows is a
trademark, of Microsoft Corporation.
LOC Technology and KeyLOC are trademarks of Apricot Computers
Limited.
Other trademarks are the properties of their respective owners.
Information contained in this document is subject to change without notice
and does not represent a commitment on the part of Apricot Computers
Limited. Any software described in this manual is furnished under a license
agreement. The software may be used or copied only in accordance with the
terms of this agreement. It is against the law to copy any disk supplied for
any other purpose than the purchaser’s personal use.
All rights reserved; no use or disclosure without written consent.
Copyright © Apricot Computers Limited 1996
Published by:
Apricot Computers Limited
3500 Parkside
Birmingham Business Park
B37 7YS
MITSUBISHI ELECTRIC
Printed in the United Kingdom
Preface
Preface
This booklet describes the operation of the Apricot LOC
Technology v2.1 security system as implemented by the Apricot LS
Security Card.
It is intended to be read only by the persons responsible for
configuring the security system – the so-called “Master” users.
Instructions for “ordinary” users of the system are provided in an
Appendix, which can be photocopied if necessary.
The reason for this is that most ordinary users will not need to
know the details of the system in order to use it. The system is made
more secure by providing information on a “need-to-know” basis.
MASTER USER’S GUIDE
i
Contents
CONTENTS
1
2
3
4
ii
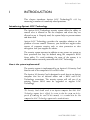
Introduction
Introducing Apricot LOC Technology
1/1
LOC Saver for Windows
1/5
Telling users about the security system
1/5
Configuring the Security System
Using the LOC Technology Setup utility
2/2
Setting up a security configuration
2/3
Defining user accounts
2/6
Understanding the Logon Sequence
How do users logon?
3/2
What happens after logging-on?
3/3
Variations caused by Quick Logon
3/3
Changing a password at logon
3/4
LOC Saver for Windows
Installing the software
4/2
Configuring LOC Saver
4/3
Troubleshooting
4/4
MASTER USER’S GUIDE
Contents
A
B
Technical Information
Installing the Apricot LS Security Card
A/1
Enabling BIOS reprogramming
A/2
Upgrading the BIOS
A/2
Entering the System Identification Number (SIN)
A/3
Erasing the security configuration
A/3
Quick Guide to Security
MASTER USER’S GUIDE
iii
Introduction
1
INTRODUCTION
This chapter introduces Apricot LOC Technology™ v2.1 by
answering a number of commonly-asked questions.
Introducing Apricot LOC Technology
The Apricot LOC Technology security system offers the ability to
control who is allowed to use the computer and when they are
allowed to use it. Properly used, the system helps to prevent misuse
and deter theft.
Apricot LOC Technology provides the complete solution to the
problem of access control. However, you should not neglect other
aspects of computer security such as virus protection or data
encryption. Ask your supplier for advice.
The security system operates in addition to any power-on, system or
boot password that may be defined using the computer’s BIOS
Setup utility. To avoid confusing the users of the system, it is
advisable not to use such passwords with LOC Technology.
How is the system implemented?
The security system is implemented by an Apricot LS Security Card
fitted in one of the computer’s ISA or EISA slots.
The Apricot LS Security Card is designed to work best in an Apricot
computer that has an infrared sensor and a BIOS with LOC
Technology extensions. The security system will tell you if an
existing Apricot BIOS must be upgraded to support LOC
Technology.
Note
The Security Card should work in an Apricot computer that lacks LOC
Technology support, but is slightly less secure in that the system can be bypassed by removing the card. In this manual, it is assumed that the host
computer has LOC Technology support unless stated otherwise.
MASTER USER’S GUIDE
1/1
Introduction
How is the system configured?
The security system is configured by using the LOC Technology
Setup utility which is held in the Security Card’s read-only memory.
LOC Technology Setup can be started whenever the computer is
turned on or rebooted, by pressing ALT+S when prompted to do so.
The security system can prevent individual users accessing the
utility.
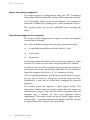
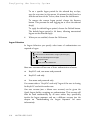
How do users logon to the computer?
The security system obliges users to logon every time the computer
is turned on or rebooted.
For a fully-authenticated logon the user must present three items:
♦
A hand-held infrared device called a KeyLOC card
♦
A user name
♦
A password
In situations where full authentication is deemed unnecessary, either
the KeyLOC card or the user name and password may be omitted.
In addition, the user can be assigned logon periods that specify on
what days of the week, and between what times, he is permitted to
logon (for example, from 9:00 to 17:30, Monday to Friday).
A user is usually permitted to change his password when he logs on.
He may also be forced to change his password every few days.
Alternatively, a user may be barred from changing his password
altogether.
The security system also supports a “Quick Logon” facility. This
allows the creation of one user account which does not require any
authentication at logon. This could be useful in situations where the
computer has a majority of users with identical security
requirements. These users would rely on the Quick Logon account,
whereas fully- or partially-authenticated logons would be reserved
for special users such as Master users (see below).
1/2
MASTER USER’S GUIDE
Introduction
1
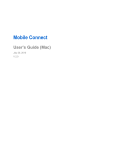
LOGON
Activate KeyLOC Card Now
(Press ESC For User Logon)
Security is active, logon required
1.5 METRES
MAXIMIUM
2
USER LOGON
User Name John Doe
Password
********
Change password
OK
Enter your user name and password
apricot
F2
F1
Esc
2
Q
A
Caps Lock
|
\
Ctrl
E
D
S
X
Z
6
T
F
C
H
G
V
U
B
N
0
O
M
<
,
Alt
:
;
>
.
F11
F12
+
=
{
[
P
L
K
J
_
-
)
9
I
F10
F9
(
*
8
7
Y
F8
F7
&
^
5
R
F6
F5
%
$
4
3
W
F4
F3
£
!
1
}
]
@
'
~
Scroll
Lock
Pause
Break
1
A
Insert
Home
Page
Up
Num
Lock
Delete
End
Page
Down
7
Home
8
9
Pg Up
4
5
6
1
End
2
3
Pg Dn
/
*
-
+
#
?
/
Alt Gr
Print
Scrn
SysRq
Ctri
0
Ins
.
Enter
Del
As mentioned earlier, each individual user can be denied access to
the LOC Technology Setup utility. In addition, each user account
can be given an expiry date (with the exception of the Master user
account).
What happens after several invalid logons?
An invalid logon is one which involves an unrecognised KeyLOC
card, an incorrect user name or password, or which is attempted
outside the user’s permitted logon periods.
A lockout period can be imposed after three consecutive invalid
logons. This means that the computer is “locked” in the logon
sequence and cannot boot. No further logons can be attempted until
MASTER USER’S GUIDE
1/3
Introduction
the lockout period expires. The user cannot circumvent the lockout
period by turning off the computer; the security system keeps track
of elapsed time even when the computer is turned off.
Optionally, an alarm can be set to sound after four invalid logons
(that is, during the second and subsequent lockouts).
Who are the “Master” users?
At least one user account must be given “Master” status. A Master
user can logon at any time and is always allowed to access the LOC
Technology Setup utility. A Master user account can never expire,
nor can it be given the Quick Logon facility (in other words, some
authentication is always required).
What other features are there?
Ownership string
An ownership string identifies the owner of the computer, whether
it is a person or an organization. The string is prominently displayed
every time the computer is turned on or rebooted. The string cannot
be altered or deleted except by those users who are permitted access
to LOC Technology Setup.
The purpose of the ownership string is to deter theft by making the
provenance of the computer clear.
Logon statistics
The total number and last recorded date of both valid logons and
invalid logon attempts are displayed after each successful logon.
These statistics can be reset from within LOC Technology Setup.
This information can aid the detection of attempts to breach
security.
What happens if the Security Card is removed or substituted?
If the Apricot LS Security Card is removed from the computer, the
computer will detect the absence of the card and refuse to boot.
1/4
MASTER USER’S GUIDE
Introduction
Every Security Card has a unique System Identification Number
or SIN programmed into it at the factory. If one Security Card is
removed and replaced by another, the computer will detect the
change and require the user to type in the SINs of both the old card
and new card. (If the new card had already been programmed with a
security configuration, that configuration is erased automatically.)
Important
The SIN is printed on a small label stuck onto the Security Card. To preserve
security, this label must be removed and the SIN recorded in a safe, secure
place together with the serial number of the card and the serial number of the
computer in which the card is installed.
What else is the SIN used for?
In exceptional circumstances it may be necessary to erase the
security configuration held in the Security Card’s memory. This can
be done by removing a jumper on the card (see Appendix A for
details).
Until the jumper is replaced the security system insists that the SIN
is entered whenever the computer is turned on or rebooted. The SIN
therefore provides a “fail-safe” mechanism in case the jumper is
removed maliciously in an attempt to by-pass security.
LOC Saver for Windows
LOC Saver for Windows is an optional software enhancement for
the Microsoft Windows for Workgroups v3.11 operating system.
When leaving the computer unattended for a time, a user can click
the button on his KeyLOC card to obscure the screen and lock the
keyboard and mouse; Windows continues working “behind the
scenes”. When the user returns, another click of the button cancels
unattended mode. See Chapter 4 for more information.
Telling users about the security system
You can photocopy Appendix B of this booklet and give copies to
each of the users of the computer as a Quick Guide To Security. You
may want to back this up by explaining further the terms shown in
MASTER USER’S GUIDE
1/5
Introduction
bold (for example, lockout period). Note that users whose
accounts do not include the right to use LOC Technology Setup
need never know that such a utility even exists.
1/6
MASTER USER’S GUIDE
Configuring the Security System
2
CONFIGURING THE SECURITY
SE CURITY
SYSTEM
The security system is enabled and configured by using the LOC
Technology Setup utility. Once the security system is enabled,
individual users may be barred from accessing this utility.
For an Apricot computer with LOC Technology BIOS support,
BIOS reprogramming must be enabled in order to use the security
system. This feature is usually controlled by a jumper on the
motherboard (see the computer’s Owner’s Handbook for details). If the
Security Card is pre-installed at the factory, BIOS reprogramming
should be enabled by default. The security system itself will tell you
if you need to enable BIOS reprogramming.
Don’t forget to remove the SIN label from the Security Card and
record the SIN in a safe, secure place together with the serial
number of the card and the serial number of the computer in which
the card is installed.
Note
The Apricot LS Security Card is normally pre-installed at the factory. Refer to
Appendix A if you need to remove or re-install it.
MASTER USER’S GUIDE
2/1
Configuring the Security System
Using the LOC Technology Setup utility
To configure the security system:
1.
Turn on or reboot the computer.
2.
If the security system is already enabled, logon to the computer
using an account that includes the right to access LOC
Technology Setup.
3.
Press the ALT+S key combination when invited to do so.
4.
In the LOC Technology Setup dialog, set up the global
options you want. See the later section on “Setting up a
security configuration” for details.
5.
To define user accounts, choose the Set Users button.
6.
In the User Setup dialog, choose the Next User button to cycle
through the accounts to find a free account, or the account you
want to edit. Free accounts are marked as FREE in the User
Name text box.
7.
Set up the account details you want. See the section on
“Defining user accounts” for details. Choose the Next User
button to find the next account you want to edit. When you
have finished, choose the OK button.
8.
In the LOC Technology Setup dialog, choose the Change
Status button to set the Security Status to “Enabled” or
“Disabled”, as required.
The security system has no effect until it is enabled.
9.
Choose the Save button to save the new security configuration
in memory.
If you have saved changes in the utility, the computer reboots
automatically.
2/2
MASTER USER’S GUIDE
Configuring the Security System
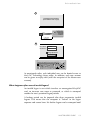
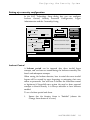
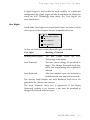
Setting up a security configuration
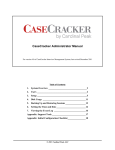
In the LOC Technology Setup dialog box you can configure
Lockout Control, Security Password Configuration, Logon
Administration and the Ownership String.
LOC Technology Setup
Security Status
Lockout Control
Save
Enabled
Alarm Enabled
Cancel
Lockout Duration:
2
Minutes
Change Status
Set Users...
Logon Administration
Security Password Configuration
Total successful logons:
132
Total Invalid logon attempts:
9
Date last reset:
01/01/94
Reset
Minimum Password Length:
6
Minimum Password Lifetime:
0
Maximum Password Lifetime: 255
Days
Days
Ownership String
Imperial Assurance Co Ltd
Lockout Control
A lockout period can be imposed after three invalid logon
attempts, and an alarm can sound during the lockouts caused by the
fourth and subsequent attempts.
When setting the lockout duration, bear in mind that most invalid
logons will be caused by users forgetting or mistyping their user
names or passwords. You will have to balance the frustration caused
to legitimate (if forgetful) users against the need to deter repeated
attempts to breach security. It is always advisable to have lockouts
enabled.
To set a lockout period and alarm:
1.
Ensure that the Security Status is “Enabled” (choose the
Change Status button if it is not).
MASTER USER’S GUIDE
2/3
Configuring the Security System
2.
Type the lockout duration in the Lockout Duration box
(between 1 and 255 minutes, or up to 4.25 hours).
3.
If an alarm is required, select the Alarm Enabled check box.
To disable both the lockout and the alarm without disabling the
security system, set a lockout duration of zero minutes.
Security Password Configuration
The Security Password Configuration settings apply restrictions on
the use of passwords to increase the effectiveness of the security
system.
Security Password Configuration
Minimum Password Length:
6
Minimum Password Lifetime:
0
Maximum Password Lifetime: 255
Days
Days
The minimum password length is the minimum number of
characters allowed in any user’s password.
The minimum password lifetime is the minimum number of days
that must elapse before any user can change his password.
Sometimes a user, annoyed at being forced to change his password
(or worried about forgetting the new one) will be tempted to change
back to the old one soon afterward. The minimum password lifetime
feature will prevent this.
The maximum password lifetime is the number of days that a
user’s password will remain valid; after this, the user will be forced
to change his password at the next logon attempt. The maximum
password lifetime applies only to those users who have the Expiry
(Password) attribute set in their user accounts.
To set the security password configuration:
1.
2/4
Ensure that the Security Status is “Enabled” (choose the
Change Status button if it is not).
MASTER USER’S GUIDE
Configuring the Security System
2.
Type the minimum password length in the Minimum Password
Length box (between 1 and 8 characters).
Set a minimum length of at least 6 characters; the more
characters a password has, the more difficult it will be to guess.
3.
Type the minimum password lifetime in the Minimum
Password Lifetime box (between 0 and 255 days).
A minimum lifetime of 0 days allows a user to change his
password at any time, unless the Lock Password attribute is set
in his user account.
4.
Type the maximum password lifetime in the Maximum
Password Lifetime box (between 1 and 255 days, or up to 9
months).
Set a relatively short maximum; the longer a password remains
current, the greater the chance of its being discovered.
Logon Administration
Logon Administration shows the history of logon attempts at the
computer:
♦
The total number of successful logons since the logon statistics
were last reset.
♦
The total number of invalid logons since the logon statistics
were last reset.
♦
The date when the logon statistics were last reset.
To reset the logon statistics:
1.
Ensure that the Security Status is “Enabled” (choose the
Change Status button if it is not).
2.
Choose the Reset button.
This not only resets the logon statistics shown in the LOC
Technology Setup dialog, but also those displayed after each
successful logon (see the chapter on “Understanding the Logon
Sequence”, later in this booklet).
MASTER USER’S GUIDE
2/5
Configuring the Security System
Ownership String
The ownership string is displayed every time the computer is turned
on or rebooted.
Don’t set an ownership string without restricting access to the LOC
Technology Setup utility. Otherwise, anyone using the computer
will be able to change or delete the ownership string.
To set the ownership string:
1.
Ensure that the Security Status is “Enabled” (choose the
Change Status button if it is not).
2.
Type the ownership string into the Ownership String box.
You can use up to 40 characters.
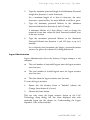
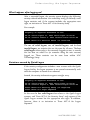
Defining user accounts
You set up user accounts using the User Setup dialog box.
User Setup
User Information
OK
User Account:
User1
Master Status
Password:
Cancel
********
Expiry
Expiry Date:
User Account:
21 / 09 / 94
Delete User
Password:
Next User...
Set KeyLOC card...
Login Periods...
KeyLOC card NOT SET
Logon Selection
Don't ask for Authentication at logon (Quick logon)
Ask for the following items at logon
User Rights
Security Setup Disable
Lock Password
KeyLOC Card
User name and Password
2/6
MASTER USER’S GUIDE
Lock Keyboard
Configuring the Security System
If you define any user accounts, you must include at least one Master
user account.
You do not have to enable the security system before defining user
accounts. The number of user accounts is limited by the capacity of
the memory on the Security Card. This may vary for different
models.
User Information
Under User Information you provide details of the user name,
password, KeyLOC card and logon periods.
An account does not need to have to have either a user name or a
password if you don’t plan to ask for them at logon (see “Logon
Selection” below). However, it can be beneficial to define them
anyway as this provides a way of identifying the account.
You will also need to define user names and passwords if users are
to share KeyLOC cards (although it is best if users each have their
own KeyLOC cards). A Master user’s KeyLOC card cannot be
shared.
For ordinary users, you can set a date when the user account will
expire. After this date, the user will be unable to logon, and attempts
to do so will be counted as invalid logons.
You can also set a date when the user’s password will expire, by
applying the maximum password lifetime. After this date the user is
allowed to logon one more time with his old password, but is then
forced to change it, at which point the next password expiry date is
calculated automatically.
If you don’t set a password expiry date, the password will never
expire. However, the user can still change his password voluntarily,
provided that the Lock Password attribute is not set (see “User
Rights” below).
Again for ordinary users, you can set a permitted logon period for
each day of the week.
MASTER USER’S GUIDE
2/7
Configuring the Security System
To set the user information:
1.
Type the user name in the User Name text box. You must use a
different name for each user account.
If you do not supply a user name, the security system puts
USER (followed by a user number) in the User Name box. This
shows that the account is in use, but it is not the account’s user
name.
2.
Type the password in the Password text box and press ENTER.
Then re-type the password to confirm it.
To preserve security, the password appears as a string of
asterisks. Remember that there may be a minimum password
length.
User names and passwords can each have up to 8 characters,
selected from A-Z, a-z, 0-9 and SPACE.
3.
If this is a Master user account, select the Master Status check
box.
When you select Master Status, some of the other controls in
the User Setup dialog are disabled (they become dimmed or
“greyed-out”). These changes are made to ensure that a Master
user will always be able to logon and access the LOC
Technology Setup utility.
The Master Status check box is greyed-out for accounts with
shared KeyLOC cards.
4.
To set a date when the user account will expire, select the User
Account check box in the Expiry section and then type the
date next to it.
You cannot set an expiry date for a Master user account.
5.
2/8
To set a date when the password will expire, select the
Password check box in the Expiry section. You do not need to
type the date itself as it is automatically set to today’s date plus
the maximum password lifetime.
MASTER USER’S GUIDE
Configuring the Security System
The Password check box is greyed-out if the Lock Password
attribute is set; if a user cannot change his password, it cannot
be allowed to expire.
6.
If the user account requires a KeyLOC card, click on the Set
KeyLOC Card button. Aim the KeyLOC card at the
computer’s infrared sensor and press the button on the card.
The card’s unique electronic signature is added to the security
configuration.
The KeyLOC card will be rejected if it is already allocated to a
Master user, or to another user who has a “KeyLOC card only”
logon.
7.
To set logon periods for a non-Master user, choose the Logon
Periods button. The Logon Periods dialog appears.
Logon Periods
Graphical representation of logon times
Midnight
6:00
12:00
18:00
Midnight
Monday:
Tuesday:
Wednesday:
Thursday:
Friday:
Saturday:
Sunday:
Edit Times
Monday
Tuesday
Wednesday
Thursday
Friday
Saturday
Sunday
Times (24 Hour)
From:
Add
8 : 00
Remove
To:
OK
16 : 00
Default
Cancel
Use the check boxes in the Edit Times section to select the
days of the week you want to edit.
MASTER USER’S GUIDE
2/9
Configuring the Security System
To set a specific logon period for the selected day or days,
type the start time (to the nearest 30 minutes) in the From box
and the end time in the To box, then choose the Add button.
To remove the current logon period, choose the Remove
button. This prevents the user logging-on at all on the selected
day(s).
To apply the default logon period, choose the Default button.
The default logon period is 24 hours, allowing unrestricted
logons on the selected day(s).
8.
When you are satisfied, choose the OK button.
Logon Selection
In Logon Selection you specify what items of authentication are
required at logon.
Logon Selection
Don't ask for Authentication at logon (Quick logon)
Ask for the following items at logon
KeyLOC Card
User name and Password
Most user accounts will use one of three authentication schemes:
♦
KeyLOC card, user name and password.
♦
KeyLOC card only.
♦
User name and password only.
You cannot select a “KeyLOC card only” logon if the user is sharing
his KeyLOC card with another user.
One user account (not a Master user account) can be given the
Quick Logon facility, requiring no authentication. This account will
then be used automatically by all users unless they specifically
invoke the logon sequence and use a different account (see the
chapter on “Understanding the Logon Sequence” for more
information).
2/10
MASTER USER’S GUIDE
Configuring the Security System
If Quick Logon is used it must be used carefully. In a multi-user
configuration the Quick Logon account should never be allowed to
access the LOC Technology Setup utility. See “User Rights” for
more information.
User Rights
Listed under User Rights are several check boxes. Use these to select
what aspects of the computer the user is not allowed to use.
User Rights
Security Setup Disable
Lock Password
Lock Keyboard
At first, no check box is selected and all rights are enabled.
User right
Meaning if selected
Security Setup Disable
The user cannot access
Technology Setup utility.
Lock Password
The user cannot change his password at
logon. The Change Password check box
in the User Logon dialog box is ignored if
selected.
Lock Keyboard
After the computer boots, the keyboard is
locked until the user enters his password.
the
LOC
The Security Setup Disable and Lock Keyboard check boxes are
greyed-out for a Master user account.
The Lock Password check box is greyed-out if the Expiry
(Password) attribute is set, because a user must be permitted to
change his password when it expires.
MASTER USER’S GUIDE
2/11
Understanding the Logon Sequence
3
UNDERSTANDING THE LOGON
SEQUENCE
While the security system is disabled, the computer boots as
described in the Owner’s Handbook.
Once the security system is enabled, the logon sequence starts
automatically every time the computer is turned on or re-booted
(unless the security configuration includes a Quick Logon account –
see the section below on “Variations caused by Quick Logon”).
Depending on the particular model of computer, the logon sequence
may occur before, during or after the power-on self-test (POST). In
any case, the logon sequence occurs before the computer starts
looking for an operating system.
The security system operates in addition to any password that may
be defined using the computer’s BIOS Setup utility. The type of
password provided in BIOS Setup varies with the model of
computer, but if enabled it will typically be required after the logon
sequence (see the Owner’s Handbook for more information).
MASTER USER’S GUIDE
3/1
Understanding the Logon Sequence
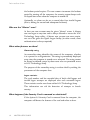
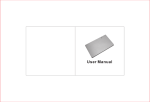
How do users logon?
Logon Sequence
LOGON
First Invalid
Attempt
LOGON
USER LOGON
Activate KeyLOC Card Now
(Press ESC For User Logon)
User Name John Doe
Activate KeyLOC Card Now
Password
********
(Press ESC
For user Logon)
Change password
Security is active, logon required
Security is active, logon required
OK
Enter your user name and password
Second Invalid
Attempt
LOGON
Activate KeyLOC Card Now
Password
********
(Press ESC
For user Logon)
Change password
Security is active, logon required
OK
Enter your user name and password
Status Bar says
"Invalid Logon
User not found!"
"Invalid Logon
will cause lockout!"
SECURITY LOCKOUT
John Doe
Activate KeyLOC Card Now
Password
********
(Press ESC
For user Logon)
A Security
Violation has occurred
Change password
System Locked until 09:25
Security is active, logon required
OK
"Invalid Logon" User not found!
User Name
SECURITY LOCKOUT
John Doe
Activate KeyLOC Card Now
Password
********
(Press ESC
For user Logon)
A Security
Violation has occurred
Change password
System Locked until 09:25
Security is active, logon required
OK
"Invalid Logon" User not found!
09:23:17
USER LOGON
ALARM
User Name John Doe
Password
USER LOGON
USER LOGON
User Name
09:23:17
Status Bar says
LOGON
LOGON
USER LOGON
User Name John Doe
Fourth and
Successive
Attempts
Third Invalid
Attempt
********
LOCKOUT
Change password
OK
Enter your user name and password
LOCKOUT
Valid Logon
Repeat Logon
Sequence
Repeat Logon
Sequence
Repeat Logon
Sequence
Repeat Logon
Sequence
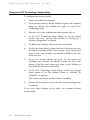
The Logon dialog box, requesting a KeyLOC card, will appear if
the security configuration includes at least one account requiring
KeyLOC card authentication.
The User Logon dialog appears if the user presses ESC at the Logon
dialog or if his account requires full authentication. The User Logon
dialog also appears if the KeyLOC card is not recognised; this masks
the fact that the logon has already failed.
If the proffered authentication is not recognised, or if the user is
outside his logon period for today, the logon attempt fails and the
Logon or User Logon dialog re-appears. Repeated invalid logon
attempts may cause lockouts and sound the lockout alarm, if these
features are enabled (see diagram).
If the computer is turned off after one or more invalid logons, the
security system remembers how many invalid logons there have
been and will re-commence from the appropriate point in the logon
sequence when the computer is next turned on.
3/2
MASTER USER’S GUIDE
Understanding the Logon Sequence
What happens after logging-on?
After a successful logon, the security system displays the following
security-related information: the ownership string (if defined), some
logon statistics and, if the account includes the appropriate user
right, an invitation to “Press ALT+S for Security Setup”.
For example:
Property of Imperial Assurance Co Ltd
No of valid logons 11, Last valid logon 21-09-96
No of invalid logons 2, Last invalid logon 04-09-96
Press ALT+S for Security Setup (if required)
The no. of valid logons, no. of invalid logons, and the last
invalid logon, are statistics that are the same for all users. The last
valid logon relates only to the currently logged-on user; it records
the last date on which he (or someone using his user account)
logged on. These statistics can be reset from within LOC
Technology Setup.
Variations caused by Quick Logon
If the security configuration includes a user account with the Quick
Logon facility, the logon sequence is not started automatically each
time the computer is turned on or rebooted.
Instead, the security information appears straight away.
Property of Imperial Assurance Co Ltd
No of valid logons 11, Last valid logon 21-09-96
No of invalid logons 2, Last invalid logon 04-09-96
Press ALT+S for Security Setup (if required)
Press ALT+L for Logon Sequence
In this case the last valid logon date relates to the Quick Logon
account, and “Press ALT+S for Security Setup” only appears if the
Quick Logon account has the appropriate user right. In addition,
however, there is an invitation to “Press ALT+L for Logon
Sequence”.
MASTER USER’S GUIDE
3/3
Understanding the Logon Sequence
If the user presses ALT+L when this final message appears, the logon
sequence is started as described earlier. Otherwise, he is
automatically logged-on using the Quick Logon account.
Changing a password at logon
A user is usually permitted to change his password when he logs on,
by selecting the Change Password check box in the User Logon
dialog before choosing OK. The Change Password dialog appears.
Change Password
New Password
********
Confirm
OK
Cancel
Enter & confirm new password
If the security configuration includes a minimum password lifetime,
the user will not be allowed to change his password until this period
has expired. A user is also not permitted to change his password
voluntarily if his user account includes the Lock Password attribute.
In these cases, the Change Password check box in the User Logon
dialog is inactive.
On the other hand, a user can be forced to change his password if
the security configuration specifies a maximum password lifetime. In
this case, the Change Password dialog – retitled as the Password
Expired dialog – appears once the user’s password has expired,
whether or not the user requests it.
3/4
MASTER USER’S GUIDE
LOC Saver for Windows
4
LOC SAVER FOR WINDOWS
WIND OWS
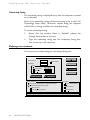
Temporarily unattended computers can pose a serious security
problem; a secure logon procedure is worthless if a ten-minute
coffee break can leave the whole system exposed. On the other
hand, it is inconvenient to have to turn off the computer for only a
short absence.
LOC Saver for Windows is an optional software enhancement for
the Microsoft Windows for Workgroups v3.11 operating system.
When leaving the computer unattended for a time, a user can click
the button on his KeyLOC card to obscure the screen and lock the
keyboard and mouse. When the user returns, another click of the
button cancels unattended mode.
LOC Saver can be invoked and cancelled only by the currentlylogged-on user or by any Master user (provided that they have
KeyLOC cards).
The user can select a .BMP file with which to obscure the screen,
and specify an inactivity timeout so that LOC Saver can act like a
secure screen saver.
Ask your Apricot supplier about how to get a copy of LOC Saver.
Use the information in this chapter to install and configure LOC
Saver, and to help users with their problems.
MASTER USER’S GUIDE
4/1
LOC Saver for Windows
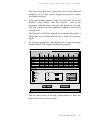
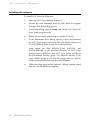
Installing the software
To install LOC Saver for Windows:
1.
Insert the LOC Saver diskette in drive A.
2.
Choose the Run command from the File menu in Program
Manager. The Run dialog appears.
3.
In the Run dialog, type a:\setup and choose OK. The LOC
Saver Setup program starts.
4.
Follow the on-screen instructions to install LOC Saver.
5.
In the Destination Path dialog, specify a drive and directory
for LOC Saver and its associated files (the default directory is
C:\LOCTECH2). Then choose the Continue button.
Setup copies the files APRLOC2.386, LOC.DLL, and
LOCSAVER.EXE to the specified directory. A LOC Saver
program icon is added to a new LOC Saver group and also to
the pre-defined StartUp group. For effective security, LOC
Saver should remain in the StartUp group, where it will be
loaded automatically each time you start Windows.
6.
4/2
When the Setup program has finished, a dialog appears which
says that the installation is complete.
MASTER USER’S GUIDE
LOC Saver for Windows
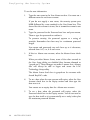
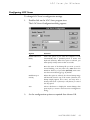
Configuring LOC Saver
To change LOC Saver’s configuration settings:
1.
Double-click on the LOC Saver program icon.
The LOC Saver Configuration dialog appears.
2.
Option
Function
Enable Timeout &
Delay
Select this option if you want the computer to lock
automatically after a specified period of mouse and
keyboard inactivity. When this option is selected, you
must specify a Delay timeout value in seconds.
File
Enter the name of the bitmap file you want to use for
screen blanking. You may select any .BMP file in the
Windows directory. If you select (Default), LOC Saver
uses the LOC Technology logo by default.
Enable Drop &
Gravity
When this option is selected, the chosen bitmap image
will descend from the top of the screen (otherwise, the
bitmap simply appears all at once). You may enter a
Gravity value from 1 (slowest) to 30 (fastest) to control
the drop speed.
Test
Choose this button to display the current bitmap, then
press any key to return to the LOC Saver Configuration
dialog.
Set the configuration options as required then choose OK.
MASTER USER’S GUIDE
4/3
LOC Saver for Windows
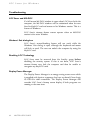
Troubleshooting
LOC Saver and MS-DOS
If a full-screen MS-DOS window is open when LOC Saver locks the
computer, the MS-DOS window will be minimized when the user
fires his KeyLOC card and returns to his Windows session. This is a
feature of Windows.
LOC Saver’s timeout feature cannot operate when an MS-DOS
session is the active Window.
Windows’ Exit dialog box
LOC Saver’s screen-blanking feature will not work while the
Windows’ Exit dialog is open, although the keyboard and mouse
will lock as usual. The user can unlock the computer by using his
KeyLOC card.
Disabling LOC Technology
LOC Saver must be removed from the StartUp group before
disabling the security system. If this is not done, LOC Saver’s
timeout feature may lock the computer and then be unable to
recognise any KeyLOC cards.
Display Power Manager
The Display Power Manager is an energy-saving screen saver which
is supplied with Apricot computers that have on-board Cirrus Logic
CL-GD543x video controllers. The Display Power Manager will
override LOC Saver’s bitmap screen display if both programs are
running at the same time.
4/4
MASTER USER’S GUIDE
Technical Information
A
TECHNICAL INFORMATION
INFORMAT ION
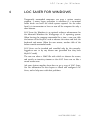
This Appendix provides some information about installing the
Apricot LS Security Card and erasing the security configuration
from the card’s memory. You should rarely, if ever, need to do
either.
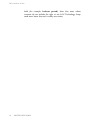
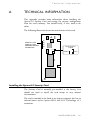
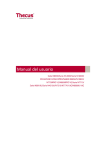
The following illustration shows the main features of the card.
IR1
APRICOT LS340
APRICOT LS550
INFRARED SENSOR
CONNECTOR
IR2
IR3
IR4
CLEAR SECURITY
JUMPER
JP1
NORMAL
CLEAR
Installing the Apricot LS Security Card
The Security Card is normally pre-installed at the factory. You
should not need to install the card except in very unusual
circumstances.
The card is intended to be fitted in an Apricot computer that has an
infrared sensor and an Apricot BIOS with LOC Technology v2.1
extensions.
MASTER USER’S GUIDE
A/1
Technical Information
The card should work in a non-Apricot computer, but this cannot
be guaranteed. In a non-Apricot computer the system is less secure.
Without an infrared sensor, KeyLOC cards cannot be used, and
without BIOS support the security system can be by-passed by
removing the Security Card. In these situations, you should enforce
physical security by locking the computer’s system unit and keeping
the keys in a safe, secure place.
The card is installed in the same way as any other ISA expansion
card (see the computer’s Owner’s Handbook for instructions). The card
may have up to four alternative connectors for an internal infrared
sensor cable. In an Apricot LS340 or LS550 computer, use the 3-pin
IR2 connector.
Remove the SIN label from the card and record the SIN in a safe,
secure place together with the serial number of the card and the
serial number of the computer in which the card is installed.
The card does not require any manual configuration, although if the
computer supports PCI cards you may have to declare ISA Legacy
Resource usage in the computer’s BIOS Setup utility. The Security
Card’s base memory address is D000h (although only the area
between D8000h-E0000h is actually used) and its only I/O port
address below 3FFh is 259h. It uses no interrupts or DMA
channels.
Enabling BIOS reprogramming
If the Security Card is fitted in an Apricot computer with LOC
Technology BIOS support, BIOS reprogramming must be enabled
in order to use the security system. The security system will display a
warning dialog if BIOS reprogramming is disabled.
BIOS reprogramming is usually controlled by a jumper on the
motherboard. See the computer’s Owner’s Handbook for details.
Upgrading the BIOS
When the computer is turned on, the Security Card checks the
motherboard BIOS. If it is an Apricot BIOS that currently lacks
LOC Technology support, but which can be upgraded, a dialog
A/2
MASTER USER’S GUIDE
Technical Information
advising an upgrade appears. In this situation the Security Card
cannot be used without upgrading the BIOS – the security system
will not allow the computer to boot until the BIOS is upgraded.
BIOS upgrades are normally performed by a service engineer. Ask
your supplier or authorized maintainer for assistance. If you need to
use the computer in the meantime, simply remove the Security Card.
Entering the System Identification Number (SIN)
Every Apricot LS Security Card has a unique System
Identification Number or SIN programmed into it at the factory.
When installing a Security Card
After installing the Security Card in an Apricot computer with LOC
Technology BIOS support, you are prompted to type in the Security
Card’s SIN when turning on the computer for the first time.
When replacing a Security Card
If you replace one Security Card with another you are required to
supply the SINs of both old and new cards. If the new card had
already been programmed with a security configuration, that
configuration is erased automatically when you enter its SIN.
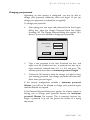
Erasing the security configuration
In exceptional circumstances it may be necessary to erase the
Security Card’s security configuration and start again.
To erase the security configuration:
1.
Turn off the computer and unplug all power cords.
2.
Take suitable anti-static precautions and remove the system
unit cover.
If you are unfamiliar with the recommended anti-static
precautions or the process of removing the system unit cover,
refer to the computer’s Owner’s Handbook.
MASTER USER’S GUIDE
A/3
Technical Information
3.
If necessary, remove any expansion cards that obscure the
Security Card.
4.
Move the Clear Security (CLR SEC) jumper on the Security
Card to the “Clear” position (see diagram).
5.
Replace the system unit cover and reconnect all power cords.
6.
Insert a system diskette in Drive A and turn on the computer.
7.
Type the Security Card’s SIN in the Security Failure dialog
box and choose OK.
Security Failure
Enter SIN
OK
The LOC Technology Setup utility starts automatically.
8.
Define at least one Master user account, then exit from LOC
Technology Setup (see Chapter 2, “Configuring the Security
System”, for detailed instructions).
9.
Turn off the computer, unplug all power cords and remove the
system unit cover.
10. Return the Clear Security jumper on the Security Card to the
“Normal” position.
11. Replace any expansion cards you removed earlier.
12. Replace the system unit cover and reconnect all power cords.
A/4
MASTER USER’S GUIDE
Quick Guide to Security
B
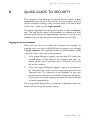
QUICK GUIDE TO SECURITY
SEC URITY
This computer is protected by an internal security system. A user
account has been set up so that you can use the computer, but you
may be restricted to using it only at certain times or on certain days
of the week – these are your logon periods.
The person responsible for the security system is called the Master
user. This may be the owner of the computer, or someone else who
has been given the job of safeguarding its security. If you have any
problems with the security system, ask the Master user for help.
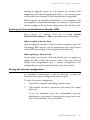
Logging-on to the computer
Every time you turn on or restart the computer (for example, by
pressing CTRL+ALT+DEL in MS-DOS) you can expect to go through
a logon sequence. This typically involves an infrared device called
a KeyLOC card, a user name and a password.
1.
If the Logon dialog box appears, aim your KeyLOC card at the
infrared sensor on the front of the computer and press the
button on the card. If you don’t have a KeyLOC card, press
the ESC key instead.
2.
If the User Logon dialog box appears, type your user name in
the User Name box, press TAB, then type your password in the
Password box. The password is not displayed as you type
(each character is shown as an asterisk). Choose the OK button
(if you press ENTER after typing your password, the OK button
is chosen automatically).
You may get both dialog boxes, or only one. It depends on how the
Master user has set up the security system.
USER’S GUIDE
B/1
Quick Guide to Security
1
LOGON
Activate KeyLOC Card Now
(Press ESC For User Logon)
Security is active, logon required
1.5 METRES
MAXIMIUM
2
USER LOGON
User Name John Doe
Password
********
Change password
OK
Enter your user name and password
apricot
F2
F1
Esc
2
Q
A
Caps Lock
|
\
Ctrl
E
D
S
X
Z
Alt
6
T
F
C
H
G
V
U
B
N
0
O
M
<
,
:
;
>
.
F11
F12
+
=
{
[
P
L
K
J
_
-
)
9
I
F10
F9
(
*
8
7
Y
F8
F7
&
^
5
R
F6
F5
%
$
4
3
W
F4
F3
£
!
1
}
]
@
'
~
Scroll
Lock
Pause
Break
1
A
Insert
Home
Page
Up
Num
Lock
Delete
End
Page
Down
7
Home
8
9
Pg Up
4
5
6
1
End
2
3
Pg Dn
/
*
-
+
#
?
/
Alt Gr
Print
Scrn
SysRq
Ctri
0
Ins
.
Enter
Del
If the authentication you offer is correct, and provided that one of
your logon periods is current, the computer boots normally and you
are free to use the computer. Otherwise, the logon is invalid and the
computer will not boot.
A lockout period may be imposed after three invalid logon
attempts, and an alarm may sound after four invalid attempts. If a
lockout is imposed, you will have to wait for it to end before you
can try to logon again. Turning the computer off then on again will
not cancel the lockout or the alarm.
B/2
USERS GUIDE
Quick Guide to Security
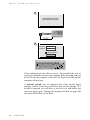
Changing your password
Depending on how security is configured, you may be able to
change your password voluntarily when you logon. If you can
change your password, you should do so regularly.
To change your password:
1.
After typing your user name and password in the User Logon
dialog box, select the Change Password check box before
choosing OK. The Change Password dialog box appears. (If it
doesn’t, you are not allowed to change your password.)
Change Password
New Password
********
Confirm
OK
Cancel
Enter & confirm new password
2.
Type a new password in the New Password text box, and
repeat it in the Confirm text box. A password can have up to
eight characters, selected from A-Z, a-z, 0-9 and space. The
security system may enforce a minimum password length.
3.
Choose the OK button to make the change, or Cancel to keep
your existing password. Any change you make will come into
effect when you next logon.
If the security configuration includes a minimum password
lifetime, you will not be allowed to change your password again
until this lifetime has expired.
If the Password Expired dialog ever appears, the security system is
forcing you to change your password because the maximum
password lifetime has expired. This is necessary because the
longer a password is in use, the greater the chance of it being
discovered.
USER’S GUIDE
B/3
Quick Guide to Security
Don’t choose a password that someone who knows you could guess.
For example, avoid obvious choices such as your partner’s name or
your car registration number. Use a mix of uppercase and lowercase
letters, and numbers. Use made-up words that aren’t in the
dictionary. Never write your password down or tell anyone
(including the Master user) what it is.
Logon statistics
When you logon, some logon statistics are displayed, for example:
No of valid logons 11, Last valid logon 21-09-94
No of invalid logons 2, Last invalid logon 04-09-94
The no. of valid logons, no. of invalid logons, and the last
invalid logon date, are statistics that are the same for all users. The
last valid logon relates only to you; it records the last date on
which you (or someone using your user account) logged on. These
statistics can be reset from time to time by the Master user.
Variations in the logon sequence
There are some possible variations in the logon sequence, depending
on the details of the security configuration:
♦
There is an optional feature known as Quick Logon. If this
feature is enabled, you will not have to go through the logon
sequence every time you want to use the computer. Instead, the
following message is displayed:
Press ALT+L for Logon Sequence
If you press ALT-L within 2 seconds of this message appearing,
the logon sequence is started as described earlier. If you do
nothing, you will be automatically logged-on using a
“standard” or “default” user account.
♦
B/4
USERS GUIDE
The Master user may have decided to disable the alarm and/or
set a null lockout period. If no lockout period is specified, the
system allows unlimited logon attempts.
Quick Guide to Security
LOC Saver for Windows
LOC Saver is an optional enhancement to the security system for use
with the Windows for Workgroups operating system. When leaving
the computer unattended for a time, you can click the button on
your KeyLOC card to obscure the screen and lock the keyboard and
mouse; Windows continues working “behind the scenes”. When you
return, another click of the KeyLOC card’s button unlocks the
computer. Ask the Master user if your computer has this feature.
Remember, if there’s anything about the security system you don’t
understand, ask the Master user.
USER’S GUIDE
B/5
APRICOT COMPUTERS LIMITED
3500 PARKSIDE
BIRMINGHAM BUSINESS PARK
BIRMINGHAM B37 7YS
UNITED KINGDOM
MITSUBISHI ELECTRIC
APRICOT COMPUTERS LIMITED
TRAVELLERS LANE
HATFIELD
HERTFORDSHIRE AL10 8XB
UNITED KINGDOM
MITSUBISHI ELECTRIC EUROPE GmbH
GOTHAER STRASSE 8
POSTFACH 1548
40835 RATINGEN
DEUTSCHLAND