1
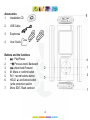
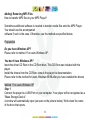
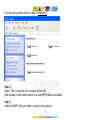
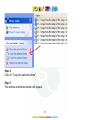
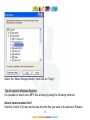
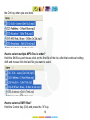
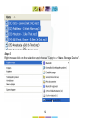
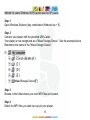
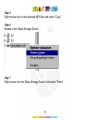
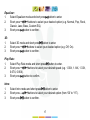
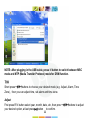
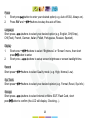
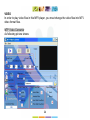
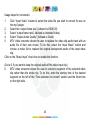
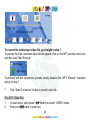
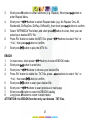
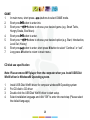
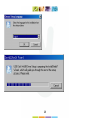
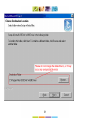
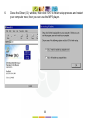
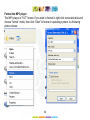
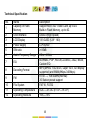
PMP-870 User manual www.123victory.eu Foreword ...........................................................................................................................3 Functions Overview ...........................................................................................................3 Accessories .......................................................................................................................4 Buttons and the functions ..................................................................................................4 Charging Li –polymer battery safely..................................................................................5 CAUTION: .........................................................................................................................5 Adding/ Removing MP3 Files ............................................................................................6 Preparation............................................................................................................................6 Method 1 for users Windows XP ...........................................................................................6 Tips for select in Windows Explorer ......................................................................................9 Method 2 for users Windows XP .........................................................................................11 Method for users Windows 95/98 (works also for XP-users)...............................................13 BASIC OPERATIONS .....................................................................................................15 Play MP3 Music ..................................................................................................................15 Volume Adjustment: ............................................................................................................15 Voice record ( Record and Recording playback mode).......................................................15 Menu Navigation .................................................................................................................16 MUSIC ................................................................................................................................16 Music Playback Submenu...................................................................................................16 FILE ....................................................................................................................................18 VOICE.................................................................................................................................19 PHOTO ...............................................................................................................................19 FM radio ..............................................................................................................................20 SETUP ................................................................................................................................20 USB Mode:..........................................................................................................................20 DRM Function .....................................................................................................................21 Time ....................................................................................................................................22 Power..................................................................................................................................23 Language ............................................................................................................................23 Display ................................................................................................................................23 1 Record ................................................................................................................................23 Sys Tools ............................................................................................................................23 Storage ...............................................................................................................................23 VIDEO .............................................................................................................................24 MTP Video Converter..........................................................................................................24 Play MTV Video files ...........................................................................................................26 EBOOK............................................................................................................................27 GAME ..............................................................................................................................28 CD disk use specification ................................................................................................28 Format the MP3 player ....................................................................................................34 Technical Specification....................................................................................................35 Notice ..............................................................................................................................36 Safety instructions ...........................................................................................................37 Hearing safety .....................................................................................................................37 Traffic safety........................................................................................................................37 European Union...............................................................................................................37 Disposal of old electrical appliances ...............................................................................38 RoHS complaint...............................................................................................................38 2 Note: Please recharge the MP3 player before using it! Foreword Thanks for using our MP3 digital player! Before using the MP3 player, please read the user guide carefully so as to use the player better. If damage is caused by personal mishandle of the software or hardware, or by personal product repairing and other accidental matters, we will not be responsible for any loss that resulted from above reasons. Please backup your data onto your personal computer in case of any unpredictable things. Functions Overview The player supports MP3 and WMA music file formats. Including WMA files with DRM (Digital Rights Management) function. The player has a recording function. The player has repeat functions. The player has Video Playback, Photo Viewer, Game Mode, etc. The player can power off automatically after a preset time. 3 Accessories 1. Installation CD 2. USB Cable 3. Earphones 4. User Guide Buttons and the functions 1. : Play/Pause : Previous track/ Backward 2. : Next track/Forward 3. 4. M: Menu or confirm button 5. R/V : record/volume button 6. HOLD : Lock/Unlock button (write protection) switch. 7. Micro SD/T-Flash card slot 4 Charging Li –polymer battery safely 1. Connect the PC USB port and the MP3 USB port with the provided USB cable. 2. The power sign is shown dynamic when charging, once full charged,, the power sign will stop moving, power is full, please shut off the power. The charging time is approximately 1.5 hours. 3. If the unit is being used during charging, it will take longer to charge. 4. To stop recharging, disconnect the USB cable. Notes: Before your first time use, please recharge your MP3 player. Your computer must be turned on while connected to your MP3 for charging. CAUTION: 1. Danger of explosion if battery is incorrectly replaced. Replace only with the same or equivalent type. 2. Do not disassemble, crush, short-circuit or incinerate your battery as it may cause fire, injury, burns, or other hazards. 5 Adding/ Removing MP3 Files How to transfer MP3 files to your MP3 Player? Sometimes additional software is needed to transfer media files onto the MP3 Player. You should use the accompanied software if such is the case. Otherwise, use the method as specified below. Preparation Do you have Windows XP? Please refer to method 1 for users Windows XP. You don’t have Windows XP? Insert the driver CD Rom in the CD Rom drive. This CD Rom was included with the player. Install the drivers from the CD Rom, consult the player his documentation. Please refer to the method for users Windows 95/98 after you have installed the drivers Method 1 for users Windows XP Step 1 Connect the player to a USB-Port on your computer. Your player will be recognized as a "Mass Storage Device". A window will automatically open (as seen on the picture below). Write down the name of the drive that opens. 6 If you do not get this screen, refer to method 2. Step 2 Select This Computer icon located on the left. And browse to the folder where your own MP3 files are located. Step 3 Select the MP3 files you wish to copy to your player. 7 Step 4 Click on "Copy the selected items". Step 5 The window mentioned below will appear. 8 Select the "Mass Storage Device " and click on "Copy". Tips for select in Windows Explorer It is possible to select more MP3 files at once by using the following methods: How to select random files? Hold the Control (Ctrl) key and mouse click the files you want to be selected. Release 9 the Ctrl key when you are done. How to select multiple MP3 files in order? Hold the Shift-key and mouse click on the first file of the list, after that continue holding shift and mouse click the last file you want to select. How to select all MP3 files? Hold the Control key (Ctrl) and press the "A" key. 10 Method 2 for users Windows XP Step 1 Open Windows Explorer (keycombination Windowskey + E). Step 2 Connect your MP3 player with the provided cable to an USB-Port Your player will now be recognized as a "Mass Storage Device", see the example below. Step 3 Use Windows Explorer to browse to the folder where your MP3 files are located. Step 4 Select the Mp3 files wich you wish to copy to your player. 11 Step 5 Right mouse click on the selection and choose "Copy to -> Mass Storage Device". 12 Method for users Windows 95/98 (works also for XP-users) Step 1 Open Windows Explorer (key combination Windows key + E). Step 2 Connect your player with the provided USB-Cable. Your player is now recognized as a "Mass Storage Device". See the example below. Remember the name of the "Mass Storage Device". Step 3 Browse to the folder where your own MP3 files are located. Step 4 Select the MP3 files you wish top copy to your player. 13 Step 5 Right mouse click on the selected MP3 files and select "Copy". Step 6 Browse to the "Mass Storage Device". Step 7 Right mouse click the "Mass Storage Device" and select "Paste". 14 BASIC OPERATIONS Play MP3 Music To Start: 1. Connect earphone to earphone jack. 2. Switch HOLD to unlock position 3. Long press button to turn on and enter “MUSIC” mode (the default mode is “MUSIC” mode). 4. Short press button to play music. 5. To return main menu: Long press M button. To Pause/Play: Short press button. / button. To change tracks: Short press To turn unit off: Long press button. Volume Adjustment: In music or MTV files playing, Voice, FM tuner mode, short press R/V button, then press / button to turn down or turn up volume. Voice record ( Record and Recording playback mode) 1. Long press R/V button to enter record mode in music playing or pause mode. 2. Short press M button to save the record file, short press button to play the record. 3. Short press / button to select your desired record file. 4. Whilst in playback mode short press M button to enter into submenu (e.g. Repeat, play rate, Intro, VOICE, File Browse, A-B). 15 Menu Navigation M button: Enter main menu, submenu or return. Skip button ( / ): Shift menus. Play/Pause button ( ): Play, Pause, or confirm. Long press M button to enter main menu. Short press / buttons to select your desired option (e.g. MUSIC, FILE, VOICE, PHOTO, FM, SETUP, VIDEO, EBOOK, GAME). MUSIC Long press button to turn unit on and enter “MUSIC” mode (the default mode is button to play music. “MUSIC” mode), then short press Music Playback Submenu Short press M button to enter into submenu and short press / buttons to select your desired Mode (e.g. Repeat, Equalizer, 3D, Play Rate, Intro, File Browse, A-B). Repeat: 1. Select Repeat mode and short press button to enter. / buttons to select your desired option (e.g. No Repeat, One, 2. Short press All, RandomAll, DirRepOne, DirRep, DirRanAll). 3. Short press button to confirm. 16 Equalizer: 1. Select Equalizer mode and short press button to enter. / buttons to select your desired option (e.g. Normal, Pop, Rock, 2. Short press Classic, Jazz, Bass, Custom EQ). 3. Short press button to confirm. 3D: 1. 2. 3. Select 3D mode and short press button to enter. / buttons to select your desired option (e.g. Off, On). Short press Short press button to confirm. Play Rate: 1. Select Play Rate mode and short press button to enter. 2. Short press / buttons to select your desired speed (e.g. 1.00X, 1.14X, 1.33X, 0.67X, 0.80X). 3. Short press button to confirm. Intro: button to enter. 1. Select Intro mode and short press 2. Short press / buttons to select your desired option (from “00’ to “15”). 3. Short press button to confirm. 17 File Browse 1. Select File Browse mode and short press button to enter. / buttons to select your desired file. 2. Short press 3. Short press button to play the file A-B 1. Select A-B mode and short press button to enter. 2. Short press R/V button to select A point, short press R/V button again to start A-B repeat mode, short press R/V button for the third time to cancel A-B repeat mode. FILE 1. In main menu, short press / buttons to select FILE mode. 2. Short press button to enter into. / buttons to choose your desired file(including MTV files, music 3. Short press files, photo files, and voice files, etc) 4. Short press R/V button to delete the file, and short press / buttons to select No or Yes, then short press button to confirm. 5. Long press M button to return to main menu. 18 VOICE / buttons to select VOICE mode. 1. In main menu, short press 2. Short press button to enter into. 3. Short press / button to choose your desired recording file 4. Short press button to play the recording file. 5. Long press R/V button to enter record mode. 6. Short press M button to save the record file, short press button to play the record file. / button to select your desired record file. 7. Short press 8. Whilst in playback mode short press M button to enter into submenu (e.g. Repeat, Play Rate, Intro, VOICE, File Browse, A-B). this part please refer to page910<music playback submenu> 9. Long press M button to return to main menu. PHOTO / buttons to select PHOTO mode. 1. In main menu, short press 2. Short press button to enter into. / buttons to choose your desired photo file 3. Short press / buttons to select “No” or 4. Press R/V button to delete the photo file, press “Yes”, then press button to confirm. 5. Short press button to scan your desired picture. / buttons to 6. Short press button again to browse all photos. or short press scan previous or next picture 7. Long press M button to return to main menu. 19 FM radio / buttons to select “FM“ mode. 1. Short press 2. Short press button to enter “FM” mode. 3. Short press / button to tune your desired stations (at intervals of 0.1 MHz). 4. Long press R/V button to start recording FM. 5. Short press M button to enter submenu (e.g. Preset, Auto Search, Manual Search, Save, Exit). 6. Short press button to confirm. SETUP 1. In main menu, short press / buttons to select “SETUP“ mode. 2. Short press button to enter into. / buttons to choose your desired mode(e.g. USB Mode, Time, 3. Short press Power, Language, Display, Record, Sys Tools, Storage) 4. Short press button to confirm. USB Mode: Short press / buttons to select USB Mode (MSC mode or MTP mode) 20 DRM Function Stands for digital rights management, a technology used to protect digital products from copyright infringement. When a customer buys a DRM- protected music download, the download is encrypted specifically for that customer. To allow the customer to use the file on a separate MP3 player they must link the DRM enabled player to Windows Media Player 10 and link both applications. This allows the downloaded music file to then be used on a separate digital music player. NOTE: To make DRM function, the computer OS must be Windows XP system, installed with Windows Media player 10 or higher version, and have a valid internet connection. 1. In USB Mode select MTP mode and short press button to confirm. 1. Plug in the Unit to the USB port of your computer. 2. Enter the Media Player mode in the computer automatically to operate synchronously. 21 NOTE: After plugging in the USB cable, press M button to switch between MSC mode and MTP (Media Transfer Protocol) mode for DRM function. Time / buttons to choose your desired mode (e.g. Adjust, Alarm, Time Short press Zone),then you can adjust time, set alarm and time zone. Adjust First press R/V button select year, month, date, etc, then press button to confirm. your desired option, at last press 22 / buttons to adjust Power 1. Short press button to enter your desired option( e.g. Auto off:002, Always on). / buttons to setup the auto off time. 2. Press R/V and Language Short press / buttons to select your desired option (e.g. English, CHI(Simp), CHI(Trad), French, German, Italian, Polish, Portuguese, Russian, Spanish). Display / buttons to select “Brightness” or “Screen” menu, then short 1. Short press button to enter. press / buttons to setup screen brightness or screen backlight time. 2. Short press Record Short press / buttons to select Quality mode ( e.g. High, Normal, Low). Sys Tools Short press / buttons to select your desired opinion.(e.g. Format, Reset, Sys Info.) Storage Short press / buttons to select Internal or Micro SD/T-Flash Card, short press button to confirm (the LCD will display: Checking…). 23 VIDEO In order to play video files in this MP3 player, you must change the video files into MTV video format files. MTP Video Converter As following picture shows: 24 Usage steps for conversion: 1. Click “Input Video” column to select the video file you wish to convert for use on the mp3 player. 2. Select the “output frame size”( Advised is 160X128) 3. Select “output frame rate”( Advised is Animated Video) 4. Select “Output Audio Quality”( Advised is Good) 5. MTV video converter allows the user to replace the video clip audio track with an audio file of their own choice. To do this, select the “Input Music” button and choose a music file to replace the original background audio of the input video clip. Click on the “Music Input” check box to enable the function. (Go to 6. if you want to keep the original audio of the video input clip.) 6. MTV video converter allows the user to convert a segment of the selected video clip rather than the whole clip. To do this, enter the starting time of the desired segment on the left of the “Time selection to convert” section and the finish time on the right side. 25 To convert the whole input video file, go straight to step 7 To preview how the converted video file will appear, click on the MTV preview check box and then click “Start Preview” To proceed with the conversion process simply deselect the “MTV Preview” checkbox and go to step 7. 7. Click “Start Conversion” button to convert video file. Play MTV Video files / button to select “VIDEO“ mode. 1. In main menu, short press 2. Short press button to enter into. 26 3. 4. 5. 6. 7. Short press M button to enter submenu (e.g. Repeat), Short press button to enter Repeat Menu. Short press / buttons to select Repeat mode (e.g. No Repeat, One, All, RandomAll, DirRepOne, DirRep, DirRanAll), then short press button to confirm. Select “MTPMEDIA” file folder, and short press button to enter, then you can select your desired MTV file. Press R/V button to delete the MTV file, press / buttons to select “No” or “Yes”, then press button to confirm. Short press button to play the MTV file. EBOOK / buttons to select EBOOK mode. 1. In main menu, short press 2. Short press button to enter into. 3. Short press / buttons to choose your desired file / buttons to select “No” or 4. Press R/V button to delete the .TXT file, press “Yes”, then press button to confirm. 5. Short press button to scan your desired file. / buttons to scan previous or next page 6. Short press 7. Short press M button to return to EBOOK catalog 8. Long press M button to return to main menu. ATTENTION: the EBOOK function only can browse .TXT files. 27 GAME 1. In main menu, short press / buttons to select GAME mode. 2. Short press button to enter into. 3. Short press / buttons to choose your desired game.(e.g. Smart Tetris, Hungry Snake, Box Move) 4. Short press button to enter. 5. Short press / buttons to choose your desired option.(e.g. Start, Introduction, Level Set, History) 6. Short press button to enter, short press M button to select “Continue” or “exit”. 7. Long press M button to return to main menu. CD disk use specification Note: Please remove MP3 player from the computer when you install USB Disk Win98 driver in Windows98 Operating system. 1. 2. 3. 4. Install USB Disk Win98 driver for computer windows98 Operating system Put CD disk to CD driver Double click the USB Disk Win98 driver to start setup. Select installation language and click “OK” to enter into next step (Please select the default language). 28 29 5. Click “Next>” to enter into next step. 30 31 32 6. Close the Driver (G:) window, then click “OK” to finish setup process and restart your computer now, then you can use the MP3 player. 33 Format the MP3 player The MP3 player is “FAT” format. If you wish to format it, right click removable disk and choose “format” mode, then click “Start” to format in operating system. As following picture shows: 34 Technical Specification No. Name Capacity of Flash Memory USB Interface Description Support Micro SD/T-flash Card, up to 2G Build-in Flash Memory, up to 4G. USB2.0(High Speed) 3 LCD Display 4 Power supply 1.8’ OLED (128*160) Li-Polymer 1 2 5 S/N ratio 6 Audio Frequency Range 7 EQ 8 Decoding Format 9 FM 10 File System ≥ 85dB 20hz – 20khz NORMAL, POP, ROCK,CLASSIC, JAZZ, BASS, Custom EQ MP3 (MPEG 1.0/2.0/2.5, Layer 1/2/3, ID3 display supported) and WMA(8Kbps-340Kbps) 87.50 ---- 108.00MHz(Normal) 30 Station preset support FAT16, FAT32 11 12 Operating Temperature Operating Moisture 5OC ----35 OC (41 OF---95 OF) 10%—75% 35 Notice ¾ Please unlock the button before use. ¾ EQ is not obvious when playing WMA format music. ¾ Can’t identify the sixth and above sixth level of directory. ¾ Do not leave the player in a place subject to moisture with temperature higher than 35℃ or lower than –5℃ ¾ Do not use the earphones while driving an automobile or riding a bicycle, it’s not only dangerous but also against the law. ¾ It may cause an accident if you turn up the volume of the earphones while walking down the street, especially crossing at intersections. ¾ Do not turn up the volume too high, doctors warn against prolonged exposure to high volume. ¾ Stop using the device or turn the volume down if you have ringing in your ears. ¾ Our packages use cardboard, polyethylene, and do not use any unnecessary materials ¾ As U-disk, the disk will be write-protected if you switch the hold to lock the buttons. ¾ Press 【Reset】button to reset the setting when hang up. ¾ The user manual only for reference. It is standard by the sample. 36 Safety instructions Hearing safety Warning: Using the earphone at high volume may result in permanent hearing loss. Listen at a moderate volume. If you experience a ringing in your ears, reduce the volume or stop listening. Traffic safety Important: Using the earphone while taking part of traffic may be dangerous and we advise not to use while taking part of traffic. It even may be illegal in some areas. European Union This product complies with the European Directives 72/23/EEC and 89/336/EEC. 37 Disposal of old electrical appliances The European Directive 2002/96/EC on Waste Electrical and Electronic Equipment (WEEE), requires that old household electrical appliances must not be disposed of in the normal unsorted municipal waste stream. Old appliances must be collected separately in order to optimise the recovery and recycling of the materials they contain and reduce the impact on human health and the environment. The crossed out 'wheeled bin' symbol on the product reminds you of your obligation, that when you dispose of the appliance it must be separately collected. Consumers should contact their local authority or retailer for information concerning the correct disposal of their old appliance. RoHS complaint The RoHS Directive stands for "the restriction of the use of certain hazardous substances in electrical and electronic equipment". This Directive will ban the placing on the EU market of new electrical and electronic equipment containing more than agreed levels of lead, cadmium, mercury, hexavalent chromium, polybrominated biphenyl (PBB) and polybrominated diphenyl ether (PBDE) flame retardants from 1 July 2006 38 Nederland United Kingdom Deutschland Heeft u vragen? Questions? Haben Sie Fragen? Gelieve uw product niet Don’t return the product. Bitte bringen Sie Ihr Produkt meteen terug brengen. Please contact our technical nicht zurück. Kontaktieren Neemt u alstublieft eerst support. Sie bitte zuerst unseren contact op met onze E-mail: support@123victory.eu technischen Kundendienst. technische ondersteuning. Telefoon: 0900-1238428 (€ 0,45 pm) E-mail: support@123victory.eu Website: www.123victory.eu Website: www.123victory.eu enjoy your life with Victory! 39 E-mail: support@123victory.eu Website: www.123victory.eu France Italia España Vous avez des Domande ? ¿ Tienen preguntas? Questions? Non restituire subito il tuo No devuelven sus Ne retournez pas votre prodotto. Prima, per favore, productos. Por favor produit. contatta il supporto tecnico. contacte nuestro servicio Merci de contacter notre E-mail: support@123victory.eu tecnico. support technique. E-mail: support@123victory.eu Website: www.123victory.eu Website: www.123victory.eu enjoy your life with Victory! 40 E-mail: support@123victory.eu Website: www.123victory.eu