1
Table of Contents
TABLE OF CONTENTS
Chapter 1 - Getting Started
Introduction
JP1 or JP1x
Remote basics
Sending an EFC
Shifting Buttons
Phantom Buttons
Phantom Devices
Restricted Buttons
LKMS Hierarchy
Record Button
Punch Through
VPT - Volume Punch Through
Channel Lock
TPT - Transport Punch Through
HT - Home Theater
RF - Radio Frequency Remotes
Modem WAV upgradeable remotes.
RDFs
IR.EXE Safety
How can I reset my remote?
Files to run the JP1 Tools
Chapter 2.
Connecting IR to your remote
Troubleshooting your connection.
A special note about batteries.
IR's Display
IR's Menus
File
Remote
Interface
Tools
Advanced
The Toolbar
IR's General Tab
file:///C|/remotejp/IRHELPPDF/Table%20of%20Contents.htm (1 of 3) [09/06/10 3:24:09 PM]
Table of Contents
Code Selector
Sorts and Moves
Learned Signals
Key Moves
Macros
Chapter 3 - Intermediate Programming
Remote Memory Usage
Device Upgrades
Using KM, Keymap-Master, to create a device upgrade
Using RM, RemoteMaster, to create a device upgrade
Protocol Upgrades
Creating a Better Upgrade
EFCs and OBCs
Chapter 4 - Advanced Programming
Extenders?
Special Protocols
DSM - Device Specific Macros
DKP Double KeyPress.
LKP LONG KeyPress
Pause
The Zenith Trick
Checking for Duration
MultiPlex
ToadTog
Custom Mode Name
Chapter 5 - Finding Codes
Finding Codes
Searching the JP1 forum file section for upgrades
Searching Hifi-Remote's Advanced Codes
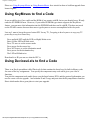
Using Learned Signals
Using Keymoves to find a Code
Using Devices4 to find a Code
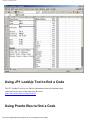
Using JP1 Lookup Tool
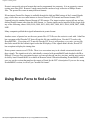
Using Pronto files to find a Code
Using Brute Force
file:///C|/remotejp/IRHELPPDF/Table%20of%20Contents.htm (2 of 3) [09/06/10 3:24:09 PM]
Table of Contents
with Finesse
Final Resort
Chapter 6 - Modem Upgradeable Remotes
WAV FILES
Chapter 7 - The Glossary
The Glossary
file:///C|/remotejp/IRHELPPDF/Table%20of%20Contents.htm (3 of 3) [09/06/10 3:24:09 PM]
Chapter1 - Getting Started
CHAPTER 1 - GETTING STARTED
Introduction
JP1 or JP1x
Remote basics
Sending an EFC
Shifting Buttons
Phantom Buttons
Phantom Devices
Restricted Buttons
LKMS Hierarchy
Record Button
Punch Through
VPT - Volume Punch Through
Channel Lock
TPT - Transport Punch Through
HT - Home Theater
RF - Radio Frequency Remotes
Modem WAV upgradeable remotes.
RDFs
IR.EXE Safety
How can I reset my remote?
Files to run the JP1 Tools
INTRODUCTION
There is so much to learn about JP1. It’s a fascinating subject, but chances are if you are reading this, all
you want to do is control your TV, VCR and DVD using 1 remote. This is my attempt to create a guide
on how to use IR and the supporting tools. But keep in mind that the software is continually evolving
and this document was last updated in the summer of 2010.
This is compiled from many posts and articles I read in the JP1 forum. I’ve borrowed freely from what
I’ve read on the JP1 site at hifi-remotes.com, and from the old Yahoo site. My thanks to everyone on the
JP1 experts who created the tools and shared their knowledge.
file:///C|/remotejp/IRHELPPDF/Chapter1.htm (1 of 13) [09/06/10 3:24:11 PM]
Chapter1 - Getting Started
JP1 or JP1.x?
Our tools only work with some of the many remotes manufactured by Universal Electronics (UEI).
These remotes have a 6-pin connector or a space for 6-pin connector on the circuit board. Prior to 2004,
if you opened up that battery compartment and saw that 6-pin connector, that was all you needed to
know. It's not that simple any more. Prior to about 2004, all remotes used a separate memory chip
(EEPROM) for programmable data. We have always called these JP1 remotes because that was the
original designation of the 6-pin connector marked on the PCB. Remotes currently manufactured use
newer technology, flash microcomputers. These omit the EEPROM in favor of using part of the flash
RAM to store programmable data.
There is a tendency to refer to the entire population of remotes we deal with as JP1 remotes, which can
be quite misleading. Only EEPROM remotes are JP1 remotes. Flash remotes are either JP1.1, JP1.2,
JP1.3. That is an important distinction because not all interfaces will talk to all UEI remotes.
Communications with a FLASH chip is very different than communications with an EEPROM and
requires a different type of interface.
Determining which type of remote you have can be quite difficult. Just because the PCB might say JP1,
doesn't mean you have a JP1 EEPROM remote. There are plenty of JP1.2 and JP1.3 remotes that say JP1
on the PCB. However if it says JP1.1, JP1.2 or JP1.3 you probably have a flash remote. JP1.1 remotes
have very limited support, and have very special communications needs, so you might be better off
picking another remote.
Before you buy or make an interface you should determine which type of remote you have. If you are
not sure what type of remote you have, try looking it up in the Chart of Remotes. If you can’t find your
model in the chart, post a question on the forum.
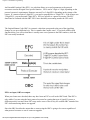
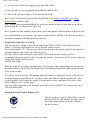
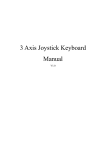
JP1 remotes employ an EEPROM
memory, which uses the I2C protocol for reading and writing. The remote
microprocessor is not involved when IR.exe communicates with the EEPROM.
The computer generates and receives I2C data by:
1) using a parallel port and some interface electronics to the 6-pin.
2) by using a serial port and some different interface electronics.
For both 1) and 2) (simple interfaces), gwiopm.sys is used to allow
IR.exe to send/receive the I2C protocol by directly manipulating the
pins of the port.
3) by using a Delcom microprocessor (and interface electronics) connected
to the computer by a USB port. The Delcom micro translates USB packets
to the I2C protocol. A device driver is needed for IR.exe to communicate
with the Delcom micro. Computers running 32 bit Windows with a UHCI
USB host controller can typically use the Delcom supplied driver; others
file:///C|/remotejp/IRHELPPDF/Chapter1.htm (2 of 13) [09/06/10 3:24:11 PM]
Chapter1 - Getting Started
should use WdpIntel (32 bit) or WdpAMD (64 bit) drivers.
4) By using 3) below combined with a JP1 adapter.
JP1.2/1.3 remotes use flash memory. IR.exe interacts with the microprocessor in the remote which does
the actual read/write of the flash memory. Communication with the remote's micro employs a serial
protocol similar to the ubiquitous RS-232.
IR can use:
1) a serial port with some interface electronics to the 6-pin. Hardware built into the serial port generates
the bit streams in the correct format, and the driver is included in the OS.
2) A USB port equipped with a USB to Serial converter, which may require a driver, or it may be
included in the OS. The converter formats the bits. Interface 1) plugs into the converter.
3) A USB to Serial converter with additional interface electronics to the 6-pin. The converter formats the
bits. A driver may be required, or included in the OS.
For all of the 1.2/1.3 scenarios, IR.exe thinks it is communicating via a serial port, and it uses
JP12serial.DLL to do that. I believe that IR.exe requires that both JP12serial.DLL and gwiopm.sys are
present even if they won't be used.
Besides those, drivers may be required to support the Delcom interface (only used with JP1) or to
support a USB to Serial converter (JP1.2/1.3 only), or for an integrated USB to Serial converter and
interface electronics (e.g. Tommy Tyler's JP1.2/1.3 interface cable.)
Remote Basics
There are a few things you should know about how your remote works when you try to set up your
program. Some of this can be gleaned from your user manual, and some of it is just learned by
observation.
The [Setup] button
Many of the topics in this help document will talk about the [Setup] button. I've used [Setup] because
that was how the button was labeled on my first UEI remote, you'll have to translate that for whatever
button is the equivalent on your remote.
Your [Setup] button is the button that you use to start manual 9xx programming when you are initially
setting up your remote manually. The labeling of the [Setup] button varies by remote models. It may be
labeled [Setup]; [Magic]; [P]; [Set]. If you are not sure check your manual.
file:///C|/remotejp/IRHELPPDF/Chapter1.htm (3 of 13) [09/06/10 3:24:11 PM]
Chapter1 - Getting Started
I can see why they called it the [Magic] button. It really makes these remotes do magical things.
There were two uses of the setup button that are pretty well covered in your remotes user manual
1) A long press is used to assign your setup codes to the device buttons.
2) A long press is used to issue a *9xx command. *9xx commands vary by remote, but include things
like recording and erasing macros, recording and erasing a learn, setting up or erasing a keymove,
searching for setup codes, blinking back setup codes.
All of these were accomplished with the long press, holding the button down until the LED flashed
twice. But did you know that on many remotes a short press of the [SETUP] button can be used to send
extended function codes (EFC), or shifting a button?
Sending an EFC
UEI remotes do a very good job of generic coverage of most brand name equipment. However if you
need functionality that is not included in the generic setup, UEI has provided a way to supplement these
codes using EFCs. EFCs can be sent directly through the remotes numeric keypad, and they can be
pasted (or keymoved) to remote buttons for regular use. A keymove is easy to setup with our software
and cables, but it can also be done via a keymove 994 command. See this Manual Programming Quick
Reference to see how to setup keymoves without the benefit of a cable.
With newbies, there seems to be a lot of confusion between setup codes and EFCs, especially on the
remotes that use 5-digit EFCs and 5-digit Setup codes. A setup code is a reference to the remotes internal
library of codes. A booklet or pamphlet came with your remote listing the available setup codes in the
remotes library. The EFCs on the other hand are codes that translate to one function within the setup
code such as the number 1 or the volume up.
Older JP1 remotes only use 3-digit EFCs. You just press [Setup] followed by xxx where xxx is the EFC.
Values range from 000 to 255.
Newer remotes use 5-digit EFCs. You press [Setup] followed by xxxxx where xxxxx is the numeric
EFC, values can range from 00000-99999.
If an EFC is shown in 3 digits, this can be sent with the newer remote by padding the EFC with "00" so
001 would be 00001. The older remotes can not send the 5-digit EFCs. By using RM and KM, we can
try to reverse engineer the 5-digit EFC into a 3-digit EFC.
Shifting buttons
Have you ever wondered where you could put another macro, or where you could store another learn?
You probably have figured out that most keys on your remote will hold learns, keymoves and macros,
not just the ones that are labeled as L (learning buttons) or M (macro buttons), but did you know that on
many UEI remotes you can store your macros, keymoves and macros on a shifted button.
file:///C|/remotejp/IRHELPPDF/Chapter1.htm (4 of 13) [09/06/10 3:24:11 PM]
Chapter1 - Getting Started
Every button on your remote has a keycode. If you were to open your remote and look at the printed
circuit board, you could read that keycode. When you do a short press of [Setup] prior to pressing a key,
the keycode of the button press is altered by setting a bit. That new keycode is for all practical purposes a
different button. It can have macros, keymoves and learns associated with it.
If the shifted function is set up to on a numeric button, when you want to use that function, you'll need to
press the [Setup] button twice before pressing the number, otherwise your remote thinks you are trying
to send an EFC. This may not be true if you are using an extender. Most extenders disable the [Setup]EFC functionality and only require a single press of the [Setup] key to access shifted number buttons.
Also most extenders let you add a third function to buttons called an xShift.
Phantom Buttons
As discussed above, each button has a keycode. When there is a unused keycode in the allowable
keycode range and that keycode doesn't have some special use to the remote, it can be used as a phantom
key. These unused keycodes or phantom buttons can only be accessed with the JP1 tools.
A phantom key may be used as the bound key in macros, learns and keymoves. These phantom keys can
only be accessed in macros and macro-like special protocols, so a physical key is required only to start
the process. By using phantom keys in this way, physical keys can be reserved for functions that must be
associated directly with physical keypresses.
Phantom Device
Sometimes a remote is setup to handle more devices than there are device buttons. For example the URC10820, 8820 and 6820 have 10, 8, and 6 device buttons respectively. These remotes all share the same
chip. The smaller remotes are missing the physical buttons to select all 10 devices, but the programming
still uses the keycode to do the device selection. So the 8820 has 2 phantom devices, the 6820 has 4
phantom devices. With our JP1 tools, we can set up macros to access the missing device buttons
(keycodes), and put our remote into another device mode.
Restricted Buttons
Almost all buttons on your remote accept learns, keymoves and macros. There are some exception.
These exceptions vary by remote, but in general, device buttons ( [TV], [DVD]. [VCR], [CBL], [SAT],
[RCVR], [CD], [PVR], [AUX], [PVR] );[Home Theater]; [Light];[Setup]; [Fav/Scan] and [Sleep]
may not accept learning or key moves without an extender. Even though these buttons are restricted, the
keycodes associated with the shifted value of these buttons don't have those restrictions. So if your
remote supports shifting, you can learn to the shifted key.
LKMS- Hierarchy
file:///C|/remotejp/IRHELPPDF/Chapter1.htm (5 of 13) [09/06/10 3:24:11 PM]
Chapter1 - Getting Started
UEI remotes can have lots of kinds of operations associated with each keycode. There maybe a function
assigned by the setup code, a learn, a keymove or a macro.
Learning,
Many JP1 remotes are equipped to learn a signal from another remote. The learned code is bound to a
keycode and a device mode. So if you learned a signal to the TV/Mute button, you could learn another
signal to the CBL/Mute button. To learn more about Learns see Chapter 2- Learned Signals.
Keymoves
Keymoves are also bound to a keycode and a device mode. Keymoves can be created by copying another
button, or they can be setup to send a function based on a numeric code called an extended function code
( EFC). A keymove "remembers" the setup code that was in use at the time they were setup. The setup
controls the signals format. Once a keymove is created, if you change your setup codes, the keymove
will still reference the setup code that was used to create them. Keymoves can be used to solve a lot of
problems. To learn more about keymoves See Chapter 2 - Creating Keymoves .
Macros
A macro a list of buttons that will be processed when the macro button is pressed. A macro doesn't
reference the device that was in use when they were setup, it is modeless. A few remotes allow you to
include another macro key at the end of the macro sequence, so that you can concatenate macros, but
most remotes just allow you a 15 or 20 steps, if no extender is in use. To learn more about macros See
Chapter 2 - Creating Macros.
LKMS - Search Order
When you press a button, the remote starts searching for what it needs to do.
First it looks to see if you learned anything to that button.
Is there a learned signal associated with this button for this device index?
YES, Execute and EXIT
Is there a keymove associated with this button for this device index?
Yes, Execute and Exit
Is there a macro associated with this button?
Yes Execute and exit
Is the button in the button map for the device type associated with the setup code pointed to by the
device index?
Yes, then if the button is assigned, Execute it and Exit, otherwise just Exit
Is the unshifted button for the device type associated with the setup code pointed to by the device type ?.
(a.k.a., shift cloak)
Yes, then if the button is assigned, Execute and Exit, otherwise just Exit
Nothing left to try, just EXIT
file:///C|/remotejp/IRHELPPDF/Chapter1.htm (6 of 13) [09/06/10 3:24:11 PM]
Chapter1 - Getting Started
So if you change the setup code for your new DVD player, and the Play doesn't seem to work it could be
several causes. If there was a learn remaining on the DVD/Play key, the setup code would not execute. If
there was a keymove remaining on the DVD/Play key, the setup code would execute. If there was a
macro on the PLAY key, the setup code would not work......
[RECORD]
UEI has a built in safety function that prevents you from unintended recording, by requiring you to press
[Record] twice, to access the function. Sometimes this safety feature isn't implemented on device types.
However, most of the time, you'll need to press [Record] twice, even when you are programming a
macro.
Punch Through, VPT, Channel Lock, TPT and HT
Universal remotes can handle several pieces of equipment. Certain groups of keys don't make sense on
all types of equipment. Punch through allows you to control other equipment with these groups of keys
without constantly change device mode. VPT, TPT, Channel Lock and HT are schemes to allow punch
through.
VPT - Volume Punch Through
Volume punch through is a feature found on most universal remotes. Volume punch through allows you
to set up volume buttons vol+,vol- and mute to work to work equipment that is a assigned to a different
device button than the device mode currently selected.
Channel Lock
Channel lock is a feature that allows the channel changing buttons to control always go to the set top
box, (STB). Many cable and satellite OEM remotes have this feature.
TPT Transport Punch Through
The transport keys, {play, stop, pause, record, fast forward, reverse} are the keys used to control
playback devices like CD players, VCRs and DVDs. Some remotes employ a transport punch through
scheme where if the device type of the current setup code doesn't include transport keys, the transport
keys will be controlled by the last device that allowed transport keys. Other remotes let you specify
which device mode will always control the transport keys.
file:///C|/remotejp/IRHELPPDF/Chapter1.htm (7 of 13) [09/06/10 3:24:11 PM]
Chapter1 - Getting Started
HT- Home Theater
Many remotes have a [Home Theater] button. The user can then specify which device will control the
different key divisions (volume, transport, channel ). Pressing this single button will then set which
device modes will cover the various key sets.
Radio Frequency Remotes(RF)
Some UEI remotes are RF/IR remotes. IR remotes need a line of sight, but RF can be transmitted
through cabinet doors and walls. UEI RF remotes have a base station. That base station receives the RF
signal and translates the signal back into IR. Some OEM remotes use RF instead of infrared signals. The
JP1 RF remotes can not be used to replace those OEM RF remotes. The JP1 RF can only communicate
with their base station. The Jp1 RF remote will NOT communicate with your RF fan, or your RF lights,
or your RF DishNetwork box. Universal RF remotes can not be used to replace RF OEM remotes.
The UEI remotes that send RF are becoming difficult to find, but there are IR Repeater systems available
that will work with any IR remote, so RF shouldn't be a deal breaker when looking for a remote.
Modem - WAV Upgradeable remotes
Some of the more expensive UEI remotes are WAV upgradeable. These remotes have a modem in them.
With JP1 software you can create a WAV sound file that will add upgrades to your remote. Modem
upgradeable remotes are really nice if you are managing a remote for a friend. You can just email them a
WAV file and they don't need to have an interface.
IR Safety
IR.exe is the program that is going to read and write information from the remote. IR will only read and
write the E2/EEPROM area of the remote where the user data is stored. IR does not access the ROM
area.
All sorts of safe guards are built in to stop the user from making mistakes, but there are times when
things don't always go as planned. A best practice is to always start your work by downloading from
your remote. I thought that would insure that I was getting all the information out of the remote, but I
was wrong. Sometimes IR can make silent changes to the data you download. So a cautious user should
start with a RAW DOWNLOAD of a new remote. A RAW DOWNLOAD is the safest way to make sure
you have a good .ir file to fall back on in case things get really messed up. We will show you how to
make an IR backup file in after we've gotten your remote connected in Chapter 2.
file:///C|/remotejp/IRHELPPDF/Chapter1.htm (8 of 13) [09/06/10 3:24:11 PM]
Chapter1 - Getting Started
If something does go wrong, the best way to repair the E2/EEPROM area is to upload your backup
image to get things back to normal. This is especially important if you are using an OEM remote,
because the OEM may have added special settings in the remote after the remote was manufactured. If a
good backup is not available, a full manufacturer’s reset is usually the next step. The problem with a
manufacturer's reset is that for OEM remotes, you will lose special settings and you may lose access to
special functions for the OEM .
There are many reasons the remote might misbehave. Sometimes just removing and replacing the
batteries might clear up the problem. If bad information in the E2/EEPROM area is causing the problem,
removing and replacing the batteries is not going to help. There must be an active "write" to change
anything in the E2/EEPROM area of the remote. The E2/EEPROM area retains its information even
when there is no power supplied!
If you installed a stay resident extender you'll need to check your extender documentation to see how to
do a recovery, the steps that follow are not appropriate for these JP1.3 stay-resident extenders.
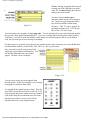
How can I reset my remote?
There are two or more types of resets within your remote. There is a 980/OPS, which is usually
described in the user's manual. There is also a full manufacturer's reset MFR/981, which restores your
remote to the way it came from the factory. If your are using an OEM remote, such as a cable company
remote, you will lose information that was added by the OEM company specific to their cable system
when you perform a reset.
An OPS/980 reset will just delete your (a) learned signals, (b) macros and (c) keymoves. It won't erase
any upgrades that are loaded in the remote, it won't change the setup codes that are assigned to the
device buttons and it won't work if the EEPROM contents are corrupted.
An MFR/981 reset will discard the entire contents of the EEPROM area and will reset it to the factory
defaults, so this is a very useful command if you have really screwed up your EEPROM contents, or if
you have just installed a new EEPROM.
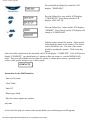
1
For most non-LCD remotes:
- Press and hold SETUP (might be labeled SET, MAGIC or P), 2 flashes
- Type 981, 4 flashes
2
For most Kameleon remotes:
- Press and hold SETUP (might be labeled SET, MAGIC or P), 2 flashes
- Press OTHER
- Type 981, 4 flashes
3
For the current LCD remotes (e.g., URC-8910, etc):
- Press and hold SETUP until screen reads "CODE SET"
- Press RECORD
- Follow the prompts
4
For the RCA RCU810:
file:///C|/remotejp/IRHELPPDF/Chapter1.htm (9 of 13) [09/06/10 3:24:11 PM]
Chapter1 - Getting Started
- Press and hold 'CODE SEARCH'
- Press RECORD
- Scroll up to MFR RESET
- Follow the prompts
5
For the Radio Shack 15-2107:
- Press and hold SETUP (i.e., the green P button) for 3 seconds
- Then press and hold MUTE for 3 seconds
- Scroll up to MFR RESET
- Follow the prompts
6
For older LCD remotes (e.g., URC-9800, 15-1995, Maestro II, etc):
- Unlock the Service Menu
- Restore Factory Defaults
7
For the Sony Tivo (RMT-V303) and DirecTivo (RM-Y809) remotes:
- Press and hold BOTH the Tivo and TV-Power buttons until the red LED stays lit
- Type 0981, 4 flashes (Note: the leading zero is required)
8
For the Motorola DCP501R
- This remote has a button labeled "Setup", but its function is to enter the setup
menu on the DCP501 box itself.
- Hold down one of the VCR or TV device buttons until all the device buttons begin
to flash in sequence
- Enter "981" when the sequence completes. The Cable button will flash four times.
How do I do a reset with extender?
There are two types of extenders, those that need to be activated every time you remove
the batteries and those that stay active. You’ll need to read the documentation to make
sure that you follow the proper procedure for your extender.
Stay resident extenders (JP1.3 extenders written by unclemiltie) have special
recovery procedures, see the documentation.
EEPROM remotes/JP1.2 Extenders
Remove a battery.
Press any key.
Put battery back.
Do NOT press TV/Power.
Now you can use the [Setup] button to begin the reset steps as described above
What if my remote was not listed above?
file:///C|/remotejp/IRHELPPDF/Chapter1.htm (10 of 13) [09/06/10 3:24:11 PM]
Chapter1 - Getting Started
If your UEI remote doesn't fall into any of the categories above and it doesn't have a
SETUP button (even with a different label), you might still be able to perform a factory
reset. Check your user manual to see what the instructions are to program the remote;
specifically you should look for instructions that include typing 9xx type commands.
The first step in these instructions usually involves holding down 2 buttons at the same
time (just like with the Sony Tivo remotes in #7 above). Therefore, to perform a factory
reset, you should hold those same 2 buttons down, and then type 981. If that doesn't
work, try typing 0981 (i.e., with the leading zero).
_________________________________________________________________________
RDFs
Each remote model has different requirements. In order for our tools to know how to handle the different
remotes, the remotes are explored and a Remote Definition File (RDF) is developed.
Our software tools, IR, RemoteMaster, and RMIR all need RDFs to make your remote work. We
identify the different remotes by the signature found in the E2 area. That signature is then used for the
first part of the RDF's file name. When downloading from a remote, or opening an .ir file, IR.exe uses
that signature to find an RDF. The RDF is needed so that the data in the E2/EEPROM area can be
interpreted.
You need to download the remote definitions, and tell IR where they are as detailed in the in Connecting
to the Remote section of Chapter 2.
Get your RDFs here
Forum Index -> Download Database -> JP1 File Section -> Tools -> Main
RDFs under development can be found here
Forum Index -> Download Database -> JP1 File Section -> Tools -> RDF Files
If you get a message that there is no RDF for your remote, check to make sure you have the latest and
greatest RDFs installed and that your path is set correctly in IR. If it is a newer remote check in the RDF
Files area to see if there is currently an RDF file being developed for this remote.
If it is indeed a new remote, a new RDF will need to be created.
This is the process for creating a new RDF file.
file:///C|/remotejp/IRHELPPDF/Chapter1.htm (11 of 13) [09/06/10 3:24:11 PM]
Chapter1 - Getting Started
Your first step should be to download the memory and post it to the discussion group. You should also
mention what setup codes are programmed to each of the device buttons. Then a JP1 expert should be
able to put a quickie RDF file together for you. This will enable you to look at the memory with IR.exe,
but it will be up to you to get the rest of the more detailed information.
If the remote let's you program macros, you would need to program 3 or 4 macros, just enough to
include every button on the remote once. You should make a note of the order of the buttons that you
included in each macro, then dump the memory again and look at the macros using IR.exe, this will tell
you the key codes for each button, you can then edit the RDF file to use the correct button names.
If this remote let's you do other things, like setting VPT, etc, you should dump the memory, change the
setting, then dump again to see which bytes of data changed. This is where the "set baseline" function in
the raw data panel proves extremely useful.
Files for JP1 Tools
The JP1 tools are a work in progress. There are often new versions. You always need to check for
updates and read the readme files and release notes to find out what is new.
The JP1 tools are delivered in pieces. You'll need to download several pieces depending on your
needs. There are two different programs, IR or RMIR, available to talk to the remote. This document
does not cover RMIR. At this writing RMIR is still in beta, so it is assumed you'll be running IR to talk
to your remote, and you will need either Keymap-Master or RemoteMaster if you have a piece of
equipment that is not covered by the remote’s built-in library of setup codes.
To run IR you’ll need these files.
IR.exe
Forums->Downloads->Tools->Main
DecodeIR.dll
Forums->Downloads->Tools->Main
gwiopm.sys
(should be bundled with IR)
JP12serial.DLL
(should be bundled with IR)
RDFs
Forums->Downloads->Tools->Main
You'll also need any additional drivers that were required for your interface or any USB adapter you
have in use. The delcom driver was misbehaving on Vista and Win 7 so a new driver was developed in
lieu of the delcom driver. (2010) so you'll need to use one of the driver sets listed below.
If you have a JP1 EEPROM USB interface cable
WdpAMD.zip|
Forums->Downloads->Tools->Main
or
WdpAMD.zip is for 64 bit computers
WpdIntel.zip
WdpIntel.zip is for 32 bit computers
file:///C|/remotejp/IRHELPPDF/Chapter1.htm (12 of 13) [09/06/10 3:24:11 PM]
Chapter1 - Getting Started
If you need Wav Output
IR2Wav
Forums->Downloads->Tools->Main
SunJava 1.4 or later Download for free from http://java.sun.com/javase/downloads/index.jsp
If you plan on running an extender
ExtInstall
Forums->Downloads->Tools->Program
You'll want version 2.0 or later. Version 2 introduced Flash remote support
and also preserves comments from the original IR file.
runtime libraries
For version 2.0, you'll also need to get the runtime libraries from Microsoft
http://www.microsoft.com/downloads/details.aspx?familyid=200B2FD9AE1A-4A14-984D-389C36F85647&displaylang=en
extender file
Forums->Downloads->Extenders
To run Keymap-Master you’ll need these files
Keymap-Master.xls Forums->Downloads->Tools->Main
Microsoft Excel
Purchased separately or bundled with Microsoft Office
Check Keymap-Master Release Notes to see which versions of Excel are
acceptable. As of Keymap-Master 9.06 Excel 2007 had some unresolved
issues.
To run RemoteMaster you’ll need these files.
(See RemoteMaster Section to see more about installing this option)
RemoteMaster.JAR
Maps & Images
RDFs
Forums->Downloads->Tools->Main
Forums->Downloads->Tools->Main
Forums->Downloads->Tools->Main
SunJava 5.0 or later
Download for free from http://java.sun.com/javase/downloads/index.jsp
Either the runtime or the java Developers Kit will allow you to run
RemoteMaster
________________________________________________________________________
file:///C|/remotejp/IRHELPPDF/Chapter1.htm (13 of 13) [09/06/10 3:24:11 PM]
Chapter2 - Programming our remote
CHAPTER 2 - PROGRAMMING A REMOTE
This chapter covers basic programming your remote of your remote, using IR.EXE. These could have
done manually with 9xx commands.
Connecting IR to your remote
Troubleshooting your connection.
A special note about batteries.
IR's Display
IR's Menus
File
Remote
Interface
Tools
Advanced
The Toolbar
IR's General Tab
Code Selector
Sorts and Moves
Learned Signals
Key Moves
Macros
CONNECTING TO THE REMOTE
1
Check for the latest Updates.
2
Read the Release Notes that came with your IR.EXE
3
Download the latest RDFs.
The RDFs are no longer packaged with IR you need to get these separately
Forum Index -> Download Database -> JP1 File Section -> Tools -> Main
4
RDFs still under development can be found at the JP1 forum.
Forum Index -> Download Database -> JP1 File Section -> Tools -> RDF Files
Tell IR where the downloaded RDFs are located.
File -> Set Directory -> RDF Directory
Navigate to the folder where your RDFs are stored.
5
Tell IR what type of cable you are using JP1-Parallel, JP1-Serial, JP1-USB, or JP1.x.
file:///C|/remotejp/IRHELPPDF/Chapter2.htm (1 of 24) [09/06/10 3:24:15 PM]
Chapter2 - Programming our remote
______________________________________________
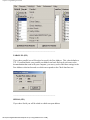
PARALLEL (JP1)
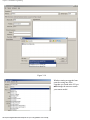
If you chose parallel you will be asked to specify the Port Address. This value defaults to
378. If you don't know your parallel port address and can't find out by reference to the
documentation that came with your computer, you can try each of the three settings in the
Port Address selection box and see which one responds to the Check Interface test
______________________________________________
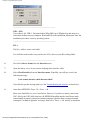
SERIAL (JP1)
If you chose Serial you will be asked to which com port address
file:///C|/remotejp/IRHELPPDF/Chapter2.htm (2 of 24) [09/06/10 3:24:15 PM]
Chapter2 - Programming our remote
______________________________________________
USB – (JP1)
If you choose Jp1 USB, 1. Download either WdpAMD.zip or WdpIntel.zip and unzip to a
convenient location on your computer. Read and follow the installation instructions since the
installation procedure varies by operating system.
______________________________________________
JP1.x
The Jp1.x cable is a true serial cable.
You will also need to make sure you have the JP1.x driver in your IR working folder.
______________________________________________
6
Now Select Driver Status from the Interface menu.
7
Open the battery cover of your remote and plug in the interface cable.
8
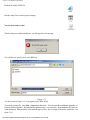
Select Check Interface from the Interface menu. Hopefully you will now receive the
following message:
Your remote interface check has succeeded!
If you did not get this message please see the Troubleshooting the interface section below.
9
Auto detect EEPROM , Force <2k , Force >=4k
Most users should leave it set to Auto Detect. However, if you have a remote, such as the
URC-9960 or the URC-8060, that has a 4k EEPROM installed and the Auto Detect mode
cannot handle it properly (the most common symptom is that the data is wrapped around
causing the "no data in signature" message), then select "Force >= 4k" and try to download
file:///C|/remotejp/IRHELPPDF/Chapter2.htm (3 of 24) [09/06/10 3:24:15 PM]
Chapter2 - Programming our remote
10
Press the [Download from Remote] button.
IR will now look through the RDFs in the location you specified, and try to find the best
match according to the signature it found in the data sent from the remote. You will notice
that the title bar changed to reflect the type of remote it is.
11
You are now ready to save the information to an IR file.
Select Save as from the File menu.
You will want to have a copy of your setup before you start playing with your remotes
memory. Make sure to give your file that describes it accurately. You will probably have
several versions of your IR file before you are completely happy with it.
Note: If you are starting with an OEM remote, a RAW Download is STRONGLY
recommended.
When you did the normal downloaded, IR may have made some silent changes or even asked
to make some changes. While this usually isn't a problem, its still better to err on the side of
caution. A good insurance policy would be to download and save a RAW Image before you
start working on a remote. To do that you need to go to the Advanced menu and Enable Raw
download.
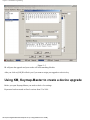
1) Advanced->Enable RAW Download
2) A [Raw Download] button should have appeared in the "middle button area" of the
general tab, and/or as a new option on the toolbar. If neither the middle buttons nor the
toolbar is on, you will need to turn on one or both of those options with the Tools->Options
menu item.
3) Press the [Raw Download] button and wait for the download
4)Then save that image using File->Save from the menu.
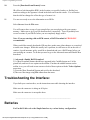
Troubleshooting the Interface:
If you built your own interface, see the instructions on trouble shooting the interface.
Make sure the connector is sitting on all 6 pins.
Make sure the connector is not upside down.
____________________________________________________________
Batteries
For Parallel Cables a.k.a. the Simple Interface try various battery configurations
file:///C|/remotejp/IRHELPPDF/Chapter2.htm (4 of 24) [09/06/10 3:24:15 PM]
Chapter2 - Programming our remote
For all the other types of cables, strong batteries are beneficial when
communicating with the remote, but this is not always true for the parallel interface
cable. The JP1 simple interface is very sensitive to the charge in memory. Try
various battery configurations to see if you can establish communications. You
may need to try the download with batteries, without batteries, with old batteries,
with new batteries, with one battery reversed.
As long as were talking about batteries, it is important that the batteries have a snug
fit. The remote manual recommends alkaline batteries, but many of the JP1 users
use rechargeables just fine. However you want to stay away from the cheapy noname batteries because they are not always standard size, and loose batteries in your
remote can make the remote act up, especially if you are using an extender
____________________________________________________________
Try Adjusting the transmission Delay
From the Advanced select Transmission Delay and change it from 0 to 400
, which slows things down a bit so we're not trying to outrun the interface
___________________________________________________________
Cable Issues
file:///C|/remotejp/IRHELPPDF/Chapter2.htm (5 of 24) [09/06/10 3:24:15 PM]
Chapter2 - Programming our remote
Make sure you are not trying to talk to a JP1 remote with a JP1.x cable.
Make sure you are not trying to talk to a JP1.x remote with a JP1 cable.
How can you tell what kind of remote it is?
See Chapter 1 JP1 or JP1x
Were you trying to use a serial or parallel to USB adaptor?
The JP1 cable will not work with a serial to USB adapter because, rather
than using true RS232 serial communications as a JP1.x cable does, JP1 uses
a couple of control lines in "bit bang" mode to clock data directly to/from
the EEPROM, and the USB port wouldn't have a clue what the signals are.
Likewise, the Parallel cable will not work via a Parallel to USB adapter.
You have to have a specifically built JP1 USB cable. Different parts,
different price, etc. Check out the Marketplace section.
NO RDF Found
If you get that message you most likely didn't set your folder correctly. Check to see that your folder is
set correctly. If that fails to fix things please see Chapter 1 - RDFs.
If your issues are not resolved, talk to the experts at the JP1 forum.
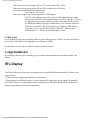
Congratulations!
If you made it this far you've probably got your remote connected and have downloaded from your
remote.
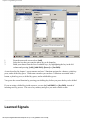
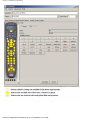
IR's Display
You'll notice that your screen shots are going to look considerably different than mine. There are two
causes for this.
1) There are menu settings that add buttons and features.
2) Each remote has different features, if tabs or buttons don't apply they are not shown.. Remember
those RDFs that were so important to the download process? Well these RDFs tell IR which tabs to
display, depending on the remote's capabilities.
file:///C|/remotejp/IRHELPPDF/Chapter2.htm (6 of 24) [09/06/10 3:24:15 PM]
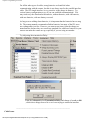
Chapter2 - Programming our remote
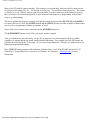
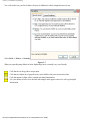
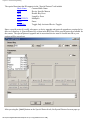
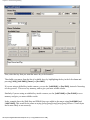
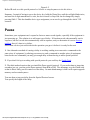
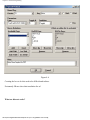
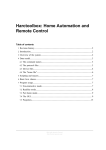
For example, this screen has a bunch of different options that will be different than yours.
The title(1) display can be expanded in the tools options, the toolbar (3) can be turned on and off and
the icons may be different depending on options. The tabs (4) available change depending on what
features the remote has. The middle button area(5) can be hidden shown in the options menu. shown.
Some buttons, such as the Upload Wav to remote button (6) will only show when a remote that support
wav upgrades are shown. Some buttons like the Raw Download(7) can be turned on by selecting an
option from the Advanced menu, and others like the EEPROM type buttons (8) can be toggled on and
off in the tools options menu. Even the menu items(2) can be missing or suddenly appear on the menu.
Make sure to read the section on the menu to see how to control these options.
file:///C|/remotejp/IRHELPPDF/Chapter2.htm (7 of 24) [09/06/10 3:24:15 PM]
Chapter2 - Programming our remote
IR's Menus
File Menu
New > current RDF
This option is rarely used, since it is better to let it start with a
download.
Presents you with a list of RDFs.
> Select
This is rarely used since IR will open the correct RDF when an IR file
is opened or the remote is downloaded.
Open
Opens an .ir file and can also open the old .txt format
Save
Saves the .ir file
Save As
Save the .ir file with a new name
Merge using ExtInstall
This allows you to merge an extender into the current .ir file
Import from WAV
> new image
> merge with current
See Chapter 6
Export to Wav
>Entire image
>Settings
>Keymoves, Macros
>Upgrades
>Learns
See Chapter 6
Set Directory
>RDF Path
RDFs are required for IR, please down load them and
>ExtInstall Path
Extinstall the program to merge extender code into your current
setup. Extinstall is optional.
>IrToWav Path
IRToWav is only for remotes that have modems. See Chapter 6
>RemoteMaster Path
If you want to be able to open RemoteMaster from inside IR, set the
post here. Optional
>IR Help Path
Path to this file
file:///C|/remotejp/IRHELPPDF/Chapter2.htm (8 of 24) [09/06/10 3:24:15 PM]
Chapter2 - Programming our remote
>Export Output Path
Summary
Path for pronto output. File name will be ExportedPronto.txt.
The summary is a great way to diagnose problems, and document
setups.
recent file list
Exit
Remote
Quit
Directs communication with remotes
Download from Remote
Reads the remotes E2/EEPROM area, and uses the signature to find
the appropriate RDF to display the data.
Upload to Remote
Writes the data to the remote.
Upload to Baseline
Uploads the remote to the baseline. This is used in RDF development.
Interface
JP1 Parallel
Select this if you are using an EEPROM parallel interface.
JP1 Serial
Select this if you are using an EEPROM serial interface.
JP1 USB
Select this if you are using an EEPROM USB interface.
JP1 (Serial or USB)
Select this if you are using a FLASH interface for JP1.1, JP1.2, or
JP1.3
Driver Status
Checks that drivers are there
Check Interface
Does a quick check to make sure IR can see remote.
Auto Check
The meaning of AutoCheck has changed. There is no longer a need to
check the interface with the remote unplugged, so the interface check
is now done (transparently) before every read/write operation. In
extremely rare circumstances (with "marginal" remotes, interfaces,
and/or parallel
ports) the interface test fails but the interface will still work. The
AutoCheck menu item allows users with this problem to disable the
automatic test. Note that regardless of the AutoCheck setting in
previous versions, AutoCheck with default to on.
Verify Writes
Write verification is optional, since errors should be caught as they
happen.
Auto Detect EEPROM
This is the setting most EEPROM users should use.
file:///C|/remotejp/IRHELPPDF/Chapter2.htm (9 of 24) [09/06/10 3:24:15 PM]
Chapter2 - Programming our remote
Force <= 2k
Use if you have a 1k chip and you are having troubles with the
interface. Most users should use the AutoCheck option.
Force >=4k
Most users should leave it set to AutoCheck.. However, if you have a
remote, such as the URC-9960 or the URC-8060, that has a 4k
EEPROM installed and the Auto Detect mode cannot handle it
properly (the most common symptom is that the data is wrapped
around causing the "no data in signature" message), then select "Force
>= 4k" and try to download
Tools
Options
> Tool Bar
Displays the toolbar under the menu line
> Middle Buttons
Displays or removes the buttons in the middle of the general screen
that duplicate the toolbar buttons.
> Extended Titles
Changes the title bar on the main window. This option adds the
signature, version # of IR, interface type the window to the window.
> Highlighting
Highlighting is used to studying the raw data. .
EFC Calculator
Converts to and from EFCs.
Checksum Calculator
Computes a checksum
Code Selector
The Code selector is available for remotes that have a [SetupCodes]
Section in the RDF. These were added in version 1.30 of the RDFs.
The code selector is available on the toolbar. It is a very helpful tool
for all users.
Set Baseline
This sets a baseline and highlights all changes in the RAW data after
the baseline is set.
Clear Baseline
Turns off baseline highlighting.
Restore to Baseline
Advanced
Rolls back to state when baseline was set.
Mostly for use by RDF developers, but there are some useful features
for the average user too.
Clean Upper Memory
Do not use this option on a working IR file. This is used by RDF
developers to see what bits are being changed. It is not going to make
your remote work better, in fact it will probably make your remote
not work at all.
Suppress Messages
This is a really nasty option, it suppresses all warning messages and
gets you into all sorts of trouble! Do not check this box.
Always Allow RDF Selection
Always give you the choices.
file:///C|/remotejp/IRHELPPDF/Chapter2.htm (10 of 24) [09/06/10 3:24:15 PM]
Chapter2 - Programming our remote
Always Show Extenders
List both extender and normal RDFs
Show RDF Edit Buttons
This is a really great feature if you are involved in editing RDFs. Rdf
Edit and Refresh buttons appear in the tool bar and Edit and Refresh
options end up on the File menu as well. This allows the RDF
developer test RDF changes without closing IR.
Wrap Summary Lines
Wrap the lines on the various summary reports.
Forced Learn Timings
This option shows all learns as timings, not just the ones that didn't
decode. If you are at all interested in learning about protocols I'd
recommend turning this option on.
Disable Device Offset
Some OEM remotes disguise the standard setup codes, by adding an
offset.
Active Pronto Switch
The normal operation of the radio buttons on the Add/Edit dialog box
for learned signals is, with one exception, passive. You paste, or
otherwise enter, the signal data and select UEI Learned or Pronto
format independently. The format choice simply tells IR.exe how to
interpret the data when you press the OK button. The new option
Active Pronto Switch on the Advanced menu
changes the radio buttons to an active mode. In that mode you need to
select the format before you enter or edit the signal data. Switching
the radio buttons to the other format will convert the
display in the data window to the new format. You can therefore
convert the data between formats without needing to accept it with the
OK button. The one exception in normal operation
is when you press Edit for an existing learned signal but have not yet
actually edited it. The buttons are active until you actually make an
edit. This enables you to switch to, and display, the Pronto format of
the existing signal without needing to turn on Active Pronto Switch.
IRP Data Format
This enables you to choose whether the data values displayed in the
Analyzer window are shown in binary (base 2), quaternary (base 4) or
hex (base 16). The default is hex.
Always Display EEPROM
Type
Displays AutoDetect and Force options on General Page.
Transmission Delay
Transmission Delay is used with the old EEPROM serial and
parallel interfaces. If you can't connect adjusting the transmission
delay may slow things down enough so that communications can be
established.
Initialize to $00
For use by RDF developers, not for IR users.
Initialize to $FF
For use by RDF developers, not for IR users.
Enable Raw DownLoad
Downloads the data from the E2/EEPROM area without applying any
rules or making any changes.
Enable Unsafe Upload
Allows unsafe upload.
file:///C|/remotejp/IRHELPPDF/Chapter2.htm (11 of 24) [09/06/10 3:24:15 PM]
Chapter2 - Programming our remote
Prioritize Macros
This option overrides the default order and puts macros first.
Normally IR orders keys in this order: KeyMoves, SpecialProtocols,
Favs, Macros.
Disable DecodeIR
DO NOT USE. IR works with DecodeIR to decode signals, but it also
has an obsolete internal decoder. If this option accidentally gets
turned on, your decodes will not make sense. If decodes don't make
sense make sure this option did not get turned on!
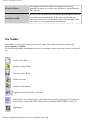
The Toolbar
The toolbar is a set of icons located just below the menu. The toolbar is turned on and off with
Tools->Options->ToolBar.
If you are having trouble deciphering the icon, use your mouse to hover above the icons to see the tool
tip.
Create a new .IR file.
Open an existing .IR file.
Save the current .IR file.
Upload to remote.
Download from Remote
Toggle between JP1 and JP1.x interfaces.
Code Selector, lets you pick device codes from a list, instead of typing them in. Requires a
[SetupCodes] section in the RDF. This section was added to RDFs in RDF release 1.30
Highlighting
file:///C|/remotejp/IRHELPPDF/Chapter2.htm (12 of 24) [09/06/10 3:24:15 PM]
Chapter2 - Programming our remote
Undo Sort/Move
Redo Sort/Move
Opens a new session of RemoteMaster. You must have set the path to remote master in File>Set Directory->RemoteMaster
Opens Excel and loads the KeyMap-Master spreadsheet. KM must have been opened at least
once before.
Opens the current RDF
Refreshes the IR with the new RDF information.
__________________________________________________________________________
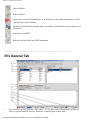
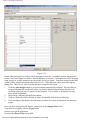
IR's General Tab
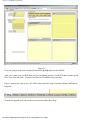
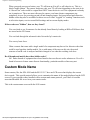
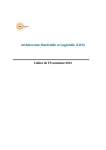
1
Note that there are tabs at the top of the screen. You use these tabs to change to the KeyMoves,
Macros, Special Protocols, Devices, Protocols, Learned Signals or Raw data.
file:///C|/remotejp/IRHELPPDF/Chapter2.htm (13 of 24) [09/06/10 3:24:15 PM]
Chapter2 - Programming our remote
2
These little buttons allow you to copy information into a clipboard
3
The Device Buttons correspond to the remotes device mode buttons. The labels for these buttons
come from the RDF. On some remotes like the 6012, or the 6131, there me more device mode
buttons than are actually on the remote, because the signature in the remote is the same as other
remotes in the family that have more physical device buttons.
The type and code associated with the device button tells the remote which setup code to use to
process button presses. The setup code could refer to the 4-digit code library of internal codes that
came with the remote, or these could refer to device upgrades that have been installed in the
upgrade area of this remote.
4
5
6
7
8
9
10
11
A new feature has been added to the IR to help you select only valid codes. For this to work, the
RDFs need to have a [SetupCodes] section. Most RDFs had this information added in release 1.30.
If your remote's RDF has this information, when you select incorrect setup codes, they will be
shown in RED. This also led to the code selection tool shown below..
The "Other Settings" are remote specific. This is where you will find features of the specific
remote. The remote above has VPT (Volume Punch Through) set to the TV. This is where you
might find HT (Home theater settings) and other special settings for the particular remote model.
Download From the remote
Upload to the remote
Auto-detect EEPROM type, IR can't always distinguish large or smaller than normal EEPROM's
that have been installed in a remote, and it may need to be forced.
Buttons 5, 6, and 7 are part of the "middle buttons" set. These buttons can be hidden by a Tools>Options selection.
This indicates the amount of memory available for keymoves, macros and fav lists.
Indicates the upgrades area. The upgrade area can be rolled into other memory areas.
Indicates if there is any learning memory available.
This is the IR LED simulator.
Normally when IR completes a download and releases its reset of the remote, the red LED blinks
twice to indicate the remote has been re-enabled. There are some circumstances where the LED
doesn't blink, to tell you that the download is complete. To compensate for this, IR simulates the
LED with a little red dot at lower left of the display. When that dot blinks after about two
seconds, you know the operation has been completed successfully. Otherwise you'll see an error
message displayed.
file:///C|/remotejp/IRHELPPDF/Chapter2.htm (14 of 24) [09/06/10 3:24:15 PM]
Chapter2 - Programming our remote
Code Selector
The code selector lets you pick your
setup codes from a pick list, instead of
typing them in. The code selector can be
accessed from the Toolbar, or from the
Tool menu.
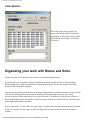
Organizing your work with Moves and Sorts.
The next screens we are going to look at have user populated grids and lists.
The grids and lists can quickly become a jumbled mess which can make it hard to read and debug.
Recent changes have improved our ability to organize these grids. We can sort and move the keys
around to make them more readable.
You can sort most grids and list boxes by clicking column headers. Sorting on multiple sort keys can be
achieved by clicking headers in succession, starting with the most minor sort key. As is usual,
successive presses of the same header reverse the sort order. The list boxes of the Devices, Protocols
and Learned Signals pages can also be sorted, but as these do not have headers, there are instead entries
on the right-click menu to sort them.
You can also move 1 or more lines in a grid. Select 1 or more rows, and then drag them with the mouse.
In the case of grids, the in the case of grids, the drag must be started in the left-most (row number)
column.
file:///C|/remotejp/IRHELPPDF/Chapter2.htm (15 of 24) [09/06/10 3:24:15 PM]
Chapter2 - Programming our remote
There are buttons on the toolbar, and corresponding entries on right-click menus, to undo moves and
sorts and also to re-do them after they have been undone. Up to eight levels of moving or sorting can be
undone and redone, independently for each grid or list box.
________________________________________________________________
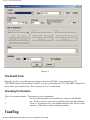
Macros
Macro buttons can be setup to perform repetitive, time-consuming operation for easy, convenient
access through the press of a single key. Macro buttons are ideal for home theater operations, setting
a favorite channel, guide steps or other multiple functions you would like to control with one button.
Each Macro key can hold up to 15 key presses. Macros cannot be nested in an unextended remote.
That means you cannot have a macro call another macro in the middle of its key press sequence.
You can include device keys in your macros. They device key will change the active device, so that
subsequent button presses will come from that new device.
Macros can be placed on most buttons. You usually need an extender if you want to put a macro on a
device button, although a few rare remotes, like the URC-10820N, do allow macros on device
buttons. Macros are modeless, they are active for ALL device modes.
A macro is just a sequence of button presses. Each button press uses the active device mode at that
moment in time.
Macros can be programmed without IR, via the SET 995 command, but they are much easier with IR.
file:///C|/remotejp/IRHELPPDF/Chapter2.htm (16 of 24) [09/06/10 3:24:15 PM]
Chapter2 - Programming our remote
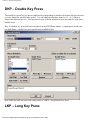
1
2
3
From the macro tab screen select [Add]
Select the key that you want the macro key to be bound to.
Build your macro from the list of available keys, by highlighting the key in the left
column and pressing [Add], [Add Shift]; [Insert] or [Ins Shift].
As was described in chapter 1, most remotes can have 2 functions assigned to a button, a plain key
press, and a shifted key press. With some extenders you can have 3 functions associated with a
button, a plain key press, a shifted key press, and an xshifted key press.
You get to the second function by pressing your shifting key before you press the key to be shifted.
If you are using a shifted key inside a macro, you use the [Add Shift]/ or [Ins Shift], instead of
inserting two key presses. This saves key memory and gives you more reliable results.
_________________________________________________________________________
Learned Signals
file:///C|/remotejp/IRHELPPDF/Chapter2.htm (17 of 24) [09/06/10 3:24:15 PM]
Chapter2 - Programming our remote
Many of the JP1 models support learning. Your remote's user manual may lead you to believe that you can
only teach your learning keys, L1 – L4, but that is not the case. You can learn to almost any key. The reason
we always try to say "almost" when we talk about the ability to learn to almost all of the buttons is because
there are always a few buttons that qualify as special buttons and cannot be re-programmed in the normal
ways (e.g. with learning).
The device buttons are the prime example, but right after them are buttons like [FAV/SCAN] and [SLEEP]
on remotes like the 15-1994, the [LIGHT] button and the [SETUP] button are other examples of buttons that
can never be re-programmed (without an extender, at least).
Some of the newer remotes have restrictions on the [POWER] button too.
The [COMM SKIP] button on the 8910 is obviously another example.
Once you eliminate the special buttons, you are free to program every other button in all device modes,
regardless of whether that device mode usually includes that button. For example, the three PIP buttons are
typically only included in the TV keymap. So, if you are programming the CD mode, you might elect to use
learning to program them instead.
Most EEPROM learning remotes will hold about 28 learned keys, some of the FLASH remotes up to 50
learned keys. Learned keys have a special area of memory. See Chapter 3 - Memory Usage for more
information..
file:///C|/remotejp/IRHELPPDF/Chapter2.htm (18 of 24) [09/06/10 3:24:15 PM]
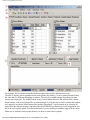
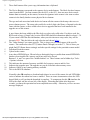
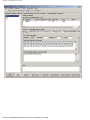
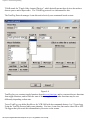
Chapter2 - Programming our remote
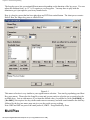
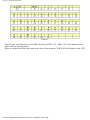
When you download from your remote, DecodeIR attempts to identify the protocol, device, sub-device and
OBC and EFC. This information is of great use when you are doing KeyMoves or building device upgrades.
If a signal didn't decode you will get the timing data. You can get that information on all signals if you turn on
the Advanced>Forced Learned Timings options. This is really helpful when you are trying to learn about
protocols. But even if you are not interested in the data, the Code Summary is a very handy report for
gathering information to make an upgrade. Below, you'll see what the screen looks like if you turn on the
Forced Learned Timings.
file:///C|/remotejp/IRHELPPDF/Chapter2.htm (19 of 24) [09/06/10 3:24:15 PM]
Chapter2 - Programming our remote
file:///C|/remotejp/IRHELPPDF/Chapter2.htm (20 of 24) [09/06/10 3:24:15 PM]
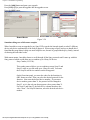
Chapter2 - Programming our remote
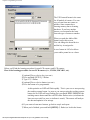
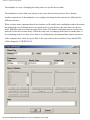
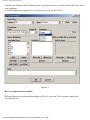
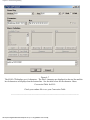
The UEI Learned format is the same
for all models of remotes. You can
copy a learn from one remote to
another. Some remotes have
learning memory but no learning
hardware. If you have another
learner you can transfer the learn
from one type of remote to another
When you push the Add or Edit
button you get this screen.
You can change the bound device
and the key its assigned to.
A new feature in 8.03 also allows
you to add a pronto hex as a learn.
Below you'll find the learning procedure for non-LCD remotes, and LCD remotes.
Here is the learning procedure for non-LCD remotes (i.e., 15-1994, URC-8811, etc).
1) [optional] Press a device key (see note)
2) Press and hold [SETUP], 2 flashes
3) Type 975, 2 flashes
4) [optional] Press a device button (see note)
5) Press the button to be programmed
At this point the red LED will flash rapidly. This is your cue to start pressing
the teaching remote button. As soon as you start pressing the teaching remote
button, the red LED will stop flashing, but you should KEEP PRESSING the
teaching remote button until the red LED either flashes twice (to indicate the
learn was successful) or once (to indicate it wasn't). The remote will analyze
the data and optimize it for storage.
6) If you want to learn more buttons, go back to step 4 and repeat.
7) When you're finished, press and hold [SETUP] (2 flashes) to lock in the learns.
file:///C|/remotejp/IRHELPPDF/Chapter2.htm (21 of 24) [09/06/10 3:24:15 PM]
Chapter2 - Programming our remote
Note: Pressing a device button in step 1 sets the default device mode to be
used for all the learned buttons, thus eliminating the need for pressing a device
button in step 4. You should do this if you want to learn all the buttons under
the same device mode.
If you omit step 1 and step 4, the buttons will be learned under the last device mode
used, so if you can't remember what that is, press a device button.
If you want to learn the buttons under several different device modes, omit step 1 and
press the relevant device buttons in step 4. Once a device button has been selected in
step 4, it will remain in effect until a different device mode is selected in step 4, so you
can omit this step until you need the buttons to be learned under a different mode.
Here is the procedure for LCD remotes (RS 15-2116/2117, URC-8910/9910/HT Pro, etc.)
Ensure good batteries in both remotes.
Place the remotes on a flat surface facing properly at a distance of 2-4 inches.
1) [optional] Press a device button (see note)
2) Press and hold [SETUP], "CODE SET" displays on LCD
3) Press "UP" or "DOWN" ARROW repeatedly until the LCD displays "IR LEARN"
4) [optional] Press a device button (see note)
5) Press the button to be programmed
At this point the LCD will display "LEARNING", this is your cue to start
pressing the teaching remote button. As soon as you start pressing the
teaching remote button, the LCD display will go blank, but you should KEEP
PRESSING the teaching remote button until the LCD display displays either
"SUCCESS" (to indicate the learn was successful) or "FAILED" (to indicate it
wasn't).
6) If you want to learn more buttons, go back to step 4 and repeat.
7) When you're finished, press exit to lock in the learns.
Note: Pressing a device button in step 1 sets the default device mode to be
used for all the learned buttons, thus eliminating the need for pressing a device
button in step 4. You should do this if you want to learn all the buttons under
the same device mode.
If you omit step 1 and step 4, the buttons will be learned under the last device mode
used, so if you can't remember what that is, press a device button.
If you want to learn the buttons under several different device modes, omit step 1 and
press the relevant device buttons in step 4. Once a device button has been selected in
step 4, it will remain in effect until a different device mode is selected in step 4, so you
can omit this step until you need the buttons to be learned under a different mode.
--------------------------------------------------------------------------From the information here you can create new key moves, or new device upgrades.
file:///C|/remotejp/IRHELPPDF/Chapter2.htm (22 of 24) [09/06/10 3:24:15 PM]
Chapter2 - Programming our remote
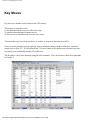
Key Moves
Key moves are another useful feature in the UEI remotes.
This feature is typically used to :
1) add functions that are not part of the basic setup.
2) simulate punch through to another device.
3) block access to functions that are in the users setup.
.
You can either copy keys from one device to another or setup new functions using EFCs.
.
On my system I wanted to prevent anybody from accidentally turning off the satellite box, when they
meant to turn off the TV. So I KeyMoved the TV power button to the satellite power button to prevent
my family from accidentally turning off satellite box.
The KeyMove can be done manually using the 994-command. You can read more about 994 commands
in Chapter 5.
file:///C|/remotejp/IRHELPPDF/Chapter2.htm (23 of 24) [09/06/10 3:24:15 PM]
Chapter2 - Programming our remote
From this screen you have the ability the Edit, Add, Clone (partially copy), Delete or Import from RM or
ExtenderCodeCalculator.xls.
You assign a bound key, it can be shifted, or with
some extenders it can be x shifted.
You can select from one of the device mode and
setup from any of the device modes that you have
assigned to your device buttons, or you can select
any other device type/setup code that actually
exists in the UEI built in library, or any upgrade
devices that you have added with KeymapMaster or RemoteMaster.
If you hand type in a code that does not exist in
your remote, your remote may hang up.
There are three types of keymoves. EFC, HEX commands and Key(code). KeyCode type keymoves
were introduced at the end of the EEPROM era, but are pretty standard on FLASH type remotes. A
KeyCode type keymove, lets you send any key that is defined in a setup code.
An EFC style keymove allows you to add functions that may or may not be defined in a setup code. On
remotes that take both types of keymoves, EFC style keymoves take 1 more byte than keyCode type
keymoves.
The Hex option, is set up for adding special protocols that are not supported by the special protocols tab.
See Chapter 5 for more information on finding EFC codes.
file:///C|/remotejp/IRHELPPDF/Chapter2.htm (24 of 24) [09/06/10 3:24:15 PM]
Chapter3 - Intermediate Programming
Chapter 3 - Intermediate Programming
In this chapter were going to show you how and why we create device upgrades and protocol upgrades.
Remote Memory Usage
Device Upgrades
Using KM, KeyMap-Master, to create a device upgrade
Using RM, Remote Master, to create a device upgrade
Protocol Upgrades
Creating a Better Upgrade
EFCs and OBCs
Remote Memory Usage
The memory available for keymoves and macros is very limited. Creating device upgrades to
incorporate keymoves can save you some keymove space, and creating device upgrades from your
learned signals can free up learned memory. Using an extender can give you a huge increase in the
amount of keymove/macro space.
Let's take a look
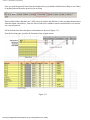
The EEPROM memory is partitioned. For the URC8811, it is as follows:
Learning memory: 1021 bytes
Upgrade memory: 762 bytes
Keymove/Macro memory: 219 bytes
Although these numbers may vary WIDELY, in general, a single learned function consumes about 25-50
bytes, so you can usually get around 20-40 total learned functions stored before that portion of the
memory is full.
A single KEYMOVE (by which you can assign an advanced code to another button) consumes between
5-6 bytes, so you can usually have up to 40 keymoves, as well. A macro can be pretty long (5-20 bytes),
and if you use a bunch of macros to set up your system, as many do, you may find that the limit on this
memory is stifling.
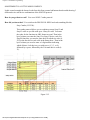
An entire device upgrade with a full set of button assignments (around 30 or so, depending upon device
mode chosen) may occupy anywhere from 40 to 140 bytes (also depending on how complex the protocol
is and if an additional protocol upgrade is required to support the device upgrade), so upgrades are
almost always the most efficient method to get the device and button mappings you desire. You can
install between 8 and 12 device upgrades, depending upon their size. Before you know it you end up
with your memory full.
When you use the extender, all of the learning memory is converted to keymove/macro memory,
although, a small amount of it becomes unavailable (to run the extender itself). For the 8811, this results
in:
file:///C|/remotejp/IRHELPPDF/Chapter3.htm (1 of 28) [09/06/10 3:24:18 PM]
Chapter3 - Intermediate Programming
Learning memory: n/a
Upgrade memory: 485 bytes (with preloaded protocols)
Keymove/Macro memory: 852 bytes
The extender is just a SOFTWARE load into the EEPROM. You can still learn and decode signals by
deactivating the extender, but you are unable to USE learned signals directly in the remote with the
extender activated. But you don't need to use learned signals directly when you simply use the decoded
learned data to build an upgrade (much more efficient, remember?), AND you have LOTS of room for
keymoves and macros to customize your remote. Further more, there are other benefits to running the
extender (like faster macro execution, greater flexibility in how to construct macros, keymoves onto
buttons that would not normally permit it, and the availability of special functions like ToadTog,
Long/Double Key press, Device Specific Macros.)
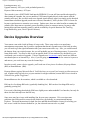
Device Upgrades Overview
Your remote came with a built-in library of setup codes. These setup codes cover most home
entertainment components, but if you have equipment that doesn't respond to any of the built-in codes,
you will need to get the signal information into your remote some other way. Sure, you could learn all
the buttons from your original remote, but you will probably run out of learning memory if you need to
learn all the codes. You may be able to get an upgrade from UEI via modem or by download, or you
could make your own device upgrade. A device upgrade uses less memory and is stored in a different
area than keymoves or learned keys. Also, if you are going to need an extender for extensive keymoves
and macros, you won't have any room for learned keys.
In order to easily create a device upgrade, you'll need one of two pieces of software, Keymap-Master
(KM) or RemoteMaster (RM).
Keymap-Master requires Microsoft Excel. You'll also have to set your Excel security to allow macros to
run. Another really big help is to set your monitor for a high resolution, because KM is best viewed in
1280x1024 to get the “big picture”.
RemoteMaster use the Java runtime, which is available as a free download.
KM can do a few things RM can't (a gradually shrinking list). RM can do a few things KM can't (a
gradually growing list).
For several of the things that both do, RM has a slightly more understandable User Interface, but only for
those who don't already know the KM way.
Some users may have issues with installing Sun Java on some computers. We've run into some
problems where Microsoft Java must be the default Java for both the .jar extension and Internet
Explorer. The install instructions for both Sun Java and RM should both do a better job of telling you
how to use it with Sun Java not default for .jar, but it doesn't turn out to be very hard.
file:///C|/remotejp/IRHELPPDF/Chapter3.htm (2 of 28) [09/06/10 3:24:18 PM]
Chapter3 - Intermediate Programming
The JP1 developers have already scaled back how much they do to KM. For example, they don't
automatically add new remotes to it when they surface. But one major reason why KM will probably
always stick around is portability. Despite the fact that Java is supposedly the most portable language
around and can run on most platforms, if you lack the authority to install it on your machine (which is
the case in many offices) you are stuck with using KM.
Plus, as RM can import KM files and KM cannot import RM files, upgrades created in KM format are
available to a wider audience.
Cutting & pasting from KM to a spreadsheet is a lot easier than doing the same with RM. However RM
handles xShifted keys, for extenders that support the xShift, which is a great feature.
So whichever software you are using, KM or RM. you'll want to start out by looking for upgrades in the
files section. Even if your exact equipment model isn't there, similar equipment can save you lots of
work, since manufactures usually keep the same button layout and the same protocols and even the same
device and sub-device numbers across a family of products.
Look for other JP1er's upgrades in the JP1 forum's file section
Forum Index -> Download Database -> JP1 File Section -> Device Upgrades
Looking at an example can save you lots of work
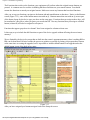
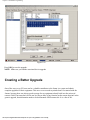
Develop your upgrade in either Keymap Master or RemoteMaster.
Once you've developed your Device upgrade you'll need to copy and paste it into IR.
Here is a typical upgrade code. It starts includes everything from the word Upgrade to the word End.
Your upgrades may have come from Keymap-Master or RemoteMaster or you may have copied an
upgrade directly from a post in the forum.
Upgrade Code 0 = 27 D6 (DVD/2006) Sony RDR-GX7 DVD player (KM v9.06) 27 00
BE 5A 72 F1 92 C4 46 00 90 59 00 59 80 59
40 59 C0 59 20 59 A0 59 60 59 E0 59 10 59 C8 59
28 59 A8 59 CC 59 4C 59 2C 59 9C 59 C8 5B 3A 59
D8 59 D0 59 2A 59 70 59 E8 5B 9E 59 5E 59 DE 59
3E 59
KeyMoves
A3 F4 27 D6 58 59«Top Menu» ¦AE F4 27 D6 CA 59
«System Menu» ¦8B F4 27 D6 8C 59«Next Chapter»
¦8D F4 27 D6 0C 59«Prev Chapter Track-»
End
Copy your upgrade.
In IR select {Device tab}
Click on [ Add ]
Paste your upgrade (Ctrl+V)
Click on [OK]
file:///C|/remotejp/IRHELPPDF/Chapter3.htm (3 of 28) [09/06/10 3:24:18 PM]
Chapter3 - Intermediate Programming
Figure 3- 5
IR will parse the upgrade and your results will look something like this
After you click on [OK] IR will ask you if you want to assign your upgrade to a device key.
Using KM, Keymap-Master to create a device upgrade
Before you open Keymap-Master you need to check a few settings.
Keymaster has been tested on Excel versions from 97 to 2010.
file:///C|/remotejp/IRHELPPDF/Chapter3.htm (4 of 28) [09/06/10 3:24:18 PM]
Chapter3 - Intermediate Programming
You will need to set your Excel Macro Security to Medium to allow unsigned macros to run.
Select Tools -> Macro –> Security
Figure 3-7
When you open Keymap-Master it looks frightening, but it is actually very user friendly
.
Cells that are in deep yellow accept input.
Cells that are dotted out or grayed out are not available with your current selections
Cells that appear in light yellow contain calculated information.
Use your mouse to hover over the little red triangle in the upper corner of a cell to get helpful
information
file:///C|/remotejp/IRHELPPDF/Chapter3.htm (5 of 28) [09/06/10 3:24:18 PM]
Chapter3 - Intermediate Programming
Figure 3-8
If you are going to look at an existing KM sheet press [Load] and locate the KM file.
After you've made your own KM sheet you'll use the [Save] button to save the KM sheet, not the typical
File-> Save from the menu. You don't save the whole worksheet, only your data.
Figure 3-8 shows the setup screen. We will be interested in the Setup, Functions, Buttons and Protocol
Help tabs.
To make the upgrade work for your device you need to follow these steps.
file:///C|/remotejp/IRHELPPDF/Chapter3.htm (6 of 28) [09/06/10 3:24:18 PM]
Chapter3 - Intermediate Programming
,
Whether starting an upgrade from scratch
or using one of the Upgrades you found
at the JP1 you must change the remote to
match your remote model.
You must select a device type to
determine which layout you are going to
use. The device type determines which
keys will be available without using
Figure 3-9
keymoves. This TV code is going to be
operating an alarm clock. A TV doesn't
have to use a TV device type.
You must assign your upgrade a 4-digit setup code. You are absolutely free to use any setup code number
that you like, in the range 0000 through 2047. If you use a number that is already in the remote's built in
code library, you will override that number, which means you will no longer be able to use the built in
code, but you won't get an error message or anything.
For that reason, we generally advise that you use numbers that are more obviously your own and that don't
override built in numbers, such as 2000, 2001, 2002, etc - but it's your choice.
Next you need to specify your protocol, and
supply the required protocol information. You
can find this information in your learned
signals. I'll show you two examples.
Figure 3-10
You can easily create your own upgrade from
learned signals. In this first example we are creating
an upgrade to control an alarm clock.
I've learned all the signals into my remote. They all
were NEC2 protocols with a Device code 186. I fill
in the protocol and device numbers from my learned
code on the Setup Screen and then moved on to the
function screen where I set up a list of all the
functions that were on my original remote.
file:///C|/remotejp/IRHELPPDF/Chapter3.htm (7 of 28) [09/06/10 3:24:18 PM]
Chapter3 - Intermediate Programming
Once you pick the protocol Name from the dropdown list, you should read the Protocol Help to see if there
is anything unusual about the protocol you are using.
Protocol Help told me that there are 2 NEC protocols, and the big difference is the repeating characteristics
when the button is held down. Since the Device/Sub-device numbers remain consistent there is no need to
use a special protocol.
Fill in the Functions Sheet and protocol information as shown in Figure 3-11.
Note the function page, specifies the functions of my original remote.
Figure 3-11
file:///C|/remotejp/IRHELPPDF/Chapter3.htm (8 of 28) [09/06/10 3:24:18 PM]
Chapter3 - Intermediate Programming
SOMETIMES IT IS A LITTLE MORE COMPLEX.
In this second example the learned codes from this Sony remote had buttons that decoded showing 3
different device sub-device combinations of the SONY20 protocol.
How do you get that to work? You use a SONY Combo protocol.
How did you know that? You switch to the PROTOCOL HELP and read something like this.
Sony Combo (12/15/20):
This combo protocol allows you to combine as many Sony12 and
Sony15 codes as you like with up to 4 Sony20 codes. You enter
the codes for the functions in OBC format as usual. Then in the
byte2 column you enter the Sony12 or Sony15 device code. For
Sony20 functions, you need to enter the 8-bit subdevice code (0255) in the four device code cells in the Setup sheet. Then in the
byte2 column you need to enter a 1-digit number indicating
which of those 4 sub-devices you wish to use (1, 2, 3, or 4),
followed by a space, followed by the 5-bit main device code (031).
Figure 3-12
file:///C|/remotejp/IRHELPPDF/Chapter3.htm (9 of 28) [09/06/10 3:24:18 PM]
Chapter3 - Intermediate Programming
The Functions sheet refers to the functions your equipment will perform when the original remote buttons are
pressed. A common error for newbies is thinking that these functions are your remote buttons. You should
rename the functions to match your original remote. Make sure to note any buttons that have dual functions.
After you set up your functions, navigate to the buttons tab and match buttons to functions. Notice on the Buttons
screen (Figure 3-13), some of the button names start with an @. Buttons names that start with an @ are not part
of the button layout for the device type you chose on the setup page. Functions that you assign to these keys will
be translated to a Key Move when you paste your results into IR. Also any functions that you assign to a shifted
button (column D) will also be assigned as a keymove.
Functions that appear grayed out in column F have been assigned to a button at least once.
Is there any way to include the shift functions as part of the device upgrade without affecting the move/macro
memory?
We are limited by the device key maps that are built into the remote's permanent memory, there is nothing KM or
RM can do about that. KM tries to make the process as painless as possible by letting you program these buttons
at the same time as creating the upgrade, but it's impossible to include shifted buttons in an upgrade unless the
shifted button is part of the built in key maps.
Figure 3-13
After you have assigned your buttons navigate back to the Setup tab screen.
file:///C|/remotejp/IRHELPPDF/Chapter3.htm (10 of 28) [09/06/10 3:24:18 PM]
Chapter3 - Intermediate Programming
Figure 3-14
After you have assigned your buttons, switch back to the {Setup} tab shown in Figure 3-14.
You are now ready to transfer the information to IR
Copy the Device upgrade.
Switch to IR
Select the {Device Tab}
Click [Add]
Paste the upgrade [Ctrl]+[V]
Click [ok]
Keymap-Master
file:///C|/remotejp/IRHELPPDF/Chapter3.htm (11 of 28) [09/06/10 3:24:18 PM]
IR
Chapter3 - Intermediate Programming
Figure 3-15
Switch back to Keymap-Master
If there is a Red Notice that says *** The Protocol Code below is Required ****
Copy the Protocol Upgrade
Switch to IR
Select the {Protocols Tab}
Click on [Add]
Paste the upgrade [Ctrl]+[V]
Click on [ok]
Keymap-Master
IR
Figure 3-15
Switch back to Keymap-Master
The final step is to save your work. Don't use the File -> Save command. Instead press the [SAVE]
button on the {Setup} page. This will just save the upgrade portion of the spreadsheet as a .txt text file.
Using RemoteMaster
Installing RemoteMaster
1
2
Find the remotemaster from the forums/downloads tools/main area
Unzip the RemoteMaster file
file:///C|/remotejp/IRHELPPDF/Chapter3.htm (12 of 28) [09/06/10 3:24:18 PM]
Chapter3 - Intermediate Programming
Figure 3-16
3
4
5
Download the RM Images
Unzip the remote maps and images.
Download the runtime or the development tool kit from sun.com
file:///C|/remotejp/IRHELPPDF/Chapter3.htm (13 of 28) [09/06/10 3:24:18 PM]
Chapter3 - Intermediate Programming
Read the ReadMe.HTML file.
Run the setup file to set the registry settings.
You are now ready to run! .
The first time you run RemoteMaster, you will get this error message.
You will have to specify where your RDFs are.
Figure 3-17
Use the screen in Figure 3-17 to navigate to your RDF folder.
To load an existing file, select File -> Open from the menu. You can open RemoteMaster upgrades, or
Keymap-Master upgrades. Keymap-Master updates have a .txt extension. RemoteMaster files have an
.rmdu extension. RemoteMaster can read both types of files, but its output is limited to .rmdu files. See
figure 3-18.
file:///C|/remotejp/IRHELPPDF/Chapter3.htm (14 of 28) [09/06/10 3:24:18 PM]
Chapter3 - Intermediate Programming
Figure 3-18
Whether starting an upgrade from
scratch or using one of the
Upgrades you found at the JP1 you
must change the remote to match
your remote model.
file:///C|/remotejp/IRHELPPDF/Chapter3.htm (15 of 28) [09/06/10 3:24:18 PM]
Chapter3 - Intermediate Programming
Figure 3-19
You will need to assign your upgrade a 4-digit setup code. You are absolutely free to use any setup
code number that you like, in the range 0000 through 2047. If you use a number that is already defined
in the remote's built in code library, you will override that number, which means you will no longer be
able to use the built in code, but you won't get an error message or any other notification.
For that reason, we generally advise that you use numbers that are more obviously your own and that
don't override built in numbers, such as 2000, 2001, 2002, etc - but it's your choice.
The Layout Tab
On a new upgrade, you must select a device type to
determine which layout you are going to use.
If you look at the {Layout} tab you'll see a picture
of your remote. The keys that are highlighted with
yellow are the keys that will be available for the
device upgrade without using keymoves. The
highlighted keys will vary depending on the
selected device type.
This TV code is going to be operating an alarm
clock. You are free to use whatever type of device
you want. Picking certain device types may affect
your volume punch through or your transport punch
through, and if you have an LCD screen on your
remote it may be confusing to your users to see TV
displayed for your alarm clock, but the device type
does not affect the signal in any way.
file:///C|/remotejp/IRHELPPDF/Chapter3.htm (16 of 28) [09/06/10 3:24:18 PM]
Chapter3 - Intermediate Programming
file:///C|/remotejp/IRHELPPDF/Chapter3.htm (17 of 28) [09/06/10 3:24:18 PM]
Chapter3 - Intermediate Programming
You can create your own upgrade from learned
signals. In this first example we are creating an
upgrade to control an alarm clock.
I've learned all the signals into my remote. They all
were NEC2 protocols with a Device code 186. I fill
in the protocol and device numbers from my learned
code on the Setup Screen and then moved on to the
function screen where I set up a list of all the
functions that were on my original remote.
file:///C|/remotejp/IRHELPPDF/Chapter3.htm (18 of 28) [09/06/10 3:24:18 PM]
Chapter3 - Intermediate Programming
Figure 3-22
At the bottom of the screen there are buttons that help you organize your functions. These buttons are
used as follows.
New
Add a new empty function line. If no function is currently selected, the new function will be
added at the bottom. If a function is selected, the new function will be inserted above the selected
function. This can also be accomplished by using the context menu. Just right click where you
want to add the new function, and select New.
Delete Delete the currently selected function(s). Functions that have been assigned to buttons cannot be
deleted. You can select multiple functions. This can also be accomplished using the context
menu. Simply right-click on the function you want to delete and select Delete. If the function you
right-clicked on is one of many selected functions, all the functions will be deleted.
Clean Up Deletes all functions that don't have an assigned OBC/EFC/HEX .
Move up Move the selected function one position up the list. This can also be accomplished by dragging
the function number. Only one function can be moved at a time.
Move down Move the selected function one position down the list. This can also be accomplished by dragging
the function number. Only one function can be moved at a time.
Copy
Copy the contents of the selected cells to the clipboard. This can also be accomplished using the
context menu, by right-clicking on a group of selected cells and selecting Copy.
Paste
Paste the contents of the clipboard into the selected cell. This can also be accomplished using the
context menu, by right-clicking on the cell in which you want to pasted, and selecting Paste. This
can be useful for copying columns of information from KM to RM..
After you create a list of functions you need to assign them to a button on your remote. This is
accomplished on the button screen, show here or on the layout screen show above if you prefer the
graphical inerface..
file:///C|/remotejp/IRHELPPDF/Chapter3.htm (19 of 28) [09/06/10 3:24:18 PM]
Chapter3 - Intermediate Programming
Figure 3-23
Button labels that appear in red have not been assigned a function. Available Functions that appear in
red have not been assigned to a button. Buttons that have an asterisk (*) after the name will be assigned
using keymoves, as these buttons are not part of the device type layout. Functions assigned in the shift
column will be assigned a function using keymoves too. These functions can be accessed using the
[Setup] key. There are a 4 ways to get the functions assigned to the button.
1
Click the [Auto assign] button to get some functions automatically assigned. The ones that get
assigned automatically are the ones where you used the default function names and there's an
equivalent button on your JP1 remote for that function. You are under no obligation to accept
these default assignments.
2
Drag-n-drop a function onto the desired button
3
Click on a button (It will he outlined in white), then double-click the desired function.
4. Click on a button, then double-click the button and then click on the function from the functions
popup.
Once you have assigned all your buttons, switch over to the {Output Tab} screen.
Copy the device upgrade with the [Copy] button.
Switch over to the IR application.
Switch to the {Device Tab} screen in IR.
file:///C|/remotejp/IRHELPPDF/Chapter3.htm (20 of 28) [09/06/10 3:24:18 PM]
Chapter3 - Intermediate Programming
Press the [Add] button and paste your upgrade.
Press [Ctrl]+[V] to paste the upgrade into the upgrade screen.
Press the [OK] button.
RemoteMaster
IR
Figure 3-24
Sometimes things are a little more complex.
When I needed to create an upgrade for my Sony DVD recorder the learned signals revealed 3 different
device sub-device combinations of the Sony20 protocol. When trying to figure out how to handle this I
found that Keymap-Master's help was more helpful to me, because it grouped the help by family, instead
of showing the individual codes.
With remote master I needed to know to scroll through all the Sony protocols until I came up with this
Sony protocol which would allow me to combine up to 4 Sony 20 devices
Sony Combo (12/15/20):
This combo protocol allows you to combine as many Sony12 and
Sony15 codes as you like with up to 4 Sony20 codes. You enter
the 4 Sony20 sub-device numbers on the Setup panel.
On the Functions panel, you enter the codes for the functions in
OBC format as usual. Then you select the desired protocol for the
function. Next enter the desired device number. If you enter a
device number greater than 31, the protocol will be changed to
Sony15, as it is the only one that supports values greater than 31.
For Sony12 and Sony15, the Sub-device column must have the
value "none". For Sony20 functions, select the desired sub-device
number.
file:///C|/remotejp/IRHELPPDF/Chapter3.htm (21 of 28) [09/06/10 3:24:18 PM]
Chapter3 - Intermediate Programming
Figure 3-25
Once you have assigned your functions to buttons, switch over to the {Output Tab} screen.
Copy the device upgrade with the [Copy] button.
Switch over to the IR application.
Switch to the {Device Tab} screen in IR.
Press the [Add] button and paste your upgrade.
Press [Ctrl]+[V] to paste the upgrade into the upgrade screen.
Press the [OK] button.
file:///C|/remotejp/IRHELPPDF/Chapter3.htm (22 of 28) [09/06/10 3:24:18 PM]
Chapter3 - Intermediate Programming
Remote Master
IR
Figure 3-26
You will see that this device upgrade also requires a protocol upgrade.
Switch over to the {Output Tab} screen of RemoteMaster.
Copy the protocol upgrade with the [Copy] button located directly above the protocol box.
Switch over to the IR application.
Switch to the {Protocol Tab} screen in IR.
Click the [Add] button and paste your protocol upgrade.
Press [Ctrl]+[V] to paste the upgrade into the upgrade screen.
Click the [OK] button.
RemoteMaster
IR
Figure 3-28
Make sure to save your upgrade.
From the menu select File -> Save and provide a name to your upgrade.
The file will be saved as an .rmdu file.
file:///C|/remotejp/IRHELPPDF/Chapter3.htm (23 of 28) [09/06/10 3:24:18 PM]
Chapter3 - Intermediate Programming
Protocol Upgrades
A Protocol is a segment of code that tells a JP1 Remote how to format an IR signal. The Protocol tells
how to translate the Fixed Data and Variable Data into the final signal. The Protocol itself contains
data, such as carrier frequency that are the same for all Setup Code using that Protocol. You may need
to add a protocol if your device doesn't have it built in, or if you want to use a combined protocols or a
hacked version of a protocol.
A Special Protocol is a segment of code that works on the behavior of your remote. Extenders, Device
Specific Macros, Double Key Press, Long Key Press, Multiplexers, Pause and ToadTog are examples
of special protocols. These little programs teach your remote how to do things that non-jp1 remotes
can't do. Special protocols always come with a special device. Make sure you add the device too.
Here is a typical upgrade code. It starts includes everything from the word Upgrade to the word End.
You're upgrades may have come from Keymap-Master or RemoteMaster or you may have copied an
upgrade directly from a post in the forum.
Upgrade Protocol 0 = 01 27 (S3C8+) Sony Combo (12/15/20) (KM v9.06)
3A 8A 42 8B 15 F8 15 05 07 02 58 01 18 01 2C 01
18 57 D0 04 B0 01 18 08 03 08 76 07 01 EB 17 76
08 01 6B 0F E6 28 F9 E6 12 08 08 08 E0 C0 56 C0
03 09 01 E6 24 05 8D 01 49
End
Copy your protocol upgrade:
Switch to IR
Select the {Protocols Tab}
Press [Add]
Paste your upgrade using (Ctrl+V)
Your results look like figure 3-29.
file:///C|/remotejp/IRHELPPDF/Chapter3.htm (24 of 28) [09/06/10 3:24:18 PM]
Chapter3 - Intermediate Programming
Figure 3-29
Press [OK] to save the upgrade.
NOTE: Make sure you add the associated device upgrade
Creating a Better Upgrade
One of the ways every JP1 user can be a valuable contributor to the forum is to create and submit
complete upgrades for their equipment. This never even crossed my mind when I first started with the
forums, because there was always good coverage for my equipment already built in to the universal
remotes. Duh! That came back to bite me! As long as there is any function on the remote that isn't in the
generic upgrade, that information needs to be documented. OEM remotes die. It is a fact of life.
file:///C|/remotejp/IRHELPPDF/Chapter3.htm (25 of 28) [09/06/10 3:24:18 PM]
Chapter3 - Intermediate Programming
Whether you are using RemoteMaster (RM) or KeyMaster(KM) you have a tab called functions and
another tab called buttons. The names on the buttons sheet represent your JP1 remote. The names on the
functions sheet should represent your original remote (plus meaningful names for working functions
that were missing from the original remote). The initial names on the functions sheet don't represent
your original remote only because RM or KM can't see your original remote. As a courtesy, RM and
KM fill in the function names with the buttons on your JP1 remote. You should delete any functions
that don't apply, and add any functions that are on the OEM remote. Even if you are not going to assign
these functions to buttons, it is important to include these on the functions tab, so that your upgrade is
complete.
When you are creating the function list, make sure to note double functioning. Often your OEM remote
keys are used to do different functions. They may have small print on or above the buttons, that
indicates those functions. That is important information. If you don't have the OEM remote in front of
you, it is difficult to imagine for example, that the “pause button” for playback, might also be the “up
button” when you are in working in the menus.
There are a number of different ways to handle that type of information.
You can 1) make a compound name, 2) list each function with the same OBC, or 3) include that
information in the Notes section. Whatever you do, it is important to convey that information to the
next guy.
You should now share your upgrade by posting it in the proper file section. There is no review or
approval process. Once you've posted it, it is out there to help the next guy. You can always come back
later and see how many times the file has been downloaded to know that you've helped lots of other
people.
If you want to make a superior upgrade, you can check other peoples upgrade for similar equipment and
see if you can find any other commands that work on your equipment but are not on your OEM remote.
You would be surprised at how often there are features that are not on the OEM remote! The more
complete the upgrade, the more useful it is.
A partial upgrade is better than no upgrade at all. If you don't have time to make a complete upgrade,
post your work-in-progress. You have the ability to edit/update your own files when you get around to
finishing the project. That way if this becomes a low priority project, and you don't get around to
finishing it, we still have a starting point for helping other users.
EFCs and OBCs
file:///C|/remotejp/IRHELPPDF/Chapter3.htm (26 of 28) [09/06/10 3:24:18 PM]
Chapter3 - Intermediate Programming
An Extended Function Code (EFC), is a code that allows us to send a parameter to the protocol
executor to send an IR signal for a specific function. EFCs can be 3 digit or 5 digit, depending on the
protocol executor's requirements. Remotes can send 3 or 5 digit EFCs depending on the vintage of the
remote. If a remote requires 5-digit EFCs, you need to prepend 00 to a 3-digit EFCs. If the remote uses
3-Digit EFCs, you can not send 5-digit EFCs. EFCs are specific to a protocol executor. The EFC
should not be confused with the OBC. EFCs have absolutely no meaning outside the UEI world.
The Original Button Code (OBC) is a numeric value that corresponds to the part of the signal that
changes as you press different keys. This is a number that "makes sense". If you look at RM or KM
function sheets, you will see that there is usually some sort of pattern to the OBC numbers, while the
EFCs are totally unordered.
EFCs are input, OBCs are output.
When your learns were decoded, there may have been an EFC as well as the OBC listed. That EFC is
only usable if you are using the basic protocol executor for creating that type of signal. If you use a
different protocol executor, those EFCs may not be correct. That is why we used the OBC instead of the
EFC when transferring data to our upgrade.
Since the OBC describes the output that we want, using the OBC is going to be correct regardless of
what protocol executor we use to create our upgrade.
file:///C|/remotejp/IRHELPPDF/Chapter3.htm (27 of 28) [09/06/10 3:24:18 PM]
Chapter3 - Intermediate Programming
file:///C|/remotejp/IRHELPPDF/Chapter3.htm (28 of 28) [09/06/10 3:24:18 PM]
Chapter4 - Advanced Programming
CHAPTER 4 - Advanced Programming
In this chapter we are going to take a look at advanced JP1 programming.
Extenders
Special Protocol Functions
DSM - Device Specific Macros
DKP Double Key Press
LKP Long Key Press
Pause
The Zenith Trick
Checking for Duration
Multiplexer
ToadTog
Custom Mode Name
Extenders
An extender is a special piece of software written by a JP1 member to enhance the JP1 experience.
Each extender is specifically tailored to the capabilities of the remote. This software is loaded into the
E2/EEPROM area. The extender is activated by a special keymove, typically a TV/Power. Once the
extender is activated it takes control of the keypad and changes the way the remote handles the
E2/EEPROM area, until the extender is deactivated. Deactivation will be covered in you README file.
The list of extender features has improved and increased over the years. There may be many extenders
available for your remote. As a general rule, you're usually best off choosing the most recent extender
for a particular remote, as it is most likely to have previous versions' bugs fixed. However, there may be
times when the mix of features you want is better in an older version. Typically the extenders with
fewer features take less of the E2/EEPROM area. It is very important to read the README file, to
decide which extender you want.
The basic advantages of modern extenders are:
file:///C|/remotejp/IRHELPPDF/Chapter4.htm (1 of 18) [09/06/10 3:24:21 PM]
Chapter4 - Advanced Programming
A
B
C
D
E
D
E
F
Doubles or triples the amount of keymove/macro space
Most people move to extenders because they have run out of keymove/macro space. If your
remote has learning memory, you can overcome this shortage by using an extender. Once you
switch to an extender, the keymove and macro space will be much larger than it was. All this
extra keymove/macro space came from the E2/EEPROM area where the learns are normally
stored. This makes learning a little inconvenient, as you need to disable the extender, do your
learns, read the decode and then make an upgrade/or keymove to handle the new function. Then
reload your extender image with the new upgrades and reactiveate your extender.
Faster Macro execution
Nested Macros
With the ability to call one macro from another macro, so we create complex macros without
worrying about the 15-20 key limit on an unextended remote.
Adds xShift capability
The xShift is a great way to handle extremely complex equipment that needs more keys than are
on the remote. XShift increases the number of pressable keys.
Temporary device selection in macros
The temporary device selection in macros solves the problem of how to have macros leave the
remote in the proper state when the macro finishes.
HT - Home theater emlation.
HT emulation gives you greater control of punch through for volume, transport, channel and
menu keys. See more below.
Special Protocols
Special Protocols to make it easier to customize your remote. The pause protocol is generic and
can be used across a whole family of remotes. Other special protocols like the ToadTog, Double
Key Press, Long Key Press, Device Specific Macros, Multiplex and others, will only work on the
remote they were designed for. These Special protocols are almost always developed by the
extender writer.
Improved FAV key handling.
The amount of automation you can do with an extender is far superior to the kind of automation you can
do with the standard remote. Figuring out how to use these features can be quite daunting.
Once you’ve found the extender you want, you’ll want to read the README file, even if you’ve
installed extenders before, because every extender is different.
Getting started with an extender can vary from one extender to another. If the extender zip file includes
a .HEX file, then this extender was designed to be installed via ExtInstall. Your documentation may tell
you how to do this at the command prompt, but IR makes it very easy to do it from a menu option.
Once you’ve downloaded Extinstall and its supporting libraries, you just need to tell IR where to find it.
You open your existing .IR file and pick Extinstall off the menu and follow the prompts.
If the extender predates extinstall, or if you don’t have anything complicated to start with, you can start
with the pre-built file. This may be an .IR file or if the extender predates IR 5.0, your pre-built file
might be a .txt file. Just open your pre-built file and start adding your keymoves and macros.
file:///C|/remotejp/IRHELPPDF/Chapter4.htm (2 of 18) [09/06/10 3:24:21 PM]
Chapter4 - Advanced Programming
HT – Home Theater
Many extenders offer sophisticated HT settings. In an unextended remote, when you press a device
button, it sets a device index. This device index is used to locate the setup codes and keymoves. In an
extender offering HT settings, the extender keeps an array of device indexes corresponding to logical
groupings of the keys. The number and composition of these groups varies from remote to remote, but
in general they usually have:
Volume (Vol-, Vol+, and mute);
Transport (Play, Pause, Stop, FF, Rew, Rec, maybe others);
PIP (PIP on/off, Swap, Move, others possible);
Menu (Menu, arrows, Select);
Channel (CH+, CH-, Last or Prev, Fav, the number keys); and
Other (Power, TV/Video, Light, Setup, Device keys etc.)
Any time a key is pressed, the extender checks to see which keyset the key belongs to, and then uses the
appropriate device index to find setup codes and keymoves.
Most extenders use one of two basic approaches to implementing HT device selection. These methods
are very different. It is helpful to know the different types so that you can understand what you are
seeing if you open someone elses IR to take a look at how things are acommplished.
One thing both types of HT implementation offer is TEMPORARY device selection. Temporary device
selection makes macros more powerful. Temporary device selection lasts until a macro ends or a
CANCEL temporary device selection is reached or different temporary device is processed.
Temporary device selection makes it easier to create macros that don't change your device mode..
When an extender offers HT, the device buttons, become ordinary buttons and new keycodes are created
to perform the device index selection. Most extenders build a courtesy macro on the device keys to
demonstrate how to do device selection.
a) The first method employs a key combination temporary device selection keycode and a
Set_xxx_ keys keycode.
b) The second method has specific keycodes that assign device index directly to keyset as one
operation.
The code scheme described in (a) is typically used in remotes that have more than 8 devices in total. On
an 8 device remote this method (a) would only require 15 sequential keycodes, but for method (b) it
would require 57 sequential keycodes. (8 devices*(6 divisions+1 temporary)+ 1 cancel).
For scheme A, you need at least two commands in a macro to assign a keyset to a device. For example,
to set the transport keys to the VCR device, you would use the macro "DEV_VCR;
SET_TRANS_KEYS". Dev_xxx are temporary device selection keycodes. Dev_xxx keycodes will
override all keyset rules, until a DEV_Cancel is encountered; or a different DEV_xxx keycode is issued
or until you’ve processed the last key in the macro buffer.
file:///C|/remotejp/IRHELPPDF/Chapter4.htm (3 of 18) [09/06/10 3:24:21 PM]
Chapter4 - Advanced Programming
To assign ALL of the keys to one device you can make a simple macro:
DEV_VCR, SET_VOL_KEYS, SET_PIP_KEYS, SET_TRANS_KEYS, SET_CHAN_KEYS,
SET_MENU_KEYS, SET_OTHER_KEYS
or you can mix and match to have your remote set up to control your Receiver's Volume, your TV's PIP
functions, your VCR's Transport functions and your SAT Box for everything else:
DEV_RCVR, SET_VOL_KEYS, DEV_TV, SET_PIP_KEYS, DEV_VCR, SET_TRANS_KEYS,
DEV_SAT, SET_OTHER_KEYS, SET_MENU_KEYS, SET_CHAN_KEYS
In scheme B, a SINGLE keycode assigns a particular set of buttons to a device. The prefix indicates the
keyset. The second part of the name indicates the device index normally associated with the device
button.
V_ Volume
P_ Pip
T_ Transport
M_ Menu
C_ Channel
O_ Other
For example, T_VCR assigns the transport buttons to the device index normally associated with the
VCR button.
The corresponding Device Selection macros to the examples in the previous scheme would be:
Simple device selection:
V_VCR, P_VCR, T_VCR, M_VCR, O_VCR, C_VCR
and the customized macro would look like:
V_RCVR, P_TV, T_VCR, O_SAT, M_SAT, C_SAT.
This scheme has a separate method for TEMPORARY DEVICE SELECTION for you to use within
macros or other sequences, and that is use of an X_device keycode and (X_TV or X_DVD) and
X_Cancel. X_device will override all keyset rules, until the device until a X_Cancel is encountered; or
a different X_device keycode is issued or until you’ve processed the last key in the macro buffer.
For more information, see the Beginner's Extender FAQ in the extender section of the forums.
Special Protocols
There are some special protocols that have been written to add even more flexibility to your JP1
remotes. Special protocols are really keymoves. Your extender might describe in detail how to construct
the hex for these keymoves, because we used to have to do these in an outside program and then copy
the hex in as a keymove. IR now has the ability to aid you in using many of these special protocols.
file:///C|/remotejp/IRHELPPDF/Chapter4.htm (4 of 18) [09/06/10 3:24:21 PM]
Chapter4 - Advanced Programming
The special functions that IR supports in the “Special Protocol” tab include
Mode Name
Custom Mode Name
DSM
Device Specific Macros
DKP
Double Key Press
LKP
Long Key Press
MULTIPLEX
Multiplex
Pause
Pause
TOADTog
Toggle Only Activated Device Toggler
Since a special protocol is really a keymove, a device upgrade and protocol upgrade are required to be
able to set them up. A [SpecialProtocols] section in the RDF lists all the special protocols available for
the remote. The special protocol upgrade and its associated device must be loaded into IR or your
options will be grayed out.
After pressing the [ Add ] button on the Special Protocol tab, this Special Protocol screen pops up.
file:///C|/remotejp/IRHELPPDF/Chapter4.htm (5 of 18) [09/06/10 3:24:21 PM]
Chapter4 - Advanced Programming
In the bound key section, you select the device and the key that you want to hold the special function.
The key can be a plain key, a shifted key or if the extender allows it, an xshift key. From the keyboard
you would access the shifted key by pressing [Setup] and then the key, and you would access the
xshifted key by pressing [Setup],[Setup] and then the key. Shifted keys and xShifted keys change the
upper two bits of the base keys keycode. When using these shifted or xshifted keys inside macros, device
specific macros , double keypresses and long keypress and TOADTog protocols, we don't need to use
the [Setup] key, we just set the bits with Add Shift, and Add XShift. This saves space and is more
reliable than using the [Setup] key prior to the key.
The Type list provides you with the special protocol choices. The list of possible choices is defined in
the RDF. If the options are grayed out, you don’t have the device/protocol combination installed. Some
Special protocols require an extender and some don’t. The Pause protocol is available with or without
an extender. You can get the protocol for the Pause from either RemoteMaster or KeyMap-Master. There
may be a stand-alone multiplexor as well.
To see more click on a link.
Custom Mode Name
Device Specific Macros
Double Key Press
Long Key Press
Multiplex
Pause
Toggle Only Activated Device Toggler
DSM –Device Specific Macros
You’ll remember that a macro is global or modeless. A macro key effects all device modes. A DSM is
only in effect when the bound device keys are active. A device specific macro is built much the same
way as a macro key.
A DSM can be up to 12 button presses in length. Here is an example. When I pressed the DVD Stop
button, shift-Stop and xShift-Stop are processed.
file:///C|/remotejp/IRHELPPDF/Chapter4.htm (6 of 18) [09/06/10 3:24:21 PM]
Chapter4 - Advanced Programming
First, select the key that you want the macro key to be bound to.
Then build your macro from the list of available keys, by highlighting the key in the left column and
pressing [Add], [Add Shift]; [Insert] or [Ins Shift].
If you are using a shifted key inside a macro, you use the [Add Shift]/ or [Ins Shift], instead of inserting
two key presses. This saves key memory, and to give you more reliable results.
Similarly if you are using an xshifted key inside a macro, use the [Add Xshift] or [Ins Xshift] to save
memory and give you more reliable results.
In the example above the Shift-Stop and XShift-Stop were added to the macro using [Add Shift] and
[Add Xshift]. This would be the same as saying [setup][stop][setup][setup][stop] but uses 3 fewer bytes
and is more likely to run correctly.
file:///C|/remotejp/IRHELPPDF/Chapter4.htm (7 of 18) [09/06/10 3:24:21 PM]
Chapter4 - Advanced Programming
DKP – Double Key Press
The double key press lets you process different keys depending on whether the button was pressed once
or twice during the specified time period. You can adjust the duration from 1 to 15. A 15 allows a
longer time between presses. You may have to play with the duration to get it just right for your heavy
handed users.
Here is a double key press that has been placed on my DVD Pause button. A single press would send
out Shift-Pause, a double key press would send out xShift-Pause.
Note: DKP and LKP are part of the same protocol, LDKP – Long/Double Key Press
LKP – Long Key Press
file:///C|/remotejp/IRHELPPDF/Chapter4.htm (8 of 18) [09/06/10 3:24:21 PM]
Chapter4 - Advanced Programming
The long key press lets you assign different macros depending on the duration of the key press. You can
adjust the duration from 1 to 15. A 15 requires a very long press. You may have to play with the
duration to get it just right for your heavy handed users.
Here is a long key press that has been placed on my DVD fast rewind button. The short press executes
Shift-F.Rew, the longer key press to xShift-F.Rew.
Figure 4-1
This macro selection is very similar to your regular macro selection. You start by populating your Short
Key press macro. Then select the Long Keys area and you are ready to select the go over and select the
available keys. Just as with macros, if you want the shifted value, you add the key with [ Add Shift ] or
[ Ins Shift ], this requires less key strokes and conserves memory, and with some extenders the shift key
followed by the key in a macro may not give you the results you are seeking.
Note: DKP and LKP are part of the same protocol, LDKP – Long/Double Key Press
MultiPlex
file:///C|/remotejp/IRHELPPDF/Chapter4.htm (9 of 18) [09/06/10 3:24:21 PM]
Chapter4 - Advanced Programming
The multiplex is a way of changing the setup code for a specific device mode.
The multipelxer is most often used when you have more devices than you have device buttons.
Another common use of the multipelxer is to configure the button for the same device differently for
different activities.
When you have more equipment than device buttons, you'll usually need a multiplexer unless the remote
has phantom devices. Phantom devices are much easier to setup because they have their own device
index. MultiPlexed devices share the same device index. This makes setting up keymoves and special
protocols for the device index tricky. While the setup code is changing, the keymoves remain static. A
lot of planning needs to be done if you want to use multiplexing on equipment that requires keymoves.
In the example below, when you press Shift-1, the setup code for the bound device key index(DVD),
will be changed to VCR/DVD 0162.
file:///C|/remotejp/IRHELPPDF/Chapter4.htm (10 of 18) [09/06/10 3:24:21 PM]
Chapter4 - Advanced Programming
Figure 4-2
Before IR took over this special protocol we’d have to setup keymoves to do this in hex.
Summary. Instead of having to press the device key, hold the [Setup] key until the red light blinks twice,
and enter the 4 digit manufacturer’s code, the device mode’s setup code can be changed by simply
pressing Shift-1. This also handles device type assignment, so no need to go through the whole *992
scenario.
Pause
Sometimes your equipment can’t respond as fast as a macro sends signals, especially if the equipment is
just powering up. The solution is to add some type of delay. If functions work when manually sent in
sequence, but don’t work when automatically sent in sequence, and you determine it is not a duration
problem, then it’s time to try delays.
Most often a device just needs time do the operation you gave it before it is ready for the next
1. One alternative method of causing a delay is avoiding sending two consecutive commands to the
same piece of equipment, by altering your macro to send a command to another piece of equipment
between the two commands you may get enough delay without having to add a special protocol.
2. If you don't feel up to working with special protocols you could try the Zenith Trick.
3. The third method requires that you install the Pause special protocol. If you are hesitant to jump into
extenders just yet, you can get the Pause protocol from KM or RM. The advantage over the Zenith trick
is that it allows fairly precise control over the delay. Its main disadvantage is that it will require upgrade
memory and an extra keymove.
You can then set up your delay from the Special Protocol screen.
You specify the length of the delay.
file:///C|/remotejp/IRHELPPDF/Chapter4.htm (11 of 18) [09/06/10 3:24:21 PM]
Chapter4 - Advanced Programming
Figure 4-3
The Zenith Trick
Basically, for this you would program a keymove from the VCR/0039 setup code onto the TV's
"RECORD" button (it doesn't matter what EFC you use), then include the TV's "RECORD" button in the
macro where you need the delay. This will give you 2 or 3 seconds delay.
Checking for Duration
This is for extended remotes. The duration is set to a minimum.
1
Put the problem function on a pressable key, and press and hold the
key. If the key doesn’t work you’re problem goes deeper than duration.
2
Create a 2 key macro where your problem function is the first key in the
sequence. If this fails you have a duration problem.
ToadTog
file:///C|/remotejp/IRHELPPDF/Chapter4.htm (12 of 18) [09/06/10 3:24:21 PM]
Chapter4 - Advanced Programming
TOAD stands for "Toggle-Only Actuated Devices", which basically means these devices do not have
discrete power and/or input codes. The TOADTog protocol is a workaround for this.
The ToadTog Protocol manages 8 state bits and selectively runs commands based on state.
Figure 4-4
ToadTog lets you construct toggle functions from discrete functions, and/or construct discrete functions
from toggle functions, and/or track the state of device toggles so that other functions may be sent
differently depending on that state.
To use ToadTog, you define KeyMoves for VCR/1800 with hex commands that are 1 to 13 bytes long.
Using the ToadTog Protocol takes some planning. You have 8 state bits, that can be either ON or OFF.
I’d suggest that you record this information in your notes on the remote.
file:///C|/remotejp/IRHELPPDF/Chapter4.htm (13 of 18) [09/06/10 3:24:21 PM]
Chapter4 - Advanced Programming
ToadTogs are frequently used in Home Theater type macros, where you want to keep track of the status
your equipment
A ToadTog button can toggle the bit, test the bit, force it on, or force it off.
Figure 4-5
Here is a simple toad tog example:
Different functions are performed depending on if bit 5 is set or not. The bit changes state before
executing the keys.
file:///C|/remotejp/IRHELPPDF/Chapter4.htm (14 of 18) [09/06/10 3:24:21 PM]
Chapter4 - Advanced Programming
Figure 4-6
Creating the hex to do this used to be difficult and tedious.
Fortunately IR now does that translation for us!
What are discrete codes?
file:///C|/remotejp/IRHELPPDF/Chapter4.htm (15 of 18) [09/06/10 3:24:21 PM]
Chapter4 - Advanced Programming
When you push your power button, your TV will turn on if its off, or off when its on. This is a
kind of toggle button. The remote sends one code your TV will react depending on the state its in.
A "discrete on" code would be a signal that ONLY turns the device on. If the equipment is already
on, it remains on. These are most often used to ensure your home theater components stay
completely in sync for powering on and off and changing inputs. Such specialized and otherwise
hidden codes may also be available for direct access to other "toggled" or "rotating" functions such
as television inputs, receiver sound field settings and on-screen display modes.
If these codes are "hidden", how are they found?
You can check to see if someone else has already found them by looking at KM or RM sheets that
are stored on the JP1 forum.
You can look through the advanced codes list on the Jp1 remote site.
You can try brute force.
Often a remote that came with a single model of a component may have a few discrete codes that
could be used on other similar models. Or, as with many of the ones on this site, the actual
structure of an IR code is analyzed and then changed to see what the resulting code does.
Do all brands and models have these hidden codes?
No! Entire brands of equipment have been found to have no discrete codes whatsoever. Even if a
brand is known to feature some discrete functionality, particular models or lines may not.
Custom Mode Name
Some remotes, like the OFA 8910 and the RS 15-2117 have an LCD screen that displays the current
device mode. This special protocol allows you to customize the name of the mode displayed on the LCD
screen. If your extender comes bundled with a custom mode name protocol, you’ll have to read the
associated ReadMe file to see how your remote works.
This is the custom name screen with the 8910 remote.
file:///C|/remotejp/IRHELPPDF/Chapter4.htm (16 of 18) [09/06/10 3:24:21 PM]
Chapter4 - Advanced Programming
Figure 4-7
The 8910 LCD displays up to 9 characters. The first 5 characters are displayed on the top line and the
last 4 characters are displayed on the bottom line. See the table below for the character values.
Conversion Table for 8910
Check your readme file to see your Conversion Table
-----------------------------------------------------------------------------------------------------------
file:///C|/remotejp/IRHELPPDF/Chapter4.htm (17 of 18) [09/06/10 3:24:21 PM]
Chapter4 - Advanced Programming
Chart 4-1
This sets up a special keymove on the Shift-Aux key to MISC 1107. MISC 1107 is the dummy device,
which calls the special protocol.
When we include the Shift-Aux button in our Aux selection macro, VCR2 0042 will display on the LCD.
file:///C|/remotejp/IRHELPPDF/Chapter4.htm (18 of 18) [09/06/10 3:24:21 PM]
Chapter5 - Finding Codes
CHAPTER 5 - Finding Codes
What makes UEI remotes so unique is the ability to program any key using EFCs (Extended Function
Codes) also known as advanced codes. Every button that comes pre-programmed on these universal
remotes has a function code associated with it. There also may be function codes that are not preprogrammed on the remote, including some that weren't even on the original remote. These functions
can be sent from the keypad using an EFC.
The JP1 tools can't be used to extract any of the built-in setup code details. That information is stored in
ROM and JP1 only reads the E2/EEPROM area. There are some alternative ways to get this
information.
Searching the JP1 site for upgrades
Searching Hifi-Remote's Advanced Codes
Using Learned Signals
Using Keymoves
Using Devices4
Using the Lookup Tool
Using Pronto files
Using Brute Force
with Finesse
Final Resort
Searching the JP1 forum file section for Upgrades
This really is the best place to start. Major manufacturers keep their codes very stable as they add to
their product line. You can see that when you look in the manual that came with your universal
remotes. Most of the manufactures of TV’s get 1 or 2 setup codes. Chances are if you don’t find your
exact match, you’ll find something that will work. Also if you look at these other setups you may find
some EFCs that do something your original remote does not do.
For example I’ve got a Sony RDR 330 and the OEM remote has no [REC PAUSE] key, but when I was
building my device upgrade I looked at the Sony RDR-GX7 and saw an EFC for REC PAUSE, and it
worked on my DVD recorder too!
The user upgrades are located at
Forum Index -> Download Database -> JP1 File Section -> Device Upgrades
file:///C|/remotejp/IRHELPPDF/Chapter5.htm (1 of 10) [09/06/10 3:24:22 PM]
Chapter5 - Finding Codes
To make sense of these text files you’ll need either Keymap-Master or RemoteMaster.
See also Using Keymap-Master or Using RemoteMaster
Searching Hifi-Remote for Advanced Codes
If a built in code is working for your remote, this is a great place to find additional EFCs for functions
that are not found in the basic setup.
Rob has a huge collection of UEI advanced codes at this address.
http://www.hifi-remote.com/ofa/adv-codes.shtml
When you get to this address you’ll get your choice of TV, DVD, VCR device codes. Once you select
the type of device you’ll find the UEI 4 digit setup code reference.
Here is the type of information you’d find for VCR 0616.
http://www.hifi-remote.com/ofa/adv-codes.shtml
Using Learned Signals to find a Code
If you have learning remote you can learn the signals. When you download from the remote, IR will
decode the signals. Making an upgrade from these decodes is easy.
If you have a learning remote, I'd strongly suggest making a backup upgrade for all your equipment and
posting the files in the forum. You never know when your OEM remote is going to die.
See the Learned Signal Section for a refresher on how to learn a signal.
file:///C|/remotejp/IRHELPPDF/Chapter5.htm (2 of 10) [09/06/10 3:24:22 PM]
Chapter5 - Finding Codes
Please see Using Keymap-Master or Using RemoteMaster for a tutorial on how to build an upgrade from
learned signals
Using KeyMoves to find a Code
It sure would be nice if we could read the ROM of our remote with IR, but as you already know, IR only
reads the E2/EEPROM area. However, if your older EEPROM type remote supports the KeyMover
feature, you can move this information into the EEPROM and then read it with IR. This does not work
on the FLASH remotes because these move type keymoves are now accomplished with a keycode.
Lets say I want to know the power button EFC for my TV, I’m going to do a keymove to copy my TV
power key to my Aux Power key.
Press and hold SET until the LED (red light) blinks twice
Enter 994 the LED will blink twice
Press TV once to set the source mode
Press power for the source key
Press AUX once, to set the destination mode
Press power for the destination key.
The LED will blink twice
Download it to IR you can see what the EFC is.
Using Devices4.xls to find a Code
There is an Excel spreadsheet called Devices4.xls that contains the basic keys for built in library codes
for some of the key assignments. You specify the component setup code and it gives you a list of
functions.
You pick the component code and it shows you the basic buttons EFCs and the protocol information you
need to create a device upgrade. And columns E and F copy and paste into the Keymap-Master function
Sheet which makes this a great place to start your upgrade.
file:///C|/remotejp/IRHELPPDF/Chapter5.htm (3 of 10) [09/06/10 3:24:22 PM]
Chapter5 - Finding Codes
Using JP1 LookUp Tool to find a Code
The JP1 Lookup Tool lets you find the information about the standard setup
codes and covers more setup codes than devices4.
http://www.hifi-remote.com/jp1/lookup/
Using Pronto files to find a Code
file:///C|/remotejp/IRHELPPDF/Chapter5.htm (4 of 10) [09/06/10 3:24:22 PM]
Chapter5 - Finding Codes
Pronto is an upscale universal remote that can be programmed via computer. It is an expensive remote
costing more than $300. Remote Central remotecentral.com has a large collection of Philips Pronto
files. The pronto files come in many different formats.
IR can import Pronto Hex Import is available through the Add and Edit buttons of the Learned Signals
page, where there are now radio buttons to choose between UEI Learned and Pronto formats, UEI
Learned being the standard learned format of UEI remotes. The import routines support all raw and predefined Pronto formats other than the 8000 format, i.e. Pronto signals can be imported if they begin with
any of the following values: 0000, 0100, 5000, 5001, 6000, 6001, 9000, 9001, 900A, 900B, 900C, 900D,
900E.
Many companies publish their signal information in pronto format.
Another source of pronto hex are the users pronto files. CCF files are the easiest to work with. John Fine
has a program called DecodeCCF that will put this file into readable form. DecodeCCF works with
DecodeIR.DLL. If you drag a CCF onto the DecodeCCF Icon, it will produce a very nice .txt text file
that looks much like the learned signal codes that IR displays. If the signals didn't decode, DecodCCF
has an option to display the timing data.
Newer pronto remotes use a PCF file. There is no convenient way to do a batch extract and decode of
these signals. The signals need to be individually extracted with prontoEditNG and decoded with IR or
IRScope. These are less convenient because you can only decode one key at a time, and the user needs to
do this by hand. ProntoEditNG is available at RemoteCentral. When downloading ProntoEditNG, make
sure you get the version that matches the remote of listed for the PCF's description. If you use the wrong
ProntoEditNG version, it will tell you "invalid file format".
Using Brute Force to find a Code
file:///C|/remotejp/IRHELPPDF/Chapter5.htm (5 of 10) [09/06/10 3:24:22 PM]
Chapter5 - Finding Codes
The Brute force method, is one of my favorite methods for discovering EFCs. This method will only
work if you have a partially working setup, and it will only work if your equipment doesn’t use multiple
device/sub-device combinations. It’s also a little dangerous. This method involves sending all the EFC
or advanced codes to your equipment. This method may reveal undocumented features of your
equipment, or it could render your equipment unusable, so use at your own risk. For example,
many devices controlled by IR remotes, in Particular TV’s, have undocumented IR code sequences
used for servicing the equipment by factory trained technicians in possession of detailed service
manuals and test equipment. By causing a service code to be sent to your TV or other device, you
may place it in a state where it no longer operates as desired, or at all. An example of this might
be the resetting of all convergence offsets, or altering the width or height of the picture. Be
careful, if you are not sure of what the outcome might be, perhaps you should not do it.
This method only works on setup codes that use 3-digit EFCs. You can find out if your setup code uses 3
or 5 digit EFCs, by looking at the Lookup Tool. You also need to know if your remote uses 5-digit
EFCs.
If the setup code you are using uses three digit EFCs, there can only be 256 EFCs, maybe less depending
on the protocol. They start at number 000 and go through to 255. After that they start repeating, so 256
is the same as 000, 257 is the same as 001, etc. When you have a partially working device, testing the
other 256 advanced codes may reveal the function you are looking for. If your remote is a newer remote,
you need to pad these 3-digit EFCs with leading zeros. This would make your values would be between
00000 and 00255.
Your equipment needs to be in a state where it can react. If you are looking for a discrete off, your
equipment must be on. If you are looking for a discrete on, your equipment must be off.
I found some really cool features undocumented features on my TV using this method, but I also
panicked when I got into the servicing screen after I had read that warning above.
Below you will find the instructions for testing and programming a key manually. If you are using
an extender, you would need to disable your extender for this to work. You could also use
Keymap-Master or remote master to create upgrades that use all 256 EFCs for the particular
protocol/device/sub-device combination.
Non-LCD remote instructions:
A. To test a code manually:
- Press the device key
- Press SETUP (don't hold it)
- Enter the EFC code
- Check for a response from your equipment
- (Holding the final digit down is the same as holding the actual button down)
B. To program a code:
- Press the device key
- Press and hold SETUP (wait for two blinks)
- Enter 9-9-4 (wait for two blinks)
- (Optional) Press the device button the code is coming from
file:///C|/remotejp/IRHELPPDF/Chapter5.htm (6 of 10) [09/06/10 3:24:22 PM]
Chapter5 - Finding Codes
- Press SETUP (don't hold it)
Enter the EFC code
- (Optional) Press the device button the code is going to
- Press the button to be assigned
C. To program a code (to a SHIFT key):
- Press the device key
- Press and hold SETUP (wait for two blinks)
- Enter 9-9-4 (wait for two blinks)
- (Optional) Press the device button the code is coming from
- Press SETUP (don't hold it)
- Enter the EFC code
- (Optional) Press the device button the code is going to
- Press SETUP (don't hold it)
- Press the button to be assigned
D. To delete a code:
- Press the device key
- Press and hold SETUP (wait for two blinks)
- Enter 9-9-4 (wait for two blinks)
- Press the assigned button - twice
E. To delete a code (from a SHIFT key):
- Press the device key
- Press and hold SETUP (wait for two blinks)
- Enter 9-9-4 (wait for two blinks)
- Press the assigned button
- Press SETUP (don't hold it)
- Press the assigned button
LCD Remote Instructions (Current models):
A. To test a code:
- Press the device key
- Press SETUP (don't hold it)
- Enter the EFC code
- Check for a response from your equipment
- (Holding the final digit down is the same as holding the actual button down)
B. To program a code:
- Press and hold SETUP until the screen reads 'CODE SET'.
- Scroll down to 'KEY MOVER', hit SELECT.
- The screen will read 'FROM MODE'
- Press the device button the code is coming from
- The screen will read 'FROM KEY'
- Press SETUP (don't hold it)
- The screen will read 'SYNT'
- Enter the EFC code, then press SELECT
- The screen will read 'TO MODE'
- Press the device button the code is going to
file:///C|/remotejp/IRHELPPDF/Chapter5.htm (7 of 10) [09/06/10 3:24:22 PM]
Chapter5 - Finding Codes
- The screen will read 'TO KEY'
- Press the button to be assigned
- The screen will read 'SUCCESS'
C. To program a code (to a SHIFT key):
- Press and hold SETUP until the screen reads 'CODE SET'.
- Scroll down to 'KEY MOVER', hit SELECT.
- The screen will read 'FROM MODE'
- Press the device button the code is coming from
- The screen will read 'FROM KEY'
- Press SETUP (don't hold it)
- The screen will read 'SYNT'
- Enter the EFC code, then press SELECT
- The screen will read 'TO MODE'
- Press the device button the code is going to
- The screen will read 'TO KEY'
- Press SETUP (don't hold it)
- Press the button to be assigned
- The screen will read 'SUCCESS'
D. To delete a code:
- Press and hold SETUP until the screen reads 'CODE SET'.
- Scroll down to 'KEY MOVER', hit SELECT.
- The screen will read 'FROM MODE'
- Press the device button the code is being deleted from
- The screen will read 'FROM KEY'
- Press the key being cleared
- The screen will read 'TO MODE'
- Press the device button the code is being deleted from
- The screen will read 'TO KEY'
- Press the key being cleared
- The screen will read 'CLR KMVR'
- Press SELECT, the screen will read 'DELETED'
E. To delete a code (from a SHIFT key):
- Press and hold SETUP until the screen reads 'CODE SET'.
- Scroll down to 'KEY MOVER', hit SELECT.
- The screen will read 'FROM MODE'
- Press the device button the code is being deleted from
- The screen will read 'FROM KEY'
- Press SETUP (don't hold it)
- Press the key being cleared
- The screen will read 'TO MODE'
- Press the device button the code is being deleted from
- The screen will read 'TO KEY'
- Press SETUP (don't hold it)
- Press the key being cleared
- The screen will read 'CLR KMVR'
- Press SELECT, the screen will read 'DELETED'
file:///C|/remotejp/IRHELPPDF/Chapter5.htm (8 of 10) [09/06/10 3:24:22 PM]
Chapter5 - Finding Codes
LCD Remote Instructions (Older models):
A. To test a code:
- Press the device key
- Press SETUP (don't hold it)
- Enter the EFC code
- Check for a response from your equipment
- (Holding the final digit down is the same as holding the actual button down)
B. To program a code:
- Press the device key
- Press and hold SETUP until the screen reads 'TIMED SEQ'.
- Scroll down to 'CONFIGURE', hit SELECT.
- Scroll down to 'KEY MOVER', hit SELECT.
- The screen will read 'FROM'
- (Optional) Press the device button the code is coming from
- Press SETUP (don't hold it)
- Enter the EFC code
- The screen will read 'TO'
- (Optional) Press the device button the code is going to
- Press the button to be assigned
C. To program a code (to a SHIFT key):
- Press the device key
- Press and hold SETUP until the screen reads 'TIMED SEQ'.
- Scroll down to 'CONFIGURE', hit SELECT.
- Scroll down to 'KEY MOVER', hit SELECT.
- The screen will read 'FROM'
- (Optional) Press the device button the code is coming from
- Press SETUP (don't hold it)
- Enter the EFC code
- The screen will read 'TO'
- (Optional) Press the device button the code is going to
- Press SETUP (don't hold it)
- Press the button to be assigned
D. To delete a code:
- Press the device key
- Press and hold SETUP until the screen reads 'TIMED SEQ'.
- Scroll down to 'CONFIGURE', hit SELECT.
- Scroll down to 'KEY MOVER', hit SELECT.
- The screen will read 'FROM'
- Press the button to be cleared.
- The screen will read 'TO'
- Press the button to be cleared again.
E. To delete a code (from a SHIFT key):
- Press the device key
- Press and hold SETUP until the screen reads 'TIMED SEQ'.
file:///C|/remotejp/IRHELPPDF/Chapter5.htm (9 of 10) [09/06/10 3:24:22 PM]
Chapter5 - Finding Codes
-
Scroll down to 'CONFIGURE', hit SELECT.
Scroll down to 'KEY MOVER', hit SELECT.
The screen will read 'FROM'
Press the button to be cleared.
The screen will read 'TO'
Press SETUP (don't hold it)
Press the button to be cleared
Brute Force with Finesse
More and more we are seeing equipment requiring 5-digit EFCs. There are too many possiblilites to just
test them all individually. If you build an upgrade, you can see gaps in the OBC sequence. Missing
functions are usually found in those holes. If you use RemoteMaster or Keymap-Master you can
compute the 5-digit EFC for these missing OBCs. Often those EFCs will turn up a missing function.
The Final Resort
You can post in the JP1 Remotes Forum Index -> Code Search ask using this template
1. Device:
2. Type of device:
3. Year:
4. UEI Remote model:
5. Do you have a JP1 cable?
6. Still have original remote?
7. Checked the file section?
8. Checked Pronto file section (at R/C)?
9. Partially working setup code?
10. Learning remote question?
These questions are important to us. The way we answer your question, depends on the way you answer
the template questions.
file:///C|/remotejp/IRHELPPDF/Chapter5.htm (10 of 10) [09/06/10 3:24:22 PM]
Chapter6 - Modem Upgrades
CHAPTER 6- Modem upgradeable Remotes
WAV Files
Some JP1 remotes, like the RS-2133 (6 in 1 Kameleon), URC-5550(Topline 5), and URC-8550 (Topline
8), URC-7552, URC-7560, URC-7562, URC-8060 (6 in 1 Kameleon), URC-8910, URC-9910 are
equipped with modems to receive official UEI upgrades via WAV files. The UEI upgrades that come
via WAV file tend to be very bloated. You’ll probably be limited to 2 official upgrades. You can create
your own WAV files to upgrade your modem equipped remote.
Official WAV files from Oneforall are used to install new setup codes in the upgrade area of the
E2/EEPROM area of a remote. IR.EXE can create WAV files that add new upgrades, add new
keymoves, add new learns, or totally rewrite the E2/EEPROM area. Typically we'll be using WAV files
to add upgrades only, but you could do everything right down to adding an extender. The drawback with
WAV upgrades is that its only one-way communications.
IR.EXE is capable of analyzing WAV files and creating new ones. WAV files are specific to a remote
model. To create a WAV with IR you’ll need to download IRToWAV from the JP1->DOWNLOADS>Tools->Main area.
Unzip the IRToWAV file
IRToWav is a Java program and requires a Java virtual machine supporting at least version 1.4 of the
language. Sun's Java(TM) 2 Runtime Environment, Standard Edition, can be freely downloaded from
http://java.sun.com and is supported on many platforms. Earlier versions of the run-time might be
sufficient, but this has not been tested.
Java might already be installed on your system, to check it, open a command prompt and type "java version". If you receive an error, or if the displayed version number is smaller than 1.4.0, you will need
to install/upgrade your run-time.
IRToWav should work on any platform supporting Java, as it is a pure Java program. However it has
only been tested on the Windows platform.
If the Export to WAV option on the File menu is still grayed out, you’ll need to tell IR where the
IRtoWAV file is using the File->Set Directory ->IRtoWAV and then navigate to the file.
file:///C|/remotejp/IRHELPPDF/Chapter6.htm (1 of 4) [09/06/10 3:24:23 PM]
Chapter6 - Modem Upgrades
(1) You first have to build your upgrade using either KM or RM.
(2) Next you have to copy the upgrade data from KM or RM into IR.
(3) Then, in IR, you select export to .WAV from the file menu.
Steps 1 and 2 are described in great detail in the first link in the Using Keymap-Master or Using
RemoteMaster sections in help.
Step 3 requires that you download IRtoWAV and its associated files into the same directory as IR.exe,
and then from IR, you can create the .WAV file.
WAV upgrades are not cumulative in the remote. Each .wav upgrade installed replaces all previous ones.
If you want multiple device upgrades, you must accumulate them in IR.EXE. Add all the desired device
and protocol upgrades in IR, then create one .wav file.
Instruction for the OFA 6 – no LCD
Turn your speaker’s volume to half of MAX and turn the TONE to MAX if your speakers have this
feature. If you have small speakers its better to turn the volume up more.
Press the key labeled ‘TV’. Then press the [Power] key to prepare the remote control for the upgrade by
entering it upgrade state mode. The LED will stay on .
Place the remote control on the face of the speaker. The remote should be facing you. It is
recommended that your remote’s back be touching the speakers. Someone on the JP1 forum recommend
using a rubber band to hold it in place
Click the play button.
While the sound file is playing, you should hear a serial beeping sound coming from your speakers and
the remote controls’s device key LED should blink. The blinking indicates the sound is being accepted
by the remote control.
If you don’t see the device key LED blinking while the sound file is playing or it doesn’t blink after the
sound has stopped you should wait for 5 seconds to allow the remote to exit the upgrade state. Then
you will probably need to adjust the speaker’s volume and/or remote’s position on the surface of the
speaker and go to step 1 and try again.
After successful completion of the download, press and release the [MAGIC] key and the device key
LED will double blink.
Instructions for the Topline Remote LCD
Turn the speakers’ volume to half of MAX. and turn
the tone to MAX if your speakers have this feature.
If you have small speakers its better to turn the
speakers up more.
file:///C|/remotejp/IRHELPPDF/Chapter6.htm (2 of 4) [09/06/10 3:24:23 PM]
Chapter6 - Modem Upgrades
Press and hold the [Magic] key until the LCD
displays “TIMED SEQ”
Press the [Menu] key once and the LCD displays
“CODE SETUP” Press [Enter] and the LCD
displays “DEV SET UP.
Press the [Menu] key 3 times and the LCD displays
“MODEM”. Press [Enter] and the LCD display will
change to “DOWNLOAD”.
Hold the remote against the speaker. (Some people
rubber band the remote to the speaker) The remote
control should face you. The back of the remote
should be touching the speaker. Click on the play
button.
After successful completion of the download , the LCD will display “COMPLETE”. If the LCD doesn’t
display “COMPLETE” you should wait for 1 minute to allow the remote to exit the DOWNLOAD
mode. Then you will probably need to adjust the speaker’s volume and/or remote’s position on the
surface of the speaker and go to step 1 and try again.
Instructions for the 9962 Kameleon
Enter Set-Up mode,
Click "Other"
Enter 997.
Display goes blank
Place the remote against my speakers
play wav.
At the end of the play, the remote wakes up and flashes twice indicating successful upgrade.
file:///C|/remotejp/IRHELPPDF/Chapter6.htm (3 of 4) [09/06/10 3:24:23 PM]
Chapter6 - Modem Upgrades
EXTENDER NOTE
WAV files only work for the remote they were formatted for. They contain a signature that must match
the signature in the remote. If you installed an extender, it may have changed the signature in your
remote. You would have read about that in the ReadMe file that was bundled with your extender.
The Extender uses a different signature only to help people with multiple kinds of EEPROM images on
their PC keep them straight. There is no technical need for the signature difference other than that.
When people have used wav files for extenders in the past they needed to patch the extender and rename
its associated RDF file (and hide the original RDF of that name) to get the extender signature to match
what the remote expects. Then it should work.
file:///C|/remotejp/IRHELPPDF/Chapter6.htm (4 of 4) [09/06/10 3:24:23 PM]
Glossary
GLOSSARY
*9xx
15-1994
Advanced Code
BIN
CCF
Channel Lock
Cinema 7
Comcast
COX
CSV
debounce
DecodeCCF
DecodeIR.dll
Device
A reference to the commands used to program the remote from the remote's
keypad. The commands available vary by remote. There may be commands
to search for setup codes; blink back setup codes; blink back the remotes
signature; setup macros, keymoves and learns.
A sequence of numbers that start with 15- indicate a part number for a
RadioShack Remote that was manufactured by UEI. The 15-1994 is
perhaps the best known of these remotes, so well known that it is sometimes
just referred to as "the 1994".
An old term for an EFC.
1) a file extension for compressed binary files.
2) a file extension for files containing a device upgrade for a slingbox. This
type of bin file can be imported or exported from RemoteMaster.
A file extension for a file that contains encoded signal information for a
Philips Pronto Remote user's equipment. CCF files are helpful for finding
codes for equipment. These files can be converted to a tab delimited text
files with decodeCCF.
This is an option that often appears on cable remotes. This setting keeps the
channel changing buttons set to control the cable companies decoder box
even when the remote is not in CBL mode.
This is often used to reference the very popular JP1 remote, the URC-7800
Cinema 7 Remote With Learning. This usually does not reference the real
URC-7200 Cinema 7, which is very different remote.
A cable company that uses UEI remotes for their set top boxes.
A cable company that uses UEI remotes for their set top boxes.
Comma Separated Values, which is a plain text database type file, with each
record being a line, and each field in the record separated by a comma.. An
CSV file can be opened by Excel with a click so its a popular file format for
sharing data between applications.
When a button is first pressed the electrical contacts often make and break
contact several times before solid contact is made. The remote waits for a
small time period after the initial contact so make sure that these bounces
are not treated as multiple presses.
A program that can decode a Pronto CCF file. DecodeCCF uses decodeIR
to determine what kind of signal it is, and produces a tab delimited text file
of the decodes.
A dynamic linked library file used my many of the JP1 programs to decode
IR timing data..
The numerical representation of a portion of an IR signal, that usually does
not change over a group of signals for a piece of equipment.
file:///C|/remotejp/IRHELPPDF/Glossary.htm (1 of 8) [09/06/10 3:24:24 PM]
Glossary
Device Combiner
Device Index
Device keys
Device Mode
Device Upgrade
Device Type
A memory saving protocol that allows you to create one setup code that
combines several different types of signals and assign it to a single device
button.
A number that corresponds to the last device key that was pressed, or in the
case of an extender, the number to use for various keysets. When a nondevice key is pressed, the device index is used to figure out how to process
that button press.
The keys that change which equipment your remote is controlling e.g. [TV],
[DVD]. [VCR], [CBL], [SAT], [RCVR], [CD], [PVR], [AUX], [PVR].
A Device Mode is everything that gets selected by pressing a device key.
That includes a device index, a setup code and a set of key moves and a set
of learned signals.
This is a setup code that was added after the remote was manufactured, and
resides in the E2/EEPROM upgrade area.
Device type is associated with each setup code. Device types have three
major functions.
A device type is used to find the correct setup code to process when a
button is pressed. Some remotes use 5 digit setup codes where the first digit
is the device type, other remotes have you issue a *992 command to change
the device type before you enter a 4 digit setup code.
Device types determine which keys are available for assignment when
creating an upgrade. Some device types have more or different keys
available than other device types.
A device type may influence how things like volume punch through;
channel lock; transport punch through; and the record and FAV buttons
work on your remote.
Devices.xls
Devices4.xls
Although a device type is selected from a list that might say
TV;VCR;DVD;CD;AMP .... The device type has ABSOLUTELY
NOTHING to do with what kind of equipment will recognize this signal.
Device type doesn't alter the signal in anyway, it just a setting used
internally to determine how to process the button.
An Excel spreadsheet that keeps track of all the device setup codes and the
protocol information in various remotes.
A Excel spreadsheet that gives you EFC information for the setup codes in
the RS 15-1994 remote.
file:///C|/remotejp/IRHELPPDF/Glossary.htm (2 of 8) [09/06/10 3:24:24 PM]
Glossary
Discrete Code
DKP
DSM
DVR
E2
EEPROM
EFC
Extender
A code that gives you direct access to a function that is normally accessed
by toggling or rotating. Discretes are most often used to ensure your home
theater components stay completely in sync for powering on and off and
changing inputs.
Double Key Press, A special protocol that processes different keys
depending on if the key was pressed once or twice in a given time period.
Device Specific Macro, A special protocol that only runs a macro when you
are in the bound device mode.
Digital Video Recorder
The area in an Flash chip that corresponds the EEPROM area in the older
remotes.
A memory chip that maintains its contents without electrical power, and
whose contents can be erased and reprogrammed either within the remote or
from an external source. EEPROMs are used where the application requires
stable storage without power, but where the chip may have to be
reprogrammed.
Extended Function Code, this is a code that allows us send a parameter to
the protocol executor to send a IR signal for a specific function. The EFC
can be 3 or 5 digits depending on the vintage of the remote. If a remote
requires 5-digit EFCs, you need to add leading zeros to 3-digit EFCs. If the
remote uses 3-Digit EFCs, you can not send 5-digit EFCs. EFCs are
specific to a protocol executor. The EFC should not be confused with the
OBC.
An extender is a JP1 program that is loaded into the E2/EEPROM area your
remote as a protocol executor.
This protocol replaces the main processing loop and adds extended
functionality beyond that which the remote delivered as standard. This
program overrides some of the normal remote operations. An extender
converts all your learning memory to extend the keymove/macro memory,
and changes the way macros are processed.
Flash chip
Function
helper device
An extended remote has the extender program installed.
An unextended remote does not have the extender program installed.
A rewritable memory chip that retains its data without a power supply.
The portion of an IR signal that is different for each button.
Sometimes equipment takes different kinds of signals to get all the
functions. If these cannot be handled by a single setup code, a helper device
is used. A helper device may be an upgrade or it may be a built in device.
The helper device is used with keymoves, while the main setup is assigned
to a device button. Keymoves remember their own setup code.
file:///C|/remotejp/IRHELPPDF/Glossary.htm (3 of 8) [09/06/10 3:24:24 PM]
Glossary
HT
HCS08
ICT
Interface
IR
Home Theater, often used to describe a scheme where different keys for
different devices are active at the same time for ease of remote use. Many
remotes have a Home Theater button.
The Motorola flash chip in JP1.2 remotes.
A file extension produced by IRScope that contains infrared captured
timing data.
The cable that connects the remote to the computer.
1) Infrared light or Infrared Signal
2) IR.EXE one of the main JP1 tools
IR Emitter
IR Signal
IRP
IRP Notation
IR2Wav
IRTool
IRScope
IR Widget
JP1 Lookup Tool
Kameleon
Keycode
3) A file created in IR.exe that has an extension of .IR
This is the part of the remote that sends the signal, not to be confused with
the LED. The IR Emitter sends a timed signal that is not visible to the naked
eye.
A timed pattern of infrared light that follows certain rules (a protocol), so
that it can be recognized by an IR receiver.
A file extension for files containing IRP Notation for use with Makehex.
Is a formula that describes how IR timing data is interpreted. An example of
IRP notation:
{38.4k,564}<1,-1|1,-3>(16,-8,D:8,S:8,F:8,~F:8,1,-78,(16,-4,1,-173)*)
A program that converts an IR file or a portion of an IR file into a WAV file
for modem upgradeable remotes.
A program that can take learned pronto hex and call decodeIR to find out
what kind of signal it is.
A program that works with the IR Widget to capture signals, decodes the
signals and displays them graphically. It also can be used to take pronto hex
decode it, and turn in into a UEI learn.
A hardware gadget that can capture IR signals timing data.
A web based replacement for devices4.xls, this lets you find detailed
information on setup codes.
A remote that has a lighted touch screen instead of hard buttons. Like the
sound alike chameleon lizard changes appearance, the kameleon remote's
touch screen's changes depending on device selection.
The numeric code that is associated with a specific button on your remote.
file:///C|/remotejp/IRHELPPDF/Glossary.htm (4 of 8) [09/06/10 3:24:24 PM]
Glossary
Keymove
A keymove is a way to reassign the function of a particular button. A
keymove remembers its setup code. A keymove is bound to a device mode,
and a button. Keymoves carry their own setup code reference. There are
two types of keymoves,
1) A keycode keymove. A keycode keymove looks up a key to send in the
setup code it references..
KM
LCD
Learn
LED
LIRC
LIRC File
LKP
LSB
Macro
MakeHex
MakeHex GUI
Millenium
MSB
Multiplex
Navigator
OBC
2) An EFC keymove, sends a particular function which might not be
assigned to any key in the setup code.
Keymap-Master, an Excel worksheet that helps you create a device upgrade
Some of the jp1 remotes have a small liquid crystal display screen to
display prompts and setup code information to take the guess work out of
remote operation.
A recording of an IR signal that is attached to a specific key in a specific
Device Mode. The learning process captures the signal sent from the OEM
remote and detects where the signal starts repeating and optimizes it for
storage. Because the signal has been optimized, holding the OEM button
longer does not increase the amount of learning memory used to store the
recording.
Light Emitting Diode, this is the light that flashes on your remote to
acknowledge that a button was processed, not the part of the remote that
sends the signal.
(Linux Infrared remote control) is an open source package that allows users
to receive and send infrared signals with a Linux-based computer system.
A file that contains information on the signals sent by a LIRC
Long Key Press, a special protocol that processes different buttons
depending on how long the button was pressed.
Least Significant Bit first: This is the sequence for sending binary data that
is used by the majority of IR Protocols,
A macro a list of buttons that will be processed when the macro button is
pressed. Macros are useful for repetitive tasks. Macros are modeless. Each
button press uses the active device mode at that moment in time.
A program that can make pronto hex, based on IRP notation.
A user friendly wrapper for the MakeHex program.
A cable company remote that used to be popular in the JP1 group.
Most Significant Bit first: This is a sequence for sending binary data that is
used by some IR Protocols.
A special protocol that lets the user change the setup code on the fly.
A cable remote that used to be popular in the JP1 group.
Original Button Code- This will be a numeric value that corresponds to the
part of the signal that changes as you press different keys.
file:///C|/remotejp/IRHELPPDF/Glossary.htm (5 of 8) [09/06/10 3:24:24 PM]
Glossary
OEM
OFA, One For All
OTA
PB
PCB
PCF
Phantom device
Phantom key
Original Equipment Manufacturer. An OEM remote, is the remote that
came with your equipment.
One for All, a brand name remote.
Over the Air
Protocol Builder, an Excel spread sheet that allows us to create a protocol
executor to send an IR signal.
Printed Circuit Board
A file extension from newer Philips Pronto Remotes. These files contain
user's signal data on their equipment. There is no convenient way to do a
batch extract and decode of these signals. The signals need to be
individually extracted with prontoEditNG and decoded with IR or IRScope.
Sometimes a remote is setup to handle more devices than there are device
buttons. For example the URC-10820, 8820 and 6820 have 10, 8, and 6
device buttons respectively. These remotes all share the same chip. So the
8820 has 2 phantom devices, the 6820 has 4 phantom devices. With our JP1
tools, we can set up macros to access the missing device buttons, and put
our remote into another device mode.
The number of keys that may be accommodated within the range of base
key numbers, generally, is greater than the number of physical keys on the
remote. Thus, there may be “holes” throughout the numbering scheme or
there may be unused key numbers at the end. Some remotes use some of
these extra key numbers for special purposes. However, if not a special
case, such key numbers are handled by the remote just as if they represented
physical keys. These are phantom keys – key numbers without keys.
A phantom key may be used as the bound key in both macros and
keymoves, A physical key is required only to start the process, i.e., for the
first macro or keypress. The remaining macros or keymoves also must be
assigned to keys, and they would be assigned to phantom keys. By using
phantom keys in this way, physical keys can be reserved for functions that
must be associated directly with physical keypresses.
PID
Pronto
Pronto Hex
ProntoEditNG
Protocol
Protocol Executor
Protocol ID, a hex number that uniquely identifies a protocol executor.
An high-end remote manufactured by Philips. Prontos produce files that can
be shared with other Pronto users to share information about their home
theater equipment's signals.
A string of 4-digit hexadecimal number that conveys signal timing
information.
A program that allows you to edit or extract data from a Pronto PCF file,
one key at a time.
A set of rules that describe how an IR signal needs to be formatted. Also
used for protocol executor.
A small subroutine that takes in data and formats and transmits an IR signal.
file:///C|/remotejp/IRHELPPDF/Glossary.htm (6 of 8) [09/06/10 3:24:24 PM]
Glossary
Protocol Upgrade
protocol variant
protocols.ini
PVR
RDF
RM
RMDU
RMIR
RS
RTF
S3C8
S3C8+
S3F8
[Setup] Button
Setup Code
Shift Cloaking
Shifted Key
Signature
Slingbox
That is a protocol executor that was added to the remote after it was
manufactured. The Protocol upgrade resides in the E2/EEPROM upgrade
area.
1)A change in a protocol executor that requires different parameters to send
the same signal
2)A signal that ALMOST follows the rules of a well known protocol.
1) A text file used by RemoteMaster to define how device, subdevice and
function codes need to be translated into variables to be passed to the
individual protocol executors.
Personal Video Recorder
Remote Definition file, used by tools to understand how to process data
read from the remote.
RemoteMaster, a Java program that helps you create a device upgrade.
A file with an extension of .rdmu is a RemoteMaster Device Upgrade
created by RemoteMaster.
Java version of IR program
Radio Shack, a chain of stores in the U.S. that specialize in electronic
equipment.
A file extension for Rich Text Format files.
Samsung chips. The s3c8 is used in older jp1 remotes, the s3c8+ is used in
newer jp1 remotes, and the s3f8 is used in JP1.3 remotes.
Your [Setup] button is the button that you use to start manual 99x
programming when you are initially setting up your remote manually. The
labeling of the [Setup] button varies by remote models. It may be labeled
[Setup]; [Magic]; [P]; [Set] or something all together different.
A setup code is a reference to the remotes internal library of codes. A
booklet or pamphlet came with your remote listing the available setup codes
in the remotes library.
When a shifted key is processed, and no learn, keymove or macro is found,
the shift bit in the keycode is turned off before seeing if there is a function
defined for that key in the setup. This allows you to have a keymove or a
macro on a key and still access the underlying function.
When a button is preceded by the press of the [Setup] button, a bit is set to
create an alternate keycode. The alternate keycode is used for searching for
learns, keymoves and macros.
An 8 byte code stored in the remotes E2/EEPROM area that identifies the
model of remote.
The Slingbox is a TV streaming device that enables users to remotely view
their home's cable, satellite, or personal video recorder (PVR) programming
from an Internet-enabled computer with a broadband Internet connection.
file:///C|/remotejp/IRHELPPDF/Glossary.htm (7 of 8) [09/06/10 3:24:24 PM]
Glossary
Special Protocol
STB
Sub-Device
TOAD
TOADTog
Toggle
Transport keys
TPT
UART
URC
URC-xxxxx
UEI
WAV File
WAV Form
Widget
WOW
VPT
An executor developed by the JP1 community, to make our remotes more
customized. Pause, Multiplex, LKP/DKP , ToadTog
Set Top Box
The numerical representation of a portion of a set IR signals that usually
changes less often than the device over a group of signals.
A Toggle Only Actuated Device is equipment that lacks discrete codes to
do such things as power on, or power off, or select inputs without rotating
through a list.
Toggle-Only Actuated Devices toggler. The ToadTog Protocol that
manages 8 state bits and selectively runs commands based on state and was
developed to mimic discrete on/off commands
Any button that works first one way and then the other. A power button is
typically a toggle, it turns something on the first time it is pressed and then
turns it off the next time.
The keys associated with a VCR/DVD/CD/PVR that allow for Play,
Record, Stop, Pause, Forward and Reverses
Transport Punch Through, as when the remote is in TV mode but the
A Universal Asynchronous Receiver Transmitter is the electronic circuit
that makes up the serial port on a PC.
1) a universal remote control
2) Universal Remote Control, a company that makes non-jp1 remotes. This
company is a competitor of UEI.
A UEI remote part number. One For All remotes and many OEM cable
remotes have part numbers that start with URC.
Universal Electronics Inc.
A file with a WAV extension, that can be played over the PC speakers to
upgrade modem upgradeable remotes. This file can be exported or imported
by IR.exe when IR2Wav has
IRScope's graphical display of IR timing data.
see IR Widget
A cable company that uses UEI remotes for their set top boxes.
Volume Punch Through, as when the remote is in CBL mode, but if you
press the Vol+ key, it still controls the TV.
file:///C|/remotejp/IRHELPPDF/Glossary.htm (8 of 8) [09/06/10 3:24:24 PM]