1
SGI® 10-Gigabit Ethernet Adapter II
User’s Guide
007-5476-001
COPYRIGHT
© 2008, SGI. All rights reserved; provided portions may be copyright in third parties, as indicated elsewhere herein. No permission is granted
to copy, distribute, or create derivative works from the contents of this electronic documentation in any manner, in whole or in part, without the
prior written permission of SGI.
LIMITED RIGHTS LEGEND
The software described in this document is “commercial computer software” provided with restricted rights (except as to included open/free
source) as specified in the FAR 52.227-19 and/or the DFAR 227.7202, or successive sections. Use beyond license provisions is a violation of
worldwide intellectual property laws, treaties and conventions. This document is provided with limited rights as defined in 52.227-14.
TRADEMARKS AND ATTRIBUTIONS
SGI, the SGI logo, and Altix are registered trademarks, and SGI ProPack is a trademark of SGI in the United States and/or other countries
worldwide. InfiniBand is a registered trademark of InfiniBand Trade Association. Linux is a registered trademark of Linus Torvalds.
All other trademarks mentioned herein are the property of their respective owners.
FCC WARNING
This equipment has been tested and found compliant with the limits for a Class A digital device, pursuant to Part 15 of the FCC rules. These
limits are designed to provide reasonable protection against harmful interference when the equipment is operated in a commercial environment.
This equipment generates, uses, and can radiate radio frequency energy and if not installed and used in accordance with the instruction manual,
may cause harmful interference to radio communications. Operation of this equipment in a residential area is likely to cause harmful
interference, in which case the user will be required to correct the interference at personal expense.
ATTENTION
This product requires the use of external shielded cables in order to maintain compliance pursuant to Part 15 of the FCC Rules.
VDE 0871/6.78
This equipment has been tested to and is in compliance with the Level A limits per VDE 0871.
EUROPEAN UNION STATEMENT
This device complies with the European Directives listed on the “Declaration of Conformity” which is included with each product. The CE mark
insignia displayed on the device is an indication of conformity to the aforementioned European requirements.
TUV
R
geprufte
Sicherheit
NRTL/C
International Special Committee on Radio Interference (CISPR)
This equipment has been tested to and is in compliance with the Class A limits per CISPR publication 22.
Canadian Department of Communications Statement
This digital apparatus does not exceed the Class A limits for radio noise emissions from digital apparatus as set out in the Radio Interference
Regulations of the Canadian Department of Communications.
Attention
Cet appareil numérique n’émet pas de perturbations radioélectriques dépassant les normes applicables aux appareils numériques de Classe A
préscrites dans le Règlement sur les interferences radioélectriques etabli par le Ministère des Communications du Canada.
Japanese Compliance Statement
Compliance Statement in Chinese
Record of Revision
Version
Description
001
May 2008
Initial release.
007-5476-001
v
Contents
Figures .
.
.
.
.
.
.
.
.
.
.
.
.
.
.
.
.
.
.
.
.
.
.
.
.
. ix
Tables .
.
.
.
.
.
.
.
.
.
.
.
.
.
.
.
.
.
.
.
.
.
.
.
.
. xi
About This Book . . . . . . .
Important Information . . . . .
Chapter Descriptions . . . . . .
Related Publications . . . . . .
SGI Altix Hardware Documentation
Conventions . . . . . . . .
Product Support . . . . . . .
Reader Comments . . . . . . .
.
.
.
.
.
.
.
.
.
.
.
.
.
.
.
.
.
.
.
.
.
.
.
.
.
.
.
.
.
.
.
.
.
.
.
.
.
.
.
.
.
.
.
.
.
.
.
.
.
.
.
.
.
.
.
.
.
.
.
.
.
.
.
.
.
.
.
.
.
.
.
.
.
.
.
.
.
.
.
.
.
.
.
.
.
.
.
.
.
.
.
.
.
.
.
.
.
.
.
.
.
.
.
.
.
.
.
.
.
.
.
.
.
.
.
.
.
.
.
.
. xiii
. xiii
. xiv
. xiv
. xiv
. xvi
xvii
xvii
.
.
.
.
.
.
.
.
.
.
.
.
.
.
.
.
.
.
.
.
.
.
.
.
.
.
.
.
.
.
.
.
.
.
.
.
.
.
.
.
.
.
.
.
.
.
.
.
.
.
.
.
.
.
.
.
.
.
.
.
.
.
.
.
.
.
.
.
.
.
.
.
.
.
.
.
.
.
.
.
.
.
.
.
.
.
.
.
.
.
.
.
.
.
.
.
.
.
.
.
.
.
.
.
.
.
.
.
.
.
.
.
.
.
.
.
.
.
.
.
.
.
.
.
.
.
.
.
.
.
.
.
.
.
.
.
.
.
.
.
.
.
.
.
.
.
.
. 9
. 9
. 9
. 9
. 10
. 10
. 10
.
.
.
.
.
.
.
.
.
.
.
.
.
.
.
.
.
.
.
.
.
.
.
.
.
.
.
.
1.
Features and Capabilities
Hardware Platforms . .
Adapter Features . . .
Cabling . . . . . .
Fiber-Optic Cables .
Copper Cables. . .
Configuration Limits . .
2.
Connecting the Adapter to a Network . . . . . . . . . . .
Installing the Adapter . . . . . . . . . . . . . . . .
Special Installation Instructions for Altix XE320 Servers . . . . . .
Procedure 1 (Simplest) . . . . . . . . . . . . . .
Procedure 2 . . . . . . . . . . . . . . . . .
Procedure 3 (Most Complex) . . . . . . . . . . . .
Driver Specification Needed for SGI Altix 450 and SGI Altix 4700 Platforms
007-5476-001
1
1
2
4
4
6
6
vii
Contents
Connecting to a Network . . . . .
Connecting with a Fiber-Optic Cable
Connecting with a Copper Cable .
.
.
.
.
.
.
.
.
.
.
.
.
.
.
.
.
.
.
.
.
.
.
.
.
. 10
. 11
. 12
3.
Operating the Adapter . . . . . . . . . . . . .
Verifying Functionality . . . . . . . . . . . . .
Using LEDs to Determine Adapter Functionality . . . . .
Verifying That the Adapter Driver Is Loaded . . . . . .
Enabling the Adapter . . . . . . . . . . . . .
Verifying That the Adapter Is Properly Configured and Enabled
Resetting the Adapter . . . . . . . . . . . . . .
Changing the Configuration . . . . . . . . . . . .
Troubleshooting . . . . . . . . . . . . . . .
.
.
.
.
.
.
.
.
.
.
.
.
.
.
.
.
.
.
.
.
.
.
.
.
.
.
.
.
.
.
.
.
.
.
.
.
.
.
.
.
.
.
.
.
.
.
.
.
.
.
.
.
.
.
.
.
.
.
.
.
.
.
.
. 15
. 15
. 16
. 16
. 16
. 17
. 17
. 18
. 18
4.
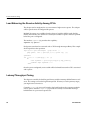
Performance Tuning . . . . . . . . .
Load Balancing the Receive Activity Among CPUs
Latency/Throughput Tuning . . . . . . .
NIC Acceleration Features. . . . . . . .
Software (SW) Stack Tuning . . . . . . .
Further Tuning with a Sample Script . . . .
.
.
.
.
.
.
.
.
.
.
.
.
.
.
.
.
.
.
.
.
.
.
.
.
.
.
.
.
.
.
.
.
.
.
.
.
.
.
.
.
.
.
.
.
.
.
.
.
.
.
.
.
.
.
.
.
.
.
.
.
.
.
.
.
.
.
.
.
.
.
.
.
. 19
. 20
. 20
. 21
. 21
. 22
Glossary .
.
.
.
.
.
.
.
.
.
.
.
.
.
.
.
.
.
.
.
.
.
.
.
.
. 23
.
.
.
.
.
.
.
.
.
.
.
.
.
.
.
.
.
.
.
.
.
.
.
.
.
. 25
Index.
viii
.
.
.
.
.
.
.
.
.
.
.
.
.
.
.
.
.
.
.
.
.
007-5476-001
Figures
Figure 2-1
SGI 10-Gigabit Ethernet Adapter II .
Connecting the Fiber-Optic Cable .
.
.
.
.
.
.
.
.
.
.
.
.
.
.
.
.
. 2
. 12
Figure 2-2
Connecting the Copper Cable .
.
.
.
.
.
.
.
.
. 13
Figure 1-1
007-5476-001
.
.
ix
Tables
Table 1-1
Table 1-2
Table 1-3
Table 1-4
Table 1-5
Table 1-6
Table 3-1
007-5476-001
Two Versions of the SGI 10-Gigabit Ethernet Adapter II .
Adapter Features . . . . . . . . . . . .
.
.
.
.
.
.
LC-to-LC Optical Cables . . .
SGI 4X Infiniband Optical Cables
SGI CX4 Copper Cables . . .
Configuration Limits . . . .
Adapter LED . . . . . .
.
.
.
.
.
.
.
.
.
.
. 4
. 5
. 6
. 6
. 16
.
.
.
.
.
.
.
.
.
.
.
.
.
.
.
.
.
.
.
.
.
.
.
.
.
.
.
.
.
.
.
.
.
.
.
3
3
xi
About This Book
This guide describes the two versions of the SGI 10-Gigabit Ethernet Adapter II, shows
you how to connect the adapter to an Ethernet network, and explains how to operate the
adapter.
You can use the adapter to replace the built-in Ethernet network adapter in your system
or use it in addition to your current adapter.
This guide is written for users of the SGI 10-Gigabit Ethernet Adapter II. It is assumed
that you have general knowledge of Ethernet networks and the system in which the
adapter is installed.
Important Information
Warning: Never look into the end of a fiber optic cable to confirm that light is being
!
emitted (or for any other reason). Most fiber optic laser wavelengths (1300 nm and
1550 nm) are invisible to the eye and cause permanent eye damage. Shorter
wavelength lasers (for example, 780 nm) are visible and can cause significant eye
damage. Use only an optical power meter to verify light output.
Warning: Never look into the end of a fiber optic cable on a powered device with
!
007-5476-001
any type of magnifying device, such as a microscope, eye loupe, or magnifying glass.
Such activity causes cause a permanent burn on the retina of the eye. Optical signal
cannot be determined by looking into the fiber end.
xiii
About This Book
Chapter Descriptions
This guide contains the following chapters:
•
Chapter 1, “Features and Capabilities,” summarizes the adapter features, lists the
protocols and interfaces with which the adapter is compatible, and gives adapter
configuration limits for various systems.
•
Chapter 2, “Connecting the Adapter to a Network,” shows you how to connect the
adapter to your network.
•
Chapter 3, “Operating the Adapter,” describes how to verify installation of the
adapter and software, how to reset the adapter, how to set parameters to improve
performance, and how to set configuration parameters.
•
Chapter 4, “Performance Tuning,”describes performance tuning for the adapter.
A glossary and an index complete this guide.
Related Publications
This guide is part of a document set that fully supports the installation, operation, and
service of the SGI 10-Gigabit Ethernet Adapter II. For more information about installing
and servicing the adapter, see the user’s guide for the system in which the board is
installed.
SGI Altix Hardware Documentation
The following is a list of hardware documentation available from SGI that describes SGI
Altix systems.
xiv
007-5476-001
About This Book
•
SGI Altix 450 System User’s Guide
Provides an overview of the Altix 450 system components, and it describes how to
set up and operate this system
•
SGI Altix 4700 User’s Guide
This guide provides an overview of the architecture and descriptions of the major
components that compose the SGI Altix 4700 family of servers. It also provides the
standard procedures for powering on and powering off the system, basic
troubleshooting information, and important safety and regulatory specifications.
•
SGI Altix ICE 8200 Series System Hardware User’s Guide
Describes the features of the SGI Alitx ICE 8200 series systems as well as
troubleshooting, upgrading, and repairing.
Describes the features of the Altix ICE 8200 server system as well as
troubleshooting, upgrading, and repairing.
•
SGI Altix XE210 System User’s Guide
Describes the features of the Altix XE210 server system as well as troubleshooting,
upgrading, and repairing.
•
SGI Altix XE240 System User’s Guide
Describes the features of the Altix XE240 server system as well as troubleshooting,
upgrading, and repairing.
•
SGI Altix XE250 System User’s Guide
Describes the features of the Altix XE250 server system as well as troubleshooting,
upgrading, and repairing.
•
SGI Altix XE310 System User’s Guide
Describes the features of the Altix XE310 server system as well as troubleshooting,
upgrading, and repairing.
•
SGI Altix XE320 System User’s Guide
Describes the features of the Altix XE320 server system as well as troubleshooting,
upgrading, and repairing.
You can obtain SGI documentation, release notes, or man pages in the following ways:
007-5476-001
•
See the SGI Technical Publications Library at http://docs.sgi.com. Various formats
are available. This library contains the most recent and most comprehensive set of
online books, release notes, man pages, and other information.
•
For the latest information about software and documentation for your SGI ProPack
software release, see the release notes that are in a file named README.TXT that is
available in /docs directory on the SGI ProPack 5 for Linux CD.
xv
About This Book
•
You can also view man pages by typing man <title> on a command line.
For example, to display the man page for the apropos command, type the following on
a command line:
man apropos
Important system configuration files and commands are documented on man pages.
References in the documentation to these pages include the name of the command and
the section number in which the command is found. For example, “apropos(1)” refers to
the apropos command and indicates that it is found in section 1 of Linux man pages.
For additional information about displaying reference pages using the man command,
see man(1).
Conventions
The following conventions are used throughout this document:
xvi
Convention
Meaning
Command
This fixed-space font denotes literal items such as commands, files,
routines, path names, signals, messages, and programming language
structures.
variable
The italic typeface denotes variable entries and words or concepts
being defined. Italic typeface also is used for book titles.
user input
This bold, fixed-space font denotes literal items that the user enters
in interactive sessions. Output is shown in nonbold, fixed-space font.
[]
Brackets enclose optional portions of a command or directive line.
...
Ellipses indicate that a preceding element can be repeated.
man page(x)
Man page section identifiers appear in parentheses after man page
names.
GUI element
This font denotes the names of graphical user interface (GUI)
elements such as windows, screens, dialog boxes, menus, toolbars,
icons, buttons, boxes, fields, and lists.
007-5476-001
About This Book
Product Support
SGI provides a comprehensive product support and maintenance program for its
products:
•
If you are in North America, contact the Technical Assistance Center at
+1 800 800 4SGI or contact your authorized service provider.
•
If you are outside North America, contact the SGI subsidiary or authorized
distributor in your country.
Reader Comments
If you have comments about the technical accuracy, content, or organization of this
document, contact SGI. Be sure to include the title and document number of the manual
with your comments. (Online, the document number is located in the front matter of the
manual. In printed manuals, the document number is located at the bottom of each
page.)
You can contact SGI in any of the following ways:
•
Send e-mail to the following address:
techpubs@sgi.com
•
Use the Feedback option on the Technical Publications Library Web page:
http://docs.sgi.com
•
Contact your customer service representative and ask that an incident be filed in the
SGI incident tracking system.
•
Send mail to the following address:
Technical Publications
SGI
1140 East Arques Avenue
Sunnyvale, CA 94085-4602
SGI values your comments and will respond to them promptly.
007-5476-001
xvii
Chapter 1
1. Features and Capabilities
Gigabit Ethernet is technology that allows computer systems to communicate at speeds
up to 10 gigabits per second (Gbps). This chapter includes the following sections:
•
“Hardware Platforms” on page 1
•
•
•
“Adapter Features” on page 2
“Cabling” on page 4
“Configuration Limits” on page 6
Hardware Platforms
The SGI 10-Gigabit Ethernet Adapter II is supported in the following systems:
•
SGI Altix XE210
•
SGI Altix XE240
•
SGI Altix XE250
•
SGI Altix XE310
•
SGI Altix XE320
•
SGI Altix ICE 8200
•
SGI Altix 450
•
SGI Altix 4700
Note: Not every Altix system can immediately accept a PCI Express card without
optional hardware to support it. For example, an Altix XE210 system needs a specific
PCIe riser to use a PCI Express card. In the case of an SGI Altix 450 and 4700 system, you
must have an optional PCIe blade installed to use a PCI Express card in the system.
Consult your SGI system hardware manual for exact requirements.
007-5476-001
1
1: Features and Capabilities
Adapter Features
The product features/specifications for the adapter are from the product specification for
the 10GbE Storage Accelerator from Chelsio Communications, Inc. See the following
webpage:
http://www.chelsio.com
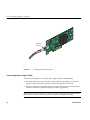
Figure 1-1 shows the SGI 10-Gigabit Ethernet Adapter II.
Figure 1-1
2
SGI 10-Gigabit Ethernet Adapter II
007-5476-001
Adapter Features
There are two versions of the SGI 10-Gigabit Ethernet Adapter II, as described in
Table 1-1.
Table 1-1
Two Versions of the SGI 10-Gigabit Ethernet Adapter II
Part Number
Marketing Code
Description
030-2313-001
PCIE-10G-C-RDMA
The CX4 version of the adapter
030-2314-001
PCIE-10G-OR-RDMA Standard version
Table 1-2 lists the product features of the adapter.
Table 1-2
007-5476-001
Adapter Features
Feature
Description/Specifications
Host Interface
+ PCI Express 1.1 x8, x4, x2, x1
+ MSI-X, MSI and support for legacy pin interrupts
Network Interfaces
+ 10GBASE-SR short-reach optics (850nm)
+ 10GBASE-CX short-reach copper
Ethernet
+ IEEE 802.3ae (10GbE)
+ IEEE 802.1p Priority and 802.1Q VLAN tagging
+ IEEE 802.3x flow control
+ IEEE 802.3ad load-balancing and failover
+ Ether II and 802.3 encapsulated frames
+ Multiple MAC addresses per interface
+ Jumbo Frames up to 9.6Kbytes
Stateless Offloads
+ TCP checksum offload for IPv4 & IPv6
+ TCP segmentation offload (TSO) for IPv4 & IPv6
+ Large send offload (LSO) for IPv4 & IPv6
+ Large receive offload (LRO) for IPv4 & IPv6
+ UDP checksum offload for IPv4 & IPv6
+ Receive-side scaling and packet steering
+ Line-rate packet filtering and attack protection
Integrated Traffic Manager
+ Multiple Tx & Rx queues with QoS
+Two separate channels for simultaneous low latency & high
bandwidth
+ Per-connection and per-class rate control
+ Packet loss avoidance
Virtualization and Firewall
Rule-based packet steering and filtering capability
3
1: Features and Capabilities
Table 1-2
Adapter Features (continued)
Feature
Description/Specifications
High Performance RDMA
+ Ultra-Low latency, line rate bandwidth
+ IETF RDDP and RDMAC iWARP compliance
+ APIs: RNIC-PI, kDAPL and OpenFabrics 1.2
Physical and Environmental
+ Dimensions without bracket: 6.6 in. x 2.5 in. or 16.8 cm x 6.4 cm
+ Operating Temp: 0 to 40ºC or 32 to 104ºF
+ Operating Humidity: 5 to 95%
+ Typical power consumption: 17W
Cabling
The cabling for the adapter is described in the following sections:
•
“Fiber-Optic Cables” on page 4
•
“Copper Cables” on page 6
Note: Cabling is not automatically bundled with the adapter.
Fiber-Optic Cables
Table 1-3 lists the SGI LC-to-LC fiber-optic cables for the PCIE-10G-OR-RDMA version
of the adapter.
Table 1-3
4
LC-to-LC Optical Cables
Marketing Code
Length
X-F44-OPT-2M
2 meters
X-F44-OPT-3M
3 meters
X-F44-OPT-5M
5 meters
X-F44-OPT-10M
10 meters
X-F44-OPT-20M
20 meters
007-5476-001
Cabling
Table 1-3
LC-to-LC Optical Cables (continued)
Marketing Code
Length
X-F44-OPT-30M
30 meters
X-F44-OPT-50M
50 meter
X-F44-OPT-100M
100 meters
X-F44-OPT-300M
300 meters
Table 1-4 lists the SGI 4X InfiniBand fiber-optic cables for the PCIE-10G-C-RDMA
version of the adapter.
Table 1-4
007-5476-001
SGI 4X Infiniband Optical Cables
Marketing Code
Length
IB-CABLE-01M-OPT
1 meter
IB-CABLE-03M-OPT
3 meters
IB-CABLE-05M-OPT
5 meters
IB-CABLE-07M-OPT
7 meters
IB-CABLE-10M-OPT
10 meters
IB-CABLE-15M-OPT
15 meters
IB-CABLE-20M-OPT
20 meters
IB-CABLE-30M-OPT
30 meters
IB-CABLE-50M-OPT
50 meters
IB-CABLE-100M-OPT
100 meters
5
1: Features and Capabilities
Copper Cables
Table 1-5 lists the SGI CX4 copper cables for the PCIE-10G-C-RDMA version of the
adapter.
Table 1-5
SGI CX4 Copper Cables
Marketing Code
Length
IB-CABLE-01M-Z
1 meter
IB-CABLE-02M-Z
2 meters
IB-CABLE-03M-Z
3 meters
IB-CABLE-04M-Z
4 meters
IB-CABLE-05M-Z
5 meters
IB-CABLE-06M-Z
6 meters
IB-CABLE-07M-Z
7 meters
IB-CABLE-06M-Z
1 meters
IB-CABLE-10M-Z
10 meters
Configuration Limits
Table 1-6 summarizes the configuration limits for the adapter .
Table 1-6
6
Configuration Limits
System
Maximum Per
Bus
Maximum Number of Adapters
Altix XE210
1
1
Altix XE240
1
2 with a PCI-x riser, 4 with a
PCI-E riser
Altix XE250
4
4
007-5476-001
Configuration Limits
Table 1-6
Configuration Limits (continued)
System
Maximum Per
Bus
Maximum Number of Adapters
Altix XE310
1
1
Altix XE320
1
1
Altix 450
1
16
Altix ICE 8200
1
4
Altix 4700
1
16
Note: You may see a performance degradation if you configure two adapters to the same
12E or 14E blade on Altix 450 or Altix 4700 servers.
007-5476-001
7
Chapter 2
2. Connecting the Adapter to a Network
This chapter describes installing the SGI 10-Gigabit Ethernet Adapter II and connecting
it to a network:
•
“Installing the Adapter” on page 9
•
“Special Installation Instructions for Altix XE320 Servers” on page 9
•
“Driver Specification Needed for SGI Altix 450 and SGI Altix 4700 Platforms” on
page 10
•
“Connecting to a Network” on page 10
Installing the Adapter
With the exceptions of the Altix 4700 and Altix XE320, refer to the instructions for
installing a PCI-E card in the user’s or owner’s guide that came with your system. For
the Altix 4700, an SGI certified service provider must install your adapter. For the Altix
XE320, see the next section “Special Installation Instructions for Altix XE320 Servers”.
Special Installation Instructions for Altix XE320 Servers
For the external connector and bracket of the adapter, some configurations may require
special adaptation to successfully mount the card to the XE320 PCIe slot. The following
are three additional procedures, presented in simplest-to-most-complex order, that
might be necessary for card insertion.
Procedure 1 (Simplest)
Remove one or two adjacent DIMMs to ease the insertion of the card into the slot.
007-5476-001
9
2: Connecting the Adapter to a Network
Procedure 2
1.
Remove one or two adjacent DIMMs.
2. Remove the chassis-mounted bracket latch of the adapter.
The bracket latch is the small assembly attached at the top of the slot with two
screws.
Procedure 3 (Most Complex)
Note: This procedure is required for the PCIE-10G-C-RDMA version (part number
030-2313-001) of the adapter.
1.
Remove one or two adjacent DIMMs.
2. Remove the short PCIe riser assembly from the chassis (one screw).
3. Position the card on the chassis sheet metal slot so that the lower bracket lip will be
inserted into its chassis lock.
4. Position the riser to couple with the adapter.
5. Position the entire assembly to couple with the motherboard.
Driver Specification Needed for SGI Altix 450 and SGI Altix 4700 Platforms
On SGI Altix 450 and SGI Altix 4700 platforms, you must ensure that the file
/etc/modprobe.conf.local contains an entry like the following:
options cxgb3 msi=0
Connecting to a Network
This section describes how you connect the adapter to a network in the following
sections:
10
•
“Connecting with a Fiber-Optic Cable” on page 11
•
“Connecting with a Copper Cable” on page 12
007-5476-001
Connecting to a Network
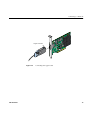
Connecting with a Fiber-Optic Cable
To connect your adapter to a network with a fiber-optic cable, do the following:
1.
Remove the protective end caps and save them.
Caution: 10-Gigabit optics are sensitive. If you plan to leave them disconnected for any
significant length of time, you must replace the end caps. The optics on the adapter
cannot be cleaned.
2. Insert the LC connector on one end of the fiber-optic cable into the adapter, as
shown in Figure 2-1. Ensure that the connector is inserted completely into the jack.
3. Insert the connector on the other end of the fiber-optic cable into the connector on
the Ethernet switch or on another computer system (as appropriate).
Note: If your network connects to an Ethernet switch, consult the operating manual for
the switch to ensure that the switch port is enabled and configured correctly.
007-5476-001
11
2: Connecting the Adapter to a Network
Fiber-optic
connector
Figure 2-1
Connecting the Fiber-Optic Cable
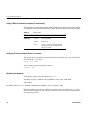
Connecting with a Copper Cable
To connect your adapter to a network with a copper cable, do the following:
1.
Insert the connector on one end of the copper cable into the adapter, as shown in
Figure 2-2. Ensure that the connector is inserted completely into the jack.
2. Insert the connector on the other end of the copper cable into the connector on the
Ethernet switch or on another computer system (as appropriate).
Note: If your network connects to an Ethernet switch, consult the operating manual for
the switch to ensure that the switch port is enabled and configured correctly.
12
007-5476-001
Connecting to a Network
Copper connector
Figure 2-2
007-5476-001
Connecting the Copper Cable
13
2: Connecting the Adapter to a Network
14
007-5476-001
Chapter 3
3. Operating the Adapter
This chapter describes several operational tasks as well as troubleshooting.
•
“Verifying Functionality” on page 15
•
“Resetting the Adapter” on page 17
•
“Changing the Configuration” on page 18
•
“Troubleshooting” on page 18
Verifying Functionality
This section describes the following:
007-5476-001
•
“Using LEDs to Determine Adapter Functionality” on page 16
•
“Verifying That the Adapter Driver Is Loaded” on page 16
•
“Enabling the Adapter” on page 16
•
“Verifying That the Adapter Is Properly Configured and Enabled” on page 17
15
3: Operating the Adapter
Using LEDs to Determine Adapter Functionality
The adapter has a single light-emitting diode (LED) display that indicates if the adapter
is configured correctly and connected to an active Ethernet. Table 3-1 describes the LED.
Table 3-1
Adapter LED
Label
Color
Meaning
LINK/ACT
Green
Link established
Yellow
Link active
Red
Power-on indicator (ON by default
during power-on but OFF after the
driver is loaded.)
Verifying That the Adapter Driver Is Loaded
The adapter driver should be automatically loaded at boot time. To verify, check for the
presence of the cxgb3 driver:
lsmod | grep cxgb3
You can load the driver manually as follows:
modprobe cxgb3
Enabling the Adapter
To enable the adapter, enter the following as root:
ifconfig IPaddress netmask mask broadcast address mtu 1500|9000
For example:
ifconfig eth2 10.0.0.1 netmask 0xffffff00 broadcast 10.0.0.255 mtu 9000
For other systems to see the new address, you must enter new addresses in host files,
DNS, or NIS as required for your system. For details, see the network documentation for
your operating system.
16
007-5476-001
Resetting the Adapter
Verifying That the Adapter Is Properly Configured and Enabled
Use the installation tool that comes with your operating system to install and configure
the adapter.
You can use the ifconfig -a command to verify the configuration information, as
follows:
systemA:~ # ifconfig -a
eth2
Link encap:Ethernet HWaddr 00:60:DD:47:81:24
inet addr:10.0.0.1 Bcast:10.0.0.255 Mask:255.255.255.0
inet6 addr: fe80::260:ddff:fe47:8124/64 Scope:Link
UP BROADCAST MULTICAST MTU:9000 Metric:1
RX packets:0 errors:0 dropped:0 overruns:0 frame:0
TX packets:0 errors:0 dropped:0 overruns:0 carrier:0
collisions:0 txqueuelen:1000
RX bytes:0 (0.0 b) TX bytes:0 (0.0 b)
Base address:0x3020 Memory:b9160000-b9180000
For more information on ifconfig, see the ifconfig(8) man page.
Resetting the Adapter
In the unlikely event that you need to reset the adapter, enter the following:
ifconfig <interface> down
ifconfig <interface> up
where interface is name of the interface. This is usually a driver name followed by a
unit number, for example, ifconfig eth0 down, for the first Ethernet interface.
For more information on ifconfig, see the ifconfig(8) man page.
007-5476-001
17
3: Operating the Adapter
Changing the Configuration
Configuration changes for Ethernet devices drivers are made by means of the
ethtool(8) command. The ethtool command works with all Linux Ethernet drivers.
In general, each feature has a query and a modify variant. If you are wondering
whether the current driver and ethtool support a specific feature, attempt to run the
query option first, an example is, as follows:
# ethtool -a eth0
Pause parameters for eth0:
Autonegotiate: on
RX:
on
TX:
on
This shows the current settings of the pause (or flow control) parameters. You can then
change these parameters with the ethtool -A option.
As with any system configuration changes, make sure to have a back out strategy, read
the most recent documentation for potential changes and pitfalls, and consult with a
relevant Linux archives for examples of common usage.
Troubleshooting
The following standard Linux commands are useful with any Ethernet device:
•
ethtool(8)
•
ifconfig(8)
•
ip(8)
For more information, see the man page associated with each tool.
18
007-5476-001
Chapter 4
4. Performance Tuning
The Network Interface Card (NIC) driver for the SGI 10-Gigabit Ethernet Adapter II
allows performance tuning in the following three major areas:
•
“Load Balancing the Receive Activity Among CPUs” on page 20
•
“Latency/Throughput Tuning” on page 20
•
“NIC Acceleration Features” on page 21
•
“Software (SW) Stack Tuning” on page 21
•
“Further Tuning with a Sample Script” on page 22
Note: Many of the tuning techniques described in this chapter require the cxgbtool (8),
which can be obtained directly from Chelsio Communications, Inc. See the following
website:
http://www.service/chelsio.com/
007-5476-001
19
4: Performance Tuning
Load Balancing the Receive Activity Among CPUs
The adapter can be configured to use a maximum of eight receive queues. The adapter
will be spread across all configured Rx queues.
Multiple Rx queues are available when the driver is loaded in MSI-X mode (default
mode). In this mode, once the driver is loaded, the number of queues must be specified
before the port is configured.
The interface cxgbtool(8) provides this capability:
cxgbtool intf qsets 8
Each queue must then be associated with a CPU through interrupt affinity. This sample
shell script allows this operation:
irqs=($(cat /proc/interrupts | grep <intf> | \
grep queue | awk ‘{ split($0,a,”:”); print a[1] }’))
cpumask=1
for (( c=0; c < ${#irqs[@]}; c++ ));
do
echo $cpumask > /proc/irq/${irqs[$c]}/smp_affinity
cpumask=`expr $cpumask \* 2`
done
Once the port is configured, receive traffic will be balanced between the CPUs associated
with a queue.
Latency/Throughput Tuning
The adapter is tuned by default for good latency with the interrupt holdoff timer set to 5
usecs. The setting can result in high interrupt load. If latency is not the primary target,
you might want to increase it.
Currently, ethtool(8) is not well suited to deal with hardware that supports multiple
receive queues. Interface cxgbtool(8) provides the facility to control the interrupt
holdoff timer on a per-receive-queue basis.
20
007-5476-001
NIC Acceleration Features
The following entry dumps the current settings:
cxgbtool intf qset
The following entry updates the holdoff timer value for queue X to Y usecs:
cxgbtool intf qset X lat Y
NIC Acceleration Features
The adapter supports all widespread acceleration features:
•
Checksum offload
•
TCP segmentation offload (TSO)
•
Large receive offload (LRO)
Checksum offload and TSO are controlled through ethtool(8).
Currently, ethtool(8) is not well suited to deal with hardware that supports multiple
receive queues. The interface cxgbtool(8) provides the facility to control LRO on a
per-recieve-queue basis. The following entry dumps the current settings:
cxgbtool intf qset
The following entry disables/enables the LRO capability for queue X:
cxgbtool intf qset X lro [0|1]
Software (SW) Stack Tuning
The SW stack can be tuned to improve TCP performance as follows:
Set
Set
Set
Set
Set
Set
Set
007-5476-001
net.core.wmem_max=”16777216”
net.core.rmem_max=”16777216”
net.ipv4.tcp_timestamps=”0”
net.ipv4.tcp_rmem=”4096 262144 16777216”
net.ipv4.tcp_wmem=”4096 262144 16777216”
net.core.optmem_max=”524288”
net.core.netdev_max_backlog=”200000”
21
4: Performance Tuning
Further Tuning with a Sample Script
Chelsio Communications, Inc. provides a sample script, perftune.sh.txt, to use for
further tuning. You can access the script by contacting Chelsio Communications, Inc.
22
007-5476-001
Glossary
acknowledge (Ack) packet
The Ack packet informs the PE that initiated a message that the destination PE accepted
the message.
autonegotiation
The process by which two computers (or a computer and a switch) connected by Gigabit
Ethernet determine the speed and other parameters with which they will communicate.
CD-ROM (CD)
A flat metallic disk that contains information that you can view and copy onto your own
hard disk; you cannot change or add to the disk. CD-ROM is an abbreviation for compact
disc read-only memory.
Ethernet
A communication network used to connect computers.
gigabit
A communication rate of 2^30 bits per second.
host
Any system connected to the network.
hostname
The name that uniquely identifies each host (system) on the network.
IP address
A number that uniquely identifies each host (system) on a TCP/IP network.
LED
Light-emitting diode, a light on a piece of hardware that indicates status or error
conditions.
007-5476-001
23
Glossary
MAC
Medium access control, also called the physical layer.
MAC address
The physical address of the Gigabit Ethernet board, which is distinct from the IP address.
MTU
Maximum Transmission Unit is a configuration parameter that controls the size of the
Ethernet frames that the Gigabit Ethernet board can transmit and receive.
man (manual) page
An online document that describes how to use a particular Linux command. Also called
reference page.
NIS
Network Information Service, a distributed database mechanism for user accounts, host
names, mail aliases, and so on.
PCI Express
Peripheral Component Interconnect Express (also referred to as PCIe) is a
high-performance I/O interconnect. PCI Express is a third-generation I/O architecture
where traditional PCI attributes are maintained, but the parallel PCI bus interconnect is
replaced by a highly scalable serial interface.
reference page
See man (manual) page.
TCP/IP
A standard networking protocol that is included in the Linux software.
24
007-5476-001
Index
C
F
cabling
copper, 6, 12
fiber-optic, 4, 5, 11
checksum offload, 21
configuration changes, 18
configuration file /etc/modprobe.conf.local, 10
configuration limits, 6
connector
copper cable, 13
LC, 11, 12
copper cables, 6, 12
customer service, xvii
CX4 cables, 6
cxgb3 driver, 10
cxgbtool interface, 19
features, 3
fiber-optic cables, 4, 5, 11
D
driver software, 10
E
G
Gigabit Ethernet board
cabling, 10
configuring
verifying, 17
enabling, 17
resetting, 17
H
hardware platforms, 1
I
ifconfig interface, 16, 17, 18
InfiniBand cables, 5
installation instructions, 9
ip interface, 18
/etc/modprobe.conf.local configuration file, 10
ethtool interface, 18, 21
L
latency tuning, 20
007-5476-001
25
Index
LC connector, 11
LEDs
troubleshooting, 16
load balancing, receive queues, 20
LRO, large receive offload, 21
O
optical cables, 4, 5, 11
P
PCI Express, 1, 3, 24
PCIe, 1, 3, 24
performance tuning, 19
perftune.sh.txt script, 22
product support, xvii
S
software stack tuning, 21
T
TCP segmentation offload (TSO), 21
technical support, xvii
throughput tuning, 20
troubleshooting, 10, 16, 18
TSO, TCP segmentation offload, 21
26
007-5476-001