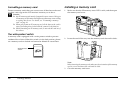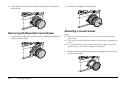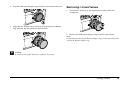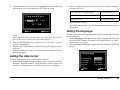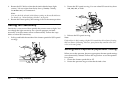
1
English
®
User’s Guide
1
All rights reserved. No part of this publication may be reproduced, stored in a retrieval system, or transmitted in any form or by any means,
electronic, mechanical, photocopying, recording, or otherwise, without the prior written permission of Seiko Epson Corporation. The information
contained herein is designed only for use with this Epson product. Epson is not responsible for any use of this information as applied to other
products.
Neither Seiko Epson Corporation nor its affiliates shall be liable to the purchaser of this product or third parties for damages, losses, costs, or
expenses incurred by the purchaser or third parties as a result of accident, misuse, or abuse of this product or unauthorized modifications, repairs,
or alterations to this product, or (excluding the U.S.) failure to strictly comply with Seiko Epson Corporation’s operating and maintenance
instructions.
Seiko Epson Corporation shall not be liable for any damages or problems arising from the use of any options or any consumable products other
than those designated as Original Epson Products or Epson Approved Products by Seiko Epson Corporation.
Seiko Epson Corporation shall not be held liable for any damage resulting from electromagnetic interference that occurs from the use of any
interface cables other than those designated as Epson Approved Products by Seiko Epson Corporation.
EPSON is a registered trademark and EPSON Stylus is a trademark of Seiko Epson Corporation.
Microsoft and Windows are registered trademarks of Microsoft Corporation.
Apple and Macintosh are registered trademarks of Apple Computer, Inc.
Adobe and Photoshop are registered trademarks of Adobe System Incorporated.
SD is a trademark.
LEICA is a registered trademark of Leica IR GmbH.
General Notice: Other product names used herein are for identification purposes only and may be trademarks of their respective owners. Epson
disclaims any and all rights in those marks.
Copyright © 2004 by Seiko Epson Corporation, Nagano, Japan
2
English
Contents
Introduction
Main Features . . . . . . . . . . . . . . . . . . . . . . . . . . . . . . . . . . . . . . .
Safety Instructions . . . . . . . . . . . . . . . . . . . . . . . . . . . . . . . . . . .
Warnings, Cautions, and Notes. . . . . . . . . . . . . . . . . . .
IMPORTANT SAFETY INSTRUCTIONS . . . . . . . . . .
5
5
5
7
Power save timer settings . . . . . . . . . . . . . . . . . . . . . . . 22
Assigning a function to the USER button . . . . . . . . . . 22
Confirming the current settings . . . . . . . . . . . . . . . . . . 22
Resetting all settings to default values . . . . . . . . . . . . 23
Releasing the Shutter . . . . . . . . . . . . . . . . . . . . . . . . . . . . . . . . 23
Full and half-release. . . . . . . . . . . . . . . . . . . . . . . . . . . . 23
Focus. . . . . . . . . . . . . . . . . . . . . . . . . . . . . . . . . . . . . . . . . 23
Chapter 1 Getting Started
Chapter 2 Taking Pictures
Unpacking Your Camera. . . . . . . . . . . . . . . . . . . . . . . . . . . . .
Camera Parts . . . . . . . . . . . . . . . . . . . . . . . . . . . . . . . . . . . . . . .
Attaching the Strap to Your Camera . . . . . . . . . . . . . . . . . . .
Using the Battery . . . . . . . . . . . . . . . . . . . . . . . . . . . . . . . . . . .
Charging the battery . . . . . . . . . . . . . . . . . . . . . . . . . . .
Inserting the battery . . . . . . . . . . . . . . . . . . . . . . . . . . .
Installing and Removing a Memory Card . . . . . . . . . . . . . .
Installing a memory card . . . . . . . . . . . . . . . . . . . . . . .
Removing a memory card . . . . . . . . . . . . . . . . . . . . . .
Mounting and Removing a Lens . . . . . . . . . . . . . . . . . . . . . .
Mounting M (Bayonet) mount lenses . . . . . . . . . . . . .
Removing M (Bayonet) mount lenses. . . . . . . . . . . . .
Mounting L mount lenses. . . . . . . . . . . . . . . . . . . . . . .
Removing L mount lenses . . . . . . . . . . . . . . . . . . . . . .
Setting Up Your Camera . . . . . . . . . . . . . . . . . . . . . . . . . . . . .
Turning the power on . . . . . . . . . . . . . . . . . . . . . . . . . .
Setting the date and time . . . . . . . . . . . . . . . . . . . . . . .
Setting the date format . . . . . . . . . . . . . . . . . . . . . . . . .
Setting the language . . . . . . . . . . . . . . . . . . . . . . . . . . .
10
11
13
13
13
14
15
16
17
17
17
18
18
19
20
20
20
21
21
About Indicator Needles . . . . . . . . . . . . . . . . . . . . . . . . . . . . . 24
Setting Photo Quality . . . . . . . . . . . . . . . . . . . . . . . . . . . . . . . . 25
Setting White Balance. . . . . . . . . . . . . . . . . . . . . . . . . . . . . . . . 25
Setting ISO Sensitivity . . . . . . . . . . . . . . . . . . . . . . . . . . . . . . . 26
Setting Auto Exposure (Aperture Priority) . . . . . . . . . . . . . . 26
Setting Manual Exposure (Shutter Speed Priority) . . . . . . . 28
B (Bulb) shooting . . . . . . . . . . . . . . . . . . . . . . . . . . . . . . 29
Setting Manual Aperture Locking . . . . . . . . . . . . . . . . . . . . . 29
Selecting a Frame . . . . . . . . . . . . . . . . . . . . . . . . . . . . . . . . . . . 30
Selecting Color/Monochrome . . . . . . . . . . . . . . . . . . . . . . . . 30
Selecting the Picture Settings (Image Type) . . . . . . . . . . . . . 31
Using the Flash Function . . . . . . . . . . . . . . . . . . . . . . . . . . . . . 31
Sequential Number Settings . . . . . . . . . . . . . . . . . . . . . . . . . . 32
Calibrating Indicator Needles . . . . . . . . . . . . . . . . . . . . . . . . . 32
3
Chapter 3 Viewing and Managing Your Photos
Chapter 6 Maintenance and Troubleshooting
Viewing Photos with the LCD Monitor . . . . . . . . . . . . . . . . .34
Viewing the previous or next photo . . . . . . . . . . . . . . .34
Switching between display styles . . . . . . . . . . . . . . . . .34
Viewing Your Photos in a Slide Show . . . . . . . . . . . . . . . . . .37
Deleting Images . . . . . . . . . . . . . . . . . . . . . . . . . . . . . . . . . . . . .38
Formatting a memory card . . . . . . . . . . . . . . . . . . . . . .38
Locking Images. . . . . . . . . . . . . . . . . . . . . . . . . . . . . . . . . . . . . .39
Locking an image. . . . . . . . . . . . . . . . . . . . . . . . . . . . . . .39
Locking all images. . . . . . . . . . . . . . . . . . . . . . . . . . . . . .39
Unlocking all images. . . . . . . . . . . . . . . . . . . . . . . . . . . .39
Magnifying Images . . . . . . . . . . . . . . . . . . . . . . . . . . . . . . . . . .39
LCD Brightness Settings . . . . . . . . . . . . . . . . . . . . . . . . . . . . . .40
Setting Number of Prints (DPOF Setting) . . . . . . . . . . . . . . .40
Cleaning the Camera . . . . . . . . . . . . . . . . . . . . . . . . . . . . . . . .
Storing the Camera . . . . . . . . . . . . . . . . . . . . . . . . . . . . . . . . . .
Troubleshooting . . . . . . . . . . . . . . . . . . . . . . . . . . . . . . . . . . . .
Contacting Customer Support . . . . . . . . . . . . . . . . . . . . . . . .
Chapter 4 Using the LCD Monitor
How to Use the LCD Monitor . . . . . . . . . . . . . . . . . . . . . . . . .41
Menu structure. . . . . . . . . . . . . . . . . . . . . . . . . . . . . . . . .41
Chapter 5 Using the RAW Data Processing Software
Overview . . . . . . . . . . . . . . . . . . . . . . . . . . . . . . . . . . . . . . . . . . .44
System Requirements . . . . . . . . . . . . . . . . . . . . . . . . . . . . . . . .44
Installing the Software. . . . . . . . . . . . . . . . . . . . . . . . . . . . . . . .45
EPSON PhotoRAW . . . . . . . . . . . . . . . . . . . . . . . . . . . . .45
EPSON RAW Plug-In . . . . . . . . . . . . . . . . . . . . . . . . . . .45
Starting the Software . . . . . . . . . . . . . . . . . . . . . . . . . . . . . . . . .46
EPSON PhotoRAW . . . . . . . . . . . . . . . . . . . . . . . . . . . . .46
EPSON RAW Plug-In . . . . . . . . . . . . . . . . . . . . . . . . . . .46
Finding More Information . . . . . . . . . . . . . . . . . . . . . . . . . . . .46
4
47
47
47
48
Appendix A Appendix
Standards and Approvals . . . . . . . . . . . . . . . . . . . . . . . . . . . .
Camera. . . . . . . . . . . . . . . . . . . . . . . . . . . . . . . . . . . . . . .
Lithium-ion battery . . . . . . . . . . . . . . . . . . . . . . . . . . . .
Battery charger . . . . . . . . . . . . . . . . . . . . . . . . . . . . . . . .
Specifications . . . . . . . . . . . . . . . . . . . . . . . . . . . . . . . . . . . . . . .
Camera. . . . . . . . . . . . . . . . . . . . . . . . . . . . . . . . . . . . . . .
General. . . . . . . . . . . . . . . . . . . . . . . . . . . . . . . . . . . . . . .
Image format. . . . . . . . . . . . . . . . . . . . . . . . . . . . . . . . . .
Optic system . . . . . . . . . . . . . . . . . . . . . . . . . . . . . . . . . .
Display functions . . . . . . . . . . . . . . . . . . . . . . . . . . . . . .
Interface (external connector). . . . . . . . . . . . . . . . . . . .
Indicators for camera setting . . . . . . . . . . . . . . . . . . . .
Viewfinder indicators . . . . . . . . . . . . . . . . . . . . . . . . . .
Internal clock. . . . . . . . . . . . . . . . . . . . . . . . . . . . . . . . . .
Power supply . . . . . . . . . . . . . . . . . . . . . . . . . . . . . . . . .
Battery charger . . . . . . . . . . . . . . . . . . . . . . . . . . . . . . . .
Performance. . . . . . . . . . . . . . . . . . . . . . . . . . . . . . . . . . . . . . . .
File size of photos. . . . . . . . . . . . . . . . . . . . . . . . . . . . . .
About Optional Accessories . . . . . . . . . . . . . . . . . . . . . . . . . .
Index
50
50
50
50
50
50
50
50
51
51
51
51
52
52
52
52
53
53
53
English
Introduction
Main Features
The main features of the camera are described below.
❏ The world’s first rangefinder digital camera.
❏ Capable of mounting existing lenses. The EM mount allows you to
use most standard lenses such as Leica M/L mount lenses.
❏ Provides accurate framing using parallax auto compensation.
❏ Provides constantly stable focus with a bright rangefinder.
❏ Supports CCD-RAW data, saved in ERF (EPSON RAW File)
format, and they can be processed using the EPSON PhotoRAW or
EPSON RAW Plug-In applications provided.
Note:
❏ Do not expose the camera to severe impact; doing so may cause
malfunctions especially while the camera is operating.
❏ We strongly recommend you back up files stored on the HDD to another
storage device periodically.
❏ Epson is not liable for any problems resulting from the loss or corruption
of data on the HDD.
Safety Instructions
Read all of these instructions before using this product, and keep this
guide handy for later reference. Follow all warnings and instructions
marked on this product and the options.
Warnings, Cautions, and Notes
w
c
Warnings must be followed carefully to avoid bodily injury.
Cautions must be observed to avoid damage to your equipment.
Notes contain important information and useful tips on the operation of your
product.
When using the camera
❏
❏
❏
❏
❏
❏
❏
❏
❏
❏
Follow all warnings and instructions marked on this product.
Do not insert objects into any openings.
Do not touch the components inside this product unless instructed
to do so in the user documentation. Never force this product’s
components into place. Although this product is designed to be
sturdy, rough handling can damage it.
Protect the camera from rapid temperature change.
Never spill liquid onto this product.
If this product emits unusual noises, odors, or smoke, cancel the
current operation and turn it off immediately. Remove the battery
from the product. Contact our Customer Support.
To prevent fire or electric shock, do not cover this product with a
blanket or other covering that may give off a static electric shock.
To prevent fire or electric shock, do not expose this product or its
options to rain or moisture.
To prevent fire or explosion, do not use this product where
flammable or volatile gas is stored.
Do not use this product outdoors during a thunderstorm.
Introduction
5
❏
❏
❏
❏
❏
Do not use this product after moving it between extreme
temperatures, which may cause condensation to form on electronic
parts.
To prevent possible injury, do not take flash pictures in close
proximity to anyone’s eyes.
Do not insert your finger into the camera or EM mount.
If the liquid crystal solution contained in the LCD monitor leaks
out and gets on your hands, wash them thoroughly with soap and
water. If it gets into your eyes, flush them immediately with water.
When connecting this product to a computer or other device with
a cable, ensure the correct orientation of the connectors. Each
connector has only one correct orientation. Inserting a connector in
the wrong orientation may damage both devices connected by the
cable.
When using the strap
❏
❏
❏
Do not swing the camera about. This can damage the camera or
other objects, or cause injury.
Do not pull or tighten the strap too much when wearing it; this can
cause serious injury.
Keep the strap away from children.
❏
❏
❏
❏
❏
❏
❏
❏
❏
❏
❏
❏
❏
❏
❏
When using the battery
Follow the precautions below when using the battery as mishandling
it may cause injury.
❏ If battery acid gets into your eyes or on your skin, immediately rinse
the affected area thoroughly with water and seek medical
treatment. If a battery is swallowed, seek medical treatment
immediately.
❏ Use only an Epson Li-ion battery for this camera according to the
directions in the user documentation.
6
Introduction
❏
❏
❏
❏
❏
Do not use the battery that comes with this product for other
devices.
To protect against short-circuiting, do not remove the outside
sleeves of the battery.
Do not handle the battery with wet hands or use it near water.
Do not expose the battery to water or high humidity.
Do not drop, puncture, disassemble, mutilate, or short-circuit the
battery.
Do not expose the battery to heat, fire, or water.
Do not use batteries that are leaking or damaged in any way.
Do not charge the battery on battery chargers other than the one
provided with this product.
Do not charge the battery near open flame or in very hot locations.
Keep the battery away from heat sources.
Prevent the battery from coming into contact with metal objects
that could short-circuit it, such as coins or keys.
Do not solder wires or terminals directly to the battery.
Do not touch battery terminals.
Keep the battery away from open flame.
If overheating, discoloration, distortion, a strange smell or any
other abnormal situations occur, remove the battery from this
product and do not use it.
Keep batteries out of the reach of children.
If charging has not finished after the regular charging time, stop
charging.
Do not place the battery into a high-pressured container or a
microwave.
Do not insert the battery into power outlets or other power sources
such as cigarette lighters.
Charge the battery before using it. The battery is not fully charged
when you purchase it.
❏
❏
❏
❏
❏
When not using this device for a long period, remove the battery
from this product and store it separately.
Do not store the battery where temperature or humidity is very
high.
Store the battery out of children’s reach.
Discharge the battery completely before storing it for a long time.
When not using the battery for a long time, charge the battery and
then discharge it completely about once a year during storage.
For North America and Canada Users:
This mark indicates that the battery will be recycled by
RBRC. When you dispose of the battery, contact RBRC.
When using the battery charger
IMPORTANT SAFETY INSTRUCTIONS
Before disposing of the battery, make sure you discharge it completely.
Warning:
❏ Be sure to completely cover both ends of the battery with tape to
prevent combustion or explosion when disposing of it.
❏ Do not dispose of the battery as ordinary refuse. Instead, dispose
of it in a collection or recycle box in accordance with local laws.
w
❏
For the Netherlands users:
Do not dispose of the battery with ordinary refuse. Instead, dispose of
it as small chemical waste in accordance with local laws, and the
following Dutch Government Gazette 45, KCA Marking:
Bij dit produkt zijn batterijen geleverd. Wanneer deze
leeg zijn, moet u ze niet weggooien maar inleveren als
KCA.
Warning:
Read all relevant safety and operating instructions before using
this product, as misuse could result in personal injury from fire,
explosion, leakage, overheating, or electric shock.
These safety and operating instructions should be kept for future
reference.
Use only the Epson battery charger provided to charge the Epson
Li-ion battery Model EU-85. Never attempt to charge other types
of batteries in this charger as they may explode, leak, overheat, or
cause personal injury.
Do not charge primary (non-rechargeable) batteries.
Do not handle the battery charger with wet hands or use it near
water.
Do not expose the battery charger to water or high humidity.
Use only the type of power source indicated on the battery
charger’s label, and always supply power directly from a standard,
domestic power outlet with a power cord that meets the relevant
local safety standards.
Place the battery charger near an electrical outlet where the power
cord can be easily unplugged.
The battery charger is designed for use and provided with this
product. Do not attempt to use it with other electronic devices
unless specified.
w
When disposing of the battery
❏
❏
❏
❏
For German users:
❏
Do not dispose of the battery with ordinary refuse. Instead, dispose of
it in a recycle box in accordance with local laws.
❏
Introduction
7
English
When storing the battery
❏
❏
❏
❏
❏
❏
❏
❏
❏
❏
❏
❏
❏
❏
8
The battery charger included is designed for use with this product.
Use of any other battery charger could result in fire, electrical shock,
or injury.
Use only a power source that meets the power requirements
indicated on the label attached to the product. If you are not sure
of the power supply specifications in your area, contact your local
power company or contact our Customer Support.
Make sure the total amperage of all devices plugged into the power
outlet does not exceed the power outlet’s ampere rating.
If you plan to use this product in Germany, the building installation
must be protected by a 16 amp circuit breaker to provide adequate
short-circuit protection and over-current protection for this
product.
Do not use a damaged or frayed battery charger.
If you use an extension cord with this product, make sure the total
amperage of all devices plugged into the extension cord does not
exceed the cord’s ampere rating.
Never disassemble, modify, or attempt to repair the battery charger
by yourself except as specifically explained in this guide.
Do not use power outlets controlled by wall switches or automatic
timers.
Do not use power outlets on the same circuit as large motors or
other appliances that may cause voltage fluctuations.
Avoid using outlets on the same circuit as photocopiers or air
conditioning systems that regularly switch on and off.
Position this product’s power cord so that it will not be stepped on
or run over.
Do not place any objects on the power cord or the battery charger.
Keep the power cord straight at the ends and at the points where
it enters the transformer.
The power cord should be placed to avoid abrasions, cuts, fraying,
crimping, kinking, and other damage.
Introduction
❏
If you cannot insert the plug into the power outlet, contact an
electrician.
For US and Canadian users:
Use the power cord provided or a 6 to 10 foot UL-approved type SPT-2
or heavier type, 2 X 18 AWG cord with a 125 V 10 A plug and 125 V 7
A connector.
When using a memory card
❏
❏
❏
Only memory cards designed for the product’s specifications can
be used.
The methods for using memory cards vary according to card type.
Be sure to refer to the documentation included with your memory
card for details.
Do not remove the memory card while the power switch is on.
When using the LCD
❏
❏
❏
❏
The LCD monitor on this product may contain a few small bright
or dark spots. These are normal and do not mean that your LCD
monitor is damaged in any way.
If the LCD monitor on this product is damaged, consult your
dealer.
If the liquid crystal solution contained in the LCD monitor on this
product leaks out and gets onto your hands, wash them thoroughly
with soap and water. If it gets into your eyes, flush them
immediately with water. If discomfort or vision problems remain
after a thorough flushing, see a doctor immediately.
Only use a soft, dry cloth to clean the display. Do not use liquid or
chemical cleaners.
When storing, maintaining, or transporting the
camera
❏
Do not store this product outdoors.
❏
❏
English
❏
❏
Do not store this product near water.
Do not store this product in a location subject to high temperature
or humidity.
Do not store this product in a location subject to rapid changes in
temperature or humidity.
Do not store this product in a location subject to direct sunlight or
strong light sources.
For United Kingdom, Hong Kong, and Singapore
users
Replace fuses only with fuses of the correct size and rating.
For United Kingdom users
Safety information
Warning:
Refer to the rating plate for voltage and check that the appliance voltage
corresponds to the supply voltage.
Important:
The wires in the mains lead fitted to this appliance are coloured in accordance
to the following code:
Blue - Neutral
Brown - Live
w
If you have to fit a plug:
As the colours of the mains lead of this appliance may not match coloured
markings used to identify the terminals in a plug, please proceed as follows:
The blue wire must be connected to the terminal in the plug marked with the
letter N.
The brown wire must be connected to the terminal in the plug marked with the
letter L.
If damage occurs to the plug, replace the cord set or consult a qualified
electrician.
Introduction
9
Chapter 1
Getting Started
Unpacking Your Camera
Make sure that your camera box contains all of the items shown below.
Camera body
Li-ion battery
10
Getting Started
Battery charger
Power cable
(for battery charger)
User’s guide
CD-ROM
(EPSON PhotoRAW/EPSON RAW
Plug-In × 1, Adobe Photoshop
Elements 2.0 × 2)
Lens hole cover
strap
English
Camera Parts
Front view
Top view
1
Shutter-release button
Accessory shoe
Needle indicator
1
X contact
1
Lens release button
JOG dial
Back view
AE-lock button
Photo quality/WB settings
lever
Power switch
Frame selector
lever
Lock-release
button
Shutter speed
dial/ISO speed
set ring
1
1
Shutter charge
lever
1
SD card access LED
1
LCD button
MENU button
1
ENTER button
LCD monitor
CANCEL button
USER button
1
Getting Started
11
X contact
Used to mount an optional flash.
Lens release button
Used to mount or remove lenses.
AE-lock button
Locks exposure.
Photo quality/WB
settings lever
Sets photo quality or white balance.
SD card access LED
Indicates the following statuses of the SD card.
Lit: accessing a memory card
Blinking: a memory card error occurring
Unlit: not accessing a memory card
Needle indicator
Displays the current settings information with 4
needles (number of remaining photos, photo
quality, remaining battery power, and white
balance settings). For details, see “About
Indicator Needles” on page 24.
Accessory shoe
Used to mount optional equipment such as a
flash or external viewfinder.
JOG dial
Navigates through the menus or photos
displayed on the LCD monitor. For details, see
“Menu structure” on page 41.
Frame selector lever
Sets a field angle for the finder.
Shutter charge lever
Winds up the shutter.
LCD button
Switches between the shooting mode and the
playback mode.
Power switch
Switches the power on/off.
MENU button
Displays the Main menu on the LCD monitor
(available in the playback mode).
Shutter speed dial/ISO
speed set ring
Sets the shutter speed. Or pull this dial up and
rotate it to set the ISO sensitivity.
ENTER button
Defines the selected item or settings (available
in the playback mode).
Lock-release button
Unlocks the shutter speed dial.
CANCEL button
Returns to the previous menu without making
any settings (available in the playback mode).
USER button
Performs the function previously assigned to it.
LCD monitor
Displays a menu screen or photos.
Shutter-release button
Half-release: Press the shutter-release button
halfway down to display the optimal shutter
speed (i.e., optimal exposure value) in the
viewfinder. Also, pressing this button halfway
in the playback mode or the Power Save Timer
mode returns the camera to the shooting
mode.
Full-release: Press this button fully down to take
a photo.
12
Getting Started
3.
English
Attaching the Strap to Your Camera
Lace the strap end through the two plastic fasteners.
Follow the steps below to attach the strap with the camera.
1. Attach the protective pad and the metal ring to one side of the
camera.
1
1
1
4.
2.
Lace the strap end through the holes in the protective pad and the
metal ring.
1
Repeat steps 1 to 3 for the other end of the strap.
1
Using the Battery
Charging the battery
Your camera comes with a lithium-ion battery (EU-85). Be sure to
charge the battery before using the camera for the first time or after long
periods of disuse. It takes about 3.5 hours to charge the battery when
no charge remains.
Follow the steps below to charge the battery.
1
1
1
1
Getting Started
13
1.
Connect the battery charger with the provided power cable, then
insert the plug into a power outlet.
2.
Place the battery into the battery charger.
3.
Take the battery out when the charge lamp turns off. After charging
the battery, unplug the battery charger’s plug from the outlet.
Note:
❏ The charging time for the battery may differ depending on the temperature
or the battery’s remaining charge.
❏ During charging, the red lamp indicates the following status:
Lit:
Indicates the battery is charging.
Unlit:
Indicates charging is complete or the battery is not set.
Inserting the battery
Your camera uses the lithium-ion battery (EU-85) provided. Under any
circumstances, do not use another make or model of a battery.
14
Getting Started
Make sure that the camera is off, and then open the battery cover
as shown below.
DUMMY
Note:
❏ To check the battery’s remaining charge, see “Remaining battery power”
on page 24.
❏ If you find that your battery has run out soon after recharging it a number
of times, make sure to discharge it completely before recharging it. Or, the
battery’s service life has ended. In that case, replace it with a new battery.
Installing and Removing a Memory Card
You cannot take photos unless an SD memory card is installed in your
camera.
Caution:
❏ Do not use the SD memory card with dust or lint on the terminal.
If the terminal of the card is dirty, data import or export may not
be executed properly.
❏ Never insert or remove a memory card while the SD card access
LED is being lit. Doing so may cause data in the card to be lost or
damaged.
❏ Avoid using or storing the card in direct sunlight, or in places that
are extremely hot, humid, or dusty.
❏ Keep the memory card slot cover closed while the memory card is
loaded. This protects the memory card and the slot from dust and
static; otherwise data on the memory card may be lost or damaged.
❏ Exposure of static electric shock to the memory card may cause this
product to malfunction.
Note:
To use a memory card correctly, read manuals provided with the memory card.
When using other devices with a memory card, also read manuals provided
with those devices.
c
2.
Insert the battery.
Insert the battery into the camera until it clicks, making sure the
orientation of the battery is correct.
DUMMY
3.
Close the battery cover.
English
1.
1
1
1
1
1
1
1
1
1
Getting Started
15
Formatting a memory card
Installing a memory card
Format a memory card when you want to erase all the data on the card
or when a message on the LCD monitor instructs you to do so.
Caution:
❏ An SD memory card must be formatted in your camera. Using an
SD memory card formatted in a different camera may cause reading
or writing data errors. For details, see “Formatting a memory
card” on page 38.
❏ When you format an SD memory card, all the data on the card is
erased, including those locked with the camera’s lock function.
❏ While formatting an SD memory card, do not take the card out of
the camera.
1.
Make sure that the SD memory access LED is unlit, and then open
the memory card cover.
c
DUMMY
The write protect switch
A memory card is equipped with a write protect switch to prevent
accidental loss of data. When this switch is in the lock position, photos
on a memory card are locked and cannot be deleted or overwritten.
2.
Insert the card all the way into the memory card slot until it clicks.
Write protect
switch
DUMMY
3.
16
Getting Started
Note:
When inserting the memory card, make sure the orientation of the memory
card is correct and insert the card until it clicks.
Close the memory card cover.
1.
Make sure the SD memory access LED is unlit, and then open the
memory card cover.
Caution:
Never remove a memory card while the access lamp is on. Doing so may
cause data in the card to be lost or damaged.
Push the memory card down until it clicks. When you release your
finger, the SD memory card pops out.
Note:
If the memory card is not ejected, push the memory card down again.
Remove the memory card.
Close the memory card cover.
c
2.
3.
4.
❏
When you mount a collapsible lens, do not collapse the lens after
mounting it. Collapsing the lens into the camera by force or
mounting the lens while it is collapsed may damage the camera or
the lens.
Lenses that can be used but must not be collapsed include:
- HEKTOR 50 mm F2.5
- ELMAR 50 mm F3.5
Even with the same lens, the image quality using this camera may
differ from that of an image taken with an analog camera.
1
1
Mounting M (Bayonet) mount lenses
1.
Match the red mark on the camera body with the red mark on the
lens-barrel.
1
1
Mounting and Removing a Lens
You can use M (Bayonet) mount lenses on the camera. In addition, you
can also use L mount lenses by attaching the optional M-Bayonet
adapter ring.
Caution:
❏ Some M/L mount lenses cannot be used because of the structure of
the camera. For example, lenses with external dimensions
exceeding 20.5 mm cannot be used with this camera.
Lenses that cannot be used include:
- HOLOGON 15 mm F8
- SUPER ANGULON 21 mm F3.4
- SUPER ANGULON 21 mm F4
- ELMARIT 28 mm F2.8 (earliest model)
-F2 (Dual Range SUMMICRON)
English
Removing a memory card
1
c
1
c
Caution:
Do not insert your finger into the camera or EM mount.
1
1
1
Getting Started
17
2.
Insert the lens into the camera body and turn the lens clockwise
until it clicks.
Removing M (Bayonet) mount lenses
1.
Turn the lens all the way counterclockwise while keeping the lens
release button pressed.
2.
Lift the lens straight out of the mount.
Mounting L mount lenses
Note:
❏ When you install an L mount lens, you need an optional M-Bayonet
adapter ring.
❏ There are three sizes of M-Bayonet adapter rings, and any one of them can
be used.
❏ For more information on mounting an M-Bayonet adapter ring on the
camera body, see the M-Bayonet adapter ring manual.
1.
Mount an optional M-Bayonet adapter ring together with its cover
on the camera body.
DUMMY
18
Getting Started
Turn the M-Bayonet adapter ring clockwise, then remove the cover.
English
2.
Removing L mount lenses
1.
Turn the lens all the way counterclockwise and pull the lens
straight out.
DUMMY
1
1
3.
Align the lens mount screw with that of the M-Bayonet adapter
ring, and turn the lens clockwise until it clicks.
1
2. Remove the M-Bayonet adapter ring from the camera body.
Note:
For details about removing M-Bayonet adapter rings, see the manual provided
with the M-Bayonet adapter ring.
1
1
c
1
Caution:
Be careful to not tighten the lens too tightly to the camera.
1
1
1
Getting Started
19
Setting Up Your Camera
Turning the power on
1.
Turn the power switch to the on position.
When you turn your camera on, the current settings information
(number of remaining photos, photo quality, remaining battery
power, and white balance settings) is indicated on the needle
indicator on the top of the camera. For details, see “About Indicator
Needles” on page 24.
20
Getting Started
Note:
To turn the power switch off, turn the power switch to the off position.
Setting the date and time
When you turn on the camera the first time, you need to set the current
date (month, day, and year) and time (hours and minutes) on the LCD
monitor. Once these settings are made, the camera automatically
records the date and time each time an image is taken.
Note:
❏ If you remove the battery from the camera, the date and time settings will
be erased approximately two days at a maximum after the last time the
camera was used.
❏ After changing the battery, make sure that the date and time is set
correctly. If necessary, set the date and time again.
❏ You can change the settings later using the Basic Setup menu. For details,
see “Basic Setup menu” on page 43.
Follow the steps below to set the date and time.
1. Turn the power switch on.
2. Invert the LCD monitor toward you and press the LCD button. The
Time and Date screen is displayed on the LCD monitor.
For details about inverting the LCD monitor, see “How to Use the
LCD Monitor” on page 41.
Confirm that the value for year is highlighted, and rotate the JOG
dial clockwise or counterclockwise to change the value.
2.
Time and Date
2004
01 / 01
3.
15 : 09
Set
4.
5.
Back
Note:
When you rotate the JOG dial clockwise, the value will be increased. To
decrease the value, rotate the JOG dial counterclockwise.
Press the ENTER button. The value for year is set, and a value for
month is highlighted.
Repeat steps 3 and 4 until you finish making all settings for date
and time.
The date and time setting is saved, and the screen returns to the
Basic Setup menu.
Select your desired display format for the year, month, and date
using the JOG dial.
YYYY/MM/DD (default setting)
Year/Month/Day
DD/MM/YYYY
Day/Month/Year
MM/DD/YYYY
Month/Day/Year
1
Press the ENTER button.
The Date Format setting is saved, and the screen returns to the Basic
Setup menu.
You can select a desired language for messages or menus displayed on
the LCD monitor.
1. Select Language in the Basic Setup menu using the JOG dial, and
press the ENTER button. For details on using the menu, see “Basic
Setup menu” on page 43.
2. Select the desired language using the JOG dial, and press the ENTER
button.
Set
1
1
1
Language
Japanese
French
Italian
Dutch
1
1
Setting the language
Setting the date format
You can select display format for the date and time.
1. Select Date Format in the Basic Setup menu using the JOG dial,
and press the ENTER button. The Date Format screen appears. For
details on using the menu, see “Basic Setup menu” on page 43.
English
3.
1
English
German
Spanish
T-Chinese
1
Back
1
Getting Started
21
The selected function is assigned to the USER button, and the screen
returns to the Camera Settings menu.
The new setting is saved, and the screen returns to the Basic Setup
menu.
Power save timer settings
Confirming the current settings
If no operations are performed for a certain period although the power
switch is on, the LCD monitor is turned off automatically and the
camera enters the Power Save Timer mode to reduce the drain on the
battery.
Note:
While the camera is in the Power Save Timer mode, you can press any button
to return to the previous mode.
1. Select Power Save Timer in the Basic Setup menu using the JOG
dial, and press the ENTER button. For details on using the menu,
see “Basic Setup menu” on page 43.
2. Select the length of time using the JOG dial before the camera enters
the Power Save Timer mode, and press the ENTER button.
You can select from 3 min., 5 min. (default setting), 10 min., or 20
min.
The new setting is saved, and the screen returns to the Basic Setup
menu.
You can check the current settings on the LCD monitor.
1. Select Current Settings in the Camera Settings menu using the JOG
dial. For details on using the menu, see “Camera Settings menu”
on page 42.
The Current Settings screen is displayed.
Assigning a function to the USER button
You can assign the one of the following functions to the USER button.
Available functions are Delete, Lock, Magnify, Print, Settings (current
settings), and Film. As a default setting, Delete is assigned to the USER
button.
1. Select Assign User Button in the Camera Settings menu using the
JOG dial, and press the ENTER button. For details on using the
menu, see “Camera Settings menu” on page 42.
2. Select a function to be assigned using the JOG dial, and press the
ENTER button.
22
Getting Started
Current Settings
Date:2004/01/01 00:00
Color:Color
Film:Film 1
E = L , S = M ,T = H , C = L , N = L
Power Save Timer:5min
Sequential Numbering:On
USER Button:Delete
Back
2.
After confirming the setting information, press the CANCEL
button to return to the Camera Settings menu.
If necessary, you can use this function to initialize all current settings
to their default settings as shown below.
English
Resetting all settings to default values
Releasing the Shutter
Full and half-release
Setting item
Default setting
The shutter-release button has the following two-step function.
Color
Color
Half-release:
Film
Standard
Date
YYYY/MM/DD
Power Save Timer
5 min.
Sequential Numbering
On
LCD Brightness
5/8
Language
English
Focus
USER Button
Delete
To set focus on a subject such as a group of people, superimpose the
double images in the center of the viewfinder into one by rotating the
focusing grip of the lens.
Note:
When focusing the subject, place your eye at the center of the rangefinder
eyepiece.
Follow the steps below to reset the initial settings.
1. Select Initialize Settings in the Camera Settings menu using the JOG
dial, and press the ENTER button. The Initialize Settings screen is
displayed. For details on using the menu, see “Camera Settings
menu” on page 42.
2. Confirm that OK is highlighted, and press the ENTER button.
Camera Settings are initialized, and the screen returns to the
Camera Settings menu.
Full-release:
When you press the shutter-release button halfway
down, the optimal shutter speed (i.e., optimal
exposure value) is displayed in the viewfinder. Also,
pressing the shutter-release button halfway in the
playback mode or the Power Save Timer mode
returns to the shooting mode.
Press the shutter-release button fully down to take a
photo.
1
1
1
1
1
1
More focusing
For accurate focusing of subjects with vertical lines, simply turn and
adjust the lens so that the lines join together.
1
1
1
Getting Started
23
Chapter 2
Taking Pictures
About Indicator Needles
With the needle indicator on the top of the camera, you can check the
current status of the following four factors: the number of remaining
photos, photo quality, remaining battery power, and white balance.
The current statuses are indicated by 4 needles on the indicator.
Note:
When the needle indicator needs to be adjusted, you can calibrate the needles
manually. For details, see “Calibrating Indicator Needles” on page 32.
Photo Quality
The short needle on the right-side of the meter indicates the photo
quality setting. The current photo quality setting is indicated as N
(Normal: 2240 × 1488 pixels), H (High: 3008 × 2000 pixels), or R
(CCD-RAW) on the scale.
Remaining battery power
The short needle on the bottom of the meter indicates the remaining
battery power. The current battery level is indicated on the scale from
E (Empty) to F (Full).
White balance
The short needle on the left-side of the meter indicates the white balance
setting. The following icons indicate the current white balance settings.
Icons on the needle
indicator
A
White balance setting
Auto
Sunny
The number of remaining photos
The long needle on the top of the meter indicates the number of
remaining photos (0 to 500). When an SD card is not installed in the
camera or an error occurs, the needle indicates E.
Note:
Although “500” is shown on the meter as the maximum number, the actual
maximum number of remaining photos is 999.
24
Taking Pictures
Shade
Cloudy
Incandescent
Fluorescent
Before taking photos using the camera, photo quality (image format,
size, and compression ratio) must be specified. Set photo quality
according to how you plan to use your image data.
Photo quality setting
When taking photos using the camera, images are saved in JPEG or
RAW format. The following table shows image formats and their
compression ratios (RAW format is incompressible).
Image format and
size
Compression ratio
2240 × 1488 (JPEG)
3008 × 2000 (JPEG)
CCD-RAW
Needle
indicator
Average file
size
1/4 (unchangeable)
N
about 1.5MB
1/4 (unchangeable)
H
about 3MB
3.
Setting White Balance
The white balance function adjusts the camera for different kinds of
lighting. It makes white look the same color in any situation. The
camera has two white balance modes: automatic and manual. In the
manual mode you can change the color setting according to your
shooting objects or situations. Follow the steps below to adjust white
balance manually.
1.
-
R
Rotate the JOG dial to select your desired photo quality.
The selected photo quality is indicated on the needle indicator (the
short needle on the right-side of the indicator). For details, see
“About Indicator Needles” on page 24.
Return the Photo quality/WB settings lever to the center position.
Switch the Photo quality/WB settings lever to WB position.
2
2
2
2
about 10MB
2
Follow the steps below to set photo quality.
1.
English
2.
Setting Photo Quality
Switch the Photo quality/WB settings lever to the Q position.
2
2
2
2
Taking Pictures
25
2.
3.
Rotate the JOG dial to select the desired white balance (light
source). You can select from Auto, Sunny, Shade, Cloudy,
Incandescent, or Fluorescent.
Note:
You can check the selected white balance setting on the needle indicator.
For details, see “About Indicator Needles” on page 24.
Return the Photo quality/WB settings lever to the center position.
2.
Rotate the ISO speed set ring. You can select ISO sensitivity from
200, 400, 800, or 1600.
Setting ISO Sensitivity
Sensitivity is a measure of how quickly the camera reacts to light. You
can change the light sensitivity for a specific purpose and time
manually or let the camera select it automatically. Follow the steps
below to select ISO sensitivity.
1. Pull up and hold the outside of the shutter speed dial (ISO speed
set ring).
3. Release the ISO speed set ring.
Note:
If the subject is dark, setting a higher ISO sensitivity allows faster focusing
and less chance of blurring. However, your photos may contain noise (lose
color) or become grainy.
Setting Auto Exposure (Aperture Priority)
When you set the aperture, the most appropriate shutter speed settings
are automatically selected. Follow the steps below to set the aperture
for a photo.
1. Rotate the shutter speed dial to AE.
2. Rotate the aperture ring to select the desired value.
26
Taking Pictures
4.
Maneuver the shutter charge lever.
Focus on the subject.
English
3.
Note:
❏ When you set NR (Noise Reduction) to Hi (High) in the Film Settings
screen and set the exposure at more than 2 seconds, noise reduction is
automatically performed after taking a photo. While the noise reduction
is being performed, do not turn the power off until the SD card access LED
is unlit. If you turn the power off before the noise reduction procedure is
complete, the image before the noise reduction is saved.
❏ For brighter subjects, fast moving subjects or with a higher value film
speed, a higher shutter speed is recommended.
❏ You can take photos locking the aperture value manually. For details, see
“Setting Manual Aperture Locking” on page 29.
2
Exposure compensation
2
Exposure compensation is used to alter the exposure suggested by the
camera. Exposure can be set between AE -2.0 EV (underexposure) and
AE +2.0 EV (overexposure).
You can change exposure compensation using the shutter speed dial.
2
2
2
2
2
5.
Press the shutter-release button all the way down.
Shutter speed is automatically set in an appropriate exposure, and
a picture is taken.
Background is much brighter than the
main subject
Select positive values
Background is much darker than the main
subject
Select negative values
Taking Pictures
2
2
27
Note:
❏ When you switch the shutter speed setting from AE (0) to another value,
rotate the shutter speed dial while pressing the lock-release button.
❏ To cancel the exposure compensation, turn the shutter speed dial to AE.
Exposure compensation value is set to zero.
Locking exposure setting (AE lock)
The AE-lock button is used to take pictures using a locked exposure
metering value. This function is useful when setting exposure before
shooting a backlit subject.
1. Position the subject for which you want to set exposure, and press
the AE-lock button. The exposure is locked and remains locked
while the AE-lock button is held.
Setting Manual Exposure (Shutter Speed
Priority)
You can specify the shutter speed from 1 to 2000 sec., or B (Bulb)
manually. This mode is useful for fast moving subjects or when you
have little time to check focus.
To lock the shutter speed, follow the steps below.
1. Maneuver the shutter charge lever.
2. Rotate the shutter speed dial to the desired shutter speed value (1
to 2000).
Note:
To switch the shutter speed setting from auto to manual, rotate the shutter
speed dial while pressing the lock-release button.
3. Press the shutter-release button halfway. The optimal shutter speed
(i.e., optimal exposure value) blinks, and the current shutter speed
is lighted, in the viewfinder.
DUMMY
2.
28
Keeping the AE-lock button pressed, recompose the subject and
press the shutter-release button.
A picture is taken with the exposure set when you pressed the
AE-lock button.
Note:
Exposure is not locked even if you press the shutter-release button halfway.
Taking Pictures
60
4.
250
Rotate the aperture ring until the optimal shutter speed matches
the current shutter speed value. The display of the optimal shutter
speed value changes from blinking to lighted.
❏
To install or uninstall a cable release on the camera, follow the illustration
below.
2
2
B (Bulb) shooting
The bulb shooting is used for taking photos of subjects such as a night
scene or astronomical object by keeping the shutter open while it is
pressed.
1. Rotate the shutter speed dial to B.
2. Rotate the aperture ring to select the desired value.
3. Maneuver the shutter charge lever.
4. Focus on the subject.
5. Keep the shutter-release button pressed until the desired exposure
is acquired. When you release the shutter-release button, shooting
is finished.
Note:
❏ When you set NR (Noise Reduction) to Hi (High) in the Film Settings
screen and set the exposure at more than 2 seconds, noise reduction is
automatically performed after taking a photo. While the noise reduction
is being performed, do not turn the power off until the SD card access LED
is unlit. If you turn the power off before the noise reduction procedure is
complete, the image before the noise reduction is saved.
❏ When taking photos with the bulb function, use a tripod or cable release
to prevent the picture from blurring.
English
5. Focus on the subject.
6. Press the shutter-release button all the way down to take a photo.
Note:
❏ If you set the shutter speed at a high value, you can shoot even a fast
moving subject as if it is a stationary subject.
❏ To avoid blurring, set the shutter speed faster than “1 sec./focal length.”
If you set a slow shutter speed, it is recommended to use a tripod.
2
Setting Manual Aperture Locking
2
To lock the aperture manually, follow the steps below.
1. Maneuver the shutter charge lever.
2. Rotate the aperture ring to the desired value.
2
2
2
2
2
Taking Pictures
29
3.
Press the shutter-release button halfway. The optimal shutter speed
(i.e., optimal exposure value) blinks, and the current shutter speed
is lighted, in the viewfinder.
Selecting a Frame
Frame patterns can be selected from 28 mm, 35 mm, and 50 mm. Turn
the frame selector lever to select the frame pattern according to the focal
length of the lens being used. The parallax is automatically corrected
according to the shooting distance of the lens to be used.
DUMMY
60
250
4. Rotate the shutter speed dial to the optimal shutter speed value.
5. Focus on the subject.
6. Press the shutter-release button all the way down to take a photo.
Note:
You can take photos even when specifying only an aperture value manually.
For details, see “Setting Auto Exposure (Aperture Priority)” on page 26.
The frame is displayed in the viewfinder to show the range to be
focused in with the lens attached.
Selecting Color/Monochrome
You can set the color to color or monochrome when taking photos. The
default setting is Color. When you select Monochrome in the Color
Setting screen, you can choose the filter color in the Monochrome Filter
screen.
1. Select Color setting in the Camera Settings menu using the JOG
dial, and press the ENTER button. The Color Setting screen is
displayed. For details on using the menu, see “Camera Settings
menu” on page 42.
30
Taking Pictures
3.
Select Color or Monochrome.
To set the color to color, select Color using the JOG dial and press
the ENTER button. The color setting is complete and the screen
returns to the Camera Settings menu.
To set the color to monochrome, select Monochrome using the
JOG dial and press the MENU button. The Monochrome Filter
screen is displayed. Proceed to step 3.
Select one of the following monochrome filters using the JOG dial,
and press the ENTER button.
Standard
No color filter is selected.
Green
Suitable for portraits.
Yellow
Suitable for landscape photos. The color contrast
is enhanced in the order of Yellow, Orange, and
Red.
Orange
Red
The color setting is complete and the screen returns to the Camera
Settings menu.
Note:
When you select a monochrome filter, you can take monochrome
pictures with a color filtered effect.
Selecting the Picture Settings (Image
Type)
You can select the image type from Standard or Film1 to Film3.
Standard
Values for Edge Enhance, Saturation, Tint, and
Contrast, are already set to Me (Medium), and NR
(Noise Reduction) is set to Lo (Low) by default.
Film1 to Film3
You can set your desired value for Edge
Enhance, Saturation, Tint, Contrast, and NR
(Noise Reduction) using the JOG dial.
To make Film1 to Film3 settings, follow the steps below.
1. Select Film Setting in the Camera Settings menu using the JOG dial,
and press the ENTER button. The Film Setting screen is displayed.
For details on using the menu, see “Camera Settings menu” on page
42.
2. Select your desired image number (Film1 to Film3) and press the
MENU button. The selected number of the Film Settings screen is
displayed.
3. Select an item for which you want to change the setting using the
JOG dial, and press the ENTER button. You can select the item from
Edge Enhance, Saturation, Tint, Contrast, and NR (Noise
Reduction) for each film number.
4. Change the value for the item using the JOG dial and press the
ENTER button. You can set the value from Lo, Me, and Hi.
5. Repeat step 3 and 4 to change values for desired items.
6. After changing the value for each item, select Finish and press the
ENTER button.
The new values are saved, and the screen returns to the Camera
Settings menu.
2
2
2
2
2
2
2
Using the Flash Function
An optional flash can be used when taking photos under poor lighting
situations.
1. Install an optional flash to the accessory shoe or X contact on the
camera.
2. Maneuver the shutter charge lever.
3. Set the shutter speed to 1/125 or below.
Taking Pictures
English
2.
31
2
2
4.
Focus on the subject and identify the length between the camera
lens and the subject.
5. Set the corresponding aperture value from the length and aperture
list. For the list of the length and aperture value, see the flash unit
manual.
6. Rotate the aperture ring to select the desired value.
7. Focus on the subject again and press the shutter-release button
down.
Note:
For more information on the flash, see the flash’s manual.
Calibrating Indicator Needles
You can check the statuses of the following four factors: the number of
remaining photos, photo quality, remaining battery power, and white
balance using the needle indicator on the top of the camera. There are
4 needles on the indicator to indicate the statuses of these factors. If any
of these needles becomes inaccurate, follow the steps below to adjust it.
Sequential Number Settings
You can select whether to store photos with sequential numbers.
1. Select Sequential Numbering in the Basic Setup menu using the
JOG dial, and press the ENTER button. For details on using the
menu, see “Basic Setup menu” on page 43.
The Sequential Numbering screen is displayed.
2.
32
On (default)
The sequence of numbers continues even
when the memory card is replaced.
Off
The sequence of numbers is reset and a
new sequential number is given when
replacing the memory card.
Use the JOG dial to highlight On or Off, and press the ENTER
button. The new setting is saved and the screen returns to the Basic
Setup menu.
Taking Pictures
1.
Select Calibrate Needles in the Camera Settings menu using the
JOG dial, and press the ENTER button. The Needle Calibration
screen is displayed. For details on using the menu, see “Camera
Settings menu” on page 42.
3.
4.
5.
6.
English
2.
Select the needle to be adjusted using the JOG dial, and press the
ENTER button.
The needles indicate the following factors.
Needle display
Function
E (long needle on the top of the
meter)
Number of remaining photos
R (short needle on the right-side of
the meter)
Photo quality
E (short needle on the bottom of the
meter)
Remaining battery power
A (short needle on the left-side of the
meter)
White balance
2
2
2
2
Note:
For setting details, see “About Indicator Needles” on page 24.
Move the left or right arrow using the JOG dial and press the ENTER
button. The selected needle is moved by one scale each time you
press the ENTER button.
Repeat step 3 until the needle returns to its original position.
Select Finish using the JOG dial and press the ENTER button.
To calibrate another needle, repeat steps 2 to 5.
To finish the needle calibration, select Finish using the JOG dial and
press the ENTER button.
The selected needle returns to the current value, and the screen
returns to the Camera Settings menu.
2
2
2
2
2
Taking Pictures
33
Chapter 3
Viewing and Managing Your Photos
Viewing Photos with the LCD Monitor
When turning the power switch on, the camera enters the shooting
mode. To view the photos on the camera, invert the LCD monitor
toward you and press the LCD button. The camera switches from the
shooting mode to the playback mode, and the last recorded photo
(photo with the largest number) is displayed. For details about
inverting the LCD monitor, see “How to Use the LCD Monitor” on page
41.
- Histogram display
- Highlight display
- Framing guide display
- Detailed information display
- 4-photo display
Note:
When viewing a photo in the playback mode for the first time, the photo is
displayed in standard display. Next time you return to the playback mode, a
photo is displayed in the last selected display style.
Display icons
The icons displayed on the bottom of the LCD monitor indicate the
following functions or operations.
Indicates you can operate the menu procedure by
rotating the JOG dial clockwise or counterclockwise in
the upper position.
Viewing the previous or next photo
Rotate the JOG dial clockwise or counterclockwise to display the
previous or next photo.
Switching between display styles
In the playback mode, photos can be displayed in the following 7 styles.
To switch between display styles, pull up the JOG dial to the upper
position and rotate it clockwise or counterclockwise.
- Standard display (default setting)
- General information display
34
Viewing and Managing Your Photos
Indicates you can scroll a photo horizontally by rotating
the JOG dial clockwise or counterclockwise in the upper
position (displayed in the Magnify mode).
Indicates you can scroll a photo vertically by rotating the
JOG dial clockwise or counterclockwise in the upper
position (displayed in the Magnify mode).
Indicates you can display the previous or next photo by
rotating the JOG dial clockwise or counterclockwise in
the lower position.
English
Indicates you can magnify or shrink of a photo by
rotating the JOG dial clockwise or counterclockwise in
the lower position (displayed in the Magnify mode).
Standard display
Appears when the ENTER button is available.
3
Appears when the CANCEL button is available.
Appears when the current photo display style is full
screen.
3
Appears when the current photo display style is 4-photo
display.
Note:
❏ When the battery is running low, the
(battery) icon appears above
the JOG dial icon.
❏ When the JOG dial is in the upper position, the (upper) icon turns green
in the bottom left of the screen. Also, when the JOG dial is in the lower
position, the (lower) icon turns green.
❏
3
Number of current photo/total number of images (9999 at a
maximum)
3
General information display
3
Display contents
3
Contents in the photo display styles are as follows:
3
❏
❏
❏
❏
3
Number of current photo/total number of images (9999 at a
maximum)
Date and time of photo
File number
Photo quality
Viewing and Managing Your Photos
3
35
❏
❏
Lock ( ) icon (displayed only when the file is locked)
Print ( ) icon with number of prints (displayed only when DPOF
settings have been made)
❏
❏
Number of current photo/total number of images (9999 at a
maximum)
Highlight display
Histogram display
Framing guide display
❏
❏
❏
❏
Number of current photo/total number of images (9999 at a
maximum)
Histogram
Highlight display
36
Viewing and Managing Your Photos
Framing guide
Number of current photo/total number of images (9999 at a
maximum)
Detailed information display
❏
❏
❏
❏
❏
❏
❏
❏
❏
❏
❏
Number of current photo/total number of images (9999 at a
maximum)
Date and time of photo
File name (file number and format)
Image solution
Photo quality
Shutter speed (when the picture is taken with auto exposure, “AE”
and the exposure compensation value are displayed. e.g., AE+1.3)
ISO sensitivity
White balance
Film setting
Lock ( ) icon (displayed only when the file is locked)
Print ( ) icon with number of prints (displayed only when DPOF
settings have been made)
Color (color/monochrome) setting. When monochrome is set, the
color of filter is also displayed.
4-photo display
English
❏
Viewing Your Photos in a Slide Show
Images are played back in an automatic slide show with an interval of
about 3 seconds between each image.
1. Press the MENU button in the playback mode. The Main menu is
displayed.
2. Select Slide Show using the JOG dial, and press the ENTER button.
3. Select the direction for viewing slide show using the JOG dial.
❏ When you rotate the JOG dial (in the upper position) clockwise,
a slide show is done starting from the beginning of the stored
images. The playback (r) icon is displayed in the bottom of the
screen.
❏ When you rotate the JOG dial (in the upper position)
counterclockwise, the slide show is done starting from the end
of the stored images. The reverse playback (l) icon displayed
in the bottom of the screen.
4. Press the ENTER button. The slide show starts.
Note:
❏ To stop the slide show, press the ENTER button. To restart, press the
ENTER button again.
❏ To return to the Main menu, press the CANCEL button.
3
3
3
3
3
3
3
3
❏
Number of current photo/total number of images (only for the
selected photo)
3
Viewing and Managing Your Photos
37
Deleting Images
In the playback mode, you can delete the currently displayed image or
all of the images at once in the LCD monitor.
Deleting an image
To delete the currently displayed image, follow the steps below.
1. Display the image you want to delete using the JOG dial, and press
the MENU button. The Main menu is displayed.
2. Select Delete and press the ENTER button. The Delete menu is
displayed.
3. Confirm that Delete 1 image is highlighted, and press the ENTER
button. The confirmation screen is displayed.
Note:
❏ When rotating the JOG dial in the lower position, you can display
another image to be deleted.
❏ You cannot delete the image displayed with the lock ( ) icon.
4. In the confirmation screen, select OK using the JOG dial and press
the ENTER button.
Deleting all images
1.
2.
3.
4.
38
Press the MENU button in the playback mode. The Main menu is
displayed.
Select Delete and press the ENTER button. The Delete menu is
displayed.
Select Delete all images using the JOG dial in upper position, and
press the ENTER button. The confirmation screen is displayed.
In the confirmation screen, select OK using the JOG dial and press
the ENTER button.
Viewing and Managing Your Photos
Note:
❏ You cannot delete the image displayed with the lock ( ) icon. For details,
see “Locking Images” on page 39.
❏ When an SD memory card is locked, the message “Cannot delete. The SD
card is write-protected.” is displayed. Remove the card from the camera,
then unlock the card and try it again.
Formatting a memory card
Format a memory card when you want to erase all the data on the card
or when a message on the LCD monitor instructs you to do so.
To format a memory card, follow the steps below.
1. Select Format SD Card in the Camera Settings menu using the JOG
dial, and press the ENTER button. The Format SD Card menu is
displayed.
2. Select Quick Format or Full Format using the JOG dial, and press
the ENTER button. The confirmation screen is displayed.
3. Select OK using the JOG dial, and press the ENTER button.
The SD card formatting starts and the message “Formatting” is
displayed.
After the SD memory card is formatted, the screen returns to the
Camera Settings menu.
Caution:
❏ An SD memory card must be formatted in your camera before you
take pictures.
❏ While formatting an SD memory card, do not take the card out of
the camera.
Note:
❏ When you format an SD memory card, all the data on the card is erased,
including protected pictures.
❏ When an SD memory card is locked, the message “Cannot format. The
SD card is write-protected.” is displayed. Remove the card from the
camera, then unlock the card and try it again.
c
This function is used to protect images from accidental deletion.
Note:
After locking images, they become read only.
Locking an image
1.
2.
3.
In the playback mode, display the picture you want to lock and
press the MENU button. The Main menu is displayed.
Select Lock using the JOG dial, and press the ENTER button. The
Lock menu is displayed.
Note:
If the selected image has already been locked, the lock ( ) icon is displayed
on the top right of the image.
Select Lock/Unlock 1 image using the JOG dial in upper position,
and press the ENTER button.
Note:
❏ When rotating the JOG dial in the lower position, you can display
another image to be locked.
❏ Depending on whether the selected image is locked, the effect of the
menu item “Lock/Unlock 1 image” changes.
❏ When the image is locked, the lock ( ) icon is displayed on the top
right of the image.
Locking all images
1.
2.
3.
Press the MENU button in the playback mode. The Main menu is
displayed.
Select Lock using the JOG dial, and press the ENTER button. The
Lock menu is displayed.
Select Lock all images using the JOG dial, and press the ENTER
button.
All the images in the SD memory card are locked.
Caution:
When you format an SD memory card, all the data on the card is erased,
including protected pictures.
c
English
Locking Images
Unlocking all images
3
To unlock all the protected images in the SD memory card, select
Unlock all images using the JOG dial in step 3 described above, and
press the ENTER button. When the selected images are unlocked, the
lock ( ) icon on the images is hidden.
3
3
Magnifying Images
You can zoom in an image displayed in the LCD monitor.
1. Press the MENU button in the playback mode. The Main menu is
displayed.
2. Select Magnify using the JOG dial, and press the ENTER button. The
Magnify mode( ) icon is displayed on the top left corner of the
screen.
3. Rotate the JOG dial (lower position) clockwise to enlarge an image.
To reduce an image, rotate the JOG dial (lower position)
counterclockwise.
Note:
Rotate the JOG dial (upper position) and press the ENTER button to switch
the direction from vertical to horizontal, or vice versa. The current
direction setting is indicated by the
(holizontal direction) icon or
(vertical direction) icon in the bottom left of the screen.
3
3
3
3
3
3
Viewing and Managing Your Photos
39
LCD Brightness Settings
Brightness of the LCD monitor can be selected from 8 grades (default
setting is 5).
1. Select LCD Brightness in the Basic Setup menu using the JOG dial,
and press the ENTER button.
2. Select the desired brightness using the JOG dial and press the
ENTER button.
The new setting is saved, and the screen returns to the Basic Setup
menu.
Setting Number of Prints (DPOF Setting)
When you want to print photos, you can specify the number of prints
and information to be included on each photo. This setting is saved in
a Digital Print Order Format (DPOF) file on the camera’s memory card.
You can apply these settings when using a printer or printing
application that supports the DPOF standard. Also, in some countries
you will find digital photo labs that support DPOF and can print
according to the settings in your DPOF file.
1. Press the MENU button in the playback mode. The Main menu is
displayed.
2. Select Print Order using the JOG dial, and press the ENTER button.
3. Select Set DPOF for one or Set DPOF for all using the JOG dial,
and press the ENTER button.
To specify the DPOF for the currently displayed image, select Set
DPOF for one.
To confirm the current DPOF setting, select View current DPOF.
Note:
When rotating the JOG dial in the lower position, you can display another
image to be set DPOF.
40
Viewing and Managing Your Photos
4.
Specify the number of prints using the JOG dial and press the
ENTER button.
Note:
The number of prints cannot be specified for CCD-RAW data.
English
Chapter 4
Using the LCD Monitor
How to Use the LCD Monitor
You can use the LCD monitor to view photos in the playback mode or
make settings for the camera functions. When using the LCD monitor,
invert it toward you and press the LCD button. To invert the LCD
monitor, insert your finger tip into the dent on the side of the monitor
to open the LCD monitor 90° (1). Then rotate it 180° (2) and turn the
monitor 90° again (3).
❏
When you perform one of the following in the playback mode, the LCD
monitor is turned off and the camera returns to the shooting mode.
- Press the LCD button
- Press the shutter-release button halfway
- Invert the LCD monitor
Menu structure
In the playback mode, you can specify camera settings with various
menus. To navigate through the menus or functions, use the JOG dial
and buttons next to the LCD monitor.
4
4
4
4
LCD
4
MENU
DUMMY
ENTER
4
CANCEL
USER
Dent
c
Caution:
❏ Do not operate or leave the LCD monitor while it is opened.
❏ Do not grab the LCD monitor or lift it up while holding it.
Note:
❏ When you turn the power switch on while the LCD monitor is inverted
toward you, the camera enters the playback mode.
LCD button:
Switches from the shooting mode to playback
mode, or vice versa.
MENU button:
Displays the Main menu on the LCD monitor.
ENTER button:
Used when you determine the currently selected
value or option (or display sub menu items).
4
4
4
Using the LCD Monitor
41
CANCEL button:
USER button:
JOG dial:
Used when you exit without making any setting
and the screen returns to the previous menu or
function.
Used when you perform previously assigned
function.
Rotate the JOG dial clockwise or
counterclockwise to display the previous or next
menu or photo. The JOG dial is used in either the
upper or lower position depending on the menu
or function. To use the JOG dial in the upper
position, pull it up as shown below.
Main menu items
Function
Description
Delete
Delete 1 image or Delete all images
Magnify
Max 9.4 times (for JPEG images with 3008 × 2000 pixels)
Max 2 times (for RAW images)
Display position can be moved (vertical/horizontal).
Lock
Lock/Unlock 1 image, Lock all images, or Unlock all
images
Print Order
Set DPOF for one, Set DPOF for all (0 - 99), or View current
DPOF.
Slide Show
Playback photo images in a slide show.
Camera
Settings
Displays the Camera Settings menu. For details, see
“Camera Settings menu” on page 42.
Camera Settings menu
Main menu
When you press the MENU button in the playback mode, the Main
menu is displayed first. All the operations can be started from this
menu.
How to open the menu
To open the Camera Settings menu, follow the steps below.
1. Press the MENU button in the playback mode. The Main menu is
displayed.
2. Select Camera Settings using the JOG dial, and press the ENTER
button. The Camera Settings menu is displayed.
Camera Settings menu items
42
Using the LCD Monitor
Function
Description
Current Settings
Displays current settings list.
Color Setting
Color or Monochrome
English
Basic Setup Menu items
Function
Description
Film Setting
Available from Film1 to Film3, or Standard.
When selecting Film1 to Film3, you can set a
value for Edge Enhance, Saturation, Tint,
Contrast, and NR (Noise Reduction).
Function
Description
Time and Date
Sets the date (year, month, and day) and time
(hours and minutes).
Basic Setup
Displays the Basic Setup menu. See “Basic Setup
menu” on page 43.
Date Format
Format SD Card
Quick Format or Full Format
Selects date display format from the following:
YYYY/MM/DD (default setting),
MM/DD/YYYY,
DD/MM/YYYY
Assign USER Button
Assigns a function to the USER button.
Available functions are Delete, Lock, Magnify,
Print, Settings, and Film.
Power Save Timer
Selects the length of time before the camera
enters the Power Save Timer mode.
Available from 3 min, 5 min (default setting), 10
min, or 20 min.
Calibrate Needles
Displays the Needle Calibration menu to adjust
the following four needles: E (number of
remaining photos), R (photo quality), E
(remaining battery power), and A (white
balance). These settings are indicated on the
needle indicator.
Initialize Settings
Sequential Numbering
Resets the current settings (except date and
time settings) to their default settings.
Basic Setup menu
How to open the menu
To open the Basic Setup menu, follow the steps below.
1. Press the MENU button in the playback mode. The Main menu is
displayed.
2. Select Camera Settings using the JOG dial, and press the ENTER
button. The Camera Settings menu is displayed.
3. Select Basic Setup using the JOG dial, and press the ENTER button.
The Basic Setup menu is displayed.
Specifies whether to store images with a
sequential number (included in the file name).
On (default): sequential numbers continue
even if the memory card is replaced.
Off: sequential numbers end and new
sequential number are given when the
memory card is replaced.
LCD Brightness
Calibrates brightness of the LCD monitor.
Language
Selects a language displayed on the LCD
monitor from the following: Japanese, English,
French, German, Italian, Spanish, Dutch,
T-Chinese
4
4
4
4
4
4
4
4
4
Using the LCD Monitor
43
Chapter 5
Using the RAW Data Processing Software
Windows: OS:
Overview
When you take photos with CCD-RAW specified for photo quality, you
can process these photos using the RAW data processing software.
You can use the following software according to your needs:
EPSON PhotoRAW
EPSON RAW Plug-In
Hard Ware: Pentium III 1 GHz or higher (Pentium IV 2
GHz or higher is recommended)
Process ERF (EPSON RAW File) files provided from
DSC (Digital Still Camera) in a batch using
optional parameters.
Memory:
256 MB or more (512 MB or more is
recommended)
Hard Disk:
5 MB or more free memory is required for
installation
170 MB or more free memory is required for
operation
Display:
SVGA (800 × 600) or higher, 24 bit color or
higher
Used with Adobe Photoshop 7, Photoshop CS, or
Adobe Photoshop Elements 2.0 to display ERF
(EPSON RAW File) files on these applications.
Note:
❏ To install the EPSON PhotoRAW or EPSON RAW Plug-In software,
you need administrator privileges.
❏ For CCD-RAW files, only ERF format is supported.
❏ When processing ERF files, copy it from an SD memory card to the hard
disk drive beforehand. If processing ERF files on a memory card, it may
take a long time.
Macintosh: OS:
The system requirements for using the camera with a computer are as
follows:
c
Using the RAW Data Processing Software
Mac OS® 9.1 - 9.2.2 (CarbonLib compatible),
Mac OS® 10.2 or later
Hard Ware: PowerPC G3 233 MHz or higher (PowerPC
G4 1GHz or higher is recommended)
Memory:
42 MB for application memory
Hard Disk:
50 MB or more free memory is required for
installation
170 MB or more free memory is required for
operation
Display:
800 × 600 or higher, 32000 colors or more
System Requirements
44
Microsoft® Windows® 98, 98 Second
Edition, Me, 2000 Professional, XP Home
Edition, XP Professional
Caution:
EPSON PhotoRAW is available only for Windows.
EPSON PhotoRAW
1.
2.
Insert the software CD-ROM into the CD-ROM drive.
The EPSON Installer Program dialog box appears automatically.
Note:
❏ If the EPSON Installation Program dialog box does not appear, click
the CD-ROM icon, and then select Open from the File menu. Then
double-click EPSETUP. EXE.
❏ When the authentication dialog box for assigning administrator
privileges appears, enter the user name and password, and then click
OK.
Follow the on-screen instructions until all of the software is
installed. When a message appears to inform you that the
installation is complete, click Finish.
Uninstalling the software
Perform one of the following to uninstall EPSON PhotoRAW.
❏ Click Start, point to Settings, and select Control Panel,
Add/Remove Programs, and then click EPSON PhotoRAW.
❏ Click Start, point to Programs, and select EPSON PhotoRAW, and
then click Uninstall.
EPSON RAW Plug-In
1.
Insert the software CD-ROM into the CD-ROM drive.
For Windows users:
The EPSON Installer Program dialog box appears automatically.
Note:
❏ To install the EPSON RAW Plug-In, you need administrator
privileges.
2.
If the EPSON Installation Program dialog box does not appear, click
the CD-ROM icon, and then select Open from the File menu. Then
double-click EPSETUP. EXE.
For Macintosh users:
Double-click Ins EPSON RAW Plug-In icon inside the EPSON
folder.
Note:
When the authentication dialog box for assigning administrator privileges
appears, enter the user name and password, and then click OK.
Follow the on-screen instructions until all of the software is
installed. When a message appears to inform you that the
installation is complete, click Finish or Quit.
Note:
❏ EPSON RAW Plug-In program is automatically installed in the
plug-in folder of Adobe Photoshop 7, Adobe Photoshop CS, or Adobe
Photoshop Elements 2.0.
❏ If the plug-in folder of Adobe Photoshop 7, Adobe Photoshop CS, or
Adobe Photoshop Elements 2.0 is not detected automatically, specify
the folder manually.
Uninstalling the software
English
❏
Installing the Software
5
5
5
5
5
5
Follow the steps below to uninstall EPSON PhotoRAW.
For Windows
Click Start, point to Settings, and select Control Panel,
Add/Remove Programs, and then click EPSON RAW Plug-In.
5
For Macintosh
Delete the EPSON folder in the plug-in folder of Adobe Photoshop
7, Adobe Photoshop CS, or Adobe Photoshop Elements 2.0.
5
5
Using the RAW Data Processing Software
45
Starting the Software
EPSON PhotoRAW
Click Start, point to All programs (or Programs), and select EPSON
PhotoRAW, and then click EPSON PhotoRAW.
EPSON PhotoRAW is started and the main window is displayed.
❏
You cannot select an ERF file from a sub folder.
For Macintosh
Start Adobe Photoshop 7, Adobe Photoshop CS, or Adobe Photoshop
Elements 2.0, and open the ERF file you want to process.
The main window of EPSON RAW Plug-In is displayed as shown
below.
Note:
❏ When the EPSON RAW Plug-In does not start automatically even if you
select an ERF file, select Open from the File menu, and select EPSON
RAW Plug-In from Format drop-down list. Then select your desired ERF
file.
❏ You cannot select an ERF file from a sub folder.
EPSON RAW Plug-In
For Windows
1.
2.
3.
46
Click Start, point to All programs (or Programs), and select
Adobe, and then click Adobe Photoshop 7, Adobe Photoshop CS,
or Adobe Photoshop Elements 2.0.
Click File, point to Open. The Open dialog box is displayed.
Select the ERF file and click the Open button.
Note:
❏ When the EPSON RAW Plug-In does not start automatically even
if you select an ERF file, select Open As from the File menu, and
select EPSON RAW Plug-In from the Open as drop-down list.
Then select your desired ERF file.
Using the RAW Data Processing Software
Finding More Information
For more information about each software, see online help.
English
Chapter 6
Maintenance and Troubleshooting
6
Cleaning the Camera
Troubleshooting
To keep your camera at its best, you should clean it thoroughly several
times a year. Before you perform any maintenance on the camera, be
sure to read the “Safety Instructions” on page 5. Then, follow these
guidelines.
❏ Be sure to turn the camera off before cleaning.
❏ Use a clean, dry cloth to keep the camera free of dust.
❏ Do not use harsh or abrasive cleaners.
❏ If necessary, clean the battery contacts with a dry cloth.
When a problem occurs, an error message usually appears in the LCD
monitor. Refer to the following section to solve the problem.
Storing the Camera
If you are not planning to use the camera for a long period of time,
remove the battery and store it at a low temperature in a dry location.
This prevents damage to the camera from battery leaks or corrosion.
Store the camera in its case. Do not store the camera in the following
locations.
❏ Where it will be exposed to direct sunlight, for example, on a car
dashboard
❏ Near sources of bright light or high humidity
❏ Near sources of heat or in a closed car
❏ In areas with excessive dirt or dust
❏ Where it will be exposed to strong vibrations or magnetic fields
Status and error messages
6
6
Error message
Description
Cannot delete. The image is
locked.
Unlock the image using the lock
function in the Main menu and delete
the image again.
Cannot delete. The SD card is
write-protected.
Release the write-protect switch from
the lock position, and delete again.
Cannot lock. The SD card is
write-protected
The SD card is already locked as the
write-protect switch is in the lock
position.
Cannot unlock. The SD card is
write-protected.
Release the write-protect switch from
the lock position.
6
6
6
6
6
6
Maintenance and Troubleshooting
47
Contacting Customer Support
For users in the Middle East
If your Epson product is not operating properly and you cannot solve
the problem using the troubleshooting information in your product
documentation, contact the customer support services for assistance. If
customer support for your area is not listed below, contact the dealer
where you purchased your product.
Customer support will be able to help you much more quickly if you
give them the following information:
❏ Product serial number
(The serial number label is usually on the back of the product.)
❏ Product model
❏ Product software version
(Click About, Version Info, or similar button in the product
software.)
❏ Brand and model of your computer
❏ Your computer operating system’s, name and version
❏ Names and versions of the software applications you normally use
with your product
For users in Scandinavia
For users in the United Kingdom and the Republic
of Ireland
For users in South Africa
URL
http://www.epson.co.uk
Telephone (UK)
08701 637 766
(The Republic of Ireland)
48
01 679 9016
Maintenance and Troubleshooting
URL
http://www.epson.com
E-mail
epson_support@compubase.co.ae
Telephone
+971 4 352 4488
Fax
+971 4 351 6617
URL
http://www.epson.com
Telephone
Denmark 80 88 11 27
Finland 0800 523 010
Norway 800 11 828
Sweden 08 445 12 58
URL
www.epson.co.za
Telephone
(011) 444-5223 or 0800 600 578
Support Technique EPSON France,
0 892 899 999 (0,34 E/minute)
Ouvert du lundi au samedi de 9h00 à 20h00 sans interruption
http://www.epson.fr/support/selfhelp/french.htm pour accéder à
l'AIDE EN LIGNE.
http://www.epson.fr/support/services/index.shtml pour accéder
aux SERVICES du support technique.
English
For user in France
For users in Spain
URL
http://www.epson.es
E-mail
soporte@epson.es
Telephone
902 40 41 42
Fax
93 582 15 16
6
6
For user in Germany
EPSON Service Center c/o Exel Hünxe GmbH
Werner-Heisenberg-Strase 2
46569 Hünxe
For users in Portugal
6
URL
http://www.epson.pt
E-mail
apoio_clientes@epson.pt
Telephone
707 222 000
Fax
21 303 54 90
6
For user in Italy
EPSON Italia S.p.a.
Via M. Viganò de Vizzi, 93/95
20092 Cinisello Balsamo (MI)
Tel. 02.660.321
Fax. 02.612.36.22
Assistenza e Servizio Clienti
TECHNICAL HELPDESK
02.268.300.58
http://www.epson.it
6
6
6
6
6
Maintenance and Troubleshooting
49
Appendix A
Appendix
Standards and Approvals
Specifications
Camera
Camera
EMC Directive 89/336/EEC
EN55022 Class B
Epson Rangefinder Digital Camera R-D1
EN55024
General
Dimensions
and weight:
Lithium-ion battery
EMC Directive 89/336/EEC
EN55022 Class B
EN55024
Battery charger
Low Voltage Directive 73/23/EEC
EN60950
EMC Directive 89/336/EEC
EN55022 Class B
Temperature:
Humidity:
(without condensation)
Memory card:
Power sources:
Height:
88.5 mm (3.54 inches)
Width:
142 mm (5.68 inches)
Depth:
39.5 mm (1.58 inches)
Weight:
Approx. 590 g (1.3 lb)
Operating: 5 to 35°C
Storage: -20 to 60°C
Operating: 30 to 80%
Storage: 10 to 80%
SD memory card: Up to 1GB
Lithium-ion battery (EU-85)
EN55024
Image format
Recording format:
File type:
Recorded image size:
50
Appendix
JPEG, CCD-RAW
Exif Ver.2.21, DCF (Design rule for Camera
File system) 2.0, DPOF 1.1 compliant
JPEG: 2240 × 1488 pixels
JPEG: 3008 × 2000 pixels
CCD-RAW
Locked at 1/4
Supports PRINT Image Matching Ver.2.6
(JPEG only)
Optic system
Image sensor:
Available pixels:
Lens mount:
Viewfinder:
Viewfinder
magnification:
Range finder:
Primary-color CCD (APS size: 23.7 × 15.6 mm)
6.1 M
EM mount
Real image range finder type see-through
viewfinder
Real-size
With coupled coincidence-type range finder
(interlocking range: 0.7m to infinity)
Visual field frame: 28/35/50 mm bright frame switching, parallax
auto correction
Visual field ratio: 85% (at 3 m)
Shutter:
Electronically controlled vertically traveling focal
plane shutter
Shutter speed: 1/2000 - 1 sec, bulb
Flash:
Synchronous: 1/125 sec or less
Supported only in synchronized shooting
Metering:
TTL screen surface direct actual-aperture
center-weighted averaged metering
Exposure control: Aperture priority auto exposure/manual
English
JPEG compression ratio:
PRINT image matching:
Display functions
LCD monitor: Type 2 low-temperature polysilicon color LCD
235K pixels
Needle
4-needle indicator (number of remaining
indicator:
photos/photo quality/remaining battery
power/white balance setting)
SD card access Lit/unlit/blinks red
LED:
A
A
Interface (external connector)
Memory card I/F:
X contact:
SD card I/F
For external flash (synchronizes at shutter speed
downward than 1/125 sec)
A
Indicators for camera setting
Normal (JPEG: 2240 × 1488 pixels)
High (JPEG: 3008 × 2000 pixels)
RAW (CCD-RAW)
White balance setting:
Auto (TTL metering auto white
balance)/Sunny/Shade/Cloudy/Inca
ndescent/Fluorescent
Number of remaining photos: E (no card/card error), 0-500 (500 on
display; up to 999 can be taken)
Remaining battery power:
Full - Empty
Exposure compensation
-2.0 - +2.0 EV (1/3 EV steps)/AE (Auto)
setting:
Shutter speed setting:
1/2000 sec - 1 sec, bulb
ISO speed setting:
200/400/800/1600
Viewfinder angle setting:
28/35/50 mm
Image size setting:
Appendix
A
51
A
A
A
A
A
Viewfinder indicators
Exposure meter:
Battery service life:
Displays optimal shutter speed on LED based on
metered value. Also displays current set value
through shutter speed dial
(metered value: blinking/SS dial setting: lit).
Displayed shutter speed: 1/2000 - 1 sec, bulb
* Shooting conditions 1:
Shooting six pictures per minute at a regular
interval then turning the camera off for one
minute before turning it on again and repeating
this procedure, while the flash is off, a shutter
speed of 1/250, ISO of 200, image size of N (JPEG;
2240 × 1488 pixels) and WB on Sunny.
Internal clock
Internal clock:
Records the shooting date on the photo
(YYYY/MM/DD, H/M/S)
Contains a capacitor for clock back-up
(24 hours without battery)
** Shooting conditions 2:
Turning on the camera and waiting 30 seconds
before taking the first picture, then taking nine
more pictures at 30 second intervals before
turning off the camera and removing the
battery for 10 minutes and repeating this
procedure, while using the flash - which is
attached to the accessory shoe - on full for every
second shot, with a shutter speed of 1/125, ISO
of 200, image size of H (JPEG; 3008 × 2000 pixels)
and WB on Auto.
Power supply
Type of battery:
Model:
Output voltage:
Capacity:
Number of shots possible
Under shooting conditions 1*: Up to about 1000
shots
Under shooting conditions 2**: Up to about 360
shots (compliant with the CIPA standard)
Li-ion battery
EU-85
3.7 V
1500 mAh
Battery charger
Model No.:
Input voltage:
Charging method:
Charging display:
52
Appendix
A281H
100 - 240 VAC, 50/60Hz
Constant voltage, constant current
Charging: Red LED lit
Completed: LED unlit
English
Performance
File size of photos
Photo quality:
2240 × 1488 (JPEG):
3008 × 2000 (JPEG):
CCD-RAW:
Compression ratio
Locked at 1/4
Locked at 1/4
Non-compressive
A
Average file size
about 1.5MB
about 3MB
about 10MB
A
About Optional Accessories
A
The following options are available for the camera.
❏ Lithium-ion battery (Model: EU-85)
A
A
A
A
A
A
Appendix
53
Index
A
USER button, 12
Accessory shoe, 11, 12
AE lock, 28
AE-lock button, 11, 28
Auto Exposure, 26
B
Basic Setup menu, 43
Battery
battery charger, 10
charging, 13
inserting, 14
lamp, 14
li-ion battery, 10, 13
remaining battery power, 24
Battery charger, 10
Brightness of the LCD monitor,
40
Bulb shooting, 29
Button
AE-lock button, 12, 28
CANCEL button, 12
ENTER button, 11, 12
LCD button, 12, 34, 41
lens release button, 12
lock-release button, 28
MENU button, 12, 41
shutter-release button, 12
54
Index
C
Cable release, 29
Calibration Needle Indicator, 32
Camera Settings menu, 42
CANCEL button, 11
Color setting
color, 30
monochrome, 30
Compression ratio, 25
Contacting EPSON, 48
Current settings, 22
Customer support, 48
general information display,
35
highlight display, 36
histogram display, 36
standard display, 35
DPOF, 40
E
ENTER button, 11
EPSON PhotoRAW, 44, 45
EPSON RAW Plug-In, 44
ERF (EPSON RAW File), 44
Exposure compensation, 27
F
D
Date and time settings, 20
Date format, 21
Default settings, 23
Delete
deleting all images, 38
deleting an image, 38
Display icons, 34
Display style, 34
4-photo display, 36
detailed information display,
36
Framing guide display, 36
Flash, 31
Format
SD memory card, 16, 38
Frame selector lever, 11, 12
Invert
LCD monitor, 41
ISO sensitivity, 26
ISO speed set ring, 11, 12, 26
J
JOG dial, 11, 42
JPEG, 25
L
Language, 21
LCD button, 11
LCD monitor, 11, 12, 20, 41
invert, 41
Lens release button, 11
Li-ion battery, 10
L mount lens
mounting, 18
removing, 19
Lock-release button, 11, 12
I
Icons, 34
Image locking, 39
Image type, 31
Installing
memory card, 15
software, 45
M
M (Bayonet) mount lens
mounting, 17
removing, 18
Main menu, 42
N
Needle indicator, 11, 12
number of remaining photos,
24
photo quality, 24
remaining battery power, 24
white balance, 24
Number of remaining photos, 24
O
Option
flash, 31
M-Bayonet adapter ring, 18
P
Photo quality, 24, 25
Photo quality lever, 11, 12
Power on/off, 20
Power save timer, 22
Power switch, 11, 12
PRINT image matching, 51
R
T
RAW, 25
Technical support, 48
S
U
SD card access LED, 11, 12
SD memory card
formatting, 16, 38
installing, 15
removing, 17
write protect switch, 16
Sequential number, 32
Setting
brightness of the LCD
monitor, 40
date and time, 20
date format, 21
language, 21
power save timer, 22
sequential number, 32
white balance, 25
Shutter charge lever, 11, 12
Shutter-release button, 11
full-release, 23
half-release, 23
Shutter speed dial, 11, 12, 26
Slide show, 37
Software
installing, 45
system requirements, 44
USER button, 11, 22
English
Manual shooting
aperture locking, 29
shutter speed locking, 28
Memory card cover, 16
Memory card slot, 16
MENU button, 11
W
WB settings lever, 11, 12
White balance, 24
Write protect switch, 16
X
X contact, 11, 12
Z
Zoom in/out, 39
Index
55
56
Index