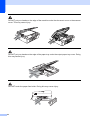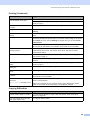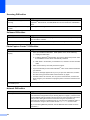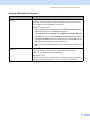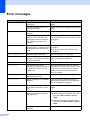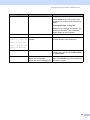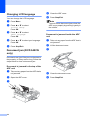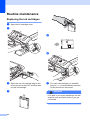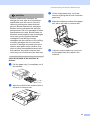
1
USER’S GUIDE DCP-330C DCP-540CN EC Declaration of Conformity under the R & TTE Directive i Table of Contents Section I 1 General General Information 2 Using the documentation ....................................................................................... 2 Symbols and conventions used in the documentation .................................... 2 Control panel overview .......................................................................................... 3 Warning LED indications ................................................................................. 5 Printing Reports............................................................................................... 5 2 Loading documents and paper 6 Loading documents ............................................................................................... 6 Using the ADF (DCP-540CN only)....................................................................................... 6 Loading paper, envelopes and other media .......................................................... 7 Loading paper and other media....................................................................... 7 3 General setup 9 Paper settings........................................................................................................ 9 Paper Type ...................................................................................................... 9 Paper Size ....................................................................................................... 9 LCD display ........................................................................................................... 9 LCD Contrast................................................................................................... 9 Setting the backlight brightness..................................................................... 10 Setting the Dim Timer for the backlight ........................................................10 Setting the Off Timer ..................................................................................... 10 Section II Copy 4 Making copies 12 How to copy......................................................................................................... 12 Making a single copy ..................................................................................... 12 Making multiple copies ..................................................................................12 Copy options........................................................................................................ 12 Section III Direct Photo Printing 5 Printing photos from a memory card 14 PhotoCapture Center™ Operations..................................................................... 14 Using memory cards...................................................................................... 14 Getting started .....................................................................................................14 Print Images......................................................................................................... 15 View Photo(s) ................................................................................................15 Print Index (Thumbnails) ............................................................................... 15 ii Print All Photos ..............................................................................................15 Print Photos ...................................................................................................16 DPOF printing ................................................................................................16 6 Printing photos from a camera with PictBridge 17 Before Using PictBridge.......................................................................................17 PictBridge requirements ................................................................................17 Section IV Appendixes A Safety and Legal 20 Choosing a location .............................................................................................20 To use the machine safely.............................................................................21 Important safety instructions..........................................................................24 IMPORTANT - For your safety ......................................................................25 LAN connection (DCP-540CN only) ..............................................................25 EU Directive 2002/96/EC and EN50419........................................................25 Legal limitations for copying ..........................................................................26 Trademarks ...................................................................................................27 B Troubleshooting and Routine Maintenance 28 Troubleshooting ..................................................................................................28 If you are having difficulty with your machine ................................................28 Error messages ...................................................................................................32 Changing LCD language ...............................................................................34 Document jam (DCP-540CN only) ................................................................34 Printer jam or paper jam ................................................................................35 Routine maintenance ...........................................................................................36 Replacing the ink cartridges ..........................................................................36 Cleaning the scanner.....................................................................................38 Cleaning the print head .................................................................................38 Checking the print quality ..............................................................................38 Checking the printing alignment ....................................................................39 Checking the ink volume ...............................................................................39 Packing and shipping the machine ......................................................................40 C Menu and Features 42 Menu keys ...........................................................................................................42 D Specifications 43 General ................................................................................................................43 Consumable items ...............................................................................................45 Network (LAN) (DCP-540CN only) ......................................................................46 E iii Index 47 Section I General General Information Loading documents and paper General setup I 2 6 9 1 General Information Using the documentation 1 Thank you for buying a Brother machine! Reading the documentation will help you make the most of your machine. Symbols and conventions used in the documentation The following symbols and conventions are used throughout the documentation. Bold Bold typeface identifies specific keys on the machine control panel. Italics Italicized typeface emphasizes an important point or refers you to a related topic. Courier New Text in the Courier New font identifies messages on the LCD of the machine. Warnings tell you what to do to prevent possible personal injury. Electrical Hazard icons alert you to possible electrical shock. Hot Surface icons warn you not to touch machine parts that are hot. Cautions specify procedures you must follow or avoid to prevent possible damage to the machine or other objects. Notes tell you how you should respond to a situation that may arise or give tips about how the operation works with other features. Improper Setup icons alert you to devices and operations that are not compatible with the machine. 2 1 1 General Information Control panel overview 1 1 COPY 01 Quality Enlarge/Reduce Paper Type Paper Size Brightness Normal 100% Plain Pap A4 0 1 1 LCD (liquid crystal display) Displays messages on the screen to help you set up and use your machine. Also, you can adjust the angle of the LCD display by lifting it. 2 Number of Copies Use this key to make multiple copies. 3 Menu keys: d or c Press to scroll backward or forward to a menu selection. a or b Press to scroll through the menus and options. Menu Lets you access the main menu. OK Lets you select a setting. 4 Start keys: Colour Start Lets you start making copies in full colour. Also lets you start a scanning operation (in colour or mono, depending on the scanning setting in the ControlCenter software). Mono Start Lets you start making copies in monochrome. Also lets you start a scanning operation (in colour or mono, depending on the scanning setting in the ControlCenter software). 3 Chapter 1 10 9 8 7 6 5 01 Normal 100% Plain Pap A4 0 2 5 Stop/Exit Stops an operation or exits from a menu. 6 On/Off You can turn the machine on or off. If you turn the machine off, it will still periodically clean the print head to maintain print quality. 7 Ink Management Lets you clean the print head, check the print quality, and check the available ink volume. 8 Scan Lets you access Scan mode. 9 PhotoCapture Lets you access PhotoCapture Center™ mode. 10 Warning LED Turns red when the LCD displays an error or an important status message. 4 3 4 General Information Warning LED indications The status LED (Light Emitting Diode) is a light that shows the DCP status.The LCD shows the current machine status when the machine is idle. 1 Printing Reports 0 1 The following reports are available: Help List User Settings Network config. (DCP-540CN only) How to print a report COPY Quality Enlarge/Reduce Paper Type Paper Size Brightness LED 01 Normal 100% Plain Pap A4 0 DCP status Description Ready The DCP is ready for use. Cover open The cover is open. Close the cover. (See Error messages on page 32.) Ink empty Replace the Ink cartridge with a new one. (See Replacing the ink cartridges on page 36.) Paper error Put paper in the tray or clear the paper jam. Check the LCD message. (See Error messages on page 32.) Other messages Check the LCD message. (See Error messages on page 32.) a b Press Menu. Press a or b to choose Print Reports. Press OK. c Press a or b to choose the report you want. Press OK. d Press Mono Start. Off Red 5 2 Loading documents and paper Loading documents Using the ADF (DCP-540CN only) 2 The ADF can hold up to 10 pages and feeds each sheet individually. Use standard 80 g/m2 (20 lb) paper and always fan the pages before putting them in the ADF. Recommended environment Temperature: 20 to 30° C (68 to 86° F) Humidity: 50% to 70% Paper: 80 g/m2 A4 (20 lb LTR) Document Sizes Supported Length: 148 to 355.6 mm (5.8 to 14 in.) Width: 148 to 215.9 mm (5.8 to 8.5 in.) Weight: 64 to 90 g/m2 (17 to 24 lb) How to load documents CAUTION DO NOT pull on the document while it is feeding. DO NOT use paper that is curled, wrinkled, folded, ripped, stapled, paper clipped, pasted or taped. DO NOT use cardboard, newspaper or fabric. Make sure documents written with ink are completely dry. 6 a Fan the pages well. Make sure you put the documents face down, top edge first in the ADF until you feel them touch the feed roller. b Adjust the paper guides to fit the width of your documents. c Unfold the ADF Document Output Support Flap (1). 2 2 1 2 CAUTION DO NOT leave thick documents on the scanner glass. If you do this, the ADF may jam. 2 2 Loading documents and paper Loading paper, envelopes and other media b 2 2 Loading paper and other media 2 a c d Check that the paper is flat in the tray. 7 Chapter 2 Note f When you use Legal size paper, press and hold the universal guide release button as you slide out the front of the paper tray. g e Gently adjust the paper side guides with both hands and the paper length guide to the paper. h Note Be careful that you do not push the paper in too far; it may lift at the back of the tray and cause feed problems. 8 3 General setup Paper settings Paper Type a b 3 Press a or b to choose General Setup. Press OK. Press a or b to choose Paper Type. Press OK. d Press a or b to choose Plain Paper, Inkjet Paper, Brother Photo, Other Photo or Transparency. Press OK. LCD display Press Stop/Exit. Paper Size a b 3 3 Press Menu. Press a or b to choose General Setup. Press OK. c Press a or b to choose LCD Settings. Press OK. d Press a or b to choose LCD Contrast. Press OK. e Press a or b to choose Light, Med or Dark. Press OK. f Press Stop/Exit. Note When you use transparencies or glossy paper, remove each sheet at once to prevent smudging or paper jams. 3 LCD Contrast a b Press Menu. c e 3 3 3 Press Menu. Press a or b to choose General Setup. Press OK. c Press a or b to choose Paper Size. Press OK. d Press a or b to choose Letter, Legal, A4, A5 or 10×15cm. Press OK. e Press Stop/Exit. 9 Chapter 3 Setting the backlight brightness a b c d a b Press a or b to choose General Setup. Press OK. Press a or b to choose LCD Settings. Press OK. Press a or b to choose Backlight. Press OK. Press a or b to choose Light, Med or Dark. Press OK. f Press Stop/Exit. Setting the Dim Timer for the backlight Press Menu. Press a or b to choose General Setup. Press OK. c Press a or b to choose LCD Settings. Press OK. d Press a or b to choose Dim Timer. Press OK. e Press a or b to choose 10 Secs, 20 Secs, 30 Secs or Off. Press OK. f Press Stop/Exit. 10 3 Press Menu. e a b Setting the Off Timer 3 Press Menu. Press a or b to choose General Setup. Press OK. c Press a or b to choose LCD Settings. Press OK. d Press a or b to choose Off Timer. Press OK. e Press a or b to choose 1 Min, 2 Mins, 3 Mins, 5 Mins, 10 Mins, 30 Mins or Off. Press OK. f Press Stop/Exit. 3 Section II Copy Making copies II 12 4 Making copies How to copy Making a single copy a b 4 4 4 Copy options You can change the copy settings from the default display. The LCD shows: Load your document. (See Loading documents on page 6.) COPY Quality Enlarge/Reduce Paper Type Paper Size Brightness Press Mono Start or Colour Start. Making multiple copies 4 4 01 1 Normal 100% Plain Pap A4 0 You can make up to 99 copies. a b c Load your document. Press + or - repeatedly until the number of copies you want appears (up to 99). Press Mono Start or Colour Start. Note To sort the copies, press a or b to choose Stack/Sort. 12 1 No of Copies You can enter the number of copies you want by pressing + or - repeatedly. Press a or b to scroll through the copy options menu. When the option you want is highlighted, press OK. The machine returns to its default settings after 60 seconds. Section III Direct Photo Printing III Printing photos from a memory card 14 Printing photos from a camera with PictBridge 17 5 Printing photos from a memory card PhotoCapture Center™ Operations Using memory cards CompactFlash® 5 5 5 1 Memory Stick® Memory Stick Pro™ SecureDigital™ Getting started 2 3 4 1 CompactFlash ® 2 SecureDigital™, MultiMediaCard™ 3 Memory Stick®, Memory Stick Pro™ 4 xD-Picture Card™ xD-Picture Card™ MultiMediaCard™ miniSD™ can be used with a miniSD™ adapter. Memory Stick Duo™ can be used with a Memory Stick Duo™ adapter. Memory Stick Pro Duo™ can be used with a Memory Stick Pro Duo™ adapter. Adapters are not included with the machine. Contact a third party supplier for adapters. PhotoCapture light is on, the media card is properly inserted. PhotoCapture light is off, the media card is not properly inserted. PhotoCapture light is blinking, the media card is being read or written to. The machine can only read one media card at a time so do not put more than one card in the slot. 14 5 Printing photos from a memory card Print Images View Photo(s) a c 5 5 Press a or b to choose 6 Images/Line Fast or 5 Images/Line Photo. Press OK. Make sure you have put the media card in the correct slot. Press (PhotoCapture). b Press a or b to choose View Photo(s). Press OK. c d Press d or c to choose your photo. d Press + or - repeatedly to enter the number of copies you want. Print All Photos e Repeat step c and step d until you have chosen all the photos. a f After you have chosen all the photos, do one of the following: Press OK and change the print setting. If you do not want to change any settings, press Colour Start to print. Print Index (Thumbnails) 5 Images/Line Photo 5 The PhotoCapture Center™ assigns numbers for images (such as No.1, No.2, No.3, and so on). a 5 Press Colour Start to print. 5 Make sure you have put the media card in the correct slot. Press (PhotoCapture). b Press a or b to choose Print All Photos. Press OK. c Press + or - repeatedly to enter the number of copies you want. d Do one of the following: Change the print setting. If you do not want to change any settings, press Colour Start to print. Make sure you have put the media card in the correct slot. Press b 6 Images/Line Fast (PhotoCapture). Press a or b to choose Print Index. Press OK. 15 Chapter 5 Print Photos a 5 Make sure you have put the media card in the correct slot. Press a (PhotoCapture). b Print the Index. (See Print Index (Thumbnails) on page 15.) c Press a or b to choose Print Photos. Press OK. d Press + repeatedly to enter the image number that you want to print from the Index page (Thumbnails). If you want to choose a two digit number, press c to move the cursor to the next digit. (For example, enter 1, c, 6 to print image No.16.) Press OK. e Repeat step d until you have entered all the image numbers that you want to print. f After you have chosen all the image numbers, press OK again. g Press + or - repeatedly to enter the number of copies you want. Press OK. h Do one of the following: Change the print setting. If you do not want to change any settings, press Colour Start to print. 16 DPOF printing Make sure you have put the media card into the correct slot. Press (PhotoCapture). The machine will ask you if you want to use DPOF setting. b c Press + to choose Yes. Do one of the following: Change the print settings. If you do not want to change any settings, press Colour Start to print. 5 6 Printing photos from a camera with PictBridge Before Using PictBridge PictBridge requirements 6 6 To avoid errors, remember the following points: The machine and the digital camera must be connected using a suitable USB cable. The image file extension must be .JPG (Other image file extensions like .JPEG, .TIF, .GIF and so on will not be recognized). PhotoCapture Center operations are not available when using the PictBridge feature. 17 6 Chapter 6 18 Section IV Appendixes Safety and Legal Troubleshooting and Routine Maintenance Menu and Features Specifications IV 20 28 42 43 A Safety and Legal Choosing a location Put your machine on a flat, stable surface that is free of vibration and shocks, such as a desk. Put the machine near a standard, grounded electrical socket. Choose a location where the temperature remains between 10° and 35° C (50° F and 95° F). CAUTION • Avoid placing your machine in a high-traffic area. • Avoid placing your machine on carpet. • DO NOT put the machine near heaters, air conditioners, refrigerators, medical equipment, chemicals or water. • DO NOT expose the machine to direct sunlight, excessive heat, moisture, or dust. • DO NOT connect your machine to electrical sockets controlled by wall switches or automatic timers. • Disruption of power can wipe out information in the machine's memory. • Do not connect your machine to electrical sockets on the same circuit as large appliances or other equipment that might disrupt the power supply. • Avoid interference sources, such as speakers or the base units of cordless phones. 20 A A Safety and Legal To use the machine safely A Please keep these instructions for later reference and read them before attempting any maintenance. WARNING There are high voltage electrodes inside the machine. Before you clean the inside of the machine, make sure you have unplugged the power cord from the electrical socket. Doing this will prevent an electrical shock. DO NOT handle the plug with wet hands. Doing this might cause an electrical shock. DO NOT pull in the middle of the power cord. Doing this might cause an electrical shock. 21 DO NOT put your hands on the edge of the machine under the document cover or the scanner cover. This may cause injury. DO NOT put your hands on the edge of the paper tray under the output paper tray cover. Doing this may cause injury. DO NOT touch the paper feed roller. Doing this may cause injury. 22 Safety and Legal DO NOT touch the area shaded in the illustration. Doing this may cause injury. When moving the machine you must lift it from the base, by placing a hand at each side of the unit as shown in the illustration. Do not carry the machine by holding the scanner cover. If the machine becomes hot, releases smoke, or generates any strong smells, immediately turn off the power switch and unplug the machine from the electorical socket. Call your Brother dealer or Brother Customer Service. If metal objects, water or other liquids get inside the machine, immediately turn off the power switch and unplug the machine from the electrical socket. Call your Brother dealer or Brother Customer Service. WARNING • This product must be installed near an electrical socket that is easily accessible. In case of an emergency, you must unplug the power cord from the electrical socket to shut off the power completely. • Always make sure the plug is fully inserted. 23 Important safety instructions 1 Read all of these instructions. 2 Save them for later reference. 3 Follow all warnings and instructions marked on the product. 4 Unplug this product from the wall socket before cleaning the inside of the machine. Do not use liquid or aerosol cleaners. Use a damp cloth for cleaning. 5 Do not use this product near water. 6 Do not place this product on an unstable cart, stand, or table. The product may fall, causing serious damage to the product. 7 Slots and openings in the cabinet and the back or bottom are provided for ventilation. To ensure reliable operation of the product and to protect it from overheating, these openings must not be blocked or covered. The openings should never be blocked by placing the product on a bed, sofa, rug, or other similar surface. This product should never be placed near or over a radiator or heater. This product should never be placed in a built-in installation unless adequate ventilation is provided. 8 This product should be operated from the type of power source indicated on the label. If you are not sure of the type of power available, call your dealer or local power company. 9 Use only the power cord supplied with this machine. 10 This product is equipped with a 3-wire grounded plug, a plug having a third (grounded) pin. This plug will only fit into a grounded power outlet. This is a safety feature. If you are unable to insert the plug into the outlet, call your electrician to replace your obsolete outlet. Do not defeat the purpose of the grounded plug. 11 Do not allow anything to rest on the power cord. Do not place this product where people can walk on the cord. 12 Do not place anything in front of the machine that will block printing. Do not place anything in the path of printing. 13 Wait until pages have exited the machine before picking them up. 14 Unplug this product from the power socket and refer all servicing to Brother Authorized Service Personnel under the following conditions: When the power cord is damaged or frayed. If liquid has been spilled into the product. If the product has been exposed to rain or water. If the product does not operate normally when the operating instructions are followed, adjust only those controls that are covered by the operating instructions. Incorrect adjustment of other controls may result in damage and will often require extensive work by a qualified technician to restore the product to normal operation. If the product has been dropped or the casing has been damaged. If the product exhibits a distinct change in performance, indicating a need for service. 24 A Safety and Legal 15 To protect your product against power surges, we recommend the use of a power protection device (Surge Protector). 16 To reduce the risk of fire, electric shock and injury to people, note the following: Do not use this product near appliances that use water, a swimming pool, or in a wet basement. Do not use the machine during an electrical storm (there is the remote possibility of an electrical shock) or to report a gas leak in the vicinity of the leak. IMPORTANT - For your safety A To ensure safe operation, the supplied three-pin plug must be inserted only into a standard threepin electrical socket that is effectively grounded through the normal household wiring. The fact that the equipment operates satisfactorily does not imply that the power is grounded and that the installation is completely safe. For your safety, if in any doubt about the effective grounding of the power, consult a qualified electrician. LAN connection (DCP-540CN only) A CAUTION DO NOT connect this product to a LAN connection that is subject to over-voltages. EU Directive 2002/96/EC and EN50419 A European Union Only This equipment is marked with the above recycling symbol. It means that at the end of the life of the equipment you must dispose of it separately at an appropriate collection point and not place it in the normal domestic unsorted waste stream. This will benefit the environment for all. (European Union only) 25 Legal limitations for copying It is an offence to make reproductions of certain items or documents with the intent to commit fraud. This memorandum is intended to be a guide rather than a complete list. We suggest you check with relevant legal authorities if in doubt about a particular item or document. The following are examples of documents which may not be copied: Money Bonds or other certificates of indebtedness Certificates of Deposit Armed Forces Service or Draft papers. Passports Postage Stamps (cancelled or uncancelled) Immigration Papers Welfare documents Cheques or Drafts drawn by Governmental Agencies Identification Documents, badges or insignias Licences and Certificates of Title to motor vehicles Copyrighted works cannot be copied. Sections of a copyrighted work can be copied for ‘fair dealing’. Multiple copies would indicate improper use. Works of art should be considered the equivalent of copyrighted works. Licenses and Certificates of Title to motor vehicles may not be copied under certain state/provincial laws. 26 A Safety and Legal Trademarks A The Brother logo is a registered trademark of Brother Industries, Ltd. Brother is a registered trademark of Brother Industries, Ltd. Multi-Function Link is a registered trademark of Brother International Corporation. © 2006 Brother Industries, Ltd. All rights reserved. Windows and Microsoft are registered trademarks of Microsoft in the U.S. and other countries. Macintosh and TrueType are registered trademarks of Apple Computer, Inc. PaperPort is a registered trademarks of ScanSoft, Inc. Presto! PageManager is a registered trademark of NewSoft Technology Corporation. Microdrive is a trademark of International Business Machine Corporation. CompactFlash is a registered trademark of SanDisk Corporation. Memory Stick is a registered trademark of Sony Corporation. SecureDigital is a trademark of Matsushita Electric Industrial Co. Ltd., SanDisk Corporation and Toshiba Corporation. SanDisk is a licensee of the SD and miniSD trademarks. MultiMediaCard is a trademark of Infineon Technologies and licensed to the MultiMediaCard Association. xD-Picture Card is a trademark of Fujifilm Co. Ltd., Toshiba Corporation and Olympus Optical Co. Ltd. PictBridge is a trademark. Memory Stick Pro, Memory Stick Pro Duo, Memory Stick Duo and MagicGate are trademarks of Sony Corporation. Each company whose software title is mentioned in this manual has a Software License Agreement specific to its proprietary programs. All other brand and product names mentioned in this User's Guide, the Software User's Guide and the Network User’s Guide are registered trademarks of their respective companies. 27 B Troubleshooting and Routine Maintenance Troubleshooting If you are having difficulty with your machine Printing Difficulty Suggestions No printout Check the interface cable on both the machine and your computer. (See the Quick Setup Guide.) Make sure the machine is plugged in and not in Power Save mode. One or more ink cartridges are empty. (See Replacing the ink cartridges on page 36.) Check to see if the LCD is showing an error message. (See Error messages on page 32.) Check that the correct printer driver has been installed and chosen. Make sure that the machine is online. Click Start and then Printers and Faxes. Right-click and choose Brother DCP-XXXX (where XXXX is your model name), and make sure that Use Printer Offline is unchecked. Poor print quality Check the print quality. (See Checking the print quality on page 38.) Make sure that the Media Type setting in the printer driver or the Paper Type setting in the machine’s menu matches the type of paper you are using. (See Printing for Windows ® in the Software User's Guide on the CD-ROM.) Make sure that your ink cartridges are fresh. The following may cause ink to clog: The expiration date written on the cartridge package has passed. (Cartridges stay usable for up to two years if kept in their original packaging.) The ink cartridge was in your machine over six months. The ink cartridge may not have been stored properly before use. Try using the recommended types of paper. The recommended environment for your machine is between 20° C to 33° C (68° F to 91° F). White horizontal lines appear in text or graphics. Clean the print head. (See Cleaning the print head on page 38.) Try using the recommended types of paper. If you want to print on Photo L or 10 × 15 cm paper, make sure you use the photo paper tray. The machine prints blank pages. Clean the print head. (See Cleaning the print head on page 38.) Characters and lines are stacked. Check the printing alignment. (See Checking the printing alignment on page 39.) Printed text or images are skewed. Make sure the paper is loaded properly in the paper tray and the paper side guide is adjusted correctly. (See Loading paper and other media on page 7.) Make sure the Jam Clear Cover is set properly. Smudged stain at the top center of the printed page. Make sure the paper is not too thick or curled. Printing appears dirty or ink seems to run. Make sure you are using the recommended types of paper. Don't handle the paper until the ink is dry. 28 B B B Troubleshooting and Routine Maintenance Printing (Continued) Difficulty Suggestions Stains appear on the reverse side or at the bottom of the page. Make sure the printer platen is not dirty with ink. The machine prints dense lines on the page. Check Reverse Order in the Basic tab of the printer driver. The printouts are wrinkled. In the printer driver Basic tab, click Settings, and uncheck Bi-Directional Printing. Cannot perform ‘2 in 1 or 4 in 1’ printing. Check that the paper size setting in the application and in the printer driver are the same. Print speed is too slow. Try changing the printer driver setting. The highest resolution needs longer data processing, sending and printing time. Try the other quality settings in the printer driver Basic tab. Also, click the Settings, and make sure you uncheck Colour Enhancement. Make sure you are using the paper support flap. (See Loading paper and other media on page 7.) Set the borderless feature off. Borderless printing is slower than normal printing. (See Printing for Windows® in the Software User's Guide on the CD-ROM.) Colour Enhancement is not working properly. If the image data is not full colour in your application (such as 256 colour), Colour Enhancement will not work. Use at least 24 bit colour data with the Colour Enhancement feature. Machine feeds multiple pages. Make sure the paper is loaded properly in the paper tray. (See Loading paper and other media on page 7.) Check that more than two types of paper are not loaded in the paper tray at any one time. Printed pages are not stacked neatly. Make sure you are using the paper support flap. (See Loading paper and other media on page 7.) Printed pages re-feed and cause a paper jam. Make sure you pull out the paper support until it clicks. Machine does not print from Paint Brush. Try setting the Display setting to ‘256 colours’. Machine does not print from Adobe Illustrator. Try to reduce the print resolution. (See Printing for Windows® in the Software User's Guide on the CD-ROM.) Machine cannot print full pages of a document. Reduce the print resolution. (See Printing for Windows® in the Software User’s Guide on the CD-ROM.) Out of memory message occurs. Reduce the complexity of your document and try again. Reduce the graphic quality or the number of font sizes within your application software. Copying Difficulties Difficulty Suggestions Vertical streaks appear on copies. If you see vertical streaks on copies, clean the scanner. (See Cleaning the scanner on page 38.) Poor copy results when using the ADF. (DCP-540CN only) Try using the scanner glass. 29 Scanning Difficulties Difficulty Suggestions TWAIN/WIA errors appear while scanning. Make sure the Brother TWAIN/WIA driver is chosen as the primary source. In Poor scanning results when using the ADF. Try using the scanner glass. PaperPort® SE with OCR, click File, Scan and choose the Brother TWAIN/WIA driver. Software Difficulties Difficulty Suggestions Cannot install software or print. Run the Repair MFL-Pro Suite program on the CD-ROM. This program will repair and reinstall the software. ‘Device Busy’ Make sure the machine is not showing an error message on the LCD. PhotoCapture Center™ Difficulties Difficulty Suggestions Removable Disk does not work properly. 1 Have you installed the Windows® 2000 update? If not, do the following: 1) Unplug the USB cable. 2) Install the Windows® 2000 update, and see the Quick Setup Guide. After the installation the PC will be automatically restarted. 3) Wait about 1 minute after you restart the PC, and then connect the USB cable. Cannot access Removable Disk from Desktop icon. 2 Take out the memory card and put it back in again. 3 If you have tried ‘Eject’ from within Windows®, take out the media card before you continue. 4 If an error message appears when you try to eject the media card, it means the card is being accessed. Wait a while and then try again. 5 If all of the above do not work, turn off your PC and machine, and then turn them on again. (You will have to unplug the power cord of the machine to turn it off.) Make sure you have put the media card into the media slot. Network Difficulties Difficulty Suggestions Cannot print over the Network. Make sure that your machine is powered on and is online and in Ready mode. Print a Network Configuration list (see Printing Reports on page 5.) and check the current Network settings printed in this list. Reconnect the LAN cable to the hub to verify that the cabling and network connections are good. If possible, try connecting the machine to a different port on your hub using a different cable. If the connections are good, the machine shows LAN Active for 2 seconds. (If you are having Network problems, see the Network User’s Guide for more information.) 30 Troubleshooting and Routine Maintenance Network Difficulties (Continued) Difficulty Suggestions The network scanning feature does not work. (For Windows® users only) The firewall setting on your PC may be rejecting the necessary network connection. Follow the instructions below to configure the Firewall. If you are using a personal Firewall software, see the User’s Guide for your software or contact the software manufacturer. <Windows® XP SP2 users> 1 Click the Start button, Control Panel and then Windows Firewall. Make sure that Windows Firewall on the General tab is set to On. 2 Click Advanced tab and Settings button in Network Connection Settings. 3 Click Add button, and in the Description of service field,enter any name. In the Name or IP Address field enter "localhost". In the internal and external port numbers fields enter 54925 for network scanning. Choose UDP and click OK. Repeat this step adding Port 137 for Windows®. 4 Your computer cannot find your machine. Make sure the new settings are added and the box is checked, and then click OK. <Windows® users> The firewall setting on you PC may be rejecting the necessary network connection. For detail, see the instruction above. <Macintosh® users> Re-select your machine in the DeviceSelector application located in Macintosh HD/Library/Printers/Brother/Utilities or from the model of ControlCenter2. 31 Error messages B Error Message Cause Action Cover is Open The scanner cover is not closed completely. Lift the scanner cover and then close it again. The ink cartridge cover is not completely closed. Firmly close the ink cartridge cover until it clicks. Print data is left in the machine's memory. Re-start printing from your computer. Print data is left in the machine's memory. The USB cable was unplugged while the computer was sending the data to the machine. Press Stop/Exit. The machine will cancel the job and clear it from the memory. Try to print again. The document was not inserted or fed properly, or the document scanned from the ADF was too long. See Using the ADF (DCP-540CN only) on page 6. Data Remaining Document Jam See Document jam (DCP-540CN only) on page 34. High Temperature The print head is too warm. Allow the machine to cool down. Ink Empty One or more of the ink cartridges is empty. The machine will stop all print operations. Replace the ink cartridges. (See Replacing the ink cartridges on page 36.) Low Temperature The print head is too cold. Allow the machine to warm up. Media Error The media card is either corrupted, improperly formatted, or there is a problem with the media card. Put the card firmly into the slot again to make sure it is in the correct position. If the error remains, check the media drive by putting in another media card that you know is working. Near Empty One or more of the ink cartridges are running out of ink. Order a new ink cartridge. No Cartridge An ink cartridge is not installed properly. Take out the ink cartridge and put it in again seating it properly. (See Replacing the ink cartridges on page 36.) No File The media card in the media drive does not contain a .JPG file. Put the correct media card into the slot again. No Paper Fed The machine is out of paper or paper is not properly loaded in the paper tray. Do one of the following: Refill the paper in the paper tray, and then press Mono Start or Colour Start. Remove the paper and load it again and then press Mono Start or Colour Start. The paper is jammed in the machine. 32 See Printer jam or paper jam on page 35. Troubleshooting and Routine Maintenance Error Message Cause Action Out of Memory The machine's memory is full. Copy operation in progress Press Stop/Exit and wait until the other operations in progress finish and then try again. Printing operation in progress Reduce print resolution. (For details, see Printing for Windows® in the Software User's Guide on the CD-ROM.) Paper Jam Paper is jammed in the machine. (See Printer jam or paper jam on page 35.) Unable to Change XX The machine has a mechanical problem. Disconnect the machine from the power for several minutes, then reconnect it. Wrong Paper Size Paper is not the correct size. Load the correct size of paper (Letter, Legal or A4), and then press Mono Start or Colour Start. Wrong USB device Unplug the device from the PictBridge port, A non-PictBridge compatible or then press On/Off to turn the machine off broken device has been connected to the PictBridge port. and then on again. Unable to Clean XX Unable to Init. XX Unable to Print XX Unable to Scan XX 33 Changing LCD language B You can change the LCD language. a b c d e To avoid future document jams close the ADF cover properly by pushing it gently in the middle. Press a or b to select Initial Setup. Press OK. Press a or b to select Local Language. Press OK. Press a or b to select your language. Press OK. e Press Stop/Exit. Document jam (DCP-540CN only) Press Stop/Exit. Note Press Menu d Close the ADF cover. Document is jammed inside the ADF unit a Take out any paper from the ADF that is not jammed. b c Lift the document cover. d e Close the document cover. B Documents can jam if they are not inserted or fed properly, or if they are too long. Follow the steps below to clear a document jam. Document is jammed in the top of the ADF unit a b c 34 Take out any paper from the ADF that is not jammed. Open the ADF cover. B Press Stop/Exit. B Troubleshooting and Routine Maintenance Printer jam or paper jam B d a b c e f g Push the paper tray firmly back into the machine. 35 Routine maintenance Replacing the ink cartridges a b B B Open the ink cartridge cover. e M brother XXXX f c d Open the new ink cartridge bag for the colour shown on the LCD, and then take out the ink cartridge. g For each new cartridge you installed, press + (Yes) to automatically reset the ink dot counter for that colour. WARNING If ink gets in your eyes, wash them out with water at once and call a doctor if you are concerned. 36 Troubleshooting and Routine Maintenance CAUTION Brother multifunction machines are designed to work with ink of a particular specification and will work to a level of optimum performance when used with genuine Brother Branded ink cartridges. Brother cannot guarantee this optimum performance if ink or ink cartridges of other specifications are used. Brother does not therefore recommend the use of cartridges other than genuine Brother Branded cartridges or the refilling of empty cartridges with this machine or the refilling of empty cartridges with ink from other sources. If damage is caused to the print head or other parts of this machine as a result of using incompatible products with this machine, any repairs required as a result may not be covered by the warranty. Clean the outside of the machine as follows: a c Lift the output paper tray cover and remove anything that is stuck inside the paper tray. d Wipe the inside and outside of the paper tray with a soft cloth to remove dust. e Close the output paper tray cover and put the paper tray firmly back in the machine. B Pull the paper tray (1) completely out of the machine. 1 b Wipe the outside of the machine with a soft cloth to remove dust. 37 Cleaning the scanner B a Checking the print quality a b b a b c Press a or b to choose Print Quality. Press OK. d e Press Colour Start. f Do one of the following: If all lines are clear and visible, press + to choose Yes, and go to step j. If you can see missing short lines as shown below, press - to choose No. Press a or b to choose Cleaning. Press OK. Press a or b to choose Black, Color or All. Press OK. The machine cleans the print head. When cleaning is finished, the machine will go back to standby mode automatically. If you clean the print head at least five times and the print has not improved, call your Brother dealer. Check the quality of the four colour blocks on the sheet. Poor g The LCD asks you if the print quality is OK for black and three colours. Press + (Yes) or - (No). h The LCD asks you if you want to start cleaning. Press + (Yes). The machine starts cleaning the print head. i After cleaning is finished, press Colour Start. The machine starts printing the Print Quality Check Sheet again and then returns to step e. Press Ink Management. Note 38 B Press a or b to choose Test Print. Press OK. c OK Cleaning the print head Press Ink Management. B Troubleshooting and Routine Maintenance j Press Stop/Exit. If you repeat this procedure at least five times and the print quality is still poor, replace the ink cartridge for the clogged colour. After replacing the ink cartridge, check the print quality. If the problem still exists, repeat the cleaning and test print procedures at least five times for the new ink cartridge. If ink is still missing, call your Brother dealer. f For 600 dpi, press d or c to select the number of the test print that most closely matches the number 0 sample (1-8). Press OK. g For 1200 dpi, press d or c to select the number of the test print that most closely matches the number 0 sample (1-8). Press OK. h Press Stop/Exit. Note Checking the ink volume B You can check the ink that is left in the cartridge. i Checking the printing alignment a b Press Ink Management. Press a or b to choose Test Print. Press OK. c Press a or b to choose Alignment. Press OK. d Press Mono Start or Colour Start. The machine starts printing the Alignment Check Sheet. e Check the 600 dpi and 1200 dpi test prints to see if number 5 most closely matches number 0. If the number 5 sample of both the 600 dpi and 1200 dpi are the best matches, press + (Yes) to finish Alignment Check, and go to step h. If another test print number is a better match for either 600 dpi or 1200 dpi, press - (No) to choose it. B a b Press Ink Management. c Press Stop/Exit. Press a or b to select Ink Volume. Press OK. The LCD shows the ink volume. Note You can check the ink volume from your computer. (See Printing for Windows® in the Software User's Guide on the CDROM.) 39 Packing and shipping the machine CAUTION It is important to allow the machine to ‘park’ the print head after a print job. Listen carefully to the machine before unplugging it to make sure that all mechanical noise has stopped. Not allowing the machine to finish this parking process may lead to print problems and possible damage to the print head. a b CAUTION B If you are not able to find the yellow protective part, DO NOT remove the ink cartridges before shipping. It is essential that the machine be shipped with either the yellow protective parts or the ink cartridges in position. Shipping without them will cause damage to your machine and may void your warranty. d Unplug the machine from the electrical socket. e Using both hands, use the plastic tabs on both sides of the machine to lift the scanner cover until it locks securely into the open position then unplug the interface cable from the machine, if it is connected. Open the ink cartridge cover. Pull the lock release levers down and take out all ink cartridges. (See Replacing the ink cartridges on page 36.) f c g 40 Troubleshooting and Routine Maintenance h i Close the carton and tape it shut. 41 C Menu and Features Menu keys C Access the main menu. Access its menu of temporary settings. a b Scroll through the current menu level. d Go back to the previous menu level. c Go to the next menu level. Go to the next menu level. Accept an option. Select the number to enter. Stop the current operation. 42 C D Specifications General D D Memory Capacity 32 MB ADF (automatic document feeder) Up to 10 pages Temperature: 20° C - 30° C (68° F - 86° F) Humidity: 50% - 70% Paper: [80 g/m2 (20 lb)] A4 size Paper Tray 100 Sheets [80 g/m2 (20 lb)] Printer Type Ink Jet Print Method Black: Piezo with 94 × 1 nozzles Colour: Piezo with 94 × 3 nozzles LCD (liquid crystal display) 50.8 mm (2.0 in) Colour LCD (DCP-330C/DCP-540CN) Power Source AC 220 to 240V 50/60Hz Power Consumption Power Save Mode: Average 5.5 W Standby: Average 7 W Operating: Average 21 W 43 Dimensions (DCP-540CN) (DCP-330C) 150 mm (5.9 in.) 180 mm (7.1 in.) 398 mm (15.7 in.) 398 mm (15.7 in.) 360 mm (14.2in.) 370 mm (14.6 in.) 351 mm (13.8 in.) 351 mm (13.8 in.) 443 mm (17.4 in.) 443 mm (17.4 in.) Weight 7.3 kg (16.06 lb) (DCP-330C) 8.0 kg (17.6 lb) (DCP-540CN) Noise Operating: 50 dB or less 1 Temperature Operating: 10 to 35° C (50° F to 95° F) Best Print Quality: 20 to 33° C (68° F to 91° F) Operating: 20 to 80% (without condensation) Best Print Quality: 20 to 80% (without condensation) Humidity 1 44 This depends on printing conditions. Specifications Consumable items D Ink The machine uses individual Black, Yellow, Cyan and Magenta ink cartridges that are separate from the print head assembly. Service Life of Ink Cartridge Replacement Ink Cartridges Black - Approximately 500 pages at 5% coverageYellow, Cyan and Magenta - Approximately 400 pages at 5% coverage The first time you install a set of ink cartridges the machine will use an amount of ink to fill the ink delivery tubes for high quality print outs. This process will only happen once. With all following ink cartridges you can print the specified number of pages. The above figures assume continuous printing at a resolution of 600 x 600 dpi in normal mode after installing new ink cartridge. The number of pages a cartridge will print may change depending on how often you use the machine and how many pages you print with each use. The machine will automatically and periodically clean the print head assembly, a process that uses a small amount of ink. When the machine identifies a cartridge as empty there may be a small amount of ink left in it. This is necessary to prevent air from drying out and damaging the print head assembly. Replacement Consumables <Black> LC1000BK, <Yellow> LC1000Y, <Cyan> LC1000C, <Magenta> LC1000M 45 Network (LAN) (DCP-540CN only) LAN You can connect your machine to a network for Network Printing and Network Scanning (Windows ® only). Also included is Brother BRAdmin Professional Network Management software for Windows® and BRAdmin Light for Mac OS® X 10.2.4 or greater. Support for Windows® 98/98SE/Me/2000/XP Mac OS® X 10.2.4 or greater Ethernet 10/100 BASE-TX Auto Negotiation (Wired LAN) Protocols TCP/IP ARP, RARP, BOOTP, DHCP, APIPA (Auto IP), NetBIOS Name Resolution, DNS Resolver, LPR/LPD, Custom Raw Port/Port9100, FTP Server, mDNS, TELENET, SNMP 46 D E Index A J ADF (automatic document feeder) .............6 ADF cover ................................................34 Jams document ............................................. 34 paper .................................................... 34 C L Cleaning print head ..............................................38 scanner .................................................38 Consumable items ...................................45 Control panel overview .............................. 3 ControlCenter See Software User's Guide on the CD-ROM. .................................................. Copy multiple .................................................12 single ....................................................12 using ADF .............................................12 LCD (liquid crystal display) Brightness ............................................ 10 Contrast .................................................. 9 Dim Timer ............................................. 10 Help List ................................................. 5 Language ............................................. 34 Off Timer .............................................. 10 E Error messages on LCD ..........................32 Ink Empty ..............................................32 Near Empty ...........................................32 No Paper Fed .......................................32 Out of Memory ......................................33 Unable to Change .................................33 Unable to Clean ....................................33 Unable to Init. ........................................33 Unable to Print ......................................33 Unable to Scan .....................................33 M Maintenance, routine ............................... 36 Mode, entering PhotoCapture ......................................... 4 Scan ....................................................... 4 N Network Printing See Network User's Guide on the CD-ROM. .............................................. Scanning See Software User's Guide on the CD-ROM. .............................................. H HELP LCD messages using Menu keys ................................42 I Ink cartridges checking ink volume .............................39 ink dot counter ......................................36 replacing ...............................................36 47 P S Paper size ..........................................................9 size of document .....................................6 type .........................................................9 PaperPort® See Software User's Guide and PaperPort® User’s Guide on the CD-ROM. ................. PhotoCapture Center™ CompactFlash® .....................................14 DPOF printing .......................................16 from PC See Software User's Guide on the CD-ROM. ............................................... Memory Stick Pro™ ..............................14 Memory Stick® ......................................14 MultiMediaCard™ .................................14 Preview photos .....................................15 Printing all photos ............................................15 index ..................................................15 photos ................................................16 SecureDigital™ .....................................14 xD-Picture Card™ .................................14 Presto!® PageManager® See Help in Presto!® PageManager® to access the User’s Guide. .......................... Print difficulties ..............................................28 improving quality ...................................38 paper jams ............................................35 reports .....................................................5 Programming your machine .....................42 Safety Instructions ................................... 24 Scanning See Software User's Guide on the CD-ROM. .................................................. Shipping the machine .............................. 40 R Reports Help List ..................................................5 how to print .............................................5 User Settings ..........................................5 48 T Troubleshooting ....................................... 28 checking ink volume ............................. 39 document jam ....................................... 34 error messages on LCD ....................... 32 if you are having difficulty copying .............................................. 29 Network ............................................. 30 PhotoCapture Center™ ..................... 30 printing .............................................. 28 scanning ............................................ 30 software ............................................. 30 paper jam ............................................. 35 print quality ........................................... 38 W Windows® See Software User's Guide on the CD-ROM. .................................................. Visit us on the World Wide Web http://www.brother.com EEU_ENG