1
Siemens ID Mouse V 3.1
User Guide
June 2000 Edition
Copyright © Siemens AG 2000
Publisher:
ICM CD IS FT
Hofmannstr. 31
81379 Munich
Germany
Siemens ID Mouse V3.1
Installation and Startup
User Guide
June 2000 Edition
Table of Contents
1
Installation and Startup .....................................................................................................6
1.1 System Requirements .....................................................................................................6
1.2 Installation Instructions .....................................................................................................6
1.3 Startup ..............................................................................................................................6
1.4 Uninstalling the Software..................................................................................................7
2
Working with the Application............................................................................................8
2.1 User Manager ...................................................................................................................8
2.1.1 Selecting Users.........................................................................................................8
2.1.1.1 User Data...........................................................................................................8
2.1.1.2 Options ............................................................................................................10
2.1.2 Adding, Editing and Deleting Fingerprint Data ........................................................12
2.1.2.1 User Data.........................................................................................................12
2.1.2.2 Finger Data ......................................................................................................14
2.2 Logging on ......................................................................................................................16
2.2.1 Logging on to the System .......................................................................................16
2.2.1.1 Logging on to the System with a Fingerprint ...................................................16
2.2.1.2 Logging on to the System with a User ID and Password................................17
2.2.2 Logging on to the User Manager .............................................................................18
2.2.2.1 Logging on with a Fingerprint...........................................................................18
2.2.2.2 Logging on with a User ID and Password .......................................................18
2.2.3 Logging on to the Network.......................................................................................18
2.3 Screen Saver..................................................................................................................18
3
Administration...................................................................................................................19
3.1 Providing Additional Security for the Computer via BIOS Settings ................................19
3.2 Securing the Computer via the User Manager...............................................................19
3.3 Changing the Hardware Configuration ...........................................................................19
4
Technical Data and Constraints.....................................................................................20
5
Siemens ID Mouse FAQs and troubleshooting............................................................21
5.1 Where can I find information in the Web?......................................................................21
5.2 What is ID Mouse? .........................................................................................................21
5.3 Where do I get help if I have problems with the software or hardware?........................21
5.4 Under which operating systems does the ID Mouse run? .............................................22
5.5 How does FingerTIP TM work? .......................................................................................22
5.6 How can you bypass logon under Win 98 if, for example, the ID Mouse is defective? .22
5.7 The sensor does not work..............................................................................................23
5.8 What do I do if the mouse cursor freezes after a successful and correct installation of
the ID Mouse?.......................................................................................................................23
5.9 The computer does not “wake up” with the Siemens ID Mouse....................................23
Page 4
User Guide
June 2000 Edition
Siemens ID Mouse V3.1
Installation and Startup
5.10 Where can I find out which version of ID Mouse I am using? ....................................23
5.11 What can I use the ID Mouse scroll wheel for?..........................................................24
5.12 Frequently Asked Questions? ....................................................................................24
6
Safety regulations:...........................................................................................................27
7
Care:..................................................................................................................................28
Page 5
Siemens ID Mouse V3.1
Installation and Startup
User Guide
June 2000 Edition
1 Installation and Startup
1.1 System Requirements
•
It is assumed that the PC has Windows98 installed on it and is USB-capable.
The USB capability of the system can be tested by double-clicking the program
Tools\USBREADY.EXE supplied on the CD-ROM.
•
The Siemens ID Mouse should not be connected before the installation.
•
The Windows98 operating system CD is required for the installation.
•
The screen resolution must be set to at least 800x600 pixels with more than 256 colors.
1.2 Installation Instructions
1. The Setup program is started automatically on placing the supplied CD-ROM in the drive.
If the Setup is not started automatically, see step 2.
2. Select “Run” from the “Start” menu and enter the following command:
X:\Setup
where X is the drive letter for your CD-ROM drive.
3. The Setup program guides you through the installation process.
4. Note:
F After the installation, you will need to restart the computer, since no logon via the
Siemens ID Mouse has occurred as yet, and no users exist in the User Manager.
5. After the Siemens ID Mouse software has been installed from the CD-ROM, the Siemens
ID Mouse can be connected.
If you connected the Siemens ID Mouse before the installation, you can load the required
drivers from the Siemens ID Mouse installation CD.
1.3 Startup
After installing the Siemens ID Mouse, the following programs can be called via the
“ID Mouse” item on the Start menu:
User Manager
management of users
Readme
brief information
Screen Saver
screen saver
Uninstall ID Mouse
program to uninstall the Siemens ID Mouse
User Guide
opens the User Guide
In order to enable a fingerprint logon after starting the computer, the appropriate users must
be added to the archive with the aid of the “User Manager” program.
The Siemens ID Mouse is activated on restarting the computer and requests the user to
provide a fingerprint identification.
Page 6
User Guide
June 2000 Edition
Siemens ID Mouse V3.1
Installation and Startup
Following the installation of the Siemens ID Mouse, the screen saver will be installed, but not
yet activated. You can set the screen saver via the Display icon in the Control Panel. Please
note that password protection must be disabled.
The user instructions are supplied as a PDF file on the CD. In order to read this file, you will
need the Acrobat Reader program, which can also be installed from the Siemens ID Mouse
CD. The installation program is available in the Acrobat folder in the desired language.
The Siemens ID Mouse can only be used with the Windows98 operating system. If you want
to use Windows NT4 or Windows2000, please refer to the corresponding manual.
The fingerprints captured with the User Manager are only valid for the product Siemens ID
Mouse.
1.4 Uninstalling the Software
The Siemens ID Mouse can be fully uninstalled by selecting the corresponding item via the
Start menu.
Page 7
Siemens ID Mouse V3.1
Working with the Application
User Guide
June 2000 Edition
2 Working with the Application
2.1 User Manager
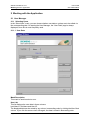
2.1.1 Selecting Users
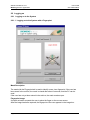
In the “Select User” mask, you can choose whether user data or options are to be edited via
the corresponding tabs. On starting the User Manager, the “User Data” page is always
displayed, since this is most frequently used.
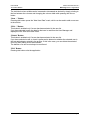
2.1.1.1 User Data
Mask Description
This mask is used to select a user.
User List
This list displays the user data in three columns:
Last Name, First Name and User ID.
The displayed data can be sorted by any column in ascending order by clicking the title of that
column. If you click the same column title again, the data is sorted in descending order.
Page 8
User Guide
June 2000 Edition
Siemens ID Mouse V3.1
Working with the Application
The individual column widths can be increased or decreased as desired by simply pointing to
the line between the columns and changing the column width while pressing the mouse
button.
“New ...” Button
Pressing this button opens the “New User Data” mask, which can be used to add a new user
to the archive.
“Edit ...” Button
This button is enabled only if a user has been selected in the user list.
If you have selected a user, the data for that user is read from the User Manager and
displayed in the “Edit User Data” mask.
“Delete” Button
This button is enabled only if a user has been selected in the user list.
If you have selected a user, a check is performed to determine whether the selected user is
the last administrator entered in the archive. If this is the case, you can delete the selected
user only after adding a new administrator.
The deletion of a user must always be confirmed.
“Exit” Button
Pressing this button exits the application.
Page 9
Siemens ID Mouse V3.1
Working with the Application
User Guide
June 2000 Edition
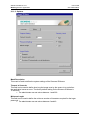
2.1.1.2 Options
Mask Description
This mask is used to define the system settings of the Siemens ID Mouse.
Timeout in Seconds
This field can be used to define how long the image scan by the sensor is to run before
the application issues an error. The factory default setting for the Siemens ID Mouse is
10 seconds.
F The administrator can set values between 1 and 200.
Minimum Length
This field can be used to define the minimum number of characters required for the logon
password.
F The administrator can set values between 0 and 40.
Page 10
User Guide
June 2000 Edition
Siemens ID Mouse V3.1
Working with the Application
Security Level
Three levels of security can be set to define the security level with which the identification is to
be performed:
High, Medium, Low.
These settings have various different consequences for authorized users, with regard to ease
of operation, and for the security of the system.
"High" increases system security since more fingerprint characteristics are checked.
However, this may also cause an increased number of rejections of authorized users.
"Medium" is the factory default.
If "Low" is set, fewer fingerprint characteristics are checked. This can cause unauthorized
access or user mix-ups to occur more frequently than with security level "High".
Fingerprint or Fingerprint and User ID
With the “Fingerprint” setting, users can log on to the PC and terminate the screen saver only
with a fingerprint identification and not via a user ID and password.
The default factory setting for the Siemens ID Mouse is “Fingerprint and User ID”.
Shut down PC automatically on invalid identification
Selecting this entry causes the PC to be automatically shut down if a “handling” error occurs
(e.g. due to missing files) when logging on to the PC or terminating the screen saver. If only
the fingerprint identification fails, this mechanism has no effect.
“Apply” Button
This button is enabled only if a change has been made in one of the fields. When the button is
pressed, the entered data is verified and saved in the User Manager.
“Exit” Button
Pressing this button exits the application.
Page 11
Siemens ID Mouse V3.1
Working with the Application
User Guide
June 2000 Edition
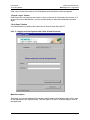
2.1.2 Adding, Editing and Deleting Fingerprint Data
This mask is used to add, delete or improve individual fingerprints and to manage user data.
The header line indicates whether the data of an existing user is being edited or whether the
addition of a new user is involved.
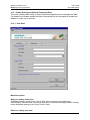
2.1.2.1 User Data
Mask Description
Status on adding a new user:
All fields are empty, except for the “Group” field, which is preset to the default entry
“Administrator” if there are still no users in the archive. If the archive already contains existing
users, the default setting for the “Group” field is “User”.
Status on editing user data:
Page 12
User Guide
June 2000 Edition
Siemens ID Mouse V3.1
Working with the Application
All fields are filled with the data that was read from the User Manager. The “User ID” field
cannot be edited.
First Name / Last Name
These fields are used to specify the first name and last name of the user, respectively.
F A maximum of 40 characters are permitted.
F Both fields are mandatory.
Group
In this field you specify whether the user is an administrator or a normal user of the PC.
F Administrators are authorized to edit all system settings and the data of all stored
users and may also delete existing users or add new users to the archive.
F Normal users are only granted the right to edit their own data.
F Only the entries “User” and “Administrator” are allowed in this field.
F The field is mandatory.
User ID
This field is used to specify the user ID with which the user logs on to Windows98.
F A maximum of 40 characters are allowed.
F The field is mandatory.
F The user ID must be unique in the User Manager and cannot be edited after being
entered in the system.
Password
This field is used to specify the password to be passed to Windows98 during the logon.
F A maximum of 40 characters are allowed.
F The entry is checked to determine whether the minimum number of characters set
in the User Manager have been entered.
Only “*” characters are displayed in this field.
Note: The entered password must match the password in the Windows98 settings (Control
Panel) and can subsequently only be changed there.
Confirm Password
This field is used to repeat the password for confirmation purposes.
Only “*” characters are displayed in the field.
“Apply” Button
This button is enabled only if a change has been made in one of the fields. On pressing the
button, the entered data is verified and stored.
“Close” or “Exit” Button
If an administrator has logged on to the application, the “Close” button appears, and pressing
this button returns control to the “Select User” mask.
Otherwise, the “Exit” button appears which, if pressed, exits the application.
Page 13
Siemens ID Mouse V3.1
Working with the Application
User Guide
June 2000 Edition
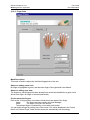
2.1.2.2 Finger Data
Mask Description
This mask is used to capture the individual fingerprints of the user.
Status on adding a new user:
No finger is highlighted in green, and the index finger of the right hand is the default.
Status on editing user data:
The fingers for which fingerprints have already been stored are identified by a green circle
above each finger. No finger is selected (red border).
Circles above the fingers
Each of the 10 fingers has a circle above it that shows the status of the finger:
Green
The finger has been saved in the User Manager.
White
The finger is not yet in the archive.
The selected finger is indicated by a circle with a red border.
You can select a finger by clicking one of the circles. The values displayed in the “Select
Hand” and “Select Finger” fields (combo boxes) are automatically set accordingly.
Page 14
User Guide
June 2000 Edition
Siemens ID Mouse V3.1
Working with the Application
Select Hand / Select Finger
These combo boxes are used to select the hand and finger, respectively. On changing the
hand or finger, the corresponding circle above the finger is also selected automatically.
“Start Capture” Button
If the selected finger is already stored in the archive, you will be asked if you want to improve
the captured image.
If the finger is not yet in the archive, you are requested three times to place the appropriate
finger on the sensor.
If you do not place the finger on the sensor in time, you are asked whether the capture is to be
repeated.
If the quality of the captured image is not good enough, the capture must be repeated.
After the fingerprint has been captured successfully, the added finger is highlighted in green.
“Delete Fingerprint” Button
The deletion of a finger must always be confirmed.
A confirmation is also requested when deleting the last finger of a user or the user itself.
The last finger of the last administrator cannot be deleted.
After a finger has been deleted, the deleted finger is again marked with a white circle.
Image box
The user is requested to place his or her finger on the sensor or to remove it from the sensor
by means of a simple animation.
After each image has been successfully captured, the corresponding fingerprint image is
displayed here.
If the image capture process is completed successfully, a corresponding message is issued,
and the Image box is then cleared.
If the capture is aborted by pressing the Return key, a corresponding message is issued, and
the Image box is then cleared.
“Close” or “Exit” Button
If an administrator has logged on to the application, the “Close” button appears, and pressing
this button returns control to the “Select User” mask.
Otherwise, the “Exit” button appears which, if pressed, exits the application.
Page 15
Siemens ID Mouse V3.1
Working with the Application
User Guide
June 2000 Edition
2.2 Logging on
2.2.1 Logging on to the System
2.2.1.1 Logging on to the System with a Fingerprint
Mask Description
The mask with the Fingerprint tab is used to identify a user via a fingerprint. If the user has
been saved in the archive, the mask is closed after about 2 seconds, and the PC can be
used.
If the user has not yet been stored in the archive, the mask remains open.
Fingerprint Image
A simple animation requests the user to place the finger on the mouse sensor.
After the image has been captured, the fingerprint of the user appears in the image box.
Page 16
User Guide
June 2000 Edition
Siemens ID Mouse V3.1
Working with the Application
If the user is found in the archive, the First Name and Last Name of that user appear.
“Repeat Logon” Button
If the finger was not placed on the sensor in time or the user is not stored in the archive, or if
an error occurs on identification, you can use this button to start the identification process
again.
“Shut Down” Button
If no identification is possible, this button can be used to shut down the PC.
2.2.1.2 Logging on to the System with a User ID and Password
Mask Description
This mask can only be displayed if the system administrator has enabled a logon with a user
ID and password in the Options mask. The user logs on to the PC by specifying the user ID
and password.
Page 17
Siemens ID Mouse V3.1
Working with the Application
User Guide
June 2000 Edition
User ID
A unique user ID that is stored for each user in the User Manager and required for the logon.
Password
A password that can be stored for each user in the User Manager. The “Password” field may
be left empty if the administrator has permitted the use of blank passwords in the User
Manager.
“Logon” Button
This button can only be selected when the User ID and/or Password fields have been filled.
On pressing this button, the user ID and password are checked in the User Manager, and the
result is displayed.
“Shut Down” Button
If no identification is possible, this button can be used to shut down the PC.
2.2.2 Logging on to the User Manager
On starting the application, an additional check is performed on the identity of the user to
determine his or her rights. Administrators may edit the data of all stored users and the
system settings; normal users may only edit their own data.
If no users have been added to the archive as yet, no identity check occurs, and the
“Select User” mask is automatically displayed. If there are already users stored in the archive,
the user is requested to provide a fingerprint identification.
2.2.2.1 Logging on with a Fingerprint
See the mask description in the section on “Logging on to the PC with a Fingerprint”.
The “Shut Down” button is replaced by the “Exit” button, which closes the application.
2.2.2.2 Logging on with a User ID and Password
See the mask description in the section on “Logging on to the PC with a User ID and
Password”.
The “Shut Down” button is replaced by the “Exit” button, which closes the application.
2.2.3 Logging on to the Network
If the user ID and password for the Windows98 client and the NT server are the same,
logging on with a fingerprint will log you on to the Windows98 client as well as the
NT server without having to specify the password again.
Note: When a new user logs on for the first time, the password for the Windows98 client
must be confirmed. No entry of a password is required for subsequent logons.
2.3 Screen Saver
The screen saver is not automatically activated after the installation.
On starting the screen saver, a video is played. Moving the mouse or pressing a key
terminates the screen saver and returns you to the same scenario as when logging on to
the PC. Only an administrator or the currently logged user may terminate the screen saver.
The settings for the ID Mouse screen saver enable you to select any AVI to be played when
the screen saver is run.
Page 18
User Guide
June 2000 Edition
Siemens ID Mouse V3.1
Administration
3 Administration
3.1 Providing Additional Security for the Computer via BIOS Settings
Apart from the steps performed to secure the computer after the installation, the administrator
should also make use of the security settings available in the BIOS of modern PCs. Almost all
modern PCs include options to prevent the computer from being started with a floppy disk or
to change the startup sequence so that the computer boots first from the hard disk.
For more details on how to enable these features in the BIOS, please refer to the manual of
your PC or motherboard.
These measures will effectively ensure that the identification with the Siemens ID Mouse
cannot be bypassed.
Note that a BIOS password that is only known to the administrator must also be assigned
when using this function; otherwise, experienced users could change the startup sequence in
the BIOS and thus break into the PC with a Startup diskette.
Attention
The administrator should make sure that he or she never forgets the password, since BIOS
passwords can often only be removed by the hardware manufacturer.
3.2 Securing the Computer via the User Manager
The User Manager of the Siemens ID Mouse offers additional options to prevent unauthorized
access to the computer. These include:
- Enabling logons only via fingerprints
The administrator can set the system to allow only a fingerprint identification when starting
up the computer or terminating the screen saver. This disables the tab on
which the user ID and password can be specified.
- Automatic shutdown of the PC when a logon error occurs
If the application returns an error on performing the identification, the computer is
automatically shut down.
- Setting the security level to “High”
The security level for the identification can be set to “High”.
- Minimum password length
If it is not possible to do without the option of logging on with a user ID and password, the
minimum length for passwords should be set to at least 8 characters.
3.3 Changing the Hardware Configuration
If the User Manager has been set to allow only a fingerprint logon to the PC, the following
must be observed:
Before you install any new hardware in your PC, it is advisable to temporarily change the
logon method in the User Manager to allow both the fingerprint option as well as a user ID and
password. After you have successfully installed the hardware, you can then reset the system
to allow only the fingerprint logon.
Page 19
Siemens ID Mouse V3.1
Technical Data and Constraints
User Guide
June 2000 Edition
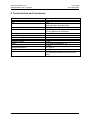
4 Technical Data and Constraints
Mouse
Supported operating systems
Port
I/O level
Fingerprint acquisition
Resolution
Tracking speed
Minimum actuations per switch
Power consumption in mouse mode
Power consumption in scanning mode
Operating voltage
Cable
Operating temperature
Storage temperature
Humidity
Certifications
Page 20
3-button mouse with scroll wheel
Windows98
USB
USB V1.0
Mouse function: optomechanical
Capacitive scanning
224x288 pixels
513 dpi; data format: 8 bits/pixel
200 +/- 50 mm/sec
1 million
30 mA
70 mA
5 VDC
1.5 m USB full-speed rev. 1.0
0 – 50οC
-15ο to 60οC
0 – 80%
CE, FC, UL
TÜV Rheinland certification for the device
safety
User Guide
June 2000 Edition
Siemens ID Mouse V3.1
Siemens ID Mouse FAQs and troubleshooting
5 Siemens ID Mouse FAQs and troubleshooting
5.1 Where can I find information in the Web?
ID Mouse:
http://www.fingertip.de
http://www.siemens.ch/icp/produkte/prod_idmouse.htm
FingerTIP™ module:
http://www.siemens.ch/news/werbung/fingertip.htm
Other information on FingerTIP™ or biometric systems:
http://www.infineon.com/products/chipcds/portfol/biometr/40021r.htm
5.2 What is ID Mouse?
The Siemens ID Mouse is an integrated PC peripheral device. It combines the functionality of
a user-friendly, ergonomic PC mouse with scroll wheel and the possibility of fingerprint
identification with the new Siemens FingerTIP™ sensor. A simple touch of the fingerprint
sensor makes secure system identification possible.
The passwords used on PCs to prevent unauthorized use can be replaced in line with stateof-the-art technology by the Siemens ID Mouse without the need for additional products. The
ID Mouse prevents unauthorized access to your PC. The biometric characteristics (minutiae)
of your fingerprint identify you as the only authorized user.
The ID Mouse is the first product with the FingerTIP™ sensor, which offers fingerprint
capturing functioning on a capacitive rather than an optical basis, and which combines both
PC mouse functionality and fingerprint capturing in one.
5.3 Where do I get help if I have problems with the software or hardware?
From our Hotlines:
Austria:
Belgium:
Denmark:
Finland:
France
:
Germany:
Italy:
Luxembourg:
Norway:
Sweden:
Spain:
Switzerland:
United Kingdom:
+43-117075004
+32-78152221
+45-35258600
+358-922943700
+49-1805333220
+49-1805333220
+39-0269893691
+352-43843399
+47-22633314
+46-87509911
+34-902115061
+41-12120090
+44-990334411
Page 21
Siemens ID Mouse V3.1
Siemens ID Mouse FAQs and troubleshooting
User Guide
June 2000 Edition
5.4 Under which operating systems does the ID Mouse run?
Win 98, 98se, Win NT 4.0 as of Service Pack 3 or higher and Windows 2000.
5.5 How does FingerTIP TM work?
The FingerTIP TM module, the core of the ID Mouse, enables the fingerprint to be reliably read
in and evaluated and can be used in various ways.
When a finger is lying on the sensor, 65'000 sensor electrodes measure the exact distance
between the skin surface and the sensor. The integrated software optimizes recognition
performance both for generating the reference data record and for every subsequent check.
With a surface area of less than 160 mm2, the biometric sensor can also be used in very
small devices. In less than 100 ms the sensor generates a digitized gray-scale image of the
fingerprint. Image processing software looks for the characteristic features of the fingerprint
("minutiae") and stores their position and orientation. When a fingerprint is checked later on,
an evaluation algorithm compares the sensor image with the previously stored reference
data. The release signal comes from the sensor chip only if both data records match. The
reference data is stored in the local memory. The identification or verification is carried out
within the computer. It is not the entire fingerprint which is stored as the reference data
record, but rather a few characteristic features from which the original fingerprint cannot be
reconstructed.
What also makes the FingerTIP TM stand out is its low power consumption. This enables use
in mobile devices such as laptops and mobile phones in particular. A further feature of the
sensor is its sleep mode. Its construction, developed especially for this product, facilitates
integration of the FingerTIP TM into the most varied of devices. A flexible printed board bridges
the gap between the sensor on the surface of the device and the data-processing chip at its
interior. It offers the designer a certain degree of flexibility when deciding where to mount the
sensor on the device. The DIN (German standard) plug connection enables soldering in
standard SMD (Surface Mounted Device) technology. The FingerTIP TM is manufactured in
standard CMOS technology as is used for the production of integrated circuits. It thus offers a
low-cost introduction to the use of biometric systems.
5.6 How can you bypass logon under Win 98 if, for example, the ID Mouse is
defective?
The computer must be started up with a startup disk under MS-DOS.
Switch to the ID Mouse folder:
default:
c:\progr~1\idmouse
The login entry must be deactivated with ren login.exe loginold.exe.
Note: This will only work if you have not set your PC to shut down automatically.
Page 22
User Guide
June 2000 Edition
Siemens ID Mouse V3.1
Siemens ID Mouse FAQs and troubleshooting
5.7 The sensor does not work
Error screen
If the mouse was already connected before installing the Siemens ID Mouse software, the
following error occurs:
The mouse works, but the sensor does not produce any image. An error message is issued
to indicate that the mouse may not be connected.
Reason:
The driver required to control the sensor is not available before the installation. On connecting
the mouse, Windows98 tries to find an appropriate driver and stores an
unknown device in the Device Manager for the missing sensor driver.
Solution:
The following steps are needed to solve the problem:
• Choose “Settings” from the “Start” menu
• Select “Control Panel”
• Double-click the “System” icon
• Click the “Device Manager” tab
• Select the “Unknown Device” entry
• Press the “Remove” button and confirm the following prompt
• Press the “Refresh” button
On completing these steps, the appropriate USB driver for the sensor will be installed.
5.8 What do I do if the mouse cursor freezes after a successful and correct
installation of the ID Mouse?
If the software and drivers for the Logitec mouse or IntelliMouse are installed on your
computer, conflicts can occur with the drivers. Uninstall your Logitec mouse or IntelliMouse.
5.9 The computer does not “wake up” with the Siemens ID Mouse
The power management features of the PC can be set in both Windows98 as well as the
BIOS. However, since Microsoft has already announced known problems with USB devices
when setting the power management via the BIOS, the following is recommended:
• Enter the BIOS setup on starting the computer (for details on how to activate the BIOS,
please refer to the manual of your PC or motherboard).
• Disable the power management timeouts (for details on how to disable this feature in the
BIOS, see the manual of your PC or motherboard).
• After restarting the computer, select “Settings” on the “Start” menu
• Then select “Control Panel”
• Double-click the “Power Management” icon
• Set the desired timeouts.
5.10 Where can I find out which version of ID Mouse I am using?
Page 23
Siemens ID Mouse V3.1
Siemens ID Mouse FAQs and troubleshooting
User Guide
June 2000 Edition
a. in the Readme file and
b. in the "Info" window.
5.11 What can I use the ID Mouse scroll wheel for?
The scroll wheel makes it much easier to navigate within applications, the operating system
and when browsing the Internet. You can use it to "scroll", "autoscroll" and "zoom".
The scroll functionality is supported in many standard Windows applications. The ID Mouse
wheel enables you to scroll through the Internet and long documents under Windows by using
a fingertip.
Using "autoscroll": You can determine the pace with which you scroll through the screen.
Zoom function: Pressing and holding down the "Ctrl" key while turning the ID Mouse wheel
changes the zoom factor (Office97).
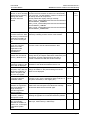
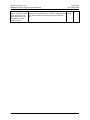
5.12 Frequently Asked Questions?
Question / Problem
Answer
Mouse and Sensor do not 1. Activate USB in the BIOS and set Plug&Play OS to
work
No. To do so, enter the setup (usually with F2) when
- Error number 824828
starting the computer and make the configuration in Menu
advanced.
2. Was the mouse unofficially supplied e.g. a mouse from
CeBit or some other test version. In this case, the USBDriver will not work. Getting an official mouse will solve the
problem.
OS
All
Version
All
NT4
Blue Screen when
booting up
1. If the Logitech-Driver IMOUFLTR.SYS is installed, there
are problems with the USB Driver. The deinstallation of the
Logitech Software (settings/control-panel/Software) will
solve the problem.
2. If an additional Mouse Software is installed, problems
with the USB-Driver can occur. Deinstallation of the
additional Mouse Software can solve the problem.
3. Check whether you are using a certified USB Card. You
can check this in the internet under http://www.usb.org.
NT4
All
The Mouse shakes, the
cursor can't be positioned
properly, the scroll wheel
is too flimsy and the
slider moves by itself
After deinstalling the
software, the computer
no longer works e.g. the
files remain.
In this case, the Mouse has to be exchanged for a newer
version. Downloading the newest software will not solve
the problem. Problem was solved with hardwareversion
A000-04. This version is shown when the ID Mouse is
plugged the first time.
Files remain when a deinstallation is carried out via the
Control Panel. It can even happen that a PC using NT4
will not start. Deinstallation should always be performed
from the ID Mouse Start Menu. In version 3.0 both types
are supported.
All
All
Win98,
WinNT4
V1.0,
V1.1,
V2.0
Page 24
User Guide
June 2000 Edition
Siemens ID Mouse V3.1
Siemens ID Mouse FAQs and troubleshooting
After deinstalling the ID
Mouse, an error message
appears during rebooting,
stating that certain
services cannot be
started.
During deinstallation the USB Drivers are not completely WinNT4
removed. The error will have no effect on the functionality
of the computer. The deinstallation routines in version 3.0
will cleanly remove all components.
Remedy: Delete the registry settings manually.
HKEY_LOCAL_MACHINE\System\CurrentControlSet\Enu
m\Root\LEGACY_USBBULK
HKEY_LOCAL_MACHINE\System\CurrentControlSet\Enu
m\Root\LEGACY_USBDRV
HKEY_LOCAL_MACHINE\System\CurrentControlSet\Enu
m\Root\LEGACY_USBMOUSE
V1.0,
V1.1,
V2.0
After the computer has
not been used for a while
all memory resources are
exhausted. Possibly all
you can do is boot your
PC.
The USB drivers will not
run on the computer.
There is no USB
registration under
settings/controlpanel/devices
After the installation
another PC card will not
work e.g. Network card
This problem only exists in version 1.0 and can only be
resolved by installing a newer version of the software.
V1.0
During installation
protection violation or the
Error 1385 is displayed.
While rebooting the
computer, resp. after the
ID Mouse installation, it
takes a long time until
the user can register.
After installation an error
is displayed that the
installation failed.
After installing the
software the registration
with the ID Mouse no
longer works (the
standard registration
always appears)
Parts in the masks are
not clearly visible or
bitmaps are moved.
With driver problems how
can you manually
deinstall the software in
order to run, for example,
a Windows System
again.
WinNT4
It was established that the USB drivers will not run on dual WinNT4
processor. This is due to a Microsoft fault in NT4.
All
Enter the setup programme by starting the computer
(usually with F2) and adjust under Menu Advanced by PCI
Components, that the USB Interrupt of this card is
blocked or allocate the USB with another Interrupt.
All
All
In this case, the problem can only be removed with
installation of the ID Mouse Software Version 3.0.
WinNT4
After rebooting the computer all network drives and NT
settings are loaded. In this period nothing from the ID
Mouse can be displayed.
WinNT4
V1.0,
V1.1,
V2.0
All
You should check if the user has sufficient rights on the
computer to carry out the installation (Write protection of
the system directories, in the registry etc)
WinNT4,
Win2k
All
In this case, the deinstallation programm of the other
software also removed parts of the ID Mouse. Remedy:
Deinstall the ID Mouse and reinstall again.
WinNT4,
Win2k
All
The problem appears when setting up large typefaces.
Resetting the typeface to normal will resolve the problem.
All
All
Delete the following files from the system directory:
usbdrv.sys, usbmouse.sys, usbbulk.sys
All
All
Page 25
Siemens ID Mouse V3.1
Siemens ID Mouse FAQs and troubleshooting
After installing the ID
Mouse, how do I proceed
when my NT Sytem no
longer boots and I have
formatted my system
partition NTFS?
Page 26
User Guide
June 2000 Edition
Deactivate the USB-Port in the bios, remove other
WinNT4,
hardware components like sound cards or delete with the Win2k
tools (NTFS for DOS full version) the above mentioned
files.
All
User Guide
June 2000 Edition
Siemens ID Mouse V3.1
Safety regulations:
6 Safety regulations:
F The device must not be operated or stored in damp rooms.
F The fingerprint sensor must not be hit by hard objects.
F No modifications may be made to the Siemens ID Mouse. Repairs may be carried out by
authorized service centers only.
F No liability will be accepted for damage caused by use of the Siemens ID Mouse,
especially that arising from improper use or non-observance of the User Guide.
Page 27
Siemens ID Mouse V3.1
Care:
User Guide
June 2000 Edition
7 Care:
Please use a dry cloth to clean the casing and the fingerprint sensor. Liquids should not be
allowed to get inside the Siemens ID Mouse or onto the fingerprint sensor.
Page 28