1
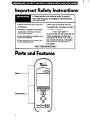
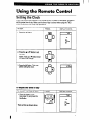
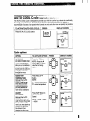
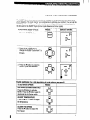
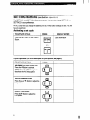
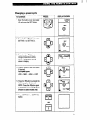
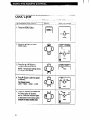
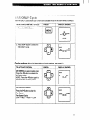
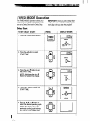
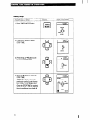
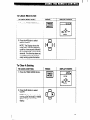
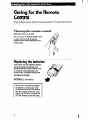
Owher’s
Important Safety
Instructions
4
Parts and Features
4
Using the
Remote Control
5
Setting
the Clock
5
AUTO COOL Cycle 6
REMOTE CONTROL
1180435-A
SLEEP Cycle
7
SETTING Buttons
8
COOL Cycle
10
FAN ONLY Cycle
11
DRY Cycle
12
TIMED MODE
Operation
13
Caring for the
Remote Control
16
Troubleshooting
17
Obtaining
17
Service
..
You now own the air conditioner
with the remote control that’s so
easy to use you’ll hardly believe it! We based our control on the latest
video game technology,
so anyone can use it.
This book explains all of the buttons and advanced functions of your
remote control. Besides this, to make everything
easy, the display
screen on top of the remote takes you through each step quickly and
clearly.
Most of the time, though, you’ll probably just press “Auto Cool” when
you use your Cool Impressions Air Conditioner.
temperature
This will give you the
you like in an instant.
So just think of your remote control as a video game control -just
point and shoot. It’s that easy!
WHIRLPOOL
CORPORATION
3
I ’
Important
Safety
Instructions
To reduce the risk of fire, electrical shock, or personal
injury when using your air conditioner,
follow these basic
safety precautions:
Read all instructions before using your
air conditioner.
*Complete the installation requirements
as described in the Room Air Conditioner Owner’s Manual.
l Do not allow children
to operate or play
with the air conditioner.
l
*Do not operate the air conditioner
the front panel removed.
I
with
. Never clean air conditioner parts with
flammable fluids. The fumes can create a
fire hazard or explosion.
l FOR YOUR SAFETY
l
DO NOT STORE OR USE GASOLINE OR
OTHER FLAMMABLE VAPORS AND
LIQUIDS IN THE VICINITY OF THIS OR
ANY OTHER APPLIANCE. THE FUMES
CAN CREATE A FIRE HAZARD OR
EXPLOSION.
- SAVE THESE INSTRUCTIONS
Parts and Features
Display
Control buttons -
-
Using the Remote
Control
Every time you put new batteries in the remote control, or power is interrupted, you need to
set the proper time of day. Make sure the time of day is correct when using the TIMED
MODE Delay Start and Delay Stop operations.
--- -.-.--------c
TO SET:
_-_
PRESS:
1 1. Press the A Button.
-
DISPLAY SHOWS:
.nnu
9.UU
0
aAD
v
2. Press the A or V Button to set
the time.
NOTE: Hold A or V Button down
for faster time change.
3. Press the b Button. This completes setting the clock.
0
aa)
v
I
L
To adjust
the time
:l?:XL
T
of day
TO ADJUST THE TIME OF DAY:
PRESS:
DISPLAY SHOWS:
1. Open the battery cover
(see page 16) and press the
Set Button.
Then set time as shown above.
I
5
The AUTO COOL Cycle is designed to provide you with the comfort you desire by continually
“learning” your preferences. Once the Cycle “learns” what temperature(s) you desire, it
automatically chooses a fan speed when turned on and cools the room as quickly as possible.
_.~
--.. _“....--- - ----__.- -.__. . ~
~.-DISPLAY SHOWS:
PRESS:
TO ACTIVATE AUTO COOL CYCLE:
1
Press the AUTO COOL Button.
_’I
Cycle
6
options
OPTION:
TO ACTIVATE OPTION:
AIR SWING
(on select models only)
The Air Swing feature
tells your air conditioner
to move the air output
louvers side to side and
swing the cooled air
through the room.
Press the 4 Button.
NOTE: Press the 4
Button again to deactivate the Air Swing
option.
ADJUST AIR
TEMPERATURE
Although the AUTO
COOL Cycle has an
initial factory-preset
cooling temperature,
you may decide the
room is too cool/warm.
Press the A or V
Button.
NOTE:
A- warmer temperature
V- cooler temperature
ADJUST
FAN SPEED
Although the AUTO
COOL Cycle automatically chooses the proper
fan speed to cool the
room, you may desire to
increase or decrease
the amount of air
blowing into the room.
Press the b Button to
advance the Fan
Speed.
AUTO --) LOW + MED
+ HIGH
PRESS:
DISPLAY SHOWS:
0
laD
v
0
aAb
v
I
_.
.+
The SLEEP Cycle allows your air conditioner to adjust the temperature and fan speed while
you’re sleeping. The cycle “learns” your preferences to optimize your comfort. You can set the
SLEEP Cycle for 1 to 8 hours. The air conditioner control panel shows the setting closest to
the time set for the SLEEP Cycle (4-hour cycle shows as a 5hour cycle).
TO ACTIVATE
SLEEP CYCLE:-.
PRESS:
n
Press the SLEEP Button.
DISPLAY SHOWS:
SLEEP
I
J
2. Press the A or V Button to
change the SLEEP Cycle from 1 to
8 hours.
3. Press the b Button to enter the
SLEEP Cycle time selection.
Cycle
options
TO ACTIVATE
(For a full description
OPTION:
AIR SWING (on select models only)
Press the 4 Button to activate.
NOTE: Press the 4 Button again to
deactivate the Air Swing option.
of cycle options,
see page 6.)
1 PRESS:
’
ADJUST TEMPERATURE
Press the A or V Button to adjust
the temperature.
ADJUST FAN SPEED
Press the b Button to adjust the
Fan Speed.
7
The SElTING 1 and SETTING 2 Buttons are preset. You can also change SElTING
SElTING 2 to your preferences.
NOTE: Every time you change the batteries, the SElTING
have to reset them.
Activating
1 or
Button settings are lost. You will
a set cycle
TO ACTIVATE
CYCLE:
Press the SElTING
Button.
1 or SElTING
PRESS:
2
I- DISPLAY SHOWS:
t Cycle information
-
sE7’NG
cl
OR
SE2iNG
cl
i
Cycle
options
TO ACTIVATE
(For a full description
OPTION:
of cycle op!ions,
see page 6.)
PRESS:
AIR SWING (on select models only)
Press the 4 Button to activate.
NOTE: Press the 4 Button again to
deactivate the Air Swing option.
ADJUST TEMPERATURE
Press the A or V Button to adjust the
temperature.
ADJUST FAN SPEED
Press the b Button to adjust the
Fan Speed.
I
Changing
a preset cycle
-.^.-- ._. ~._~_.
-.~- ...-.. ._~ I -- .-_._.~_.
----PRESS:
’ TO CHANGE:
DISPLAY SHOWS:
.nnnu
9.uu
’ Open the battery cover (see page
16) and press the SET Button.
TmEsEl
43 -1
i
2. Press the F or V Button to select
SETTING 1 or SElTING 2.
0
0
0
0
aAb
v
3. Press the A or 7 Button to
change temperature setting.
NOTE: Temperature setting
shows in display.
aAD
v
4. Press b Button to alter fan speed
(if desired).
Fan Speed cycle:
LOW + MED -+ HIGH --) LOW
5. Press the 4 Button to activate the
Air Swing option (if desired).
NOTE: Press the 4 Button again
to deactivate the Air Swing option.
(Feature on select models only)
6. Press SETTING
Button.
1 or SElTING
2
aAb
V
lAD
V
sETNG
cl
SETNG
cl
OR
-2
..-
--u-w-
OQb
“-
_Lm__w_
--
.-,.,
.
..>
. .._
^r_
_ ,_
I
, -1
I
_
>.=
--I_
Cycle
You can set a specific temperature
.--- -- -.-----_--_--.TO ACTIVATE COOL CYCLE:
in the COOL Cycle instead of AUTO COOL, if desired.
..-.
_.--. _-_.
_.
.DISPLAY
PRESS:
-__-- SHOWS:
- .~-- +
--..
- -.. - - ..-.----
1. Press the MENU Button.
rl
MENU
2. Press the A Button to select
COOL Cycle.
0
aAD
v
3. Press the A or V Button to
change temperature setting.
NOTE: Temperature setting shows
in the top of the display.
4. Press b Button to alter fan speed
(if desired).
Fan Speed cycle:
LOW + MED --) HIGH --) LOW
5. Press the 4 Button to activate the
Air Swing option (if desired).
NOTE: Press the 4 Button again
to deactivate the Air Swing option.
(Feature on select models only)
10
_.
0
0
0
aAD
v
aAb
V
4AD
V
I
The FAN ONLY Cycle allows you to move and circulate the air in the room without cooling it.
.-. --.
TO ACTIVATE FAN ONLY CYCLE:
DISPLAY SHOWS:
PRESS:
‘. Press the MENU Button.
rl
MENU
COOL
n
FAN
ONLY
DAY
43
*llmcooL
2. Press the b Button to select the
FAN ONLY Cycle.
0
aa)
v
Cycle
options
TO ACTIVATE
(For a full description
OPTION:
of cycle options,
PRESS:
see page 6.)
DISPLAY SHOWS:
AIR SWING (on select models only)
Press the 4 Button to activate the
Air Swing option.
NOTE: Press the 4 Button again to
deactivate the Air Swing option.
ADJUST
FAN SPEED
Press the b Button to alter the
Fan Speed.
Fan Speed Cycle:
LOW -+ MED + HIGH --) LOW
0
aAb
v
11
The DRY Cycle allows your air conditioner to operate as a dehumidifier. It removes excess
moisture from the room air without providing significant cooling. The fan defaults to the
optimal speed for the cycle.
TO ACTIVATE
DRY CYCLE:
1. Press MENU Button.
PRESS:
-
DISPLAY SHOWS:
r-l
MENU
COOL
FAN ONLY
DR”
43
*u-lo
CmL
2. Press the 4 Button to select the
DRY Cycle.
Cycle
options
TO ACTIVATE
(For a full description
OPTION:
ON”
Am0
Amok
EElFANs-
of cycle options,
PRESS:
AIR SWING (on select models only)
Press the 4 Button to activate the
Air Swing option.
NOTE: Press the 4 Button again to
deactivate the Air Swing option.
ADJUST FAN SPEED
Press the b Button to alter the
Fan Speed.
Fan Speed Cycle:
LOW --) MED + HIGH + LOW
12
0
aAb
\/
see page 6.)
DISPLAY SHOWS:
The TIMED MODE Operation allows your
unit to turn on or off at selected times. You
can set a Delay Start and/or Delay Stop.
Delay
IMPORTANT: Once you set a Delay Start
or Stop time, the unit follows that program
every day until you clear the program.
Start
-__.---TO SET DELAY START:
- -----1. Press the TIMED MODE Button.
PRESS:
cl
DISPLAY SHOWS:
TIMED
MODE
2. Press the A Button to select
START TIME.
3. Press the A or V Button to set
the START TIME.
NOTE: Hold down the A or V
Button for fastest time change.
4. Press the b Button to enter the
START TIME.
5. Press A, V, b, or 4 Button to
select the desired operating cycle.
NOTE: The display shows the
previously running cycle information and the words TIMED SET.
13
Delay
Stop
- -- - - ------------TO SET DELAY STOP: ---.---1. Press TIMED MODE Button.
r
__._ -..-..-... .~. .PRESS:----~--+
.._--
cl
TIMED
MODE
_._ _ -_.-DISPLAY SHOWS:
’
ETDP
2. Press the V Button to select
STOP TIME.
0
0
0
aaD
v
3. Press the A or V Button to set
the desired STOP TIME.
aAD
v
4. Press the b Button to enter the
STOP TIME.
NOTE: The display shows the
previously running cycle information and the words TIMED SET.
Once the STOP TIME is reached,
the air conditioner turns itself off.
14
aa)
v
TlYE
To Check
What
Is Set
TO CHECK
WHAT IS SET:
.I____
----__.-_--.-..-...
DISPLAY SHOWS:
PRESS:
..-- . .-.-~
: I. Press the TIMED MODE Button.
1 MODE 1
L
/
2. Press the 4 Button to select
WHAT IS SET?.
NOTE: The Display shows the
Delay Start Time and operating
cycle for a few seconds followed
by the Delay Stop Time for a few
seconds. If no time has been set,
the display returns to the previously running cycle information.
To Clear
J
3
IAD
v
A Setting
TO CLEAR A SElTING:
1. Press the TIMED MODE Button.
PRESS:
DISPLAY SHOWS:
cl
TIMED
MODE
2. Press the p Button to select
CLEAR.
NOTE: Display shows previously
running cycle information. TIMED
SET no longer shows in the
display.
15
Caring for the Remote
Control
Proper maintenance of your remote control ensures longer life. This section tells you how to
perform general maintenance for your remote control.
Cleaning
the remote
control
Wipe clean with a soft, dry cloth.
NOTE: DO NOT immerse the remote control
in water. Doing so could damage the
batteries and the internal electronics of the
remote control.
Replacing
the batteries
Under normal use and operating conditions,
you should replace the batteries in the
remote control once a year. However, if the
air conditioner stops responding to the
remote control, the batteries could be low
and need to be changed.
BATTERIES:
(2) AAA Alkaline
IMPORTANT: Every time you replace
the batteries or cut the power to the
remote control, your SETTING Buttons
lose their program and the time of day
setting. You will have to reprogram the
SETTING Buttons and the time of day.
16
I
I
Troubleshooting
Performance problems often result from little things you can find and fix yourself, without tools
of any kind. Check the chart below for problems you can fix. It could save you the cost of a
service call.
Unit starts
unexpectedly
; POSSIBLE SOLUTION
/
j Check if Delay Start is set. See pages 13-15 for more information
,I on TIMED MODE Operations.
Unit stops
unexpectedly
Check if Delay Stop is set. See pages 13-l 5 for more information
on TIMED MODE Operations.
PROBLEM
----
Make sure unit is plugged into a live circuit with proper voltage.
Check if a household fuse has blown or the circuit breaker tripped.
Make sure unit is turned on.
See if the local power has failed.
Unit does not
respond to
remote control
Replace the batteries in the remote control. If this does not work,
call for service on your remote control.
Unit does not
remember your
cycle settings
Every time you replace the batteries or cut the power to the remote
control, your SElTING Buttons lose their settings and the time of
day setting. You will have to reset the SElTING Buttons and the
time of day.
Obtaining
Service
If the problem
is not due
to an item listed in the
chart above . . .
Contact the dealer from whom you purchased the unit or an authorized Whirlpool*
service company.
* Registered
Trademark
of Wh~rtpool Corporation,
U.S.A
17
’