1
BEA WebLogic
Server
™
Configuring and
Managing WebLogic
Server
Release 8.1
Document Revised: December 5. 2002
Copyright
Copyright © 2002 BEA Systems, Inc. All Rights Reserved.
Restricted Rights Legend
This software and documentation is subject to and made available only pursuant to the
terms of the BEA Systems License Agreement and may be used or copied only in
accordance with the terms of that agreement. It is against the law to copy the software
except as specifically allowed in the agreement. This document may not, in whole or
in part, be copied photocopied, reproduced, translated, or reduced to any electronic
medium or machine readable form without prior consent, in writing, from BEA
Systems, Inc.
Use, duplication or disclosure by the U.S. Government is subject to restrictions set
forth in the BEA Systems License Agreement and in subparagraph (c)(1) of the
Commercial Computer Software-Restricted Rights Clause at FAR 52.227-19;
subparagraph (c)(1)(ii) of the Rights in Technical Data and Computer Software clause
at DFARS 252.227-7013, subparagraph (d) of the Commercial Computer
Software--Licensing clause at NASA FAR supplement 16-52.227-86; or their
equivalent.
Information in this document is subject to change without notice and does not represent
a commitment on the part of BEA Systems. THE SOFTWARE AND
DOCUMENTATION ARE PROVIDED “AS IS” WITHOUT WARRANTY OF
ANY KIND INCLUDING WITHOUT LIMITATION, ANY WARRANTY OF
MERCHANTABILITY OR FITNESS FOR A PARTICULAR PURPOSE.
FURTHER, BEA Systems DOES NOT WARRANT, GUARANTEE, OR MAKE
ANY REPRESENTATIONS REGARDING THE USE, OR THE RESULTS OF THE
USE, OF THE SOFTWARE OR WRITTEN MATERIAL IN TERMS OF
CORRECTNESS, ACCURACY, RELIABILITY, OR OTHERWISE.
Trademarks or Service Marks
BEA, Jolt, Tuxedo, and WebLogic are registered trademarks of BEA Systems, Inc.
BEA Builder, BEA Campaign Manager for WebLogic, BEA eLink, BEA Manager,
BEA WebLogic Commerce Server, BEA WebLogic Enterprise, BEA WebLogic
Enterprise Platform, BEA WebLogic Express, BEA WebLogic Integration, BEA
WebLogic Personalization Server, BEA WebLogic Platform, BEA WebLogic Portal,
BEA WebLogic Server, BEA WebLogic Workshop and How Business Becomes
E-Business are trademarks of BEA Systems, Inc.
Configuring and Managing WebLogic Server
-ii
All other trademarks are the property of their respective companies.
Configuring and Managing WebLogic Server
-iii
Part Number
Document Revised
Software Version
N/A
December 5, 2002
BEA WebLogic Server
Version 8.1
Configuring and Managing WebLogic Server
Contents
About This Document
Audience............................................................................................................ xiii
e-docs Web Site................................................................................................. xiii
How to Print the Document............................................................................... xiii
Related Information........................................................................................... xiv
Contact Us! ........................................................................................................ xiv
Documentation Conventions ...............................................................................xv
1. Overview of WebLogic System Administration
Introduction to System Administration ............................................................. 1-2
WebLogic Server Domains ............................................................................... 1-2
System Administration Infrastructure ............................................................... 1-5
The Administration Server and Managed Servers............................................. 1-6
Failover for the Administration Server ...................................................... 1-6
Failover for Managed Servers .................................................................... 1-7
Domain-Wide Administration Port ............................................................ 1-7
Service Packs and WebLogic Server Instances.......................................... 1-8
System Administration Tools ............................................................................ 1-8
Security Protections for System Administration Tools.............................. 1-8
System Administration Console................................................................. 1-8
Command-Line Interface ........................................................................... 1-9
JMX.......................................................................................................... 1-10
Configuration Wizard............................................................................... 1-11
Java Utilities............................................................................................. 1-11
Node Manager .......................................................................................... 1-11
SNMP ....................................................................................................... 1-12
Logs.......................................................................................................... 1-12
Configuring and Managing WebLogic Server
-iv
Editing config.xml.................................................................................... 1-13
Resources You Can Manage in a WebLogic Server Domain.......................... 1-13
Servers ...................................................................................................... 1-14
Clusters ..................................................................................................... 1-14
Machines................................................................................................... 1-15
Network Channels .................................................................................... 1-15
JDBC ........................................................................................................ 1-15
JMS........................................................................................................... 1-16
WebLogic Messaging Bridge ................................................................... 1-16
Web Servers and Web Components ......................................................... 1-17
Applications.............................................................................................. 1-17
Application Formats.......................................................................... 1-17
Editing and Creating Deployment Descriptors with WebLogic Builder .
1-18
Startup and Shutdown Classes.................................................................. 1-19
JNDI ......................................................................................................... 1-19
Transactions.............................................................................................. 1-19
XML ......................................................................................................... 1-20
Security..................................................................................................... 1-20
WebLogic Tuxedo Connector .................................................................. 1-21
Jolt ............................................................................................................ 1-21
Mail........................................................................................................... 1-21
Starting and Using the Administration Console .............................................. 1-21
Browser Support for the Administration Console .................................... 1-22
Starting the Administration Console ........................................................ 1-22
Using the Administration Console ........................................................... 1-23
Using WebLogic Server with Web Servers..................................................... 1-23
Monitoring ....................................................................................................... 1-24
Licenses ........................................................................................................... 1-25
2. Overview of WebLogic Server Domains
What Is a Domain? ............................................................................................ 2-1
Contents of a Domain................................................................................. 2-2
Administration Server ......................................................................... 2-3
Managed Servers and Clustered Managed Servers ............................. 2-4
-v
Configuring and Managing WebLogic Server
Resources and Services ....................................................................... 2-5
Common Domain Types ............................................................................ 2-6
Domain Restrictions .......................................................................................... 2-7
Domain Directory and config.xml ............................................................. 2-7
Domain Directories Structure ............................................................. 2-8
A Server’s Root Directory .................................................................. 2-9
3. Overview of Node Manager
Introduction to Node Manager .......................................................................... 3-1
Node Manager Architecture and Environment.................................................. 3-2
Node Manager Runs on Machines that Host Managed Servers................. 3-3
Node Manager Should Run as a Service.................................................... 3-4
Node Manager is Domain-Independent ..................................................... 3-4
Node Manager Clients................................................................................ 3-4
Node Manager Uses SSL ........................................................................... 3-5
Native Support for Node Manager ............................................................. 3-5
Node Manager Capabilities ............................................................................... 3-5
Start Managed Servers ............................................................................... 3-5
Suspend or Stop Managed Servers............................................................. 3-6
Shutdown Failed Managed Servers............................................................ 3-7
Restart of Crashed and Failed Managed Servers ....................................... 3-7
Prerequisites for Automatic Restart of Managed Servers .................. 3-8
4. Configuring, Starting, and Stopping Node Manager
Configuring Node Manager............................................................................... 4-1
Default Configuration ................................................................................ 4-2
Configuration Checklist ............................................................................. 4-2
Set Up the Node Manager Hosts File.................................................. 4-3
Reconfigure Startup Service ............................................................... 4-4
Update nodemanager.properties.......................................................... 4-4
Configure a Machine to Use Node Manager ...................................... 4-5
Configure Managed Server Startup Arguments.................................. 4-5
Ensure Administration Server Address is Defined ............................. 4-5
Configure SSL for Node Manager ...................................................... 4-6
Configure Monitoring, Shutdown and Restart for Managed Servers . 4-6
Configuring and Managing WebLogic Server
-vi
Starting and Stopping Node Manager ............................................................... 4-6
Starting Node Manager as a Service .......................................................... 4-7
Starting Node Manager with Commands or Scripts................................... 4-7
Command Syntax for Starting Node Manager.................................... 4-7
Node Manager Environment Variables ...................................................... 4-9
Node Manager Properties ......................................................................... 4-10
Stopping Node Manager........................................................................... 4-12
Troubleshooting Node Manager ...................................................................... 4-13
Managed Server Log Files........................................................................ 4-13
Node Manager Log Files................................................................... 4-14
Correcting Common Problems.......................................................... 4-14
Node Manager and Managed Server States.............................................. 4-16
5. Setting Up a WebLogic Server as a Windows Service
Setting Up a Windows Service................................................................... 5-2
Using a Non-Default JVM with a Windows Service ................................. 5-5
Verifying the Setup..................................................................................... 5-5
Using the Control Panel to Stop or Restart the Service.............................. 5-6
Removing a Server as a Windows Service................................................. 5-6
Changing Startup Credentials for a Server Set Up as a Windows Service 5-7
The WebLogic Server Windows Service Program (beasvc.exe) ............... 5-8
6. Server Lifecycle
Lifecycle Overview ........................................................................................... 6-1
WebLogic Server States .................................................................................... 6-2
Getting Server State.................................................................................... 6-3
Understanding Server State ........................................................................ 6-4
SHUTDOWN ...................................................................................... 6-4
STARTING ......................................................................................... 6-4
STANDBY .......................................................................................... 6-5
RESUMING ........................................................................................ 6-6
RUNNING .......................................................................................... 6-6
SUSPENDING .................................................................................... 6-6
SHUTDOWN ...................................................................................... 6-7
FAILED............................................................................................... 6-7
-vii
Configuring and Managing WebLogic Server
UNKNOWN........................................................................................ 6-7
States Defined by Node Manager ....................................................... 6-8
Lifecycle Commands......................................................................................... 6-8
Start ............................................................................................................ 6-8
Graceful Shutdown..................................................................................... 6-9
Graceful Shutdown Sequence ........................................................... 6-10
Controlling Graceful Shutdown ........................................................ 6-10
In-Flight Work Processing ................................................................ 6-11
Forced Shutdown...................................................................................... 6-13
7. Configuring WebLogic Server Web Components
Overview ........................................................................................................... 7-2
HTTP Parameters .............................................................................................. 7-2
Configuring the Listen Port ............................................................................... 7-4
Web Applications .............................................................................................. 7-5
Web Applications and Clustering .............................................................. 7-6
Designating a Default Web Application .................................................... 7-6
Configuring Virtual Hosting.............................................................................. 7-7
Virtual Hosting and the Default Web Application..................................... 7-8
Setting Up a Virtual Host ........................................................................... 7-9
How WebLogic Server Resolves HTTP Requests .......................................... 7-10
Setting Up HTTP Access Logs........................................................................ 7-14
Log Rotation............................................................................................. 7-14
Common Log Format ............................................................................... 7-14
Setting Up HTTP Access Logs by Using Extended Log Format............. 7-15
Creating the Fields Directive ............................................................ 7-16
Supported Field identifiers................................................................ 7-16
Creating Custom Field Identifiers..................................................... 7-18
Preventing POST Denial-of-Service Attacks .................................................. 7-22
Setting Up WebLogic Server for HTTP Tunneling ........................................ 7-23
Configuring the HTTP Tunneling Connection......................................... 7-23
Connecting to WebLogic Server from the Client..................................... 7-24
Using Native I/O for Serving Static Files (Windows Only)............................ 7-25
Configuring and Managing WebLogic Server
-viii
8. Protecting System Administration Operations
Operations Available to Each Role ................................................................... 8-2
Default Group Associations ....................................................................... 8-3
Protected User Interfaces................................................................................... 8-4
Overlapping Permissions for System Administration MBeans and Policies on
Resources.................................................................................................... 8-5
Resources and Policies ............................................................................... 8-6
Working with Policies ................................................................................ 8-7
Maintaining a Consistent Security Scheme................................................ 8-8
Permissions for Starting and Shutting Down a WebLogic Server .................... 8-8
Permissions for Using the weblogic.Server Command.............................. 8-9
Permissions for Using the Node Manager.................................................. 8-9
Shutting Down a WebLogic Server.......................................................... 8-10
9. Monitoring a WebLogic Server Domain
Facilities for Monitoring WebLogic Server ...................................................... 9-1
Administration Console.............................................................................. 9-1
Server Self-Health Monitoring ................................................................... 9-2
Obtaining Server Health Programmatically ........................................ 9-3
Messages and Log Files.............................................................................. 9-3
Monitoring WebLogic Server using the Administration Console..................... 9-5
Domain Monitoring Pages.......................................................................... 9-5
Other Domain Monitoring Links......................................................... 9-6
Server Monitoring Pages ............................................................................ 9-6
Other Server Monitoring Links ......................................................... 9-10
Clusters Monitoring Pages ....................................................................... 9-10
Machines Monitoring Pages ..................................................................... 9-11
Deployments Monitoring Pages ............................................................... 9-12
Services Monitoring Pages ....................................................................... 9-14
10. Recovering Failed Servers
WebLogic Server Failure Recovery Features.................................................. 10-1
Automatic Restart for Managed Servers .................................................. 10-2
Managed Server Independence Mode ...................................................... 10-2
Backing Up Configuration and Security Data ................................................. 10-5
-ix
Configuring and Managing WebLogic Server
Backing up config.xml ............................................................................. 10-6
WebLogic Server Archives Previous Versions of config.xml .......... 10-6
WebLogic Server Archives config.xml during Server Startup ......... 10-7
Backing Up Security Data........................................................................ 10-8
Backing Up the WebLogic LDAP Repository.................................. 10-8
Backing Up SerializedSystemIni.dat and Security Certificates........ 10-9
Restarting Failed Server Instances ................................................................ 10-10
Restarting an Administration Server ...................................................... 10-10
Restarting an Administration Server When Managed Servers are not
Running.................................................................................... 10-10
Restarting an Administration Server When Managed Servers are
Running.................................................................................... 10-11
Restarting Managed Servers................................................................... 10-12
Starting a Managed Server When the Administration Server is
Accessible ................................................................................ 10-12
Starting a Managed Server When the Administration Server Is Not
Accessible ................................................................................ 10-13
Additional Failure Topics ............................................................... 10-14
11. Configuring Network Resources
Overview of Network Configuration............................................................... 11-1
New Network Configuration Features in WebLogic Server .................... 11-2
Understanding Network Channels................................................................... 11-2
What is a Channel?................................................................................... 11-3
Rules for Configuring Channels ....................................................... 11-3
Custom Channels Can Inherit Default Channel Attributes ............... 11-3
Why Use Network Channels? .................................................................. 11-4
WebLogic Server and the Channel Selection Process ............................. 11-5
Prioritizing Outgoing Connections ................................................... 11-5
Handling Channel Failures................................................................ 11-6
Upgrading Quality of Service Levels for RMI ................................. 11-6
Standard WebLogic Server Channels ...................................................... 11-7
The Default Network Channel .......................................................... 11-7
Administrative Channel .................................................................... 11-7
Configuring a Channel .................................................................................. 11-10
Configuring Channels: Facts and Rules ................................................. 11-10
Configuring and Managing WebLogic Server
-x
Configuring Network Channels with a Cluster ...................................... 11-11
Create the Cluster ............................................................................ 11-11
Create and Assign the Network Channel ........................................ 11-11
A. Starting and Stopping Servers: Quick Reference
Starting Instances of WebLogic Server ............................................................ A-2
Shutting Down Instances of WebLogic Server ................................................ A-4
-xi
Configuring and Managing WebLogic Server
CHAPTER
About This Document
This document describes how to configure and manage a WebLogic Server domain.
The document is organized as follows:
!
Chapter 1, “Overview of WebLogic System Administration.” provides an
overview of WebLogic Server system administration tools and capabilities.
!
Chapter 2, “Overview of WebLogic Server Domains.” provides general
information about WebLogic Server domains.
!
Chapter 3, “Overview of Node Manager.” describes Node Manager, a
stand-alone Java application that you use to remotely control and monitor
WebLogic Server instances.
!
Chapter 4, “Configuring, Starting, and Stopping Node Manager.” describes how
to use the Node Manager.
!
Chapter 5, “Setting Up a WebLogic Server as a Windows Service.” describes
how to run WebLogic Server automatically on the Windows platform.
!
Chapter 6, “Server Lifecycle.” describes the operational phases of a WebLogic
Server instance, from start up to shut down.
!
Chapter 7, “Configuring WebLogic Server Web Components.” describes how to
use WebLogic Server as a Web server.
!
Chapter 8, “Protecting System Administration Operations.” describes how to
secure access to system adminstration.
!
Chapter 9, “Monitoring a WebLogic Server Domain.” describes how to monitor
the runtime state of a WebLogic Server domain.
!
Chapter 10, “Recovering Failed Servers.” describes failover procedures for
WebLogic Server instances.
Configuring and Managing WebLogic Server
-xii
!
Chapter 11, “Configuring Network Resources.” describes how to optimize your
WebLogic Server domain for your network.
!
Chapter A, “Starting and Stopping Servers: Quick Reference.” provides quick
procedures for starting WebLogic Server instances.
Audience
This document is written for system administrators responsible for implementing a
WebLogic Server installation.
e-docs Web Site
BEA product documentation is available on the BEA corporate Web site. From the
BEA Home page, click on Product Documentation.
How to Print the Document
You can print a copy of this document from a Web browser, one main topic at a time,
by using the File→Print option on your Web browser.
A PDF version of this document is available on the WebLogic Server documentation
Home page on the e-docs Web site (and also on the documentation CD). You can open
the PDF in Adobe Acrobat Reader and print the entire document (or a portion of it) in
book format. To access the PDFs, open the WebLogic Server documentation Home
page, click Download Documentation, and select the document you want to print.
Adobe Acrobat Reader is available at no charge from the Adobe Web site at
http://www.adobe.com.
-xiii
Configuring and Managing WebLogic Server
Related Information
WebLogic Server Administration Console Help at
http://e-docs.bea.com/wls/docs81b/ConsoleHelp/index.html
Using WebLogic Server Clusters at
http://e-docs.bea.com/wls/docs81b/cluster/index.html
WebLogic Server Command Reference at
http://e-docs.bea.com/wls/docs81b/admin_ref/index.html
Contact Us!
Your feedback on BEA documentation is important to us. Send us e-mail at
docsupport@bea.com if you have questions or comments. Your comments will be
reviewed directly by the BEA professionals who create and update the documentation.
In your e-mail message, please indicate the software name and version you are using,
as well as the title and document date of your documentation. If you have any questions
about this version of BEA WebLogic Server, or if you have problems installing and
running BEA WebLogic Server, contact BEA Customer Support through BEA
WebSupport at http://www.bea.com. You can also contact Customer Support by using
the contact information provided on the Customer Support Card, which is included in
the product package.
When contacting Customer Support, be prepared to provide the following information:
!
Your name, e-mail address, phone number, and fax number
!
Your company name and company address
!
Your machine type and authorization codes
!
The name and version of the product you are using
!
A description of the problem and the content of pertinent error messages
Configuring and Managing WebLogic Server
-xiv
Documentation Conventions
The following documentation conventions are used throughout this document.
Convention
Usage
Ctrl+Tab
Keys you press simultaneously.
italics
Emphasis and book titles.
monospace
text
Code samples, commands and their options, Java classes, data types,
directories, and file names and their extensions. Monospace text also
indicates text that the user is told to enter from the keyboard.
Examples:
import java.util.Enumeration;
chmod u+w *
config/examples/applications
.java
config.xml
float
monospace
italic
text
Placeholders.
UPPERCASE
MONOSPACE
TEXT
Device names, environment variables, and logical operators.
Example:
String CustomerName;
Examples:
LPT1
BEA_HOME
OR
{ }
A set of choices in a syntax line.
[ ]
Optional items in a syntax line. Example:
java utils.MulticastTest -n name -a address
[-p portnumber] [-t timeout] [-s send]
-xv
Configuring and Managing WebLogic Server
Convention
Usage
|
Separates mutually exclusive choices in a syntax line. Example:
java weblogic.deploy [list|deploy|undeploy|update]
password {application} {source}
...
.
.
.
Indicates one of the following in a command line:
!
An argument can be repeated several times in the command line.
!
The statement omits additional optional arguments.
!
You can enter additional parameters, values, or other information
Indicates the omission of items from a code example or from a syntax line.
Configuring and Managing WebLogic Server
-xvi
-xvii
Configuring and Managing WebLogic Server
CHAPTER
1
Overview of WebLogic
System Administration
The following sections provide an overview of system administration for WebLogic
Server:
!
“Introduction to System Administration” on page 1-2
!
“WebLogic Server Domains” on page 1-2
!
“System Administration Infrastructure” on page 1-5
!
“The Administration Server and Managed Servers” on page 1-6
!
“System Administration Tools” on page 1-8
!
“Resources You Can Manage in a WebLogic Server Domain” on page 1-13
!
“Starting and Using the Administration Console” on page 1-21
!
“Using WebLogic Server with Web Servers” on page 1-23
!
“Monitoring” on page 1-24
!
“Licenses” on page 1-25
Configuring and Managing WebLogic Server
1-1
1
Overview of WebLogic System Administration
Introduction to System Administration
WebLogic Server system administration tools allow you to install, configure, monitor,
and manage one or more WebLogic Server installations. You also use the tools to
manage and monitor the applications hosted on WebLogic Server. A WebLogic Server
installation can consist of a single WebLogic Server instance or multiple instances,
each hosted on one or more physical machines.
Using the system administration tools, which include an Administration Console,
command line utilities, and an API, you manage services such as security, database
connections, messaging, and transaction processing. The tools also include capabilities
for monitoring the health of the WebLogic Server environment to ensure maximum
availability for your applications.
WebLogic Server Domains
The basic administrative unit for WebLogic Servers is called a domain. A domain is a
logically related group of WebLogic Server resources that are managed as a unit by a
WebLogic Server instance configured as the Administration Server. A domain
includes one or more WebLogic Servers and may also include WebLogic Server
clusters. Clusters are groups of WebLogic Servers that work together to provide
scalability and high-availability for applications. Applications are also deployed and
managed as part of a domain.
You can organize your domains based on criteria such as:
1-2
!
Logical divisions of applications. For example, a domain devoted to end-user
functions such as shopping carts and another domain devoted to back-end
accounting applications.
!
Physical location. Domains for different locations or branches of your business.
!
Size. Domains organized in small units that can be managed more efficiently,
perhaps by different personnel.
Configuring and Managing WebLogic Server
WebLogic Server Domains
Note: All WebLogic Server instances in a domain must run the same version of the
WebLogic Server software. The Administration Server must also have the
same or later service pack installed as the Managed Servers in its domain. For
example, the Administration Server could be running version 8.1, Service
Pack 1 while the Managed Servers are running version 8.1 without Service
Pack 1.
For more information about domains, see Configuring Domains.
Figure 1-1 WebLogic Server Domain
Configuring and Managing WebLogic Server
1-3
1
Overview of WebLogic System Administration
Figure 1-1 depicts a possible configuration of a WebLogic Server Domain—one of
many possible configurations.
In the depicted domain, there are three physical machines.
Machine A is dedicated as the Administration Server and hosts one instance of
WebLogic Server. The System Administration Tools communicate with the
Administration Server to perform configuration and monitoring of the servers and
applications in the domain. The Administration Server communicates with each of the
Managed Servers on behalf of the System Administration Tools. The configuration for
all the servers in the domain is stored in the configuration repository, the config.xml
file, which resides on the machine hosting the Administration Server.
Machines B and C each host two instances of WebLogic Server, WebLogic Servers 1
through 4. These instances are called Managed Servers. The Administration Server
communicates with an instance of Node Manager running on each machine to control
startup and shutdown of the Managed Servers.
WebLogic Servers 2 and 4 are part of a WebLogic Cluster (outlined in red). This cluster
is running an application that responds to HTTP requests routed to the cluster from a
hardware load balancer. (You could also use an instance of WebLogic Server to
provide load balancing.) The load balancer processes HTTP requests from the Internet
after they have passed through a firewall. The load balancer and firewall are not part
of the domain. A replicated copy of objects such as HTTP sessions is passed between
the two cluster members to provide failover capability.
WebLogic Server 1 runs an application that uses Java Database Connectivity (JDBC)
to access a database server running on another physical machine that is not part of the
WebLogic Domain.
Note: The pictured domain is only intended to illustrate the concepts of a WebLogic
Server domain and how you manage the domain. Many possible
configurations of servers, clusters, and applications are possible in a
WebLogic Server domain.
1-4
Configuring and Managing WebLogic Server
System Administration Infrastructure
System Administration Infrastructure
System administration infrastructure in WebLogic Server is implemented using the
Java Management Extension (JMX) specification from Sun Microsystems. The JMX
API models system administration functions with Java objects called MBeans.
Knowledge of this implementation as described in this discussion of system
administration infrastructure is not necessary to manage a WebLogic Server domain.
There are three types of MBeans used to manage a WebLogic Server domain:
administration, configuration, and runtime Mbeans.
Administration Mbeans contain a set of attributes that define configuration parameters
for various management functions. All attributes for administration MBeans have
pre-set default values. When the Administration Server starts, it reads a file called
config.xml and overrides the default attribute values of the administration MBeans
with any attribute values found in the config.xml file.
The config.xml file, located on the machine that hosts the Administration Server,
provides persistent storage of Mbean attribute values. Every time you change an
attribute using the system administration tools, its value is stored in the appropriate
administration MBean and written to the config.xml file. Each WebLogic Server
domain has its own config.xml file.
If you set any configuration attributes on the command line when you start the
Administration Server using the -D arguments, these values override the values set by
the defaults or those read from the config.xml file. These overridden values are also
persisted to config.xml file by the Administration Server. For more information
about these command-line arguments, see Configuring Servers.
Configuration Mbeans are copies of Administration Mbeans that each Managed Server
uses to initialize its configuration. When you start a Managed Server, the server
receives a copy of the of all the administration MBeans from the Administration Server
and stores them in memory as configuration MBeans. If you override any
configuration attributes when starting a Managed Server, those values override the
values received from the Administration Server but are not written to the config.xml
file. For more information about starting a Managed Server, see Starting Managed
Servers.
Configuring and Managing WebLogic Server
1-5
1
Overview of WebLogic System Administration
Runtime Mbeans contain sets of attributes consisting of runtime information for active
WebLogic Servers instances and applications. By retrieving the values of attributes in
these runtime MBeans, you can monitor the running status of a WebLogic Server
domain.
Mbeans may also contain operations used to execute management functions.
Although users with a knowledge of these Mbeans and the JMX API can create their
own customized management system, most users prefer to use the system
administration tools provided with WebLogic Server to perform these tasks. These
tools do not require knowledge of the JMX API. For more information, see “System
Administration Tools” on page 1-8.
The Administration Server and Managed
Servers
One instance of WebLogic Server in each domain is configured as an Administration
Server. The Administration Server provides a central point for managing a WebLogic
Server domain. All other WebLogic Server instances in a domain are called Managed
Servers. In a domain with only a single WebLogic Server instance, that server
functions both as Administration Server and Managed Server.
For a typical production system, BEA recommends that you deploy your applications
only on Managed Servers. This practice allows you to dedicate the Administration
Server to configuration and monitoring of the domain.
For more information, see Starting and Stopping Servers.
Failover for the Administration Server
To prevent the Administration Server from becoming a single point of failure,
Managed Servers can always function without the presence an Administration Server,
but an Administration Server is required to manage and monitor the domain. By
maintaining backups of the config.xml file and certain other resources for a domain,
1-6
Configuring and Managing WebLogic Server
The Administration Server and Managed Servers
you can replace a failed Administration Server with a backup WebLogic Server
instance that can assume the role of Administration Server. For more information, see
Starting Administration Servers and Recovering Failed Servers.
Failover for Managed Servers
When a Managed Server starts, it contacts the Administration Server to retrieve its
configuration information. If a Managed Server is unable to connect to the specified
Administration Server during startup, it can retrieve its configuration directly by
reading a configuration file and other files located on the Managed Server’s file
system.
A Managed Server that starts in this way is running in Managed Server Independence
mode. In this mode, a server uses cached application files to deploy the applications
that are targeted to the server. You cannot change a Managed Server's configuration
until it is able to restore communication with the Administration Server. For more
information, see Recovering Failed Servers.
Domain-Wide Administration Port
You can enable an administration port for use with servers in a domain. The
administration port is optional, but it provides two important capabilities:
!
It enables you to start a server in standby state. While in the standby state, the
administration port remains available to activate or administer the server.
However, the server’s other network connections are unavailable to accept client
connections. See Starting and Stopping WebLogic Server for more information
on the standby state.
!
It enables you to separate administration traffic from application traffic in your
domain. In production environments, separating the two forms of traffic ensures
that critical administration operations (starting and stopping servers, changing a
server’s configuration, and deploying applications) do not compete with
high-volume application traffic on the same network connection.
For more information, see Configuring a Domain-Wide Administration Port.
Configuring and Managing WebLogic Server
1-7
1
Overview of WebLogic System Administration
Service Packs and WebLogic Server Instances
All WebLogic Server instances in a domain must run the same version of the
WebLogic Server software. The Administration Server must also have the same or
later service pack installed as the Managed Servers in its domain. For example, the
Administration Server could be running version 8.1, Service Pack 1 while the
Managed Servers are running version 8.1 without Service Pack 1.
System Administration Tools
Using JMX as the underlying architecture, system administration tools are provided
for a variety of management functions. An Administration Server must be running
when you use system administration tools to manage a domain.These tools are
discussed in the next sections.
Security Protections for System Administration Tools
All system administration operations are protected based on the user name used to
access a system administration tool. A user (or the group a user belongs to) must be a
member of one of four security roles. These roles grant or deny a user access to various
sets of system administration operations. The roles are Admin, Operator, Deployer,
and Monitor. You can also set a security policy on WebLogic Server instances in a
domain. For more information, see “Protecting System Administration Operations” on
page 8-1.
System Administration Console
The Administration Console is a Web Application hosted by the Administration
Server. You can access the Administration Console using a Web browser from any
machine on the local network that can communicate with the Administration Server
(including a browser running on the same machine as the Administration Server). The
1-8
Configuring and Managing WebLogic Server
System Administration Tools
Administration Console allows you to manage a WebLogic Server domain containing
multiple WebLogic Server instances, clusters, and applications. The management
capabilities include:
!
Configuration
!
Stopping and starting servers
!
Monitoring server health and performance
!
Monitoring application performance
!
Viewing server logs
!
Assistants, which step you through the following tasks:
"
Creating JDBC conncection pools and DataSources
"
Deploying your applications
"
Configuring SSL
Using the Administration Console, system administrators can easily perform all
WebLogic Server management tasks without having to learn the JMX API or the
underlying management architecture. The Administration Server persists changes to
attributes in the config.xml file for the domain you are managing.
For more information, see:
!
“Starting and Using the Administration Console” on page 1-21
!
Administration Console Online Help at
http://e-docs.bea.com/wls/docs81b/ConsoleHelp/index.html. (The
online help is also available from the Administration Console by clicking on the
“?” icons.)
Command-Line Interface
The command-line interface allows you to manage a WebLogic Servers domain when
using the Administration Console is not practical or desired—such as when you want
to use scripts to manage your domain, when you cannot use a Web browser to access
the Administration Console, or if you prefer using the command-line interface over a
Configuring and Managing WebLogic Server
1-9
1
Overview of WebLogic System Administration
graphical user interface. You can use only the command-line interface to manage your
domain, or you may use the command-line interface in combination with other system
administration tools such as the Administration Console to manage you domain.
The command line interface invokes a Java class called weblogic.Admin. Arguments
for this class provide the ability to perform many common management functions
without the need to learn the JMX API. For more information, see:
!
!
Commands for Managing the Server Lifecycle
WebLogic Server API Reference (Javadocs - See the weblogic.management
packages.)
If you require more fine-grained control than the weblogic.Admin management
functions provide you can also use the command line interface to perform set or get
operations directly on Mbean attributes. This feature requires knowledge of the
WebLogic Server Mbean architecture. For more information, see the following
resources:
!
!
Commands for Managing WebLogic Server MBeans
Javadocs for WebLogic Server Classes at
http://e-docs.bea.com/wls/docs81b/javadocs/index.html.
!
"
Select the weblogic.management.configuration package for
configuration MBeans (to configure a WebLogic Domain)
"
Select the weblogic.management.runtime package for runtime MBeans
(for monitoring).
A reference of Mbeans and attributes is provided in the BEA WebLogic Server
Configuration Reference at
http://e-docs.bea.com/wls/docs81b/config_xml/index.html. This
reference is correlated with the elements representing MBeans in the
config.xml file.
JMX
Advanced Java programmers with knowledge of the JMX API from Sun Microsystems
Inc. and WebLogic Server Mbeans can write their own management components as a
Java class.
1-10
Configuring and Managing WebLogic Server
System Administration Tools
For more information, see:
!
Programming WebLogic JMX Services at
http://e-docs.bea.com/wls/docs81b/jmx/index.html.
!
WebLogic Server API Reference (Javadocs) at
http://e-docs.bea.com/wls/docs81b/javadocs/index.html. (See the
weblogic.management packages.)
Configuration Wizard
Use the Configuration Wizard to create a new WebLogic Server domain. This tool can
create domain configurations for stand-alone servers, Administration Servers with
Managed Servers, and clustered servers. The Configuration Wizard creates the
appropriate directory structure for your domain, a basic config.xml file, and scripts
you can use to start the servers in your domain.
You can run the Configuration Wizard either using a graphical user interface (GUI) or
in a text-based command line environment. You can invoke the wizard as an optional
part of the installation process or independently after installation. You can also create
user-defined domain templates for use by the Configuration Wizard.
For more information, see Creating Domains and Servers.
Java Utilities
Utility programs are provided for common tasks such as deploying an application and
testing DBMS configurations. For more information, see Using the WebLogic Java
Utilities.
Node Manager
Node Manager is a Java program provided with WebLogic Server that enables you to
start, shut down, restart, and monitor remote WebLogic Server instances. To enable
these capabilities, you run an instance of Node Manager on each physical machine in
your domain.
Configuring and Managing WebLogic Server
1-11
1
Overview of WebLogic System Administration
For more information, see Creating Domains and Servers.
SNMP
WebLogic Server includes the ability to communicate with enterprise-wide
management systems using Simple Network Management Protocol (SNMP). The
WebLogic Server SNMP capability enables you to integrate management of
WebLogic Servers into an SNMP-compliant management system that gives you a
single view of the various software and hardware resources of a complex, distributed
system.
For more information, see:
!
WebLogic SNMP Management Guide at
http://e-docs.bea.com/wls/docs81b/snmpman/index.html.
!
WebLogic SNMP MIB Reference at
http://e-docs.bea.com/wls/docs81b/snmp/index.html.
Logs
Many WebLogic Server operations generate logs of their activity. Each server has its
own log as well as a standard HTTP access log. These log files can be configured and
used in a variety of ways to monitor the health and activity of your servers and
applications.
For more information, see:
1-12
!
Logging
!
“Setting Up HTTP Access Logs” on page 7-14
!
Using WebLogic Logging Services at
http://e-docs.bea.com/wls/docs81b/logging/index.html.
Configuring and Managing WebLogic Server
Resources You Can Manage in a WebLogic Server Domain
You can also configure a special domain log that contains a definable subset of log
messages from all WebLogic Server instances in a domain. You can modify which
logged messages from a local server appear in the domain log using the system
administrating tools. You can view this domain log using the Administration Console
or a text editor/viewer.
For more information, see Domain Log Filters at
http://e-docs.bea.com/wls/docs81b/ConsoleHelp/domain_log_filters.
html.
Editing config.xml
You can manage a WebLogic Server domain by manually editing the persistent store
for configuration, the config.xml. (Other system administration tools automatically
save the configuration to the config.xml file.) Because of the difficulty of correctly
editing the XML syntax required in this file, this method of configuration is not
recommended but may provide advantages in limited situations.
Note: Do not edit the config.xml file while the Administration Server is running.
For more information, see BEA WebLogic Server Configuration Reference at
http://e-docs.bea.com/wls/docs81b/config_xml/index.html.
Resources You Can Manage in a WebLogic
Server Domain
This section discusses the domain resources you manage with the system
administration tools.
Configuring and Managing WebLogic Server
1-13
1
Overview of WebLogic System Administration
Servers
The administrative concept of a server represents an instance of WebLogic Server in
your domain. Using the system administration tools you can:
!
Start and stop servers. (To start and stop servers on a remote machine, you must
have Node Manager installed on the remote machine.) For more information see
“Node Manager” on page 1-11.
!
Configure a server’s connections: ports, HTTP settings, jCom settings, and time
outs.
!
Configure HTTP server functionality and Virtual Hosts
!
Configure logging and view logs
!
Deploy applications to specific servers
!
Configure WebLogic Server resources active on the server, such as JDBC
Connection Pools and startup classes.
Clusters
WebLogic Server clusters allow you to distribute the work load of your application
across multiple WebLogic Server instances. Clusters can improve performance and
provide fail-over should a server instance become unavailable. For example, clusters
provide several ways to replicate objects used in your applications so that data is not
lost in the event of hardware failure.
You can architect combinations of clusters to distribute the work load in a way that
provides the best performance for your applications.
Some services that are hosted on a single instance of WebLogic Server can be migrated
from one server to another in the event of server failure. The system administration
tools allow you to control these migrations.
For more information, see Using WebLogic Server Clusters at
http://e-docs.bea.com/wls/docs81b/cluster/index.html.
1-14
Configuring and Managing WebLogic Server
Resources You Can Manage in a WebLogic Server Domain
Machines
The administrative concept of a machine represents the physical machine that hosts an
instance of WebLogic Server. WebLogic Server uses machine names to determine the
optimum server in a cluster to which certain tasks, such as HTTP session replication,
are delegated.
Using the system administration tools you can define one or more machines, configure
Node Manger for those machines, and assign servers to the machines. For UNIX
machines, you can configure UID and GID information.
For more information, see Using WebLogic Server Clusters at
http://e-docs.bea.com/wls/docs81b/cluster/setup.html.
Network Channels
Network channels are an optional feature that you can use to configure additional ports
with one or more WebLogic Server instances or clusters. All servers and clusters that
use a network channel inherit the basic port configuration of the channel itself. You
can also customize a channel's port settings on an individual server using channel
fine-tuning. This fine-tuning process creates an additional network resource called a
Network Access Point.
For more information, see Configuring Network Resources at
http://e-docs.bea.com/wls/docs81b/adminguide/network.html.
JDBC
Java Database Connectivity (JDBC) allows Java programs to interact with common
DBMSs such as Oracle, Microsoft SQL Server, Sybase, and others.
Using the System Administration tools you can manage and monitor connectivity
between WebLogic Server and your database management system. Connectivity is
usually established through connection pools.
For more information, see JDBC.
Configuring and Managing WebLogic Server
1-15
1
Overview of WebLogic System Administration
JMS
The Java Message Service (JMS) is a standard API for accessing enterprise messaging
systems that allow communication between applications.
Using the system administration tools, you can define configuration attributes to:
!
Enable JMS
!
Create JMS servers
!
Create and/or customize values for JMS servers, connection factories,
destinations (physical queues and topics), distributed destinations (sets of
physical queue and topic members within a cluster), destination templates,
destination sort order (using destination keys), persistent stores, paging stores,
session pools, and connection consumers.
!
Set up custom JMS applications.
!
Define thresholds and quotas.
!
Enable any desired JMS features, such as server clustering, concurrent message
processing, destination sort ordering, persistent messaging, message paging, flow
control, and load balancing for distributed destinations.
For more information, see Configuring JMS.
WebLogic Messaging Bridge
A Messaging Bridge transfers messages between two messaging providers. The
providers may be another implementation of WebLogic JMS or a 3rd party JMS
provider.
For more information, see Using the WebLogic Messaging Bridge.
1-16
Configuring and Managing WebLogic Server
Resources You Can Manage in a WebLogic Server Domain
Web Servers and Web Components
WebLogic Server can perform as a fully functional Web server. WebLogic Server can
server both static files such as HTML files and dynamic files such as Java servlets or
Java ServerPages (JSP). Virtual hosting is also supported.
For more information on managing Web server functionality in WebLogic Server, see
“Configuring WebLogic Server Web Components” on page 7-1.
Applications
Application deployment tools, including the Administration Console allow you to
deploy, manage, update, and monitor your applications. The application deployment
tools also allow you to deploy and update applications in a cluster of WebLogic
Servers.
WebLogic Server uses a two-phase deployment model that gives you more control
over the deployment process. For more information, see WebLogic Server
Deployment.
Using the system administration tools you can:
!
Deploy applications to one or more WebLogic Servers or clusters in a domain.
!
Configure runtime parameters for the applications.
!
Monitor application performance
!
Configure security parameters
!
View an application’s deployment descriptor.
!
Protect access to an application based on security roles or a security policy. For
more information see Setting Protections for WebLogic Resources at
http://e-docs.bea.com/wls/docs81b/ConsoleHelp/security_7x.html#
securitypolicies.
Application Formats
You deploy applications in one or more of the following J2EE application formats:
Configuring and Managing WebLogic Server
1-17
1
Overview of WebLogic System Administration
!
Web Applications
!
Enterprise JavaBeans (EJB)
!
Enterprise Applications
!
J2EE Connectors
!
Web Services. Web services are deployed as a Web Application that includes a
special deployment descriptor that configures the Web Service.
For more information, see:
!
Developing Applications
!
Assembling and Configuring Web Applications
!
Deploying Applications and Modules
!
Developing WebLogic Server Applications
!
Programming WebLogic Enterprise Java Beans
!
Programming WebLogic J2EE Connectors
!
Programming WebLogic Web Services
!
Defining a Security Policy
!
Setting Protections for WebLogic Resources
Editing and Creating Deployment Descriptors with WebLogic Builder
In addition to using the Administration Console to edit deployment descriptors you can
also use the more robust WebLogic Builder tool that is included with your WebLogic
Server distribution. WebLogic Builder is a stand-alone graphical tool for assembling a
J2EE application, creating and editing deployment descriptors, and deploying an
application on WebLogic Server. For more information, see WebLogic Builder Online
Help at http://e-docs.bea.com/wls/docs81b/wlbuilder/index.html.
1-18
Configuring and Managing WebLogic Server
Resources You Can Manage in a WebLogic Server Domain
Startup and Shutdown Classes
A startup class is a Java program that is automatically loaded and executed when a
WebLogic Server is started or restarted and after other server initialization tasks have
completed. A shutdown class is automatically loaded and executed when a WebLogic
Server is shut down either from the Administration Console or using the
weblogic.Admin shutdown command.
You use the system administration tools to register and manage startup and shutdown
classes.
For more information, see Starting and Stopping WebLogic Server Instances.
JNDI
The Java Naming and Directory Interface (JNDI) API enables applications to look up
objects—such as Data Sources, EJBs, JMS, and MailSessions—by name. You can
view the JNDI tree through the Administration Console.
For additional information, see:
!
JNDI
!
Programming WebLogic JNDI at
http://e-docs.bea.com/wls/docs81b/jndi/index.html.
Transactions
You use the system administration tools to configure and enable the WebLogic Server
Java Transaction API (JTA). The transaction configuration process involves
configuring:
!
Transaction time outs and limits
!
Transaction Manager behavior
For more information, see:
!
JTA
Configuring and Managing WebLogic Server
1-19
1
Overview of WebLogic System Administration
!
Programming WebLogic JTA
XML
The XML Registry is a facility for configuring and administering the XML resources
of an instance of WebLogic Server. XML resources in WebLogic Server include the
parser used by an application to parse XML data, the transformer used by an
application to transform XML data, external entity resolution, and caching of external
entities.
For more information, see Administering WebLogic Server XML at
http://e-docs.bea.com/wls/docs81b/xml/xml_admin.html.
Security
The WebLogic Server security subsystem allows you to plug in third-party security
solutions and also provides out-of-the box implementations for many common security
systems. You can also create your own security solution and implement it in WebLogic
Server.
For backwards compatibility, the security functionality available in version 6.0 and 6.1
of WebLogic Server is also supported when running in Compatibility Mode.
Using the administration tools, you can define realms, users, groups, passwords, ACLs
and other security features.
For more information, see:
!
Managing WebLogic Security at
http://e-docs.bea.com/wls/docs81b/secmanage/index.html.
!
Using Compatibility Security in Managing WebLogic Security at
http://e-docs.bea.com/wls/docs81b/secmanage/security6.html.
!
“Security” in the Administration Console Help at
http://e-docs.bea.com/wls/docs81b/ConsoleHelp/security_7x.html.
!
1-20
Security Index Page
Configuring and Managing WebLogic Server
Starting and Using the Administration Console
WebLogic Tuxedo Connector
WebLogic Tuxedo Connector provides interoperability between WebLogic Server
applications and Tuxedo services. The connector allows WebLogic Server clients to
invoke Tuxedo services and Tuxedo clients to invoke WebLogic Server Enterprise
Java Beans (EJBs) in response to a service request.
For more information see WebLogic Tuxedo Connector at
http://e-docs.bea.com/wls/docs81b/wtc.html.
Jolt
Jolt is a Java-based client API that manages requests to BEA Tuxedo services via a Jolt
Service Listener (JSL) running on a Tuxedo server.
For more information, see BEA Jolt at
http://e-docs.bea.com/tuxedo/tux80/interm/jolt.htm.
Mail
WebLogic Server includes the JavaMail API version 1.1.3 reference implementation
from Sun Microsystems.
For more information, see “Using JavaMail with WebLogic Server Applications”
under Programming Topics at
http://e-docs.bea.com/wls/docs81b/programming/topics.html.
Starting and Using the Administration
Console
This section contains instructions for starting and using the Administration Console.
Configuring and Managing WebLogic Server
1-21
1
Overview of WebLogic System Administration
Browser Support for the Administration Console
To run the Administration Console, use one of the following Web browsers:
!
Microsoft Internet Explorer, version 5 on Windows
!
Microsoft Internet Explorer, version 6 on Windows
!
Netscape, version 4.7 on Windows or SunOS
!
Netscape, version 6, on Windows or SunOS
If you use a Web browser that is not on the above list you may experience functional
or formatting problems.
Starting the Administration Console
1. Start a WebLogic Administration Server. For more information, see Starting
Administration Servers.
2. Open one of the supported Web browsers and open the following URL:
http://hostname:port/console
Where hostname is the DNS name or IP address of the Administration Server
and port is the address of the port on which the Administration Server is
listening for requests (7001 by default). If you started the Administration Server
using Secure Socket Layer (SSL), you must add s after http as follows:
https://hostname:port/console
For more information about setting up SSL for system administration, see Server
--> Configuration --> Keystores and SSL.
3. When the login page appears, enter the user name and the password you used to
start the Administration Server (you may have specified this user name and
password during the installation process) or enter a user name that belongs to one
of the following security groups: Administrators, Operators, Deployers, or
Monitors. These groups provide various levels of access to system administration
functions in the Administration Console. For more information, see “Protecting
System Administration Operations” on page 8-1.
1-22
Configuring and Managing WebLogic Server
Using WebLogic Server with Web Servers
Using the security system, you can add or delete users to one of these groups to
provide controlled access to the console. For more information, see “Protecting
System Administration Operations” on page 8-1.
Note: If you have your browser configured to send HTTP requests to a proxy server,
then you may need to configure your browser to not send Administration
Server HTTP requests to the proxy. If the Administration Server is on the same
machine as the browser, then ensure that requests sent to localhost or
127.0.0.1 are not sent to the proxy.
Using the Administration Console
For more information on using the Administration Console, see Configuring Your
Domain Using the Administration Console.
Using WebLogic Server with Web Servers
You can proxy requests from popular Web servers to an instance of WebLogic Server
or a cluster of WebLogic Servers by using one of the Web server plug-ins. Plug-ins are
available for the following Web servers:
!
Netscape Enterprise Server or IPlanet
!
Microsoft Internet Information Server
!
Apache
Because these plug-ins operate in the native environment of the Web server,
management of the plug-ins is done using the administration facilities of that Web
server.
For more information, see Using WebLogic Server with Plug-ins at
http://e-docs.bea.com/wls/docs81b/plugins/index.html.
Special servlets are also available to proxy requests from an instance of WebLogic
Server to another instance of WebLogic Server or to a cluster of WebLogic Servers.
For more information, see:
Configuring and Managing WebLogic Server
1-23
1
Overview of WebLogic System Administration
!
Configure Proxy Plug-ins at
http://e-docs.bea.com/wls/docs81b/plugins/http_proxy.html.
!
Proxying Requests to a WebLogic Cluster at
http://e-docs.bea.com/wls/docs81b/cluster/setup.html#proxyplugi
ns.
Monitoring
The system administration tools contain extensive capabilities for monitoring
WebLogic Servers, domains, and resources. Using the tools you can monitor:
!
!
!
1-24
Server health and performance:
"
Execute Queues
"
Connections
"
Sockets
"
Threads
"
Throughput
"
Memory Usage
Security:
"
Locked-out users
"
Invalid Logins
"
Login attempts
Transactions:
"
Committed transactions
"
Rolledback transactions
!
JMS connections and servers
!
WebLogic Messaging Bridge
!
Applications:
Configuring and Managing WebLogic Server
Licenses
!
"
Servlet sessions
"
Connector connection pools
"
EJB performance
JDBC connections and connection pools
For more information, see Monitoring a WebLogic Server Domain at
http://e-docs.bea.com/wls/docs81b/adminguide/monitoring.html
Licenses
WebLogic Server requires a valid license to function.
An evaluation copy of WebLogic Server is enabled for 30 days so you can start using
WebLogic Server immediately. To use WebLogic Server beyond the 30-day
evaluation period, you will need to contact your salesperson about further evaluation
or purchasing a license for each IP address on which you intend to use WebLogic
Server. All WebLogic Server evaluation products are licensed for use on a single
server with access allowed from up to three unique client IP addresses.
If you downloaded WebLogic Server from the BEA Web site, your evaluation license
is included with the distribution. The WebLogic Server installation program allows
you to specify the location of the BEA home directory, and installs a BEA license file,
license.bea, in that directory.
For more information, see Installing and Updating a WebLogic Server License.
Configuring and Managing WebLogic Server
1-25
1
1-26
Overview of WebLogic System Administration
Configuring and Managing WebLogic Server
CHAPTER
2
Overview of WebLogic
Server Domains
The following sections describe WebLogic Server domains and their contents:
!
“What Is a Domain?” on page 2-1
!
“Domain Restrictions” on page 2-7
What Is a Domain?
A domain is the basic administration unit for WebLogic Server instances. A domain
consists of one or more WebLogic Server instances (and their associated resources)
that you manage with a single Administration Server. You can define multiple
domains based on different system administrators’ responsibilities, application
boundaries, or geographical locations of servers. Conversely, you can use a single
domain to centralize all WebLogic Server administration activities.
If you create multiple domains, keep in mind that each domain is represented in a
separate configuration file (config.xml), and you cannot perform configuration or
deployment tasks in multiple domains at the same time. When you use the
Administration Console to perform a configuration task, the changes you make apply
to the currently selected domain. To make changes in a different domain, you must
select that domain. For this reason, the servers instances, applications, and resources
in one domain should be treated as being independent of servers, applications, and
resources in a different domain.
Configuring and Managing WebLogic Server
2-1
2
Overview of WebLogic Server Domains
Contents of a Domain
A domain can include multiple WebLogic Server clusters and non-clustered
WebLogic Server instances. Strictly speaking, a domain could consist of only one
WebLogic Server instance—however, in that case that sole server instance would be
an Administration Server, because each domain must have exactly one Administration
Server. Although the scope and purpose of a domain can vary significantly, most
WebLogic Server domains contain the components described in this section.
The following figure shows a production environment that contains an Administration
Server, three standalone Managed Servers, and a cluster of three Managed Servers.
Domain
Managed
Server
Administration
Server
Resources/
Services
Managed
Server
Resources/
Services
Managed
Server
Resources/
Services
Cluster
Resources/ Managed
Server
Services
2-2
Configuring and Managing WebLogic Server
Managed
Server
Managed
Server
What Is a Domain?
Administration Server
Each WebLogic Server domain must have one server instance that acts as the
Administration Server. You use the Administration Server, programmatically or via
the Administration Console, to configure all other server instances and resources in the
domain.
Role of the Administration Server
Before you start the Managed Servers in a domain, you start the Administration Server.
When you start a standalone or clustered Managed Server, it contacts the
Administration Server for its configuration information. In this way, the
Administration Server operates as the central control entity for the configuration of the
entire domain.
You can invoke the services of the Administration Server in the following ways:
!
WebLogic Server Administration Console—The Administration Console is a
graphical user interface (GUI) to the Administration Server.
!
WebLogic Server Application Programming Interface (API)—You can write a
program to modify configuration attributes using the API provided with
WebLogic Server.
!
WebLogic Server command-line utility—This utility allows you to create scripts
to automate domain management.
Whichever method is used, the Administration Server for a domain must be running to
modify the domain configuration.
When the Administration Server starts, it loads the config.xml for the domain. It
looks for config.xml in the current directory. Unless you specify another directory
when you create a domain, config.xml is stored in:
BEA_HOME/user_projects/mydomain
where mydomain is a domain-specific directory, with the same name as the domain.
Each time the Administration Server starts successfully, and each time you modify the
configuration, a backup configuration file is created. For more information, see
“Backing up config.xml” on page 10-6.
Configuring and Managing WebLogic Server
2-3
2
Overview of WebLogic Server Domains
For more information about the Administration Server and its role in the WebLogic
Server JMX management system, see “System Administration Tools” in the
Administration Guide.
What Happens if the Administration Server Fails?
The failure of an Administration Server for a domain does not affect the operation of
Managed Servers in the domain. If an Administration Server for a domain becomes
unavailable while the server instances it manages—clustered or otherwise—are up and
running, those Managed Servers continue to run. If the domain contains clustered
server instances, the load balancing and failover capabilities supported by the domain
configuration remain available, even if the Administration Server fails.
If an Administration Server fails because of a hardware or software failure on its host
machine, other server instances on the same machine may be similarly affected.
However, the failure of an Administration Server itself does not interrupt the operation
of Managed Servers in the domain.
For more information, see “Recovering Failed Servers” on page 10-1.
Managed Servers and Clustered Managed Servers
In a domain, server instances other than the Administration Server are referred to as
Managed Servers. Managed Servers host the components and associated resources that
constitute your applications—for example, JSPs and EJBs. When a Managed Server
starts up, it connects to the domain’s Administration Server to obtain configuration and
deployment settings.
Note: Managed Servers in a domain can start up independently of the Administration
Server if the Administration Server is unavailable. See “Recovering Failed
Servers” on page 10-1 for more information.
Two or more Managed Servers can be configured as a WebLogic Server cluster to
increase application scalability and availability. In a WebLogic Server cluster, most
resources and services are deployed to each Managed Server (as opposed to a single
Managed Server,) enabling failover and load balancing. To learn which component
types and services can be clustered—deployed to all server instances in a cluster—see
“What Types of Objects Can Be Clustered?” in Using WebLogic Server Clusters.
2-4
Configuring and Managing WebLogic Server
What Is a Domain?
You can create a non-clustered Managed Server and add it to a cluster by configuring
pertinent configuration parameters for the server instance and the cluster. Conversely,
you can remove a Managed Server from a cluster by re-configuring the parameters
appropriately. The key difference between clustered and non-clustered Managed
Servers is support for failover and load balancing—these features are available only in
a cluster of Managed Servers.
Your requirements for scalability and reliability drive the decision on whether or not
to cluster Managed Servers. For example, if your application is not subject to variable
loads, and potential interruptions in application service are acceptable, clustering may
be unnecessary.
For more information about the benefits and capabilities of a WebLogic Server cluster,
see “Introduction to WebLogic Server Clustering” in Using WebLogic Server Clusters
A single domain can contain multiple WebLogic Server clusters, as well as multiple
Managed Servers that are not configured as clusters.
Resources and Services
In addition to the Administration Server and Managed Servers, a domain also contains
the resources and services required by Managed Servers and hosted applications
deployed in the domain.
Examples of domain-level resources include:
!
Machine definition identify a particular, physical piece of hardware. A Machine
definition is used to associate a computer with the Managed Server(s) it hosts.
This information is used by Node Manager in restarting a failed Managed
Server, and by a clustered Managed Server in selecting the best location for
storing replicated session data. For more information about Node Manager, see
“Overview of Node Manager” on page 3-1.
!
Network channels, an optional resource that can be used to define default ports,
protocols, and protocol settings. After creating a network channel, you can
assign it to any number of Managed Servers and clusters in the domain.
See“Configuring Network Resources” on page 11-1 for more information.
Managed Servers in the domain host their own resources and services. You can deploy
resources and services to selected Managed Servers or to a cluster. Examples of
deployable resources include:
!
application components, such as EJBs
Configuring and Managing WebLogic Server
2-5
2
Overview of WebLogic Server Domains
!
connectors, startup classes,
!
JDBC connection pools,
!
JMS servers
Common Domain Types
There are two basic types of domains:
!
Domain with Managed Servers: A simple production environment can consist
of a domain with several Managed Servers that host applications, and an
Administration Server to perform management operations. In this configuration,
applications and resources are deployed to individual Managed Servers;
similarly, clients that access the application connect to an individual Managed
Server.
Production environments that require increased application performance,
throughput, or availability may configure two or more of Managed Servers as a
cluster. Clustering allows multiple Managed Servers to operate as a single unit to
host applications and resources. For more information about the difference
between a standalone and clustered Managed Servers, see “Managed Servers and
Clustered Managed Servers” on page 2-4.
!
Standalone Server Domain: For development or test environments, you may
want to deploy a single application and server independently from servers in a
production domain. In this case, you can deploy a simple domain consisting of a
single server instance that acts as an Administration Server that, and also hosts
the applications you are developing. The examples domain that you can install
with WebLogic Server is an example of a standalone server domain.
Note: In production environments, BEA recommends that you deploy applications
only on Managed Servers in the domain; the Administration Server should be
reserved for management tasks.
2-6
Configuring and Managing WebLogic Server
Domain Restrictions
Domain Restrictions
Many WebLogic Server installations consist of a single domain that includes all the
Managed Servers required to host applications. If you create more than one domain,
note the following restrictions:
!
Each domain requires its own Administration Server for performing
management activities. When you are using the Administration Console to
perform management and monitoring tasks, you can switch back and forth
between domains, but in doing so, you are connecting to different
Administration Servers.
!
All Managed Servers in a cluster must reside in the same domain; you cannot
“split” a cluster over multiple domains.
!
You cannot share a configured resource or subsystem between domains. For
example, if you create a JDBC connection pool in one domain, you cannot use it
with a Managed Server or cluster in another domain. (Instead, you must create a
similar connection pool in the second domain.)
Domain Directory and config.xml
The configuration of a domain is stored in the config.xml file for the domain.
config.xml specifies the name of the domain and the configuration parameter
settings for each server instance, cluster, resource, and service in the domain. The
config.xml for a domain is stored in the domain directory, which you specify when
you create the domain.
The domain directory also contains default script files that you can use to start the
Administration Server and Managed Servers in the domain. For more information
about these scripts and other methods of starting a server instance, see “Starting and
Stopping WebLogic Server.
Configuring and Managing WebLogic Server
2-7
2
Overview of WebLogic Server Domains
Domain Directories Structure
In prior releases of WebLogic Server, domain directories were created within the
directory structure of the Weblogic Server installation. With WebLogic Server 7.0 and
later, you can set up domain directories outside the product installation directory tree,
in any location on the system that can access the Weblogic Server installation and the
JDK.
This new directory structure is more flexible. It allows you to store your application
code in a directory structure separate from WebLogic Server executables and related
files—this practice is recommended.
The domain directory structure should have:
!
!
A root directory with the same name as the domain, such as mydomain or
petstore. This directory should contain the following:
"
The configuration file (usually config.xml) for the domain.
"
Any scripts you use to start server instances and establish your environment.
A subdirectory for storing applications for the domain, typically named
applications.
Note: If you plan to use the WebLogic Server’s auto-deployment feature—available
when a domain is running in development mode—the subdirectory for
applications must be named applications. For information about
auto-deployment, see “Auto-Deployment” in Developing WebLogic Server
Applications.
You can create other directories within the domain directory structure, as desired.
When you start a server instance in a domain for the first time, Weblogic Server creates
the following subdirectories in the domain directory:
!
data for storing security information
!
logs for storing domain-level logs
!
server_name for each server running in the domain, for storing server-level
logs
!
temp for storing temporary files
For example:
2-8
Configuring and Managing WebLogic Server
Domain Restrictions
You can use the Configuration Wizard to create and configure domains. At the end of
a custom installation, you are prompted to run the Configuration Wizard. You can also
start the Configuration Wizard from the Start menu or by using a script. For more
information, see Creating Domains and Servers.
When you use the Configuration Wizard to create a domain, it creates the
user_projects directory in the BEA Home directory as a container for your
domains. It also creates a root directory for the new domain and any other directories
specified in the domain template that you select to create the domain.
A Server’s Root Directory
All instances of WebLogic Server use a root directory to store runtime data and to
provide the context for any relative pathnames in the server’s configuration.
In addition, an Administration Server uses its root directory as a repository for the
domain’s configuration data (such as config.xml) and security resources (such as the
default, embedded LDAP server), while a Managed Server stores replicated
administrative data in is root directory. (See Figure 2-1.)
Configuring and Managing WebLogic Server
2-9
2
Overview of WebLogic Server Domains
Figure 2-1 Root Directory for WebLogic Server Instances
Root Directory for
Administration Server
Administration Server
config.xml
Security data
context
Runtime data
Contact Administration Server for
security and configuration data
Root Directory for
Managed Server
Managed Server
context
Runtime and
replicated data
Multiple instances of WebLogic Server can use the same root directory. However, if
your server instances share a root directory, make sure that all relative filenames are
unique. For example, if two servers share a directory and they both specify
.\MyLogFile, then each server instance will overwrite the other’s .\MyLogFile.
To determine the root directory for an Administration Server, WebLogic Server does
the following:
!
2-10
If the server’s startup command includes the
-Dweblogic.RootDirectory=path option, then the value of path is the root
directory.
Configuring and Managing WebLogic Server
Domain Restrictions
!
If -Dweblogic.RootDirectory=path is not specified, and if the working
directory (that is, the directory from which you issue the startup command)
contains a config.xml file, then the working directory is the root directory.
!
If neither of the previous statements is true, then the server looks for a
config.xml file in working-directory/config/domain-name. If it finds
config.xml in this directory, then
working-directory/config/domain-name is the root directory.
!
If WebLogic Server cannot find a config.xml file, then it offers to create one.
If you use the Node Manager to start a Managed Server, the root directory is located
on the computer that hosts the Node Manager process. To determine the location of the
server’s root directory, WebLogic Server does the following:
!
If you specified a root directory in the Administration Console on the Server -->
Configuration --> Remote Start tab, then the directory you specified is the root
directory.
!
If you did not specify a root directory in the Administration Console, then the
root directory is
WL_HOME\common\nodemanager\server-name\server-name.log
where WL_HOME is the directory in which you installed WebLogic Server on the
Node Manager’s host computer.
If you do not use the Node Manager to start a Managed Server (and therefore use the
java weblogic.Server command or a script that calls that command), WebLogic
Server does the following to determine the root directory:
!
If the server’s startup command includes the
-Dweblogic.RootDirectory=path option, then the value of path is the root
directory.
!
If -Dweblogic.RootDirectory=path is not specified, then the working
directory is the root directory. For example, if you run the weblogic.Server
command from c:\config\MyManagedServer, then
c:\config\MyManagedServer is the root directory.
To make it easier to maintain your domain configurations and applications across
upgrades of WebLogic Server software, it is recommended that the root directory not
be the same as the installation directory for the WebLogic Server software.
Configuring and Managing WebLogic Server
2-11
2
2-12
Overview of WebLogic Server Domains
Configuring and Managing WebLogic Server
CHAPTER
3
Overview of Node
Manager
The Managed Servers in a production WebLogic Server environment are often
distributed across multiple machines and geographic locations.
Node Manager is a stand-alone Java utility, provided with WebLogic Server, that
allows you to perform common operations tasks for a Managed Server, regardless of
its location with respect to its Administration Server. If you run Node Manager on a
machine that hosts Managed Servers, you can start and stop the Managed Servers
remotely. Node Manager can also automatically restart a Managed Server after an
unexpected failure.
The following sections describe Node Manager, its capabilities, and how it fits into a
WebLogic Server environment.
!
“Introduction to Node Manager” on page 3-1
!
“Node Manager Architecture and Environment” on page 3-2
!
“Node Manager Capabilities” on page 3-5
For instructions on how to configure and use Node Manager, see “Configuring,
Starting, and Stopping Node Manager” on page 4-1.
Introduction to Node Manager
Node Manager enables you to perform these tasks:
Configuring and Managing WebLogic Server
3-1
3
Overview of Node Manager
!
Start and stop remote Managed Servers.
!
Monitor the self-reported health of Managed Servers and automatically kill
server instances whose health state is “failed”.
!
Automatically restart Managed Servers that have the “failed” health state, or
have shut down unexpectedly due to a system crash or reboot.
Node Manager Architecture and
Environment
Figure 3-1 illustrates how Node Manager works with other resources in your
WebLogic Server environment to start, stop, and restart Managed Servers.
3-2
Configuring and Managing WebLogic Server
Node Manager Architecture and Environment
Figure 3-1 Node Manager Architecture
Node Manager Runs on Machines that Host Managed
Servers
To take advantage of Node Manager capabilities, you must run a Node Manager
process on each machine that hosts Managed Servers. You can manage multiple
Managed Servers on a single machine with one Node Manager process—in Figure 3-1,
the two Managed Servers on Machine C can be controlled by a single Node Manager
process.
You cannot use Node Manager to start or stop an Administration Server. In a
production environment, there is no need to run Node Manager on a machine that runs
an Administration Server, unless that machine also runs Managed Servers. In a
Configuring and Managing WebLogic Server
3-3
3
Overview of Node Manager
development environment, you may wish to run Node Manager on a machine that
hosts an Administration Server and one or more Managed Servers, because doing so
allows you to start and stop the Managed Servers using the Administration Console.
Node Manager Should Run as a Service
The WebLogic Server installation process installs Node Manager to run as a daemon
on UNIX machines or as a Windows service on Windows-based machines. A key
Node Manager feature is the ability to restart Managed Servers after a failure. If the
failure is a machine crash, running Node Manager as a service ensures that Node
Manager starts up automatically when the machine reboots, and is available to restart
Managed Servers on that machine.
Node Manager is Domain-Independent
A Node Manager process is not associated with a specific WebLogic domain. Node
Manager resides outside the scope of a domain, and you can use a single Node
Manager process to start Managed Servers in any WebLogic Server domain that it can
access—in Figure 3-1, Managed Server 2 and Managed Server 3 could be in separate
domains, and controlled by a single Node Manager process.
Node Manager Clients
You can invoke Node Manager’s capabilities using the WebLogic Server
Administration Console or JMX clients such as the weblogic.Admin command-line
utility. Typically, Node Manager is called by an Administration Server on a remote
machine. However, Node Manager can be called by local Administration Server as
well—allowing you to issue commands to co-resident Managed Servers using the
Administration Console.
3-4
Configuring and Managing WebLogic Server
Node Manager Capabilities
Node Manager Uses SSL
Communication between Node Manager and Managed Servers, Administration
Servers, or other clients requires two-way Secure Socket Layer (SSL) protocol, which
provides authentication and encryption. Node Manager uses two-way SSL to verify the
identity of Managed Servers that communicate with it. You cannot use Node Manager
features with an unsecured communication protocol.
Native Support for Node Manager
BEA provides native Node Manager libraries for Windows, Solaris, HP UX, Linux on
Intel, Linux on Z-Series, and AIX operating systems.
For other UNIX and Linux operating Systems, you must disable the
weblogic.nodemanager.nativeVersionEnabled option at the command line
when starting Node Manager to use the pure Java version. For more information. See
“Node Manager Properties” on page 4-10.
Native Node Manager is not supported on Open VMS, OS/390, AS400, UnixWare, or
Tru64 UNIX.
Node Manager Capabilities
The following sections describe Node Manager functionality.
Start Managed Servers
Client requests to start a Managed Server using Node Manager are issued to the
Administration Server for the domain that contains the Managed Server. The
Administration Server dispatches the start command to the Node Manager process on
the machine that hosts the target Managed Server. Node Manager forwards the start
request to the target Managed Server for execution. If the Managed Server does not
respond within 60 seconds, the Node Manager sets the state of the Managed Server to
Configuring and Managing WebLogic Server
3-5
3
Overview of Node Manager
UNKNOWN. Node Manager does not retry the start command. If the Managed Server
successfully starts and establishes a connection with Node Manager, the state of the
Managed Server is updated appropriately.
Node Manager starts a Managed Server in its last runtime state, rather than in the
startup mode configured for the server instance. The startup mode for a server instance
is configured on the Server—>Configuration—>General tab; by default, the startup
mode is RUNNING. Node Manager does not refer to this attribute value when starting a
Managed Server.
When Node Manager starts a Managed Server, it uses the startup arguments configured
for the Managed Server in the Server—>Configuration—>Remote Start tab.
Note: Node Manager uses the same command arguments that you supply when
starting a Managed Server using a script or at the command line. For
information about startup arguments, see “weblogic.Server Command-Line
Reference” in WebLogic Server Command Reference.
If you do not specify startup arguments for a Managed Server in its Remote Start tab,
Node Manager uses its own properties as defaults to start the Managed Server. (See
“Node Manager Properties” on page 4-10.) Although the Node Manager property
values may suffice to boot a Managed Server, to ensure a consistent and reliable boot
process, you should configure startup arguments for each Managed Server.
Node Manager starts a Managed Server in a dedicated process on the target machine,
separate from the Node Manager and Administration Server processes, in the same
directory where the Node Manager process is running.
The messages that would otherwise be output to STDOUT or STDERROR when starting a
Managed Server are instead displayed in the Administration Console and written to the
Node Manager log file for that server instance. For more information, see “Managed
Server Log Files” on page 4-13.
Suspend or Stop Managed Servers
Client requests to stop or suspend a Managed Server using Node Manager are issued
to the Administration Server for the domain that contains the Managed Server. The
Administration Server dispatches the command directly to the target Managed Server.
If the Administration Server cannot reach the target Managed Server, the command is
dispatched to the Node Manager process running on the target Managed Server’s
3-6
Configuring and Managing WebLogic Server
Node Manager Capabilities
machine. The Node Manager forwards the request to the target Managed Server for
execution. If the Managed Server fails to respond to a shutdown request from the Node
Manager, the Node Manager process itself performs the shutdown.
Shutdown Failed Managed Servers
Node Manager periodically checks the self-reported heath status of Managed Servers
that it has started. (For information about how a Managed Server monitors its health,
see “Server Self-Health Monitoring” on page 9-2.) By default, Node Manager issues a
health query to a Managed Server every 180 seconds.
Node Manager will automatically kill a Managed Server that reports its health state as
“failed”, if the Managed Server’s Auto Kill If Failed attribute is true. By default,
the Auto Kill If Failed attribute is false. If you want Node Manager to restart a
Managed Server that is hung, set Auto Kill If Failed to true.
If a Managed Server does not respond to three consecutive health queries in a row,
Node Manager considers the Managed Server to be “failed”, and shuts it down, if Auto
Kill If Failed is set.
For instructions on controlling the frequency with which Node Manager checks the
health state of a Managed Server, see “Configure Monitoring, Shutdown and Restart
for Managed Servers” on page 4-6.
Restart of Crashed and Failed Managed Servers
By default, Node Manager automatically restarts Managed Server that have crashed,
and Managed Servers that it killed because their health state was “failed”.
By default, Node Manager will restart a Managed Server no more than 2 times within
a one hour period. You can configure how many times Node Manager will restart a
Managed Servers it controls, and the period of time over which it will do the restarts.
For instructions, see “Configure Monitoring, Shutdown and Restart for Managed
Servers” on page 4-6.
Note: If you stop a Node Manager process that is currently monitoring Managed
Servers, do not shut down those Managed Servers while the Node Manager
process is shut down. Node Manager will be unaware of shutdowns performed
Configuring and Managing WebLogic Server
3-7
3
Overview of Node Manager
on Managed Servers while it was down. When Node Manager is restarted, if a
Managed Server it was previously monitoring is not running, it will
automatically restart it.
Prerequisites for Automatic Restart of Managed Servers
For Node Manager to restart failed Managed Servers, the behavior must be configured
appropriately, as described in “Configure Monitoring, Shutdown and Restart for
Managed Servers” on page 4-6. In addition, the following prerequisites apply:
3-8
!
A Node Manager process can automatically monitor, shutdown, and restart only
those Managed Servers that it started. It cannot provide these services for
Managed Servers booted directly from the command line.
!
If the event that caused a Manager Server to fail also causes Node Manager to
fail, the Node Manager process on the machine where the Managed Server runs
must be restarted, either by the operating system or manually, to be available to
restart the failed Managed Server.
Configuring and Managing WebLogic Server
CHAPTER
4
Configuring, Starting,
and Stopping Node
Manager
Node Manager is a stand-alone utility you can run on machines that host Managed
Servers that allows to you start and stop the Managed Servers remotely. Node Manager
can also automatically restart a Managed Server after an unexpected failure. For a full
discussion of Node Manager functionality, see “Node Manager Capabilities” on page
3-5.
The following sections describe how to configure and use Node Manager:
!
“Configuring Node Manager” on page 4-1
!
“Starting and Stopping Node Manager” on page 4-6
!
“Troubleshooting Node Manager” on page 4-13
Configuring Node Manager
This section describes the default configuration for Node Manager after installation,
and the tasks required to configure Node Manager for a production environment.
Configuring and Managing WebLogic Server
4-1
4
Configuring, Starting, and Stopping Node Manager
Default Configuration
Node Manager is ready-to-run after WebLogic Server installation if you run Node
Manager and the Administration Server on the same machine, and use the
demonstration SSL configuration. By default, the following behaviors will be
configured:
!
You can start a Managed Server using Node Manager, via the Administration
Console. If a Managed Server does not respond to the start command within 60
seconds, Node Manager sets the server’s state to UNKNOWN. This does not affect
the target server instances’s ability to start up and communicate with Node
Manager. If the target server’s startup process takes longer than 60 seconds,
Node Manager will still accept messages from the server instance, and reset the
server instance’s state as appropriate. However, Node Manager will not re-issue
the start command.
!
Node Manager will monitor the Managed Servers that it has started—it will
check the self-reported health status of each Managed Server every 180 seconds.
If a Managed Server does not respond to three consecutive health inquiries,
Node Manager considers the Managed Server “failed”.
!
Automatic shutdown of Managed Servers is disabled. Node Manager will not
kill Managed Server processes that are failed.
!
Automatic restart of Managed Servers is enabled. Node Manager will restart:
"
"
Managed Servers that it killed, and
Managed Servers that were running when a failure condition resulted in an
system reboot
up to two times within a 60 minute interval.
Configuration Checklist
This section summarizes the tasks required to configure Node Manager for a
production environment, and tailor its behavior.
!
4-2
Configure Node Manager to accept commands from remote hosts—In a
production environment, Node Manager must accept commands from remote
hosts. To enable this, perform these tasks:
Configuring and Managing WebLogic Server
Configuring Node Manager
a. “Set Up the Node Manager Hosts File” on page 4-3
b. “Reconfigure Startup Service” on page 4-4
c. “Update nodemanager.properties” on page 4-4
d. “Configure a Machine to Use Node Manager” on page 4-5
e. “Configure Managed Server Startup Arguments” on page 4-5
f. “Ensure Administration Server Address is Defined” on page 4-5
!
Configure Node Manager for production security components—By default
Node Manager runs with demonstration security components. To use production
security components, “Configure SSL for Node Manager” on page 4-6.
!
Tailor monitoring and restart behavior—To change Node Manager’s
monitoring, shutdown and restart behaviors, see “Configure Monitoring,
Shutdown and Restart for Managed Servers” on page 4-6.
Set Up the Node Manager Hosts File
Node Manager accepts commands from Administration Servers running on the same
machine and on trusted hosts. Trusted hosts are identified by IP address or DNS name
in the nodemanager.hosts file, which is installed in the
WL_HOME\common\nodemanager\config directory, where WL_HOME is the top-level
installation directory for WebLogic Server.
Note: You can specify a different name and location for the trusted hosts file using
the weblogic.nodemanager.trustedHosts command-line argument. For
more information, see “Node Manager Properties” on page 4-10.
By default, nodemanager.hosts is empty. To add trusted hosts, edit the file with a
text editor, and add one line for each trusted host on which an Administration Server
runs. If you want Node Manager to accept commands from any host, put an asterisk in
the hosts file.
If you identify a trusted host by its DNS name, you must enable reverse DNS lookup
when starting Node Manager. By default, reverse DNS lookup is disabled. You can
enable reverse DNS lookup with the command-line argument:
-Dweblogic.nodemanager.reverseDnsEnabled=true
Configuring and Managing WebLogic Server
4-3
4
Configuring, Starting, and Stopping Node Manager
Reconfigure Startup Service
The WebLogic Server installation process installs Node Manager as a Windows
service, or a daemon on UNIX systems. By default, the service starts up Node Manager
to listen on localhost:5555.
When you configure Node Manager to accept commands from remote systems, you
must uninstall the default Node Manager service, and reinstall the Node Manager
service, specifying a non-localhost Listen Address.
The directory WL_HOME\server\bin (where WL_HOME is the top-level directory for
the WebLogic Server installation) contains uninstallNodeMgrSvc.cmd, a script for
uninstalling the Node Manager service, and installNodeMgrSvc.cmd, a script for
installing Node Manager as a service.
1. Delete the service using uninstallNodeMgrSvc.cmd.
2. Edit installNodeMgrSvc.cmd to specify Node Manager’s Listen Address and
Listen Port.
Notes: If you identify Node Manager’s Listen Address by IP address (except for the
localhost address, 127.0.0.1), you must disable Host Name Verification on
remote Administration Servers, or other clients such as weblogic.Admin, that
will access Node Manager.
Make the same edits to uninstallNodeMgrSvc.cmd as you make to
installNodeMgrSvc.cmd, so that you can successfully uninstall the service
in the future, as desired.
3. Run installNodeMgrSvc.cmd to re-install Node Manager as a service, listening
on the updated address and port.
Update nodemanager.properties
If Node Manager must accept commands from remote clients, and you will start Node
Manager from the command line, add the Node Manager’s Listen Address and Listen
Port to the nodemanager.properties file. Update nodemanager.properties on
each system on which Node Manager will run. For more information on
nodemanager.properties, see “Node Manager Properties” on page 4-10.
To obtain your own digital certificate and private key and configure SSL for a
production environment, follow the instructions in “Configuring the SSL Protocol” in
Managing WebLogic Security.
4-4
Configuring and Managing WebLogic Server
Configuring Node Manager
Configure a Machine to Use Node Manager
If Node Manager must accept commands from remote clients, you must create a
machine definition for each machine that runs a Node Manager process.
A machine definition associates a particular machine with the server instances it hosts,
and specifies the connection attributes for the Node Manager process on that machine.
You can create a machine definition using the Machine-->Configuration-->Node
Manager tab in the Administration Console. Enter the DNS name or IP address upon
which Node Manager listens in the Listen Address box. If you identify the Listen
Address by IP address (except for the localhost address, 127.0.0.1), you must disable
Host Name Verification on remote Administration Servers, or other clients such as
weblogic.Admin, that will access Node Manager.
Note:
If host name verification is disabled, and you specify the Listen Address of
the Administration Server by its IP address, you must still include that IP
address in nodemanager.hosts.
For more information on disabling host name verification, see “Using a Hostname
Verifier” in Managing WebLogic Security. For instructions on configuring a machine,
see “Configuring a Machine” in Administration Console Online Help.
Configure Managed Server Startup Arguments
Specify the startup arguments that Node Manager will use to start a Managed Server
in the Server—>Configuration—>Remote Start tab for the Managed Server. If you do
not specify startup arguments for a Managed Server in this fashion, Node Manager
uses its own properties as defaults to start the Managed Server. Although these defaults
are sufficient to boot a Managed Server, to ensure a consistent and reliable boot
process, configure startup arguments for each Managed Server. For instructions, see
“Configure Startup Arguments for Managed Servers” in Administration Console
Online Help.
Ensure Administration Server Address is Defined
Make sure that a Listen Address is defined for each Administration Server that will
connect to the Node Manager process. If the Listen Address for a Administration
Server is not defined, when Node Manager starts a Managed Server it will direct the
target server to contact localhost for its configuration information.
Configuring and Managing WebLogic Server
4-5
4
Configuring, Starting, and Stopping Node Manager
Set the Listen Address using the Server-->Configuration-->General tab in the
Administration Console.
Configure SSL for Node Manager
Communication between Node Manager and an Administration Server uses the Secure
Socket Layer (SSL) protocol, configured for two-way SSL.
Authentication requires use of the public key infrastructure, including a
password-protected private key and a user identify certificate.
The default WebLogic Server installation includes demonstration key and certificate
files that allow you to use SSL communication out of the box. The files—
DemoIdentity.jks, DemoTrust.jks, and demo.crtsetup—are installed in
WLSHome/server/lib. No additional configuration is necessary if you are using the
sample key and certificate files.
Configure Monitoring, Shutdown and Restart for Managed Servers
Node Manager’s default monitoring shutdown and restart behaviors are described in
“Default Configuration” on page 4-2. To reconfigure the behavior, see “Configure
Monitoring, Shutdown and Restart for Managed Servers” in Administration Console
Online Help.
Note: These features are available when the conditions described in
“Prerequisites for Automatic Restart of Managed Servers” on page 3-8 are
met.
Starting and Stopping Node Manager
These sections describe methods of starting Node Manager, required environment
variables, and command line arguments.
4-6
!
“Starting Node Manager as a Service” on page 4-7
!
“Starting Node Manager with Commands or Scripts” on page 4-7
!
“Node Manager Environment Variables” on page 4-9
Configuring and Managing WebLogic Server
Starting and Stopping Node Manager
!
“Node Manager Properties” on page 4-10
Starting Node Manager as a Service
The WebLogic Server installation process automatically installs Node Manager as a
service, so that it starts up automatically when the system boots. This behavior is
appropriate for a production environment, as it ensures that Node Manager is available
to restart Managed Servers after a machine reboot.
Starting Node Manager with Commands or Scripts
Although running Node Manager as an operating system service is recommended, you
can also start Node Manager manually at the command prompt or with a script. The
environment variables Node Manager requires are described in “Node Manager
Environment Variables” on page 4-9. Command line options are described in “Node
Manager Properties” on page 4-10.
Sample start scripts for Node Manager are installed in the WL_HOME\server\bin
directory, where WL_HOME is the top-level installation directory for WebLogic Server.
Use startNodeManager.cmd on Windows systems and startNodeManager.sh on
UNIX systems.
The scripts set the required environment variables and start Node Manager in
WL_HOME/common/nodemanager. Node Manager uses this directory as a working
directory for output and log files. To specify a different working directory, edit the start
script with a text editor and set the value of the NODEMGR_HOME variable to the desired
directory.
Edit the sample start script to make sure that the command qualifiers set the correct
listen address and port number for your Node Manager process.
Command Syntax for Starting Node Manager
In WebLogic Server 8.1, Node Manager properties can be provided on the command
line, or defined in the nodemanager.properties file, which is installed in the
directory where you start Node Manager. Values supplied on the command line
override the values in nodemanager.properties.
Configuring and Managing WebLogic Server
4-7
4
Configuring, Starting, and Stopping Node Manager
Properties that are specific to a server instance are specified on the
The syntax for starting Node Manager is:
java [java_property=value ...] -D[nodemanager_property=value]
-D[server_property=value] weblogic.NodeManager
Note: WebLogic Server 8.1 provides a new wrapper to
weblogic.nodeManager.NodeManager. The new wrapper is
weblogic.NodeManager
In the command line, a java_property indicates a direct argument to the java
executable, such as -ms or -mx. If you did not set the CLASSPATH environment
variable, use the -classpath option to identify required Node Manager classes.
Node Manager communicates with its clients using two-way SSL. The Administration
Server SSL configuration applies to the domain as a whole. After configuring the
Administration Server, each Node Manager instance that you run in the domain must
specify startup arguments that identify the keystore, password, and certificate files to
use for SSL communication:
!
weblogic.nodemanager.keyFile
!
weblogic.nodemanager.keyPassword
!
weblogic.nodemanager.certificateFile
!
weblogic.security.SSL. trustedCAKeyStore
!
weblogic.nodemanager.sslHostNameVerificationEnabled
For example, to start Node Manager using the SSL configuration provided with the
sample SSL certificate and key files:
java.exe -Xms32m -Xmx200m -classpath %CLASSPATH% -Dbea.home=c:\bea
-Dweblogic.nodemanager.keyFile=e:\bea\user_domains\mydomain\demok
ey.pem
-Dweblogic.security.SSL.trustedCAKeyStore=e:\bea\weblogic700\serv
er\lib\cacerts
-Dweblogic.nodemanager.certificateFile=e:\bea\user_domains\mydoma
in\democert.pem
-Djava.security.policy=e:\weblogic700\server\lib\weblogic.policy
-Dweblogic.nodemanager.sslHostNameVerificationEnabled=false
weblogic.NodeManager
4-8
Configuring and Managing WebLogic Server
Starting and Stopping Node Manager
Note: If you run Node Manager on a UNIX operating system other than Solaris or
HP UX, you cannot have any white space characters in any of the parameters
that will be passed to the java command line when starting Node Manager.
For example, this command fails due to the space character in the name “big
iron”.
-Dweblogic.Name="big iron"
See “Node Manager Properties” on page 4-10 for information about all Node Manager
command-line arguments.
Node Manager Environment Variables
Before starting Node Manager, you must set several environment variables. You can
set the environment variables for a domain in a start script or on the command line. The
sample start scripts provided with WebLogic Server—startNodeManager.cmd for
Windows systems and startNodeManager.sh for UNIX systems—set the required
variables, which are listed in the following table.
Environment
Variable
Description
JAVA_HOME
Root directory of JDK that you are using for Node Manager. For
example:
set JAVA_HOME=c:\bea\jdk131
Node Manager has the same JDK version requirements as WebLogic
Server.
WL_HOME
WebLogic Server installation directory. For example:
set WL_HOME=c:\bea\weblogic700
PATH
Must include the WebLogic Server bin directory and path to your Java
executable. For example:
set
PATH=%WL_HOME%\server\bin;%JAVA_HOME%\bin;%PATH%
Configuring and Managing WebLogic Server
4-9
4
Configuring, Starting, and Stopping Node Manager
Environment
Variable
Description
LD_LIBRARY_
PATH
(UNIX only)
For HP UX and Solaris systems, must include the path to the native Node
Manager libraries.
Solaris example:
LD_LIBRARY_PATH:$WL_HOME/server/lib/solaris:$WL_HO
ME/server/lib/solaris/oci816_8
HP UX example:
SHLIB_PATH=$SHLIB_PATH:$WL_HOME/server/lib/hpux11:
$WL_HOME/server/lib/hpux11/oci816_8
CLASSPATH
You can set the Node Manager CLASSPATH either as an option on the
java command line used to start Node Manager, or as an environment
variable.
Windows NT example:
set
CLASSPATH=.;%WL_HOME%\server\lib\weblogic_sp.jar;%
WL_HOME%\server\lib\weblogic.jar
Node Manager Properties
The table below describes all Node Manager properties.
4-10
Node Manager
Property
Description
Default
weblogic.nodemanager.
certificateFile
The path to the certificate file used
for SSL authentication.
./config/democert.pem
weblogic.nodemanager.
javaHome
The Java home directory that Node
Manager uses to start Managed
Servers on this machine.
none
weblogic.security.SSL.
trustedCAKeyStore
The path to the key store that holds
a private key.
Configuring and Managing WebLogic Server
Starting and Stopping Node Manager
Node Manager
Property
Description
weblogic.nodemanager.
sslHostNameVerificatio
nEnabled
Enables or disables Administration
Server hostname checks against
the nodemanager.hosts file.
Default
Disable only when using the
demonstration certificates, or if
you are specifying Node Manager
Listen Address as an IP address.
weblogic.nodemanager.
keyFile
The path to the private key file to
use for SSL communication with
the Administration Server.
./config/demokey.pem
weblogic.nodemanager.
keyPassword
The password used to access the
encrypted private key in the key
file.
password
weblogic.ListenAddress
The address on which Node
Manager listens for connection
requests. This argument deprecates
weblogic.nodemanager.listenAddr
ess.
localhost
weblogic.ListenPort
The TCP port number on which
Node Manager listens for
connection requests. This
argument deprecates
weblogic.nodemanager.listenPort.
5555
weblogic.nodemanager.
nativeVersionEnabled
For UNIX systems other than
Solaris or HP-UX, set this property
to false to run Node Manager in
non-native mode.
true
weblogic.nodemanager.
reverseDnsEnabled
Specifies whether entries in the
trusted hosts file can contain DNS
names (instead of IP addresses).
false
weblogic.nodemanager.
savedLogsDirectory
The path to directory where Node
Manager stores log files. Node
Manager creates a subdirectory in
the savedLogsDirectory
named NodeManagerLogs.
./NodeManagerLogs
Configuring and Managing WebLogic Server
4-11
4
Configuring, Starting, and Stopping Node Manager
Node Manager
Property
Description
Default
weblogic.nodemanager.
startTemplate
For UNIX systems, specifies the
path of a script file used to start
Managed Servers.
./nodemanager.sh
weblogic.nodemanager.
trustedHosts
The path to the trusted hosts file
that Node Manager uses. See “Set
Up the Node Manager Hosts File”
on page 4-3.
./nodemanager.hosts
weblogic.nodemanager.
weblogicHome
Root directory of the WebLogic
Server installation. This is used as
the default value of
-Dweblogic.RootDirectory
for servers that do not have a
configured root directory.
n/a
weblogic.nodemanager.
listenAddress
(Deprecated)
The address on which Node
Manager listens for connection
requests. Use
weblogic.ListenAddress in place of
this deprecated argument.
localhost
weblogic.nodemanager.
listenPort
(Deprecated)
The TCP port number on which
Node Manager listens for
connection requests. Use
weblogic.ListenPort in place of
this deprecated argument.
5555
Stopping Node Manager
To stop a Node Manager process, close the command shell in which it is running.
If you stop a Node Manager process that is currently monitoring Managed Servers, do
not shut down those Managed Servers while the Node Manager process is shut down.
Node Manager will be unaware of shutdowns performed on Managed Servers while it
was down. When Node Manager is restarted, if a Managed Server it was previously
monitoring is not running, it will automatically restart it.
4-12
Configuring and Managing WebLogic Server
Troubleshooting Node Manager
Troubleshooting Node Manager
The following sections describe how to diagnose and correct Node Manager problems.
Use the Node Manager log files to help troubleshoot problems in starting or stopping
individual Managed Servers. Use the steps in “Correcting Common Problems” on page
4-14 to solve problems in Node Manager configuration and setup.
Managed Server Log Files
When you start a WebLogic Server instance, startup or error messages are printed to
STDOUT or STDERROR and to the server log file. You can view the log file by right
clicking on the server in the left pane of the Administration Console and selecting the
option View server log, or by selecting the View server log link on any server tab
page.
If you start a server instance with Node Manager, Node Manager writes these
messages in the NodeManagerLogs directory. By default, NodeManagerLogs is
created in the directory where you start Node Manager. A separate subdirectory is
created for each Managed Server that Node Manager starts on the machine. Each
subdirectory uses the naming convention domain_server, which designates the
domain name and Managed Server name, respectively.
Logs files stored in the server directory include:
! servername_pid —This
file saves the process ID of the Managed Server named
servername. Node Manager uses this information to kill the Managed Server, if
requested by the Administration Server to do so.
!
config.xml—This file saves startup configuration information passed to Node
Manager from the Administration Server when starting a Managed Server.
!
servername_output.log—This file saves Node Manager startup messages
generated when Node Manager attempts to start a Managed Server. If a new
attempt is made to start the server, this file is renamed by appending _PREV to
the file name.
!
servername_error.log—This file saves Node Manager error messages
generated when Node Manager attempts to start a Managed Server. If a new
Configuring and Managing WebLogic Server
4-13
4
Configuring, Starting, and Stopping Node Manager
attempt is made to start the server, this file is renamed by appending _PREV to
the file name.
The domain’s Administration Server stores a copy of the Managed Server log files in
the a directory name NodeManagerClientLogs. This directory is created one
directory level above the Administration Server’s root directory (by default, the
directory in which you started the server). The NodeManagerClientLogs directory
contains a subdirectory for each Managed Server you attempted to start with Node
Manager. Each log in these subdirectories corresponds to an attempt to carry out some
action, such as starting or killing the server process. The name of the log file includes
a timestamp that indicates the time at which the action was attempted.
You can view the standard output and error messages for a server, as well as Node
Manager’s log messages for a particular Managed Server, on its
Server->Monitoring->Remote Start Output tab.
Node Manager Log Files
Node Manager generates its own log files, which contain Node Manager startup and
status messages. Node Manager log files are placed in the
NodeManagerLogs\NodeManagerInternal subdirectory. The log files using the
naming convention NodeManagerInternal_timestamp, where timestamp
indicates the time at which Node Manager started.
Because Node Manager creates a new log file (with a unique timestamp) each time it
starts, you should periodically remove the NodeManagerLogs subdirectory to reclaim
the space used by old log files.
Correcting Common Problems
The table below describes common Node Manager problems and their solutions
4-14
Configuring and Managing WebLogic Server
Troubleshooting Node Manager
.
Symptom
Explanation
Error message: Could
not start server
'MyServer' via
Node Manager reason: 'Target
machine
configuration not
found'.
You have not assigned the Managed Server to a machine.
Follow the steps in “Configure a Machine to Use Node
Manager” on page 4-5.
Error message:
<SecureSocketListe
ner: Could not
setup context and
create a secure
socket on
172.17.13.26:7001>
The Node Manager process may not be running on the
designated machine. See “Starting and Stopping Node
Manager” on page 4-6.
I configured self-health
monitoring attributes for a
server, but Node Manager
doesn’t automatically
restart the server.
To automatically reboot a server, you must configure the
server’s automatic restart attributes as well as the health
monitoring attributes. See “Configure Monitoring, Shutdown
and Restart for Managed Servers” on page 4-6 and “Starting and
Stopping Node Manager” on page 4-6.
In addition, you must start Managed Servers using Node
Manager. You cannot automatically reboot servers that were
started outside of the Node Manager process (for example,
servers started directly at the command line).
Configuring and Managing WebLogic Server
4-15
4
Configuring, Starting, and Stopping Node Manager
Symptom
Explanation
Applications on the
Managed Server are using
the wrong directory for
lookups.
Applications deployed to WebLogic Server should never make
assumptions about the current working directory. File lookups
should generally take place relative to the Root Directory
obtained with the ServerMBean.getRootDirectory()
method (this defaults to the “.” directory). For example, to
perform a file lookup, use code similar to
String rootDir =
ServerMBean.getRootDirectory();
//application root directory
File f = new File(rootDir + File.separator +
"foo.in");
rather than simply:
File f = new File("foo.in");
If an application is deployed to a server that is started using
Node Manager, use the following method calls instead:
String rootDir //application root directory
if ((rootDir =
ServerMBean.getRootDirectory()) ==
null) rootDir =
ServerStartMBean.getRootDirectory();
File f = new File(rootDir + File.separator +
"foo.in");
The ServerStartMBean.getRootDirectory() method
obtains the Root Directory value that you specified when
configuring the server for startup using Node Manager. (This
corresponds to the Root Directory attribute specified the
Configuration->Remote Start page of the Administration
Console.)
Node Manager and Managed Server States
Node Manager defines its own, internal Managed Server states for use when restarting
a server. If Node Manager is configured to restart Managed Servers, you may observe
these states in the Administration Console during the restart process.
!
4-16
FAILED_RESTARTING—Indicates that Node Manager is currently restarting a
failed Managed Server.
Configuring and Managing WebLogic Server
Troubleshooting Node Manager
!
ACTIVATE_LATER—Indicates that MaxRestart restart attempts have been made
in current RestartInterval, and Node Manager will attempt additional restarts
in the next RestartInterval.
!
FAILED_NOT_RESTARTABLE—Indicates that the server is Failed, but Node
Manager cannot restart it because the server's AutoRestart or
AutoKillIfFailed attribute is set to False.
Configuring and Managing WebLogic Server
4-17
4
4-18
Configuring, Starting, and Stopping Node Manager
Configuring and Managing WebLogic Server
CHAPTER
5
Setting Up a WebLogic
Server as a Windows
Service
If you want a WebLogic Server to start automatically when you boot a Windows host,
you can set up the server as a Windows service.
For each server that you set up as a Windows service, WebLogic Server creates a key
in the Windows Registry under
HKEY_LOCAL_MACHINE\SYSTEM\CurrentControlSet\Services. The registry
entry contains such information as the name of the server and other startup arguments.
When you start the Windows host, it passes the information in the registry to the JVM.
This section describes the following tasks:
!
Setting Up a Windows Service
!
Using a Non-Default JVM with a Windows Service
!
Verifying the Setup
!
Using the Control Panel to Stop or Restart the Service
!
Removing a Server as a Windows Service
!
Changing Startup Credentials for a Server Set Up as a Windows Service
Configuring and Managing WebLogic Server
5-1
5
Setting Up a WebLogic Server as a Windows Service
Setting Up a Windows Service
WebLogic Server includes a master script,
WL_HOME\server\bin\installSvc.cmd, that you can use to set up a server instance
as a Windows Service. Instead of invoking the installSvc.cmd master script
directly, create your own script that supplies values for a set of variables and then calls
the installSvc.cmd script:
1. In the root directory for the domain’s Administration Server (the directory that
contains the domain’s config.xml file), create a script that is similar to the one in
Listing 5-1.
Listing 5-1 Script for Setting Up a Server as a Windows Service
@rem *************************************************************************
@rem
@rem
@rem
@rem
This script sets up a WebLogic Server instance as a Windows service.
It sets variables to specify the domain name, server name, and optionally,
user credentials, startup mode, and arguments for the JVM. Then the script
calls the %WL_HOME%\server\bin\installSvc.cmd script.
@rem *************************************************************************
echo off
SETLOCAL
@rem Set DOMAIN_NAME to the name of the domain in which you have defined
@rem the server instance.
set DOMAIN_NAME=myWLSdomain
@rem Set USERDOMAIN_HOME to the root directory of the domain’s Administration
@rem Server, which is the directory that contains the domain’s config.xml file.
@rem For more information about the root directories for servers, refer to
@rem “A Server’s Root Directory” on page 2-9.
set USERDOMAIN_HOME=D:\bea\user_projects\myWLSdomain
@rem Set SERVER_NAME to the name of the existing server instance that you want
@rem set up as a Windows service.
set SERVER_NAME=myWLSserver
@rem
@rem
@rem
@rem
@rem
5-2
Optional: one way of bypassing the username and password prompt during
server startup is to set WLS_USER to your system username and WLS_PW to
your password. The script encrypts the login credentials and stores them
in the Windows registry.
The disadvantage to this method is that changing the username or password
Configuring and Managing WebLogic Server
@rem for the server instance requires you to delete the Windows service and set
@rem up a new one with the new username and password.
@rem If you use a boot identity file to bypass the prompt, you can change the
@rem login credentials without needing to modify the Windows service. For more
@rem information about bypassing the username and password prompt, refer to
@rem "Bypassing the Prompt for Username and Password" in the Administration
@rem Console Online Help.
set WLS_USER=
set WLS_PW=
@rem Optional: set Production Mode. When STARTMODE is set to true, the server
@rem starts in Production Mode. When not specified, or when set to false, the
@rem server starts in Development Mode. For more information about
@rem Development Mode and Production Mode, refer to
@rem "Starting in Development Mode or Production Mode" in the Administration
@rem Console Online Help.
set STARTMODE=
@rem Set JAVA_OPTIONS to the Java arguments you want to pass to the JVM. Separate
@rem multiple arguments with a space.
@rem If you are using this script to set up a Managed Server as a Windows service,
@rem you must include the -Dweblogic.management.server argument, which
@rem specifies the host name and listen port for the domain’s Administration
@rem Server. For example:
@rem set JAVA_OPTIONS=-Dweblogic.management.server=http://adminserver:7501
@rem For more information, refer to
@rem "weblogic.Server Configuration Options" in the WebLogic Server Command
@rem Reference.
set JAVA_OPTIONS=
@rem Optional: set JAVA_VM to the java virtual machine you want to run.
@rem For example:
@rem set JAVA_VM=-server
set JAVA_VM=
@rem Set MEM_ARGS to the memory args you want to pass to java. For example:
@rem set MEM_ARGS=-Xms32m -Xmx200m
set MEM_ARGS=
@rem
@rem
@rem
@rem
call
Call Weblogic Server service installation script. Replace <WL_HOME> with
the absolute pathname of the directory in which you installed WebLogic
Server. For example:
call "D:\bea\weblogic810\server\bin\installSvc.cmd"
"<WL_HOME>\server\bin\installSvc.cmd"
ENDLOCAL
Configuring and Managing WebLogic Server
5-3
5
Setting Up a WebLogic Server as a Windows Service
2. If you set up both an Administration Server and a Managed Server to run as
Windows services on the same computer, you can specify that the Managed
Server starts only after the Administration Server has started by doing the
following:
a. In a text editor, open the WL_HOME\server\bin\installSvc.cmd master
script.
The last command in this script invokes the beasvc utility.
b. Add the following arguments to the command that invokes the beasvc utility:
"
-depend: service_names
Comma-separated list of services that must start before this service starts.
"
-delay: delay_milliseconds
Number of milliseconds to delay the JVM thread.
The -delay argument is optional, but recommended to make sure that an
Administration Server has time to complete its startup cycle before any
Managed Servers start.
For example, the modified beasvc invocation will resemble the following:
"%WL_HOME%\server\bin\beasvc" -install
-svcname:"beasvc %DOMAIN_NAME%_%SERVER_NAME%"
-depend: "beasvc myDomain_myAdminServer"
-delay: "800"
-javahome:"%JAVA_HOME%" -execdir:"%USERDOMAIN_HOME%"
-extrapath:"%WL_HOME%\server\bin" -password:"%WLS_PW%"
-cmdline:%CMDLINE%
3. Save the script and run it from the server’s root directory.
If the script runs successfully, it creates a Windows service named
beasvc DOMAIN_NAME_SERVER_NAME and prints a line to standard out that is
similar to the following:
beasvc mydomain_myserver installed.
4. If you modified the WL_HOME\server\bin\installSvc.cmd master script,
undo your modifications so the script can be used to set up other server instances.
Note: If you use the Domain Configuration Wizard to create a domain and server,
some of the domain templates prompt you to set up the server as a Windows
service. You can choose yes to set up an Administration Server as a Windows
service. However, if you want to set up a Managed Server with a dependency,
you must choose no in the wizard and complete the steps in this section.
5-4
Configuring and Managing WebLogic Server
Regardless of whether you choose yes or no, if the domain template includes
a prompt for setting up a service, it will create a script named
installService.cmd in the server’s root directory, which is similar to the
script in Listing 5-1, “Script for Setting Up a Server as a Windows Service,”
on page 5-2.
Using a Non-Default JVM with a Windows Service
If you are not using the JVM installed with WebLogic Server, you must edit the master
script so that it installs server instances that use a non-default JVM:
1. Create a backup copy of WL_HOME\server\bin\installSvc.cmd.
2. Open installSvc.cmd in a text editor.
3. Edit the set JAVA_HOME command to specify the home directory of your JVM.
For example, set JAVA_HOME=C:\JRockit\JRE\1.3.1
4. Edit the set JAVA_VENDOR command so that it specifies one of the supported
values.
The supported values are listed in the line immediately preceding the set
JAVA_VENDOR command.
Verifying the Setup
To verify that you successfully set up a WebLogic Server as a Windows service, do the
following:
1. Open a command window and enter the following command:
set PATH=WL_HOME\server\bin;%PATH%
2. Navigate to the directory immediately above your domain directory. For example,
to verify the setup for BEA_HOME\user_domains\mydomain, navigate to
BEA_HOME\user_domains.
3. Enter the following command:
beasvc -debug "yourServiceName"
For example, beasvc -debug "beasvc mydomain_myserver".
Configuring and Managing WebLogic Server
5-5
5
Setting Up a WebLogic Server as a Windows Service
If your setup was successful, the beasvc -debug command starts your server. If the
script returns an error similar to the following, make sure that you specified the correct
service name:
Unable to open Registry Key .......
System\CurrentControlSet\Services\beasvc
example_examplesServer\Parameters
Using the Control Panel to Stop or Restart the Service
After you set up a server to run as a Windows service, you can use the Service Control
Panel to stop and restart the server:
1. Select Start→Settings→Control Panel.
2. On Windows 2000, open the Administrative Tools Control Panel. Then open the
Services Control Panel.
On Windows NT, open the Services Control Panel directly from the Control
Panel window.
3. In the Services Control Panel, find the service that you created. By default, the
service name starts with beasvc.
4. Right-click the service name and select commands from the shortcut menu.
Removing a Server as a Windows Service
To remove a server as a Windows service, do the following:
1. In the root directory of the domain’s Administration Server (the directory that
contains the domain’s config.xml file), create a script similar to the one in
Listing 5-2.
Listing 5-2 Script to Remove a Windows Service
@rem *************************************************************************
@rem This script is used to uninstall a WebLogic Server service for a
@rem server instance that is defined for the current domain.
5-6
Configuring and Managing WebLogic Server
@rem The script simply sets the DOMAIN_NAME and SERVER_NAME variables and calls
@rem the %WL_HOME%\server\bin\uninstallSvc.cmd script.
@rem *************************************************************************
echo off
SETLOCAL
@rem Set DOMAIN_NAME to the name of the domain that contains the server.
set DOMAIN_NAME=myWLSdomain
@rem Set SERVER_NAME to the name of the server that you want to remove as
@rem a service.
set SERVER_NAME=myWLSserver
@rem
@rem
@rem
@rem
call
Call Weblogic Server service uninstallation script. Replace <WL_HOME> with
the absolute pathname of the directory in which you installed WebLogic
Server. For example:
call "D:\bea\weblogic810\server\bin\uninstallSvc.cmd"
"<WL_HOME>\server\bin\uninstallSvc.cmd"
ENDLOCAL
2. Save and run the script.
If the removal script runs successfully, its output in the command window includes a
line similar to the following:
beasvc mydomain_myserver removed.
Changing Startup Credentials for a Server Set Up as a
Windows Service
To change passwords or add users for any WebLogic Server, you must start the server
and use the security realm’s administration tools. If you use the security realm that is
installed with WebLogic Server, you can use the Administration Console. If you use a
third-party security realm, you must use the administration tools provided in that
realm.
After you change the security data, you must do the following to change the arguments
that are passed to the server during the startup cycle:
Configuring and Managing WebLogic Server
5-7
5
Setting Up a WebLogic Server as a Windows Service
!
If you set up the Windows service to retrieve usernames and passwords from a
boot identity file, you can overwrite the existing file with a new one that
contains the new username and password. For information about creating a boot
identity file, refer to "Creating a Boot Identity File" in the Administration
Console Online Help.
!
If you set up the Windows service to retrieve usernames and passwords from the
Windows registry, then you must remove the Windows service and create a new
one that uses your new username or password:
a. Uninstall the WebLogic Server as a Windows service. For more information,
refer to “Removing a Server as a Windows Service” on page 5-6.
b. In a text editor, open the script that you used the install the service and enter
your new password as the value for the set WLS_USER and/or set WLS_PW
directive. WebLogic encrypts this value in the Windows Registry.
After you run the script, you can remove the password from this file.
c. Save and execute the script. This will create a new service with the updated
password.
The WebLogic Server Windows Service Program
(beasvc.exe)
The installSvc.cmd and uninstallSvc.cmd master scripts are convenience
wrappers for the WebLogic Server Windows Service program, beasvc.exe. You can
modify those scripts or create your own scripts that invoke beasvc.exe and install
WebLogic Servers or Node Managers as Windows services. If you want to uninstall a
service, you can invoke beasvc.exe directly without creating a script.
For information on how to install or remove the Node Manager as a Windows service,
see "Starting Node Manager as a Windows Service" in the Configuring and Managing
WebLogic Serve guide.
beasvc.exe is located in WL_HOME\server\bin and your script can pass any of the
following parameters:
–install
Install the specified service.
5-8
Configuring and Managing WebLogic Server
–remove
Remove the specified service.
–svcname: service_name
The user-specified name of the service to be installed or removed.
–javahome: java_directory
Root directory of the Java installation. The start command will be formed by
appending \bin\java to java_directory.
–execdir: domain_name
Directory where this startup command will be executed.
–extrapath: additional_env_settings
Additional path settings that will be prepended to the path applicable to this
command execution.
–help
Prints out the usage for the beasvc.exe command.
-depend: service_names
Comma-separated list of services that this service depends on.
-delay: delay_milliseconds
Number of milliseconds to delay the JVM thread.
–cmdline: variable
The java command-line parameters to be used when starting a WebLogic
Server as a Windows service. For example:
-cmdline:"-ms64m -mx64m
-classpath C:\bea\wweblogic8.1\lib\weblogic.jar
-Dweblogic.Name=myserver weblogic.Server"
Win32 systems have a 2K limitation on the length of the command line. If the classpath
setting for the Windows service startup is very long, the 2K limitation could be
exceeded. To work around this limitation, you can do the following when using the
beasvc command:
1. Place the classpath values in a text file.
2. Place your beasvc command in a script. In this script, assign the parameters for
the beasvc command to a variable. For the classpath parameter, use the
following syntax:
-classpath @filename
3. Then, specify the variable as the value of the -cmdline parameter. For example:
Configuring and Managing WebLogic Server
5-9
5
Setting Up a WebLogic Server as a Windows Service
set CMDLINE="-ms64m -mx64m -Dweblogic.Name=myserver
-Dbea.home=\"c:\bea\" -classpath @C:\temp\myclasspath.txt
weblogic.Server"
"c:\bea\weblogic810\server\bin\beasvc" -install
-svcname:myserver -cmdline:%CMDLINE%
Run the script.
5-10
Configuring and Managing WebLogic Server
CHAPTER
6
Server Lifecycle
At any time, a WebLogic Server instance is in a particular operating state.
Commands—such as start, stop, and suspend—cause specific changes to the state of a
server instance. The following sections describe WebLogic Server states, the state
transitions that can occur, and the relationship between commands that you issue and
server state transitions.
!
“Lifecycle Overview” on page 6-1
!
“WebLogic Server States” on page 6-2
!
“Lifecycle Commands” on page 6-8
Lifecycle Overview
The series of states through which a WebLogic Server instance can transition is called
the server lifecycle. Figure 6-1 illustrates the server lifecycle and the relationships
between WebLogic Server operating states.
Configuring and Managing WebLogic Server
6-1
6
Server Lifecycle
Figure 6-1 The Server Lifecycle
To understand the each state, and the relationships among states, see “WebLogic
Server States” on page 6-2.
WebLogic Server States
WebLogic Server displays and stores information about the current state of a server
instance, and state transitions that have occurred since the server instance started up.
This information is useful to administrators who:
6-2
Configuring and Managing WebLogic Server
WebLogic Server States
!
Monitor the availability of server instances and the applications they host.
!
Perform data to day operations tasks, including startup and shutdown
procedures.
!
Diagnose problems with application services.
!
Plan correction actions, such as migration of services, when a server instance
fails or crashes.
Getting Server State
There are multiple methods of accessing the state of a server instance:
!
Administration Console—Multiple pages display state information:
"
"
"
The Servers table on the Servers page displays the current state of each
server instance in the current domain.
The Server→Monitoring tab displays the state of the current server instance,
and the date and time it entered the state.
The log file for a server, available from the Server Log command on all
Server tabs, includes timestamped messages for state transitions that have
occurred since the server instance was last started.
!
Programmatically—You can obtain the state of a server instance
programmatically, using the getState () method on the server’s
weblogic.management.runtime.ServerRuntimeMBean. For more
information see “Accessing Runtime Information” in Programming WebLogic
Management Services with JMX.
!
Command Line Interface—For information about obtaining state information
from a command line interface, see “GETSTATE” in WebLogic Server
Command-Line Interface Reference.
Configuring and Managing WebLogic Server
6-3
6
Server Lifecycle
Understanding Server State
The following sections describe the key states that a server instance can have, the
processing associated with the state, and how the state fits into a sequence of state
transitions.
SHUTDOWN
In the SHUTDOWN state, a server instance is configured but inactive. A server instance
reaches the SHUTDOWN state as a result of a graceful shutdown or forced shutdown.
A graceful shutdown can be initiated when the server instance is in the RUNNING or the
STANDBY state. The graceful shutdown process consists of the following state
transitions:
RUNNING→SUSPENDING→STANDBY→SHUTTING DOWN→SHUTDOWN
For more information about the graceful shutdown process, see “Graceful Shutdown”
on page 6-9.
A forced shutdown can be initiated from any server state. The forced shutdown process
consists of the following state transitions:
any state→STANDBY→SHUTTING DOWN→SHUTDOWN
For more information about the forced shutdown process, see “Forced Shutdown” on
page 6-13.
For information about issuing stop commands, see “Starting and Stopping Servers” in
Administration Console Online Help.
STARTING
In the STARTING state, a server instance prepares itself to accept requests and perform
application processing. A server instance cannot accept requests while in the
STARTING state.
When a server instance starts itself, it retrieves its configuration data, starts its
kernel-level services, initializes subsystem-level services, deploys applications, and
loads and runs startup classes. For more information about the startup process, see
“Start” on page 6-8.
6-4
Configuring and Managing WebLogic Server
WebLogic Server States
A server instance can enter the STARTING state only from the SHUTDOWN state, as a
result of either a Start command or a Start in Standby command.
SHUTDOWN→STARTING→RUNNING
SHUTDOWN→STARTING→STANDBY
For information about issuing start commands, see “Starting and Stopping Servers” in
Administration Console Online Help.
STANDBY
In the STANDBY state, a server has initialized all of its services and applications, can
accept administration commands, and can participate in cluster communication.
However, it does not accept requests from external clients.
The server instance can enter the STANDBY if:
!
It is started in standby mode. Starting a server in STANDBY state is a method of
keeping a server available as a “hot” backup, especially in a high-availability
environment. A server instance started in standby can be quickly brought to the
running state, as necessary to replace a failed server instance. Starting a server
instance in standby mode requires a domain-wide administrative port. For more
information, see “Administration Port Requires SSL” on page 11-9.
You can start a server instance in standby mode using the Start this server in
standby mode command on the Server→Control tab. You can also set a default
startup mode for a server instance on the Server→Configuration→General tab of
the Administration Console. The process of starting a server in standby mode
consists of the following state transitions:
SHUTDOWN→STARTING→STANDBY
!
Shutdown, either gracefully or forcefully.
A server instance transitions through the STANDBY state during any shutdown
process
During the graceful shutdown process, a server instance goes through the
following state transitions:
RUNNING→SUSPENDING→STANDBY→SHUTTING DOWN→SHUTDOWN
During the forceful shutdown process, a server instance goes through the
following state transitions:
Configuring and Managing WebLogic Server
6-5
6
Server Lifecycle
any state→STANDBY→SHUTDOWN
RESUMING
A server instance enters the RESUMING state as a result of the Resume this server...
command. A server instance that is resumed from the STANDBY goes through the
following state transitions:
STANDBY→RESUMING→RUNNING
RUNNING
When a server instance is in the RUNNING state, it offers its services to clients and can
operate as a full member of a cluster. A server instance can enter the STANDBY if:
!
It is started using the Start this server... command. During the regular startup
process, a server instance goes through the following state transitions:
SHUTDOWN→STARTING→RUNNING
!
It is started with the Resume this server... command. During the resume
process, a server instance goes through the following state transitions:
STANDBY→RESUMING→RUNNING
SUSPENDING
A server instance enters this state during the graceful shutdown process. While in the
SUSPENDING state, the server handles in-flight work. The processing a server instance
perform for in-flight work while in the SUSPENDING state is described in “In-Flight
Work Processing” on page 6-11. Upon completion of in-flight work, the server
progresses from the SUSPENDING state to the SHUTTING_DOWN state.
During the graceful shutdown process, a server instance goes through the following
state transitions:
RUNNING→SUSPENDING→STANDBY→SHUTTING DOWN→SHUTDOWN
6-6
Configuring and Managing WebLogic Server
WebLogic Server States
SHUTDOWN
A server instance enters the shutdown state as a result of a graceful shutdown or forced
shutdown process.
During the graceful shutdown process, a server instance goes through the following
state transitions:
RUNNING→SUSPENDING→STANDBY→SHUTTING DOWN→SHUTDOWN
For more information about the graceful shutdown process, see “Graceful Shutdown”
on page 6-9.
During the forced shutdown process, a server instance goes through the following state
transitions:
any state→STANDBY→SHUTDOWN
For more information about the forced shutdown process, see “Forced Shutdown” on
page 6-13.
FAILED
A server instance enters the FAILED state when one or more critical services become
dysfunctional. When a server instance finds one or more critical subsystems have
failed, the server instance sets its state to FAILED to indicate that the it cannot reliably
host an application.
To recover from the FAILED state, a server instance must be shutdown and restarted,
either manually, or automatically with Node Manager, if it is configured on the host
machine. For information about automatic restarts, see “Shutdown Failed Managed
Servers” on page 3-7.
A server instance can only enter the FAILED state from the RUNNING state:
RUNNING→FAILED
UNKNOWN
If a server instance cannot be contacted, it is considered to be in the UNKNOWN state.
Configuring and Managing WebLogic Server
6-7
6
Server Lifecycle
States Defined by Node Manager
When Node Manager restarts a failed or killed Managed Server, it defines additional
server states, which are described in “Node Manager and Managed Server States” on
page 4-16. These states are displayed in the Administration Console, and provide
visibility into the status of the restart process.
For information about Node Manager, see “Overview of Node Manager” on page 3-1.
Lifecycle Commands
This section describes key commands that affect the state of a server instance, and the
processing a server instance performs as a result of the command. For information
about issuing lifecycle commands, see “Starting and Stopping Servers” in
Administration Console Online Help.
Start
When a server instance starts, it:
1. Retrieves its configuration data.
An Administration Server retrieves domain configuration data, including
security configuration data, from the config.xml for the domain.
A Managed Server contacts the Administration Server for its configuration and
security data. If you set up SSL, a Managed Server uses its own set of certificate
files, key files, and other SSL-related files and contacts the Administration
Server for the remaining configuration and security data.
2. Starts its kernel-level services, which include logging and timer services.
Initializes subsystem-level services with the configuration data that it retrieved
in step 2a. These services include the following:
6-8
Configuring and Managing WebLogic Server
Lifecycle Commands
!
Security Service
!
JCA Container
!
RMI Service
!
JDBC Container
!
Cluster Service
!
EJB Container
!
IIOP Service
!
Web Container
!
Naming Service
!
Deployment Manager
!
RMI Naming Service
!
JMS Provider
!
File Service
!
Remote Management
!
Transaction Service
3. If you have configured a server instance to use a separate administration port, the
server enables remote configuration and monitoring. For information about
administration ports, see “Administration Port Requires SSL” on page 11-9.
4. Deploys modules in the appropriate container and in the order that you specify in
the WebLogic Server Administration Console.
Startup classes that are configured to load before application deployments are
loaded and run after the server instance deploys JDBC connection pools and
before it deploys Web applications and EJBs.
5. Startup classes that are configured to load after application deployments are
loaded and run.
Graceful Shutdown
A graceful shutdown gives WebLogic Server subsystems time to complete certain
application processing currently in progress. The work completed is referred to as
in-flight work. During a graceful shutdown, subsystems complete in-flight work and
suspend themselves in an specific sequence and in a synchronized fashion, so that
back-end subsystems like JDBC connection pools are available when front-end
subsystems are suspending themselves.
Configuring and Managing WebLogic Server
6-9
6
Server Lifecycle
Graceful Shutdown Sequence
The following list shows the order in which subsystems suspend themselves. Each
subsystem completes its in-flight work before the next one commences its preparation
to suspend.
1. Non-Transaction RMI Service
2. Web Container
3. Client Initiated Transaction Service
4. Remote RMI Service
5. Timer Service
6. Application Service
7. EJB Container
8. JMS Provider
9. JDBC Container
10. Transaction Service
Controlling Graceful Shutdown
ServerMBean has two new attributes for controlling the length of the graceful
shutdown process. Their values are displayed and configurable on the
Server→Control→Start/Stop tab:
6-10
!
Ignore Sessions During Shutdown— If you enable this option WebLogic Server
will drop all HTTP sessions immediately, rather than waiting for them to
complete or timeout. Waiting for abandoned sessions to timeout can significantly
lengthen the graceful shutdown process, because the default session timeout is
one hour.
!
Graceful Shutdown Timeout—Specifies a time limit for a server instance to
complete a graceful shutdown. If you supply a timeout value, and the server
instance does not complete a graceful shutdown within that period, WebLogic
Server will perform a forced shutdown on the server instance.
Configuring and Managing WebLogic Server
Lifecycle Commands
Note: Graceful Shutdown Timeout is a different attribute from
ServerLifeCycleTimeoutVal, which applies only to a force shutdown.
In-Flight Work Processing
The following sections describe how each subsystem handles work in process when it
suspends itself during a graceful shutdown.
RMI Subsystem
The RMI subsystem suspends in three steps. Each step in this process completes before
the following step commences.
1. Non-transaction remote requests are rejected by the Non-Transaction RMI Service.
2. The Client Initiated Transaction Service waits for pending client transactions to
complete.
3. The Remote RMI Service rejects all remote requests with or without transactions.
After these steps are completed, no remote client requests are allowed. Requests with
administrative privileges and internal system calls are accepted.
When a clustered server instance is instructed to prepare to suspend, the RMI system
refuses any in-memory replication calls, to allow other cluster members to choose new
secondaries.
Web Container
After the Web Container subsystem is instructed to prepare to suspend, it rejects new
sessions requests. Existing sessions are handled according to the persistence method:
!
No persistence—Pending sessions with no persistence are allowed to complete.
!
In-memory replication in a cluster—Sessions with secondary sessions are
immediately suspended. If a primary session does not have a secondary session,
the Web Contains waits until a secondary session is created, or until the session
times out, whichever occurs first.
!
JDBC persistence and file persistence—The Web Container immediately
suspends sessions that are replicated in a database or file store.
Configuring and Managing WebLogic Server
6-11
6
Server Lifecycle
The completion of pending sessions is optional. To immediate drop all sessions, use
the Ignore Sessions During Shutdown option on the Servers→Control→Start/Stop tab
in the Administration Console, or the -ignoreSessions option with
weblogic.Admin.
Timer Service
The Timer Service cancels all triggers running on application execute queues.
Application execute queues include the default queue and queues configured through
the ExecuteQueueMBean.
Application Service
The Application Service completes pending work in the application queues before
suspending. Application execute queues include the default queue and queues
configured through the ExecuteQueueMBean.
EJB Container
The EJB Container suspends MDBs.
JMS Service
The JMS Service marks itself as suspending and waits for its reference count of
pending requests to drop to zero.
JDBC Service
The JDBC Service closes idle connections in the connection pools.
Transaction Service
The Transaction Service waits for the pending transaction count in the Transaction
Manager to drop to zero before suspending. Completing all pending transactions can
be a lengthy process, depending on the configuredbtransaction timeout.
If a graceful shutdown takes too long because of pending transactions, you can halt it
with a forced shutdown command. A forced shutdown suspends all pending work in
all subsystems.
6-12
Configuring and Managing WebLogic Server
Lifecycle Commands
Forced Shutdown
A forced shutdown is immediate—WebLogic Server subsystems suspend all
application processing currently in progress. A forced shutdown can be performed on
a server instance in any state.
ServerMBean defines the ServerLifecycleTimeoutVal attribute, which specifies a
timeout period for subsystems to suspend themselves. If a subsystem fails to suspend
itself within the timeout period, the server instance is killed.
Configuring and Managing WebLogic Server
6-13
6
6-14
Server Lifecycle
Configuring and Managing WebLogic Server
CHAPTER
7
Configuring WebLogic
Server Web
Components
The following sections discuss how to configure WebLogic Server Web components:
!
“Overview” on page 7-2
!
“HTTP Parameters” on page 7-2
!
“Configuring the Listen Port” on page 7-4
!
“Web Applications” on page 7-5
!
“Configuring Virtual Hosting” on page 7-7
!
“How WebLogic Server Resolves HTTP Requests” on page 7-10
!
“Setting Up HTTP Access Logs” on page 7-14
!
“Preventing POST Denial-of-Service Attacks” on page 7-22
!
“Setting Up WebLogic Server for HTTP Tunneling” on page 7-23
!
“Using Native I/O for Serving Static Files (Windows Only)” on page 7-25
Configuring and Managing WebLogic Server
7-1
7
Configuring WebLogic Server Web Components
Overview
In addition to its ability to host dynamic Java-based distributed applications,
WebLogic Server is also a fully functional Web server that can handle high volume
Web sites, serving static files such as HTML files and image files as well as servlets
and JavaServer Pages (JSP). WebLogic Server supports the HTTP 1.1 standard.
HTTP Parameters
You can configure the HTTP operating parameters using the Administration Console
for each Server or Virtual Host.
Attribute
Description
Range of Values
Default Value
Default Server Name
When WebLogic Server
redirects a request, it sets
the host name returned in
the HTTP response header
with the string specified
with Default Server
Name.
String
Null
Boolean
True
Useful when using
firewalls or load balancers
and you want the
redirected request from
the browser to reference
the same host name that
was sent in the original
request.
Enable Keepalives
7-2
This attribute sets whether
or not HTTP keep-alive is
enabled
True = enabled
False = not enabled
Configuring and Managing WebLogic Server
HTTP Parameters
Attribute
Description
Range of Values
Default Value
Send
Server
Header
If set to false, the server
name is not sent with the
HTTP response. Useful
for wireless applications
where there is limited
space for headers.
Boolean
True
Duration
The number of seconds
that WebLogic Server
waits before closing an
inactive HTTP
connection.
Integer
30
The number of seconds
that WebLogic Server
waits before closing an
inactive HTTPS
connection.
Integer
60
When selected, the
session ID no longer
includes JVM
information. This may be
necessary when using
URL rewriting with WAP
devices that limit the size
of the URL to 128
characters. Selecting
WAP Enabled may affect
the use of replicated
sessions in a cluster.
Enabled
Disabled
This attribute sets the
timeout (in seconds) that
WebLogic Server waits
between receiving chunks
of data in an HTTP POST
data. Used to prevent
denial-of-service attacks
that attempt to overload
the server with POST
data.
Integer
(labeled Keep Alive Secs
on the Virtual Host panel)
HTTPS Duration
(labeled Https Keep Alive
Secs on the Virtual Host
panel)
WAP Enabled
Post Timeout Secs
True = enabled
False = not enabled
Disabled
0
Configuring and Managing WebLogic Server
7-3
7
Configuring WebLogic Server Web Components
Attribute
Description
Range of Values
Default Value
Max Post Time
This attribute sets the time
(in seconds) that
WebLogic Server waits
for chunks of data in an
HTTP POST data.
Integer
0
Max Post Size
This attribute sets the size
of the maximum chunks
of data in an HTTP POST
data.
Integer
0
External DNS Address
If your system includes an
address translation
firewall that sits between
the clustered WebLogic
Servers and a plug-in to a
web server front-end,
such as the Netscape
(proxy) plug-in, set this
attribute to the address
used by the plug-in to talk
to this server.
Configuring the Listen Port
You can specify the port that each WebLogic Server listens on for HTTP requests.
Although you can specify any valid port number, if you specify port 80, you can omit
the port number from the HTTP request used to access resources over HTTP. For
example, if you define port 80 as the listen port, you can use the form
http://hostname/myfile.html instead of
http://hostname:portnumber/myfile.html.
You define a separate listen port for regular and secure (using SSL) requests. You
define the regular listen port on the Servers node in the Administration Console, under
the Configuration/General tab, and you define the SSL listen port under the
Connections/SSL tab.
7-4
Configuring and Managing WebLogic Server
Web Applications
Web Applications
HTTP and Web Applications are deployed according to the Servlet 2.3 specification
from Sun Microsystems, which describes the use of Web Applications as a
standardized way of grouping together the components of a Web-based application.
These components include JSP pages, HTTP servlets, and static resources such as
HTML pages or image files. In addition, a Web Application can access external
resources such as EJBs and JSP tag libraries. Each server can host any number of Web
Applications. You normally use the name of the Web Application as part of the URI
you use to request resources from the Web Application.
By default JSPs are compiled into the servers' temporary directory the location for
which is (for a server: "myserver" and for a webapp: "mywebapp"):
<domain_dir>\myserver\.wlnotdelete\appname_mywebapp_4344862
The server deletes the temp directory (and thus the default working directory for the
jsps) each time the server is restarted. If the JSPs are configured to be precompiled they
will be precompiled each time the server restarts.
To avoid this there are following options:
!
Precompile the generated classes into your WEB-INF/classes directory (or a jar
file in WEB-INF/lib).
! Set a workingDir for the jsp-descriptor in your weblogic.xml
<jsp-descriptor>
<jsp-param> <param-name>workingDir</param-name>
<param-value>d:\jsp_store</param-value> </jsp-param>
</jsp-descriptor>
After this is done the precomiled classes will not be deleted each time the server
restarts and they will not be recompiled.
For more information, see Assembling and Configuring Web Applications at
http://e-docs.bea.com/wls/docs81b/webapp/index.html.
Configuring and Managing WebLogic Server
7-5
7
Configuring WebLogic Server Web Components
Web Applications and Clustering
Web Applications can be deployed in a cluster of WebLogic Servers. When a user
requests a resource from a Web Application, the request is routed to one of the servers
of the cluster that host the Web Application. If an application uses a session object,
then sessions must be replicated across the nodes of the cluster. Several methods of
replicating sessions are provided.
For more information, see Using WebLogic Server Clusters at
http://e-docs.bea.com/wls/docs81b/cluster/index.html.
Designating a Default Web Application
Every server and virtual host in your domain can declare a default Web Application.
The default Web Application responds to any HTTP request that cannot be resolved to
another deployed Web Application. In contrast to all other Web Applications, the
default Web Application does not use the Web Application name as part of the URI.
Any Web Application targeted to a server or virtual host can be declared as the default
Web Application. (Targeting a Web Application is discussed later in this section. For
more information about virtual hosts, see “Configuring Virtual Hosting” on page 7-7).
The examples domain that is shipped with Weblogic Server has a default Web
Application already configured. The default Web Application in this domain is named
DefaultWebApp and is located in the applications directory of the domain.
If you declare a default Web Application that fails to deploy correctly, an error is
logged and users attempting to access the failed default Web Application receive an
HTTP 400 error message.
For example, if your Web Application is called shopping, you would use the
following URL to access a JSP called cart.jsp from the Web Application:
http://host:port/shopping/cart.jsp
If, however, you declared shopping as the default Web Application, you would access
cart.jsp with the following URL:
http://host:port/cart.jsp
(Where host is the host name of the machine running WebLogic Server and port is
the port number where the WebLogic Server is listening for requests.)
7-6
Configuring and Managing WebLogic Server
Configuring Virtual Hosting
To designate a default Web Application for a server or virtual host, use the
Administration Console:
1. In the left pane, expand the Web Application node
2. Select your Web Application
3. In the right pane, select the Targets tab.
4. Select the Servers tab and move the server (or virtual host) to the chosen column.
(You can also target all the servers in a cluster by selecting the Clusters tab and
moving the cluster to the Chosen column.)
5. Click Apply.
6. Expand the Servers (or virtual host) node in the left pane.
7. Select the appropriate server or virtual host.
8. In the right pane, select the Connections tab
9. Select the HTTP tab (If you are configuring a virtual host, select the General tab
instead.)
10. Select a Web Application from the drop-down list labeled Default Web
Application.
11. Click Apply.
12. If you are declaring a default Web Application for one or more managed servers,
repeat these procedures for each managed server.
Configuring Virtual Hosting
Virtual hosting allows you to define host names that servers or clusters respond to.
When you use virtual hosting you use DNS to specify one or more host names that map
to the IP address of a WebLogic Server or cluster and you specify which Web
Applications are served by the virtual host. When used in a cluster, load balancing
allows the most efficient use of your hardware, even if one of the DNS host names
processes more requests than the others.
Configuring and Managing WebLogic Server
7-7
7
Configuring WebLogic Server Web Components
For example, you can specify that a Web Application called books responds to
requests for the virtual host name www.books.com, and that these requests are targeted
to WebLogic Servers A,B and C, while a Web Application called cars responds to the
virtual host name www.autos.com and these requests are targeted to WebLogic
Servers D and E. You can configure a variety of combinations of virtual host,
WebLogic Servers, clusters and Web Applications, depending on your application and
Web server requirements.
For each virtual host that you define you can also separately define HTTP parameters
and HTTP access logs. The HTTP parameters and access logs set for a virtual host
override those set for a server. You may specify any number of virtual hosts.
You activate virtual hosting by targeting the virtual host to a server or cluster of
servers. Virtual hosting targeted to a cluster will be applied to all servers in the cluster.
Virtual Hosting and the Default Web Application
You can also designate a default Web Application for each virtual host. The default
Web Application for a virtual host responds to all requests that cannot be resolved to
other Web Applications deployed on same server or cluster as the virtual host.
Unlike other Web Applications, a default Web Application does not use the Web
Application name (also called the context path) as part of the URI used to access
resources in the default Web Application.
For example, if you defined virtual host name www.mystore.com and targeted it to a
server on which you deployed a Web Application called shopping, you would access
a JSP called cart.jsp from the shopping Web Application with the following URI:
http://www.mystore.com/shopping/cart.jsp
If, however, you declared shopping as the default Web Application for the virtual host
www.mystore.com, you would access cart.jsp with the following URI:
http://www.mystore.com/cart.jsp
For more information, see “How WebLogic Server Resolves HTTP Requests” on page
7-10.
7-8
Configuring and Managing WebLogic Server
Configuring Virtual Hosting
Setting Up a Virtual Host
To define a virtual host, use the Administration Console to:
1. Create a new Virtual Host.
a. Expand the Services node in the left pane. The node expands and displays a list
of services.
b. Click on the virtual hosts node. If any virtual hosts are defined, the node
expands and displays a list of virtual hosts.
c. Click on Create a New Virtual Host in the right pane.
d. Enter a name to represent this virtual host.
e. Enter the virtual host names, one per line. Only requests matching one of these
virtual host names will be handled by the WebLogic Server or cluster targeted
by this virtual host.
f. (Optional) Assign a default Web Application to this virtual host.
g. Click Create.
2. Define logging and HTTP parameters:
a. (Optional) Click on the Logging tab and fill in HTTP access log attributes (For
more information, see “Setting Up HTTP Access Logs” on page 7-14.)
b. Select the HTTP tab and fill in the HTTP Parameters.
3. Define the servers that will respond to this virtual host.
a. Select the Targets tab.
b. Select the Servers tab. You will see a list of available servers.
c. Select a server in the available column and use the right arrow button to move
the server to the chosen column.
4. Define the clusters that will respond to this virtual host (optional). You must have
previously defined a WebLogic Cluster. For more information, see Using
WebLogic Server Clusters at
http://e-docs.bea.com/wls/docs81b/cluster/index.html.
Configuring and Managing WebLogic Server
7-9
7
Configuring WebLogic Server Web Components
a. Select the Targets tab.
b. Select the Clusters tab. You will see a list of available servers.
c. Select a cluster in the available column and use the right arrow button to move
the cluster to the chosen column. The virtual host is targeted on all of the servers
of the cluster.
5. Target Web Applications to the virtual host.
a. Click the Web Applications node in the left panel.
b. Select the Web Application you want to target.
c. Select the Targets tab in the right panel.
d. Select the Virtual Hosts tab.
e. Select Virtual Host in the available column and use the right arrow button to
move the Virtual Host to the chosen column.
How WebLogic Server Resolves HTTP
Requests
When WebLogic Server receives an HTTP request, it resolves the request by parsing
the various parts of the URL and using that information to determine which Web
Application and/or server should handle the request. The examples below demonstrate
various combinations of requests for Web Applications, virtual hosts, servlets, JSPs,
and static files and the resulting response.
Note: If you package your Web Application as part of an Enterprise Application, you
can provide an alternate name for a Web Application that is used to resolve
requests to the Web Application. For more information, see Deploying Web
Applications as Part of an Enterprise Application at
http://e-docs.bea.com/wls/docs81b/webapp/deployment.html#wa
r-ear.
7-10
Configuring and Managing WebLogic Server
How WebLogic Server Resolves HTTP Requests
The table below provides some sample URLs and the file that is served by WebLogic
Server. The Index Directories Checked column refers to the Index Directories attribute
that controls whether or not a directory listing is served if no file is specifically
requested. You set Index Directories using the Administration Console, on the Web
Applications node, under the Configuration →Files tab.
Table 7-1 Examples of How WebLogic Server Resolves URLs
URL
Index
Directories
Checked?
This file is served in
response
http://host:port/apples
No
Welcome file* defined in
the apples Web
Application.
http://host:port/apples
Yes
Directory listing of the top
level directory of the
apples Web Application.
http://host:port/oranges/naval
Does not
matter
Servlet mapped with
<url-pattern> of
/naval in the oranges
Web Application.
There are additional
considerations for servlet
mappings. For more
information, see
Configuring Servlets at
http://e-docs.bea.c
om/wls/docs81b/weba
pp/
components.html
#configuringservlets.
Configuring and Managing WebLogic Server
7-11
7
Configuring WebLogic Server Web Components
Table 7-1 Examples of How WebLogic Server Resolves URLs
URL
Index
Directories
Checked?
This file is served in
response
http://host:port/naval
Does not
matter
Servlet mapped with
<url-pattern> of
/naval in the oranges
Web Application and
oranges is defined as the
default Web Application.
For more information, see
Configuring Servlets at
http://e-docs.bea.c
om/wls/docs81b/weba
pp/
components.html
#configuringservlets.
http://host:port/apples/pie.jsp
Does not
matter
pie.jsp, from the
top-level directory of the
apples Web Application.
http://host:port
Yes
Directory listing of the top
level directory of the
default Web Application
http://host:port
No
Welcome file* from the
default Web Application.
http://host:port/apples/myfile.html
Does not
matter
myfile.html, from the
top level directory of the
apples Web Application.
http://host:port/myfile.html
Does not
matter
myfile.html, from the
top level directory of the
default Web Application.
http://host:port/apples/images/red.gif
Does not
matter
red.gif, from the images
subdirectory of the
top-level directory of the
apples Web Application.
7-12
Configuring and Managing WebLogic Server
How WebLogic Server Resolves HTTP Requests
Table 7-1 Examples of How WebLogic Server Resolves URLs
URL
Index
Directories
Checked?
This file is served in
response
http://host:port/myFile.html
Does not
matter
Error 404
Where myfile.html does not exist in the apples Web
Application and a default servlet has not been defined.
For more information, see
Customizing HTTP Error
Responses at
http://e-docs.bea.c
om/wls/docs81b/weba
pp/components.html#
error-page.
http://www.fruit.com/
No
Welcome file* from the
default Web Application
for a virtual host with a host
name of
www.fruit.com.
http://www.fruit.com/
Yes
Directory listing of the top
level directory of the
default Web Application
for a virtual host with a host
name of
www.fruit.com.
http://www.fruit.com/oranges/myfile.html
Does not
matter
myfile.html, from the
oranges Web Application
that is targeted to a virtual
host with host name
www.fruit.com.
* For more information, see Configuring Welcome Pages at
http://e-docs.bea.com/wls/docs81b/webapp/components.html#welcome_
pages.
Configuring and Managing WebLogic Server
7-13
7
Configuring WebLogic Server Web Components
Setting Up HTTP Access Logs
WebLogic Server can keep a log of all HTTP transactions in a text file, in either
common log format or extended log format. Common log format is the default, and
follows a standard convention. Extended log format allows you to customize the
information that is recorded. You can set the attributes that define the behavior of
HTTP access logs for each server or for each virtual host that you define.
For information on setting up HTTP logging for a server or a virtual host, refer to the
following topics in the Administration Console online help:
!
Specifying HTTP Log File Settings for a Server
!
Specifying HTTP Log File Settings for a Virtual Host
Log Rotation
You can also choose to rotate the log file based on either the size of the file or after a
specified amount of time has passed. When either one of these two criteria are met, the
current access log file is closed and a new access log file is started. If you do not
configure log rotation, the HTTP access log file grows indefinitely. The name of the
access log file includes a numeric portion that is incremented upon each rotation.
Separate HTTP Access logs are kept for each Web Server you have defined.
Common Log Format
The default format for logged HTTP information is the common log format at
http://www.w3.org/Daemon/User/Config/Logging.html#common-logfileformat. This standard format follows the pattern:
host RFC931 auth_user [day/month/year:hour:minute:second
UTC_offset] "request" status bytes
where:
host
Either the DNS name or the IP number of the remote client
7-14
Configuring and Managing WebLogic Server
Setting Up HTTP Access Logs
RFC931
Any information returned by IDENTD for the remote client; WebLogic Server
does not support user identification
auth_user
If the remote client user sent a userid for authentication, the user name;
otherwise “-”
day/month/year:hour:minute:second UTC_offset
Day, calendar month, year and time of day (24-hour format) with the hours
difference between local time and GMT, enclosed in square brackets
"request"
First line of the HTTP request submitted by the remote client enclosed in
double quotes
status
HTTP status code returned by the server, if available; otherwise “-”
bytes
Number of bytes listed as the content-length in the HTTP header, not including
the HTTP header, if known; otherwise “-”
Setting Up HTTP Access Logs by Using Extended Log
Format
WebLogic Server also supports extended log file format, version 1.0, as defined by the
W3C. This is an emerging standard, and WebLogic Server follows the draft
specification from W3C at www.w3.org/TR/WD-logfile.html. The current
definitive reference may be found from the W3C Technical Reports and Publications
page at www.w3.org/pub/WWW/TR.
The extended log format allows you to specify the type and order of information
recorded about each HTTP communication. To enable the extended log format, set the
Format attribute on the HTTP tab in the Administration Console to Extended. (See
“Creating Custom Field Identifiers” on page 7-18).
You specify what information should be recorded in the log file with directives,
included in the actual log file itself. A directive begins on a new line and starts with a
# sign. If the log file does not exist, a new log file is created with default directives.
However, if the log file already exists when the server starts, it must contain legal
directives at the head of the file.
Configuring and Managing WebLogic Server
7-15
7
Configuring WebLogic Server Web Components
Creating the Fields Directive
The first line of your log file must contain a directive stating the version number of the
log file format. You must also include a Fields directive near the beginning of the
file:
#Version: 1.0
#Fields: xxxx xxxx xxxx ...
Where each xxxx describes the data fields to be recorded. Field types are specified as
either simple identifiers, or may take a prefix-identifier format, as defined in the W3C
specification. Here is an example:
#Fields: date time cs-method cs-uri
This identifier instructs the server to record the date and time of the transaction, the
request method that the client used, and the URI of the request for each HTTP access.
Each field is separated by white space, and each record is written to a new line,
appended to the log file.
Note: The #Fields directive must be followed by a new line in the log file, so that the
first log message is not appended to the same line.
Supported Field identifiers
The following identifiers are supported, and do not require a prefix.
date
Date at which transaction completed, field has type <date>, as defined in the
W3C specification.
time
Time at which transaction completed, field has type <time>, as defined in the
W3C specification.
time-taken
Time taken for transaction to complete in seconds, field has type <fixed>, as
defined in the W3C specification.
bytes
Number of bytes transferred, field has type <integer>.
Note that the cached field defined in the W3C specification is not supported in
WebLogic Server.
7-16
Configuring and Managing WebLogic Server
Setting Up HTTP Access Logs
The following identifiers require prefixes, and cannot be used alone. The supported
prefix combinations are explained individually.
IP address related fields:
These fields give the IP address and port of either the requesting client, or the
responding server. This field has type <address>, as defined in the W3C
specification. The supported prefixes are:
c-ip
The IP address of the client.
s-ip
The IP address of the server.
DNS related fields
These fields give the domain names of the client or the server. This field has
type <name>, as defined in the W3C specification. The supported prefixes are:
c-dns
The domain name of the requesting client.
s-dns
The domain name of the requested server.
sc-status
Status code of the response, for example (404) indicating a “File not found”
status. This field has type <integer>, as defined in the W3C specification.
sc-comment
The comment returned with status code, for instance “File not found”. This
field has type <text>.
cs-method
The request method, for example GET or POST. This field has type <name>,
as defined in the W3C specification.
cs-uri
The full requested URI. This field has type <uri>, as defined in the W3C
specification.
cs-uri-stem
Only the stem portion of URI (omitting query). This field has type <uri>, as
defined in the W3C specification.
Configuring and Managing WebLogic Server
7-17
7
Configuring WebLogic Server Web Components
cs-uri-query
Only the query portion of the URI. This field has type <uri>, as defined in the
W3C specification.
Creating Custom Field Identifiers
You can also create user-defined fields for inclusion in an HTTP access log file that
uses the extended log format. To create a custom field you identify the field in the ELF
log file using the Fields directive and then you create a matching Java class that
generates the desired output. You can create a separate Java class for each field, or the
Java class can output multiple fields. A sample of the Java source for such a class is
included in this document. See “Java Class for Creating a Custom ELF Field” on page
7-22.
To create a custom field:
1. Include the field name in the Fields directive, using the form:
x-myCustomField.
Where myCustomField is a fully-qualified class name.
For more information on the Fields directive, see “Creating the Fields
Directive” on page 7-16.
2. Create a Java class with the same fully-qualified class name as the custom field
you defined with the Fields directive (for example myCustomField). This class
defines the information you want logged in your custom field. The Java class
must implement the following interface:
weblogic.servlet.logging.CustomELFLogger
In your Java class, you must implement the logField() method, which takes a
HttpAccountingInfo object and FormatStringBuffer object as its
arguments:
7-18
"
Use the HttpAccountingInfo object to access HTTP request and response
data that you can output in your custom field. Getter methods are provided to
access this information. For a complete listing of these get methods, see “Get
Methods of the HttpAccountingInfo Object” on page 7-19.
"
Use the FormatStringBuffer class to create the contents of your custom
field. Methods are provided to create suitable output. For more information
on these methods, see the Javadocs for FormatStringBuffer (see
Configuring and Managing WebLogic Server
Setting Up HTTP Access Logs
http://e-docs.bea.com/wls/docs81b/javadocs/weblogic/servlet/
logging/FormatStringBuffer.html).
3. Compile the Java class and add the class to the CLASSPATH statement used to start
WebLogic Server. You will probably need to modify the CLASSPATH statements
in the scripts that you use to start WebLogic Server.
Note: Do not place this class inside of a Web Application or Enterprise
Application in exploded or jar format.
4. Configure WebLogic Server to use the extended log format. For more
information, see “Setting Up HTTP Access Logs by Using Extended Log
Format” on page 7-15.
Note: When writing the Java class that defines your custom field, you should not
execute any code that is likely to slow down the system (For instance,
accessing a DBMS or executing significant I/O or networking calls.)
Remember, an HTTP access log file entry is created for every HTTP request.
Note: If you want to output more than one field, delimit the fields with a tab
character. For more information on delimiting fields and other ELF formatting
issues, see Extended Log Format at
http://www.w3.org/TR/WD-logfile-960221.html.
Get Methods of the HttpAccountingInfo Object
The following methods return various data regarding the HTTP request. These
methods are similar to various methods of javax.servlet.ServletRequest,
javax.servlet.http.Http.ServletRequest, and
javax.servlet.http.HttpServletResponse.
For details on these methods see the corresponding methods in the Java interfaces
listed in the following table, or refer to the specific information contained in the table.
Table 7-2 Getter Methods of HttpAccountingInfo
HttpAccountingInfo Methods
Where to find information on the methods
Object getAttribute(String name);
javax.servlet.ServletRequest
Enumeration getAttributeNames();
javax.servlet.ServletRequest
String getCharacterEncoding();
javax.servlet.ServletRequest
Configuring and Managing WebLogic Server
7-19
7
Configuring WebLogic Server Web Components
Table 7-2 Getter Methods of HttpAccountingInfo
HttpAccountingInfo Methods
Where to find information on the methods
int getResponseContentLength();
javax.servlet.ServletResponse.
setContentLength()
This method gets the content length of the response, as set
with the setContentLength() method.
String getContentType();
javax.servlet.ServletRequest
Locale getLocale();
javax.servlet.ServletRequest
Enumeration getLocales();
javax.servlet.ServletRequest
String getParameter(String name);
javax.servlet.ServletRequest
Enumeration getParameterNames();
javax.servlet.ServletRequest
String[] getParameterValues(String
name);
javax.servlet.ServletRequest
String getProtocol();
javax.servlet.ServletRequest
String getRemoteAddr();
javax.servlet.ServletRequest
String getRemoteHost();
javax.servlet.ServletRequest
String getScheme();
javax.servlet.ServletRequest
String getServerName();
javax.servlet.ServletRequest
int getServerPort();
javax.servlet.ServletRequest
boolean isSecure();
javax.servlet.ServletRequest
String getAuthType();
javax.servlet.http.Http.ServletRequest
String getContextPath();
javax.servlet.http.Http.ServletRequest
Cookie[] getCookies();
javax.servlet.http.Http.ServletRequest
long getDateHeader(String name);
javax.servlet.http.Http.ServletRequest
String getHeader(String name);
javax.servlet.http.Http.ServletRequest
Enumeration getHeaderNames();
javax.servlet.http.Http.ServletRequest
7-20
Configuring and Managing WebLogic Server
Setting Up HTTP Access Logs
Table 7-2 Getter Methods of HttpAccountingInfo
HttpAccountingInfo Methods
Where to find information on the methods
Enumeration getHeaders(String name);
javax.servlet.http.Http.ServletRequest
int getIntHeader(String name);
javax.servlet.http.Http.ServletRequest
String getMethod();
javax.servlet.http.Http.ServletRequest
String getPathInfo();
javax.servlet.http.Http.ServletRequest
String getPathTranslated();
javax.servlet.http.Http.ServletRequest
String getQueryString();
javax.servlet.http.Http.ServletRequest
String getRemoteUser();
javax.servlet.http.Http.ServletRequest
String getRequestURI();
javax.servlet.http.Http.ServletRequest
String getRequestedSessionId();
javax.servlet.http.Http.ServletRequest
String getServletPath();
javax.servlet.http.Http.ServletRequest
Principal getUserPrincipal();
javax.servlet.http.Http.ServletRequest
boolean
isRequestedSessionIdFromCookie();
javax.servlet.http.Http.ServletRequest
boolean
isRequestedSessionIdFromURL();
javax.servlet.http.Http.ServletRequest
boolean
isRequestedSessionIdFromUrl();
javax.servlet.http.Http.ServletRequest
boolean isRequestedSessionIdValid();
javax.servlet.http.Http.ServletRequest
String getFirstLine();
Returns the first line of the HTTP request, for example:
GET /index.html HTTP/1.0
long getInvokeTime();
Returns the length of time it took for the service method
of a servlet to write data back to the client.
int getResponseStatusCode();
javax.servlet.http.HttpServletResponse
String
getResponseHeader(String name);
javax.servlet.http.HttpServletResponse
Configuring and Managing WebLogic Server
7-21
7
Configuring WebLogic Server Web Components
Listing 7-1 Java Class for Creating a Custom ELF Field
import weblogic.servlet.logging.CustomELFLogger;
import weblogic.servlet.logging.FormatStringBuffer;
import weblogic.servlet.logging.HttpAccountingInfo;
/* This example outputs the User-Agent field into a
custom field called MyCustomField
*/
public class MyCustomField implements CustomELFLogger{
public void logField(HttpAccountingInfo metrics,
FormatStringBuffer buff) {
buff.appendValueOrDash(metrics.getHeader("User-Agent"));
}
}
}
Preventing POST Denial-of-Service Attacks
A Denial-of-Service attack is a malicious attempt to overload a server with phony
requests. One common type of attack is to send huge amounts of data in an HTTP POST
method. You can set three attributes in WebLogic Server that help prevent this type of
attack. These attributes are set in the console, under Servers or virtual hosts. If you
define these attributes for a virtual host, the values set for the virtual host override
those set under Servers.
PostTimeoutSecs
You can limit the amount of time that WebLogic Server waits between
receiving chunks of data in an HTTP POST.
MaxPostTimeSecs
Limits the total amount of time that WebLogic Server spends receiving post
data. If this limit is triggered, a PostTimeoutException is thrown and the
following message is sent to the server log:
Post time exceeded MaxPostTimeSecs.
7-22
Configuring and Managing WebLogic Server
Setting Up WebLogic Server for HTTP Tunneling
MaxPostSize
Limits the number of bytes of data received in a POST from a single request. If
this limit is triggered, a MaxPostSizeExceeded exception is thrown and the
following message is sent to the server log:
POST size exceeded the parameter MaxPostSize.
An HTTP error code 413 (Request Entity Too Large) is sent back to the client.
If the client is in listening mode, it gets these messages. If the client is not in
listening mode, the connection is broken.
Setting Up WebLogic Server for HTTP
Tunneling
HTTP tunneling provides a way to simulate a stateful socket connection between
WebLogic Server and a Java client when your only option is to use the HTTP protocol.
It is generally used to tunnel through an HTTP port in a security firewall. HTTP is a
stateless protocol, but WebLogic Server provides tunneling functionality to make the
connection appear to be a regular T3Connection. However, you can expect some
performance loss in comparison to a normal socket connection.
Configuring the HTTP Tunneling Connection
Under the HTTP protocol, a client may only make a request, and then accept a reply
from a server. The server may not voluntarily communicate with the client, and the
protocol is stateless, meaning that a continuous two-way connection is not possible.
WebLogic HTTP tunneling simulates a T3Connection via the HTTP protocol,
overcoming these limitations. There are two attributes that you can configure in the
Administration Console to tune a tunneled connection for performance. You access
these attributes in the Servers section, under the Connections and Protocols tabs. It is
advised that you leave them at their default settings unless you experience connection
problems. These properties are used by the server to determine whether the client
connection is still valid, or whether the client is still alive.
Configuring and Managing WebLogic Server
7-23
7
Configuring WebLogic Server Web Components
Enable Tunneling
Enables or disables HTTP tunneling. HTTP tunneling is disabled by default.
Note that the server must also support both the HTTP and T3 protocols in order
to use HTTP tunneling.
Tunneling Client Ping
When an HTTP tunnel connection is set up, the client automatically sends a
request to the server, so that the server may volunteer a response to the client.
The client may also include instructions in a request, but this behavior happens
regardless of whether the client application needs to communicate with the
server. If the server does not respond (as part of the application code) to the
client request within the number of seconds set in this attribute, it does so
anyway. The client accepts the response and automatically sends another
request immediately.
Default is 45 seconds; valid range is 20 to 900 seconds.
Tunneling Client Timeout
If the number of seconds set in this attribute have elapsed since the client last
sent a request to the server (in response to a reply), then the server regards the
client as dead, and terminates the HTTP tunnel connection. The server checks
the elapsed time at the interval specified by this attribute, when it would
otherwise respond to the client’s request.
Default is 40 seconds; valid range is 10 to 900 seconds.
Connecting to WebLogic Server from the Client
When your client requests a connection with WebLogic Server, all you need to do in
order to use HTTP tunneling is specify the HTTP protocol in the URL. For example:
Hashtable env = new Hashtable();
env.put(Context.PROVIDER_URL, "http://wlhost:80");
Context ctx = new InitialContext(env);
On the client side, a special tag is appended to the http protocol, so that WebLogic
Server knows this is a tunneling connection, instead of a regular HTTP request. Your
application code does not need to do any extra work to make this happen.
7-24
Configuring and Managing WebLogic Server
Using Native I/O for Serving Static Files (Windows Only)
The client must specify the port in the URL, even if the port is 80. You can set up your
WebLogic Server to listen for HTTP requests on any port, although the most common
choice is port 80 since requests to port 80 are customarily allowed through a firewall.
You specify the listen port for WebLogic Server in the Administration Console under
the “Servers” node, under the “Network” tab.
Using Native I/O for Serving Static Files
(Windows Only)
When running WebLogic Server on Windows NT/2000 you can specify that
WebLogic Server use the native operating system call TransmitFile instead of using
Java methods to serve static files such as HTML files, text files, and image files. Using
native I/O can provide performance improvements when serving larger static files.
Native I/O is enabled by default. You can disable it by clicking on server/tuning and
deselecting the checkbox. When you save this configuration it is written to the
config.xml file rather than the web.xml file used when you configure Native I/O
programmatically.
To configure native I/O programmatically, add two parameters to the web.xml
deployment descriptor of a Web Application containing the files to be served using
native I/O. The first parameter, weblogic.http.nativeIOEnabled should be set to
TRUE to enable native I/O file serving. The second parameter,
weblogic.http.minimumNativeFileSize sets the minimum file size for using
native I/O. If the file being served is larger than this value, native I/O is used. If you
do not specify this parameter, a value of 400 bytes is used.
Generally, native I/O provides greater performance gains when serving larger files;
however, as the load on the machine running WebLogic Server increases, these gains
diminish. You may need to experiment to find the correct value for
weblogic.http.minimumNativeFileSize.
The following example shows the complete entries that should be added to the
web.xml deployment descriptor. These entries must be placed in the web.xml file after
the <distributable> element and before <servlet> element.
Configuring and Managing WebLogic Server
7-25
7
Configuring WebLogic Server Web Components
<context-param>
<param-name>weblogic.http.nativeIOEnabled</param-name>
<param-value>TRUE</param-value>
</context-param>
<context-param>
<param-name>weblogic.http.minimumNativeFileSize</param-name>
<param-value>500</param-value>
</context-param>
For more information on writing deployment descriptors, see Writing Web
Application Deployment Descriptors at
http://e-docs.bea.com/wls/docs81b/webapp/deployment.html.
7-26
Configuring and Managing WebLogic Server
CHAPTER
8
Protecting System
Administration
Operations
To leverage individual skills, many Web development teams divide system
administration responsibilities into distinct roles. Each project might give only one or
two team members permission to deploy components, but allow all team members to
view the WebLogic Server configuration. A WebLogic Server supports this role-based
development by providing four global roles that determine access privileges for system
administration operations: Admin, Deployer, Operator, and Monitor.
All WebLogic Server system administration operations are implemented via a set of
MBeans. An MBean is a type of Java object that is specified in the Java Management
Extensions (JMX). When a user tries to invoke operations on these
system-administration MBeans, the WebLogic Server determines whether the user
belongs to a role that is permitted to carry out the operation. For more information on
MBeans that configure WebLogic Servers, refer to “System Administration
Infrastructure” on page 1-5.
This topic contains the following sections:
!
Operations Available to Each Role
!
Protected User Interfaces
!
Permissions for Starting and Shutting Down a WebLogic Server
Note: These role-based permissions replace access control lists (ACLs) for securing
WebLogic Server MBeans, which were used before Release 7.0.
Configuring and Managing WebLogic Server
8-1
8
Protecting System Administration Operations
Operations Available to Each Role
Table 8-1 describes the four global roles that WebLogic Server uses to determine
access privileges for system administration operations, and the permissions granted to
each role.
Table 8-1 Global Roles and Permissions
Global Role
Permissions
Admin
View the server configuration, including the encrypted value of
encrypted attributes.
Modify the entire server configuration.
Deploy applications, EJBs, startup and shutdown classes, J2EE
Connectors, and Web Service components, and edit deployment
descriptors.
Start, resume, and stop servers by default. “Permissions for Starting
and Shutting Down a WebLogic Server” on page 8-8, provides more
information.
Deployer
View the server configuration, except for encrypted attributes.
Deploy applications, EJBs, startup and shutdown classes, J2EE
Connectors, and Web Service components, and edit deployment
descriptors.
Operator
View the server configuration, except for encrypted attributes.
Start, resume, and stop servers by default. “Permissions for Starting
and Shutting Down a WebLogic Server” on page 8-8, provides more
information.
Monitor
View the server configuration, except for encrypted attributes.
This role effectively provides read-only access to the
Administration Console, weblogic.Admin utility and MBean
APIs.
No user, regardless of role membership, can view the non-encrypted version of an
encrypted attribute.
8-2
Configuring and Managing WebLogic Server
Operations Available to Each Role
While you can create any number of additional roles for use in your applications, only
the roles in Table 8-1 have permission to view or change the configuration of a
WebLogic Server. To define a role, use the Administration Console. For more
information, refer to Granting Roles in the Managing WebLogic Security guide.
Default Group Associations
By default, a WebLogic Server defines four groups that correspond to the four global
roles. By adding a username to one of these groups, the user will also be in the
corresponding global role. (See Table 8-2.)
Table 8-2 Default Group Associations
Members of This Group
Are In This Role
Administrators
Admin
Deployers
Deployer
Operators
Operator
Monitors
Monitor
Membership in a group is a static identity that a system administrator assigns, while
membership in a role can be dynamically calculated based on data such as group
membership, username, or the time of day. (See Figure 8-1.)
Configuring and Managing WebLogic Server
8-3
8
Protecting System Administration Operations
Figure 8-1 Relationship of Group and Role Membership
Members of Role
Calculated membership based
on user ID or group ID and
time/date.
Static list of user IDs
Static list of additional groups
Members of
Corresponding Group
Static list of group and
user IDs
For example, if you add a user to the group named Deployers, by default the user will
also belong to the Deployer role. You can, however, modify the default definition of
the Deployer role so that a user named User1 is in the Deployer role from 6am to 6pm,
and a user named User2 is in the role from 6pm to 6am.
When you use the Configuration Wizard to create WebLogic Server configuration, the
administrative user that you create is in the Administrators group, and, therefore, the
Admin role. The Deployers, Operators, and Monitors groups are empty.
For information on creating users and assigning them to roles, refer to Defining Users
and Granting Roles in the Managing WebLogic Security guide.
Protected User Interfaces
You can use the following user interfaces (UIs) to perform system administration
operations:
8-4
Configuring and Managing WebLogic Server
Overlapping Permissions for System Administration MBeans and Policies on Resourc!
The Administration Console. For information about using this UI, refer to the
Administration Console Online Help.
Note: To use the Administration Console, you must belong to one of the groups
and roles that are described in Table 8-2. The other user interfaces do not
require you to belong to one of the default groups.
!
The weblogic.Admin command. For information about using this UI, refer to
"weblogic.Admin Command-Line Reference" in the WebLogic Server Command
Line Reference.
!
MBean APIs. For information about using these APIs, refer to the Programming
WebLogic JMX Services guide.
If you attempt to invoke an operation for which you do not have permission, the
WebLogic Server instance throws a
weblogic.management.NoAccessRuntimeException. The server instance sends
this exception to its log file, and you can configure a server to send exceptions to
standard out. If you invoke the command from the Administration Console, you see an
Access denied error.
Overlapping Permissions for System
Administration MBeans and Policies on
Resources
For a few, specific operations, the MBean permissions described in previous sections
overlap with another security scheme, policies on resources. In these cases, a user must
satisfy both security schemes to invoke the operation.
This section contains the following subsections:
!
Resources and Policies
!
Working with Policies
!
Maintaining a Consistent Security Scheme
Configuring and Managing WebLogic Server
8-5
8
Protecting System Administration Operations
Resources and Policies
A WebLogic Server instance, the server’s subsystems (such as Deployment Manager
and JDBC Container), and the items that the subsystems control (such as Web
applications and JDBC connection pools) are called resources. Each WebLogic Server
resource exposes a set of its operations through its own instance of the
weblogic.security.spi.Resource interface.
A policy is a set of criteria that determines who can access the Resource interface for
a resource. For example, the Resource interface for a server resource exposes
operations that start, shut down, lock, or unlock the server instance. You can define a
policy that determines who can access the server’s Resource interface and its
methods.
In some cases, the operations that the Resource interface exposes change attributes of
WebLogic Server MBeans. In these cases, the permissions specified by the policy must
agree with the role-based protections of MBean attributes. (See Figure 8-2.)
Figure 8-2 Overlapping Permissions for Server Policies and MBeans
Resource Interface
start()
stop()
lock()
unlock()
Server MBeans
isUserInRole()
8-6
Configuring and Managing WebLogic Server
Server Policy
isAccessAllowed()
Server
Overlapping Permissions for System Administration MBeans and Policies on Resourc-
Working with Policies
You can view, create, or modify policies on resources from the Administration
Console. For example, to view the policy on a server resource, right click the name of
a WebLogic Server and choose Define Policy. As illustrated in Figure 8-3, the default
policy for a server resource grants access to the Admin and Operator role.
Figure 8-3 Default Policy for a Server Resource
Note that a server resource inherits a default policy. If you want to change the inherited
policy statement for all WebLogic Server instances in a domain, do the following from
the Administration Console:
1. Right-click the Servers node.
2. From the shortcut menu, click Define Policy.
3. In the right pane, modify the policy and click Apply.
For more information on creating and modifying policies, refer to Setting Protections
for WebLogic Resources in the Managing WebLogic Security guide.
Configuring and Managing WebLogic Server
8-7
8
Protecting System Administration Operations
Maintaining a Consistent Security Scheme
The default configuration of groups, roles, server policies, and MBean permissions
work together to create a consistent security scheme. You can, however, make
modifications that limit access in ways that you do not intend.
For example, if you add a user to the Operator role but fail to add the Operator role to
the policy of a server resource, the Operator can call MBean methods that are used in
the startup and shutdown sequence, but cannot use any server-resource operations to
start or stop a server.
To keep MBean security synchronized with the permissions granted by policies,
consider the following when you create or modify a policy:
!
Consider always giving the Admin role access to a resource.
!
For a policy on a server, consider adding the Operator role.
!
For a policy on a deployable resource (such as an EJB, Application, Connector,
or Startup/Shutdown class), consider adding the Deployer role.
In addition, note that if a user does not belong to one of the four groups described in
Table 8-2, the user cannot log in to the Administration Console.
Permissions for Starting and Shutting Down
a WebLogic Server
WebLogic Server enables two techniques for starting and shutting down server
instances, the weblogic.Server command and the Node Manager. Because the
underlying components for weblogic.Server and Node Manager are different, the
two commands use different authentication methods.
This section contains the following subsections:
8-8
!
Permissions for Using the weblogic.Server Command
!
Permissions for Using the Node Manager
Configuring and Managing WebLogic Server
Permissions for Starting and Shutting Down a WebLogic Server
!
Shutting Down a WebLogic Server
Permissions for Using the weblogic.Server Command
The weblogic.Server command, which starts a WebLogic Server from a local host
machine, calls methods that are protected by a policy on the server resource. To use
this command, you must satisfy the requirements of the policy on the server.
Some weblogic.Server arguments set attributes for MBeans. However, because
these arguments modify an MBean before the server is in the RUNNING state, the policy
on the server resource, not the MBean security scheme, is the authorizer. For example,
a user in the Operator role can use the -Dweblogic.ListenPort argument to change
a server’s default listen port, but once the WebLogic Server is running, the Operator
user cannot change the listen port value.
For more information about weblogic.Server, refer to "Starting in Development
Mode or Production Mode" in the Administration Console Online Help.
Permissions for Using the Node Manager
The Node Manager uses both MBeans and the server resource to start a remote server.
If you have configured a Node Manager on the host machine of a remote WebLogic
Server, by default a user in the Admin or Operator role can use the Node Manager to
start the remote server.
You must make sure that any modifications you make to the default security settings
do not prevent a user from being authorized by both MBean security and the server
policy. For example, if you remove the Operator role from a server policy, the Operator
can still call MBean methods but cannot call the server resource.
For information about the Node Manager, refer to "Managing Server Availability with
Node Manager" in the Configuring and Managing WebLogic Server guide.
Configuring and Managing WebLogic Server
8-9
8
Protecting System Administration Operations
Shutting Down a WebLogic Server
Shutting down a WebLogic Server also involves both MBeans and the server resource.
When you issue a shutdown command, the server first determines whether you are a
member of the Admin or Operator role (per the MBean security scheme). Then, after
the MBean operations run, the server determines whether the policy on the server
resource authorizes you to shut down the server.
8-10
Configuring and Managing WebLogic Server
CHAPTER
9
Monitoring a WebLogic
Server Domain
These sections describe WebLogic Server monitoring capabilities that help you
manage and optimize application availability, performance, and security:
!
“Facilities for Monitoring WebLogic Server” on page 9-1
!
“Monitoring WebLogic Server using the Administration Console” on page 9-5
Facilities for Monitoring WebLogic Server
These sections describe WebLogic Server facilities for monitoring the health and
performance of a WebLogic Server domain:
!
“Administration Console” on page 9-1
!
“Server Self-Health Monitoring” on page 9-2
!
“Messages and Log Files” on page 9-3
Administration Console
The WebLogic Server Administration Console provides visibility into a broad array of
configuration and status information.
Configuring and Managing WebLogic Server
9-1
9
Monitoring a WebLogic Server Domain
The Administration Console obtains information about domain resources from the
domain’s Administration Server. The Administration Server is populated with
Management Beans (MBeans), based on Sun’s Java Management Extension (JMX)
standard, which provides the scheme for management access to domain resources.
The Administration Server contains:
!
Configuration MBeans, which control the domain’s configuration, and
!
Run-time MBeans, which provide a snapshot of information about domain
resources, such as JVM memory usage. When a resource in the domain—for
instance, a Web application—is instantiated, an run-time MBean instance is
created which collects information about that resource.
When you access a monitoring page for particular resource in the Administration
Console, the Administration Server performs a GET operation to retrieve the current
attribute values.
For details on what data is available on specific console pages, see “Monitoring
WebLogic Server using the Administration Console” on page 9-5.
Server Self-Health Monitoring
WebLogic Server provides a self-health monitoring feature to improve the reliability
and availability of server instances in a domain. Selected subsystems within each
server instance monitor their health status based on criteria specific to the subsystem.
If an individual subsystem determines that it can no longer operate in a consistent and
reliable manner, it registers its health state as “failed” with the host server instance.
Each server instance checks the health state of all its registered subsystems to
determine the overall viability of the server. If one or more critical subsystems have
reached the “failed” state, the server instance marks its own health state as “failed” to
indicate that the it cannot reliably host an application.
When used in combination with Node Manager, server self-health monitoring enables
you to automatically reboot servers that have failed. This improves the overall
reliability of a domain, and requires no direct intervention from an administrator. See
“Node Manager Capabilities” on page 3-5 for more information.
9-2
Configuring and Managing WebLogic Server
Facilities for Monitoring WebLogic Server
Obtaining Server Health Programmatically
You can check the self-reported health state of a server instance programmatically by
calling the getHealthState() method on the ServerRuntimeMBean. Similarly, you
can obtain the health state of a registered WebLogic Server subsystem by calling the
getHealthState() method on its MBean. The following MBeans automatically
register their health states with the host server:
!
JMSRuntimeMBean
!
JMSServerRuntimeMBean
!
JTARuntimeMBean
!
TransactionResourceRuntimeMBean
See the Javadocs for WebLogic Classes for more information on individual MBeans.
Messages and Log Files
WebLogic Server records information about events such as configuration changes,
deployment of applications, and subsystem failures in log files. The information in log
files is useful for detecting and troubleshooting problems, and monitoring performance
and availability.
For detailed information about log files and the WebLogic Server logging subsystem,
see “Logging” in Administration Console Online Help.
WebLogic Server outputs status and error messages to:
!
Standard Out—By default, a WebLogic Server instance prints all messages of
WARNING severity or higher to standard out—typically the command shell
window in which you are running the server instance. You can control what
messages a server instance writes to standard out using the Server→Logging tab.
If you start a Managed Server with Node Manager, Node Manager redirects the
server instance’s standard out to a file. In this case, you can view the Managed
Server’s output using Domain→Server→Remote Start Output→View Server output.
!
Standard Error—A WebLogic Server instance writes errors to standard error—
typically the command shell window in which you are running the server
instance.
Configuring and Managing WebLogic Server
9-3
9
Monitoring a WebLogic Server Domain
If you start a Managed Server with Node Manager, Node Manager redirects the
server instance’s standard error to a file. In this case, you can view the Managed
Server’s output using Domain→Server→Remote Start Output→View Server error output.
9-4
!
Server Logs—Each WebLogic Server instance writes all messages from its
subsystems and applications to a log file on its host machine. You can configure
logging behavior using the Server→Logging→Server tab. You can view a server
instance’s log file using the View server log link on any server tabs page.
!
Domain Log—By default, each server instance in a domain forwards all
messages from its subsystems and applications to the Administration Server for
the domain. The Administration Server writes a subset of the messages to the
Domain Log. You can control whether or not a server instance sends its
messages to the Administration Server, and configure filters that control which
messages it sends using the Server→Logging→Domain tab. You can view the
Domain Log using the View domain log link on any domain tab page.
!
Node Manager Logs—Node Manager writes startup and status messages to a
log file in the NodeManagerLogs\NodeManagerInternal subdirectory. Node
Manager log files are named NodeManagerInternal_timestamp, where
timestamp indicates the time at which Node Manager started.
!
HTTP Logs—By default, each server instance maintains a log of HTTP
requests. You can disable HTTP logging, or configure logging behavior using
the Server→Logging→HTTP tab.
!
JTA Logs—You can configure a server instance to maintain a JTA transaction
log using the Server→Logging→JTA tab.
!
JDBC Logs—You can configure a server instance to maintain a JDBC log using
the Server→Logging→JDBC tab.
Configuring and Managing WebLogic Server
Monitoring WebLogic Server using the Administration Console
Monitoring WebLogic Server using the
Administration Console
The left pane of the Administration Console is a tree control, with a node for key
entities you have configured. The following sections list the attributes displays on
monitoring pages in each node:
!
“Domain Monitoring Pages” on page 9-5
!
“Server Monitoring Pages” on page 9-6
!
“Clusters Monitoring Pages” on page 9-10
!
“Machines Monitoring Pages” on page 9-11
!
“Deployments Monitoring Pages” on page 9-12
!
“Services Monitoring Pages” on page 9-14
Domain Monitoring Pages
You can access one WebLogic domain at a time using the Administration Console.
The Domain→Monitoring tab provides access to key configuration attributes and the current
state for the servers and clusters in the current domain. The following table lists the monitoring
pages available for a domain, and the attributes displayed on each page.
Console Page
Attributes Displayed
Domain→Monitoring→Server
!
Name
!
Machine
!
Listen Address
!
Listen Port
!
State
!
SSL Listen Port
Configuring and Managing WebLogic Server
9-5
9
Monitoring a WebLogic Server Domain
Console Page
Attributes Displayed
Domain→Monitor→Cluster
!
Name
!
Cluster Status
!
Cluster Address
!
Multicast Address
!
Multicast Send Delay
!
Configure Server Count
!
Good Server Count
!
Bad Server Count
Other Domain Monitoring Links
Each domain-level monitoring page has links to display:
!
Domain Log—The Domain Log contains messages forwarded by all server
instances in the domain.
!
Domain-wide Security Settings
Server Monitoring Pages
When expanded, the Servers node lists each server instance in the current domain. To
monitor key run-time attributes for a server instance, click on its name, and choose one
of Monitoring tabs. The monitoring pages available depend on the application objects
deployed to the server instance. The following table lists the monitoring pages available for
a server instance, and the attributes displayed on each page.
9-6
Configuring and Managing WebLogic Server
Monitoring WebLogic Server using the Administration Console
Console Page
Attributes Displayed
Domain→Server→Monitoring→
General
!
State Activation Time
!
WebLogic Version
!
JDK Vendor
!
JDK Version
!
Operating System
!
OS Version
Domain→Server→Monitoring→
!
Idle Threads
Performance
!
Oldest Pending Request
!
Throughput
!
Queue Length
!
Memory Usage
!
Total Users Locked Out
!
Total Invalid Logins
!
Total Login Attempts while
Locked
!
Total Users Unlocked
!
Invalid Logins High
!
Locked Users
Domain→Server→Monitoring→
General→Monitor all Active
Queues...
Domain→Server→Monitoring→
General→Monitor all Connections...
Domain→Server→Monitoring→
General→Monitor all Active
Sockets..
Domain→Server→Monitoring→
Security
Configuring and Managing WebLogic Server
9-7
9
Monitoring a WebLogic Server Domain
Console Page
Attributes Displayed
Domain→Server→Monitoring→
JMS
!
Current Connections
!
Connections High
!
Total Connections
!
Current JMS Servers
!
Servers High
!
Servers Total
!
Total Transactions
!
Total Committed
!
Total Rolled Back
!
Timeout Rollbacks
!
Resource Rollbacks
!
Application Rollbacks
!
System Rollbacks
!
Total Heuristics
!
Total Transactions Abandoned
!
Average Commit Time
Domain→Server→Monitoring→
JMS
Monitor all Active JMS
Connections...
Domain→Server→Monitoring→
JMS
Monitor all Active JMS Servers...
Domain→Server→Monitoring→
JMS→Monitor all Pooled JMS
Connections...
Domain→Server→Monitoring→
JTA
9-8
Configuring and Managing WebLogic Server
Monitoring WebLogic Server using the Administration Console
Console Page
Attributes Displayed
Transaction by Name
!
Pooled Beans Current Count
!
Beans in Use Current Count
!
Access Total Count
!
Miss Total Count
!
Cache Access Count
!
Cache Hit Count
!
Cache Miss Count
!
Name
!
Transactions
!
Commits
!
Rollbacks
!
Heuristics
!
Heuristic Commits
!
Heuristic Rollbacks
!
Mixed Heuristics
!
Heuristic Hazards
!
Transaction Id
!
Name
!
Status
!
Seconds Active
!
Servers
!
Resources
Transactions by Resource
In-Flight JTA
Domain→Server→Remote Start
Output→View Server output...
If the server instance was started by
Node Manager,
its standard out is written to a log file
that can be viewed
with this link.
Domain→Server→Remote Start
Output→View Server error output...
If the server instance was started by
Node Manager,
its standard err is written to a log file
that can be viewed
with this link.
Configuring and Managing WebLogic Server
9-9
9
Monitoring a WebLogic Server Domain
Console Page
Attributes Displayed
Domain→Server→Remote Start
Output→View Node Manager
output...
If the server instance was started by
Node Manager,
the Node Manager log can be viewed
with this link.
Domain→Server→Monitoring→
JRockit
!
Total Nursery Size
!
Max Heap Size
!
Gc Algorithm
!
Total Garbage Collection Count
!
GCHandles Compaction
!
Concurrent
!
Generational
!
Incremental
!
Parallel
!
Number Of Processors
!
Total Number Of Threads
!
Number Of Daemon Threads
Other Server Monitoring Links
Each top level tab page for a server instance—Performance, Security, JMS, JTA— has
links to display:
!
Server Log—The Server Log contains all messages generated by its subsystems
and applications.
!
JNDI Tree—The JNDI tree shows the objects deployed to the current server
instance.
Clusters Monitoring Pages
The following table lists the monitoring pages available for a cluster, and the attributes displayed
on each page
9-10
Configuring and Managing WebLogic Server
Monitoring WebLogic Server using the Administration Console
.
Console Page
Attributes Displayed
Domain→Cluster→Monitoring
!
Number of Servers configured for
this cluster
!
Number of Servers currently
participating in this cluster
!
Name
!
State
!
Servers
!
Resend Requests
!
Fragments Received
!
Lost Multicast Messages
Machines Monitoring Pages
The following table lists the monitoring pages available for a machine, and the attributes
displayed on each page.
.
Console Page
Attributes Displayed
Machine→Monitoring→Node
Manager Status
!
State
!
bea.home
!
weblogic.nodemanager.javaHome
!
weblogic.nodemanager.listenAddre
ss
!
weblogic.nodemanager.listenPort
!
CLASSPATH
Machine→Monitoring→Node
Manager→Logs
Configuring and Managing WebLogic Server
9-11
9
Monitoring a WebLogic Server Domain
Deployments Monitoring Pages
The following table lists the monitoring pages available in the Deployments Node, and the
attributes displayed on each page
.
Console Page
Attributes Displayed
EJB --> Monitoring --> Stateful EJBs
!
Cache Access Count
!
Cache Hit Count
!
Lock Manager Entries Current
Count
!
Lock Manager Access Count
!
Lock Manager Waiter Total
Count
!
Lock Manager Timeout Total
Count
!
Pooled Beans Current Count
!
Beans In Use Current Count
!
Waiter Current Count
!
Pool Timeout Total Count
!
Access Total Count
!
Miss Total Count
!
Pooled Beans Current
!
Pooled Beans Current Count
!
Beans In Use Current Count
!
Pool Timeout Total Count
!
Access Total Count
!
JMSConnection Alive
EJB --> Monitoring --> Stateless
EJBs
EJB --> Monitoring --> Message
Driven EJBs
9-12
Configuring and Managing WebLogic Server
Monitoring WebLogic Server using the Administration Console
Console Page
Attributes Displayed
EJB --> Monitoring --> Entity EJBs
!
Pooled Beans Current Count
!
Beans in Use Current Count
!
Access Total Count
!
Miss Total Count
!
Cache Access Count
!
Cache Hit Count
!
Cache Miss Count
!
Server
!
Context Root
!
Servlets
!
Sessions
!
Sessions High
!
Total Sessions
!
Servlet Name
!
Server
!
Invocation Total Count
!
Execution Time Average
Web
Applications→Monitoring→Web
Applications
Web Applications→Monitoring→
Servlets
Web Applications→
Monitoring→Sessions
Web Service --> Monitoring -->
Servlets
Web Service --> Monitoring -->
Sessions
Web Service --> Monitoring --> Web
Services
Connector Modules
EJB Modules
Configuring and Managing WebLogic Server
9-13
9
Monitoring a WebLogic Server Domain
Services Monitoring Pages
The following table lists the monitoring pages available in the Services node, and the attributes
displayed on each page.
Console Page
Attributes Displayed
JDBC→Connection Pools
!
Server
!
State
!
Connections
!
Waiters
!
Num Unavailable
!
Name
!
Dentinal
!
Pool Name
!
Row Prefetch Enabled
!
Enable Two Phase Commit
!
Stream Chunk Size
!
Row Prefetch Size
!
Deployed
!
Name
!
JNDIName
!
Client Id
!
Default Priority
!
Default Time To Live
!
Default Redelivery Delay
!
Name
!
Store
!
Temporary Template
!
Bytes Maximum
!
Messages Maximum
JDBC→DataSources
JMS Connection Factory
JMS Server
JMS Topics
9-14
Configuring and Managing WebLogic Server
Monitoring WebLogic Server using the Administration Console
Console Page
Attributes Displayed
JMS Queues
Configuring and Managing WebLogic Server
9-15
9
9-16
Monitoring a WebLogic Server Domain
Configuring and Managing WebLogic Server
CHAPTER
10 Recovering Failed
Servers
A variety of events can lead to the failure of a server instance. Often one failure
condition leads to another. Loss of power, hardware malfunction, operating system
crashes, network partitions, and unexpected application behavior can all contribute to
the failure of a server instance.
Depending on availability requirements, you may implement a clustered architecture
to minimize the impact of failure events. (For information about failover in a
WebLogic Server cluster, see “Failover and Replication in a Cluster” in Using
WebLogic Server Clusters.) However, even in a clustered environment, server
instances may fail periodically, and it is important to be prepared for the recovery
process.
These topics describe WebLogic Server features for recovering failed servers
instances, guidelines for backing up the data required for restart, and instructions for
restarting failed server instances:
!
“WebLogic Server Failure Recovery Features” on page 10-1
!
“Backing Up Configuration and Security Data” on page 10-5
!
“Restarting Failed Server Instances” on page 10-10
WebLogic Server Failure Recovery Features
This section describes WebLogic features that support recovery from failure.
Configuring and Managing WebLogic Server
10-1
10
Recovering Failed Servers
Automatic Restart for Managed Servers
WebLogic Server provides self-health monitoring to improve the reliability and
availability of server instances in a domain. Selected subsystems within each
WebLogic Server instance monitor their health status based on criteria specific to the
subsystem. (For example, the JMS subsystem monitors the condition of the JMS thread
pool while the core server subsystem monitors default and user-defined execute queue
statistics.) If an individual subsystem determines that it can no longer operate in a
consistent and reliable manner, it registers its health state as “failed” with the host
server.
Each WebLogic Server instance, in turn, checks the health state of its registered
subsystems to determine its overall viability. If one or more of its critical subsystems
have reached the FAILED state, the server instance marks its own health state FAILED
to indicate that it cannot reliably host an application.
When used in combination with Node Manager, server self-health monitoring enables
you to automatically reboot servers that have failed. This improves the overall
reliability of a domain, and requires no direct intervention from an administrator.
For information on this feature, see “Node Manager Capabilities” on page 3-5. For
instructions to configure Node Manager and automatic restart behaviors, see
“Configuring Node Manager” on page 4-1.
Managed Server Independence Mode
When a Managed Server starts, it tries to contact the Administration Server to retrieve
its configuration information. If a Managed Server cannot connect to the
Administration Server during startup, it can retrieve its configuration by reading
configuration and security files directly. A Managed Server that starts in this way is
running in Managed Server Independence (MSI) mode. By default, MSI mode is
enabled. For information about disabling MSI mode, see “Disabling Managed Server
Independence” in Administration Console Online Help.
In Managed Server Independence mode, a Managed Server looks in its root directory
for the following files:
!
10-2
msi-config.xml—a replica of the domain’s config.xml.(Even if the
domain’s configuration file is named something other than config.xml, a
Configuring and Managing WebLogic Server
WebLogic Server Failure Recovery Features
Managed Server in MSI mode always looks for a configuration file named
msi-config.xml.)
!
SerializedSystemIni.dat
!
boot.properties—an optional file that contains an encrypted version of your
username and password. For more information, “Bypassing the Prompt for
Username and Password” in the Administration Console Online Help.
MSI Mode and the Managed Servers Root Directory
By default, a server instance assumes that its root directory is the directory from which
it was started. For more information about a server’s root directory, refer to “A
Server’s Root Directory” on page 2-9.
If you enable replication of configuration data, as described in “Backing Up Security
Data” on page 10-8, and if you have started the Managed Server at least once while the
Administration Server was running, msi-config.xml and
SerializedSystemIni.dat will already be in the server’s root directory.
boot.properties is not replicated. If it is not already in the Managed Server’s root
directory, you must copy it there.
If msi-config.xml and SerializedSystemIni.dat are not in the root directory,
you can either:
!
Copy config.xml and SerializedSystemIni.dat from the Administration
Server’s root directory (or from a backup) to the Managed Server’s root
directory. Then, rename the configuration file to msi-config.xml, or
!
Use the -Dweblogic.RootDirectory=path startup option to specify a
directory that already contains these files.
MSI Mode and the Security Realm
A Managed Server must have access to a security realm to complete its startup process.
If you use the security realm that WebLogic Server installs, then the Administration
Server maintains an LDAP server to store the domain’s security data. All Managed
Servers replicate this LDAP server. If the Administration Server fails, Managed
Servers running in MSI mode use the replicated LDAP server for security services.
If you use a third party security provider, then the Managed Server must be able to
access the security data before it can complete its startup process.
Configuring and Managing WebLogic Server
10-3
10
Recovering Failed Servers
MSI Mode and SSL
If you set up SSL for your servers, each server requires its own set of certificate files,
key files, and other SSL-related files. Managed Servers do not retrieve SSL-related
files from the Administration Server (though the domain’s configuration file does store
the pathnames to those files for each server). Starting in MSI Mode does not require
you to copy or move the SSL-related files unless they are located on a machine that is
inaccessible.
MSI Mode and Deployment
A Managed Server that starts in MSI mode deploys its applications from its staging
directory: serverroot/stage/appName.
MSI Mode and Managed Server Configuration Changes
If you start a Managed Server in MSI mode, you cannot change its configuration until
it restores communication with the Administration Server.
MSI Mode and Node Manager
You cannot use Node Manager to start a server instance in MSI mode, because Node
Manager requires the presence of the Administration Server. If the Administration
Server is unavailable, you must log onto Managed Server’s host machine to start the
Managed Server.
MSI Mode and Configuration File Replication
Managed Server Independence mode includes an option that copies the required
configuration files into the Managed Server's root directory every 5 minutes. This
option does not replicate a boot identity file. (For more information about boot identity
files, see “Bypassing the Prompt for Username and Password” in Administration
Console Online Help.)
By default, a Managed Server does not replicate these files. Depending on your backup
schemes and the frequency with which you update your domain's configuration, this
option might not be worth the performance cost of copying potentially large files
across a network.
Caution: Do not enable file replication for a server that shares an installation or root
directory with another server. Unpredictable errors can occur for both servers.
10-4
Configuring and Managing WebLogic Server
Backing Up Configuration and Security Data
To enable a Managed Server to replicate the domain's configuration files, see
“Replicating a Domain's Configuration Files for Managed Server Independence” in
Administration Console Online Help.
MSI Mode and Restored Communication with an Administration Server
When the Administration Server starts, it can detect the presence of running Managed
Servers (if -Dweblogic.management.discover=true, which is the default setting
for this property).
Upon startup, the Administration Server looks at a persisted copy of the file
running-managed-servers.xml and notifies all the Managed Servers listed in the
file of its presence.
Managed Servers that were started in Managed Server Indpendence Mode while the
Administration Server was unavailable will not appear in
running-managed-servers.xml. To re-establish a connection between the
Administration Server and such Managed Servers, use the weblogic.Admin
DISCOVERMANAGEDSERVER command. For more information, see
“DISCOVERMANAGEDSERVER” in WebLogic Server Command Reference.
When an Administration Server starts up and contacts a Managed Server running in
MSI mode, the Managed Server deactivates MSI mode and registers itself to the
Administration Server for future configuration change notifications.
Backing Up Configuration and Security Data
Recovery from the failure of a server instance requires access to the domain’s
configuration and security data. This section describes file backups that WebLogic
Server performs automatically, and recommended backup procedures that an
administrator should perform.
Configuring and Managing WebLogic Server
10-5
10
Recovering Failed Servers
Backing up config.xml
By default, an Administration Server stores a domain’s configuration data in a file
called domain_name\config.xml, where domain_name is the root directory of the
domain.
Backup config.xml to a secure location in case a failure of the Administration Server
renders the original copy unavailable. If an Administration Server fails, you can copy
the backup version to a different machine and restart and Administration Server on the
new machine.
WebLogic Server Archives Previous Versions of config.xml
By default, the Administration Server archives up to 5 previous versions of
config.xml in the domain-name/configArchive directory.
When you save a change to a domain’s configuration, the Administration Server saves
the previous configuration in domain-name\configArchive\config.xml#n. Each
time the Administration Server saves a file in the configArchive directory, it
increments the value of the #n suffix, up to a configurable number of copies—5 by
default. Thereafter, each time you change the domain configuration:
!
the archived files are rotated so that the newest file has a suffix with the highest
number,
!
the previous archived files are renamed with a lower number, and
!
the oldest file is deleted.
Example of Archived config.xml Naming and Rotation
In the MedRec domain, the current configuration file used by the MedRecServer is
WL_HOME\samples\server\config\medrec\config.xml. If you add a server
instance using the Administration Console, when you click the Create button,
MedRecServer saves the old config.xml file as
WL_HOME\samples\server\config\medrec\configArchive\config.xml#2.
10-6
Configuring and Managing WebLogic Server
Backing Up Configuration and Security Data
The new file, WL_HOME\samples\server\config\medrec\config.xml,
represents the MedRec domain with the new server instance. The previous file,
WL_HOME\samples\server\config\medrec\configArchive\config.xml#2,
contains the MedRec domain configuration as it was prior to creation of the new server
instance.
The next time you change the configuration, MedRecServer saves the current
config.xml file as config.xml#3. After four changes to the domain, the
configArchive directory contains four files: config.xml#2, config.xml#3,
config.xml#4, config.xml#5. The next time you change the configuration,
MedRecServer saves the old config.xml as config.xml#5. The previous
config.xml#5 is renamed as config.xml#4, and so on. The old config.xml#2 is
deleted.
Configuring the Number of Archived config.xml Versions
To configure how many previous versions of the domain configuration are archived:
1. In the left pane of the Administration Console, click on the name of the domain.
2. In the right pane, click the Configuration tab. Then click the General tab.
3. In the Advanced Options bar, click Show.
4. In the Archive Configuration Count box, enter the number of versions to save.
5. Click Apply.
WebLogic Server Archives config.xml during Server Startup
In addition to the files in domain-name\configArchive, the Administration Server
creates two other files that back up the domain’s configuration at key points during the
startup process:
!
domain-name\config-file.xml.original—the configuration file just before
the Administration Server parses it and adds subsystem data.
!
domain-name\config-file.xml.booted—the configuration file just after the
Administration Server successfully boots. If the config.xml becomes
corrupted, you can boot the Administration Server with this file.
Configuring and Managing WebLogic Server
10-7
10
Recovering Failed Servers
Example of Archives of config.xml During Startup
If your domain configuration is stored in config.xml, when you start the domain’s
Administration Server, the Administration Server:
1. Copies config.xml to config.xml.original.
2. Parses config.xml. Depending on the domain configuration, some WebLogic
subsystems add configuration information to config.xml. For example, the
Security service adds MBeans and encrypted data for SSL communication.
3. Copies the parsed and modified config.xml to MyConfig.xml.booted.
The Administration Server uses the parsed and modified config.xml. When you
update the domain’s configuration, it copies the old config.xml to
domain-name\configArchive\MyConfig.xml#2.
Backing Up Security Data
The WebLogic Security service stores its configuration data config.xml file, and also
in an LDAP repository and other files.
Backing Up the WebLogic LDAP Repository
The default Authentication, Authorization, Role Mapper, and Credential Mapper
providers that are installed with WebLogic Server store their data in an LDAP server.
Each WebLogic Server contains an embedded LDAP server. The Administration
Server contains the master LDAP server which is replicated on all Managed Servers.
If any of your security realms use these installed providers, you should maintain an
up-to-date backup of the following directory tree:
domain_name\adminServer\ldap
where domain_name is the domain’s root directory and adminServer is the directory
in which the Administration Server stores runtime and security data.
Each WebLogic Serve has an LDAP directory, but you only need to back up the LDAP
data on the Administration Server—the master LDAP server replicates the LDAP data
from each Managed Server when updates to security data are made. WebLogic security
10-8
Configuring and Managing WebLogic Server
Backing Up Configuration and Security Data
providers cannot modify security data while the domain’s Administration Server is
unavailable. The LDAP repositories on Managed Servers are replicas and cannot be
modified.
The ldap/ldapfiles subdirectory contains the data files for the LDAP server. The
files in this directory contain user, group, group membership, policies, and role
information. Other subdirectories under the ldap directory contain LDAP server
message logs and data about replicated LDAP servers.
Do not update the configuration of a security provider while a backup of LDAP data
is in progress. If a change is made—for instance, if an administrator adds a user—
while you are backing up the ldap directory tree, the backups in the ldapfiles
subdirectory could become inconsistent. If this does occur, consistent, but potentially
out-of-date, LDAP backups are available, as described in “WebLogic Server Backs Up
LDAP Files” on page 10-9.
WebLogic Server Backs Up LDAP Files
Once a day, a server suspends write operations and creates its own backup of the
LDAP data. It archives this backup in a ZIP file below the ldap\backup directory and
then resumes write operations. This backup is guaranteed to be consistent, but it might
not contain the latest security data.
For information about configuring the LDAP backup, see “Configuring Backups for
the Embedded LDAP Server” in Administration Console Online Help.
Backing Up SerializedSystemIni.dat and Security Certificates
All servers create a file named SerializedSystemIni.dat and locate it in the
server’s root directory. This file contains encrypted security data that must be present
to boot the server. You must back up this file.
If you configured a server to use SSL, you must also back up the security certificates
and keys. The location of these files is user-configurable.
Configuring and Managing WebLogic Server
10-9
10
Recovering Failed Servers
Restarting Failed Server Instances
The nature of your applications and user demand determine the steps you take to
restore application service. In particular, these factors influence the recovery process:
!
Was the failed server instance an Administration Server or a Managed Server?
!
Can you restart the failed server instance on same machine upon which it was
running when it failed?
!
What are the network conditions when you restart the server instance? Can the
service instance you are restarting establish communications with its
Administration Server?
!
Was the server instance that failed the active host for a migratable service in a
WebLogic Server cluster?
!
Were any changes made to the domain configuration made while the failed
server instance was down?
!
Was the domain configuration corrupted?
Restarting an Administration Server
The following sections describe how to start an Administration Server after a failur.
Restarting an Administration Server When Managed Servers are not Running
If no Managed Servers in the domain are running when you restart a failed
Administration Server, no special steps are required. Start the Administration Server
as you normally do. For details, see “Starting and Stopping Servers” in Administration
Console Online Help.
10-10
Configuring and Managing WebLogic Server
Restarting Failed Server Instances
Restarting an Administration Server When Managed Servers are Running
If the Administration Server shuts down while Managed Servers continue to run, you
do not need to restart the Managed Servers that are already running in order to recover
management of the domain. The procedure for recovering management of an active
domain depends upon whether you can restart the Administration Server on the same
machine it was running on when the domain was started.
Restarting an Administration Server on the Same Machine
If you restart the WebLogic Administration Server while Managed Servers continue to
run, by default the Administration Server can discover the presence of the running
Managed Servers.
Note: Make sure that the startup command or startup script does not include
-Dweblogic.management.discover=false, which disables an
Administration Server from discovering its running Managed Servers. For
more information about -Dweblogic.management.discover, see “Server
Communication” in weblogic.Server Command-Line Reference.
The root directory for the domain contains a file running-managed-servers.xml
which is a list of the Managed Servers that the Administration Server knows about.
When the Administration Server starts, it uses this list to check for the presence of
running Managed Servers.
Restarting the Administration Server does not cause Managed Servers to update the
configuration of static attributes. Static attributes are those that a server refers to only
during its startup process. WebLogic Servers must be restarted to take account of
changes to static configuration attributes. Discovery of the Managed Servers only
enables the Administration Server to monitor the Managed Servers or make runtime
changes in attributes that can be configured while a server is running (dynamic
attributes).
Restarting an Administration Server on Another Machine
If a machine crash prevents you from restarting the Administration Server on the same
machine, you can recover management of the running Managed Servers as follows:
1. Install the WebLogic Server software on the new administration machine (if this
has not already been done).
Configuring and Managing WebLogic Server
10-11
10
Recovering Failed Servers
2. Make your application files available to the new Administration Server by
copying them from backups or by using a shared disk. Your application files
should be available in the same relative location on the new file system as on the
file system of the original Administration Server.
3. Make your configuration and security data available to the new administration
machine by copying them from backups or by using a shared disk. For more
information, refer to “Backing Up Configuration and Security Data” on page
10-5.
4. Restart the Administration Server on the new machine.
Make sure that the startup command or startup script does not include
-Dweblogic.management.discover=false, which disables an Administration
Server from discovering its running Managed Servers. For more information
about -Dweblogic.management.discover, see “Server Communication” in
weblogic.Server Command-Line Reference.
When the Administration Server starts, it communicates with the Managed Servers and
informs them that the Administration Server is now running on a different IP address.
Restarting Managed Servers
The following sections describe how to start Managed Servers after failure. For
recovery considerations related to transactions and JMS, see “Additional Failure
Topics” on page 10-14.
Starting a Managed Server When the Administration Server is Accessible
If the Administration Server is reachable by Managed Server that failed, you can:
10-12
!
Restart it manually or automatically using Node Manager—You must configure
Node Manager and the Managed Server to support this behavior. For details, see
“Configure Monitoring, Shutdown and Restart for Managed Servers” on page
4-6.
!
Start it manually with a command or script—For instructions, see “Starting and
Stopping Servers” in Administration Console Online Help.
Configuring and Managing WebLogic Server
Restarting Failed Server Instances
Starting a Managed Server When the Administration Server Is Not Accessible
If a Managed Server cannot connect to the Administration Server during startup, it can
retrieve its configuration by reading locally cached configuration data. A Managed
Server that starts in this way is running in Managed Server Independence (MSI) mode.
For a description of MSI mode, and the files that a Managed Server must access to start
up in MSI mode, see “Managed Server Independence Mode” on page 10-2.
Note: If the Managed Server that failed was a clustered Managed Server that was the
active server for a migratable service at the time of failure, perform the steps
described in “Migrating When the Currently Active Host is Unavailable” in
Using WebLogic Server Clusters. Do not start the Managed Server in MSI
mode.
To start up a Managed Server in MSI mode:
1. Ensure that the following files are available in the Managed Server’s root directory:
"
msi-config.xml.
"
SerializedSystemIni.dat
"
boot.properties
If these files are not in the Managed Server’s root directory:
a. Copy the config.xml and SerializedSystemIni.dat file from the
Administration Server’s root directory (or from a backup) to the Managed
Server’s root directory.
b. Rename the configuration file to msi-config.xml. When you start the server,
it will use the copied configuration files.
Note: Alternatively, you can use the -Dweblogic.RootDirectory=path
startup option to specify a root directory that already contains these files.
2. Start the Managed Server at the command line or using a script.
The Managed Server will run in MSI mode until it is contacted by its
Administration Server. For information about restarting the Administration
Server in this scenario, see “Restarting an Administration Server When Managed
Servers are Running” on page 10-11.
Configuring and Managing WebLogic Server
10-13
10
Recovering Failed Servers
Additional Failure Topics
For information related to recovering JMS data from a failed server instance, see
“Configuring JMS Migratable Targets” in Programming WebLogic JMS.
For information about transaction recovery after failure, see “Moving a Server to
Another Machine” and “Transaction Recovery After a Server Fails” in Administration
Console Online Help.
10-14
Configuring and Managing WebLogic Server
CHAPTER
11 Configuring Network
Resources
WebLogic Server allows you to manage the connection behavior of the server
instances that host applications. Configurable resources, including Network Channels
and domain-wide administration ports, help you effectively utilize the network
features of the machines that host your applications and manage quality of service.
The following sections describe configurable WebLogic Server network resources,
examples of their use, and the configuration process:
!
“Overview of Network Configuration” on page 11-1
!
“Understanding Network Channels” on page 11-2
!
“Configuring a Channel” on page 11-10
Overview of Network Configuration
For many development environments, configuring WebLogic Server network
resources is simply a matter of identifying a Managed Server’s Listen Address and
Listen Port. However, in most production environments, administrators must balance
finite network resources against the demands placed upon the network. The task of
keeping applications available and responsive can be complicated by specific
application requirements, security considerations, and maintenance tasks, both
planned and unplanned.
Creating and Configuring WebLogic Server Domains
11-1
11
Configuring Network Resources
WebLogic Server allows you to control the network traffic associated with your
applications in a variety of ways, and configure your environment to meet the varied
requirements of your applications and end users. You can:
!
Designate the NICS and ports used by Managed Servers and for different types
of network traffic.
!
Prioritize traffic by server instance or type of traffic.
!
Support multiple protocols and security requirements.
!
Specify connection and message timeout periods.
!
Impose message size limits.
These and other connection characteristics can be specified by defining a Network
Channel—the primary configurable WebLogic Server resource for managing network
connections. You can configure a Network Channel with the
Servers-->Protocols-->Channels tab in the Administration Console or by using
NetworkChannelMBean.
New Network Configuration Features in WebLogic Server
In this version of WebLogic Server, the functionality of Network Channels has been
enhanced to simplify the configuration process. Network Channels now encompass the
features that, in WebLogic Server 7.x, required both Network Channels and Network
Access Points. In this version of WebLogic Server, Network Access Points are
deprecated.
Understanding Network Channels
The sections that follow describe Network Channels and the standard channels that
WebLogic Server pre-configures, and discusses common applications for channels.
11-2
Creating and Configuring WebLogic Server Domains
Understanding Network Channels
What is a Channel?
A Network Channel is a configurable resource that defines the attributes of a network
connection to WebLogic Server. For instance, a Network Channel can define:
!
The protocol the connection supports.
!
The listen address.
!
The listen ports for secure and non-secure communication.
!
Connection properties such as the login timeout value and maximum message
sizes.
!
Whether or not the connection supports tunneling.
!
Whether the connection can be used to communicate with other WebLogic
Server instances in the domain, or used only for communication with clients.
Rules for Configuring Channels
Follow these guidelines when configuring a channel.
!
A channel can be assigned to a single server instance.
!
You can assign multiple channels to a server instance.
!
Each channels assigned to a particular server instance must have a unique
combination of Listen Address, Listen Port, and Protocol.
!
If you assign non-SSL and SSL channels to the same server instance, make sure
that they do not use the same port number.
Custom Channels Can Inherit Default Channel Attributes
If you do not assign a channel to a server instance, it uses WebLogic Server’s default
channel, which is automatically configured by WebLogic Server, based on the
attributes in ServerMBean or SSLMBean. The default channel is described in “The
Default Network Channel” on page 11-7.
Creating and Configuring WebLogic Server Domains
11-3
11
Configuring Network Resources
ServerMBean and SSLMBean represent a server instance and its SSL configuration.
When you configure a server instance’s Listen Address, Listen Port, and SSL Listen
port, using the Server-->Configuration-->General tab, those values are stored in the
ServerMBean and SSLMBean for the server instance.
If you do not specify a particular connection attribute in a custom channel definition,
the channel inherits the value specified for the attribute in ServerMBean. For
example, if you create a channel, and do not define its Listen Address, the channel will
use the Listen Address defined in ServerMBean. Similarly, if a Managed Server
cannot bind to the Listen Address or Listen Port configured in a channel, the Managed
Server uses the defaults from ServerMBean or SSLMBean.
Why Use Network Channels?
You can use Network Channels to manage quality of service, meet varying connection
requirements, and improve utilization of your systems and network resources. For
example, Network Channels allow you to:
!
Segregate different types of network traffic—You can configure whether or
not a channel supports outgoing connections. By assigning two channels to a
server instance—one that supports outgoing connections and one that does not—
you can independently configure network traffic for client connections and
server connections, and physically separate client and server network traffic onto
different listen addresses or listen ports.
You can also segregate instance administration and application traffic by
configuring a domain-wide administration port. For more information, see
“Administrative Channel” on page 11-7.
11-4
!
Support varied application or user requirements on the same Managed
Server—You can configure multiple channels on a Managed Server to support
different protocols, or to tailor properties for secure vs. non-secure traffic.
!
Prioritize network connections that servers use to connect to other servers
in a domain—If a server instance has several outbound-capable channels
assigned, you can prioritize each channel with a weighted value. When the
server instance initiates an outgoing connection, the channels with a
higher-weighted value are used before those with lower-weighted channels. You
can use this functionality to ensure that all server-to-server traffic has a
Creating and Configuring WebLogic Server Domains
Understanding Network Channels
guaranteed level of throughput, by assigning the highest weighting to an
outbound channel that utilizes a fast NIC.
Note: Network channel weights apply only to internal connections made for remote
references, such as a remote EJB reference or a resource located via JNDI.
Channel weights are not used for connections initiated directly via a URL.
If you use a Network Channel with a server instance on a multi-homed machine, you
must enter a valid Listen Address either in ServerMBean or in the channel. If the
channel and ServerMBean Listen Address are blank or specify the localhost address
(IP address 0.0.0.0 or 127.*.*.*), the server will bind the Network Channel listen port
and SSL listen ports to all available IP addresses on the multi-homed machine. See
“The Default Network Channel” on page 11-7 for information on setting the Listen
Address in ServerMBean.
WebLogic Server and the Channel Selection Process
This section describes how WebLogic selects among multiple channel to use under
various circumstances.
Prioritizing Outgoing Connections
If a Managed Server has several channels that support outgoing connections, it must
choose which channel to use when connecting to another server instance. WebLogic
Server first selects channels based on the protocol required for the connection. If
multiple channels have the same protocol support, you can prioritize those channels by
assigning a different weight to each.
A channel weight is a simple numerical value that can be applied to the
NetworkChannelMBean. Channel weights are considered only when multiple
channels with the same service level could be used to initiate an outgoing connection.
(If a channel with a higher service level is currently active, it is used regardless of
channel weights). Higher-valued weights are selected over lower-weighted channels to
choose a channel for outgoing connections.
In a multihomed system, channel weights allow you to prioritize equivalent channels
based on the known capacity of available network cards.
Creating and Configuring WebLogic Server Domains
11-5
11
Configuring Network Resources
Note: The default channel and administration channel, derived from values in the
ServerMBean and SSLMBean, are always considered for outgoing
connections, and use a default weight of 50.
Handling Channel Failures
Although WebLogic Server always attempts to use the highest-weighted channels
before lower-weighted ones, a network failure may render the selected channel
unavailable. To handle potential failures, WebLogic Server selects outgoing channels
using the following algorithm:
1. WebLogic Server first tries the highest-weighted channel having the required
quality of service.
2. If a connection cannot be made using the highest-weighted channel, WebLogic
Server tries the next-highest weighted channel with the required quality of
service.
3. If the connection request fails again, the server continues the connection attempt
using lower-weighted channels, until all channels have been attempted.
4. If the server cannot connect using any available channel, a failure message is
returned to the calling user.
This algorithm ensures that users receive a connection error message only when all
channels of the required quality of service level have been exhausted. If all channel
combinations are exhausted and another user attempts to initiate an outgoing
connection (or a connection is retried after a failure), WebLogic Server restarts the
channel selection process, starting with the highest-weighted channel.
Upgrading Quality of Service Levels for RMI
For RMI lookups only, WebLogic Server may upgrade the service level of an outgoing
connection. For example, if a T3 connection is required to perform an RMI lookup, but
an existing channel supports only T3S, the lookup is performed using the T3S channel.
This upgrade behavior does not apply to server requests that use URLs, since URLs
embed the protocol itself. For example, the server cannot send a URL request
beginning with http:// over a channel that supports only https://.
11-6
Creating and Configuring WebLogic Server Domains
Understanding Network Channels
Standard WebLogic Server Channels
WebLogic Server provides pre-configured channels that you do not have to explicitly
define.
!
Default channel—Every Managed Server has a default channel.
!
Administrative channel—If you configure a domain-wide Administration Port,
WebLogic Server configures an Administrative Channel for each Managed
Server in the domain.
The Default Network Channel
Every WebLogic Server domain has a default channel that is generated automatically
by WebLogic Server. The default channel is based on the Listen Address and Listen
Port defined in the ServerMBean and SSLMBean. It provides a single Listen Address,
one port for HTTP communication (7001 by default), and one port for HTTPS
communication (7002 by default). You can configure the Listen Address and Listen
Port using the Configuration-->General tab in the Administration Console; the values
you assign are stored in attributes of the ServerMBean and SSLMBean.
The default configuration may meet your needs if:
!
You are installing in a test environment that has simple network requirements.
!
Your server uses a single NIC, and the default port numbers provide enough
flexibility for segmenting network traffic in your domain.
Using the default configuration ensures that third-party administration tools remain
compatible with the new installation, because network configuration attributes remain
stored in ServerMBean and SSLMBean.
Even if you define and use custom Network Channels for your domain, the default
channel settings remain stored in ServerMBean and SSLMBean, and are used if
necessary to provide connections to a server instance.
Administrative Channel
You can define an optional administration port for your domain. When configured, the
administration port is used by each Managed Server in the domain for communication
with the domain’s Administration Server.
Creating and Configuring WebLogic Server Domains
11-7
11
Configuring Network Resources
Administration Port Capabilities
An administration port provides these capabilities:
!
It enables you to start a server in standby state. This allows you to administer a
Managed Server, while its other network connections are unavailable to accept
client connections. For more information on the standby state, see “STANDBY”
on page 6-5.
!
It enables you to separate administration traffic from application traffic in your
domain. In production environments, separating the two forms of traffic ensures
that critical administration operations (starting and stopping servers, changing a
server’s configuration, and deploying applications) do not compete with
high-volume application traffic on the same network connection.
!
It allows you to administer a deadlocked server instance using the
weblogic.Admin command line utility. If you do not configure an
administration port, administrative commands such as THREAD_DUMP and
SHUTDOWN will not work on deadlocked server instances.
If a administration port is enabled, WebLogic Server automatically generates an
Administration Channel based on the port settings upon server instance startup.
Administration Port Restrictions
The administration port accepts only secure, SSL traffic, and all connections via the
port require authentication. Because of these features, enabling the administration port
imposes the following restrictions on your domain:
11-8
!
The Administration Server and all Managed Servers in your domain must be
configured with support for the SSL protocol. Managed Servers that do not
support SSL will be unable to connect with the Administration Server during
startup—you will have to disable the administration port in order to configure
them.
!
Because all server instances in the domain must enable or disable the
administration port at the same time, you configure the administration port at the
domain level. You can change an individual Managed Server’s administration
port number, but you cannot enable or disable the administration port for an
individual Managed Server. The ability to change the port number is useful if
you have multiple server instances with the same Listen Address.
Creating and Configuring WebLogic Server Domains
Understanding Network Channels
!
After you enable the administration port, you must establish an SSL connection
to the Administration Server in order to start any Managed Server in the domain.
This applies whether you start Managed Servers manually, at the command line,
or using Node Manager. For instructions to establish the SSL connection, see
“Booting Managed Servers to use Administration Port” on page 11-9.
!
After enabling the administration port, all Administration Console traffic must
connect via the administration port.
Administration Port Requires SSL
The administration port requires SSL, which is enabled by default when you install
WebLogic Server. If SSL has been disabled for any server instance in your domain,
including the Administration Server and all Managed Servers, re-enable it using the
Server--> Configuration-->General tab in the Administration Console.
Ensure that each server instance in the domain has a configured default listen port or
default SSL listen port. The default ports are those you assign on the
Server-->Configuration-->General tab in the Administration Console. A default port
is required in the event that the server cannot bind to its configured administration port.
If an additional default port is available, the server will continue to boot and you can
change the administration port to an acceptable value.
By default WebLogic Server is configured to use demonstration certificate files. To
configure production security components, follow the steps in “Configuring the SSL
Protocol” in Managing WebLogic Security.
Configure Administration Port
Enable the administration port as described in “Enabling the Domain-Wide
Administration Port” in Administration Console Online Help.
After configuring the administration port, you must restart the Administration Server
and all Managed Servers to use the new administration port.
Booting Managed Servers to use Administration Port
To reboot Managed Servers to connect to the Administration Server’s administration
port, the command line or start script must specify the https:// prefix, rather than
http://, as shown below.
-Dweblogic.management.server=https://host:admin_port
Creating and Configuring WebLogic Server Domains
11-9
11
Configuring Network Resources
If the hostname in the URL is is not identical to the hostname in the Administration
Server’s certificate, disable hostname verification in the command line or start script,
as shown below:
-Dweblogic.security.SSL.ignoreHostnameVerification=true
Configuring a Channel
You can configure a Network Channel using Servers-->Protocols-->Channels tab in
the Administration Console or using the NetworkChannelMBean.
For instructions to configure a channel for a non-clustered Managed Server, see
“Configuring a Network Channel” in Administration Console Online Help. To
configure a channel for clustered Managed Servers see, “Configuring Network
Channels with a Cluster” on page 11-11.
For a summary of key facts about Network Channels, and guidelines related to their
configuration, see “Configuring Channels: Facts and Rules” on page 11-10.
Configuring Channels: Facts and Rules
Follow these guidelines when configuring a channel.
11-10
!
Each channel you configure for a particular server instance must have a unique
combination of Listen Address, Listen Port, and Protocol.
!
A channel can be assigned to a single server instance.
!
You can assign multiple channels to a server instance.
!
If you assign non-SSL and SSL channels to the same server instance, make sure
that they do not use the same port number.
!
After creating a new channel, you must restart the server instance for the channel
settings to take effect. Similarly, you must restart the server instance for most
channel configuration changes to take effect.
Creating and Configuring WebLogic Server Domains
Configuring a Channel
!
Some protocols do not support particular features of channels. In particular the
COM protocol does not support SSL or tunneling.
!
You must define a separate channel for each protocol you wish the server
instance to support, with the exception of HTTP.
HTTP is enabled by default when you create a channel, because RMI protocols
typically require HTTP support for downloading stubs and classes. You can
disable HTTP support on the Advanced Options portion of
Servers-->Protocols-->Channels tab in the Administration Console.
!
WebLogic Server uses the internal channel names .WLDefaultChannel and
.WLDefaultAdminChannel and reserves the .WL prefix for channel names. do
not begin the name of a custom channel with the string .WL.
Configuring Network Channels with a Cluster
To configure a channel for clustered Managed Servers, note the information in
“Configuring Channels: Facts and Rules” on page 11-10, and follow the guidelines
described in the following follow.
Create the Cluster
If you have not already configured a cluster you can:
!
Use the Configuration Wizard to create a new, clustered domain, following the
instructions in “Create a Clustered Domain” in Using WebLogic Clusters, or
!
Use the Administration Console to create a cluster in an existing domain,
following the instructions “Configuring a Cluster” in Administration Console
Online Help.
For information and guidelines about configuring a WebLogic Server cluster, see
“Before You Start” in Using WebLogic Clusters.
Create and Assign the Network Channel
Use the instructions in “Configuring a Network Channel” in Administration Console
Online Help to create a new Network Channel for each Managed Server in the cluster.
When creating the new channels:
Creating and Configuring WebLogic Server Domains
11-11
11
11-12
Configuring Network Resources
!
For each channel you want to use in the cluster, configure the channel
identically, including its name, on each Managed Server in the cluster.
!
Make sure that the Listen Port and SSL Listen Port you define for each Managed
Server’s channel are different than the Managed Server’s default listen ports. If
the custom channel specifies the same port as a Managed Server’s default port,
the custom channel and the Managed Server’s default channel will each try to
bind to the same port, and you will be unable to start the Managed Server.
!
If a Cluster Address has been configured for the cluster, it will be appear in the
Cluster Address field on the Server-->Protocols-->Network
Channel-->Configuration tab. If a Cluster Address has not been configured,
supply it when configuring the Channel. The Network Channel requires a cluster
address to generate EJB handles and failover addresses for use with the cluster.
for information on cluster addressing, see “Cluster Address” in Using WebLogic
Clusters.
Creating and Configuring WebLogic Server Domains
CHAPTER
A
Starting and Stopping
Servers: Quick
Reference
The following sections describe simple, frequently used ways to start and shut down
instances of WebLogic Server:
!
“Starting Instances of WebLogic Server” on page A-2
!
“Shutting Down Instances of WebLogic Server” on page A-4
For a comprehensive discussion of starting and shutting down WebLogic Server
instances, refer to "Starting and Stopping Servers."
Configuring and Managing WebLogic Server
A-1
A
Starting and Stopping Servers: Quick Reference
Starting Instances of WebLogic Server
In the following table, WL_HOME refers to the directory in which you installed the
WebLogic Server software.
Table 11-1 Starting Server Instances
To Start
Do The Following
The MedRecServer sample
server
Invoke the following command:
WL_HOME\samples\server\config\startMedRecServer.cmd
(Windows)
WL_HOME\samples\server\config\startMedRecServer.sh (UNIX)
The server starts as an Administration Server in the MedRec domain.
The Examples server
Invoke the following command:
WL_HOME\samples\server\config\startExamplesServer.cmd
(Windows)
WL_HOME\samples\server\config\startExamplesServer.sh
(UNIX)
The server starts as an Administration Server in the Examples domain.
An Administration Server
that you create
Invoke the following command:
domain_directory\startWebLogic.cmd (Windows)
domain_directory\startWebLogic.sh (UNIX)
where domain_directory is the directory that you specified as the domain
directory.
Note:
A-2
In a development environment, it is usually sufficient to start an
Administration Server and deploy your applications directly onto the
Administration Server. In a production environment, you create Managed
Servers to run applications.
Configuring and Managing WebLogic Server
Starting Instances of WebLogic Server
Table 11-1 Starting Server Instances
To Start
Do The Following
A Managed Server that you Do the following:
create
1. Start the domain’s Administration Server.
2. Configure the Managed Server to communicate with a Node Manager.
For more information, refer to “Configuring a Machine.”
3. Start the Node Manager on the computer that you want to host the
Managed Server.
For more information, refer to "Starting Node Manager."
4. Start the domain’s Administration Console.
For more information, refer to "Starting the Administration Console."
5. In left pane of the Administration Console, expand the Servers folder.
6. Click on the name of the server. (See Figure 11-1.)
Figure 11-1 Click on the Name of the Server
7. In the right pane, select the Control tab. Then select the Start/Stop tab.
8. Select Start this server. Then click Yes to confirm and start the server.
For information on the username and password that you use when starting a server,
refer to "Providing Usernames and Passwords to Start a Server."
Configuring and Managing WebLogic Server
A-3
A
Starting and Stopping Servers: Quick Reference
Shutting Down Instances of WebLogic
Server
The recommended procedure for shutting down a server is as follows:
1. Start the domain’s Administration Console. For more information, refer to
"Starting the Administration Console"
2. In left pane of the Administration Console, expand the Servers folder.
3. Click on the name of a server. (See Figure 11-1.)
4. In the right pane, select the Control tab. Then select the Start/Stop tab.
5. Select Shutdown this server. Then click Yes to confirm and shut down the server.
This initiates a graceful shutdown, in which the server notifies subsystems to complete
all in-work requests. After the subsystems complete their work, the server stops.
A-4
Configuring and Managing WebLogic Server
Index
A
E
access logs 7-14
Administration Console
read-only access 8-2
stopping WebLogic Servers from A-4
Administration Server
restarting 10-10, 10-11
role in monitoring domain 9-2
evaluation license 1-25
extended log format 7-14
B
beasvc.exe 5-8
C
common log format 7-14
Concurrent 9-10
config.xml 2-8
Configuration
HTTP parameters 7-2
D
default Web Application 7-6
and Virtual Hosting 7-8
denial of service attacks, preventing 7-22
domain
directory structure 2-8
monitoring 9-1
G
Gc Algorithm 9-10
GCHandles Compaction 9-10
Generational 9-10
H
HTTP 7-2
HTTP access logs 7-14
common log format 7-14
extended log format 7-15
Log Rotation 7-14
HTTP parameters 7-2
HTTP requests 7-11
HTTP tunneling 7-23
client connection 7-24
configuring 7-23
I
I/O 7-25
Incremental 9-10
J
JDBC connection pools
managing 9-14
Configuring and Managing WebLogic Server
I--1
monitoring 9-14
JRockitRuntime
JRockit
Concurrent 9-10
Gc Algorithm 9-10
GCHandles Compaction 9-10
Generational 9-10
Incremental 9-10
Max Heap Size 9-10
Number Of Daemon Threads 9-10
Number Of Processors 9-10
Parallel 9-10
Total Garbage Collection Count
9-10
Total Number Of Threads 9-10
Total Nursery Size 9-10
JVM (Java Virtual Machine), using a nondefault 5-5
L
license
evaluation 1-25
listen port 7-4
Number Of Processors 9-10
P
Parallel 9-10
platform support
for Node Manager 3-5
POST method 7-22
PostTimeoutSecs 7-22
R
read-only access for Administration Console
8-2
running-managed-servers.xml 10-11
S
server startup messages
when started remotely 4-13
starting WebLogic Server
as Windows Service 5-6
stopping WebLogic Servers A-4
T
M
Max Heap Size 9-10
MaxPostSize 7-23
MaxPostTimeSecs 7-22
monitoring
a WebLogic domain 9-1
how it works 9-2
JDBC connection pools 9-14
Total Garbage Collection Count 9-10
Total Number Of Threads 9-10
Total Nursery Size 9-10
TransmitFile 7-25
tunneling 7-23
U
URL resolution 7-11
N
V
native I/O 7-25
Node Manager
platform support 3-5
Number Of Daemon Threads 9-10
Virtual Hosting 7-7
default Web Application 7-8
setting up 7-9
I--2
Configuring and Managing WebLogic Server
W
Web Application 7-5
default Web Application 7-6
URL 7-11
Windows Service
starting WebLogic Server as 5-6
Windows service
removing WebLogic Server as 5-6
Configuring and Managing WebLogic Server
I--3


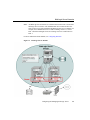


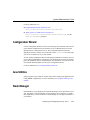

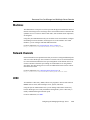


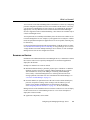


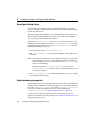


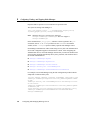


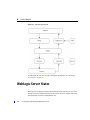


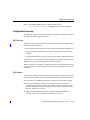

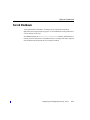


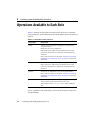


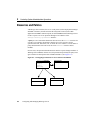
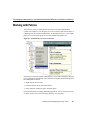


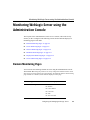


![[1 ] Oracle® Fusion Middleware](http://vs1.manualzilla.com/store/data/005864196_1-9da2f2f6c7b4ef8d293b35b0c50291d0-150x150.png)