1
QMS 4060
Print System
Reference
®
1800465-001C
Trademarks
The following are trademarks or registered trademarks of their respective owners. Other
product names mentioned in this manual may also be trademarks or registered
trademarks of their respective owners. Registered trademarks are registered in the
United States Patent and Trademark Office; some trademarks may also be registered in
other countries. QMS and the QMS logo, Courageous, Crown, and the Crown seal are
registered trademarks of QMS, Inc., and ImageServer, QFORM, and PS Executive
Series are trademarks of QMS, Inc. PostScript is a trademark of Adobe Systems
Incorporated for a page description language and may be registered in certain
jurisdictions. Throughout this manual, “PostScript Level 2” is used to refer to a set of
capabilities defined by Adobe Systems for its PostScript Level 2 page description
language. These capabilities, among others, are implemented in this product through a
QMS-developed emulation that is compatible with Adobe's PostScript Level 2 language.
Adobe/Adobe Systems Incorporated. 3Com, 3+Open/3Com Corporation. Aldus, Aldus
PageMaker, Aldus FreeHand/Aldus Corporation. Apple, AppleTalk, EtherTalk,
LaserWriter, LocalTalk, Macintosh, TrueType/Apple Computer, Inc. VINES/Banyan.
CompuServe /H & R Block. DEC, DECnet, VMS/Digital Equipment Corporation.
PhoneNET/Farallon Computing, Inc. Hewlett-Packard, HP, PCL, HP-GL, LaserJet/
Hewlett-Packard Co. IBM PC, IBM 3270/5250A, Token-Ring/International Business
Machines Corporation. Intel/Intel Corporation. Microsoft, MS-DOS/Microsoft
Corporation. Novell and NetWare/Novell, Inc. QuarkXPress/Quark, Inc. TOPS/Sun
Microsystems, Inc. UNIX/UNIX Systems Laboratories.
Proprietary Statement
The digitally encoded software included with your Courageous Print System is
Copyrighted © 1998 by QMS, Inc. All Rights Reserved. This software may not be
reproduced, modified, displayed, transferred, or copied in any form or in any manner or
on any media, in whole or in part, without the express written permission of QMS, Inc.
Copyright Notice
This manual is Copyrighted © 1998 by QMS, Inc., One Magnum Pass, Mobile, AL
36618. All Rights Reserved. This manual may not be copied in whole or in part, nor
transferred to any other media or language, without the express written permission of
QMS, Inc.
Contents
1 Introduction
Introduction ..................................................................................1-2
About This Manual .......................................................................1-2
Typographic Conventions 1-3
2 Print Media
Introduction ..................................................................................2-2
Media Sizes and Imageable Areas ..............................................2-2
Imageable Area 2-2
Page Margins 2-4
Media Types and Weights ...........................................................2-4
Labels 2-4
Paper 2-4
Transparencies 2-5
Media Storage .............................................................................. 2-5
3 Professional Printing
Introduction .................................................................................. 3-2
About Typefaces and Fonts ....................................................... 3-2
Typeface Classification 3-3
Typography Terms 3-4
Resident Fonts, Typefaces, and Symbol Sets .......................... 3-7
Resident PostScript Fonts 3-7
Resident HP PCL 5e Fonts 3-9
PCL 5e Symbol Sets 3-12
Resident HP-GL Symbol Sets 3-13
Optional Fonts ........................................................................... 3-14
4 Printer Configuration
Introduction .................................................................................. 4-2
Methods of Configuration ........................................................... 4-2
Using an Application 4-2
Using QMS Document Option Commands 4-3
Using the Control Panel 4-3
Using a Remote Console 4-3
Using the Local Console Port 4-4
Configuration Menu ..................................................................... 4-4
Accessing the Configuration Menu 4-5
Selecting Configuration Menu Options 4-6
Changing Character Information 4-8
Saving Configuration Changes 4-12
Canceling Configuration Changes 4-13
Setting the Message Window Language 4-13
Restoring the Factory Default Configuration 4-14
Working with Custom Configurations 4-14
Rebooting the System 4-15
Operator Control Menu ............................................................. 4-16
Copies 4-17
ii
QMS 4060 Print System Reference
Duplexing 4-17
Offset Stacking 4-18
Face-Up Order 4-18
Collation 4-18
Orientation 4-21
Input 4-21
Paper Output 4-24
Chaining Paper Inputbins 4-25
Setting Up Chaining Options 4-26
Custom Input Bins 4-28
Consumables 4-29
Crown Accounting 4-29
Copy Accounting Files to Host 4-44
Administration Menu .................................................................4-46
Communications ........................................................................4-46
Setting Timeouts 4-47
Setting Parallel Interface Parameters 4-49
Emulation 4-50
Setting Network 2 Options 4-54
Emulations ..................................................................................4-56
Setting ESP Default Parameters 4-56
Setting PostScript Parameters 4-57
Setting PCL 5e Parameters 4-58
Setting HP-GL Parameters 4-64
Setting Line Printer Parameters 4-69
Special Pages .............................................................................4-73
Working with Status Pages 4-74
Printing a Calibration Page 4-74
Working with Header Pages 4-75
Working with Trailer Pages 4-76
Printer Start-Up Options ............................................................4-77
Enabling/Disabling the Start-Up Page 4-77
Enabling/Disabling the SYS\START File 4-78
Loading the PostScript Error Handler 4-79
Memory ......................................................................................4-79
Manual Configuration Menu 4-80
Engine .........................................................................................4-86
Adjusting the Image Alignment 4-86
Setting Default Paper 4-87
Contents
iii
Setting Inputbin x Name 4-88
Setting Outputbin x Name 4-88
Specifying Page Recovery Action 4-89
Setting Toner Low Action 4-89
Setting Energy Conservation 4-89
Setting Default Resolution 4-90
Setting Toner Density 4-91
Rotate Simplex 4-91
Letterhead 4-92
Print Quality 4-92
Consumables ............................................................................. 4-92
Changing the Developer 4-93
Replacing the Drum 4-95
Replacing the Fuser 4-95
Replacing the Pick-Up Rollers 4-96
Miscellaneous ............................................................................ 4-98
Save Defaults 4-98
Restoring the Factory Default Configuration 4-99
Working with Custom Configurations 4-99
Reboot System 4-99
New System Image 4-100
Capture Printjob 4-100
Setting the Message Window Language 4-101
Clock Operations 4-101
Hard Disks ................................................................................ 4-102
Formatting a Hard Disk 4-103
Backing up a Hard Disk 4-103
Restore Disk 4-104
Installation Menu ..................................................................... 4-104
Operator Password 4-104
Use Operator Password 4-105
Admin Password 4-105
Use Admin Password 4-106
Using Passwords 4-106
Configuring Optional Features ............................................... 4-107
iv
QMS 4060 Print System Reference
5 Additional Technical
Information
Introduction ..................................................................................5-2
Printer-Host Communication ......................................................5-2
Interface 5-2
Simultaneous Interface Operation (SIO) 5-2
ESP Technology 5-2
Communication Modes 5-3
Halftones .......................................................................................5-4
A Special Note for QuarkXPress Users 5-6
Memory .........................................................................................5-7
QMS Memory Management 5-8
Memory Terms 5-8
Evaluation of Your Printing Environment 5-11
Memory Clients 5-13
Hard Disk Management 5-19
End Job Mode .............................................................................5-20
Common Reasons to Use End Job Mode 5-21
Using the EOD Commands 5-22
Setting the End Job Mode for the Serial and Parallel Protocols 5-22
Setting the End Job Mode via the Control Panel 5-23
Adding an EOD Command to Your File 5-25
Creating a Network Job Separator 5-26
Parallel Interface Modes ............................................................5-27
Byte Mode 5-27
Compatibility Mode 5-27
ECP (Enhanced Compatibility Port) Mode 5-28
EPP (Enhanced Parallel Port) Mode 5-28
Nibble Mode 5-28
PS Protocol Option ....................................................................5-28
Options 5-30
Advantages 5-31
Implementation 5-31
HP-GL Color Encoding ..............................................................5-32
Contents
v
A QMS Customer Support
Sources of Support .....................................................................A-2
Your QMS Vendor A-2
Your Application Vendor A-2
Q-FAX A-2
CompuServe A-3
Internet A-3
QMS Customer Response Center (CRC) A-3
QMS World-wide Offices .............................................................A-5
B Technical Specifications
Print Engine Specifications ......................................................B-10
Print Speed B-10
Physical Specifications B-11
Electrical Specifications B-12
Environmental Specifications B-12
Controller Specifications ..........................................................B-14
Print Media .................................................................................B-15
Print Media SIzes B-17
Consumable Supplies ...............................................................B-18
Regulatory ..................................................................................B-19
PC Cable Pinouts .......................................................................B-20
Centronics/IEEE 1284 Parallel B-20
Serial B-22
LocalTalk (Optional Interface) B-24
Macintosh to Serial B-24
Ethernet B-25
Printer Options ..........................................................................B-26
Warranty Considerations ..........................................................B-28
Consumables and Your Warranty B-28
Electrostatic Discharge and Your Warranty B-28
vi
QMS 4060 Print System Reference
C Document Option
Commands
Introduction ................................................................................. C-2
Supported QMS DOCs ................................................................ C-2
Header/Trailer Page Commands C-2
HP-GL Emulation Commands C-2
HP PCL 5e Emulation Commands C-3
Lineprinter Emulation Commands C-3
CCITT Groups 3 and 4 Commands C-3
Document Formatting C-4
Sessions Command C-4
LN03 Commands C-4
D Notices
Manual Notice .............................................................................. D-2
FCC Compliance Statement ....................................................... D-2
Canadian Users Notice ............................................................... D-3
Europe RFI Statement ................................................................. D-3
Acoustics ..................................................................................... D-4
Data Communications (United Kingdom only) ......................... D-4
Safety Standards and General Considerations ........................ D-5
Laser Safety ................................................................................. D-5
Power Cord .................................................................................. D-6
Colophon ..................................................................................... D-6
Contents
vii
E
Configuration
Menu
Introduction .................................................................................. E-2
Menu Chart Conventions E-2
Installation Menu E-3
Operator Control Menu E-4
Administration Menu E-5
Index
v
viii
QMS 4060 Print System Reference
1
Introduction
In This Chapter . . .
n
“About This Manual” on page 1-2
n
“Typographic Conventions” on page 1-3
Introduction
Introduction
This manual provides detailed instructions and technical information
for your QMS 4060 Print System. Use this guide in conjunction with
your other printer documentation.
This chapter gives you a brief overview of this manual.
About This Manual
The information in this manual is divided into the following sections:
n
Chapter 1—Introduction
Provides an overview of the manual.
n
Chapter 2—Print Media
Lists print media sizes, margins, and imageable areas and provides media storage information.
n
Chapter 3—Professional Printing
Discusses typefaces and fonts, typographic terms, displays the
printer’s typefaces, and provides some page design tips.
n
Chapter 4—Printer Configuration
Explains the methods of configuring the printer, demonstrates
how to use printer control panel, and provides a detailed discussion of the configuration menu.
n
Chapter 5—Additional Technical Information
Defines ESP and SIO, communication modes, halftones, and
memory. Discusses end job mode, IEEE 1284 bidirectional parallel interface modes, PS Protocol and HP-GL color encoding.
1-2
QMS 4060 Print System Reference
About This
Manual
n
Appendix A—QMS Customer Support
Provides world-wide product sales and support telephone numbers and describes how to communicate with QMS through CompuServe, the Internet, and Q-FAX.
n
Appendix B—Technical Specifications
Provides technical specifications for the printer and lists available
supplies and replacement parts.
n
Appendix C—Document Option Commands
Lists printer-supported Document Option Commands (DOCs).
n
Appendix D—Notices
Lists manual and legal notices.
n
Appendix E—Configuration Menu
Provides a view of the printer’s configuration menu.
Typographic Conventions
The following typographic conventions are used in this manual:
Mixed-Case
Courier
Text you type, and messages and information
displayed on the screen
Mixed-Case
Variable text you type; replace the italicized
Italic Courier word(s) with information specific to your printer
or computer
UPPERCASE
COURIER
Information displayed in the printer message
window
lowercase bold
PostScript operators and DOS commands
lowercase italic
Variable information in text
UPPERCASE
File and utility names
↵
Press the Enter key (PC) or Return key
(Macintosh)
Introduction
1-3
About This
Manual
^
Press and hold down the Ctrl key (PC)
In Adobe Acrobat PDF versions of the manual,
click to play a QuickTime video clip of the
procedure described in the text.
»
Note: Notes contain tips, extra information, or important information
that deserves emphasis or reiteration.
▲ Caution: Cautions present information that you need to know to avoid
equipment damage, process failure, or extreme annoyance.
M WARNING! Warnings indicate the possibility of personal injury if a
specific procedure is not performed exactly as described in the
manual.
ACHTUNG! Bitte halten Sie sich exakt an die im Handbuch
beschriebene Vorgenhensweise, da sonst Verletzungsgefahr
bestehen könnte.
v
1-4
QMS 4060 Print System Reference
2
Print Media
In This Chapter . . .
n
“Media Sizes and Imageable Areas” on page 2-2
n
“Media Types and Weights” on page 2-4
n
“Media Storage” on page 2-5
Introduction
Introduction
This chapter lists the media sizes and imageable areas supported by
the QMS 4060 Print System, and then provides information on selecting and storing media.
Media Sizes and Imageable
Areas
Your printer supports media in a number of sizes. Each media size
has a certain imageable area, the maximum area on which the printer
can print. This area is subject to both hardware limits (the physical
media size and the margins required by the printer) and software constraints (the amount of memory available for the full-page frame
buffer).
»
Note: Ensure that the media size matches the tray size (for example,
letter/A4 media must be loaded only when the tray is set to letter/A4
size). Since the media tray sends a media size signal to the printer
controller, using a wrong size media will cause your image to be
positioned incorrectly on the page or clipped and can result in paper
jams.
Imageable Area
The imageable area is the area on which the printer is guaranteed to
print clearly and without distortion. This area is subject to both hardware limits (the physical media size and the margins required by the
printer) and software constraints (the amount of memory available for
the full-page frame buffer).
2-2
QMS 4060 Print System Reference
Media Sizes and
Imageable
Areas
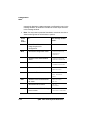
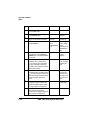
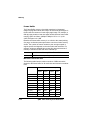
The following table lists the size, imageable area, and feed edge (the
edge of the media drawn into the printer first) of all supported media
as well as information about their input, output, and finishing options:
Media
Media Size
Inches
Millimeters
Imageable Area
Inches
Millimeters
Feed
Edge
Input/
Output
11x17
11.00x17.00 279.4x431.8
10.67x16.67 270.93x423.38
Short
D, L, M, P, U
A3
A4
A5
11.69x16.54 297.0x420.0
11.69x8.27 297.0x210.0
5.85x8.27
148x210.0
11.35x16.20 288.21x411.48
7.93x11.35 201.51x288.21
5.48x7.94
139.12x201.55
Short
Long
Short
D, L, M, P, U,
D, F, L, M, U
P D, D, L, M
U, P
B4 (JIS)
B5 (JIS)
10.12x14.33 257.0x364.0
7.17x10.12 182.0x257.0
9.77x13.998 248.24x355.56
6.87x9.78
173.40x248.50
Short
Short
D, L, M, P, U
D, L, M, P, U
B4 (ISO)
B5 (ISO)
9.84x13.90
6.93x9.84
9.50x13.57
6.59x9.51
Short
Short
C, D, P,
C, D, P
250x353
176x250
241.47x344.55
167.30x241.55
Executive 7.25x10.50
184.20x266.70 6.92x10.20
175.73x259.13
Short
D, M, P
Legal
Letter
215.9x355.6
8.16x13.67
279.40x215.90 8.17x10.67
207.26x347.18
207.48x270.93
Short
Long
D, L, M, P, U
D, F, L, M, P
U
139.7x215.9
131.06x207.48
Short
C, D, P
8.5x14.0
11.00x8.5
Statement 5.50x8.50
5.16x8.17
*D=Duplexer, F=Large-Capacity Input Feeder, L=Lower tray, M=Middle tray, U=Upper tray,
P=Large-Capacity Output Stacker, C=Custom tray
Working Within the Imageable Area
The imageable areas for print media on your QMS 4060 Print System
may vary 1/16" (1.6 mm). This is normal mechanical engine alignment
tolerances. You can adjust the alignment of the image in several different ways:
n
Adjust the margins or page size through your application.
n
Use the printer’s control panel (Administration/Engine/Image
Alignment menu).
n
Use the PostScript translate and scale operators to reduce
image size and change its placement on the page.
Print Media
2-3
Media Types
and Weights
Page Margins
Margins are set through your application. Some applications allow
you to set custom page sizes and margins while others have only
standard page sizes and margins from which to choose. If you choose
a standard format, you may lose part of your image (due to imageable
area constraints). If you can custom-size your page, use those sizes
given for the imageable area for optimum results.
Media Types and Weights
Your printer supports envelopes, labels, paper, postcards, and transparencies in a number of sizes. The following information provides
media types and weights that your printer supports.
Labels
Type
See appendix B, “Technical Specifications,” for information on typical
types of labels.
Weight
The printer supports 31-36 lb (120-139 g/m2) labels.
Paper
Type
Use paper recommended for laser printers, such as Hammermill
Laser Print. See appendix B, “Technical Specifications,” for information on typical types of paper.
2-4
QMS 4060 Print System Reference
Media Storage
Weight
The printer supports the following weights of paper:
n
Paper trays—17-36 lb (64-139 g/m2)
n
Large-Capacity Input Feeder—17-36 lb (64-139 g/m2)
Transparencies
Type
See appendix B, “Technical Specifications,” for information on typical
types of transparencies.
Heat Tolerance
The printer supports transparencies able to withstand the heat generated by the fuser (190° C/374° F), without transformation.
Media Storage
Improperly stored media increases the chance of paper jams during
printing and can drastically affect the print quality of the printed page.
Keep media in good condition by storing it
n
In its wrapper
n
On a flat surface
n
In a closed cabinet
n
In a cool, dry area
See appendix B, “Technical Specifications,” for information on storage conditions for media.
v
Print Media
2-5
3
Professional
Printing
In This Chapter . . .
n
“About Typefaces and Fonts” on page 3-2
n
“Resident Fonts, Typefaces, and Symbol Sets” on page 3-7
n
“Optional Fonts” on page 3-14
Introduction
Introduction
This chapter defines common terms used in the description of fonts
and typefaces, and displays the printer’s resident typefaces.
About Typefaces and Fonts
Many of the terms and phrases used in desktop publishing are
derived from the language of professional printers and typesetters.
This section explains common words and phrases used when discussing typefaces.
Typeface
Typeface Family
A named design of a set of
printed characters, such as
Times, that has a specified
obliqueness (degree of slant)
and stroke weight (thickness of
stroke). It does not define a
particular size.
Font
Character Set
A set of characters of the same
typeface (such as Times), style
(such as italic), stroke weight
(such as bold), and point size
(such as 10). Although you hear
the term “font” used more
generally, as if referring to a
typeface, it’s really only a
member of a typeface family.
3-2
A group of similar typefaces.
For example, the Times
typeface family consists of four
typefaces: Times Roman, Times
Bold, Times Italic, and Times
Bold Italic.
A collection of symbols
designed for various printing
applications. Many character
sets are composed of the
letters (uppercase and
lowercase A-Z), digits (0-9),
and any symbol (such as blank
space, dollar sign, and
ampersand). Other character
sets are composed entirely of
symbols.
QMS 4060 Print System Reference
About
Typefaces and
Fonts
Typeface Classification
One way of classifying the different typefaces is to group them into
the following categories:
Serif
A serif is a decorative line or tail on the ends of the strokes of a letter.
Serifs, usually on the lower half of a letter, have also been
referred to as feet or curlicues.
Courier, ITC Bookman, New
Century Schoolbook, Palatino,
and Times are serif typefaces. In the example shown, all the letters
except “e” and “o” have serifs.
Times Roman
Sans Serif
Helvetica
Sans serif (“sans” is French for
“without”) indicates a typeface
without any of these small tails. A
sans serif typeface is decorative by the shape and styling of its letters
but has less detail than a serif typeface. Helvetica, Helvetica
Condensed, Helvetica Narrow, and ITC Avant Garde Gothic are all
sans serif typefaces. In the example shown above, the slight curving
at the bottom of the letters “t” and “a” is not a serif. It is part of the line
forming the letter rather than a decorative line added on.
Script
Script typefaces simulate handwriting or brush lettering. Each letter is
connected visually, if not
physically. ITC Zapf Chancery is a
script typeface.
Zapf Chancery
Professional Printing
3-3
About
Typefaces and
Fonts
Pi or Symbol
Σψµβολ
Pi or symbol typefaces are
collections of assorted specialpurpose characters (for example,
decorative, graphic, math, or
monetary characters). They are especially useful for highlighting items
in lists, providing graphics, and displaying symbols that might
otherwise have to be drawn in by hand. Many typefaces today include
a complement of the more commonly used pi characters. Symbol and
ITC Zapf Dingbats are pi typefaces.
Typography Terms
Monospacing
The terms “monospaced” and “fixed-pitch” refer to a typeface whose
characters all have uniform and equal spacing. These typefaces are
useful for spreadsheets and other documents with columnar data.
Monospacing is the opposite of proportional spacing.
Proportional Spacing
The term “proportionally spaced” refers to a typeface in which the
width of each character varies. For example, the letter “i” is thinner
than the letter “m” and therefore takes up less space. Proportional
spacing saves page space and is easier on the eye. This manual’s
text uses the Helvetica font, a proportionally spaced typeface.
Because proportionally spaced typefaces place each character according
to its individual size, they increase
legibility and readability. This example shows the difference
between a monospaced typeface (Courier) and a proportional
typeface (Times).
alphabet
alphabet
3-4
QMS 4060 Print System Reference
About
Typefaces and
Fonts
Bitmapped Font
A bitmapped font is a one in which each
character is represented by a set of dot
patterns. Each font size requires a different
set of dot patterns.
Scalable Font
A scalable font is one in which each character’s dot pattern (bitmap) is
generated from a mathematical representation (or outline) of the
character. Scalable fonts eliminate the need to store many different
font sizes.
Point Size
Point size refers to the height of a proportionally spaced typeface. A
point is a unit of measure equal to 1/72". Therefore, the larger the point
size, the larger the letter. The following example shows characters in
8, 10, 12, 24, and 36 point sizes:
AB
C
DE
Pitch
Pitch refers to the number of characters per horizontal inch (cpi) in a
monospaced typeface. Therefore, the larger the pitch, the smaller the
mathematic
letter. For example, a ten-pitch typeface
prints ten characters per inch (or 10 cpi)
0
1
while a twelve-pitch typeface prints
mathematical
twelve characters per inch (or 12 cpi).
The example shows ten-pitch and twelve0
1
pitch Courier.
Professional Printing
3-5
About
Typefaces and
Fonts
Stroke Weight
Pa
la
tin
o
Pa
lat
in
o
Stoke weight (light/medium/bold) is the
width (thickness) of the lines (strokes) that
make up a character. The example at left
shows the medium and bold weights of
Palatino.
Italic and Oblique Forms
Italic was originally developed in
the early sixteenth century as a
typeface based on cursive
handwriting. Today’s italics are still
individually crafted typefaces
designed to blend with a specific roman (upright) typeface.
Times Roman
Times Italic
ITC Avant Garde Roman
ITC Avant Garde Oblique
Oblique (or slanted) type
forms, however, are not
designed and crafted
individually but are mechanically slanted versions of the roman form
from which they derive.
Orientation
Orientation is the direction of the print or image on a page. Portrait
orientation reads from left to right, across the narrower dimension of
the page. Landscape orientation also reads from left to right but
places the print across the wider dimension of the page. Spreadsheet
and table applications commonly use landscape printing. Both terms
3-6
QMS 4060 Print System Reference
Resident Fonts,
Typefaces, and
Symbol Sets
derive from painting; a portrait is usually a vertical view while a landscape is usually a horizontal view.
Portrait
AbcdefghijklmnopqrstuvwxyzAbcdefghijklmnop
qrstuvwxyzAbcdefghijklmnopqrstuvwxyzAbcde
fghijklmnopqrstuvwxyzAbcdefghijklmnopqrst
uvwxyzAbcdefghijklmnopqrstuvwxyzAbcdefg
hijklmnopqrstuvwxyzAbcdefghijklmnopqrstuv
wxyzAbcdefghijklmnopqrstuvwxyz
AbcdefghijklmnopqrstuvwxyzAbcdefghijklmnop
qrstuvwxyzAbcdefghijklmnopqrstuvwxyzAbcde
fghijklmnopqrstuvwxyzAbcdefghijklmnopqrst
uvwxyzAbcdefghijklmnopqrstuvwxyzAbcdefg
hijklmnopqrstuvwxyzAbcdefghijklmnopqrstuv
wxyzAbcdefghijklmnopqrstuvwxyz
AbcdefghijklmnopqrstuvwxyzAbcdefghijklmnop
qrstuvwxyzAbcdefghijklmnopqrstuvwxyzAbcde
fghijklmnopqrstuvwxyzAbcdefghijklmnopqrst
uvwxyzAbcdefghijklmnopqrstuvwxyzAbcdefg
hijklmnopqrstuvwxyzAbcdefghijklmnopqrstuv
wxyzAbcdefghijklmnopqrstuvwxyz
AbcdefghijklmnopqrstuvwxyzAbcdefghijklmnop
qrstuvwxyzAbcdefghijklmnopqrstuvwxyzAbcde
fghijklmnopqrstuvwxyzAbcdefghijklmnopqrst
Landscape
AbcdefghijklmnopqrstuvwxyzAbcdefghijklmnopqrstuvwxyzAbc
defghijklmnopqrstuvwxyzAbcdefghijklmnopqrstuvwxyzAbcdefg
hijklmnopqrstuvwxyzAbcdefghijklmnopqrstuvwxyzAbcdefghijkl
mnopqrstuvwxyzAbcdefghijklmnopqrstuvwxyzAbcdefghijklmno
pqrstuvwxyzAbcdefghijklmnopqrstuvwxyzAbcdefghijklmnopqrs
tuvwxyzAbcdefghijklmnopqrstuvwxyzAbcdefghijklmnopqrstuvw
wxyzAbcdefghijklmnopqrstuvwxyzAbcdefghijklmnopqrstuvwxyz
AbcdefghijklmnopqrstuvwxyzAbcdefghijklmnopqrstuvwxyzAbc
defghijklmnopqrstuvwxyzAbcdefghijklmnopqrstuvwxyzAbcdefg
hijklmnopqrstuvwxyzAbcdefghijklmnopqrstuvwxyzAbcdefghijkl
mnopqrstuvwxyzAbcdefghijklmnopqrstuvwxyzAbcdefghijklmno
pqrstuvwxyzAbcdefghijklmnopqrstuvwxyzAbcdefghijklmnopqrs
tuvwxyzAbcdefghijklmnopqrstuvwxyzAbcdefghijklmnopqrstuvw
Resident Fonts, Typefaces,
and Symbol Sets
Resident PostScript Fonts
The following 42 PostScript fonts are resident in your printer. See your
QMS vendor if you are interested in expanding your printer's typeface
families.
All of these typeface families are authentic: they are licensed, they
carry the true name, and they have multilingual character sets.
Professional Printing
3-7
Resident Fonts,
Typefaces, and
Symbol Sets
Serif Fonts
ITC Bookman Light
ITC Bookman Light Italic
ITC Bo okman Demibold
ITC Bookman Demibold It a l ic
Palatino Roman
Palatino Italic
Palatino Bold
Palatino Bold Italic
New Century Schoolbook Roman
New Century Schoolbook Italic
New Century Schoolbook Bold
New Century Schoolbook Bold
Italic
Times Roman
Times Italic
Times Bold
Times Bold Italic
Courier
Courier Oblique
Courier Bold
Courier Bold Oblique
Sans Serif Fonts
ITC Avant Garde Gothic Book
ITC Avant Garde Gothic Book Oblique
ITC Avant Garde Gothic Demibold
ITC Avant Garde Gothic Demibold
Oblique
Helvetica Condensed
Helvetica Condensed Oblique
Helvetica Condensed Bold
Helvetica Condensed Bold Oblique
Helvetica
Helvetica Oblique
Helvetica Bold
Helvetica Bold Oblique
Helvetica Narrow
Helvetica Narrow Oblique
Helvetica Narrow Bold
Helvetica Narrow Bold Oblique
Script Font
ITC Zapf Chancery Medium Italic
Pi or Symbol Fonts
Σψµβολ (Symbol)
✤❉■❇❂❁▼▲ (ITC Zapf Dingbats)
3-8
QMS 4060 Print System Reference
Resident Fonts,
Typefaces, and
Symbol Sets
Other Fonts
OCR-B
PC US ASCII
PC Multilingual
Resident HP PCL 5e Fonts
Your printer has resident HP PCL 5e fonts. This gives the QMS 4060
the ability to emulate the HP LaserJet 5Si. All fonts can be automatically rotated to landscape orientation.
»
Note: 300/600 dpi switching is available.
This table is a complete list of the fonts available for PCL 5e. They can
be automatically rotated to landscape orientation. All fonts are scalable and available in 32 symbol sets unless otherwise noted.
Font
Adobe Symbol Medium (1 symbol
set)
Pi/
Sans
Symbol Serif
Script Serif
ü
Albertus Semi Bold
Albertus Extra Bold
ü
ü
Antique Olive Medium
Antique Olive Italic Medium
Antique Olive Bold
ü
ü
ü
Arial
Arial Bold
Arial Italic
Arial Bold Italic
ü
ü
ü
ü
ü
Clarendon Condensed Bold
Coronet Italic Medium
Professional Printing
ü
3-9
Resident Fonts,
Typefaces, and
Symbol Sets
Font
Pi/
Sans
Symbol Serif
Courier Medium
Courier Italic Medium
Courier Bold
Courier Bold Italic
ü
ü
ü
ü
Garamond (Stempel) Medium
Garamond (Stempel) Italic Medium
Garamond (Stempel) Bold
Garamond (Stempel) Italic Bold
ü
ü
ü
ü
Letter Gothic Medium
Letter Gothic Italic Medium
Letter Gothic Bold
ü
ü
ü
Line Printer Legal Medium (8.5
points, 25 symbol sets)
Line Printer PC-850 Medium (8.5
points, 25 symbol sets)
Line Printer PC-8 D/N Medium (8.5
points, 25 symbol sets)
Line Printer PC-8 Medium (8.5
points, 25 symbol sets)
Line Printer Roman-8 Medium (8.5
points, 25 symbol sets)
Line Printer ECMA-94 Latin 1
(ISO8859/1) (8.5 points, 25
symbol sets)
ü
ü
ü
ü
ü
ü
ü
Merigold
Omega Medium
Omega Italic Medium
Omega Bold
Omega Italic Bold
3-10
Script Serif
ü
ü
ü
ü
QMS 4060 Print System Reference
Resident Fonts,
Typefaces, and
Symbol Sets
Font
Pi/
Sans
Symbol Serif
Script Serif
Times Medium
Times Italic Medium
Times Bold
Times Italic Bold
ü
ü
ü
ü
Times Roman Medium
Times Roman Italic Medium
Times Roman Bold
Times Roman Italic Bold
ü
ü
ü
ü
Univers Medium
Univers Italic Medium
Univers Bold
Univers Italic Bold
ü
ü
ü
ü
Univers Condensed Medium
Univers Condensed Italic Medium
Univers Condensed Bold
Univers Condensed Italic Bold
ü
ü
ü
ü
Wingdings (1 symbol set)
Professional Printing
ü
3-11
Resident Fonts,
Typefaces, and
Symbol Sets
PCL 5e Symbol Sets
This table lists all of the PCL 5e symbol sets that are supported on
the QMS 4060 Print System.
Roman - 8
PC - 850
PC8 - US
PC8 - DN
Legal
ISO - 4 (UK)
ISO - 6 (ASCII)
ISO -11 (SWED)
ISO - 15 (ITAL)
ISO - 17 (SPAN)
ISO - 21 (GERM)
ISO - 60 (NORW)
ISO -69 (FREN)
Desktop
PS - Math
Math - 8
3-12
Microsoft - Pub
Pi - font
PS - Text
Ventura - Intl
Ventura - Math
Ventura - US
Windows 3.0 (LATIN 1)
ISO - Latin - 1
ISO - Latin - 2
ISO - Latin - 5
PC - 852 (Latin 2)
PC - 8tk
Windows 3.1 1-1 (Latin 1)
Windows 3.1 1-2 (Latin 2)
Windows 3.1 1-3 (Latin 3)
MC - Text
QMS 4060 Print System Reference
Resident Fonts,
Typefaces, and
Symbol Sets
Resident HP-GL Symbol Sets
Your printer has the following resident HP-GL symbol sets. All come
in both fixed- and variable-spaced versions, and all are scalable.
Fixed space ANSI ASCII
Fixed space 9825 Character
Set
Fixed spaceFrench/German
Fixed space Scandinavian
Fixed space Spanish/Latin
American
Fixed space Special symbols
Fixed space JIS ASCII
Fixed space Roman
extensions
Fixed space Katakana
Fixed space ISO IRV
Variable space ANSI ASCII
Variable space 9825
Character set
Variable space French/
German
Variable space Scandinavian
Variable space Spanish/Latin
American
Variable space Special
symbols
Variable space ASCII
Variable space Roman
extensions
Variable space Katakana
Professional Printing
Variable space ISO IRV
Fixed space ISO Swedish
Fixed space ISO Swedish for
names
Fixed space ISO Norway
version 1
Fixed space ISO German
Fixed space French
Fixed space United Kingdom
Fixed space Italian
Fixed space Spanish
Fixed space Portuguese
Fixed space Norway version 2
Variable space ISO Swedish
Variable space ISO Swedish
for names
Variable space ISO Norway
version 1
Variable space German
Variable space French
Variable space United
Kingdom
Variable space Italian
Variable space Spanish
Variable space Portuguese
Variable space Norway
version 2
3-13
Optional Fonts
Optional Fonts
Your printer supports the following optional fonts:
n
A disk containing typefaces (fonts), such as the ProCollection for
the HP emulations on your printer or other special fonts.
n
A SIMM containing 65 ProCollection fonts for the HP emulation
on your printer.
n
A Kanji Option Kit that contains either a pre-formatted external
hard disk with Kanji fonts and other files or a Kanji SIMM.
Contact QMS or your printer vendor for availability of these fonts.
QMS also provides logos, signatures, and other form services. See
appendix A, “QMS Customer Support,” for locations and telephone
numbers.
v
3-14
QMS 4060 Print System Reference
4
Printer
Configuration
In This Chapter . . .
n
“Methods of Configuration” on page 4-2
n
“Configuration Menu” on page 4-4
n
“Operator Control Menu” on page 4-16
n
“Administration Menu” on page 4-46
n
“Installation Menu” on page 4-104
Introduction
Introduction
This chapter begins by listing and describing the different ways you
can configure your printer to meet your special printing needs.
The next section describes how to use the printer control panel to
access the configuration menu and how to make configuration
changes.
The rest of the chapter provides basic printer configuration information about some of the configuration menu options. The QMS CrownNet Interface System Administrator’s Guide (on the QMS Software
Utilities CD-ROM) contains the CrownNet submenu configuration
information for the Ethernet interface. In both guides, menu features
are grouped according to task. Each feature is introduced, then a
table describes the feature’s location in the configuration menu, the
available choices for that feature, and the factory default (the value
set at the factory).
Methods of Configuration
You have five ways to configure your printer to meet your printing
needs:
n
Through an application
n
Through printer commands
n
Through the printer control panel
n
Through a remote console (for network users)
n
Through a local console
Using an Application
Using your application is the best way to control your printer since
most printing is done on a per-job basis. This helps prevent confusion
in network environments and saves you from making changes at the
4-2
QMS 4060 Print System Reference
Methods of
Configuration
printer control panel. Your application documentation explains how to
control your printer settings: probably by choosing options from a
printing menu.
Applications use printer drivers to send appropriate commands to the
printer for requested tasks. If your application doesn’t have a QMS
4060 Print System driver, you can select a comparable PostScript
driver, such as the QMS Level 2 Windows driver or a LaserWriter
driver. However, comparable drivers may not allow you to access all
of your printer's features, such as 600x600 dpi printing, duplexing, or
collating.
Using QMS Document Option Commands
QMS Document Option Commands (DOCs) can enable job-specific
features your application or page description language can’t access.
See your QMS Crown Document Option Commands manual on the
QMS Software Utilities CD-ROM for information on the DOC commands. See appendix C, “Document Option Commands,” of this manual for a list of DOCs this printer supports.
Using the Control Panel
Your printer is configured at the factory for most typical printing environments, so most users don’t have to use the control panel often.
However, if you do need to change a printer setting for all print jobs
(not just on a per-job basis), you can do so through the control panel.
If you’re working in a shared printing environment, your system
administrator should be the only person to make changes through the
printer’s control panel.
»
Note: The menu navigation button functions appear on the display
panel only when the printer is off line.
Using a Remote Console
Many of the configuration choices that can be made at the control
panel can also be made via a Remote Console session from
CrownAdmin. You can run Remote Console via Telnet a TCP/IP enviPrinter Configuration
4-3
Configuration
Menu
ronment. To avoid confusion in a shared printing environment, only
the system administrator should make configuration changes. See
the QMS CrownAdmin on-line help for information on using Remote
Console.
»
Note: If a remote console has the printer off line, pressing the Online
button will not take effect until the console puts the printer back on
line.
Using the Local Console Port
The Local Console port can also allow you to make configuration
choices that are normally made at the control panel. See chapter 6,
“Local and Remote Console,” of the Operations manual for more
information.
»
Note: If a local console has the printer off line, pressing the Online
button will not take effect until the console puts the printer back on
line.
Configuration Menu
The printer’s configuration menu allows you to change the default
printer configuration settings. Any changes made to the configuration
will reside as new default settings and affect all subsequent print jobs.
The options in the configuration menu are organized under three
main menus:
n
Operator Control Menu
Use this menu to select document processing options such as
copy count, choosing input and output paper bins, chaining input
bins, and duplexing (if a duplexing unit is installed). Document
processing options are usually specified within individual jobs
since each job has its own requirements. However, if there’s no
way of specifying these options within an application, use the
control panel to change options, send the job, and then change
the defaults back.
4-4
QMS 4060 Print System Reference
Configuration
Menu
Note: Defining document processing options for a particular job
through the control panel is not recommended in a shared
environment. When many systems are using the same printer,
there’s no way of making sure that no other jobs are sent to the
printer while the defaults are changed. The Operator Control
menu may be password-protected with an optional security key if
the system administrator does not want users changing defaults.
»
n
Administration Menu
Use this menu to maintain printer-host communication information, and for selecting and configuring printer emulations, configuring special pages, printing engine calibration, and configuring
hard disks (if installed).
Note: For information on printer-host communication using the
Ethernet interface or any of the Administration/Communications/
Network/CrownNet options, see chapter 2, “Printer
Configuration,” in the QMS CrownNet System Administrator’s
Guide on the QMS Software Utilities CD-ROM. The
Administration menu may be password protected with an optional
security key if the system administrator does not want users
changing defaults.
»
n
Installation Menu
Use this menu to establish passwords for the Operator Control
and Administration menus. This menu displays only when an
optional security key is installed.
Accessing the Configuration Menu
To access the configuration menu, make sure the printer is idle (IDLE
displays in the message window), then press the Online button to
take the printer off line (the Online button function changes to Offline),
and finally press the Menu button.
Example
The following table shows how to use control panel buttons to access
the printer configuration menu. Press the control panel buttons in the
Printer Configuration
4-5
Configuration
Menu
order shown. The printer responds by displaying a status message or
configuration menu in the message window.
Note: You may need to press the Next button more than one time to
advance through the list of options.
»
Press
this
button
to...
The message window
reads...
Online
Take the printer off line and ready
the printer for configuration.
IDLE
Menu
Access the configuration menu.
CONFIGURATION
OPERATOR CONTROL
The printer must be off line and idle before you can access the configuration menu.
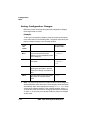
Selecting Configuration Menu Options
Once you access the configuration menu, you use the control panel
buttons to move through the menu. Use the following buttons:
Press this
button
4-6
to...
Next
Advance to the next option or submenu within a
menu.
Previous
Return to the previous option or submenu within a
menu.
Select
Select an option or enter a submenu.
QMS 4060 Print System Reference
Configuration
Menu
Example
To change the default printer emulation from ESP to PostScript, press
the control panel buttons in the order shown in the following table.
»
Note: You may need to press the Next button more than once to
advance through the list of selections or options.
Press this
button
to...
The message
window reads...
Online
Turn off the Online indicator and
ready the printer for
configuration.
IDLE
Menu
Access the configuration menu.
CONFIGURATION
OPERATOR
CONTROL
Next
Advance to the Operator Control/
Administration menu.
CONFIGURATION
ADMINISTRATION
Select
Access the Administration menu
ADMINISTRATION
COMMUNICATIONS
Select
Access the Communications
menu.
COMMUNICATIONS
TIMEOUTS
Next
Advance to the
Communications/Parallel menu.
COMMUNICATIONS
PARALLEL
Select
Access the Parallel menu.
PARALLEL
MODE
Next
Advance to the Parallel/
Emulation menu.
PARALLEL
EMULATION
Select
Access the Emulation menu.
EMULATION
ESP
Previous
Advance to the Emulation/
PostScript menu.
EMULATION
POSTSCRIPT
Printer Configuration
4-7
Configuration
Menu
Select PostScript as the default
emulation.
POSTSCRIPT
IS SELECTED
After 3 seconds you are returned
to the Parallel/Emulation menu.
PARALLEL
EMULATION
Offline or
Menu
Exit from the menu (Offline) or
return to the previous menu
(Menu). You are prompted to
save your change(s).
SAVE CHANGES?
NO
Next
Advance to the Save Changes?/
Yes option.
SAVE CHANGES?
YES
Select
Select YES. The printer finishes
printing any print jobs in process,
saves your change, and returns
to idle.
IDLE
Select
Changing Character Information
Sometimes, rather than selecting an option, you need to enter character information. A character is any letter, digit, or symbol. A field is a
group of characters that have meaning. Use the printer control panel
to enter character information in the message window during printer
configuration. The maximum length of the message window is 16
characters.
Entering character information through the control panel is similar to
setting the time and date on a digital watch. You enter one character
4-8
QMS 4060 Print System Reference
Configuration
Menu
at a time. The current input character flashes. Use the following buttons to change the current input character:
Press this
button
to...
Next
Advance to the next choice for the current input
character.
Previous
Return to the previous choice for the current input
character.
Once you have changed the current input character, use the following
buttons to move the cursor to another input character:
Press this
button
to...
Select
Advance the cursor to the next character.
Menu
Return the cursor to the previous character.
To exit from the character selection process, move the cursor to the
last character of the input field (the character farthest to the right) and
press the Select button, or move to the first character of the input field
(the character farthest to the left) and press the Menu button.
When you exit, the printer verifies character information and confirms
it in the message window. If character information is valid, you’re
returned to the previous menu; if it’s invalid, you’re returned to the
input field. Press the Menu button to cancel any changes to the character information.
If the current character information is longer than the value that you
need to enter, replace each extra character with a space. The printer
interprets a space at the end of character information as a blank.
Example
To change the HP-GL emulation scaling percent, press the control
panel buttons in the order shown in the following table. The printer
Printer Configuration
4-9
Configuration
Menu
responds by displaying a status message or configuration menu in the
message window. An underline indicates the current input character
in the message window.
»
Note: You may need to press the Next button more than one time to
advance through the list of selections or options.
Press
this
button
to...
The message window
reads...
Online
Turn off the Online indicator and
ready the printer for
configuration.
IDLE
Menu
Access the configuration menu.
CONFIGURATION
OPERATOR
CONTROL
Next
Advance to the Administration
menu.
CONFIGURATION
ADMINISTRATION
Select
Access the Administration menu
ADMINISTRATION
COMMUNICATIONS
Next
Advance to the Emulation menu.
ADMINISTRATION
EMULATIONS
Select
Access the Emulations menu.
EMULATIONS
ESP DEFAULT
EMUL
Next
Advance to the Emulations/HPGL menu.
EMULATIONS
HP-GL
Select
Access the HP-GL menu.
HP-GL
PLOTTER
Next
Advance to the HP-GL/Scaling
Percent menu.
HP-GL
SCALING PERCENT
4-10
QMS 4060 Print System Reference
Configuration
Menu
Select
Access the Scaling Percent
menu.
SCALING PERCENT
100
Previous
Lower the current character to 0.
SCALING PERCENT
000
Select
Select 0 and move the current
character to the next 0.
SCALING PERCENT
000
Next
(5 times)
Advance the current character to
5.
SCALING PERCENT
050
Select
Select 5 and move the current
character to the last 0.
SCALING PERCENT
050
Select
Select 50 as the default scaling
percent.
50
IS SELECTED
After 3 seconds you are returned
to the HP-GL/Scaling Percent
menu.
HP-GL
SCALING PERCENT
Offline
or Menu
Exit from the menu (Online) or
return to the previous menu
(Menu). You are prompted to
save your change(s).
SAVE CHANGES?
NO
Next
Advance to the Save Changes?/
Yes option.
SAVE CHANGES?
YES
Select
Select Yes. The printer finishes
printing any print jobs in process,
saves your change, and returns
to idle.
IDLE
Printer Configuration
4-11
Configuration
Menu
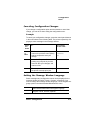
Saving Configuration Changes
Before the printer can accept print jobs with configuration changes,
the changes must be saved.
Example
To save your configuration changes, press the control panel buttons
in the order shown in the following table. The printer responds by displaying a status message in the message window.
Press
this
button
»
4-12
to...
The message
window reads...
Offline or
Menu
Exit from the menu (Online) or
return to the previous menu
(Menu). You are prompted to save
your change(s).
SAVE
CHANGES?
NO
Next
Advance to the Save Changes?/
Yes option.
SAVE
CHANGES?
YES
Select
Select Yes. The printer finishes
printing any print jobs in process,
saves your change, and returns to
idle.
IDLE
Offline
Turn the printer on-line and ready
the printer to accept and print
jobs.
IDLE
Note: The printer may need to be restarted before certain changes to
the Administration menu take effect. Some changes restart the printer
automatically while others display the message REBOOT NOW? in the
control panel message window. If this message appears, select YES
to restart the printer and have the change(s) take effect immediately,
or select NO to wait until you manually restart the printer for changes
to take effect.
QMS 4060 Print System Reference
Configuration
Menu
Canceling Configuration Changes
If you change a configuration option and then decide to cancel that
change, you can do so when exiting the configuration menu.
Example
To cancel your configuration changes, press the control panel buttons
in the order shown in the following table. The printer responds by displaying a status message in the message window.
Press
this
button
to...
The message
window reads...
Offline
or
Menu
Exit from the menu (Offline) or
return to the previous menu (Menu)
and be prompted to save your
change.
SAVE
CHANGES?
NO
Select
Select No. The printer finishes
printing any print jobs in process,
does not save your changes, and
returns to idle.
IDLE
Offline
Turn the printer on-line and ready
the printer to accept print jobs.
IDLE
Setting the Message Window Language
Status messages and configuration menus can be displayed in the
message window in English, French, German, or Spanish. If you
need to change the message window language, use the Keypad Language option in the Administration/Miscellaneous menu.
Menu
Administration/Miscellaneous/Keypad Language
Choices
English, French, German, Spanish
Printer Configuration
4-13
Configuration
Menu
Default
English
Notes
The printer must be restarted for changes to the
Keypad Language menu to take effect. You can either
let the printer restart automatically after you save the
change and exit from the Configuration menu, or you
can wait for the change to take effect the next time
you manually turn on the printer.
Restoring the Factory Default Configuration
If you need to cancel all of the configuration changes you have made,
you can reset all of the configuration settings to their factory defaults.
Menu
Administration/Miscellaneous/Restore Defaults
Purpose
Allows you to cancel all of the configuration changes you’ve
made and reset all of the configuration settings to their factory
defaults
Choices
Yes, No
Default
No
Notes
This process takes a few minutes to complete.
Working with Custom Configurations
Saving a Default Custom Configuration
Menu
Administration/Miscellaneous/Save Defaults
Purpose
Saves the current printer configuration as a custom default.
Choices
Yes—Save the current configuration settings as a custom
default.
No—Don’t save the current configuration settings as a custom
default.
4-14
Default
No
Notes
You can save only one configuration; however, you can change
the saved configuration at any time.
QMS 4060 Print System Reference
Configuration
Menu
Restoring a Default Custom Configuration
Menu
Administration/Miscellaneous/Restore Defaults/Saved Defaults
Purpose
Reconfigures the printer by using the default custom
configuration.
Choices
Yes, No
Default
No
Notes
To restore the saved defaults, access the menu item and select
Yes.
Rebooting the System
Use this option to restart the system after making a group of configuration menu changes. Before making configuration changes an
advanced status page should be printed. After changing any option
that requires a system restart, you are prompted to REBOOT NOW? If
you want to make other configuration changes choose no. After you
make all configuration changes choose Yes to restart the system and
have all configuration menu changes take effect at once.
»
Menu
Administration/Miscellaneous/Reboot System
Choices
Yes—Reboots the system.
No—Does not reboot the system.
Default
No
Notes
This process takes a few minutes to complete.
Note: If you save a change and for some reason want to return to the
previous state, use the advanced status page as a reference.
Printer Configuration
4-15
Operator Control
Menu
Operator Control Menu
The Operator Control menu contains the following selections:
Selection
4-16
See this section...
Copies
“Copies” on page 4-17
Duplex
“Duplexing” on page 4-17
Offset Stacking
“Offset Stacking” on page 4-18
Face-Up Order
“Face-Up Order” on page 4-18
Collation
“Collation” on page 4-18
Orientation
“Orientation” on page 4-21
Inputbin
“Input” on page 4-21
Outputbin
“Selecting a Paper Outputbin” on page 4-24
Chain
Inputbins
“Chaining Paper Inputbins” on page 4-25
LCIT, Lower,
Middle, Upper
Chaining
“Setting Up Chaining Options” on page 4-26
Custom Input
Tray
“Custom Input Bins” on page 4-28
Consumables
“Consumables” on page 4-29
Accounting
“Accounting Menu” on page 4-30
QMS 4060 Print System Reference
Operator Control
Menu
Copies
While it is preferable to use your application to select the number of
copies to print, you can change the default number of copies for all
print jobs through the printer control panel.
Menu
Operator Control/Copies
Choices
001-999
Default
001
Notes
Sets the default number of copies for all subsequent
print jobs. When power is turned off and then back on
again, the number of copies is restored to the default
setting of 001.
Duplexing
The Duplex option allows you to print on both sides of the paper.
Menu
Operator Control/ Duplex
Choices
Off, On
Off—Prints simplex pages.
On—Duplexes each page of each job.
Tumble—Prints jobs so they can be bound at the top
edge (flip-chart style).
Default
Off
Notes
If you want to print individual jobs duplex, leave the
printer set to Off and choose duplex through your
application.
Printer Configuration
4-17
Operator Control
Menu
Offset Stacking
This option offsets each job as they are stacked in the optional LCOS.
Menu
Operator Control/Offset Stacking
Choices
Off, On
Off—Jobs stack normally.
On—Each job is offset in the LCOS output tray.
Default
Off
Face-Up Order
This option allows you to choose stacking your print job in normal
face-down order or reverse order.
Menu
Operator Control/Face-Up Order
Choices
Normal, Reverse
Normal—Order of printing is first page of the job
printed first.
Reverse—Order of printing is last page of the job is
printed first.
Default
Normal
Notes
Reverse face-up order is not supported when printing
duplex jobs.
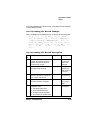
Collation
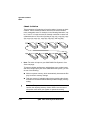
Collation is one of your printer’s features. It is the printing of sets of
multiple copies of a document in numeric order. Your printer is capable of delivering multiple copies of your files in collated order to the
4-18
QMS 4060 Print System Reference
Operator Control
Menu
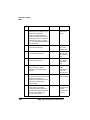
output tray. The following figure shows the collated and uncollated
stacking for two copies of a four-page file.
1
2
3
4
1
2
Collated
3
4
1
1
2
2
3
3
4
4
Uncollated
The main advantage of collation is convenience and the time savings
derived from not having to separate and sort individual copies of a
document. Each copy of the document exists as a whole unless
chunk collation has occurred.
Enabling/Disabling Collation
Menu
Operator Control/Collation
Choices
On—Enable collation.
Off—Disable collation.
Default
Off
Working with Chunk Collation
For a multiple copy document with collation On, there must be
enough display list memory to hold the display list blocks for all pages
in the collation range. See the “Memory” section in chapter 5, for
more information on the Display List compressed blocks. If there is
not enough memory, then a chunk collation boundary is forced after
the last compiled page of the collation range.
»
Note: Under normal conditions with 32 MB of RAM and the internal
hard disk for virtual memory, your QMS 4060 should have enough
memory to prevent chunk collation from occurring.
Printer Configuration
4-19
Operator Control
Menu
Chunk Collation
This mechanism of introducing a forced boundary is known as chunk
collation. Chunk collation breaks a document into several smaller,
more manageable sets. For example, in the following illustration, copies “a” and “b” of each set must be manually combined to create one
collated document. The order of printing is copy 1(a), copy 2(a), copy
3(a), copy 4(a), copy 1(b), copy 2(b), copy 3(b), and copy 4(b).
»
Note: The order of output on your QMS 4060 Print System is from
first to last page.
To improve collation performance, which allows you to collate longer
and more complex print jobs on the QMS 4060 Print System, you can
do one of the following:
▲
4-20
n
Add more printer memory, which automatically increases the Display List client’s memory settings.
n
Take any memory, if available and not being used by other clients,
and add it to the Administration/Memory/K Mem Display memory
setting.
Caution: This option should be used only by individuals who are
familiar with adjusting memory clients’ values. Incorrect use of
this option could cause your system to operate incorrectly.
QMS 4060 Print System Reference
Operator Control
Menu
Note: Collating through your application is more time consuming
than collating through the printer. The application sends the
complete job the requested number of times rather than sending
it once and holding data in printer memory.
»
Orientation
While you can usually specify the orientation of a print job in your
application, if you consistently use a certain paper orientation, you
can set this in the Operator Control/Orientation menu.
Menu
Operator Control/Orientation
Choices
Portrait—Vertical.
Landscape—Horizontal.
Default
Portrait
Input
Your QMS 4060 Print System comes standard with three 500-sheet
paper trays. Using the control panel, you can select a default paper
input source, chain these input sources, and name them.
Selecting a Paper Inputbin
Your printer has the following inputbins:
Upper Tray
Holds approximately 500 sheets of letter/A4 to
A3/11" x 17" paper.
Middle Tray
Holds approximately 500 sheets of letter/A4 to
A3/11" x 17" paper.
Lower Tray
Holds approximately 500 sheets of letter/A4 to
A3/11" x 17" paper.
Printer Configuration
4-21
Operator Control
Menu
Optional Custom
Paper Tray (used in
place of one of the
other trays)
Holds approximately 500 sheets of letter/A4 to
11''x17''/A3 paper, statement, B4 (ISO), and B5
(ISO).
Optional LargeCapacity Input
Feeder (LCIF)
Two models—one holds 3000 sheets of lettersize paper and the other holds 3000 sheets of
A4-size paper.
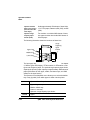
The following illustration shows the locations of these bins.
Large
Capacity
Input
Feeder
Upper Tray
Middle Tray
Lower Tray
The input trays support several types and sizes of paper. See chapter
2, “Media Types and Weights,” of this manual, for information on the
types and weights of paper. The optional large-capacity input feeder
expands the printer’s paper capacity to approximately 4500 sheets of
paper (500 sheets for the upper, middle, and lower trays, and 3000
sheets for the input feeder).
The Operator Control/Inputbin menu allows you to select the default
tray or tray (inputbin) from which paper is drawn into the printer.
4-22
Menu
Operator Control/Inputbin
Choices
Upper—Upper tray
Middle—Middle tray
Lower—Lower tray
Optional—Large-capacity input feeder
Default
Upper
QMS 4060 Print System Reference
Operator Control
Menu
Naming Paper Inputbins
Options in the Administration/Engine menu allow you to give each
inputbin a more descriptive name. These names are displayed in the
printer message window, where appropriate. You can also use the
descriptive names with Document Option Commands. (See the QMS
Crown Document Option Commands manual on the QMS Software
Utilities CD-ROM for complete information on Document Option
Commands.)
Inputbin 1
Inputbin 1 is the upper paper tray.
Menu
Administration/Engine/Inputbin 1 Name
Choices
Up to 16 characters
Default
upper
Inputbin 2
Inputbin 2 is the middle paper tray.
Menu
Administration/Engine/Inputbin 2 Name
Choices
Up to 16 characters
Default
middle
Inputbin 3
Inputbin 3 is the lower paper tray.
Menu
Administration/Engine/Inputbin 3 Name
Choices
Up to 16 characters
Default
lower
Printer Configuration
4-23
Operator Control
Menu
Inputbin 5
Inputbin 5 is the optional large-capacity paper feeder.
Menu
Administration/Engine/Inputbin 4 Name
Choices
Up to 16 characters
Default
LCIF
Paper Output
Selecting a Paper Outputbin
An option in the Operator Control menu allows you to select the default
outputbin (tray).
Menu
Operator Control/Outputbin
Choices
Upper
Face-Up Stack—optional (appears only if unit is
installed)
Face-Down Stack—optional (appears only if unit is
installed)
Default
Upper
Naming the Paper Outputbin
The Administration/Engine/Outputbin menu is used to name output
bins. You can also use this name with DOC commands. (See the
QMS Crown Document Option Commands manual for information.)
4-24
Menu
Administration/Engine/Outputbin 1 Name
Choices
Up to 16 characters
Default
upper
QMS 4060 Print System Reference
Operator Control
Menu
Menu
Administration/Engine/Outputbin 2 Name
Choices
Up to 16 characters
Default
face up stack
Menu
Administration/Engine/Outputbin 3 Name
Choices
Up to 16 characters
Default
face down stack
Chaining Paper Inputbins
An option in the Operator Control menu allows you to “chain” inputbins (trays) so that when the first inputbin empties, the printer will
automatically draw paper from another inputbin with either the same
or any size and type of paper (dependent on the choice selected).
Menu
Operator Control/Chain Inputbins
Choices
On—Switch to the next inputbin with the same size
and type of paper when the default inputbin is
empty.
»
Note: Make sure the three trays use the same
size paper.
Off—Don’t switch inputbins; use only the default
inputbin.
On Any—Switch to the next inputbin with similar size
of paper when the default inputbin is empty.
Printer Configuration
4-25
Operator Control
Menu
Default
On
Notes
Use the Operator Control/Inputbin menu to set the
default inputbin. Make sure that the three inputbins
use the same size paper.
When chaining "on any" and duplexing, the printer will
chain to a similar size paper (for example, letter to A4)
but not to the large paper sizes—11"x17" and A3.
This is because these large sizes are fed through the
printer in a different printing order than the smaller
sizes. When these restrictions occur on chaining on
any, the printer will prompt you to add the default
paper size to any tray. The custom tray chaining
"on any" for large format- paper will not occur unless
there is another custom tray with the same paper size
or a standard tray with A3 or 11"x17" paper.
Setting Up Chaining Options
Options in the Operator Control menu allow you to configure whether
or not an inputbin will be available for chaining from another inputbin.
Large-Capacity Input Feeder (LCIF)
Use the Operator Control/Chain Option/LCIT Chaining to chain to the
optional tray.
Menu
Operator Control/Chain Option/LCIT Chaining
Choices
On—Allow media to be pulled from the large-capacity
input tray.
Off—Don’t allow media to be pulled from the largecapacity input tray.
4-26
QMS 4060 Print System Reference
Operator Control
Menu
Default
On
Notes
The Operator Control/Chain Option menu must be set
to On before the setting in this menu takes effect.
»Note: When making this selection, you may use
"LCIF," "LCIT," or "Optional" even though your printer
menu only displays "Optional."
Lower Inputbin
Use the Operator Control/Chain Option/Lower Chaining to chain to
the lower inputbin.
Menu
Operator Control/Chain Option/Lower Chaining
Choices
On—Allow media to be pulled from the lower inputbin
if necessary.
Off—Don’t allow media to be pulled from the lower
inputbin.
Default
On
Notes
The Operator Control/Chain Option menu must be set
to On before the setting in this menu takes effect.
Middle Inputbin
Use the Operator Control/Chain Option/Middle Chaining to chain to
the middle inputbin.
Menu
Operator Control/Chain Option/Middle Chaining
Choices
On—Allow media to be pulled from the middle
inputbin if necessary.
Off—Don’t allow media to be pulled from the middle
inputbin.
Printer Configuration
4-27
Operator Control
Menu
Default
On
Notes
The Operator Control/Chain Option menu must be set
to On before the setting in this menu takes effect.
Upper Inputbin
Use the Operator Control/Chain Option/Upper Chaining menu to
chain to the upper inputbin.
Menu
Operator Control/Chain Option/Upper Chaining
Choices
On—Allow media to be pulled from the upper inputbin
if necessary.
Off—Don’t allow media to be pulled from the upper
inputbin.
Default
On
Notes
The Operator Control/Chain Option menu must be set
to On before the setting in this menu takes effect.
Custom Input Bins
This option allows you to set up the paper size for the optional custom
input tray. Since the tray can be installed in the upper, middle, or lower
tray positions there are three options under this menu—one for each
tray position.
4-28
Menu
Operator Control/Custom Input Bin
Choices
Upper, Middle, or Lower
Default
The default setting for each tray position is letter
paper size.
Notes
The choices for each tray position are letter, legal,
executive, A3, A4, A5, B4, B5, B4 (ISO), B5 (ISO),
11 x 17, Statement.
QMS 4060 Print System Reference
Operator Control
Menu
Consumables
These options help you monitor your printer’s consumables.
Printing a Consumables Statistics Page
Menu
Operator Control/Consumables/Print Statistics
Purpose
Prints a consumables statistics page
Choices
No, Yes
Default
No
Notes
The consumables statistics page allows you to check the
amount of usage for printer consumables and other printer
statistics, such as the number of sheets, faces, and planes
printed as well as the average coverage of each color toner.
»
Note: The number of sheets/faces printed statistics differ
from the number of sheets printed statistics on the printer’s
start-up and status pages, which refer to the total number
of sheets/faces of media printed during the life of the
printer.
Crown Accounting
Crown accounting, a tool to help you keep track of the use of printer
resources, is available on your QMS 4060 Print System with a hard
disk installed, with or without a network connection.
Paper use is the most commonly monitored resource. However,
Crown accounting also allows you to monitor
n
Paper use per user
n
Time consumed serving each user’s jobs
n
Connectivity options
n
Frequency of jams
n
Times of peak use
n
Number, complexity, and average size of jobs per user
n
Commonly used features, such as duplexing or finishing
Printer Configuration
4-29
Operator Control
Menu
»
Note: If you are connected to a network via TCP/IP, you have a
choice of using Crown accounting or the standard TCP/IP accounting
through your UNIX host software. See the TCP/IP Protocol Option
User’s Guide for more information on TCP/IP accounting.
As jobs are printed on your QMS printer, the system collects information about different job parameters in relation to the jobs. When each
job completes, the printer stores an entry for the job in the Job
Accounting file(s).
▲ Caution: Do not turn the printer off while the disk is being accessed.
Doing so may cause inconsistencies in the information stored.
Accounting Menu
The Accounting menu includes five submenus, allowing you to enable
or disable job accounting, allocate disk space when accounting is
enabled, reset accounting, store job accounting information in a single job file or in multiple files, and copy the accounting information.
Job accounting information may be stored in a single file if it can be
retrieved via FTP on your host. Otherwise, the selected job accounting file should be spread into several files.
Setting the Accounting Mode
The Accounting Mode option enables or disables job accounting.
Choices are Enabled or Disabled with a default of Disabled. In order
for the accounting process to run on your system, you must enable
accounting via the in control panel or via remote console. When
accounting is disabled any files containing data remain untouched.
However, empty files are removed to save disk space.
Allocating Disk Space
The Operator Control/Accounting/Disk Space option allocates disk
space for job accounting files. The range of values is 51200 (50 KB)
to 10240 (10 MB) with a default value of 01024 KB (1 MB).
4-30
QMS 4060 Print System Reference
Operator Control
Menu
The amount of space required for each job can vary between 200 and
250 bytes, so each 1 MB in the job accounting file will store information on 4,000 to 5,000 jobs.
If the selected value is greater than the current value, the file size is
increased to reserve the extra space. If the value is smaller than the
current file size, any empty job accounting files are moved. If only one
file is used and it is not empty, it cannot be shrunk.
Resetaccounting
The Resetaccounting option erases the Accounting files and recreates them using the current file size. If this operation is selected when
accounting is disabled, the files are removed but not recreated, thus
saving disk space. The range of values is Yes and No. The default
value is No.
This operation is also available as the resetaccount command for the
admin user at a remote console. See the Remote Console User’s Guide
documentation for more information on the resetaccount command.
When job files are more than 80% full but less than 100% full, the following message displays on the control panel and remote console:
xxxxxxxx FILE xxx% FULL
(xxx% is the percentage full, reported as 80%, 85%, 90%, or 95%.)
This is an appropriate time to copy these files to floppies or to transfer
them to your host computer using ftp if it is available to you. Then use
the option to reset the accounting files to empty after they are copied
to a floppy or to a host.
When the file is 100% full, the
xxx FILE IS FULL
message displays.
Printer Configuration
4-31
Operator Control
Menu
»
Note: When accounting is enabled and the Job Accounting files are
100% full, no further print jobs are accepted by the printer until
Resetaccounting is selected or until Accounting is disabled. If you
disable Accounting at this time, no job information is stored. You can
retrieve your accounting files while they are full and then do the
Resetaccounting operation. However, to avoid delaying jobs being
sent to the printer, it is advisable to perform the retrieve/reset
operations before the job accounting files fill up.
Segmenting the Accounting Job File
The Job File Segment menu allows you to decide whether accounting
information is stored in the printer in a single file or in multiple files.
Choices are Single and Multiple, with Multiple as the default. Although
it is convenient to store accounting data in a single file, the multiple
file option is useful if you must transfer your files to your host via
floppy disk.
If a single file is used, its size equals the Disk Space value described
earlier in this section. The file name will be ACC1.JOB.
If multiple files are selected, their combined size equals the File Size
value described earlier in this section. Each file will be 1 MB, except
the last file, which includes the remaining dedicated space. That is, if
you dedicate 10 MB to accounting and select multiple files, the printer
creates 10 files of 1 MB each. If you dedicate 5.5 MB to accounting,
the printer creates 5 files of 1 MB each and one of 500 KB. The Job
file names will be ACC1.JOB, ACC2.JOB, and so on.
Accounting Files
»
Note: You can also access these accounting files with the Windowsbased QMS Crown Printer Auditor (CPA) utility on the QMS Software
Utilities CD-ROM. Refer to the CPA on-line help for more information.
The following accounting files are stored in ASCII format on SYS, the
printer’s hard disk, in the SYS:/ADMIN directory:
n
Job Accounting File (ACCx.JOB)
This is the main accounting file. When each job completes, the
printer stores an entry for the job in this file. The job accounting
4-32
QMS 4060 Print System Reference
Operator Control
Menu
file may be a single file or multiple files, with x as the file number
when multiple files are used. Information in this file is kept intact
after the printer is turned off and back on again.
n
Paper Accounting File (ACC.PAP)
This file contains descriptions of the paper types supported on
the QMS 4060 Print System.
n
Status Accounting File (ACC.STA)
This file stores configuration information about accounting.
n
Dictionary File (ACC.DIC)
This file contains documentation about accounting and a description of the fields used in the other accounting files
▲ Caution: All the accounting files are stored in ASCII format to make it
simpler to use the information in different environments after it is
retrieved from the printer's hard disk.
Accounting File Format Description
Accounting files are recorded in ASCII format in a series of tagged
fields.
New fields can be added without losing backward compatibility,
because each field is tagged. A version field is included in the
ACC.STA file to identify the supported fields as the system evolves.
»
Note: Field 45 in the Job Accounting File example on page 4-35
illustrates that new fields can be added to the series but used where
logical, in this case between fields 6 and 7. Field 45, which provides
information about the interface used, was added in response to a
customer request.
Conventions
The following conventions are the same for job, paper, and status
files:
Printer Configuration
4-33
Operator Control
Menu
n
Tag Identifiers
These three-digit numbers are used to identify fields. The threedigit number is used instead of a name to minimize use of disk
space. The Dictionary file (ACC.DIC) provides the field names
associated with each tag identifier.
n
String Information
String information for record field values is stored inside braces
(for example, {this is a string}). This allows spaces within strings
and stores only the necessary characters of a string value. String
fields for which no value is specified are stored as {}, instead of
using blanks or the maximum field size.
n
New Records
New records are separated by a <CR> character to increase
readability.
n
Separators
A typical record in any of the accounting files is a sequence of
pairs of tag identifiers and field values separated by commas. The
tag identifier and field value are separated by a colon.
Example
The following is an example of the format of an accounting file record:
1:
3,
2:{this is a string},
<CR>
In this example, the record has fields identified by tags 1 and 2. Since
these values don't use 3 digits for the tag identifier, spaces are stored
instead, to provide consistency and simplicity while using only a small
amount of extra space. In this example, the value for the field tagged
1 is the integer 3 and the value for the field tagged 2 is a string. The
<CR> represents the carriage return character.
Accounting Files Description of Fields
This section includes examples of a job accounting file, a paper
accounting file, and a status accounting file. Each example is followed
4-34
QMS 4060 Print System Reference
Operator Control
Menu
by a chart explaining the various fields, using data from the example
to help clarify the fields.
Job Accounting File Record Example
This is a sample record extracted from an actual job accounting file:
0: 6, 1: 1, 2:{ 8h 5m52}, 3:{ 7/ 7/1998},
4:3, 5:{lsmith}, 6:{}, 45:{ IF 1 Ethernet},
7:{Microsoft Word - WW6083WO.DOC}, 8:{}, 9:
2794, 10: 15414, 11: 1, 12:
0, 13: 2, 14: 3,
15: 0, 16:0, 17: 1, 18: 0, 19: 1, 46:
0,
47:
0, 48:
0, 49:
5,<CR> 20:3,
21: 2
Job Accounting File Record Description
Field
ID
Description
Example
Explanation
0:
The Job ID field is the document’s
number. The number sequence
restarts whenever the printer is
turned off and on again.
0: 6
This is the sixth
job since the
printer was
restarted
1:
This field is the document’s
internally assigned priority.
1:1
Priority 1, the
highest, has
been assigned
to this job
2:
This field indicates the time a
document arrived in the printer by
hour, minute, and second.
2: {8h5m52}
Printer received
job at 8:05:52
3:
This field indicates the date a
document arrived in the printer.
3: { 7/ 7/1998}
Printer received
job on July 7,
1998
4:
4: 3
This field is the document’s
completion code:
0 User aborted document
1 Printer aborted document
2 Emulation aborted document
3 Successfully printed document
Printer Configuration
Job printed
successfully
4-35
Operator Control
Menu
4-36
Field
ID
Description
Example
Explanation
5:
The User Name field corresponds
to the %%For DOC.
5: {lsmith}
L Smith sent job
6:
The Host Name field corresponds
to the %%Host DOC.
6: {}
No host name
assigned
45:
The Connection field indicates the 45:IF 1
I/O port in which the job arrived.
Ethernet
This job arrived
via Ethernet
7:
The File Name field corresponds to 7: {Microsoft
the %%Title DOC.
Word WW6083WO.D
OC}
QMS DOC was
used to assign
the title
Microsoft Word WW6083WO.
DOC
8:
The Charge Number field
8: {}
corresponds to the %%Charge
Number DOC. This field identifies
the account.
No charge
number
assigned
9:
The Compile Time field is the
processor time in milliseconds
(1/1000 second) spent translating
the page description language.
Typically, it also includes minimal
other system activity.
Processor spent
2.794 seconds
compiling the
page
10
The Print Time field represents the 10: 15414
total elapsed time in milliseconds(1/
1000 second) used by the document
since its first page started printing
until its last page cleared the
printer.
Job took 15.414
seconds from
the start of the
first page to the
end of the last
page
11:
The Header Count field indicates
how many images comprise the
document header page(s) subjob.
An image equals one page face.
There is one
header page
12:
The Error Count field indicates how 12: 0
many images comprise the
document error page(s) subjob. An
image equals one page face.
9: 2794
11: 1
No error pages
QMS 4060 Print System Reference
Operator Control
Menu
Field
ID
Description
13:
The Body Count field represents
13: 2
the number of images in the actual
document, excluding multiple
copies. An image equals one page
face.
Two pages in
the document
14:
The Simplex Count field is number 14: 3
of the page faces printed, including
body and header pages and taking
into consideration multiple copies.
Three page
faces printed
15:
The Duplex Count field represents 15: 0
the sheet count of duplex pages
printed, taking into consideration
multiple copies.
No duplex
pages
16:
The Finishing Options field is a
number formed by adding the
codes for the different options:
0None
2Offset Stacking
16: 0
No finishing
options
17:
The Chunk Count field represents
the number of collated chunks for
this job. If the complete document
does not fit in memory, chunk
collation is activated. A value of 1
for this field indicates no partial
collation was necessary.
17: 1
Entire job
printing in one
collated unit
18:
The Jam field indicates how many 18: 0
times the printer jammed while
printing the document.
Printer Configuration
Example
Explanation
No jams during
this document
4-37
Operator Control
Menu
4-38
Field
ID
Description
Example
Explanation
19:
The Paper Types Count field
19: 1
indicates how many different types
of paper were used in the
document and represents the
number of separate index entries
that follow the main record for the
document in the Job Accounting
file. A <CR> follows this field before
the index entries.
46:
The Cyan Count field is always 0
on monochrome printers.
46:
0
There is no cyan
toner in the
printable area.
47:
The Magenta Count field is always 47:
0 on monochrome printers.
0
There is no
magenta toner
in the printable
area.
48:
The Yellow Count field is always 0
on monochrome printers.
48:
0
There is no
yellow toner in
the printable
area.
49:
The Black Count field indicates the 49:
amount of toner (in square
centimeters) used for the entire
print job.
5
There are 5
square
centimeters of
toner in the
entire print job.
20:
The Index Count field represents
20: 3
the number of sheets of paper of a
specific type used by the
document. The actual description
of the paper is in the Paper
Accounting file.
Job used three
sheets of paper
21:
The Index field represents the
21: 2
record number in the Paper
Accounting file that contains the
description for the preceding paper
count. A <CR> follows each
occurrence of this field.
A description of
the paper type is
in Paper
Accounting file
number 2
One type of
paper used in
this job
QMS 4060 Print System Reference
Operator Control
Menu
Paper Accounting File Record Example
The following example shows a Paper Accounting file:
22: 8268, 23: 11693, 24: 75, 25:{ white}, 26:{
plain}, 27:{
},
22: 8500, 23: 11000, 24: 75, 25:{ white}, 26:{
plain}, 27:{
},
22: 7165, 23: 10118, 24: 75, 25:{ white}, 26:{
plain}, 27:{
},
22: 14000, 23: 8500, 24: 75, 25:{ white}, 26:{
plain}, 27:{
},
22: 16535, 23: 11693, 24: 75, 25:{ white}, 26:{
plain}, 27:{
},
22: 14331, 23: 10118, 24: 75, 25:{ white}, 26:{
plain}, 27:{
},
22: 17000, 23: 11000, 24: 75, 25:{ white}, 26:{
plain}, 27:{
},
22: 7500, 23: 10500, 24: 75, 25:{ white}, 26:{
plain}, 27:{
},
22: 8268, 23: 5827, 24: 75, 25:{ white}, 26:{
plain}, 27:{
},
Paper Accounting File Record Description
The Paper Accounting file has one record for each of the nine possible paper sizes. Field 21 refers to a specific record in the Paper
Accounting file. In the example above, Field 21 indicates that the
paper is of the second type. Therefore, the second record from the
Printer Configuration
4-39
Operator Control
Menu
Paper Accounting file describes the paper used. The second record
tells you:
»
4-40
Field
ID
Description
Example
Explanation
22:
The Paper Width field contains the 22: 8500
paper width in mils (1/1000").
The paper is
8500 mils or
8.5" wide
23:
The Paper Height field contains the 23: 11000
paper height in mils (1/1000").
Paper is 11000
mils or 11” high
24:
The Paper Weight represents the 24: 75
weight per surface square units (g/
m2)
Paper weighs 75
g/m2
25:
The Color field indicates the color
of the paper.
25: white
Paper is white
26:
The Type field indicates additional
properties of the paper.
26: plain
Paper is plain
27:
The Label field represents a name 27: { }
for the paper type.
No paper type
name
Note: Fields 24, 25, 26, and 27 are designed primarily for future
enhancements to the accounting capabilities.
QMS 4060 Print System Reference
Operator Control
Menu
Status Accounting File Record Example
The following is an example of the Status Accounting file:
28: 1, 29: 9, 30: 1048576, 31: 1048576, 32: 74993,
33: 74993, 34: 1, 35: 1, 36: 309, 37:2, 38:1, 39:0,
40:0, 41:31, 42:23, 43:31, 44:31
Status Accounting File Record Description
Field
ID
Description
Example
Explanation
28:
The Version field indicates the
accounting file’s version number.
The initial version is 1.
28: 1
This is the first
version of the
file
29:
The Number of Paper Types field 29: 9
indicates how many records are in
the Paper Accounting file.
The paper
accounting file
has 9 records
30:
The Job Accounting File Size field 30: 1048576
indicates how many bytes are
dedicated to accounting files.
Maximum is 10 MB.
1048576 bytes,
or 1 MB, is
dedicated to
accounting
31:
The Last Job File Size field
31:
indicates the size of the last file. In 1048576
the multiple-file configuration, each
file is 1 MB except the last, which
holds any remaining space.
1048576 bytes,
or 1 MB, is in the
last file
32:
The Job File Usage field indicates
in bytes the total current use in all
the job files.
32: 74993
All accounting
files total 74993
bytes
33:
The Current Job File Usage field
indicates in bytes the current level
of use in the current Job
Accounting file.
33: 74993
The accounting
file which is
currently
receiving data
totals 74993
bytes
Printer Configuration
4-41
Operator Control
Menu
4-42
Field
ID
Description
Example
34:
The Maximum Number of Job Files 34: 1
field indicates the maximum
number of job files. For example,
even if your system is configured
for multiple files, if only 1 MB is
dedicated to accounting, the
maximum number of files is 1. If 5.5
MB is dedicated to accounting, the
maximum number of files is 6.
There can be
only 1 job
accounting file.
Although the
printer is
configured for
multiple files
(see field 37)
there is only one
because only 1
MB is dedicated
to accounting
35:
The Current Job File field indicates 35: 1
which file has been used most
recently. By comparing this with
Field 33, you can determine which
file is current and how much space
is left in it.
The most
recently used
file is File 1
36:
The Number of Jobs field indicates 36: 309
how many documents are
accounted for in the Job
Accounting file(s). A value of 0 can
mean that no jobs have been
printed or that accounting is
disabled.
Current Job
Accounting files
hold data on
309 jobs
37:
The Multifile field has a value of 1 if 37: 2
a single file is used and a value of 2
if multiple files are used to store job
information.
Job Accounting
is set for
multiple files
38:
The Enabled field indicates
whether accounting is currently
enabled or disabled.
1—Enabled
0—Disabled
Accounting is
currently
enabled
38: 1
Explanation
QMS 4060 Print System Reference
Operator Control
Menu
Field
ID
Description
Example
Explanation
39:
The Job File Full flag indicates
whether the Job Accounting file is
full.
1 File is full;
Resetaccounting should be
performed
0 Job accounting file is not full
39: 0
Accounting files
are not full
40:
The Paper Accounting File Full flag 40: 0
indicates whether the Paper
Accounting file is full.
1 File is full; Resetaccounting
should be performed
0Job accounting file is not full
The Paper
Accounting file
is not full
41:
The User field indicates the
maximum character length of the
User Name field in the Job
Accounting file. User names are
assigned with QMS DOC.
41: 31
The User name
can be up to 31
characters
42:
The Host field indicates the
maximum character length of the
Host Name field in the Job
Accounting file. Host names are
assigned with QMS DOC.
42: 23
The Host name
can be up to 23
characters
43:
The File field indicates the
maximum character length of the
File Name field in the Job
Accounting file. File names are
assigned with QMS DOC.
43: 31
The File Name
can be up to 31
characters
44:
The Charge field indicates the
maximum character length of the
Charge Number field in the Job
Accounting file. Charge numbers
are assigned with QMS DOC.
44: 31
The Charge field
can be up to 31
characters
Printer Configuration
4-43
Operator Control
Menu
Copy Accounting Files to Host
Accounting files should be transferred to your host computer periodically to keep the printer from being overloaded with data and to allow
you easy analysis of data.
Using the QMS Crown Printer Auditor (CPA) Utility
You can access the accounting files with the Windows-based QMS
Crown Printer Auditor (CPA) utility on the QMS Software Utilities CDROM. Refer to the CPA on-line help for more information.
Using the File Transfer Protocol (FTP)
»
Note: FTP works only when the printer is off line and the message
window displays IDLE. Use the ls command in the SYS:/admin
directory to see which accounting files you are going to retrieve. The
ls command is issued from a remote console. If multiple Job
Accounting files are used, each of the ACCx.JOB files should be
copied. (x is the number of each subsequent Job Accounting file.)
Use File Transfer Protocol (FTP) on the host, if a TCP/IP connection
is available to the printer, to copy the files from the printer’s hard disk
to the host as follows:
4-44
1
Type ftp printer-name (where printer-name is either the
IP address of the printer or its corresponding host name).
2
If your printer has a DECnet-TCP/IP interface, follow these
steps. Otherwise go to step 3.
a
When prompted for a user id, enter admin as the user name
and give the appropriate password, if required.
b
At the ftp> prompt, type bin↵ to use binary mode for the
download procedure.
QMS 4060 Print System Reference
Operator Control
Menu
c
Type
get SYS:/admin/acc1.job acc1.job↵
get SYS:/admin/acc.pap acc.pap↵
get SYS:/admin/acc.sta acc.sta↵
Note: If multiple Job Accounting files are used, each of the
ACCx.JOB files should be copied. (x is the number of each
subsequent Job Accounting file.)
»
d
3
Continue at step 4.
If your printer has a CrownNet interface, follow these steps:
a
When prompted for a user id, enter root as the user name
and give the default password (pass).
b
At the ftp> prompt, type bin↵ to use binary mode for the
download procedure.
c
Type
get SYS:/admin/acc1.job acc1.job↵
get SYS:/admin/acc.pap acc.pap↵
get SYS:/admin/acc.sta acc.sta↵
Note: If multiple Job Accounting files are used, each of the
ACCx.JOB files should be copied. (x is the number of each
subsequent Job Accounting file.)
»
4
Exit ftp.
Type quit↵
Processing Accounting Information on the Host
After the accounting files are stored on your host, you can create your
own filters (programs) based on your specific requirements using the
file and record descriptions shown earlier in this chapter.
Printer Configuration
4-45
Administration
Menu
Administration Menu
The Administration menu contains the following submenus:
Selection
See this section...
Communications
“Communications” on page 4-46
Emulations
“Emulations” on page 4-56
Special Pages
“Special Pages” on page 4-73
Startup Options
“Printer Start-Up Options” on page 4-77
Memory
“Memory” on page 4-79
Engine
“Engine” on page 4-86
Consumables
“Consumables” on page 4-92
Miscellaneous
“Resetting All Consumables Statistics Counters” on
page 4-98
Disk Operations
“Hard Disks” on page 4-102
Communications
This menu contains several options that allow you to configure the
printers communication parameters to match the host and application
parameters.
»
4-46
Note: This section contains information on the Timeouts, Parallel,
and Network2 menus. For information on printer-host communication
using the Ethernet interface or any options located under the
CrownNet submenu (Administration/Communications/Network2/
CrownNet), see chapter 2, “Printer Configuration,” of the QMS
CrownNet System Administrator’s Guide. For information on the
optional serial and LocalTalk interfaces, see the Options manual.
QMS 4060 Print System Reference
Communications
Setting Timeouts
The Timeouts options limit the amount of time the printer waits on
transmission from the host for various types of data.
Setting a PostScript Emulation Timeout
The PostScript emulation timeout is the maximum number of seconds
the PostScript emulation waits for incoming data.
Menu
Administration/Communications/Timeouts/PS Wait
Timeout
Choices
00000-99999
Default
00030 (30 sec.)
Notes
A value of 00000 is the same as infinity (no timeout).
The job is closed and the next job in the queue begins
if all of the following occur:
n No additional data is received during the
specified period of time.
n
The interface didn’t time out.
n
An EOD (end-of-document commands)
was not seen.
When a print job is sent from a Macintosh, the PS
Wait timeout is automatically changed to 00300 (5
min.).
Large print jobs, such as those generated by graphics
or computer-aided design applications, require
timeouts of 00300 (5 min.).
Printer Configuration
4-47
Communications
Setting an Emulation Timeout
The emulation timeout is the maximum number of seconds emulations other than PostScript (such as HP-GL, HP PCL5e, and Lineprinter) wait for incoming data.
Menu
Administration/Communications/Timeouts/Emul
Timeout
Choices
00000-99999
Default
00005 (5 sec.)
Notes
A value of 000 is the same as infinity (no timeout).
Setting a Print Job Timeout
The print job timeout is the maximum number of seconds the printer
processes a print job before it ends the job.
Menu
Administration/Communications/Timeouts/Job
Timeout
Choices
00000-99999
Default
00000 (infinity, no timeout)
Notes
A value of 000 is the same as infinity (no timeout).
Setting an ESP Timeout
The ESP timeout is the maximum number of seconds the printer waits
to match an emulation before printing the job in the default emulation.
4-48
Menu
Administration/Communications/Timeouts/ESP
Timeout
Choices
00000-99999
QMS 4060 Print System Reference
Communications
Default
00003 (3 sec.)
Notes
A value of 00000 is the same as infinity (no timeout).
Setting Parallel Interface Parameters
Use the Administration/Communications/Parallel menu to set the parallel interface values used for printer-host communications.
Mode
The parallel interface supports Centronics parallel communication as
well as IEEE 1284 bidirectional parallel communication.
Menu
Administration/Communications/Parallel/Mode
Choices
Interactive—Establish two-way communication
between the host and the printer.
Noninteractive—Establish one-way communication
from the host to the printer.
Disabled—Turn off parallel communication with the
host. The printer stops accepting print jobs over the
parallel interface.
Default
Noninteractive
Notes
The printer must be restarted for changes to the
menu to take effect. You can either let the printer
restart automatically after you save the change and
exit from the Configuration menu, or you can wait for
the change to take effect the next time you manually
turn on the printer. See chapter 5, “Additional
Technical Information,” for a discussion of the
different modes.
Printer Configuration
4-49
Communications
Emulation
Sets the parallel interface emulation.
Menu
Administration/Communications/Parallel/Emulation
Choices
ESP, Hexdump, PostScript, PCL5e, HPGL,
Lineprinter
» Note: Other optional emulations, such as
LN03+, QUIC, TIFF, CALS, CCITT, and CGM,
also appear, if installed.
Default
ESP
Minimum Number of Kilobytes for Spooling
Sets the minimum number of kilobytes of system memory allocated to
the parallel interface.
Menu
Administration/Communications/Parallel/Min K Spool
Choices
00000-99999
Default
00015
Notes
This value must be less than K Mem For Spool in the
administration/memory submenu.
A 00000 value does not turn off the spooling buffer for
the parallel interface. If the value is set to 00000, the
printer calculates the Min K Spool automatically at
initialization.
The printer must be restarted for changes to the Min
K Spool menu to take effect. You can either let the
printer restart automatically after you save the change
and exit the configuration menu, or you can wait for
the change to take effect the next time you manually
turn on the printer.
4-50
QMS 4060 Print System Reference
Communications
Spooling Timeout
Sets the number of seconds the interface waits for data from the host
before terminating a spooled print job.
Menu
Administration/Communications/Parallel/Spool
Timeout
Choices
00000-99999
Default
00030
Data Bits
Sets the number of data bits transmitted per character.
Menu
Administration/Communications/Parallel/Data Bits
Choices
7, 8
Default
8
End Job Mode
Enables (and identifies an end-of-job sequence) or disables data
stream sensing for the end-of-document (EOD) command.
Menu
Administration/Communications/Parallel/End Job
Mode
Choices
None—The printer recognizes only the PostScript ^D
command.
QMS EOD—The printer recognizes only the QMS
%%EndOfDocument command.
HP EOD—The printer recognizes only the HP
<ESC>%12345X command.
Printer Configuration
4-51
Communications
Default
None
Notes
See chapter 5, “Additional Technical Information,” for
details on how to implement this feature on your QMS
4060 Print System.
Default Job Priority
Allows you to specify which jobs are printed first, according to the
interface through which they are received, when jobs are received
simultaneously.
Menu
4-52
Administration/Communications/Parallel/Def Job Prio
Choices
001-100 (highest-lowest priority)
Default
001 (highest priority)
Notes
For example, you can give jobs received via the
parallel interface priority over jobs received via the
Ethernet interface.
QMS 4060 Print System Reference
Communications
PS Protocol
Sets the binary communications protocol (BCP) for communicating
over a parallel interface to a PostScript printer.
Menu
Administration/Communications/Parallel/PS Protocol
Choices
Normal—Enables standard, ASCII (7-bit) hex
protocol. Data is sent and received in ASCII format.
This mode is recommended if you do not print binary
data. It was designed for data in the printable ASCII
range. Print jobs can change this setting through
PostScript operators.
Normal Fixed—Enables standard, ASCII (7-bit) hex
protocol. Print jobs cannot change this setting
through PostScript operators.
Binary—Enables binary communications protocol
(BCP). Print jobs can change this setting through
PostScript operators. Data in the printable ASCII
range also prints.
Binary Fixed—Enables binary communications
protocol (BCP). Print jobs cannot alter change this
setting through PostScript operators. Data in the
printable ASCII range also prints.
Default
Normal
Notes
See chapter 5, “Additional Technical Information,” for
a full discussion of PS Protocol.
Printer Configuration
4-53
Communications
Setting Network 2 Options
CrownNet
For information on options and defaults found in this menu, see chapter 2, “Printer Configuration,” in the QMS CrownNet System Administrator’s Guide.
PS Protocol
Sets the binary communications protocol (BCP) for communicating
over a CrownNet interface to a PostScript printer.
Menu
Administration/Communications/Network 2/PS
Protocol
Choices
Normal—Enables standard, ASCII (7-bit) hex protocol.
Data is sent and received in ASCII format. This mode
is recommended if you do not print binary data. It was
designed for data in the printable ASCII range. Print
jobs can change this setting through PostScript
operators.
Normal Fixed—Enables standard, ASCII (7-bit) hex
protocol. Print jobs cannot change this setting through
PostScript operators.
Binary—Enables quoted binary communications
protocol (BCP). Print jobs can change this setting
through PostScript operators. Data in the printable
ASCII range also prints.
4-54
QMS 4060 Print System Reference
Communications
Binary Fixed—Enables binary communications
protocol (BCP). Print jobs cannot change this setting
through PostScript operators. Data in the printable
ASCII range also prints.
QBinary (Quoted Binary)—Enables quoted binary
communications protocol. Print jobs can change this
setting through PostScript operators. Data in the
printable ASCII range also prints. Use the special
quoting mechanism (see the following section) for the
special characters and ^D (EOF).
QBinary (Quoted Binary) Fixed—Enables binary
communications protocol (BCP). Print jobs cannot
alter change this setting through PostScript operators.
Data in the printable ASCII range also prints. Use the
special quoting mechanism (see the following section)
for the special characters and ^D (EOF).
Default
Normal
Notes
See chapter 5, “Additional Technical Information,” for a
full discussion of PS Protocol.
Default Job Priority
Allows you to specify which jobs are printed first, according to the
interface through which they are received, when jobs are received
simultaneously.
Menu
Choices
Administration/Communications/Network 2/Def Job
Prio
001-100 (highest-lowest priority)
Printer Configuration
4-55
Emulations
Default
001 (highest priority)
Notes
For example, you can give jobs received via the
Ethernet interface priority over jobs received via the
parallel and serial interfaces.
Emulations
Use the Administration/Emulations menu to set the parameters for the
available printer emulations. Optional printing emulations appear only
if installed.
»
Note: To choose an emulation or ESP for a particular interface, use
the appropriate interface menu in the Administration/Communications
menu.
Setting ESP Default Parameters
The ESP Default Emul sets the ESP default emulation used when
ESP is unable to identify the language of a print job. This allows the
system administrator to select alternate default emulations.
4-56
Menu
Administration/Emulations/ESP Default
Choices
HPGL, Lineprinter, PCL5e, PostScript
» Note: Other optional emulations; such as
LN03+, QUIC, TIFF, CALS, CCITT, and CGM,
also appear, if installed.
Default
PCL5e
QMS 4060 Print System Reference
Emulations
Setting PostScript Parameters
The PostScript menu allows you to select halftone type and intensity.
Halftone Type
Sets the halftone type.
Menu
Administration/Emulations/PostScript/Halftone Type
Choices
Basic
Standard
Advanced
Default
Standard
These options allow you to customize the smoothness of the printed
image according to the number of grayscales it uses. The number of
gray levels increases by increasing the halftone type and the printer
resolution.
See the "Halftones," section in chapter 5, “Additional Technical Information,” for more detailed information on halftones and how to
change their characteristics via the printer configuration menu.
Intensity
Sets the intensity for PostScript printing.
Menu
Administration/Emulations/PostScript/Intensity
Choices
Darkest, Darker, Nominal, Lighter, Lightest
Default
Nominal
Notes
Intensity uses the PostScript settransfer operator’s
functionality to make the print lighter or darker while
maintaining the linearity of the grayscale.
Printer Configuration
4-57
Emulations
Setting PCL 5e Parameters
The PCL 5e menu maintains PCL 5e emulation attributes such as
default font, symbol set, and point size. There are ten configuration
settings.
Default Font
Sets the printer’s default font.
Menu
Administration/Emulations/PCL 5E/Default Font
Choices
Courier12*, Courier12bold*, Courier12italic*,
Courier10*, Courier10bold*, Courier10italic*,
Lineprinter, Times*, Times*Italic, Times*Bold,
Times*BldItalic, Univ*, Univ*Italic, Univ*Bold,
Univ*BldItalic, Univcond*, Univcond*Italic,
Univcond*Bold, Univcond*BldItlc, Select By Index
Default
Courier12*
Notes
Fonts with an asterisk “*” in their names are scalable.
Their default point size is set by the Point Size x100
option. Choosing Select By Index as the default font
selects the font by the index number printed on the
advanced status page and is set through the Default
Font Index option.
» Note: You must use the Select By Index value
to select an Intellifont.
All lineprinter fonts are bitmap fonts, so they have a
fixed point size. Selecting a bound, bitmap font
overrides the default settings for symbol set and point
size. An unbound font uses the specified default
symbol set if possible, and a scalable font uses the
default font size.
Symbol Set
Selects the default symbol set for the emulation. Not all symbol sets
are available with certain resident fonts. In particular, the Desktop, PS
4-58
QMS 4060 Print System Reference
Emulations
Math, Math 8, Microsoft Pub, Pi Font, PS Text, Ventura Intl, Ventura
Math, Ventura US, and Windows symbol sets cannot be used with the
resident lineprinter bitmap fonts.
Menu
Administration/Emulations/PCL 5E/Symbol Set
Choices
Roman-8, PC-850, PC8-US, PC8-DN, Legal, ISO-4,
ISO-6, ISO-11, ISO-15, ISO-17, ISO-21, ISO-60,
ISO-69, Desktop, PS Math, Math 8, Microsoft-Pub, Pifont, PS-Text, Ventura-Intl, Ventura-Math, Ventura-US,
Windows, ISO-Latin-1, ISO-Latin-2, ISO-Latin-5, PC852, PC-8tk, Windows 3.1-1, Windows 3.1-2,
Windows 3.1-3, MC-Text
Default
Roman-8
Notes
If a mismatch between symbol set and fonts occurs,
the standard PCL font selection mechanism is used to
locate a font that matches the selected symbol set.
With the standard set of fonts distributed for your
printer, this matches the Times* font, but other userinstalled fonts could change this result.
Lines Per Inch
Sets the default lines printed per inch in PCL jobs, regardless of page
size.
Menu
Administration/Emulations/PCL 5E/Lines/Inch x100
Choices
100 to 4800
Default
0600
Notes
You must enter the number of lines per inch times
100. For example, 6 lines per inch is entered as 0600;
6.6 lines per inch is entered as 0660.
Printer Configuration
4-59
Emulations
Line Termination
Indicates the default line termination mode. This setting specifies the
treatment of line feeds and carriage returns. (See Appendix C, “Document Option Commands,” for more information on line termination).
Menu
Administration/Emulations/PCL 5E/Line Termination
Choices
CR=CR LF=LF
CR=CR+LF LF=LF
CR=CR LF=CR+LF
CR or LF=CR+LF
Default
CR=CR LF=LF
Point Size x100
Sets the point size for scalable default fonts in units of hundreths of a
point. For example, a 24 point default point size is selected by entering 2400. The smallest increment allowed in point size is .25 point (for
example, 8.5 point and 8.75 point fonts are allowed, but 8.6 point is
not).
4-60
Menu
Administration/Emulations/PCL 5E/Point Size x100
Choices
00025-99975 (0.25-999.75 points)
Default
01200 (12 points)
Notes
If a nonscalable bitmap font is specified, the setting is
ignored.
QMS 4060 Print System Reference
Emulations
Retain Temporary
Allows you to control the PCL 5e print environment across print jobs.
Menu
Administration/Emulations/PCL 5E/Retain Temporary
Choices
Off, On, On Compatibility
Off—Resets PCL to its default state at the end of
each PCL print job, executes an implicit <ESC>E
at the start and end of the job, and deletes any
temporary fonts, macros, and patterns.
On—Resets PCL to its default state at the end of
each PCL print job. Temporary fonts, macros, and
patterns from previous PCL jobs are retained in
memory after the print job has completed. You can
recall these downloaded fonts, macros, or patterns
from within your PCL file without having to
download them again.
On Compatibility—Retains the entire state of PCL as
well as the temporary macros, fonts, and patterns
from previous PCL jobs.
Printer Configuration
4-61
Emulations
Default
Off
Notes
A retained state is cleared if you do any of the
following:
n Explicitly clear the PCL state by sending an
<ESC>E or Printer Job Language.
n Turn off the printer. (Note that if Retain Temporary is set to On or On Compatibility and power
is turned off and back on again, all temporary
objects on the disk’s standard resource will
become permanent. RAM-based temporary
objects are lost).
n Change any PCL front panel option.
n Send any PCL-specific DOC commands (except
the DOC emulation command).
n Send a PCL job from a different communications
port. For example, the state set up by a PCL job
using the parallel port is cleared if a subsequent
PCL job arrives at the serial port).
Default Font Index
Sets the Default Font Index when the Default Font is set to
selectbyindex.
4-62
Menu
Administration/Emulations/PCL E/Default Font Idx
Choices
0 to 32767
Default
00000
Note
The index number can be obtained by the listing
printed on the advanced status page. See “Printing a
Status Page” on page 4-74, for status page details.
QMS 4060 Print System Reference
Emulations
Monochrome GL/2
Allows your printer to emulate a monochrome or color plotter.
Menu
Administration/Emulations/PCL 5E/
Monochrome GL 2
Choices
On, Off
On—Sets the printer to monochrome (2 pen).
Off—Sets the printer to color (8 pen). Since a
monochrome print system has two pen colors only
(black and white), grayscale patterns are substituted
for other colors.
The printer maps each pen to its assigned color, then
converts the color to a grayscale using the National
Television System Committee (NTSC) color standard
for luminosity coefficients (Additive System):
Y = .3R + .59G + .11B
Examples on How to Use the Color Standard Formula
White Y = [(1*0.3) + (1*0.59) + (1*0.11)]—100% gray
Black
Y = [(0*0.3) + (0*0.59) + (0*0.11)]—0% gray
Red
Y = [(1*0.3) + (0*0.59) + (0*0.11)]—30% gray
Green Y = [(0*0.3) + (1*0.59) + (0*0.11)]—59% gray
Yellow Y = [(1*0.3) + (1*0.59) + (0*0.11)]—89% gray
Blue
Y = [(0*0.3) + (0*0.59) + (1*0.11)]—11% gray
Magenta Y = [(1*0.3) + (0*0.59) + (1*0.11)]—41% gray
Cyan
Y = [(0*0.3) + (1*0.59) + (1*0.11)]—70% gray
Default
On
Pen Color Defaults:
Pen 0 = White
Pen 1 = Black
Pen 2 = Red
Pen 3 = Green
Pen 4 = Yellow
Pen 5 = Blue
Pen 6 = Magenta
Pen 7 = Cyan
Printer Configuration
4-63
Emulations
Download Location
Controls the default storage location of PCL objects (fonts, macros,
and patterns) when it is not otherwise specified through DOC commands.
Menu
Administration/Emulations/PCL 5E/Downld Location
Choices
Disk—All downloaded PCL objects are stored in the
default disk resource, if present.
Memory—All downloaded PCL objects are stored in
temporary storage in RAM.
Default
Memory
Notes
If this is set to memory, before downloading any fonts,
macros, or patterns, ensure that the printer has
enough memory to do the download. See chapter 2,
the “Downloading Disk Fonts” section, for information
on increasing printer memory when downloading
fonts.
DOC commands specifying resources override this
option on a per-job basis.
If the printer has a large amount of memory, setting
this option to Memory enhances printer performance.
Setting HP-GL Parameters
This section contains the configuration choices available under Emulations/HP-GL.
4-64
QMS 4060 Print System Reference
Emulations
Plotter
Identifies the HP-GL plotter type.
Menu
Administration/Emulations/HPGL/Plotter
Choices
7475A—
7470A—
Colorpro—
7550A—
DraftMaster—Supports architectural and engineering
paper sizes (for example, A to E and Arch A to Arch
E). These paper sizes describe a mapping to the
physical paper. This mapping is a scaling factor (or a
size ratio) between the chosen paper size and the
physical paper size in the default inputbin. For
example if A3 is selected (size 11.69'' x 16.54'') for
paper size and the physical paper size in the default
inputbin is A4 (8.27'' x 11.69''), then the plot is scaled
by a factor of 2.
Default
7550A
Scaling Percent
Identifies the percentage to reduce or enlarge an image.
»
Menu
Administration/Emulations/HPGL/Scaling Percent
Choices
001-150 (1-150%)
Default
100 (100%)
Note: To scale plots, select the paper size originally used for the plot
in the Paper Type menu and then enter the reduction or enlargement
needed to fit the plot on the new page in the Scaling Percent menu.
Printer Configuration
4-65
Emulations
Enhanced Mode
Increases the resolution of the grid for downloaded characters. The
HP-GL UC (User-defined Character) command allows you to download and draw characters using an encoding scheme consisting of
sequences of pen control movements and coordinate sequences.
The characters are drawn on a grid that is superimposed on the character plot cell.
Menu
Administration/Emulations/HPGL/Enhanced Mode
Choices
On—Standard resolution for fixed- and variablespaced fonts (4x8 grid).
Off—Enhanced resolution for variable-spaced fonts
(26x36 grid).
Default
Off
Expand Mode
Defines a larger imageable area which affects the default placement
of the scaling points P1 and P2.
4-66
Menu
Administration/Emulations/HPGL/Expand Mode
Choices
On—Turn on expand mode
Off—Use default scaling points, plotting range, and
plotting area.
QMS 4060 Print System Reference
Emulations
Default
Off
Notes
The available range of plotter units for a particular
paper size is only partially determined by setting the
Expand Mode to On. When the printer/plotter senses
the paper size it automatically sets the hard clip limit
to 15mm on three sides and 39 mm on the fourth. If
Expand Mode is On, then the hard clip limits are set
to 5mm on three sides and 29 mm on the fourth side.
This is what allows you to define a larger imageable
area.
The HP-GL emulation senses the paper type if the
paper type is set to Scale to Paper. It is also possible
to have the HP-GL emulation use a particular paper
size by setting Original Paper Type through the
control panel or by using a Document Option
Command.
Paper Type
Identifies the original image’s paper size.
Menu
Administration/Emulations/HPGL/Paper Type
Printer Configuration
4-67
Emulations
Choices
A—(8.5''x 11''—216 x 279 mm),
A0—(33.11'' x 46.81''—841 x 1189 mm)
A1—(23.39'' x 3.11''—594 x 1189 mm)
A2—(16.54'' x 23.29''—420 x 594 mm)
A3—(11.69'' x 16.54''—297 x 420 mm)
A4—(8.27'' x 11.69''—210 x 297 mm)
B—(11'' x 17''—279 x 432 mm)
C—(17'' x 22"—431.80 x 558.80 mm)
D—(22'' x 34''—558.80 x 863.60 mm)
E—(34'' x 44''—863.60 x 1117.60 mm)
C ARCH
D ARCH
E ARCH
Scale to Paper
Default
Scale to Paper
Pen 1 - Pen 8
Sets the width and color for the eight plotter pens. Each pen has a
width and a color option available.
»
4-68
Note: See chapter 5, “Additional Technical Information,” for more
information on the HP-GL emulation color encoding equation.
Menu
Administration/Emulations/HPGL/Pen x/Width
Choices
0-60 (0.0-6.0 mm)
Default
Pen 1—7 (0.7 mm)
Pen 2—3 (0.3 mm)
Pen 3—3 (0.3 mm)
Pen 4—3 (0.3 mm)
Pen 5—3 (0.3 mm)
Pen 6—3 (0.3 mm)
Pen 7—3 (0.3 mm)
Pen 8—3 (0.3 mm)
Note
A choice of 0 defaults to one pixel width.
QMS 4060 Print System Reference
Emulations
Menu
Administration/Emulations/HPGL/Pen x/Color
Choices
Black, Blue, Brown, Cyan, Gray-25%, Gray-50%,
Gray-75%, Green, Magenta, Orange, Red, Violet,
Yellow
Default
Pen 1—Black (100% black)
Pen 2—Black (100% black)
Pen 3—Red (70% black)
Pen 4—Green (41% black)
Pen 5—Blue (89% black)
Pen 6—Violet (59% black)
Pen 7—Orange (25.8% black)
Pen 8—Brown (50% black)
Setting Line Printer Parameters
The following twelve configuration options are available.
Font
Sets the printer fonts for the current print job. Any PostScript fonts
available on the printer can be used. To see a list of available PostScript fonts, print an advanced status page through the printer configuration menu.
Menu
Administration/Emulations/Line Printer/Font
Choices
All printer-resident PostScript fonts.
Default
Courier
Printer Configuration
4-69
Emulations
Autowrap
Indicates whether long lines are to be wrapped to the next line instead
of being truncated.
Menu
Administration/Emulations/Line Printer/Autowrap
Choices
On—Wrap long lines.
Off—Truncate long lines.
Default
On
Character Map
Specifies the type of character map to be used.
Menu
Administration/Emulations/Line Printer/Character
Map
Choices
ASCII, EBCDIC
Default
ASCII
CR IS CRLF
Specifies whether each carriage return (CR) in the print job is translated to a carriage return/line feed (CRLF) combination.
4-70
Menu
Administration/Emulations/Line Printer/CR IS CRLF
Choices
On—Translate all carriage returns to line feeds.
Off—Use carriage returns only as carriage returns.
Default
Off
QMS 4060 Print System Reference
Emulations
FF is CRFF
Specifies whether each form feed (FF) in the print job is translated to
a carriage return/form feed (CRFF) combination.
Menu
Administration/Emulations/Line Printer/FF IS CRLF
Choices
On—Translate all form feeds to carriage return/form
feed combinations.
Off—Use form feeds only as form feeds.
Default
On
LF is CRLF
Specifies whether each line feed (LF) in the print job is translated to a
carriage return/line feed (CRLF) combination.
Menu
Administration/Emulations/Line Printer/LF IS CRLF
Choices
On—Translate all line feeds to carriage return/line
feed combinations.
Off—Use line feeds only as line feeds.
Default
On
Line Numbering
Specifies that a five-digit number is to be prefixed to each line.
Menu
Administration/Emulations/Line Printer/Line
Numbering
Choices
On—Number all lines.
Off—Don’t number lines.
Default
Off
Printer Configuration
4-71
Emulations
Lines Per Page
Specifies the number of lines printed on a page before an automatic
page eject. Interline spacing is set to the selected point size. Logical
pages consisting of more lines than specified are split into multiple
pages.
Menu
Administration/Emulations/Line Printer/Lines per
Page
Choices
001-128
Default
87
Margins
Defines the left, right, top, and bottom margins in 1/7200" increments.
4-72
Menu
Administration/Emulations/Line Printer/Margins
Choices
Bottom
Left
Right
Top
0-79200 (0"-11.00")
0-79200 (0"-11.00")
0-79200 (0"-11.00")
0-79200 (0"-11.00")
Default
Bottom
Left
Right
Top
0
0
0
0
Note
The margins are in 1/7200" increments (79200 is
11.00'' at 7200 increments).
QMS 4060 Print System Reference
Special Pages
Orientation
Specifies whether text and graphics are placed on the page in a portrait or landscape orientation.
Menu
Administration/Emulations/Line Printer/Orientation
Choices
Landscape, Portrait
Default
Portrait
Point Sz 100ths
Sets the five-digit value used to specify the point size of the font for
the current print job.
Menu
Administration/Emulations/Line Printer/Point Sz
100ths
Choices
00000-99999
Default
00880 (8.8 points)
Tab Stops
Specifies the number of spaces between tab stops.
Menu
Administration/Emulations/Lineprinter/Tab Stops
Choices
000-256
Default
8
Special Pages
Use the Administration/Special Pages menu to print special pages,
such as status pages, calibration page, header pages, and trailer
pages.
Printer Configuration
4-73
Special Pages
Working with Status Pages
Printing a status page is a two-step procedure: Identify the type of
status page you want to print, and then print it.
Identifying a Status Page Type
Two types of status pages are available.
Menu
Administration/Special Pages/Status Page Type
Choices
Standard—Lists printer identification information,
current memory configuration, timeouts,
communication settings, input buffer sizes, and
available fonts.
Advanced—Contains the same information as the
standard status page as well as configuration menu
settings, fonts, and downloaded emulations.
Default
Standard
Printing a Status Page
After you have identified the type of status page to print, use the Status Page button on the printer control panel to print it.
»
Note: If you choose an advanced status page but only a standard
status page prints, the printer has run out of RAM. Either reallocate
memory among the memory clients (see chapter 5, “Additional
Technical Information,” ) or consider adding more memory to the
printer.
Printing a Calibration Page
Prints a calibration page.
4-74
Menu
Administration/Special Pages/Calibration Page
Choices
Yes—Prints calibration page.
No—Calibration page will not be printed.
QMS 4060 Print System Reference
Special Pages
Default
Yes
Notes
See the Administration/Engine/Image Alignment menu
for calibration instructions.
Working with Header Pages
A header page is a separator page that prints before a print job to
help users sort their jobs. The information on the header page can be
customized. See the QMS Crown Document Option Commands manual on the QMS Software Utilities CD-ROM for more information.
Enabling/Disabling Header Pages
Menu
Administration/Special Pages/Header Page
Choices
On—Print a header page before each job.
Off—Don’t print a header page before each job.
Default
Off
Identifying a Header Page Input Source
You can select the input bin (tray) from which the printer pulls paper
when printing the header page.
Menu
Administration/Special Pages/Header Inputbin
Choices
Upper—Pull header page paper from the upper input
bin.
Middle—Pull header page paper from the middle
input bin.
Lower—Pull header page paper from the lower bin.
Printer Configuration
4-75
Special Pages
Default
Upper
Notes
If you used the Administration/Engine/Inputbin x
Name options to change the names of the input bins,
these names replace Upper, Middle, and Lower in the
message window.
Working with Trailer Pages
A trailer page is a separator page that prints after a print job to help
users sort out their jobs and, if requested, identify print job errors.
Enabling/Disabling Trailer Pages
4-76
Menu
Administration/Special Pages/Trailer Page
Choices
Off—Don’t print a trailer/error page for each print job.
On—Print a trailer/error page for each print job.
On Error—If any print job errors exist, print a trailer
page that lists the errors as well as other trailer page
information.
Errors Only—If any print job errors exist, print a trailer
page that lists the errors but omits other trailer page
information.
Default
Off
Notes
See the QMS Crown Document Option Commands
manual for more information.
QMS 4060 Print System Reference
Printer Start-Up
Options
Identifying a Trailer Page Input Source
You can select the input bin (tray) from which the printer pulls paper
when printing the trailer page.
Menu
Administration/Special Pages/Trailer Inputbin
Choices
Upper—Pull trailer page from the upper input bin.
Middle—Pull trailer page from the middle input bin.
Lower—Pull header page from the lower bin.
Default
Upper
Notes
If you used the Administration/Engine/Inputbin x
Name options to change the names of the inputbins,
these names replace Upper, Middle, and Lower in the
message window.
Printer Start-Up Options
The Administration/Startup Options menu allows you to configure
your printer to run certain options automatically when you turn it on.
Enabling/Disabling the Start-Up Page
By default, the printer prints a start-up page when you turn it on. The
start-up page lists basic information about the printer, such as its
Printer Configuration
4-77
Printer Start-Up
Options
name, the PostScript version, and various printer settings. However,
you can turn the start-up page off to conserve paper and toner.
Menu
Administration/Startup Options/Do Start Page
Choices
Yes—Print a start-up page each time the printer is
turned on.
No—Don’t print a start-up page each time the printer
is turned on.
Default
Yes
Notes
If you used the Administration/Engine/Inputbin x
Name options to change the names of the input bins,
these names replace Upper, Middle, Lower, and
Optional in the message window.
Enabling/Disabling the SYS\START File
If you have a hard disk and Do Sys Start is enabled, when the printer
is turned on, the controller checks the hard disk for a PostScript file
named SYS\START and executes this file.
4-78
Menu
Administration/Startup Options/Do Sys Start
Choices
Yes—Check the hard disk for and execute the
SYS\START file when the printer is turned on.
No—Don’t check the hard disk for a SYS\START file.
Default
Yes
Notes
This file does not print. Information on creating a
SYS\START file is available via Q-FAX (see appendix
A, “QMS Customer Support,” for information on using
Q-FAX).
QMS 4060 Print System Reference
Memory
Loading the PostScript Error Handler
Error Handler is a diagnostic tool that identifies PostScript errors
encountered during a print job.
Menu
Administration/Startup Options/Do Error Handler
Choices
Yes—Load the Error Handler at power on.
No—Don’t load the Error Handler.
Default
No
Notes
You must restart the printer before this change will
take effect.
Refer to the PostScript Language Reference Manual
(Adobe Systems Incorporated, Reading, PA:
Addison-Wesley, 1990, ISBN 0-201-18127-4) for
more information on PostScript errors.
Memory
This submenu allows you to allocate the printer’s memory (RAM)
among the various memory clients. The flexibility of defining memory
available to clients allows experienced users to optimize the printer's
performance according to a given set of conditions.
This section briefly describes each of the memory submenus and the
memory clients. See chapter 5, “Additional Technical Information,” for
more detailed information on the printer’s memory and what benefits,
if any, may result from adding memory to each client.
To find out how memory is currently allocated, print a status page
using the Print Status button on the control panel or check each client
individually in the configuration menu.
Printer Configuration
4-79
Memory
Manual Configuration Menu
The manual configuration menu allows you to finely adjust memory
clients to your particular printing needs.
Configuring Spooling
The K Mem for Spool, listed on the status page as Host Input, is the
total number of kilobytes of RAM allocated to all spooling buffers. This
memory client stores incoming data from the various interfaces until it
is processed and printed.
Menu
Administration/Memory/Manual Config/K Mem for
Spool
Choices
00128-30720
Notes
This value must be greater than the sum of the Min K
Spool for all installed and enabled interfaces.The
maximum value listed depends on the amount of
memory installed.
If you change the K Mem for Spool value, the printer
automatically restarts after you save your changes
and exit from the configuration menu.
When the sum of the Min K Spool for all interfaces is less than K Mem
for Spool, memory is allocated as follows:
4-80
1
Interfaces with Min K Spool (in the Administration/Communications menu) value greater than zero receive their specified allocation.
2
The remaining memory in K Mem for Spool is allocated to Shared
Spooling Space. This can be seen in the Communications Settings & Input Buffer Sizes area of the status page.
3
The Shared Spooling Space can be allocated to any of the communication interfaces if the input jobs require more spooling
space. The limit to this is the amount of Host Input (K Mem for
Spool) shown on the status page.
QMS 4060 Print System Reference
Memory
»
Note: If you add the Input Buffer Sizes allocated to each interface and
the Shared Spooling Space, the result should equal Host Input.
PostScript Heap
The K Mem for PSHeap, listed on the status page as Heap, is the
number of kilobytes of RAM dedicated to the PostScript emulation
interpreter. This memory client holds downloaded PostScript emulation fonts, operators, and forms.
Menu
Administration/Memory/Manual Config/K Mem for
PSHeap
Choices
01280-no maximum
Notes
If you change the K Mem for PSHeap value, the
printer automatically restarts after you save your
changes and exit from the configuration menu. The
maximum value listed depends on the amount of
memory installed.
PostScript Fonts
The K Mem for PS Fonts, listed on the status page as Font Cache, is
the number of kilobytes of RAM dedicated to caching previously
scaled bitmap representations of fonts for the PostScript emulation
interpreter.
Menu
Administration/Memory/Manual Config/K Mem for PS
Fonts
Printer Configuration
4-81
Memory
Choices
00088-05120
Notes
This memory setting can reduce the number of times
a PostScript font must be converted from outline form
to bitmap form, thus reducing processing time. The
maximum value listed depends on the amount of
memory installed.
If you change the K Mem for PS Fonts value, the
printer automatically restarts after you save your
changes and exit from the Configuration menu.
Emulation
The K Mem Emulation, listed on the status page as Emulation, is the
number of kilobytes of RAM to be used by non-PostScript emulations
for temporary storage and for loading optional emulations.
Menu
Administration/Memory/Manual Config/K Mem
Emulation
Choices
01024-no maximum
Notes
If you receive an emulation error, you may need to
increase the amount of memory for this client.The
maximum value listed depends on the amount of
memory installed.
If you change the K Mem Emulation value, the printer
automatically restarts after you save your changes
and exit from the configuration menu.
Emulation (Temporary)
The K Mem Emul Temp, listed on the status page as Emulation Temporary, is the number of kilobytes of RAM to be used by non-Post-
4-82
QMS 4060 Print System Reference
Memory
Script emulations for storing downloaded (soft) fonts, forms, or
macros.
Menu
Administration/Memory/Manual Config/K Mem Emul
Temp
Choices
00256-30720
Notes
This value must be greater than the sum of the Min K
Spool for all installed and enabled interfaces. Data in
this client disappears when the printer is turned off.
Increasing this client’s size increases the number of
PCL downloaded fonts which can be accepted.The
maximum value listed depends on the amount of
memory installed.
If you change the K Mem Emul Tmp value, the printer
automatically restarts after you save your changes
and exit from the Configuration menu.
Display List
The K Mem Display is the number of kilobytes of RAM dedicated to
the display lists. The display list holds the intermediate representation
of pages to be printed. Increasing the size of the Display List
increases the number of pages that can be collated. The maximum
number of pages that can be collated is 100 pages.
Menu
Administration/Memory/Manual Config/K Mem
Display
Choices
00384-no maximum
Notes
The maximum value listed depends on the amount of
memory installed. If you change the K Mem Display
value, the printer automatically restarts after you save
your changes and exit from the configuration menu.
Printer Configuration
4-83
Memory
Disk Cache
The K Mem Disk Cache is the number of kilobytes of RAM dedicated
to the disk cache. This memory client speeds file system throughput
on any installed hard disks by storing frequently used data in system
memory instead of continually storing it to and retrieving it from a hard
disk.
Menu
Administration/Memory/Manual Config/K Mem Disk
Cache
Choices
00000-30720
Default
00256
Notes
If you change the K Mem Disk Cache value, the
printer automatically restarts after you save your
changes and exit from the configuration menu.
The amount of memory needed for this memory client depends on
the size and number of hard disks, the number of subdirectories on
each disk, and the amount of memory dedicated to caching.
»
Note: If sufficient memory is available to the disk cache, all disks are
accessible. If insufficient memory is available to the disk cache, some
disks may be accessible while others may not be.
The recommended amount of memory for the disk cache client is
n
120 KB minimum
n
0.5 KB per MB of disk storage total for all disks
For example, the recommended amount of memory for the disk cache
for a single 120 MB hard disk is 180 KB, and for two 120 MB hard
disks it is 240 KB. These are recommended values. The printer will
still operate with a smaller cache, but decreased performance may
result.
Frame Buffer
The Frame Buffer memory client holds rasterized or bitmapped
images of page faces which are ready to be sent to the print engine. A
4-84
QMS 4060 Print System Reference
Memory
frame holds the contents of each single page image. For example, a
600 dpi page printed on letter size paper would consume frame buffer
memory space as follows: (600dpi x 600dpi x 8.5'' x 11'')/8 =
4,207,500 bytes or 4.1 M.
Frame buffer memory should always be the first memory client that is
configured in the printer. After this, all other clients can be configured
depending on your printing needs. Anytime the frame buffer client is
changed, all of the other clients will be resized to their default values.
Frame buffer can be configured manually or by resetting the printer
defaults. In all cases, be sure to keep a copy of the status page as a
record of memory client settings. See chapter 5, “Additional Technical
Information,” for more information on memory and the frame buffer
client.
Menu
Administration/Memory/Manual Config/K Mem Frame
Buffer
Choices
02200-104532
Printer Memory
MB Printer Mem, listed as Total Memory on the status page, is the
number of megabytes of RAM available to be split among the various
memory clients. The size of this client's memory limits the number of
jobs that may be queued simultaneously. When this client's memory
is exhausted, the printer slows down, and the hosts are forced to wait.
Menu
Administration/Memory/Manual Config/MB Printer
Mem
Choices
000-999
Default
Depends on the amount of memory installed.
Notes
This memory client is not user-configurable.
Since the printer uses a portion of the hard disk for
memory swapping, the amount of memory displayed
is larger than the actual amount of memory installed
in the printer.
Printer Configuration
4-85
Engine
Engine
Through the Administration/Engine menu you can set print enginerelated parameters.
Adjusting the Image Alignment
This option allows you to adjust the horizontal and vertical placement
of printed images.
To check image alignment, print a standard status page (Print Status
button). When the printer is placing images properly, the alignment
angle bar in the lower-left corner of the status page is 0.5"/12.7 mm
from the left and bottom edges of the page. If the angle bar is off, use
the Administration/Engine/Image Alignment option to align the image
horizontally and vertically in pixel increments (1/300" or 0.08 mm).
»
Note: Engine constraints may limit the accuracy of pixel alignment.
Horizontal Offset
Menu
Administration/Engine/Image Alignment/Horiz Offset
Choices
000-300 (0.00"/0 mm-1.00"/25.4 mm)
Default
100 (0.33"/.84 mm)
Notes
Values above 100 move the image to the right.
Values below 100 move the image to the left.
Vertical Offset
4-86
Menu
Administration/Engine/Image Alignment/Vertical
Offset
Choices
000-300 (0.00"-1.00")
QMS 4060 Print System Reference
Engine
Default
100 (0.33"/.84 mm)
Notes
Values above 100 move the image down.
Values below 100 move the image up.
Duplex H. Offset
Menu
Administration/Engine/Image Alignment/Duplex H.
Offset
Choices
000-300 (0.00"/0 mm-1.00"/25.4 mm)
Default
100 (0.33"/.84 mm)
Notes
Values above 100 move the image to the right.
Values below 100 move the image to the left.
Duplex V. Offset
Menu
Administration/Engine/Image Alignment/Duplex V.
Offset
Choices
000-300 (0.00"-1.00")
Default
100 (0.33"/.84 mm)
Notes
Values above 100 move the image down.
Values below 100 move the image up.
Setting Default Paper
The default paper size is used when the selected paper size is
requested but the input tray is missing from the engine.
Menu
Administration/Engine/Default Paper
Choices
Letter, A4
Default
Letter
Printer Configuration
4-87
Engine
Setting Inputbin x Name
These options are used to name inputbins 1, 2, 3, and 5.
Menu
Administration/Engine/Inputbin x Name
Choices
Up to 16 alphanumeric characters
Default
Inputbin 1 “upper” / Inputbin 2 “middle”/ Inputbin 3
"lower"/Inputbin 5 "LCIF"
Note
The inputbin 5 option appears only if the optional
large-capacity input feeder (LCIF) is installed.
Setting Outputbin x Name
These options are used to name output bins 1, 2, and 3.
4-88
Menu
Administration/Engine/Outputbin x Name
Choices
Up to 16 alphanumeric characters
Default
Outputbin 1 “upper”/ Outputbin 2 “face-up stack”/
Outputbin 3 "face-down stack"
Note
The outputbin 2 and outputbin 3 options appear only
if the optional LCOS is installed.
QMS 4060 Print System Reference
Engine
Specifying Page Recovery Action
When a paper jam or other similar error occurs, the printer can reprint
the job starting from the page on which the jam occurred.
Menu
Administration/Engine/Page Recovery
Choices
On—Reprints a print job from the page on which the
jam or error occurred.
Off—Don’t reprint a print job when a jam or error
occurs.
Default
On
Setting Toner Low Action
You can configure the printer to stop or to continue printing when a
TONER LOW error message is displayed in the message window.
Menu
Administration/Engine/Toner Low Act.
Choices
Continue—Continue printing when a TONER LOW
message displays.
Stop—Stop printing when a TONER LOW message
displays.
Default
Continue
Setting Energy Conservation
The Energy Saver option specifies whether the printer changes to a
low-power state (the engine remains on, but the fuser turns off) after
Printer Configuration
4-89
Engine
the printer is inactive for a user-defined length of time. When a print
job is received, the printer returns to normal power within 90 seconds.
Menu
Administration/Engine/Energy Saver
Choices
15 minutes, 30 minutes, 1 hour, 2 hours, 3 hours—
Idle time before activation of low-power state.
Off—Use normal power all of the time.
Default
1 hour
Setting Default Resolution
This option sets the print engine’s default resolution.
4-90
Menu
Administration/Engine/Def. Resolution
Choices
300 dpi—300x300 dpi resolution.
600 dpi—600x600 dpi resolution.
Default
600 dpi
QMS 4060 Print System Reference
Engine
Setting Toner Density
Print density is the amount of toner placed on each dot, making the
print appear lighter or darker. The higher the density, the darker the
print looks and the higher the contrast is on the page.
»
Note: If the print density is too light, make sure that the
Administration/Engine/Print Quality/Normal option is turned on before
making any adjustments. The Conserve Toner option saves toner by
simulating draft-quality printing.
Administration/Engine/Toner Density
Menu
Choices
Note
D
L
......^..|.....
—This is a scale that moves left or right
with the Previous and Next buttons
D
L
|.....^........
—The lightest available setting
D
L
......^.......|
—The darkest available setting
A vertical bar moves left or right towards L (Light) or D
(Dark).
Rotate Simplex
Use Administration/Engine/Rotate Simplex to select rotate simplex.
Menu
Administration/Engine/Rotate Simplex
Choices
No, Yes
Default
No
Printer Configuration
4-91
Consumables
Letterhead
Use Administration/Engine/Letterhead to select letterhead.
Menu
Administration/Engine/Letterhead
Choices
Off, On
Default
Off
Print Quality
The Print Quality option allows the printer to operate at a lower rate of
toner consumption and extend the life of your toner bottles.
Menu
Administration/Engine/Print Quality
Choices
Normal—Normal toner use.
Conserve Toner—Toner use is lowered.
Default
Normal
Consumables
This group of menu configurations is necessary for performing certain
maintenance procedures on your printer. You will need to access this
menu whenever you have to add toner, developer, replace the fuser,
replace the drum, and replace rollers.
▲ Caution: Failure to configure the consumable menus when
performing maintenance on your printer can result in poor printer
performance or printer failure.
4-92
QMS 4060 Print System Reference
Consumables
Changing the Developer
This menu prompts you through the changing developer procedures.
See chapter 2, “Consumables,” in the Operations manual for the procedure and illustrations on changing the developer.
Menu
Administration/Consumables/Developer
Choices
No, Yes
Printer Configuration
4-93
Consumables
4-94
Default
No
Notes
When you select Yes the message window displays:
OPEN UPPER RIGHT
DOOR
After you open the door the message window
displays
WASTE BOTTLE IN?
SELECT WHEN DONE
After you check the waste bottle, close the door, and
press select the message window displays
PURGING
DEVELOPER....
The developer purge will last about 30 seconds and
the message window displays
OPEN UPPER RIGHT
DOOR
After you open the door the message window
displays
FILL DEVELOPER
SELECT WHEN DONE
After you have filled the developer, and pressed
Select the message window displays
INSERT BOTTLE
SELECT WHEN DONE
This is your prompt to insert the developer waste
bottle and press Select.
QMS 4060 Print System Reference
Consumables
Replacing the Drum
This menu prompts you through replacing the drum procedures. See
chapter 2, “Consumables,” in the Operations manual for the procedure and illustrations on replacing the drum.
Menu
Administration/Consumables/Drum Unit
Choices
No, Yes
Default
No
Notes
When you select Yes, the message window displays
REPLACE DRUM UNIT
SELECT WHEN DONE
When you select Yes, again the message window
displays
REPLACE CHARGER
SELECT WHEN DONE
Replacing the Fuser
This menu prompts you through replacing the fuser procedures. See
chapter 2, “Consumables,” in the Operations manual for the procedure and illustrations on replacing the fuser.
Menu
Administration/Consumables/Fuser
Choices
No, Yes
Default
No
Notes
When you select Yes, the message window displays
REPLACE FUSER
SELECT WHEN DONE
Printer Configuration
4-95
Consumables
Replacing the Pick-Up Rollers
This menu prompts you through replacing the pick-up roller. See
chapter 2, “Consumables,” in the Operations manual for the procedure and illustrations on replacing the pick-up rollers.
Menu
Administration/Consumables/Pick Unit 1
Choices
No, Yes
Default
No
Notes
This menu is selected when you replace the pick-up
roller on the upper tray.
When you select Yes, the message window displays
REPLACE PICK 1
SELECT WHEN DONE
Menu
Administration/Consumables/Pick Unit 2
Choices
No, Yes
Default
No
Notes
This menu is selected when you replace the pick-up
roller on the middle tray.
When you select Yes, the message window displays
REPLACE PICK 2
SELECT WHEN DONE
4-96
QMS 4060 Print System Reference
Consumables
Menu
Administration/Consumables/Pick Unit 3
Choices
No, Yes
Default
No
Notes
This menu is selected when you replace the pick-up
roller on the lower tray.
When you select Yes, the message window displays
REPLACE PICK 3
SELECT WHEN DONE
Menu
Administration/Consumables/LCIF Pick Unit
Choices
No, Yes
Default
No
Notes
This menu is selected when you replace the pick-up
roller on the optional LCIF tray. This menu appears
only if the LCIF is installed.
When you select Yes, the message window displays
REPLACE PICK LCIF
SELECT WHEN DONE
Printer Configuration
4-97
Miscellaneous
Resetting All Consumables Statistics Counters
Menu
Operator Control/Consumables/Start Period
Purpose
Allows you to reset all counters for the user-defined
consumables tracking period to 0.
Choices
No—Don’t reset counters to 0
Yes—Reset counters to 0
Default
No
Miscellaneous
The Miscellaneous submenu allows you to change printer configurations, such as defaults and message window language.
Save Defaults
Use Administration/Miscellaneous/Save Defaults to save your
defaults.
4-98
Menu
Administration/Miscellaneous/Save Defaults
Choices
No, Yes
Default
No
QMS 4060 Print System Reference
Miscellaneous
Restoring the Factory Default Configuration
If you need to cancel all of the configuration changes you have made,
you can reset all of the configuration settings to their factory defaults
or custom defaults.
Menu
Administration/Miscellaneous/Restore Defaults/
Factory Defaults or Custom Defaults
Choices
Yes, No
Default
No
Notes
When you choose Yes, the printer automatically
reboots. This process takes several minutes to
complete.
Working with Custom Configurations
See "Saving a Default Configuration," on pages 4-14 and 4-15 for
information on working with custom configurations.
Reboot System
You can use this selection to restart the printer without turning off the
power switch. You would use this when you’ve made changes to the
configuration and need to restart the printer before the new settings
will be acknowledged.
Menu
Administration/Miscellaneous/Reboot System
Choices
Yes, No
Default
No
Printer Configuration
4-99
Miscellaneous
New System Image
The system software in your printer is stored on the internal hard
drive. This allows you to update the system software from the host
computer.
Menu
Administration/Miscellaneous/New System Image
Choices
Yes, No
Default
No
Notes
The procedures for downloading a new system image
are in chapter 9, “Troubleshooting Printer Problems,”
in the Operations guide.
Capture Printjob
This allows you to capture the next job received by the printer and
store it to the printer’s memory. To access the captured print job you
must copy the file from the printer’s memory system (memory
includes the printer’s hard disk). Copy the captured file from
SYS:/USR/LOGFILE.DAT
Menu
Administration/Miscellaneous/Capture Printjob
Choices
Disable, Capture Nextjob, Del Capturedjob
Default
Disable
Notes
If the print job is larger than the available space on
the hard disk, the job will be flushed. The captured
print job will remain on the disk until it is deleted with
the Del Capturedjob menu option or it is overwritten
when another print job is captured.
4-100
QMS 4060 Print System Reference
Miscellaneous
Setting the Message Window Language
Status messages and configuration menus can be displayed in the
message window in English, French, German, or Spanish.
Menu
Administration/Miscellaneous/Keypad Language
Choices
English, French, German, Spanish
Default
English
Notes
The printer must be restarted for changes to the
Keypad Language menu to take effect. You can either
let the printer restart automatically after you save the
change and exit from the Configuration menu, or you
can wait for the change to take effect the next time
you manually turn on the printer.
Clock Operations
This menu allows you to set the internal real-time clock and adjust its
speed.
Menu
Administration/Miscellaneous/Clock Operations/
Set Clock
Choices
Current Value: MON 20 JUL 1998 13:00:00
Enter Value:
Default
Current time and date
Menu
Administration/Miscellaneous/Clock Operations/
Adjust Clock
Choices
-155 SEC/MONTH to +155 SEC/MONTH
Default
0 SEC/MONTH
Printer Configuration
4-101
Hard Disks
Hard Disks
Use the Administration/Disk Operations menu to format the internal
hard disk or connected hard disks.
See the Options manual for more information on installing external
hard disks.
▲ Caution: If you connect to this printer an external hard disk you
previously used with an earlier QMS Crown printer (QMS 1660E,
QMS 1725E, QMS 2025, or QMS 3225 ), this QMS 4060 Print
System software release will automatically reorganize the files on the
hard disk when the printer is turned back on again. (The printer
release number is listed on both the start-up and the status page.)
Once this reorganization is done, the files on the hard disk can no
longer be accessed if the hard disk is reattached to an earlier QMS
Crown printer.
This reorganization process takes time. If, when you first turn the
printer on after attaching a previously used hard disk, it does not
come on line immediately, be patient. Interrupting the reorganization
process could cause all files on the hard disk to be lost.
4-102
QMS 4060 Print System Reference
Hard Disks
Formatting a Hard Disk
Use the Administration/Disk Operations/Format Disk menu to format
a hard disk.
Menu
Administration/Disk Operations/Format Disk
Choices
Dsk#0 - Dsk#4, Dsk#6, Dsk#7
Default
Dsk#7
Notes
Dsk#5 is reserved for the CrownCopy option. Dsk#7
belongs to the internal hard disk. This disk contains all
the printer system code and if formatted will cause the
printer to not function. Do not format Dsk#7 unless you
are troubleshooting a disk problem. See Chapter 9,
“Troubleshooting Printer Problems,” in the Operations
manual for more information.
Refer to chapter 1, “Memory and Storage,” in the
Options manual for complete information on backing up
data to a Jaz or Zip Drive and restoring data from a Jaz
or Zip Drive.
Backing up a Hard Disk
Use the Administration/Disk Operations/Backup Hard Disk to backup
a hard disk.
Menu
Administration/Disk Operations/Backup Hard Disk
Purpose
Allows you to back up all the files stored on a storage device
Choices
DSK7 Full, DSK7 Incremental
Default
DSK#7 Full
Notes
DSK#5 is reserved for the CrownCOpy option. Dsk#7 is the
internal hard disk.
Printer Configuration
4-103
Installation
Menu
Refer to chapter 1, “Memory and Storage,” in the Options manual for
complete information on backing up data to a Jaz or Zip Drive and
restoring data from a Jaz or Zip Drive.
Restore Disk
Use Administration/Disk Operations/Restore Disk to restore your
disk.
Menu
Administration/Disk Operations/Restore Disk
Choices
DSK7
Default
DSK7
Note
There is only one selection available
Refer to chapter 1, “Memory and Storage,” in the Options manual for
complete information on backing up data to a Jaz or Zip Drive and
restoring data from a Jaz or Zip Drive.
Installation Menu
The Installation menu appears only if a security key is installed. The
system administrator uses the Installation menu to set passwords for
the Operator Control and Administration menus.
Operator Password
Allows you to enter a password used to enter the Operator menu
when enabled.
Menu
Installation/Operator Passwrd
Choices
Up to 16 alphanumeric characters
4-104
QMS 4060 Print System Reference
Installation Menu
Default
Blank (no password)
Notes
Enable the password in the Installation/Use Operator
Pwd menu.
Use Operator Password
Determines if a password is required to enter the Operator menu.
Menu
Installation/Use Operator Pwd
Choices
On—Requires a password to enter the Operator
Control menu.
Off—No password required to enter the Operator
Control menu.
Default
Off
Notes
Enter the password in the Installation/Operator
Passwrd menu.
Admin Password
This represents the password used to enter the Administration menu
when enabled.
Menu
Installation/Admin Password
Choices
Up to 16 alphanumeric characters
Default
Blank (no password)
Notes
Enable the password in the Installation/Use Admin
Pwd menu.
Printer Configuration
4-105
Installation
Menu
Use Admin Password
Determines if a password is required to enter the Administration
menu.
Menu
Installation/Use Admin Pwd
Choices
On—Require a password to enter the Administration
menu.
Off—Don’t require a password to enter the
Administration menu.
Default
Off
Notes
Enter the password in the Installation/Admin
Password menu.
Using Passwords
When a password is required to enter the Operator Control or Administration menu, the message window displays
ENTER PASSWORD
if you press the Select button to enter the menu. Enter the password
or press the Menu button to return to the menu.
If you specify the correct password, access to the selected menu is
granted. However, if you enter an invalid password, the message window flashes
INVALID PASSWORD
for three seconds and then returns you to the Configuration menu.
»
4-106
Note: Password protection from the menu does not prevent access
from CrownAdmin 3 if the CrownAdmin utility password is used.
QMS 4060 Print System Reference
Configuring
Optional
Features
Configuring Optional Features
Several of the optional features available affect printer configuration
and the Configuration menu. When an optional feature is installed, its
configuration information merges into the Configuration menu. See
the Options manual for more information.
v
Printer Configuration
4-107
5
Additional
Technical
Information
In This Chapter . . .
n
“Printer-Host Communication” on page 5-2
n
“Halftones” on page 5-4
n
“Memory” on page 5-7
n
“End Job Mode” on page 5-20
n
“Parallel Interface Modes” on page 5-27
n
“PS Protocol Option” on page 5-28
n
“HP-GL Color Encoding” on page 5-32
Introduction
Introduction
This chapter provides additional technical information on memory
management, end job mode, the PS Protocol option, and HP-GL
color-to-grayscale conversion.
Printer-Host Communication
Interface
An interface is the point at which two elements connect so they can
work together. A printer-host interface is the way a printer connects to
and works with a host (a microcomputer, workstation, minicomputer,
mainframe computer, or network), and it involves both hardware and
software. The way your printer interfaces with a host depends on
many things, including computer type, computer ports available, interface cabling, application software, printer emulations, and printer drivers.
Simultaneous Interface Operation (SIO)
Simultaneous Interface Operation (SIO), a standard feature of QMS
Crown architecture, enables your QMS 4060 Print System to
communicate simultaneously with hosts through the parallel, optional
serial, Ethernet, and optional interface ports. In other words, SIO
allows you to have more than one host communicating with the printer
at one time.
ESP Technology
Emulation Sensing Processor (ESP) technology is another standard
feature of QMS Crown architecture. ESP technology, which works
with most popular commercially available applications, uses a form of
artificial intelligence to analyze incoming file data and select the
appropriate printer emulation (for example, PostScript emulation,
5-2
QMS 4060 Print System Reference
Printer-Host
Communication
HP-GL emulation, HP-PCL emulation, or another optional emulation)
from those installed on the printer.
The print job is processed without your having to change printer
switch settings or send software commands to accommodate different
printer emulations.
When your printer is in ESP mode, you can easily print files prepared
for a PostScript printer, an HP LaserJet, or an HP-GL plotter. The file
prints correctly as long as it contains the traditional PostScript or HPGL commands for such items as page formats and job parameters
(number of copies, page margins, fonts).
The QMS 4060 Print System prints almost any file sent in a language
ESP technology understands, whether you have one, two, or more
hosts, and whether you are communicating through a parallel, Ethernet, optional serial, or other optional interface. Most users never have
to change from ESP mode to another mode.
Communication Modes
You can either allow your printer to operate in its default ESP mode or
configure its ports to accept jobs in only a particular emulation mode
(for example, PostScript emulation only, HP PCL only, or HP-GL emulation only). The default printer communication settings can be
changed through the Configuration menu, which you access through
the control panel—in the Administration/Communications menu, you
can choose a default emulation for the parallel and optional serial
interfaces, and in the Administration/Emulations menu, you can configure the printer defaults for each emulation mode. (The optional
LocalTalk interface uses only PostScript.)
Advanced users can also use PostScript operators to reconfigure
printer ports. Generally, it is best to keep your printer in ESP mode.
Since ESP mode is the factory default, all you have to do to use it initially is connect your host and printer and then send a file.
If you do want to reconfigure the interface ports for specific emulations (or if you need to return the printer to ESP mode), use the
printer's control panel (the Administration/Communications menu).
Additional Technical Information
5-3
Halftones
Configuring the printer through the control panel is described in chapter 4, “Printer Configuration,” of this manual.
Halftones
The ability of the printer to produce halftones allows you to add
scanned images or halftone graphics to your documents. This section
will explain some of the options available on the QMS 4060 for halftone printing.
What are Halftones?
Continuous tone scanned images have to be converted to dot pattern
images on a laser printer. Laser printers, like printing presses, only
have the ability to print patterns of dots controlled by turning on and
off the laser. Because of the limited resolving power of the eye halftones appear as continuous tone images. For an example hold a
newspaper photograph very close to your eyes to see the halftone
dots.
Halftone characteristics can be changed by settings available on your
QMS 4060 Print System. The following factors can be used to adjust
the halftone characteristics of your documents.
n
Printer resolution
n
Screen frequency and screen angles (Halftone types)
There can be some side effects to changing these factors. Factors
such as the number of gray levels, printer performance, and scanned
image quality can be affected.
Gray Levels
Gray levels are a progressive series of gray tones between black and
white. Gray levels are produced by varying the ratio of black to white
halftone dots. The number of gray levels depends on printer resolution and screen frequency.
5-4
QMS 4060 Print System Reference
Halftones
Screen Frequency
Screen frequency or Lines Per Inch (LPI) is the number of lines of
halftone dots that compose each inch of a halftone screen. The
screen frequency determines the number of halftone dots used to
represent gray levels in a given area.
The following formula shows the relationship between screen frequency, print resolution and gray levels. As the screen frequency
increases, the number of gray levels decrease. If resolution is
increased, the number of gray levels will also increase.
n
gray levels = (resolution/screen frequency)2 + 1
You can change screen frequency by selecting the halftone type in
the QMS 4060 configuration menu, through your application, or by
using the PostScript setscreen operator.
The extra gray levels available through higher resolution provide a
smoother shift from the darkest black to very light grays.
Screen Angle
A screen angle is the angle at which a halftone screen prints. The
default screen angle for your QMS 4060 Print System is 45° at
300x300, and 600x600. This is the normal angle for black and white
printers. Selecting advanced halftone types menu option will vary the
screen angle. You can also change the screen angle through the
PostScript setscreen operator.
Additional Technical Information
5-5
Halftones
Halftone Types
Your printer provides three different options for halftones—basic,
standard, and advanced. The number of gray levels increases by
increasing the halftone type setting and the printer resolution.
Note: The default for this menu is Standard. The standard
settings are optimized for performance. The advanced settings
are optimized for quality.
»
A Special Note for QuarkXPress Users
Make sure you have installed the 4060 PDFs in the PDF folder in the
QuarkXPress folder. The name of the PDF is
n
QMS4060.PDF
To select the PDF, go to the Page Setup dialog box in QuarkXPress,
and hold down the Shift key while clicking the Printer Type list box.
(The italicized selections are PPDs, and the non-italicized selections
are PDFs.) The PPD will allow you to access the halftone settings.
Enhanced Screening
To use enhanced (advanced) screening (or halftoning), do the
following:
In Your QuarkXPress Document (Page Setup Dialog Box)
n
In the Printer Type listbox select
QMS 4060 Print System
n
If you have EFIcolor software loaded, select None.
n
Select Use PDF Screen Values.
Standard Screening
To use standard screening (or halftoning), do the following:
In Your QuarkXPress Document (Page Setup Dialog Box)
n
In the Printer Type listbox select
QMS 4060 Print System
5-6
QMS 4060 Print System Reference
Memory
n
If you have EFIcolor software loaded, select None.
n
Select Use PDF Screen Values.
Basic Screening
To use basic screening (or halftoning), do the following:
In Your QuarkXPress Document (Page Setup Dialog Box)
n
In the Printer Type listbox select
QMS 4060 Print System.
n
If you have EFI color software loaded, select None.
n
Set the Halftone Screen (lpi) to the lpi of your choice.
n
Disable the option Use PDF Screen Values.
Memory
Memory allows your printer to store and retrieve information that’s
required to perform many of its tasks. The memory requirements of
each printer are dictated by the applications to be run. Each printer
comes standard with a certain amount of memory, but you may add
more memory as necessary.
The memory is divided among users (or “clients”), each of which allocated a specific amount (or “block”) of memory. Each memory client is
dedicated to a specific printing and application purpose. Your QMS
4060 Print System allows you to distribute its memory among the various memory clients where it can best serve your specific printing
needs. The following sections provide information on memory management so you can get the most from your printer.
Generally, there are two main reasons for wanting to reconfigure your
printer’s memory:
n
To achieve maximum performance
n
To enable additional features
Additional Technical Information
5-7
Memory
The ability to configure your printer's memory doesn’t necessarily
mean that you must change your current configuration. If you’re presently using all the features you need and the printer is performing efficiently, you shouldn’t feel compelled to reconfigure your printer's
memory. Just remember that if your printing needs change, not only
do you have the ability to increase the amount of printer memory, but
you also can redistribute it where you feel it would best meet your
printing requirements.
QMS Memory Management
Managing the memory on your printer is much the same as managing
your personal income. In money management, you have a certain
amount of income and many ways of spending that income. You
decide where that money goes according to what’s important to you.
There’s no single correct way to manage money, but there is one best
way for you according to your financial obligations. Just as long as
your method works for you.
The same is true for managing the memory on your printer. There’s
no single correct way for everyone to allocate available printer memory. There is, however, a best way to configure your printer's memory
for maximum efficiency in your specific printing environment. For
example, if you use a large number of PostScript fonts of various point
sizes, you may want to increase the amount of memory allocated to
the area specified for PostScript fonts. Or you may want to increase
memory to the area that minimizes slowdowns when collating large
print jobs.
Memory configuration affects these things as well as the number of
jobs that can be accepted by the printer, the number of options
available simultaneously, the number of downloadable fonts and
emulations that can be stored, and overall printer performance.
Memory Terms
Before you can configure your printer's memory efficiently, you must
first understand the different types of memory and how they work
together. Your QMS 4060 Print System documentation uses the following memory terms:
5-8
QMS 4060 Print System Reference
Memory
Memory
Memory allows your printer to store and retrieve information. It’s the
space within your printer where information is stored while being
actively worked on.
Memory Client
A memory client is a user of a block of memory dedicated to a specific
function. Each memory client controls certain features. When insufficient memory is allocated to a specific client, the features it controls
may not be accessible.
Excess Memory
Some printers designate one or two memory clients to receive all the
excess, or unassigned memory. On your QMS 4060 Print System
excess memory is distributed among all the memory clients.
Storage
Storage is a device in (or on) which information can be kept. There
are three main types of storage—ROM, RAM, and hard disk drives.
ROM stores read-only data, RAM represents temporary storage, and
hard disk drives hold information on a more permanent basis (see the
following definitions).
ROM (Read Only Memory)
This type of memory contains data and/or machine-executable
instructions that can be read but not modified. This information is not
lost when the printer’s power is turned off.
RAM (Random Access Memory)
RAM is the memory your printer uses to perform each task. It can be
written to and read from. Once a task is complete, the memory is free
again to be used for another file. This memory is volatile, so if your
printer loses power while a file is being sent, you must resend the file.
The number and type of features you can run on your printer simultaneously depend on the amount of RAM you have and how that RAM
Additional Technical Information
5-9
Memory
is distributed. Your printer comes with 32 MB of RAM, but it is upgradable to 128 MB by adding Single In-line Memory Modules (SIMMs).
RAM Disk
Also called a virtual disk, the RAM disk is an area of RAM that is used
to simulate an additional hard disk. Data can be written and read
more quickly than on a hard disk, but a RAM disk loses any
information stored on it when the printer's power is turned off. The
spooling buffer is a RAM disk client if a hard disk is not available.
SCSI (Small Computer System Interface)
The printer’s SCSI port allows you to connect up to three optional
SCSI hard disks and the optional CrownCopy scanner, providing storage for fonts, emulations, and other files. Hard disks are also used to
increase the amount of collation that can be accepted and provide a
secondary storage area for spooled data, while providing virtual
memory capabilities.
IDE (Integrated Drive Electronics)
The standard internal hard disk. “Integrated” refers to the fact that all
of the controller electronics are on the drive itself, so no separate
adapter card or expansion slot is required.
Volatile Memory
This type of memory is cleared when the printer is turned off. For
example, most RAM is volatile.
Non-volatile Memory
This type of memory is not lost when the printer loses power.
NV RAM
This protected form of RAM is used to store information such as your
printer’s configuration menu. Configuration options you have chosen,
such as emulations, memory settings, and input bins, are saved to
this non-volatile RAM. This information is not lost when you turn off
your printer.
5-10
QMS 4060 Print System Reference
Memory
Physical Memory
Physical memory refers to the amount of RAM installed in the printer.
Virtual Memory
Virtual memory extends the effective size of the printer’s memory by
using a disk file or swap file to simulate additional memory space. It
enables the hard disk to accept data swapped from RAM to free temporarily the RAM for other tasks.
Spool
Spooling is temporary storage to hold print jobs until the printer is
available to process them.
Evaluation of Your Printing Environment
The first step in allocating your printer’s memory is to define your
printing needs. Each of your printer’s features requires a minimum
amount of memory. If you use a feature, you must allocate enough
memory to the client which controls it. On the other hand, if there are
features you don’t use, you can take the memory in the clients that
control the unused features and assign it to other clients that need
additional memory.
»
Note: With 32 MB standard memory on your QMS 4060, you should
have enough memory to support all paper sizes at the highest
resolution and duplexed.
Evaluation Questions
To get a better idea of what your printing requirements and your
printer’s capabilities are, answer the following questions. The memory
client or menu option associated with each evaluation question is
listed in italics after the question.
1
How much RAM does your printer have (standard and additional
memory)? Total Memory
2
Do you have the option of installing additional memory if it’s
needed? Total Memory
Additional Technical Information
5-11
Memory
3
Does your printer have any internal or external hard disks connected? If so, how many and what size? Disk Cache
4
Which resident emulations will you be running? PS Heap or Emulation
5
Will you be loading any nonresident emulations? If so, how many
and which ones? Emulation and Emulation Temp
6
How many printer ports will be connected? Host Input and Input
Buffer
7
Do you have an optional interface connected? Input Buffer
8
How many people will be using this printer simultaneously? Host
Input or K Mem for Spool
9
How many downloadable fonts will you be using? What sizes?
From which emulation? Font Cache or Emulation Temp
10 Will you use many different sizes of fonts/typefaces? Font Cache
11 How large are the files you typically print? How large is the largest
file you’ll be printing? Host Input or K Mem for Spool
12 Are most of your files text, or are any graphics intensive? Display
List
13 Will you want to download fonts, forms, or operators to memory?
Font Cache or Emulation Temp
14 Will you be collating documents? If so, how large and complex
will these documents be? Display List
15 What media sizes will you be using? Frame Buffer
16 At which resolution will you be printing? Frame Buffer
17 Will you use CrownCopy? ImageServer? CrownImage? Frame
Buffer or Display List
After you have answered all of these questions, read the following
sections to find out which memory clients control features you plan to
use and which memory clients control features you don’t need.
5-12
QMS 4060 Print System Reference
Memory
Memory Clients
Memory clients are users of printer memory that are dedicated to a
specific purpose. Each of the memory clients is located in the Administration/Memory menu. When you allocate memory to a specific client through the control panel, it’s allocated in kilobytes (KB). Each
time you make changes in the Administration/Memory menu, print out
a status page to confirm the memory reallocation.
»
Note: The value for each memory client must be divisible by 4 KB.
Therefore, if a value is entered that is not evenly divisible by 4 KB, it’s
automatically converted to the next lower value that’s divisible by 4
KB. For example, if you enter 102 KB, the actual value is lowered to
100 KB, assuming there is enough memory available to allocate to
this client. See the “Memory” section of chapter 4, “Printer
Configuration,” for each memory client’s minimum and default
settings.
Memory clients in the 4060 are automatically allocated when the
printer is installed or when you upgrade the printer’s memory. There
are other occasions when the printer’s memory is automatically reallocated.These occur:
n
When the printer is installed.
n
When new system software is installed.
n
When adding or removing hard disks.
n
When memory is upgraded.
n
When Frame Buffer is manually adjusted.
n
When restoring printer defaults.
Remember that if you perform any of these functions the memory clients will be set to default values. The default values depend on the
amount of physical memory installed in your printer. The default allocation adjusts the Frame Buffer memory client first. It is set to the minimum values of physical memory needed for your print jobs, that is,
paper size, resolution, and duplex printing. The other memory clients
are allocated memory from what is left over in physical memory.
Additional Technical Information
5-13
Memory
Frame Buffer
The Frame Buffer memory client holds rasterized or bitmapped
images of page faces which are ready to be sent to the print engine. A
frame holds the contents of each single page image. For example, a
600 dpi page printed on letter size paper would consume frame buffer
memory space as follows: (600dpi x 600dpi x 8.5 in x 11 in) /8 =
4,207,500 bytes or 4.1 MB.
Because the frame buffer memory is so critical to the actual printing
of a page, its allocation takes precedence over that of other memory
clients. The number of frames needed to print at engine speed is
engine specific and depends on the size media and resolution. For
example, printing at 600x600 dpi requires four times the amount of
memory in the frame buffer than does 300x300 dpi.
Menu
Administration/Memory/K Mem Frame Buffer
Choices
02200-variable depending on options installed
Minimum Frame Buffer Size
The following table lists the minimum number of KB that must be
devoted to the frame buffer for all media size and resolution combinations.
Media
5-14
Minimum Frame Buffer Size (in KB)
300dpi
300dpi
600dpi
600dpi
simplex
duplex
simplex
duplex
Letter/A4
2200*
2200*
3980
7960
Legal
2200*
2504
4968
9936
11”x17”
2200*
3952
7852
15704
Universal
2200
4400
8752
17504
A5
2200*
2200*
2200*
3912
A3
2200*
4104
8164
16328
B5 (JIS)
2200*
2200*
2984
5968
B4 (JIS)
2200*
3056
6072
12144
B5 (ISO)
2200*
2200*
2984
5968
B4 (ISO)
2200*
3056
6072
12144
QMS 4060 Print System Reference
Memory
Media
»
Minimum Frame Buffer Size (in KB)
300dpi
300dpi
600dpi
600dpi
simplex
duplex
simplex
duplex
Statement
2200*
2200*
2200*
3752
Executive
2200*
2200*
3124
6248
Note: * 2200KB is the minimum allowed for the Frame Buffer client.
Display List
Also known as K Mem Display, this client stores compressed representations, or blocks, of the pages to be printed. It takes approximately one compressed block for a normal 8.5" x 11" (215.9 mm x
279.4 mm) text page, four compressed blocks for an 8.5" x 11"
(215.9 mm x 279.4 mm) page that includes some graphics, and as
many as 500 compressed blocks for an extremely complex page.
Many pages of compressed blocks belonging to multiple print jobs
can be stored at the same time in the display list. If enough memory is
allocated to this memory client, a page can always be ready to print
as soon as another page has been imaged to the print engine.
The amount of memory required for each compressed block is printer
specific. The QMS 4060 Print System takes approximately 64 KB of
memory from the display list for each compressed block. However, if a
page includes raster image data (for example, TIFF or bitmap data),
each compressed block will require much more memory.
Increasing the amount of memory in this client may improve printing
throughput and minimize slowdowns due to collating or printing complex pages. If your QMS 4060 Print System has a hard drive and the
disk swap option is enabled the memory added to this client is taken
from virtual memory. If your printer does not have a hard drive then
the memory added to this client is taken from the amount of physical
memory in your printer. It may be necessary to reduce memory added
to another client before adding memory to the Display List. Check that
the Frame Buffer still has the minimum amount of memory needed for
your printing needs before reallocating this memory.
Additional Technical Information
5-15
Memory
PostScript Font Cache
Also known as K Mem PS Fonts and Font Cache, this memory client
stores bitmapped representations of previously scaled PostScript
fonts. This process reduces the number of times a font must be converted from outline form to bitmap form. Printing pages that have
characters already stored in the font cache is immensely faster than
printing characters not yet in the font cache.
As the font cache memory fills, the printer makes room for new bitmapped characters by erasing those that have been in the cache
longest without being used. By increasing the memory allocated to
this client, the printer can store more characters and spend less time
erasing and replacing characters in the cache. You should be careful
when increasing this client because the printer may spend more time
searching the cache than it would scaling the character. This client
has a limit to the maximum point size it will store.
Normally, you don’t need to change this memory client unless you
use a large number of fonts at various point sizes. If you do, you may
allocate additional memory to this client to improve printer performance. There’s no specific formula to use in figuring the amount of
memory required by the font cache, but after a certain point, large font
caches cause the printer to take longer to print than smaller font
caches because of the search time through the cache. The recommended font cache size is in the following ranges:
n
128-256 KB for 300x300 dpi printing
n
256-512 KB for 600x600 dpi printing
You should experiment to see what font cache size works best for
you.
PS Heap
Also known as K Mem PSHeap, Heap, PostScript VM, and Virtual
Memory, this client holds downloaded fonts, PostScript operators, and
forms.
Inefficiently coded PostScript jobs can consume an extremely large
amount of virtual memory or leave objects in the PostScript heap after
5-16
QMS 4060 Print System Reference
Memory
the print jobs are completed, leading to virtual memory errors. If not
enough memory is allocated to the PS heap, the job cannot print.
Increasing the memory allocated to this client allows more complex
jobs to print and increases the number of fonts that can be downloaded to virtual memory. However, this client should be increased
only if you receive a virtual memory error when attempting to print a
job or download a font, and even then it should be increased only in
small increments until the error message goes away. Excess memory
in the PS heap is not used.
Emulation
Also known as K Mem Emulation, this client is used to store any
optional or loadable emulations, such as LN03 Plus or QUIC II.
Increasing this client’s memory allows you to load more than one
optional emulation so that it doesn’t have to be reloaded every time
the print job is sent.
If an emulation is loaded to process a print job and there is not
enough memory in the emulation client, another emulation already
loaded may be unloaded automatically to obtain enough memory. If
you notice a delay in printing between jobs that have different nonresident emulations, it’s possible that the emulations are having to reload
each time they’re run. Adding to the emulation client may eliminate
the unloading and reloading of these emulations and, consequently,
increase throughput. If the disk swapping option is turned on then you
can increase the emulation memory client using this memory.
Also increase the emulation client if you’re printing complex nonPostScript jobs that may require more memory to process correctly.
Emulation Temporary
Also known as K Mem Emul Tmp and Emulation Temporary, this client sets the amount of system memory to be used by non-PostScript
emulations for storing downloaded fonts, forms, and macros. By dedicating a portion of memory to this client, your printer can perform
“context switching,” the ability to retain downloaded fonts and forms
even after the printer changes from one emulation to another. Context
Additional Technical Information
5-17
Memory
switching prevents unnecessary repetitive downloading and traffic
congestion on networks.
Normally, this memory client doesn’t need to be changed unless you
plan to download many different non-PostScript fonts.
Spool Buffers
Also known as Host Input and K Mem for Spool, this memory client
stores incoming data from all the interfaces until the emulation can
process the print job. When enough memory is allocated to this client,
the host becomes free more quickly, and the number of jobs that the
printer can accept simultaneously is increased. You should consider
the amount of data being sent simultaneously when allocating memory to the spool buffer. The internal hard disk can supplement this client with additional memory needed for spooling. See the “Hard Disk
Management” section later in this chapter.
»
Note: While increasing this client is beneficial in reducing network
traffic, throughput is not necessarily increased. In addition, making
this client too large could actually decrease throughput because of
the overhead involved with managing a large spool.
Disk Cache
This memory client stores frequently used data in system memory
instead of continually storing and retrieving it from a hard disk. If a lot
of disk access is required, adding memory to the disk cache may
increase the printer’s performance. For example, if many fonts are
stored on disk, faster access to these fonts is achieved by increasing
the disk cache size. When one or more hard disks are installed and
formatted, disk cache is automatically allocated 256 KB.
The disk cache is a high speed temporary buffer for data going to and
from the hard disk. It can speed the printer in two ways:
5-18
n
Information such as frequently referenced fonts and logos may
still be in the cache and may not have to be pulled off a hard disk
each time they’re needed.
n
Information being written to a hard disk can be held in the cache
temporarily until a more convenient time to be written to disk.
QMS 4060 Print System Reference
Memory
The amount of memory needed for the disk cache client is dependent
on the size of the disk, the number of disks, the number of subdirectories on each disk, and the amount of memory dedicated to caching.
As long as the disk cache is enabled and there is enough memory in
the disk cache, all disks are accessible. If insufficient memory is allocated to the disk cache, some disks may be seen while others are
not.
The recommended amount of memory for the disk cache client for all
disk drives is as follows:
n
120 KB minimum
n
0.5 KB per MB of disk storage total for all disks
For example, the recommended amount of memory for the disk cache
for a single 120 MB hard disk would be 180 KB, and for two 120 MB
hard disks it would be 240 KB.
MB Printer Mem
This field on the status page shows the size of the physical RAM
installed in the printer. When disk swapping is enabled (Administration/Memory/Enable Disk Swap), this field also gives the size of available virtual memory.
System Memory
Also known as System Use, this non-configurable client is the amount
of RAM used to run the printer’s operating system. It’s never
increased or decreased. The system memory subtracted from the
total amount of RAM identifies the amount of RAM available for all the
other memory clients.
Hard Disk Management
You can add up to three external SCSI hard disks to your QMS 4060
Print System. These hard disks serve as secondary storage places
for such items as downloaded fonts, emulations, and spooled data.
Additional Technical Information
5-19
End Job Mode
»
Note: See FAQ 7181 for a list of approved hard disks, their
manufacturers and part numbers, and the QMS products on which
they can be used. You can access QMS FAQs through the Internet at
http://www.qms.com/support/supportbase/ or through Q-FAX. (See
appendix A, “QMS Customer Support,” to find out how to access
Q-FAX documents).
FAQ numbers are subject to change, so yo may want to obtain a
directory of Q-FAX documents before requesting a specific document.
Virtual Memory Support
Your printer supports virtual memory capabilities for all of the memory
clients except Disk Cache and Frame Buffer when disk swapping is
enabled (Administration/Memory/Enable Disk Swap menu). These
capabilities extend the amount of memory available for certain supported features, such as spooling and collation.
End Job Mode
When sending print jobs through the serial and parallel protocols,
some applications and their printer drivers append an end-of-document command (EOD) to each print job to ensure that each file prints
correctly. The reason for this is that some protocols and print queuing
systems send print jobs to the printer as one continuous data stream
(one print job immediately following another).
But the problem with this system is that some applications are limited
by the printer language and are unable to produce an EOD command. This becomes even more problematic when you’re printing to a
QMS 4060 Print System, where print jobs of all supported emulations
can be received simultaneously. ESP technology examines the first
part of each print job to determine its emulation. Once the emulation
is identified, the print job processes without further checking. This
minimizes any slowdown resulting from the sensing process. To help
ESP technology determine the proper emulation of successive print
jobs, the printer must be able to identify the end of job for each job.
5-20
QMS 4060 Print System Reference
End Job Mode
Therefore, unless a wait timeout (the amount of time the printer is
waiting on data from the host) occurs and ends each print job, or
unless you add an EOD command between each file being printed
through these protocols, some print jobs may be interpreted by the
printer as one job and may “run” together. See chapter 4, “Printer
Configuration,” for more information on emulation timeout.
When printing multiple jobs with little or no time delay and with no
EOD command between each job, the serial and parallel protocols
may be unable to detect an end of job automatically. So the End Job
Mode feature on the QMS 4060 printer was designed to allow you to
set the end of document for print jobs being sent through these protocols.
Common Reasons to Use End Job Mode
If you are printing via the serial and parallel protocols, and one of the
following conditions exists, you may need to set the end job mode:
n
Multiple print jobs with little or no time delay and with no EOD
commands have been sent to the printer and the message window displays only one active job.
n
Multiple print jobs of the same printer language have been sent to
the printer and they print on the same page. (For example, you
send the AUTOEXEC.BAT file with no EOD command followed
with little or no time delay by the CONFIG.SYS file, and they both
print on the same page.)
n
Multiple print jobs of different printer languages “run” together as
if they are a single print job. (For example, you send a PCL print
job followed by a PostScript print job, and the PCL job prints and
is followed by what appears to be program code instead of your
PostScript print job.)
n
You want to print multiple jobs with header pages.
n
You want to print multiple jobs where job separation is important.
When your printer is in ESP mode, printing multiple jobs through the
serial and parallel protocols and end job mode is not set, ESP technology interprets the emulation for only the first job. The print jobs that
Additional Technical Information
5-21
End Job Mode
follow are interpreted as being the same emulation as the first job. For
example, if there are two print jobs, the first a PCL file with no EOD
command, and the second a PostScript file with a Ctrl-D (a PostScript
end-of-file character)—ESP technology interprets the emulation of
the first job correctly. But since the first print job has no EOD command, it “runs” into the second job, and even though the second job is
PostScript, it prints in PCL.
Using the EOD Commands
Since the serial and parallel protocols may not be able to detect an
EOD automatically, due to a lack of an EOD command in some printer
languages, you can insert an EOD command at the end of your file to
tell the printer where your print job ends. QMS Crown printers recognize two end-of-document commands: QMS EOD and HP EOD.
These commands are functionally the same. They enable data
stream sensing for the EOD command, allowing your host computer
to control print job separation. The QMS EOD and the HP EOD
commands perform an end of document for all of the printer
emulations supported on your printer (PostScript, HP-GL, HP PCL,
and Lineprinter).
See your system administrator or applications development department to have them identify the standard EOD command for your organization, or to have them select a standard EOD command.
Setting the End Job Mode for the Serial and
Parallel Protocols
Your printer can be connected through the optional serial or standard
parallel interface to a stand-alone PC, to a PC print server, or to some
other type of print queuing system. This section provides a quick
guide to the steps needed to set the end job mode for each environment. The following sections provide more detailed information for
each step.
5-22
QMS 4060 Print System Reference
End Job Mode
Stand-Alone PC
1
Set the end job mode from the printer's control panel.
2
Add the EOD command to your file.
Note: If using steps 1 and 2 is not feasible in your stand-alone PC
environment, you can alternatively use a program that either
causes an emulation timeout or that inserts an EOD command
between each print job. See your QMS vendor for more
information on this type of program.
»
PC Print Server
1
Set the end job mode from the printer’s control panel.
2
Create a job separator to append an EOD command and
send it between each print job.
Other Print Queuing Systems
If you use a print queuing system other than a PC print server and
you experience what appears to be an EOD command problem, you
may need to use another procedure, such as a print utility, an initialization sequence, or a header page to add an EOD command. See
your print queuing system documentation, your network administrator, or your QMS vendor for more information.
Setting the End Job Mode via the Control
Panel
Use the following procedure to set the end job mode from the printer’s
control panel for printers connected via the optional serial or parallel
interface to a stand-alone PC, a PC print server, or some other type of
print queuing system.
»
Note: If you print both serial and parallel protocol jobs, then you must
set the end job mode for each protocol.
Wait for the printer to go idle, and then press the control panel buttons
in the order shown in the following instructions to access the End Job
Mode option. The printer responds by displaying a status message in
the message window.
Additional Technical Information
5-23
End Job Mode
»
Note: You may need to press the Next button one or more times to
advance through the list of selections or options.
Key
Purpose
Message Window
Online
Turns off the Online indicator
and readies the printer for
configuration.
IDLE
Menu
Accesses the configuration
menu.
CONFIGURATION
OPERATOR CONTROL
Next
Advances to the Operator
Control/Administration menu.
CONFIGURATION
ADMINISTRATION
Select
Accesses the Administration
menu
ADMINISTRATION
COMMUNICATIONS
Next
Advances to the
Communications/ Parallel (or
Serial) menu.
COMMUNICATIONS
PARALLEL(or SERIAL)
Select
Accesses the Parallel (or Serial) PARALLEL/SERIAL
menu.
MODE
Next
Advances to the Parallel (or
Serial)/End Job Mode menu.
PARALLEL/SERIAL
END JOB MODE
Select
Accesses the End Job Mode
menu.
Next
Advances to the appropriate
option (QMS EOD, HP EOD, or
None).
END JOB MODE
OPTION
END JOB MODE
OPTION
Select
Selects the option.
Returns to the Parallel (or
Serial)/End Job Mode menu.
5-24
Online
Asks you if you want to save
your change.
Next
Advances to the Yes option.
Select
Saves your change and idles
the printer.
Online
Puts the printer back on line.
OPTION
IS SELECTED
PARALLEL/SERIAL
END JOB MODE
SAVE CHANGES?
NO
SAVE CHANGES?
YES
IDLE
IDLE
QMS 4060 Print System Reference
End Job Mode
Adding an EOD Command to Your File
When adding an EOD command to your file, use the syntax for the
selected EOD command exactly as written (the command's syntax is
case sensitive).
»
Note: <ESC> represents the escape character. (The decimal value
for the escape character is 027, and the hexadecimal value is 1B.)
How you enter the escape character depends on your application.
Some applications allow you to press and hold the ALT key and then
type 027 to enter the escape character, while others allow you to type
certain character sequences to represent the escape character. See
your computer or application documentation to find out how to enter
the escape character on your system.
For this EOD command... Use this syntax...
»
QMS EOD
%%EndOfDocument
<CR><LF>
HP EOD
<ESC>%-12345X
Note: The <CR><LF> sequence following the %%EndOfDocument
line for the QMS EOD is necessary to avoid an INPUT IDLE message
remaining in the printer message window after the document finishes
printing.
When the QMS EOD or the HP EOD is set, the printer does not recognize the Ctrl-D EOD command. Add your organization's standard
EOD command to the end of your print file, or add it to a separate file
as follows.
Adding an EOD Command to the End of Your File
Create an output file (for example, ASCII, PCL, or PostScript file to
disk) and add your organization's standard EOD command (QMS
EOD or HP EOD) to the end of that file.
Additional Technical Information
5-25
End Job Mode
Sample output file:
Text
Text
Text
Text
%%EndOfDocument
Adding an EOD Command to a Separate File
Create an ASCII text file that contains only the EOD command. For
example, create a DOS batch file listing each print filename followed
by the EOD command filename for each file being printed. Then “run”
the batch file to print your list of files.
Sample DOS batch file:
Command
Explanation
Print mktg.doc
Print end.txt
Print acct.doc
Print end.txt
Job filename
EOD command filename
Job filename
EOD command filename
Creating a Network Job Separator
If your printer is connected to a network through a PC and the PC is
acting as a print server managing the printing of shared network files,
then your system administrator must create a job separator and
associate it with a print job queue. Different network environments
have different procedures for creating the job separator, such as
initialization sequences, custom banner pages, print job headers, or
print job trailers. The print server does not necessarily send multiple
print jobs to the printer in the order that you queued them to the
printer. The network job separator is accessed with each print job, so
this ensures that network job separation is enforced. See the QMS
Crown Network Notes on the QMS Software Utilities CD-ROM for
more information on how to create a network job separator for several
commonly used networks.
5-26
QMS 4060 Print System Reference
Parallel
Interface Modes
Parallel Interface Modes
In addition to Centronics parallel communication, your printer’s parallel interface provides IEEE 1284 bidirectional parallel communication,
which supports five modes of operation. The printer automatically recognizes and uses the mode dictated by the host.
Byte Mode
Printer-host communication is done in bytes.The byte mode may be
used by the host device in a DMA (Direct Memory Access) mode for
more efficient operation.
When byte transfer is complete and there is no more data to transmit,
the host may do one of the following:
n
Terminate and return to the compatibility mode.
n
Stay in the Host Busy, Data Not Available phase.
n
Set Host Busy Low, putting the interface into the idle phase.
If there is additional data, the host may do one of the following:
n
Set Host Busy Low, indicating that the host can accept additional
data.
n
Stay in the Host Busy, Data Not Available phase.
n
Terminate and return to the compatibility mode.
Check your host documentation to see if the host is IEEE 1284 compatible.
Compatibility Mode
Printer-host communication is done in a manner that ensures compatibility.
Additional Technical Information
5-27
PS Protocol
Option
ECP (Enhanced Compatibility Port) Mode
This is an advanced version of byte mode which allows transfer of
data in either direction without returning to the compatibility mode.
The communication is a half-duplex channel with either device, the
host or the printer, making a request for data transfer when there is
available data. In the case of simultaneous requests for transfer, the
printer always defers to the host.
EPP (Enhanced Parallel Port) Mode
Printer-host communication is done via asynchronous bidirectional
eight-bit transfer. A return to compatibility mode is not required.
Nibble Mode
Printer-host communication is done in nibbles (four bits; one-half
byte) with the low order nibble sent first. A transfer of two nibbles is
required for each byte of information.
PS Protocol Option
Your QMS 4060 Print System supports PS Protocol, a new protocol
for communication between the printer and a host computer over the
parallel, optional serial, and optional network interfaces. This binary
communications protocol (BCP) allows any 8-bit binary value (0-255)
to be treated as data, while allowing a few of the values to function as
special control characters. When communicating 8-bit binary data in
binary or binary fixed mode, the printer uses the quoting mechanism
of the binary communications protocol to distinguish between the
special control characters and print job binary data.
5-28
QMS 4060 Print System Reference
PS Protocol
Option
To differentiate data from the special control characters, any data that
is the same as one of the following special control characters must be
quoted.
ASCII
ASCII
Keyboard Name
ASCII
Hex
Control Function
^A
^C
^D
^E
^Q
^S
T
^\
0x01
0x03
0x04
0x05
0x11
0x13
0x14
0x1C
Quote data character
Abort job and flush to end of
file
End-of-file marker
(Reserved for future use)
XON in XON/XOFF flow
control
XOFF in XON/XOFF flow
control
Job status request
(Reserved for future use)
SOH
ETX
EOT
ENQ
DC1
DC3
DC4
FS
A data byte is quoted by replacing it with a two-character sequence.
The first character is a ^A (ASCII hex 0x01), and the second character is the character itself XORed with the ASCII value 0x40. For example, to send the value 0x14(^T) as data, send the two-character
sequence 0x01 0x54 (^a T) instead. (ASCII “T” is the result of XORing
^T with 0x40).
This method of quoting guarantees that whenever the printer receives
any of the eight control characters, the control function is intended
regardless of whether the preceding character is a ^A. Any data byte
not equal to one of the eight special control characters is transmitted
by sending the data byte.
For more information on BCP and quoting, see the PostScript Language Reference Manual (Adobe Systems, Inc., Reading, MA: Addison-Wesley, 1990, ISBN 0-201-18127-4), the “Adobe Serial and
Parallel Communications Protocols Specification” (in Adobe Developer Support. Adobe Systems, Inc., February 14, 1992), and the
“PostScript Language Reference Manual” (in Supplement for Version
2011, Adobe Systems, Inc., January 24, 1992).
Additional Technical Information
5-29
PS Protocol
Option
Options
The following options are available in the PS Protocol menu:
Menu
Administration/Communications/Interface/PS Protocol
Choices Name and Description
Interfaces
Normal—Enables standard, ASCII hex
Parallel, Serial,
protocol. Data is sent and received in Ethernet, TokenASCII format. This mode is
Ring, LocalTalk
recommended if you do not print
binary data. It was designed for data in
the printable ASCII range. Print jobs
can alter the PS protocol value through
PostScript operators.
Normal Fixed—Enables standard, ASCII
hex protocol. Print jobs cannot alter
this value through PostScript
operators.
Parallel, serial,
Ethernet, TokenRing, LocalTalk
Binary—Enables binary communications
protocol. Print jobs can alter this value
through PostScript operators. Data in
the printable ASCII range also prints).
Parallel, Serial,
LocalTalk,
Ethernet, TokenRing
Binary Fixed—Enables binary
communications protocol. Print jobs
can not alter this value through
PostScript operators. Data in the
printable ASCII range also prints.
Parallel, Serial,
LocalTalk,
Ethernet, TokenRing
QBinary (Quoted Binary)—Enables binary Ethernet, Tokencommunications protocol. Print jobs
Ring
can alter this value through PostScript
operators. Data in the printable ASCII
range also prints. Use the special
quoting mechanism for the special
characters and ^D (EOF).
5-30
QMS 4060 Print System Reference
PS Protocol
Option
Qbinary (Quoted Binary) Fixed—Enables Ethernet, Tokenbinary communications protocol. Print Ring
jobs cannot alter this value through
PostScript operators. Data in the
printable ASCII range also prints. Use
the special quoting mechanism for the
special characters and ^D (EOF).
Default
Normal
Notes
A data stream sent through the serial or parallel interface
using Binary is treated the same as a data stream sent
through an optional network interface using QBinary.
However, a data stream sent through an optional network
interface using QBinary is not treated the same as a data
stream sent through the same interface using Binary.
Advantages
The main advantage of using the Binary and Binary Fixed PS protocol
modes when sending binary data is that these modes compress the
data stream allowing your documents to be smaller so you can send
smaller jobs to the printer. For example, some device drivers can format bit map images as binary data instead of as ASCII hex data.
Implementation
To implement PS protocol for sending binary data on your system you
need a device driver available with some applications or operating
systems, or you can alternatively use a program to read the data and
write out the quoted characters. Contact QMS for any available information on device drivers or binary filter programs.
Additional Technical Information
5-31
HP-GL Color
Encoding
HP-GL Color Encoding
The term “pen” in the HP-GL emulation refers to a logical pen (in
other words, the current pen position) rather than to a physical pen on
a plotter. A pen and a pen color are selected to draw images. This
emulation supports 8 pens and pen colors.
Since your QMS 4060 Print System is a monochrome (black and
white) printer, the pen colors are converted to shades of gray. The
default color mappings for the 8 pens are as follows:
»
Pen
Pen Color
Level of Gray
1
2
3
4
5
6
7
8
Black
Black
Red
Green
Blue
Violet
Orange
Brown
100%
100%
70%
41%
89%
59%
25.8%
50%
Note: The default color for both pen 1 and pen 2 is black. However,
the pen width for these two pens is different. Pen 1 is 0.7 mm and pen
2 is 0.3 mm.
The printer maps each pen to its assigned color, then converts the
color to a grayscale using the National Television System Committee
(NTSC) standard equation for encoding color. This equation converts
a given set of CMYK values to grayscale. For the 8 pen colors
assigned to pens 1 - 8, the printer uses the designated grayscale; for
any other pen color, the printer uses the following equation:
[(C*0.3) + (M*0.59) + (Y*0.11) + K] ÷ 255
»
Note: This equation assumes that each grayscale is a byte value that
ranges from 0 to 255 (100%). If the sum of the left-side (calculation in
brackets) of the NTSC equation is greater than 255, then the sum is
set equal to 255.
v
5-32
QMS 4060 Print System Reference
A
QMS Customer
Support
In This Chapter . . .
n
“Sources of Support” on page A-2
n
“QMS World-wide Offices” on page A-5
Sources of
Support
Sources of Support
Several sources of help and information are available, depending on
the type of help you need:
Your QMS Vendor
Your local vendor (the one from whom you bought the printer) may be
best equipped to help you. Your vendor has specially trained service
technicians available to answer questions, and the equipment to analyze your printer problems.
Your Application Vendor
Often, “printing” problems have more to do with the application being
used than with the printer. In this case, the application manufacturer
is the best source of help.
Q-FAX
Q-FAX, a QMS information retrieval service, provides application
notes, technical support notes on common printing problems, and
information about printer specifications, options, accessories, consumables, and prices.
In the United States and Canada, call (800) 633-7213 to reach
Q-FAX. In all other countries, call (334) 633-3850. Have your fax number handy when you call (or place the call from your fax machine's
handset).
You can choose to have either a directory (a list of currently available
documents) or a specific document sent to you. The first time you call,
request the directory (press 2 on your phone or fax keypad when
prompted). Then call back to request specific documents. You can
order up to three documents per call.
A-2
QMS 4060 Print System Reference
Sources of
Support
CompuServe
Through CompuServe, you ask general (non-technical) questions,
share information with other users, and access printing information
and programs. When you use CompuServe, type go qmsprint↵ to
go directly to the forum where QMS is located. The QMS library section contains application notes, printer drivers, utilities, technical information, and announcement files.
Internet
The QMS server provides access to technical reports, new product
announcements, a trade show schedule, and other general information about QMS.
If you have access to the World Wide Web, you can view the QMS
home page at http://www.qms.com/. The QMS ftp resource is
ftp.qms.com.
QMS Customer Response Center (CRC)
You can contact the QMS Customer Response Center (CRC) in three
different ways:
n
»
Telephone—You can call the CRC at (334) 633-4500 (US)
Monday–Friday, 7:00 am–6:00 pm, Central Time.
Note: If you call for assistance, have the following information
ready so our technicians can help you more quickly:
þ Your phone number, fax number, and shipping address
þ A description of the problem
þ The printer model
þ The type of host computer you’re using
þ The type and version of operating system you’re using
þ The interface you’re using, and, if serial, the protocol (for
example, XON/XOFF)
þ The application and version you’re using
QMS Customer Support
A-3
Sources of
Support
þ The emulation you’re using
þ Your printer firmware version (listed on the status/start-up
pages)
A-4
n
Fax—You can fax questions to the CRC at (334) 633-3716 (US).
Provide the same information as listed above, and indicate
whether you would like a faxed or a phoned reply.
n
Internet—If you have access to the World Wide Web, you can
access the CRC through the QMS home page at
http://www.qms.com/
QMS 4060 Print System Reference
QMS Worldwide Offices
QMS World-wide Offices
QMS United States and Latin America
General Contact
1 (334) 633-4300
Fax 1 (334) 633-4866
Email info@qms.com
Internet http://www.qms.com
Information on QMS products, supplies, and accessories, and on the
authorized QMS remarketer or service provider nearest you
1 (800) 523-2696
Customer Response Center (CRC)
Technical Assistance
1 (334) 633-4500
7:00 am–6:00 pm Central Time
Fax 1 (334) 633-3716
Internet http://www.qms.com
Latin America Fax
1 (334) 639-3347
National Service
Service Information, Installation, and Maintenance Pricing
1 (800) 762-8894
On-Site Service and Depot Repair Information
1 (800) 858-1597
7:00 am–7:00 pm Central Time
Spare Parts Ordering and Information
1 (334) 633-4300 x2530
8:00 am–5:00 pm Central Time
QMS Canada
General Contact
1 (514) 333-5940
Fax 1 (514) 333-5949
Supplies and Accessories
1 (800) 268-0343 x223
National Service
On-Site Service and Depot Repair Information
1 (800) 268-4969
8:30 am–7:00 pm Eastern Time
Spare Parts Ordering and Information
1 (905) 206-9234 x238
8:30 am–5:00 pm Eastern Time
QMS Customer Support
A-5
QMS Worldwide Offices
QMS in Japan
General Contact
(+81)-3 3779-9600
Fax (+81)-3 3779-9650
Internet http://www.qmsj.co.jp
QMS in Latin America
General Contact
Cra 43 DD#8-42
Officina 201
Medellin, Colombia
(+57) (4) 312 13 70
Fax (+57) (4) 268 92 97
QMS EMEA
QMS Australia Anitech
Sydney Business & Tech. Centre
52/2 Railway Parade
2141 Lidcombe NSW
Australia
(+61) 2–9901 3235
Fax (+61) 2–9901 3273
QMS Benelux Planetenbaan 60 ‘Corner Plaza’
3606 AK Maarssen
Belgium, NetherThe Netherlands
lands, and all
(+31) 346–551333
unlisted countries
Fax (+31) 346–550170
Internet http://www.qms.nl
QMS France
QMS GmbH
Germany and
Austria
A-6
Vélizy Plus
1 Bis, Rue du Petit Clamart
78142 Vélizy Cedex
France
(+33) 1–410 79 393
Fax (+33) 1–408 30 110
Gustav Heinemann Ring 212
D-81739 Munich
Germany
(+49) 89 63 02 67 0
Fax (+49) 89 63 02 67 67
QMS 4060 Print System Reference
QMS Worldwide Offices
QMS Italy
Via della Repubblica 56
43100 Parma
Italy
(+39) 52–1231 998
Fax (+39) 52–1232 902
QMS Nordic
Arenavägen 41, 6th floor
121 77 Johanneshov
Sweden, Finland,
Sweden
Norway, and
(+46) 8–600 01 30
Denmark
Fax (+46) 8–600 01 33
QMS South
Africa
QMS UK
United Kingdom
and Ireland
Saskay House
Unit 24 Sunninghill Business Park
Peltier Road, Sunninghill, Johannesburg
Republic of South Africa
(+27) 11–807 6957
Fax (+27) 11–807 6960
Old Bridge House, The Hythe
Staines, Middlesex TW18 3JF
United Kingdom
(+44) 1784–442255
Fax (+44) 1784–461641
v
QMS Customer Support
A-7
B
Technical
Specifications
In This Chapter . . .
n
“Print Engine Specifications” on page B-2
n
“Controller Specifications” on page B-6
n
“Print Media” on page B-7
n
“Print Media” on page B-7
n
“PC Cable Pinouts” on page B-12
n
“Printer Options” on page B-18
Print Engine
Specifications
Print Engine Specifications
Engine
Fujitsu Super Gamma 40
Duty Cycle
Maximum - 300,000 images per month
Printing
Technology
Laser diode, electro-photographic
Paper Size
Letter, Legal, Statement, 11"x17", Executive, A3,
A4, A5, B4, B5, B4 (JIS), B5 (JIS), B4 (ISO), B5
(ISO)
Paper Type
Plain paper, labels, recycle paper, transparencies,
bond paper, pre-punched paper
Paper Input
Capacity
3 trays x 500 sheets (64 g/m2) standard or custom
Paper Output
Capacity
500 sheets (64 g/m2) face down tray
Resolution
300x300 dpi
600x600 dpi
Warm-Up Time
Less than 150 seconds
3000 sheets (A4, Letter size only) optional LargeCapacity Input Feeder (LCIF)
2000 sheets optional Large-Capacity Output
Stacker (LCOS)
Print Speed
Paper Size
B-2
Simplex
Duplex
Letter
40
40
Legal
25
25
11”x17”
21
15
Executive
40
40
A3
21
15
A4
40
40
A5R
40
40
B4R (JIS)
24
24
QMS 4060 Print System Reference
Print Engine
Specifications
Paper Size
Simplex
Duplex
B5 (JIS)
34
34
Custom (width =
3.93" to 11.69"/
100mm to 297mm,
length = 7.16" to 8.5"/
182mm to 215.9mm)
40
40
Custom (width =
3.93" to 11.69"/
100mm to 297mm,
length = 8.5" to 17"/
215.9mm to
431.8mm)
21
15
Custom (width =
3.93" to 11.69"/
100mm to 297mm,
length = 8.5" to
11.69"/215.9mm to
297mm)
30
30
Notes:
1. Unit of measure: Images Per Minute (IPM)
2. In simplex and duplex modes, all the speeds have a ±5%
tolerance.
3. JIS - Japan Industrial Standards
Physical Specifications
Item
Specification
Dimensions Width
22.5"(570mm
Weight
Depth
Height
24.8"(630mm)
40.6"(1030mm)
Main Unit - Approximately 287 lbs (130 kg)
LCIF - 44 lbs (20 kg)
LCOS - 90.5 lbs (41 kg)
Technical Specifications
B-3
Print Engine
Specifications
Item
Service
Area
Specification
Front
Back
Left
Right
25.6"(650mm)
33.5"(850mm)
33.5"(850
mm)
33.5"(850
mm)
Electrical Specifications
Item
Input Power
Specifications
Voltage
120 to 127 VAC ± 10%, 12A
200 TO 240 VAC ± 10%, 7A
Phase
Single-phase
Frequency
50/60 Hz +2%,-4%
Power Consumption
1300 VA or less than during
operating
Heat Production
894 kcal per hour
Environmental Specifications
Item
Ambient Conditions
Specification
Operating
Non-operating
Temperature
50° - 95° F/10° - 35°C 32° - 95° F/0° - 35°C
Humidity
20% -80% no
condensation
20% -80% no
condensation
Maximum and wetbulb 84° F/ 29° C (no condensation)
temperature
Temperature and
humidity gradients
B-4
27° F/15° C per hour or less and 30% RH per
day or less (no condensation)
QMS 4060 Print System Reference
Print Engine
Specifications
Item
Specification
Acoustic noise
55 dB(A) or less - printer only
57 dB(A) or less - printer with LCOS & LCIF
50 dB(A) or less - standby
Dust
0.15 mg./m3 (stearic acid)
Ozone emission
0.1 PPM or less
Tilt
Up to maximum of 5° from level
Technical Specifications
B-5
Controller
Specifications
Controller Specifications
Emulations
PostScript Level 2 (300/600 dpi)
HP PCL 5e (HP LaserJet 4Si compatible, without
PJL; 300/600 dpi))
HP-GL 7475A/7550A/Draftmaster (300/600 dpi)
Lineprinter (300/600 dpi)
Support for optional downloadable emulations
Fonts
42 resident PostScript fonts, including OCR B that
can be scaled from 4 points upward and rotated to
any angle in 1° increments; all typefaces have
multilingual character sets
1 resident bitmap HP PCLe font in 25 symbol sets,
35 resident scalable HP PCL5e fonts in up to 32
symbol sets, 1 resident scalable HP PCL5e font in
1 symbol set, and 5 resident scalable HP PCL5e
fonts, all of which can automatically be rotated to
landscape orientation
40 resident HP-GL symbol sets
Support for Type 1 and Type 3 host-resident
downloadable PostScript fonts
Support for Type 42 (PostScript format) hostresident downloadable TrueType fonts
Support for Truetype fonts in PCL
B-6
QMS 4060 Print System Reference
Print Media
Interfaces
Centronics/IEEE 1284 bidirectional parallel and
CrownNet Ethernet interfaces
Support for an optional interface (LocalTalk,
Ethernet, Token-Ring, DECnet, or Serial)
SCSI interface, supporting up to 3 external hard
disks and one optional CrownCopy (scanner)
Memory
32 MB RAM (60 ns) standard, upgradable to 128
MB
SIMM connector for up to 16 MB optional fonts
System
Software
Softloadable; stored on internal hard disk
Type
NEC 4300 processor operating at 133 MHz
Print Media
Delivery
Face down output tray
500 sheets of 20 lb (75 g/m2) paper
Output stacker
2000 sheets of 20 lb (75 g/m2) paper
3000 sheets of 20 lb (75 g/m2) paper
Feed
3 standard input paper trays
About 500 sheets each of 20 lb (75 g/m2) paper, for a total
of 1500 sheets
Large-capacity input feeder (LCIF)
3000 sheets of 20 lb (80 g/m2) paper
Loading
Automatic from input paper trays, custom tray, or largecapacity input feeder
Sizes
(See the following table)
Technical Specifications
B-7
Print Media
B-8
Types
Cut-sheet paper, transparencies, 3-hole punched paper,
preprinted forms, and labels. See “Consumable
Supplies” on page B-10, for recommended media.
Weight
Plain, Bond, or Recycled Paper: 17-36 lb (64-139 g/m2)
Labels: 31-36 lb (120-139 g/m2)
QMS 4060 Print System Reference
Print Media
Print Media SIzes
Media
Media Size
Inches
Imageable Area
Millimeters
Inches
Millimeters
Feed
Edge
Input/
Output
11x17
11.00x17.00 279.4x431.8
10.67x16.67 270.93x423.38 Short
D, L, M, P, U
A3
A4
A5
11.69x16.54 297.0x420.0
11.69x8.27 297.0x210.0
5.85x8.27
148x210.0
11.35x16.20 288.21x411.48 Short
7.93x11.35 201.51x288.21 Long
5.48x7.94
139.12x201.55 Short
D, L, M, P, U
D, F, L, M, U
P D, D, L, M,
U, P
B4 (JIS)
B5 (JIS)
10.12x14.33 257.0x364.0
7.17x10.12 182.0x257.0
9.77x13.998 248.24x355.56 Short
6.87x9.78
173.40x248.50 Short
D, L, M, P, U
D, L, M, P, U
B4 (ISO)
B5 (ISO)
9.84x13.90
6.93x9.84
9.50x13.57
6.59x9.51
C, D, P
C, D, P
250x353
176x250
241.47x344.55 Short
167.30x241.55 Short
Executive 7.25x10.50
184.20x266.70
6.92x10.20
175.73x259.13 Short
D, M, P
Legal
Letter
215.9x355.6
279.40x215.90
8.16x13.67
8.17x10.67
207.26x347.18 Short
207.48x270.93 Long
D, L, M, P, U
D, F, L, M, P,
U
139.7x215.9
5.16x8.17
131.06x207.48 Short
C, D. P
8.5x14.0
11.00x8.5
Statement 5.50x8.50
*D=Duplexer, F=Large-Capacity Input Feeder, L=Lower tray, M=Middle tray, U=Upper tray,
P=Large-Capacity Output Stacker, C=Custom tray
Technical Specifications
B-9
Consumable
Supplies
Consumable Supplies
Trays
Three 500-sheet paper trays
Media —Sizes
See “Print Media SIzes” on page B-9, for media
size information.
Media—
Recommended
Brands
Paper
Paper Storage
Laser—Hammermill Laser Print
Labels
Avery 5160
Adhesive label stock should have
pressure-sensitive (peel-and-stick)
adhesive backing and should be
17-34 lb (64 -128 g/m2). The label
backing must be able to withstand
heat generated by the fixing
assembly (190° C/374° F). Use
only label sizes letter or A4.
Transparencies
3M CG3300
Use only transparency sizes letter
or A4. Transparencies must be
able to withstand the heat
generated by the fuser (190° C/
374° F), without transformation.
Sealed in
cartons
Recommended storage
temperature and humidity are 32°95°F/0°-35°C and 20%-80% RH.
The recommended storage
temperature and humidity for paper
in opened cartons are 59°-77°F/
15°-25°C and 40%-50% RH.
In unsealed
cartons
Consumable
Storage
B-10
Plain—Xerox 4024
Temperature
-4° to 122° F (-20° to 50° C)
Temperature
Change
27° F (15° C)/hour or less
Humidity
10% to 90% RH
Storage
18 months
QMS 4060 Print System Reference
Regulatory
Regulatory
CE Marking
International (EU)
EN 55022:1987
(Class AITE)
EN 60950:1992
IEC 801-2
IEC 801-3
IEC 801-4
Emissions
Safety
ESD
Radiated susceptibility
Fast transcients
Electromagnetic International (EU)
Compatibility
IEC 801-2
(EMC)
IEC 801-3
IEC 801-4
ESD
Radiated susceptibility
Fast transcients
Electromagnetic DOC (Canada)
Emissions (EMI) Canadian CRC c1374
Class A digital device
EU (International)
EN 55022:1987
Class A ITE
FCC (USA)
Title 47 CFR Ch. 1, Part 15 Class A digital device
VCCI (Japan)
VCCI V-3Class 1 ITE
Energy Star
(USA)
Class 1 ITE
Energy Star compliant
(base model only)
Product Safety
cUL (Canada)
EU (International)
UL (USA)
Product Laser
Safety
CDRH (USA)
(International)
Technical Specifications
CAN/CSA C22.2 No. 950-M90
EN 60950:1992
UL 1950, second edition
EU
Title 21 CFR Ch. I,
Subchapter J
IEC 825
B-11
PC Cable
Pinouts
PC Cable Pinouts
Centronics/IEEE 1284 Parallel
This table gives the pinouts for the printer end of the Centronics/IEEE
1284 parallel cable used to connect your printer to a computer.
Signal Pin No.
1
2
3
4
5
6
7
8
9
10
11
12
13
14
15
16
17
18
19-30
31
32
33
34
35
36
B-12
Signal Description
StrobeData 1
Data 2
Data 3
Data 4
Data 5
Data 6
Data 7
Data 8
AcnlgBusy+
Pe+
Select
Autofeed
Reserved
Ground
Ground
Vcc Test
Ground
Iprime
FaultReserved
Reserved
Reserved
Selectin
Direction
In
InOut
InOut
InOut
InOut
InOut
InOut
InOut
InOut
Out
Out
Out
Out
In
In
Out
In
QMS 4060 Print System Reference
PC Cable Pinouts
Notes to the Table
n
Direction refers to the direction of signal flow as viewed from the
printer.
n
Return denotes “twisted-pair return” and is to be connected at
signal-ground level. When wiring the interface, be sure to use a
twisted-pair cable for each signal and never fail to complete connection on the return side. To prevent noise effectively, these
cables should be shielded and connected to the chassis of the
system unit and printer, respectively.
n
All interface conditions are based on Transistor-Transistor Logic
(TTL) level. Both the rise and fall times of each signal must be
less than 0.2 microseconds.
n
Data transfer must be carried out by recognizing the ACKNLG or
BUSY signal.
n
The cable must have an overall braided shield, Belden 8345 or
equivalent.
n
Connectors must have shielded housings. The overall shield must
be bonded to the shielded housings at both ends of the cable.
Technical Specifications
B-13
PC Cable
Pinouts
Serial
This table gives the correct pinouts for the 9-pin male RS-232 serial
interface.
»
Note: The serial interface is an option which must be purchased
through your QMS vendor. See appendix A, “QMS Customer
Support,” for a list of locations and telephone numbers.
Pin Name
1
Not Used
2
Receive Data (RXD)
3
Transmit Data (TXD)
4
Data Terminal Ready
(DTR)
5
Signal Ground (GND)
6
Data Set Ready (DSR)
7
Ready To Send (RTS)
8
Clear To Send (CTS)
9
Reserved
B-14
Pinout View from Printer Interface
QMS 4060 Print System Reference
PC Cable Pinouts
IBM PC/XT, PC/AT, and Compatible Computers
The following diagrams show the serial cable pinouts for IBM PC/XT,
PC/AT, and compatible computers.
»
Note: Not all serial cables are configured as shown and may require
an additional null-modem adapter. Check with your cable vendor for
compatibility.
To Printer
To CPU XT
To Printer
To CPU AT
9-Pin
25-Pin
Female
9-Pin
9-Pin
Female
1
Not
Used
1
Not
Used
RXD
2
2
RXD
RXD
2
2
RXD
TXD
3
3
TXD
TXD
3
3
TXD
DTR
4
20
DTR
DTR
4
4
DTR
DSR
6
6
DSR
DSR
6
6
DSR
GND
5
7
GND
GND
5
5
GND
RTS
7
4
RTS
RTS
7
7
RTS
CTS
8
5
CTS
CTS
8
8
CTS
9
»
Not
Used
9
Not
Used
Note: To download printer system software via the serial port, your
hardware must have RTS and CTS support. Make sure that pins 4
and 5 on the 25-pin serial cable and pins 7 and 8 on the 9-pin serial
cable are criss-crossed as shown in this diagram.
Technical Specifications
B-15
PC Cable
Pinouts
LocalTalk (Optional Interface)
The following table provides the pinouts for the printer’s optional 8-pin
LocalTalk interface:
Pin
Pinout View from Printer
Interface
Name
1,2,7 Reserved
3
Transmit Data - (TXD)
4
Signal Ground (GND)
5
Receive Data - (RXD)
6
Transmit Data + (TXD)
8
Receive Data + (RXD)
Macintosh to Serial
The following table provides the pinouts for a cable connecting the
Macintosh printer or modem port to the printer’s serial port:
»
Note: To download printer system software from a Macintosh, you
must have this type cable. Make sure pins 4 and 5 are crisscrossed
as shown in this diagram.
To Macintosh
DIN-8 Male
To Printer
DB-9 Female
HandshakeOut
1
7
RTS
HandshakeIn
2
8
CTS
TXD-
3
3
TXD
RXD-
5
2
RXD
GND,RXD+
4,8*
5
GND
6
Not Used
7
Not Used
* Pins 4 and 8 must be connected together on the DIN-8 cable.
B-16
QMS 4060 Print System Reference
PC Cable Pinouts
Ethernet
10BaseT RJ45
The following table provides the pinouts for the 10BaseT RJ45 Ethernet interface:
Pin Name
1
Transmit Data +
2
Transmit Data -
3
Receive Data +
4
No Contact
5
No Contact
6
Receive Data -
7
No Contact
8
No Contact
Pinout View from Printer Interface
10Base2 BNC
The following table provides the pinouts for the 10Base2 BNC
Ethernet interface:
Pin Name
1
Ground
2
Signal
Pinout view from Printer Interface
Technical Specifications
Ground
Signal
B-17
Printer Options
Printer Options
Cables
You may purchase cables from your local vendor.
See cable specifications, earlier in this chapter.
CrownCopy
Monochrome scanner/copier with automatic
document feed (ADF) capability; connects to the
external SCSI port via a SCSI 2 to Centronics 50
cable.
Emulations
Loadable disk format (requires optional hard disk
and additional memory):
LN03 Plus (300 dpi only; 15 typefaces)
QMS QUIC II (300 dpi only)
XES
CGM
QFORM
ImageServer II
Fonts
Kanji SIMM with 2 Morisawa fonts
Kanji external hard disk with 5 Kanji fonts
MICR fonts
Check with QMS, for a complete list of optional
fonts. See appendix A,“QMS Customer Support,”
for a list of locations and telephone numbers.
Forms Printing
QMS QFORM, printer-resident forms printing
enabler
Hard Disks—
External SCSI
See FAQ 7181 for a list of approved hard disks,
their manufacturers and part numbers, and the
QMS products on which they can be used. You can
access QMS FAQs through the Internet at http://
www.qms.com/support/supportbase/ or through QFAX. (See appendix A, “QMS Customer Support,”
to find out how to access
Q-FAX documents).
FAQ numbers are subject to change, so yo may
want to obtain a directory of Q-FAX documents
before requesting a specific document.
B-18
QMS 4060 Print System Reference
Printer Options
Image Printing
QMS ImageServer
Interfaces
CrownNet Ethernet (EtherTalk, LAN Manager/Lan
Server, NetWare, TCP/IP)
CrownNet Token-Ring (LAN Manager/Lan Server,
NetWare, TCP/IP)
DECnet
LocalTalk
Serial RS232
Check with your QMS vendor, for a complete list of
optional interfaces. See appendix A, “QMS
Customer Support,” for a list of locations and
telephone numbers.
Media Input
3000-sheet input paper deck (LCIF)
Media Output
2000-sheet output stacker (LCOS)
3000-sheet output stacker (LCOS)
Security
Security key
SIMMs
Kanji SIMM
Memory
8, 16, and 32 MB sizes; See FAQ 7181 for a list of
approved hard disks, their manufacturers and part
numbers, and the QMS products on which they can
be used. You can access QMS FAQs through the
Internet at http://www.qms.com/support/
supportbase/ or through Q-FAX. (See appendix A,
“QMS Customer Support,” to find out how to
access Q-FAX documents).
FAQ numbers are subject to change, so yo may
want to obtain a directory of Q-FAX documents
before requesting a specific document.
Storage
Internal IDE hard disk
External SCSI hard disks (up to 3)
Warning Device QMS BuzzBox Lite light/buzzer printer warning
device
Technical Specifications
B-19
Warranty
Considerations
Warranty Considerations
Various factors can affect a printer’s warranty. Two important ones are
consumables and electrostatic discharge. Read your printer warranty
carefully, and then store it in a safe place.
»
Note: Don’t return any merchandise to the manufacturer without
calling for a return merchandise authorization (RMA) number. See
appendix A, “QMS Customer Support,” for the QMS Customer
Response Center (CRC) telephone number where you can obtain an
RMA number.
Consumables and Your Warranty
The use of non-QMS consumables and/or accessories alone does
not affect either your warranty or any maintenance contract you may
have purchased. However, if QMS printer failure or damage is found
to be directly attributable to the use of non-QMS consumables and/or
accessories, QMS will not repair the printer free of charge. In this
case, standard time and material charges will be applied to service
your printer for that particular failure or damage. QMS recommends
that you use only QMS consumables and accessories to support your
printer. For Information on QMS products, supplies, and accessories,
and on the authorized QMS remarketer or service provider nearest
you, in the US, call 1 (800) 523-2696. In all other countries, check
appendix A, “QMS Customer Support,” for the QMS office closest to
you.
Electrostatic Discharge and Your Warranty
It's very important to protect the printer controller board and other
printer circuit boards from electrostatic damage.
If an anti-static wrist strap is provided in your printer option kit,
attach one end of it to your wrist and the other end to any convenient
electrical ground. The bare metal chassis of equipment, such as on
the back of a computer, is suitable if it is plugged in but turned off.
Never attach the wrist strap to any piece of equipment with an
electrical current present. Turn off all power switches first. Plastic,
B-20
QMS 4060 Print System Reference
Warranty
Considerations
rubber, wood, painted metal surfaces, and telephones are not acceptable grounding points. The printer isn't an acceptable grounding point
either because it must be unplugged before you perform this task.
If you don't have an anti-static wrist strap, discharge your body's
static electric charge by touching a grounded surface before you handle any printer boards or components and before removing the controller board cover. If you must walk around before completing your
task, discharge your body’s static electric charge again before touching the printer controller board.
Incidental and consequential damages caused by not discharging
electrostatic buildup can affect your printer warranty.
v
Technical Specifications
B-21
C
Document Option
Commands
In This Chapter . . .
n
“Supported QMS DOCs” on page C-2
Introduction
Introduction
This appendix lists the supported Document Option Commands
(DOCs) for your QMS 4060 Print System. The commands are
grouped by feature type.
Each command is preceded by either a DOC statement (%%) or an
IncludeFeature statement (%%IncludeFeature). See the QMS Crown
Document Option Commands manual for information on how to use
each command.
Supported QMS DOCs
Header/Trailer Page Commands
Print copyright statement
Print document creator
Print creation date and time
Print current date
Print document owner
Print document host
Print routing information
Print document title
Print version and revision
Print header page
Print trailer page
%%CopyRight:
%%Creator:
%%CreationDate:
%%Date:
%%For:
%%Host:
%%Routing:
%%Title:
%%Version:
%%IncludeFeature: header
%%IncludeFeature: trailer
HP-GL Emulation Commands
Select enhanced resolution
Expand plot
Select original paper size
Select pen width and color
Select plotter
Scale the image
C-2
%%IncludeFeature: enhanced
%%IncludeFeature: expand
%%IncludeFeature: size
%%IncludeFeature: pen
%%IncludeFeature: plotter
%%IncludeFeature: scaling
QMS 4060 Print System Reference
Supported QMS
DOCs
HP PCL 5e Emulation Commands
Enable scalable fonts
Install object
Remove object
Remove resource
Select default font
Select default font ID
Select symbol set
Set carriage return to CR+LF
Set linefeed to CR+LF
Set number of lines per inch
Set point size
Resource
%%IncludeFeature: scalablefonts
%%IncludeFeature: install
%%IncludeFeature: remove
%%IncludeFeature: removeresource
%%IncludeFeature: font
%%IncludeFeature: fontid
%%IncludeFeature: symbolset
%%IncludeFeature: criscrlf
%%IncludeFeature: lfiscrlf
%%IncludeFeature: linesperinch
%%IncludeFeature: pointsize
%%IncludeFeature: resource
Lineprinter Emulation Commands
Select font for current job
Set point size for current job
Specify character map type
Number lines
Set tabs
Set linefeed to CR+LF
Set carriage return to CR+LF
Set formfeed to CR+FF
Wrap lines
Set number of lines per page
Set margins
Set orientation
%%IncludeFeature: font
%%IncludeFeature: pointsize
%%IncludeFeature: map
%%IncludeFeature: number
%%IncludeFeature: tabs
%%IncludeFeature: lfiscrlf
%%IncludeFeature: criscrlf
%%IncludeFeature: ffiscrff
%%IncludeFeature: autowrap
%%IncludeFeature: linesperpage
%%IncludeFeature: lpmargins
%%IncludeFeature: lporientation
CCITT Groups 3 and 4 Commands
Start decompression
Set encoded byte flag
Set end of block
Set line end
Eject page
Set image position
Invert image
%%ImageData
%%EBAMode
%%BlockEnd
%%LineEnd
%%PageEnd
%%ImagePosition
%%InvertImage
Document Option Commands
C-3
Supported QMS
DOCs
Set dpi for image expansion
Set data compression
Reverse bits
End print job
Set image size
Set image rotation
%%DPI
%%Compression
%%BitReverse
%%JobEnd
%%ImageSize
%%Rotation
Document Formatting
Logical page orientation
Duplex print jobs
Number up printing
Offset logical page
Print borders
Scale logical page
Booklet printing
Print background images
Set printer resolution
Print page range
Collate print job
Logical page size
Select number of copies
Select paper
Select output bins
Select orientation
Select emulation
Logical margins
Select print mode
%%IncludeFeature: pageorientation
%%IncludeFeature: duplex
%%IncludeFeature: pagegrid
%%IncludeFeature: pageoffsets
%%IncludeFeature: border
%%IncludeFeature: pagescaling
%%IncludeFeature: booklet
%%IncludeFeature: background
%%IncludeFeature: resolution
%%IncludeFeature: pagerange
%%IncludeFeature: collate
%%IncludeFeature: pagesize
%%IncludeFeature: numcopies
%%IncludeFeature: input
%%IncludeFeature: output
%%IncludeFeature: orientation
%%IncludeFeature: emulation
%%IncludeFeature: margins
%%IncludeFeature: quality
Sessions Command
New layout command
%%IncludeFeature: newlayout
LN03 Commands
Identify product
Control line wrap
Specify default paper size
C-4
%%IncludeFeature: product
%%IncludeFeature: autowrap
%%IncludeFeature: paper_size
QMS 4060 Print System Reference
Supported QMS
DOCs
Control transformation point
Adjust image horizontally
Adjust image vertically
Set power-up configuration
%%IncludeFeature:
paper_size_override
%%IncludeFeature: xorigin
%%IncludeFeature: yorigin
%%IncludeFeature: reset_override
v
Document Option Commands
C-5
D
Notices
In This Chapter . . .
n
“Manual Notice” on page D-2
n
“FCC Compliance Statement” on page D-2
n
“Canadian Users Notice” on page D-3
n
“Europe RFI Statement” on page D-3
n
“Acoustics” on page D-4
n
“Data Communications (United Kingdom only)” on page D-4
n
“Safety Standards and General Considerations” on page D-5
n
“Laser Safety” on page D-5
n
“Power Cord” on page D-6
n
“Colophon” on page D-6
Manual Notice
Manual Notice
QMS, Inc. reserves the right to make changes to this manual and to
the equipment described herein without notice. Considerable effort
has been made to ensure that this manual is free of inaccuracies and
omissions. However, QMS, Inc. makes no warranty of any kind
including, but not limited to, any implied warranties of merchantability and fitness for a particular purpose with regard to this
manual. QMS, Inc. assumes no responsibility for, or liability for, errors
contained in this manual or for incidental, special, or consequential
damages arising out of the furnishing of this manual, or the use of this
manual in operating the equipment, or in connection with the performance of the equipment when so operated.
FCC Compliance Statement
This equipment has been tested and found to comply with the limits
for a Class A digital device, pursuant to Part 15 of the FCC Rules.
These limits are designed to provide reasonable protection against
harmful interference when the equipment is operated in a commercial
environment. This equipment generates, uses, and can radiate radio
frequency energy, and if not installed and used in accordance with the
instructions, may cause harmful interference to radio communications. Operation of this equipment in a residential area is likely to
cause harmful interference in which case the user will be required to
correct the interference at his own expense.
»
Note: A shielded cable is required to comply with the limits for a Class
A digital device, pursuant to Part 15 of the FCC rules.
▲ Caution: Any modifications or changes to this product not expressly
approved in writing by the manufacturer responsible for compliance to
Federal Regulations could void the user's authority to operate this
product within the Laws and Regulations of the Federal
Communications Commission.
D-2
QMS 4060 Print System Reference
Canadian Users
Notice
M WARNING! To prevent electrical shock, do not remove any covers
from your printer unless you are experienced in working with circuit
boards and are following instructions for procedures described in
QMS documentation.
ACHTUNG! Um elektrische Kurtzschlüsse zu vermeiden, entfernen
Sie keine Gehaüseteile von Ihrem Drucker, wenn Sie keine
Erfahrungen im Umgang mit elektrischen Bauteilen haben. Befolgen
Sie die in der QMS Dokumentation beschriebenen Hinweise.
Canadian Users Notice
This Class A digital apparatus complies with Canadian ICES-003.
Cet appareil numérique de la classe A est conforme á la norme
NMB-003 du Canada.
Europe RFI Statement
This is a Class A product. In a domestic environment, this product
may cause radio interference, in which case the user may be required
to take adequate measures.
Notices
D-3
Acoustics
Acoustics
Acoustic noise levels per ISO 9296:
Printing:
LpAm:
56 dB (bystander)
LWAd:
7.0 B
Standby:
LpAm:
39 dB (bystander)
LWAd:
5.4 B
Geraeuschemission nach ISO 9296:
Druckend:
LpAm:
56 dB (nachbararbeitsplatz)
LWAd:
7.0 B
Betriebs-bereit:
LpAm:
47 dB (nachbararbeitsplatz)
LWAd:
5.4 B
Data Communications (United
Kingdom only)
Pursuant to Section 22 of Telecommunications Act of 1984, this product is approved for indirect connection to Public Telecommunications
systems within the United Kingdom under the General Approval number NS/G/1234/J/100003.
D-4
QMS 4060 Print System Reference
Safety Standards
and General
Considerations
Safety Standards and General
Considerations
This printer has been designed to conform to recognized technical
standards, including the following national and international product
safety standards and norms:
n
UL 1950
n
U.S. CDRH 21CFR Ch. 1 Subch J
n
EN 60950 (IEC 950)
n
EN 60825 (IEC 825)
n
CSA C22.2 No. 950-95, Third Edition
Any unauthorized removal of safety covers, manipulation of safety
switches, and interference with the safety system is strictly prohibited.
Such actions can cause personal injury and can damage the system.
Also make sure that the operating and maintenance areas are not
obstructed in any way.
Laser Safety
This printer is certified as a Class 1 laser product under the U.S.
Department of Health and Human Services (DHHS) Radiation Performance Standard according to the Radiation Control for Health and
Safety Act of 1968. This means that the printer does not produce hazardous laser radiation.
Since radiation emitted inside the printer is completely confined within
protective housings and external covers, the laser beam cannot
escape from the machine during any phase of user operation.
Notices
D-5
Power Cord
Power Cord
The following power cord requirements are in effect for the 220v QMS
4060 Product.
Minimum
0.75 mm2
Minimum
H05 VV - F
»
Note: The male plug is certified in the country
in which the equipment is to be installed, and
the female plug is an IEC 320 connector.
Colophon
This manual was written and formatted in FrameMaker. Some illustrations were created in Adobe Illustrator and translated to WMF format
in Transverter Pro; other illustrations were created directly in
FrameMaker. The menu configuration tree was produced using
Microsoft PowerPoint. Typefaces chosen are Benguiat, Courier, Helvetica, MarkerFelt, and Tekton. The manual was printed in cameraready form on a QMS printer.
v
D-6
QMS 4060 Print System Reference
E
Configuration
Menu
In This Chapter . . .
n
“Installation Menu” on page E-3
n
“Operator Control Menu” on page E-4
n
“Administration Menu” on page E-5
Introduction
Introduction
You may use this section as a quick reference for understanding and
navigating the menu structure of the QMS 4060 Print System.The following menu charts are provided in this section:
n
Installation Menu
Shows the configurations available when the security key is used
to access the Installation Menu.
n
Operator Control Menu
Shows the operator printer configurations.
n
Administration Menu
Shows the printer adminstration configurations.
Menu Chart Conventions
The following conventions are used in the menu charts:
E-2
n
Some menu selections are marked with an asterisk (*). These
selections will only appear on your print system if the specified
option is installed.
n
These menu charts show only the top-level menus. See chapter
4, “Printer Configuration,” for detailed information on a menu
selections’s options.
QMS 4060 Print System Reference
Introduction
Installation Menu
Idle
Installation*
Operator Control
Operator Passwrd
(Enter
password)
Use Operator PWD
Off or On
Admin Password
(Enter
password)
Use Admin PWD
Off or On
Administration
*Optional
E-3
Introduction
Operator Control Menu
Idle
Operator Control
Copies
Duplex
Offset Stacking*
Off, On, or
Tumble
Off or On
Normal or Reverse
Collation
Off or On
Orientation
Portrait or
Landscape
Outputbin
Chain Inputbins
Custom Input Bin
Chain Option
Accounting
Consumables
Installation*
001-999
Face-Up Order
Inputbin
E-4
Administration
Upper, Middle,
Lower
or Optional*
Upper, Face-Up Stack*
or Face-Down Stack*
On, Off, or
On Any
Upper, Middle,
Lower
On or Off
Letter
Legal
Executive
11x17
A3
A4
A5
B4
B5
Statement
B4(ISO)
B5(ISO)
Upper, Middle,
Lower
or Optional
Mode
Disk Space
Resetaccounting
or File Segment
Print Statistics
*Optional
QMS 4060 Print System Reference
Introduction
Administration Menu
Idle
Administration
Communications
Emulations
Installation*
Timeouts
Serial*
Parallel
Network1*
Network2
ESP Default
PostScript
PCL 5E
HP-GL
LinePrinter
TIFF*
CALS*
CGM*
LN03+*
QUIC*
Special Pages
Calibration Page
Header Page
Header Inputbin
Trailer Page
Trailer Inputbin
Status Page Type
Startup Options
Do Start Page
Do Sys Start
Do Error Handler
Memory
Engine
Consumables
Miscellaneous
v
Configuration
Disk Operations
Manual Config
Developer
Drum Unit
Fuser Unit
Pick Unit 1
Pick Unit 2
Pick Unit 3
LCIF Pick Unit*
Start Period
Image Alignment
Default Paper
Inputbin 1 Name
Inputbin 2 Name
Inputbin 3 Name
Inputbin 5 Name
Outputbin 1 Name
Outputbin 2 Name
Outputbin 3 Name
Page Recovery
Toner Low Act.
Energy Saver
Toner Density
Rotate SImplex
Letterhead
Def. Resolution
Print Quality
Save Defaults
Restore Defaults
Reboot System
New System Image
Capture Printjob
Keypad Language
Clock Operations
Format Disk
Backup Hard Disk
Restore Disk
*Optional
E-5
Index
Numerics
10Base2
See Ethernet
10BaseT
See Ethernet
1284, IEEE, cable pinouts B-12
A
About this manual 1-2
Accounting
Copying accounting files 4-44
Dictionary file 4-33
Fields, description 4-34
File format description 4-33
File transfer protocol 4-44
Host 4-45
Job accounting file 4-32
Paper accounting file 4-33
Status accounting file 4-33
Acrobat 1-4
Administration menu 4-5
Disk Operations menu 4-103
Memory menu 5-13
Special Pages menu 4-73
Startup Options menu 4-77
Administration password 4-105
Adobe
Acrobat 1-4
Advanced status page 4-74
Albertus 3-9
Aligning image 2-3
Alignment, image 4-86
Antique Olive 3-9
Application
Configuration, printer 4-2
Avant Garde Gothic
ITC Avant Garde Gothic 3-3
B
Backing up
Hard disk 4-103
Bitmapped font 3-5
BNC
See Ethernet
Bookman
ITC Bookman 3-3
Buffer
Spooling 5-18
Buffer, frame
Memory, allocating 4-84
Byte
Mode, parallel 5-27
C
Cable pinouts
IBM PC/XT B-15
Cabling
See also Pinouts
Canadian users
Statement D-3
Chain Inputbins menu 4-25
Character set 3-2
Clarendon Condensed 3-9
Client, memory 5-9, 5-13
Collation 4-18
Colophon D-6
Communication
Modes 5-3
Communications submenu 4-46
Compatibility mode, parallel 5-27
Configuration
Application, via 4-2
Changes, canceling 4-13
Changes, saving 4-12
Character information, changing 4-8
Commands, via 4-3
Control panel, via 4-3
Custom, restoring 4-15
Custom, saving 4-14, 4-15
Defaults, restoring 4-14, 4-99
I-2
Menu options, selecting 4-6
Methods 4-2
PostScript operators, via 4-3
Quick (see Frame Buffer)
Remote Console, via 4-3
Configuration menu 4-4
Accessing 4-5
Administration menu 4-5
Changes, canceling 4-13
Changes, saving 4-12
Character information, changing 4-8
Installation menu 4-5
Menu Chart E-2
Operator Control menu 4-4
Options, selecting 4-6
Conservation
Energy 4-89
Power 4-89
Conserve Toner 4-92
Consumable supplies B-10
Consumables
Counters, resetting 4-98
Print statistics 4-29
Start Period menu 4-98
Statistics 4-29
Statistics, resetting 4-98
Warranty B-20
Consumables statistics pages 4-29
Context switching 5-17
Control panel
Configuration, printer 4-3
Language, message window 4-13, 4101
Message window language 4-13, 4101
Controller
Specifications B-6
Copying
Accounting files 4-44
Coronet 3-9, 3-10, 3-11
Courier 3-8, 3-10
cpi
Pitch 3-5
QMS 4060 Print System Reference
Creating a network job separator 5-26
Customer Response Center (CRC),
QMS A-3
Customer support, QMS A-2
D
Data Bits menu (parallel) 4-51
Def Resolution menu 4-90
Defaults
Custom, restoring 4-15
Custom, saving 4-14
Restoring 4-14
Defaults, configuration
Restoring 4-99
Dictionary file 4-33
Dingbats
ITC Zapf Dingbats 3-3
Disk
See Hard disk
See Hard disk<$npage 4-103
Disk cache 4-80, 4-84, 5-18
Disk Operations menu 4-103
Display 4-83
Display List 4-80
Display list 5-15
Do Error Handler menu 4-79
Do Start Page menu 4-77
Do Sys Start menu 4-78
DOC
HP PCL 5e emulation commands C-3
HP-GL emulation commands C-2
Lineprinter emulation commands C-3
PCL 5e emulation commands C-3
Document Option Commands
Header/Trailer Page C-2
Sessions C-4
Documentation
About this manual 1-2
Duplexing 4-17
E
ECP mode, parallel 5-28
Index
Emul Timeout menu 4-48
Emulation 4-47, 5-17
Lineprinter 4-69
Memory, allocating 4-82
PostScript 4-57
Temporary, allocating memory 4-82
Timeout 4-48
Emulation Memory 4-80
Emulation menu
Parallel 4-50
Emulation temporary 5-17
Emulations
Setting parameters 4-56
Emulations menu 4-56
End job mode 5-20
Reasons to use 5-21
Setting 5-22, 5-23
End Job Mode menu
Parallel 4-51
End-of-document command 5-20
Adding to a file 5-25
Energy Conservation 4-89
Energy Saver menu 4-89
Engine
Default Paper 4-87
Inputbin Name 4-88
Outputbin Name 4-88
Engine menu
Energy Saver menu 4-89
Image Alignment menu 4-86
Page Recovery menu 4-89
Resolution menu 4-90
Toner Out Act. menu 4-89
Vertical Offset menu 4-86, 4-87
Enhanced Compatibility Port mode,
parallel 5-28
Enhanced Parallel Port mode, parallel
5-28
EOD command 5-22
Network job separator 5-26
Other print queuing systems 5-23
PC print server 5-23
Stand-alone PC 5-23
I-3
EPP mode, parallel 5-28
Error Handler, PostScript 4-79
ESP 5-20
Printing modes 5-2
Timeout 4-48
ESP Timeout menu 4-48
Ethernet
Cable pinouts, 10Base2 BNC B-17
Cable pinouts, 10BaseT RJ45 B-17
Excess memory 5-9
External hard disks B-18
F
Factory defaults, restoring 4-14, 4-99
FCC compliance D-2
Caution D-2
Fields
Accounting 4-34
Font cache 5-16
Fonts 3-13
Bitmapped 3-5
Defined 3-2
Intellifonts 3-9
PostScript, allocating memory 4-81
Resident, PostScript B-6
Scalable 3-5
See also specific font name
Frame Buffer 4-80, 5-14
Memory, allocating 4-84
G
Garamond (Stempel) 3-10
Gray levels 4-57, 5-4, 5-5
H
Halftone quality
Screen frequency 5-4
Halftone Type 4-57
Configuration menu 4-57
Halftones 5-4
Hard disk 4-102, 5-19
I-4
Backing up 4-103
External B-18
Formatting 4-103
IDE board B-18
Internal B-18
Internal, specs B-18
SCSI B-18
Header Inputbin menu 4-75
Header pages 4-75
Header Page menu 4-75
Inputbin 4-75
Header/Trailer Page
Document Option Commands C-2
Heap 4-81, 5-16
Helvetica 3-8
Horiz. Offset menu 4-86
Host Input 4-80, 5-18
HP EOD 5-22
HP-GL
DOC C-2
HP-GL symbol sets 3-13
9825 Character Set symbol set (HPGL) 3-13
I
IBM PC
AT cable pinouts B-15
XT cable pinouts B-15
IDE 5-10
IDE board B-18
IEEE 1284 cable pinouts B-12
Image alignment 2-3, 4-86
Image Alignment menu 4-86
Imageable area 2-2
Image alignment 2-3
Input Bin Name 4-88
Inputbin
Chaining 4-25, 4-26
Chaining, LCIF 4-26
Chaining, upper 4-28
Chaining,lower 4-27
Chaining,middle 4-27
QMS 4060 Print System Reference
Header pages 4-75
Trailer pages 4-77
Installation menu 4-5, 4-104
Integrated Drive Electronics
See IDE
Intellifont SIMM
Albertus 3-9
Antique Olive 3-9
Clarendon Condensed 3-9
Coronet 3-9, 3-10, 3-11
Courier 3-10
Garamond (Stempel) 3-10
Letter Gothic 3-10
Marigold 3-9
Interfaces
Parallel parameters, setting 4-49
Internet A-3
Invalid password 4-106
Italic 3-6
ITC Bookman 3-8
ITC Zapf Chancery 3-8
ITC Zapf Dingbats 3-8
J
Jam
Recovery 4-89
Jaz drive 4-103
Job accounting file 4-32
Job Timeout menu 4-48
K
K Mem Disk Cache menu 4-84
K Mem Display 5-15
K Mem Display menu 4-83
K Mem Emul Tmp 5-17
K Mem Emul Tmp menu 4-82
K Mem Emulation menu 4-82
K Mem for PS Fonts menu 4-81
K Mem for PS Heap menu 4-81
K Mem for Spool 5-18
K Mem for Spool menu 4-80
K Mem PS Fonts 5-16
Index
K Mem PS Heap 5-16
Keypad language menu 4-13, 4-101
L
Labels 2-4
Printing 2-4
Storage 2-5
Type 2-4
Weight 2-4
Landscape orientation 3-6
Language
Message window 4-13, 4-101
Laser safety D-5
LCIF
Chaining 4-26
LCIF Chaining menu 4-26
Letter Gothic 3-10
Lineprinter
DOC C-3
Setting parameters 4-69
Lines per inch 5-5
LocalTalk
Pinouts, cable B-16
Lower Chaining menu 4-27
LPI 4-57
M
Macintosh
Macintosh-to-serial cable pinouts B-16
Manual
Typographic conventions 1-3
Manual notice D-2
Margins
Imageable region 2-2
Margins, page 2-4
Marigold 3-9
MB Printer Mem 5-19
MB Printer Mem menu 4-85
Media
Imageable area 2-2, 2-3
Jam recovery 4-89
Margins 2-4
I-5
Page sizes B-7
Specifications B-10
Storage 2-5
Types 2-4
Weights 2-4
Memory 5-7, 5-9
Buffer, frame 4-84
Client 5-9, 5-13
Definitions 5-8
Disk cache 4-84
Display 4-83
Emulation 4-82
Emulation, temporary, allocating
memory 4-82
Excess 5-9
Fonts, PostScript 4-81
Frame Buffer 4-84
Frame Buffer menu 4-84
Heap, PostScript 4-81
Host Input 4-80
IDE 5-10
K Mem Disk Cache menu 4-84
K Mem Display menu 4-83
K Mem Emul Tmp menu 4-82
K Mem Emulation 4-82
K Mem for PS Fonts menu 4-81
K Mem for PS Head menu 4-81
K Mem for Spool menu 4-80
Management 5-8
Manual Configuration 4-80
MB Printer Mem menu 4-85
Non-volatile 5-10
NV RAM 5-10
Physical 5-11
PostScript fonts 4-81
Printer 4-85
PS Heap 4-81
RAM 5-9
RAM disk 5-10
ROM 5-9
SCSI 5-10
Spooling 4-80
Storage 5-9
I-6
System Use 4-85
Virtual 5-11, 5-16, 5-19, 5-20
Volatile 5-10
Memory Clients 4-80
Memory clients 5-7, 5-15
Disk cache 5-18
Emulation temporary 5-17
Font cache 5-16
Frame buffer 5-14
Heap 5-16
Host input 5-18
K Mem Display 5-15
K Mem Emul Tmp 5-17
K Mem for Spool 5-18
K Mem PS Fonts 5-16
K Mem PS Heap 5-16
MB Printer Mem 5-19
PostScript font cache 5-16
PostScript heap 5-16
PostScript VM 5-16
PS heap 5-16
Spool buffers 5-18
System memory 5-19
System use 5-19
Virtual memory 5-16
Memory submenu 4-79
Menu
Installation 4-104
Operator Control 4-16, 4-46
See menu name
Message window
Language, changing 4-13, 4-101
Middle Chaining menu 4-27
Min K Spool menu
Parallel 4-50
Mode
Communication 5-3
Printing, PostScript 5-2
Mode menu
Parallel 4-49
Monospacing 3-4
QMS 4060 Print System Reference
N
Nibble mode, parallel 5-28
Non-volatile memory 5-10
NV RAM 5-10
O
Oblique 3-6
Offset, image, configuring 4-86
Operator Control menu 4-4, 4-16, 4-46
Chain Inputbins 4-25
Collation 4-18
LCIF Chaining 4-26
Lower Chaining 4-27
Middle Chaining 4-27
Upper Chaining 4-28
Optional accessories
Hard disk, B-18
Hard disk, internal B-18
IDE board B-18
Optional features 4-107
Orientation
Landscape 3-6
Portrait 3-6
Output bin name 4-88
P
Page margins 2-4
Page Recovery menu 4-89
Paper
Brands B-10
Jams 2-2
Sizes 2-2
Storage 2-5, B-10
Transparencies 2-2
Types 2-4
Weights 2-4
Paper accounting file 4-33
Paper tray
See Tray, Inputbin, Tray
Parallel
Byte mode 5-27
Index
Compatibility mode 5-27
Data Bits menu 4-51
ECP mode 5-28
Emulation menu 4-50
End Job Mode menu 4-51
Enhanced Compatibility Port mode 528
Enhanced Parallel Port mode 5-28
EPP mode 5-28
Menu 4-49
Min K Spool menu 4-50
Mode menu 4-49
Modes 5-27
Nibble mode 5-28
Parameters, setting 4-49
PS Protocol menu 4-53, 4-54
Spool Timeout menu 4-51
Parallel interface
IEEE 1284 cable pinouts B-12
Parallel protocol 5-21
Password
Administration 4-105
Invalid 4-106
Using 4-106
PC/AT
See IBM PC
PC/XT
See IBM PC
PCL 5e 3-13
DOC C-3
Fonts 3-9
PDF file
Adobe Acrobat 1-4
Physical memory 5-11
Pinouts
IBM PC/AT B-15
IBM PC/XT B-15
Pinouts, cable
Centronics cable pinouts B-12
Ethernet, 10Base2 BNC B-17
Ethernet, 10BaseT RJ45 B-17
IBM PC/AT B-15
IBM PC/XT B-15
I-7
LocalTalk B-16
Macintosh-to-serial B-16
Serial B-14
Pitch 3-5
Point size 3-5
Portrait orientation 3-6
Postcards
Storage 2-5
PostScript
Error Handler 4-79
Font cache 5-16
Fonts, allocating memory 4-81
Heap 4-81, 5-16
Printing mode 5-2
Setting parameters 4-57
Timeout 4-47
PostScript operators
scale 2-3
setscreen 5-5
translate 2-3
PostScript VM 5-16
Power
Conservation 4-89
Print Media
Page sizes and imageable regions 2-2
Print media jams
Preventing 2-5
Print quality
Halftones 5-4
Screen angles 5-5
Print resolution
See Resolution
Printer
Memory 4-85
Start-up options 4-77
Printer options
Kanji option kit 3-14
Printing
Environments 5-11
Modes 5-2
Proportional spacing 3-4
PS Heap 4-80
PS heap 5-16
I-8
PS protocol 5-28
Advantages 5-31
Implementation 5-31
Quoted character 5-29
PS Protocol menu
Parallel 4-53, 4-54
PS Wait Timeout menu 4-47
Q
Q-FAX A-2
QMS
Customer Response Center (CRC) A3
World-wide offices A-5
QMS EOD 5-22
QuarkXPress 5-6
Quick configuration
See Frame buffer
QuickTime 1-4
R
Radiation D-5
RAM 5-9
NV RAM 5-10
RAM disk 5-10
Random Access Memory 5-9
Read-Only Memory 5-9
Reboot Now? message 4-12
Record description 4-35, 4-41
Remote Console
Configuration, printer 4-3
Resident fonts
HP PCLe fonts 3-9, 3-13
Resolution 5-5
Gray levels 5-5
Setting 4-90
Restore Defaults menu 4-14, 4-15
RJ45
See Ethernet
ROM 5-9
QMS 4060 Print System Reference
S
Sans serif typefaces 3-3
Save Defaults menu 4-14
Scalable font 3-5
scale (PostScript operator) 2-3
Schoolbook
New Century Schoolbook 3-3
Screen angle 4-57, 5-5
Screen frequency 4-57, 5-4, 5-5
Script typefaces 3-3
SCSI 5-10
SCSI hard disks
Specs B-18
Serial port
Cable pinouts B-14
Serial protocol 5-21
Serif typefaces 3-3
Service
United States A-4
Sessions
Document Option Commands C-4
setscreen 5-5
Signal direction B-13
SIMM 5-10
Simultaneous Interface Operation 5-2
SIO 5-2
Small Computer System Interface
See SCSI
Special Pages
Calibration 4-74
Header pages 4-75
Menu 4-73
Status Page Type menu 4-74
Trailer pages 4-76
Special Pages menu
Header Inputbin menu 4-75
Header Page menu 4-75
Trailer Inputbin menu 4-77
Trailer Pages menu 4-76
Specifications
Consumables B-10
Controller B-6
Emulations B-6
Index
Memory B-7
Print engine B-2
Print Media B-7
Print method B-2
Resolution B-2
SIMMs B-19
Warm-up time B-2
Spool 4-80, 5-11
Spool buffers 5-18
Spool Timeout menu (Parallel) 4-51
Spooling
Memory, allocating 4-80
Min K Spool menu 4-50
Standard status page 4-74
Start-up options 4-77
Startup Options menu
Do Error Handler menu 4-79
Do Start Page menu 4-77
Do Sys Start menu 4-78
Start-up page
Menu 4-77
Status accounting file 4-33
Record description 4-41
Status message
Reboot Now? 4-12
Status page
Advanced 4-74
Printing 4-74
Standard 4-74
Type 4-74
Status page key 4-74
Status Page Type menu 4-74
Stempel
See Garamond (Stempel)
Storage
Consumables B-10
IDE 5-10
Media 2-5
Memory 5-9
SCSI 5-10
Stroke weight 3-6
Support, QMS
Customer A-2
I-9
Internet A-3
Technical A-3
World-wide A-5
Symbol 3-8
Symbol sets
HP-GL 3-13
SYSSTART file 4-78
System memory 5-19
System Use 4-85, 5-19
T
Technical support, QMS A-3
Temporary emulation 5-17
Timeout 4-47
ESP 4-48
Job 4-48
Timeout, PostScript 4-47
Timeouts menu
Emul Timeout 4-48
ESP Timeouts menu 4-48
Job Timeout menu 4-48
PS Wait Timeout 4-47
Toner
Toner out action 4-89
Toner Out Act. menu 4-89
Toner Use
Toner Conservation 4-92
Trailer Inputbin menu 4-77
Trailer pages 4-76
Menu 4-76
Source, specifying 4-77
translate (PostScript operator) 2-3
Transparencies
Brands B-10
Storage 2-5
Type 2-5
Weight 2-5
Tray
Chaining 4-25, 4-26, 4-27, 4-28
Typeface 3-2
Courier 3-8, 3-10
Defined 3-2
I-10
Family 3-2
Helvetica 3-8
Italic 3-6
ITC Bookman 3-8
ITC Zapf Chancery 3-8
ITC Zapf Dingbats 3-8
Monospacing 3-4
Oblique 3-6
Pitch 3-5
Point size 3-5
Proportional spacing 3-4
Sans serif 3-3
Script 3-3
Serif 3-3
Stroke weight 3-6
Symbol 3-8
U
Upper Chaining menu 4-28
Using
EOD commands 5-22
File transfer protocol 4-44
V
Vertical Offset menu 4-86, 4-87
Video clips 1-4
Virtual disk 5-10
Virtual memory 5-11, 5-16, 5-19, 5-20
Volatile memory 5-10
W
Warranty B-20
Z
Zapf Chancery
ITC Zapf Chancery 3-3
Zapf Dingbats
ITC Zapf Dingbats 3-3
Zip drive 4-103
QMS 4060 Print System Reference