1
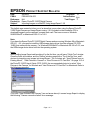
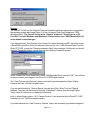
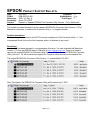
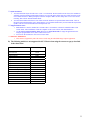
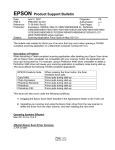
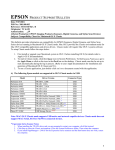
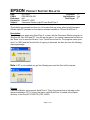
EPSON
Date:
PSB #:
Reference:
Product(s):
Subject:
PRODUCT SUPPORT BULLETIN
4/17/2002
PSB.2002.04.006
N/A
PhotoPC 3100Z
Panorama Stitcher Light EP and QuickTime 5
Originator: TC
Authorization:
Total Pages: 2
This bulletin was created to inform you of an issue that can occur when using Panorama
Stitcher Light EP (included on the camera software installation CD) and QuickTime 5.
Description:
This issue occurs when using QuickTime 5, or later, with the Panorama Stitcher program on
Windows 98, Me, 2000 and XP. You will see the issue if you create a panorama and click on
the "Save" icon to save the file as a ".mov" QuickTime movie file. The progress meter goes
from 0 to 100% and the file looks like it is going to be saved, but then you see the following
warning message:
Note: If QT is not installed you get the following error and the file is still not saved:
Reason:
Panorama Stitcher only supports QuickTime 4. This is the version that is included on the
camera installation CD. To correct the issue, install QuickTime 4 located in the IExpert
directory of the PhotoPC 3100Z CD (CPD-12425).
Page 1 of 2
Note: Before installing QuickTime 4, you must completely un-install QT 5.x.
1. Click on the "Start" button go to Settings>Control Panel and click on the Add/Remove
Programs icon.
2. Click the "Uninstall Everything" button to completely remove QT 5 (see red box below).
3. After removing QT 5, insert the PhotoPC 3100Z CD (CPD-12425) in your CD-ROM
drive and explore the CD.
4. Open the IExpert directory, then open the QuickTime folder and double-click the "Quick
TimeInstaller.exe" - to run the Quick Time Installer.
5. You will now be able to save .mov files.
Page 2 of 2
EPSON
Date:
PSB #:
Reference:
Product(s):
Subject:
PRODUCT SUPPORT BULLETIN
4/8/2002
Originator: TC
PSB.2002.04.003
Authorization:
N/A
Total Pages: 3
Epson PhotoPC 3100Z Digital Camera
Importing Images on a Mac/PC Using Image Expert 1.9.0
This bulletin was created to inform you of an issue that occurs when using the Epson PhotoPC
3100Z Digital Camera and Image Expert version 1.9.0 (included on the Installation CD) to
download images from the camera’s compact flash card. The issue occurs on Windows
98/2000/Me/XP or Macintosh OS 8.5.1 to 9.2.2.
Note:
If you have the Epson PhotoPC 3100Z Digital Camera and are running Windows 98 or Macintosh
OS 8.5.1 - 8.6, you need to install the USB storage device driver from the software CD (CPD12425) that came with the camera. For Windows 2000/Me/XP or Macintosh OS 9.0 to 9.2.2, use
the USB storage device driver built into the operating system.
Issue:
After installing Image Expert and launching it for the first time, you will see a "Quick Tour" window.
Close the Quick tour window, and the “Startup” window opens with a “Tip of the Day” box, and 3
choices for importing your images into Image Expert. The 3 choices are: “View Pictures from an
Existing Album,” “View Pictures in Camera” or “View Pictures in PC Card Slot.” On page 10-3 of
the PhotoPC 3100Z User's Guide (CPD-12422), the recommended choice is to select “View
Pictures in the Camera” for Windows and “View Pictures in PC Card Slot” for Macintosh. Refer to
the following screenshot:
.
If you click “View Pictures in the Camera” (see red arrow above) it causes Image Expert to display
the following "Camera connection failed" error message:
Page 1 of 3
Reason:
The PhotoPC 3100Z and the Compact Flash card installed inside the camera are recognized by
the operating system and Image Expert 1.9.0 as a Compact Flash Card Reader and “USB
(Mounted Drive).“ The Correct choice in the “Startup” window is “View Pictures in PC
Card Slot” for both Windows and Macintosh. This selection uses "USB (Mounted Drive)"
as its default connection type.
If you have selected “View Pictures in the Camera” for either Windows or MAC, this option forces
a Serial/USB connection. Since this selection does not look for a "USB (Mounted Drive)" like the
Photo PC 3100Z, you get the "Camera connection failed" error message. At this point you should
click the "Connection" button, you will then see the following Connection window:
In the "Connect Via:" Drop down menu, select “USB (Mounted Drive)“ and click "OK." You will then
be able to access your images in the Photo PC 3100Z Digital Camera.
The “View Pictures in the Camera” option is included to provide support for Epson Digital
Cameras that use a TWAIN compliant driver.
If you un-check the box for “Show at Startup” you can turn off the “Quick Tour” and “Startup”
windows. They can also be turned off from the “Preferences” window. See the Image Expert
"Help" menu for information on changing Preferences.
Note: In Image Expert version 1.9.0 “Camera Controls” is not supported by the PhotoPC 3100Z
because it is not a TWAIN compliant camera.
If you have selected the “View Pictures in Camera” option, the connection type default changes to
Page 2 of 3
Serial/USB. Image Expert always remembers the last connection type selected, so the user must
open the "Camera" pull down menu, click on "Connection" and change the setting back to "USB
(Mounted Drive)" for both MAC and PC.
Page 3 of 3
EPSON
Date:
PSB #:
Reference:
Product(s):
Subject:
PRODUCT SUPPORT BULLETIN
3/27/2002
Originator: TC
PSB.2002.03.005
Authorization:
TE01-141 Rev. A
Total Pages: 1
Photo PC-3100Z
Release of Updated EPSON File Converter Utility Version 1.12 for Macintosh.
This bulletin provides information on the updated EPSON File Converter Utility Version 1.12 for
Macintosh computers. It replaces File Converter Utility v.1.1 (original release).
Problem description:
When an image is converted to the DCF file format using Epson’s File Converter Utility v.1.1, the
compressed file will lock up the host computer when it is attached to an e-mail.
Resolution:
Version 1.12 has been released to countermeasure this issue. You can download the Macintosh
Version 1.12 from the EPSON Support Web site at http://support.epson.com There is no need to
remove the original EPSON File Converter Utility Version 1.1. The Updated EPSON File Converter
Utility (Version 1.12) will overwrite the original File Converter Utility and restore the sample files.
The original EPSON File Converter Utility Version 1.1 is dated March 23, 2001.
After The Update, the EPSON File Converter Utility will be dated July 9, 2001.
Page 1 of 1
EPSON PRODUCT SUPPORT BULLETIN
Date: 8/07/2001
PSB No.: 2001.08.004
Reference: N/A
Originator: JD & RS
Authorization:
Affected Product(s): Photo PC 3000 & 3100Z
Subject: Addressing Issues with Blurry and Out-Of-Focus Images
This bulletin provides information concerning blurry or out-of-focus images that end users may experience when
using the Photo PC 3000 or 3100Z camera. Several factors can contribute to blurry or out-of- focus images. The
next section provides a list of possible causes and remedies.
Causes/Remedies:
1. Make sure your subject is centered in the viewfinder or LCD screen, then press the shutter button halfway
down. The camera will then auto focus the subject. If you’re using the viewfinder wait until the photo-capture
light turns green. If you’re using the LCD screen you’ll see a green circle. Then fully depress the shutter button
while holding the camera perfectly still. This should ensure a good exposure.
2. As lighting conditions change so do exposure settings; this can contribute to blurry images. For example, dim
lighting requires longer exposure times, so the slightest movement of the camera will generate blurry images.
The more the camera is moved during exposure the more blurry your image will look. For lighting conditions that
require longer exposure times try placing the camera on a stable surface or a tripod. Avoid holding the camera,
if possible.
3. The built-in flash has a range of approximately 14 feet. If lighting conditions are poor you may need a better
flash range. Consider using an external flash. The camera is equipped with a Hot-Shoe adapter for this purpose.
If you are using a tripod, try using the 10-second delay feature to avoid movement when pressing the shutter
button. Refer to the user's guide for more information on using the built-in flash and the shutter delay feature.
4. If you get blurry images turn the camera OFF then back ON again. This will reset the camera's focus
mechanism.
5. When the camera is using batteries it automatically shuts off or goes to sleep after 30 seconds (default). If the
lens is accidentally repositioned (pushed in or bumped) when the camera is in sleep mode, the focus settings
stored in the camera’s firmware are no longer accurate. When you start taking pictures again the images will be
blurry since the camera is not aware that the lens has changed position. You must turn the camera OFF and
back ON. This will re-calibrate the camera's focusing mechanism. As a precaution, avoid contact with any
hard surface while the lens is extended.
6. If the battery power is depleted while the lens is extended and you cannot get the camera to automatically
retract the lens, then you must either connect a power adapter, if possible, or install a fresh set of batteries.
Then turn the camera ON and then OFF to retract the lens. DO NOT attempt to manually push or force the lens
back into the camera. This will damage the lens mechanism.
1
EPSON PRODUCT SUPPORT BULLETIN
Date: 9/07/2001
PSB No.: 2001.08.002
Reference: TE01-045 Rev. B
Originator: TC & JD
Authorization:
Affected Product(s): EPSON Imaging Products (Scanners, Digital Cameras, and Stylus Scan Devices)
Subject: Compatibility Chart for Macintosh OS X Classic
This bulletin provides information on compatibility for EPSON Scanners, Digital Cameras, and Stylus Scan
Series devices running in Macintosh OS X Classic mode. Mac OS X provides the Classic environment mode for
Mac OS 9 compatible applications and device drivers. Classic mode will require Mac OS 9.1 system software.
To setup Classic mode follow the steps below:
1. First install or upgrade your Macintosh system to OS 9.1 before installing OS X (for details refer to
Apple’s OS X documentation).
2. To start in Classic mode, click the Classic icon in System Preferences. To find System Preferences go to
the Apple Menu or click on the icon in the Dock bar on the desktop. Classic mode can also be set up to
start automatically during the log in process. (Refer to your Apple documentation for installation and
operation of Macintosh OS X Classic and 9.1).
3. To run a Classic application, just double–click on it or a document created with the application.
A) The following Epson models are supported in OS X Classic mode via USB.
Model
Perfection 610
Perfection 636U
Perfection 640U
Perfection 1200U
Perfection 1240U
Perfection 1640SU
Expression 1600
Expression 1640XL
Expression 1680
Stylus Scan 2000
Stylus Scan 2500
Photo PC 800/850Z/3000Z
Photo PC 3100Z
Driver Version
TWAIN L 1.00E
TWAIN 3.20A
TWAIN L 2.01A
TWAIN 4.01A
TWAIN 5.00A
TWAIN 5.00A
TWAIN Pro/Pro Network 2.00A *
TWAIN Pro/Pro Network 2.00A *
TWAIN Pro/Pro Network 2.00A *
TWAIN (v.1.10A); Printer (v.6.25E) **
TWAIN (v.1.10A); Printer (v.6.25E) **
EPSON Photo!3 (v.1.40E) ***
USB Storage Device ****
Connector Type
USB
USB
USB
USB
USB
USB
USB
USB
USB
USB
USB
USB
USB
Note: MAC OS X Classic mode supports USB-native and network-capable devices. Classic mode does not
support MAC Serial, SCSI or FireWire connected devices.
* Expression Series Scanner Notes:
1.
2.
3.
When installing the TWAIN driver and you are prompted to restart your computer, click Quit instead.
Click Stop to close the Classic environment. Close the System Preferences folder. Then restart the computer.
If you install PageManager v 2.40.05 for the Expression series scanners and the Start button does not work, restart
the computer.
1
** Stylus Scan Notes:
1.
You must install the Stylus Scan drivers in a true 9.1 environment. Do not install in OS X Classic, the installation
will hang. From the Printing and Scanning Software CD, open the Epson Stylus Scan 2xxx folder and click on the
icon to install the drivers. When prompted, restart the computer. Make sure the startup disk is set to OS X before
restarting. Start Classic and install Smart Panel.
2. You must install Smart Panel from its own folder. From the Software CD open the Smart Panel folder. Click on
the Epson Smart Panel Installer icon to install. Before you can launch Smart Panel you must install the Stylus Scan
Updater. The file can be downloaded from the Epson web site.
*** Digital Camera Notes:
1. EPSON Photo! 3 must be installed in a true Mac OS 9.1 environment. It cannot be installed in Mac OS X
Classic mode. After installation, restart the computer in OS X, start Classic, then launch Photo! 3.
2. Use the EPSON Camera Monitor Setup dialog box in Apple Menu Items to assign an application before
using the programmable Push (Shutter) Button Function.
3. You can use the Push Button Function in Classic mode.
****Photo PC 3100Z Notes:
1. This camera is supported by Mac OS X native mode using the embedded Image Capture application.
B) The following models are not supported in OS X Classic when using the connector type(s) described
in the chart below.
Model
Perfection 636
Perfection 1200
Expression 636
Expression 800
Expression 1600
Expression 1640XL
Expression 1680
Expression 836XL
GT-10000 (PC platform only)
GT-10000+ (PC platform only)
GT-30000 (PC platform only)
Photo PC 500
Photo PC 600
Photo PC 650
Photo PC 700
Photo PC 750Z
Connector Type
SCSI
SCSI
SCSI
SCSI
SCSI/FireWire
SCSI/FireWire
SCSI/FireWire
SCSI
SCSI
SCSI
SCSI/FireWire
Serial
Serial
Serial
Serial
Serial
2