1
WF455ARG*
Washing Machine
user manual
This manual is made with 100% recycled paper.
imagine the possibilities
Thank you for purchasing this Samsung product.
To receive more complete service or accessory
parts, please register your product at or contact
www.samsung.com/register
1-800-SAMSUNG (726-7864)
WF455AG-03159A_EN.indd 1
2012-04-13
11:59:17
key features of your new
Smart PowerFoam™ washer
1.
VRT PLUS™ (Vibration Reduction Technology)
This Samsung washer minimizies noise and vibration with dual 3D vibration sensors and
smart control technology, ensuring quiet operation.
2.
The Largest Capacity
Samsung’s extra-large capacity laundry machine can wash a full set of your bedding, a
kingsize comforter, or up to 32 bath towels in a single load. Since you don’t have to do as
many loads, you save time, money, water, and energy.
3.
PowerFoam™
Samsung’s effective PowerForm delivers improved cleanliness with advanced fabric care.
PowerFoam allows detergent to distribute evenly and penetrate fabrics faster and deeper.
4.
PureCycle™(Tub Cleaning cycle)
Clean your drum with one button! This Pure Cycle is specially designed to remove
detergent residue & dirt bulidup in the tub, diaphragm and door glass without the need for
special chemical detergents.
5.
SpeedSpray™
Samsung’s new Speed Spray technology saves you up to 25%* more time when doing
laundry by shortening wash times while still keeping all segments of the washing process
and getting your clothes clean.
*Based on 8 pounds loads, Normal cycle (under Normal Soil level without any options),
on previous and existing 4.3 cu.ft. Samsung front loading washers released until 2011
without Speed Spray.
**Speed Spray performs in Normal, Bedding PLUS, Deep Steam, Stain Away and
Eco Cold cycle and the saving time may vary by cycles and various load and option
compositions.
6.
Deep steam
The Deep Steam feature boosts cleaning performance and loosens grime and dirt, thus
providing superior cleaning results.
7.
Smart Control
Samsung’s innovative Smart Control technology enables you to control your washer
through personal technologies such as smart phones. You don’t have to be on standby
until the cycle ends. Smart Control allows you to monitor the washing process and let you
know when the cycle is complete.
8.
Smart Care
Samsung’s Smart Care, an automatic error-monitoring system, detects and diagnoses
problems at an early stage and provides a quick and easy solution. With the innovative
Smart Control technology, you can also be alerted when the problem occurs via your smart
phones.
9.
Stylish design
The stylish design of this washer blends well with your environment.
10. Digital Display & Center jog dial
The Jog dial enables you to select cycles in both directions with ease, and the display is
easy to use and understand.
2_ key features of your new Smart PowerFoam™ washer
WF455AG-03159A_EN.indd Sec9:2
2012-04-13
11:59:19
11. DD Motor
The power to handle anything! Our direct-drive inverter motor delivers power right to the
washer tub from a variable speed, reversible motor. A beltless direct-drive motor generates
a higher spin speed of 1,300rpm for more effective, quiter operation. The washer also has
fewer moving parts, meaning fewer repairs.
12. Sanitize
When selecting this cycle, the water heats to an extra high temperature to remove 99.9%
of certain bacteria typically found on clothing, bedding, or towels. This certification is
conducted by NSF International, an independent third-party testing and certification
organization.
Please check the garment care label to avoid garment damage. Only sanitizing cycles have
been designed to meet the requirements of this protocol for sanitization efficacy.
NSF Protocol P172
Sanitization Performance of Residential and
Commercial, Family-Sized Clothes Washers
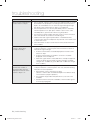
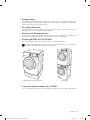
13. Pedestal with Storage Drawers (Model No : WE357*)
An optional 15” pedestal is available to raise the washer for easier loading and unloading.
It also offers a built-in storage drawer that can hold a 100 oz. bottle of detergent
14. Stacking (Model No : SK-5A/XAA)
Samsung washers and dryers can be stacked to maximize usable space. An optional
stacking kit is available for purchase from your Samsung retailer.
<Pedestal with Storage Drawers>
<Stacking>
key features of your new Smart PowerFoam™ washer _3
WF455AG-03159A_EN.indd Sec9:3
2012-04-13
11:59:19
safety information
Congratulations on your new Samsung washer. This manual contains important
information on the installation, use and care of your appliance. Please take time to
read this manual to take full advantage of your washer’s many benefits and features.
WHAT YOU NEED TO KNOW ABOUT SAFETY INSTRUCTIONS
The Warnings and Important Safety Instructions in this manual do not cover all possible conditions and
situations that may occur. It is your responsibility to use common sense, caution, and care when installing,
maintaining and operating your washer.
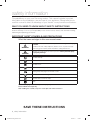
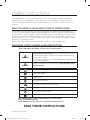
IMPORTANT SAFETY SYMBOLS AND PRECAUTIONS
What the icons and signs in this user manual mean:
WARNING
CAUTION
Hazards or unsafe practices that may result in severe personal injury
or death.
To reduce the risk of fire, explosion, electric shock, or personal injury
when using your washer, follow these basic safety precautions:
Hazards or unsafe practices that may result in minor personal injury
or property damage.
Do NOT attempt.
Do NOT disassemble.
Do NOT touch.
Follow directions explicitly.
Unplug the power plug from the wall socket.
Make sure the machine is grounded to prevent electric shock.
Call the service center for help.
Note
These warning signs are here to prevent injury to you and others.
Please follow them explicitly.
After reading this section, keep it in a safe place for future reference.
SAVE THESE INSTRUCTIONS
4_ safety information
WF455AG-03159A_EN.indd Sec1:4
2012-04-13
11:59:20
WARNING
WARNING
To reduce the risk of fire, electric shock, or injury to persons when using your appliance, follow
basic precautions, including the following:
1. Read all instructions before using the appliance.
2. Do not wash or dry articles that have been previously cleaned in, washed in, soaked in, or
spotted with gasoline, dry-cleaning solvents, other flammable or explosive substances as
they give off vapors that could ignite or explode.
3. Do not allow children to play on or in the appliance. Close supervision of children is
necessary when the appliance is used near children.
4. Before the appliance is removed from service or discarded, remove the door to the washing
or drying compartment.
5. Do not reach into the appliance if the drum is moving.
6. Do not install or store this appliance where it will be exposed to the weather.
7. Do not tamper with controls.
8. Do not repair or replace any part of the appliance or attempt any servicing unless specifically
recommended in the user-maintenance instructions or in published user-repair instructions
that you understand and have the skills to carry out.
9. Do not add gasoline, dry-cleaning solvents, or other flammable or explosive substances to
the wash water. These substances give off vapors that could ignite or explode.
10. Under certain conditions, hydrogen gas may be produced in a hot water system that has not
been used for 2 weeks or more. HYDROGEN GAS IS EXPLOSIVE. If the hot water system
has not been used for such a period, before using a washer or combination washer-dryer,
turn on all hot water faucets and let the water flow from each for several minutes. This will
release any accumulated hydrogen gas. As the gas is flammable, do not smoke or use an
open flame during this time.
SAVE THESE INSTRUCTIONS
safety information _5
WF455AG-03159A_EN.indd Sec1:5
2012-04-13
11:59:20
safety information
WARNING
CRITICAL INSTALLATION WARNINGS
Plug the power cord into an AC 120 V / 60 Hz / 15 A wall socket or higher and use the
socket for this appliance only. In addition, do not use an extension cord.
- Sharing a wall socket with other appliances, using a power strip, or using an extension
cord may result in electric shock or fire.
- Do not use an electric transformer. It may result in electric shock or fire.
- Ensure that the voltage, frequency, and amperage provided at the wall socket match the
power specifications of the product.
The installation of this appliance must be performed by a qualified technician or service
company.
- Failing to do so may result in electric shock, fire, an explosion, problems with the
product, or injury.
Remove all foreign substances such as dust or water from the power plug terminals and
contact points using a dry cloth on a regular basis.
- Unplug the power plug and clean it with a dry cloth.
- Failing to do so may result in electric shock or fire.
Plug the power plug into the wall socket in the right direction so that the cord runs towards
the floor.
- If you plug the power plug into the socket in the opposite direction, the electric wires
within the cable may be damaged and this may result in electric shock or fire.
This appliance must be properly grounded.
Do not ground the appliance to a gas pipe, plastic water pipe, or telephone line.
- Improper grounding may result in electric shock, fi re, an explosion, or problems with the
product.
- Never plug the power cord into a socket that is not grounded correctly and make sure
that it is in accordance with local and national codes.
Do not install this appliance near a heater or inflammable material.
Do not install this appliance in a humid, oily or dusty location, or in a location exposed to
direct sunlight and water (rain drops).
Do not install this appliance in a location where gas may leak.
- This may result in electric shock or fire.
Plug the power plug into the wall socket firmly. Do not use a damaged power plug,
damaged power cord, or loose wall socket.
- This may result in electric shock or fire.
Do not pull or excessively bend the power cord.
Do not twist or tie the power cord.
Do not hook the power cord over a metal object, place a heavy object on the power cord,
insert the power cord between objects, or push the power cord into the space behind the
appliance.
- This may result in electric shock or fire.
SAVE THESE INSTRUCTIONS
6_ safety information
WF455AG-03159A_EN.indd Sec1:6
2012-04-13
11:59:20
Do not pull the power cord when unplugging the power plug.
- Unplug the power plug by holding the plug.
- Failing to do so may result in electric shock or fire.
If the power plug or power cord is damaged, contact your nearest service center.
CAUTION
INSTALLATION CAUTIONS
Position the appliance so that the power plug is easily accessible.
- Failing to do so may result in electric shock or fire due to electric leakage.
Install your appliance on a level and hard floor that can support its weight.
- Failing to do so may result in abnormal vibrations, noise, or problems with the product.
Unplug the power plug when the appliance is not being used for long periods of time or
during a thunder/lightning storm.
- Failing to do so may result in electric shock or fire.
WARNING
CRITICAL USAGE WARNINGS
If the appliance is flooded, cut the power immediately and contact your nearest service
center.
If the appliance emits a strange noise, a burning smell, or smoke,, unplug the power plug
immediately and contact your nearest service center.
- Failing to do so may result in electric shock or fire.
In the event of a gas leak (such as propane gas, LP gas, etc.), ventilate immediately without
touching the power plug. Do not touch the appliance or power cord.
- Do not use a ventilating fan.
- A spark may result in an explosion or fire.
Do not wash items contaminated with gasoline, kerosene, benzene, paint thinner, alcohol or
other flammable or explosive substances.
- This may result in electric shock, fire or an explosion.
Do not open the washer door by force while the washer is operating (high-temperature
washing/drying/spinning).
- Water flowing out of the washer may result in burns or cause the floor to be slippery.
This may result in injury.
- Opening the door by force may result in damage to the product or personal injury.
Make sure to remove the packaging (sponge, styrofoam) attached to the bottom of the
washer before using it.
Do not insert your hand under the washer.
- This may result in injury.
SAVE THESE INSTRUCTIONS
safety information _7
WF455AG-03159A_EN.indd Sec1:7
2012-04-13
11:59:20
safety information
Do not touch the power plug with wet hands.
- This may result in electric shock.
Do not turn the appliance off by unplugging the power plug while an operation is in
progress.
- Plugging the power plug into the wall socket again may cause a spark and result in
electric shock or fire.
Keep all packaging materials well out of the reach of children, as packaging materials can
be dangerous to children.
- If a child places a bag over its head, it may result in suffocation.
Do not let children or infirm persons use this washer unsupervised.
- Failing to do so may result in electric shock, burns or injury.
Do not insert your hand or a metal object under the washer while it is operating.
- This may result in injury.
Make sure the detergent drawer is closed before you put laundry into the washer or remove
laundry from the washer.
- If the detergent drawer is open, you could strike the drawer with your head and injure
yourself.
Do not attempt to repair, disassemble, or modify the appliance yourself.
- Do not use any fuse (such as cooper, steel wire, etc.) other than the standard fuse.
- If you need to repair or reinstall the appliance, contact your nearest service center.
- Failing to do so may result in electric shock, fire, problems with the product, or injury.
If water has enters the appliance anywhere but the drum, unplug the power plug and
contact your nearest service center.
- Failing to do so may result in electric shock or fire.
When the water supply hose comes loose from the faucet and floods the appliance, unplug
the power plug.
- Failing to do so may result in electric shock or fire.
If any foreign substance enters the appliance, unplug the power plug and contact you
nearest service center.
- Failing to do so my result in electric shock or fire.
CAUTION
USAGE CAUTIONS
If the the washer is contaminated by a foreign substance such as detergent, dirt, food
waste, etc., unplug the power plug and clean the washer using a damp, soft cloth.
- Failing to do so may result in discoloration, deformation, damage or rust.
If struck hard, the front glass can break. Take care when using the washer.
- If the glass is broken, it may result in injury.
SAVE THESE INSTRUCTIONS
8_ safety information
WF455AG-03159A_EN.indd Sec1:8
2012-04-13
11:59:20
After a water supply failure or when reconnecting the water supply hose, open the faucet
slowly.
Open the faucet slowly after a long period of non-use.
- The air pressure in the water supply hose or the water pipe may result in damage to a
part or in water leakage.
If a drain error occurs during an operation, check if there is a drainage problem.
- If the washer is used when it is flooded because of a drainage problem,, it may result in
electric shock or fire due to electric leakage.
Insert the laundry into the washer completely so that laundry does not get caught in the
door.
- If laundry gets caught in the door, it may result in damage to the laundry or the washer,
or result in water leakage.
Ensure that the faucet is turned off when the washer is not being used.
- Ensure that the screw on the water supply hose connector is firmly connected to the
faucet and properly tightened.
- Failing to do so may result in property damage or injury.
Take care that the Rubber Seal and the Front Door Glass are not contaminated by a foreign
substance (e.g. waste, thread, hair, etc.)
- If a foreign substance is caught in the door or the door is not completely closed, it may
cause water leakage.
Open the faucet and check if the water supply hose connector is firmly tightened and that
there is no water leaking before using the product.
- If the water supply hose connectors are loose, it may result in water leakage.
The product you have purchased is designed for domestic use only.
The use for business purposes qualifi es as product misuse. In this case, the product will
not be covered by the standard warranty provided by Samsung and no responsibility can
be attributed to Samsung for malfunctions or damages resulting from such misuse.
If the wash is not performed and the laundry is left for a period of time after adding
detergent or applying stain remover or pre-treatment onto the laundry, the laundry may be
discolored.
Select the recommended cycle and temperature on the basis of the laundry items, sort the
laundry by color on the basis of its colorfastness and select the appropriate cycle.
Make sure that foreign objects such as pins, buttons and coins are removed from clothing
items when adding laundry into the washer. Wash dirty laundry separately from relatively
clean items and wash fragile items separately from tougher textiles.
If an item is stained, wash it as fast as possible. Use stain remover or detergent only after
testing the colorfastness of the item by applying a small quantity to an inside seam.
SAVE THESE INSTRUCTIONS
safety information _9
WF455AG-03159A_EN.indd Sec1:9
2012-04-13
11:59:20
safety information
Do not stand on top of the appliance or place objects (such as laundry, lighted candles,
lighted cigarettes, dishes, chemicals, metal objects, etc.) on the appliance.
- This may result in electric shock, fire, problems with the product, or injury.
Do not operate the appliance with wet hands.
- This may result in electric shock.
Do not spray volatile material such as insecticide onto the surface of the appliance.
- As well as being harmful to humans, it may also result in electric shock, fire or problems
with the product.
Do not place an object that generates a electromagnetic field near the washer.
- This may result in injury due to a malfunction.
Since the water drained during a high-temperature wash or drying cycle is hot, do not touch
the water.
- This may result in burns or injury.
Do not wash, spin or dry water-proof seats, mats or clothing (*).
- Do not wash thick, hard mats even if the washer mark is on the care label.
- This may result in injury or damage to the washer, walls, floor or clothing due to
abnormal vibrations.
* Woolen bedding, rain covers, fishing vests, ski pants, sleeping bags, diaper covers,
sweat suits, and bicycle, motor cycle, car covers, etc.
Do not operate the washer when the detergent box is removed.
- This may result in electric shock or injury due to water leakage.
Do not touch the inside of the tub during or just after drying as it is hot.
- This may result in burns.
Do not insert your hand into the detergent dispenser after opening it.
- This may result in injury as your hand may be caught.
Do not place any non-laundry objects, such as shoes, food waste, or animals into the
washer.
- This can cause abnormal vibrations that can damage the washer, and, in the case of
pets, cause severe injury or death.
Do not press the buttons using sharp objects such as pins, knifes, fingernails, etc.
- This may result in electric shock or injury.
Do not wash laundry contaminated by oils, creams or lotions usually found in skincare
shops or massage clinics.
- This may result in the rubber seal becoming deformed and water leakage.
Do not leave metal objects (safety pins, hair pins, etc.) or bleach in the tub for long periods
of time.
- This may cause the tub to rust.
- If rust appears on the surface of the tub, apply a neutral cleansing agent to the surface
and use a sponge to clean it. Never use a metal brush.
SAVE THESE INSTRUCTIONS
10_ safety information
WF455AG-03159A_EN.indd Sec1:10
2012-04-13
11:59:20
Do not use dry cleaning detergent directly and do not wash, rinse, or spin laundry
contaminated by dry cleaning detergent.
- This may result in spontaneous combustion or ignition due to the heat from the oxidation
of the oil.
Do not use hot water from water cooling/heating devices.
- This may result in problems with the washer.
Do not use natural hand-washing soap in the washer.
- If it hardens and accumulates inside the washer, it may result in problems with the
product, discoloration, rust or bad odors.
Do not wash large laundry items such as bedding in the washing net.
- Failing to do so may result in injury due to abnormal vibrations.
- Place smaller items, such as lace socks and lingerie in the washing net.
Do not use hardened detergent.
- If it accumulates inside the washer, it may cause water leakage.
Do not wash throw rugs or doormats.
- If you wash throw rugs or doormats, sand will accumulate inside the washer. It may
result in errors such as no draining.
Take care that children’s fingers are not caught in the door when closing it.
- This may result in injury.
WARNING
CRITICAL CLEANING INSTRUCTIONS
Do not clean the appliance by spraying water directly onto it.
Do not use benzene, thinner or alcohol to clean the appliance.
- This may result in discoloration, deformation, damage, electric shock or fire.
Before cleaning or performing maintenance, unplug the appliance from the wall socket.
- Failing to do so may result in electric shock or fire.
SAVE THESE INSTRUCTIONS
safety information _11
WF455AG-03159A_EN.indd Sec1:11
2012-04-13
11:59:20
safety information
REGULATORY NOTICE
1. FCC Notice
FCC CAUTION:
CAUTION
Any changes or modifications not expressly approved by the party responsible for compliance
could void the user’s authority to operate the equipment.
This device complies with Part 15 of FCC Rules. Operation is Subject to following two
conditions:
1. This device may not cause harmful interference, and
2. This device must accept any interference received including interference that cause
undesired operation.
For product available in the USA/Canada market, only channel 1~11 can be operated. Selection
of other channels is not possible.
FCC STATEMENT:
This equipment has been tested and found to comply within the limits for a Class B digital
device, pursuant to part 15 of the FCC Rules. These limits are designed to provide reasonable
protection against harmful interference in a residential installation.
This equipment generates, uses, and can radiate radio frequency energy and, if not installed
and used in accordance with the instructions, may cause harmful interference to radio
communications. However, there is no guarantee that interference will not occur in a particular
installation. If this equipment does cause harmful interference to radio or television reception,
which can be determined by turning the equipment off and on, the user is encouraged to try to
correct the interference by one or more of the following measures:
• Reorient or relocate the receiving antenna
• Increase the separation between the equipment and receiver
• Connect the equipment into an outlet on a different circuit from that to which the receiver is
connected
• Consult the dealer or an experienced radio/TV technician for help.
FCC RADIATION EXPOSURE STATEMENT:
This equipment complies with FCC radiation exposure limits set forth for an uncontrolled
environment. This equipment should be installed and operated with a minimum distance of 20cm
between the radiator and your body. This device and its antenna(s) must not be co-located or
operation in conjunction with any other antenna or transmitter.
SAVE THESE INSTRUCTIONS
12_ safety information
WF455AG-03159A_EN.indd Sec1:12
2012-04-13
11:59:20
2. IC Notice
The term “IC” before the radio certification number only signifies that Industry Canada technical
specifications were met. Operation is subject to the following two conditions: (1) this device may
not cause interference, and (2) this device must accept any interference, including interference
that may cause undesired operation of the device.
This Class B digital apparatus complies with Canadian ICES-003.
Cet appareil numérique de la classe B est conforme á la norme NMB-003 du Canada.
For product available in the USA/Canada market, only channel 1~11 can be operated. Selection
of other channels is not possible.
IC RADIATION EXPOSURE STATEMENT:
This equipment complies with IC RSS-102 radiation exposure limits set forth for an uncontrolled
environment. This equipment should be installed and operated with minimum distance 20cm
between the radiator & your body. This device and its antenna(s) must not be co-located or
operation in conjunction with any other antenna or transmitter.
SAVE THESE INSTRUCTIONS
safety information _13
WF455AG-03159A_EN.indd Sec1:13
2012-04-13
11:59:20
contents
INSTALLING YOUR WASHER
16
OPERATING INSTRUCTIONS
23
WASHING A LOAD OF LAUNDRY
24
16
16
17
17
17
17
18
18
18
18
19
20
Unpacking your washer
Overview of your washer
Electrical
Grounding
Water
Drain facility
Flooring
Location considerations
Alcove or closet installation
Undercounter installation(washer only)
With optional pedestal base or stacking kit
Important note to installer
23
23
Loading your washer
Getting started
24
26
27
28
28
28
28
29
29
30
31
31
31
32
Overview of the control panel
Delay Start
Child Lock
Spin Only
Drum Light
Garment+
My cycle
Steam
Smart Care
Washing clothes using the cycle selector
Setting the Smart Control
Configuring the wired/wireless sharer
Check before installation
Connecting to the network using the WPS
setting
Connecting to the network using the AP
setting
Downloading and running the mobile app,
Samsung Smart Washer/Dryer App
Using the mobile App
Disconnecting the connection
Starting a new wash
Registering your washer
Quick guide for Wi-Fi setting and AP
connecting
Quick guide for device certification
Detergent use
Features
33
34
36
36
36
38
40
41
42
42
14_ contents
WF455AG-03159A_EN.indd Sec6:14
2012-04-13
11:59:20
MAINTAINING YOUR WASHER
44
49
APPENDIX
55
Cleaning the exterior
Cleaning the interior
Cleaning the dispensers
Storing your washer
Cleaning the debris filter
Cleaning the door seal/bellow
Preserving the top cover and the front frame
Pure CycleTM
49
51
53
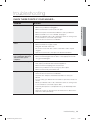
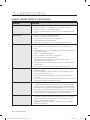
Check these points if your washer…
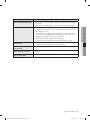
Information codes
Network Setup Q&A
55
56
58
58
58
59
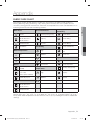
Fabric care chart
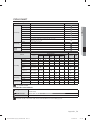
Cycle chart
Helping the environment
Declaration of conformity
Specification
Open Source Announcement
contents _15
WF455AG-03159A_EN.indd Sec6:15
2012-04-13
11:59:20
01 contents
TROUBLESHOOTING
44
44
45
45
46
47
47
48
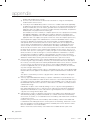
installing your washer
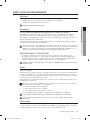
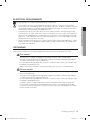
UNPACKING YOUR WASHER
Unpack your Washer and inspect it for shipping damage. Make sure you have received all of the items
shown below. If your Washer was damaged during shipping, or you do not have all of the items, contact
1-800-SAMSUNG(726-7864).
To prevent personal injury or strain, wear protective gloves whenever lifting or carrying the unit.
WARNING
Packing materials can be dangerous to children; keep all packing material (plastic bags, polystyrene,
etc.) well out of the reach of children.
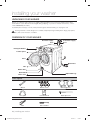
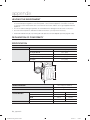
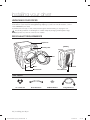
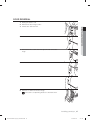
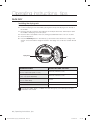
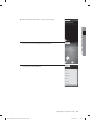
OVERVIEW OF YOUR WASHER
Hot water supply
hose
Cold water supply
hose
Detergent drawer
Control panel
Door
Drain Hose
Tub
Debris filter
Drain tube
Adjustable legs
Filter cover
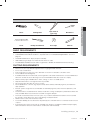
Parts supplied
Wrench
Bolt hole covers
Water supply hoses
Hose guide
User manual book
Plastic zip hose tie
Tools needed
Pliers
Flat screwdriver
16_ installing your washer
WF455AG-03159A_EN.indd Sec3:16
2012-04-13
11:59:20
BASIC LOCATION REQUIREMENTS
Electrical
•
120 Volt 60 Hz 15 AMP fuse or circuit breaker
•
Individual branch circuit serving only your Washer is recommended.
•
Your Washer is equipped with a power cord.
NEVER USE AN EXTENSION CORD.
CAUTION
01 installing your washer
Grounding
ELECTRICAL GROUNDING IS REQUIRED ON THIS APPLIANCE.
This appliance must be grounded. In the event of malfunction or breakdown, grounding will
reduce the risk of electric shock by providing a path of least resistance for electric current.
This appliance is equipped with a power cord having a three-prong grounding plug for use in a
properly installed and grounded outlet.
The plug must be plugged into an appropriate outlet that is properly installed and grounded in
accordance with all local codes and ordinances.
WARNING
Improper connection of the equipment-grounding conductor can result in a risk of electrical
shock. Check with a qualified electrician or serviceman if you are in doubt as to whether the
appliance is properly grounded. Do not modify the plug provided with the appliance – if it
does not fit the outlet, have a proper outlet installed by a qualified electrician.
IMPORTANT SAFETY PRECAUTIONS
•
To prevent unnecessary risk of fire, electrical shock or personal injury, all wiring and
grounding must be done in accordance with the National Electrical Code ANSI/FNPA, No.
70 Latest Revision and local codes and ordinances. It is the personal responsibility of the
appliance owner to provide adequate electrical service for this appliance.
CAUTION
NEVER CONNECT GROUND WIRE TO PLASTIC PLUMBING LINES, GAS LINES, OR HOT
WATER PIPES.
Water
To correctly fill your Washer in the proper amount of time, water pressure of 20-116 psi (137800kPa) is required.
Water pressure less than 20 psi may cause water valve failure, or may not allow the water valve
to shut off completely. Or, it may extend the fill time beyond what your Washer controls allow,
resulting in your Washer turning off. A time limit is built into the controls in the event of an internal
hose becoming loose and flooding your home.
The water faucets must be within 4 feet/122 cm of the back of your Washer for the inlet hoses
provided with your Washer.
Accessory inlet hoses are available in various lengths up to 10 feet/305cm for faucets that
are further away from the back of your Washer.
To avoid the possibility of water damage:
•
•
•
WARNING
CAUTION
Have water faucets easily accessible
Turn off faucets when the washer is not in use.
Periodically check that there is no leakage from the water inlet hose fittings.
CHECK ALL CONNECTIONS AT THE WATER VALVE AND FAUCET FOR LEAKS.
Using hard water or bad quality water may cause the water supply valve to operate
abnormally.
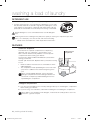
Drain facility
The recommended height of the standpipe is 18 in/46 cm. The drain hose must be routed
through the drain hose clip to the standpipe. The standpipe must be large enough to accept the
outside diameter of the drain hose. The drain hose is attached at the factory.
installing your washer _17
WF455AG-03159A_EN.indd Sec3:17
2012-04-13
11:59:20
installing your washer
Flooring
For best performance, your Washer must be installed on a solidly constructed floor. Wood floors
may need to be reinforced to minimize vibration and/or unbalanced load situations. Carpeting
and soft tile surfaces are contributing factors in vibration may cause your washer to move slightly
during the spin cycle.
Never install your washer on a platform or weakly supported structure.
Location considerations
Do not install your washer in areas where water may freeze, since your washer will always
maintain some water in its water valve, pump, and hose areas. This can cause damage to the
pump, hoses and other components.
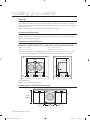
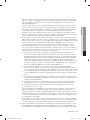
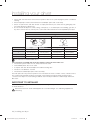
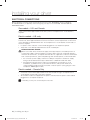
Alcove or closet installation
MINIMUM CLEARANCES FOR CLOSET AND ALCOVE INSTALLATIONS:
Sides – 1 in / 25 mm
Top – 17 in / 432 mm
Rear – 5.9 in / 150 mm
Closet Front – 2 in / 51 mm
If the washer and dryer are installed together, the closet front must have at least a 72 in² (465
cm²) unobstructed air opening. Your washer alone does not require a specific air opening.
A
B
1 in.
(2.5 cm)
1 in.
(2.5 cm)
27 in.
(68.6 cm)
17 in.
(43.2 cm)
27 in.
(68.6 cm)
1 in.
(2.5 cm)
2 in.
(5 cm)
34.1 in.
(86.5 cm)
5.9 in.
(15 cm)
A. Recessed area
B. Side view - closet or confined area
Undercounter installation(washer only)
39.6 in.
(100.6 cm)
1 in.
(2.5 cm)
27 in.
(68.6 cm)
1 in.
(2.5 cm)
18_ installing your washer
WF455AG-03159A_EN.indd Sec3:18
2012-04-13
11:59:21
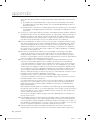
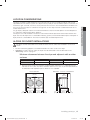
With optional pedestal base or stacking kit
Required Dimensions for Installation With Pedestal
51.2 in. (130 cm) to clear open door
39.0 in.
(99 cm)
01 installing your washer
53.6 in.
(136.2 cm)
34.1 in.
(86.5 cm)
27 in.
(68.6 cm)
5.9 in.
(15 cm)
5 in.
(12.7 cm)
3 in.
(7.6 cm)
48 in.² *
(310 cm²)
24 in.² *
(155 cm²)
3 in.
(7.6 cm)
Closet or Door
1 in.
(2.5 cm)
34.1 in.
(86.5 cm)
5.9 in.**
(15 cm)
Required Dimensions for Installation With Stacking Kit
6 in. *
(15.2 cm)
78 in.
(198 cm)
It is not recommended to stack DV457* on
your washer.
(it might be hard to control dryer LCD
because of the viewing angle.)
* Required spacing
** External exhaust elbow requires additional space.
1 in.
(2.5 cm)
27 in.
(68.6 cm)
installing your washer _19
WF455AG-03159A_EN.indd Sec3:19
2012-04-13
11:59:21
installing your washer
IMPORTANT NOTE TO INSTALLER
Please read the following instructions carefully before installing your Washer.
These instructions should be retained for future reference.
We recommend you hire a professional for installation of this washer.
STEP 1
Selecting a Location
Before you install your washer, make sure the location:
•
•
•
•
•
•
•
•
Has a hard, level surface without carpeting or flooring that may obstruct ventilation.
Has no dust, oil and detergent etc.
Is away from direct sunlight
Has adequate ventilation
Will not freeze (below 32°F or 0°C)
Is away from heat sources such as oil or gas
Has enough slack for the power cord.
Doesn’t have any carpeting that will obstruct ventilation openings.
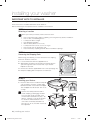
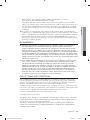
STEP 2
Removing the Shipping Bolts
Before using your Washer, you must remove the four shipping
bolts from the back of the unit.
1. Loosen all the bolts with the supplied wrench.
2. Slide the bolt and spacer up and remove the bolt with the
spacer through the hole in the rear wall of your washer.
Repeat for each bolt.
3. Fill the holes with the supplied Bolt Hole Covers (See page 16).
4. Keep the shipping bolts and spacers for future use.
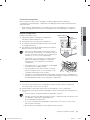
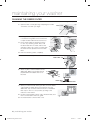
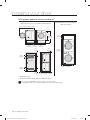
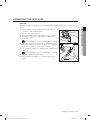
STEP 3
Installing your Washer
1. Place the drain hose in the drain facility. Be
sure an airtight connection is NOT made
between the drain hose and the standpipe.
The standpipe must be at least 18 in or 46
cm high.
Caution must always be exercised to
avoid collapsing or damaging the drain
hose. For best results, the drain hose
should not be restricted in any way – by
elbows, couplings, or excessive lengths.
For situations where the drain hose
cannot be conveniently elevated to at
least 18 in or 46 cm, the drain hose must
be supported.
Laundry tub
Stand pipe
Hose
retainer
96” Max
18” Min
96” Max
18” Min
Tie strap
20_ installing your washer
WF455AG-03159A_EN.indd Sec3:20
2012-04-13
11:59:21
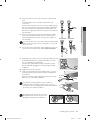
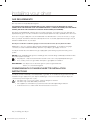
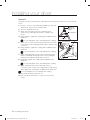
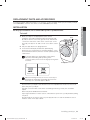
3. Connect the other end of the Hot and Cold water supply
hose to the inlet water valve at the rear of the washing
machine.Tighten by hand until snug, then two-thirds of a
turn with pliers.
Cold
Hot
Rubber
Washer
Cold printed
01 installing your washer
2. Check the inlet hose to ensure a washer is inside each fill
hose.
Thread the inlet hoses to the HOT and COLD faucet
connections.
On the other end of the hose, check for one rubber washer
per hose and install each fill hose to the water valve. Make
sure the hose with the Hot printed line is attached to the
HOT faucet. Tighten by hand until snug, then two-thirds of a
turn with pliers.
Hot printed
For correct water use, connect both HOT and COLD water
valves. If either or both are not connected, an “nF” (no fill)
error can occur.
4. Turn on the “HOT” and “COLD “water supply and check all
connections at the water valve and the faucet for leaks.
5. Plug the power cord into a 3-Prong, well grounded 120 volt
60 Hz approved electrical outlet protected by a 15-amp
fuse or comparable circuit breaker.
Your washer is grounded through the third prong of the
power cord when plugged into a three-prong grounded
receptacle.
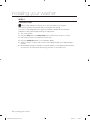
6. Slide your washer into position.
7. Level your washer by turning the leveling legs in or out as
necessary by hand or by using the wrench included with
your washer.
When your washer is level, tighten the locking nuts using
the wrench or (-) flathead screwdriver.
Locking
Nut
Levelling
Leg
Your Washer must be leveled on all four sides. A
carpenter’s level should be used on all four corners of
your Washer. It’s a good idea after the first dozen washes
to recheck your washer’s levelness.
Avoid damage to the legs. Do not move
the Washer unless the Locking-nuts are
fastened to the bottom of the Washer.
installing your washer _21
WF455AG-03159A_EN.indd Sec3:21
2012-04-13
11:59:22
installing your washer
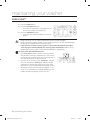
STEP 4
Calibration mode
Before using Calibration mode, be sure to take out all items from the drum.
Your Samsung washer automatically detects the weight of the laundry.
For more accurate weight detection, please run Calibration Mode after the installation.
Calibration mode is performed by following the steps below.
1. Turn on the washer.
2. Press the Temp button and Delay Start button simultaneously at least 3 seconds.
3. Remove any contents in the tub and close the door.
4. Press the Start/Pause button to run Calibration Mode.
5. The drum rotates clockwise and counterclockwise approximately for for approximately 3
minutes.
6. When Calibration Mode is finished, the “En/End” appears on the display and the washing
machine turns off automatically. The washing machine is now ready for use.
22_ installing your washer
WF455AG-03159A_EN.indd Sec3:22
2012-04-13
11:59:22
operating instructions
LOADING YOUR WASHER
You can fill the tub with dry, unfolded clothes; but DO NOT OVERLOAD the tub.
•
Overloading may reduce washing efficiency, cause excess wear, and possibly cause creasing or
wrinkling of the load.
•
Wash delicate items such as bras, hosiery, and other lingerie in the Delicates cycle with similar
lightweight items.
•
When washing big bulky items or a few smaller items that don’t fill the tub completely – a rug, a pillow,
stuffed toys, or one or two sweaters, for example – add a few towels to improve tumbling and spin
performance.
02 operating instructions
•
During the spin cycle, the washer may add additional water to redistribute the excessive imbalance
inside the drum.
•
When washing heavily soiled loads, do not overload your Washer in order to assure good cleaning
results.
•
To add a forgotten item:
1. Press the Start/Pause Button.
2. Wait for the Door Lock light to go out (5 seconds)
3. Add the item, close the door, and press the Start/Pause Button.
After a 10-second pause, the cycle will resume.
GETTING STARTED
1. Load your Washer.
2. Close the door.
CAUTION
Push the laundry into the drum completely to prevent the laundry from being caught in the door or
from falling out of the drum.
3. Add detergent and additives to the dispenser (see page 42).
4. Select the appropriate cycle and options for the load (see page 24).
5. Press the Start/Pause Button.
The drum automatically rotates and measures the weight of the laundry without supplying water in
order to adjust the wash time. (The rotating display on the display panel indicates that the weight of the
laundry is being measured.)
6. The Wash Indicator light will illuminate.
7. The estimated cycle time will appear in the display.
The time may fluctuate to better indicate the time remaining in the cycle.
The actual time required for a cycle may differ from the estimated time in the display depending on the
water pressure, water temperature, detergent, and laundry.
8. Before your washer starts to fill, it will make a series of clicking noises to check the door lock and do a
quick drain.
•
When the cycle is complete, the Door Lock light will go out and “End” will appear in the display.
•
DO NOT attempt to open the door until the Door Lock light is off. To add a forgotten item, see
“Loading your Washer” section. (page 23)
•
When your Washer is restarted after a pause, expect a delay of up to 15 seconds before the cycle
continues.
•
Pressing the Power button cancels the cycle and stops your washer.
•
The Pre Wash, Wash, Rinse and Spin indicator lights will illuminate during those portions of the cycle.
Do not place anything on top of your washer while it is running.
WARNING
operating instructions _23
WF455AG-03159A_EN.indd Sec2:23
2012-04-13
11:59:22
washing a load of laundry
WARNING
WARNING: To reduce the risk of fire, electric shock, or injury to persons, read the IMPORTANT
SAFETY INSTRUCTIONS before operating this appliance.
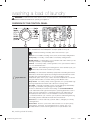
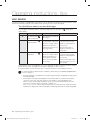
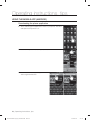
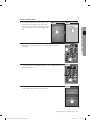
OVERVIEW OF THE CONTROL PANEL
1
2
3
4
5
6
7
8
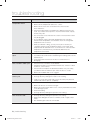
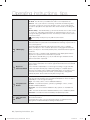
Select the appropriate cycle for the type of load.
This will determine the tumble pattern and spin speed for the cycle.
To minimize wrinkling of laundry, select the Perm Press cycle.
Normal - For most fabrics including cottons, linens, and normally soiled garments.
Heavy Duty - For sturdy, colorfast fabrics and heavily soiled garments.
Bedding PLUS - For bulky items such as blankets and sheets. When you are
washing comforters, use liquid detergent.
Sanitize - For heavily soiled, colorfast garments. This cycle heats the water to
150°F to eliminate bacteria.
If Pause is selected during the heating portion of the Sanitize Cycle, your
Washer door will remain locked for your safety.
Stain Away - For stained clothes. Stain Away cycle provides outstanding stain removal
performance, with the utmost gentle care, avoiding the need for pre-treatment of stains.
1
Cycle Selector
For Best stain removal performance , it is recommended to use hot
temperature option in this cycle, in which the wash temperature is increased
using the internal heater, for overall cleaning of the different stains.
Deep Steam - For heavily soiled, colorfast garments, this cycle provides high
washing temperature and steam and is efficient in cleaning stains.
Eco Cold - It provides useful daily care for normally and lightly soiled laundry
by using only cold water, saving energy and caring fabric.
It cleans as effectively as the warm wash setting on *conventional Normal
cycle under Normal and Light Soil level options. (Cleaning performance of Eco
Cold cycle may not be equal to conventional Normal cycle under heavy soil
level option) For best result, it is recommended to use less than 8 pounds.
* conventional Normal cycle - Normal cycle on previous and existing Samsung
front loading washers released until 2009 without PowerFoam
Perm Press - For wash-and-wear, synthetic fabrics, and lightly to normally
soiled garments.
Active Wear - Use this cycle to wash exercise wear such as sports jersey,
training pants, shirts/tops and other performance clothing. This cycle
provides effective soil removal with gentle action for special fabric care.
24_ washing a load of laundry
WF455AG-03159A_EN.indd Sec5:24
2012-04-13
11:59:22
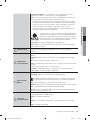
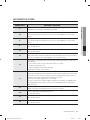
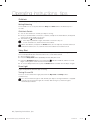
Delicates/Hand Wash - For sheer fabrics, bras, lingerie silk, and other
handwash-only fabrics. For best results, use liquid detergent.
Wool - For machine-washable wool. Loads should be under 8 pounds. For
best results, we recommend a load of 4.4 pounds or less.
• The Wool cycle washes laundry by moving the wash drum horizontally
to maintain the characteristics of the wool fibers and to prevent damage
to the cloth. It then stops for a while to allow the laundry to soak in the
water. This pause in the operation of the Wool cycle is normal.
03 washing a load of laundry
•
We recommend you use a neutral detergent to prevent damage to the
cloth and to improve the washing results.
The wool wash cycle of this machine has been approved by
Woolmark for the washing of machine washable Woolmark
products, provided that the products are washed according
to the instructions on the garment label and those issued by
the manufacturer of this washing machine, M1207.
Quick Wash - For lightly soiled garments needed quickly.
2
Digital Display
Rinse + Spin - Use for loads that need rinsing only or to add rinse-added
fabric softener to a load.
The large Digital Display is easy to use. It provides instructions and
diagnostics while keeping you updated on the cycle status and time
remaining.
Press the button repeatedly to cycle through the different water temperature
options.
Extra Hot - Heavily soiled, colorfast items. Only available with the Sanitize
cycle.
3
Temperature
selection button
Hot - Whites and heavily soiled, colorfast items.
Warm - Colorfast items. When warm rinse is selected, only the final rinse will
be warm.
The other rinses will be cold to conserve energy.
Eco Warm - Moderately soiled, colorfast items; most wrinkle-free items.
Cold - Brightly colored, very lightly soiled items.
Press the button repeatedly to cycle through the different spin speed options.
Extra High - Removes more water from loads during spin.
4
Spin selection
button
To minimize wrinkling of wrinkle-free and no-iron fabrics, DO NOT use
the Extra High spin option for these loads, nor overload your Washer.
High - Use for underwear, t-shirts, jeans and sturdy cottons.
Medium - Use for jeans, wrinkle-free or wash-and-wear items and synthetics.
Low - Use for delicate items needing a slow spin speed.
No Spin - Drains your Washer without spinning. Use for extremely delicate
items that cannot tolerate any spin.
Press the button to select the soil level/washing time.
(Heavy Normal Light)
Heavy - For heavily soiled loads.
5
Soil Level
selection button
Normal - For moderately soiled loads. This setting is best for most loads.
Light - For lightly soiled loads.
washing a load of laundry _25
WF455AG-03159A_EN.indd Sec5:25
2012-04-13
11:59:22
washing a load of laundry
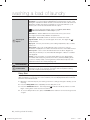
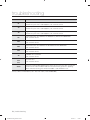
Press these buttons to select different cycle options.
Pre Wash - To use this feature, add detergent to the pre wash section of the
detergent compartment. When turned on, the washer fills with cold water and
detergent, tumbles, then drains and advances to the selected wash cycle.
Some cycles cannot be selected with with this option.
You cannot select the prewash option in the Wool, Quick Wash,
Delicates/Handwash and Rinse+Spin cycles.
Extra Rinse - Add an additional rinse at the end of the cycle to more
thoroughly remove laundry additives and perfumes.
Extra Spin - Add additional time to remove more water from loads.
6
Select Cycle
Option
]”
Signal On/Off - When you activate Signal off function, the “Signal off [
lamp illuminate.
My Cycle - Choose your favorite cycle including temperature, spin, soil level,
option, etc.
Delay Start - Any cycle can be delayed for up to 24 hours in one-hour
increments. Displayed hour indicates the time at which the wash will be started.
Pure CycleTM - Use to clean dirt and bacteria from the drum. Regular use
(after every 40 washes) is recommended. No detergent or bleach is needed
(see page 48).
Steam - Press this button to use the Steam Wash function. Steam Wash
is available with Heavy Duty, Normal, Perm Press, Sanitize, Bedding PLUS
cycles. For heavily soiled, colorfast garments, Steam Wash improves stain
treatment and uses less water (See page 29).
7
Start/Pause
selection button
Press to pause and restart programs.
8
Power button
Press once to turn your washer on, press again to turn your washer off. If
the washer is left on for more than 10 minutes without any buttons being
touched, the power automatically turns off.
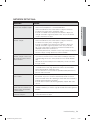
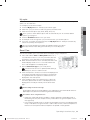
Delay Start
You can set the washing machine to fi nish your wash automatically at a later time, choosing a
delay of between 1 to 24 hours (in 1 hour increments). The hour displayed indicates the time at
which the wash will be finished.
1. Manually or automatically set your washing machine according to the type of laundry you are
washing.
2. Press the Delay Start button repeatedly until the delay time is set.
3. Press the Start/Pause button. The “Delay Start [
begin counting down until it reaches the set time.
]” indicator will be lit, and the clock will
4. To cancel a Delay End function, press the Power button and then turn the washing machine
on again.
26_ washing a load of laundry
WF455AG-03159A_EN.indd Sec5:26
2012-04-13
11:59:23
Child Lock
This function prevents children from playing with your washer.
CAUTION
Although the Child Lock function is activated, you must keep an eye on children so that
they do not operate your washer.
Press and hold both the Spin and Soil Level buttons simultaneously for approximately 3 seconds.
]” lamp
•
When you activate the Child Lock function, the door locks and the “Child Lock [
illuminates.
•
If you press the Start/Pause button after you have activated the Child Lock function , none
of the buttons will work except for the Power button.
•
If you press a button when the buttons are locked, the “Child Lock [
]” lamp blinks.
Pausing the Child Lock function
When the door is locked or the buttons are locked by the Child Lock function, you can pause the
Child Lock operation for 1 minute by pressing and holding both the Spin and Soil Level buttons
simultaneously for approximately 3 seconds.
•
If you pause the Child Lock mode temporarily, the door lock is released for 1 minute for user
convenience. During this period, the “Child Lock [ ]” lamp blinks.
•
If you open the door after the minute is over, an alarm sounds for up to 2 minutes.
•
If you close the door within the 2 minutes, the door is locked and the Child Lock function is
reactivated. If you close the door after the 2 minutes, the door is not locked automatically
and no alarm sounds.
Deactivating the Child Lock function
Press and hold both the Spin and Soil Level buttons simultaneously for approximately 6
seconds.
•
When you deactivate the Child Lock function, the door is unlocked and the “Child Lock [
is turned off.
]”
WARNING
• The Child Lock function prevents children or the infirm from accidently operating the
washer and injuring themselves.
• If a child enters the washing machine, the child may become trapped and suffocate.
CAUTION
• Once you have activated the Child Lock function, it continues working even if the power
is turned off.
• Opening the door by force can result in injury due to damage to the product.
To add laundry after you have activated the Child Lock function, you must first pause or
deactivate the Child Lock function.
If you want to open the door of the washing machine when the Child Lock function is
activated:
•
Pause or deactivate the Child Lock function.
•
Turn the washing machine off and then on again.
washing a load of laundry _27
WF455AG-03159A_EN.indd Sec5:27
2012-04-13
11:59:23
03 washing a load of laundry
Activating the Child Lock function
washing a load of laundry
Spin Only
If you press the Power button and then press and hold the Spin button for 2 seconds, the spin
time will be displayed on the display panel.
Then, press the Spin button repeatedly until the required spin level is selected, and then press
the Start/Pause button.
Before pressing the Spin Only button, you can select a cycle with the Cycle Selector. If you
have selected a cycle, you can only select the corresponding spin level.
Drum Light
1. If the door is opened when the power is on, the Drum Light is automatically turned on.
2. If the door is closed when the power is on, the Drum Light is automatically turned off.
3. Press the Temp. and the Spin buttons simultaneously to turn the Drum Light on or off.
4. If 4 minutes have passed after the Drum Light is turned on, the Drum Light is automatically
turned off.
Garment+
You can add or take out laundry items even after the wash has started, as long as the
“Garment+” light is on. Pushing the Start/Pause button unlocks the door, unless the water is
too hot or if there is too much water in your Washer. If you are able to unlock the door and wish
to continue the wash cycle, close the door and press the Start/Pause button.
My cycle
Allows you to activate your custom wash (temperature, spin, soil level, etc.) with one–button
convenience.
By pushing the My Cycle button, you activate the settings used during the My Cycle mode.
The “My Cycle” light will indicate activation.
You can select all options as follows in “My Cycle” mode.
1. Select cycle using the Cycle Selector dial.
2. After cycle selection, set each option.
See page 56 for available option settings with each cycle.
3. Then, you can start “My Cycle” by pushing the Start/Pause button in “My Cycle” mode.
The cycle and options you select will be displayed the next time you choose “My Cycle”.
You can change the “My Cycle” settings by repeating the same process above.
The last used setting will be displayed the next time you choose “My Cycle”.
28_ washing a load of laundry
WF455AG-03159A_EN.indd Sec5:28
2012-04-13
11:59:23
Steam
The Steam Wash function injects steam directly into the laundry in the wash tub to increase the
wash temperature and enhance the soak effect, thus improving the wash performance.
1. Load the washer.
03 washing a load of laundry
2. Press the Power button.
3. Turn the Cycle Selector and select a steam cycle. (The Deep Steam cycle automatically
selects the Steam Wash function.)
4. Press the Steam button.
5. Add detergent into the dispenser tray for a wash, and add fabric softener up to the marked
line.
6. Press the Start/Pause button.
: The washer automatically selects the optimal wash conditions by sensing the weight of the
laundry.
Steam may not necessarily be visible during the steam cycles.
Steam may not be present during entire steam wash cycle.
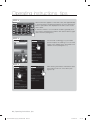
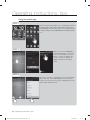
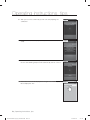
Smart Care
This function enables you to check the status of the washing machine using a smartphone.
1. To enable the Smart Care function, press and hold
the Soil Level and Steam button for 3 seconds
within 10 seconds after turning the power on by
pressing the Power button.
2. If the Smart Care function is activated, the led on
window display rotates for 2 or 3 seconds and then
the Smart Care indicator is lit on the display.
3. Run the Smart Care app on your smart phone.
4. The Smart Care function is optimized with Galaxy S, Galaxy S2, iPhone 4 and iPhone 4S.
5. Focus your smart phone’s camera on the display panel of the washing machine.
6. If the smart phone’s camera is focused on the display panel of the washing machine, the
result is automatically recognized and the error type and countermeasures are displayed on
the smart phone.
7. If an error occurs more than twice, please manually enter the error code displayed on the
display panel of the washing machine into the Smart Care app.
Downloading the Smart Care app
• Download the Samsung Smart Washer/Dryer App into your mobile phone from the
Android market or Apple App store. (Search word : Samsung Smart Washer/Dryer)
Precautions when using Smart Care
• If a lighting device (e.g. fluorescent or lamp) is reflected on the display panel of the
washing machine, the result on the display panel may not be recognized easily.
• If an error occurs more than twice, please manually enter the error code displayed on the
display panel of the washing machine into the Smart Care app.
• If the angle of the smartphone camera and the display panel of the washing machine is
incorrect, the error may not be recognized properly.
Please try to hold the smart phone at an angle to the display panel as shown by the
figure.
washing a load of laundry _29
WF455AG-03159A_EN.indd Sec5:29
2012-04-13
11:59:23
washing a load of laundry
Washing clothes using the cycle selector
Your new washing machine makes washing clothes easy, using Samsung’s “Fuzzy Control”
automatic control system. When you select a wash program, the machine will set the correct
temperature, washing time, and washing speed.
1. Press the Power button.
2. Open the door.
3. Load the articles of clothing one at a time loosely into the drum, without overfilling it.
4. Close the door.
5. Add detergent, softener, and pre-wash detergent (if necessary) into the appropriate
compartments.
Pre-wash is only available when selecting the Normal, Perm Press, Sanitize, Bedding Plus,
Deep Steam and Heavy Duty cycles. It is only necessary if your clothing is heavily soiled.
6. Use the Cycle Selector to select the appropriate cycle according to the type of material:
Normal, Heavy Duty, Perm Press, Sanitize, Bedding Plus, Deep Steam, Eco Cold, Stain
Away, Active Wear, Delicates/Hand Wash, Wool, Quick Wash, Rinse + Spin and Spin Only.
The relevant indicators will illuminate on the control panel.
7. At this time, you can control the wash temperature, the number of rinse cycles, the spinning
speed, and the delay time by pressing the appropriate option button.
8. Press the Start/Pause button on the Cycle Selector and the wash will begin. The process
indicator will light up and the remaining time for the cycle will appear in the display.
Pause Option
1. Within 5 minutes of starting a wash, it is possible to add/remove laundry items to/from the
wash.
2. Press the Start/Pause button to unlock the door.
3. The door cannot be opened when the water is too HOT or the water level is too HIGH.
4. After closing the door, press the Start/Pause button to restart the wash.
When the cycle is finished:
After the total cycle has finished, the power will turn off automatically.
1. Open the door.
2. Remove laundry.
30_ washing a load of laundry
WF455AG-03159A_EN.indd Sec5:30
2012-04-13
11:59:23
SETTING THE SMART CONTROL
Connect a wired/wireless sharer and the washer through a wireless connection, connect to www.
samsungsmartappliance.com and register the washer to the Smart Control service.
03 washing a load of laundry
This product does not contain a wireless router.
Configuring the wired/wireless sharer
•
This product supports DHCP (Dynamic Host Configuration Protocol). Therefore, if a user
wants to use an existing wired/wireless sharer, the sharer’s DHCP server function must be
enabled.
•
Set the channel for the connection with the wired/wireless sharer to a channel that is not
being used.
•
The WEP, TKIP or TKIP AES encryption types are supported for wired/wireless sharers and
other new Wi-Fi encryption types are not supported.
•
The quality of the wireless network may be affected by the surrounding environment.
•
If your Internet service provider has registered and fixed the MAC address (unique
identification number of a device) of the user’s PC or modem, you may not be able to
connect the washer to the Internet. Please ask your Internet service provider about the
procedures to connect a device (e.g. washer) other than a computer to the Internet. If your
Internet service provider requires an ID and password to connect to the Internet, you may
not be able to connect the washer to the Internet. In this case, you have to enter the ID and
password to connect to the Internet.
You may not be able to connect to the Internet due to a firewall. In this case, ask your
Internet service provider for assistance.If you cannot connect the washer to the Internet even
after contacting your Internet service provider, please contact a Samsung Electronics dealer
or service center.
Check before installation
•
For the procedures to install a normal wired/wireless sharer,
refer to the user manual of the corresponding wired/
wireless sharer.
•
Samsung washers only support Wi-Fi 2.4Ghz.
•
Samsung washers support IEEE 802.11 b/g/n and Wi-Fi
Direct (IEEE802.11n is recommended).
•
If the wired/wireless sharer is not Wi-Fi certified, it cannot
be connected with the washer.
washing a load of laundry _31
WF455AG-03159A_EN.indd Sec5:31
2012-04-13
11:59:23
washing a load of laundry
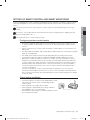
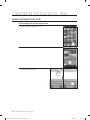
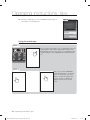
Connecting to the network using the WPS setting
• Samsung washers use PBC as the WPS type. Check if the current wired/wireless sharer
supports Wi-Fi Protected Setup™(WPS).
• Check if the wired/wireless share has a WPS button.
1. Press and hold both the Temp. and Start/Pause buttons
for 5 seconds.
2. Turn the Cycle Selector until “UP” is displayed on the
display panel and press the Start/Pause button.
If the connection is not established within 5 minutes,
“FUP” is displayed on the display panel.
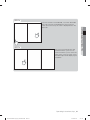
3. Press and hold the WPS button of the wired/wireless
sharer that will be connected with the washer for 120
seconds or less to run the WPS function of the wired/
wireless sharer. If the WPS function runs, the wired/wireless
sharer automatically fetches the necessary information from
the washer and the washer is automatically connected to
the Internet through the wired/wireless sharer.
• How to use the WPS function of the wired/wireless sharer may differ depending
on the manufacturer. Refer to the user manual of the corresponding wired/wireless
sharer.
• Even after the WPS setup is complete, it may take some time until the actual
connection is established to allocate an IP address through DHCP (up to 5 minutes).
CAUTION
• Note that if you use a wired/wireless sharer that is not WPS-certified, the washer
may not be connected through Wi-Fi or a device that was connected to the wired/
wireless sharer may be disconnected.
• Please note that for some wired/wireless sharers, if you press and hold the WPS
button for some time, the settings of the sharer may be reset.
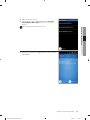
4. If the washer and the wired/wireless sharer are properly
indicator blinks on the display panel for
connected, the
30 seconds.
5. Press the Smart Control button to finish the Smart
Control connection setup. When the setup is completed
indicator blinks on the display panel with a
normally, the
beeping sound.
If you press the Smart Control button when the washer and the wired/wireless sharer
are not properly connected, the invalid button sound is heard and the Smart Control
connection setup is not completed.
32_ washing a load of laundry
WF455AG-03159A_EN.indd Sec5:32
2012-04-13
11:59:23
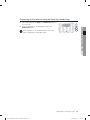
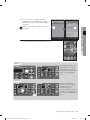
Connecting to the network using the AP setting
1. Press and hold the Temp. and Start/Pause buttons for 5 seconds.
2. The AP menu appears on the LED screen.
3. If the Start/Pause button is pressed after approximately 1 minute, the AP blinks.
03 washing a load of laundry
If the “AP” display does not blink.
Since the Wi-Fi module is not ready, try again after a moment.
(Approximately 1 minute is needed for the Wi-Fi module to get ready.)
4. Check if the SMARTWASHER is displayed in the list displayed in the mobile Wi-Fi setup
screen. If it is in the list, perform step 5.
5. Launch the app, enter Connection setup and press the Setting Start button.
6. The app attempts to connect to the washing machine that has changed to AP mode.
7. When the connection is established, the AP list is displayed.
8. Select the AP and enter the password.
9. When the setting is completed.
When the setting is successfully completed, “oAP” is displayed on the LED.
When the setting is unsuccessfully completed, “FAP” is displayed on the LED.
washing a load of laundry _33
WF455AG-03159A_EN.indd Sec5:33
2012-04-13
11:59:24
washing a load of laundry
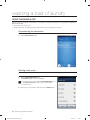
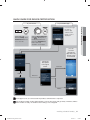
DOWNLOADING AND RUNNING THE MOBILE APP, SAMSUNG
SMART WASHER/DRYER APP
Follow the procedure below to download and run the mobile app, Samsung Smart Washer/Dryer App.
1. Download the Samsung Smart Washer/Dryer App into your mobile phone from the
Android market. You can skip this step if the app has been already downloaded into your
mobile phone.
2. Tap the Samsung Smart Washer/Dryer App icon on
your mobile phone to run the app.
The initial screen is displayed.
3. The Home screen is displayed. It shows that your mobile
phone is not yet connected to your washer.
4. Tap the Indoor control or Outdoor control.
34_ washing a load of laundry
WF455AG-03159A_EN.indd Sec5:34
2012-04-13
11:59:24
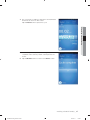
5. Tap your washer’s name.
6. The progress screen is displayed while the Samsung
Smart Washer/Dryer App tries to connect to your
washer.
03 washing a load of laundry
Connecting may take a minute or two.
7. When the connection is established, the screen shown at
right appears.
washing a load of laundry _35
WF455AG-03159A_EN.indd Sec5:35
2012-04-13
11:59:24
washing a load of laundry
USING THE MOBILE APP
After you washer has been connected, you can perform the following operations using the Samsung Smart
Washer/Dryer App.
•
Disconnect the connection
•
Start a new wash (including receiving notifications and controlling your washer)
Disconnecting the connection
Follow the procedure below to disconnect the connection to your washer.
1. Tab the Disconnect button.
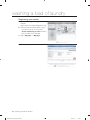
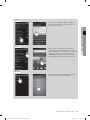
Starting a new wash
Follow the procedure below to start a new wash from your mobile app.
1. Tap the Start new wash button.
The Choose cycle screen is displayed.
In your washer, you must tap the Smart Control button
in the Cycle Selection screen to turn on the Smart
Control function.
2. Select the cycle you want, and then top the Start button.
36_ washing a load of laundry
WF455AG-03159A_EN.indd Sec5:36
2012-04-13
11:59:24
3. The cycle status including cycle progress and estimated
finish time are shown on the screen.
Tap the Pause button to pause the cycle.
03 washing a load of laundry
4. When the cycle is completed, the message “Cycle
complete” and a summary review of all the phases are
shown.
5. Tap the Dismiss button to return to the Home screen.
washing a load of laundry _37
WF455AG-03159A_EN.indd Sec5:37
2012-04-13
11:59:24
washing a load of laundry
Registering your washer
1. Access Samsung Smart appliance
website.
(http://www.samsungsmartappliance.com)
2. Enter the User ID and Password to log in.
If you don’t have an account, press
“Create a Samsung account” and fill in
the form to become a member.
3. Select “My page” “My page”.
4. Select “Add device”.
38_ washing a load of laundry
WF455AG-03159A_EN.indd Sec5:38
2012-04-13
11:59:24
5. After entering the MAC written from
following instruction.
1) Press and hold both the Temp., and
Start/Pause buttons for 3 seconds.
3) Find out 12 Hexadecimal Address,
pressing Start/Pause buttons for 2
digit & text.
6. Click the “Certify device”.
7. Press and hold both the Temp., and
Start/Pause buttons for 3 seconds.
8. Turn the Cycle Selector until PS is displayed on the display panel and press the Start/Pause
button.
9. When certify device checking window comes on, click the “Ok”.
•
If the washer you are registering is already registered by other users, a window will come
on asking whether you want to delete the usage authority of the existing users, or not.
10. After the registration of the washer is
completed, you can check the registered
washer on the device information list.
washing a load of laundry _39
WF455AG-03159A_EN.indd Sec5:39
2012-04-13
11:59:24
03 washing a load of laundry
2) Turn the Cycle Selector until “Ad” is
displayed on the display panel and
press the Start/Pause button.
washing a load of laundry
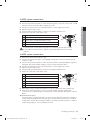
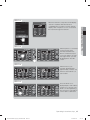
QUICK GUIDE FOR WI-FI SETTING AND AP CONNECTING
In your washer
Press and hold
both the Temp. and
Start/Pause buttons
for 3 seconds.
In your Mobile App.
If SMART
WASHER is
listed in the Wi-Fi
settings screen
on the mobile
phone, run the
mobile app, select
Connection
setup and press
the Setting Start
button.
Turn the Cycle
Selector until
is displayed on
the display panel
and press the
Start/Pause button.
This process delivers the connection
information of the AP that is connected
with the mobile from the mobile to the
product.
If this process is successfully completed,
the product is automatically connected to
the AP. When the setting is successfully
completed, the oAP is displayed on the
LED.
Success
If the wrong password is entered when
you configure the AP mode, the Wi-Fi
connection will not work properly even
if the product is connected with the
oAP. Check the password and enter the
password correctly.
Failure
40_ washing a load of laundry
WF455AG-03159A_EN.indd Sec5:40
2012-04-13
11:59:25
QUICK GUIDE FOR DEVICE CERTIFICATION
In your washer
03 washing a load of laundry
Press and hold
both the Temp. and
Start/Pause buttons
for 3 seconds.
In your Mobile App.
Connect through
the app so
that the app
authentication
ready screen is
displayed.
Turn the Cycle Selector
is displayed on
until
the display panel and
press the Start/Pause
button after tap
“Confirm” on the app.
you can
connect
through the
App when only
the PS mode
is terminated
Follow the
description
in the figure
below.
Success
Failure
Success
Failure
If the app has not yet connected to the product, authentication is required.
For the Wi-Fi module, it takes approximately 1 minute to boot up and get ready. Therefore,until the
Wi-Fi module is ready, the Smart Control setting is not configured.
washing a load of laundry _41
WF455AG-03159A_EN.indd Sec5:41
2012-04-13
11:59:25
washing a load of laundry
DETERGENT USE
Your Washer is designed to use high efficiency (HE) detergents.
•
For best cleaning results, use a high efficiency detergents such as Tide
HE, Wisk HE, Cheer HE or Gain HE*. High efficiency detergents contain
suds suppressors that reduce or eliminate suds. When fewer suds are
produced, the load tumbles more efficiently and cleaning is maximized.
WARNING
Regular detergent is not recommended. Please use HE detergents
only.
Reducing the amount of detergent may reduce the quality of cleaning. It is important to pre–treat
stains, sort carefully by color and soil level, and avoid overloading.
* Brand names are trademarks of their respective manufacturers.
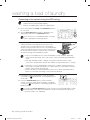
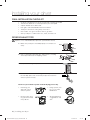
FEATURES
Automatic dispenser
Your Washer has separate compartments for dispensing
detergent and color-safe bleach, chlorine bleach, and
fabric softener. Add all laundry additives to their respective
compartments before starting your Washer.
The automatic dispenser MUST ALWAYS be in place before
starting your Washer.
DO NOT open the automatic dispenser when your washer is running.
To use:
• Never exceed the manufacturer’s recommendations when
adding detergent.
• This compartment holds liquid detergent for the main wash
cycle, which is added to the load at the beginning of the
cycle.
Liquid detergent
compartment
When using powdered detergent, remove the liquid
detergent compartment from the detergent drawer. The
washer will not dispense powdered detergent from the
liquid detergent compartment.
Detergent compartment
1. Pour the recommended amount of laundry detergent directly into the detergent compartment
before starting your Washer.
2. If you are using color-safe bleach, add it with the detergent to the detergent compartment.
When adding color-safe bleach with detergent, it is best if both laundry products are in the
same form – granular or liquid.
42_ washing a load of laundry
WF455AG-03159A_EN.indd Sec5:42
2012-04-13
11:59:25
Pre wash compartment
When using the Pre Wash option, detergent should be added to both the Pre Wash
compartment and the detergent compartment. The detergent will automatically be dispensed
during Pre Wash.
If high efficiency (HE) detergent is used, add 1/3 of the recommended amount to the Pre
Wash compartment and 2/3 of the recommended amount to the detergent compartment.
03 washing a load of laundry
•
Bleach compartment
(Liquid chlorine bleach only)
Fabric Softener
compartment
1. Add chlorine bleach to the bleach compartment.
DO NOT exceed the MAX FILL line.
Bleach
compartment
2. Avoid splashing or over–filling the compartment.
3. Your Washer automatically dispenses bleach into the tub
at the appropriate time.
4. The dispenser automatically dilutes liquid chlorine bleach
before it reaches the wash load.
•
Never pour undiluted liquid chlorine bleach directly
onto the load or into the tub. It is a powerful chemical
and can cause fabric damage, such as weakening of
the fibers or color loss, if not used properly.
•
If you prefer to use color–safe, non–chlorine bleach,
add it to the appropriate detergent compartment.
DO NOT pour color–safe bleach into the Bleach
compartment.
•
Oxi-type boosters or color-safe bleach can be added
to the drum prior to adding laundry.
•
Put the laundry into the drum only after confirming
that the oxi-type boosters or color-safe bleach has
completely entered the hole of the drum.
•
However, to use powdered detergent and powder oxi-type boosters or powdered colorsafe bleach at the same time, it is more effective putting them in together and removing
the liquid detergent holder from the detergent compartment.
Fabric softener compartment
1. Pour the recommended amount of liquid fabric softener into the softener compartment.
For smaller loads, use less than one capful.
2. Dilute the fabric softener with water until it reaches MAX FILL in the compartment.
3. The dispenser automatically releases liquid fabric softener at the proper time during the rinse
cycle.
•
Use the softener compartment ONLY for liquid fabric softeners.
•
DO NOT use the Downy Ball* in the fabric softener compartment with this Washer. It will
not add fabric softener at the appropriate time.
Use the detergent Compartment.
•
It is not recommended using liquid fabric softener that is too sticky as it may not mix
with the water sufficiently.
*
Brand names are trademarks of their respective manufacturers.
washing a load of laundry _43
WF455AG-03159A_EN.indd Sec5:43
2012-04-13
11:59:26
maintaining your washer
CLEANING THE EXTERIOR
Turn off the water faucets after finishing the day’s washing.
This will shut off the water supply to your Washer and prevent the unlikely possibility of damage from
escaping water. Leave the door open to allow the inside of your Washer to dry out.
Use a soft cloth to wipe up all detergent, bleach or other spills as they occur.
Clean the following as recommended:
Control Panel – Clean with a soft, damp cloth. Do not use abrasive powders or cleaning pads. Do not spray
cleaners directly on the panel.
Cabinet – Clean with soap and water.
CLEANING THE INTERIOR
Clean the interior of your Washer periodically to remove any dirt, soil, odor, mold, mildew, or bacterial
residue that may remain in your Washer as a result of washing clothes.
Failure to follow these instructions may result in unpleasant conditions, including odors and/or permanent
stains on your Washer or laundry.
Hard water deposits may be removed, if needed. Use a cleaner labeled “Washer safe”.
44_ maintaining your washer
WF455AG-03159A_EN.indd Sec4:44
2012-04-13
11:59:26
CLEANING THE DISPENSERS
The automatic dispenser may need to be cleaned periodically due to laundry additive buildup.
1. Pull the detergent liquid holder out of the detergent compartment.
1
04 maintaining your washer
2. Remove the siphon cap from the fabric softener and bleach
compartments.
3. Wash all of the parts under running water.
4. Clean the dispenser recess with a soft brush.
5. Reinsert the siphon cap and push it firmly into place.
6. Push the dispenser back into place.
7. Run a Rinse+Spin c ycle without any load in your washer.
2
Siphon cap
STORING YOUR WASHER
Washers can be damaged if water is not removed from hoses and internal components before storage.
Prepare your Washer for storage as follows:
•
Select the Quick Wash cycle and add bleach to the automatic dispenser. Run your Washer through the
cycle without a load.
•
Turn the water faucets off and disconnect the inlet hoses.
•
Unplug your Washer from the electrical outlet and leave your Washer door open to let air circulate inside
the tumbler.
•
If your Washer has been stored in below–freezing temperatures, allow time for any leftover water in your
Washer to thaw out before use.
maintaining your washer _45
WF455AG-03159A_EN.indd Sec4:45
2012-04-13
11:59:26
maintaining your washer
CLEANING THE DEBRIS FILTER
We recommend cleaning the debris filter when water does not drain well or the “nd” error message is displayed.
1. Open the filter cover by pressing and pulling the handle
of the filter cover with your finger.
2. Holding the drain cap, pull the drain tube that
is hooked on the guide hook to the front.Do
not pull the drain tube with excessive force.
Filter cover
Step 1
3. Place a bowl under the washing machine
to catch any remaining water. Then, hold
the drain tube with one hand, and turn the
emergency drain cap counter clockwise with
the other hand to separate it from the drain
tube.
Step 2
Drain cap
4. Drain the remaining water completely.
5. Pull out the debris cap and debris filter assembly.
Debris filter cap
6. Wash any dirt or other material from the
debris filter. Make sure the drain pump
propeller behind the debris filter is not
blocked.
Debris filter
cap
Debris filter
7. When you have finished cleaning the filter, insert the debris
cap and filter assembly back into the washer. Turn the
debris filter cap clockwise until the indicator on the debris
filter cap is in the 12 o’clock position, pointing to the
indicator on the washer.
8. Re-attach the emergency drain cap to the drain tube, and
then hook the tube to the hook guide.
9. Re-install the filter cover the filter cover.
46_ maintaining your washer
WF455AG-03159A_EN.indd Sec4:46
2012-04-13
11:59:26
CLEANING THE DOOR SEAL/BELLOW
1. Open the washer door and remove any clothing or items from the washer.
seal/bellow
3. If stained areas are found, wipe down these areas of the seal/bellow, using the procedure
that follows.
a) Mix a dilute solution, using ¾ cup (177 mL) of liquid chlorine bleach, and 1 gal. (3.8 L) of
warm tap water.
b) Wipe the seal/bellow area with the dilute solution, using a damp cloth.
c) Let stand 5 minutes.
d) Wipe down area thoroughly with a dry cloth and let the washer interior air dry with door
open.
IMPORTANT:
• Wear rubber gloves when cleaning for prolonged periods.
• Refer to the bleach manufacturer’s instructions for proper use.
PRESERVING THE TOP COVER AND THE FRONT FRAME
Do not place any heavy or sharp objects or a detergent box on the washing machine. Keep them on the
purchased pedestal or in a separate storage box. This may scratch or damage the top cover of the washing
machine.
Since the entire washing machine has a high-gloss finish, the surface can be scratched or damaged.
Therefore, avoid scratching or damaging the surface when using the washing machine.
maintaining your washer _47
WF455AG-03159A_EN.indd Sec4:47
2012-04-13
11:59:27
04 maintaining your washer
2. Inspect the gray colored seal/bellow between the door
opening and the basket for stained areas. Pull back the
seal/bellow to inspect all areas under the seal/bellow and to
check for foreign objects.
maintaining your washer
PURE CYCLETM
Pure Cycle is a self-cleaning cycle that removes mold that may occur inside the washing machine.
1. Press the Power button.
2. Press the Pure CycleTM button.
•
Once the Pure Cycle button is pressed, the only
function that can be set is Delay Start.
3. Press the Start/Pause button.
•
CAUTION
If you press the Start/Pause button, Pure Cycle
begins.
•
Using Pure Cycle, you can clean the drum without using a cleansing agent.
•
Never use Pure Cycle when laundry is in the washing machine. This may cause damage to
the laundry or a problem with the washing machine.
•
If you want to use drum cleansing agent, use only 1/10 of the amount of the drum
cleansing agent recommended by the cleansing agent manufacturer. (When using a
powder-type cleansing agent , remove the liquid detergent compartment.)
The Pure Cycle Auto Indicator Function
•
If the “Pure Cycle” button is lit after a wash, it indicates
that tub (drum) cleaning is required. In this case, remove
the laundry from the washing machine, turn the power on,
and clean the drum by running Pure Cycle.
•
If you do not run Pure Cycle, the “Pure Cycle” indicator
turns off. However, the “Pure Cycle” indicator will light
again after two washes. Not running Pure Cycle at this
point will not cause a problem with the washing machine.
•
Although the Pure Cycle Auto Indicator appears once a
month or so, the frequency may differ depending on the
number of times the washing machine is used.
48_ maintaining your washer
WF455AG-03159A_EN.indd Sec4:48
2012-04-13
11:59:27
troubleshooting
CHECK THESE POINTS IF YOUR WASHER…
SOLUTION
Will not start..
•
Make sure the door is firmly closed.
•
Make sure your Washer is plugged in.
•
Make sure the water source faucets are open.
•
Make sure to press the Start/Pause Button to start your Washer.
•
Make sure Child Lock is not activated; see page 27.
•
Before your Washer starts to fill, it will make a series of clicking noises
to check the door lock and do a quick drain.
•
Check the fuse or reset the circuit breaker
•
Turn both faucets on fully.
•
Make sure the door is tightly closed.
•
Straighten the water inlet hoses.
•
Disconnect hoses and clean screens. Hose filter screens may be
clogged.
Has no water or not enough
water..
•
Open and close the door, then press the Start/Pause Button.
Has detergent remaining
in the automatic dispenser
after the wash cycle is
complete.
•
Make sure your Washer is running with sufficient water pressure.
•
Make sure the Detergent Selector dial is in the upper position when
using granular detergent.
Vibrates or is too noisy.
•
Make sure your Washer is set on a level surface. If the surface is not
level, adjust your Washer feet to level the appliance.
•
Make sure that the shipping bolts are removed.
•
Make sure your Washer is not touching any other object.
•
Make sure the laundry load is balanced.
•
Plug the power cord into a live electrical outlet.
•
Check the fuse or reset the circuit breaker.
•
Close the door and press the Start/Pause Button to start your
Washer.
For your safety, your Washer will not tumble or spin unless the door is
closed.
•
Before your Washer starts to fill, it will make a series of clicking noises
to check the door lock and do a quick drain.
•
There may be a pause or soak period in the cycle. Wait briefly and it
may start.
•
Check the screens on the inlet hoses at the faucets for obstructions.
Clean the screens periodically.
Stops
05 troubleshooting
PROBLEM
troubleshooting _49
WF455AG-03159A_EN.indd Sec7:49
2012-04-13
11:59:27
troubleshooting
PROBLEM
SOLUTION
Fills with the wrong
temperature water.
•
Turn both faucets on fully.
•
Make sure the temperature selection is correct.
•
Make sure the hoses are connected to the correct faucets.
Flush water lines.
•
Check the water heater. It should be set to deliver a minimum 120°
F (49° C) hot water at the tap. Also check the water heater capacity
and recovery rate.
•
Disconnect the hoses and clean the screens. The hose filter screens
may be plugged.
•
As your Washer is filling, the water temperature may change as
the automatic temperature control feature checks incoming water
temperature. This is normal.
•
While your Washer is filling, you may notice just hot and/or just
cold water going through the dispenser when cold or warm wash
temperatures are selected. This is a normal function of the automatic
temperature control feature as your Washer determines the
temperature of the water.
•
Press the Start/Pause Button to stop your Washer.
•
Your Washer door will remain locked during the heating portion of the
Sanitize Cycle
•
It may take a few moments for the door lock mechanism to
disengage.
•
Check the fuse or reset the circuit breaker.
•
Straighten the drain hoses. Eliminate kinked hoses. If there is a drain
restriction, call for service.
•
Close the door and press the Start/Pause Button. For your safety,
your Washer will not tumble or spin unless the door is closed.
•
Make sure the debris filter is not clogged.
•
Use the High or Extra High spin speed.
•
Use high efficiency detergent to reduce over–sudsing.
•
Load is too small. Very small loads (one or two items) may become
unbalanced and not spin out completely.
•
Make sure the door is firmly closed.
•
Make sure all hose connections are tight.
•
Make sure the end of the drain hose is correctly inserted and secured
to the drainage system.
•
Avoid overloading.
•
Use high efficiency detergent to prevent over–sudsing.
•
Use high efficiency detergent to prevent over-sudsing.
•
Reduce the detergent amount for soft water, small or lightly soiled
loads.
•
Non-HE detergent is NOT recommended.
Door locked or will not
open.
Does not drain and/or spin.
Load is too wet at the end
of the cycle.
Leaks water.
Has excessive suds.
50_ troubleshooting
WF455AG-03159A_EN.indd Sec7:50
2012-04-13
11:59:27
INFORMATION CODES
Information codes may be displayed to help you better understand what is occurring with your washer.
ERROR CODE
MEANING & SOLUTION
An unbalanced load that prevents your washer from spinning.
Redistribute the load, press the Start/Pause button.
dS
The door is open when the washer is running.
Close the door tightly and restart the cycle. If the code reappears, call customer
service.
FL
Your washer failed to lock the door.
Close the door tightly and restart the cycle. If the code reappears, call customer
service.
Hr
A water temperature control problem. (Heater control problem)
Call customer service.
LE
Your washer has tried to fill, but has not reached the proper water level.
Call customer service.
LO
The door will not unlock.
Make sure the door is firmly closed. Press the Power button to turn off your washer,
then turn it on again. If the code reappears, call customer service.
nd
Your washer is not draining. This can also mean that the unit senses a small clog
while draining.
1. Turn off the unit for 10 seconds and then turn it on again.
2. Select the Spin Only cycle.
3. Press the Start/Pause to drain the water.
If it still does not drain, call for service.
nF
Your washer has tried to fill but was unsuccessful.
Make sure the water faucets are open all the way. Check for bent hoses. Check the
inlet screens on the hoses. If you are using a Flood Safety Device, please remove
the device and connect the water hoses directly to the unit.
Check if the hot water supply hose is connected.
You must connect the hot water supply hose because hot water is supplied by the
Auto Temperature Control (A.T.C.) function if the temperature of the cold water is
lower than 59°F.
nF1
The hot/cold water hose connection is not correct.
Please connect the hot/cold water hose connection correctly.
OE
A fault is detected in the water level sensor.
Call customer service.
1E
The Water Level sensor is not working properly.
Call customer service.
E2
A jammed key.
Call customer service.
05 troubleshooting
dc
troubleshooting _51
WF455AG-03159A_EN.indd Sec7:51
2012-04-13
11:59:27
troubleshooting
ERROR CODE
MEANING & SOLUTION
tE
A temperature sensor problem.
Restart the cycle. If the code reappears, call customer service.
3E
A motor problem.
Restart the cycle. If the code reappears, call customer service.
2E
High/Low voltage detected.
Restart the cycle. If the code reappears, call customer service.
AE
A Communication error between the SUB(Sensor) PBA and the MAIN PBA
Call customer service.
AE4
A Communication error between the WIFI PBA and the MAIN PBA
Call customer service.
AE3
A Communication error between the DR Module and the MAIN PBA
Call customer service.
AE5
A Communication error between the LCD PBA and the MAIN PBA
Call customer service.
8E
SF1
SF2
SF3
SUdS
A MEMS sensor problem.
Call customer service.
A system error
Call customer service.
Too many suds are detected during the wash session. The unit is put on hold until
the amount of suds have been reduced. The unit will then go back to operating.
When it finishes washing, the “End” and “SUdS” codes will blink in turn.
For any codes not listed above, call 1–800–726–7864 (1–800–SAMSUNG)
52_ troubleshooting
WF455AG-03159A_EN.indd Sec7:52
2012-04-13
11:59:27
NETWORK SETUP Q&A
ANSWER
The washer or dryer is not
found in the smartphone app.
•
•
•
•
•
Check the power status of the AP.
Check if the smartphone is connected with Wi-Fi.
Check if the Wi-Fi function of the washer or dryer is turned on.
To refresh the screen, press “Configure” again.
If the AP is installed too far away from the washer or dryer, the
strength of the Wi-Fi signal may weak. In this case, move the AP
closer to the washer or dryer.
The AP is not found on the
washer or dryer.
•
•
•
•
Check the power status of the AP.
Check if the Wi-Fi function of the washer or dryer is turned on.
To refresh the screen, press “Configure” again.
If the AP is installed too far away from the washer or dryer, the
strength of the Wi-Fi signal may weak. In this case, move the
AP closer to the washer or dryer. Ensure that the number of the
displayed antenna bars are at least 3.
Since if the performance of the AP is low, it may not be found by the
washer or dryer, use high performance AP if available.
•
There are more than one
washer or dryer in the house.
Do I have to install an AP for
each of them?
•
•
•
Which AP is better?
•
•
•
How can I check if the AP is
out of order?
•
•
•
05 troubleshooting
QUESTION
You can install only one AP.
I you want to one AP for each of the washer and dryer, select the
corresponding AP for each of the products in the “Smart Washer”
app.
When both washer and dryer are installed, they can be controlled
through one AP.
Since the washer or dryer is controlled through the AP from the inside
or outside of the house, high performance AP is recommended.
Use an AP with Wi-Fi certification mark.
Since an AP with 2 or more antennas provides better performance,
purchse and use the AP.
Connect to the AP on a smartphone and check if you can connect to
the Internet. If you can connect to the Internet, the AP is normal.
Check if the LED of the AP is blinking. If all the LEDs are turned off, it
indicates that the power is turned off.
If the AP doesn’t seem to be working properly, request after-sales
service.
The customer does not have
a PC. Can the customer can
use the indoor and outdoor
control feature?
•
If the Internet can be accessed inside of the house, the feature is
available. However, you have to sign up the web site and resgister the
product.
How many users can control
a washer or dryer?
•
Only if the “Smart Washer” app is authenticated, multiple users can
control the washer or dryer.
troubleshooting _53
WF455AG-03159A_EN.indd Sec7:53
2012-04-13
11:59:27
troubleshooting
QUESTION
ANSWER
Where are the proper place to
install a washer or dryer?
•
•
•
•
•
Since a washer or dryer is heavy and connected with water, it should
be installed in the proper place. Installing the AP near the washer or
dryer is recommended. You can check the signal strength through
the setup screen of the washer or dryer or a smartphone.
Since the performance is seriously affected by a door or steel wall,
install the product in an open place. If there is door in front of the
installed product, open the door when using the product.
Do not place an object maden with steel or glass in front of the front
LCD of the washer since it blocks the radio signal.
Note that the radio signal may be weaken or interfered and the
communication with the smartphone may fail when a microwave oven
is used in the house.
Install the washer or dryer so that the front of the product faces the
AP if available.
How can I connect the
washer or dryer with a
smartphone stably?
•
When the signal strenth that is displayed on the LCE of the washer
or dryer is weak, the control may fail. Check the mark as follows or
measure the signal strength.
• At least 3 antenna bars should be displayed on the LCD of the
washer or dryer.
• At least 3 antenna bars for the Wi-Fi connection should be
displayed on the smartphone.
• When the signal strenth is measured with a smartphone app that
shows the Wi-Fi signal strength, the signal strength should be
stronger than -65 dBm. (E.g. -60 dBm and -50 dBm are stronger
than -65 dBm.)
What should I have to
do when the number of
the antenna bars that are
displayed on the LCD of the
washer or dryer is 1?
•
When the signal strenth that is displayed on the LCE of the washer
or dryer is weak, the control may fail. In this case, take the following
measures for normal operation.
• Move the AP closer to the washer or dryer.
(At least 3 antenna bars should be dislayed in the network setup
of the washer for proper operation.)
• Since old AP may provide lower performance, use new one if
available.
• Stand the antenna of the AP if available so that the radio signal is
more easily propagated.
54_ troubleshooting
WF455AG-03159A_EN.indd Sec7:54
2012-04-13
11:59:27
appendix
FABRIC CARE CHART
Wash Cycle
Special Instructions
Warning Symbols for
Laundering
Normal
Line Dry/ Hang to Dry
Do Not Wash
Permanent Press /
Wrinkle Resistant /
Wrinkle Control
Drip Dry
Do Not Wring
Gentle/Delicates
Dry Flat
Do Not Bleach
Hand Wash
Heat Setting
Do Not Tumble Dry
High
No Steam (added to
iron)
Hot
Medium
Do Not Iron
Warm
Low
Cold
Any Heat
Dry Clean
No Heat/Air
Do Not Dry Clean
Water Temperature**
Bleach
Any Bleach (when
needed)
Iron-Dry or Steam
Temperatures
Dryclean
Line Dry/ Hang to Dry
Only Non-Chlorine
(color-safe)
Bleach (when needed)
High
Drip Dry
Tumble Dry Cycle
Medium
Dry Flat
Low
For machine-washable
wool. Loads should be
under 8 pounds.
Normal
06 appendix
The following symbols provide garment care direction. The Clothing care labels include symbols for
washing, bleaching, drying and ironing, or dry cleaning when necessary. The use of symbols ensures
consistency among garment manufacturers of domestic and imported items. Follow care label directions to
maximize garment life and reduce laundering problems.
Permanent Press/
Wrinkle Resistant/
Wrinkle Control
Gentle/ Delicates
** The dot symbols represent appropriate wash water temperatures for various items. The temperature
range for Hot is 105° - 125° F/ 41° - 52°C, for Warm 85° - 105° F/29° - 41° C and for Cold 60° - 85° F/16°
- 29° C. (Wash water temperature must be a minimum of 60° F/16°C for detergent activation and effective
cleaning.) The clothes Washer may not ensure these temperatures because the actual water temperatures
entering your Washer are dependent on water heater settings and regional water supply temperatures. For
example, cold water entering the home in the northern states during winter may be 40° F/4° C which is
too cold for effective cleaning. The water temperature in this situation will need to be adjusted by selecting
a warm setting, adding some hot water to the MAX FILL line or using your Washer’s heating option, if
available.
appendix _55
WF455AG-03159A_EN.indd Sec8:55
2012-04-13
11:59:27
appendix
CYCLE CHART
Use this chart to set the best cycle and option for you laundry.
(: Factory setting, : Selectable, x: Not available)
Functions
Temp.
Course
Spin
Extra
Hot
Hot
Warm
Eco
Warm
Cold
Extra
High
High
Medium
Low
No Spin
Normal
X
Heavyduty
X
Perm Press
X
X
X
Sanitize
X
X
X
X
Bedding Plus
X
X
X
X
Deep Steam
X
X
X
X
Rinse + Spin
X
X
X
X
Spin only
X
X
X
X
X
Quick Wash
X
Wool
X
X
X
X
X
Delicates/Hand wash
X
X
X
X
X
Stain Away
X
Active Wear
X
X
X
X
eco Cold
X
X
X
X
Pure Cycle
X
X
X
X
X
X
X
X
56_ appendix
WF455AG-03159A_EN.indd Sec8:56
2012-04-13
11:59:28
CYCLE CHART
Use this chart to set the best cycle and option for you laundry.
(: Factory setting, : Selectable, x: Not available)
06 appendix
Functions
Options
Soil Level
Course
Extra
Heavy
(Heavy)
Heavy
()
Normal
Light
()
Extra
Light
(Light)
Extra
Rinse
Extra
Spin
My
Cycle
Pre
Wash
Delay
Start
Steam
Normal
Heavyduty
Perm Press
X
Sanitize
Bedding Plus
Deep Steam
X
X
X
X
Rinse + Spin
X
X
Spin only
X
X
X
Quick Wash
X
X
X
Wool
X
X
X
X
X
X
X
X
Delicates/Hand wash
X
X
X
Stain Away
Active Wear
X
eco Cold
X
X
X
X
X
X
X
Pure Cycle
appendix _57
WF455AG-03159A_EN.indd Sec8:57
2012-04-13
11:59:28
appendix
HELPING THE ENVIRONMENT
•
Your Washer is manufactured from recyclable materials. If you decide to dispose of it, please observe
local waste disposal regulations. Cut off the power cord so that the appliance cannot be connected
to a power source. Remove the door so that animals and small children cannot get trapped inside the
appliance.
•
Do not exceed the detergent quantities recommended in the detergent manufacturers’ instructions.
•
Use stain removal products and bleaches before the wash cycle only when necessary.
•
Save water and electricity by only washing full loads (the exact amount depends upon the program used).
DECLARATION OF CONFORMITY
This appliance complies with UL2157.
SPECIFICATION
TYPE
FRONT LOADING WASHER
Div
DIMENSIONS
Inches (mm)
A. Height-Overall
38.7” (984)
B. Width
27” ( 686)
C. Depth with door open 90°
51.2”(1300)
D. Depth
34.1”( 865)
C
D
A
B
WATER PRESSURE
20-116psi(137-800kPa)
WEIGHT
105kg (231.5lb)
HEATER RATING
POWER
CONSUMPTION
SPIN REVOLUTION
900 W
WASHING
120 V
200 W
WASHING AND HEATING
120 V
1150 W
SPIN
120 V
550 W
DRAIN
120 V
WF455ARG***
80 W
1300 rpm
58_ appendix
WF455AG-03159A_EN.indd Sec8:58
2012-04-13
11:59:28
OPEN SOURCE ANNOUNCEMENT
The software included in this product contains copyrighted software that is licensed under the GPL/LGPL.
You may obtain the complete Corresponding Source code from us for a period of three years after our last
shipment of this product by sending email to:
06 appendix
oss.request@samsung.com
If you want to obtain the complete Corresponding Source code in the physical medium such as CD-ROM,
the cost of physically performing source distribution may be charged.
This offer is valid to anyone in receipt of this information.
GPL Software:
Bridge-Utils, BusyBox, DNRD, dosfstools, iproute2, IPTables, Linux Kernel, ntpclient, Open1x, RSDK
toolchain, rtl819x - Bootloader, samba, squashfs, udhcp Server-Client Package, USB-ModeSwitch,
wireless-tools
LGPL Software:
libnl-Netlink Library, Mini-XML
GNU GENERAL PUBLIC LICENSE
Version 2, June 1991
Copyright (C) 1989, 1991 Free Software Foundation, Inc.
51 Franklin Street, Fifth Floor, Boston, MA 02110-1301, USA
Everyone is permitted to copy and distribute verbatim copies of this license document, but changing it is not
allowed.
Preamble
The licenses for most software are designed to take away your freedom to share and change
it. By contrast, the GNU General Public License is intended to guarantee your freedom to share
and change free software--to make sure the software is free for all its users. This General Public
License applies to most of the Free Software Foundation’s software and to any other program
whose authors commit to using it. (Some other Free Software Foundation software is covered by
the GNU Lesser General Public License instead.)
You can apply it to your programs, too.
When we speak of free software, we are referring to freedom, not price. Our General Public
Licenses are designed to make sure that you have the freedom to distribute copies of free
software (and charge for this service if you wish), that you receive source code or can get it if you
want it, that you can change the software or use pieces of it in new free programs; and that you
know you can do these things.
To protect your rights, we need to make restrictions that forbid anyone to deny you these rights
or to ask you to surrender the rights. These restrictions translate to certain responsibilities for you
if you distribute copies of the software, or if you modify it.
For example, if you distribute copies of such a program, whether gratis or for a fee, you must
give the recipients all the rights that you have. You must make sure that they, too, receive or can
get the source code. And you must show them these terms so they know their rights.
We protect your rights with two steps: (1) copyright the software, and (2) offer you this license
which gives you legal permission to copy, distribute and/or modify the software.
Also, for each author’s protection and ours, we want to make certain that everyone understands
that there is no warranty for this free software. If the software is modified by someone else and
passed on, we want its recipients to know that what they have is not the original, so that any
appendix _59
WF455AG-03159A_EN.indd Sec8:59
2012-04-13
11:59:28
appendix
problems introduced by others will not reflect on the original authors’ reputations.
Finally, any free program is threatened constantly by software patents. We wish to avoid the
danger that redistributors of a free program will individually obtain patent licenses, in effect
making the program proprietary. To prevent this, we have made it clear that any patent must be
licensed for everyone’s free use or not licensed at all.
The precise terms and conditions for copying, distribution and modification follow.
TERMS AND CONDITIONS FOR COPYING, DISTRIBUTION AND
MODIFICATION
1. This License applies to any program or other work which contains a notice placed by the
copyright holder saying it may be distributed under the terms of this General Public License.
The “Program”, below, refers to any such program or work, and a “work based on the
Program” means either the Program or any derivative work under copyright law: that is to
say, a work containing the Program or a portion of it, either verbatim or with modifications
and/or translated into another language. (Hereinafter, translation is included without limitation
in the term “modification”.) Each licensee is addressed as “you”.
Activities other than copying, distribution and modification are not covered by this License;
they are outside its scope. The act of running the Program is not restricted, and the output
from the Program is covered only if its contents constitute a work based on the Program
(independent of having been made by running the Program). Whether that is true depends on
what the Program does.
2. You may copy and distribute verbatim copies of the Program’s source code as you receive
it, in any medium, provided that you conspicuously and appropriately publish on each copy
an appropriate copyright notice and disclaimer of warranty; keep intact all the notices that
refer to this License and to the absence of any warranty; and give any other recipients of the
Program a copy of this License along with the Program.
You may charge a fee for the physical act of transferring a copy, and you may at your option
offer warranty protection in exchange for a fee.
3. You may modify your copy or copies of the Program or any portion of it, thus forming a work
based on the Program, and copy and distribute such modifications or work under the terms
of Section 1 above, provided that you also meet all of these conditions:
1) You must cause the modified files to carry prominent notices stating that you changed
the files and the date of any change.
2) You must cause any work that you distribute or publish, that in whole or in part contains
or is derived from the Program or any part thereof, to be licensed as a whole at no charge
to all third parties under the terms of this License.
3) If the modified program normally reads commands interactively when run, you must
cause it, when started running for such interactive use in the most ordinary way, to print
or display an announcement including an appropriate copyright notice and a notice that
there is no warranty (or else, saying that you provide a warranty) and that users may
redistribute the program under these conditions, and telling the user how to view a copy
of this License. (Exception: if the Program itself is interactive but does not normally print
such an announcement, your work based on the Program is not required to print an
announcement.)
These requirements apply to the modified work as a whole. If identifiable sections of that
work are not derived from the Program, and can be reasonably considered independent
and separate works in themselves, then this License, and its terms, do not apply to those
sections when you distribute them as separate works. But when you distribute the same
sections as part of a whole which is a work based on the Program, the distribution of the
whole must be on the terms of this License, whose permissions for other licensees extend to
the entire whole, and thus to each and every part regardless of who wrote it.
Thus, it is not the intent of this section to claim rights or contest your rights to work written
60_ appendix
WF455AG-03159A_EN.indd Sec8:60
2012-04-13
11:59:28
5.
6.
7.
8.
appendix _61
WF455AG-03159A_EN.indd Sec8:61
2012-04-13
11:59:28
06 appendix
4.
entirely by you; rather, the intent is to exercise the right to control the distribution of derivative
or collective works based on the Program.
In addition, mere aggregation of another work not based on the Program with the Program
(or with a work based on the Program) on a volume of a storage or distribution medium does
not bring the other work under the scope of this License.
3. You may copy and distribute the Program (or a work based on it, under Section 2) in
object code or executable form under the terms of Sections 1 and 2 above provided that you
also do one of the following:
1) Accompany it with the complete corresponding machinereadable source code, which
must be distributed under the terms of Sections 1 and 2 above on a medium customarily
used for software interchange; or,
2) Accompany it with a written offer, valid for at least three years, to give any third party,
for a charge no more than your cost of physically performing source distribution, a
complete machine-readable copy of the corresponding source code, to be distributed
under the terms of Sections 1 and 2 above on a medium customarily used for software
interchange; or, c) Accompany it with the information you received as to the offer to
distribute corresponding source code. (This alternative is allowed only for noncommercial
distribution and only if you received the program in object code or executable form with
such an offer, in accord with Subsection b above.)
The source code for a work means the preferred form of the work for making modifications
to it. For an executable work, complete source code means all the source code for all
modules it contains, plus any associated interface definition files, plus the scripts used to
control compilation and installation of the executable. However, as a special exception,
the source code distributed need not include anything that is normally distributed (in either
source or binary form) with the major components (compiler, kernel, and so on) of the
operating system on which the executable runs, unless that component itself accompanies
the executable.
If distribution of executable or object code is made by offering access to copy from a
designated place, then offering equivalent access to copy the source code from the same
place counts as distribution of the source code, even though third parties are not compelled
to copy the source
along with the object code.
You may not copy, modify, sublicense, or distribute the Program except as expressly
provided under this License. Any attempt otherwise to copy, modify, sublicense or distribute
the Program is void, and will automatically terminate your rights under this License. However,
parties who have received copies, or rights, from you under this License will not have their
licenses terminated so long as such parties remain in full compliance.
You are not required to accept this License, since you have not signed it. However, nothing
else grants you permission to modify or distribute the Program or its derivative works. These
actions are prohibited by law if you do not accept this License. Therefore, by modifying or
distributing the Program (or any work based on the Program), you indicate your acceptance
of this License to do so, and all its terms and conditions for copying, distributing or modifying
the Program or works based on it.
Each time you redistribute the Program (or any work based on the Program), the recipient
automatically receives a license from the original licensor to copy, distribute or modify the
Program subject to these terms and conditions. You may not impose any further restrictions
on the recipients’ exercise of the rights granted herein. You are not responsible for enforcing
compliance by third parties to this License.
If, as a consequence of a court judgment or allegation of patent infringement or for any
other reason (not limited to patent issues), conditions are imposed on you (whether by
court order, agreement or otherwise) that contradict the conditions of this License, they do
not excuse you from the conditions of this License. If you cannot distribute so as to satisfy
simultaneously your obligations under this License and any other pertinent obligations, then
appendix
as a consequence you may not distribute the Program at all. For example, if a patent license
would not permit royalty-free redistribution of the Program by all those who receive copies
directly or indirectly through you, then the only way you could satisfy both it and this License
would be to refrain entirely from distribution of the Program.
If any portion of this section is held invalid or unenforceable under any particular
circumstance, the balance of the section is intended to apply and the section as a whole is
intended to apply in other circumstances.
It is not the purpose of this section to induce you to infringe any patents or other property
right claims or to contest validity of any such claims; this section has the sole purpose of
protecting the integrity of the free software distribution system, which is implemented by
public license practices. Many people have made generous contributions to the wide range
of software distributed through that system in reliance on consistent application of that
system; it is up to the author/donor to decide if he or she is willing to distribute software
through any other system and a licensee cannot impose that choice.
This section is intended to make thoroughly clear what is believed to be a consequence of
the rest of this License.
9. If the distribution and/or use of the Program is restricted in certain countries either by patents
or by copyrighted interfaces, the original copyright holder who places the Program under this
License may add an explicit geographical distribution limitation excluding those countries, so
that distribution is permitted only in or among countries not thus excluded. In such case, this
License incorporates the limitation as if written in the body of this License.
10. The Free Software Foundation may publish revised and/or new versions of the General Public
License from time to time. Such new versions will be similar in spirit to the present version,
but may differ in detail to address new problems or concerns.
Each version is given a distinguishing version number. If the Program specifies a version
number of this License which applies to it and “any later version”, you have the option of
following the terms and conditions either of that version or of any later version published
by the Free Software Foundation. If the Program does not specify a version number of this
License, you may choose any version ever published by the Free Software Foundation.
11. If you wish to incorporate parts of the Program into other free programs whose distribution
conditions are different, write to the author to ask for permission. For software which is
copyrighted by the Free Software Foundation, write to the Free Software Foundation;
we sometimes make exceptions for this. Our decision will be guided by the two goals of
preserving the free status of all derivatives of our free software and of promoting the sharing
and reuse of software generally.
NO WARRANTY
12. BECAUSE THE PROGRAM IS LICENSED FREE OF CHARGE, THERE IS NO WARRANTY
FOR THE PROGRAM, TO THE EXTENT PERMITTED BY APPLICABLE LAW. EXCEPT
WHEN OTHERWISE STATED IN WRITING THE COPYRIGHT HOLDERS AND/OR OTHER
PARTIES PROVIDE THE PROGRAM “AS IS” WITHOUT WARRANTY OF ANY KIND, EITHER
EXPRESSED OR IMPLIED, INCLUDING, BUT NOT LIMITED TO, THE IMPLIED WARRANTIES
OF MERCHANTABILITY AND FITNESS FOR A PARTICULAR PURPOSE. THE ENTIRE RISK
AS TO THE QUALITY AND PERFORMANCE OF THE PROGRAM IS WITH YOU. SHOULD
THE PROGRAM PROVE DEFECTIVE, YOU ASSUME THE COST OF ALL NECESSARY
SERVICING, REPAIR OR CORRECTION.
13. IN NO EVENT UNLESS REQUIRED BY APPLICABLE LAW OR AGREED TO IN WRITING
WILL ANY COPYRIGHT HOLDER, OR ANY OTHER PARTY WHO MAY MODIFY AND/OR
REDISTRIBUTE THE PROGRAM AS PERMITTED ABOV E , BE L I ABL E TO YOU FOR
DAMAGES, INCLUDING ANY GENERAL, SPECIAL, INCIDENTAL OR CONSEQUENTIAL
DAMAGES ARISING OUT OF THE USE OR INABILITY TO USE THE PROGRAM (INCLUDING
BUT NOT LIMITED TO LOSS OF DATA OR DATA BEING RENDERED INACCURATE OR
LOSSES SUSTAINED BY YOU OR THIRD PARTIES OR A FAILURE OF THE PROGRAM TO
62_ appendix
WF455AG-03159A_EN.indd Sec8:62
2012-04-13
11:59:28
OPERATE WITH ANY OTHER PROGRAMS), EVEN IF SUCH HOLDER OR OTHER PARTY
HAS BEEN ADVISED OF THE POSSIBILITY OF SUCH DAMAGES.
END OF TERMS AND CONDITIONS
If you develop a new program, and you want it to be of the greatest possible use to the public,
the best way to achieve this is to make it free software which everyone can redistribute and
change under these terms.
To do so, attach the following notices to the program. It is safest to attach them to the start of
each source file to most effectively convey the exclusion of warranty; and each file should have at
least the “copyright” line and a pointer to where the full notice is found.
one line to give the program’s name and an idea of what it does.
Copyright (C) yyyy name of author
This program is free software; you can redistribute it and/or modify it under the terms of the GNU
General Public License as published by the Free Software Foundation; either version 2 of the
License, or (at your option) any later version.
This program is distributed in the hope that it will be useful, but WITHOUT ANY WARRANTY;
without even the implied warranty of MERCHANTABILITY or FITNESS FOR A PARTICULAR
PURPOSE. See the GNU General Public License for more details.
You should have received a copy of the GNU General Public License along with this program;
if not, write to the Free Software Foundation, Inc., 51 Franklin Street, Fifth Floor, Boston, MA
02110-1301, USA.
Also add information on how to contact you by electronic and paper mail.
If the program is interactive, make it output a short notice like this when it starts in an interactive
mode:
Gnomovision version 69, Copyright (C) year name of author Gnomovision comes with
ABSOLUTELY NO WARRANTY; for details type `show w’. This is free software, and you are
welcome to redistribute it under certain conditions; type `show c’ for details.
The hypothetical commands `show w’ and `show c’ should show the appropriate parts of the
General Public License. Of course, the commands you use may be called something other than
`show w’ and `show c’; they could even be mouse-clicks or menu items--whatever suits your
program. You should also get your employer (if you work as a programmer) or your school, if any,
to sign a “copyright disclaimer” for the program, if necessary. Here is a sample; alter the names:
Yoyodyne, Inc., hereby disclaims all copyright interest in the program `Gnomovision’ (which
makes passes at compilers) written by James Hacker.
signature of Ty Coon, 1 April 1989
Ty Coon, President of Vice
This General Public License does not permit incorporating your program into proprietary
programs. If your program is a subroutine library, you may consider it more useful to permit
linking proprietary applications with the library. If this is what you want to do, use the GNU Lesser
General Public License instead of this License.
GNU LESSER GENERAL PUBLIC LICENSE
Version 2.1, February 1999
Copyright (C) 1991, 1999 Free Software Foundation, Inc.
51 Franklin Street, Fifth Floor, Boston, MA 02110-1301 USA
Everyone is permitted to copy and distribute verbatim copies of this license document, but changing it is
appendix _63
WF455AG-03159A_EN.indd Sec8:63
2012-04-13
11:59:28
06 appendix
How to Apply These Terms to Your New Programs
appendix
not allowed.
[This is the first released version of the Lesser GPL. It also counts as the successor of the GNU Library
Public License, version 2, hence the version number 2.1.]
Preamble
The licenses for most software are designed to take away your freedom to share and change it.
By contrast, the GNU General Public Licenses are intended to guarantee your freedom to share
and change free software--to make sure the software is free for all its users.
This license, the Lesser General Public License, applies to some specially designated software
packages--typically libraries--of the Free Software Foundation and other authors who decide to
use it. You can use it too, but we suggest you first think carefully about whether this license or
the ordinary General Public License is the better strategy to use in any particular case, based on
the explanations below.
When we speak of free software, we are referring to freedom of use, not price. Our General
Public Licenses are designed to make sure that you have the freedom to distribute copies of free
software (and charge for this service if you wish); that you receive source code or can get it if you
want it; that you can change the software and use pieces of it in new free programs; and that
you are informed that you can do these things.
To protect your rights, we need to make restrictions that forbid distributors to deny you
these rights or to ask you to surrender these rights. These restrictions translate to certain
responsibilities for you if you distribute copies of the library or if you modify it.
For example, if you distribute copies of the library, whether gratis or for a fee, you must give the
recipients all the rights that we gave you. You must make sure that they, too, receive or can get
the source code. If you link other code with the library, you must provide complete object files
to the recipients, so that they can relink them with the library after making changes to the library
and recompiling it. And you must show them these terms so they know their rights.
We protect your rights with a two-step method: (1) we copyright the library, and (2) we offer you
this license, which gives you legal permission to copy, distribute and/or modify the library.
To protect each distributor, we want to make it very clear that there is no warranty for the free
library. Also, if the library is modified by someone else and passed on, the recipients should
know that what they have is not the original version, so that the original author’s reputation will
not be affected by problems that might be introduced by others.
Finally, software patents pose a constant threat to the existence of any free program. We wish to
make sure that a company cannot effectively restrict the users of a free program by obtaining a
restrictive license from a patent holder. Therefore, we insist that any patent license obtained for a
version of the library must be consistent with the full freedom of use specified in this license.
Most GNU software, including some libraries, is covered by the ordinary GNU General Public
License. This license, the GNU Lesser General Public License, applies to certain designated
libraries, and is quite different from the ordinary General Public License. We use this license for
certain libraries in order to permit linking those libraries into nonfree programs.
When a program is linked with a library, whether statically or using a shared library, the
combination of the two is legally speaking a combined work, a derivative of the original library.
The ordinary General Public License therefore permits such linking only if the entire combination
fits its criteria of freedom. The Lesser General Public License permits more lax criteria for linking
other code with the library.
We call this license the “Lesser” General Public License because it does Less to protect the
user’s freedom than the ordinary General Public License. It also provides other free software
developers Less of an advantage over competing non-free programs. These disadvantages are
the reason we use the ordinary General Public License for many libraries.
However, the Lesser license provides advantages in certain special circumstances.
For example, on rare occasions, there may be a special need to encourage the widest possible
use of a certain library, so that it becomes a de-facto standard. To achieve this, non-free
64_ appendix
WF455AG-03159A_EN.indd Sec8:64
2012-04-13
11:59:28
programs must be allowed to use the library.
A more frequent case is that a free library does the same job as widely used non-free libraries.
In this case, there is little to gain by limiting the free library to free software only, so we use the
Lesser General Public License.
In other cases, permission to use a particular library in nonfree programs enables a greater
number of people to use a large body of free software. For example, permission to use the GNU
C Library in non-free programs enables many more people to use the whole GNU operating
system, as well as its variant, the GNU/Linux operating system.
Although the Lesser General Public License is Less protective of the users’ freedom, it does
ensure that the user of a program that is linked with the Library has the freedom and the
wherewithal to run that program using a modified version of the Library.
The precise terms and conditions for copying, distribution and modification follow. Pay close
attention to the difference between a “work based on the library” and a “work that uses the
library”. The former contains code derived from the library, whereas the latter must be combined
with the library in order to run.
TERMS AND CONDITIONS FOR COPYING, DISTRIBUTION AND
MODIFICATION
1. This License Agreement applies to any software library or other program which contains a
notice placed by the copyright holder or other authorized party saying it may be distributed
under the terms of this Lesser General Public License (also called “this License”). Each
licensee is addressed as “you”.
A “library” means a collection of software functions and/or data prepared so as to be
conveniently linked with application programs (which use some of those functions and data)
to form executables.
The “Library”, below, refers to any such software library or work which has been distributed
under these terms. A “work based on the Library” means either the Library or any derivative
work under copyright law: that is to say, a work containing the Library or a portion of it, either
verbatim or with modifications and/or translated straightforwardly into another language.
(Hereinafter, translation is included without limitation in the term “modification”.)
“Source code” for a work means the preferred form of the work for making modifications to
it. For a library, complete source code means all the source code for all modules it contains,
plus any associated interface definition files, plus the scripts used to control compilation and
installation of the library.
Activities other than copying, distribution and modification are not covered by this License;
they are outside its scope. The act of running a program using the Library is not restricted,
and output from such a program is covered only if its contents constitute a work based on
the Library (independent of the use of the Library in a tool for writing it).
Whether that is true depends on what the Library does and what the program that uses the
Library does.
2. You may copy and distribute verbatim copies of the Library’s complete source code as you
receive it, in any medium, provided that you conspicuously and appropriately publish on each
copy an appropriate copyright notice and disclaimer of warranty; keep intact all the notices
that refer to this License and to the absence of any warranty; and distribute a copy of this
License along with the Library.
You may charge a fee for the physical act of transferring a copy, and you may at your option
offer warranty protection in exchange for a fee.
3. You may modify your copy or copies of the Library or any portion of it, thus forming a work
based on the Library, and copy and distribute such modifications or work under the terms of
Section 1 above, provided that you also meet all of these conditions:
1) The modified work must itself be a software library.
2) You must cause the files modified to carry prominent notices stating that you changed
appendix _65
WF455AG-03159A_EN.indd Sec8:65
2012-04-13
11:59:28
appendix
the files and the date of any change.
3) You must cause the whole of the work to be licensed at no charge to all third parties
under the terms of this License.
4) If a facility in the modified Library refers to a function or a table of data to be supplied by
an application program that uses the facility, other than as an argument passed when the
facility is invoked, then you must make a good faith effort to ensure that, in the event an
application does not supply such function or table, the facility still operates, and performs
whatever part of its purpose remains meaningful.
(For example, a function in a library to compute square roots has a purpose that is entirely
well-defined independent of the application. Therefore, Subsection 2d requires that
any application-supplied function or table used by this function must be optional: if the
application does not supply it, the square root function must still compute square roots.)
These requirements apply to the modified work as a whole. If identifiable sections of that
work are not derived from the Library, and can be reasonably considered independent
and separate works in themselves, then this License, and its terms, do not apply to those
sections when you distribute them as separate works. But when you distribute the same
sections as part of a whole which is a work based on the Library, the distribution of the
whole must be on the terms of this License, whose permissions for other licensees extend to
the entire whole, and thus to each and every part regardless of who wrote it. Thus, it is not
the intent of this section to claim rights or contest your rights to work written entirely by you;
rather, the intent is to exercise the right to control the distribution of derivative or collective
works based on the Library. In addition, mere aggregation of another work not based on
the Library with the Library (or with a work based on the Library) on a volume of a storage or
distribution medium does not bring the other work under the scope of this License.
4. You may opt to apply the terms of the ordinary GNU General Public License instead of this
License to a given copy of the Library. To do this, you must alter all the notices that refer to
this License, so that they refer to the ordinary GNU General Public License, version 2, instead
of to this License. (If a newer version than version 2 of the ordinary GNU General Public
License has appeared, then you can specify that version instead if you wish.) Do not make
any other change in these notices.
Once this change is made in a given copy, it is irreversible for that copy, so the ordinary GNU
General Public License applies to all subsequent copies and derivative works made from that
copy.
This option is useful when you wish to copy part of the code of the Library into a program
that is not a library.
5. You may copy and distribute the Library (or a portion or derivative of it, under Section 2) in
object code or executable form under the terms of Sections 1 and 2 above provided that you
accompany it with the complete corresponding machine-readable source code, which must
be distributed under the terms of Sections 1 and 2 above on a medium customarily used for
software interchange.
If distribution of object code is made by offering access to copy from a designated place,
then offering equivalent access to copy the source code from the same place satisfies the
requirement to distribute the source code, even though third parties are not compelled to
copy the source along with the object code.
6. A program that contains no derivative of any portion of the Library, but is designed to work
with the Library by being compiled or linked with it, is called a “work that uses the Library”.
Such a work, in isolation, is not a derivative work of the Library, and therefore falls outside the
scope of this License.
However, linking a “work that uses the Library” with the Library creates an executable that
is a derivative of the Library (because it contains portions of the Library), rather than a “work
that uses the library”. The executable is therefore covered by this License. Section 6 states
terms for distribution of such executables.
When a “work that uses the Library” uses material from a header file that is part of the
66_ appendix
WF455AG-03159A_EN.indd Sec8:66
2012-04-13
11:59:28
appendix _67
WF455AG-03159A_EN.indd Sec8:67
2012-04-13
11:59:28
06 appendix
Library, the object code for the work may be a derivative work of the Library even though
the source code is not. Whether this is true is especially significant if the work can be linked
without the Library, or if the work is itself a library. The threshold for this to be true is not
precisely defined by law.
If such an object file uses only numerical parameters, data structure layouts and accessors,
and small macros and small inline functions (ten lines or less in length), then the use of the
object file is unrestricted, regardless of whether it is legally a derivative work. (Executables
containing this object code plus portions of the Library will still fall under Section 6.)
Otherwise, if the work is a derivative of the Library, you may distribute the object code for
the work under the terms of Section 6. Any executables containing that work also fall under
Section 6, whether or not they are linked directly with the Library itself.
7. As an exception to the Sections above, you may also combine or link a “work that uses the
Library” with the Library to produce a work containing portions of the Library, and distribute
that work under terms of your choice, provided that the terms permit modification of the work
for the customer’s own use and reverse engineering for debugging such modifications.
You must give prominent notice with each copy of the work that the Library is used in it
and that the Library and its use are covered by this License. You must supply a copy of
this License. If the work during execution displays copyright notices, you must include the
copyright notice for the Library among them, as well as a reference directing the user to the
copy of this License. Also, you must do one of these things:
1) Accompany the work wi th the complet e corresponding machine-readable source
code for the Library including whatever changes were used in the work (which must be
distributed under Sections 1 and 2 above); and, if the work is an executable linked with
the Library, with the complete machine-readable “work that uses the Library”, as object
code and/or source code, so that the user can modify the Library and then relink to
produce a modified executable containing the modified Library. (It is understood that the
user who changes the contents of definitions files in the Library will not necessarily be
able to recompile the application to use the modified definitions.)
2) Use a suitable shared library mechanism for linking with the Library. A suitable
mechanism is one that (1) uses at run time a copy of the library already present on the
user’s computer system, rather than copying library functions into the executable, and (2)
will operate properly with a modified version of the library, if the user installs one, as long
as the modified version is interfacecompatible with the version that the work was made
with.
3) Accompany the work with a written offer, valid for at least three years, to give the same
user the materials specified in Subsection 6a, above, for a charge no more than the cost
of performing this distribution.
4) If distribution of the work is made by offering access to copy from a designated place,
offer equivalent access to copy the above specified materials from the same place.
5) Verify that the user has already received a copy of these materials or that you have
already sent this user a copy.
For an executable, the required form of the “work that uses the Library” must include any
data and utility programs needed for reproducing the executable from it. However, as a
special exception, the materials to be distributed need not include anything that is normally
distributed (in either source or binary form) with the major components (compiler, kernel, and
so on) of the operating system on which the executable runs, unless that component itself
accompanies the executable.
It may happen that this requirement contradicts the license restrictions of other proprietary
libraries that do not normally accompany the operating system. Such a contradiction means
you cannot use both them and the Library together in an executable that you distribute.
8. You may place library facilities that are a work based on the Library side-by-side in a single
library together with other library facilities not covered by this License, and distribute such
a combined library, provided that the separate distribution of the work based on the Library
appendix
and of the other library facilities is otherwise permitted, and provided that you do these two
things:
1) Accompany the combined library with a copy of the same work based on the Library,
uncombined with any other library facilities. This must be distributed under the terms of
the Sections above.
2) Give prominent notice with the combined library of the fact that part of it is a work based
on the Library, and explaining where to find the accompanying uncombined form of the
same work.
9. You may not copy, modify, sublicense, link with, or distribute the Library except as expressly
provided under this License. Any attempt otherwise to copy, modify, sublicense, link with, or
distribute the Library is void, and will automatically terminate your rights under this License.
However, parties who have received copies, or rights, from you under this License will not
have their licenses terminated so long as such parties remain in full compliance.
10. You are not required to accept this License, since you have not signed it. However, nothing
else grants you permission to modify or distribute the Library or its derivative works. These
actions are prohibited by law if you do not accept this License. Therefore, by modifying or
distributing the Library (or any work based on the Library), you indicate your acceptance of
this License to do so, and all its terms and conditions for copying, distributing or modifying
the Library or works based on it.
11. Each time you redistribute the Library (or any work based on the Library), the recipient
automatically receives a license from the original licensor to copy, distribute, link with or
modify the Library subject to these terms and conditions. You may not impose any further
restrictions on the recipients’ exercise of the rights granted herein. You are not responsible for
enforcing compliance by third parties with this License.
12. If, as a consequence of a court judgment or allegation of patent infringement or for any
other reason (not limited to patent issues), conditions are imposed on you (whether by
court order, agreement or otherwise) that contradict the conditions of this License, they do
not excuse you from the conditions of this License. If you cannot distribute so as to satisfy
simultaneously your obligations under this License and any other pertinent obligations, then
as a consequence you may not distribute the Library at all. For example, if a patent license
would not permit royalty-free redistribution of the Library by all those who receive copies
directly or indirectly through you, then the only way you could satisfy both it and this License
would be to refrain entirely from distribution of the Library.
If any portion of this section is held invalid or unenforceable under any particular
circumstance, the balance of the section is intended to apply, and the section as a whole is
intended to apply in other circumstances.
It is not the purpose of this section to induce you to infringe any patents or other property
right claims or to contest validity of any such claims; this section has the sole purpose of
protecting the integrity of the free software distribution system which is implemented by
public license practices.
Many people have made generous contributions to the wide range of software distributed
through that system in reliance on consistent application of that system; it is up to the author/
donor to decide if he or she is willing to distribute software through any other system and a
licensee cannot impose that choice.
This section is intended to make thoroughly clear what is believed to be a consequence of
the rest of this License.
13. If the distribution and/or use of the Library is restricted in certain countries either by patents
or by copyrighted interfaces, the original copyright holder who places the Library under this
License may add an explicit geographical distribution limitation excluding those countries, so
that distribution is permitted only in or among countries not thus excluded. In such case, this
License incorporates the limitation as if written in the body of this License.
14. The Free Software Foundation may publish revised and/or new versions of the Lesser
General Public License from time to time. Such new versions will be similar in spirit to the
68_ appendix
WF455AG-03159A_EN.indd Sec8:68
2012-04-13
11:59:28
NO WARRANTY
16. BECAUSE THE LIBRARY IS LICENSED FREE OF CHARGE, THERE IS NO WARRANTY
FOR THE LIBRARY, TO THE EXTENT PERMITTED BY APPLICABLE LAW. EXCEPT
WHEN OTHERWISE STATED IN WRITING THE COPYRIGHT HOLDERS AND/OR OTHER
PARTIES PROVIDE THE LIBRARY “AS IS” WITHOUT WARRANTY OF ANY KIND, EITHER
EXPRESSED OR IMPLIED, INCLUDING, BUT NOT LIMITED TO, THE IMPLIED WARRANTIES
OF MERCHANTABILITY AND FITNESS FOR A PARTICULAR PURPOSE. THE ENTIRE RISK
AS TO THE QUALITY AND PERFORMANCE OF THE LIBRARY IS WITH YOU. SHOULD THE
LIBRARY PROVE DEFECTIVE, YOU ASSUME THE COST OF ALL NECESSARY SERVICING,
REPAIR OR CORRECTION.
17. IN NO EVENT UNLESS REQUIRED BY APPLICABLE LAW OR AGREED TO IN WRI T ING
WI L L ANY COPYRIGHT HOLDER, OR ANY OTHER PARTY WHO MAY MODIFY AND/
OR REDISTRIBUTE THE LIBRARY AS PERMITTED ABOVE, BE LIABLE TO YOU FOR
DAMAGES, INCLUDING ANY GENERAL, SPECIAL, INCIDENTAL OR CONSEQUENTIAL
DAMAGES ARISING OUT OF THE USE OR INABILITY TO USE THE LIBRARY (INCLUDING
BUT NOT LIMITED TO LOSS OF DATA OR DATA BEING RENDERED INACCURATE OR
LOSSES SUSTAINED BY YOU OR THIRD PARTIES OR A FAILURE OF THE LIBRARY TO
OPERATE WITH ANY OTHER SOFTWARE), EVEN IF SUCH HOLDER OR OTHER PARTY
HAS BEEN ADVISED OF THE POSSIBILITY OF SUCH DAMAGES.
END OF TERMS AND CONDITIONS
How to Apply These Terms to Your New Libraries If you develop a new library, and you want
it to be of the greatest possible use to the public, we recommend making it free software that
everyone can redistribute and change. You can do so by permitting redistribution under these
terms (or, alternatively, under the terms of the ordinary General Public License).
To apply these terms, attach the following notices to the library. It is safest to attach them to the
start of each source file to most effectively convey the exclusion of warranty; and each file should
have at least the “copyright” line and a pointer to where the full notice is found.
one line to give the library’s name and an idea of what it does.
Copyright (C) year name of author
This library is free software; you can redistribute it and/or modify it under the terms of the GNU
Lesser General Public License as published by the Free Software Foundation; either version 2.1
of the License, or (at your option) any later version.
This library is distributed in the hope that it will be useful, but WITHOUT ANY WARRANTY;
without even the implied warranty of MERCHANTABILITY or FITNESS FOR A PARTICULAR
PURPOSE. See the GNU
appendix _69
WF455AG-03159A_EN.indd Sec8:69
2012-04-13
11:59:28
06 appendix
present version, but may differ in detail to address new problems or concerns.
Each version is given a distinguishing version number.
If the Library specifies a version number of this License which applies to it and “any later
version”, you have the option of following the terms and conditions either of that version or of
any later version published by the Free Software Foundation. If the Library does not specify
a license version number, you may choose any version ever published by the Free Software
Foundation.
15. If you wish to incorporate parts of the Library into other free programs whose distribution
conditions are incompatible with these, write to the author to ask for permission. For software
which is copyrighted by the Free Software Foundation, write to the Free Software Foundation;
we sometimes make exceptions for this. Our decision will be guided by the two goals of
preserving the free status of all derivatives of our free software and of promoting the sharing
and reuse of software generally.
appendix
Lesser General Public License for more details.
You should have received a copy of the GNU Lesser General Public License along with this
library; if not, write to the Free Software Foundation, Inc., 51 Franklin Street, Fifth Floor, Boston,
MA 02110-1301 USA Also add information on how to contact you by electronic and paper mail.
You should also get your employer (if you work as a programmer) or your school, if any, to sign a
“copyright disclaimer” for the library, if necessary. Here is a sample; alter the names: Yoyodyne,
Inc., hereby disclaims all copyright interest in the library `Frob’ (a library for tweaking knobs)
written by James Random Hacker.
signature of Ty Coon, 1 April 1990
Ty Coon, President of Vice
That’s all there is to it!
BSD LICENSE
flex: the fast lexical analyser
Copyright (c) 2001, 2002, 2003, 2004, 2005, 2006, 2007
The Flex Project.
Copyright (c) 1990, 1997 The Regents of the University of California. All rights reserved.
LibNet License
Copyright (c) 1998 - 2001 Mike D. Schiffman <mike@infonexus.com>
PPP/ Debian
Copyright (c) 1989 Regents of the University of California. All rights reserved.
Redistribution and use in source and binary forms, with or without modification, are permitted provided that
the following conditions are met:
1. Redistributions of source code must retain the above copyright notice, this list of conditions and the
following disclaimer.
2. Redistributions in binary form must reproduce the above copyright notice, this list of conditions and the
following disclaimer in the documentation and/or other materials provided with the distribution.
3. Neither the name of the <organization> nor the names of its contributors may be used to endorse or
promote products derived from this software without specific prior written permission.
THIS SOFTWARE IS PROVIDED BY THE COPYRIGHT HOLDERS AND CONTRIBUTORS “AS IS” AND ANY
EXPRESS OR IMPLIED WARRANTIES, INCLUDING, BUT NOT LIMITED TO, THE IMPLIED WARRANTIES
OF MERCHANTABILITY AND FITNESS FOR A PARTICULAR PURPOSE ARE DISCLAIMED. IN NO EVENT
SHALL <COPYRIGHT HOLDER> BE LIABLE FOR ANY DIRECT, INDIRECT, INCIDENTAL, SPECIAL,
EXEMPLARY, OR CONSEQUENTIAL DAMAGES ( INCLUDING, BUT NOT LIMITED TO, PROCUREMENT
OF SUBSTITUTE GOODS OR SERVICES; LOSS OF USE, DATA, OR PROFITS; OR BUSINESS
INTERRUPTION) HOWEVER CAUSED AND ON ANY THEORY OF LIABILITY, WHETHER IN CONTRACT,
STRICT LIABILITY, OR TORT (INCLUDING NEGLIGENCE OR OTHERWISE) ARISING IN ANY WAY OUT OF
THE USE OF THIS SOFTWARE, EVEN IF ADVISED OF THE POSSIBILITY OF SUCH DAMAGE.
70_ appendix
WF455AG-03159A_EN.indd Sec8:70
2012-04-13
11:59:28
OPENSSL
This product includes software developed by the OpenSSL Project for use in the OpenSSL Toolkit. (http://
www.openssl.org/)
This product includes cryptographic software written by Eric Young (eay@cryptsoft.com)
=====================================================================
The OpenSSL toolkit stays under a dual license, i.e. both the conditions of the OpenSSL License
and the original SSLeay license apply to the toolkit. See below for the actual license texts.
Actually both licenses are BSD-style Open Source licenses. In case of any license issues related
to OpenSSL please contact openssl-core@openssl.org.
OpenSSL License
=====================================================================
Copyright (c) 1998-2008 The OpenSSL Project. All rights reserved.
Redistribution and use in source and binary forms, with or without modification, are permitted
provided that the following conditions are met:
1. Redistributions of source code must retain the above copyright notice, this list of conditions
and the following disclaimer.
2. Redistributions in binary form must reproduce the above copyright notice, this list of
conditions and the following disclaimer in the documentation and/or other materials provided
with the distribution.
3. All advertising materials mentioning features or use of this software must display the following
acknowledgment: “This product includes software developed by the OpenSSL Project for
use in the OpenSSL Toolkit. (http://www.openssl.org/)”
4. The names “OpenSSL Toolkit” and “OpenSSL Project” must not be used to endorse or
promote products derived from this software without prior written permission. For written
permission, please contact openssl-core@openssl.org.
5. Products derived from this software may not be called “OpenSSL” nor may “OpenSSL”
appear in their names without prior written permission of the OpenSSL Project.
6. Redistributions of any form whatsoever must retain the following acknowledgment:
“This product includes software developed by the OpenSSL Project for use in the OpenSSL
Toolkit (http://www.openssl.org/)”
THIS SOFTWARE IS PROVIDED BY THE OpenSSL PROJECT “AS IS” AND ANY EXPRESSED
OR IMPLIED WARRANTIES, INCLUDING, BUT NOT LIMITED TO, THE IMPLIED WARRANTIES
OF MERCHANTABILITY AND FITNESS FOR A PARTICULAR PURPOSE ARE DISCLAIMED.
IN NO EVENT SHALL THE OpenSSL PROJECT OR ITS CONTRIBUTORS BE LIABLE FOR
ANY DIRECT, INDIRECT, INCIDENTAL, SPECIAL, EXEMPLARY, OR CONSEQUENTIAL
DAMAGES (INCLUDING, BUT NOT LIMITED TO, PROCUREMENT OF SUBSTITUTE GOODS OR
SERVICES; LOSS OF USE, DATA, OR PROFITS; OR BUSINESS INTERRUPTION) HOWEVER
CAUSED AND ON ANY THEORY OF LIABILITY, WHETHER IN CONTRACT, STRICT LIABILITY,
OR TORT (INCLUDING NEGLIGENCE OR OTHERWISE) ARISING IN ANY WAY OUT OF THE
USE OF THIS SOFTWARE, EVEN IF ADVISED OF THE POSSIBILITY OF SUCH DAMAGE.
=====================================================================
This product includes cryptographic software written by Eric Young (eay@cryptsoft.com). This
product includes software written by Tim Hudson (tjh@cryptsoft.com).
appendix _71
WF455AG-03159A_EN.indd Sec8:71
2012-04-13
11:59:28
06 appendix
LICENSE ISSUES
warranty (U.S.A)
WARRANTY
SAMSUNG WASHER
LIMITED WARRANTY TO ORIGINAL PURCHASER
This SAMSUNG brand product, as supplied and distributed by SAMSUNG ELECTRONICS AMERICA, INC.
(SAMSUNG) and delivered new, in the original carton to the original consumer purchaser, is warranted by
SAMSUNG against manufacturing defects in materials and workmanship for a limited warranty period of:
One (1) year part and labor, Two (2) years Control Board Parts, Three (3) years stainless tub part, Ten (10)
years washing motor part
This limited warranty begins on the original date of purchase, and is valid only on products purchased and
used in the United States. To receive warranty service, the purchaser must contact SAMSUNG for problem
determination and service procedures. Warranty service can only be performed by a SAMSUNG authorized
service center. The original dated bill of sale must be presented upon request as proof of purchase to
SAMSUNG or SAMSUNG’s authorized service center. SAMSUNG will provide in-home service during the
warranty period at no charge, subject to availability within the contiguous United States. In-home service is
not available in all areas.
To receive in-home service, product must be unobstructed and accessible to the service agent. If service
is not available, SAMSUNG may elect to provide transportation of the product to and from an authorized
service center.
SAMSUNG will repair, replace, or refund this product at our option and at no charge as stipulated herein,
with new or reconditioned parts or products if found to be defective during the limited warranty period
specified above. All replaced parts and products become the property of SAMSUNG and must be returned
to SAMSUNG. Replacement parts and products assume the remaining original warranty, or ninety (90)
days, whichever is longer.This limited warranty covers manufacturing defects in materials and workmanship
encountered in normal, noncommercial use of this product and shall not apply to the following: damage
that occurs in shipment; delivery and installation; applications and uses for which this product was not
intended; altered product or serial numbers; cosmetic damage or exterior finish; accidents, abuse, neglect,
fire, water, lightning, or other acts of nature or God; use of products, equipment, systems, utilities, services,
parts, supplies, accessories, applications, installations, repairs, external wiring or connectors not supplied
or authorized by SAMSUNG that damage this product or result in service problems; incorrect electrical
line voltage, fluctuations and surges; customer adjustments and failure to follow operating instructions,
maintenance and environmental instructions that are covered and prescribed in the instruction book;
product removal and reinstallation; problems caused by pest infestations. This limited warranty does not
cover problems resulting from incorrect electric current, voltage or supply, light bulbs, house fuses, house
wiring, cost of a service call for instructions, or fixing installation errors. SAMSUNG does not warrant
uninterrupted or error-free operation of the product.
72_ warranty
WF455AG-03159A_EN.indd Sec10:72
2012-04-13
11:59:28
EXCEPT AS SET FORTH HEREIN, THERE ARE NO WARRANTIES ON THIS PRODUCT EITHER EXPRESS
OR IMPLIED, AND SAMSUNG DISCLAIMS ALL WARRANTIES INCLUDING, BUT NOT LIMITED TO, ANY
IMPLIED WARRANTIES OF MERCHANTABILITY, INFRINGEMENT OR FITNESS FOR A PARTICULAR
PURPOSE.
NO WARRANTY OR GUARANTEE GIVEN BY ANY PERSON, FIRM, OR CORPORATION WITH RESPECT
TO THIS PRODUCT SHALL BE BINDING ON SAMSUNG. SAMSUNG SHALL NOT BE LIABLE FOR LOSS
OF REVENUE OR PROFITS, FAILURE TO REALIZE SAVINGS OR OTHER BENEFITS, OR ANY OTHER
SPECIAL, INCIDENTAL OR CONSEQUENTIAL DAMAGES CAUSED BY THE USE, MISUSE, OR INABILITY
TO USE THIS PRODUCT, REGARDLESS OF THE LEGAL THEORY ON WHICH THE CLAIM IS BASED,
AND EVEN IF SAMSUNG HAS BEEN ADVISED OF THE POSSIBILITY OF SUCH DAMAGES.
NOR SHALL RECOVERY OF ANY KIND AGAINST SAMSUNG BE GREATER IN AMOUNT THAN THE
PURCHASE PRICE OF THE PRODUCT SOLD BY SAMSUNG AND CAUSING THE ALLEGED DAMAGE.
WITHOUT LIMITING THE FOREGOING, PURCHASER ASSUMES ALL RISK AND LIABILITY FOR LOSS,
DAMAGE, OR INJURY TO PURCHASER AND PURCHASER’S PROPERTY AND TO OTHERS AND THEIR
PROPERTY ARISING OUT OF THE USE, MISUSE, OR INABILITY TO USE THIS PRODUCT. THIS LIMITED
WARRANTY SHALL NOT EXTEND TO ANYONE OTHER THAN THE ORIGINAL PURCHASER OF THIS
PRODUCT, IS NONTRANSFERABLE AND STATES YOUR EXCLUSIVE REMEDY.
Some states do not allow limitations on how long an implied warranty lasts, or the exclusion or limitation
of incidental or consequential damages, so the above limitations or exclusions may not apply to you. This
warranty gives you specific rights, and you may also have other rights, which vary from state to state.
To obtain warranty service, please contact SAMSUNG at:
SAMSUNG ELECTRONICS AMERICA, INC.
85 CHALLENGER ROAD RIDGEFIELD PARK, NJ 07660
1-800-SAMSUNG(726-7864)
www.samsung.com
warranty _73
WF455AG-03159A_EN.indd Sec10:73
2012-04-13
11:59:28
warranty(CANADA)
SAMSUNG WASHER
LIMITED WARRANTY TO ORIGINAL PURCHASER
This SAMSUNG brand product, as supplied and distributed by SAMSUNG ELECTRONICS CANADA, INC.
(SAMSUNG) and delivered new, in the original carton to the original consumer purchaser, is warranted by
SAMSUNG against manufacturing defects in materials and workmanship for a limited warranty period of:
One (1) year part and labor, Ten (10) years washing motor part
This limited warranty begins on the original date of purchase, and is valid only on products purchased
and used in the Canada. To receive warranty service, the purchaser must contact SAMSUNG for problem
determination and service procedures. Warranty service can only be performed by a SAMSUNG authorized
service center. The original dated bill of sale must be presented upon request as proof of purchase to
SAMSUNG or SAMSUNG’s authorized service center. SAMSUNG will provide in-home service during the
warranty period at no charge, subject to availability within the Canada. In-home service is not available in all
areas.
To receive in-home service, product must be unobstructed and accessible to the service agent. If service
is not available, SAMSUNG may elect to provide transportation of the product to and from an authorized
service center.
SAMSUNG will repair, replace, or refund this product at our option and at no charge as stipulated herein,
with new or reconditioned parts or products if found to be defective during the limited warranty period
specified above. All replaced parts and products become the property of SAMSUNG and must be returned
to SAMSUNG. Replacement parts and products assume the remaining original warranty, or ninety (90)
days, whichever is longer.This limited warranty covers manufacturing defects in materials and workmanship
encountered in normal, noncommercial use of this product and shall not apply to the following: damage
that occurs in shipment; delivery and installation; applications and uses for which this product was not
intended; altered product or serial numbers; cosmetic damage or exterior finish; accidents, abuse, neglect,
fire, water, lightning, or other acts of nature or God; use of products, equipment, systems, utilities, services,
parts, supplies, accessories, applications, installations, repairs, external wiring or connectors not supplied
or authorized by SAMSUNG that damage this product or result in service problems; incorrect electrical
line voltage, fluctuations and surges; customer adjustments and failure to follow operating instructions,
maintenance and environmental instructions that are covered and prescribed in the instruction book;
product removal and reinstallation; problems caused by pest infestations. This limited warranty does not
cover problems resulting from incorrect electric current, voltage or supply, light bulbs, house fuses, house
wiring, cost of a service call for instructions, or fixing installation errors. SAMSUNG does not warrant
uninterrupted or error-free operation of the product.
74_ warranty
WF455AG-03159A_EN.indd Sec10:74
2012-04-13
11:59:29
EXCEPT AS SET FORTH HEREIN, THERE ARE NO WARRANTIES ON THIS PRODUCT EITHER EXPRESS
OR IMPLIED, AND SAMSUNG DISCLAIMS ALL WARRANTIES INCLUDING, BUT NOT LIMITED TO, ANY
IMPLIED WARRANTIES OF MERCHANTABILITY, INFRINGEMENT OR FITNESS FOR A PARTICULAR
PURPOSE.
NO WARRANTY OR GUARANTEE GIVEN BY ANY PERSON, FIRM, OR CORPORATION WITH RESPECT
TO THIS PRODUCT SHALL BE BINDING ON SAMSUNG. SAMSUNG SHALL NOT BE LIABLE FOR LOSS
OF REVENUE OR PROFITS, FAILURE TO REALIZE SAVINGS OR OTHER BENEFITS, OR ANY OTHER
SPECIAL, INCIDENTAL OR CONSEQUENTIAL DAMAGES CAUSED BY THE USE, MISUSE, OR INABILITY
TO USE THIS PRODUCT, REGARDLESS OF THE LEGAL THEORY ON WHICH THE CLAIM IS BASED,
AND EVEN IF SAMSUNG HAS BEEN ADVISED OF THE POSSIBILITY OF SUCH DAMAGES.
NOR SHALL RECOVERY OF ANY KIND AGAINST SAMSUNG BE GREATER IN AMOUNT THAN THE
PURCHASE PRICE OF THE PRODUCT SOLD BY SAMSUNG AND CAUSING THE ALLEGED DAMAGE.
WITHOUT LIMITING THE FOREGOING, PURCHASER ASSUMES ALL RISK AND LIABILITY FOR LOSS,
DAMAGE, OR INJURY TO PURCHASER AND PURCHASER’S PROPERTY AND TO OTHERS AND THEIR
PROPERTY ARISING OUT OF THE USE, MISUSE, OR INABILITY TO USE THIS PRODUCT. THIS LIMITED
WARRANTY SHALL NOT EXTEND TO ANYONE OTHER THAN THE ORIGINAL PURCHASER OF THIS
PRODUCT, IS NONTRANSFERABLE AND STATES YOUR EXCLUSIVE REMEDY.
Some provinces do not allow limitations on how long an implied warranty lasts, or the exclusion or limitation
of incidental or consequential damages, so the above limitations or exclusions may not apply to you.
This warranty gives you specific rights, and you may also have other rights, which vary from province to
province.
To obtain warranty service, please contact SAMSUNG at:
Samsung Electronics Canada Inc.,
Customer Service 55 Standish Court Mississauga, Ontario L5R 4B2 Canada
1-800-SAMSUNG (726-7864)
www.samsung.com/ca
www.samsung.com/ca_fr (French)
warranty _75
WF455AG-03159A_EN.indd Sec10:75
2012-04-13
11:59:29
QUESTIONS OR COMMENTS?
COUNTRY
CALL
U.S.A
1-800-SAMSUNG(726-7864)
OR VISIT US ONLINE AT
www.samsung.com
MEXICO
01-800-SAMSUNG(726-7864)
www.samsung.com
CANADA
1-800-SAMSUNG(726-7864)
www.samsung.com/ca
www.samsung.com/ca_fr (French)
Code No. DC68-03159A-01 _EN
WF455AG-03159A_EN.indd Sec10:76
2012-04-13
11:59:29
DV455*
Gas and Electric Dryer
user manual
This manual is made with 100% recycled paper.
imagine the possibilities
Thank you for purchasing this Samsung product.
To receive more complete service or accessory
parts, please register your product at or contact
www.samsung.com/register
1-800-SAMSUNG (726-7864)
DV455-02836F-02_EN_20120625.indd 1
2012-06-25
5:20:16
Features
• Extra Large Capacity
Ultra drying capabilities are at your fingertips! Now you can dry extra-large loads. Our ultra
large 7.5 cu.ft. capacity dryer circulates more air through your clothes, drying them faster, for
a wrinkle-free result.
• Smart Control (Elec. Model Only)
Samsung’s innovative Smart Control technology enables you to control your dryer through
personal technology devices such as smart phones. You don’t have to be on standby until
the cycle ends. The Smart Control allows you to monitor the drying process and lets you
know when the cycle is complete.
• Smart Monitor (Gas Model Only)
Samsung’s innovative Smart Monitor technology enables you to monitor your dryer through
personal technologies such as smart phones. You don’t have to be on standby until the cycle
ends. Smart Monitor allows you to monitor the drying process and let you know when the
cycle is complete.
• Smart Care
Samsung’s Smart Care, an automatic error-monitoring system, detects and diagnoses
problems at an early stage and provides a quick and easy solution. With the innovative Smart
Remote Control technology, you can also be alerted when the problem occurs via your smart
phones.
• Steam Cycle
This cycle sprays a small amount of water into the drum of the dryer after several minutes
of tumbling with heat. It reduces bad odors from clothing that are difficult to remove when
washing with water, and also reduces wrinkles.
• Sanitize Cycle
This cycle sanitizes garments by infusing high temperature heat deep into the fabric during
the drying cycle and eliminating 99.9% of certain bacteria. Use this cycle for clothing,
bedding, towels, or other items needing sanitization. The Sanitize cycle is certified by NSF
International, an independent third-party testing and certification organization.
NSF Protocol P154
Sanitization Performance of
Residential Clothes Dryers
• Various Drying Cycles & Fuzzy Logic Algorithm
Simply turn the Jog Dial to select one of the 13 automatic drying cycles, including normal,
heavy duty and Bedding Plus, or let the Fuzzy Logic Control measure the degree of
dampness and automatically set the drying time. Precision drying has never been easier than
with Samsung.
• Vent Sensor
Your Samsung dryer is equipped with a Vent Sensor which detects and notifies you when it is
time to clean the ducts. Keep your dryer safe and efficient!
• Time Saving
Our cycles are designed with you in mind. All our dryers are designed to dry your clothes in
less time... just 42 minutes! Giving you time for more important things in life.
2_ Features
DV455-02836F-02_EN_20120625.indd Sec9:2
2012-06-25
5:21:02
• Energy Saving
Samsung dryers are super energy efficient. You can dry up to 3.31 pounds of laundry with
1kWh. Also, both the large capacity and Fuzzy Logic Control save energy by automatically
drying your clothes the most efficient way.
• Easy Reversible Door
Our dryers will fit just about anywhere and without a door conflict. The direction of our easy
reversible door can be changed easily and quickly.
• Pedestal with Storage Drawers
An optional 15” pedestal is available to raise the dryer for easier loading and unloading. It also
offers a built-in storage drawer that can hold a 100 oz. bottle of detergent
• Stacking (MODEL NO: SK-5A/XAA)
Samsung’s Washer and Dryer can be stacked to maximize usable space.
The dryer legs need to be removed to stack the Washer and Dryer. You can purchase
an optional stacking kit from you Samsung retailer.
<Pedestal with Storage Drawers>
<Stacking>
• 4-way Vent (electric model only : DV455*)
You can install the exhaust vent in the following four (4) positions: back, either side, bottom.
Features _3
DV455-02836F-02_EN_20120625.indd Sec9:3
2012-06-25
5:21:02
Safety instructions
Congratulations on your new Samsung Dryer. This manual contains important
information on the installation, use, and care of your appliance. Please take the
time to read this manual to take full advantage of your dryer’s many benefits and
features.
WHAT YOU NEED TO KNOW ABOUT SAFETY INSTRUCTIONS
Please read this manual thoroughly to ensure that you know how to operate the extensive features and
functions of your new appliance safely and efficiently. Retain the manual in a safe place near the appliance
for future reference. Use this appliance only for its intended purpose as described in this instruction manual.
The Warnings and Important Safety Instructions in this manual do not cover all possible conditions and
situations that may occur. It is your responsibility to use common sense, caution, and care when installing,
maintaining, or operating your dryer.
Always contact your manufacturer about problems or conditions you do not understand.
IMPORTANT SAFETY SYMBOLS AND PRECAUTIONS
What the icons and signs in this user manual mean:
WARNING
CAUTION
Hazards or unsafe practices that may result in severe personal injury,
death and/or property damage. Follow the information in this manual
to minimize the risk of fire or explosion or to prevent property damage,
personal injury, or death.
Do not store or use gasoline or other flammable vapors and liquids near
this or any other appliance.
Hazards or unsafe practices that may result in personal injury and/or
property damage.
Do NOT attempt.
Do NOT disassemble.
Do NOT touch.
Follow directions explicitly.
Unplug the power plug from the wall socket.
Make sure the machine is grounded to prevent electric shock.
Call the service center for help.
Note
These warning signs are here to prevent injury to you and others.
Please follow them explicitly.
After reading this section, keep it in a safe place for future reference.
SAVE THESE INSTRUCTIONS
4_ Safety instructions
DV455-02836F-02_EN_20120625.indd Sec11:4
2012-06-25
5:21:02
WARNING - Risk of Fire
•
•
•
•
WARNING
Clothes dryer installation must be performed by a qualified installer.
Install the clothes dryer according to the manufacturer’s instructions and local codes.
Do not install a clothes dryer with flexible plastic venting materials. If flexible metal (foil type) duct
is installed, it must be of a specific type identified by the appliance manufacturer as suitable for
use with clothes dryers. Flexible venting materials are known to collapse, be easily crushed, and
trap lint. These conditions will obstruct clothes dryer airflow and increase the risk of fire.
To reduce the risk of severe injury or death, follow all installation instructions.
TO REDUCE THE RISK OF FIRE OR EXPLOSION:
•
•
WARNING
Do not dry items that have been previously cleaned, washed, soaked, or spotted with
gasoline, dry cleaning solvents, or other flammable or explosive substances. They emit
vapors that could ignite or explode. Any material that has been in contact with a cleaning
solvent or flammable liquids or solids should not be placed in the dryer until all traces of
these flammable liquids or solids and their fumes have been removed.
There are many highly flammable items used in homes, such as acetone, denatured alcohol,
gasoline, kerosene, some liquid household cleaners, some spot removers, turpentine, waxes,
and wax removers
Do not dry items containing foam rubber (may be labeled latex foam) or similarly textured
rubber-like materials on a heat setting. Heated foam rubber materials can, under certain
circumstances, produce fire by spontaneous combustion.
WHAT TO DO IF YOU SMELL GAS:
•
•
•
•
•
•
•
•
Do not try to light any appliance.
Do not turn on the appliance.
Do not touch any electrical switch.
Do not use any phone in your building.
Clear the room, building or area of all occupants.
Immediately call your gas supplier from a neighbor’s phone. Follow the gas supplier’s
instructions.
If you cannot reach your gas supplier, call the fire department.
Installation and service must be performed by a qualified installer, service agency, or the gas
supplier.
SAVE THESE INSTRUCTIONS
Safety instructions _5
DV455-02836F-02_EN_20120625.indd Sec11:5
2012-06-25
5:21:02
Safety instructions
WARNING
WARNING
To reduce the risk of fire, electric shock, or injury to persons when using your appliance, follow
basic precautions, including the following:
1. Read all instructions before using this appliance.
2. Do not dry articles that have been previously cleaned in, washed in, soaked in, or spotted
with gasoline, dry-cleaning solvents, or other flammable or explosive substances, because
they give off vapors that could ignite or explode.
3. Do not use the dryer to dry clothes which have traces of any flammable substance, such
as vegetable oil, cooking oil, machine oil, flammable chemicals, thinner, etc., or anything
containing wax or chemicals, such as mops and cleaning cloths. Flammable substances may
cause the fabric to catch fire by itself.
4. Do not store or use gasoline or other flammable vapors and liquids near this or any other
appliance.
5. Do not allow children or pets to play on, in, or in front of the appliance. Close supervision is
necessary when the appliance is used near children and pets.
6. Before the appliance is removed from service or discarded, remove the door to the drying
compartment to prevent children or animals from becoming trapped inside.
7. Do not reach into the appliance when the drum is moving.
8. Do not install or store this appliance where it will be exposed to the weather.
9. Do not tamper with the controls.
10. Do not repair or replace any part of the appliance or attempt any servicing unless specifically
recommended in the user-maintenance instructions or published in the user-repair
instructions that you understand and have the skills to carry out.
11. Do not use fabric softeners or products to eliminate static unless recommended by the
manufacturer of the fabric softener or product.
12. Clean the lint screen before or after each load.
13. Do not use heat to dry articles containing foam rubber or similarly textured rubber-like
materials.
14. Keep the area around the exhaust opening and surrounding areas free from lint, dust, and
dirt.
15. The interior of the dryer and exhaust duct should be cleaned periodically by qualified service
personnel.
16. Do not place items exposed to cooking oils in your dryer. Items contaminated with cooking
oils may contribute to a chemical reaction that could cause a load to catch fire.
17. This appliance must be grounded. See “Electrical requirements” and ”Grounding” in the
“Installing your dryer” section.
18. This appliance must be properly grounded. Never plug the power cord into a receptacle
that is not grounded adequately and in accordance with local and national codes. Refer to
installation instructions for grounding this appliance.
SAVE THESE INSTRUCTIONS
6_ Safety instructions
DV455-02836F-02_EN_20120625.indd Sec11:6
2012-06-25
5:21:02
19. Ensure pockets are free from small irregularly shaped hard objects and foreign material, i.e.
coins, knives, pins, etc. These objects could damage your dryer.
20. Gas leaks may occur in your system, resulting in a dangerous situation.
21. Gas leaks may not be detected by smell alone.
22. Gas suppliers recommend you purchase and install a UL-approved gas detector.
WARNING
STATE OF CALIFORNIA PROPOSITION 65 WARNINGS:
The California Safe Drinking Water and Toxic Enforcement Act requires the Governor of California
to publish a list of substances known to the State of California to cause cancer, birth defects,
or other reproductive harm, and requires businesses to warn of potential exposure to such
substances.
This product contains a chemical known to the State of California to cause cancer, birth defects,
or other reproductive harm. This appliance can cause low-level exposure to some of the
substances listed, including benzene, formaldehyde, and carbon monoxide.
Gas appliances may cause low-level exposure to some of the substances listed including
benzene, formaldehyde, carbon monoxide, and soot; as a result of possible incomplete
combustion of natural gas or LP fuels. Exposure to these substances can be minimized further
by properly venting the dryer to the outdoors.
CAUTION
CAUTION
1. Do not sit on top of the dryer.
2. Because of continuing product improvements, Samsung reserves the right to change
specifications without notice. For complete details, see the Installation Instructions packed
with your product before selecting cabinetry, making cutouts, or beginning installation.
3. Do not wash clothing with large buckles, buttons, or other heavy metal or solid things.
4. Install and use in accordance with the manufacturer’s instructions.
5. Do not place items in your dryer that have been spotted or soaked with vegetable oil or
cooking oil. Even after being washed, these items may contain significant amounts of these
oils.
6. Residual oil on clothing can ignite spontaneously. The potential for spontaneous combustion
increases when items containing vegetable oil or cooking oil are exposed to heat. Heat
sources such as your dryer can warm these items, allowing an oxidation reaction in the oil to
occur. Oxidation creates heat. If this heat cannot escape, the items can become hot enough
to catch fire. Piling, stacking, or storing these kinds of items may prevent heat from escaping
and can create a fire hazard.
7. All washed and unwashed fabrics that contain vegetable oil or cooking oil can be dangerous.
Washing these items in hot water with extra detergent will reduce, but not eliminate, the
hazard. Always use the Cool Down cycle for these items to reduce their temperature. Never
remove these items from the dryer hot or interrupt the drying cycle until the items have run
through the Cool Down cycle. Never pile or stack these items when they are hot.
8. Take care that children’s fingers are not caught in the door when closing it. This may result in
injury.
SAVE THESE INSTRUCTIONS
Safety instructions _7
DV455-02836F-02_EN_20120625.indd Sec11:7
2012-06-25
5:21:02
Safety instructions
REGULATORY NOTICE
1. FCC Notice
FCC CAUTION:
CAUTION
Any changes or modifications not expressly approved by the party responsible for compliance
could void the user’s authority to operate the equipment.
This device complies with Part 15 of FCC Rules. Operation is subject to the following two
conditions:
1. This device may not cause harmful interference, and
2. This device must accept any interference received including interference that causes
undesired operation.
For product available in the USA/Canada market, only channel 1~11 can be operated. Selection
of other channels is not possible.
FCC STATEMENT:
This equipment has been tested and found to comply within the limits for a Class B digital
device, pursuant to part 15 of the FCC Rules. These limits are designed to provide reasonable
protection against harmful interference in a residential installation.
This equipment generates, uses, and can radiate radio frequency energy and, if not installed
and used in accordance with the instructions, may cause harmful interference to radio
communications. However, there is no guarantee that interference will not occur in a particular
installation. If this equipment does cause harmful interference to radio or television reception,
which can be determined by turning the equipment off and on, the user is encouraged to try to
correct the interference by one or more of the following measures:
• Reorient or relocate the receiving antenna
• Increase the separation between the equipment and receiver
• Connect the equipment to an outlet on a different circuit from that of the receiver.
• Consult the dealer or an experienced radio/TV technician for help.
FCC RADIATION EXPOSURE STATEMENT:
This equipment complies with FCC radiation exposure limits set forth for an uncontrolled
environment. This equipment should be installed and operated with a minimum distance of 20cm
between the radiator and your body. This device and its antenna(s) must not be co-located or
operated in conjunction with any other antenna or transmitter.
SAVE THESE INSTRUCTIONS
8_ Safety instructions
DV455-02836F-02_EN_20120625.indd Sec11:8
2012-06-25
5:21:02
2. IC Notice
The term “IC” before the radio certification number only signifies that Industry Canada technical
specifications were met. Operation is subject to the following two conditions: (1) this device may
not cause interference, and (2) this device must accept any interference, including interference
that may cause undesired operation of the device.
This Class B digital apparatus complies with Canadian ICES-003.
Cet appareil numérique de la classe B est conforme á la norme NMB-003 du Canada.
For product available in the USA/Canada market, only channels 1~11 can be operated. Selection
of other channels is not possible.
IC RADIATION EXPOSURE STATEMENT:
This equipment complies with IC RSS-102 radiation exposure limits set forth for an uncontrolled
environment. This equipment should be installed and operated with minimum distance of 20
cm between the radiator & your body. This device and its antenna(s) must not be co-located or
operated in conjunction with any other antenna or transmitter.
SAVE THESE INSTRUCTIONS
Safety instructions _9
DV455-02836F-02_EN_20120625.indd Sec11:9
2012-06-25
5:21:02
contents
INSTALLING YOUR DRYER
12
12
12
13
13
14
15
15
17
17
18
18
19
19
20
21
23
23
26
26
27
OPERATING INSTRUCTIONS, TIPS
29
CARE AND CLEANING
64
29
34
35
35
35
36
37
Unpacking your dryer
See exhaust requirements
Basic requirements
Ducting requirements
Important to installer
Location considerations
Alcove or closet installations
Mobile home installations
Exhausting
Gas requirements
Commonwealth of massachusetts
installation instructions
Electrical requirements
Grounding
Electrical connections
Connecting the inlet hose
Replacement parts and accessories
Installation
Final installation checklist
Dryer exhaust tips
Door Reversal
40
52
62
Overview of the control panel
Rack Dry
Clean the lint filter
Load the dryer properly
Getting started
Vent Sensor
Setting up Smart control and Smart
monitoring
Using the mobile app (Android)
Using the mobile app (iOS)
Registering your dryer
64
64
64
64
64
Control Panel
Tumbler
Stainless Steel Tumbler
Dryer Exterior
Dryer Exhaust System
10_ contents
DV455-02836F-02_EN_20120625.indd Sec2:10
2012-06-25
5:21:02
SPECIAL LAUNDRY TIPS
65
Special laundry tips
66
68
69
Check these points if your dryer…
Information codes
Network Setup Q&A
71
72
72
72
73
74
Fabric care chart
Protecting the environment
Declaration of conformity
Specifications
Cycle chart
Open Source Announcement
65
TROUBLESHOOTING
66
APPENDIX
71
contents _11
DV455-02836F-02_EN_20120625.indd Sec2:11
2012-06-25
5:21:03
Installing your dryer
UNPACKING YOUR DRYER
Unpack your Dryer and inspect it for shipping damage. Make sure you have received all the items
shown below. If your Dryer was damaged during shipping, or you do not have all the items, contact
1-800-SAMSUNG (726-7864).
To prevent personal injury or strain, wear protective gloves whenever lifting or carrying the unit.
WARNING
The packing materials can be dangerous children. Keep all packaging material (plastic bags,
polystyrene, etc.) well out of the reach of children.
SEE EXHAUST REQUIREMENTS
Top Cover
[ BACK ]
Control panel
Door
Filter
Water Inlet
Frame Front
Duct Exhaust
Parts supplied
“Y”-connector
Short inlet hose
Rubber Washer
Long inlet hose
12_ Installing your dryer
DV455-02836F-02_EN_20120625.indd 12
2012-06-25
5:21:03
Tools needed
Cutting knife
Pipe wrench
(gas only)
Nut drivers
Level
Phillips Screwdriver
Duct tape
Wrench
01 INSTALLING YOUR DRYER
Pliers
BASIC REQUIREMENTS
Make sure you have everything necessary for the proper installation
• A GROUNDED ELECTRICAL OUTLET is required. Refer to the “Electrical requirements” section on
page 19.
• A POWER CORD electric dryer (except for Canada).
• GAS LINES (if a gas dryer) must meet national and local codes.
• The EXHAUST SYSTEM must be made of rigid metal or flexible stiff-walled metal exhaust ducting.
DUCTING REQUIREMENTS
•
•
•
•
•
•
•
•
•
•
•
•
•
•
•
Use a 4-inch (10.2 cm) diameter rigid aluminum or rigid galvanized steel duct.
Do not use a smaller duct.
Ducts larger than 4 inches (10.2 cm) in diameter can result in increased accumulation of lint.
Lint should be removed regularly.
If a flexible metal duct must be used, use the type with a stiff sheet metal wall. Do not use a flexible duct
with a thin foil wall. A serious blockage can result if the flexible metal duct is bent too sharply.
Never install any type of flexible duct in walls, ceilings, or other concealed spaces.
Keep the exhaust duct as straight and short as possible.
Secure joints with duct tape. Do not use screws.
Plastic flexible ducts can kink, sag, be punctured, reduce airflow, extend drying times, and affect the
dryer operation.
Exhaust systems longer than recommended can extend drying times, affect machine operations, and
collect lint.
The exhaust duct should end with an exhaust hood with a swing-out damper to prevent back drafts and
entry of wildlife. Never use an exhaust hood with a magnetic damper.
The hood should have at least 12 inches (30.5 cm) of clearance between the bottom of the hood and
the ground or other obstruction. The hood opening should point down.
Never install a screen over the exhaust outlet.
To avoid lint buildup, do not exhaust the dryer directly into a window well. Do not exhaust under a house
or porch.
If the exhaust duct must run through an unheated area, the duct should be insulated and slope slightly
down towards the exhaust hood to reduce condensation and lint buildup.
Installing your dryer _13
DV455-02836F-02_EN_20120625.indd 13
2012-06-25
5:21:03
Installing your dryer
•
•
•
•
Inspect and clean the interior of the exhaust system at least once a year. Unplug the power cord before
cleaning.
Check frequently to make sure the exhaust hood damper opens and closes freely.
Check once per month, and clean at least once per year. Note: If your clothes are not getting dry, then
check the ducting for obstructions.
Do not exhaust the dryer into a wall, ceiling, crawl space, or concealed space of a building, gas vent, or
any other common duct or chimney. This could create a fire hazard from the lint expelled by the dryer.
ELECTRIC AND GAS DRYER
Weather Hood Type
Recommended
Use only for short-run installation
4” (10 .16 cm)
No. of 90° elbows
Rigid
0
1
2.5” (6.35 cm)
Metallic Flexible*
Rigid
Metallic Flexible*
24.4 m (80 ft.)
12.4 m (41 ft.)
22.6 m (74 ft.)
10.1 m (33 ft.)
20.7 m (68 ft.)
11.2 m (37 ft.)
18.9 m (62 ft.)
8.8 m (29 ft.)
2
17.4 m (57 ft.)
10.1 m (33 ft.)
15.5 m (51 ft.)
7.6 m (25 ft.)
3
14.3 m (47 ft.)
9.0 m (29 ft.)
12.5 m (41 ft.)
6.5 m (21 ft.)
* Do not use non-metallic flexible ducts.
If the new dryer is installed into an existing exhaust system you must make sure:
• The exhaust system meets all local, state, and national codes.
• That a flexible plastic duct is not used.
• To inspect and clean all lint buildup from inside the existing duct.
• The duct is not dented or crushed.
• The exhaust hood damper opens and closes freely.
The static pressure in any exhaust system must not exceed 0.83 inches of water column, or be less than 0.
This can be measured with the dryer running with a manometer at the point where the exhaust duct
connects to the dryer. A no-heat setting should be used. The dryer tumbler should be empty and the lint
filter clean.
IMPORTANT TO INSTALLER
Please read the following instructions carefully before installing the dryer. These instructions should be kept
for future reference.
WARNING
Remove the door from all discarded appliances to avoid the danger of a child being trapped and
suffocating.
14_ Installing your dryer
DV455-02836F-02_EN_20120625.indd 14
2012-06-25
5:21:03
LOCATION CONSIDERATIONS
ALCOVE OR CLOSET INSTALLATIONS
WARNING
•
•
The dryer must be exhausted to the outside to reduce the risk of fire when installed in an alcove or
closet.
01 INSTALLING YOUR DRYER
The dryer should be located where there is enough space at the front for loading the dryer, and enough
space behind for the exhaust system. This dryer is factory-ready for the rear exhaust option. To exhaust out
the bottom, right or the left, use the accessory exhaust kit. Instructions are included with the kit. Make sure
the room in which the dryer is located has enough fresh air. The dryer must be located where there are no
air-flow obstructions.
For gas dryers, adequate clearance must be maintained as noted on the data plate to ensure adequate air
for combustion and the proper dryer operation.
The dryer must not be installed or stored in an area where it will be exposed to water and/or weather. The
dryer area must be kept clear of combustible materials, gasoline, and other flammable vapors and liquids. A
dryer produces combustible lint. The area around the dryer should be kept lint-free.
No other fuel-burning appliance should be installed in the same closet as the dryer.
WARNING: To reduce the risk of fire, this dryer must be exhausted to the outside. Refer to the
“Exhausting” section on page 17.
Minimum clearances between the dryer and adjacent walls or other
surfaces
Sides
1 in / 25 mm
Rear
5 in / 127 mm
Top
17 in / 432 mm
Front
2 in / 51 mm
•
The front of the closet must have two unobstructed air openings for a combined minimum
total area of 72 in² (465 cm²) with a minimum clearance of 3” (7.6 cm) at the top and bottom.
A slatted door with equivalent space clearances is acceptable.
Recessed area
Side view - closet or confined area
1 in.
(2.5 cm)
1 in.
(2.5 cm)
27 in.
(68.6 cm)
17 in.
(43.2 cm)
27 in.
(68.6 cm)
1 in.
(2.5 cm)
2 in.
(5 cm)
34.1 in.
(86.5 cm)
5 in.
(12.7 cm)
Installing your dryer _15
DV455-02836F-02_EN_20120625.indd 15
2012-06-25
5:21:04
Installing your dryer
With optional pedestal base or stacking kit
Required Dimensions for Installation With Pedestal
Required Dimensions for Installation
With Stacking Kit
51.2 in. (130 cm) to clear open door
39 in.
(99 cm)
53.6 in.
(136.2 cm)
34.1 in.
(86.5 cm)
5 in.
(12.7 cm)
6 in. *
(15.2 cm)
27 in.
(68.6 cm)
3 in.
(7.6 cm)
2.5 in.
(6.3 cm)
77.2 in.
(196.2 cm)
48 in.² *
(310 cm²)
Closet or Door
1 in.
(2.5 cm)
27 in.
(68.6 cm)
24 in.² *
(155 cm²)
3 in.
(7.6 cm)
1 in.
34.1 in.
(2.5 cm) (86.5 cm)
5.9 in.**
(15 cm)
* Required spacing
** An external exhaust elbow requires additional space.
It is not recommended to stack DV457* on your washer.
(it might be hard to control dryer LCD because of the viewing angle.)
16_ Installing your dryer
DV455-02836F-02_EN_20120625.indd 16
2012-06-25
5:21:04
MOBILE HOME INSTALLATIONS
EXHAUSTING
The dryer shall not be exhausted into a chimney, a wall, a ceiling, an attic, a crawl space, or a concealed
space of a building.
Exhausting the dryer to the outside will prevent large amounts of lint and moisture from being blown into the
room.
01 INSTALLING YOUR DRYER
The installation of the dryer in a mobile home must conform to the Manufactured Home Construction and
Safety Standards Title 24 CFR, Part 3280 {formerly the Federal Standards for Mobile Home Construction
and Safety, Title 24, HUD (Part 280), 1975} for the United States) or CSA Standards Z240 (for Canada).
• When installing a dryer in a mobile home, provisions for anchoring the dryer to the floor must be made.
• Locate an area with adequate fresh air.
• A minimum unobstructed space of 72 in² (465 cm²) is required.
• Call 1-800-SAMSUNG for information on purchasing the Floor Anchoring Kit as an accessory.
• All mobile home installations must be exhausted to the outside with the exhaust duct termination
securely fastened to the mobile home structure, using materials that will not combust.
• The exhaust duct may not terminate underneath the mobile home.
• Refer to the following “Exhausting” section for more information.
Refer to the “Ducting requirements” section on page 13 for the maximum duct length and
number of bends.
• All dryers must be exhausted to the outside.
• Do not assemble the duct with screws or other fastening means that extend into the
duct and catch lint.
• The exhaust duct should be 4 inches (102 mm) in diameter.
• The total length of flexible metal duct shall not exceed 2.4 m (7.8 ft.).
In the United States:
•
Use only those foil-type flexible ducts, if any, specifically identified for use with the appliance
by the manufacturer and that comply with the Outline for Clothes Dryer Transition Ducts,
Subject 2158A, shall be used.
In Canada:
•
Use only those foil-type flexible ducts, if any, specifically identified for use with the appliance
by the manufacturer.
Outside the U.S. and Canada:
•
Refer to the local codes.
WARNING
WARNING
The dryer must be exhausted to the outside to reduce the risk of fire when installed in an
alcove or closet.
NEVER USE A PLASTIC OR NON-METAL FLEXIBLE DUCT.
If your existing ductwork is plastic, non-metal, or combustible, replace it with metal.
Use only a metal exhaust duct that is non-flammable to ensure containment of the exhaust
air, heat, and lint.
Installing your dryer _17
DV455-02836F-02_EN_20120625.indd 17
2012-06-25
5:21:04
Installing your dryer
GAS REQUIREMENTS
Use only natural or LP (liquid propane) gases.
THE INSTALLATION MUST CONFORM WITH LOCAL CODES, OR IN THE ABSENCE OF LOCAL
CODES, WITH THE NATIONAL FUEL GAS CODE ANSI/Z223.1, LATEST REVISION (FOR THE UNITED
STATES), OR WITH THE CAN/CGA-B149 INSTALLATION CODES (FOR CANADA).
Gas dryers are equipped with a burner vent for use with natural gas. If you plan to use your dryer with LP
(liquid propane) gas, it must be converted for safe and proper performance by a qualified service technician.
A 1/2” (1.27 cm) gas supply line is recommended and must be reduced to connect to the 3/8” (1 cm) gas
line on your dryer. The National Fuel Gas Code requires that an accessible, approved manual gas shut-off
valve be installed within 6” of your dryer.
Gas dryers installed in residential garages must be raised 18 inches (46 cm) above the floor.
Additionally, a 1/8” (0.3 cm) N.P.T. (National Pipe Thread) plugged tapping, accessible for test gauge
connection, must be installed immediately upstream of your dryer’s gas supply connection.
Your dryer must be disconnected from the gas supply pipe system during any pressure testing of the
system.
DO NOT reuse old flexible metal gas lines. Flexible gas lines must be design certified by the American Gas
Association (CGA in Canada).
• Any pipe joint compound used must be resistant to the action of any liquefied petroleum gas.
• As a courtesy, most local gas utilities will inspect a gas appliance installation.
GAS IGNITION - Your dryer uses an automatic ignition system to ignite the burner.
There is no constant burning pilot.
COMMONWEALTH OF MASSACHUSETTS INSTALLATION
INSTRUCTIONS
Your dryer must be installed by a licensed plumber or gas fitter. A “T” handle manual gas valve must be
installed in the gas supply line to your dryer. If a flexible gas connector is used to install your dryer, the
connector may not be longer than 3’ (36”).
• Gas leaks may occur in your system, creating a dangerous situation.
Gas leaks may not be detected by smell alone.
WARNING •
• Gas suppliers recommend that you purchase and install a UL-approved gas detector.
• Install and use it in accordance with the manufacturer’s instructions.
18_ Installing your dryer
DV455-02836F-02_EN_20120625.indd 18
2012-06-25
5:21:04
ELECTRICAL REQUIREMENTS
The wiring diagram is located on the plate below the control panel.
•
•
•
The improper connection of the equipment grounding conductor can result in a risk of electric
shock. Check with a qualified electrician or serviceman if you are in doubt as to whether your dryer
is properly grounded. Do not modify the plug provided with your dryer - if it doesn’t fit the outlet,
have a proper outlet installed by a qualified electrician.
To prevent unnecessary risk of fire, electrical shock, or personal injury, all wiring and grounding
must be done in accordance with local codes, or in the absence of local codes, with the National
Electrical Code, ANSI/NFPA No. 70-Latest Revision (for the U.S.) or the Canadian Electrical Code
CSA C22.1 - Latest Revisions and local codes and ordinances. It is your responsibility to provide
adequate electrical services for your dryer.
All gas installations must be done in accordance with the national Fuel Code ANSI/Z2231 - Latest
Revision (for the U.S.) or CAN/CGA - B149 Installation Codes - Latest Revision (for Canada) and
local codes and ordinances.
01 INSTALLING YOUR DRYER
WARNING
GROUNDING
This dryer must be grounded. In the event of a malfunction or breakdown, the grounding the product will
reduce the risk of electrical shock by providing a path of least resistance for the electrical current.
WARNING
Gas models
Your dryer has a cord with an equipment-grounding conductor and a grounding plug.
The plug must be plugged into an appropriate outlet that is properly installed and grounded in
accordance with all local codes and ordinances.
Do not modify the plug provided with your dryer – if it doesn’t fit the outlet, have a proper outlet
installed by a qualified electrician.
Never connect the ground wire to the plastic plumbing lines, gas lines, or hot water pipes.
WARNING
Electric models
Your dryer has an optional cord with an equipment-grounding conductor and a grounding plug,
which is sold separately.
The plug must be plugged into an appropriate outlet that is properly installed and grounded in
accordance with all local codes and ordinances.
Do not modify the plug provided with your dryer – if it doesn’t fit the outlet, have a proper outlet
installed by a qualified electrician.
If a power cord is not used and the electric dryer is to be permanently wired, the dryer must
be connected to a permanently grounded metal wiring system, or an equipment grounding
conductor must be run with the circuit conductors and connected to the equipment grounding
terminal or lead on the dryer.
Installing your dryer _19
DV455-02836F-02_EN_20120625.indd 19
2012-06-25
5:21:04
Installing your dryer
ELECTRICAL CONNECTIONS
Before operating or testing, follow all grounding instructions in the “Grounding” section on page 19.
An individual branch (or separate) circuit serving only your dryer is recommended. DO NOT USE AN
EXTENSION CORD.
Gas models – U.S. and Canada
A 120 volt, 60 Hz AC approved electrical service, with a 15-ampere fuse or circuit breaker is
required.
Electric models – U.S. only
Most U.S. dryers require a 120/240 volt, 60 Hz AC approved electrical service. Some require
120/208 volt, 60 Hz approved electrical service. The electric service requirements can be found
on the data label located behind the door. A 30-ampere fuse or circuit breaker on both sides of
the line is required.
• If a power cord is used, the cord should be plugged into a 30-ampere receptacle.
• The power cord is NOT provided with U.S. electric model dryers.
WARNING
RISK OF ELECTRIC SHOCK:
When local codes allow, the electrical supply of the dryer may be connected by means of
a new power supply cord kit, marked for use with a dryer, that is U.L. listed and rated at a
minimum of120/240 volts, 30-ampere with three No. 10 copper wire conductors terminated
with closed loop terminals, open-end spade lugs with turned up ends, or with tinned leads.
• Do not reuse a power supply cord from an old dryer. The power cord electric supply
wiring must be retained at the dryer cabinet with a suitable UL-listed strain relief.
• Grounding through the neutral conductor is prohibited for (1) new branch-circuit
installations, (2) mobile homes, (3) recreational vehicles, and (4) areas where local
codes prohibit grounding through the neutral conductor. (Use a 4-prong plug for 4 wire
receptacles, NEMA type 14-30R.)
Electric models – Canada Only
•
•
A 120/240 volt, 60 Hz AC approved electrical service fused through a 30-ampere fuse or
circuit breaker on both sides of the line is required.
All Canadian models are shipped with the power cord attached. The power cord should be
plugged into a 30-ampere receptacle.
In Canada, you may not convert a dryer to 208 volts.
20_ Installing your dryer
DV455-02836F-02_EN_20120625.indd 20
2012-06-25
5:21:04
CONNECTING THE INLET HOSE
Method 1
1. If space permits, attach the brass female end of the “Y”
connector to the cold water faucet.
2. Turn the cold water faucet off.
3. Attach the straight end of long hose to the “Y’ connector.
4. Using pliers, tighten the coupling with an additional twothirds turn.
Do not overtighten, as this may damage the coupling.
5. Attach the angled end of long hoses to fill the valve at the
bottom of the dryer’s rear frame. Screw on the coupling by
hand until it is seated on the fill valve connector.
6. Using the pliers, tighten the coupling with an additional twothirds turn.
Y-Connector
Water Hose
Duct Exhaust
01 INSTALLING YOUR DRYER
The dryer must be connected to the cold water faucet using the new inlet hoses. Do not use old
hoses.
Frame
(back)
Do not overtighten, as this may damage the coupling.
7. Check that the water faucets are on.
8. Check for leaks around the “Y” connector, faucets and
hoses.
Water Hose
Installing your dryer _21
DV455-02836F-02_EN_20120625.indd 21
2012-06-25
5:21:04
Installing your dryer
Method 2
The dryer must be connected to the cold water faucet using the new inlet hoses. Do not use old
hoses.
1. If the “Y” connector cannot be attached directly to the cold
water faucet, the short hose must be used.
2. Turn the cold water faucet off.
3. Attach the short inlet hose to the cold water faucet.
Screw on the coupling by hand until it is seated on the
faucet.
4. Using the pliers, tighten the coupling with an additional twothirds turn.
Short hose
(Inlet to cold
water)
“Y” connector
Long hose
Do not overtighten, as this may damage the coupling.
5. Attach the ‘Y” connector to the brass male end of the small
hose. Screw on the coupling by hand until it is seated on the
connector.
6. Using the pliers, tighten the coupling with an additional twothirds turn.
Duct Exhaust
Frame
(back)
Do not overtighten, as this may damage the coupling.
7. Attach the angled end of long hoses to the fill valve at the
bottom of the dryer rear frame. Screw on the coupling by
hand until it is seated on the fill valve connector.
8. Using pliers, tighten the coupling with an additional twothirds turn.
Water Hose
Do not overtighten, as this may damage the coupling.
9. Attach the washer hose to the other side of the “Y”
connector. Screw on the hose coupling until it is tight. Using
pliers, tighten the coupling with an additional two thirds turn.
Do not overtighten. You can damage the coupling.
10. Check that the water faucets are on.
11. Check for leaks around the “Y” connector, faucets and
hoses.
22_ Installing your dryer
DV455-02836F-02_EN_20120625.indd 22
2012-06-25
5:21:05
REPLACEMENT PARTS AND ACCESSORIES
If your dryer requires replacement parts or accessories, contact the dealer where you purchased your dryer
or the SAMSUNG customer care center at 1-800-SAMSUNG (726-7864).
For the proper installation, we recommend that you hire a qualified installer.
To install
1. Move your dryer to an appropriate location for the
installation. Consider installing the dryer and washer sideby-side, to allow access to the gas, electrical, and exhaust
connections. Place two of the carton cushion-tops on the
floor. Tip your dryer on its side so it lies across both cushiontops.
2. Set your dryer back in an upright position.
3. To ensure that the dryer provides the optimal drying
performance, it must be level. To minimize vibrations, noise,
and unwanted movement, the floor must be a perfectly level,
solid surface.
Level
01 INSTALLING YOUR DRYER
INSTALLATION
To set the dryer to the same height as the washer,
fully retract the leveling feet by turning them
counterclockwise, then loosen the legs by turning them
clockwise.
Leveling feet
Retract fully
Then loosen
Adjust the leveling feet only as much as necessary to
level the dryer. Extending the leveling feet more than
necessary can cause the dryer to vibrate.
4. Review the “Exhausting” section on page 17 before installing the exhaust system. Install the
ductwork from your dryer to the exhaust hood. The crimped end of the duct sections must
point away from your dryer.
DO NOT use sheet metal screws when assembling the ducting. These joints should be
taped.
Never use plastic flexible exhaust material.
Tip for tight installations: install a section of the exhaust system onto your dryer before putting
it in place.
Use duct tape to secure this section to your dryer, but do not cover the ventilation slots at
the back of the unit in dryer cabinet.
Installing your dryer _23
DV455-02836F-02_EN_20120625.indd 23
2012-06-25
5:21:05
Installing your dryer
5. Review the “Electrical requirements” section on page 19.
BEFORE OPERATING OR TESTING, follow the grounding instructions in the “Grounding”
section on page 19.
WARNING
U.S. MODELS:
RISK OF ELECTRIC SHOCK - All U.S. models are produced for a 3-WIRE SYSTEM
CONNECTION.
The dryer frame is grounded to the neutral conductor at the terminal block.
A 4-WIRE SYSTEM CONNECTION is required for new or remodeled construction,
mobile homes, or if local codes do not permit grounding through neutral. If the 4-wire
system is used, the dryer frame cannot be grounded to the neutral conductor at
the terminal block. Refer to the following instructions for 3 and 4-WIRE SYSTEM
CONNECTIONS.
Remove the terminal block cover plate.
Insert the power cord with a UL-listed strain relief through the hole provided in the cabinet
near the terminal block.
A strain relief must be used.
Do not loosen the nuts already installed on the terminal block. Be sure they are tight.
Use a 3/8” (1 cm) deep well socket.
6. Review the “Gas requirements” section on page 18. Remove the pipe thread protective
cap. Apply a pipe joint compound or about 1 1/2 wraps of Teflon tape over all threaded
connections.
The pipe joint compound must be resistant to the actions of any liquefied petroleum
gas.
Connect the gas supply to your dryer. An additional fitting is required to connect the 3/4” (1.9
cm) female thread end of a flexible connector to the 3/8” (1 cm) male threaded end on the
dryer.
Securely tighten the gas line fitting over the threads.
Turn on the gas supply.
Check all gas connections for leaks using a soap solution.
If bubbles appear, tighten the connections and recheck. DO NOT use an open flame to
check for gas leaks.
24_ Installing your dryer
DV455-02836F-02_EN_20120625.indd 24
2012-06-25
5:21:05
3-WIRE system connections
WARNING
1
External ground connector
2
Neutral grounding wire (green/yellow)
3
Center silver-colored terminal block screw
4
Neutral wire (white or center wire)
5
3/4” (1.9 cm) UL-listed strain relief
01 INSTALLING YOUR DRYER
1. Loosen or remove the center terminal block screw.
2. Connect the neutral wire (white or center wire) of the power cord to the center, silver-colored
terminal screw of the terminal block. Tighten the screw.
3. Connect the other wires to the outer terminal block screws. Tighten the screws.
4. Tighten the strain relief screws.
5. Insert the tab of the terminal block cover into your dryer’s rear panel slot.
6. Secure the cover with a hold-down screw.
If converting from a 4-wire electrical system to a 3-wire, the ground strap must be
reconnected to the terminal block support to ground the dryer frame to the neutral
conductor.
4-WIRE system connections
1. Remove the center terminal block screw.
2. Connect the ground wire (green or unwrapped) of the power cord to the external ground
conductor screw.
3. Connect the neutral wire (white or center wire) of the power cord and the appliance ground
wire (green with yellow stripes) under the central screw of the terminal block.
4. Connect the other wires to the outer terminal block screws. Tighten the screws.
5. Tighten the strain relief screws.
6. Insert the tab of the terminal block cover into your dryer’s rear panel slot.
7. Secure the cover with a hold-down screw.
1
External ground connector
2
Green or bare copper wire of the power cord
3
3/4 in. (1.9 cm) UL-listed strain relief
4
Center silver-colored terminal block screw
5
Grounding wire (green/yellow)
6
Neutral wire (white or center wire)
8. With a level, check your dryer and make the necessary adjustments to the leveling legs.
9. At this time, make sure all gas connections (on gas models), exhaust and electrical
connections are complete. Plug in your dryer, and check its operation by using the checklist
below.
10. (GAS MODELS ONLY)
The burner may not ignite initially due to air in the gas line. Allowing your dryer to operate on
a heat setting will purge the line. If the gas does not ignite within 5 minutes, turn your dryer
off and wait 5 minutes. Be sure the gas supply to your dryer has been turned on. In order to
confirm the gas ignition, check the exhaust for heat.
Installing your dryer _25
DV455-02836F-02_EN_20120625.indd 25
2012-06-25
5:21:05
Installing your dryer
FINAL INSTALLATION CHECKLIST
•
•
•
•
•
•
•
the dryer is plugged into an electrical outlet and is properly grounded.
The exhaust ductwork is hooked up and the joints are taped.
A plastic flexible duct is NOT used.
Use rigid or stiff-walled flexible metal vent material.
The dryer is level and is sitting firmly on the floor.
Gas models – the gas is turned on with no gas leaks.
Start your dryer to confirm that it runs, heats, and shuts off.
DRYER EXHAUST TIPS
A plastic or non-metal flexible duct presents a potential fire hazard.
WARNING
1. Make sure your dryer is installed properly so it exhausts air
easily.
Wall
Dryer
Duct
Exhaust
2. Use a 4” diameter rigid metal duct. Tape all joints, including
at the dryer. Never use lint-trapping screws.
4”
Tape
Duct
3. Keep ducts as straight as possible.
4. Clean all old ducts before installing your new dryer. Be sure
the vent flap opens and closes freely. Inspect and clean the
exhaust system annually.
Don’t let a poor exhaust system slow the drying process by:
•
Restricting your
dryer with a poor
exhaust system.
•
Using a plastic, thin
foil, or non-metal
flexible duct.
•
Unnecessarily using
long ducts that have
many elbows.
•
Allowing dented or
clogged ducts and
vent.
26_ Installing your dryer
DV455-02836F-02_EN_20120625.indd 26
2012-06-25
5:21:05
DOOR REVERSAL
01 INSTALLING YOUR DRYER
1. Unplug the power cord.
2. Remove two door hinge screws.
3. Lift the door and remove it.
4. Remove two screws from the frame front.
5. Remove the two screws from the opposite side of the door
hinge.
6. Remove the two screws from the holder lever.
7. Reassemble the two screws on the inside holes.
8. Remove a screw from the door hinge.
The screw is for pre-fixing the door to the frame front.
Installing your dryer _27
DV455-02836F-02_EN_20120625.indd 27
2012-06-25
5:21:06
Installing your dryer
9. Reassemble the screw in the other hole.
10. Place the door on the other side and reattach it to the dryer.
11. Reattach the holder lever.
12. Reattach the screws in the remaining holes.
28_ Installing your dryer
DV455-02836F-02_EN_20120625.indd 28
2012-06-25
5:21:06
Operating instructions, tips
WARNING
To reduce the risk of fi re, electric shock, or injury to persons,read the IMPORTANT SAFETY
INSTRUCTIONS before operating this appliance.
OVERVIEW OF THE CONTROL PANEL
1
Cycle Selector
8
6
2
3
4
5
7
8
9
10
To select a cycle, rotate the Cycle Selector dial to the desired cycle.
The indicator light by the cycle name will illuminate. The Wool, Delicates,
Sanitize, Bedding PLUS, Heavy Duty, Normal, Eco Normal and Perm Press
cycles are Sensor Dry cycles.
Sensor Dry automatically senses the moisture in the load and shuts the dryer
off when the selected dryness level (very dry to damp dry) is reached.
Eco Normal - This cycle reduces energy usage by up to 15% compared
to the Normal Dry cycle. It adjusts the cycle time and temperature for
increased efficiency.
Normal - Use this cycle to dry loads such as cotton, underwear, and linen.
Heavy Duty - Use this cycle to get high heat for heavy fabrics such as jeans,
corduroys, or work clothes.
Perm Press - Dry wrinkle-free cottons, synthetic fabrics, knits, and permanent
press fabrics automatically.
Bedding PLUS - For bulky items such as blankets, sheets, and comforters.
Delicates - The Delicates cycle is designed to dry heat-sensitive items at a
low drying temperature.
Wool - For machine washable and tumble dryable wool only.
02 OPERATING INSTRUCTIONS, TIPS
1
Load should be under 3 pounds. The Wool cycle of this machine
has been approved by Woolmark company for Total-Easy-Care
Wool products, M0913(DV455E*) and M1007(DV455G*).
Sanitize - Sanitize garments by infusing high temperature heat deep into
the fabric during the drying cycle. Use this course to keep your bedding and
curtains clean through sanitization.
Time Dry - Time Dry allows you to select the desired cycle time in minutes.
Turn the Cycle Selector dial to Time Dry, then press the Adjust Time up arrow
to set the drying time. Press the arrow repeatedly to scroll through the time
settings.
Operating instructions, tips _29
DV455-02836F-02_EN_20120625.indd Sec3:29
2012-06-25
5:21:06
Operating instructions, tips
Quick Dry - Provides a 30 minutes drying cycle.
Air Fluff - The Air Fluff cycle tumbles the load in room temperature air.
Refresh - This cycle is best for smoothing out wrinkles and reducing odors
from loads consisting of one to four dry items. In this cycle a small amount
of water is sprayed into the dryer drum after several minutes of tumbling with
heat.
Wrinkle Away - The Wrinkle Away cycle removes wrinkles from clothes stored
in closets, etc. It provides wrinkle release via optimized steam care. You can
change the drying time.(Minimum time : 20 minutes) *For best results, load no
more than 3 items.
Overloading the dryer may not yield the same results.
LED Display
The display window shows the estimated time remaining in the cycle after the
Start/Pause button is pressed. The estimated time remaining may fluctuate as
the cycle progresses.
The Drying light will illuminate and remain lit until the cycle is complete.
When your dryer is in the cool-down phase, the Cooling light will illuminate.
When your dryer is in the wrinkle prevent phase, the Wrinkle Prevent light will
illuminate.
When the cycle is complete, “End” will appear in the display panel until the
dryer door is opened or the Power button is pushed.
If your dryer is paused during a cycle, the indicator lights will blink until the
Start/ Pause button is pressed.
Dry Level
Selection Button
To select the dry level in the Normal, Heavy Duty, or other Sensor Dry cycles,
press the Dry Level button. An indicator light will illuminate next to the desired
dryness level.
Press the button repeatedly to scroll through the settings. Larger or bulkier
loads may require the Very Dry or More Dry setting for complete dryness.
The Less Dry setting is best suited for lightweight fabrics or for leaving some
moisture in the clothing at the end of the cycle. Damp Dry is designed to
partially dry items. Use for items that lay flat or hang to dry.
4
Temp Selection
Button
To select the correct temperature for the load, press the Temp button. An
indicator light will illuminate next to the desired temperature. Press the button
repeatedly to scroll through the settings.
High – For sturdy cottons or those labeled Tumble Dry.
Medium – For permanent press, synthetics, lightweight cottons, or items
labeled Tumble Dry Medium.
Med Low – For lower heat than Medium to dry synthetic or washable knit
fabrics.
Low – For heat sensitive items labeled Tumble Dry Low or Tumble Dry Warm.
Extra Low – Provides the lowest heated dry temperature possible.
5
Time Selection
Button
When using Manual Dry cycles, you can adjust the drying time by pressing the
Time selection button.
During the Sensor Dry cycle, the time light indicator is off because exact
drying times are determined by fluctuating humidity levels.
2
3
30_ Operating instructions, tips
DV455-02836F-02_EN_20120625.indd Sec3:30
2012-06-25
5:21:07
When the cycle is complete, a chime will sound.
If you selected the Wrinkle Prevent option, the chime will sound intermittently.
Adjust the volume of the chime or turn it off by pressing the Signal button.
Press the button repeatedly to scroll through the choices.
7
Delay Start
Button
Any cycle can be delayed for up to 24 hours in one-hour increments.
Displayed hour indicates the time at which the cycle will be started. (Refer to
the “Delay Start” section on page 32.)
8
Select Cycle
Option
Adjust Time – Time can be added or subtracted from the automatically set
times in the Manual Dry cycles (Time Dry, Quick Dry, or Air Fluff cycles) and
Wrinkle Away cycle.
To add or subtract time from the cycle, press the Adjust Time arrow pad up or
down until the desired time is displayed.
Wrinkle Prevent -Wrinkle Prevent provides approximately 180 minutes
of intermittent tumbling in unheated air at the end of the cycle to reduce
wrinkling. Press the Wrinkle Prevent button to activate this feature.
The indicator light above the pad will illuminate when Wrinkle Prevent is
selected.
The load is dry, and can be removed at any time during the Wrinkle Prevent
cycle.
My Cycle – Choose your favorite cycle including cycle, temp, dry level option,
etc. (Refer to the “My cycle” section on page 33.)
Rack Dry – Rack Dry is available in the Time Dry cycle. Temperature will be
set to Extra Low only. (Refer to the “Rack Dry” section on page 34.)
Mixed Load Bell - This is an alarm that notifies you when the average dry
level is damp dry (80% dried). This is useful when the laundry contains various
types of clothing you do not want to dry completely. An alarm sounds for 5
seconds. Note that the dryer will continue to run unless you pause or stop it.
This function can only be selected in the Sensor Dry course, and the dry level
can only be selected from among Normal Dry, More Dry, and Very Dry.
9
Start/Pause
selection button
Press to pause and restart programs.
10
Power button
Press once to turn your dryer on. Press again to turn it off. If your dryer is left
on for more than 10 minutes without any buttons being touched, the power
automatically turns off.
02 OPERATING INSTRUCTIONS, TIPS
6
Signal Selection
Button
Operating instructions, tips _31
DV455-02836F-02_EN_20120625.indd Sec3:31
2012-06-25
5:21:07
Operating instructions, tips
Child lock
Prevents children from playing with your dryer.
Setting/Releasing
To turn Child Lock on or off, press both the Temp. and Time buttons simultaneously for 3
seconds.
Child Lock Details
1. You can turn Child Lock on while your dryer is running.
2. Once you set the Child Lock function, no button, except for the Power button, will respond
until you turn off the Child Lock function.
3. The “Child Lock ” indicator will be lit.
• If the dryer is powered on again, the Child Lock function stays on.
• To turn off Child Lock, follow the instructions above.
When other buttons, except for the Power button, do not respond, check the Child Lock
indicator. If Child Lock is on, follow the instructions above to turn Child Lock off.
Delay Start
You can set the dryer to start your course automatically at a later time by choosing a delay time.
The hour displayed indicates the time at which the course will be started.
1. Set your drying course.
2. Press the Delay Start button repeatedly until the delay time is set.
3. Press the Start/Pause button. The “Delay Start
” indicator will be lit, and the clock will
begin counting down until it reaches the set time.
4. To cancel a Delay Start function, press the Power button and then turn the dryer on again.
Drum Light
Lights the dryer drum while the dryer is running.
Turning On and Off
To turn on or turn off the Drum Light, press both the Dry Level and Temp. buttons
simultaneously.
You can turn the Drum Light on and off while your dryer is running and when it is stopped.
If you do not turn the Drum Light off 5 minutes after turning it on, the Drum Light is
automatically turned off.
32_ Operating instructions, tips
DV455-02836F-02_EN_20120625.indd Sec3:32
2012-06-25
5:21:07
My cycle
Each cycle has certain default options that are automatically set. To see these default
options, go to page 37.
4. Push the Start/Pause button. The cycle starts.
5. As the dryer moves through the cycle, it memorizes the cycle and the options.
6. To run this cycle again at a later time, press the My Cycle button. The dryer automatically
selects the saved cycle and options.
You can change the My Cycle settings by repeating the process above.
The dryer will use these settings the next time you choose My Cycle.
Smart Care
02 OPERATING INSTRUCTIONS, TIPS
Lets you select, save, and then activate a customized cycle that includes Dry Level , Temp, Time
option, etc. at a later time.
To use My Cycle, follow these steps:
1. Push the My Cycle button. The My Cycle indicator lights.
2. Select the cycle you want to include using the Cycle Selector Dial.
3. Select and set the options (Dry Level, Temp, Time, etc.)
This function enables you to check the status of the dryer using a smartphone.
1. Press and hold the Time and Delay Start buttons for 3
seconds when an error occurs or if you haven’t pressed
any buttons on the dryer after you turned the power on.
2. When the Smart Care function is activated, the LED on the
window display rotates for 2 or 3 seconds and then the
error code will appear in the display panel.
3. Run the Smart Care app on your smart phone.
The Smart Care function is optimized with Galaxy S,
Galaxy S2, iPhone 4 and iPhone 4S.
4. If the smart phone’s camera is focused on the display panel
of the dryer, the panel and error message is automatically
recognized and the error type and countermeasures are
displayed on the smart phone.
5. If the smartphone fails to recognize the error code more
than twice, please enter the error code displayed on the
display panel of the dryer manually into the Smart Care
app.
Downloading the Smart Care app
Download the Samsung Laundry App into your mobile phone from the Android market or
Apple App store. (Search word :Samsung Smart Washer/Dryer)
Precautions when using Smart Care
• If light from a light bulb, fluorescent bulb, or lamp is reflected on the display panel of
the washing machine, the smartphone may not be able to recognize the panel or error
message easily.
• If you hold the smartphone at too large an angle relative to the front of the display panel,
it may not be able to recognize the error code. For best results, hold the smartphone so
that the front of the panel and the smartphone are parallel or nearly parallel.
Operating instructions, tips _33
DV455-02836F-02_EN_20120625.indd Sec3:33
2012-06-25
5:21:07
Operating instructions, tips
RACK DRY
Installing the drying rack
1. Open the dryer door.
2. Position the drying rack in the tumbler,, placing the front lip of the drying rack on the top of
the lint filter.
3. Place the rear legs in the two recessed areas of the dryer’s back wall, and then push down
the middle of the drying rack to fix in place.
4. Place the items to be dried on the rack, leaving space between them so air can circulate.
5. Close the dryer door.
6. Press the Rack Dry button in the Time Dry cycle and then select the time according to the
amount of moisture and the weight of the items. The drying rack can be also used at Air Fluff
cycle.
Drying Rack
Door
SUGGESTED ITEMS
SUGGESTED TEMP. SETTINGS
Washable sweaters
(block to shape and lay flat on rack)
Extra Low ( Time Dry cycle)
Stuffed toys
(cotton or polyester fiberfilled)
Extra Low ( Time Dry cycle)
Stuffed toys
(foam or rubber-filled)
Air Fluff
Foam rubber pillows
Air Fluff
Sneakers
Air Fluff
Drying foam rubber, plastic, or rubber on a heat setting may cause damage to the items
and lead to a fire hazard.
34_ Operating instructions, tips
DV455-02836F-02_EN_20120625.indd Sec3:34
2012-06-25
5:21:08
CLEAN THE LINT FILTER
After each load.
To shorten drying time.
To operate more energy efficiently.
Door
Do not operate your dryer without the lint filter in place.
Frame Front
Filter
LOAD THE DRYER PROPERLY
•
•
•
•
Place only one washload in your dryer at a time.
Mixed loads of heavy and lightweight fabrics will dry differently, which may result in lightweight fabrics
being dry while heavy fabrics remain damp at the end of a drying cycle.
Add one or more similar items to your dryer when only one or two articles of clothing need drying.
This improves the tumbling action and drying efficiency.
Overloading restricts tumbling action, resulting in uneven drying as well as excessive wrinkling of some
fabrics.
02 OPERATING INSTRUCTIONS, TIPS
•
•
•
GETTING STARTED
1.
2.
3.
4.
5.
6.
Load your dryer loosely – DO NOT overload.
Close the door.
Select the appropriate cycle and options for the load.
Press the Start/Pause button.
The dryer indicator light will illuminate.
The estimated cycle time will appear in the display.
The time may fluctuate as humidity levels fluctuate in the dryer.
• When the cycle is complete, “End” will appear in the display.
• Pressing Power cancels the cycle and stops your dryer.
• The Drying, Cooling, and Wrinkle Prevent indicator lights will illuminate during those portions of the
cycle.
Do not place anything on top of your dryer while it is running.
WARNING
Operating instructions, tips _35
DV455-02836F-02_EN_20120625.indd Sec3:35
2012-06-25
5:21:09
Operating instructions, tips
VENT SENSOR
Your Samsung dryer is equipped with a Vent Sensor, which detects and notifies you when it is time to clean
the ductwork. Keep your dryer safe and efficient by cleaning the ducts when prompted.
The Vent Sensor detects any duct blockages
You can figure out whether there is a duct blockage from the “Vent Sensor
digital display.
Level
Message
Status
” lamp of the
Solution
0
The “Vent Sensor
lamp is turned off.
”
The ductwork is free from
blockages.
-
1
The “Vent Sensor
lamp illuminates.
”
When a part of the duct
or the lint filter is blocked
by lint or a foreign object.
When the resistance is
high because the duct is
too long or bent.
Check the duct
connection and shorten
the duct and straighten it
if necessary.
Check the lint filter or
the duct and clean it if
necessary.
2
The “Vent Sensor
lamp blinks.
”
When the duct is blocked
by lint or a foreign object.
When the resistance is
very high because the
duct is too long or bent
excessively.
Check the duct
connection and shorten
the duct and straighten it
if necessary.
Check the lint filter or the
duct and clean it as soon
as possible.
In the LEVEL 2 state, this lamp blinks for 3 hours after the completion of the cycle. (If the wrinkle
prevention function is activated, this message is displayed for up to 3 hours.)
If the power button is pressed or the door is opened, the power is immediately turned off.
For more information about the duct installation, please refer to the “Ducting requirements”
section on page 13.
• Although the dryer is available even if the blockage message is displayed, the drying time
may be extended.
• If the LEVEL 1 message is displayed the first time the dryer is run after the installation,
check the connection and clean the duct. If the LEVEL 1 message appears even
after you have checked and cleaned the ducts, this may indicate that there are some
restrictions of the duct due to the length, condition, etc.
If this occurs, you can use the dryer normally and no countermeasures need to be taken.
However, the drying time may be extended or the drying performance may be degraded.
36_ Operating instructions, tips
DV455-02836F-02_EN_20120625.indd Sec3:36
2012-06-25
5:21:09
SETTING UP SMART CONTROL AND SMART MONITORING
Connect a wired/wireless router or modem and the dryer through a wireless connection, connect to www.
samsungsmartappliance.com and then register the dryer with the Smart Control, the Smart Monitoring
service.
Any actions on your dryer will turn off the Smart Control Function.(Opening Door, Tapping the LCD
panel, Pushing Buttons, Etc...)
This product does not contain a wireless router.
Configuring wireless router/modem
•
•
•
•
•
This product supports DHCP (Dynamic Host Configuration Protocol). If you wants to use
an existing wireless router/modem, you must turn on the router/modem’s DHCP server or
function.
Set the channel for the connection with the wireless router/modem to a channel that is not
being used.
The dryer supports the WEP, TKIP or TKIP AES encryption types only. Other Wi-Fi encryption
types are not supported.
The quality of the wireless network may be affected by the surrounding environment.
If your Internet service provider has registered and fixed the MAC address (the unique
identification number of a device) of your PC or modem, you may not be able to connect
the dryer to the Internet. Please ask your Internet service provider about the procedures to
connect a device (e.g. dryer) other than a computer to the Internet. If your Internet service
provider requires an ID and password to connect to the Internet, you may not be able to
connect the dryer to the Internet. In this case, you have to enter the ID and password to
connect to the Internet.
You may not be able to connect to the Internet due to a firewall. In this case, ask your
Internet service provider for assistance.If you cannot connect the dryer to the Internet even
after contacting your Internet service provider, please contact a Samsung Electronics dealer
or service center.
02 OPERATING INSTRUCTIONS, TIPS
The Smart Control function of the electronic model contains the Smart Monitoring function of gas
model,
Check before installation
•
•
•
•
For the procedures to install a normal wired/wireless sharer,
refer to the user manual of the corresponding wireless
router/modem.
Samsung dryers only support Wi-Fi 2.4Ghz.
Samsung dryers support IEEE 802.11 b/g/n and Wi-Fi
Direct (IEEE802.11n is recommended).
If the wireless router/modem is not Wi-Fi certified, it cannot
be connected to the dryer.
Operating instructions, tips _37
DV455-02836F-02_EN_20120625.indd Sec3:37
2012-06-25
5:21:09
Operating instructions, tips
Connecting to the network using the WPS setting
Your Samsung dryer uses Wi-Fi Protected Setup/Push Button Configuration WPS(PBC) as
the primary method of connecting to a wireless router or modem. If your router or modem is
WPS compliant and has a WPS button, you can easily connect your washer to your router/
modem.
1. Press and hold both the Temp. and Start/Pause buttons
for 3 seconds.
2. Turn the Cycle Selector until “UP” is displayed on the
display panel, and then press the Start/Pause button.
If the connection is not established within 5 minutes,
“FUP” is displayed on the display panel.
3. Press and hold the WPS button on the wireless router/
modem within 120 seconds to run the WPS function.
If the WPS function runs, the wireless router/modem
automatically fetches the necessary information from the
dryer and the dryer is automatically connected to the
Internet through the wired/wireless router/modem.
•
•
•
CAUTION
•
The way the WPS function runs on your wireless router/modem may differ
depending on the manufacturer. Refer to the user manual of your router/modem for
details.
Even after the WPS setup is complete, it may take some time until the actual
connection is established and an IP address is allocated through through DHCP (up
to 5 minutes).
Note that if you use a wireless router/modem that is not WPS-certified, the dryer
may not be connected through Wi-Fi or another device that was connected to the
wireless router/modem may be disconnected.
Please note that for some wireless router/modem, if you press and hold the WPS
button for some time, the settings of the router/modem may be reset.
4. If the dryer and the wireless router/modem are properly
connected, the
indicator blinks on the display panel for
30 seconds.
5. Press and hold the Signal On/Off button for 3 seconds
to finish the Smart Control connection setup. When the
setup is completed normally, the
indicator blinks on the
display panel accompanied by a beeping sound.
If you press and hold the Signal On/Off button for 3
seconds when the dryer and the wired/wireless sharer
are not properly connected, the invalid button sound
is heard and the Smart Control connection setup is
not completed.
38_ Operating instructions, tips
DV455-02836F-02_EN_20120625.indd Sec3:38
2012-06-25
5:21:09
Connecting to the network using the Samsung Laundry App
02 OPERATING INSTRUCTIONS, TIPS
1. Press and hold both the Temp. and Start/Pause buttons
for 3 seconds.
2. If “AP” is displayed on the display panel, press the
Start/Pause button.
If the connection is not established within 5 minutes,
“FAP” is displayed on the display panel.
Operating instructions, tips _39
DV455-02836F-02_EN_20120625.indd Sec3:39
2012-06-25
5:21:13
Operating instructions, tips
USING THE MOBILE APP (ANDROID)
Downloading the phone application
1. Touch and bring up the applications menu on your phone. Then find
and open the “Play Store” icon.
2. Once the “Play Store” has been open, do a search.
3. Once the search box appears type in
“Samsung Smart Washer”.
40_ Operating instructions, tips
DV455-02836F-02_EN_20120625.indd Sec3:40
2012-06-25
5:21:14
4. Once the search is complete the App
“SAMSUNG Smart Washer/Dryer” will be
displayed. You need to download this App to
your phone.
02 OPERATING INSTRUCTIONS, TIPS
Make sure the app changes from “Free” to
“Installed”
5. Once the phone app has been downloaded to your phone, you are
now ready to set up the washer Wi-Fi control.
STEP 1
Figure 1
Figure 2
You need to first press the
power button to activate
the your machine. You can
activate the machine to any
wash cycle. (See figures
1~2)
Figure 4
After you activate the
machine, press the Temp
& Start/Pause buttons
simultaneously for
5 seconds. After 5 seconds
the “AP” menu appears on
the LED screen. (See figures
3~4)
STEP 2
Figure 3
Operating instructions, tips _41
DV455-02836F-02_EN_20120625.indd Sec3:41
2012-06-25
5:21:14
Operating instructions, tips
STEP 3
After the AP menu appears on the LED screen, wait approximately
1 minute and press the Start/Pause button. Once the Start/Pause
button is pressed the “AP” displayed on the LED screen should
start to blink.
It will take a minute or so for the Wi-Fi module to get ready. So if
the you press the Start/Pause and the “AP” doesn’t blink try again
after a moment. (See figure 5)
Figure 5
STEP 4
Figure 6
Figure 7
Once the “AP” is blinking go to your mobile
phone and press the “Settings” icon. Once the
settings menu appears press the wireless and
network section. (See figures 5~7)
STEP 5
Figure 8
Figure 9
After selecting the wireless and network select
Wi-Fi setting. Then turn on the Wi-Fi. (See
figures 8~9)
42_ Operating instructions, tips
DV455-02836F-02_EN_20120625.indd Sec3:42
2012-06-25
5:21:14
STEP 6
Once the list of available networks appears,
select the network to be used and enter the
password if necessary.
The latest App version is 1.1.5
Once you are connected to the selected
network go back to the applications screen on
your mobile phone. Once you are in the phones
application screen touch the Samsung icon
“SAMSUNG Smart Washer/Dryer” that was
downloaded at the beginning of this process.
02 OPERATING INSTRUCTIONS, TIPS
STEP 7
STEP 8
After opening the Samsung app, select “Front
Load” and then “Connection Setup”.
Operating instructions, tips _43
DV455-02836F-02_EN_20120625.indd Sec3:43
2012-06-25
5:21:15
Operating instructions, tips
STEP 9
Once the mobile app is open select the “Setting
Start” key.
The Wi-Fi indicator will blink on &
off on the phone several times.
STEP 10
Once the unit starts connecting the phone will
load the AP list. When the AP list is loaded you
need to select the network.
Please make sure the app and smart
phone are connected to the same
network/wireless AP.
STEP 11
After selecting the network you need to enter
your password. Once you enter your password
select “Connect”. The unit start setting up the
network. This process delivers the connection
information of the “AP” that is connected to the
mobile phone to the product.
44_ Operating instructions, tips
DV455-02836F-02_EN_20120625.indd Sec3:44
2012-06-25
5:21:15
STEP 12
STEP 13
After the phone is connected
to the machine, press
the Temp & Start/Pause
buttons simultaneously for
5 seconds. After 5 seconds
the original wash cycle will
be displayed on the LED
screen.
02 OPERATING INSTRUCTIONS, TIPS
When the network is setup the unit will display
“Transfer complete”. After the transfer is
completed select “Confirm”. The unit will then
display “oAP”. The phone is now connected to
the machine through the network.
STEP 14
After the wash cycle
has been displayed wait
approximately 1 minute. You
will then see the Wi-Fi icon
start to blink.
STEP 15
Once the Wi-Fi icon is
displayed press and hold the
“Signal” for 3 seconds. The
Wi-Fi icon will stop blinking.
The machine is now ready to
run the device certification.
Operating instructions, tips _45
DV455-02836F-02_EN_20120625.indd Sec3:45
2012-06-25
5:21:15
Operating instructions, tips
Device certification
1. The “Device Certification” only needs to be
run with the initial setup. Touch the “Indoor
Control” tab to search for the washer’s name.
Once the washer ‘s name is displayed touch
tab.
Figure 1
Figure 2
2. Verify the that the Wi-Fi icon is not blinking. Press the Temp & Start/
Pause buttons simultaneously for 5 seconds. “AP” will now be
displayed.
Figure 3
3. Once the “AP” is displayed you need to turn the knob counter
clockwise until “PS” is displayed. After the “PS” is displayed press the
Start/Pause button.
Figure 4
46_ Operating instructions, tips
DV455-02836F-02_EN_20120625.indd Sec3:46
2012-06-25
5:21:16
Figure 5
5. After you touch the confirm tab you will now start preparing the
certification.
Figure 6
6. Follow the instructions displayed on the phone to start the washer
setup.
Figure 7
02 OPERATING INSTRUCTIONS, TIPS
4. After you the touch the washer name tab you need to touch the
confirm tab to proceed with the certification.
Operating instructions, tips _47
DV455-02836F-02_EN_20120625.indd Sec3:47
2012-06-25
5:21:17
Operating instructions, tips
7. Once the Start/Pause button is pressed the “PS” will start to blink.
Once it starts blinking the phone will automatically start to connect.
Figure 8
8. The washer name will be displayed once again. You need to press this
tab to display the “PS”.
Figure 9
9. After you touch the washer name tab, “PS” will be displayed.
Figure 10
10. After the “AP” is displayed, press the Temp & Start/Pause buttons
simultaneously for 3 seconds. Now press and hold the Signal button
to stop the Wi-Fi icon from blinking.
Figure 11
Once the Wi-Fi connection is established, begin at figure #8 to
reconnect to the same network/wireless AP.
48_ Operating instructions, tips
DV455-02836F-02_EN_20120625.indd Sec3:48
2012-06-25
5:21:17
Figure 12
12. The washer is now connected. Touch the “Start New Wash” tab and
you can now control the washer from your phone.
Figure 13
13. The Device Certification is now completed and the washer is
connected to your Smartphone.
Figure 14
02 OPERATING INSTRUCTIONS, TIPS
11. Press the washer name tab to connect to the washer.
Operating instructions, tips _49
DV455-02836F-02_EN_20120625.indd Sec3:49
2012-06-25
5:21:17
Operating instructions, tips
Using the mobile app
STEP 1
Check to make sure the Wi-Fi icon is not blinking. If the icon
is blinking press and hold the Signal button until the icon
stops blinking. Once the door lock icon is activated the unit
is ready. Now press the “SAMSUNG Smart Washer/Dryer”
icon.
STEP 2
After you touch the “SAMSUNG
Smart Washer/Dryer” icon the will
search for the washer. Once the
phone connects the washer, the
washer ‘s name, or “MAC” will
appear. Now touch the washer
name.
STEP 3
Once the connection is established , touch the “Start New
Wash” tab. The unit should display the “Choose Cycle”
screen. Once Choose Cycle screen is displayed touch the
“Start” tab at the bottom left.
50_ Operating instructions, tips
DV455-02836F-02_EN_20120625.indd Sec3:50
2012-06-25
5:21:17
STEP 4
02 OPERATING INSTRUCTIONS, TIPS
Now touch the “Start” button and
activate the wash cycle. You can
monitor the wash cycle to check the
status of the cycle. Once the cycle is
finished the phone will display “Cycle
Complete”.
Operating instructions, tips _51
DV455-02836F-02_EN_20120625.indd Sec3:51
2012-06-25
5:21:18
Operating instructions, tips
USING THE MOBILE APP (IOS)
Downloading the phone application
1. Find and open the “App Store” icon.
2. Once the “App Store” has been open, do a search.
3. Once the search box appears type in
“Samsung Smart Washer”.
52_ Operating instructions, tips
DV455-02836F-02_EN_20120625.indd Sec3:52
2012-06-25
5:21:18
4. Once the search is complete the App
“SAMSUNG Smart Washer/Dryer” will be
displayed. You need to download this App to
your phone.
02 OPERATING INSTRUCTIONS, TIPS
Make sure the app changes from “Free” to
“Installed”
5. Once the phone app has been downloaded to your phone, you
are now ready to set up the washer Wi-Fi control.
STEP 1
Figure 1
Figure 2
You need to first press the
power button to activate
the your machine. You can
activate the machine to any
wash cycle. (See figures
1~2)
Figure 4
After you activate the
machine, press the Temp
& Start/Pause buttons
simultaneously for
5 seconds. After 5 seconds
the “AP” menu appears on
the LED screen. (See figures
3~4)
STEP 2
Figure 3
Operating instructions, tips _53
DV455-02836F-02_EN_20120625.indd Sec3:53
2012-06-25
5:21:18
Operating instructions, tips
STEP 3
After the AP menu appears on the LED screen, wait approximately
1 minute and press the Start/Pause button. Once the Start/Pause
button is pressed the “AP” displayed on the LED screen should
start to blink.
It will take a minute or so for the Wi-Fi module to get ready. So if
the you press the Start/Pause and the “AP” doesn’t blink try again
after a moment. (See figure 5)
Figure 5
STEP 4
Figure 6
Figure 7
Once the “AP” is blinking go to your mobile phone
and press the “Settings” icon. Once the settings menu
appears press the Wi-Fi icon. (See figures 5~7)
Figure 9
You can see “SMARTWASHER” in the Wi-Fi
list. Select the SMARTWASHER and input the
password(WASHER2012).
You have to input as Capital.
After typing the password, select the join button. (See
figures 8~9)
STEP 5
Figure 8
STEP 6
Once you are connected to the selected network go
back to the applications screen on your mobile phone.
Once you are in the phones application screen touch
the Samsung icon “SAMSUNG Smart Washer/Dryer”
that was downloaded at the beginning of this process.
54_ Operating instructions, tips
DV455-02836F-02_EN_20120625.indd Sec3:54
2012-06-25
5:21:19
STEP 7
After opening the Samsung app, select “Front Load”
and then “Connection Setup”.
Tap the “Setting Start” and input
your SSID, Authentication Type,
Encryption Type, password of AP.
This process delivers the
connection information of the “AP”
that is connected to the mobile
phone to the product.
02 OPERATING INSTRUCTIONS, TIPS
STEP 8
Check the security option of
the router and then set the
wireless network configuration
again as below.
-
-
select the Security mode :
WPA and Encryption:TKIP
select the Security
mode : WPA2 and
Encryption:AES
refer to wireless router
manual for the security
option of the wireless
router.
STEP 9
When the network
is setup the unit will
display “Transfer
complete”. After the
transfer is completed
select “Confirm”. The
unit will then display
“oAP”. The phone is
now connected to
the machine through
the network.
Operating instructions, tips _55
DV455-02836F-02_EN_20120625.indd Sec3:55
2012-06-25
5:21:19
Operating instructions, tips
STEP 10
After the phone is connected
to the machine, press
the Temp & Start/Pause
buttons simultaneously for
5 seconds. After 5 seconds
the original wash cycle will
be displayed on the LED
screen.
STEP 11
After the wash cycle
has been displayed wait
approximately 1 minute. You
will then see the Wi-Fi icon
start to blink.
STEP 12
Once the Wi-Fi icon is
displayed press and hold the
“Signal” for 3 seconds. The
Wi-Fi icon will stop blinking.
The machine is now ready to
run the device certification.
56_ Operating instructions, tips
DV455-02836F-02_EN_20120625.indd Sec3:56
2012-06-25
5:21:20
Device certification
Figure 1
Figure 2
2. Verify the that the Wi-Fi icon is not blinking. Press the Temp & Start/
Pause buttons simultaneously for 5 seconds. “AP” will now be
displayed.
Figure 3
3. Once the “AP” is displayed you need to turn the knob counter
clockwise until “PS” is displayed. After the “PS” is displayed press the
Start/Pause button.
Figure 4
4. After you the touch the washer name tab you need to touch the
confirm tab to proceed with the certification.
Figure 5
02 OPERATING INSTRUCTIONS, TIPS
1. The “Device Certification” only needs to be
run with the initial setup. Touch the “Indoor
Control” tab to search for the washer’s name.
Once the washer ‘s name is displayed touch
tab.
Operating instructions, tips _57
DV455-02836F-02_EN_20120625.indd Sec3:57
2012-06-25
5:21:21
Operating instructions, tips
5. After you touch the confirm tab you will now start preparing the
certification.
Figure 6
6. Follow the instructions displayed on the phone to start the washer
setup.
Figure 7
7. Once the Start/Pause button is pressed the “PS” will start to blink.
Once it starts blinking the phone will automatically start to connect.
Figure 8
8. The washer name will be displayed once again. You need to press this
tab to display the “PS”.
Figure 9
58_ Operating instructions, tips
DV455-02836F-02_EN_20120625.indd Sec3:58
2012-06-25
5:21:22
Figure 10
10. After the “AP” is displayed, press the Temp & Start/Pause buttons
simultaneously for 3 seconds. Now press and hold the Signal button
to stop the Wi-Fi icon from blinking.
Figure 11
02 OPERATING INSTRUCTIONS, TIPS
9. After you touch the washer name tab, “PS” will be displayed.
Once the Wi-Fi connection is established, begin at figure #8 to
reconnect to the same network/wireless AP.
11. Press the washer name tab to connect to the washer.
Figure 12
12. The washer is now connected. Touch the “Start New Wash” tab and
you can now control the washer from your phone.
Figure 13
Operating instructions, tips _59
DV455-02836F-02_EN_20120625.indd Sec3:59
2012-06-25
5:21:22
Operating instructions, tips
13. The Device Certification is now completed and the washer is
connected to your Smartphone.
Figure 14
Using the mobile app
STEP 1
Check to make sure the Wi-Fi icon is not blinking. If the icon
is blinking press and hold the Signal button until the icon
stops blinking. Once the door lock icon is activated the unit
is ready. Now press the “SAMSUNG Smart Washer/Dryer”
icon.
STEP 2
After you touch the “SAMSUNG
Smart Washer/Dryer” icon the will
search for the washer. Once the
phone connects the washer, the
washer ‘s name, or “MAC” will
appear. Now touch the washer
name.
60_ Operating instructions, tips
DV455-02836F-02_EN_20120625.indd Sec3:60
2012-06-25
5:21:23
STEP 3
STEP 4
Now touch the “Start” button and
activate the wash cycle. You can
monitor the wash cycle to check the
status of the cycle. Once the cycle is
finished the phone will display “Cycle
Complete”.
02 OPERATING INSTRUCTIONS, TIPS
Once the connection is established , touch the “Start New
Wash” tab. The unit should display the “Choose Cycle”
screen. Once Choose Cycle screen is displayed touch the
“Start” tab.
Operating instructions, tips _61
DV455-02836F-02_EN_20120625.indd Sec3:61
2012-06-25
5:21:23
Operating instructions, tips
REGISTERING YOUR DRYER
1. Access Samsung Smart appliance
website.
(http://www.samsungsmartappliance.com)
2. Enter your User ID and Password to log in.
If you don’t have an account, press
“Create a Samsung account” and
fill in the form to become a member.
3. Select “My page” “My page”.
4. Select “Add device”.
5. Find the MAC number on your dryer and
enter it into the device page.
On your dryer:
1) Press and hold both the Temp., and
Start/Pause buttons for 3 seconds.
2) Turn the Cycle Selector until “Ad” is
displayed on the display panel and
press the Start/Pause button. The
MAC address appears.
3) Find out 12 Hexadecimal Address,
pressing Start/Pause buttons for 2
digit & text.
6. Click “Certify device”.
62_ Operating instructions, tips
DV455-02836F-02_EN_20120625.indd Sec3:62
2012-06-25
5:21:24
02 OPERATING INSTRUCTIONS, TIPS
7. Press and hold both the Temp., and
Start/Pause buttons for 3 seconds.
8. Turn the Cycle Selector until PS is
displayed on the display panel, and then
the Start/Pause button.
9. When certify device checking window
appears, click “Ok”.
If the dryer you are registering is
already registered by other users,
a window will come on asking
whether you want to delete the usage
authority of the existing users or not.
10. After the registration of the dryer is
completed, you can view the registered
dryer on the device information list.
Mac Address : Mapping Table of 7-Segment
0
1
2
3
4
5
A
B
C
D
E
F
Mac Label
6
7
8
9
90A4DE89B2D3
Mac Address Example
7-Segment
Operating instructions, tips _63
DV455-02836F-02_EN_20120625.indd Sec3:63
2012-06-25
5:21:24
Care and Cleaning
CONTROL PANEL
Clean with a soft, damp cloth. Do not use abrasive substances.
Do not spray cleaners directly on the panel.
The control panel finish may be damaged by some laundry pre-treatment soil and stain remover products.
Apply such products away from your dryer and wipe up any spills or overspray immediately.
TUMBLER
Remove any stains caused by crayon, ink, or fabric dye (from new items such as towels or jeans) with an
all-purpose cleaner.
Tumble old towels or rags to remove any remaining stain or cleaning substance.
Once these steps are followed, stains may still be visible, but should not transfer to subsequent loads.
STAINLESS STEEL TUMBLER
To clean the stainless steel tumbler, use a damp cloth with a mild, non-abrasive cleaner suitable for stainless
steel surfaces.
Remove the cleaner residue and dry with a clean cloth.
DRYER EXTERIOR
Clean with a soft, damp cloth. Do not use abrasive substances.
Protect the surface from sharp objects.
Do not place any heavy or sharp objects or a detergent box on the dryer. Keep them on the purchased
pedestal or in a separate storage box. This may scratch or damage the top cover of the dryer.
Since the entire dryer has a high-gloss finish, the surface can be scratched or damaged.
Avoid scratching or damaging the surface when using the dryer.
DRYER EXHAUST SYSTEM
Should be inspected and cleaned yearly to maintain optimum performance.
The outside exhaust hood should be cleaned more frequently to ensure proper operation.
64_ Care and Cleaning
DV455-02836F-02_EN_20120625.indd Sec5:64
2012-06-25
5:21:25
Special laundry tips
SPECIAL LAUNDRY TIPS
Please follow the care label or manufacturer’s instructions for drying special items. If care label instructions
are not available, use the following information as a guide.
•
•
•
Follow the care label instructions or dry on the Bedding Plus.
Make sure the item is thoroughly dry before using or storing.
May require repositioning to ensure even drying.
Blankets
•
Use Normal cycle and dry only one blanket at a time for best
tumbling action.
Make sure the item is thoroughly dry before using or storing.
•
Curtains & Draperies
•
•
Use the Perm Press cycle and Low or Extra Low temperature to help
minimize wrinkling.
Dry these in small loads for best results and remove as soon as
possible.
Cloth Diapers
•
Use the Normal cycle and the High temperature settings for soft,fluffy
diapers.
Down–filled Items (jackets,
sleeping bags, comforters,
etc.)
•
•
Use the Normal cycle and the Low or Extra Low temperature setting.
Adding a couple of dry towels shortens drying time and absorbs
moisture.
Foam Rubber (rug backs,
stuffed toys, shoulder pads,
etc.)
•
•
DO NOT dry on a heat setting. Use the Air Fluff cycle (no heat).
WARNING – Drying a rubber item with heat may damage it or be a
fire hazard.
Pillows
•
•
Use the Normal cycle.
Add a couple of dry towels and a pair of clean sneakers to help the
tumbling action and to fluff the item.
DO NOT dry kapok or foam pillows in dryer. Use the Air Fluff cycle.
Plastics (shower curtains,
outdoor furniture covers,
etc.)
•
•
04 SPECIAL LAUNDRY TIPS
Bedspreads & Comforters
Use the Air Fluff cycle or the Time Dry cycle and the Low or Extra
Low temperature settings depending on the care label instructions.
THINGS TO AVOID PUTTING IN THE DRYER:
• Fiberglass items (curtains, draperies, etc.).
• Woolens, unless recommended on the label.
• Vegetable or cooking oil-soaked items.
Special laundry tips _65
DV455-02836F-02_EN_20120625.indd Sec4:65
2012-06-25
5:21:25
Troubleshooting
CHECK THESE POINTS IF YOUR DRYER…
PROBLEM
SOLUTION
Doesn’t run.
•
•
•
•
Make sure the door is latched shut.
Be sure the power cord is plugged into a live electrical outlet.
Check the home’s circuit breaker and fuses.
Press the Start/Pause button again if the door is opened during the
cycle.
Doesn’t heat.
•
•
•
•
•
Check the home’s circuit breaker and fuses.
Select a heat setting other than Air Fluff.
On a gas dryer, check that the gas supply is on.
Clean the lint filter and exhaust duct.
Dryer may have moved into the cool-down phase of the cycle.
Doesn’t dry.
•
•
Check all of the above, plus...
Be sure the exhaust hood outside the home can open and close
freely.
Check exhaust system for lint buildup. Ducting should be inspected
and cleaned annually.
Use a 4” rigid metal exhaust duct.
Do not overload. 1 wash load = 1 dryer load.
Sort heavy items from lightweight items.
Large, bulky items like blankets or comforters may require
repositioning to ensure even drying.
Check that the dryer is draining properly to extract adequate water
from the load.
Load may be too small to tumble properly. Add a few towels.
•
•
•
•
•
•
•
Is noisy.
•
•
•
•
Dries unevenly.
•
•
Has an odor.
•
•
Check the load for objects such as coins, loose buttons, nails, etc.
Remove promptly.
It is normal to hear the dryer gas valve or heating element cycle on
and off during the drying cycle.
Be sure the dryer is leveled properly as outlined in the installation
instruction.
It is normal for the dryer to hum due to the high velocity of air moving
through the dryer drum and exhaust system.
Seams, pockets, and other similarly heavy areas may not be
completely dry when the rest of the load has reached the selected
dryness level. This is normal. Select the Very Dry setting if desired.
If one heavy item is dried with a lightweight load, such as one towel
with sheets, it is possible that the heavy item will not be completely
dry when the rest of the load has reached the selected dryness level.
Sort heavy items from lightweight items for best drying results.
Household odors from painting, varnishing, strong cleaners, etc.
may enter the dryer with the surrounding room air. This is normal as
the dryer draws the air from the room, heats it, pulls it through the
tumbler, and exhausts it outside.
When these odors linger in the air, ventilate the room completely
before using the dryer.
66_ Troubleshooting
DV455-02836F-02_EN_20120625.indd Sec6:66
2012-06-25
5:21:25
PROBLEM
SOLUTION
Shuts off before load is dry
•
•
•
•
•
•
Make sure the lint filter is cleaned before every load. With some loads
that produce high amounts of lint, it may be necessary to clean the
filter during the cycle.
Some fabrics are lint producers (for example, a fuzzy white cotton
towel) and they should be dried separately from clothes that are lint
trappers (for example, a pair of lack linen pants)
Divide larger loads into smaller loads for drying
Check pockets thoroughly before washing and drying clothes.
Garments still wrinkled after •
Wrinkle-Care
•
Small loads of 1 to 4 items work best.
Load fewer garments.Load similar-type garments.
Odors remain in clothing
after Refresh.
•
Fabrics containing strong odors should be washed in a normal cycle.
Water drips from nozzle
when Steam-Care starts
•
This is steam condensation. The dripping water will stop after a short
time.
Sprayed water is not visible
during Steam-Care
•
Sprayed water is difficult to see when the door is closed
05 TROUBLESHOOTING
Lint on clothes
Dryer load is too small. Add more items or a few towels and restart
the cycle.
Dryer load is too large. Remove some items and restart the dryer.
Troubleshooting _67
DV455-02836F-02_EN_20120625.indd Sec6:67
2012-06-25
5:21:25
Troubleshooting
INFORMATION CODES
Information codes may be displayed to help you better understand what is occurring with your Dryer.
ERROR DISPLAY
MEANING
SOLUTION
tE
The thermistor resistance is very
low or high.
Clean the screen or vent.
If the problem continues, call for service.
tE3
The resistance of the thermistor
for the vent blockage detection is
very low or very high.
Clean the screen or vent
If the problem continues, call for service.
HE
Invalid heating Temp when the
dryer is running.
Call for service.
dE
Running the dryer with door open
Clean the door and then restart.
If the problem continues, call for service.
bE2
Invalid state of key. Circuit short
for 30 secs.
Make sure a button is NOT being pressed
continuously. Try restarting the cycle.
If the problem continue, call for service.
FE
Invalid power source frequency
Try restarting the cycle.
If the problem continues, call for service.
2E
Electronic Control Problem
(Over Voltage Error)
Call for service.
AE
Electronic Control Problem
(Communication Error)
Call for service.
Et
Invalid state of Eeprom
communication
Call for service.
AE4
A communication error between
the Wi-Fi PBA and the MAIN PBA
Call customer service.
AE3
A A communication error between
the DR Modem and the MAIN
PBA
Call customer service.
AE5
A A communication error between
the LCD PBA and the MAIN PBA
Call customer service.
Invalid door state for more than
256 milliseconds.
Call for service.
dF
For any codes not listed above, call 1-800-SAMSUNG (726-7864)
68_ Troubleshooting
DV455-02836F-02_EN_20120625.indd Sec6:68
2012-06-25
5:21:25
NETWORK SETUP Q&A
ANSWER
The washer or dryer is not
found in the smartphone app.
•
•
•
•
•
The washer or dryer can’t find •
the AP (access point).
•
•
•
•
There are more than one
washer or dryer in the house.
Do I have to install an AP for
each of them?
•
•
•
Check the power status of the access point(AP).
Check if the smartphone is connected with Wi-Fi.
Check if the Wi-Fi function of the washer or dryer is turned on.
To refresh the screen, press “Configure” again.
If the AP is installed too far away from the washer or dryer, the
strength of the Wi-Fi signal may be weak. In this case, move the AP
closer to the washer or dryer.
Check the power status of the AP.
Check if the Wi-Fi function of the washer or dryer is turned on.
To refresh the screen, press “Configure” again.
If the AP is installed too far away from the washer or dryer, the
strength of the Wi-Fi signal may be weak. In this case, move the
AP closer to the washer or dryer. Ensure that the number of the
displayed antenna bars is at least 3.
If the strength of the AP is low, the washer or dryer may not find it.
Use a high performance AP if available.
You can install only one AP.
I you want to one AP for each of the washer and dryer, select the
corresponding AP for each of the products in the “Smart Washer”
app.
When both a washer and dryer are installed, they can be controlled
through one AP.
What kind of AP (access poin) •
should I use?
•
•
Since the washer or dryer is controlled through the AP from the inside
or outside of the house, we recommend a high performance AP.
Use an AP with Wi-Fi certification mark.
Since an AP with 2 or more antennas provides better performance,
we recommend purchasing a wireless AP with 2 or more antennas.
How can I check if the AP is
out of order?
Connect to the AP on a smartphone and check if you can connect to
the Internet. If you can connect to the Internet, the AP is normal.
Check if the LEDs on the AP are blinking. If all the LEDs are turned
off, it indicates that the power is turned off.
If the AP doesn’t seem to be working properly, request after-sales
service.
•
•
•
05 TROUBLESHOOTING
QUESTION
I do not have a PC. Can I
use the indoor and outdoor
control features?
•
If the Internet can be accessed inside of the house, the feature is
available. However, you have to sign up on the Samsung web site
and resgister the product.
How many users can control
a washer or dryer?
•
Multiple users can control the washer or dryer only if the “Smart
Washer” app is authenticated,
Troubleshooting _69
DV455-02836F-02_EN_20120625.indd Sec6:69
2012-06-25
5:21:25
Troubleshooting
QUESTION
ANSWER
What should I do to get the
strongest Wi-Fi signal?
•
•
•
•
•
Install the AP near the washer or dryer is recommended. You can
check the signal strength through the setup screen of the washer or
dryer or a smartphone.
Since network performance is seriously affected by a door or steel
wall, install the washer or dryer in an open place. If there is door in
front of the installed product, open the door when using the product.
Do not place an object made with steel or glass in front of the front
LCD of the washer since it blocks the radio signal.
Note that the radio signal may be weakened or interfered with and
the communication with the smartphone may fail when a microwave
oven is used in the house.
Install the washer or dryer so that the front of the product faces the
AP if available.
How can I connect the
washer or dryer with a
smartphone stably?
•
When the signal strenth that is displayed on the LCD of the washer or
dryer is weak, the control may fail. For stable operation, the measures
of signal strength should be as follows:
• At least 3 antenna bars should be displayed on the LCD of the
washer or dryer.
• At least 3 antenna bars for the Wi-Fi connection should be
displayed on the smartphone.
• When the signal strenth is measured with a smartphone app that
shows the Wi-Fi signal strength, the signal strength should be
stronger than -65 dBm. (E.g. -60 dBm and -50 dBm are stronger
than -65 dBm.)
What should I have to
do when the number of
the antenna bars that are
displayed on the LCD of the
washer or dryer is 1?
•
When the signal strenth that is displayed on the LCD of the washer
or dryer is weak, the control may fail. In this case, take the following
measures for normal operation.
• Move the AP closer to the washer or dryer.
(At least 3 antenna bars should be dislayed in the network setup
of the washer for proper operation.)
• Because an old AP may provide lower performance, use a new
AP if available.
• Position the antenna of the AP so that the radio signal is more
easily propagated.
70_ Troubleshooting
DV455-02836F-02_EN_20120625.indd Sec6:70
2012-06-25
5:21:25
Appendix
FABRIC CARE CHART
Wash Cycle
Special Instructions
Warning Symbols for
Laundering
Normal
Line Dry/ Hang to Dry
Do Not Wash
Permanent Press /
Wrinkle Resistant /
Wrinkle Control
Drip Dry
Do Not Wring
Gentle/Delicates
Dry Flat
Do Not Bleach
Hand Wash
Heat Setting
Do Not Tumble Dry
High
No Steam (added to
iron)
Hot
Medium
Do Not Iron
Warm
Low
Cold
Any Heat
Dry Clean
No Heat/Air
Do Not Dry Clean
Water Temperature**
Bleach
Any Bleach (when
needed)
Iron-Dry or Steam
Temperatures
06 APPENDIX
The following symbols provide garment care direction. The Clothing care labels include symbols for
washing, bleaching, drying, and ironing, or dry cleaning when necessary. The use of symbols ensures
consistency among garment manufacturers of domestic and imported items. Follow care label directions to
maximize garment life and reduce laundering problems.
Dryclean
Line Dry/ Hang to Dry
Only Non-Chlorine
(color-safe)
Bleach (when needed)
High
Drip Dry
Tumble Dry Cycle
Medium
Dry Flat
Low
Normal
Permanent Press/
Wrinkle Resistant/
Wrinkle Control
Gentle/Delicates
** The dot symbols represent appropriate wash water temperatures for various items. The temperature
range for Hot is 105 – 125 °F (41 – 52 °C), for Warm 85 – 105 °F (29 – 41 °C) and for Cold 60 – 85 °F (16 –
29 °C). (Wash water temperature must be a minimum of 60 °F (16 °C) for detergent activation and effective
cleaning.)
Appendix _71
DV455-02836F-02_EN_20120625.indd Sec7:71
2012-06-25
5:21:25
Appendix
PROTECTING THE ENVIRONMENT
This appliance is manufactured from recyclable materials. If you decide to dispose of this appliance, please
observe local waste disposal regulations. Cut off the power cord so that the appliance cannot be connected
to a power source. Remove the door so that animals and small children cannot get trapped inside the
appliance.
DECLARATION OF CONFORMITY
This appliance complies with UL2158.
SPECIFICATIONS
C
D
A
B
TYPE
DIMENSIONS
FRONT LOADING DRYER
A. Height
39” (99.0 cm)
B. Width
27” (68.6 cm)
C. Depth with door open 90°
51.65” (131.2 cm)
D. Depth
32.28” (82.0 cm)
WEIGHT
HEATER RATING
127.8 lb (57 Kg)
5300 W (Elec.)
22000 BTU/hr (Gas)
72_ Appendix
DV455-02836F-02_EN_20120625.indd Sec7:72
2012-06-25
5:21:26
CYCLE CHART
(: factory setting, : selectable )
CYCLE
Manual Dry
Steam
Cycles
MAXIMUM AMOUNT
Cottons, Work clothes, Linen, Mixed loads
Heavy Duty
Heavy fabrics such as jean, Corduroys, Heavy work clothes
Perm Press
Shirts, Synthetic fabrics, Knits, Wrinkle-free cottons, Permanent
Bedding PLUS
Bulky items such as blankets, Sheets, Comforters, Pillows
Delicates
Underwear, Blouses, Lingerie
Sanitize
Bedding, Curtains, Children` clothing
Eco Normal
Cottons, Work clothes, Linen
Wool
For machine washable and tumble dryable wool only
(Maximum amount : 3lb)
Air Fluff
Form, Rubber, Plastic
Quick Dry
Small loads
Time Dry
Any load
Wrinkle Away
Shirts, Trouser, Blouses
Refresh
Shirts, Trouser, Comforter, Pillows
06 APPENDIX
Sensor Dry
RECOMMENDED ITEMS
Normal
FUNCTIONS
CYCLE
Sensor Dry
Level
Steam Cycles
High
Medium
Medium
Low
Low
Extra
Low
Time
Wrinkle
Prevent
Delay
Start
Normal
Normal dry
Heavy Duty
Normal dry
Perm Press
Normal dry
Bedding PLUS
Normal dry
Delicates
Normal dry
Sanitize
Very dry
(No change)
Eco Normal
Normal dry
(No change)*
(DV455G)*
Sensor Dry
Manual Dry
OPTIONS
Temp. Control
Wool
Normal dry
(No change)
Air Fluff
-
Quick Dry
-
Time Dry
-
Wrinkle Away
-
Refresh
-
* is only Gas model
Load Size Recommendations
Large load
Medium load
Small load
Fill the drum to about ¾ full. Do not add items over this level as they need to
tumble freely.
Fill the drum to about ½ full.
Fill the drum with 3~5 items, not more than ¼ full.
For best results, follow the load size recommendations for each drying cycle.
Appendix _73
DV455-02836F-02_EN_20120625.indd Sec7:73
2012-06-25
5:21:26
Appendix
OPEN SOURCE ANNOUNCEMENT
The software included in this product contains copyrighted software that is licensed under the GPL/LGPL.
You may obtain the complete Corresponding Source code from us for a period of three years after our last
shipment of this product by sending email to:
oss.request@samsung.com
If you want to obtain the complete Corresponding Source code in the physical medium such as CD-ROM,
the cost of physically performing source distribution may be charged.
This offer is valid to anyone in receipt of this information.
GPL Software:
Bridge-Utils, BusyBox, DNRD, dosfstools, iproute2, IPTables, Linux Kernel, ntpclient, Open1x, RSDK
toolchain, rtl819x - Bootloader, samba, squashfs, udhcp Server-Client Package, USB-ModeSwitch,
wireless-tools
LGPL Software:
libnl-Netlink Library, Mini-XML
GNU GENERAL PUBLIC LICENSE
Version 2, June 1991
Copyright (C) 1989, 1991 Free Software Foundation, Inc.
51 Franklin Street, Fifth Floor, Boston, MA 02110-1301, USA
Everyone is permitted to copy and distribute verbatim copies of this license document, but changing it is not
allowed.
Preamble
The licenses for most software are designed to take away your freedom to share and change
it. By contrast, the GNU General Public License is intended to guarantee your freedom to share
and change free software--to make sure the software is free for all its users. This General Public
License applies to most of the Free Software Foundation’s software and to any other program
whose authors commit to using it. (Some other Free Software Foundation software is covered by
the GNU Lesser General Public License instead.)
You can apply it to your programs, too.
When we speak of free software, we are referring to freedom, not price. Our General Public
Licenses are designed to make sure that you have the freedom to distribute copies of free
software (and charge for this service if you wish), that you receive source code or can get it if you
want it, that you can change the software or use pieces of it in new free programs; and that you
know you can do these things.
To protect your rights, we need to make restrictions that forbid anyone to deny you these rights
or to ask you to surrender the rights. These restrictions translate to certain responsibilities for you
if you distribute copies of the software, or if you modify it.
For example, if you distribute copies of such a program, whether gratis or for a fee, you must
give the recipients all the rights that you have. You must make sure that they, too, receive or can
get the source code. And you must show them these terms so they know their rights.
We protect your rights with two steps: (1) copyright the software, and (2) offer you this license
which gives you legal permission to copy, distribute and/or modify the software.
Also, for each author’s protection and ours, we want to make certain that everyone understands
that there is no warranty for this free software. If the software is modified by someone else and
passed on, we want its recipients to know that what they have is not the original, so that any
74_ Appendix
DV455-02836F-02_EN_20120625.indd Sec7:74
2012-06-25
5:21:26
TERMS AND CONDITIONS FOR COPYING, DISTRIBUTION AND
MODIFICATION
1. This License applies to any program or other work which contains a notice placed by the
copyright holder saying it may be distributed under the terms of this General Public License.
The “Program”, below, refers to any such program or work, and a “work based on the
Program” means either the Program or any derivative work under copyright law: that is to
say, a work containing the Program or a portion of it, either verbatim or with modifications
and/or translated into another language. (Hereinafter, translation is included without limitation
in the term “modification”.) Each licensee is addressed as “you”.
Activities other than copying, distribution and modification are not covered by this License;
they are outside its scope. The act of running the Program is not restricted, and the output
from the Program is covered only if its contents constitute a work based on the Program
(independent of having been made by running the Program). Whether that is true depends on
what the Program does.
2. You may copy and distribute verbatim copies of the Program’s source code as you receive
it, in any medium, provided that you conspicuously and appropriately publish on each copy
an appropriate copyright notice and disclaimer of warranty; keep intact all the notices that
refer to this License and to the absence of any warranty; and give any other recipients of the
Program a copy of this License along with the Program.
You may charge a fee for the physical act of transferring a copy, and you may at your option
offer warranty protection in exchange for a fee.
3. You may modify your copy or copies of the Program or any portion of it, thus forming a work
based on the Program, and copy and distribute such modifications or work under the terms
of Section 1 above, provided that you also meet all of these conditions:
1) You must cause the modified files to carry prominent notices stating that you changed
the files and the date of any change.
2) You must cause any work that you distribute or publish, that in whole or in part contains
or is derived from the Program or any part thereof, to be licensed as a whole at no charge
to all third parties under the terms of this License.
3) If the modified program normally reads commands interactively when run, you must
cause it, when started running for such interactive use in the most ordinary way, to print
or display an announcement including an appropriate copyright notice and a notice that
there is no warranty (or else, saying that you provide a warranty) and that users may
redistribute the program under these conditions, and telling the user how to view a copy
of this License. (Exception: if the Program itself is interactive but does not normally print
such an announcement, your work based on the Program is not required to print an
announcement.)
These requirements apply to the modified work as a whole. If identifiable sections of that
work are not derived from the Program, and can be reasonably considered independent
and separate works in themselves, then this License, and its terms, do not apply to those
sections when you distribute them as separate works. But when you distribute the same
sections as part of a whole which is a work based on the Program, the distribution of the
whole must be on the terms of this License, whose permissions for other licensees extend to
the entire whole, and thus to each and every part regardless of who wrote it.
Thus, it is not the intent of this section to claim rights or contest your rights to work written
06 APPENDIX
problems introduced by others will not reflect on the original authors’ reputations.
Finally, any free program is threatened constantly by software patents. We wish to avoid the
danger that redistributors of a free program will individually obtain patent licenses, in effect
making the program proprietary. To prevent this, we have made it clear that any patent must be
licensed for everyone’s free use or not licensed at all.
The precise terms and conditions for copying, distribution and modification follow.
Appendix _75
DV455-02836F-02_EN_20120625.indd Sec7:75
2012-06-25
5:21:26
Appendix
4.
5.
6.
7.
entirely by you; rather, the intent is to exercise the right to control the distribution of derivative
or collective works based on the Program.
In addition, mere aggregation of another work not based on the Program with the Program
(or with a work based on the Program) on a volume of a storage or distribution medium does
not bring the other work under the scope of this License.
3. You may copy and distribute the Program (or a work based on it, under Section 2) in
object code or executable form under the terms of Sections 1 and 2 above provided that you
also do one of the following:
1) Accompany it with the complete corresponding machinereadable source code, which
must be distributed under the terms of Sections 1 and 2 above on a medium customarily
used for software interchange; or,
2) Accompany it with a written offer, valid for at least three years, to give any third party,
for a charge no more than your cost of physically performing source distribution, a
complete machine-readable copy of the corresponding source code, to be distributed
under the terms of Sections 1 and 2 above on a medium customarily used for software
interchange; or, c) Accompany it with the information you received as to the offer to
distribute corresponding source code. (This alternative is allowed only for noncommercial
distribution and only if you received the program in object code or executable form with
such an offer, in accord with Subsection b above.)
The source code for a work means the preferred form of the work for making modifications
to it. For an executable work, complete source code means all the source code for all
modules it contains, plus any associated interface definition files, plus the scripts used to
control compilation and installation of the executable. However, as a special exception,
the source code distributed need not include anything that is normally distributed (in either
source or binary form) with the major components (compiler, kernel, and so on) of the
operating system on which the executable runs, unless that component itself accompanies
the executable.
If distribution of executable or object code is made by offering access to copy from a
designated place, then offering equivalent access to copy the source code from the same
place counts as distribution of the source code, even though third parties are not compelled
to copy the source
along with the object code.
You may not copy, modify, sublicense, or distribute the Program except as expressly
provided under this License. Any attempt otherwise to copy, modify, sublicense or distribute
the Program is void, and will automatically terminate your rights under this License. However,
parties who have received copies, or rights, from you under this License will not have their
licenses terminated so long as such parties remain in full compliance.
You are not required to accept this License, since you have not signed it. However, nothing
else grants you permission to modify or distribute the Program or its derivative works. These
actions are prohibited by law if you do not accept this License. Therefore, by modifying or
distributing the Program (or any work based on the Program), you indicate your acceptance
of this License to do so, and all its terms and conditions for copying, distributing or modifying
the Program or works based on it.
Each time you redistribute the Program (or any work based on the Program), the recipient
automatically receives a license from the original licensor to copy, distribute or modify the
Program subject to these terms and conditions. You may not impose any further restrictions
on the recipients’ exercise of the rights granted herein. You are not responsible for enforcing
compliance by third parties to this License.
76_ Appendix
DV455-02836F-02_EN_20120625.indd Sec7:76
2012-06-25
5:21:26
06 APPENDIX
8. If, as a consequence of a court judgment or allegation of patent infringement or for any
other reason (not limited to patent issues), conditions are imposed on you (whether by
court order, agreement or otherwise) that contradict the conditions of this License, they do
not excuse you from the conditions of this License. If you cannot distribute so as to satisfy
simultaneously your obligations under this License and any other pertinent obligations, then
as a consequence you may not distribute the Program at all. For example, if a patent license
would not permit royalty-free redistribution of the Program by all those who receive copies
directly or indirectly through you, then the only way you could satisfy both it and this License
would be to refrain entirely from distribution of the Program.
If any portion of this section is held invalid or unenforceable under any particular
circumstance, the balance of the section is intended to apply and the section as a whole is
intended to apply in other circumstances.
It is not the purpose of this section to induce you to infringe any patents or other property
right claims or to contest validity of any such claims; this section has the sole purpose of
protecting the integrity of the free software distribution system, which is implemented by
public license practices. Many people have made generous contributions to the wide range
of software distributed through that system in reliance on consistent application of that
system; it is up to the author/donor to decide if he or she is willing to distribute software
through any other system and a licensee cannot impose that choice.
This section is intended to make thoroughly clear what is believed to be a consequence of
the rest of this License.
9. If the distribution and/or use of the Program is restricted in certain countries either by patents
or by copyrighted interfaces, the original copyright holder who places the Program under this
License may add an explicit geographical distribution limitation excluding those countries, so
that distribution is permitted only in or among countries not thus excluded. In such case, this
License incorporates the limitation as if written in the body of this License.
10. The Free Software Foundation may publish revised and/or new versions of the General Public
License from time to time. Such new versions will be similar in spirit to the present version,
but may differ in detail to address new problems or concerns.
Each version is given a distinguishing version number. If the Program specifies a version
number of this License which applies to it and “any later version”, you have the option of
following the terms and conditions either of that version or of any later version published
by the Free Software Foundation. If the Program does not specify a version number of this
License, you may choose any version ever published by the Free Software Foundation.
11. If you wish to incorporate parts of the Program into other free programs whose distribution
conditions are different, write to the author to ask for permission. For software which is
copyrighted by the Free Software Foundation, write to the Free Software Foundation;
we sometimes make exceptions for this. Our decision will be guided by the two goals of
preserving the free status of all derivatives of our free software and of promoting the sharing
and reuse of software generally.
NO WARRANTY
12. BECAUSE THE PROGRAM IS LICENSED FREE OF CHARGE, THERE IS NO WARRANTY
FOR THE PROGRAM, TO THE EXTENT PERMITTED BY APPLICABLE LAW. EXCEPT
WHEN OTHERWISE STATED IN WRITING THE COPYRIGHT HOLDERS AND/OR OTHER
PARTIES PROVIDE THE PROGRAM “AS IS” WITHOUT WARRANTY OF ANY KIND, EITHER
EXPRESSED OR IMPLIED, INCLUDING, BUT NOT LIMITED TO, THE IMPLIED WARRANTIES
OF MERCHANTABILITY AND FITNESS FOR A PARTICULAR PURPOSE. THE ENTIRE RISK
AS TO THE QUALITY AND PERFORMANCE OF THE PROGRAM IS WITH YOU. SHOULD
THE PROGRAM PROVE DEFECTIVE, YOU ASSUME THE COST OF ALL NECESSARY
SERVICING, REPAIR OR CORRECTION.
Appendix _77
DV455-02836F-02_EN_20120625.indd Sec7:77
2012-06-25
5:21:26
Appendix
13. IN NO EVENT UNLESS REQUIRED BY APPLICABLE LAW OR AGREED TO IN WRITING
WILL ANY COPYRIGHT HOLDER, OR ANY OTHER PARTY WHO MAY MODIFY AND/OR
REDISTRIBUTE THE PROGRAM AS PERMITTED ABOV E , BE L I ABL E TO YOU FOR
DAMAGES, INCLUDING ANY GENERAL, SPECIAL, INCIDENTAL OR CONSEQUENTIAL
DAMAGES ARISING OUT OF THE USE OR INABILITY TO USE THE PROGRAM (INCLUDING
BUT NOT LIMITED TO LOSS OF DATA OR DATA BEING RENDERED INACCURATE OR
LOSSES SUSTAINED BY YOU OR THIRD PARTIES OR A FAILURE OF THE PROGRAM TO
OPERATE WITH ANY OTHER PROGRAMS), EVEN IF SUCH HOLDER OR OTHER PARTY
HAS BEEN ADVISED OF THE POSSIBILITY OF SUCH DAMAGES.
END OF TERMS AND CONDITIONS
How to Apply These Terms to Your New Programs
If you develop a new program, and you want it to be of the greatest possible use to the public,
the best way to achieve this is to make it free software which everyone can redistribute and
change under these terms.
To do so, attach the following notices to the program. It is safest to attach them to the start of
each source file to most effectively convey the exclusion of warranty; and each file should have at
least the “copyright” line and a pointer to where the full notice is found.
one line to give the program’s name and an idea of what it does.
Copyright (C) yyyy name of author
This program is free software; you can redistribute it and/or modify it under the terms of the GNU
General Public License as published by the Free Software Foundation; either version 2 of the
License, or (at your option) any later version.
This program is distributed in the hope that it will be useful, but WITHOUT ANY WARRANTY;
without even the implied warranty of MERCHANTABILITY or FITNESS FOR A PARTICULAR
PURPOSE. See the GNU General Public License for more details.
You should have received a copy of the GNU General Public License along with this program;
if not, write to the Free Software Foundation, Inc., 51 Franklin Street, Fifth Floor, Boston, MA
02110-1301, USA.
Also add information on how to contact you by electronic and paper mail.
If the program is interactive, make it output a short notice like this when it starts in an interactive
mode:
Gnomovision version 69, Copyright (C) year name of author Gnomovision comes with
ABSOLUTELY NO WARRANTY; for details type `show w’. This is free software, and you are
welcome to redistribute it under certain conditions; type `show c’ for details.
The hypothetical commands `show w’ and `show c’ should show the appropriate parts of the
General Public License. Of course, the commands you use may be called something other than
`show w’ and `show c’; they could even be mouse-clicks or menu items--whatever suits your
program. You should also get your employer (if you work as a programmer) or your school, if any,
to sign a “copyright disclaimer” for the program, if necessary. Here is a sample; alter the names:
Yoyodyne, Inc., hereby disclaims all copyright interest in the program `Gnomovision’ (which
makes passes at compilers) written by James Hacker.
signature of Ty Coon, 1 April 1989
Ty Coon, President of Vice
This General Public License does not permit incorporating your program into proprietary
programs. If your program is a subroutine library, you may consider it more useful to permit
linking proprietary applications with the library. If this is what you want to do, use the GNU Lesser
General Public License instead of this License.
78_ Appendix
DV455-02836F-02_EN_20120625.indd Sec7:78
2012-06-25
5:21:26
GNU LESSER GENERAL PUBLIC LICENSE
[This is the first released version of the Lesser GPL. It also counts as the successor of the GNU Library
Public License, version 2, hence the version number 2.1.]
06 APPENDIX
Version 2.1, February 1999
Copyright (C) 1991, 1999 Free Software Foundation, Inc.
51 Franklin Street, Fifth Floor, Boston, MA 02110-1301 USA
Everyone is permitted to copy and distribute verbatim copies of this license document, but changing it is
not allowed.
Preamble
The licenses for most software are designed to take away your freedom to share and change it.
By contrast, the GNU General Public Licenses are intended to guarantee your freedom to share
and change free software--to make sure the software is free for all its users.
This license, the Lesser General Public License, applies to some specially designated software
packages--typically libraries--of the Free Software Foundation and other authors who decide to
use it. You can use it too, but we suggest you first think carefully about whether this license or
the ordinary General Public License is the better strategy to use in any particular case, based on
the explanations below.
When we speak of free software, we are referring to freedom of use, not price. Our General
Public Licenses are designed to make sure that you have the freedom to distribute copies of free
software (and charge for this service if you wish); that you receive source code or can get it if you
want it; that you can change the software and use pieces of it in new free programs; and that
you are informed that you can do these things.
To protect your rights, we need to make restrictions that forbid distributors to deny you
these rights or to ask you to surrender these rights. These restrictions translate to certain
responsibilities for you if you distribute copies of the library or if you modify it.
For example, if you distribute copies of the library, whether gratis or for a fee, you must give the
recipients all the rights that we gave you. You must make sure that they, too, receive or can get
the source code. If you link other code with the library, you must provide complete object files
to the recipients, so that they can relink them with the library after making changes to the library
and recompiling it. And you must show them these terms so they know their rights.
We protect your rights with a two-step method: (1) we copyright the library, and (2) we offer you
this license, which gives you legal permission to copy, distribute and/or modify the library.
To protect each distributor, we want to make it very clear that there is no warranty for the free
library. Also, if the library is modified by someone else and passed on, the recipients should
know that what they have is not the original version, so that the original author’s reputation will
not be affected by problems that might be introduced by others.
Finally, software patents pose a constant threat to the existence of any free program. We wish to
make sure that a company cannot effectively restrict the users of a free program by obtaining a
restrictive license from a patent holder. Therefore, we insist that any patent license obtained for a
version of the library must be consistent with the full freedom of use specified in this license.
Most GNU software, including some libraries, is covered by the ordinary GNU General Public
License. This license, the GNU Lesser General Public License, applies to certain designated
libraries, and is quite different from the ordinary General Public License. We use this license for
certain libraries in order to permit linking those libraries into nonfree programs.
When a program is linked with a library, whether statically or using a shared library, the
combination of the two is legally speaking a combined work, a derivative of the original library.
The ordinary General Public License therefore permits such linking only if the entire combination
fits its criteria of freedom. The Lesser General Public License permits more lax criteria for linking
other code with the library.
We call this license the “Lesser” General Public License because it does Less to protect the
Appendix _79
DV455-02836F-02_EN_20120625.indd Sec7:79
2012-06-25
5:21:26
Appendix
user’s freedom than the ordinary General Public License. It also provides other free software
developers Less of an advantage over competing non-free programs. These disadvantages are
the reason we use the ordinary General Public License for many libraries.
However, the Lesser license provides advantages in certain special circumstances.
For example, on rare occasions, there may be a special need to encourage the widest possible
use of a certain library, so that it becomes a de-facto standard. To achieve this, non-free
programs must be allowed to use the library.
A more frequent case is that a free library does the same job as widely used non-free libraries.
In this case, there is little to gain by limiting the free library to free software only, so we use the
Lesser General Public License.
In other cases, permission to use a particular library in nonfree programs enables a greater
number of people to use a large body of free software. For example, permission to use the GNU
C Library in non-free programs enables many more people to use the whole GNU operating
system, as well as its variant, the GNU/Linux operating system.
Although the Lesser General Public License is Less protective of the users’ freedom, it does
ensure that the user of a program that is linked with the Library has the freedom and the
wherewithal to run that program using a modified version of the Library.
The precise terms and conditions for copying, distribution and modification follow. Pay close
attention to the difference between a “work based on the library” and a “work that uses the
library”. The former contains code derived from the library, whereas the latter must be combined
with the library in order to run.
TERMS AND CONDITIONS FOR COPYING, DISTRIBUTION AND
MODIFICATION
1. This License Agreement applies to any software library or other program which contains a
notice placed by the copyright holder or other authorized party saying it may be distributed
under the terms of this Lesser General Public License (also called “this License”). Each
licensee is addressed as “you”.
A “library” means a collection of software functions and/or data prepared so as to be
conveniently linked with application programs (which use some of those functions and data)
to form executables.
The “Library”, below, refers to any such software library or work which has been distributed
under these terms. A “work based on the Library” means either the Library or any derivative
work under copyright law: that is to say, a work containing the Library or a portion of it, either
verbatim or with modifications and/or translated straightforwardly into another language.
(Hereinafter, translation is included without limitation in the term “modification”.)
“Source code” for a work means the preferred form of the work for making modifications to
it. For a library, complete source code means all the source code for all modules it contains,
plus any associated interface definition files, plus the scripts used to control compilation and
installation of the library.
Activities other than copying, distribution and modification are not covered by this License;
they are outside its scope. The act of running a program using the Library is not restricted,
and output from such a program is covered only if its contents constitute a work based on
the Library (independent of the use of the Library in a tool for writing it).
Whether that is true depends on what the Library does and what the program that uses the
Library does.
2. You may copy and distribute verbatim copies of the Library’s complete source code as you
receive it, in any medium, provided that you conspicuously and appropriately publish on each
copy an appropriate copyright notice and disclaimer of warranty; keep intact all the notices
that refer to this License and to the absence of any warranty; and distribute a copy of this
License along with the Library.
You may charge a fee for the physical act of transferring a copy, and you may at your option
80_ Appendix
DV455-02836F-02_EN_20120625.indd Sec7:80
2012-06-25
5:21:26
06 APPENDIX
offer warranty protection in exchange for a fee.
3. You may modify your copy or copies of the Library or any portion of it, thus forming a work
based on the Library, and copy and distribute such modifications or work under the terms of
Section 1 above, provided that you also meet all of these conditions:
1) The modified work must itself be a software library.
2) You must cause the files modified to carry prominent notices stating that you changed
the files and the date of any change.
3) You must cause the whole of the work to be licensed at no charge to all third parties
under the terms of this License.
4) If a facility in the modified Library refers to a function or a table of data to be supplied by
an application program that uses the facility, other than as an argument passed when the
facility is invoked, then you must make a good faith effort to ensure that, in the event an
application does not supply such function or table, the facility still operates, and performs
whatever part of its purpose remains meaningful.
(For example, a function in a library to compute square roots has a purpose that is entirely
well-defined independent of the application. Therefore, Subsection 2d requires that
any application-supplied function or table used by this function must be optional: if the
application does not supply it, the square root function must still compute square roots.)
These requirements apply to the modified work as a whole. If identifiable sections of that
work are not derived from the Library, and can be reasonably considered independent
and separate works in themselves, then this License, and its terms, do not apply to those
sections when you distribute them as separate works. But when you distribute the same
sections as part of a whole which is a work based on the Library, the distribution of the
whole must be on the terms of this License, whose permissions for other licensees extend to
the entire whole, and thus to each and every part regardless of who wrote it. Thus, it is not
the intent of this section to claim rights or contest your rights to work written entirely by you;
rather, the intent is to exercise the right to control the distribution of derivative or collective
works based on the Library. In addition, mere aggregation of another work not based on
the Library with the Library (or with a work based on the Library) on a volume of a storage or
distribution medium does not bring the other work under the scope of this License.
4. You may opt to apply the terms of the ordinary GNU General Public License instead of this
License to a given copy of the Library. To do this, you must alter all the notices that refer to
this License, so that they refer to the ordinary GNU General Public License, version 2, instead
of to this License. (If a newer version than version 2 of the ordinary GNU General Public
License has appeared, then you can specify that version instead if you wish.) Do not make
any other change in these notices.
Once this change is made in a given copy, it is irreversible for that copy, so the ordinary GNU
General Public License applies to all subsequent copies and derivative works made from that
copy.
This option is useful when you wish to copy part of the code of the Library into a program
that is not a library.
5. You may copy and distribute the Library (or a portion or derivative of it, under Section 2) in
object code or executable form under the terms of Sections 1 and 2 above provided that you
accompany it with the complete corresponding machine-readable source code, which must
be distributed under the terms of Sections 1 and 2 above on a medium customarily used for
software interchange.
If distribution of object code is made by offering access to copy from a designated place,
then offering equivalent access to copy the source code from the same place satisfies the
requirement to distribute the source code, even though third parties are not compelled to
copy the source along with the object code.
Appendix _81
DV455-02836F-02_EN_20120625.indd Sec7:81
2012-06-25
5:21:26
Appendix
6. A program that contains no derivative of any portion of the Library, but is designed to work
with the Library by being compiled or linked with it, is called a “work that uses the Library”.
Such a work, in isolation, is not a derivative work of the Library, and therefore falls outside the
scope of this License.
However, linking a “work that uses the Library” with the Library creates an executable that
is a derivative of the Library (because it contains portions of the Library), rather than a “work
that uses the library”. The executable is therefore covered by this License. Section 6 states
terms for distribution of such executables.
When a “work that uses the Library” uses material from a header file that is part of the
Library, the object code for the work may be a derivative work of the Library even though
the source code is not. Whether this is true is especially significant if the work can be linked
without the Library, or if the work is itself a library. The threshold for this to be true is not
precisely defined by law.
If such an object file uses only numerical parameters, data structure layouts and accessors,
and small macros and small inline functions (ten lines or less in length), then the use of the
object file is unrestricted, regardless of whether it is legally a derivative work. (Executables
containing this object code plus portions of the Library will still fall under Section 6.)
Otherwise, if the work is a derivative of the Library, you may distribute the object code for
the work under the terms of Section 6. Any executables containing that work also fall under
Section 6, whether or not they are linked directly with the Library itself.
7. As an exception to the Sections above, you may also combine or link a “work that uses the
Library” with the Library to produce a work containing portions of the Library, and distribute
that work under terms of your choice, provided that the terms permit modification of the work
for the customer’s own use and reverse engineering for debugging such modifications.
You must give prominent notice with each copy of the work that the Library is used in it
and that the Library and its use are covered by this License. You must supply a copy of
this License. If the work during execution displays copyright notices, you must include the
copyright notice for the Library among them, as well as a reference directing the user to the
copy of this License. Also, you must do one of these things:
1) Accompany the work wi th the complet e corresponding machine-readable source
code for the Library including whatever changes were used in the work (which must be
distributed under Sections 1 and 2 above); and, if the work is an executable linked with
the Library, with the complete machine-readable “work that uses the Library”, as object
code and/or source code, so that the user can modify the Library and then relink to
produce a modified executable containing the modified Library. (It is understood that the
user who changes the contents of definitions files in the Library will not necessarily be
able to recompile the application to use the modified definitions.)
2) Use a suitable shared library mechanism for linking with the Library. A suitable
mechanism is one that (1) uses at run time a copy of the library already present on the
user’s computer system, rather than copying library functions into the executable, and (2)
will operate properly with a modified version of the library, if the user installs one, as long
as the modified version is interfacecompatible with the version that the work was made
with.
3) Accompany the work with a written offer, valid for at least three years, to give the same
user the materials specified in Subsection 6a, above, for a charge no more than the cost
of performing this distribution.
4) If distribution of the work is made by offering access to copy from a designated place,
offer equivalent access to copy the above specified materials from the same place.
5) Verify that the user has already received a copy of these materials or that you have
already sent this user a copy.
For an executable, the required form of the “work that uses the Library” must include any
data and utility programs needed for reproducing the executable from it. However, as a
special exception, the materials to be distributed need not include anything that is normally
82_ Appendix
DV455-02836F-02_EN_20120625.indd Sec7:82
2012-06-25
5:21:26
06 APPENDIX
distributed (in either source or binary form) with the major components (compiler, kernel, and
so on) of the operating system on which the executable runs, unless that component itself
accompanies the executable.
It may happen that this requirement contradicts the license restrictions of other proprietary
libraries that do not normally accompany the operating system. Such a contradiction means
you cannot use both them and the Library together in an executable that you distribute.
8. You may place library facilities that are a work based on the Library side-by-side in a single
library together with other library facilities not covered by this License, and distribute such
a combined library, provided that the separate distribution of the work based on the Library
and of the other library facilities is otherwise permitted, and provided that you do these two
things:
1) Accompany the combined library with a copy of the same work based on the Library,
uncombined with any other library facilities. This must be distributed under the terms of
the Sections above.
2) Give prominent notice with the combined library of the fact that part of it is a work based
on the Library, and explaining where to find the accompanying uncombined form of the
same work.
9. You may not copy, modify, sublicense, link with, or distribute the Library except as expressly
provided under this License. Any attempt otherwise to copy, modify, sublicense, link with, or
distribute the Library is void, and will automatically terminate your rights under this License.
However, parties who have received copies, or rights, from you under this License will not
have their licenses terminated so long as such parties remain in full compliance.
10. You are not required to accept this License, since you have not signed it. However, nothing
else grants you permission to modify or distribute the Library or its derivative works. These
actions are prohibited by law if you do not accept this License. Therefore, by modifying or
distributing the Library (or any work based on the Library), you indicate your acceptance of
this License to do so, and all its terms and conditions for copying, distributing or modifying
the Library or works based on it.
11. Each time you redistribute the Library (or any work based on the Library), the recipient
automatically receives a license from the original licensor to copy, distribute, link with or
modify the Library subject to these terms and conditions. You may not impose any further
restrictions on the recipients’ exercise of the rights granted herein. You are not responsible for
enforcing compliance by third parties with this License.
12. If, as a consequence of a court judgment or allegation of patent infringement or for any
other reason (not limited to patent issues), conditions are imposed on you (whether by
court order, agreement or otherwise) that contradict the conditions of this License, they do
not excuse you from the conditions of this License. If you cannot distribute so as to satisfy
simultaneously your obligations under this License and any other pertinent obligations, then
as a consequence you may not distribute the Library at all. For example, if a patent license
would not permit royalty-free redistribution of the Library by all those who receive copies
directly or indirectly through you, then the only way you could satisfy both it and this License
would be to refrain entirely from distribution of the Library.
If any portion of this section is held invalid or unenforceable under any particular
circumstance, the balance of the section is intended to apply, and the section as a whole is
intended to apply in other circumstances.
It is not the purpose of this section to induce you to infringe any patents or other property
right claims or to contest validity of any such claims; this section has the sole purpose of
protecting the integrity of the free software distribution system which is implemented by
public license practices.
Many people have made generous contributions to the wide range of software distributed
through that system in reliance on consistent application of that system; it is up to the author/
donor to decide if he or she is willing to distribute software through any other system and a
licensee cannot impose that choice.
Appendix _83
DV455-02836F-02_EN_20120625.indd Sec7:83
2012-06-25
5:21:27
Appendix
This section is intended to make thoroughly clear what is believed to be a consequence of
the rest of this License.
13. If the distribution and/or use of the Library is restricted in certain countries either by patents
or by copyrighted interfaces, the original copyright holder who places the Library under this
License may add an explicit geographical distribution limitation excluding those countries, so
that distribution is permitted only in or among countries not thus excluded. In such case, this
License incorporates the limitation as if written in the body of this License.
14. The Free Software Foundation may publish revised and/or new versions of the Lesser
General Public License from time to time. Such new versions will be similar in spirit to the
present version, but may differ in detail to address new problems or concerns.
Each version is given a distinguishing version number.
If the Library specifies a version number of this License which applies to it and “any later
version”, you have the option of following the terms and conditions either of that version or of
any later version published by the Free Software Foundation. If the Library does not specify
a license version number, you may choose any version ever published by the Free Software
Foundation.
15. If you wish to incorporate parts of the Library into other free programs whose distribution
conditions are incompatible with these, write to the author to ask for permission. For software
which is copyrighted by the Free Software Foundation, write to the Free Software Foundation;
we sometimes make exceptions for this. Our decision will be guided by the two goals of
preserving the free status of all derivatives of our free software and of promoting the sharing
and reuse of software generally.
NO WARRANTY
16. BECAUSE THE LIBRARY IS LICENSED FREE OF CHARGE, THERE IS NO WARRANTY
FOR THE LIBRARY, TO THE EXTENT PERMITTED BY APPLICABLE LAW. EXCEPT
WHEN OTHERWISE STATED IN WRITING THE COPYRIGHT HOLDERS AND/OR OTHER
PARTIES PROVIDE THE LIBRARY “AS IS” WITHOUT WARRANTY OF ANY KIND, EITHER
EXPRESSED OR IMPLIED, INCLUDING, BUT NOT LIMITED TO, THE IMPLIED WARRANTIES
OF MERCHANTABILITY AND FITNESS FOR A PARTICULAR PURPOSE. THE ENTIRE RISK
AS TO THE QUALITY AND PERFORMANCE OF THE LIBRARY IS WITH YOU. SHOULD THE
LIBRARY PROVE DEFECTIVE, YOU ASSUME THE COST OF ALL NECESSARY SERVICING,
REPAIR OR CORRECTION.
17. IN NO EVENT UNLESS REQUIRED BY APPLICABLE LAW OR AGREED TO IN WRI T ING
WI L L ANY COPYRIGHT HOLDER, OR ANY OTHER PARTY WHO MAY MODIFY AND/
OR REDISTRIBUTE THE LIBRARY AS PERMITTED ABOVE, BE LIABLE TO YOU FOR
DAMAGES, INCLUDING ANY GENERAL, SPECIAL, INCIDENTAL OR CONSEQUENTIAL
DAMAGES ARISING OUT OF THE USE OR INABILITY TO USE THE LIBRARY (INCLUDING
BUT NOT LIMITED TO LOSS OF DATA OR DATA BEING RENDERED INACCURATE OR
LOSSES SUSTAINED BY YOU OR THIRD PARTIES OR A FAILURE OF THE LIBRARY TO
OPERATE WITH ANY OTHER SOFTWARE), EVEN IF SUCH HOLDER OR OTHER PARTY
HAS BEEN ADVISED OF THE POSSIBILITY OF SUCH DAMAGES.
END OF TERMS AND CONDITIONS
How to Apply These Terms to Your New Libraries If you develop a new library, and you want
it to be of the greatest possible use to the public, we recommend making it free software that
everyone can redistribute and change. You can do so by permitting redistribution under these
terms (or, alternatively, under the terms of the ordinary General Public License).
To apply these terms, attach the following notices to the library. It is safest to attach them to the
start of each source file to most effectively convey the exclusion of warranty; and each file should
have at least the “copyright” line and a pointer to where the full notice is found.
one line to give the library’s name and an idea of what it does.
84_ Appendix
DV455-02836F-02_EN_20120625.indd Sec7:84
2012-06-25
5:21:27
Copyright (C) year name of author
You should have received a copy of the GNU Lesser General Public License along with this
library; if not, write to the Free Software Foundation, Inc., 51 Franklin Street, Fifth Floor, Boston,
MA 02110-1301 USA Also add information on how to contact you by electronic and paper mail.
You should also get your employer (if you work as a programmer) or your school, if any, to sign a
“copyright disclaimer” for the library, if necessary. Here is a sample; alter the names: Yoyodyne,
Inc., hereby disclaims all copyright interest in the library `Frob’ (a library for tweaking knobs)
written by James Random Hacker.
06 APPENDIX
This library is free software; you can redistribute it and/or modify it under the terms of the GNU
Lesser General Public License as published by the Free Software Foundation; either version 2.1
of the License, or (at your option) any later version.
This library is distributed in the hope that it will be useful, but WITHOUT ANY WARRANTY;
without even the implied warranty of MERCHANTABILITY or FITNESS FOR A PARTICULAR
PURPOSE. See the GNU
Lesser General Public License for more details.
signature of Ty Coon, 1 April 1990
Ty Coon, President of Vice
That’s all there is to it!
BSD LICENSE
flex: the fast lexical analyser
Copyright (c) 2001, 2002, 2003, 2004, 2005, 2006, 2007
The Flex Project.
Copyright (c) 1990, 1997 The Regents of the University of California. All rights reserved.
LibNet License
Copyright (c) 1998 - 2001 Mike D. Schiffman <mike@infonexus.com>
PPP/ Debian
Copyright (c) 1989 Regents of the University of California. All rights reserved.
Redistribution and use in source and binary forms, with or without modification, are permitted provided that
the following conditions are met:
1. Redistributions of source code must retain the above copyright notice, this list of conditions and the
following disclaimer.
2. Redistributions in binary form must reproduce the above copyright notice, this list of conditions and the
following disclaimer in the documentation and/or other materials provided with the distribution.
3. Neither the name of the <organization> nor the names of its contributors may be used to endorse or
promote products derived from this software without specific prior written permission.
THIS SOFTWARE IS PROVIDED BY THE COPYRIGHT HOLDERS AND CONTRIBUTORS “AS IS” AND ANY
EXPRESS OR IMPLIED WARRANTIES, INCLUDING, BUT NOT LIMITED TO, THE IMPLIED WARRANTIES
OF MERCHANTABILITY AND FITNESS FOR A PARTICULAR PURPOSE ARE DISCLAIMED. IN NO EVENT
SHALL <COPYRIGHT HOLDER> BE LIABLE FOR ANY DIRECT, INDIRECT, INCIDENTAL, SPECIAL,
EXEMPLARY, OR CONSEQUENTIAL DAMAGES ( INCLUDING, BUT NOT LIMITED TO, PROCUREMENT
OF SUBSTITUTE GOODS OR SERVICES; LOSS OF USE, DATA, OR PROFITS; OR BUSINESS
INTERRUPTION) HOWEVER CAUSED AND ON ANY THEORY OF LIABILITY, WHETHER IN CONTRACT,
STRICT LIABILITY, OR TORT (INCLUDING NEGLIGENCE OR OTHERWISE) ARISING IN ANY WAY OUT OF
THE USE OF THIS SOFTWARE, EVEN IF ADVISED OF THE POSSIBILITY OF SUCH DAMAGE.
Appendix _85
DV455-02836F-02_EN_20120625.indd Sec7:85
2012-06-25
5:21:27
Appendix
OPENSSL
This product includes software developed by the OpenSSL Project for use in the OpenSSL Toolkit. (http://
www.openssl.org/)
This product includes cryptographic software written by Eric Young (eay@cryptsoft.com)
LICENSE ISSUES
=====================================================================
The OpenSSL toolkit stays under a dual license, i.e. both the conditions of the OpenSSL License
and the original SSLeay license apply to the toolkit. See below for the actual license texts.
Actually both licenses are BSD-style Open Source licenses. In case of any license issues related
to OpenSSL please contact openssl-core@openssl.org.
OpenSSL License
=====================================================================
Copyright (c) 1998-2008 The OpenSSL Project. All rights reserved.
Redistribution and use in source and binary forms, with or without modification, are permitted
provided that the following conditions are met:
1. Redistributions of source code must retain the above copyright notice, this list of conditions
and the following disclaimer.
2. Redistributions in binary form must reproduce the above copyright notice, this list of
conditions and the following disclaimer in the documentation and/or other materials provided
with the distribution.
3. All advertising materials mentioning features or use of this software must display the following
acknowledgment: “This product includes software developed by the OpenSSL Project for
use in the OpenSSL Toolkit. (http://www.openssl.org/)”
4. The names “OpenSSL Toolkit” and “OpenSSL Project” must not be used to endorse or
promote products derived from this software without prior written permission. For written
permission, please contact openssl-core@openssl.org.
5. Products derived from this software may not be called “OpenSSL” nor may “OpenSSL”
appear in their names without prior written permission of the OpenSSL Project.
6. Redistributions of any form whatsoever must retain the following acknowledgment:
“This product includes software developed by the OpenSSL Project for use in the OpenSSL
Toolkit (http://www.openssl.org/)”
THIS SOFTWARE IS PROVIDED BY THE OpenSSL PROJECT “AS IS” AND ANY EXPRESSED
OR IMPLIED WARRANTIES, INCLUDING, BUT NOT LIMITED TO, THE IMPLIED WARRANTIES
OF MERCHANTABILITY AND FITNESS FOR A PARTICULAR PURPOSE ARE DISCLAIMED.
IN NO EVENT SHALL THE OpenSSL PROJECT OR ITS CONTRIBUTORS BE LIABLE FOR
ANY DIRECT, INDIRECT, INCIDENTAL, SPECIAL, EXEMPLARY, OR CONSEQUENTIAL
DAMAGES (INCLUDING, BUT NOT LIMITED TO, PROCUREMENT OF SUBSTITUTE GOODS OR
SERVICES; LOSS OF USE, DATA, OR PROFITS; OR BUSINESS INTERRUPTION) HOWEVER
CAUSED AND ON ANY THEORY OF LIABILITY, WHETHER IN CONTRACT, STRICT LIABILITY,
OR TORT (INCLUDING NEGLIGENCE OR OTHERWISE) ARISING IN ANY WAY OUT OF THE
USE OF THIS SOFTWARE, EVEN IF ADVISED OF THE POSSIBILITY OF SUCH DAMAGE.
=====================================================================
This product includes cryptographic software written by Eric Young (eay@cryptsoft.com). This
product includes software written by Tim Hudson (tjh@cryptsoft.com).
86_ Appendix
DV455-02836F-02_EN_20120625.indd Sec7:86
2012-06-25
5:21:27
Warranty (U.S.A)
SAMSUNG DRYER
One (1) Year All Parts and Labor
Two (2) Years Control Board Parts
This limited warranty begins on the original date of purchase, and is valid only on products purchased and
used in the United States.
To receive warranty service, the purchaser must contact SAMSUNG for problem determination and service
procedures.
Warranty service can only be performed by a SAMSUNG authorized service center.
The original dated bill of sale must be presented upon request as proof of purchase to SAMSUNG or
SAMSUNG’s authorized service center.
SAMSUNG will provide in-home service during the warranty period at no charge, subject to availability
within the contiguous United States.
In-home service is not available in all areas.
To receive in-home service, product must be unobstructed and accessible to the service agent.
If service is not available, SAMSUNG may elect to provide transportation of the product to and from an
authorized service center.
SAMSUNG will repair, replace, or refund this product at our option and at no charge as stipulated herein,
with new or reconditioned parts or products if found to be defective during the limited warranty period
specified above.
All replaced parts and products become the property of SAMSUNG and must be returned to SAMSUNG.
Replacement parts and products assume the remaining original warranty, or ninety (90) days, whichever is
longer.
07 WARRANTY
LIMITED WARRANTY TO ORIGINAL PURCHASER
This SAMSUNG brand product, as supplied and distributed by SAMSUNG ELECTRONICS AMERICA, INC.
(SAMSUNG) and delivered new, in the original carton to the original consumer purchaser, is warranted by
SAMSUNG against manufacturing defects in materials and workmanship for a limited warranty period of:
This limited warranty covers manufacturing defects in materials and workmanship encountered in normal,
noncommercial use of this product and shall not apply to the following: damage that occurs in shipment;
delivery and installation; applications and uses for which this product was not intended; altered product or
serial numbers; cosmetic damage or exterior finish; accidents, abuse, neglect, fire, water, lightning, or other
acts of nature or God; use of products, equipment, systems, utilities, services, parts, supplies, accessories,
applications, installations, repairs, external wiring or connectors not supplied or authorized by SAMSUNG
that damage this product or result in service problems; incorrect electrical line voltage, fluctuations and
surges; customer adjustments and failure to follow operating instructions, maintenance and environmental
instructions that are covered and prescribed in the instruction book; product removal and reinstallation;
problems caused by pest infestations.
This limited warranty does not cover problems resulting from incorrect electric current, voltage or supply,
light bulbs, house fuses, house wiring, cost of a service call for instructions, or fixing installation errors.
SAMSUNG does not warrant uninterrupted or error-free operation of the product.
Warranty _87
DV455-02836F-02_EN_20120625.indd Sec8:87
2012-06-25
5:21:27
Warranty
Except as set forth herein, there are no warranties on this product either express or implied, and samsung
disclaims all warranties including, but not limited to, any implied warranties of merchantability, infringement
or fitness for a particular purpose.
No warranty or guarantee given by any person, firm, or corporation with respect to this product shall be
binding on samsung.
Samsung shall not be liable for loss of revenue or profits, failure to realize savings or thter benefits, or any
other special, incidental or consequential damages caused by the use, misuse, or inability to use this
product, regardless of the legal theory on which the claim is based, and even if samsung has been advised
of the possibility of such damages.
Nor shall recovery of any kind against samsung be greater in amount than the purchase price of the product
sold by samsung and causing the alleged damage.
Without limiting the foregoing, purchaser assumes all risk and liability for loss, damage, or injury to
purchaser and purchaser’s property and to others and their property arising out of the use, misuse,
or inability to use this product. This limited warranty shall not extend to anyone other than the original
purchaser of this product, is nontransferable and states your exclusive remedy.
Some states do not allow limitations on how long an implied warranty lasts, or the exclusion or limitation
of incidental or consequential damages, so the above limitations or exclusions may not apply to you. This
warranty gives you specific rights, and you may also have other rights, which vary from state to state.
To obtain warranty service, please contact SAMSUNG at:
Samsung Electronics America, Inc.
85 Challenger Road Ridgefield Park, NJ 07660
1-800-SAMSUNG (726-7864)
www.samsung.com
Visits by a Service Engineer to explain functions, maintenance or installation is not covered by warranty.
Please contact your Samsung call agent for help with any of these issues.
88_ Warranty
DV455-02836F-02_EN_20120625.indd Sec8:88
2012-06-25
5:21:27
Warranty (CANADA)
SAMSUNG DRYER
One (1) year part and labor
This limited warranty begins on the original date of purchase, and is valid only on products purchased and
used in the Canada.
To receive warranty service, the purchaser must contact SAMSUNG for problem determination and service
procedures.
Warranty service can only be performed by a SAMSUNG authorized service center.
The original dated bill of sale must be presented upon request as proof of purchase to SAMSUNG or
SAMSUNG’s authorized service center.
SAMSUNG will provide in-home service during the warranty period at no charge, subject to availability
within the Canada.
In-home service is not available in all areas.
07 WARRANTY
LIMITED WARRANTY TO ORIGINAL PURCHASER
This SAMSUNG brand product, as supplied and distributed by SAMSUNG ELECTRONICS CANADA, INC.
(SAMSUNG) and delivered new, in the original carton to the original consumer purchaser, is warranted by
SAMSUNG against manufacturing defects in materials and workmanship for a limited warranty period of:
To receive in-home service, product must be unobstructed and accessible to the service agent.
If service is not available, SAMSUNG may elect to provide transportation of the product to and from an
authorized service center.
SAMSUNG will repair, replace, or refund this product at our option and at no charge as stipulated herein,
with new or reconditioned parts or products if found to be defective during the limited warranty period
specified above.
All replaced parts and products become the property of SAMSUNG and must be returned to SAMSUNG.
Replacement parts and products assume the remaining original warranty, or ninety (90) days, whichever is
longer.
This limited warranty covers manufacturing defects in materials and workmanship encountered in normal,
noncommercial use of this product and shall not apply to the following: damage that occurs in shipment;
delivery and installation; applications and uses for which this product was not intended; altered product or
serial numbers; cosmetic damage or exterior finish; accidents, abuse, neglect, fire, water, lightning, or other
acts of nature or God; use of products, equipment, systems, utilities, services, parts, supplies, accessories,
applications, installations, repairs, external wiring or connectors not supplied or authorized by SAMSUNG
that damage this product or result in service problems; incorrect electrical line voltage, fluctuations and
surges; customer adjustments and failure to follow operating instructions, maintenance and environmental
instructions that are covered and prescribed in the instruction book; product removal and reinstallation;
problems caused by pest infestations.
This limited warranty does not cover problems resulting from incorrect electric current, voltage or supply,
light bulbs, house fuses, house wiring, cost of a service call for instructions, or fixing installation errors.
SAMSUNG does not warrant uninterrupted or error-free operation of the product.
Warranty _89
DV455-02836F-02_EN_20120625.indd Sec8:89
2012-06-25
5:21:27
Warranty
EXCEPT AS SET FORTH HEREIN, THERE ARE NO WARRANTIES ON THIS PRODUCT EITHER EXPRESS
OR IMPLIED, AND SAMSUNG DISCLAIMS ALL WARRANTIES INCLUDING, BUT NOT LIMITED TO, ANY
IMPLIED WARRANTIES OF MERCHANTABILITY, INFRINGEMENT OR FITNESS FOR A PARTICULAR
PURPOSE.
NO WARRANTY OR GUARANTEE GIVEN BY ANY PERSON, FIRM, OR CORPORATION WITH RESPECT
TO THIS PRODUCT SHALL BE BINDING ON SAMSUNG.
SAMSUNG SHALL NOT BE LIABLE FOR LOSS OF REVENUE OR PROFITS, FAILURE TO REALIZE
SAVINGS OR OTHER BENEFITS, OR ANY OTHER SPECIAL, INCIDENTAL OR CONSEQUENTIAL
DAMAGES CAUSED BY THE USE, MISUSE, OR INABILITY TO USE THIS PRODUCT, REGARDLESS OF
THE LEGAL THEORY ON WHICH THE CLAIM IS BASED, AND EVEN IF SAMSUNG HAS BEEN ADVISED
OF THE POSSIBILITY OF SUCH DAMAGES.
NOR SHALL RECOVERY OF ANY KIND AGAINST SAMSUNG BE GREATER IN AMOUNT THAN THE
PURCHASE PRICE OF THE PRODUCT SOLD BY SAMSUNG AND CAUSING THE ALLEGED DAMAGE.
WITHOUT LIMITING THE FOREGOING, PURCHASER ASSUMES ALL RISK AND LIABILITY FOR LOSS,
DAMAGE, OR INJURY TO PURCHASER AND PURCHASER’S PROPERTY AND TO OTHERS AND THEIR
PROPERTY ARISING OUT OF THE USE, MISUSE, OR INABILITY TO USE THIS PRODUCT.
THIS LIMITED WARRANTY SHALL NOT EXTEND TO ANYONE OTHER THAN THE ORIGINAL
PURCHASER OF THIS PRODUCT, IS NONTRANSFERABLE AND STATES YOUR EXCLUSIVE REMEDY.
Some provinces do not allow limitations on how long an implied warranty lasts, or the exclusion or limitation
of incidental or consequential damages, so the above limitations or exclusions may not apply to you.
This warranty gives you specific rights, and you may also have other rights, which vary from province to
province.
To obtain warranty service, please contact SAMSUNG at:
Samsung Electronics Canada Inc.,
Customer Service 55 Standish Court Mississauga, Ontario L5R 4B2 Canada
1-800-SAMSUNG (726-7864)
www.samsung.com/ca
www.samsung.com/ca_fr (French)
Visits by a Service Engineer to explain functions, maintenance or installation is not covered by warranty.
Please contact your Samsung call agent for help with any of these issues.
90_ Warranty
DV455-02836F-02_EN_20120625.indd Sec8:90
2012-06-25
5:21:27
Memo
DV455-02836F-02_EN_20120625.indd Sec8:91
2012-06-25
5:21:27
bit.ly/samsungwashers
QUESTIONS OR COMMENTS?
COUNTRY
CALL
OR VISIT US ONLINE AT
U.S.A
1-800-SAMSUNG (726-7864)
www.samsung.com
MEXICO
01-800-SAMSUNG (726-7864)
www.samsung.com
CANADA
1-800-SAMSUNG (726-7864)
www.samsung.com/ca
www.samsung.com/ca_fr (French)
Visits by a Service Engineer to explain functions, maintenance or installation is not covered by warranty.
Please contact your Samsung call agent for help with any of these issues.
Code No. DC68-02836F-02_EN
DV455-02836F-02_EN_20120625.indd Sec8:92
2012-06-25
5:21:27