1
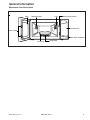
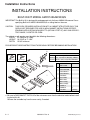
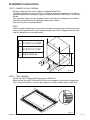
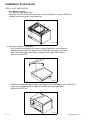
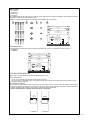
Service
This manual is to be used by qualified appliance
technicians only. Maytag does not assume any
responsibility for property damage or personal
injury for improper service procedures done by
an unqualified person.
2004
Countertop
Domestic
Microwaves
This Base Manual covers general information
Refer to individual Technical Sheet
for information on specific models
This manual includes, but is
not limited to the following:
UMC1071AAB/W
AMC4080AAB/W/Q/S
MMC5080AAB/W/Q/S
AMC5101AAB/W/Q/S
AMC5143AAB/W/Q/S
MMC5193AAB/W/Q/S
16022923
Revision 0
April 2004
Important Information
Pride and workmanship go into every product to provide our customers with quality products. It is possible, however,
that during its lifetime a product may require service. Products should be serviced only by a qualified service
technician who is familiar with the safety procedures required in the repair and who is equipped with the proper tools,
parts, testing instruments and the appropriate service manual. REVIEW ALL SERVICE INFORMATION IN THE
APPROPRIATE SERVICE MANUAL BEFORE BEGINNING REPAIRS.
Important Notices for Consumers and Servicers
!
WARNING
To avoid risk of serious injury or death, repairs should not be attempted by an unauthorized service personnel,
dangerous conditions (such as exposure to electrical shock) may result.
!
CAUTION
Maytag will not be responsible for any injury or property damage from improper service procedures. If performing
service on your own product, assume responsibility for any personal injury or property damage which may result.
To locate an authorized servicer, please consult your telephone book or the dealer from whom you purchased this
product. For further assistance, please contact:
Customer Service Support Center
CAIR Center
Web Site
Telephone Number
WWW.AMANA.COM ................................................ 1-800-843-0304
WWW.MAYTAG.COM ............................................. 1-800-688-9900
CAIR Center in Canada ........................................... 1-800-688-2002
Amana Canada Product ........................................... 1-866-587-2002
Recognize Safety Symbols, Words, and Labels
! DANGER
DANGER—Immediate hazards which WILL result in severe personal injury or death.
!
WARNING
WARNING—Hazards or unsafe practices which COULD result in severe personal injury or death.
!
CAUTION
CAUTION—Hazards or unsafe practices which COULD result in minor personal injury or product or property
damage.
2
16022923 Rev. 0
©2004 Maytag Services
Table of Contents
Important Information .................................................... 2
Important Safety Information ......................................... 4
Microwave Leakage Testing .......................................... 5
General Information
Specifications ............................................................ 7
Placement of the Oven ............................................... 7
Location of Model Number ......................................... 7
Model Identification .................................................... 7
Service ....................................................................... 7
Parts and Accessories ............................................... 7
Asure™ Extended Service Plan ................................. 7
Radio Interference ...................................................... 7
Electrical Requirements ............................................. 8
Cleaning ..................................................................... 8
Grounding Instructions ............................................... 8
Microwave Oven Description ...................................... 9
Troubleshooting Procedures
General ........................................................................ 10
Error Codes
Model MMC5080AA* ............................................. 12
Models AMC5143AA* and MMC5193AA* .............. 12
Testing Procedures ............................................... 13 - 16
©2004 Maytag Services
Disassembly Procedures
Door Assembly ......................................................... 19
Door Disassembly .................................................... 19
Outer Case ............................................................... 20
Control Panel ............................................................ 20
P.C. Board ................................................................ 20
Control Key Panel ..................................................... 21
Interlock Door Latch Switches .................................. 21
High Voltage Capacitor ............................................. 22
Diode ........................................................................ 22
Transformer .............................................................. 22
Fuse ......................................................................... 23
Magnetron ................................................................ 23
Suction Guide/Fan Motor Assembly ......................... 23
Humidity Sensor-MMC5080AA*, AMC5143AA*,
MMC5193AA* ....................................................... 24
Oven Thermostat ...................................................... 24
Light Socket ............................................................. 24
Turntable Motor ......................................................... 24
Appendix A
Installation Instructions for
AMC5143AA* ...................................................... A-2
Installation Instructions for
AMC4080AA* and MMC5080AA* ........................ A-6
Appendix B
Programming Instructions for
AMC4080AA* ...................................................... B-2
Programming Instructions for
MMC5080AA* ..................................................... B-4
Programming Instructions for
AMC5101AA* ...................................................... B-6
Programming Instructions for
AMC5143AA* .................................................... B-10
Programming Instructions for
MMC5193AA* ................................................... B-15
Care and Cleaning ................................................ B-20
16022923 Rev. 0
3
3
Important Safety Information
!
CAUTION
Read the following information to avoid possible exposure to microwave radiation:
The basic design of the Maytag and Amana microwave
oven makes it an inherently safe device to both use and
service. However, there are some precautions which
should be followed when servicing the microwave oven to
maintain this safety. These are as follows:
1. Always operate the unit from an adequately grounded
outlet. Do not operate on a two-wire extension cord.
2. Before servicing the unit (if unit is operable), perform
the microwave leakage test.
3. The oven should never be operated if the door does
not fit properly against the seal, the hinges or hinge
bearings are damaged or broken; the choke is
damaged, (pieces missing, etc.); or any other visible
damage can be noted. Check the choke area to
ensure that this area is clean and free of all foreign
matter.
4. If the oven operates with the door open and
produces microwave energy, take the following
steps.
A. Tell the user not to operate the oven.
B. Contact Maytag immediately.
5. Always have the oven disconnected when the outer
case is removed except when making the "live" tests
called for in the Service Manual. Do not reach into the
equipment area while the unit is energized. Make all
connections for the test and check them for tightness
before plugging the cord into the outlet.
6. Always ground the capacitors on the magnetron filter
box and H. V. Capacitor with an insulated-handle
screwdriver before working in the high voltage area
of the equipment compartment. Some types of
failures will leave a charge in these capacitors and
the discharge could cause a reflex action which
could make you injure yourself.
4
7. In the area of the transformer, capacitor, diode, and
magnetron there is HIGH VOLTAGE. When the unit is
operating, keep this area clean and free of anything
which could possibly cause an arc or ground, etc.
8. Do not for any reason defeat the interlock switches.
There is no valid reason for this action at any time;
nor will it be condoned by Maytag.
9. IMPORTANT: Before returning a microwave to a
customer, check for proper switch interlock action.
The primary and secondary switches MUST open
when the door is actuated. The monitor switch MUST
close at a 1/4 inch when the door is opened.
10.Before returning a microwave to a customer, verify
the door spacing is reasonably uniform along the
top, bottom, and sides, and that it measures 1/8 inch
or less.
11. The microwave oven should never be operated with:
• Any components removed and/or bypassed.
• Any of the safety interlocks failing.
• Any of the seal surfaces failing, missing, or
damaged.
12.To ensure that the unit does not emit excessive
microwave leakage and to meet the Department of
Health Human Service guidelines, check the oven
for microwave leakage using Narda Model 8100,
8200, Holaday HI1500, HI1501 or Simpson 380M
leakage monitor as outlined in the instructions. The
maximum leakage level allowed is 4mW/cm2.
13. If servicer encounters an emission reading over
4 mW/cm2 the servicer is to cease repair and contact
the Maytag Service Department immediately for
further direction. Maytag will contact the proper
Government Agency upon verification of the test
results.
16022923 Rev. 0
©2004 Maytag Services
Microwave Leakage Testing
!
Measurement With the Outer Panel
Removed
W ARNING
Check for radiation leakage after servicing. Should the
leakage be more than 4mW/cm2 inform Maytag
immediately. After repairing or replacing any radiation
safety device, keep a written record for future
reference, as required by D.H.H.S. and HEW
regulations. This requirement must be strictly
observed. In addition, the leakage reading must be
recorded on the service repair ticket while in the
customer’s home.
Avoid contacting any high voltage components.
Whenever you replace the magnetron, measure for
radiation leakage before the outer panel is installed and
after all necessary components are replaced or
adjusted. Special care should be taken in measuring
around the magnetron.
Equipment
Measurement With a Fully Assembled Oven
• Electromagnetic radiation monitor
• 600 cc glass beaker
After all components including the outer panel are fully
assembled, measure for radiation leakage around the
door periphery, the door viewing window, the exhaust
opening, and air inlet openings.
Procedure For Measuring Radiation
Leakage
Note before measuring • Do not exceed meter full scale deflection. Leak
monitor should initially be set to the highest scale.
• To prevent false readings the test probe should be
held by the grip portion of the handle only.
• The scan speed is equal to one inch per antenna
revolution or one inch per second if antenna speed is
unknown.
• Areas to be checked are all door seal areas and any
venting parts.
• Leakage with the outer panel removed...4mW/cm2 or
less.
• Leakage for fully assembled oven with door normally
closed ...4mW/cm2 or less.
• Leakage for a fully assembed oven (before the latch
switch (primary) is interrupted) while pulling the door ...
4mW/cm2 or less.
1 . Pour 275 ±15 cc (9 oz ±1/2 oz) of 20 ± 5°C
(68 ± 9°F) water in a beaker which is graduated to
600 cc and place the beaker in the center of oven.
2. Set the radiation monitor to 2450 MHz and use it
following the manufacturer’s recommended test
procedure to assure correct results.
3. While measuring the leakage, always use the two
inch (5 cm) spacer supplied with the probe.
4. Press the start pad or turn on the timer and with the
magnetron oscillating, measure the leakage by
holding the probe perpendicular to the surface being
measured.
©2004 Maytag Services
Record Keeping and Notification After
Measurement
1. After any adjustment or repair to a microwave oven,
a leakage reading must be taken. Record this
leakage reading on the repair ticket even if it is zero.
2. A copy of the repair ticket and the microwave
leakage reading should be kept by the repair facility.
16022923 Rev. 0
5
General Information
This manual provides basic instructions and suggestions
for handling, installing , and servicing microwave ovens.
The directions, information, and warnings in this manual
are developed from experience with, and careful testing of
the product. If the unit is installed according to the
Installation Instructions, it will operate properly and will
require minimal servicing. A unit in proper operating order
ensures the consumer all the benefits provided by efficient
microwave cooking.
This manual contains information needed by authorized
service technicians to install and service the microwave
pertaining to this manual. There maybe, however some
information which needs further explanation. Refer to
individual Installation Instructions, Use and Care,
Technical Sheets, or toll free technical support line to
answer questions from authorized service technicians.
Cooking Nomenclature
A
M
C
5
5
1
5
A
A
W
Color
A
B
C
H
L
P
Q
S
T
W
F
N
Brand
A
C
G
H
J
M
N
U
Y
Amana
Magic Chief
Graffer &
Sattler
Hardwick
Jenn-Air
Maytag
Norge
Universal
Crosley
Listing
Fuel
B
D
E/J
G
L
M
P
X
W
Almond on Almond
Black
Brushed Chrome
Traditional White
Traditional Almond
Prostyle
Monochromatic Bisque
Stainless
Traditional Bisque
White on White
Frost White (True Color White)
Natural Bisque (True Color Bisque)
A
C
D
G
M
P
Butane
Dual Fuel
Electric
Gas, Natural
Liquid Propane
Microwave
Standing Pilot
No Fuel
Warming Drawer
X
UL/AGA
CSA/CGA/CUL
Dual Listed
220-240 V / 50-60 Hz
Military Model
PSB Approved
(Singapore)
Export 120 V / 60 Hz
Production Code
This identifies which
version of production the
unit is.
Product Type
A
C
D
E
G
L
M
P
Q
R
S
T
V
W
Y
Z
6
Accessory/Cartridge
Cooktop Updraft/Countertop
Downdraft Cooktop or Warming Drawer
Eyelevel Range
Grill
Range (20")
Range (36")
Drop In (24")
Wall Oven (27")
Range, Free-Standing (30")
Slide-In (30")
Range Hood
OTR
Wall Oven
RV Range
RV Top
Feature Content
1000-3999
4000-6999
7000-9999
16022923 Rev. 0
Brands
Maytag/Amana
©2004 Maytag Services
General Information
Specifications
Refer to individual Technical Sheet for specification
information.
Placement of the Oven
This microwave can be easily placed in the kitchen, family
room, or anywhere else in the house. Place the oven on a
flat surface such as a kitchen countertop or a specially
designed microwave oven cart. Do not place oven above a
gas or electric range. Free air flow around the oven is
important.
Do Not Block Air Vents
All air vents must be kept clear during cooking. If air vents
are covered during operation the oven may overheat. In
this case, a sensitive thermal safety device automatically
turns the oven off. The oven will be inoperable until the
oven has cooled sufficiently.
Location of Model Number
To request service information or replacement parts, the
service center will require the complete model, serial, and
manufacturing number of your microwave oven. The
number is located on the oven front as shown in the
illustration below.
Service
Keep a copy of sales receipt for future reference or in
case warranty service is required. To locate an authorized
servicer:
• For Amana product call 1-800-628-5782 or visit the
Web Site at www.amana.com
• For Maytag product call 1-800-462-9824 or visit the
Web Site at www.maytag.com
• For product in Canada call 1-866-587-2002 or visit the
Web Sites at www.amana.com or www.maytag.com
Warranty service must be performed by an authorized
servicer. We also recommend contacting an authorized
servicer, if service is required after warranty expires.
Parts and Accessories
Purchase replacement parts and accessories over the
phone. To order accessories for your product call:
• For Amana product call 1-877-232-6771 or visit the
Web Site at www.amana.com
• For Maytag product call 1-800-462-9824 or visit the
Web Site at www.maytag.com
• For product in Canada call 1-866-587-2002 or visit the
Web Sites at www.amana.com or www.maytag.com
Extended Service Plan
Cavity
Front
We offer long-term service protection for this new oven.
• Asure™ Extended Service Plan is specially designed
to supplement Amana’s strong warranty. This plan
covers parts, labor, and travel charges.
Call 1-866-232-6244 for information.
• Dependability PlusSM Extended Service Plan is
specially designed to supplement Maytag’s warranty.
This plan covers parts, labor, and travel charges.
Call 1-800-925-2020 for information.
Model Identification
Complete enclosed registration card and promptly return.
If registration card is missing:
• For Amana product call 1-800-843-0304 or visit the
Web Site at www.amana.com
• For Maytag product call 1-800-688-9900 or visit the
Web Site at www.maytag.com
• For product in Canada call 1-866-587-2002 or visit the
Web Sites at www.amana.com or www.maytag.com
When contacting provide product information located on
rating plate. Record the following:
Model Number:
___________________
Manufacturing Number:
___________________
Serial or S/N Number:
___________________
Date of purchase:
___________________
Dealer’s name and address:
___________________
©2004 Maytag Services
Radio Interference
1. Microwave oven operation may interfere with the radio
or TV reception.
2. When there is interference, it may be reduced or
eliminated by taking the following measures:
• Clean the door and the seal surface of the oven.
• Reorient the receiving antenna of the radio or TV.
• Relocate the microwave oven in relation to the radio
or TV.
• Move the microwave away from the receiver.
• Plug the microwave into a different outlet so that the
microwave and receiver are on different branch
circuits.
3. 120 VAC, 60 Hz household outlet. Be sure the circuit
is at least 15 or 20 A and the microwave oven is the
only appliance on the circuit. It is not designed for 50
Hz or any circuit other than a 120 VAC, 60 Hz circuit.
• Electrical Rating of the Oven: 120 VAC, 60 Hz
16022923 Rev. 0
7
General Information
Electrical Requirements
Grounding Instructions
The oven is designed to operate on a Standard 120 VAC,
60 HZ household outlet.
This appliance must be grounded. If an electrical short
circuit occurs, grounding reduces the risk of electric
shock by providing an escape wire for the electric current.
The cord for this appliance has a grounding wire with a
grounding plug. Put the plug into an outlet that is properly
installed and grounded.
Cleaning
Before cleaning the oven, unplug the power supply cord. If
impossible, open the oven door to prevent an accidental
oven start.
Inside of the Oven
Use a damp cloth to wipe out crumbs and spillovers. It is
important to keep the area between door and cavity front
clean to assure a tight seal. Remove greasy spatters with
a sudsy cloth, then rinse and dry. Do not use harsh
detergent or abrasive cleaners.
Glass Tray
The glass tray can be washed by hand or in the
dishwasher.
!
Ask a qualified electrician if you do not understand the
grounding instructions or if you wonder whether the
appliance is properly grounded.
Keep the electrical power cord dry and do not pinch or
crush it in any way.
Control Panel
Wipe with a damp cloth followed immediately by a dry
cloth. The Child Lock feature is also useful when cleaning
the control panel. Child Lock prevents accidental
programming when wiping the control panel
(if so equipped).
Properly Polarized and
Grounded Outlet
Door
If steam accumulates inside or around the outside of the
oven door, wipe the panel with a soft cloth. This may
occur when the microwave oven is operated under high
humidity conditions and in no way indicates a malfunction
of the unit.
Outside Oven Surface
Clean with damp cloth. To prevent damage to the
operating parts inside the oven, the water should not be
allowed to seep into the ventilation openings.
After cleaning the oven, be sure that the rotating ring and
the glass tray are in the right position. Press the STOP/
CLEAR pad twice to reset any accidental key setting.
8
W AR NIN G
To avoid risk of electric shock, personal injury or death,
use grounding plug properly.
Three-Pronged (Grounding) Plug
For a permanently connected appliance: This appliance
must be connected to a grounded, metallic, permanent
wiring system, or an equipment grounding conductor
should be run with the circuit conductors and connected
to the equipment grounding terminal or lead on the
appliance.
16022923 Rev. 0
©2004 Maytag Services
General Information
Microwave Oven Description
Door
Light
Ventilation Holes
Safety Interlock Holes
Control Panel
Door Latches
CE1D33
Open Door PushButton
Glass Tray
©2004 Maytag Services
Guide Roller
16022923 Rev. 0
9
Troubleshooting Procedures
!
WARNING
To avoid risk of electrical shock, personal injury or death; disconnect power to oven and discharge the high voltage
capacitor before servicing, unless testing requires power.
! CAUTION
•
•
•
•
•
Verify proper grounding before checking for trouble.
Be careful of the high voltage circuit.
Discharge the high voltage capacitor.
When checking the continuity of the switches or of the high voltage transformer, disconnect one lead wire from
these parts and then check continuity with the AC plug removed. To do otherwise may result in a false reading
or damage to your meter.
Do not touch any part of the circuit on the printed circuit board, since static electric discharge may damage the
control panel. Always touch yourself to ground while working on this panel to discharge any static charge built
up in your body.
Problem
No display and no
operation
(fuse tests OK)
Possible Cause
Open or loose lead wire harness....................
Open thermal cutout (magnetron)
Open low voltage transformer
Defective Assembly PCB ...............................
No display and no
operation
(fuse blown)
Shorted lead wire harness..............................
Defective primary switch
Defective monitor switch
Shorted high voltage capacitor.......................
Shorted high voltage transformer
Cannot program
oven
Key input is not in-sequence ..........................
Open or loose membrane key pad to
Assembly PCB connection .............................
Membrane panel shorted or open
Defective Assembly PCB ...............................
10
16022923 Rev. 0
Correction
• Check wire harness, thermal cutout
and low voltage transformer for loose
wires and continuity, tighten wires
where necessary or replace failed
component, if necessary. If thermal
cutout is replaced, check fan motor.
Replace if necessary.
• Check Assembly PCB. Also, if low
voltage transformer is defective,
check/replace PCB.
• Check adjustment of primary switch,
monitor switch, power relay, door
sensing switch. Readjust/replace if
necessary. The primary, secondary
and monitor switch must be replaced
at the same time.
• Check measurement of high voltage
capacitor and high voltage
transformer. Replace if necessary. If
high voltage transformer is replaced,
check magnetron and diode.
• See Operation Procedure and verify
program sequence
• Check connections of membrane
keypad to Assembly PCB,
tighten/reconnect where necessary.
• Replace Assembly PCB
©2004 Maytag Services
Troubleshooting Procedures
Problem
Timer begins
countdown but
microwave does not
oscillate (oven lamp
illuminates, fan
motor engages but
oven does not
produce heat)
Oven lamp
illuminates and fan
motor engages
Timer does not start
once oven is
programmed
Microwave output is
low; oven takes
longer time to cook
food
Fan motor engages
when oven is
connected to
electrical source
Oven does not
operate and return
to standby
Oven emits loud
noises when
operating
Turntable motor
does not engage
Oven ceases
operation during
cooking process
Sparks emitting
during cooking
process
Uneven cooking
Noise emitting from
turntable motor
during operation
©2004 Maytag Services
Possible Cause
Latch switches not aligned properly ................
Open or loose high voltage circuit connection,
including magnetron filament circuit (greater
contact resistance lowers magnetron filament
voltage, resulting in lower magnetron output
and/or intermittent oscillation) .........................
Defective high voltage components
(transformer, capacitor, diode, fuse,
magnetron) ......................................................
Open or loose power relay wiring
Defective primary latch switch
Defective power relay or Assembly PCB ........
Maladjustment or loose wiring of primary latch
switch
Defective primary latch switch
Open or loose wiring of secondary interlock
switch
Off-alignment of primary interlock
Defective secondary interlock switch
Decrease in power source voltage..............
Open or loose magnetron filament circuit
(intermittent oscillation)
Aged magnetron
Loose wiring on door sensing switch ..........
Correction
• Adjust door and latch switches, replace if
necessary
• Check high voltage circuit connections.
Tighten/reconnect where necessary
• Check measurements on high voltage
components. See test procedure in
Replace component/s if necessary
• Replace Assembly PCB
• Check wiring connections and adjust
door and latch switches. Replace if
necessary.
• Check wiring connections and adjust
door and interlock switches. Replace if
necessary.
• Consult electrician.
• Check door sensing switch wire.
Defective Assembly PCB ............................
• Replace Assembly PCB
Loose fan/fan motor ....................................
Loose screws on high voltage transformer .
• Tighten screws of fan/fan motor.
• Tighten screws of high voltage
transformer.
• Replace high voltage diode.
• Check and replace turntable motor, if
necessary.
• Adjust door and latch switches.
Shorted high voltage diode .........................
Open or loose turntable motor wiring ..........
Defective turntable motor
Open or loose wiring of primary interlock
switch
Metallic ware or cooking dishes touching the
oven wall .....................................................
Ceramic ware trimmed with gold or silver
powder
Microware intensity characteristics
Motor
16022923 Rev. 0
• Remove all cookware trimmed with
metallic substances
• Wrap thinner parts of food with
aluminum foil, plastic wrap or cover with
a lid.
• Stir once or twice while cooking foods
such as soup, cocoa or milk.
• Replace turntable motor.
11
Troubleshooting Procedures
Sensor Error Codes (Model MMC5080AA*)
Error Code
Possible Cause
Error 1
Shorted circuit.
Error 2
Error 3
Error 4
Open circuit.
During cooling, sensor output was not less
then 4.7V within 3 minutes.
Door open when attempting to operate sensor
program.
Sensor Error Codes (Models AMC5143AA* and MMC5193AA*)
Error Code
Possible Cause
E1
Exceeds 1 time limit setting.
E4
E5
12
Sensor open.
Sensor shorted.
16022923 Rev. 0
•
•
•
•
Correction
Allow oven to cool for 5 minutes.
Check connection of wire at sensor.
Check connection of wire at sensor.
Allow oven to cool for 5 minutes.
• Close door, press PAUSE/CANCEL
and restart.
Correction
• Press the PAUSE/CANCEL key and
inspect the condition of the food.
• Check connection of wire at sensor.
• Allow oven to cool for 10 minutes.
©2004 Maytag Services
Testing Procedures
!
WARNING
To avoid risk of electrical shock, personal injury or death; disconnect power to oven and discharge the high voltage
capacitor before servicing, unless testing requires power.
Illustration
Component
High voltage
transformer
120 V
Secondary
Primary
Filament
0V
Models AMC4080AA*
and MMC5080AA*
High voltage
transformer
120 V
Secondary
Primary
Filament
0V
Models AMC5101AA*
High voltage
transformer
120 V
Secondary
Primary
Filament
0V
Models AMC5143AA*
and MMC5193AA*
Low voltage
transformer
1
9
2
6
7
3
8
4
5
Models AMC4080AA*,
MMC5080AA* and
AMC5101AA*
Low voltage
transformer
Red
Black
Blue
Yellow
Yellow
White
White
Models AMC5143AA*
and MMC5193AA*
Magnetron
Test Procedure
Discharge Capacitor
Disconnect connector and measure
continuity:
Secondary.....................................
Filament ........................................
Primary .........................................
(Measure at room temperature, or 70°)
Discharge Capacitor
Disconnect connector and measure
continuity:
Secondary.....................................
Filament ........................................
Primary .........................................
(Measure at room temperature, or 70°)
Discharge Capacitor
Disconnect connector and measure
continuity:
Secondary.....................................
Filament ........................................
Primary .........................................
(Measure at room temperature, or 70°)
Approximately 129 Ω
Measures continuity
Less than 1 Ω
Approximately 87 Ω
Measures continuity
Less than 1 Ω
Approximately 320 Ω
Approximately 7.6 Ω
Discharge Capacitor
Remove from printed circuit board
assembly and check continuity:
White Terminals (Input)..............................
Red-Black Terminal (Output 18 VAC) ........
Black-Blue Terminal (Output 7.0 VAC)
Yellow-Yellow Terminal (Output 2.28VAC)
Approximately 117 Ω
Approximately 6 Ω
Approximately 3 Ω
Approximately 3 Ω
Discharge Capacitor
Discharge Capacitor
Remove wires from capacitor terminals
and connect ohmmeter, set on highest
resistance scale to terminals.
Also check between each terminal and
capacitor case.
©2004 Maytag Services
Approximately 153 Ω
Measures continuity
Less than 1 Ω
Discharge Capacitor
Remove from printed circuit board
assembly and check continuity:
Terminals 1-4 (Input)..................................
Terminals 6-8 (Output 12.6 VAC)...............
Remove wires from magnetron and
connect ohmmeter to terminals. Also
check between each terminal and ground.
High Voltage
Capacitor
Results
16022923 Rev. 0
Between Terminals: Less than 1 Ω
Each terminal to ground: Infinite
resistance.
Note: This test is not conclusive. If
oven does not heat and all other
components test good replace the
magnetron and retest.
Between Terminals: Meter should
momentarily deflect towards zero then
return to over 5M Ω. If no deflection
occurs, or if continuous deflection
occurs, replace capacitor.
Terminal to Case: Infinite resistance
13
Testing Procedures
!
WARNING
To avoid risk of electrical shock, personal injury or death; disconnect power to oven and discharge the high voltage
capacitor before servicing, unless testing requires power.
Illustration
Component
High Voltage Diode
Test Procedure
Discharge Capacitor
Remove diode lead from capacitor and
connect ohmmeter.
Main Relay/Power
Control Relay
Primary Interlock
Switch Test
(Top Switch)
1
Reverse leads for second test.
Disconnect the leads. Place water in the
oven and set the power level to HIGH.
Press START, then check continuity
between the terminals of the relays.
Measure resistance between
terminals 1 and 2:
Door Open...............................................
Door Closed ............................................
Results
Infinite resistance should be measured
in one direction and 50K Ω or more in
the opposite direction.
NOTE: Ohmmeter must contain a
battery of 6 volts minimum.
Measures Continuity
Open
Continuity
2
Secondary Interlock
Switch Test
(Bottom Switch)
Measure resistance between
terminals 1 and 2:
Door Open...............................................
Door Closed ............................................
Open
Continuity
Interlock Monitor
Switch Test
(Middle Switch)
Measure resistance between
terminals 1 and 2:
Door Open...............................................
Door Closed ............................................
Continuity
Open
Measure resistance between
terminals 1 and 2:
Door Open...............................................
Door Closed ............................................
Continuity
Open
1
2
Models AMC4080AA*,
MMC5080AA* and
AMC5193AA*
Interlock Monitor
Switch Test
(Middle Switch)
1
2
Models AMC5101AA*,
MMC5143AA*
14
16022923 Rev. 0
©2004 Maytag Services
Testing Procedures
!
WARNING
To avoid risk of electrical shock, personal injury or death; disconnect power to oven and discharge the high voltage
capacitor before servicing, unless testing requires power.
Illustration
Component
Thermal cutout
Model AMC4080AA*,
MMC5080AA*,
MMC5193AA*
Test Procedure
Disconnect all wires from TCO.
Measure resistance across terminals.
Magnetron TCO .......................................
Thermal cutout
Model AMC5101AA*:
Disconnect all wires from TCO.
Measure resistance across terminals.
Magnetron TCO .......................................
Thermal cutout
Model AMC5143AA*:
Thermal cutout
Model AMC5143AA*
Disconnect all wires from TCO.
Measure resistance across terminals.
Magnetron TCO .......................................
Disconnect all wires from TCO.
Measure resistance across terminals.
Cavity TCO ..............................................
Lamp receptacle
Test continuity of receptacle terminals.
Fan motor
Models AMC4080AA*,
MMC5080AA*,
AMC5101AA*
Remove all wires from motor.
Measure resistance across coil.................
Results
Open at 194°F (90°C) and closed at
140°F (60°C)
Open at 185°F (85°C) and closed at
167°F (75°C)
Open at 302°F (150°C) and closed at
140°F (60°C)
Open at 212°F (100°C) and closed at
32°F (0°C)
Indicates continuity if bulb is good and
screwed in.
Approximately 48 Ω (77°F, 25°C)
Less than 44 Ω or more than 54 Ω
(70°F, 20°C), motor is defective.
Fan motor
Models AMC5143AA*,
MMC5193AA*
Remove all wires from motor.
Measure resistance across coil.................
Approximately 46 Ω (70°F, 20°C)
Less than 42Ω or more than 50Ω
(70°F, 20°C), motor is defective.
Auto Cook Test
(Sensor Only)
Models AMC5143AA*
and MMC5193AA*
Sensor Test
Models AMC5143AA*
and MMC5193AA*
Refer to Parts Manual
for proper power cord
part number.
©2004 Maytag Services
Place 1/3 cup water in oven, then press
POPCORN.
Press SENSOR REHEAT and AUTO
DEFROST at the same time.
Turntable Drive Motor
Measure across terminals
Power cord
Measure resistance of wires.
16022923 Rev. 0
After 1-2 minutes, unit beeps and
display counts down.
Press CLEAR/OFF. If test fails,
continue with Sensor Test.
Numbers displayed at Touch Pad:
15-185 is normal.
185 or higher, sensor open.
15 or lower, sensor shorted.
Voltage: Approximately 20 VAC
Resistance: Approximately 165 Ω
Continuity should be indicated on each
wire.
Verify polarity and grounding.
15
Testing Procedures
!
WARNING
To avoid risk of electrical shock, personal injury or death; disconnect power to oven and discharge the high voltage
capacitor before servicing, unless testing requires power.
Illustration
16
Pin 1
Component
Touch Pad/Control
Panel Model
AMC4080AA*
Test Procedure
Removal of Touch Pad/Control Panel
is required to perform test. Check for
continuity.
Pin 1
Touch Pad/Control
Panel Model
MMC5080AA
Removal of Touch Pad/Control Panel
is required to perform test. Check for
continuity.
16022923 Rev. 0
Pad
1
2
3
4
5
6
7
8
9
0
Popcorn
Potato
One Minute+
Beverage
Pizza Reheat
Fresh Veg
Frozen Dinner
Power Level
Auto Defrost
Clock
Pause/Cancel
Start
Pad
1
2
3
4
5
6
7
8
9
0
Popcorn
Potato
One Minute+
Fresh Veg
Single Entrée
Beverage
Pizza Reheat
Power Level
Auto Defrost
Clock
Kitchen Timer
Sound
Pause/Cancel
Start
Results
Trace
12 & 2
12 & 3
12 & 4
12 & 5
13 & 1
13 & 2
13 & 3
13 & 4
13 & 5
12 & 1
9&5
12 & 6
10 & 3
13 & 7
10 & 6
12 & 7
13 & 6
9&1
10 & 4
10 & 5
10 & 2
10 & 1
Trace
12 & 2
12 & 3
12 & 4
12 & 5
12 & 6
13 & 1
13 & 2
13 & 3
13 & 4
12 & 1
9&3
9&4
9&2
9&6
9&7
13 & 5
11 & 7
10 & 4
10 & 3
11 & 2
11 & 3
11 & 4
11 & 1
9&1
Measurement
Continuity
Continuity
Continuity
Continuity
Continuity
Continuity
Continuity
Continuity
Continuity
Continuity
Continuity
Continuity
Continuity
Continuity
Continuity
Continuity
Continuity
Continuity
Continuity
Continuity
Continuity
Continuity
Measurement
Continuity
Continuity
Continuity
Continuity
Continuity
Continuity
Continuity
Continuity
Continuity
Continuity
Continuity
Continuity
Continuity
Continuity
Continuity
Continuity
Continuity
Continuity
Continuity
Continuity
Continuity
Continuity
Continuity
Continuity
©2004 Maytag Services
Testing Procedures
!
WARNING
To avoid risk of electrical shock, personal injury or death; disconnect power to oven and discharge the high voltage
capacitor before servicing, unless testing requires power.
Illustration
Pin 1
Component
Touch Pad/Control
Panel Model
AMC5101AA*
Pin 1
Touch Pad/Control
Panel Model
AMC5143AA*
©2004 Maytag Services
Test Procedure
Removal of Touch Pad/Control Panel
is required to perform test. Check for
continuity.
Pad
1
2
3
4
5
6
7
8
9
0
Auto Reheat
Auto Defrost
One Minute+
Popcorn
Potato
Beverage
Pizza Reheat
Bacon
Frozen Dinner
Handy Helper
Kids Meals
Snack Bar
Power Level
Kitchen Timer
Clock
Sound
Pause/Cancel
Start
Removal of Touch Pad/Control Panel
Pad
is required to perform test. Check for
1
continuity.
2
3
4
5
6
7
8
9
0
Sensor Reheat
Auto Defrost
One Minute+
Popcorn
Potato
Pizza Reheat
Frozen Dinner
Fresh Vegs
Frozen Bfast
Frozen Vegs
Handy Helper
Kids Meals
Snack Bar
Power Level
Kitchen Timer
Help
My Choice
Pause/Cancel
Start
16022923 Rev. 0
Results
Trace
12 & 2
12 & 3
12 & 4
12 & 5
12 & 6
13 & 1
13 & 2
13 & 3
13 & 4
12 & 1
10 & 2
10 & 3
9&2
9&3
9&4
13 & 5
11 & 7
12 & 7
9&7
11 & 5
10 & 5
9&5
10 & 4
11 & 3
11 & 2
11 & 4
1&1
9&1
Trace
15 & 2
15 & 3
15 & 4
15 & 5
15 & 6
14 & 1
14 & 2
14 & 3
14 & 4
15 & 1
11 & 2
12 & 2
11 & 3
10 & 1
10 & 2
9&6
9&2
10 & 5
9&1
10 & 6
13 & 4
13 & 5
13 & 6
13 & 2
12 & 4
14 & 6
12 & 6
13 & 1
12 & 1
Measurement
Continuity
Continuity
Continuity
Continuity
Continuity
Continuity
Continuity
Continuity
Continuity
Continuity
Continuity
Continuity
Continuity
Continuity
Continuity
Continuity
Continuity
Continuity
Continuity
Continuity
Continuity
Continuity
Continuity
Continuity
Continuity
Continuity
Continuity
Continuity
Continuity
17
Testing Procedures
!
WARNING
To avoid risk of electrical shock, personal injury or death; disconnect power to oven and discharge the high voltage
capacitor before servicing, unless testing requires power.
Illustration
Pin 1
18
Component
Touch Pad/Control
Panel Model
MMC5193AA*
Test Procedure
Removal of Touch Pad/Control Panel
is required to perform test. Check for
continuity.
16022923 Rev. 0
Pad
1
2
3
4
5
6
7
8
9
0
Sensor Reheat
Auto Defrost
One Minute+
Popcorn
Potato
Pizza Reheat
Fresh Vegs
Frozen Bfast
Frozen Vegs
Frozen Dinner
Handy Helper
Kids Meals
Snack Bar
Power Level
Kitchen Timer
Clock
My Choice
Help
Pause/Cancel
Start
Results
Trace
15 & 2
15 & 3
15 & 4
15 & 5
15 & 6
14 & 1
14 & 2
14 & 3
14 & 4
15 & 1
11 & 2
12 & 2
11 & 3
10 & 1
10 & 2
9&6
10 & 5
9&1
10 & 6
9&2
13 & 4
13 & 5
13 & 6
13 & 2
12 & 4
13 & 3
12 & 6
14 & 6
13 & 1
12 & 1
Measurement
Continuity
Continuity
Continuity
Continuity
Continuity
Continuity
Continuity
Continuity
Continuity
Continuity
Continuity
Continuity
Continuity
Continuity
Continuity
Continuity
Continuity
Continuity
Continuity
Continuity
Continuity
Continuity
Continuity
Continuity
Continuity
Continuity
Continuity
Continuity
Continuity
Continuity
©2004 Maytag Services
Disassembly Procedures
!
To avoid the risk of electrical shock, personal injury or
death; disconnect power to oven and discharge
capacitors before following any disassembly procedure.
W AR NIN G
High voltage is present at the high voltage terminal of the
high voltage transformer during any cooking cycle.
It is neither necessary or advisable to attempt
measurement of the high voltage.
Before touching any oven components or wiring, always
unplug the oven from its power source and discharge
capacitor.
Door Disassembly
1. Disconnect power to oven and remove oven door,
see "Door Removal" procedure.
2. To remove the choke cover, locate one of the plastic
seatings securing the choke cover to the inner door
assembly. Insert a tool near the seating and gently
pry outward. Continue to work around the door
casing (prying near the plastic seatings) until choke
cover is completely loose. Remove the choke cover.
Door Assembly
!
CAUTION
A microwave leakage test must be performed anytime
a door assembly is removed, replaced, disassembled,
or adjusted for any reason.
Door Removal
1. Disconnect power to oven and remove outer case,
see "Outer Case" procedure.
2. Open the oven door to gain access to the upper
hinges. Remove 2 screws securing the upper
hinges.
3. Guide the upper hinge out of the hinge cavity.
4. Gently maneuver the door hinge pin away from the
lower hinge assembly. Lower hinge bracket should
remain attached to the microwave.
NOTE: When aligning the door for assembly, fully open
the door.
5. To place the door back on the unit, gently maneuver
the lower hinge pin onto the lower hinge assembly
while guiding the upper hinge assembly into the
upper hinge assembly cavity. Use caution and do not
allow the upper hinge assembly to separate from the
upper hinge pin. Reattach the two upper hinge
assembly retaining screws.
Upper Hinge
and screws
!
CAUTION
To avoid property damage, care must be taken when
prying choke cover from inner door assembly and
when prying inner door assembly from door frame.
3. Once the choke cover is removed, remove the inner
door assembly.
4. To remove the inner door assembly, carefully pry on
the seatings securing the inner door assembly to the
door frame. Continue to work around the door casing
(prying near the plastic seatings) until the inner door
assembly is completely loose. Remove the inner
door assembly.
5. Once the inner door assembly is removed, the door
latch and spring assembly may be removed.
6. When removing door latch and spring assembly,
remove the spring first, then slide latch assembly up
and remove.
7. Reassemble in reverse order.
Lower Hinge
©2004 Maytag Services
16022923 Rev. 0
19
Disassembly Procedures
!
To avoid the risk of electrical shock, personal injury or
death; disconnect power to oven and discharge
capacitors before following any disassembly procedure.
W AR NIN G
Control Panel
The control panel is made up of several components,
such as p.c. board and touch panel.
Hinges
Door Frame
Choke
Cover
Inner Door
Assembly
Control Panel Removal
1. Disconnect power to unit and remove outer case,
see "Outer Case" procedure.
2. Open microwave door.
3. Remove screw securing ground strap to microwave
frame.
4. Remove screws located at the top and along the side
of the touch panel. Remove the screw securing the
gound strap, then open the door. Lift control panel
up and out to release bottom tab connections.
!
Latch and Spring
CAUTION
Hold ground strap secure when removing or attaching
screw. Place the green wire under the ribbon strap.
!
CAUTION
A microwave leakage test must be performed anytime
a door assembly is removed, replaced, disassembled,
or adjusted for any reason.
Screws
Outer Case
1.
2.
3.
4.
Disconnect power to unit.
Remove screws securing outer case to the unit.
Slide outer case towards the rear of the unit, then up.
Place outer case in a safe loacation to prevent
damage.
5. Reassemble in reverse order.
5. Place control panel on a flat surface.
6. Reassemble in reverse order.
20
16022923 Rev. 0
©2004 Maytag Services
Disassembly Procedures
!
To avoid the risk of electrical shock, personal injury or
death; disconnect power to oven and discharge
capacitors before following any disassembly procedure.
W AR NIN G
P.C. Board
The p.c. board is located on the back of the control
panel near the top. This board has up to five connection
plugs which control the main power, relays and the
ribbon connector for the key panel.
P.C. Board Removal
1. Disconnect power to unit and remove outer case,
see "Outer Case" procedure.
2. Remove control panel, see "Control Panel"
procedure.
3. Discharge high voltage capacitor, see "High Voltage
Capacitor" procedure.
4. Disconnect ribbon connector by sliding top part of
connector upward. Once released, remove ribbon
from connector by sliding side-to-side.
NOTE: Caution should be used when removing cable
from connector. Ribbon cable has two holes
which the connector locks the ribbon in place.
5. Disconnect / mark wire connectors from P. C. Board.
6. Remove screws securing P. C. Board to control
panel assembly.
7. Reassemble in reverse order.
NOTE: Do not flex P. C. Board.
Control Key Panel Removal
1. Disconnect power to unit and remove outer case,
see "Outer Case" procedure.
2. Remove control panel, see "Control Panel"
procedure.
3. Discharge high voltage capacitor, see "High Voltage
Capacitor" procedure.
4. Disconnect ribbon connector by sliding connector
upward. Once in released position, remove ribbon
from connector by sliding side-to-side.
NOTE: Caution should be used when removing cable
from connector. Ribbon cable has two holes
which connector locks ribbon in place.
5. Reassemble in reverse order.
Interlock Door Latch Switches
Primary switch is operated by top latch pawl.
Interlock Switch Removal
1. Disconnect power to unit and remove outer case,
see "Outer Case" procedure.
2. Remove control panel, see "Control Panel"
procedure.
3. Discharge high voltage capacitor, see "High Voltage
Capacitor" procedure.
4. Test interlock switches before removing, see "Testing
Procedures."
5. Disconnect and label wire connections.
6. Remove interlock switch or latch board assembly by
applying pressure to both sides of the switch
mounting tabs (two near the front, two near the rear).
7. Gently remove the switch mechanism.
8. Reassemble in reverse order.
Primary
Interlock
Switch
Control Key Panel
The key panel has one ribbon connection on the P. C.
Board, and can be checked through a continuity test.
Operations of key pad can be checked by measuring
connections at end of ribbon (using high ohms scale).
Body Latch
Interlock
Monitor
Switch
Plastic fastener
Hook
Lever Switch
Door
Sensing
Switch
Holes
!
F.P.C.
connector
Terminal
socket
©2004 Maytag Services
CAUTION
Before replacing a blown monitor fuse, test both
interlock switches, monitor switch and power relay
contacts for proper operation. If the monitor fuse is
blown by a failed switch operation, all switches and
the printed circuit board must be replaced.
16022923 Rev. 0
21
Disassembly Procedures
!
To avoid the risk of electrical shock, personal injury or
death; disconnect power to oven and discharge
capacitors before following any disassembly procedure.
W AR NIN G
Adjusting Interlocks
The interlock monitor, primary, and secondary switches
act as a final safety switch protecting the operator from
microwave energy. After adjusting the interlock monitor
switches, verify they are correctly connected.
For door fit and switch operation, switch housing is
adjustable.
High Voltage Capacitor
High voltage capacitor should always be discharged by
shorting a terminal to a chassis ground. The capacitor
has a internal "shunt" resistor, but the mechanical
discharge should always be performed to avoid personal
injury.
1. Disconnect power to unit and remove outer case,
see "Outer Case" procedure.
2. Remove control panel, see "Control Panel"
procedure.
3. Loosen switch mounting screw on vertical flange.
4. Close oven door, move latch board upward toward
the top of the oven and/or away from the door latch
until gaps are less than 1/6–inch (0.5 mm).
5. Hold latch board securely for proper switch operation
and door fit, retighten screws.
6. Open the oven door slowly, watching the switches.
Verify switches release in the following order.
• Primary interlock switch
• Secondary interlock switch
• Interlock monitor switch
High Voltage Capacitor Removal
1. Disconnect power to unit and remove outer case,
see "Outer Case" procedure.
2. Discharge the high voltage capacitor by connecting a
jumper wire to the terminal of the high voltage
capacitor with the diode connection. Connect the
opposite end of the jumper wire to a well insulated
screwdriver and touch the screwdriver to the nearest
chassis ground screw.
3. Remove screws securing capacitor bracket.
4. Slide capacitor mounting bracket out of the slots and
pull outward on capacitor, diode and bracket.
5. Reassemble in reverse order.
NOTE: Adjust the latch board until all switches operate
in proper sequence.
The diode is located next to the high voltage capacitor.
7. Close the oven door slowly, watching the switches.
Verify switches activate in the following order.
Adjustment
Direction
Primary
Interlock
Switch
Interlock
Monitor
Switch
Door
Sensing
Switch
22
Diode
1. Disconnect power to unit and remove outer case,
see "Outer Case" procedure.
2. Discharge high voltage capacitor, see "High Voltage
Capacitor" procedure.
3. Disconnect diode wire terminal from high voltage
capacitor and remove screw securing diode to
ground.
4. Reassemble in reverse order.
Transformer
Power Transformer Removal
1. Disconnect power to unit and remove outer case,
see "Outer Case" procedure.
2. Discharge high voltage capacitor, see "High Voltage
Capacitor" procedure.
3. Disconnect and label wire leads from transformer.
4. From bottom of unit, access and remove screws
securing transformer.
5. Remove transformer.
6. Reassemble in reverse order.
16022923 Rev. 0
©2004 Maytag Services
Disassembly Procedures
!
W AR NIN G
To avoid the risk of electrical shock, personal injury or
death; disconnect power to oven and discharge
capacitors before following any disassembly procedure.
Fuse
Suction Guide/Fan Motor Assembly
Fuse is located in line with the power cord.
Suction guide assembly also consists of the latch board
assembly.
1. Disconnect power to unit and remove outer case,
see "Outer Case" procedure.
2. Remove and replace fuse, reassemble in reverse
order.
!
CAUTION
Before replacing a blown monitor fuse, test the
primary interlock switch, secondary interlock switch,
monitor switch, and power relay contacts for proper
operation. If the monitor fuse is blown by a failed
switch operation all switches and printed circuit board
must be replaced.
Magnetron
Magnetron fan motor provides cool air circulation from
an external air source, which provides direct cool air
through air vanes surrounding the magnetron.
1. Disconnect power to unit and remove outer case, see
"Outer Case" procedure.
2. Discharge high voltage capacitor, see "High Voltage
Capacitor" procedure.
3. Disconnect wire leads from fan motor by depressing
dimple on blue connectors, which releases the wire
clamp securing the wire to the motor.
4. Remove screws securing cooling fan to oven chassis
(screws accessible from the back of the unit).
5. Remove screws securing fan to mounting bracket.
Magnetron is mounted to the side of the cavity.
1. Disconnect power to unit and remove outer case, see
"Outer Case" procedure.
2. Discharge high voltage capacitor, see "High Voltage
Capacitor" procedure.
3. Remove screws securing magnetron to the wave
guide.
4. Reassemble in reverse order.
Fan Blower
Cover
NOTE: When replacing the magnetron, the gasket must
be in the correct position and in good condition.
Fan Motor
Fan Blade
6. Remove screws securing fan motor assembly to
bracket.
7. Remove fan blade by gently forcing blade from shaft.
8. Reassemble in reverse order.
Magnetron
Wave Guide
!
CAUTION
During replacement of magnetron, be certain the R.F.
anode gasket is in place around the anode stud.
!
WARNING
A microwave leakage test must be performed anytime
a magnetron assembly is removed, replaced,
disassembled or adjusted.
©2004 Maytag Services
16022923 Rev. 0
23
Disassembly Procedures
!
To avoid the risk of electrical shock, personal injury or
death; disconnect power to oven and discharge
capacitors before following any disassembly procedure.
W AR NIN G
Gas/Humidity Sensor – MMC5080AA*,
AMC5143AA*and MMC5193AA*
Turntable Motor
The sensor is a plug-in device located on the cavity shell
near the rear of the unit.
1. Disconnect power to unit and remove outer case,
see "Outer Case" procedure.
2. Remove sensor retainer.
3. Disconnect wire terminal retaining plug.
4. Remove/replace sensor.
5. Reassemble in reverse order.
Sensor
Receptacle
Retainer
1. Disconnect power to oven.
2. Open the oven door, remove turntable, and gently pry
upward on turntable shaft cover. During reassembly,
locate the half-moon design on the cover, align with
the shaft and genlty apply pressure.
Front of
Unit
Sensor
3. Remove bottom plate cover by cutting metal tabs.
When reinstalling use the provided screw.
Exact location
may vary
Oven Thermostat
The oven thermostat is located on the top left side of the
oven cavity on models AMC5143AA* and MMC5193AA*,
top right side of the oven cavity on all other models.
Thermostat is a resettable thermostat.
1. Disconnect power to unit and remove outer case,
see "Outer Case" procedure.
2. Disconnect wires.
3. Remove screw securing oven thermostat, slide
thermostat out.
4. Reassemble in reverse order.
Light Socket
1. Disconnect power to unit and remove outer case,
see "Outer Case" procedure.
2. Disconnect wire terminal plug from light socket.
3. Remove light socket from air duct by pressing
together the hold-downs located on the light socket
bracket.
4. Remove light bulb.
5. Replace and reassemble in reverse order.
4. Disconnect wire leads from turntable motor.
Wire leads
Turntable motor
Lamp
5. Remove screws securing turntable to the oven cavity.
6. Replace and reassemble in reverse order.
Wave Guide
24
16022923 Rev. 0
©2004 Maytag Services
Appendix A
©2004 Maytag Services
16022923 Rev. 0
A–1
Installation Instructions
INSTALLATION INSTRUCTIONS
BUILT-IN KIT MODEL AMC5143AAB/W/Q/S
IMPORTANT: This Built-In Kit is desinged for and approved only for those AMANA Microwave Ovens
specifying Built-In Kit AMC5143AAB/W/Q/S on rating label on the oven.
CAUTION:
THIS OVEN REQUIRES INSTALLATION INTO A CABINET STRUCTURE ONLY. THIS
OVEN IS NOT DESIGNED FOR USE IN NON-CABINET INSTALLTIONS OR FREESTANDING APPLICATIONS ADJACENT TO (WITHIN 2 FEET OF) ANY GAS OR ELECTRIC RANGE, COOKTOP OR OVEN.
The cabinet or wall opening must be within the following dimensions :
WIDTH 22-13/64" to 22-19/64"
HEIGHT 16-15/16" to 17-1/64"
DEPTH 15-3/4" minimum
PLEASE READ THESE INSTRUCTIONS THOROUGHLY BEFORE BEGINNING INSTALLATION!
8
Screw Information
Part
Specification
Screw-A TH,+, 2S, M4,L12,IPC(YEL), SM20C
Screw-B WE,TH,+,M4,L12,IP(YEL),WASHER
11
10
Screw A Type
Screw B Type
9
5
6
12
1
7
3
4
2
❉
NO. PART NAME
PART CODE
1
DUCT UPPER
2
DUCT BOTTOM
3
DUCT BACK A
4
DUCT BACK B
5
DUCT-RAIL
6
ASSY TRIM
7
TRIM -SIDE
8
TRIM -CAP(L)
9
TRIM -CAP(R)
10 SCREW A
11 SCREW B
12 CUSHION
Q’TY
1
1
1
1
2
2
2
2
2
4
17
1(168mm)
Be sure to DISCONNECT THE PLUG of the microwave oven from the electrical outlet before installing the built-in kit.
Remove the turntable tray from the oven cavity, if needed.
A–2
16022923 Rev. 0
©2004 Maytag Services
Installation Instructions
STEP 1 : CABINET OR WALL OPENING
Provide an opening in the wall or cabinet, as indicated in SKETCH 1.
The depth should be a minimum of 15-3/4". The floor of the opening should be constructed of
plywood strong and thick enough to support the weight of the oven <about 50 lbs.> and installation job.
First, punch the 4-holes using the template, Place the Duct-Rail on the Bottom of the Cabinet.
Coincide the Duct-Rail holes with the bottom holes of the Cabinet.
Screw the Duct-Rail using Screw B(4EA)
NOTE :
While the proper functioning of the oven does not require that opening be enclosed (with sides,
ceiling and rear partition) this may be required by local code, and it is suggested that the local
code be checked for any such requirement.
W
22-13/64" to 22-19/64"
H
16-15/16" to 17-1/64"
D
15-3/4" minimum
W
D
H
SKETCH 1
STEP 2 : TRIM ASSEMBLY
Position the ASSY TRIM and SIDES as shown in SKETCH 2.
Make sure that the ASSY TRIM and SIDES are lined up properly to be neat and symmetrical.
Then using Screw B(4EA) , screw the parts together at screw locations shown in SKETCH 2.
SKETCH 2
©2004 Maytag Services
16022923 Rev. 0
A–3
Installation Instructions
STEP 3 : DUCT INSTALLATION
a. Duct Bottom Installation
First, place the oven upside-down.
Attach the DUCT BOTTOM to the oven base using Screw B(4EA) as shown in SKETCH 3.
Carefully return the oven to it's original position.
SKETCH 3
b. Duct Upper & Back A, B Installation
1. First, screw the Duct Upper & Duct Back-A using Screw B(1EA) and remove the
Double-side tape of the Duct Upper. Remove the Double-Side tape of the Cushion.
Stick it to the Duct Upper & Duct Back-A along the Duct Upper & Duct Back-A.
Refer to the SKETCH 4.
SKETCH 4
2. Place the Assembled parts(Duct Upper & Duct Back A) on the Microwave Oven in SKETCH 5.
Screw the Assembled parts(Duct Upper & Duct Back A) using Screw B(2EA) .
Refer to the SKETCH 5.
SKETCH 5
A–4
16022923 Rev. 0
©2004 Maytag Services
Installation Instructions
3. Unscrew the Outer-Panel screw of position P.
After unscrewing, screw the Duct-Back B using Screw B(2EA) . Refer to the SKETCH 6.
SKETCH 6
STEP 4 : INSERTION OF MICROWAVE OVEN TO CABINET
Insert the Microwave Oven into the Cabinet and coincide the foot & Duct-Rain foaming holes.
Put it on the rail. Refer to the SKETCH 7.
SKETCH 7
ELECTRIC SUPPLY
PLUG THE THREE-PRONG POWER CORD INTO A PROPERLY GROUNDED OUTLET, 120V, 60Hz.
STEP 5 : INSERTION OF THE TRIM ASSEMBLY
Screw the TRIM ASSEMBLY to the Cabinet using the Secrew A(4EA) .
Next, put the TRIM-CAP (R) & (L) . Refer to the SKETCH 8.
SKETCH 8
SKETCH 8
Part No. : 8101P615-60
Code No. : DE68-02898A
©2004 Maytag Services
16022923 Rev. 0
A–5
Installation Instructions
Models AMC4080AA*, MMC5080AA*
Installation Instructions
READ CAREFULLY. KEEP THESE INSTRUCTIONS.
IMPORTANT SAFETY INSTRUCTIONS
WARNING
Before attempting the installation of this kit, be sure to unplug the oven from wall receptacle.
Your oven is designed to be installed under properly constructed, good condition wood or metal cabinets that are sturdy enough to support
the items you have in the cabinet, plus an additional 41 kg (90 pounds) from the cabinet bottom.
Empty the contents of your selected cabinet and the delicate items in adjoining cabinets.
(NOTE: When drilling the holes, the vibration could cause damage to fragile items such as crystal or china.)
Now, you must inspect your cabinets. If any of the following conditions exist, then it is your personal responsibility to test the cabinets or
contact a qualified cabinet maker.
1. Separation of joints between the bottom shelf and the cabinet structure.
2. Splitting, cracking or other signs of deterioration.
3. Check the number of screws used to install your cabinets. If your cabinet is attached to the wall with only two screws at the top, then
you must add two screws at the bottom to firmly secure your cabinet to the wall. When adding the screws, be sure that they enter wall
studs with at least 1.3 cm (1/2”) penetration.
4. On wood cabinets, the bottom shelf must be at least .48 cm (3/16”) thick masonite or plywood.
5. Be sure that the underside of the cabinet is at least 50 cm (20”) wide and 35.0cm (13 25/32”) deep. If the cabinet is less than
35.0cm(13 25/32”) deep, follow the cabinet mounting instructions catefully if you desire to mount your oven under cabinet.
To test your cabinets, place a 40 KG(90LB.) load, plus the equivalent weight of items normally stored on the shelf*, for a minimum of five
minutes.
*You may consider using jugs of water, bricks or books to obtain the test load.
PLEASE NOTE: If your cabinet is properly constructed and suitably installed it will withstand this test without any damage; however, there
is the possibility of damage should the cabinet be incapable of supporting the additional load.
The Maytag Company is NOT RESPONSIBLE FOR ANY DAMAGE OR OTHER CONSEQUENCES resulting from the performance of
this test.
If you are unsure that your cabinets are suitable for this type of installation you may use the oven on your countertop.
TOOLS AND PARTS
The following tools are needed for installation of your unit:
•
•
•
•
•
•
Drill and .64cm (1/4”) drill bit
Phillips and flat blade screwdrivers
Nail or center punch
Pencil and ruler
Scissors
Hammer
INSTALLATION PARTS LIST
The following is a list of the parts that you may need for installation of your oven.
Remove all parts from the cooking cavity and compare them with the parts list and illustration to be sure that none are missing. Use this
time to become familiar with each piece.
Part No.: 8101P611-60
Code No.: DE68-02900A
A–6
16022923 Rev. 0
©2004 Maytag Services
PARTS LIST
1. 3 Sets of bolts
2. 4-washers-A
3. 4-washers-B
4. 1-Template
Upon completing your check of the parts list, read all instructions completely before starting the installation. This will help you to become
familiar with the process and make installation easier.
(NOTE: It is suggested that you gather all needed tools and installation parts in one location.)
4
HOLE CENTRE LINE
DETACH
DETACH
DETACH
HOLE CENTRE LINE
DETACH
3
15 25/64"
2
TEMPLATE 1
1
TEMPLATE 2
IMPORTANT
Read the installation booklet for complete instructions before beginning installation.
Template must lay flat against the cabinet when locating the holes.
MICROWAVE SIDE
CABINET
FRONT
INSTRUCTIONS
(See installation booklet for complete instructions.)
If you drill the 4 mounting holes from the inside of the cabinet - place the
front edge of the template at the front edge of the cabinet.
Drill the 4 holes 1/4" DIA. as described in the installation instruction booklet.
or
(B)
HOLE CENTRE LINE
TEMPLATE
ON TOP SIDE
(A)
MICROWAVE SIDE
HOLE CENTRE LINE
15 25/64"
CABINET
FRONT
TEMPLATE ON
BOTTOM SIDE
FRONT RAIL
THICKNESS
CUT EDGE
TEMPLATE
CUT LINES
If you drill the mounting holes from the bottom side of the cabinet measure the thickness of the front rail and cut that amount off the front of
the template. Use the cutting lines to insure a straight cut. Place the cut
edge against the back side of the front rail and position the template flat
against the bottom side of the cabinet.
Drill the 4 holes 1/4" DIA. as described in the installation instruction booklet.
CABINET FRONT
TEMPLATE
CUT LINES
1 1/4 INCH
1 INCH
1/2 INCH
1/4 INCH
FRONT
FRONT
PREPARATIONS
Open the template and detach both segments along the dashed line with scissors. You should have two separate pieces.
HOLE CENTRE LINE
15 25/64"
TEMPLATE 1
DETACH
DETACH
DETACH
HOLE CENTRE LINE
DETACH
• Template 1
• Template 2
TEMPLATE 1
TEMPLATE 2
IMPORTANT
Read the installation booklet for complete instructions before beginning installation.
Template must lay flat against the cabinet when locating the holes.
MICROWAVE SIDE
INSTRUCTIONS
CABINET
FRONT
(See installation booklet for complete instructions.)
If you drill the 4 mounting holes from the inside of the cabinet - place the
front edge of the template at the front edge of the cabinet.
Drill the 4 holes 1/4" DIA. as described in the installation instruction booklet.
or
(B)
HOLE CENTRE LINE
(A)
MICROWAVE SIDE
HOLE CENTRE LINE
15 25/64"
TEMPLATE
ON TOP SIDE
CABINET
FRONT
FRONT RAIL
THICKNESS
TEMPLATE ON
BOTTOM SIDE
CUT EDGE
If you drill the mounting holes from the bottom side of the cabinet measure the thickness of the front rail and cut that amount off the front of
the template. Use the cutting lines to insure a straight cut. Place the cut
edge against the back side of the front rail and position the template flat
against the bottom side of the cabinet.
Drill the 4 holes 1/4" DIA. as described in the installation instruction booklet.
TEMPLATE
CUT LINES
CABINET FRONT
TEMPLATE
CUT LINES
1 1/4 INCH
1 INCH
1/2 INCH
1/4 INCH
FRONT
FRONT
TEMPLATE 2
TWO MOUNTING METHODS
There are two mounting methods described in this booklet that can be used.
1. Countertop Method
You can use this method if you decide not to cabinet mount your oven.
To use your oven as a countertop model, simply position the oven on the desired counter and plug the electrical cord into a three
prong (grounded)wall receptacle.
2. Cabinet Mounting Method
This method is for mounting your oven under a cabinet and uses the template, 4-washers and one set of screws. Before using this method,
the 4 plastic plug buttons on the top of the oven must be removed. This can be done by placing a thin flat blade screwdriver between the
plug button and the oven top and raising gently, taking care to avoid acratching the oven top.
OVEN MAY BE MOUNTED TO CABINETS WITH OR WITHOUT A FRONT RAIL.
CABINET
(SIDE VIEW)
COUNTERTOP
©2004 Maytag Services
CABINET
(SIDE VIEW)
COUNTERTOP
16022923 Rev. 0
A–7
DRILLING APPROACH
You have two options for drilling the mounting holes for your oven.
First, you can drill from inside of the cabinet if you have adequate space and your shelves are removable.
Second, you can drill from the bottom.
If possible, it is generally easier to work from the inside of the cabinet. Use the instructions applicable to the approach you select. Make
sure you use the template properly depending whether you drill holes from the inside or bottom side of the cabinet.
INSTRUCTIONS FOR DRILLING FROM INSIDE
If you cannot drill from the inside, go to Instructions for Drilling From Bottom.
1. If your cabinet is less than 35cm(13 25/32”) deep, cut off the front edge of Template 2 the amount by which the cabinet depth is less
than 35cm(13 25/32”), using the template cut lines as a fuide. Place Template2 inside cabinet. Cut around door jam and if necessary,
corners to make template fit.(The front edge of template must be even with the front edge of the cabinet.) Place Template 2 in
cabinet.
NOTE: For cabinets with a recessed shelf you must measure the thickness of the front rail and cut that amount off the front edge of
Template 2 using the template cut lines as a guide. This will allow Template 2 to lay flat in the shelf.
2. If you have a partition in the cabinet, you must do the following:
• Cut Template 2 into two pieces to fit each side of the partition.
• Position one piece of Template 2 inside the cabinet, making sure that the front edge is even with the front edge of cabinet.
• Position Template 1 on front of the cabinet so that the arrow is aligned with the hole center line on Template 2.
• Position remaining piece of Template 2 inside cabinet and align the hole center lines with arrows on Template 1 so that
distance from right hole center to left hole center measures the distance indicated on the template. (You will have to cut
excess paper from the middle of Template 2 to make it lay flat.)
• Position the remaining piece of Template 2 inside cabinet.
• Check again to make sure that the hole center lines on Template 2 are straight and that the distance from the right to left
drilling holes measures the distance indicated on the template.
• Go to Drilling the Mounting Holes.
INSTRUCTIONS FOR DRILLING FROM BOTTOM
1. If you have a front rail, measure the thickness and cut that amount off the front edge of Template 2 using the template cut lines as a
guide.
2. Place cut edge of Template 2 against the back side of the front rail and position it flat against the bottom side of the cabinet.
NOTE: On some cabinets a small bracket or glue block is used between the overhang and the underside of the cabinet bottom. If this is
true of your cabinets, cut Template 2 to fit around the bracket or glue block so that it will be flat on the cabinet bottom when attached.
3. If you have a partition you must do the following:
• Cut Template 2 into two pieces to fit on each side of the partition.
• Position one piece of Template 2 under the cabinet. (The cut line along the front edge of Template 2 must be placed
against the back of the front rail.)
• Attach Template 1 to rear of cabinet and align arrows with hole center line on Template 2.
A–8
16022923 Rev. 0
©2004 Maytag Services
• Position remaining piece of Template 2 under the cabinet and align the hole center lines with arrows on Template 1 so
that the distance from right hole center to left hole center measures the distance indicated on the templates. (You may
have to cut excess paper from middle of the template to make it lay flat.)
• Position Template 2. (The cut line along the front edge of template must be placed against the back of the front rail.)
DRILLING THE MOUNTING HOLES
While drilling, it is recommended that safety glasses be worn to prevent possible eye damage from cabinet shavings.
1. Use a center punch or nail to make an indentation for centering the drill bit.
2. Drill through Template 2 at the four black drilling holes indicated on the template. (Drill should be held straight to ensure proper
alignment of bolts.)
3. After drilling the four holes, remove the template and clean the drill holes.
SELECTING YOUR MOUNTING BOLTS
1. You should have three sets of bolts of varying lengths in the installation package. select one bolt of each size.
2. Hold each bolt against the cabinet front rail. pick the bolt that extends beyond top of the bottom shelf by. 48 cm (3/6") to 2.54 cm (1").
this will be the bolt length needed for your cabinets.
2.54cm~0.5cm
(1"~3/16")
TOP OF BOTTOM SHELF
NOTE: It is important to pick the correct bolt length needed for your cabinets. If the bolt is too short it won't reach the oven. If the bolt is
too long, it will not permit oven to be drawn up to the cabinet snugly.
3. From inside the cabinet, insert the bolts through the mounting straps and then into the drilled holes.
MOUNTING THE OVEN
To aid installation, we suggest that you use some solid support such as books to hold the oven while you are securing it with the mounting
bolts.
Make sure that whatever you use is stacked or cut as close as possible to the height needed for the oven to reach the cabinet bottom.
1. Place the oven on the support and move into position. Lift oven, aligning the mounting holes on the oven with the bolts. Do not grip
the door handle to help lift the oven.
2. Insert bolts into mounting holes on the oven. Tighten the bolts to secure oven to the bottom of the cabinet.(Alternate between bolts so
that oven is drawn up evenly.)
3. Once oven is securely in place, plug power cord into three prong (grounded) wall receptacle.
Printed in Malaysia
©2004 Maytag Services
16022923 Rev. 0
A–9
Appendix B
©2004 Maytag Services
16022923 Rev. 0
B– 1
Programming Instructions for AMC4080AA*
Model AMC4080AA*
B–2
16022923 Rev.0
©2004 Maytag Services
Programming Instructions for AMC4080AA*
Model AMC4080AA*
©2004 Maytag Services
16022923 Rev. 0
B– 3
Programming Instructions for MMC5080AA*
Model MMC5080AA*
B–4
16022923 Rev.0
©2004 Maytag Services
Programming Instructions for MMC5080AA*
Model MMC5080AA*
©2004 Maytag Services
16022923 Rev. 0
B– 5
Programming Instructions for AMC5101AA*
Model AMC5101AA*
B–6
16022923 Rev.0
©2004 Maytag Services
Programming Instructions for AMC5101AA*
AMC5101AA*
©2004 Maytag Services
16022923 Rev. 0
B– 7
Programming Instructions for AMC5101AA*
Model AMC5101AA*
B–8
16022923 Rev.0
©2004 Maytag Services
Programming Instructions for AMC5101AA*
Model AMC5101AA*
©2004 Maytag Services
16022923 Rev. 0
B– 9
Programming Instructions for AMC5143AA*
Model AMC5143AA*
B – 10
16022923 Rev.0
©2004 Maytag Services
Programming Instructions for AMC5143AA*
Model AMC5143AA*
©2004 Maytag Services
16022923 Rev. 0
B– 11
Programming Instructions for AMC5143AA*
Model AMC5143AA*
B – 12
16022923 Rev.0
©2004 Maytag Services
Programming Instructions for AMC5143AA*
Model AMC5143AA*
©2004 Maytag Services
16022923 Rev. 0
B– 13
Programming Instructions for AMC5143AA*
Model AMC5143AA*
B – 14
16022923 Rev.0
©2004 Maytag Services
Programming Instructions for MMC5193AA*
Model MMC5193AA*
©2004 Maytag Services
16022923 Rev. 0
B– 15
Programming Instructions for MMC5193AA*
Model MMC5193AA*
B – 16
16022923 Rev.0
©2004 Maytag Services
Programming Instructions for MMC5193AA*
Model MMC5193AA*
©2004 Maytag Services
16022923 Rev. 0
B– 17
Programming Instructions for MMC5193AA*
Model MMC5193AA*
B – 18
16022923 Rev.0
©2004 Maytag Services
Programming Instructions for MMC5193AA*
Model MMC5193AA*
©2004 Maytag Services
16022923 Rev. 0
B– 19
Care and Cleaning
All Models
Care and Cleaning
Follow these instructions to clean and care for your oven.
• Keep the inside of the oven clean. Food particles and
spilled liquids can stick to the oven walls, causing the
oven to work less efficiently.
• Wipe up spills immediately. Ue a damp cloth and mild
soap. Do not use harsh detergents or abrasives.
• To help loosen baked on food particles or liquids, heat
two cups of water (add the juice of one lemon if you
desire to keep the oven fresh) in a four-cup measuring
glass at High power for five munutes or until boiling.
Let stand in the oven for one or two minutes.
• Remove the glass tray from the oven when cleaning
the oven or tray. To prevent the tray from breaking,
handle it carefully and do not put it in water
immediately after cooking. Wash the tray carefully in
warm sudsy water or in the dishwasher.
• Clean the outside surface of the oven with soap and a
damp clith. Dry with a soft cloth. To prevent damage
to the operatin parts of the oven, don’t let water seep
into the openings.
• Wash the door window with very mild soap and water.
Be sure to use a soft cloth to avoid scratching.
• If steam accumulates inside or outside the oven door,
wipe with a soft cloth. Steam can accumulate when
operating the oven in high humidity and in no way
indicates microwave leakage.
• Never operate the oven without food in it; this can
damage the magnetron tube or glass tray. You may
wish to leave a cup of water in the oven when it is not
in use to prevent damage if the oven is accidentally
turned on.
B – 20
16022923 Rev.0
©2004 Maytag Services