1
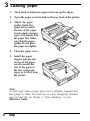
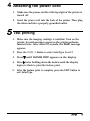
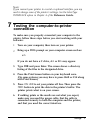
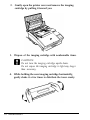
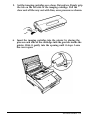
®
EPSON
1000/1500
Setup Guide
Contents
Setup
1 Unpacking . . . . . . . . . . . . . . . . . . . . . . . . . . . . .
2 Installing the imaging cartridge . . . . . . . . . . . . . . . . .
3 Loading paper . . . . . . . . . . . . . . . . . . . . . . . . . . .
4 Attaching the power cord . . . . . . . . . . . . . . . . . . . . .
5 Test printing . . . . . . . . . . . . . . . . . . . . . . . . . . . .
6 Connecting the printer to the computer . . . . . . . . . . . .
7 Testing the computer-to-printer connection . . . . . . . . . .
8 Setting up your software . . . . . . . . . . . . . . . . . . . . .
1
1
4
5
5
6
7
8
Maintenance
Replacing the imaging cartridge . . . . . . . . . . . . . . . . . . 11
Feed or paper jam . . . . . . . . . . . . . . . . . . . . . . . . . . 15
i
This booklet is to help you set up your printer and begin printing
quickly. It also gives you instructions for routine maintenance. If you
need detailed information on printer use or if you have problems
printing, see your Reference Guide.
Epson is a registered trademark of Seiko Epson Corporation.
General Notice: Other product names wed herein are for identification purposes only and
may be trademarks of their respective companies.
Copyright 8 1992 by Epson America, Inc., Torrance, California.
ii
Setup
1
Unpacking
1. Remove the accessories and printer from the shipping
carton.
2. Set the printer on a flat, stable surface.
3. Take the packaging off the printer and the other items and
store it for future use.
Note:
The printer weighs about 10 kg (22 lbs) and should be lifted with care.
2 Installing the imaging cartridge
e
CAUTION:
Do not turn the imaging cartridge upside down.
Do not expose the imaging cartridge to light any longer than
necessary.
1. Press toward you on
the latch on the left to
open the printer cover.
2. While holding the imaging cartridge horizontally, gently
shake it a few times to distribute the toner evenly.
3. Set the imaging cartridge on a clean, flat surface. Firmly grip
the tab on the left side of the imaging cartridge. Pull the
clear seal all the way out with firm, even pressure as shown.
4. Insert the imaging cartridge into the printer by placing the
pins on each side of the cartridge into the grooves inside the
printer. Slide it gently into the opening until it stops.
5. Gently press down on the printer cover until it clicks shut.
CAUTION:
Never transport the printer with the imaging cartridge
installed.
Setup
3
3
Loading paper
1. Fan a stack of letter-size paper and even up the edges.
2. Open the paper cover located on the top front of the printer.
3. Adjust the paper
guides inside the
paper bin to match
the size of the paper.
Load a stack of paper
(up to 150 sheets) into
the paper bin. Make
sure that the paper
guides do not press
the paper too tightly.
4. Close the paper cover.
5. Install the paper
stopper into the slot
on top of the paper
cover to match the
size of the paper in
the bin; it stops the
paper as it is fed from
the printer.
Note:
To load single sheets of paper types such as envelopes, transparencies,
heavy paper, or labels, feed sheets one at a time through the standard
paper bin feed slot. See Chapter 2, “Paper Handling,” in your
Reference Guide.
4 Attaching the power cord
1. Make sure the power switch at the top right of the printer is
turned off.
2. Insert the power cord into the back of the printer. Then plug
the other end into a properly grounded outlet.
5
Test printing
1. Make sure the imaging cartridge is installed. Turn on the
printer. Several messages appear as the printer performs
internal tests. After about 35 seconds, the READY message
appears.
2. Press the LEVEL 2 button to enter SelecType Level 2.
3. Press ‘I until FEATURE PRINT appears on the display.
4. Press ) twice holding down the button until the display
begins to flash to print the feature print.
5. After the feature print is complete, press the EXIT button to
exit SelecType.
Connecting the printer to the
6 computer
You can connect up to three computers (two for the
ActionLaser 1000) to your printer at the same time. If you are
connecting more than one computer, see “Sharing Your
Printer” in the Reference Guide. To connect a parallel (factory
setting), serial (built-in on the ActionLaser 1500 only), or
optional interface, follow these steps. For information on
optional interface boards, see Chapter 5 in the Reference Guide.
1. Make sure both the printer and the computer are off.
2. Connect a properly shielded interface cable to the
appropriate interface connector. Parallel cables should be
the twisted-pair type.
3. Plug the other end of the cable into your computer.
4. Insert the interface cable into the u-shaped part of one cable
clip. Lift the left side of the printer up slightly. Then hook
the short lip of the clip into the forward slot and push the
bottom of the clip under the printer until it clicks in place.
Repeat this procedure with the second clip and insert it into
the back slot.
6 Setup
Note:
If you connect your printer to a serial or optional interface, you my
need to change some of the printer’s settings. See the SelecType
INTERFACE option in Chapter 4 of the Reference Guide.
Testing the computer-to-printer
7 connection
To make sure you properly connected your computer to the
printer, follow these steps before you start working with your
software:
1. Turn on your computer; then turn on your printer.
2. Bring up a DOS prompt on your computer screen such as:
c:>
If you do not have a C drive, A:> or B:> may appear.
3. Type DIR and press Enter. The screen shows a directory
listing of the files in the designated drive.
4. Press the Print Screen button on your keyboard once.
(On some systems you may have to press Shift or Ctrl along
with Print Screen.)
5. Press ON LINE to set your printer off line. Then press the
FEED button to print the data in the printer’s buffer. The
printer prints what is on your screen.
6. If nothing prints or the results are not what you expect,
make sure you used the proper cable, that the cable is
connected securely to both the computer and the printer,
and that you used the correct interface.
Setup 7
8 Setting up your software
Choosing the printer emulation
Your printer has several resident printer emulations: HP
LaserJet III (3/P/Si), Epson LQ, Epson FX, and Epson GL/2 for
the ActionLaser 1500; HP LaserJet IIP (LJ-2P), Epson LQ, and
Epson FX for the ActionLaser 1000. The HP emulation is the
default setting. because it gives you the fullest range of features
you will probably not change it.
If you need to print documents already formatted for a dot
matrix printer or need to use programs that do not support an
HP LaserJet printer, you may want to choose a different
emulation.
To change the printer emulation, see EMULATION in
Chapter 4, “SelecType,” in the Reference Guide.
Using printer selection menus
After you choose the emulation you are going to use, you need
to set up each of your application programs for the printer by
choosing a printer name from the program’s printer selection
menu.
For the HP emulation, select one of the following from your
software’s printer selection menu:
HP LaserJet IIISi™
HP LaserJet IIIP™
ActionLaser 1500 only
HP LaserJet series III™ 7
HP LaserJet IIP™
HP LaserJet series II”
HP LaserJet Plus”
HP LaserJet 500™
HP LaserJet=
If none of the above printers is listed, select any printer model
that uses the HP Printer Command Language (PCL).
For the GL/2 emulation on the ActionLaser 1500, you can print
graphic data using the HP GL/2 commands or some HP GL
commands. See Appendix B in the Reference Guide.
For the LQ or FX emulations, select one of the following:
LQ-2500
LQ-1050/850
LQ-500/510
LQ-1000/800
®
(expanded ESC/P )
LQ-1500 (with ver. 2 ROM)
LQ printer
FX-1050/850
FX-1000/800 (286e/86e)
FX-85
FX-80
When you choose a printer name from your program’s printer
selection menu, you are accessing a portion of that software
program called the printer driver. This is the part of the
software package that translates the margins, fonts, and all the
other selections you have entered into control codes that the
printer understands.
If the format of the pages from one of your programs doesn’t
print correctly, try selecting one of the other printers from the
lists above, or call the software manufacturer to see whether
you have the most recent version of their printer driver.
For more information, see “Using the Printer With Software” in
Chapter 1 of the Reference Guide.
Setup 9
10 setup
Maintenance
Replacing the Imaging cartridge
The imaging cartridge prints up to 6,000 pages depending upon
the complexity of your print jobs.
If your printed images become faint, enter the SelecType
Level 2 TONER option to find out approximately how much
toner remains in the imaging cartridge. Simply count the
asterisks between the E (empty) and the F (full). Each asterisk
represents up to 20% of the total toner capacity. When you see
only one asterisk on the SelecType TONER message indicating
that there is less than 20% toner left, you should replace the
imaging cartridge.
e
WARNING:
Do not touch the fuser, which is marked with a CAUTION
HOT SURFACE label.
1. Turn on the printer.
Note:
If you replace the cartridge when the power is off, you must
change the TONER setting using SelecType when you turn on
the printer. See steps 7 and 8 later in this section.
Maintenance 11
2. Gently open the printer cover and remove the imaging
cartridge by pulling it toward you.
3. Dispose of the imaging cartridge with nonburnable items.
e
CAUTION:
Do not turn the imaging cartridge upside down.
Do not expose the imaging cartridge to light any longer
than necessary.
4. While holding the new imaging cartridge horizontally,
gently shake it a few times to distribute the toner evenly.
12 Maintenance
5. Set the imaging cartridge on a clean, flat surface. Firmly grip
the tab on the left side of the imaging cartridge. Pull the
clear seal all the way out with firm, even pressure as shown.
6. Insert the imaging cartridge into the printer by placing the
pins on each side of the cartridge into the grooves inside the
printer. Slide it gently into the opening until it stops. Leave
the cover open.
Maintenance 13
7. Next you reset the TONER setting. Three messages flash in
rotation on the display:
NEW CARTRIDGE?
YES, PRESS RESET
NO, PRESS CONTINUE.
8. Press RESET to change the TONER setting to full.
9. Gently press down on the printer cover until it clicks shut.
Please note: If you replace the cartridge when more than 20%
toner is left, the three rotating messages do not appear. Instead
COVER OPEN E** F (two or more asterisks) appears. Use the
SelecType Level 2 TONER option to change the TONER setting
to full.
If you do not change the TONER setting to full after replacing
the imaging cartridge, the TONER message indicates the wrong
amount of toner left. Also NEW CARTRIDGE? appears even if
the toner level is full.
Note:
Each time you replace the imaging cartridge, you should print a
feature print to be sure the print quality is satisfactory and that you
installed the cartridge properly. See “Test printing” earlier in this
guide.
14 Maintenance
Feed or paper jam
When the printer stops printing and the FE E D JAY or
PAPER JAM message appears, follow these steps:
1. Open the paper cover. Carefully remove all the paper in the
paper bin along with any sheets that have fed part way into
the printer. If the paper is caught in the paper ejection area,
gently pull it out.
2. If the paper tears when you remove it or if the paper is
caught beyond the feed slot, make sure you remove any
pieces remaining in the printer. To do this, open the printer
cover.
0
WARNING:
If you open the printer cover you expose the fuser, which is
marked by a CAUTION HOT SURFACE label. Be careful
not to touch the fuser.
Remove the imaging cartridge. Then remove any paper from
the paper feed path, reinsert the imaging cartridge, and
close the printer cover.
Note:
Because the toner on the paper inside the printer may not have
been fixed on the page, toner may come off on your hands when
you remove the paper. If you spill toner on your clothing, rinse it
off with cold water. Using hot water may leave a permanent
stain. When you resume printing, the first few pages may be
slightly smeared with excess toner.
3. Tap the edges of the paper stack on a flat surface and
carefully reload it into the paper bin. (Do not reload curled
or wrinkled sheets.) Close the paper cover.
4. The jammed page is automatically reprinted. If you did not
open the printer cover to clear the jam, press CONTINUE.
Maintenance 15