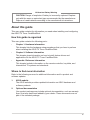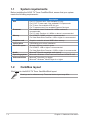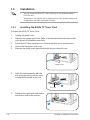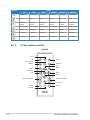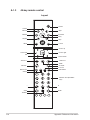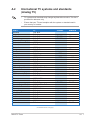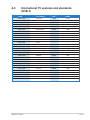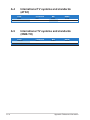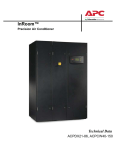
1
TV Tuner
My Cinema Series
User Manual
E5440
Eighth Edition V8
February 2010
Copyright © 2010 ASUSTeK Computer Inc. All Rights Reserved.
No part of this manual, including the products and software described in it, may be reproduced,
transmitted, transcribed, stored in a retrieval system, or translated into any language in any form or by any
means, except documentation kept by the purchaser for backup purposes, without the express written
permission of ASUSTeK Computer Inc. (“ASUS”).
Product warranty or service will not be extended if: (1) the product is repaired, modified or altered, unless
such repair, modification of alteration is authorized in writing by ASUS; or (2) the serial number of the
product is defaced or missing.
ASUS PROVIDES THIS MANUAL “AS IS” WITHOUT WARRANTY OF ANY KIND, EITHER EXPRESS
OR IMPLIED, INCLUDING BUT NOT LIMITED TO THE IMPLIED WARRANTIES OR CONDITIONS OF
MERCHANTABILITY OR FITNESS FOR A PARTICULAR PURPOSE. IN NO EVENT SHALL ASUS, ITS
DIRECTORS, OFFICERS, EMPLOYEES OR AGENTS BE LIABLE FOR ANY INDIRECT, SPECIAL,
INCIDENTAL, OR CONSEQUENTIAL DAMAGES (INCLUDING DAMAGES FOR LOSS OF PROFITS,
LOSS OF BUSINESS, LOSS OF USE OR DATA, INTERRUPTION OF BUSINESS AND THE LIKE),
EVEN IF ASUS HAS BEEN ADVISED OF THE POSSIBILITY OF SUCH DAMAGES ARISING FROM ANY
DEFECT OR ERROR IN THIS MANUAL OR PRODUCT.
SPECIFICATIONS AND INFORMATION CONTAINED IN THIS MANUAL ARE FURNISHED FOR
INFORMATIONAL USE ONLY, AND ARE SUBJECT TO CHANGE AT ANY TIME WITHOUT NOTICE,
AND SHOULD NOT BE CONSTRUED AS A COMMITMENT BY ASUS. ASUS ASSUMES NO
RESPONSIBILITY OR LIABILITY FOR ANY ERRORS OR INACCURACIES THAT MAY APPEAR IN THIS
MANUAL, INCLUDING THE PRODUCTS AND SOFTWARE DESCRIBED IN IT.
Products and corporate names appearing in this manual may or may not be registered trademarks or
copyrights of their respective companies, and are used only for identification or explanation and to the
owners’ benefit, without intent to infringe.
ii
Contents
Notices........................................................................................................... v
Safety information....................................................................................... vi
About this guide......................................................................................... vii
Chapter 1:
Hardware information
1.1
System requirements.................................................................... 1-2
1.2
Card/Box layout............................................................................. 1-2
1.3
Before you proceed...................................................................... 1-3
1.4
Installation..................................................................................... 1-4
1.5
1.4.1
Installing the ASUS TV Tuner Card.................................. 1-4
1.4.2
Installing the ASUS USB TV Box..................................... 1-5
1.4.3
Installing the ASUS TV Express Card.............................. 1-5
Connecting cables and devices................................................... 1-6
Chapter 2:
2.1
2.2
2.3
2.4
2.5
Software information
Device driver installation.............................................................. 2-2
2.1.1
Installing Microsoft® DirectX®.............................................................................. 2-2
2.1.2
Installing the driver........................................................... 2-3
2.1.3
Uninstalling the driver...................................................... 2-6
CyberLink® PowerCinema (optional).....................................2-7
Arcsoft TotalMedia (optional)................................................2-7
Presto! PVR (optional)..........................................................2-8
ASUS Splendid Technology......................................................... 2-8
2.6
ASUS VideoSecurity Online......................................................... 2-9
2.7
ASUS EZVCR............................................................................... 2-10
2.8
ASUS Eee PC Installation........................................................... 2-11
2.9
ASUS Plug and Play TV (optional)......................................2-12
2.10
2.11
ASUS Pop-up TV (optional)................................................2-12
ASUS GadgeTV........................................................................... 2-12
Appendix:
A.1
Reference information
Remote control (optional)............................................................A-2
A.1.1
39-key remote control......................................................A-2
A.1.2
21-key remote control......................................................A-4
A.1.3
46-key remote control......................................................A-6
A.1.4
41-key remote control......................................................A-8
iii
Contents
iv
A.2
International TV systems and standards (Analog TV).............A-11
A.3
International TV systems and standards (DVB-T)....................A-13
A.4
International TV systems and standards (ATSC).....................A-14
A.5
International TV systems and standards (DMB-TH)................A-14
Notices
Federal Communications Commission Statement
This device complies with Part 15 of the FCC Rules. Operation is subject to the
following two conditions:
• This device may not cause harmful interference, and
• This device must accept any interference received including interference that
may cause undesired operation.
This equipment has been tested and found to comply with the limits for a
Class B digital device, pursuant to Part 15 of the FCC Rules. These limits are
designed to provide reasonable protection against harmful interference in a
residential installation. This equipment generates, uses and can radiate radio
frequency energy and, if not installed and used in accordance with manufacturer’s
instructions, may cause harmful interference to radio communications. However,
there is no guarantee that interference will not occur in a particular installation. If
this equipment does cause harmful interference to radio or television reception,
which can be determined by turning the equipment off and on, the user is
encouraged to try to correct the interference by one or more of the following
measures:
• Reorient or relocate the receiving antenna.
• Increase the separation between the equipment and receiver.
• Connect the equipment to an outlet on a circuit different from that to which the
receiver is connected.
• Consult the dealer or an experienced radio/TV technician for help.
The use of shielded cables for connection of the monitor to the graphics card is
required to assure compliance with FCC regulations. Changes or modifications
to this unit not expressly approved by the party responsible for compliance
could void the user’s authority to operate this equipment.
Canadian Department of Communications Statement
This digital apparatus does not exceed the Class B limits for radio noise emissions
from digital apparatus set out in the Radio Interference Regulations of the
Canadian Department of Communications.
This class B digital apparatus complies with Canadian ICES-003.
REACH
Complying with the REACH (Registration, Evaluation, Authorisation, and
Restriction of Chemicals) regulatory framework, we published the chemical
substances in our products at ASUS REACH website at http://green.asus.com/
english/REACH.htm.
Safety information
Electrical safety
•
To prevent electric shock hazard, disconnect the power cable from the electric
outlet before relocating the system.
•
When adding or removing devices to or from the system, ensure that the power
cables for the devices are unplugged before the signal cables are connected. If
possible, disconnect all power cables from the existing system before you add
a device.
•
Before connecting or removing signal cables from the motherboard, ensure
that all power cables are unplugged.
Operation safety
•
The ASUS My Cinema U3000 TV Box becomes hot after prolonged use.
Handle the TV Box with care to prevent discomfort from heat exposure. The
heat will not affect the operation of the TV box so you may continue using it as
desired.
•
Before installing the motherboard and adding devices on it, carefully read all
the documentation that comes with the package.
•
Before using the product, ensure that all cables are correctly connected and
the power cables are not damaged. If you detect any damage, contact your
dealer immediately.
•
To avoid short circuits, keep paper clips, screws, and staples away from
connectors, slots, sockets, and circuitry.
•
Avoid dust, humidity, and extreme temperatures. Do not place this product in a
location where it may get wet.
•
Place this product on a flat and stable surface.
•
We recommend that you use this product in environments with an ambient
temperature below 35ºC.
• If you encounter technical problems with this product, contact a qualified
service technician or your retailer.
DO NOT throw this product in municipal waste. This product has been designed
to enable proper reuse of parts and recycling. This symbol of the crossed out
wheeled bin indicates that the product (electrical and electronic equipment)
should not be placed in municipal waste. Check local regulations for disposal of
electronic products.
DO NOT throw the battery in municipal waste. This symbol of the crossed out
wheeled bin indicates that the battery should not be placed in municipal waste.
vi
Lithium-Ion Battery Warning
CAUTION: Danger of explosion if battery is incorrectly replaced. Replace
only with the same or equivalent type recommended by the manufacturer.
Dispose of used batteries according to the manufacturer’s instructions.
About this guide
This user guide contains the information you need when installing and configuring
the ASUS TV Tuner Card/Box/Stick.
How this guide is organized
This user guide contains the following parts:
•
Chapter 1: Hardware information
This chapter lists the hardware setup procedures that you have to perform
when installing the ASUS TV Tuner Card/Box/Stick.
•
Chapter 2: Software information
This chapter gives information on how to install device drivers and
applications for the ASUS TV Tuner Card/Box/Stick.
•
Appendix: Reference information
This chapter includes information on the remote controller, key table, and
international TV systems and standards.
Where to find more information
Refer to the following sources for additional information and for product and
software updates.
1.
ASUS website
The ASUS website provides updated information on ASUS hardware and
software products.
2.
Optional documentation
Your product package may include optional documentation, such as warranty
flyers, that may have been added by your dealer. These documents are not
part of the standard package.
vii
Conventions used in this guide
To make sure that you perform certain tasks properly, take note of the following
symbols used throughout this manual.
viii
DANGER/WARNING: Information to prevent injury to yourself
when trying to complete a task.
CAUTION: Information to prevent damage to the components
when trying to complete a task.
IMPORTANT: Instructions that you MUST follow to complete a
task.
NOTE: Tips and additional information to help you complete a
task.
This chapter lists the hardware setup
procedures that you have to perform
when installing the ASUS TV Tuner.
ASUS TV Tuner
Hardware information
Chapter 1
1.1
System requirements
Before installing the ASUS TV Tuner Card/Box/Stick, ensure that your system
meets the following requirements:
Item
Slot
Processor
Memory
Graphics card
Optical drive
Hard disk space
Audio
Operating system
Software/utilities
1.2
Description
For PCI TV tuner card : One available PCI slot
For PCI-E TV tuner card: One available PCI Express slot
For TV box: One available USB 2.0 port
For TV express card: One available Express Card port
For notebook: Intel® Pentium® M 1.3GHz or above is
recommended
For PC: Intel® Pentium® 4 2.6GHz or above is recommended
For XP/MCE: 512MB or higher is recommended
For Vista Basic/Vista Premium: 1GB or higher is recommended
Graphics card with at least 32MB video memory
CD-ROM drive for driver installation
At least 1GB free hard disk space
For XP/MCE: 1GB or higher is recommended
For Vista Basic/Vista Premium: 15GB or higher is recommended
Microsoft® DirectX-compatible audio device
Microsoft® Windows® Vista Premium/Vista Basic/XP/MCE 2005
Microsoft® DirectX 9.0 or higher
Microsoft® Windows® Media Player 9 or higher
Card/Box layout
Click here for the ASUS TV Tuner Card/Box/Stick layout.
Drawings are for reference only. The actual device layout may differ.
1-2
Chapter 1: Hardware information
1.3
Before you proceed
Take note of the following precautions before you install the ASUS TV Tuner
Card/Box/Stick.
•
Unplug the power cord from the wall socket before touching any
component.
•
Use a grounded wrist strap or touch a safely grounded object or a metal
object, such as the power supply case, before handling components to
avoid damaging them due to static electricity.
•
Hold components by the edges to avoid touching the ICs on them.
•
Keep all components, such as the host adapter, in their antistatic bag
until you are ready to install them. Likewise, whenever you uninstall any
component, place it on a grounded antistatic pad or in the bag that came
with it.
•
Before you install or remove any component, ensure that the ATX power
supply is switched off or the power cord is detached from the power supply.
Failure to do so may cause severe damage to the motherboard and
peripherals.
ASUS TV Tuner
1-3
1.4
Installation
1.4.1
•
You can install the ASUS TV Tuner Card only on a motherboard with a
PCI/PCIe slot.
•
Illustrations in this section are for reference only. Your system chassis and
configuration may differ from what is shown.
Installing the ASUS TV Tuner Card
To install the ASUS TV Tuner Card:
1.
Unplug the power cord.
2.
Remove the system unit cover. Refer to the documentation that came with
your system for detailed instructions.
3.
Locate the PCI bus expansion slot. Ensure that this slot is unobstructed.
4.
Unlock the expansion card cover.
5.
Remove the metal cover opposite the slot that you intend to use.
5
Metal covers
6.
Align the card connector with the
slot and press firmly until the card
is completely seated on the slot.
PCI card
7.
6
Replace the expansion card lock to
secure the card to the chassis.
7
1-4
Chapter 1: Hardware information
1.4.2
Installing the ASUS USB TV Box
To install the ASUS USB TV Box:
1.
Place the ASUS USB TV Box on a flat and stable surface close to your
computer.
2.
Connect the USB cord A series plug to a USB 2.0 port on your computer.
PC
2
1.4.3
NB
2
Installing the ASUS TV Express Card
To install the ASUS TV Express Card:
1.
Place your notebook or desktop computer on a flat and stable surface.
2.
Locate the Express Card port.
3.
Connect the ASUS TV Express Card to the Express Card port on your
computer.
ASUS TV Tuner
1-5
1.5
Connecting cables and devices
There are various types of cable TV (CATV) and antenna connections. Consult
your dealer for the type of adapter, splitter, A/B switch, or combiner that may be
required when connecting the ASUS TV Tuner Card/Box/Stick to devices.
The ASUS TV Tuner Card/Box/Stick can receive up to 100 channels. If you do not
have a CATV system, you may use an indoor or outdoor antenna that carries only
VHF channels, UHF channels, or both VHF and UHF channels to connect to the
ASUS TV Tuner Card/Box.
Click here for more information on connecting cables and devices.
1-6
Chapter 1: Hardware information
This chapter gives information on how
to install drivers and applications for
the ASUS TV Tuner.
ASUS TV Tuner
Software information
Chapter 2
2.1
Device driver installation
You need to install the device drivers on your computer so you can use the ASUS
TV Tuner Card/Box/Stick. Refer to this chapter when installing the device drivers.
2.1.1
•
The setup screens in this chapter are for reference only. They may not
exactly match the contents displayed on your screen.
•
The contents of the Support CD are subject to change at any time without
notice.
Installing Microsoft® DirectX®
Microsoft® Direct® X allows 3D hardware acceleration support in Windows® 98,
Windows® 2000, Windows® XP, and Windows® Vista OS.
•
Ensure that you install Microsoft® DirectX® before installing the ASUS TV
Tuner Card/Box/Stick driver.
•
For software MPEG support in Windows® 98, you must first install
Microsoft® Direct® X, then install a MPEG-compliant video player.
To install Microsoft® DirectX®:
2-2
1.
Place the Installation CD into the
optical drive. An autorun screen
appears if Autorun is enabled
on your computer. You may also
double-click Setup32.exe from the
root directory to run the Installation
CD.
2.
Read the Microsoft® End User
License Agreement. Click I accept
the agreement, then click Next.
3.
Click Next to start the installation.
The installation program
automatically installs the DirectX®
9.0 runtime libraries to your
system.
Chapter 2: Software information
4.
This message appears when the
setup is completed. Click Finish to
complete the installation process.
2.1.2
Installing the driver
Installing the driver automatically
To install the driver and applications automatically:
1.
Start your computer.
2.
Windows® automatically detects
the ASUS TV Tuner Card/Box/
Stick and displays the Found New
Hardware Wizard window. Click
Cancel.
3.
Place the Support CD into the
optical drive. From the autorun
screen, select Windows
XP/Vista, then click Smart
Install wizard. This wizard
automatically installs all the
driver and applications for your
ASUS TV Tuner Card/Box/Stick
and synchronizes the TV country
settings with your OS.
ASUS TV Tuner
2-3
4.
Click Install now!. A progress bar appears to
indicate the installation status.
5.
Click Finish to complete the
installation process.
Installing the driver manually
To install the driver and applications manually:
2-4
1.
Start your computer.
2.
Windows® automatically detects
the ASUS TV Tuner Card/Box/
Stick and displays the Found New
Hardware Wizard window. Click
Cancel.
3.
Place the Support CD into the
optical drive. From the autorun
screen, select Windows XP/
Vista, then click Install Driver.
Chapter 2: Software information
4.
Click Install now!. A progress bar appears to
indicate the installation status.
5.
Click Finish to complete the driver
installation process.
6.
Select the application that you
want to use on your computer.
Follow the onscreen instructions
to complete the installation.
ASUS TV Tuner
2-5
2.1.3
Uninstalling the driver
If you want to update the driver, or if you no longer need them, refer to this section
to completely uninstall the drivers from your system to save disk space.
2-6
1.
Click Start > Control Panel.
2.
Double-click Add or Remove
Programs.
3.
Select ASUS TV Tuner Card.
4.
Click Change/Remove.
5.
Click OK.
6.
Close other applications and
remove any disks from the drives.
Click Finish to restart your
computer.
Chapter 2: Software information
2.2
CyberLink® PowerCinema (optional)
If you are running Windows® MCE/Vista Premium, you cannot watch TV
using the CyberLink® PowerCinema and MCE application at the same time.
This application allows you to watch TV and DVDs, listen to FM radio or music
CDs, or browse pictures stored in your computer. Use the mouse or the remote
control to navigate through the user interface. Refer to Appendix A.1 for details on
the remote control.
For more information on this application, refer to the Cyberlink PowerCinema
User’s Guide in the Support CD.
2.3
Arcsoft TotalMedia (optional)
If you are running Windows® MCE/Vista Premium, you cannot watch TV
using the Arcsoft TotalMedia and MCE application at the same time.
This application allows you to watch TV and DVDs, listen to FM radio or music
CDs, or browse pictures stored on your computer. Use the mouse or the remote
control to navigate through the user interface. Refer to Appendix A.1 for details on
the remote control.
Using the ASUS PE9400 Combo:
•
To watch NTSC TV, select ASUS PE9400 BDA Analog TV Tuner to scan
channel in TV setting menu.
•
To watch ATSC program, select ASUS PE9400 BDA ATSC Tuner, then select
antenna to scan channel in TV setting menu.
•
To watch Clear Qam program, select ASUS PE9400 BDA ATSC Tuner, then
select cable to scan channel in TV setting menu.
For more information on this application, refer to the Arcsoft TotalMedia User
Guide in the Support CD.
ASUS TV Tuner
2-7
2.4
Presto! PVR (optional)
If you are running Windows® MCE/Vista Premium, you cannot watch TV
using the Presto! PVR and MCE application at the same time.
This application allows you to watch TV. Use the mouse or the remote control
to navigate through the user interface. Refer to Appendix A.1 for details on the
remote control.
For more information on this application, refer to the Presto! PVR User Guide in
the Support CD.
2.5
ASUS Splendid Technology
ASUS Splendid Analog TV Video Enhancement
Technology takes computer graphics capabilities
to the next level by automatically enhancing image
quality, depth, color intensity, and image details for
the best visual results. With ASUS Splendid meeting
high visual demands, watching movies and TV on
your computer can indeed be a splendid experience.
ASUS Splendid Video Enhancement Technology makes colors come alive and
brings out optimum brightness and contrast levels even in dark scenes. You may
choose from four viewing profiles for different video viewing conditions. Select
the profile that best suits your viewing environment: Enriched (Standard), Vivid
Color (Color-enhanced), Theater (Cinematic effects), and Crystal Clear (Enhanced
contrast).
2-8
Chapter 2: Software information
2.6
ASUS VideoSecurity Online
VideoSecurity Online is a powerful monitoring and motion-detecting software.
With video capture devices such as CCD, V8, digital Hi-8 and others, you can use
VideoSecurity Online to:
•
find intruders;
•
monitor your environment;
•
detect changes in a specified location; and
•
know in advance who your visitors are.
Upon detection of any variation, VideoSecurity Online will do the following:
•
Save the date/time information on when the condition started, and
when to release tracing to a database file (watchdog.mdb).
•
Capture the condition detected and save it into a bitmap file with
reference to an image that represents the normal situation before
VideoSecurity Online started detecting the variation. You may view
any image processing software to view, modify, or distribute the image.
This database file is saved in the Programs folder.
VideoSecurity Online also lets you choose from four options on how to handle the
variation or unusual condition detected.
ASUS TV Tuner
2-9
2.7
ASUS EZVCR
ASUS EZVCR is a program that allows you to watch and record live TV on your PC
or notebook. ASUS EZVCR also lets you to listen to radio programs on systems
that support this function.
For more information, check the help file in EZVCR.
The image below shows the main ASUS EZVCR user interface window.
Channel preview
Scan channels
SKYPE TV
Setting
Image setting
Audio setting
Snap shot
Video clips
Channel
up/down
Recall
Play Pause
Stop Record
Volume
up/down
System requirements
Software
• Microsoft® Windows® XP with SP2 and Microsoft® DirectX 9 or above.
• ASUS DVD 6.0
Hardware
• ASUS TV Tuner device
• Sound card
• Processor: Intel® Pentium 4 2GHz or above, AMD K7-2000+ or above,
Intel® Centrino 1G or above
• Memory: At least 256 MB
• VGA card: At least 64 MB RAM
• Hard disk space: At least 500 MB free hard disk space
2-10
Chapter 2: Software information
2.8
ASUS Eee PC Installation
For ASUS Eee PC Linux OS, there are two ways to install drivers and applications:
with or without Internet connection.
If you have Internet connection, follow these steps (recommended):
1. Connect to the Internet.
2. Select the Setting tab, and click the Add/Remove icon.
3. Select the Play tab, click the TV driver and TV application to install the driver
and application.
4. Restart the Eee PC.
If you do not have Internet connection, follow these steps:
1. Copy the file to the home directory.
2. Press Ctrl+Alt+T.
3. In the console, type sudo su to get root privilege.
4. Type tar xvfz dvbt-4eeepc.tar.gz
5. Type install-xxxx to install the driver and application.
6. Reboot to apply the changes.
For ASUS Eee PC Microsoft® Windows® OS, refer to section 2.1: Device driver
installation to install drivers and applications.
After the installation, you can run the application from the icon displayed on the
desktop.
Watching TV programs on your Eee PC:
1. Press F1 to select the country when launching first time.
2. Press F1 to select the scan channel.
3. Close the TV application to save the channels.
4. Restart the TV application and enjoy watching TV programs on your Eee PC.
The steps above are based on ASUS U3100 mini, and It might be different
when using other ASUS TV product. Download the latest driver and read the
instructions from the ASUS website at www.asus.com.
ASUS TV Tuner
2-11
2.9
ASUS Plug and Play TV (optional)
ASUS Plug and Play TV is a user-friendly application that delivers better TV
experience. With ASUS Plug and Play TV, you can watch TV programs by just
plugging a USB dongle.
2.10
ASUS Pop-up TV (optional)
ASUS Pop-up TV is a user-friendly application that delivers better TV experience.
With ASUS Pop-up TV, you can watch TV programs by just plugging a USB
dongle.
2.11
ASUS GadgeTV
ASUS GadgeTV is a user-friendly application that allows you to watch TV, record
TV, and play video files on the Windows® sidebar.
System requirements
Windows® Vista
• ASUS TV Tuner device
• ASUS TV application
Windows® XP
• Google desktop
• ASUS TV Tuner device
• ASUS TV application
The pictures below show the main ASUS GadgeTV user interfaces.
TV Mode
TV mode
Settings
Video mode
Go to the
previous channel
Play/Pause
Record TV
Go to the next
channel
Take a snapshot
Scan TV channels
Adjust the volume
2-12
Chapter 2: Software information
Video mode
• Video file list
Video mode
TV mode
Settings
Video file list
Show next ten files in
the folder
Show previous ten files
in the folder
• Playback control
Video mode
Settings
TV mode
Forward
Rewind
Stop
Turn the volume up
Pause
Turn the volume down
Progress Bar
ASUS TV Tuner
2-13
2-14
Chapter 2: Software information
This chapter includes information on
the optional remote control, key table,
and international TV systems and
standards.
ASUS TV Tuner
Reference information
Appendix
A.1
Remote control (optional)
A.1.1
39-key remote control
Layout
Record
Previous
Rewind
Close
Stop
Next
Forward
Play/Pause
Navigation buttons
Volume control buttons
Enter/OK
Channel buttons
Back
Numeric keys
Full screen
Recall
Back to main menu
Mode buttons
Mute
A-2
Appendix: Reference information
Key table
Button
TV
FM
DVD
–
Radio mode
–
–
–
–
–
–
–
–
–
–
–
Back to main
menu
PHOTO
MUSIC
–
–
–
–
–
–
–
–
–
Photo mode
–
–
–
–
Music mode
Back to main
menu
–
Back to main
menu
DVD menu
Back to main
menu
–
Back to main
menu
–
Back to main
menu
–
Mute
Mute
Mute
Mute
Mute
Mute
Full screen
Full screen
Full screen
Full screen
Full screen
Full screen
TV mode
–
Back to
previous
channel
Back to
previous
page
Channel
up/down
~
Mode
VIDEO
–
–
–
DVD mode
–
–
Video mode
–
–
–
–
–
Back to
previous
page
Search
forward/
backward
Back to
previous
page
Next/
previous
chapter
Back to
previous
page
–
Back to
previous
page
–
Back to
previous
page
–
Volume
up/down
Volume
up/down
Volume
up/down
Volume
up/down
Volume
up/down
Volume
up/down
0 ~9
0 ~9
0 ~9
Enter
Enter
Enter
Enter
Enter
Enter
Up
Up
Up
Up
Up
Up
Down
Down
Down
Down
Down
Down
Left
Left
Left
Left
Left
Left
Right
Right
Right
Right
Right
Right
Record
Record
Record
Record
Record
Record
–
–
–
(Continued on the next page)
ASUS TV Tuner
A-3
Button
A.1.2
TV
FM
DVD
Close app
Close app
Close app
Stop
Stop
Previous
chapter
Next chapter
Mode
VIDEO
PHOTO
MUSIC
Close app
Close app
Close app
Stop
Stop
Stop
Stop
Previous
chapter
Next chapter
Previous
chapter
Next chapter
Previous
chapter
Next chapter
Previous
chapter
Next chapter
Previous
chapter
Next chapter
Rewind
Rewind
Rewind
Rewind
Rewind
Rewind
Forward
Forward
Forward
Forward
Forward
Forward
Play/pause
Play/pause
Play/pause
Play/pause
Play/pause
Play/pause
21-key remote control
Layout
Stop
TV
Play / Pause
Rewind
Home
Close
Forward
Up
Back
Enter/OK
Left
Volume up/down
Right
Down
Channel up/down
Fullscreen
Mute
Recall
Record
A-4
Appendix: Reference information
Key table
Button
TV
FM
TV mode
DVD
–
–
Mode
VIDEO
–
PHOTO
–
MUSIC
–
Stop
Stop
Stop
Stop
Stop
Stop
Close
Close
Close
Close
Close
Close
Rewind
Rewind
Rewind
Rewind
Rewind
Rewind
Play/Pause
Play/Pause
Play/Pause
Play/Pause
Play/Pause
Play/Pause
Forward
Forward
Forward
Forward
Forward
Forward
Back to main
menu
Back to
previous
menu
Channel
up/down
Back to main
menu
Back to
previous
menu
Search
forward/
backward
Back to main
menu
Back to
previous
menu
Next/
previous
chapter
Back to main
menu
Back to
previous
menu
–
Back to main
menu
Back to
previous
menu
–
Back to main
menu
Back to
previous
menu
–
Volume
up/down
Volume
up/down
Volume
up/down
Volume
up/down
Volume
up/down
Volume
up/down
Enter/OK
Enter/OK
Enter/OK
Enter/OK
Enter/OK
Enter/OK
Up
Up
Up
Up
Up
Up
Down
Down
Down
Down
Down
Down
Left
Left
Left
Left
Left
Left
Right
Right
Right
Right
Right
Right
Fullscreen
Fullscreen
Fullscreen
Fullscreen
Fullscreen
Fullscreen
Record
Record
Record
Record
Record
Record
Mute
Mute
Mute
Mute
Mute
Mute
Back to
previous
channel
ASUS TV Tuner
–
–
–
–
–
A-5
A.1.3
46-key remote control
Layout
Power
Pause
Record
Stop
Rewind
Forward
Play
Replay
Back
Skip
I more
Cursor up
Cursor left
OK
Cursor right
Cursor down
Volume +
Channel +
Volume -
Mute
Channel Live TV
Record TV
DVD Menu
Guide
Numeric and alphabetic
keys
*
Clear
#
Enter
Teletext
A-6
Appendix: Reference information
Key table
Button
TV
FM
Power
Power
Power
Pause
Pause
Stop
Stop
Record
Mode
VIDEO
PHOTO
MUSIC
Power
Power
Power
Pause
Pause
Pause
Pause
Stop
Stop
Stop
Stop
Record
Record
Record
Record
Record
Rewind
Rewind
Rewind
Rewind
Rewind
Rewind
Play
Play
Play
Play
Play
Play
Forward
Forward
Forward
Forward
Forward
Forward
Replay
Replay
Replay
Replay
Replay
Replay
Skip
Skip
Skip
Skip
Skip
Skip
I more
–
–
–
–
–
Back to
previous
OK
Back to
previous
OK
Back to
previous
OK
Back to
previous
OK
Back to
previous
OK
Back to
previous
OK
Up
Right
Left
Down
Channel
up/down
Up
Right
Left
Down
Search
forward/
backward
Up
Right
Left
Down
Next/
previous
chapter
Up
Right
Left
Down
Up
Right
Left
Down
Up
Right
Left
Down
Volume
up/down
Volume
up/down
Volume
up/down
Volume
up/down
Volume
up/down
Volume
up/down
Mute
Mute
Mute
Mute
Mute
Mute
Record TV
Guide
–
Guide
TV mode
~
DVD
–
Guide
–
–
Clear
Teletext
Enter
ASUS TV Tuner
–
Enter
–
Guide
Enter
–
–
Guide
–
–
Guide
–
–
–
Back to DVD
menu
–
Back to DVD
menu
–
Back to DVD
menu
–
–
–
–
–
–
–
–
–
Back to DVD Back to DVD Back to DVD
menu
menu
menu
0~9
0~9
0~9
Clear
–
Enter
Enter
Enter
A-7
A.1.4
41-key remote control
Layout
Home
TV
Teletext
Close
Back to main menu
TV
Close
Teletext
Numeric keys
1
2
3
4
5
6
7
8
9
VOL
Volume
CH
Channel
0
Enter/OK
OK
Navigation buttons
Back
Recall
Recall
BackTV Audio Snapshot Fullsrceen Mute
A-8
TV Audio
Snapshot
Rew
Record
Stop
Fwd
Rewind
Record
Prev
Pause
Play
Next
Mute
Fullscreen
Forward
Stop
Previous
Next
Pause
Play
Appendix: Reference information
Key table
Button
TV
DVD
Mode
VIDEO
PHOTO
MUSIC
Back to main
menu
Back to main
menu
Back to main
menu
Back to main
menu
Back to main
menu
TV Mode
–
–
–
–
–
Teletext
Teletext
–
–
–
–
–
Close
Close
Close
Close
0~9
0~9
0~9
VOL
Volume
up/down
Volume
up/down
Volume
up/down
CH
Channel
up/down
Search
forward/
backward
Next/
previous
chapter
Up
Up
Up
Up
Up
Up
Down
Down
Down
Down
Down
Down
Left
Left
Left
Left
Left
Left
Right
Right
Right
Right
Right
Right
Home
TV
0 ~
Back to main
menu
FM
Close
Close
–
Close
–
–
9
Volume
up/down
Volume
up/down
–
Volume
up/down
–
–
Enter/OK
Enter/OK
Enter/OK
Enter//OK
Enter//OK
Enter//OK
Back
Back to
previous
Back to
previous
Back to
previous
Back to
previous
Back to
previous
Back to
previous
Recall
Back to
previous
channel
Stereo
Back to
previous
channel
–
Back to
previous
channel
–
Back to
previous
channel
–
Back to
previous
channel
–
Back to
previous
channel
–
OK
TV Audio
Snapshot
Snapshot
–
Snapshot
Snapshot
–
–
Fullsrceen
Fullscreen
–
Fullscreen
Fullscreen
Fullscreen
–
(Continued on the next page)
ASUS TV Tuner
A-9
Button
FM
DVD
Mute
Mute
Mute
Mute
Rew
Rewind
Rewind
Record
Record
Stop
Mode
VIDEO
PHOTO
MUSIC
Mute
Mute
Mute
Rewind
Rewind
Rewind
Rewind
Record
Record
Record
Record
Record
Stop
Stop
Stop
Stop
Stop
Stop
Fwd
Forward
Forward
Forward
Forward
Forward
Forward
Prev
Previous
chapter
Previous
chapter
Previous
chapter
Previous
chapter
Previous
chapter
Previous
chapter
Pause
Pause
Pause
Pause
Pause
Pause
Play
Play
Play
Play
Play
Play
Play
Next
Next chapter
Next chapter
Next chapter
Next chapter
Next chapter
Next chapter
Pause
A-10
TV
Appendix: Reference information
A.2
International TV systems and standards (Analog TV)
•
TV systems and standards may change anytime without notice. This list is
provided for reference only.
•
Ensure that your TV card complies with the system or standard used in
your country or location.
AREA
TV
Albania
Argentina
Australia
Austria
Azores Is. (Portugal)
Bahamas
Bahrain
Barbados
Belgium
Bermuda
Brazil
Bulgaria
Canada
Canary Is.
China
Colombia
Cyprus
Czech Republic
Denmark
Egypt
Faroe Islands (DK)
Finland
France
Gambia
Germany
Germany (prev East)
Gibraltar
Greece
Hong Kong
Hungary
Iceland
India
Indonesia
Iran
Ireland
PAL B/G
PAL-N
PAL B/G
FM-FM
Teletext
PAL B/G
FM-FM
Teletext
PAL B
NTSC M
PAL B
NTSC N
PAL B/G
Nicam
Teletext
NTSC M
PAL-M
MTS
SECAM D
NTSC M
MTS
CC
PAL B
PAL D
NTSC N
PAL B
SECAM/PAL D/K
PAL B
Nicam
TeleText
SECAM B
PAL B
PAL B/G
Nicam
TeleText
SECAM E/L
PAL I
PAL B/G
FM-FM
TeleText
SECAM/PAL B/G
PAL B
SECAM B/H
PAL I
Nicam
PAL B/G Nicam
PAL B
PAL B
PAL B
SECAM H
PAL I
Nicam
TeleText
STEREO
SUBTITLE
(Continued on the next page)
ASUS TV Tuner
A-11
AREA
TV
STEREO
SUBTITLE
Israel
PAL B/G
Nicam
TeleText
Italy
PAL B/G
FM/FM
TeleText
Jamaica
SECAM M
Japan
NTSC J
Jordan
PAL B
Kenya
PAL B
Korea
NTSC M
Luxembourg
PAL B/G
TeleText
Madeira
PAL B
Madagascar
SECAM B
Malaysia
PAL B
Malta
PAL B/G
Mauritius
SECAM B
Mexico
NTSC M
MTS
CC
Monaco
SECAM/PAL L/G
Morocco
SECAM B
Netherlands
PAL B/G
FM-FM
TeleText
New Zealand
PAL B/G
Nicam
TeleText
North Korea
SECAM/PAL D, D/K
Norway
PAL B/G
Nicam
Pakistan
PAL B
Paraguay
PAL N
Peru
NTSC M
Philipines
NTSC M
Poland
PAL D/K
Teletext
Portugal
PAL B/G
Nicam
Teletext
Romania
PAL G
Russia
SECAM D/K
Saudi Arabia
SECAM B
Seychelles
PAL I
Singapore
PAL B
South Africa
PAL I
South Korea
NTSC N
Spain
PAL B/G
Nicam
Sri Lanka
PAL B/G
Sweden
PAL B/G
Nicam
Teletext
Switzerland
PAL B/G
FM-FM
TeleText
Tahiti
SECAM KI
Taiwan
NTSC M
Thailand
PAL B
Trinidad
NTSC M
Tunisia
SECAM B
Turkey
PAL B
TeleText
Ukraine
SECAM D/K
United Arab Emirates
PAL B/G
United States
NTSC M
United Kingdom
PAL I
VietnamNTSC/SECAM M/D
Yugoslavia
PAL B/G
Zambia
PAL B/G
Zimbabwe
PAL B/G
A-12
Appendix: Reference information
A.3
International TV systems and standards (DVB-T)
TYPELOCATION
DVB-T+PAL
Australia
BW
7 MHz
BAND
V/UHF
DVB-T+PAL
Austria
8 MHz
UHF
DVB-T+PAL
Belgium
8 MHz
UHF
DVB-T+PAL
Denmark
8 MHz
UHF
DVB-T+PAL
Estonia
8 MHz
UHF
DVB-T+PAL
Faroe Island
8 MHz
UHF
DVB-T+PAL
Finland
8 MHz
UHF
DVB-T+PAL
France
8 MHz
–
DVB-T+PAL
Germany
7/8 MHz
V/UHF
DVB-T+PAL
Hungary
DVB-T+PAL
Italy
DVB-T+PAL
India
–
–
DVB-T+PAL
Ireland
8 MHz
UHF
DVB-T+PAL
Latvia
8 MHz
UHF
DVB-T+PAL
Lithuania
–
–
DVB-T+PAL
Luxembourg
–
–
DVB-T+PAL
Netherland
8 MHz
UHF
DVB-T+PAL
Norway
8 MHz
UHF
DVB-T+PAL
Poland
8 MHz
UHF
DVB-T+PAL
Portugal
8 MHz
UHF
DVB-T+PAL
Singapore
8 MHz
UHF
DVB-T+PAL
Slovakia
–
–
DVB-T+PAL
Slovenia
7/8 MHz
V/UHF
DVB-T+PAL
S-Africa
8 MHz
UHF
DVB-T+PAL
Spain
8 MHz
UHF
DVB-T+PAL
Sweden
8 MHz
UHF
DVB-T+PAL
Switzerland
8 MHz
UHF
DVB-T+PAL
UK
8 MHz
UHF
DVB-T+NTSC
Taiwan
6 MHz
UHF
ASUS TV Tuner
8 MHz
UHF
7/8 MHz
V/UHF
A-13
A.4
A.5
A-14
International TV systems and standards (ATSC)
TYPELOCATION
ATSC
USA
BW
6 MHz
BAND
V/UHF
ATSC
6 MHz
V/UHF
Canada
International TV systems and standards (DMB-TH)
TYPELOCATION
DMB-TH
China
BW
8 MHz
BAND
V/UHF
DMB-TH
8 MHz
V/UHF
Hong Kong
Appendix: Reference information
Manufacturer:
ASUSTeK Computer Inc.
Address:
No.150, LI-TE RD., PEITOU, TAIPEI 112,
TAIWAN
Authorised representative in
Europe:
ASUS Computer GmbH
Address:
HARKORT STR. 21-23, 40880 RATINGEN,
GERMANY