1
User Manual
Table Of Contents
Introduction................................................................................3
About the AcoustiFX .......................................................................... 4
AcoustiFX Basics................................................................................ 4
How to Use This Manual .................................................................... 7
Important Safety Instructions...................................................9
Important Safety Instructions (English) .............................................. 9
Instructions de Sécurité Importantes (French) .................................. 11
Lesen Sie bitte die folgende Sicherheitshinweise (German) ............. 13
CE Declaration Of Conformity ......................................................... 15
FCC Compliance Statement.............................................................. 15
Hookup Diagram......................................................................16
A Tour of the AcoustiFX..........................................................17
Selecting Programs ..................................................................20
Editing Programs .....................................................................21
Using the Tuner ........................................................................22
Storing/Copying Programs......................................................24
Deferred Program Change ......................................................25
EFFECT Knob Settings...........................................................27
Troubleshooting........................................................................36
Specifications ............................................................................37
Warranty/Contact Alesis .........................................................38
2
1 Introduction
Welcome!
Thank you for making the Alesis AcoustiFX a part of your setup. Since 1984,
we’ve been designing and building creative tools for the audio community. We
believe in our products, because we’ve heard the results that creative people like
you have achieved with them. One of Alesis’ goals is to make high-quality music
equipment available to everyone, and this user manual is an important part of that.
After all, there’s no point in making equipment with all kinds of capabilities if no
one explains how to use them. So, we try to write our manuals as carefully as we
build our products.
The goal of this manual is to get you the information you need as quickly as
possible, with a minimum of hassle. We hope we’ve achieved that. If not, please
drop us an email and give us your suggestions on how we could improve future
editions of this manual.
We hope your investment will bring you many years of creative enjoyment and
help you achieve your musical goals.
Sincerely,
The people of Alesis
3
1
Introduction
About the AcoustiFX
The first thing you’ll probably notice about the AcoustiFX is
its size—it’s not much larger or smaller than most other
effect pedals. But don’t let that fool you. The AcoustiFX does
much more than most pedals you’ll find on the market today
(and for an unbeatable price too). We’ve packed a lot of
effects and other features into this unit. Here’s a glimpse:
AcoustiFX Key Features
•
Audio processing that’s made specifically for mic’d
acoustic guitars and other acoustic instruments (sounds
great with acoustic/electrics too)
•
40 preset patches that you can fully edit, store and
restore to the factory default settings
•
8 effect modules that provide multiple selectable effects
•
More than 40 different effects with adjustable
parameters and numerous effect combinations
•
Built-in auto-chromatic tuner
•
Battery-powered operation and an external power
option (9VDC)
•
Simple interface that gives you quick and easy access to
the AcoustiFX’s features
AcoustiFX Basics
Benefits of a Multi-Effects Pedal
If you’ve ever used effect pedals, you know they come in an
infinite array of effects, colors and sizes. If you use multiple
pedals, you probably do so by linking them all together into a
chain. The AcoustiFX eliminates the need for so many pedals
because in addition to turning your electric into an acoustic,
this pedal also combines just about all the effects you need
4
Introduction
1
into one unit. Instead of turning knobs and pushing buttons
on pedal after pedal, with the AcoustiFX you have full
control over dozens of effects with one foot pedal! It’s that
easy.
Effect Modules
If you were to think of the AcoustiFX as a series of individual
pedals linked together, then each pedal in that series would be
considered an effect module. The AcoustiFX has eight
separate effect modules, as shown below:
You can assign one effect to each of these modules and
adjust its parameters accordingly. On the face of the unit,
you’ll see a list of possible effect types for some of these
modules. For more on effect modules, see chapter 10.
Effect Types
When we use the word “effect” in this manual, we’re usually
referring to an effect type. Each module provides you with a
selection of effect types, only one of which may be chosen
for each module. For example, the TYPE module allows you
to select which type of acoustic sound you want (Clean,
Warm, Bright, Rhythm and others). The behavior of each of
these effect types may be adjusted in one or more ways to
produce variations of the effect.
Parameters
A parameter is a control that changes the characteristics of an
effect. When we use the word “parameter,” we are referring
to the “direct control” parameter available to the FX1 and
FX2 modules. The parameters for FX1 and FX2 are labeled
PARAM on the face of the AcoustiFX. The characteristic
controlled by a parameter varies from effect to effect.
5
1
Introduction
Programs
A program is a combination of effects modules and
their respective settings. In PLAY mode, you have
quick access to the AcoustiFX’s 40 programs via the
foot pedals and the VALUE knob. The programs are
divided up into banks A – D and are identified by a bank
letter and a program number on the display.
6
Introduction
1
How to Use This Manual
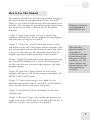
This manual is divided into the following sections describing
the various functions and applications for the AcoustiFX.
While it’s a good idea to read through the entire manual once
carefully, if you already have general knowledge about effects,
you should use the table of contents to look up specific
functions.
Helpful tips and advice
are highlighted in a
shaded box like this.
Chapter 3: Getting Started shows you how to get the unit
connected and turned on. We’ve included a hookup diagram
and some tips on using the AcoustiFX.
Chapter 4: A Tour of the AcoustiFX describes all the controls
and features of the unit. This chapter features diagrams of the
top and rear panels that are labeled with the name and a brief
overview of each function. The paragraphs that follow the
diagrams provide in-depth description of these features.
Chapters 5 through 9 include step-by-step instructions for using
the AcoustiFX, including how to select and edit programs,
use the tuner function, store and copy programs, and defer
program changes.
Chapter 10: Effects Knob Settings explains the unit’s effect
modules and types, as well as other settings controlled by the
EFFECT and VALUE knobs.
When something
important appears in
the manual, an
exclamation mark (like
the one shown at left)
will appear with some
explanatory text. This
symbol indicates that
this information is vital
when operating the
AcoustiFX.
Chapter 11: Troubleshooting can give you a hand if you’re
experiencing problems with the AcoustiFX. You’ll find that
most issues can be resolved simply and quickly.
Chapter 12: Specifications is full of information for the more
technical users.
Chapter 13: Warranty/Contact Alesis explains the warranty we
supply with the AcoustiFX and lets you know the best way to
reach us if you have any questions or comments.
7
1
Introduction
This page intentionally left blank.
8
2 Important Safety Instructions
Important Safety Instructions (English)
Safety symbols used in this product
This symbol alerts the user that there are important operating
and maintenance instructions in the literature accompanying this
unit.
This symbol warns the user of uninsulated voltage within the
unit that can cause dangerous electric shocks.
This symbol warns the user that output connectors contain
voltages that can cause dangerous electrical shock.
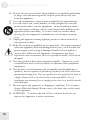
Please follow these precautions when using this
product:
1.
2.
3.
4.
5.
6.
Read these instructions.
Keep these instructions.
Heed all warnings.
Follow all instructions.
Do not use this apparatus near water.
Clean only with a damp cloth. Do not spray any liquid cleaner onto
the faceplate, as this may damage the front panel controls or cause a
dangerous condition.
7. Install in accordance with the manufacturer's instructions.
8. Do not install near any heat sources such as radiators, heat registers,
stoves, or other apparatus (including amplifiers) that produce heat.
9. Do not defeat the safety purpose of the polarized or grounding-type
plug. A polarized plug has two blades with one wider than the other.
A grounding-type plug has two blades and a third grounding prong.
The wide blade or the third prong is provided for your safety.
When the provided plug does not fit into your outlet, consult an
electrician for replacement of the obsolete outlet.
9
2
Important Safety Instructions
10. Protect the power cord from being walked on or pinched, particularly
at plugs, convenience receptacles, and the point where they exit
from the apparatus.
11. Use only attachments or accessories specified by the manufacturer.
12. Use only with a cart, stand, bracket, or table designed for use with
professional audio or music equipment. In any installation, make
sure that injury or damage will not result from cables pulling on the
apparatus and its mounting. If a cart is used, use caution when
moving the cart/apparatus combination to avoid injury from tipover.
13. Unplug this apparatus during lightning storms or when unused for
long periods of time.
14. Refer all servicing to qualified service personnel. Servicing is required
when the apparatus has been damaged in any way, such as when the
power-supply cord or plug is damaged, liquid has been spilled or
objects have fallen into the apparatus, the apparatus has been
exposed to rain or moisture, does not operate normally, or has been
dropped.
15. This unit produces heat when operated normally. Operate in a wellventilated area with at least six inches of clearance from peripheral
equipment.
16. This product, in combination with an amplifier and headphones or
speakers, may be capable of producing sound levels that could cause
permanent hearing loss. Do not operate for a long period of time at
a high volume level or at a level that is uncomfortable. If you
experience any hearing loss or ringing in the ears, you should consult
an audiologist.
17. Do not expose the apparatus to dripping or splashing. Do not place
objects filled with liquids (flower vases, soft drink cans, coffee cups)
on the apparatus.
18. WARNING: To reduce the risk of fire or electric shock, do not
expose this apparatus to rain or moisture.
10
Important Safety Instructions
2
Instructions de Sécurité Importantes (French)
Symboles utilisés dans ce produit
Ce symbole alèrte l’utilisateur qu’il existe des instructions de
fonctionnement et de maintenance dans la documentation jointe
avec ce produit.
Ce symbole avertit l’utilisateur de la présence d’une tension non
isolée à l’intérieur de l’appareil pouvant engendrer des chocs
électriques.
Ce symbole prévient l'utilisateur de la présence de tensions sur
les raccordements de sorties, représentant un risque
d'électrocution.
Veuillez suivre ces précautions lors de l’utilisation
de l’appareil:
1. Lisez ces instructions.
Gardez ces instructions.
Tenez compte de tous les avertissements.
Suivez toutes les instructions.
N’utilisez pas cet allareil à proximité de l’eau.
Ne nettoyez qu’avec un chiffon humide. Il est potentiellement
dangereux d'utiliser des pulvérisateurs ou nettoyants liquides sur cet
appareil.
7. Installez selon les recommandations du constructeur.
8. Ne pas installer à proximilé de sources de chaleur comme radiateurs,
cuisinière ou autre appareils (don’t les amplificateurs) produisant de
la chaleur.
9. Ne pas enlever la prise de terre du cordon secteur. Une prise murale
avec terre deux broches et une troisièrme reliée à la terre. Cette
dernière est présente pour votre sécurité. Si le cordon secteur ne
rentre pas dans la prise de courant, demandez à un électricien
qualifié de remplacer la prise.
2.
3.
4.
5.
6.
11
2
Important Safety Instructions
10. Evitez de marcher sur le cordon secteur ou de le pincer, en particulier
au niveau de la prise, et aux endroits où il sor de l’appareil.
11. N’utilisez que des accessoires spécifiés par le constructeur.
12. N’utilisez qu’avec un stand, ou table conçus pour l’utilisation d’audio
professionnel ou instruments de musique. Dans toute installation,
veillez de ne rien endommager à cause de câbles qui tirent sur des
appareils et leur support.
13. Débranchez l’appareil lors d’un orage ou lorsqu’il n’est pas utilisé
pendant longtemps.
14. Faites réparer par un personnel qualifié. Une réparation est nécessaire
lorsque l’appareil a été endommagé de quelque sorte que ce soit, par
exemple losrque le cordon secteur ou la prise sont endommagés, si
du liquide a coulé ou des objets se sont introduits dans l’appareil, si
celui-ci a été exposé à la pluie ou à l’humidité, ne fonctionne pas
normalement ou est tombé.
15. Puisque son fonctionement normale génère de la chaleur, placez cet
appareil au moins 15cm. des équipments péripheriques et assurez
que l’emplacement permet la circulation de l’air.
16. Ce produit, utilisé avec un amplificateur et un casque ou des enceintes,
est capable de produite des niveaux sonores pouvant engendrer une
perte permanente de l’ouïe. Ne l’utilisez pas pendant longtemps à
un niveau sonore élevé ou à un niveau non confortable. Si vous
remarquez une perte de l’ouïe ou un bourdonnement dans les
oreilles, consultez un spécialiste.
17. N'exposez pas l'appareil à l'égoutture ou à l'éclaboussement. Ne
placez pas les objets remplis de liquides (vases à fleur, boîtes de
boisson non alcoolique, tasses de café) sur l'appareil.
18. AVERTISSEMENT: Pour réduire le risque du feu ou de décharge
électrique, n'exposez pas cet appareil à la pluie ou à l'humidité.
12
Important Safety Instructions
2
Lesen Sie bitte die folgende Sicherheitshinweise (German)
Sicherheit Symbole verwendet in diesem
Produkt
Dieses Symbol alarmiert den Benutzer, daß es wichtige
Funktionieren und Wartung Anweisungen in der Literatur gibt,
die diese Maßeinheit begleitet.
Dieses Symbol warnt den Benutzer der nicht isolierten
Spannung innerhalb der Maßeinheit, die gefährliche elektrische
Schläge verursachen kann.
Dieses Symbol warnt den Benutzer, dem Ausgabestecker
Spannungen enthalten, die gefährlichen elektrischen Schlag
verursachen können.
Folgen Sie bitte diesen Vorkehrungen, wenn dieses
Produkt verwendet wird:
1. Lesen Sie die Hinweise.
Halten Sie sich an die Anleitung.
Beachten Sie alle Warnungen.
Beachten Sie alle Hinweise.
Bringen Sie das Gerät nie mit Wasser in Berührung.
Verwenden Sie zur Reinigung nur ein weiches Tuch. Verwenden Sie
keine flüssigen Reinigungsmittel. Dies kann gefährliche Folgen
haben.
7. Halten Sie sich beim Aufbau des Gerätes an die Angaben des
Herstellers.
8. Stellen Sie das Gerät nich in der Nähe von Heizkörpern,
Heizungsklappen oder anderen Wärmequellen (einschließlich
Verstärkern) auf.
9. Verfehlen Sie nicht den Zweck des grounging Terminals auf dem
Netzstecker. Dieses Terminal wird für Ihre Sicherheit zur Verfügung
gestellt.
2.
3.
4.
5.
6.
13
2
Important Safety Instructions
10. Verlegen Sie das Netzkabel des Gerätes niemals so, daß man darüber
stolpern kann oder daß es gequetscht wird.
11. Benutzen Sie nur das vom Hersteller empfohlene Zubehör.
12. Verwenden Sie ausschließlich Wagen, Ständer, oder Tische, die
speziell für professionelle Audio- und Musikinstrumente geeignet
sind. Achten Sie immer darauf, daß die jeweiligen Geräte sicher
installiert sind, um Schäden und Verletzungen zu vermeiden. Wenn
Sie einen Rollwagen benutzen, achten Sie darauf, das dieser nicht
umkippt, um Verletzungen auszuschließen.
13. Ziehen Sie während eines Gewitters oder wenn Sie das Gerät über
einen längeren Zeitraum nicht benutzen den Netzstecher aus der
Steckdose.
14. Die Wartung sollte nur durch qualifiziertes Fachpersonal erfolgen.
Die Wartung wird notwendig, wenn das Gerät beschädigt wurde
oder aber das Stromkabel oder der Stecker, Gegenstände oder
Flüssigkeit in das Gerät gelangt sind, das Gerät dem Regen oder
Feuchtigkeit ausgesetzt war und deshalb nicht mehr normal arbeitet
oder heruntergefallen ist.
15. Dieses Gerät produziert auch im normalen Betrieb Wärme. Achten
Sie deshalb auf ausreichende Lüftung mit mindestens 15 cm
Abstand von anderen Geräten.
16. Dieses Produkt kann in Verbindung mit einem Verstärker und
Kopfhörern oder Lautsprechern Lautstärkepegel erzeugen, die
anhaltende Gehörschäden verursachen. Betreiben Sie es nicht über
längere Zeit mit hoher Lautstärke oder einem Pegel, der Ihnen
unangenehm is. Wenn Sie ein Nachlassen des Gehörs oder ein
Klingeln in den Ohren feststellen, sollten Sie einen Ohrenarzt
aufsuchen.
17. Setzen Sie den Apparat nicht Bratenfett oder dem Spritzen aus.
Plazieren Sie die Nachrichten, die mit Flüssigkeiten (gefüllt werden
Blumevases, Getränkdosen, Kaffeetassen) nicht auf den Apparat.
18. WARNING: um die Gefahr des Feuers oder des elektrischen
Schlages zu verringern, setzen Sie diesen Apparat nicht Regen oder
Feuchtigkeit aus.
14
Important Safety Instructions
2
CE Declaration Of Conformity
See our website at
http://www.alesis.com
FCC Compliance Statement
This device complies with Part 15 of the FCC rules. Operation is subject
to the following two conditions: (1) This device may not cause harmful
interference and (2) this device must accept any interference received,
including interference that may cause undesired operation.
NOTE: This equipment has been tested and found to comply with the
limits for a Class B digital device, pursuant to Part 15 of the FCC Rules.
These limits are designed to provide reasonable protection against
harmful interference in a residential installation. This equipment generates,
uses and can radiate radio frequency energy and, if not installed and used
in accordance with the instructions, may cause harmful interference to
radio communications. However, there is no guarantee that interference
will not occur in a particular installation. If this equipment does cause
harmful interference to radio or television reception, which can be
determined by turning the equipment off and on, the user is encouraged
to try to correct the interference by one or more of the following
measures:
-- Reorient or relocate the receiving antenna.
-- Increase the separation between the equipment and receiver.
-- Connect the equipment into an outlet on a circuit different from that to
which the receiver is connected.
-- Consult the dealer or an experienced radio/TV technician for help.
15
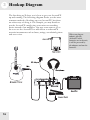
3 Hookup Diagram
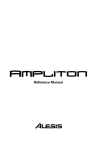
The first thing we’ll show you is how to get your AcoustiFX
up and running. The following diagram shows you the most
common method of hooking up your AcoustiFX, but there
are other ways of doing it. For example, you may decide to
run the AcoustiFX straight into your mixer or recording
device instead of an amplifier. You may even want to go so
far as to use the AcoustiFX to add effects to other mic’d
acoustic instruments such as brass, strings, woodwinds, piano
and even voice.
16
When you plug an
adapter into the
AcoustiFX while
batteries are in the unit,
it will be powered by
the adapter and not the
batteries.
4 A Tour of the AcoustiFX
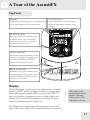
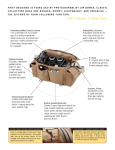
Top Panel
Display
Indicates bank and program, shows parameter
values and displays pitch in tuner mode.
VALUE knob
Adjusts parameter values, program
numbers and master volume; stores
changes.
OUTPUT
9VDC
INPUT
CONTROL
EFFECT knob
Puts the AcoustiFX in PLAY mode
or EDIT mode. You are in EDIT
mode when you select a module or
parameter with this knob.
BANK
CLEAN
WARM
BRIGHT
RHYTHM
JUMBO
DRIVE
HIGH
HI MID
LO MID
LOW
HPF
EQ
Left foot pedal
Decrements program number; when
used with the right foot pedal, puts
the unit in BYPASS and MUTE
modes and accesses the tuner.
PROGRAM
HALL
ROOM
PLAT
REVERSE
DOUBLING
STEREO
PING PONG
TAPE
ECHO
CHORUS
PHASER
FLANGER
TREMOLO
12-STRING
SLOW ATTACK
STEP FILTER
WAH (U)
ROTARY (L)
CRY
#
EDITED
EDGE
COMP/LIMIT
HUM CANCEL
NOISE
PARAM
PARAM
LEVEL
EFFECT
PUSH TO STORE
HOLD FOR VOL
BYPASS
(TUNER)
VALUE
HOLD FOR MUTE
Right foot pedal
Increments program number; when
used with the left foot pedal, puts the
unit in BYPASS and MUTE modes
and accesses the tuner.
Display
This LED display is made up of two digits and two decimal
points. In PLAY mode, the digits indicate the current bank
letter and program number. When you turn the EFFECT
knob to a module or parameter, the two digits display the
setting of the selection. Descriptions of settings for each
mode and parameter are in chapter 10.
When either of the
decimal points on the
display is flashing,
battery power is low
and about to run out.
The Display also contains two decimal points, each to the
right of one of the digits. The # decimal point is used by the
17
4
A Tour of the AcoustiFX
AcoustiFX’s tuner to help indicate the pitch of a note you’re
playing, and the EDITED decimal point lights up when you
have changed the settings of the current program. You can
read more about these in chapter 6, “Editing Programs,” and
chapter 7, “Using the Tuner.”
EFFECT knob
The EFFECT knob is used for selecting effect modules,
parameters and other settings to edit. Around the knob, you’ll
see the names of sixteen different settings, including eight
effect modules (EQ is a single module made up of five
separate settings), two effect parameters (labeled PARAM)
and a program-level setting (LEVEL). The PLAY setting is
what you’ll want to be in while playing your guitar through
the AcoustiFX.
Refer to chapter 10 for descriptions of the possible values for
the EFFECT knob’s settings.
VALUE knob
In PLAY mode, this knob lets you select a program. When
you make a selection other than PLAY with the EFFECT
knob, you are in edit mode, and the VALUE knob allows you
to change the setting of the mode, parameter or global setting
you have selected. Also, you can press this knob to store
changes you have made to a program.
Foot Pedals
While in PLAY mode, the left foot pedal decrements the
program number, and the right foot pedal increments the
program number. When you press both pedals together, the
AcoustiFX goes into bypass mode, in which the audio signal
from your guitar simply passes through the AcoustiFX
without being affected. When you hold both foot pedals
down for longer then half a second, the AcoustiFX goes into
mute mode, in which no signal at all leaves the AcoustiFX.
When you are in bypass or mute mode, the tuner is activated.
18
While in PLAY mode, if
you press and hold the
VALUE knob for longer
than half a second, the
display will change to
the current master
volume setting (1 to 30).
Default volume is 21
(unity gain) and each
number indicates a 2dB
change from the
number above or below
it. Unlike LEVEL,
which indicates the
level of an individual
program, the master
volume is a global
setting that is
remembered each time
the unit is turned off.
A Tour of the AcoustiFX
4
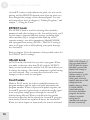
Rear Panel
The rear panel is where you’ll connect the power source,
optional control pedal and your guitar and amplifier. It’s
important that you use the right types of plugs in these jacks.
Be sure to follow these guidelines.
19
5 Selecting Programs
After you’ve plugged everything in, you’ll probably want to
check out the factory presets we programmed into the
AcoustiFX. This chapter shows you how to do that.
To Select Programs
1.
Make sure the AcoustiFX is
hooked up properly and turned
on, as outlined in chapter 3.
2.
Make sure you’re in PLAY
mode (turn the EFFECT knob
to PLAY).
3.
Change programs in one of
these two ways:
1
3
2
Foot pedals
This is the easiest way to
switch programs, especially
while playing your guitar. Just
step on the left foot pedal
to decrement the program
number and the right to
increment it. You can hold
down a pedal to increment or
decrement programs continuously.
VALUE knob
You also can turn this knob to switch programs.
4.
20
Play your guitar to hear how the program affects the
sound.
3
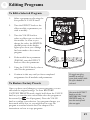
6 Editing Programs
To Edit a Selected Program
1.
Select a program to edit using the
foot pedals or VALUE knob.
2.
Turn the EFFECT knob to the
effect module or parameter you
wish to modify.
3.
Turn the VALUE knob to
select an effect type or value for
the module. As soon as you
change the value, the EDITED
decimal point on the display
lights up to show you a change
has been made to the current
program.
2
1
4
4.
If the module has a parameter
(PARAM), turn the EFFECT
knob to select the parameter.
5.
Using the VALUE knob, select a
value for the parameter.
6.
Continue in this way until you have completed
assignments for all modules and parameters.
To Restore Factory Presets
Once you have saved changes to a preset program, you can
still recall the original settings. To enter RESTORE
FACTORY PRESETS mode, simply hold down the VALUE
knob as you turn the unit on and then select the program to
for all programs). Press the VALUE
be restored (or
knob to confirm your selection. Any program changes you
have made will be lost, so you might want to copy the
program to another location first. See chapter 8 for
instructions on how to copy programs.
3
5
1
To toggle an effect
module on and off,
press both pedals while
the effect module is
selected.
Just turn the EFFECT
knob to exit the
RESTORE FACTORY
PRESETS mode, or
turn the unit off and
then on again.
21
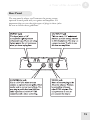
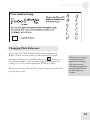
7 Using the Tuner
To Tune Your Guitar
1.
In PLAY mode, enter BYPASS
by pressing both foot
mode
pedals at the same time once, or
2
3
enter MUTE mode
by
holding them both down for
more than half a second. The
display will now show tuning
information.
2.
Make sure your guitar is
connected to the AcoustiFX,
and play the open string you
wish to tune. The left digit of
the display indicates the pitch
nearest that of the open string.
If the # decimal point is lit, the
note is a sharp. If it is not lit,
the note is a natural.
3.
Look at the right digit of the
display to determine if the pitch is correct.
If the top four segments of the digit are rotating
clockwise, then your guitar’s pitch is higher than the
pitch shown in the first digit. If the bottom four
segments are rotating counterclockwise, the pitch is low.
The more the pitch is off, the faster the rotation. If no
pitch is detected, you’ll see a dash in the left digit.
4.
Tune the string until an 8 appears in the second digit,
indicating that the string is in tune with the pitch
displayed in the left digit.
The visual guide on the next page shows you what
you’ll see on the display while tuning your guitar.
22
1
Using the Tuner
7
Changing Pitch Reference
If you turn the VALUE knob while using the tuner, the
display shows you the setting for the AcoustiFX’s pitch
) for the A
reference, which is set to 440Hz (shown as
note above middle C. The possible range of values for this
setting is 35 to 45, which represents 435Hz to 445Hz.
When you turn the AcoustiFX on and off again, the reference
pitch is reset to 40.
While you are viewing
or editing the pitch
reference, the display
will return to pitch
indication if you do not
turn the VALUE knob
for more than two
seconds.
23
8 Storing & Copying Programs
To Store a Program
1.
In PLAY or EDIT mode, press
the VALUE knob. The display
will flash the current program
number.
2.
Use the VALUE knob or the
foot pedals to select the
program number where the
current program will be stored.
If you want to save it in the
same program number, you
can skip this step.
3.
Press the VALUE knob again
to store the program in the
selected place. The AcoustiFX
then returns to the mode it
was in before you began the
store operation, and the
destination program becomes the
current program.
To Copy a Program
A copy is just a store of a program that hasn’t been modified,
so just follow the same steps as you would to store a program.
24
1
3
2
The store operation
times out if you do
nothing for more than
five seconds. You also
can abort the operation
by turning the EFFECT
knob to a different
position.
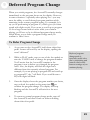
9 Deferred Program Change
When you switch programs, the AcoustiFX normally changes
immediately to the program shown on the display. However,
in some situations—especially when playing live—you may
want the ability to scroll through program numbers while
remaining in the current program setting. For example, let’s
say you’re performing in program A3, which gives you clean
sound with slight reverb. If you want to scroll up to program
C6 for a larger sound with an echo while you continue
playing, you’ll have to be in deferred program-change mode,
which allows you to defer a program change until you
confirm it. Here’s how:
To Defer Program Change
1.
As you turn on the AcoustiFX, hold down either foot
pedal. Letters will scroll by on the display, spelling the
word “deferred.”
2.
While in PLAY mode, step on one of the foot pedals or
turn the VALUE knob to change the program number.
You’ll notice that the AcoustiFX remains in the
program it was in before you changed the program
value. Also, the display will flash the digit that is
different from the currently selected program. For
example, if you are playing in program D5 and scroll up
to program D7, the 7 will flash. If you scroll down to
B2, both digits will flash.
3.
Once the display shows the program number you desire,
to
step on both foot pedals at the same time
confirm the program change. The display will stop
flashing and the AcoustiFX will switch to the new
program.
4.
To return to normal program-change mode, turn off
the AcoustiFX and turn it back on without holding
down either foot pedal.
Deferred programchange mode is
especially useful when
you’re performing and
want to switch easily
between settings as you
continue playing.
25
9
Deferred Program Change
This page intentionally left blank.
26
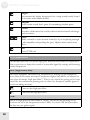
10 EFFECT Knob Settings
Following are descriptions of each of the effect modules (and
other settings of the EFFECT knob), along with their effect
types and parameters.
PLAY
In this setting, the display shows you the current program number. This is the
mode in which you should be performing, as it allows you to easily switch
programs via the foot pedals.
Indicates the bank letter and program number of the current
program.
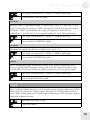
COMP/LIMIT (Compressor/Limiter)
Compression evens out the highs and lows of your sound by squeezing them
into a thinner range of levels, bringing down the louder levels and boosting the
quieter ones. Limiting eases only the high levels.
Provide increasing levels of compression.
Provide increasing limiting.
Turns COMP/LIMIT off.
TYPE
Many factors affect the sound of an acoustic guitar, including its size, the type
and thickness of the wood, and the make of amplifier. The TYPE effect module
allows you to capture a number of these acoustic-guitar sounds.
Clean
The clean, natural sound of a quality acoustic guitar.
Warm
A dark, deep sound typical of guitars made of dense rosewood or
mahogany.
27
10
EFFECT Knob Settings
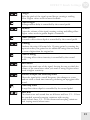
Bright
Accentuates the higher frequencies for a crisp sound usually found
in acoustics with smaller bodies.
Rhythm
A full, warm sound that’s great for strumming rhythm parts.
Jumbo
Provides a little more low-end for that sound associated with largebody acoustics.
Drive
Adds a crunch to your acoustic sound, as if you’re playing through
a tube amplifier and pushing the gain. Higher values mean more
drive.
Off
Turns TYPE off.
EQ (Equalizer)
This module provides you with a high-pass filter and four bands of equalization
that you can use to shape the sound of your audio signal by cutting and boosting
certain frequencies.
HPF (High-Pass Filter)
This filter eliminates unwanted low frequencies by cutting out all frequencies
lower than 80 Hz when activated. Frequencies higher than 80 Hz are allowed to
pass (thus the name “high-pass filter”). This is very useful for getting rid of noise
caused by air conditioners, passing cars or other low-frequency rumble (great if
you’re recording at home).
Turns on the high-pass filter.
Turns off the high-pass filter.
LOW
This is a single-pole low-shelf filter at 150Hz. This works by allowing you to
boost or cut all of the frequencies below 150Hz. Use the LOW band to adjust
the bass in your guitar signal.
28
EFFECT Knob Settings
10
This range corresponds to -12dB to +12dB in 1dB steps.
Turns off the LOW EQ band.
LO MID
This EQ band is a parametric band at 700Hz with a Q of 1.5. This type of EQ
works by boosting or cutting at 700Hz, along with a band of frequencies above
and below 700Hz. Q determines the range of frequencies affected (the
bandwidth). A Q value of 1.5 is an optimal setting for most EQ applications.
This range corresponds to -12dB to +12dB in 1dB steps.
Turns off the LO MID EQ band.
HI MID
This band is a parametric band at 2.5kHz with a Q of 1.5.
This range corresponds to -12dB to +12dB in 1dB steps.
Turns off the HI MID EQ band.
HIGH
This is a single-pole high shelf filter at 5kHz. This works by allowing you to
boost or cut the 5kHz frequency, along with all of the frequencies above that.
Use the HIGH band to control the highest frequencies in your guitar signal.
This range corresponds to -12dB to +12dB in 1dB steps.
Turns off the HIGH EQ band.
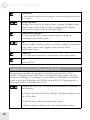
EDGE
This is a filtered limiter that gives your acoustic guitar a bright, edgy sound. This
effect works by taking the original signal, filtering out all frequencies that fall
below 2kHz, feeding that into a limiter and then mixing it back with the original,
unfiltered, unlimited sound.
Increasing amounts of edge.
Turns off EDGE.
29
10
EFFECT Knob Settings
HUM CANCEL
The hum canceller eliminates unwanted low-end hum by eliminating the
frequency that contains the hum (60Hz). Unlike the high-pass filter, this mode
allows you to control how much noise you want to eliminate. If the high-pass
filter is turned on, you do not need to use the hum canceller.
Increasing levels of hum elimination (60Hz harmonic notch filters).
Turns off the hum canceller.
NOISE GATE
The noise gate eliminates unwanted noise by gating the signal, which means that
it mutes the signal until the signal’s level rises above a certain point.
Increasing levels of gate threshold.
Turns off the noise gate.
FX1 (Multi-Effect Module 1, Stereo Effects)
This module gives you a choice of stereo effects. You assign one effect at a time
to this module.
Chorus
Adds fullness to your sound by emulating a chorus of multiple
instruments. Higher values indicate greater modulation depth.
Pedal Chorus
A Chorus effect whose modulation depth is controlled by the
control pedal.
Phaser
An effect that shifts the phase of the signal and adds it to the
original sound (in simpler terms, it adds a duplicate signal that is
delayed a bit). The phaser gives your guitar a full, pulsating sound.
Higher values result in more feedback, producing a more intense
effect.
Pedal Phaser
A phaser effect whose feedback is controlled by the control pedal.
30
EFFECT Knob Settings
10
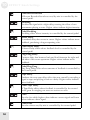
Flanger
Shifts the pitch of the signal up and down, creating a swirling
effect. Higher values result in more feedback.
Pedal Flanger
A flanger whose delay is controlled by the control pedal.
Tremolo
Varies the volume of the signal, creating a rising and falling effect.
Higher values result in greater depth of variation.
Pedal Tremolo
A tremolo effect whose depth is controlled by the control pedal.
12-String
Emulates the crisp, full sound of a 12-string guitar by creating the
impression that your guitar has six additional strings that are tuned
an octave higher than the original six.
Pedal 12-String
A 12-string effect whose intensity is controlled by the control
pedal.
Slow Attack
Reduces the attack rate of the signal, slowing the rate at which the
volume of the sound rises when you attack a string. Higher values
result in higher sensitivity.
Random Sample and Hold Step Filter
Filters the signal with a cutoff frequency that changes to a new
random value at fixed time intervals, producing an arpeggiator-like
sound.
Pedal Step Filter
A step filter whose depth is controlled by the control pedal.
Auto Wah
The classic auto wah sound that we all know and love. U1 – U4 are
the standard, upward-sweeping variations with varying
attack/release rates. U5 – U9 are downward-sweeping variations
with varying attack/release rates.
31
10
EFFECT Knob Settings
Pedal Wah
A wah sound controlled by moving the control pedal up and down
as you play.
Rotary Speaker
Emulates the sound of the classic rotary, creating a Doppler effect
similar to that achieved by an organ’s rotating speaker. Higher
values result in greater intensity and pan depth.
Pedal Rotary Speaker
A rotary speaker effect whose intensity and pan depth are
controlled by the control pedal.
Cry
Creates an effect similar to that of a voice box, adding a human-like
crying effect to the sound. Higher values result in faster
attack/release rates.
Pedal Cry
A cry effect whose intensity is controlled by the control pedal.
Off
Turns off FX1.
PARAM (Direct-Control Parameter for FX1)
This parameter modifies the operation of the effect selected for the FX1
module. Changing between effect types with dissimilar value ranges will scale
this value accordingly. For example, if you set Phaser to PARAM=63 and then
switch to the Auto Wah effect, its PARAM value will be 12. Changing back to
Phaser will result in a PARAM value of 63.
Indicates the value of FX1’s direct-control parameter, according to
the following:
For Phaser, Tremolo, Step Filter, Flanger and Chorus, indicates the
rate of the effect.
For Slow Attack, indicates the rate of the attack.
For Rotary Speaker, indicates the rate of the speaker rotation.
32
EFFECT Knob Settings
10
For Cry and Auto Wah, indicates the attack/release rate.
Indicates that the control pedal controls the parameter.
Indicates that the effect assigned to the FX1 module does not have
a direct-control parameter (for example, 12-String, Pedal Wah or
Pedal Cry) or that FX1 is off.
FX2 (Multi-Effect Module 2, Delay-Based Effects)
This module gives you a choice of delay-based effects. A delay is an echo of the
original signal that can occur at varying frequency and time.
Hall Reverb
Simulates the effect of sound waves bouncing off of the walls of a
concert hall. Higher values indicate a wetter mix.
Pedal Hall Reverb
A Hall Reverb effect whose wet/dry mix is controlled by the
control pedal.
Room Reverb
Simulates the effect of sound waves bouncing off of the walls of a
room. Higher values indicate a wetter mix.
Pedal Room Reverb
A Room Reverb effect whose wet/dry mix is controlled by the
control pedal.
Plate Reverb
Recreates the classic “plate reverb” sound achieved by using a
metal plate. Higher values indicate a wetter mix.
Pedal Plate Reverb
A Plate Reverb effect whose wet/dry mix is controlled by the
control pedal.
Reverse Reverb
Creates a backwards-playing reverb that you hear immediately
before you hear the original signal, instead of after it. Higher values
indicate a wetter mix.
33
10
EFFECT Knob Settings
Pedal Reverse Reverb
A Reverse Reverb effect whose wet/dry mix is controlled by the
control pedal.
Doubling
Doubles the signal with a slight delay, creating the effect of two
instruments playing at once. Higher values indicate higher intensity.
Pedal Doubling
Doubling effect whose intensity is controlled by the control pedal.
Stereo Delay
A standard delay that occurs in stereo. Higher values indicate more
feedback, producing a longer-repeating echo.
Pedal Stereo Delay
A Stereo Delay effect whose feedback level is controlled by the
control pedal.
Ping Pong Delay
Creates a delay that bounces back and forth between the right and
left sides of the stereo spectrum. Higher values indicate more
feedback.
Pedal Ping Pong
Ping Pong Delay effect whose amount of feedback is controlled by
the control pedal.
Tape Delay
Emulates the retro tape-delay effect that was created by recording a
signal to tape and playing it back as a delay. Higher values indicate
more feedback.
Pedal Tape Delay
A Tape Delay effect whose feedback is controlled by the control
pedal; great for singling out notes or sections to echo.
Echo
An echo for which higher values indicate a wetter signal and lower
values indicate a drier signal.
Pedal Echo
An echo whose wet/dry mix is controlled by the control pedal.
34
EFFECT Knob Settings
10
Off
Indicates FX2 is off.
PARAM (Direct-Control Parameter for FX2)
This direct-control parameter works in a similar fashion as the one for FX1.
For Doubling, Ping Pong, Tape Delay, Stereo Delay and Echo,
indicates the length of the delay, up to one second for Tape Delay
and up to half a second for the others.
For all reverbs, higher values indicate a longer decay.
Indicates that the control pedal controls the parameter.
Indicates FX2 is off.
LEVEL
In this position, the display shows you the output level of the current program.
Level
Indicates the program output level in 2dB steps, where 25 is unity
gain (0dB). Unity gain is the point at which the level of the output
is the same as the level of the input.
35
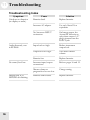
11 Troubleshooting
Troubleshooting Index
Symptoms
Unit does not function
(no display or audio).
Audio distorted, even
in BYPASS.
No sound, level low.
Display dim, # or
EDITED dot flashing.
36
Cause
Batteries dead.
Solution
Replace batteries.
Incorrect AC adapter.
Use only Alesis P6 or
equivalent.
No/incorrect INPUT
connection.
On battery power, the
AcoustiFX will turn on
only when a mono 1/4”
plug is inserted into the
INPUT jack.
Input level too high.
Reduce instrument
output level.
Output level too high.
Turn down master
volume.
Batteries low.
Replace batteries.
Incorrect input/output
connections.
Refer to pages 16 and 19.
Master volume or
program level set too low.
Change setting.
Batteries almost dead.
Replace batteries.
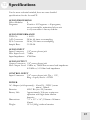
12 Specifications
For the more technical-minded, here are some detailed
specifications for the AcoustiFX.
AUDIO PROCESSING
Effect Modules:
8
Programs:
4 banks x 10 Programs = 40 programs,
user overwritable, maintained when unit
is off, restorable to factory defaults
AUDIO PERFORMANCE
THD+N:
< 0.05%
A/D Converter:
20-bit, 64 times oversampling
D/A Converter:
20-bit, 128 times oversampling
Sample Rate:
31.25kHz
AUDIO INPUT
Input Connector:
Max. Input Level:
Input Impedance:
1/4" mono phone jack
7.6dBu
470kOhm
AUDIO OUTPUT
Output Connector: 1/4" stereo phone jack
Max. Output Level: 1.9dBu w/ 10kHOhm or more load impedance
0.25 dBu w/ 63 Ohm load impedance
CONTROL INPUT
Input Connector: 1/4" stereo phone jack, Tip = 1.5V,
Ring = Input, Sleeve = GND
POWER
AC Adapter (sold separately): Alesis P6 - 9VDC (center
minus), 300mA
Batteries:
4 IEC R6 (size AA) batteries
Battery Life:
Approximately 30 hours continuous
operation with high-drain alkaline
batteries
Dimensions:
7.5” x 5.5” x 1.6” (190mm x 140mm x
41mm)
Weight:
15.7oz (445g) without batteries
37
13 Warranty/Contact Alesis
Alesis Limited Warranty
ALESIS CORPORATION ("ALESIS") warrants this product to be free of defects in material and
workmanship for a period of one (1) year for parts and for a period of one (1) year for labor from the date
of original retail purchase. This warranty is enforceable only by the original retail purchaser and cannot be
transferred or assigned.
For the most effective service, the purchaser should register the purchase on the ALESIS website at
http://www.alesis.com/support/warranty.htm.
During the warranty period, ALESIS shall, at its sole and absolute option, either repair or replace free of
charge any product that proves to be defective on inspection by ALESIS or its authorized service
representative. In all cases disputes concerning this warranty shall be resolved as prescribed by law.
To obtain warranty service, the purchaser must first call or write ALESIS at the address and telephone
number available on the Alesis website to obtain a Return Authorization Number and instructions
concerning where to return the unit for service. All inquiries must be accompanied by a description of the
problem. All authorized returns must be sent to ALESIS or an authorized ALESIS repair facility postage
prepaid, insured and properly packaged. Proof of purchase must be presented in the form of a bill of sale,
canceled check or some other positive proof that the product is within the warranty period. ALESIS
reserves the right to update any unit returned for repair. ALESIS reserves the right to change or improve
design of the product at any time without prior notice.
This warranty does not cover claims for damage due to abuse, neglect, alteration or attempted repair by
unauthorized personnel, and is limited to failures arising during normal use that are due to defects in
material or workmanship in the product.
THE ABOVE WARRANTIES ARE IN LIEU OF ANY OTHER WARRANTIES OR
REPRESENTATIONS WHETHER EXPRESS OR IMPLIED OR OTHERWISE, WITH
RESPECT TO THE PRODUCT, AND SPECIFICALLY EXCLUDE ANY IMPLIED
WARRANTIES OF FITNESS FOR A PARTICULAR PURPOSE OR MERCHANTABILITY OR
OTHER IMPLIED WARRANTIES. Some states do not allow limitations on how long an implied
warranty lasts, so the above limitation may not apply to you.
IN NO EVENT WILL ALESIS BE LIABLE FOR INCIDENTAL, CONSEQUENTIAL,
INDIRECT OR OTHER DAMAGES RESULTING FROM THE BREACH OF ANY EXPRESS
OR IMPLIED WARRANTY, INCLUDING, AMONG OTHER THINGS, DAMAGE TO
PROPERTY, DAMAGE BASED ON INCONVENIENCE OR ON LOSS OF USE OF THE
PRODUCT, AND, TO THE EXTENT PERMITTED BY LAW, DAMAGES FOR PERSONAL
INJURY. Some states do not allow the exclusion or limitation of incidental or consequential damages, so
the above limitation or exclusion may not apply to you.
THIS CONTRACT SHALL BE GOVERNED BY THE INTERNAL LAWS OF THE STATE OF
CALIFORNIA WITHOUT REFERENCE TO CONFLICTS OF LAWS. This warranty gives you
specific legal rights, and you may also have other rights required by law which vary from state to state.
This warranty only applies to products sold to purchasers in the United States of America or Canada. The
terms of this warranty and any obligations of Alesis under this warranty shall apply only within the country
of sale. Without limiting the foregoing, repairs under this warranty shall be made only by a duly authorized
Alesis service representative in the country of sale. For warranty information in all other countries please
refer to your local distributor.
38
Warranty/Contact Alesis
13
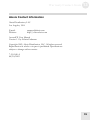
Alesis Contact Information
Alesis Distribution, LLC
Los Angeles, USA
E-mail:
Website:
support@alesis.com
http://www.alesis.com
AcoustiFX User Manual
Version 1.1 by Edwin Erdmann
Copyright 2003, Alesis Distribution, LLC. All rights reserved
Reproduction in whole or in part is prohibited. Specifications
subject to change without notice.
7-51-0140-A
04/30/2003
39
7-51-0140-A