1
Network Guide
Please read this guide before operating this equipment.
After you finish reading this guide, store it in a safe place for future reference.
ENG
0
Ot¯
CLC3220/iR C3220N
Network Guide
Manuals for the Machine
The manuals for this machine are divided as follows. Please refer to them for detailed information.
The manuals supplied with optional equipment are included in the list below. Depending on the system
configuration and product purchased, some manuals may not be needed.
Guides with this symbol are printed manuals.
CD-ROM
• Basic Information
• Basic Operations
• Troubleshooting
• Copying and Mail Box Instructions
• Sending and Fax Instructions
• Setting Up the Network Connection and Installing
the CD-ROM Software
• Remote User Interface Instructions
• Network Connectivity and Setup Instructions
• Color Network ScanGear Installation and
Instructions
• PS/PCL/UFR Printer Instructions
• PCL Printer Driver Installation and Instructions
• PS Printer Driver Installation and Instructions
• Mac OS X PS Printer Driver Installation and
Instructions
• UFR Printer Driver Installation and Instructions
Guides with this symbol are PDF manuals included on the
accompanying CD-ROM.
User's Guide
Reference Guide
CD-ROM
Copying and Mail Box
Guide
CD-ROM
Sending and Facsimile
Guide
CD-ROM
Network Quick Start
Guide
Remote UI Guide
CD-ROM
Network Guide
(This Document)
CD-ROM
Color Network ScanGear
User's Guide
CD-ROM
PS/PCL/UFR Printer
Guide
CD-ROM
PCL Driver Guide
CD-ROM
PS Driver Guide
CD-ROM
Mac PS Driver Guide
CD-ROM
UFR Driver Guide
CD-ROM
• Fax Driver Installation and Instructions
• Installing MEAP Applications and
Using the Login Service
Fax Driver Guide
CD-ROM
MEAP SMS Administrator
Guide
CD-ROM
To view the manual in PDF format, Adobe Reader/Adobe Acrobat Reader is required. If Adobe Reader/Adobe Acrobat Reader is not installed on your
system, please download it from the Adobe Systems Incorporated website.
How This Manual Is Organized
Chapter 1
Before You Start
Chapter 2
Settings Common to the Network Protocols
Chapter 3
Using a TCP/IP Network
Chapter 4
Using a NetWare Network (Windows)
Chapter 5
Using a NetBIOS Network
Chapter 6
Using an AppleTalk Network (Macintosh)
Chapter 7
Using the Network and Device Settings with Utilities
Chapter 8
Troubleshooting
Chapter 9
Appendix
Includes the network settings, specifications, and index.
Considerable effort has been made to ensure that this manual is free of inaccuracies and omissions. However, as we are constantly improving our
products, if you need an exact specification, please contact Canon.
Contents
Preface . . . . . . . . . . . . . . . . . . . . . . . . . . . . . . . . . . . . . . . . . . . . . . . . . . . . . . . . . . . . . . . . . viii
How To Use This Manual. . . . . . . . . . . . . . . . . . . . . . . . . . . . . . . . . . . . . . . . . . . . . . . . . . . viii
Symbols Used in This Manual. . . . . . . . . . . . . . . . . . . . . . . . . . . . . . . . . . . . . . . . . . . . . viii
Keys and Buttons Used in This Manual. . . . . . . . . . . . . . . . . . . . . . . . . . . . . . . . . . . . . . . ix
Displays Used in This Manual . . . . . . . . . . . . . . . . . . . . . . . . . . . . . . . . . . . . . . . . . . . . . . .x
Abbreviations Used in This Manual . . . . . . . . . . . . . . . . . . . . . . . . . . . . . . . . . . . . . . . . . . xi
Legal Notices . . . . . . . . . . . . . . . . . . . . . . . . . . . . . . . . . . . . . . . . . . . . . . . . . . . . . . . . . . . . .xii
Trademarks . . . . . . . . . . . . . . . . . . . . . . . . . . . . . . . . . . . . . . . . . . . . . . . . . . . . . . . . . . . . xii
Copyright . . . . . . . . . . . . . . . . . . . . . . . . . . . . . . . . . . . . . . . . . . . . . . . . . . . . . . . . . . . . . xiii
Disclaimers . . . . . . . . . . . . . . . . . . . . . . . . . . . . . . . . . . . . . . . . . . . . . . . . . . . . . . . . . . . xiii
Chapter 1
Before You Start
Optional Equipment and System Environment Requirements . . . . . . . . . . . . . . . . . . . . 1-2
Printing or Sending a Fax from a Computer . . . . . . . . . . . . . . . . . . . . . . . . . . . . . . . . . . 1-2
Optional Equipment Requirements . . . . . . . . . . . . . . . . . . . . . . . . . . . . . . . . . . . . . . 1-2
System Environment Requirements . . . . . . . . . . . . . . . . . . . . . . . . . . . . . . . . . . . . . 1-2
Using E-Mail/I-Fax . . . . . . . . . . . . . . . . . . . . . . . . . . . . . . . . . . . . . . . . . . . . . . . . . . . . . . 1-5
Optional Equipment Requirements . . . . . . . . . . . . . . . . . . . . . . . . . . . . . . . . . . . . . . 1-5
System Environment Requirements . . . . . . . . . . . . . . . . . . . . . . . . . . . . . . . . . . . . . 1-5
Sending Data . . . . . . . . . . . . . . . . . . . . . . . . . . . . . . . . . . . . . . . . . . . . . . . . . . . . . . . . . 1-6
Optional Equipment Requirements . . . . . . . . . . . . . . . . . . . . . . . . . . . . . . . . . . . . . . 1-6
System Environment Requirements . . . . . . . . . . . . . . . . . . . . . . . . . . . . . . . . . . . . . 1-6
Checking Your Network Environment . . . . . . . . . . . . . . . . . . . . . . . . . . . . . . . . . . . . . . . . 1-8
Sample Windows Network . . . . . . . . . . . . . . . . . . . . . . . . . . . . . . . . . . . . . . . . . . . . . . . 1-8
With a NetWare Server . . . . . . . . . . . . . . . . . . . . . . . . . . . . . . . . . . . . . . . . . . . . . . . 1-8
Without a NetWare Server . . . . . . . . . . . . . . . . . . . . . . . . . . . . . . . . . . . . . . . . . . . . 1-9
Sample Macintosh Network . . . . . . . . . . . . . . . . . . . . . . . . . . . . . . . . . . . . . . . . . . . . . 1-10
Sample UNIX Network . . . . . . . . . . . . . . . . . . . . . . . . . . . . . . . . . . . . . . . . . . . . . . . . . 1-11
Using a Network with Various Types of Computers . . . . . . . . . . . . . . . . . . . . . . . . . . . 1-12
Chapter 2
Settings Common to the Network Protocols
Network Environment Setup Procedures . . . . . . . . . . . . . . . . . . . . . . . . . . . . . . . . . . . . . 2-2
Connecting the Machine to a Computer or Network . . . . . . . . . . . . . . . . . . . . . . . . . . . . 2-3
Connecting to a Network. . . . . . . . . . . . . . . . . . . . . . . . . . . . . . . . . . . . . . . . . . . . . . . . . 2-4
Using Ethernet . . . . . . . . . . . . . . . . . . . . . . . . . . . . . . . . . . . . . . . . . . . . . . . . . . . . . 2-4
Using Token Ring (Optional) . . . . . . . . . . . . . . . . . . . . . . . . . . . . . . . . . . . . . . . . . . . 2-5
Connecting to a USB Interface (Optional) . . . . . . . . . . . . . . . . . . . . . . . . . . . . . . . . . . . . 2-7
Interface Settings . . . . . . . . . . . . . . . . . . . . . . . . . . . . . . . . . . . . . . . . . . . . . . . . . . . . . . . . 2-9
Settings from the Control Panel . . . . . . . . . . . . . . . . . . . . . . . . . . . . . . . . . . . . . . . . . . 2-10
Setting Up the Ethernet Driver . . . . . . . . . . . . . . . . . . . . . . . . . . . . . . . . . . . . . . . . 2-10
Setting Up the Token Ring . . . . . . . . . . . . . . . . . . . . . . . . . . . . . . . . . . . . . . . . . . . 2-13
Communication Environment Setup . . . . . . . . . . . . . . . . . . . . . . . . . . . . . . . . . . . . . . . . 2-17
Settings from the Control Panel . . . . . . . . . . . . . . . . . . . . . . . . . . . . . . . . . . . . . . . . . . 2-17
Chapter 3
Using a TCP/IP Network
TCP/IP Network Setup Procedures . . . . . . . . . . . . . . . . . . . . . . . . . . . . . . . . . . . . . . . . . . 3-2
Protocol Settings . . . . . . . . . . . . . . . . . . . . . . . . . . . . . . . . . . . . . . . . . . . . . . . . . . . . . . . . . 3-3
v
Settings from the Control Panel . . . . . . . . . . . . . . . . . . . . . . . . . . . . . . . . . . . . . . . . . . . 3-4
TCP/IP Settings . . . . . . . . . . . . . . . . . . . . . . . . . . . . . . . . . . . . . . . . . . . . . . . . . . . . 3-4
E-Mail/I-Fax Settings . . . . . . . . . . . . . . . . . . . . . . . . . . . . . . . . . . . . . . . . . . . . . . . 3-24
Startup Time Settings . . . . . . . . . . . . . . . . . . . . . . . . . . . . . . . . . . . . . . . . . . . . . . 3-30
Setting Up a Computer for Printing/Sending a Fax (Windows/UNIX) . . . . . . . . . . . . . 3-33
Printer Connection Method (LPD/Raw) . . . . . . . . . . . . . . . . . . . . . . . . . . . . . . . . . . . . 3-35
Windows 98/Me . . . . . . . . . . . . . . . . . . . . . . . . . . . . . . . . . . . . . . . . . . . . . . . . . . . 3-35
Windows 2000/XP/Server 2003. . . . . . . . . . . . . . . . . . . . . . . . . . . . . . . . . . . . . . . 3-36
Windows NT 4.0 . . . . . . . . . . . . . . . . . . . . . . . . . . . . . . . . . . . . . . . . . . . . . . . . . . 3-41
UNIX . . . . . . . . . . . . . . . . . . . . . . . . . . . . . . . . . . . . . . . . . . . . . . . . . . . . . . . . . . . 3-45
Printer Connection Method (IPP) . . . . . . . . . . . . . . . . . . . . . . . . . . . . . . . . . . . . . . . . . 3-46
Windows 98/Me/NT 4.0 . . . . . . . . . . . . . . . . . . . . . . . . . . . . . . . . . . . . . . . . . . . . . 3-46
Windows 2000/XP/Server 2003. . . . . . . . . . . . . . . . . . . . . . . . . . . . . . . . . . . . . . . 3-48
Printer Connection Method (FTP) . . . . . . . . . . . . . . . . . . . . . . . . . . . . . . . . . . . . . . . . 3-51
Setting Up a Computer as a File Server . . . . . . . . . . . . . . . . . . . . . . . . . . . . . . . . . . . . .
FTP Server Settings. . . . . . . . . . . . . . . . . . . . . . . . . . . . . . . . . . . . . . . . . . . . . . . . . . .
Windows 2000/XP/Server 2003. . . . . . . . . . . . . . . . . . . . . . . . . . . . . . . . . . . . . . .
Windows NT 4.0 . . . . . . . . . . . . . . . . . . . . . . . . . . . . . . . . . . . . . . . . . . . . . . . . . .
UNIX/Linux. . . . . . . . . . . . . . . . . . . . . . . . . . . . . . . . . . . . . . . . . . . . . . . . . . . . . . .
Mac OS X . . . . . . . . . . . . . . . . . . . . . . . . . . . . . . . . . . . . . . . . . . . . . . . . . . . . . . .
FTP Server for iW Gateway . . . . . . . . . . . . . . . . . . . . . . . . . . . . . . . . . . . . . . . . . .
Chapter 4
3-53
3-54
3-54
3-60
3-66
3-68
3-70
Using a NetWare Network (Windows)
NetWare Network Setup Procedures . . . . . . . . . . . . . . . . . . . . . . . . . . . . . . . . . . . . . . . . 4-2
NetWare Print Service Settings. . . . . . . . . . . . . . . . . . . . . . . . . . . . . . . . . . . . . . . . . . . . .
Types of Print Service . . . . . . . . . . . . . . . . . . . . . . . . . . . . . . . . . . . . . . . . . . . . . . . . . .
Setup Using NetWare Administrator or PCONSOLE . . . . . . . . . . . . . . . . . . . . . . . . . . .
Using NetWare Administrator in the NDS Queue Server Mode or
the Remote Printer Mode (NetWare 4.x or Later) . . . . . . . . . . . . . . . . . . . . . . . . . .
Using PCONSOLE in the Queue Server Mode or Remote Printer
Mode in the Bindery Mode (NetWare 3.2) . . . . . . . . . . . . . . . . . . . . . . . . . . . . . . . .
Protocol Settings . . . . . . . . . . . . . . . . . . . . . . . . . . . . . . . . . . . . . . . . . . . . . . . . . . . . . . . .
Settings from the Control Panel . . . . . . . . . . . . . . . . . . . . . . . . . . . . . . . . . . . . . . . . . . .
4-3
4-4
4-5
4-5
4-6
4-9
4-9
Setting Up a Computer for Printing/Sending a Fax . . . . . . . . . . . . . . . . . . . . . . . . . . . . 4-17
Connecting to a NetWare Network. . . . . . . . . . . . . . . . . . . . . . . . . . . . . . . . . . . . . . . . 4-17
Printer Connection Method . . . . . . . . . . . . . . . . . . . . . . . . . . . . . . . . . . . . . . . . . . . . . 4-17
Setting Up a Computer as a File Server . . . . . . . . . . . . . . . . . . . . . . . . . . . . . . . . . . . . . 4-18
Chapter 5
Using a NetBIOS Network
NetBIOS Network Setup Procedures . . . . . . . . . . . . . . . . . . . . . . . . . . . . . . . . . . . . . . . . 5-2
Protocol Settings . . . . . . . . . . . . . . . . . . . . . . . . . . . . . . . . . . . . . . . . . . . . . . . . . . . . . . . . 5-3
Settings from the Control Panel . . . . . . . . . . . . . . . . . . . . . . . . . . . . . . . . . . . . . . . . . . . 5-3
TCP/IP Settings . . . . . . . . . . . . . . . . . . . . . . . . . . . . . . . . . . . . . . . . . . . . . . . . . . . . 5-4
SMB and WINS Settings . . . . . . . . . . . . . . . . . . . . . . . . . . . . . . . . . . . . . . . . . . . . . 5-4
Setting Up a Computer for Printing/Sending a Fax . . . . . . . . . . . . . . . . . . . . . . . . . . . . 5-10
Connecting to a TCP/IP Network . . . . . . . . . . . . . . . . . . . . . . . . . . . . . . . . . . . . . . . . . 5-10
Connecting to a NetBIOS Network. . . . . . . . . . . . . . . . . . . . . . . . . . . . . . . . . . . . . . . . 5-10
Windows 98/Me . . . . . . . . . . . . . . . . . . . . . . . . . . . . . . . . . . . . . . . . . . . . . . . . . . . 5-11
Windows 2000/XP/Server 2003. . . . . . . . . . . . . . . . . . . . . . . . . . . . . . . . . . . . . . . 5-12
Windows NT 4.0 . . . . . . . . . . . . . . . . . . . . . . . . . . . . . . . . . . . . . . . . . . . . . . . . . . 5-13
Printer Connection Method . . . . . . . . . . . . . . . . . . . . . . . . . . . . . . . . . . . . . . . . . . . . . 5-14
Setting Up a Computer as a File Server . . . . . . . . . . . . . . . . . . . . . . . . . . . . . . . . . . . . .
Connecting to a TCP/IP Network . . . . . . . . . . . . . . . . . . . . . . . . . . . . . . . . . . . . . . . . .
Connecting to a NetBIOS Network and Configuring a Shared Folder . . . . . . . . . . . . .
Windows 95/98/Me . . . . . . . . . . . . . . . . . . . . . . . . . . . . . . . . . . . . . . . . . . . . . . . .
Windows 2000/XP/Server 2003. . . . . . . . . . . . . . . . . . . . . . . . . . . . . . . . . . . . . . .
vi
5-16
5-16
5-17
5-17
5-22
Windows NT 4.0 . . . . . . . . . . . . . . . . . . . . . . . . . . . . . . . . . . . . . . . . . . . . . . . . . . . 5-30
Samba (UNIX/Linux) . . . . . . . . . . . . . . . . . . . . . . . . . . . . . . . . . . . . . . . . . . . . . . . . 5-35
Chapter 6
Using an AppleTalk Network (Macintosh)
AppleTalk Network Setup Procedures. . . . . . . . . . . . . . . . . . . . . . . . . . . . . . . . . . . . . . . . 6-2
Macintosh Network Settings. . . . . . . . . . . . . . . . . . . . . . . . . . . . . . . . . . . . . . . . . . . . . . . . 6-3
Protocol Settings . . . . . . . . . . . . . . . . . . . . . . . . . . . . . . . . . . . . . . . . . . . . . . . . . . . . . . . . . 6-4
Settings from the Control Panel . . . . . . . . . . . . . . . . . . . . . . . . . . . . . . . . . . . . . . . . . . . 6-5
Setting Up a Computer for Printing . . . . . . . . . . . . . . . . . . . . . . . . . . . . . . . . . . . . . . . . . . 6-8
Chapter 7
Using the Network and Device Settings with Utilities
NetSpot Device Installer . . . . . . . . . . . . . . . . . . . . . . . . . . . . . . . . . . . . . . . . . . . . . . . . . . . 7-2
NetSpot Console . . . . . . . . . . . . . . . . . . . . . . . . . . . . . . . . . . . . . . . . . . . . . . . . . . . . . . . . . 7-3
Chapter 8
Troubleshooting
Network Connection Problems and Remedies . . . . . . . . . . . . . . . . . . . . . . . . . . . . . . . . . 8-2
Printing Problems and Remedies . . . . . . . . . . . . . . . . . . . . . . . . . . . . . . . . . . . . . . . . . . . 8-4
Data Sending/File Sharing Problems and Remedies . . . . . . . . . . . . . . . . . . . . . . . . . . . . 8-9
Chapter 9
Appendix
Network Setting Items . . . . . . . . . . . . . . . . . . . . . . . . . . . . . . . . . . . . . . . . . . . . . . . . . . . . . 9-2
Available Software for Network Settings. . . . . . . . . . . . . . . . . . . . . . . . . . . . . . . . . . . . . 9-11
Confirming Settings . . . . . . . . . . . . . . . . . . . . . . . . . . . . . . . . . . . . . . . . . . . . . . . . . . . . . 9-12
Viewing the Network Access Log . . . . . . . . . . . . . . . . . . . . . . . . . . . . . . . . . . . . . . . . . . 9-13
Specifications . . . . . . . . . . . . . . . . . . . . . . . . . . . . . . . . . . . . . . . . . . . . . . . . . . . . . . . . . . 9-14
Ethernet Interface Adaptor . . . . . . . . . . . . . . . . . . . . . . . . . . . . . . . . . . . . . . . . . . . . . . 9-14
Hardware Specifications . . . . . . . . . . . . . . . . . . . . . . . . . . . . . . . . . . . . . . . . . . . . . 9-14
Software Specifications. . . . . . . . . . . . . . . . . . . . . . . . . . . . . . . . . . . . . . . . . . . . . . 9-14
Token Ring Network Interface Adaptor . . . . . . . . . . . . . . . . . . . . . . . . . . . . . . . . . . . . . 9-15
Hardware Specifications . . . . . . . . . . . . . . . . . . . . . . . . . . . . . . . . . . . . . . . . . . . . . 9-15
Software Specifications. . . . . . . . . . . . . . . . . . . . . . . . . . . . . . . . . . . . . . . . . . . . . . 9-15
Index . . . . . . . . . . . . . . . . . . . . . . . . . . . . . . . . . . . . . . . . . . . . . . . . . . . . . . . . . . . . . . . . . . 9-16
vii
Preface
Thank you for purchasing the Canon CLC3220/iR C3220N. Please read this manual thoroughly before
operating the product in order to familiarize yourself with its capabilities, and to make the most of its
many functions. After reading this manual, store it in a safe place for future reference.
How To Use This Manual
Symbols Used in This Manual
The following symbols are used in this manual to explain procedures, restrictions, handling
precautions, and instructions that should be observed for safety.
.
CAUTION
Indicates a caution concerning operations that may lead to injury to persons, or
damage to property if not performed correctly. In order to use the machine safely,
always pay attention to these cautions.
.
IMPORTANT
Indicates operational requirements and restrictions. Be sure to read these items
carefully in order to operate the product correctly, and to avoid damage to the
product.
.
NOTE
viii
Indicates a clarification of an operation, or contains additional explanations for a
procedure. Reading these notes is highly recommended.
Keys and Buttons Used in This Manual
The following symbols and key/button names are a few examples of how keys and buttons to be
clicked or pressed are expressed in this manual:
• Control Panel Keys:
<Key icon>
Examples:
• Touch Panel Display Keys:
Examples:
[Key Name]
[Cancel]
[Done]
• Buttons on Computer Operation Screens: [Button Name]
Examples:
[OK]
[Add]
ix
Displays Used in This Manual
Screen shots of the touch panel display used in this manual may differ from the ones you
actually see, depending on the operating system and options that come with your machine.
The keys or buttons which you should click or press are marked with a
, as shown below.
When multiple buttons or keys can be clicked or pressed, they will be highlighted and mentioned
in the order in which they should be clicked or pressed.
x
Abbreviations Used in This Manual
In this manual, product names and model names are abbreviated as follows:
Microsoft® Windows® 95 operating system:
Windows 95
Microsoft® Windows® 98 operating system:
Windows 98
Microsoft® Windows® Millennium Edition operating system:
Windows Me
Microsoft® Windows NT® operating system:
Windows NT
Microsoft® Windows® 2000 operating system:
Windows 2000
Microsoft® Windows® XP operating system:
Windows XP
Microsoft® Windows Server
Windows Server
2003
2003 operating system:
Microsoft® Windows® operating system:
Windows
PostScript® 3 emulation:
PS
Novell NetWare®:
NetWare
xi
Legal Notices
Trademarks
Canon, the Canon logo, iR, NetSpot, and iW are trademarks of Canon Inc.
Adobe, Acrobat, PostScript, and PostScript 3 are trademarks of Adobe Systems Incorporated.
Apple, AppleTalk, EtherTalk, LocalTalk, Macintosh, Mac OS, and Power Macintosh are
trademarks of Apple Computer, Inc.
PCL is a trademark of Hewlett-Packard Company.
IBM and OS/2 are trademarks of International Business Machines Corporation.
Microsoft, MS-DOS, the Windows logo, Windows, and Windows NT are registered trademarks
of Microsoft Corporation in the United States and other countries.
Windows Server is a trademark of Microsoft Corporation in the United States and other
countries.
Netscape and Netscape Navigator are trademarks of Netscape Communications Corporation.
NetWare® and Novell are registered trademarks of Novell, Inc.
IPX/SPX, NDS, NDPS, and Novell Client are trademarks of Novell, Inc.
Solaris, Sun, SunOS, and Sun Microsystems are trademarks of Sun Microsystems in the United
States and other countries.
Ethernet is a trademark of Xerox Corporation.
UNIX is a registered trademark of The Open Group in the United States and other countries.
Red Hat is a trademark of Red Hat, Inc. in the United States and other countries.
Linux is a registered trademark of Linus Torvalds.
Citrix, MetaFrame, and MetaFrame XP are trademarks or registered trademarks of Citrix
Systems, Inc. in the United States and other countries.
Other product and company names herein may be the trademarks of their respective owners.
xii
Copyright
Copyright 2004 by Canon Inc. All rights reserved.
No part of this publication may be reproduced or transmitted in any form or by any means,
electronic or mechanical, including photocopying and recording, or by any information storage
or retrieval system without the prior written permission of Canon Inc.
Disclaimers
The information in this document is subject to change without notice.
CANON INC. MAKES NO WARRANTY OF ANY KIND WITH REGARD TO THIS MATERIAL,
EITHER EXPRESS OR IMPLIED, EXCEPT AS PROVIDED HEREIN, INCLUDING WITHOUT
LIMITATION, THEREOF, WARRANTIES AS TO MARKETABILITY, MERCHANTABILITY,
FITNESS FOR A PARTICULAR PURPOSE OF USE OR AGAINST INFRINGEMENT OF ANY
PATENT. CANON INC. SHALL NOT BE LIABLE FOR ANY DIRECT, INCIDENTAL, OR
CONSEQUENTIAL DAMAGES OF ANY NATURE, OR LOSSES OR EXPENSES RESULTING
FROM THE USE OF THIS MATERIAL.
xiii
xiv
Before You Start
1
CHAPTER
This chapter describes what you need to know before you start using the machine, including the network
environments with which the machine is compatible, and how to check the network environment you are
using.
Optional Equipment and System Environment Requirements . . . . . . . . . . . . . . . . . . . . . . . . . . . . . . . . 1-2
Printing or Sending a Fax from a Computer . . . . . . . . . . . . . . . . . . . . . . . . . . . . . . . . . . . . . . . . . . . . . . . . . . . . . . . 1-2
Using E-Mail/I-Fax . . . . . . . . . . . . . . . . . . . . . . . . . . . . . . . . . . . . . . . . . . . . . . . . . . . . . . . . . . . . . . . . . . . . . . . . . . 1-5
Sending Data . . . . . . . . . . . . . . . . . . . . . . . . . . . . . . . . . . . . . . . . . . . . . . . . . . . . . . . . . . . . . . . . . . . . . . . . . . . . . . 1-6
Checking Your Network Environment . . . . . . . . . . . . . . . . . . . . . . . . . . . . . . . . . . . . . . . . . . . . . . . . . . . 1-8
Sample Windows Network . . . . . . . . . . . . . . . . . . . . . . . . . . . . . . . . . . . . . . . . . . . . . . . . . . . . . . . . . . . . . . . . . . . . 1-8
Sample Macintosh Network . . . . . . . . . . . . . . . . . . . . . . . . . . . . . . . . . . . . . . . . . . . . . . . . . . . . . . . . . . . . . . . . . . 1-10
Sample UNIX Network . . . . . . . . . . . . . . . . . . . . . . . . . . . . . . . . . . . . . . . . . . . . . . . . . . . . . . . . . . . . . . . . . . . . . . 1-11
Using a Network with Various Types of Computers . . . . . . . . . . . . . . . . . . . . . . . . . . . . . . . . . . . . . . . . . . . . . . . . 1-12
1-1
Optional Equipment and System Environment
Requirements
Before You Start
1
This section describes the system environments with which the machine is compatible.
Printing or Sending a Fax from a Computer
Optional Equipment Requirements
The following optional equipment is required for printing or sending a fax from a computer:
■ Printing
• If you are using the iR C3220N
- The optional equipment is unnecessary
• If you are using the CLC3220 (either one of the following optional equipment)
- Color Network Multi-PDL Printer Kit (If you want to use the UFR/PS/PCL printer driver)
- Color Network Printer Unit (If you want to use the PS printer driver)
■ Sending a Fax
• Super G3 FAX Board
• Resolution Switching Board
• Color Image Reader
IMPORTANT
For more information on the equipment needed, consult your local authorized Canon dealer.
System Environment Requirements
The following network and system environments are compatible when printing or sending a fax
from a computer:
1-2
Optional Equipment and System Environment Requirements
■ With a TCP/IP Network:
• Compatible OS
- Microsoft Windows 98/Me
- Microsoft Windows NT Server 4.0
- Microsoft Windows NT Workstation 4.0
- Microsoft Windows 2000 Server
- Microsoft Windows 2000 Professional
- Microsoft Windows XP Professional
- Microsoft Windows XP Home Edition
- Microsoft Windows Server 2003
- Solaris Version 1.1x (SunOS Version 4.1x) or later
- Solaris Version 2.5x (SunOS Version 5.5x) or later
• Compatible Computers
- Windows; IBM PC/compatibles
Before You Start
1
■ With a NetBIOS Network:
• Compatible OS
- Microsoft Windows 98/Me
- Microsoft Windows NT Server 4.0
- Microsoft Windows NT Workstation 4.0
- Microsoft Windows 2000 Server
- Microsoft Windows 2000 Professional
- Microsoft Windows XP Professional
- Microsoft Windows XP Home Edition
- Microsoft Windows Server 2003
• Compatible Protocol
- NetBIOS over TCP/IP
• Compatible Computers
- IBM PC/compatibles
Optional Equipment and System Environment Requirements
1-3
■ With a NetWare Network:
• Compatible Servers
- Novell NetWare Version 3.2/4.1/4.11/4.2/5/5.1/6
• Compatible Clients
- Microsoft Windows 98/Me
- Microsoft Windows NT Server 4.0
- Microsoft Windows NT Workstation 4.0
- Microsoft Windows 2000 Server
- Microsoft Windows 2000 Professional
- Microsoft Windows XP Professional
- Microsoft Windows XP Home Edition
- Microsoft Windows Server 2003
• Compatible Computers
- IBM PC/compatibles
Before You Start
1
■ With an AppleTalk Network:
Compatible AppleTalk:EtherTalk Phase 2
See the Driver Guide for compatible operating systems and computers.
■ With a Server-Based Computing Environment:
• Compatible Windows Terminal Server (Services)
- Microsoft WIndows NT 4.0 Terminal Server Edition
- Microsoft Windows 2000 Server
- Microsoft Windows Server 2003
• Compatible Software
- Citrix MetaFrame 1.8
- Citrix MetaFrame XP
IMPORTANT
• If you are using the optional Color Network Printer Unit, see the manual provided with the optional Color
Network Printer Unit for details on the system environment requirements.
• If you are using Windows NT 4.0, you need to install Service Pack 6a or later.
• If you are using Windows 2000, you need to install Service Pack 2 or later.
• The machine does not support Macintosh LocalTalk networks.
1-4
Optional Equipment and System Environment Requirements
Using E-Mail/I-Fax
Optional Equipment Requirements
The following optional equipments are confirmed for using the e-mail/I-fax functions:
• Color Universal Send Kit
1
• Resolution Switching Board
Before You Start
• Color Image Reader
IMPORTANT
For more information on the equipment needed, consult your local authorized Canon dealer.
System Environment Requirements
The following system environments are confirmed for using the e-mail/I-fax functions.
• Compatible mail forwarding server software
- Sendmail 8.93 or later (UNIX)
- Microsoft Exchange Server (Windows)
Microsoft Exchange Server 5.5 + Service Pack 1 or later
- Lotus Domino R4.6 or later (Windows)
• Compatible mail receiving server software
- Qpopper 2.53 or later (UNIX)
- Microsoft Exchange Server (Windows)
Microsoft Exchange Server 5.5 + Service Pack 1 or later
- Lotus Domino R4.6 or later (Windows)
IMPORTANT
• If you are using Windows NT 4.0, you need to install Service Pack 6a or later.
• If you are using Windows 2000, you need to install Service Pack 2 or later.
NOTE
The machine sends e-mail or I-fax messages to mail servers using SMTP.
The machine can receive incoming messages from a mail server using the POP3 protocol or directly
using the machine's own SMTP receiving function.
If the latter method is used, it is not necessary for the mail server to support the POP3 protocol. (The
machine can receive I-fax images and error e-mail messages sent when errors occur during
communication, but not any other type of e-mail.)
Optional Equipment and System Environment Requirements
1-5
Sending Data
Optional Equipment Requirements
The following optional equipment is required for sending data:
• Color Universal Send Kit
1
• Resolution Switching Board
Before You Start
• Color Image Reader
IMPORTANT
For more information on the equipment needed, consult your local authorized Canon dealer.
System Environment Requirements
The following network and system environments apply when sending data from the machine to
a file server, depending on the type of network used:
■ With a TCP/IP Network (Using FTP):
• Compatible servers
- Microsoft Windows NT Server 4.0 and Internet Information Server 4.0
- Microsoft Windows 2000 Server and Internet Information Services 5.0
- Microsoft Windows XP Professional and Internet Information Services 5.1
- Microsoft Windows Server 2003 and Internet Information Services 6.0
- Solaris Version 2.6 or later
- Red Hat Linux 7.2 or later
- Mac OS X
- FTP server for iW Gateway
• Compatible protocol
- TCP/IP
1-6
Optional Equipment and System Environment Requirements
■ With a NetBIOS Network:
• Compatible servers
- Microsoft Windows 95/98/Me
- Microsoft Windows NT Server 4.0
- Microsoft Windows NT Workstation 4.0
- Microsoft Windows 2000 Server
- Microsoft Windows 2000 Professional
- Microsoft Windows XP Professional
- Microsoft Windows XP Home Edition
- Microsoft Windows Server 2003
• Compatible server software for sending data
- Samba 2.2.8a or later (UNIX/Linux)
• Compatible protocol
- NetBIOS over TCP/IP
Before You Start
1
■ With a NetWare Network:
• Compatible server
- Novell NetWare Version 3.2/4.11/4.2/5/5.1/6
• Compatible protocol
- IPX
IMPORTANT
• If you are using the optional Color Universal Send Kit, the optional Resolution Switching Board, and the
optional Color Image Reader with the optional Color Network Printer Unit, see the manual provided with
the optional Color Network Printer Unit for details on the system environment requirements.
• If you are using Windows NT 4.0, you need to install Service Pack 6a or later.
• If you are using Windows 2000, you need to install Service Pack 2 or later.
Optional Equipment and System Environment Requirements
1-7
Checking Your Network Environment
Before You Start
1
Refer to the following diagram examples to confirm the network environment that is connected
to the machine, and then perform the necessary operations for that environment.
If you are using the optional Color Network Printer Unit, see the manual provided with the
optional Color Network Printer Unit.
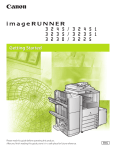
Sample Windows Network
With a NetWare Server
In a network environment like the one below, a TCP/IP, NetWare, or NetBIOS (NetBIOS over
TCP/IP) protocol can be used. Multiple protocols can also be used at the same time.
To use the e-mail/I-fax function, a TCP/IP protocol is required.
Windows 2000
Windows XP
Windows NT
Protocol: TCP/IP, NetWare, NetBIOS
NetWare Server
The Machine
After configuring the settings in accordance with Chapter 2, "Settings Common to the Network
Protocols," see the following depending on the protocol:
• Chapter 3, "Using a TCP/IP Network"
• Chapter 4, "Using a NetWare Network (Windows)"
• Chapter 5, "Using a NetBIOS Network"
1-8
Checking Your Network Environment
IMPORTANT
• To use the e-mail/I-fax functions, the optional equipment must be installed. For the equipment needed,
see "Optional Equipment and System Environment Requirements," on p. 1-2.
• The machine does not support NetBEUI.
Without a NetWare Server
Windows 2000
Windows XP
Windows NT
Protocol: TCP/IP, NetBIOS
The Machine
After configuring the settings in accordance with Chapter 2, "Settings Common to the Network
Protocols," see the following depending on the protocol:
• Chapter 3, "Using a TCP/IP Network"
• Chapter 5, "Using a NetBIOS Network"
IMPORTANT
The machine does not support NetBEUI.
Checking Your Network Environment
1
Before You Start
In a network environment like the one below, either TCP/IP or NetBIOS (NetBIOS over TCP/IP)
protocol can be used. Multiple protocols can also be used at the same time.
1-9
Sample Macintosh Network
With Macintosh computers, the AppleTalk (EtherTalk) protocol is used for printing.
To use the e-mail/I-fax function or to send data, a TCP/IP protocol is required.
Macintosh
Before You Start
1
Protocol: AppleTalk
The Machine
After configuring the settings in accordance with Chapter 2, "Settings Common to the Network
Protocols," see the following, depending on the protocol:
• Chapter 6, "Using an AppleTalk Network (Macintosh)"
• Chapter 3, "Using a TCP/IP Network"
IMPORTANT
To use the e-mail/I-fax functions, or data sending functions for the machine, the optional equipment
must be installed. For the equipment needed, see "Optional Equipment and System Environment
Requirements," on p. 1-2.
1-10
Checking Your Network Environment
Sample UNIX Network
With UNIX computers, the TCP/IP protocol is used.
Solaris (SunOS)
Before You Start
1
Protocol: TCP/IP
The Machine
After configuring the settings in accordance with Chapter 2, "Settings Common to the Network
Protocols," see the following:
• Chapter 3, "Using a TCP/IP Network"
Checking Your Network Environment
1-11
Using a Network with Various Types of Computers
If there are various types of computers on the network, network operations depend on the type
of computer being used.
For example, if you are using Windows XP and Macintosh computers, you will need to specify
the settings described in both "Sample Windows Network," on p. 1-8, and "Sample Macintosh
Network," on p. 1-10.
1
Before You Start
To use the e-mail/I-fax function, a TCP/IP protocol is required.
To use the data sending function, a TCP/IP, NetWare, or NetBIOS protocol is required.
Windows
Macintosh
Protocol: TCP/IP, NetWare, AppleTalk, NetBIOS
NetWare Server
The Machine
After configuring the settings in accordance with Chapter 2, "Settings Common to the Network
Protocols," see the following depending on the protocol:
• Chapter 3, "Using a TCP/IP Network"
• Chapter 4, "Using a NetWare Network (Windows)"
• Chapter 5, "Using a NetBIOS Network"
IMPORTANT
To use the e-mail/I-fax functions, or data sending functions for the machine, the optional equipment
must be installed. For the equipment needed, see "Optional Equipment and System Environment
Requirements," on p. 1-2.
1-12
Checking Your Network Environment
Settings Common to the
Network Protocols
2
CHAPTER
This chapter describes setting items common to the network protocols, which are required for using the
machine in a network environment. Before specifying the settings of the desired protocol (Chapters 3 to 6),
be sure to set items explained in this chapter. (If you are using the optional Color Network Printer Unit, see
the manual provided with the optional Color Network Printer Unit.)
Network Environment Setup Procedures . . . . . . . . . . . . . . . . . . . . . . . . . . . . . . . . . . . . . . . . . . . . . . . . 2-2
Connecting the Machine to a Computer or Network . . . . . . . . . . . . . . . . . . . . . . . . . . . . . . . . . . . . . . . . 2-3
Connecting to a Network . . . . . . . . . . . . . . . . . . . . . . . . . . . . . . . . . . . . . . . . . . . . . . . . . . . . . . . . . . . . . . . . . . . . . 2-4
Connecting to a USB Interface (Optional) . . . . . . . . . . . . . . . . . . . . . . . . . . . . . . . . . . . . . . . . . . . . . . . . . . . . . . . . 2-7
Interface Settings . . . . . . . . . . . . . . . . . . . . . . . . . . . . . . . . . . . . . . . . . . . . . . . . . . . . . . . . . . . . . . . . . . 2-9
Settings from the Control Panel . . . . . . . . . . . . . . . . . . . . . . . . . . . . . . . . . . . . . . . . . . . . . . . . . . . . . . . . . . . . . . . 2-10
Communication Environment Setup . . . . . . . . . . . . . . . . . . . . . . . . . . . . . . . . . . . . . . . . . . . . . . . . . . . 2-17
Settings from the Control Panel . . . . . . . . . . . . . . . . . . . . . . . . . . . . . . . . . . . . . . . . . . . . . . . . . . . . . . . . . . . . . . . 2-17
2-1
Network Environment Setup Procedures
Before using the machine in a network environment, it is necessary to perform the following
setup procedures.
2
Settings Common to the Network Protocols
1
Network Cable Connection (See "Connecting the Machine to a Computer or Network," on p. 2-3.)
Connect the machine to the network using the network cables.
2
Interface Settings (See "Interface Settings," on p. 2-9.)
Specify the interface settings for communication between the machine and computers on your network. To specify the settings,
use:
• The machine's control panel
• A web browser (Remote UI)
3
Communication Environment Setup (See "Communication Environment Setup," on p. 2-17.)
Set up a configuration for communication between the machine and computers on your network.
IMPORTANT
If you configure the interface settings for the first time, use the control panel of this machine. After
configuring the TCP/IP settings, you can change the content by using a web browser (Remote UI).
2-2
Network Environment Setup Procedures
Connecting the Machine to a Computer or
Network
This section describes how to connect the machine to a computer or network, and describes
the types of connection and cables you can use.
The machine can be connected to a computer or network with a USB cable, 10Base-T/
100Base-TX Ethernet cable, or Token Ring cable.
CAUTION
When connecting the interface cable or network cable, be sure to observe the following
precautions in order to avoid electrical shock.
- Turn the main power switch to OFF before unplugging the power cable from the power
supply. (See Chapter 1, "Before You Start Using This Machine," in the Reference Guide.)
- Turn OFF the computer and unplug its power cord from the power supply.
IMPORTANT
• External USB devices (i.e. memory, keyboard, mouse, etc.) are not supported by the optional USB
Interface Board.
• A USB cable or a network cable are not included in this package. Please obtain a suitable cable for your
computer or network.
• The machine supports both Ethernet and Token Ring networks; however, you cannot use the machine
to connect to both types of networks at the same time.
• If the machine has both network boards (Ethernet and Token Ring) installed, the Token Ring has priority
over the Ethernet.
• You cannot use Ethernet and Token Ring at the same time. When a Token Ring Board is installed in the
machine, you cannot use Ethernet. To use Ethernet, you need to remove the Token Ring Board from the
machine.
• The Token Ring Board and the USB Interface Board cannot be installed together.
• For more information on the USB Interface Board and the Token Ring Network I/F Adapter, consult your
local authorized Canon dealer.
Connecting the Machine to a Computer or Network
2-3
Settings Common to the Network Protocols
2
Connecting to a Network
The machine supports TCP/IP, AppleTalk, and NetWare, which enables it to be used by
Windows, Macintosh, UNIX, and Linux computers. It also has a 10Base-T/100Base-TX
connector and optional Token Ring connector that can be used on most LANs.
Using Ethernet
Connect the machine's RJ-45 connector to a hub port using a Category 5 twisted pair LAN
cable.
Settings Common to the Network Protocols
2
PC with
100Base-TX Connector
PC with
10Base-T Connector
Ethernet Cable
Hub
IMPORTANT
• The machine supports both Ethernet and Token Ring networks; however, you cannot use the machine
to connect to both types of network at the same time.
• If the machine has both network boards (Ethernet and Token Ring) installed, you need to remove the
Token Ring Board. For more information, consult your local authorized Canon dealer.
• You cannot use the machine as a repeater, bridge, or gateway.
• If two or more machines are on an AppleTalk network, they should be switched 'on' 10 seconds or more
apart.
2-4
Connecting the Machine to a Computer or Network
NOTE
Using Token Ring (Optional)
The optional Token Ring Board has two connectors. One is an RJ-45 connector, and the other is
a DB9 connector. Use only one of these connectors to connect to the network. Do not connect
anything to the other connector. You cannot use both connectors at the same time.
■ Connect Using an RJ-45 Type Cable
Connect the RJ-45 connector of the optional Token Ring Board that is installed on the machine to a hub
or MAU port using a Category 5 cable. Every computer connected to this network must have Token Ring
capability.
PC with
Token Ring Connector
PC without
Token Ring Connector
Token Ring
LAN Card
Token Ring Cable
(RJ-45 Type)
Token Ring Hub or MAU Port
Connecting the Machine to a Computer or Network
2-5
2
Settings Common to the Network Protocols
• The machine can automatically detect the type of Ethernet (10Base-T or 100Base-TX).
• If you are using a mixed 10 Base-T/100 Base-TX environment, devices on the network (hubs, routers,
etc.) must support the mixed environment. For more information, consult your local authorized Canon
dealer.
• After connecting the network cable, perform the following operations. (For more information, see the
relevant descriptions.)
- Set the date and time, and System Manager settings. (See Chapter 6, "System Manager Settings," in
the Reference Guide.)
- Set the network settings.
- Install a printer driver if necessary. (See the PCL Driver Guide, the PS Driver Guide, or the UFR Driver
Guide.)
IMPORTANT
• The use of an STP cable is required to comply with the limits for a Class B digital device, pursuant to
EN55022:1998 when you connect the machine to a Token Ring network.
• If the machine has both network boards (Ethernet and Token Ring) installed, the Token Ring has priority
over the Ethernet.
• All devices connected to the network, such as hubs, Token Ring cables, Token Ring cards, etc., must
support Token Ring. For more information, consult your local authorized Canon dealer.
■ Connect Using a DB9 Type Cable
Connect the DB9 connector of the optional Token Ring Board that is installed on the machine to a hub or
MAU port using an IBM Type 1 or Type 1A STP cable. Every computer connected to this network must
have Token Ring capability.
Settings Common to the Network Protocols
2
PC with
Token Ring Connector
PC without
Token Ring Connector
Token Ring
LAN Card
Token Ring Cable
(DB9 Type)
Token Ring Hub or MAU Port
IMPORTANT
• The use of an STP cable is required to comply with the limits for a Class B digital device, pursuant to
EN55022:1998 when you connect the machine to a Token Ring network.
• If the machine has both network boards (Ethernet and Token Ring) installed, the Token Ring has priority
over the Ethernet.
• All devices connected to the network (such as hubs, Token Ring cables, Token Ring cards, etc.) must
support Token Ring. For more information, consult your local authorized Canon dealer.
2-6
Connecting the Machine to a Computer or Network
Connecting to a USB Interface (Optional)
If you install a USB Interface Board on the machine, you can connect the machine to a
computer with a USB port via a USB cable. The machine is USB Full Speed (USB 1.1
equivalent) compatible. The printer drivers, USB class driver, and utility that matches the
operating system on your computer will be installed. For more information on installing the
printer driver through a USB connection, see Chapter 2, "Getting Started," in the PCL Driver
Guide, the PS Driver Guide, or the UFR Driver Guide.
Printer Driver Software
USB Connector
USB Cable
USB Port
CAUTION
If you connect or disconnect the USB cable while the main power switch is ON, do not touch
the metal parts around the connector, as this may result in electrical shock.
IMPORTANT
• Do not connect or disconnect the USB cable in the following situations, as it may cause your computer
or the machine to operate poorly:
- When installing the printer driver
- When the computer is booting up
- When printing
• If you disconnect the USB cable with the computer or machine's main power switch ON, always wait at
least five seconds before reconnecting the cable. Immediately reconnecting the cable may cause your
computer or machine to operate poorly.
Connecting the Machine to a Computer or Network
2-7
Settings Common to the Network Protocols
2
NOTE
• If the machine is connected to a computer with a USB cable, you can print a document from your
computer using the printer driver, or send a fax from your computer using the fax driver.
• You cannot specify the computer connected to the machine through a USB connection as a destination
of the send jobs or forwarded jobs. Also, with that computer, you cannot use Remote UI and the
Network Scan function.
Settings Common to the Network Protocols
2
2-8
Connecting the Machine to a Computer or Network
Interface Settings
You can specify the interface settings for the machine by using any of the following.
• The machine's control panel
• A web browser (Remote UI)
This section describes how to specify the settings from the control panel.
If you are using Ethernet to interface, see "Setting Up the Ethernet Driver," on p. 2-10.
If you are using Token Ring to interface, see "Setting Up the Token Ring," on p. 2-13.
IMPORTANT
• If you configure the interface settings for the first time, use the control panel of this machine. After
configuring the protocol settings, you can change the content by using a web browser (Remote UI).
• If you use Token Ring, it is necessary to purchase the optional Token Ring Network Interface Adapter.
• You cannot use Ethernet and Token Ring at the same time. When a Token Ring board is already
installed in the machine, you cannot use Ethernet. To use Ethernet, remove the Token Ring board from
the machine.
NOTE
For instructions on how to enter settings using a web browser (Remote UI), see Chapter 3,
"Customizing Settings," in the Remote UI Guide.
Interface Settings
2-9
Settings Common to the Network Protocols
2
Settings from the Control Panel
The procedures for specifying the settings from the control panel are as follows.
IMPORTANT
Settings specified from the control panel become effective after the machine is restarted, after the
procedure.
NOTE
For instructions on how to enter characters using the touch panel display, see Chapter 2, "Basic
Operations," in the Reference Guide.
Settings Common to the Network Protocols
2
Setting Up the Ethernet Driver
1
Press
2
Press [System Settings].
.
NOTE
If the message <Enter the System Manager ID and Password using the numeric keys.> appears
on the touch panel display, enter the System Manager ID and password. For instructions on how
to enter the System Manager ID and password, see Chapter 2, "Basic Operations," in the
Reference Guide.
2-10
Interface Settings
3
Press [Network Settings].
4
5
Settings Common to the Network Protocols
2
Press [▼] or [▲] until [Ethernet Driver Settings] appears ➞ press
[Ethernet Driver Settings].
Select [On] or [Off] for <Auto Detect>.
Interface Settings
2-11
● If you want the machine to automatically determine the communication mode
(Half duplex/Full duplex) and Ethernet type (10Base-T/100Base-TX):
❑ Select [On].
❑ Skip to step 8.
● If you want to manually specify the communication mode (Half duplex/Full
duplex) and Ethernet type (10Base-T/100Base TX):
❑ Select [Off].
❑ Proceed to step 6.
2
IMPORTANT
Settings Common to the Network Protocols
If you reconnect the network cable (for example, reconnect the cable to a different Ethernet hub)
with the power ON, the Auto Detect function will not work even if you set <Auto Detect> to 'On'.
(Connect the cable with the power OFF.)
NOTE
The default setting is 'On'. Use the [Off] setting to specify a particular Ethernet setting.
6
Specify <Communication Mode> on the Ethernet Driver Settings
screen.
● If you want to alternately send and receive:
❑ Select [Half Duplex].
● If you want to simultaneously send and receive:
❑ Select [Full Duplex].
7
Specify <Ethernet Type> on the Ethernet Driver Settings screen.
● If you want to establish a 10Base-T network connection:
❑ Select [10 Base-T].
● If you want to establish a 100Base-TX network connection:
❑ Select [100 Base-TX].
2-12
Interface Settings
8
Confirm the settings you specified ➞ press [OK].
The display returns to the Network Settings screen.
10
Press [Done] repeatedly until the Additional Functions screen closes.
Restart the machine.
❑ Turn OFF the machine, wait at least 10 seconds, and then turn it ON again.
2
NOTE
For instructions on how to turn ON/OFF the machine, see Chapter 1, "Before You Start Using
This Machine," in the Reference Guide.
The Ethernet driver settings are complete.
Setting Up the Token Ring
1
Press
2
Press [System Settings].
.
NOTE
If the message <Enter the System Manager ID and Password using the numeric keys.> appears
on the touch panel display, enter the System Manager ID and password. For instructions on how
to enter the System Manager ID and password, see Chapter 2, "Basic Operations," in the
Reference Guide.
Interface Settings
2-13
Settings Common to the Network Protocols
9
3
Press [Network Settings].
Settings Common to the Network Protocols
2
4
5
2-14
Press [▼] or [▲] until [Token Ring Settings] appears ➞ press [Token
Ring Settings].
Select the appropriate ring speed and the communication method for
your environment from the Ring Speed and Communication Method
drop-down list.
Interface Settings
NOTE
If [Auto Detect] is selected, the ring speed and communication method are specified
automatically.
6
Specify <Maximum Frame Size>.
Enter a value appropriate for your environment using
-
(numeric keys).
IMPORTANT
7
To perform source routing, select [On] for <Use Source Routing>.
If you select [Off] for <Use Source Routing>, skip to step 10.
The allowable combinations of <Token Ring Settings>: <Use Source Routing>, <All Broadcast
Request>, and <All Broadcast Response Notice> are shown below:
• Off/invalid/invalid
• On/On/invalid
• On/Off/On
• On/Off/Off
IMPORTANT
If the machine does not perform source routing correctly on a local network, select [Off] for <Use
Source Routing>.
8
To perform all broadcast request, select [On] for <All Broadcast
Request>.
If you select [On] for <All Broadcast Request>, skip to step 10.
9
10
To perform all broadcast response notice, select [On] for <All
Broadcast Response Notice>.
Specify <LAA Mode> on the Token Ring Settings screen.
❑ If you want to use an LAA (Locally Administered Address), select [On] ➞ press [LAA] ➞
enter the LAA.
The allowable range for an LAA is from 40 00 00 00 00 00 to 7F FF FF FF FF FF.
Interface Settings
2-15
2
Settings Common to the Network Protocols
The machine may not work normally with the default settings. Enter a value appropriate for your
environment.
IMPORTANT
• If you use an LAA, be sure to set a valid LAA. The machine will not work normally if you use the
default address without changing it.
• Either the MAC address or LAA is required as the Token Ring node address. If you do not set any
LAA, the MAC address is used as the node address.
NOTE
The MAC address displayed on the touch panel display is unique to the Token Ring board, and is
set independently of the MAC address of the Ethernet board.
2
Settings Common to the Network Protocols
11
Confirm the settings you specified ➞ press [OK].
The display returns to the Network Settings screen.
12
13
Press [Done] repeatedly until the Additional Functions screen closes.
Restart the machine.
❑ Turn OFF the machine, wait at least 10 seconds, and then turn it ON again.
NOTE
For instructions on how to turn ON/OFF the machine, see Chapter 1, "Before You Start Using
This Machine," in the Reference Guide.
The Token Ring settings are complete.
2-16
Interface Settings
Communication Environment Setup
To set up a configuration for communication between the machine and computers on your
network, follow the procedures below.
After configuring TCP/IP settings, you can change the content by using a web browser (Remote UI).
Settings from the Control Panel
The procedure for specifying the settings from the control panel is as follows:
1
Specify the SNMP settings.
● If you want to set or browse each item of the machine with a utility that uses
SNMP to obtain information:
❑ Press ➞ [System Settings] ➞ [Network Settings].
❑ Press [▼] or [▲] until [SNMP Settings] appears ➞ press [SNMP Settings].
Communication Environment Setup
2-17
Settings Common to the Network Protocols
2
NOTE
❑ Select [On].
Settings Common to the Network Protocols
2
❑ To change [Community Name] to a name other than 'public', press [Community Name] ➞
enter the community name.
❑ Confirm the settings you specified ➞ press [OK].
● If you do not want to do the above:
❑
❑
❑
❑
2
Press
➞ [System Settings] ➞ [Network Settings].
Press [▼] or [▲] until [SNMP Settings] appears ➞ press [SNMP Settings].
Select [Off].
Confirm the settings you specified ➞ press [OK].
Specify the port setting.
● If you want to set or browse detailed information on the machine with a Canon
driver or utility:
❑ On the Network Settings screen, press [▼] or [▲] until [Enable Dedicated Port] appears ➞
press [Enable Dedicated Port].
2-18
Communication Environment Setup
❑ Select [On].
❑ Confirm the settings you specified ➞ press [OK].
The display returns to the Network Settings screen.
● If you do not want to do the above:
❑ On the Network Settings screen, press [▼] or [▲] until [Enable Dedicated Port] appears ➞
press [Enable Dedicated Port].
❑ Select [Off].
❑ Confirm the settings you specified ➞ press [OK].
The display returns to the Network Settings screen.
IMPORTANT
• If you want to use a Canon driver or utility, select [On] for both [Use SNMP] and [Enable
Dedicated Port].
• You can restrict the IP addresses of computers on which items can be set or browsed. If you
restrict the IP addresses, it is not possible to set or browse detailed information concerning the
machine on computers other than the ones of which the IP addresses are allowed, even if both
[Use SNMP] and [Enable Dedicated Port] are [On]. For details, see "Protocol Settings," on p. 3-3.
3
If you are using the optional Color Network Multi-PDL Printer Kit
(Standard equipment for the iR C3220N) or the optional Super G3 FAX
Board, set the spooler. Otherwise, skip to step 5.
Communication Environment Setup
2-19
Settings Common to the Network Protocols
2
● If you want to spool print jobs transmitted to this machine on the machine's
hard disk:
❑ On the Network Settings screen, press [▼] or [▲] until [Use Spooler] appears ➞ press [Use
Spooler].
Settings Common to the Network Protocols
2
❑ Select [On].
● If you do not want to spool a print job on the machine's hard disk before
starting printing:
❑ On the Network Settings screen, press [▼] or [▲] until [Use Spooler] appears ➞ press [Use
Spooler].
❑ Select [Off].
IMPORTANT
If you are using the optional Color Network Multi-PDL Printer Kit (Standard equipment for the iR
C3220N), take note of the following:
- If the print job is sent from a Macintosh computer to a PS printer, you cannot specify whether to
spool under this option. Spooling is determined by the name of the printer selected in the
Macintosh Chooser. For more information, see "Setting Up a Computer for Printing," on p. 6-8.
2-20
Communication Environment Setup
- If you print a file in the PDF or PS format by specifying its URL on a web browser (Remote UI),
the print job will always be spooled, regardless of the settings made under this option.
NOTE
When you spool a print job on the hard disk, the time required to release a computer outputting a
print job is shortened. Note that to manage a print job of the machine, you can use the touch
panel display of the machine, a web browser (Remote UI), or the print queue provided with
Windows to display a job list or delete a job.
4
Confirm the settings you specified ➞ press [OK].
5
Press [Done] repeatedly until the Additional Functions screen closes.
Restart the machine.
❑ Turn OFF the machine, wait at least 10 seconds, and then turn it ON again.
NOTE
For instructions on how to turn ON/OFF the machine, see Chapter 1, "Before You Start Using
This Machine," in the Reference Guide.
The communication environment setup is complete. Proceed to Chapters 3 to 6 depending on the
protocol.
Communication Environment Setup
2-21
Settings Common to the Network Protocols
6
2
Settings Common to the Network Protocols
2
2-22
Communication Environment Setup
Using a TCP/IP Network
3
CHAPTER
This chapter describes the settings and procedures necessary to connect and use the machine with a
TCP/IP network.
TCP/IP Network Setup Procedures . . . . . . . . . . . . . . . . . . . . . . . . . . . . . . . . . . . . . . . . . . . . . . . . . . . . 3-2
Protocol Settings. . . . . . . . . . . . . . . . . . . . . . . . . . . . . . . . . . . . . . . . . . . . . . . . . . . . . . . . . . . . . . . . . . . 3-3
Settings from the Control Panel . . . . . . . . . . . . . . . . . . . . . . . . . . . . . . . . . . . . . . . . . . . . . . . . . . . . . . . . . . . . . . . . 3-4
Setting Up a Computer for Printing/Sending a Fax (Windows/UNIX) . . . . . . . . . . . . . . . . . . . . . . . . . . 3-33
Printer Connection Method (LPD/Raw) . . . . . . . . . . . . . . . . . . . . . . . . . . . . . . . . . . . . . . . . . . . . . . . . . . . . . . . . . 3-35
Printer Connection Method (IPP) . . . . . . . . . . . . . . . . . . . . . . . . . . . . . . . . . . . . . . . . . . . . . . . . . . . . . . . . . . . . . . 3-46
Printer Connection Method (FTP). . . . . . . . . . . . . . . . . . . . . . . . . . . . . . . . . . . . . . . . . . . . . . . . . . . . . . . . . . . . . . 3-51
Setting Up a Computer as a File Server . . . . . . . . . . . . . . . . . . . . . . . . . . . . . . . . . . . . . . . . . . . . . . . . 3-53
FTP Server Settings . . . . . . . . . . . . . . . . . . . . . . . . . . . . . . . . . . . . . . . . . . . . . . . . . . . . . . . . . . . . . . . . . . . . . . . . 3-54
3-1
TCP/IP Network Setup Procedures
To use a TCP/IP network, it is necessary to perform the following procedures.
1
Protocol Settings (See "Protocol Settings," on p. 3-3.)
Specify the protocol settings. To specify the settings, use:
• The machine's control panel
• A web browser (Remote UI)
• NetSpot Device Installer (Canon utility)
• A web browser (NetSpot Console) (Canon utility)
Using a TCP/IP Network
3
2
Computer Settings for Printing/Sending a Fax (See "Setting Up a Computer for Printing/Sending a Fax
(Windows/UNIX)," on p. 3-33.)
Specify the settings for each computer you use for printing or sending a fax. (To print or send a fax from a computer, the
optional equipment must be installed. For the equipment needed, see "Optional Equipment and System Environment
Requirements," on p. 1-2.)
3
Computer Settings for a File Server (See "Setting Up a Computer as a File Server," on p. 3-53.)
Specify the settings of the computer receiving data sent from the machine. (To send data, the optional equipment must be
installed. For the equipment needed, see "Optional Equipment and System Environment Requirements," on p. 1-2.)
IMPORTANT
• If you are using the optional Color Network Printer Unit, for step 2, see the manual provided with the
optional Color Network Printer Unit.
• It is recommended that the network manager perform steps 1 and 3 above.
• The machine or the printer option does not come with printer driver software that can be used on a
UNIX platform. (Use LPD to set up a printer in UNIX.)
• To print from a Macintosh, see Chapter 6, "Using an AppleTalk Network (Macintosh)."
• As this product does not come with fax driver software for the UNIX platform, it is not possible to send a
fax from a UNIX platform.
• Use the control panel or NetSpot Device Installer if you configure the protocol settings for the first time.
After configuring protocol settings, you can change the content by using a web browser (Remote UI) or
a web browser (NetSpot Console).
3-2
TCP/IP Network Setup Procedures
Protocol Settings
You can specify the protocol settings for the machine by using any of the following.
This section describes how to specify the settings from the control panel.
• The machine's control panel
• A web browser (Remote UI)
• NetSpot Device Installer (Canon utility)
IMPORTANT
• If you configure the protocol settings for the first time, use the control panel of this machine or NetSpot
Device Installer. After configuring protocol settings, you can change the content by using a web browser
(Remote UI) or a web browser (NetSpot Console).
• Some items cannot be set using NetSpot Device Installer or NetSpot Console. For details about items
that can be set with NetSpot Device Installer or NetSpot Console, see "Network Setting Items," on p.
9-2.
• You can retain the security by setting the range of IP addresses of computers that can obtain access to
the machine.
Once you set the range of IP addresses of computers on which items for the machine can be set or
browsed, it is not possible to use a web browser (Remote UI) on computers of which the IP addresses
are not allowed; a utility on the computers cannot be used to set or browse detailed information
concerning the machine. Also, once you set the range of IP addresses of computers from which data
(print/fax/I-fax job) can be sent to the machine, the machine rejects data sent from computers of which
the IP addresses are not allowed. For details, see step 21 in "TCP/IP Settings," on p. 3-4. (To print or
send a fax/I-fax from a computer, the optional equipment must be installed. For the equipment needed,
see "Optional Equipment and System Environment Requirements," on p. 1-2.)
• When using functions to access external servers on the internet, you may not be able to access them
due to the settings of firewalls, etc. In this case, consult your network administrator.
NOTE
• For instructions on how to enter settings using a web browser (Remote UI), see Chapter 3,
"Customizing Settings," in the Remote UI Guide.
• For more information on NetSpot Device Installer or NetSpot Console, see Chapter 7, "Using the
Network and Device Settings with Utilities."
Protocol Settings
3-3
Using a TCP/IP Network
3
• A web browser (NetSpot Console) (Canon utility)
Settings from the Control Panel
The procedures for specifying the settings from the control panel are as follows.
IMPORTANT
• If you are using the optional Color Network Printer Unit, see the manual provided with the optional Color
Network Printer Unit for more information on the settings (other than for e-mail/I-fax settings).
• Settings specified from the control panel become effective after the machine is restarted, after the
procedure.
NOTE
For instructions on how to enter characters using the touch panel display, see Chapter 2, "Basic
Operations," in the Reference Guide.
3
Using a TCP/IP Network
TCP/IP Settings
NOTE
If only the optional Color Network Multi-PDL Printer Kit (Standard equipment for the iR C3220N) or the
optional Super G3 FAX Board is installed, set the following items:
- [LPD Settings] (See step 13.)
- [RAW Settings] (See step 14.)
- [IPP Settings] (See step 18.)
3-4
1
Press
2
Press [System Settings].
Protocol Settings
.
NOTE
If the message <Enter the System Manager ID and Password using the numeric keys.> appears
on the touch panel display, enter the System Manager ID and password. For instructions on how
to enter the System Manager ID and password, see Chapter 2, "Basic Operations," in the
Reference Guide.
3
Press [Network Settings].
4
Using a TCP/IP Network
3
Press [TCP/IP Settings].
Protocol Settings
3-5
5
Press [IP Address Settings].
6
Specify the relevant items for your system.
Using a TCP/IP Network
3
● Using a fixed IP address:
❑ Press [IP Address].
❑ Enter the IP address using - (numeric keys).
❑ Specify the [Subnet Mask] and [Gateway Address] settings in the same way.
● Using DHCP:
❑ Press [DHCP].
❑ Enter the IP address, subnet mask, and gateway address.
If this information cannot be obtained via DHCP after restart of the machine, the settings
entered in the initial setup operation (above) are used.
3-6
Protocol Settings
● Using RARP:
❑ Press [RARP].
❑ Enter the IP address, subnet mask, and gateway address.
If this information cannot be obtained via RARP after restart of the machine, the settings
entered in the initial setup operation (above) are used.
● Using BOOTP:
❑ Press [BOOTP].
❑ Enter the IP address, subnet mask, and gateway address.
If this information cannot be obtained via BOOTP after restart of the machine, the settings
entered in the initial setup operation (above) are used.
• Only one of the DHCP, BOOTP, or RARP settings can be selected at any one time.
• Even if you use the DHCP, BOOTP, and RARP settings, you should enter an IP address, subnet
mask, and gateway address. If this information cannot be obtained from the DHCP, BOOTP, or
RARP server, the settings entered from the control panel are used.
• If the machine is restarted after settings are made to use any of DHCP, BOOTP, or RARP, the
TCP/IP Settings screen displays the IP address setting values obtained from the DHCP, BOOTP,
or RARP server. (If the IP address, host name, and domain name have been set previously,
these will be overwritten by the setting values obtained from DHCP, BOOTP, or RARP.)
• If you use DHCP without the DNS dynamic update function, it is recommended that an identical
IP address be assigned to the machine at all times. (If the IP address is not identical, the host
name for the machine will not be able to correspond to the IP address.)
• It takes about two minutes to check whether the DHCP, BOOTP, or RARP settings can be used.
If you do not plan to use one of these settings, it is recommended that you turn them off.
7
Confirm the settings you specified ➞ press [OK].
The display returns to the TCP/IP Settings screen.
Protocol Settings
3-7
3
Using a TCP/IP Network
NOTE
8
If you use a DNS server and DNS dynamic update functions, press
[DNS Server Settings].
Otherwise, skip to step 13.
Using a TCP/IP Network
3
9
Specify the IP address of a DNS server.
Use
-
(numeric keys) to enter the IP address.
If you do not want to set up a DNS secondary server, enter <0.0.0.0>.
10
Enter the host name and domain name.
Enter the name of the machine as [Host Name], and the network domain name of the machine
as [Domain Name].
Example:
[Host Name]: host_name
[Domain Name]: organization.company.com
3-8
Protocol Settings
11
Specify the [DNS Dynamic Update] function.
❑ If you want to use the DNS server dynamic update function, press [On]. Otherwise, press
[Off].
IMPORTANT
• The DNS dynamic update function enables the machine to register the IP address, host name,
and domain name of the machine to the DNS server automatically. This function is available in
the environment where there is a dynamic DNS server.
• To use the DNS dynamic update function, enter the IP address of a DNS server, the host name,
and domain name of this machine. (See steps 9 and 10.)
Confirm the settings you specified ➞ press [OK].
3
The display returns to the TCP/IP Settings screen.
13
Specify the LPD settings.
● If you want to use LPD as the print application:
❑ On the TCP/IP Settings screen, press [▼] or [▲] until [LPD Settings] appears ➞ press [LPD
Settings].
Protocol Settings
3-9
Using a TCP/IP Network
12
❑ Press [On].
❑ If you want to print a banner page (the print job must be set to output a banner), press [On];
3
otherwise, press [Off].
Using a TCP/IP Network
Output of a banner page is set on a print-job basis. Even if [On] is selected for [LPD Banner
Page], a banner page cannot be output for a print job, when it is not set to output.
❑ Confirm the settings you specified ➞ press [OK].
The display returns to the TCP/IP Settings screen.
● If you do not want to use LPD as the print application:
❑ On the TCP/IP Settings screen, press [▼] or [▲] until [LPD Settings] appears ➞ press [LPD
Settings].
❑ Press [Off].
❑ Confirm the settings you specified ➞ press [OK].
The display returns to the TCP/IP Settings screen.
14
Specify the Raw settings.
● If you want to use Raw as the print application:
❑ On the TCP/IP Settings screen, press [▼] or [▲] until [RAW Settings] appears ➞ press [RAW
Settings].
❑ Select [On].
3-10
Protocol Settings
❑ If you want to establish bidirectional communication using Port9100, press [On] for <Use
Bidirectional>.
❑ Confirm the settings you specified ➞ press [OK].
● If you do not want to use Raw as the print application:
❑ On the TCP/IP Settings screen, press [▼] or [▲] until [RAW Settings] appears ➞ press [RAW
Settings].
❑ Select [Off].
❑ Confirm the settings you specified ➞ press [OK].
The display returns to the TCP/IP Settings screen.
15
Specify the SNTP settings.
IMPORTANT
In order to perform time synchronization through SNTP, it is necessary to set the time zone of the
region in which you are using the machine in advance. For instructions on how to set the time
zone, see Chapter 6, "System Manager Settings," in the Reference Guide.
● If you want to perform time synchronization using SNTP:
❑ On the TCP/IP Settings screen, press [▼] or [▲] until [SNTP Settings] appears ➞ press
[SNTP Settings].
❑ Press [On] for <Use SNTP>.
Select the interval for performing time synchronization in <Polling Interval>. You can set the
interval to be between 1 and 48 hours.
Protocol Settings
3-11
Using a TCP/IP Network
3
The display returns to the TCP/IP Settings screen.
❑ Press [NTP Server Address] ➞ enter the NTP server address or host name.
❑ Confirm the settings you specified ➞ press [OK].
3
Using a TCP/IP Network
The display returns to the TCP/IP Settings screen.
● If you do not want to perform time synchronization using SNTP:
❑ On the TCP/IP Settings screen, press [▼] or [▲] until [SNTP Settings] appears ➞ press
[SNTP Settings].
❑ Press [Off] for <Use SNTP>.
❑ Confirm the settings you specified ➞ press [OK].
The display returns to the TCP/IP Settings screen.
16
Specify the FTP print settings.
This machine contains an internal FTP server, and a function that enables the machine to print
jobs which are uploaded to this server from PCs on the network. This function is for use in
special environments, such as in a large-scale system that includes a printing function for
processing a large amount of business data. This function, however, is not a general printing
method. For more information on the type of data you can print and the procedure for printing
via the internal FTP server, see "Printer Connection Method (FTP)," on p. 3-51.
● If you want to use FTP as the print application:
❑ On the TCP/IP Settings screen, press [▼] or [▲] until [FTP Print Settings] appears ➞ press
[FTP Print Settings].
❑ Press [On] for <Use FTP printing>.
❑ Press [User] to enter the login user name for access to the FTP server.
3-12
Protocol Settings
❑ Press [Password] to enter the login password for access to the FTP server.
❑ Confirm the settings you specified ➞ press [OK].
IMPORTANT
• If you do not specify [User] and [Password], all user names and passwords will be valid.
• The password will appear in the job list as a user name if you enter "anonymous" as a login user
name for access to an FTP server without specifying [User] and [Password], or if you enter
"anonymous" in [User]. (To display the job list, press [System Monitor] ➞ [Print] ➞ [Log] on the
touch panel display.)
• The port number is 21 and cannot be changed.
● If you do not want to use FTP as the print application:
❑ On the TCP/IP Settings screen, press [▼] or [▲] until [FTP Print Settings] appears ➞ press
[FTP Print Settings].
❑ Press [Off] for <Use FTP printing>.
❑ Confirm the settings you specified ➞ press [OK].
The display returns to the TCP/IP Settings screen.
17
Specify the PASV mode for FTP.
IMPORTANT
Whether you use the PASV mode for FTP depends on the network environment you are using
and the settings of the file server you are sending to. Before specifying the PASV mode for FTP,
consult your network administrator.
❑ On the TCP/IP Settings screen, press [▼] or [▲] until [Use PASV Mode for FTP] appears ➞
press [Use PASV Mode for FTP].
Protocol Settings
3-13
Using a TCP/IP Network
3
The display returns to the TCP/IP Settings screen.
❑ Press [On] for [Use PASV Mode for FTP].
❑ Confirm the settings you specified ➞ press [OK].
3
Using a TCP/IP Network
The display returns to the TCP/IP Settings screen.
18
Specify the IPP settings.
● If you want to use IPP as the print application:
❑ On the TCP/IP Settings screen, press [▼] or [▲] until [IPP Settings] appears➞ press [IPP
Settings].
❑ Select [On].
Selecting [On] for [IPP Settings] automatically sets [Use HTTP] to [On].
❑ If you are using IPP authentication, press [On] for <Use Authentication> ➞ enter the user
name to use for IPP authentication in [User], and the password to use for IPP authentication
in [Password].
❑ Confirm the settings you specified ➞ press [OK].
The display returns to the TCP/IP Settings screen.
3-14
Protocol Settings
● If you do not want to use IPP as the print application:
❑ On the TCP/IP Settings screen, press [▼] or [▲] until [IPP Settings] appears ➞ press [IPP
Settings].
❑ Select [Off].
❑ Confirm the settings you specified ➞ press [OK].
The display returns to the TCP/IP Settings screen.
Specify the HTTP settings.
❑ On the TCP/IP Settings screen, press [▼] or [▲] until [Use HTTP] appears➞ press [Use
HTTP].
❑ If you want to use the Remote UI or IPP, select [On].
3
Selecting [Off] for [Use HTTP] automatically sets [Remote UI] and [IPP Settings] to [Off].
❑ Confirm the settings you specified ➞ press [OK].
The display returns to the TCP/IP Settings screen.
IMPORTANT
If you are using the optional Color Network Multi-PDL Printer Kit (Standard equipment for the iR
C3220N), you can print a file in the PDF or PS format by specifying its URL on a web browser
(Remote UI). To use this function, you need to make the following settings.
- [Use HTTP]: [On] (Set in this step.)
- [Proxy Settings]: The settings suitable for your environment (See step 20.)
- [LPD Settings]: [On] (See step 13.)
NOTE
[Remote UI] can be set on the System Settings screen.
Protocol Settings
3-15
Using a TCP/IP Network
19
20
If you are using the optional Color Network Multi-PDL Printer Kit
(Standard equipment for the iR C3220N), set a proxy. Otherwise, skip to
step 21.
● If you want to use a proxy:
❑ On the TCP/IP Settings screen, press [▼] or [▲] until [Proxy Settings] appears ➞ press
[Proxy Settings].
❑ Select [On] for <Use Proxy>.
Using a TCP/IP Network
3
❑ Press [Server Address] to enter a proxy server IP address or name.
❑ Press [Port Number] to enter the port number of a proxy server.
❑ If you want to use a proxy in the same domain, select [On] for <Use Proxy within the Same
Domain>.
❑ Confirm the settings you specified ➞ press [OK].
The display returns to the TCP/IP Settings screen.
● If you do not want to use a proxy:
❑ On the TCP/IP Settings screen, press [▼] or [▲] until [Proxy Settings] appears ➞ press
[Proxy Settings].
❑ Select [Off] for <Use Proxy>.
❑ Confirm the settings you specified ➞ press [OK].
The display returns to the TCP/IP Settings screen.
3-16
Protocol Settings
IMPORTANT
If you are using the optional Color Network Multi-PDL Printer Kit (Standard equipment for the iR
C3220N), you can print a file in the PDF or PS format by specifying its URL on a web browser
(Remote UI). To use this function, you need to make the following settings.
- [Use HTTP]: [On] (See step 19.)
- [Proxy Settings]: The settings suitable for your environment (Set in this step.)
- [LPD Settings]: [On] (See step 13.)
Specify the IP address range.
You need to set <RX/Print Range> if any of the following options are installed: Color Network
Multi-PDL Printer Kit (Standard equipment for the iR C3220N), Super G3 FAX Board, or Color
Universal Send Kit.
● If you do not want to restrict the IP addresses of computers from which data
(print/fax/I-fax job) can be sent to the machine:
❑ On the TCP/IP Settings screen, press [▼] or [▲] until [IP Address Range Settings] appears
➞ press [IP Address Range Settings].
❑ Press [Permit IP Address(es)] for <RX/Print Range>.
Protocol Settings
3-17
3
Using a TCP/IP Network
21
❑ Select [Off] for <Apply Settings> ➞ press [OK].
❑ Press [Reject IP Address(es)] for <RX/Print Range>.
❑ Select [Off] for <Apply Settings> ➞ press [OK].
Using a TCP/IP Network
3
● If you want to restrict the IP addresses of computers from which data (print/
fax/I-fax job) can be sent to the machine:
❑ On the TCP/IP Settings screen, press [▼] or [▲] until [IP Address Range Settings] appears
➞ press [IP Address Range Settings].
❑ Press [Permit IP Address(es)] for <RX/Print Range>.
❑ Select [On] for <Apply Settings>.
❑ Press [Register].
3-18
Protocol Settings
❑ If you want to store only one IP address, press [Single Address] to enter the IP address that
is to be permitted ➞ press [OK].
❑ If you want to store a range of IP addresses that are to be permitted, press [Multiple
3
Using a TCP/IP Network
Addresses] to specify [First Address] and [Last Address] ➞ press [OK].
❑
❑
❑
❑
❑
Press [OK].
Press [Reject IP Address(es)] for <RX/Print Range>.
Select [On] for <Apply Settings>.
Press [Register].
If you want to store only one IP address, press [Single Address] to enter the IP address that
is to be rejected ➞ press [OK].
❑ If you want to store a range of IP addresses that are to be rejected, press [Multiple
Addresses] to specify [First Address] and [Last Address] ➞ press [OK].
❑ Press [OK].
Protocol Settings
3-19
● If you do not want to restrict the IP addresses of computers on which the
machine setting items can be set or browsed using the Remote UI or utility:
❑ On the TCP/IP Settings screen, press [▼] or [▲] until [IP Address Range Settings] appears
➞ press [IP Address Range Settings].
❑ Press [Permit IP Address(es)] for <Setting/Browsing Range>.
Using a TCP/IP Network
3
❑ Select [Off] for <Apply Settings> ➞ press [OK].
❑ Press [Reject IP Address(es)] for <Setting/Browsing Range>.
❑ Select [Off] for [Apply Settings]➞ press [OK].
3-20
Protocol Settings
● If you want to restrict the IP addresses of computers on which the machine
setting items can be set or browsed using the Remote UI or utility:
❑ On the TCP/IP Settings screen, press [▼] or [▲] until [IP Address Range Settings] appears
➞ press [IP Address Range Settings].
❑
❑
❑
❑
Press [Permit IP Address(es)] for <Setting/Browsing Range>.
Select [On] for <Apply Settings>.
Press [Register].
If you want to store only one IP address, press [Single Address] to enter the IP address that
is to be permitted ➞ press [OK].
Using a TCP/IP Network
3
❑ If you want to store a range of IP addresses that are to be permitted, press [Multiple
Addresses] to specify [First Address] and [Last Address] ➞ press [OK].
❑
❑
❑
❑
Press [OK].
Press [Reject IP Address(es)] for <Setting/Browsing Range>.
Select [On] for <Apply Settings>.
Press [Register].
Protocol Settings
3-21
❑ If you want to store only one IP address, press [Single Address] to enter the IP address that
is to be rejected ➞ press [OK].
❑ If you want to store a range of IP addresses that are to be rejected, press [Multiple
Addresses] to specify [First Address] and [Last Address] ➞ press [OK].
❑ Press [OK].
IMPORTANT
• You can register up to eight IP addresses or IP address ranges.
• An IP address of <0.0.0.0> cannot be specified.
• The value of [First Address] for [Multiple Addresses] should be smaller than or equal to that of
[Last Address].
• If <Apply Settings> is set to 'Off' for both [Permit IP Address(es)] and [Reject IP Address(es)], all
IP addresses are permitted.
• If <Apply Settings> is set to 'Off' for [Permit IP Address(es)] and <Apply Settings> is set to 'On'
for [Reject IP Address(es)], IP addresses that are beyond the specified range of [Reject IP
Address(es)] are permitted.
• If <Apply Settings> is set to 'On' for [Permit IP Address(es)] and <Apply Settings> is set to 'Off'
for [Reject IP Address(es)], IP addresses that are beyond the specified range of [Permit IP
Address(es)] are not permitted.
• If <Apply Settings> for both [Permit IP Address(es)] and [Reject IP Address(es)] is set to 'On', IP
addresses that are beyond the ranges of both [Permit IP Address(es)] and [Reject IP
Address(es)] are not permitted.
• If <Apply Settings> for both [Permit IP Address(es)] and [Reject IP Address(es)] is set to 'On', IP
addresses that are within the ranges of both [Permit IP Address(es)] and [Reject IP Address(es)]
are not permitted.
• If the usage of a protocol or print application is not permitted on your device, it cannot be used
even after its IP address is permitted on the machine; on your device, configure the settings to
permit the protocol or print application.
Using a TCP/IP Network
3
NOTE
This machine logs attempts to gain access from IP addresses that it has been set to reject. For
instructions on how to refer to the access log, see "Viewing the Network Access Log," on p. 9-13.
22
Press [Done].
The display returns to the TCP/IP Settings screen.
23
3-22
Press [Done] repeatedly until the Additional Functions screen closes.
Protocol Settings
24
Restart the machine.
❑ Turn OFF the machine, wait at least 10 seconds, and then turn it ON again.
NOTE
For instructions on how to turn ON/OFF the machine, see Chapter 1, "Before You Start Using
This Machine," in the Reference Guide.
Check to see if the network settings you specified are set correctly.
❑ Press ➞ [System Settings] ➞ [Network Settings] ➞ [TCP/IP Settings].
❑ Press [PING Command].
3
Using a TCP/IP Network
25
❑ Enter an IP address that exists on the network ➞ press [Start].
Use
-
(numeric keys) to enter an IP address.
When you press [Start], the result of the PING command appears on the touch panel
display.
If this result is inappropriate, check the settings described in "Interface Settings," on p. 2-9,
and "TCP/IP Settings," on p. 3-4.
Protocol Settings
3-23
IMPORTANT
• If you set the startup time of the network function of the machine by following the procedure in
"Startup Time Settings," on p. 3-30, execute the PING command only after the time you set as
the startup time passes (the default setting startup time is '60 seconds').
• If you connect the machine to a switching hub, the machine may not be able to connect to a
network even though your network settings are appropriate. This problem may be resolved by
delaying the startup of network communications for the machine. See "Startup Time Settings,"
on p. 3-30 for how to set up the startup time.
❑ Press [Done] ➞ press [▼] or [▲] until [SNTP Settings] appears ➞ press [SNTP Settings].
❑ Press [NTP Server Check].
<OK> is displayed if time synchronization is working correctly via SNTP.
NOTE
3
Using a TCP/IP Network
• If <Error> is displayed, check the settings for [NTP Server Address] set in step 15.
• Even if you perform [NTP Server Check], time settings are not updated. Check that
communications are possible between the machine and the NTP server.
26
Press [Done] repeatedly until the Additional Functions screen closes.
The TCP/IP settings are complete.
E-Mail/I-Fax Settings
IMPORTANT
To use the e-mail/I-fax functions, the optional equipment must be installed. For the equipment needed,
see "Optional Equipment and System Environment Requirements," on p. 1-2.
1
3-24
Press
Protocol Settings
.
Press [System Settings].
3
NOTE
If the message <Enter the System Manager ID and Password using the numeric keys.> appears
on the touch panel display, enter the System Manager ID and password. For instructions on how
to enter the System Manager ID and password, see Chapter 2, "Basic Operations," in the
Reference Guide.
3
Press [Network Settings].
Protocol Settings
3-25
Using a TCP/IP Network
2
4
Press [▼] or [▲] until [E-mail/I-Fax] appears ➞ press [E-mail/I-Fax].
5
Specify the mail server for receiving e-mail/I-faxes.
Using a TCP/IP Network
3
The machine supports both SMTP and POP3 functions.
NOTE
The machine can receive I-fax images and communication error notices only.
● If you want to receive e-mail/I-faxes using the machine's own SMTP receiving
function:
❑ Register the host name of the machine with the DNS server.
❑ Press [On] for <SMTP Receipt> ➞ press [Off] for <POP>.
❑ Press [E-mail Address] ➞ enter the e-mail address your machine will use.
You can specify any user name (the part of the address located in front of the @ symbol).
Enter the host name after the "@" symbol in the e-mail address.
Input Example :
ifax@host_name.organization.company.com
(In this example the host name of the machine registered with the DNS
server is "host_name.organization.company.com".)
3-26
Protocol Settings
● If you want to receive e-mail/I-faxes using the POP server:
❑ Press [On] for <POP> ➞ press [Off] for <SMTP Receipt>.
3
Input Example :
Using a TCP/IP Network
❑ Press [E-mail Address] ➞ enter the e-mail address your machine will use.
account1@pop_server.organization.company.com
(In this example the name of the POP server is
"pop_server.organization.company.com".)
❑ Press [POP Server] ➞ enter a POP server IP address or name.
Input Example :
IP address: 192.168.1.1
Name: pop_server.organization.company.com
❑ Press [POP Address] ➞ enter the login name for access to the POP server.
Input Example :
account1
❑ Press [POP Password] ➞ enter the password for access to the POP server.
❑ Press [-] and [+] or use - (numeric keys) to set [POP Interval] at the interval you want
the POP server to check for incoming e-mail.
If the interval is set to 0, the POP server is not checked automatically. For instructions on
how to manually check the POP server, see Chapter 8, "Checking/Changing the Send/
Receive Status," in the Sending and Facsimile Guide.
Protocol Settings
3-27
❑ Press [Authent./Encryption].
Select the authentication method supported by the POP server from [Standard], [APOP], or
[POP AUTH].
3
Using a TCP/IP Network
❑ If you want to send encrypted data, press [On] for <Allow SSL (POP)>.
IMPORTANT
If the POP server does not support SSL encryption, data is not encrypted when [On] is selected
for <Allow SSL (POP)>.
❑ Press [OK].
The display returns to the E-mail/I-Fax screen.
6
Specify the mail server for sending e-mail/I-faxes.
● If you are using an SMTP server that requires POP before SMTP (method for
authenticating users who have logged in the POP server before sending
e-mail):
❑ Press [SMTP Server] ➞ enter an SMTP server IP address or name.
Input Example :
IP address: 192.168.1.1
Name: smtp.organization.company.com
3-28
Protocol Settings
❑ Press [Authent./Encryption] ➞ press [On] for <POP Authentication before Sending> ➞ press
[Off] for <SMTP Authentication (SMTP AUTH)>.
❑ Press [OK].
● If you are using an SMTP server that requires SMTP Authentication (method
for authenticating users who have logged in the SMTP server before sending
e-mail):
❑ Press [SMTP Server] ➞ enter an SMTP server IP address or name.
Input Example :
IP address: 192.168.1.1
Name: smtp.organization.company.com
❑ Press [Authent./Encryption] ➞ press [On] for <SMTP Authentication (SMTP AUTH)> ➞
press [Off] for <POP Authentication before Sending>.
❑ Press [User] ➞ enter the user name used for logging in to the SMTP server.
If you are using the Microsoft SMTP server, enter a user name in [User] using the following
format: user name @domain name.
Input Example :
user@organization.company.com
❑ Press [Password] ➞ enter the password used for logging in to the SMTP server.
❑ If you want to send encrypted data, press [On] for <Allow SSL (SMTP)>.
IMPORTANT
If the SMTP server does not support the encryption, data is not encrypted when [On] is selected
for <Allow SSL (SMTP)>.
❑ Press [OK].
The display returns to the E-mail/I-Fax screen.
Protocol Settings
3-29
Using a TCP/IP Network
3
The display returns to the E-mail/I-Fax screen.
● If you are using an SMTP server that does not require authentication for
sending e-mail:
❑ Press [SMTP Server] ➞ enter an SMTP server IP address or name.
Input Example :
IP address: 192.168.1.1
Name: smtp.organization.company.com
❑ Press [Authent./Encryption] ➞ press [Off] both for <SMTP Authentication (SMTP AUTH)>
and <POP Authentication before Sending>.
❑ Press [OK].
The display returns to the E-mail/I-Fax screen.
Using a TCP/IP Network
3
7
Confirm the settings you entered ➞ press [OK].
8
Press [Done] repeatedly until the Additional Functions screen closes.
9
Restart the machine.
❑ Turn OFF the machine, wait at least 10 seconds, and then turn it ON again.
NOTE
For instructions on how to turn ON/OFF the machine, see Chapter 1, "Before You Start Using
This Machine," in the Reference Guide.
The e-mail/I-fax settings are complete.
Startup Time Settings
If you connect the machine to a switching hub, it may not be able to connect to a network even
though your network settings are set correctly.
This occurs because the spanning tree process performed between switching hubs prevents
them from communicating with each other immediately after the machine connects to a
switching hub.
In this case, use the following procedure to delay the start of communication.
1
3-30
Press
Protocol Settings
➞ [System Settings] ➞ [Network Settings].
2
Press [▼] or [▲] until [Startup Time Settings] appears ➞ press [Startup
Time Settings].
3
Using a TCP/IP Network
3
Set the time period required to delay the startup of network
communications for the machine.
Press [-] or [+] to set the time period.
4
Confirm the settings you specified ➞ press [OK].
The display returns to the Network Settings screen.
5
Press [Done] repeatedly until the Additional Functions screen closes.
Protocol Settings
3-31
6
Restart the machine.
❑ Turn OFF the machine, wait at least 10 seconds, and then turn it ON again.
NOTE
For instructions on how to turn ON/OFF the machine, see Chapter 1, "Before You Start Using
This Machine," in the Reference Guide.
The startup time settings are complete.
Using a TCP/IP Network
3
3-32
Protocol Settings
Setting Up a Computer for Printing/Sending a
Fax (Windows/UNIX)
After you have completed the protocol settings for printing and sending a fax with the machine,
you are ready to set up each of the computers for printing or sending a fax.
■ Connecting to a TCP/IP Network
All computers that use the printer must have TCP/IP client software installed and must be enabled for
TCP/IP network use. For details, see the manuals provided with the operating system.
To print or send a fax from a computer, you must install a driver and specify a port setting. The port
setting differs depending on the print application used for printing or sending a fax. Use the following
information as a guide to determine the print application you are using, and then perform the necessary
operations.
• LPD
This is the print application generally used with TCP/IP.
See "Printer Connection Method (LPD/Raw)," on p. 3-35.
• Raw
This is a print application used with Windows. It can send a job to the machine at higher speeds than
LPD.
See "Printer Connection Method (LPD/Raw)," on p. 3-35.
• IPP
This is a print application that can be used with Windows. It uses the HTTP protocol to send a job to
the machine using Internet/intranet connections.
See "Printer Connection Method (IPP)," on p. 3-46.
• FTP
This is a print application that prints files by copying them to the printer using FTP client software.
See "Printer Connection Method (FTP)," on p. 3-51.
• SMB
This is a print application that can be used with NetBIOS network.
See Chapter 5, "Using a NetBIOS Network."
Setting Up a Computer for Printing/Sending a Fax (Windows/UNIX)
3-33
Using a TCP/IP Network
3
■ Installing the Driver and Specifying the Port Setting
IMPORTANT
• To print or send a fax from a computer, the optional equipment must be installed. For the equipment
needed, see "Optional Equipment and System Environment Requirements," on p. 1-2.
• If the settings for <RX/Print Range> in [IP Address Range Settings] do not permit the IP address of a
computer in which a driver is installed, you cannot print from the computer. (See step 21 in "TCP/IP
Settings," on p. 3-4.)
• If you print with IPP, the [Pause Printing] and [Cancel All Documents] settings on the [Printer] menu in
the Windows print queue cannot be used. (To view the print queue, click the [Start] menu ➞ point to
[Settings] ➞ click [Printers] ➞ double-click the icon of the machine.)
NOTE
• It is recommended that you install Canon LPR2 when using Raw or IPP in Windows. Canon LPR2
enables you to easily set ports. For more information, see the Canon LPR2 User's Guide (PDF manual).
For instructions on how to display the Canon LPR2 User's Guide, see the Network Quick Start Guide.
• If Windows NT/2000/XP/Server 2003 is on your network, the following procedure enables you to set up
a print server for more efficient management of network printers. Once a print server is set up, print jobs
can be managed by the print server. Also, by setting up an alternate driver for the print server, printer
drivers can be installed in each computer via the network.
For instructions on how to set print servers, see the following procedures indicated in the manual for
each driver:
- If you want to use the PCL printer driver
See the procedure for alternative printer driver installation in Chapter 2, "Getting Started," in the PCL
Driver Guide.
- If you want to use the PS printer driver
See the procedure for alternative printer driver installation in Chapter 2, "Getting Started," in the PS
Driver Guide.
- If you want to use the UFR printer driver
See the procedure for alternative printer driver installation in Chapter 2, "Getting Started," in the UFR
Driver Guide.
- If you want to use the fax driver
See the procedure for alternative printer driver installation in Chapter 2, "Getting Started," in the Fax
Driver Guide.
Using a TCP/IP Network
3
3-34
Setting Up a Computer for Printing/Sending a Fax (Windows/UNIX)
Printer Connection Method (LPD/Raw)
The following is the procedure for specifying the port setting.
Windows 98/Me
■ Installing a New Driver
Install the driver.
Install the driver according to the following procedures indicated in the manual for each driver:
• If you want to use the PCL printer driver
See the procedure for dynamic installation in Chapter 2, "Getting Started," in the PCL Driver
Guide.
• If you want to use the PS printer driver
See the procedure for dynamic installation in Chapter 2, "Getting Started," in the PS Driver
Guide.
• If you want to use the UFR printer driver
See the procedure for dynamic installation in Chapter 2, "Getting Started," in the UFR Driver
Guide.
• If you want to use the fax driver
See the procedure for dynamic installation in Chapter 2, "Getting Started," in the Fax Driver
Guide.
IMPORTANT
If your computer fails to transmit data to the printer during installation of the driver, when the error
message appears, click [No] ➞ set the byte count mode to off.
NOTE
• The print application will be LPD and the print queue will be set to <LP> if the driver has been
installed according to the above procedures.
• This machine enables you to specify print queues other than <LP>. For details on print queues
and instructions on how to change the settings, see "Changing the Port after Installing the
Driver," on p. 3-36.
Setting Up a Computer for Printing/Sending a Fax (Windows/UNIX)
3-35
3
Using a TCP/IP Network
1
■ Changing the Port after Installing the Driver
1
Install Canon LPR2, and change the port settings.
For instructions on how to install Canon LPR2 and set ports, see the Canon LPR2 User's Guide
(PDF manual). For instructions on how to display the Canon LPR2 User's Guide, see the
Network Quick Start Guide.
IMPORTANT
If you want to use LPD, enter one of the following in [LPR Queue Name] in the [Add Port] dialog
box of Canon LPR2.
- LP
The machine prints according to its spool settings. Normally enter <LP> as a print queue.
- SPOOL
The machine prints only after spooling a print job on the hard disk, regardless of its spool
settings.
- DIRECT
The machine prints without spooling a print job on the hard disk, regardless of its spool
settings.
Using a TCP/IP Network
3
The installation of the driver and the port settings is complete.
Windows 2000/XP/Server 2003
■ Installing a New Driver
1
Install the driver.
Install the driver according to the following procedures indicated in the manual for each driver:
• If you want to use the PCL printer driver
See the procedure for dynamic installation in Chapter 2, "Getting Started," in the PCL Driver
Guide.
• If you want to use the PS printer driver
See the procedure for dynamic installation in Chapter 2, "Getting Started," in the PS Driver
Guide.
• If you want to use the UFR printer driver
See the procedure for dynamic installation in Chapter 2, "Getting Started," in the UFR Driver
Guide.
• If you want to use the fax driver
See the procedure for dynamic installation in Chapter 2, "Getting Started," in the Fax Driver
Guide.
3-36
Setting Up a Computer for Printing/Sending a Fax (Windows/UNIX)
NOTE
• The print application will be LPD and the print queue will be set to <LP> if the driver has been
installed according to the above procedures.
• This machine enables you to specify print queues other than <LP>. You can also use Raw as the
print application. For instructions on how to change the settings, see "Changing the Port after
Installing the Driver," on p. 3-37.
■ Changing the Port after Installing the Driver
1
Install Canon LPR2, and change the port settings.
If you do not want to use Canon LPR2, proceed to step 2.
If you want to use Canon LPR2, the port changes are complete.
IMPORTANT
If you want to use LPD, enter one of the following in [LPR Queue Name] in the [Add Port] dialog
box of Canon LPR2.
- LP
The machine prints according to its spool settings. Normally enter <LP> as a print queue.
- SPOOL
The machine prints only after spooling a print job on the hard disk, regardless of its spool
settings.
- DIRECT
The machine prints without spooling a print job on the hard disk, regardless of its spool
settings.
NOTE
If you are using Windows 2000/XP/Server 2003, you can set LPD or Raw by using the standard
feature of your OS, without installing Canon LPR2. If you do not want to use Canon LPR2, see
steps 2 to 11.
2
Open the printer properties dialog box.
❑ If you are using Windows 2000, on the [Start] menu, point to [Settings] ➞ click [Printers].
❑ If you are using Windows XP Professional/Server 2003, on the [Start] menu, click [Printers
and Faxes].
❑ If you are using Windows XP Home Edition, on the [Start] menu, point to [Control Panel] ➞
point to [Printers and Other Hardware] ➞ click [Printers and Faxes].
Setting Up a Computer for Printing/Sending a Fax (Windows/UNIX)
3-37
3
Using a TCP/IP Network
For instructions on how to install Canon LPR2 and set ports, see the Canon LPR2 User's Guide
(PDF manual). For instructions on how to display the Canon LPR2 User's Guide, see the
Network Quick Start Guide.
3
Right-click the icon of the printer you installed ➞ click [Properties].
4
Click the [Ports] tab to display the [Ports] sheet.
5
Click [Add Port] to open the [Printer Ports] dialog box.
Using a TCP/IP Network
3
6
From [Available ports types], select [Standard TCP/IP Port] ➞ click
[New Port].
The Add Standard TCP/IP Printer Port Wizard starts.
7
3-38
Click [Next].
Setting Up a Computer for Printing/Sending a Fax (Windows/UNIX)
8
Enter the printer IP address or printer host name.
❑ In [Printer Name or IP Address], enter the printer IP address or printer host name ➞ click
[Next].
❑ After the computer has confirmed that there is a printer in which the entered IP address is
assigned, the [Completing the Add Standard TCP/IP Printer Port Wizard] window appears ➞
click [Finish].
If the dialog box displays <Additional Port Information Required>, follow the instructions on
the screen to search again, or click [Standard] ➞ click [Canon Network Printing Device with
P9100] under [Device type] ➞ click [Next] to exit the Wizard.
9
10
Click [Close] to close the [Printer Ports] dialog box.
If you want to use LPD, change the port configuration information. If
you want to use Raw, proceed to step 11.
❑ In the printer properties dialog box, click [Configure Port].
Setting Up a Computer for Printing/Sending a Fax (Windows/UNIX)
3-39
Using a TCP/IP Network
3
❑ Select [LPR] under [Protocol] ➞ enter a print queue in [Queue Name] under [LPR Settings]
➞ click [OK].
Using a TCP/IP Network
3
You can specify a print queue in [Queue Name]. The following three print queues are
available:
• LP
The machine prints according to its spool settings. Normally enter <LP> as a print queue.
• SPOOL
The machine prints only after spooling a print job on the hard disk regardless of its spool
settings.
• DIRECT
The machine prints without spooling a print job on the hard disk regardless of its spool
settings.
11
Click [OK].
The installation of the driver and the port settings is complete.
3-40
Setting Up a Computer for Printing/Sending a Fax (Windows/UNIX)
Windows NT 4.0
■ Installing a New Driver
1
Check that [Microsoft TCP/IP Printing] is installed.
❑ Right-click the [Network Neighborhood] icon on the screen ➞ click [Properties].
❑ Click the [Services] tab to display the [Services] sheet.
If [Microsoft TCP/IP Printing] is not included in [Network Services], proceed to step 2;
otherwise skip to step 3.
3
If [Microsoft TCP/IP Printing] is not installed, install it.
❑ Click [Add].
❑
❑
❑
❑
Using a TCP/IP Network
2
Select [Microsoft TCP/IP Printing] from [Network Services] ➞ click [OK].
When asked to insert the Windows NT setup disk, insert the disk.
After the files have been copied, the [Network] dialog box opens ➞ click [OK].
Click [Restart] to restart Windows NT.
Setting Up a Computer for Printing/Sending a Fax (Windows/UNIX)
3-41
3
Install the driver.
Install the driver according to the following procedures indicated in the manual for each driver:
• If you want to use the PCL printer driver
See the procedure for dynamic installation in Chapter 2, "Getting Started," in the PCL Driver
Guide.
• If you want to use the PS printer driver
See the procedure for dynamic installation in Chapter 2, "Getting Started," in the PS Driver
Guide.
• If you want to use the UFR printer driver
See the procedure for dynamic installation in Chapter 2, "Getting Started," in the UFR Driver
Guide.
• If you want to use the fax driver
See the procedure for dynamic installation in Chapter 2, "Getting Started," in the Fax Driver
Guide.
3
Using a TCP/IP Network
NOTE
• The print application will be LPD and the print queue will be set to <LP> if the driver has been
installed according to the above procedures.
• This machine enables you to specify print queues other than <LP>. For details on print queues
and instructions on how to change the settings, see "Changing the Port after Installing the
Driver," on p. 3-42.
■ Changing the Port after Installing the Driver
1
Install Canon LPR2, and change the port settings.
If you do not want to use Canon LPR2, proceed to step 2.
For instructions on how to install Canon LPR2 and set ports, see the Canon LPR2 User's Guide
(PDF manual). For instructions on how to display the Canon LPR2 User's Guide, see the
Network Quick Start Guide.
If you want to use Canon LPR2, the port changes are complete.
IMPORTANT
If you want to use LPD, enter one of the following in [LPR Queue Name] in the [Add Port] dialog
box of Canon LPR2.
- LP
The machine prints according to its spool settings. Normally enter <LP> as a print queue.
- SPOOL
The machine prints only after spooling a print job on the hard disk, regardless of its spool
settings.
3-42
Setting Up a Computer for Printing/Sending a Fax (Windows/UNIX)
- DIRECT
The machine prints without spooling a print job on the hard disk, regardless of its spool
settings.
NOTE
If you are using Windows NT 4.0, you can set LPD by using the standard service of your OS
(Microsoft TCP/IP), without installing Canon LPR2. In this case, you cannot set Raw. For
instructions on how to install the Microsoft TCP/IP Printing service, see steps 1 and 2 of
"Installing a New Driver," on p. 3-41. For instructions on how to change ports using the Microsoft
TCP/IP Printing service, see steps 2 to 9.
On the [Start] menu, point to [Settings] ➞ click [Printers].
3
Right-click the icon of the printer you installed ➞ click [Properties].
4
Click the [Ports] tab to display the [Ports] sheet.
5
Click [Add Port] to open the [Printer Port] dialog box.
6
From [Available Printer Ports], select [LPR Port] ➞ click [New Port].
3
Using a TCP/IP Network
2
The [Add LPR compatible printer] dialog box opens.
IMPORTANT
If [LPR Port] is not displayed, you need to install the Microsoft TCP/IP Printing service.
Click [Cancel] to close all dialog boxes ➞ install the Microsoft TCP/IP Printing service. After
installing, start again from step 2.
For instructions on how to install the Microsoft TCP/IP Printing service, see steps 1 and 2 in
"Installing a New Driver," on p. 3-41.
7
Enter the IP address or printer host name in [Name or address of
server providing lpd].
Setting Up a Computer for Printing/Sending a Fax (Windows/UNIX)
3-43
8
Enter the print queue name in [Name of printer or print queue on that
server] ➞ click [OK].
You can specify a print queue in [Name of printer or print queue on that server]. The following
three print queues are available:
• LP
The machine prints according to its spool settings. Normally enter <LP> as a print queue.
• SPOOL
The machine prints only after spooling a print job on the hard disk regardless of its spool
settings.
• DIRECT
The machine prints without spooling a print job on the hard disk regardless of its spool
settings.
Using a TCP/IP Network
3
9
Click [OK].
The installation of the driver and the port settings is complete.
3-44
Setting Up a Computer for Printing/Sending a Fax (Windows/UNIX)
UNIX
NOTE
The machine supports the LPD print application for printing over TCP/IP networks.
1
Log in to a workstation as a superuser.
2
Set up the spooling system.
● Example using Solaris 1.x:
3
❑ Add the following to the /etc/printcap file:
Using a TCP/IP Network
<Print queue name>|<comment>:\
:lp=<device special file>:\
:sd=<spool directory>:\
:rm=<printer IP address or host name>:
Input Example:
print_queue_name|comments:\
:lp=/var/spool/print_queue_name/.null:\
:sd=/var/spool/print_queue_name:\
:rm=printer_host_name:
● Example using Solaris 2.x:
❑
❑
❑
❑
❑
Start the admintool utility.
Select [Browse] ➞ [Printers].
Select [Edit] ➞ [Add] ➞ [Access to Printer].
In [Printer Server], enter the IP address or printer host name.
Click [OK].
Setting Up a Computer for Printing/Sending a Fax (Windows/UNIX)
3-45
NOTE
• The admintool utility belongs to the operating system. For specific operating instructions, see the
operating system manual.
• The above procedures are only examples. The setup procedures for your environment may differ.
• You can specify a print queue. The following three print queues are available:
- LP
The machine prints according to its spool settings. Normally enter <LP> as a print queue.
- SPOOL
The machine prints only after spooling a print job on the hard disk regardless of its spool
settings.
- DIRECT
The machine prints without spooling a print job on the hard disk regardless of its spool settings.
• When the job record appears on the touch panel display of this machine, <unknown> may be
displayed as Document Name and User Name of printing data transmitted to this machine over
UNIX network.
(To display the job record, press [System Monitor] ➞ [Print] ➞ [Log] on the touch panel display in
this order.)
Using a TCP/IP Network
3
The print settings are complete.
Printer Connection Method (IPP)
The following is the procedure for specifying the port setting.
Windows 98/Me/NT 4.0
NOTE
• If you are using Windows 95/98/Me, you can also set IPP by installing the IPP Client software for
Windows 95/98/Me supplied by Microsoft.
• In the following procedures, items displayed on the screen for Windows 98 are used; items might differ
depending on your operating system.
3-46
Setting Up a Computer for Printing/Sending a Fax (Windows/UNIX)
1
Check the settings for <RX/Print Range> in [IP Address Range
Settings] to see whether the IP address of the computer in which a
driver is to be installed is permitted. (See step 21 in "TCP/IP Settings,"
on p. 3-4.)
IMPORTANT
• If the settings for <RX/Print Range> in [IP Address Range Settings] do not permit the IP address,
you cannot install a driver.
• If the IP address of the computer is beyond the range of the permitted addresses for <RX/Print
Range> after installing a driver, you cannot print from the computer.
3
After installing Canon LPR2, restart the computer.
For instructions on how to install Canon LPR2 and set ports, see the Canon LPR2 User's Guide
(PDF manual). For instructions on how to display the Canon LPR2 User's Guide, see the
Network Quick Start Guide.
3
Install the driver.
Install the driver according to the following procedures indicated in the manual for each driver:
• If you want to use the PCL printer driver
See the procedure for standard installation in Chapter 2, "Getting Started," in the PCL Driver
Guide.
• If you want to use the PS printer driver
See the procedure for standard installation in Chapter 2, "Getting Started," in the PS Driver
Guide.
• If you want to use the UFR printer driver
See the procedure for standard installation in Chapter 2, "Getting Started," in the UFR Driver
Guide.
• If you want to use the fax driver
See the procedure for standard installation in Chapter 2, "Getting Started," in the Fax Driver
Guide.
When the dialog box for selecting the port appears during installation, click [Use Standard Port].
4
When you have finished installing the drivers, use Canon LPR2 to set
the ports.
For instructions on how to install Canon LPR2 and set ports, see the Canon LPR2 User's Guide
(PDF manual). For instructions on how to display the Canon LPR2 User's Guide, see the
Network Quick Start Guide.
Setting Up a Computer for Printing/Sending a Fax (Windows/UNIX)
3-47
Using a TCP/IP Network
2
IMPORTANT
When manually entering a URL in [Printer URL] in the [Add Port] dialog box of Canon LPR2, use
the following format:
http://< the IP address or host name of the machine>/ipp
The installation of the driver and the port settings is complete.
Windows 2000/XP/Server 2003
NOTE
By installing Canon LPR2, you can also set IPP. Canon LPR2 enables you to easily set ports. For more
information, see the Canon LPR2 User's Guide (PDF manual). For instructions on how to display the
Canon LPR2 User's Guide, see the Network Quick Start Guide.
Using a TCP/IP Network
3
1
Check the settings for <RX/Print Range> in [IP Address Range
Settings] to see whether the IP address of the computer in which a
driver is to be installed is permitted. (See step 21 in "TCP/IP Settings,"
on p. 3-4.)
IMPORTANT
• If the settings for <RX/Print Range> in [IP Address Range Settings] do not permit the IP address,
you cannot install a driver.
• If the IP address of the computer is beyond the range of the permitted addresses for <RX/Print
Range> after installing a driver, you cannot print from the computer.
3-48
Setting Up a Computer for Printing/Sending a Fax (Windows/UNIX)
2
Start the Add Printer Wizard.
● If you are using Windows 2000:
❑ On the [Start] menu, point to [Settings] ➞ click [Printers].
❑ Double-click the [Add Printer] icon.
● If you are using Windows XP Professional:
❑ On the [Start] menu, click [Printers and Faxes].
❑ In the [Printer Tasks] menu, select [Add a printer].
● If you are using Windows XP Home Edition:
❑ On the [Start] menu, click [Control Panel].
❑ Click [Printers and Other Hardware] ➞ click [Printers and Faxes].
❑ In the [Printer Tasks] menu, select [Add a printer].
Using a TCP/IP Network
3
● If you are using Windows Server 2003:
❑ On the [Start] menu, click [Printers and Faxes].
❑ Double-click the [Add a printer] icon.
3
Enter the URL of your printer.
❑ Click [Next].
A dialog box for selecting the printer connection method appears.
❑ If you are using Windows 2000, select [Network Printer].
If you are using Windows XP/Server 2003, select [A network printer, or a printer attached to
another computer].
❑ Click [Next].
A dialog box for locating your printer appears.
Setting Up a Computer for Printing/Sending a Fax (Windows/UNIX)
3-49
❑ If you are using Windows 2000, select [Connect to a printer on the Internet or on your
intranet].
If you are using Windows XP/Server 2003, select [Connect to a printer on the Internet or on
a home or office network].
Using a TCP/IP Network
3
❑ Enter the following URL in [URL].
http://<the IP address or host name of the machine>/ipp
❑ Click [Next].
A dialog box for selecting the printer manufacturer and printer name appears.
❑ Click [Have Disk] ➞ specify the folder on the CD-ROM that contains the printer driver.
4
Follow the instructions on the screen to complete the installation.
The installation of the driver and the port settings is complete.
3-50
Setting Up a Computer for Printing/Sending a Fax (Windows/UNIX)
Printer Connection Method (FTP)
This machine contains an internal FTP server, and a function that enables the machine to print
jobs which are uploaded to this server from PCs on the network. This function is for use in
special environments, such as in a large-scale system that includes a printing function for
processing a large amount of business data. This function, however, is not a general printing
method. The only types of data you can print using this method are plain text data, and binary
data after it has passed through the printer driver. Since jobs uploaded to the FTP server are
printed without passing through a printer driver, if you upload application data, it does not pass
through a printer driver, and therefore will never be printed correctly.
The following is the procedure for printing via FTP.
3
Go to the MS-DOS prompt or the Command prompt ➞ log in to the
machine's FTP server.
Using a TCP/IP Network
1
For details on user names and passwords, see step 16 in "TCP/IP Settings," on
p. 3-4.
IMPORTANT
Up to three clients can be logged in simultaneously to its FTP server.
2
Execute the following command to change the file type to IMAGE
(BINARY).
ftp> bin
IMPORTANT
Change the file type to IMAGE (BINARY) even if you are printing text files.
3
Execute the following command to upload the file to be printed.
ftp> put <file name to be printed>
4
Execute the following command to log out from the server.
ftp> bye
Setting Up a Computer for Printing/Sending a Fax (Windows/UNIX)
3-51
NOTE
• The following is a UNIX command example for steps 1 to 4.
U:> ftp 172.24.176.244
*Connect to server
Connected to 172.24.176.244.
220 Connection established.
Name (172.24.176.244:none): user_name
*User login
331 Password required to login.
Password:
*Enter password
230 User user_name logged in.
ftp> bin
*Set file type
200 Type set to IMAGE (binary).
ftp> put print.txt *Upload print file
200 PORT command successful.
150 Opened BINARY data connection for file transfer.
226 Transfer complete.
ftp> bye
*Cut off server connection
221 Server closing down connection.
• You cannot perform manipulation of files (changing file names, deleting, etc.) on the FTP server
by using FTP commands.
Using a TCP/IP Network
3
3-52
Setting Up a Computer for Printing/Sending a Fax (Windows/UNIX)
Setting Up a Computer as a File Server
To send data from the machine to a computer on your network, you need to specify the settings
of the computer for receiving data.
You can send data over a TCP/IP network to any of the following:
• FTP server (Windows NT/2000/XP/Server 2003, UNIX, Linux, Mac OS X, iW Gateway series)
• Windows shared folder (Windows 98/Me/NT/2000/XP/Server 2003)
This section describes how to set up a computer as an FTP server.
For instructions on how to configure a Windows and Samba shared folder, see "Setting Up a
Computer as a File Server," in Chapter 5, "Using a NetBIOS Network." (See p. 5-16.)
IMPORTANT
• To send data from the machine, the optional equipment must be installed. For the equipment needed,
see "Optional Equipment and System Environment Requirements," on p. 1-2.
• Samba 2.2.8a or later is supported.
• This section describes only the procedures for setting up a computer to receive data sent from the
machine. To send data from the machine to a server on the network, you must enter an address setting
from the control panel.
For instructions on how to specify recipient address settings, see Chapter 2, "Basic Sending Methods,"
in the Sending and Facsimile Guide.
• The following procedures describe a sample FTP server setup. Depending on your environment, the
actual setup procedure may differ.
Setting Up a Computer as a File Server
3-53
Using a TCP/IP Network
3
• Samba shared folder (UNIX/Linux)
FTP Server Settings
Windows 2000/XP/Server 2003
IMPORTANT
• It is recommended that the network manager configure the FTP server.
• The use of Windows 2000 Server as an FTP server requires the installation of Microsoft Internet
Information Services 5.0 (IIS 5.0). If IIS is not installed in the computer you are using, you will need to
install IIS before entering these settings. For installation procedures, see the manuals provided with
your operating system.
• The use of Windows XP Professional as an FTP server requires the installation of Microsoft Internet
Information Services 5.1 (IIS 5.1). If IIS is not installed in the computer you are using, you will need to
install IIS before entering these settings. For installation procedures, see the manuals provided with
your operating system.
• The use of Windows Server 2003 as an FTP server requires the installation of Microsoft Internet
Information Services 6.0 (IIS 6.0). If IIS is not installed in the computer you are using, you will need to
install IIS before entering these settings. For installation procedures, see the manuals provided with
your operating system.
• Verification of users for access to FTP servers is done by referencing the local account database of
Windows 2000 Server/XP Professional/Server 2003 that is used as the FTP server. Therefore, it is not
possible to use the account of a domain user registered in Windows 2000 Server/XP Professional/
Server 2003 to send data directly from the machine to FTP servers in other domains.
• This section describes the procedures for using the default home directory under [Default FTP Site]. To
use other settings, enter the FTP site and home directory by referring to the manual for IIS.
Using a TCP/IP Network
3
1
Log on to Windows as a member of the group with access rights to the
directory to be designated as the FTP site directory.
NOTE
Depending on your environment, the access rights settings for a drive or directory may differ. For
details, see the Windows manual.
3-54
Setting Up a Computer as a File Server
2
Start IIS.
❑ If you are using Windows 2000, on the [Start] menu, point to [Programs] ➞ point to
[Administrative Tools] ➞ click [Internet Service Manager].
If you are using Windows XP, on the [Start] menu, click [Control Panel] ➞ [Performance and
Maintenance] ➞ [Administrative Tools] ➞ [Internet Information Services].
If you are using Windows Server 2003, on the [Start] menu, point to [Administrative Tools] ➞
click [Internet Information Services Manager].
Enter the FTP site settings.
❑ Right-click the [Default FTP Site] icon ➞ click [Properties].
3
Using a TCP/IP Network
3
In Windows Server 2003, the [Default FTP Site] icon is displayed under [FTP Sites].
❑ In the [Default FTP Site Properties] dialog box, click the [Security Accounts] tab to display
the [Security Accounts] sheet.
❑ If you are using Windows 2000, deselect [Allow Anonymous Connections].
If you are using Windows XP/Server 2003, deselect [Allow only anonymous connection].
Setting Up a Computer as a File Server
3-55
❑ Click the [Home Directory] tab to display the [Home Directory] sheet ➞ select both [Read]
and [Write].
Using a TCP/IP Network
3
❑ Click [OK] to close the [Default FTP Site Properties] dialog box.
4
Confirm [Full computer name].
● If you are using Windows 2000:
❑ Right-click the [My Computer] icon on the screen ➞ click [Properties].
❑ Click the [Network Identification] tab to display the [Network Identification] sheet ➞ confirm
[Full computer name].
3-56
Setting Up a Computer as a File Server
❑ Click [Cancel] to close the [System Properties] dialog box.
Using a TCP/IP Network
3
● If you are using Windows XP/Server 2003:
❑ On the [Start] menu, right-click [My Computer] ➞ click [Properties].
❑ Click the [Computer Name] tab to display the [Computer Name] sheet ➞ confirm [Full
computer name].
❑ Click [Cancel] to close the dialog box.
5
Set up the users and passwords for access to the FTP server.
❑ If you are using Windows 2000, right-click the [My Computer] icon ➞ click [Manage].
If you are using Windows XP/Server 2003, on the [Start] menu, right-click [My Computer] ➞
click [Manage].
The [Computer Management] window opens.
Setting Up a Computer as a File Server
3-57
❑ Under [System Tools], double-click [Local Users and Groups] ➞ right-click the [Users] folder
➞ click [New User].
Using a TCP/IP Network
3
❑ In the [New User] dialog box, enter the user name in [User name] ➞ enter the password in
[Password] ➞ re-enter the password in [Confirm Password].
Enter a user name and a password not longer than 24 alphanumeric characters.
If [User must change password at next logon] is selected, any new users added must
change their passwords in order to send data from the machine. (You cannot change the
password from the control panel.)
❑ Confirm the settings ➞ click [Create].
❑ Close the [Computer Management] window.
3-58
Setting Up a Computer as a File Server
NOTE
In the Active Directory environment, the procedures for setting up users differ from the above.
For details, see the Windows manual.
Set a recipient address using the control panel.
Sample recipient setting:
• Server side settings:
[Full Computer Name]:
starfish.organization.company.com
Create a directory named "share" in the specified FTP server's home directory
"\lnetpub\ftproot", and then set "share" as the data destination.
3
• The machine's recipient settings:
[Protocol]:
FTP
[Host Name]:
starfish.organization.company.com
[File Path]:
share
[User]:
User name entered in step 5
[Password]:
Password for the above user
Setting Up a Computer as a File Server
Using a TCP/IP Network
6
3-59
IMPORTANT
• To use [Full computer name] confirmed in step 4 as the host name for [Host Name] as shown in
the above example, it is necessary to use a DNS server. (This applies even if the machine and
the FTP server are in the same subnet.) If no DNS server is available, the host name setting
should be specified using the IP address of the FTP server.
• Up to 128 alphanumeric characters can be entered for both [Host Name] and [File Path] on the
control panel. Use strings no more than 128 characters long for the corresponding items on the
server.
• If you switch the language of the touch panel display, [Host Name] and [File Path] may not be
displayed correctly.
• If the FTP port number is set to a value other than 21, specify the following for [Host Name]:
<IP address of FTP server>:<Port number>
Example: 192.168.1.21:21000
3
NOTE
Using a TCP/IP Network
For instructions on how to specify recipient address settings, see Chapter 2, "Basic Sending
Methods," in the Sending and Facsimile Guide.
The settings for sending data to the FTP server are complete.
Windows NT 4.0
IMPORTANT
• It is recommended that the network manager configure Windows NT Server 4.0.
• The use of Windows NT Server as an FTP server requires the installation of Microsoft Internet
Information Server 4.0 (IIS 4.0). If IIS 4.0 is not installed in your computer, you will need to install IIS 4.0
before entering these settings. For installation procedures, see the manuals provided with your
operating system.
• Verification of users for access to FTP servers is done by referencing the local account database of
Windows NT 4.0 Server that is used as the FTP server. Therefore, it is not possible to use the account
of a domain user registered in Windows NT 4.0 Server to send data directly from the machine to FTP
servers in other domains.
• This section describes the procedures for using the default home directory under [Default FTP Site]. To
use other settings, enter the FTP site and home directory by referring to the manual for IIS 4.0.
3-60
Setting Up a Computer as a File Server
1
Log on to Windows NT 4.0 as a member of the group with access
rights to the directory to be designated as the FTP site directory.
NOTE
Depending on your environment, the access rights settings for a drive or directory may differ. For
details, see the Windows NT Server 4.0 manual.
3
Start IIS 4.0.
3
Enter the FTP site settings.
❑ Right-click the [Default FTP Site] icon ➞ click [Properties].
Using a TCP/IP Network
2
❑ In the [Default FTP Site Properties] dialog box, click the [Security Accounts] tab to display
the [Security Accounts] sheet ➞ deselect [Allow Anonymous Connections].
Setting Up a Computer as a File Server
3-61
❑ Click the [Home Directory] tab to display the [Home Directory] sheet ➞ select both [Read]
and [Write].
Using a TCP/IP Network
3
❑ Click [OK] to close the [Default FTP Site Properties] dialog box.
4
3-62
Confirm [Host Name] and [Domain].
❑ Right-click the [Network Neighborhood] icon on the screen ➞ click [Properties].
❑ In the [Network] dialog box, click the [Protocols] tab to display the [Protocols] sheet.
Setting Up a Computer as a File Server
❑ In [Network Protocols], double-click [TCP/IP Protocol].
Using a TCP/IP Network
3
❑ Click the [DNS] tab to display the [DNS] sheet ➞ confirm the host name and domain
settings.
❑ Click [Cancel] to close the [Network] dialog box.
Setting Up a Computer as a File Server
3-63
5
Set up the users and passwords for access to the FTP server.
❑ On the [Start] menu, point to [Programs] ➞ point to [Administrative Tools] ➞ click [User
Manager for Domains].
❑ On the [User] menu, click [New User].
❑ Enter the user name in [Username] ➞ enter the password in [Password] ➞ re-enter the
password in [Confirm Password].
Using a TCP/IP Network
3
Enter a user name and a password not longer than 24 alphanumeric characters.
If [User Must Change Password at Next Logon] is selected, any new users added must
change their password in order to send data from the machine. (You cannot change the
password from the control panel.)
❑ Confirm the settings you entered ➞ click [Add].
❑ Exit the User Manager.
6
Set a recipient address using the control panel.
Sample recipient setting:
• Server side settings (set using the above procedure):
[Host name]:
starfish
[Domain]:
organization.company.com
Create a directory named "share" in the specified FTP server's home directory
"\lnetpub\ftproot," and then set "share" as the data destination.
3-64
Setting Up a Computer as a File Server
• The machine's recipient settings:
[Protocol]:
FTP
[Host Name]:
starfish.organization.company.com
[File Path]:
share
[User]:
User name entered in step 5
[Password]:
Password for the above user
IMPORTANT
• To use the host name confirmed in step 4 for [Host Name] as shown in the above example, it is
necessary to use a DNS server. (This applies even if the machine and the FTP server are in the
same subnet.) If no DNS server is available, the host name setting should be specified using the
IP address of the FTP server.
• Up to 128 alphanumeric characters can be entered for both [Host Name] and [File Path] on the
control panel. Use strings no more than 128 characters long for the corresponding items on the
server.
• If you switch the language of the touch panel display, [Host Name] and [File Path] may not be
displayed correctly.
• If the FTP port number is set to a value other than 21, specify the following for [Host Name]:
<IP address of FTP server>:<Port number>
Example: 192.168.1.21:21000
NOTE
For instructions on how to specify recipient address settings, see Chapter 2, "Basic Sending
Methods," in the Sending and Facsimile Guide.
The settings for sending data to the FTP server are complete.
Setting Up a Computer as a File Server
3-65
Using a TCP/IP Network
3
UNIX/Linux
IMPORTANT
• UNIX users must have Solaris 2.6 or later installed in order to use the computer as an FTP server. Linux
users must have Red Hat Linux 7.2 or later installed in order to use the computer as an FTP server.
• In some environments, detailed settings may be required in order to use FTP. For details, consult your
network manager.
1
2
Using a TCP/IP Network
3
Log in to a workstation as a superuser.
Set up the users who send documents from the machine, and their
passwords.
Enter a user name and a password not longer than 24 alphanumeric characters.
3
4
Create a shared directory to be used for recipient addresses, and then
enable read access and write access by the users who will be sending
data.
Set a recipient address using the control panel.
Sample recipient setting:
• Server side settings:
[Host Name]:
starfish
[Domain]:
organization.company.com
The user's home directory is /home/hsato, and /home/hsato/share is the data destination.
3-66
Setting Up a Computer as a File Server
• The machine's recipient settings:
[Protocol]:
FTP
[Host Name]:
starfish.organization.company.com
[User]:
User name entered in step 2
[Password]:
Password for the above user
[File Path]:
Enter one of the following:
share (when using relative path)
/home/hsato/share (when using absolute path)
Using a TCP/IP Network
3
IMPORTANT
• To use the host name of the above example for [Host Name], it is necessary to use a DNS
server. (This applies even if the machine and the FTP server are in the same subnet.) If no DNS
server is available, the host name setting should be specified using the IP address of the FTP
server.
• Up to 128 alphanumeric characters can be entered for both [Host Name] and [File Path] on the
control panel. Use strings no more than 128 characters long for the corresponding items on the
server.
• If you switch the language of the touch panel display, [Host Name] and [File Path] may not be
displayed correctly.
• If the FTP port number is set to a value other than 21, specify the following for [Host Name]:
<IP address of FTP server>:<Port number>
Example: 192.168.1.21:21000
NOTE
For instructions on how to specify recipient address settings, see Chapter 2, "Basic Sending
Methods," in the Sending and Facsimile Guide.
The settings for sending data to the FTP server are complete.
Setting Up a Computer as a File Server
3-67
Mac OS X
1
2
3
Using a TCP/IP Network
3
Log in to Mac OS X as Administrator.
Start the FTP services under Mac OS X.
❑ Click the [System Preferences] icon in [Dock].
❑ Click the [Sharing] icon in the [System Preferences] window.
❑ Select [Allow FTP access].
❑ Click [Show All] on the toolbar.
Specify the user to whom you want to send data, and then the
password.
❑ Click the [Users] icon in the [System Preferences] window.
❑ In the [Users] window, enter the name of the user to whom you want to send data from the
machine through Mac OS X ➞ enter the password.
Enter a user name and a password not longer than 24 alphanumeric characters.
❑ Close the [Users] window.
4
Create a shared folder to which files are to be sent.
Sample setting:
Create a folder named "iR_Folder" in the [Public] folder in the [Home] folder.
5
Grant access to the shared folder created in step 4.
❑ Click to select the shared folder ➞ select [Show Info] from the [File] menu.
❑ Select [Privileges] from [Show].
❑ Enable read & write access to the folder by the owner and members of a group to which the
owner belongs.
❑ Close the [Info] window.
3-68
Setting Up a Computer as a File Server
Set a recipient address using the control panel.
Sample recipient setting:
• Server side settings (set using the above procedure):
Create a folder named "iR_Folder" in the [Public] folder in the [Home] folder of the user named
"yoko," and then specify the iR_Folder as the folder to which files are sent.
• The machine's recipient settings:
[Protocol]:
FTP
[Host Name]:
IP address of Macintosh
[User]:
User name entered in step 3
[Password]:
Password for the above user
[File Path]:
Enter one of the following:
3
Using a TCP/IP Network
6
Public/iR_Folder (If you enter a relative path)
/Users/yoko/Public/iR_Folder (If you enter an absolute path)
IMPORTANT
• Up to 128 alphanumeric characters can be entered for [File Path] on the control panel. Use a
string no more than 128 characters long for the item.
• If you switch the language of the touch panel display, [Host Name] and [File Path] may not be
displayed correctly.
• If the FTP port number is set to a value other than 21, specify the following for [Host Name]:
<IP address of FTP server>:<Port number>
Example: 192.168.1.21:21000
NOTE
For instructions on how to specify recipient address settings, see Chapter 2, "Basic Sending
Methods," in the Sending and Facsimile Guide.
Setting Up a Computer as a File Server
3-69
The settings for sending data to the FTP server are complete.
FTP Server for iW Gateway
NOTE
An FTP server for iW Gateway is required for receiving data from the machine, when used with iW
Gateway.
1
Set up the FTP server for iW Gateway.
For details about the settings, see the iW Gateway User's Guide.
3
Using a TCP/IP Network
2
On the FTP server for iW Gateway, specify the folder to store data sent
from the machine.
For details about the settings, see the iW Gateway User's Guide.
NOTE
• Up to 128 alphanumeric characters can be entered for a folder name.
• Enter a user name and a password not longer than 24 alphanumeric characters.
3
On the FTP server for iW Gateway, export destination data.
For details about the settings, see the iW Gateway User's Guide.
IMPORTANT
• A DNS server is needed to use an FQDN format (for example,
starfish.organization.company.com) for the FTP server address. (A DNS server is also required if
the machine and the FTP server are in the same subnet.) If you have not set up a DNS server,
use IP addresses.
• Up to 128 alphanumeric characters can be entered for an FTP server address of the FQDN
format.
4
Use the web browser (Remote UI) of the machine to import the
destination data exported in step 3 into the machine.
❑ Click [Add. Func.] of the web browser (Remote UI) ➞ click [Import/Export].
❑ Click [Import] at the right window.
❑ Select the address book of the import destination from [Address Book].
❑ Select [Append] or [Overwrite] from [Import Method] to append the data to the address book
or overwrite the address book with the data.
3-70
Setting Up a Computer as a File Server
❑ In [File Path], enter the path to the folder storing the destination data exported in step 3.
❑ Select [Custom Format] from [File Format].
❑ Click [Start Import].
IMPORTANT
• If the System Manager ID and password of the machine are set, the dialog box for entering a
user name and password appears; enter the System Manager ID in [User Name] and password
in [Password].
• If you switch the language of the touch panel display, [Host Name] and [File Path] may not be
displayed correctly.
• If the FTP port number is set to a value other than 21, specify the following for [Host Name]:
<IP address of FTP server>:<Port number>
Example: 192.168.1.21:21000
For instructions on how to specify recipient address settings, see Chapter 2, "Basic Sending
Methods," in the Sending and Facsimile Guide.
The settings for sending data to the FTP server for iW Gateway are complete.
Setting Up a Computer as a File Server
3-71
Using a TCP/IP Network
3
NOTE
Using a TCP/IP Network
3
3-72
Setting Up a Computer as a File Server
Using a NetWare Network
(Windows)
4
CHAPTER
This chapter describes settings and procedures for using the machine with a NetWare network.
NetWare Network Setup Procedures . . . . . . . . . . . . . . . . . . . . . . . . . . . . . . . . . . . . . . . . . . . . . . . . . . . 4-2
NetWare Print Service Settings . . . . . . . . . . . . . . . . . . . . . . . . . . . . . . . . . . . . . . . . . . . . . . . . . . . . . . . 4-3
Types of Print Service. . . . . . . . . . . . . . . . . . . . . . . . . . . . . . . . . . . . . . . . . . . . . . . . . . . . . . . . . . . . . . . . . . . . . . . . 4-4
Setup Using NetWare Administrator or PCONSOLE . . . . . . . . . . . . . . . . . . . . . . . . . . . . . . . . . . . . . . . . . . . . . . . . 4-5
Protocol Settings. . . . . . . . . . . . . . . . . . . . . . . . . . . . . . . . . . . . . . . . . . . . . . . . . . . . . . . . . . . . . . . . . . . 4-9
Settings from the Control Panel . . . . . . . . . . . . . . . . . . . . . . . . . . . . . . . . . . . . . . . . . . . . . . . . . . . . . . . . . . . . . . . . 4-9
Setting Up a Computer for Printing/Sending a Fax . . . . . . . . . . . . . . . . . . . . . . . . . . . . . . . . . . . . . . . . 4-17
Connecting to a NetWare Network . . . . . . . . . . . . . . . . . . . . . . . . . . . . . . . . . . . . . . . . . . . . . . . . . . . . . . . . . . . . . 4-17
Printer Connection Method . . . . . . . . . . . . . . . . . . . . . . . . . . . . . . . . . . . . . . . . . . . . . . . . . . . . . . . . . . . . . . . . . . . 4-17
Setting Up a Computer as a File Server . . . . . . . . . . . . . . . . . . . . . . . . . . . . . . . . . . . . . . . . . . . . . . . . 4-18
4-1
NetWare Network Setup Procedures
To use a NetWare network, it is necessary to perform the following procedures.
1
NetWare Print Service Settings ("NetWare Print Service Settings," on p. 4-3.)
Specify the NetWare print service settings. (To print or send a fax from a computer, the optional equipment must be installed.
For the equipment needed, see "Optional Equipment and System Environment Requirements," on p. 1-2.)
To specify the settings from the computer, use:
• NWADMIN or PCONSOLE (Novell software provided with NetWare)
• NetSpot Device Installer (Canon utility)
• A web browser (NetSpot Console) (Canon utility)
4
Using a NetWare Network (Windows)
2
Protocol Settings (See "Protocol Settings," on p. 4-9.)
Specify the protocol settings. To specify the settings, use:
• The machine's control panel
• A web browser (Remote UI)
• NetSpot Device Installer (Canon utility)
• A web browser (NetSpot Console) (Canon utility)
3
Computer Settings for Printing (See "Setting Up a Computer for Printing/Sending a Fax,"
on p. 4-17.)
Specify the settings of each computer you use for printing or sending a fax. (To print or send a fax from a computer, the optional
equipment must be installed. For the equipment needed, see "Optional Equipment and System Environment Requirements," on
p. 1-2.)
4
Computer Settings for a File Server (See "Setting Up a Computer as a File Server," on p. 4-18.)
Specify the settings of the computer receiving data sent from the machine. (To send data, the optional equipment must be
installed. For the equipment needed, see "Optional Equipment and System Environment Requirements," on p. 1-2.)
IMPORTANT
• If you are using the optional Color Network Printer Unit, for steps 1 to 3, see the manual provided with
the optional Color Network Printer Unit.
• It is recommended that the network manager perform steps 1, 2, and 4 above.
• To configure settings with software other than the control panel of the machine, NWADMIN,
PCONSOLE, or NetSpot Device Installer, TCP/IP protocol must be supported by your network
environment.
4-2
NetWare Network Setup Procedures
NetWare Print Service Settings
To print using a NetWare network, you need to specify print service settings including print
server and queue settings. You can use any of the software listed below to specify the print
service settings from your computer.
• NWADMIN or PCONSOLE (Novell software provided with NetWare)
• NetSpot Device Installer (Canon utility)
• A web browser (NetSpot Console) (Canon utility)
IMPORTANT
NOTE
• You can specify the print server settings on the NetWare server and the print service settings of the
machine at the same time, using NetSpot Device Installer or NetSpot Console. For instructions on how
to specify the settings, see each online help.
• For more information on NetSpot Device Installer or NetSpot Console, see Chapter 7, "Using the
Network and Device Settings with Utilities."
NetWare Print Service Settings
4-3
4
Using a NetWare Network (Windows)
• To specify the print service settings from NWADMIN or NetSpot Device Installer, the computer must
have Novell Client (NetWare Client by Novell) installed. To specify the print service settings using
NetSpot Console, the computer with NetSpot Console installed must have Novell Client (NetWare Client
by Novell) installed, and TCP/IP protocol must be supported by your network environment.
• The following procedures describe a sample NetWare setup. Depending on your environment, the
actual setup procedure may differ.
Types of Print Service
Before specifying print service settings, refer to the following descriptions to determine the type
of print service you are using.
NOTE
• Normally with NetWare 4.x or later, it is recommended that you use NDS print service. With NetWare
3.2, it is recommended that you use Bindery print service. This manual describes procedures for these
two combinations only.
• With NetWare 5.x, you can use NDPS (Novell Distributed Print Services).
For NDPS settings, see the NetWare manual.
• With NetWare 6, you can use iPrint print service. For iPrint settings, see the NetWare manual.
■ NDS (Novell Directory Service) and Bindery Mode
The machine network supports both the NDS and Bindery mode.
Determine the appropriate mode according to the network environment you are using. (If you are using
NetWare 3.2, only the Bindery mode is available.)
Using a NetWare Network (Windows)
4
■ Queue Server Mode and Remote Printer Mode
The machine supports both the queue server mode and the remote printer mode.
• Queue Server Mode
If the machine is used in the queue server mode, all print server functions are provided by the machine
itself; no other print server hardware or software is required. In the NDS queue server mode (NDS
PServer), the NDS print server is used for printing. In the Bindery queue server mode (Bindery PServer),
the Bindery print server is used for printing. In the queue server mode, a separate NetWare user
operating license is required for each machine.
• Remote Printer Mode
In the remote printer mode, NetWare print server is required to control the printer. The machine prints
using the NDS print server in the NDS remote printer mode (NPrinter), and the Bindery print server in
the Bindery remote printer mode (RPrinter).
4-4
NetWare Print Service Settings
Setup Using NetWare Administrator or PCONSOLE
Using NetWare Administrator in the NDS Queue Server Mode or
the Remote Printer Mode (NetWare 4.x or Later)
1
2
Log in to NetWare as Administrator (or equivalent access) ➞ start
NetWare Administrator.
Execute Quick Setup.
❑ Select the container object for the printer object you want to create ➞ click [Print Services
Quick Setup] on the [Tools] menu.
4
Specify the [Print Server name], [Printer], and [Print Queue] settings.
❑ Enter the print server name in [Print Server name].
To use an existing print server, click the button to the right of [Print Server name] ➞ select a
print server from the list box.
❑ Under [Printer], enter the printer name in [Name].
❑ From [Type], select the printer connection method.
If you are using the queue server mode, select [Other/Unknown] from [Type].
If you are using the remote printer mode, select [Parallel] from [Type] ➞ click
[Communication] to open the [Parallel Communication] dialog box ➞ select [LPT1] from
[Port], and [Manual load] under [Connection type]. Under [Interrupts], specify the
appropriate setting for your environment ➞ click [OK] to close the [Parallel Communication]
window.
❑ Under [Print Queue], enter the queue name in [Name]. In [Volume], enter the volume in
which the queue is placed.
To use an existing print server, click the button to the right of [Volume] ➞ select a print server
from the list box.
❑ Click [Create] ➞ exit NetWare Administrator.
NOTE
Be sure to remember the name of the print server. You need it to specify the machine's protocol
settings.
NetWare Print Service Settings
4-5
Using a NetWare Network (Windows)
3
4
If you are using the remote printer mode, start the print server.
❑ If you are using the NetWare file server as a print server, enter <Load PSERVER.NLM> in
the file server ➞ press [ENTER] on the keyboard.
NOTE
If you are using the queue server mode, this step is not required.
NetWare print service settings are complete. Proceed to "Protocol Settings," on p. 4-9.
Using PCONSOLE in the Queue Server Mode or Remote Printer
Mode in the Bindery Mode (NetWare 3.2)
1
Using a NetWare Network (Windows)
4
2
Log in to NetWare as Supervisor, and then start PCONSOLE.
If you have not set up a print server yet, set up the print server.
❑ On the [Available Options] menu, select [Print Server Information] ➞ press [ENTER] on the
keyboard.
❑ Press [INSERT] on the keyboard.
❑ Enter the name of the print server you are setting up ➞ press [ENTER] on the keyboard.
❑ Press [ESC] on the keyboard to return to the [Available Options] menu.
NOTE
Be sure to remember the name of the print server. You need it to specify the printer's protocol
settings.
3
Set up a Queue, and then assign the print server to the queue.
❑ On the [Available Options] menu, select [Print Queue Information] ➞ press [ENTER] on the
keyboard.
❑
❑
❑
❑
4-6
Press [INSERT] on the keyboard.
Enter the name of the queue you are setting up ➞ press [ENTER] on the keyboard.
Select the name of the queue you specified ➞ press [ENTER] on the keyboard.
Select [Queue Servers] ➞ press [ENTER] on the keyboard.
NetWare Print Service Settings
❑ Press [INSERT] on the keyboard.
❑ Select the print server you set up in step 2 ➞ press [ENTER] on the keyboard.
❑ Press [ESC] on the keyboard repeatedly until you return to the [Available Options] menu.
4
Assign the printer to the print server.
❑ On the [Available Options] menu, select [Print Server Information] ➞ press [ENTER] on the
keyboard.
5
Select the print server you set up in step 2 ➞ press [ENTER] on the keyboard.
Select [Print Server Configuration] ➞ press [ENTER] on the keyboard.
Select [Printer Configuration] ➞ press [ENTER] on the keyboard.
From [Configured Printers], select the number of the printer you want to use ➞ press
[ENTER] on the keyboard.
Specify the printer name, type, etc.
❑ In [Name], enter the name you want to use for the printer ➞ press [ENTER] on the keyboard.
❑ If you are using the queue server mode, select [Defined elsewhere] from [Type].
If you are using the remote printer mode, select [Remote Parallel, LPT1] from [Type].
❑ Specify the remaining items ➞ press [ESC] on the keyboard.
❑ In the confirmation box that opens, select [Yes] ➞ press [ENTER] on the keyboard.
❑ Press [ESC] on the keyboard to return to the [Print Server Configuration] Menu.
6
Assign a queue to the printer.
❑ Select [Queues Serviced by Printer] ➞ press [ENTER] on the keyboard.
❑ Select the name of the printer you set up in step 5 ➞ press [ENTER] on the keyboard.
❑ Press [INSERT] on the keyboard.
❑ Select the queue you set up in step 3 ➞ press [ENTER] on the keyboard.
NetWare Print Service Settings
4-7
4
Using a NetWare Network (Windows)
❑
❑
❑
❑
7
8
Press [ESC] on the keyboard repeatedly until you return to the [Exit
PCONSOLE] window ➞ select [Yes] to quit PCONSOLE.
If you are using the remote printer mode, start the print server.
❑ If you are using a NetWare file server as a print server, enter <LOAD PSERVER.NLM (print
server name)> on the file server ➞ press [ENTER] on the keyboard.
❑ If you are using a dedicated print server, enter <PSERVER.EXE> ➞ enter the print server
name on the print server ➞ press [ENTER] on the keyboard.
NOTE
This step is not required if you are using the queue server mode.
NetWare print service settings are complete. Proceed to "Protocol Settings," on p. 4-9.
Using a NetWare Network (Windows)
4
4-8
NetWare Print Service Settings
Protocol Settings
You can specify the protocol settings for the machine by using any of the following:
• The machine's control panel
• A web browser (Remote UI)
• NetSpot Device Installer (Canon utility)
• A web browser (NetSpot Console) (Canon utility)
IMPORTANT
NOTE
• For instructions on how to enter settings using a web browser (Remote UI), see Chapter 3,
"Customizing Settings," in the Remote UI Guide.
• For more information on NetSpot Device Installer or NetSpot Console, see Chapter 7, "Using the
Network and Device Settings with Utilities."
Settings from the Control Panel
The procedure for specifying the settings from the control panel is as follows.
IMPORTANT
Settings made from the control panel become effective when the machine is restarted after the
procedure.
NOTE
For instructions on how to enter characters using the touch panel display, see Chapter 2, "Basic
Operations," in the Reference Guide.
1
Press
.
Protocol Settings
4-9
4
Using a NetWare Network (Windows)
• To configure settings with software other than the control panel of the machine or NetSpot Device
Installer, TCP/IP protocol must be supported by your network environment.
• Some items cannot be set using NetSpot Device Installer or NetSpot Console. For details about items
that can be set with NetSpot Device Installer or NetSpot Console, see "Network Setting Items," on p.
9-2.
• The following procedure describes sample settings using the control panel.
2
Press [System Settings].
NOTE
If the message <Enter the System Manager ID and Password using the numeric keys.> appears
on the touch panel display, enter the System Manager ID and password. For instructions on how
to enter the System Manager ID and password, see Chapter 2, "Basic Operations," in the
Reference Guide.
Using a NetWare Network (Windows)
4
3
4-10
Press [Network Settings].
Protocol Settings
Press [NetWare Settings].
5
Select [On] for <NetWare>.
6
4
Using a NetWare Network (Windows)
4
Select the frame type for your environment from the Frame Type
drop-down list.
If you select [Auto Detect], the frame type is automatically determined.
7
Select the print service from the Print Service drop-down list.
Specify the same settings specified in "NetWare Print Service Settings," on p. 4-3.
Protocol Settings
4-11
NOTE
The following print services are available:
- [Bindery PServer]:
Used in the queue server mode (Bindery mode print service).
- [RPrinter]:
Used in the remote printer mode (Bindery mode print service).
- [NDS PServer]:
Used in the queue server mode (NDS print service).
- [NPrinter]:
Used in the remote printer mode (NDS print service).
8
Press [Settings].
The screen for specifying the print service settings is displayed.
NOTE
4
Using a NetWare Network (Windows)
You can specify the print service settings either by selecting the desired options from the list on
the screen displayed by pressing [Browse], or by entering the desired character string for each
item. To select from the Browse screen, proceed to step 9; to enter character strings, skip to step
10.
9
On the Browse screen, specify the print service details.
Specify the same tree, context, file server, and print server names specified in "NetWare Print
Service Settings," on p. 4-3. (Settings differ depending on the print service. For print service
settings, see "Network Setting Items," on p. 9-2.)
● Setting NDS PServer or NPrinter (If the browse right is not limited to the
specific user):
❑ Press [Browse].
4-12
Protocol Settings
❑ Press [Skip Log In] in the Browse screen.
If the browse right is not limited to the specific user, you can specify the print service without
having to log in to NetWare.
❑
❑
❑
❑
❑
❑
❑
Select the tree to which the desired print server belongs ➞ press [Down].
Select the context to which the desired print server belongs ➞ press [Down].
Select the desired print server ➞ press [OK].
For NDS PServer, specify each item on the screen for setting NDS PServer if necessary.
Press [OK] to return to the screen for setting NetWare.
Press [OK].
Skip to step 11.
● Setting NDS PServer or NPrinter (If the browse right is limited to the specific
user):
❑ Press [Browse].
❑ In the Browse screen, select the tree to which you log in ➞ press [Down].
❑ Select the context to which you log in ➞ press [Down] repeatedly if necessary.
❑ Press [Log In].
If the browse right is limited to the specific user, it is necessary to log in to NetWare as a
user to whom the browse right is granted.
❑ In the Enter Network Password screen, enter the name and password of a user to whom the
browse right is granted ➞ press [OK].
Enter a user name prefixed with CN=. If the password is not specified, leave [Password]
blank.
❑ Select the tree to which the desired print server belongs ➞ press [Down].
❑ Select the context to which the desired print server belongs ➞ press [Down].
❑ Select the desired print server ➞ press [OK].
Protocol Settings
4-13
Using a NetWare Network (Windows)
4
❑
❑
❑
❑
For NDS PServer, specify each item on the screen for setting NDS PServer if necessary.
Press [OK] to return to the screen for setting NetWare.
Press [OK].
Skip to step 11.
● Setting Bindery PServer or RPrinter:
❑ Press [Browse].
Using a NetWare Network (Windows)
4
❑ In the Browse screen, select the file server to which the desired print server belongs ➞
press [Down].
❑ In the Enter Network Password screen, enter the name and password of a user on the file
server ➞ press [OK].
If the password is not specified, leave [Password] blank.
❑ Select the desired print server ➞ press [OK].
❑ For Bindery PServer, specify each item on the screen for setting Bindery PServer if
necessary.
❑ Press [OK] to return to the screen for setting NetWare.
❑ Press [OK].
❑ Skip to step 11.
IMPORTANT
If you use [Browse] to specify each item, press [Browse] after the expiration of the time specified
in "Startup Time Settings," on p. 3-30 (the default setting startup time is '60 seconds').
4-14
Protocol Settings
10
Enter the desired character string for the print service details.
Specify the same tree, context, file server, and print server names specified in "NetWare Print
Service Settings," on p. 4-3. (Settings differ depending on the print service. For print service
settings, see "Network Setting Items," on p. 9-2.)
● Setting NDS PServer or NPrinter:
❑
❑
❑
❑
❑
❑
Press [Print Server] to enter the name of the desired print server.
Press [Tree] to enter the name of the tree to which the desired print server belongs.
Press [Context] to enter the name of the context to which the desired print server belongs.
For NDS PServer, specify each of the other items if necessary.
Press [OK] to return to the screen for setting NetWare.
Press [OK].
Using a NetWare Network (Windows)
4
● Setting Bindery PServer or RPrinter:
❑ Press [Print Server] to enter the name of the desired print server.
❑ Press [File Server] to enter the name of the file server to which the desired print server
belongs.
❑ For Bindery PServer, specify each of the other items if necessary.
❑ Press [OK] to return to the screen for setting NetWare.
❑ Press [OK].
11
Press [Done] repeatedly until the Additional Functions screen closes.
Protocol Settings
4-15
12
Restart the machine.
❑ Turn OFF the machine, wait at least 10 seconds, and then turn it ON again.
NOTE
For instructions on how to turn ON/OFF the machine, see Chapter 1, "Before You Start Using
This Machine," in the Reference Guide.
The protocol settings are complete.
Using a NetWare Network (Windows)
4
4-16
Protocol Settings
Setting Up a Computer for Printing/Sending a
Fax
After you have completed NetWare print service settings and printer protocol settings, you are
ready to set up each of the computers for printing or sending a fax.
IMPORTANT
To print or send a fax from a computer, the optional equipment must be installed. For the equipment
needed, see "Optional Equipment and System Environment Requirements," on p. 1-2.
In order to use the NetWare network, all computers that will perform printing or sending a fax
need to have NetWare client software installed. For details, see your NetWare and operating
system manuals.
Printer Connection Method
Install the driver according to the following procedures indicated in the manual for each driver:
• If you want to use the PCL printer driver
See the procedure for standard installation in Chapter 2, "Getting Started," in the PCL Driver
Guide.
• If you want to use the PS printer driver
See the procedure for standard installation in Chapter 2, "Getting Started," in the PS Driver
Guide.
• If you want to use the UFR printer driver
See the procedure for standard installation in Chapter 2, "Getting Started," in the UFR Driver
Guide.
• If you want to use the fax driver
See the procedure for standard installation in Chapter 2, "Getting Started," in the Fax Driver
Guide.
When the dialog box for selecting the port appears during installation, click [Use Network
Printer] ➞ [Settings]. From the list, select the print queue that you created in "NetWare Print
Service Settings," on p. 4-3.
Setting Up a Computer for Printing/Sending a Fax
4-17
4
Using a NetWare Network (Windows)
Connecting to a NetWare Network
Setting Up a Computer as a File Server
To send data from the machine to a computer on your network, you need to specify the settings
of the computer for receiving data.
This section describes how to set up a computer as a file server.
IMPORTANT
• To send data from the machine, the optional equipment must be installed. For the equipment needed,
see "Optional Equipment and System Environment Requirements," on p. 1-2.
• To send a file to the NetWare server, make the following NetWare settings of the machine. For
instructions on how to specify the protocol settings, see "Protocol Settings," on p. 4-9.
- <NetWare>: [On]
- The Frame Type drop-down list: Frame type suitable for your environment
• This section describes only the procedures for setting up a computer receiving data sent from the
machine. To send data from the machine to a server on the network, you must enter an address setting
from the control panel. For instructions on how to specify recipient address settings, see Chapter 2,
"Basic Sending Methods," in the Sending Guide.
• In some environments, additional detailed settings such as authority settings may be required. For
details, consult the network manager of the environment you are using.
Using a NetWare Network (Windows)
4
1
2
Log in to NetWare as Administrator (or as a user of equivalent
authority).
Set up the users and passwords for sending data from the machine.
Enter a user name and a password not longer than 24 alphanumeric characters.
3
4-18
Create a directory to be used for recipient addresses, and then enable
read access and write access by the users who will be sending data.
Setting Up a Computer as a File Server
Set a recipient address from the control panel.
There are two methods for specifying the recipient address settings. You can select the desired
values from the list displayed by pressing [Browse]. Or you can press each key to enter the
desired value for each item.
4
Sample recipient settings: NDS Mode Example
Using a NetWare Network (Windows)
4
If you send data to the "data" under "share_vol" in the above tree structure, the settings of the
host name and the file path differ depending on the location of a user account.
Setting Up a Computer as a File Server
4-19
• Example 1 If "SALES_JP" contains the user account "jenkins"
[Host Name]:
SALES_JP.SALES.TREE=CANON
[File Path]:
share_vol\data
[User]:
CN=jenkins
[Password]:
(Password for the above user)
• Example 2 If "SALES_US" contains the user account "john"
4
[Host Name]:
SALES_US.SALES.TREE=CANON
[File Path]:
share_vol.SALES_JP.\data (One dot is required before \data.)
[User]:
CN=john
[Password]:
(Password for the above user)
Using a NetWare Network (Windows)
• Example 3 If "SALES" contains the user account "smith"
[Host Name]:
SALES.TREE=CANON
[File Path]:
share_vol.SALES_JP\data
[User]:
CN=smith
[Password]:
(Password for the above user)
• Example 4 If "Tokyo" contains the user account "edwards"
[Host Name]:
Tokyo.MARKETING.TREE=CANON
[File Path]:
share_vol.SALES_JP.SALES..\data
(Two dots are required before \data.)
[User]:
CN=edwards
[Password]:
(Password for the above user)
Sample recipient settings: Bindery Mode Example:
• Server side settings:
[File Server Name]:
TOPMAX_SERVER
Set \CSG in the SYS volume as the recipient.
4-20
Setting Up a Computer as a File Server
• The machine's address settings:
[Protocol]:
NetWare (IPX)
[Host Name]:
TOPMAX_SERVER
[File Path]:
SYS\CFG
[User]:
(User name entered in step 2)
[Password]:
(Password for the above user)
IMPORTANT
NOTE
For instructions on how to specify recipient address settings, see Chapter 2, "Basic Sending
Methods," in the Sending Guide.
The settings for sending data to the file server are complete.
Setting Up a Computer as a File Server
4-21
4
Using a NetWare Network (Windows)
• If you use [Browse] to specify each item, press [Browse] after the expiration of the time specified
in "Startup Time Settings," on p. 3-30 (the default setting startup time is '60 seconds').
• Up to 128 alphanumeric characters can be entered for both [Host Name] and [File Path] on the
control panel. Use strings no more than 128 characters long for the corresponding items on the
server.
• If you change the language of the touch panel display, [Host Name] and [File Path] may not be
displayed correctly, or you may not be able to browse the directories.
• In NDS mode, take notice of the following:
- For the host name, specify the context by which a user logs in.
- For the file path, specify the relative path from the user context. You may omit the "xx=" portion,
but the ".TREE=" portion with the tree name may not be omitted.
- Enter a user name prefixed with "CN=."
- Unless the same directory tree contains the user account name by which a user logs in and the
volume object to which data is sent, dots are required according to the layer of the relative path.
For example, one dot is required to indicate the layer one level above (Example 2), and two
dots are required to indicate the layer two levels above (Example 4).
Using a NetWare Network (Windows)
4
4-22
Setting Up a Computer as a File Server
Using a NetBIOS Network
5
CHAPTER
This chapter describes settings and procedures for using the machine with a NetBIOS network.
NetBIOS Network Setup Procedures . . . . . . . . . . . . . . . . . . . . . . . . . . . . . . . . . . . . . . . . . . . . . . . . . . . 5-2
Protocol Settings. . . . . . . . . . . . . . . . . . . . . . . . . . . . . . . . . . . . . . . . . . . . . . . . . . . . . . . . . . . . . . . . . . . 5-3
Settings from the Control Panel . . . . . . . . . . . . . . . . . . . . . . . . . . . . . . . . . . . . . . . . . . . . . . . . . . . . . . . . . . . . . . . . 5-3
Setting Up a Computer for Printing/Sending a Fax . . . . . . . . . . . . . . . . . . . . . . . . . . . . . . . . . . . . . . . . 5-10
Connecting to a TCP/IP Network . . . . . . . . . . . . . . . . . . . . . . . . . . . . . . . . . . . . . . . . . . . . . . . . . . . . . . . . . . . . . . 5-10
Connecting to a NetBIOS Network . . . . . . . . . . . . . . . . . . . . . . . . . . . . . . . . . . . . . . . . . . . . . . . . . . . . . . . . . . . . . 5-10
Printer Connection Method . . . . . . . . . . . . . . . . . . . . . . . . . . . . . . . . . . . . . . . . . . . . . . . . . . . . . . . . . . . . . . . . . . . 5-14
Setting Up a Computer as a File Server . . . . . . . . . . . . . . . . . . . . . . . . . . . . . . . . . . . . . . . . . . . . . . . . 5-16
Connecting to a TCP/IP Network . . . . . . . . . . . . . . . . . . . . . . . . . . . . . . . . . . . . . . . . . . . . . . . . . . . . . . . . . . . . . . 5-16
Connecting to a NetBIOS Network and Configuring a Shared Folder . . . . . . . . . . . . . . . . . . . . . . . . . . . . . . . . . . 5-17
5-1
NetBIOS Network Setup Procedures
To use a NetBIOS network, it is necessary to perform the following procedures.
1
Protocol Settings (See "Protocol Settings," on p. 5-3.)
Specify the protocol settings. To specify the settings, use:
• The machine's control panel
• A web browser (Remote UI)
• A web browser (NetSpot Console) (Canon utility)
2
Computer Settings for Printing (See "Setting Up a Computer for Printing/Sending a Fax,"
on p. 5-10.)
Specify the settings of each computer you use for printing or sending a fax. (To print or send a fax from a computer, the optional
equipment must be installed. For the equipment needed, see "Optional Equipment and System Environment Requirements," on
p. 1-2.)
Using a NetBIOS Network
5
3
Computer Settings for a File Server (See "Setting Up a Computer as a File Server," on p. 5-16.)
Specify the settings of the computer receiving data sent from the machine. (To send data, the optional equipment must be
installed. For the equipment needed, see "Optional Equipment and System Environment Requirements," on p. 1-2.)
IMPORTANT
• If you are using the optional Color Network Printer Unit, for steps 1 and 2, see the manual provided with
the optional Color Network Printer Unit.
• It is recommended that the network manager perform steps 1 and 3 above.
• The only base protocol supported by a NetBIOS network is TCP/IP. (SMB is used as the print
application.) NetBEUI is not supported with the machine.
• Use the control panel or NetSpot Device Installer if you configure the TCP/IP settings for the first time.
After configuring the settings, you can change the content by using a web browser (Remote UI) or a web
browser (NetSpot Console).
5-2
NetBIOS Network Setup Procedures
Protocol Settings
You can specify the protocol settings for the machine by using any of the following:
• The machine's control panel
• A web browser (Remote UI)
• A web browser (NetSpot Console) (Canon utility)
IMPORTANT
• If you configure the TCP/IP settings for the first time, use the control panel of this machine or NetSpot
Device Installer. After configuring the settings, you can change the content by using a web browser
(Remote UI) or a web browser (NetSpot Console).
• Some items cannot be set using NetSpot Device Installer or NetSpot Console. For details about items
that can be set with NetSpot Device Installer or NetSpot Console, see "Network Setting Items," on p.
9-2.
• For instructions on how to enter settings using a web browser (Remote UI), see Chapter 3,
"Customizing Settings," in the Remote UI Guide.
• For more information on NetSpot Device Installer or NetSpot Console, see Chapter 7, "Using the
Network and Device Settings with Utilities."
Settings from the Control Panel
The procedures for specifying the settings from the control panel are as follows.
IMPORTANT
Settings specified from the control panel become effective after the machine is restarted, after the
procedure.
NOTE
For instructions on how to enter characters using the touch panel display, see Chapter 2, "Basic
Operations," in the Reference Guide.
Protocol Settings
5
Using a NetBIOS Network
NOTE
5-3
TCP/IP Settings
1
Specify the TCP/IP settings.
If you have not entered the TCP/IP settings yet, enter them now. (see "TCP/IP Settings," on p.
3-4 in Chapter 3, "Using a TCP/IP Network").
Next, specify the SMB and WINS settings.
SMB and WINS Settings
To use the machine on a NetBIOS network, specify the SMB settings.
To resolve a name with WINS, specify the WINS settings that follow.
NOTE
WINS (Windows Internet Name Service) is a service for associating a NetBIOS name (which is a
computer name or printer name on a NetBIOS network) with an IP address.
To use WINS, a WINS server is required.
Using a NetBIOS Network
5
1
Press
2
Press [System Settings].
.
NOTE
If the message <Enter the System Manager ID and Password using the numeric keys.> appears
on the touch panel display, enter the System Manager ID and password. For instructions on how
to enter the System Manager ID and password, see Chapter 2, "Basic Operations," in the
Reference Guide.
5-4
Protocol Settings
3
Press [Network Settings].
4
Press [SMB Settings].
5
If you want to print or send a fax via a NetBIOS network, select [On] for
<Use SMB>.
IMPORTANT
To print or send a fax from a computer, the optional equipment must be installed. For the
equipment needed, see "Optional Equipment and System Environment Requirements," on p.
1-2.
Protocol Settings
5-5
Using a NetBIOS Network
5
6
Specify the [Server], [Printer], and [Workgroup] settings.
[Server]:
Enter the name of a computer that the machine connects to. Be sure to enter a unique name
that does not exist as a name for another computer or printer on the same network.
[Printer]:
Enter the printer name of the machine.
[Workgroup]:
Enter the name of the workgroup the machine belongs to.
If there is no workgroup on your environment, create a workgroup in the Windows environment,
and then enter the workgroup name.
Using a NetBIOS Network
5
IMPORTANT
• You cannot enter the domain name as the workgroup name.
• Enter the printer name of up to 12 characters in [Printer] when printing from Windows NT.
• You cannot enter a character string including blanks in [Server], [Printer], and [Workgroup].
7
Press [Comment].
Enter a comment about the printer if necessary. If you display the printer information, the
comment you specified here appears.
8
Specify <LM Announce>.
● If you want the machine to notify the LAN Manager of its existence on the
network:
❑ Select [On].
5-6
Protocol Settings
● If you do not want the machine to notify the LAN Manager of its existence on
the network:
❑ Select [Off].
NOTE
• <LM Announce> is provided to enable the LAN Manager to refer to the machine.
• If the LAN Manager does not have to refer to the machine, you can control the traffic over your
network by selecting [Off].
9
Confirm the settings you specified ➞ press [OK].
The display returns to the Network Settings screen.
10
To specify the WINS settings, press [TCP/IP Settings].
Otherwise, skip to step 16.
11
Using a NetBIOS Network
5
Press [WINS Configuration].
Protocol Settings
5-7
12
To resolve the name with WINS, select [On].
Otherwise, select [Off].
If you select [Off], skip to step 14.
13
5
Specify the IP address of a WINS server.
IMPORTANT
Using a NetBIOS Network
If DHCP determines the IP address, the IP address obtained from a DHCP server is overwritten
with the IP address of a WINS server (obtained from the DHCP server), whenever possible.
14
Specify the [Scope ID] setting.
Enter the scope ID if necessary.
The scope ID is an identifier for determining the range available to a printer or computer.
Regardless of the [WINS Configuration] setting, a scope ID is referred to from the network.
IMPORTANT
• If you set a scope ID, the machine cannot communicate with any computer whose scope ID is
different from the scope ID you set here.
• If any scope ID is not set on computers in your network environment, leave this setting blank.
15
Confirm the settings you specified ➞ press [OK].
The display returns to the TCP/IP Settings screen.
5-8
Protocol Settings
16
17
Press [Done] repeatedly until the Additional Functions screen closes.
Restart the machine.
❑ Turn OFF the machine, wait at least 10 seconds, and then turn it ON again.
NOTE
For instructions on how to turn ON/OFF the machine, see Chapter 1, "Before You Start Using
This Machine," in the Reference Guide.
The protocol settings are complete.
Using a NetBIOS Network
5
Protocol Settings
5-9
Setting Up a Computer for Printing/Sending a
Fax
After you have completed the protocol settings, you are ready to set up each of the computers
for printing or sending a fax.
IMPORTANT
To print or send a fax from a computer, the optional equipment must be installed. For the equipment
needed, see "Optional Equipment and System Environment Requirements," on p. 1-2.
Connecting to a TCP/IP Network
All computers that use the machine for printing or sending a fax must have TCP/IP client
software installed and must be enabled for TCP/IP network use. For details, see the manuals
provided with the operating system.
Using a NetBIOS Network
5
Connecting to a NetBIOS Network
All computers that use the machine for printing or sending a fax must be enabled for NetBIOS
network use.
See the procedures referenced below to set the computers.
• Windows 98/Me: See "Windows 98/Me," on p. 5-11.
• Windows 2000/XP/Server 2003: See "Windows 2000/XP/Server 2003," on p. 5-12.
• Windows NT 4.0: See "Windows NT 4.0," on p. 5-13.
IMPORTANT
The following procedures describe a sample NetBIOS setup. Depending on your environment, the
actual setup procedure may differ.
5-10
Setting Up a Computer for Printing/Sending a Fax
Windows 98/Me
Specify the NetBIOS settings.
❑ Right-click the [Network Neighborhood] icon or [My Network Places] icon displayed on the
screen ➞ click [Properties].
❑ In [The following network components are installed], confirm that both [Client for Microsoft
Networks] and [File and printer sharing for Microsoft Networks] appear. If not, click [Add] to
install these components.
5
❑ Select [TCP/IP] from [The following network components are installed] ➞ click [Properties].
The [TCP/IP Properties] dialog box appears on the screen.
❑ Click the [Bindings] tab to display the [Bindings] sheet ➞Select [Client for Microsoft
Networks].
❑ Click [OK].
❑ Restart the computer if prompted.
Setting Up a Computer for Printing/Sending a Fax
5-11
Using a NetBIOS Network
1
Windows 2000/XP/Server 2003
1
Specify the NetBIOS settings.
❑ If you are using Windows 2000, right-click the [My Network Places] icon on the screen ➞
click [Properties].
If you are using Windows XP, on the [Start] menu, right-click [My Network Places] ➞ click
[Properties].
If you are using Windows Server 2003, on the [Start] menu, click [Control Panel] ➞ [Network
Connections].
In the case of Windows 2000, the [Network and Dial-up Connections] window opens.
In the case of Windows XP, the [Network Connections] window opens.
❑ Right-click the [Local Area Connection] icon ➞ click [Properties].
The [Local Area Connection Properties] dialog box opens.
❑ Confirm that [Client for Microsoft Networks], [File and Printer Sharing for Microsoft
Networks], and [Internet Protocol (TCP/IP)] are all selected. If any of these functions are not
selected, select them now.
Using a NetBIOS Network
5
❑ Double-click [Internet Protocol (TCP/IP)] to open the [Internet Protocol (TCP/IP) Properties]
dialog box. In the [General] sheet, click [Advanced].
❑ Click the [WINS] tab, and then in the [WINS] sheet. Select [Enable NetBIOS over TCP/IP].
❑ Click [OK] until all the dialog boxes are closed.
❑ Restart the computer if prompted.
5-12
Setting Up a Computer for Printing/Sending a Fax
Windows NT 4.0
Specify the NetBIOS settings.
❑ Right-click the [Network Neighborhood] icon displayed on the screen ➞ click [Properties].
❑ Click the [Services] tab to display the [Services] sheet. Then, confirm that [NetBIOS
Interface] and [Server] appear in [Network Services]. If not, click [Add] to install them.
5
Using a NetBIOS Network
1
❑ Click [OK].
❑ Restart the computer if prompted.
Setting Up a Computer for Printing/Sending a Fax
5-13
Printer Connection Method
Install the driver and specify the port for the machine to use to print or send a fax. Follow the
instructions below.
NOTE
If Windows NT/2000/XP/Server 2003 is on your network, the following procedure enables you to set up
a print server for more efficient management of network printers. Once a print server is set up, print jobs
can be managed by the print server. Also, by setting up an alternate driver for the print server, printer
drivers can be installed in each computer via the network.
For instructions on how to set print servers, see the following procedures indicated in the manual for
each driver:
- If you want to use the PCL printer driver
See the procedure for alternative printer driver installation in Chapter 2, "Getting Started," in the PCL
Driver Guide.
- If you want to use the PS printer driver
See the procedure for alternative printer driver installation in Chapter 2, "Getting Started," in the PS
Driver Guide.
- If you want to use the UFR printer driver
See the procedure for alternative printer driver installation in Chapter 2, "Getting Started," in the UFR
Driver Guide.
- If you want to use the fax driver
See the procedure for alternative printer driver installation in Chapter 2, "Getting Started," in the Fax
Driver Guide.
Using a NetBIOS Network
5
1
Check the settings for both <RX/Print Range> and <Setting/Browsing
Range> in [IP Address Range Settings] to see whether the IP address
of the computer in which a driver is to be installed is permitted. (See
step 21 in "TCP/IP Settings," on p. 3-4.)
IMPORTANT
• If the settings for both <RX/Print Range> and <Setting/Browsing Range> in [IP Address Range
Settings] do not permit the IP address, you cannot install a driver.
• If the IP address of the computer is beyond the range of the permitted addresses for <RX/Print
Range> after installing a driver, you cannot print from the computer.
5-14
Setting Up a Computer for Printing/Sending a Fax
2
Install the driver.
Install the driver according to the following procedures indicated in the manual for each driver:
• If you want to use the PCL printer driver
See the procedure for standard installation in Chapter 2, "Getting Started," in the PCL Driver
Guide.
• If you want to use the PS printer driver
See the procedure for standard installation in Chapter 2, "Getting Started," in the PS Driver
Guide.
• If you want to use the UFR printer driver
See the procedure for standard installation in Chapter 2, "Getting Started," in the UFR Driver
Guide.
• If you want to use the fax driver
See the procedure for standard installation in Chapter 2, "Getting Started," in the Fax Driver
Guide.
When the dialog box for selecting the port appears during installation, click [Use Network
Printer] ➞ [Settings]. From the list, select [Workgroup], [Server], and [Printer] you set in "SMB
and WINS Settings," on p. 5-4.
The port settings are complete.
Using a NetBIOS Network
5
Setting Up a Computer for Printing/Sending a Fax
5-15
Setting Up a Computer as a File Server
To send data from the machine to a computer on your network, you need to specify the settings
of the computer for receiving data. You can send data over a NetBIOS network to a Windows
and Samba (UNIX/Linux) shared folder. This section describes how to configure a shared folder.
IMPORTANT
• Samba 2.2.8a or later is supported.
• To send data from the machine, the optional equipment must be installed. For the equipment needed,
see "Optional Equipment and System Environment Requirements," on p. 1-2.
• This section describes only the procedures for setting up a computer receiving data sent from the
machine. To send data from the machine to a server on the network, you must enter an address setting
from the control panel. For instructions on how to specify recipient address settings, see Chapter 2,
"Basic Sending Methods," in the Sending and Facsimile Guide.
• The following procedures describe a sample shared folder configuration. Depending on your
environment, the actual configuration procedure may differ.
Using a NetBIOS Network
5
NOTE
You can send data over a TCP/IP network from the machine to an FTP server. For instructions on how
to set up an FTP server, see "Setting Up a Computer as a File Server," in Chapter 3, "Using a TCP/IP
Network." (See p. 3-53.)
Connecting to a TCP/IP Network
A computer that receives data sent from the machine must have TCP/IP client software installed
and must be enabled for TCP/IP network use. For details, see the manuals provided with the
operating system.
5-16
Setting Up a Computer as a File Server
Connecting to a NetBIOS Network and Configuring a
Shared Folder
Windows 95/98/Me
NOTE
• If a suitable Windows NT/2000/XP/Server 2003 machine is available on your network, it is
recommended that you configure that machine as a file server instead of using a Windows 98/Me
machine.
• In the following procedures, items displayed on the screen for Windows 98 are used; items might differ
depending on your operating system.
Specify the NetBIOS settings.
❑ Right-click the [Network Neighborhood] icon displayed on the screen ➞ click [Properties].
❑ In [The following network components are installed], confirm that both [Client for Microsoft
Networks] and [File and printer sharing for Microsoft Networks] appear. If not, click [Add] to
install these components.
5
Using a NetBIOS Network
1
❑ Click [File and Print Sharing] ➞ select [I want to be able to give others access to my files] ➞
click [OK].
Setting Up a Computer as a File Server
5-17
❑ To specify the access control method, click the [Access Control] tab ➞ select the level of
access control.
5
Using a NetBIOS Network
If you select [User-level access control], specify a domain in which a list of users and groups
is saved.
❑ In the [Network] dialog box, click the [Identification] tab to display the [Identification] sheet.
Confirm the computer name.
❑ Click [OK] to close the [Network] dialog box.
5-18
Setting Up a Computer as a File Server
Set up file sharing.
● If [Share-level access control] is selected:
❑ Right-click the folder you want to share using Explorer ➞ click [Sharing].
❑ On the [Sharing] sheet, select [Shared As] ➞ enter the share name in [Share Name].
5
Using a NetBIOS Network
2
❑ For [Access Type], select either [Full] or [Depends on Password].
❑ Enter a password.
If [Depends on Password] is selected, enter the password for full access.
Up to 14 alphanumeric characters can be entered for the password.
❑ Confirm the settings you entered ➞ click [OK].
● If [User-level access control] is selected:
❑ Right-click the folder you want to share using Explorer ➞ click [Sharing].
Setting Up a Computer as a File Server
5-19
❑ On the [Sharing] sheet, select [Shared As] ➞ enter the share name in [Share Name].
❑ Click [Add].
5
The [Add Users] dialog box appears on the screen.
Using a NetBIOS Network
❑ From the left list select the users you want to give access to the shared folder to ➞ add them
to the right list.
NOTE
For details on this dialog box, see the Windows 98/Me manual.
❑ Confirm the settings you entered ➞ click [OK].
❑ Click [OK] to close the properties dialog box of the shared folder.
3
Set a recipient address using the control panel.
There are two methods for specifying the recipient address settings. You can select the desired
values from the list displayed by pressing [Browse]. Or you can press each key to enter the
desired value for each item.
Sample recipient setting:
• Server side settings:
[Computer name]:
swan
[Share Name]:
share
Create a folder called Images within share, and then specify Images as the recipient for
sending.
5-20
Setting Up a Computer as a File Server
• The machine's recipient settings:
[Protocol]:
Windows (SMB)
[Host Name]:
\\swan\share
[File Path]:
\Images
[User]:
(Not required if you have selected [Share-level access control] in step 1)
[Password]:
Password entered in step 2.
IMPORTANT
• If you use [Browse] to specify each item, press [Browse] after the expiration of the time specified
in "Startup Time Settings," on p. 3-30 (the default setting startup time is '60 seconds').
• Up to 128 alphanumeric characters can be entered for both [Host Name] and [File Path] on the
control panel. For [User], up to 20 alphanumeric characters can be entered. Enter each of these
items on the server using no more than their allowable number of characters.
• If you change the language of the touch panel display, [Host Name] and [File Path] may not be
displayed correctly, or you may not be able to browse the directories.
• If the language of the touch panel display differs from the computer used as a master browser,
[Host name] and [File path] may not be displayed correctly, or you may not be able to browse the
directories.
NOTE
• You can send data using the following formats. A DNS server is required for the latter case.
\\192.168.2.100\share
\\host_name.organization.company.com\share
• You can also specify the user name in the address using the following format.
domain_name\user_name (up to 15 alphanumeric characters for the domain name, and up to 20
for the user name)
• For instructions on how to specify recipient address settings, see Chapter 2, "Basic Sending
Methods," in the Sending and Facsimile Guide.
Setting Up a Computer as a File Server
5-21
Using a NetBIOS Network
5
The settings for sending data to the shared folder are complete.
Windows 2000/XP/Server 2003
IMPORTANT
It is recommended that the network manager configure the file server.
NOTE
The number of users or clients that can access a server running Windows 2000/XP/Server 2003 is
limited. After this number of users or clients is reached, it is not possible to send to a server running
Windows 2000 /XP/Server 2003.
1
2
5
Log on to Windows as Administrator.
Specify the NetBIOS settings.
❑ If you are using Windows 2000, right-click the [My Network Places] icon on the screen ➞
Using a NetBIOS Network
click [Properties].
If you are using Windows XP, on the [Start] menu, right-click [My Network Places] ➞ click
[Properties].
If you are using Windows Server 2003, on the [Start] menu, click [Control Panel] ➞ [Network
Connections].
In the case of Windows 2000, the [Network and Dial-up Connections] window opens.
In the case of Windows XP, the [Network Connections] window opens.
❑ Right-click the [Local Area Connection] icon ➞ click [Properties].
The [Local Area Connection Properties] dialog box opens.
5-22
Setting Up a Computer as a File Server
❑ Confirm that [Client for Microsoft Networks], [File and Printer Sharing for Microsoft
❑ Double-click [Internet Protocol (TCP/IP)] to open the [Internet Protocol (TCP/IP) Properties]
5
❑ Click the [WINS] tab, and then in the [WINS] sheet select [Enable NetBIOS over TCP/IP].
❑ Click [OK] until all the dialog boxes are closed.
❑ Restart the computer if prompted.
Using a NetBIOS Network
Networks], and [Internet Protocol (TCP/IP)] are all selected. If any of these functions is not
selected, select it now.
dialog box. In the [General] sheet, click [Advanced].
3
Confirm the computer name.
● If you are using Windows 2000:
❑ Right-click the [My Computer] icon ➞ click [Manage].
The [Computer Management] window opens.
❑ Right-click the [Computer Management (Local)] icon ➞ click [Properties].
The [Computer Management (Local) Properties] dialog box opens.
Setting Up a Computer as a File Server
5-23
❑ Click the [Network Identification] tab to display the [Network Identification] sheet ➞ confirm
the [Computer name] setting.
5
Using a NetBIOS Network
❑ Click [Cancel] to close the dialog box ➞ close the [Computer Management] window.
● If you are using Windows XP/Server 2003:
❑
❑
❑
❑
On the [Start] menu, right-click [My Computer] ➞ click [Properties].
Click the [Computer Name] tab to display the [Computer Name] sheet.
Click [Change] ➞ [More] in the [Computer Name Changes] dialog box.
In the [DNS Suffix and NetBIOS Computer Name] dialog box, confirm [NetBIOS computer
name].
❑ Click [Cancel] until all the dialog boxes are closed.
4
Set up the users and passwords for access to the shared folder.
❑ Right-click the [My Computer] icon ➞ click [Manage].
The [Computer Management] window opens.
5-24
Setting Up a Computer as a File Server
❑ Under [System Tools], double-click [Local Users and Groups] ➞ right-click the [Users] folder
➞ click [New User].
[Password] ➞ re-enter the password in [Confirm Password].
Up to 20 alphanumeric characters can be entered for the user name, and up to 14 for the
password.
If [User must change password at next logon] is selected, any new users added must
change their passwords in order to send data from the machine. (You cannot change the
password from the control panel.)
❑ Confirm the settings ➞ click [Create].
Setting Up a Computer as a File Server
5-25
5
Using a NetBIOS Network
❑ In the [New User] dialog box, enter the user name in [User name] ➞ enter the password in
❑ Close the [Computer Management] window.
NOTE
In the Active Directory environment, the procedures for setting up users differ from the above.
For details, see the Windows manual.
5
Configure the shared folder.
❑ Right-click the folder you want to share using [Explorer] ➞ click [Properties].
❑ On the [Sharing] sheet, select [Share this folder] ➞ enter the share name in [Share name].
Using a NetBIOS Network
5
5-26
Setting Up a Computer as a File Server
❑ To create a shared folder on a FAT or FAT32 format disk (If the [Security] tab is undisplayed),
click [Permissions]. Select or add the users or groups you want to give access to the shared
folder to. Under [Permissions], select both [Change] and [Read] ➞ click [OK].
sheet, select or add the users or groups you want to give access to the shared folder to.
Under [Permissions], select both [Write] and [Read & Execute], or a higher access authority.
For data in the folder, check both [Write] and [Read], or a higher access authority.
❑ Click [OK] ➞ close the properties dialog box of the shared folder.
NOTE
• To display the [Security] tab in Windows XP, open Folder Options ➞ deselect [Use simple file
sharing]. However, you can share folders and files with [Use simple file sharing] selected. Select
or deselect [Use simple file sharing] to suit your environment. For details about the settings, see
the manual provided with Windows XP.
• In the Active Directory environment, the procedures for specifying the security settings of the
shared folder differ from the above. For details, see the Windows manual.
6
If you are using the Windows Server 2003 Active Directory
environment, specify the following settings.
❑ Click the [Start] menu ➞ point to [Administrative Tools] ➞ click [Domain Controller Security
Policy].
The [Domain Controller Security Settings] window appears.
Setting Up a Computer as a File Server
5-27
5
Using a NetBIOS Network
❑ To create a shared folder on an NTFS format disk, click the [Security] tab. In the [Security]
❑ In the left window, double-click [Security Settings] ➞ [Local Policies] ➞ click [Security
Options].
❑ In the right window, select [Microsoft network server: Digitally sign communications
(always)] ➞ set to [Disabled].
5
Using a NetBIOS Network
❑ Close the [Domain Controller Security Settings] window.
NOTE
To browse the directories and send data in the Windows Server 2003 Active Directory
environment, you must first specify this setting.
7
Set a recipient address using the control panel.
There are two methods for specifying the recipient address settings. You can select the desired
values from the list displayed by pressing [Browse]. Or you can press each button to enter the
desired value for each item.
Sample recipient setting:
• Server side settings:
[Computer name]:
swan
[Share Name]:
share
Create a folder called Images within share, and then specify Images as the recipient for
sending.
5-28
Setting Up a Computer as a File Server
• The machine's Recipient Settings:
[Protocol]:
Windows (SMB)
[Host Name]:
\\swan\share
[File Path]:
\Images
[User]:
User name entered in step 4.
[Password]:
Password for the above user.
IMPORTANT
• If you use [Browse] to specify each item, press [Browse] after the expiration of the time specified
in "Startup Time Settings," on p. 3-30 (the default setting startup time is '60 seconds').
• Up to 128 alphanumeric characters can be entered for both [Host Name] and [File Path] on the
control panel. Enter each of these items on the server using no more than their allowable number
of characters.
• If you change the language of the touch panel display, [Host Name] and [File Path] may not be
displayed correctly, or you may not be able to browse the directories.
• If the language of the touch panel display differs from the computer used as a master browser,
[Host name] and [File path] may not be displayed correctly, or you may not be able to browse the
directories.
• If you send data in the Windows 2000/XP/Server 2003 Active Directory environment, specify the
actual directory path when setting the recipient address. While sending, the Active Directory
cannot be browsed and the tree path cannot be specified.
Setting Up a Computer as a File Server
5-29
Using a NetBIOS Network
5
NOTE
• You can send data using the following formats. A DNS server is required for the latter case.
\\192.168.2.100\share
\\host_name.organization.company.com\share
• You can also specify the user name in the address using the following formats.
- domain_name\user_name (up to 15 alphanumeric characters for the domain name, and up to
20 for the user name)
- user_name@organization.company.com (up to 128 characters in total)
Note that the latter is only applicable when sending to a Windows 2000/XP/Server 2003
computer that belongs to a domain containing Windows 2000/Server 2003 domain controllers.
• For instructions on how to specify recipient address settings, see Chapter 2, "Basic Sending
Methods," in the Sending and Facsimile Guide.
The settings for sending data to the shared folder are complete.
Windows NT 4.0
IMPORTANT
5
Using a NetBIOS Network
It is recommended that the network manager configure Windows NT Server 4.0.
NOTE
Windows NT Server 4.0 can be accessed by a limited number of users or clients. Once this limit is
reached, it is not possible to send to Windows NT Server 4.0.
1
2
5-30
Log on to Windows NT Server 4.0 as any of the following:
Administrators, or Server Operators.
Specify the NetBIOS settings.
❑ Right-click the [Network Neighborhood] icon displayed on the screen ➞ click [Properties].
Setting Up a Computer as a File Server
❑ Click the [Services] tab to display the [Services] sheet ➞ confirm that [NetBIOS Interface]
and [Server] appear in [Network Services]. If not, click [Add] to install them.
❑ Click the [Protocols] tab to display the [Protocols] sheet ➞ confirm that [TCP/IP Protocol]
❑ Click the [Identification] tab to display the [Identification] sheet ➞ confirm the computer
name.
❑ Click [OK] to close the dialog box.
Setting Up a Computer as a File Server
5
Using a NetBIOS Network
appears in [Network Protocols]. If not, click [Add] to install it.
5-31
3
Set the users and passwords for access to the shared folder.
❑ On the [Start] menu, point to [Programs] ➞ point to [Administrative Tools] ➞ click [User
Manager for Domains] to start the User Manager.
❑ On the [User] menu, click [New User].
❑ Enter the user name in [Username] ➞ enter the password in [Password] ➞ re-enter the
password in [Confirm Password] ➞ enter additional information if necessary.
Using a NetBIOS Network
5
Up to 20 alphanumeric characters can be entered for the user name, and up to 14 for the
password.
If [User Must Change Password at Next Logon] is selected, any new users added must
change their password in order to send data from the machine. (You cannot change the
password from the control panel.)
❑ Confirm the settings ➞ click [Add].
❑ Exit the User Manager.
4
5-32
Set up file sharing.
❑ Right-click the folder you want to share using Explorer ➞ click [Sharing].
Setting Up a Computer as a File Server
❑ Click the [Sharing] tab to display the [Sharing] sheet. Select [Shared As] ➞ enter the share
name in [Share Name].
click [Permissions] to open the [Access Through Share Permissions] dialog box. Select or
add the users or groups you want to give access to the shared folder to ➞ select either
[Change] or [Full Control] from [Type of Access] ➞ click [OK].
❑ To create a shared folder on an NTFS format disk, click the [Security] tab. In the [Security]
sheet, click [Permission] to open the [Directory Permission] dialog box. Select or add the
users or groups you want to give access to the shared folder to. For each user or group,
select [Add] or [Read] access from [Type of Access]. Also select [Add] or [Read] access for
each folder in the file.
❑ Click [OK] ➞ close the properties dialog box of the shared folder.
Setting Up a Computer as a File Server
5-33
5
Using a NetBIOS Network
❑ To create a shared folder on a FAT or FAT32 format disk (If the [Security] tab is undisplayed),
5
Set a recipient address using the control panel.
There are two methods for specifying the recipient address settings. You can select the desired
values from the list displayed by pressing [Browse]. Or you can press each button to enter the
desired value for each item.
For sample settings, see the example of Windows 2000/XP/Server 2003 address settings (see
p. 5-12).
IMPORTANT
• If you use [Browse] to specify each item, press [Browse] after the expiration of the time specified
in "Startup Time Settings," on p. 3-30 (the default setting startup time is '60 seconds').
• Up to 128 alphanumeric characters can be entered for both [Host Name] and [File Path] on the
control panel. Enter each of these items on the server using no more than their allowable number
of characters.
• If you change the language of the touch panel display, [Host Name] and [File Path] may not be
displayed correctly, or you may not be able to browse the directories.
• If the language of the touch panel display differs from the computer used as a master browser,
[Host name] and [File path] may not be displayed correctly, or you may not be able to browse the
directories.
NOTE
5
Using a NetBIOS Network
• You can send data using the following formats. A DNS server is required for the latter case.
\\192.168.2.100\share
\\host_name.organization.company.com\share
• You can also specify the user name in the address using the following format.
domain_name\user_name (up to 15 alphanumeric characters for the domain name, and up to 20
for the user name)
• For instructions on how to specify recipient address settings, see Chapter 2, "Basic Sending
Methods," in the Sending and Facsimile Guide.
The settings for sending data to the shared folder are complete.
5-34
Setting Up a Computer as a File Server
Samba (UNIX/Linux)
IMPORTANT
• Samba 2.2.8a or later is supported.
• In some environments, detailed settings may be required in order to use Samba. For details, consult
your network manager.
1
2
Log in to a workstation as a superuser.
Set up the users who access Samba shared folder, and their
passwords.
Set a user name not longer than 20 alphanumeric characters, and a password not longer than
14 alphanumeric characters.
Set a recipient address using the control panel.
There are two methods for specifying the recipient address settings. You can select the desired
values from the list displayed by pressing [Browse]. Or you can press each key to enter the
desired value for each item.
Sample recipient setting:
• Server side settings:
[Computer name]:
swan
[Share Name]:
share
Create a folder called Images within share, and then specify Images as the recipient for
sending.
Setting Up a Computer as a File Server
5-35
5
Using a NetBIOS Network
3
• The machine's recipient settings:
[Protocol]:
Windows (SMB)
[Host Name]:
\\swan\share
[File Path]:
\Images
[User]:
User name entered in step 4.
[Password]:
Password for the above user.
Using a NetBIOS Network
5
IMPORTANT
• If you use [Browse] to specify each item, press [Browse] after the expiration of the time specified
in "Startup Time Settings," on p. 3-30 (the default setting startup time is '60 seconds').
• Up to 128 alphanumeric characters can be entered for both [Host Name] and [File Path] on the
control panel. For [User], up to 20 alphanumeric characters can be entered. Enter each of these
items on the server using no more than their allowable number of characters.
• If you change the language of the touch panel display, [Host Name] and [File Path] may not be
displayed correctly, or you may not be able to browse the directories.
• If the language of the touch panel display differs from the computer used as a master browser,
[Host name] and [File path] may not be displayed correctly, or you may not be able to browse the
directories.
5-36
Setting Up a Computer as a File Server
NOTE
• You can send data using the following formats. A DNS server is required for the latter case.
\\192.168.2.100\share
\\host_name.organization.company.com\share
• You can also specify the user name in the address using the following format.
- domain_name\user_name (up to 15 alphanumeric characters for the domain name, and up to
20 for the user name)
- user_name@organization.company.com (up to 128 characters in total)
Note that the latter is only applicable when sending to a Windows 2000/XP/Server 2003
computer that belongs to a domain containing Windows 2000/Server 2003 domain controllers.
• For instructions on how to specify recipient address settings, see Chapter 2, "Basic Sending
Methods," in the Sending and Facsimile Guide.
The settings for sending data to the shared folder are complete.
Using a NetBIOS Network
5
Setting Up a Computer as a File Server
5-37
Using a NetBIOS Network
5
5-38
Setting Up a Computer as a File Server
Using an AppleTalk Network
(Macintosh)
6
CHAPTER
This chapter describes settings and procedures for printing via an AppleTalk network.
AppleTalk Network Setup Procedures . . . . . . . . . . . . . . . . . . . . . . . . . . . . . . . . . . . . . . . . . . . . . . . . . . 6-2
Macintosh Network Settings . . . . . . . . . . . . . . . . . . . . . . . . . . . . . . . . . . . . . . . . . . . . . . . . . . . . . . . . . . 6-3
Protocol Settings. . . . . . . . . . . . . . . . . . . . . . . . . . . . . . . . . . . . . . . . . . . . . . . . . . . . . . . . . . . . . . . . . . . 6-4
Settings from the Control Panel . . . . . . . . . . . . . . . . . . . . . . . . . . . . . . . . . . . . . . . . . . . . . . . . . . . . . . . . . . . . . . . . 6-5
Setting Up a Computer for Printing . . . . . . . . . . . . . . . . . . . . . . . . . . . . . . . . . . . . . . . . . . . . . . . . . . . . . 6-8
6-1
AppleTalk Network Setup Procedures
To print via an AppleTalk network, it is necessary to perform the following procedures.
1
Macintosh Network Settings (See "Macintosh Network Settings," on p. 6-3.)
Set up the Macintosh for connection to an Ethernet network.
2
Protocol Settings (See "Settings from the Control Panel," on p. 6-5.)
Specify the protocol settings. To specify the settings, use:
• The machine's control panel
• A web browser (Remote UI)
• NetSpot Device Installer (Canon utility)
• A web browser (NetSpot Console) (Canon utility)
3
6
Macintosh Print Settings (See "Setting Up a Computer for Printing," on p. 6-8.)
Using an AppleTalk Network (Macintosh)
Specify the settings for each computer you use for printing.
IMPORTANT
• If you are using the optional Color Network Printer Unit, see the manual provided with the optional Color
Network Printer Unit.
• To print from a computer, the optional equipment must be installed. For the equipment needed, see
"Optional Equipment and System Environment Requirements," on p. 1-2.
• It is not possible to send a fax from a computer via an AppleTalk network.
• It is recommended that the network manager perform step 2 above.
• To configure settings with software other than the control panel of the machine, TCP/IP protocol must be
supported by your network environment.
6-2
AppleTalk Network Setup Procedures
Macintosh Network Settings
Verify the Macintosh network settings.
1
2
Check that [AppleTalk] is active.
❑ Click [Chooser] on the [Apple] menu.
❑ Check that [Active] is selected under [AppleTalk]. If [Inactive] is selected, select [Active].
Check that the AppleTalk connection method is [Ethernet].
❑ On the [Apple] menu, point to the control panels ➞ click [AppleTalk].
❑ Set the selection to [Ethernet].
❑ Close the [AppleTalk] dialog to save the setting.
6
NOTE
Using an AppleTalk Network (Macintosh)
In an environment connecting to Ethernet through LocalTalk, select [Printer Port].
The Macintosh network settings are complete.
Macintosh Network Settings
6-3
Protocol Settings
You can specify the protocol settings for the machine by using any of the following:
• The machine's control panel
• A web browser (Remote UI)
• NetSpot Device Installer (Canon utility)
• A web browser (NetSpot Console) (Canon utility)
IMPORTANT
• To print from a computer, the optional equipment must be installed. For the equipment needed, see
"Optional Equipment and System Environment Requirements," on p. 1-2.
• To configure settings with software other than the control panel of the machine, TCP/IP protocol must be
supported by your network environment.
• Some items cannot be set using NetSpot Device Installer or NetSpot Console. For details about items
that can be set with NetSpot Device Installer or NetSpot Console, see "Network Setting Items," on p.
9-2.
• The following procedure describes sample settings using the control panel.
6
Using an AppleTalk Network (Macintosh)
NOTE
• For instructions on how to enter settings using a web browser (Remote UI), see Chapter 3,
"Customizing Settings," in the Remote UI Guide.
• For more information on NetSpot Device Installer or NetSpot Console, see Chapter 7, "Using the
Network and Device Settings with Utilities."
6-4
Protocol Settings
Settings from the Control Panel
The procedure for specifying the settings from the control panel is as follows.
IMPORTANT
• AppleTalk is available only on Ethernet. You cannot use AppleTalk on Token Ring. If the Token Ring
board is installed on the machine, you cannot use AppleTalk. Remove the Token Ring board if it is
installed on the machine.
• Settings from the control panel become effective when the machine is restarted after the procedure.
NOTE
For instructions on how to enter characters using the touch panel display, see Chapter 2, "Basic
Operations," in the Reference Guide.
1
Press
2
Press [System Settings].
.
NOTE
If the message <Enter the System Manager ID and Password using the numeric keys.> appears
on the touch panel display, enter the System Manager ID and password. For instructions on how
to enter the System Manager ID and password, see Chapter 2, "Basic Operations," in the
Reference Guide.
Protocol Settings
6-5
Using an AppleTalk Network (Macintosh)
6
3
Press [Network Settings].
4
Press [AppleTalk Settings].
5
Select [On] for <AppleTalk>.
Using an AppleTalk Network (Macintosh)
6
Selecting [Off] disables AppleTalk.
6-6
Protocol Settings
6
Press [Service Name] ➞ enter the name of the printer.
The name you enter here appears in the Macintosh Chooser.
IMPORTANT
• The name of the printer can have up to 32 characters.
• If there is more than one printer in the same zone, each printer must have a unique name.
7
Press [Zone] ➞ enter a zone name.
If you are using a network that is set up in zones, enter the name of the zone.
You can also enter a zone name by pressing [Browse] and selecting the appropriate name from
the displayed list.
8
Confirm the settings you specified ➞ press [OK].
9
Press [Done] repeatedly until the Additional Functions screen closes.
Restart the machine.
❑ Turn OFF the machine, wait at least 10 seconds, and then turn it ON again.
6
NOTE
For instructions on how to turn ON/OFF the machine, see Chapter 1, "Before You Start Using
This Machine," in the Reference Guide.
The protocol settings are complete.
Protocol Settings
6-7
Using an AppleTalk Network (Macintosh)
10
Setting Up a Computer for Printing
After you have completed the machine protocol settings, install the printer driver on the
Macintosh that will do the printing, and then make the settings for the print destination.
See the Network Quick Start Guide to install the printer driver and to set the port.
IMPORTANT
To print from a computer, the optional equipment must be installed. For the equipment needed, see
"Optional Equipment and System Environment Requirements," on p. 1-2.
NOTE
Select either one of the following names displayed in the Chooser. ('xxx' indicates the name of the
printer entered in [Service Name].)
- [xxx_D]: the print job is printed without spooling to the hard disk of the machine.
- [xxx_S]: the print job is printed after it has been spooled to the hard disk of the machine.
Using an AppleTalk Network (Macintosh)
6
6-8
Setting Up a Computer for Printing
Using the Network and
Device Settings with Utilities
7
CHAPTER
This chapter describes the utilities used for managing networks and printers.
NetSpot Device Installer . . . . . . . . . . . . . . . . . . . . . . . . . . . . . . . . . . . . . . . . . . . . . . . . . . . . . . . . . . . . . 7-2
NetSpot Console. . . . . . . . . . . . . . . . . . . . . . . . . . . . . . . . . . . . . . . . . . . . . . . . . . . . . . . . . . . . . . . . . . . 7-3
7-1
NetSpot Device Installer
NetSpot Device Installer is a utility for specifying the initial settings of Canon devices connected
to a network. Available on the CD-ROM, NetSpot Device Installer can be accessed directly
without installation, enabling network users to quickly and easily specify the initial settings of
network devices.
For the system requirements for NetSpot Device Installer and instructions on how to install the
software, see the Readme file for NetSpot Device Installer. For instructions on how to display
the Readme file, see the Network Quick Start Guide.
Using the Network and Device Settings with Utilities
7
7-2
NetSpot Device Installer
NetSpot Console
NetSpot Console is a utility capable of managing devices connected to a network. This software
enables network administrators to set or view various types of information about network
devices using a web browser, such as list or map display of devices, detailed protocol settings,
display and notification of device status, and job manipulations.
For the system requirements for NetSpot Console and instructions on how to install the
software, see the NetSpot Console User's Guide or Readme file. For instructions on how to
display the NetSpot Console User's Guide or Readme file, see the Network Quick Start Guide.
Using the Network and Device Settings with Utilities
7
NetSpot Console
7-3
Using the Network and Device Settings with Utilities
7
7-4
NetSpot Console
Troubleshooting
8
CHAPTER
This chapter describes how to resolve printing problems.
Network Connection Problems and Remedies . . . . . . . . . . . . . . . . . . . . . . . . . . . . . . . . . . . . . . . . . . . . 8-2
Printing Problems and Remedies . . . . . . . . . . . . . . . . . . . . . . . . . . . . . . . . . . . . . . . . . . . . . . . . . . . . . . 8-4
Data Sending/File Sharing Problems and Remedies . . . . . . . . . . . . . . . . . . . . . . . . . . . . . . . . . . . . . . . 8-9
8-1
Network Connection Problems and Remedies
This section describes the causes of network connection problems, and how to resolve them.
<Check the network connection.> is displayed on the control panel.
Cause
The machine and cable are not properly connected.
Remedy
Turn OFF the machine's power switches, check that the machine is connected to the network
using the proper cable, and then turn them to ON again. (See "Connecting the Machine to a
Computer or Network," on p. 2-3.)
Troubleshooting
The machine automatically connects to other than the intended destination via its dial-up access (when a
dial-up router is connected to your network).
Cause
The machine periodically or temporarily communicates with devices on your network. If a
dial-up router or NetWare file server is on the network to which the machine is connected, the
machine connects to other than the intended destination, depending on the settings of the
machine or dial-up router (including the following examples); this may result in subscriber line
charges and call charges.
Examples:
• The file or mail server's host name or IP address set on the machine does not exist on the
network.
• The DNS server exists on an external network.
• You attempt to access a device connected to an external network, if the device's
information is set on the DNS server on the network to which the machine is connected.
Remedy
Check the following:
• If the dial-up router does not have to send packets via broadcast, change the router settings
to ensure that it sends packets via a method other than broadcast. If dial-up router has to
send packets via broadcast, check that the settings are correct.
• Check that the file or mail server's host name or IP address set on the machine is correct.
• If you attempt to access a device on the network to which the machine is connected with
the DNS server on an external network, set the destination using an IP address, not a host
name.
8
8-2
Network Connection Problems and Remedies
• If information about a device on an external network is set on the DNS server on the
network to which the machine is connected, check the settings.
Cause 1
The IP addresses of computers on which a web browser (Remote UI) or utility is used are not
allowed in <Setting/Browsing Range> in [IP Address Range Settings].
Remedy
If the settings for <Setting/Browsing Range> in [IP Address Range Settings] do not permit
the IP address of a computer on which a web browser (Remote UI) or utility is used, you
cannot set the machine setting items or browse information on the machine.
Check the settings for <Setting/Browsing Range> in [IP Address Range Settings]. (See step
21 in "TCP/IP Settings," on p. 3-4.)
Cause 2
[Use SNMP] or [Enable Dedicated Port Settings] is set to [Off].
Remedy
Set [Use SNMP] and [Enable Dedicated Port Settings] to [On]. (See "Communication
Environment Setup," on p. 2-17.)
Cause 3
The SNMP community name does not match.
Remedy
If you use an SNMP community name different from that stored in the machine to access the
machine from a utility, the utility will not detect the machine. In this case, check the SNMP
community name. (See "Communication Environment Setup," on p. 2-17.)
Troubleshooting
Detailed information concerning the machine cannot be set or browsed using a web browser (Remote UI),
or utility.
8
Network Connection Problems and Remedies
8-3
Printing Problems and Remedies
This section describes how to resolve basic printing problems.
Unable to Install a Driver (TCP/IP Network)
Cause
The IP address of the computer in which a driver is to be installed is not permitted by the
settings for <RX/Print Range> in [IP Address Range Settings].
Remedy
If you want to use IPP for printing and the IP address of the computer in which a driver is to
be installed is not permitted by the settings for <RX/Print Range> in [IP Address Range
Settings], the driver cannot be installed successfully. Check the settings for <RX/Print
Range> in [IP Address Range Settings]. (See step 21 in "TCP/IP Settings," on p. 3-4.)
Troubleshooting
Unable to Install a Driver (NetBIOS Network)
Cause
The IP address of the computer in which a driver is to be installed is not permitted by the
settings for both <RX/Print Range> and <Setting/Browsing Range> in [IP Address Range
Settings].
Remedy
If you are using a NetBIOS network and the IP address of the computer in which a driver is to
be installed is not permitted by the settings for both <RX/Print Range> and <Setting/
Browsing Range> in [IP Address Range Settings], the driver cannot be installed successfully.
Check the settings for both <RX/Print Range> and <Setting/Browsing Range> in [IP Address
Range Settings]. (See step 21 in "TCP/IP Settings," on p. 3-4.)
8
Unable to Print from a TCP/IP Network
8-4
Cause 1
The machine and cable are not properly connected.
Remedy
Turn OFF the machine's power switches, check that the machine is connected to the network
using the proper cable, and then turn them to ON again. (See "Connecting the Machine to a
Computer or Network," on p. 2-3.)
Printing Problems and Remedies
Cause 2
TCP/IP network is not properly set up.
Remedy
Confirm that the IP addresses are properly set up. If the IP addresses were set using DHCP,
BOOTP, or RARP, confirm that they are operating.
NOTE
Cause 3
The computer that is printing is not properly set up.
Remedy
Check the following:
• Confirm that the proper printer driver is installed. If you are printing from Windows, each
computer must have a printer driver installed. For instructions on how to install printer
drivers, see the Driver Guide.
• Confirm that the correct printer is set as the output destination for the computer that is
printing. Check the output destination in [Printer] in [Control Panel].
• If you are using LPD with Windows 98/Me, follow the procedures below to confirm the spool
settings: On the [Start] menu, point to [Settings] ➞ click [Printers]. Right-click the printer
icon you are using ➞ on the pop-up menu, click [Properties]. Click the [Details] tab to
display the [Details] sheet. Click [Spool Settings] to open the [Spool Settings] dialog box.
Confirm that [Spool print jobs so program finishes printing faster] is selected. If it is not
selected, select it ➞ click [OK].
Cause 4
The name of the file being printed is too long.
Remedy
Normally LPR sends jobs either under the name of the application software used for printing
or under the file name. However, a job name longer than 255 characters cannot be sent to
the printer. To correct this problem, rename the file with a shorter name.
Cause 5
The IP address of the computer from which data (print/fax/I-fax job) is to be sent to the
machine is not permitted by the settings for <RX/Print Range> in [IP Address Range
Settings].
Remedy
Check the settings for <RX/Print Range> in [IP Address Range Settings]. (See step 21 in
"TCP/IP Settings," on p. 3-4.)
Printing Problems and Remedies
Troubleshooting
Your computer may not be able to recognize the machine even though the IP address settings are
appropriate. This problem may be resolved by delaying the startup of network communications for the
machine. (See "Startup Time Settings," on p. 3-30.)
8
8-5
Unable to Print from a NetWare Network
Cause 1
The machine and cable are not properly connected.
Remedy
Turn OFF the machine's power switches, check that the machine is connected to the network
using the proper cable, and then turn them to ON again. (See "Connecting the Machine to a
Computer or Network," on p. 2-3.)
Cause 2
The NetWare network is not properly set up.
Remedy
Check the following:
• Confirm that the NetWare file server is running.
• Confirm that there is sufficient disk space on the NetWare file server. Large files cannot be
printed if there is insufficient disk space.
• Start NWADMIN or PCONSOLE, and then confirm that the print queue is set up properly
and is active.
• Confirm that the network settings of the machine are correctly set. (See "Protocol Settings,"
on p. 3-3.) Check the following in particular:
- A valid frame type is selected from [Frame Type].
- [Print Server] and [Printer Number] are correctly specified.
Troubleshooting
NOTE
Your computer may not be able to recognize the machine even though the IP address settings are
appropriate. This problem may be resolved by delaying the startup of network communications for the
machine. (See "Startup Time Settings," on p. 3-30.)
Cause 3
The computer that is printing is not properly set up.
Remedy
Check the following:
• Confirm that the proper printer driver is installed. If you are printing from Windows, each
computer must have a printer driver installed.
• For instructions on how to install printer drivers, see the Driver Guide.
• Confirm that the correct printer is set as the output destination for the computer that is
printing. In Windows 98/Me, confirm the output destination in [Printer] in [Control Panel].
Cause 4
If you are using an NDS PServer or Bindery PServer and the print server has a password
setting, the machine's password setting is incorrect.
Remedy
Perform the following steps to correct the machine's password setting:
• Confirm the password in the NetWare print server for printing on the machine.
• Press
➞ [System Settings] ➞ [Network Settings] ➞ [NetWare Settings] to open the
NetWare Settings screen.
• Press [Settings] ➞ enter a valid password in [Print Server Password]. (The setting becomes
effective when the machine is restarted.)
8
8-6
Printing Problems and Remedies
Unable to Print from a NetBIOS Network (Windows)
Cause 1
The machine and cable are not properly connected.
Remedy
Turn OFF the machine's power switches, check that the machine is connected to the network
using the proper cable, and then turn them to ON again. (See "Connecting the Machine to a
Computer or Network," on p. 2-3.)
Cause 2
TCP/IP network is not properly set up.
Remedy
On the assumption that the TCP/IP is working correctly if you print using NetBIOS network,
check the following:
• Confirm that the IP addresses are properly set up. If the IP addresses were set using
DHCP, BOOTP, or RARP, confirm that they are operating.
• If you are using a DHCP server, confirm that the WINS server is working correctly with the
DHCP server.
NOTE
Troubleshooting
Your computer may not be able to recognize the machine even though the IP address settings are
appropriate. This problem may be resolved by delaying the startup of network communications for the
machine. (See "Startup Time Settings," on p. 3-30.)
Cause 3
NetBIOS network is not properly set up.
Remedy
Confirm that SMB and WINS are properly set up.
Cause 4
The IP address of the computer from which data (print/fax/I-fax job) is to be sent to the
machine is not permitted by the settings for <RX/Print Range> in [IP Address Range
Settings].
Remedy
Check the settings for <RX/Print Range> in [IP Address Range Settings]. (See step 21 in
"TCP/IP Settings," on p. 3-4.)
Cause 5
The computer that is printing is not properly set up.
Remedy
Check the following:
• Confirm that the proper printer driver is installed. If you are printing from Windows, each
computer must have a printer driver installed.
• For instructions on how to install printer drivers, see the Driver Guide.
• Confirm that the correct printer is set as the output destination for the computer that is
printing. In Windows 98/Me, confirm the output destination in [Printer] in [Control Panel].
Printing Problems and Remedies
8
8-7
Unable to Print from an AppleTalk Network
Cause 1
The machine and cable are not properly connected.
Remedy
Turn OFF the machine's power switches, check that the machine is connected to the network
using the proper cable, and then turn them to ON again. (See "Connecting the Machine to a
Computer or Network," on p. 2-3.)
Cause 2
The AppleTalk network is not properly set up.
Remedy
Confirm the AppleTalk settings. (See "Settings from the Control Panel," on p. 6-5.)
In particular, check the following:
Set the [Phase] to a valid phase type.
Set the [Zone] to the zone to which the printer belongs.
NOTE
Troubleshooting
Your computer may not be able to recognize the machine even though the IP address settings are
appropriate. This problem may be resolved by delaying the startup of network communications for the
machine. (See "Startup Time Settings," on p. 3-30.)
Cause 3
The computer that is printing is not properly set up.
Remedy
Check the following:
• In the Chooser, confirm that the proper printer driver is installed.
• In the Chooser, confirm that the proper printer has been selected as the destination.
• In the Chooser, confirm that [AppleTalk] is active.
• In [Network Control Panel] or [AppleTalk Control Panel], confirm that the AppleTalk
connection method is EtherTalk or Ethernet.
8
8-8
Printing Problems and Remedies
Data Sending/File Sharing Problems and
Remedies
The following describes how to resolve data sending/file sharing problems.
Cause 1
The FTP server is not set correctly.
Remedy
Perform the following to check the server status. (If you are using Windows, perform these
from the MS-DOS prompt.)
• Example using UNIX, where the FTP server has the IP address: 192.168.1.195
U:>ftp 192.168.1.195
*Connect to server
Connected to 192.168.37.195.
220 canmfs FTP server (UNIX(r) System V Release 4.0) ready.
User (192.168.37.195:(none)): user_name
*User login
331 Password required for user_name.
Password:
*Enter password
230 User user_name logged in.
ftp> cd /export/share
*Move to data destination directory
250 CWD command successful.
ftp> bin
*Set data transfer type (binary)
200 Type set to I.
ftp> put sample.tif
*Set transfer file name for verification
ftp> by
*Cut off server connection
221 Goodbye
NOTE
If the above are confirmed and file sharing still does not operate normally, consult the network
administrator for the environment you are using.
Cause 2
The machine's address [User] setting contains one or more spaces after the user name.
Remedy
Ensure that the machine's address [User] setting does not contain spaces after the user
name.
Data Sending/File Sharing Problems and Remedies
8-9
Troubleshooting
Unable to Send Data/Share Files (FTP)
8
Cause 3
The machine was turned to OFF while sending data to the FTP server, and when the
machine was turned back to ON, it attempted to resend the data. (If a Windows NT/2000/XP/
Server 2003 FTP server is being used.)
Remedy
If power to the machine is turned to OFF while data is being sent to the FTP server, the FTP
server may hold the data in a writing-in-progress state. Therefore, this data cannot be
overwritten even when the machine reconnects and sends the same data again. Stop the
FTP server temporarily and delete the data that has not finished sending, so it can be sent
again.
Troubleshooting
Unable to Send Data/Share Files (NetWare)
Cause 1
File sharing settings for the NetWare file server are incorrect. (In Bindery Mode.)
Remedy
Check the following settings:
• Use your computer to log in to NetWare file server.
From Windows Explorer, double-click [Entire Network] ➞ check that the NetWare server
you want to share is listed there.
You can also check for the NetWare server as follows: On the [Start] menu, point to [Find] ➞
click [Computer] ➞ enter the name of the server you want to share ➞ check that the server
is on the network. (This server name will be [Host Name] entered when you set up the
recipient settings.)
• Open the server ➞ open the folder for file sharing. (The path to this folder will be [File Path]
entered when you set up the recipient settings.)
• Check that files can be written to this folder.
NOTE
If data cannot be sent or file sharing will not work after you do the above, consult your network manager.
8
8-10
Cause 2
File sharing settings for the NetWare file server are incorrect. (In NDS Mode.)
Remedy
Check the following settings:
• Log in as a user with Admin (or equivalent authority).
From Windows Explorer, double-click [Entire Network] ➞ check that the NetWare server
you want to share is listed there.
You can also check for the NetWare server as follows: On the [Start] menu, point to [Find] ➞
click [Computer] ➞ enter the name of the server you want to share ➞ check that the server
is on the network.
• Start the NWADMIN for this server. If [Root] is displayed at the upper left corner of the
screen, the layer below it is the context. If [Root] is not displayed, go to the [View] menu ➞
select [Go Up a Level] to change to the display below [Root]. (This context will be the value
entered to the right side of the expression "o=" when you set up [Host Name] of the
recipient.)
Data Sending/File Sharing Problems and Remedies
• With <Root> appearing on the screen, go to the [View] menu ➞ select [Go Up a Level] to
open the [Set Context] dialog box. The tree name will be displayed in [Tree]. (This tree
name will be the value entered to the right side of the expression ".TREE=" when you set
up [Host Name] of the recipient.)
NOTE
If data cannot be sent or file sharing will not work after you do the above, consult your network manager.
Cause 3
There is a print job in the printing queue, and the machine is still receiving this job.
Remedy
Send the data after the print job has been completely received. The machine cannot send
data while it is receiving a print job.
Cause
File sharing settings for the shared folder are incorrect.
Remedy
Check the following settings:
• On the computer you are using, go into Windows Explorer ➞ double-click [Entire Network]
➞ check that the computer you want to share is listed there. You can also check for the
computer as follows: On the [Start] menu, point to [Find] ➞ click [Computer] ➞ enter the
name of the computer you want to share ➞ check that the computer is on the network.
• If the computer you want to share is listed, double-click its icon to see whether the shared
name of the folder you want to share is listed.
• If the shared name does not appear, see "Setting Up a Computer as a File Server," on p.
3-53, and then check the shared folder settings.
Troubleshooting
Unable to Send Data/Share Files (Windows and Samba File Sharing)
8
Data Sending/File Sharing Problems and Remedies
8-11
Troubleshooting
8
8-12
Data Sending/File Sharing Problems and Remedies
Appendix
9
CHAPTER
This chapter includes network settings, specifications, and index.
Network Setting Items. . . . . . . . . . . . . . . . . . . . . . . . . . . . . . . . . . . . . . . . . . . . . . . . . . . . . . . . . . . . . . . 9-2
Available Software for Network Settings . . . . . . . . . . . . . . . . . . . . . . . . . . . . . . . . . . . . . . . . . . . . . . . . 9-11
Confirming Settings. . . . . . . . . . . . . . . . . . . . . . . . . . . . . . . . . . . . . . . . . . . . . . . . . . . . . . . . . . . . . . . . 9-12
Viewing the Network Access Log . . . . . . . . . . . . . . . . . . . . . . . . . . . . . . . . . . . . . . . . . . . . . . . . . . . . . 9-13
Specifications . . . . . . . . . . . . . . . . . . . . . . . . . . . . . . . . . . . . . . . . . . . . . . . . . . . . . . . . . . . . . . . . . . . . 9-14
Ethernet Interface Adaptor . . . . . . . . . . . . . . . . . . . . . . . . . . . . . . . . . . . . . . . . . . . . . . . . . . . . . . . . . . . . . . . . . . . 9-14
Token Ring Network Interface Adaptor . . . . . . . . . . . . . . . . . . . . . . . . . . . . . . . . . . . . . . . . . . . . . . . . . . . . . . . . . . 9-15
Index . . . . . . . . . . . . . . . . . . . . . . . . . . . . . . . . . . . . . . . . . . . . . . . . . . . . . . . . . . . . . . . . . . . . . . . . . . . 9-16
9-1
Network Setting Items
With the control panel of the machine, a web browser (Remote UI), NetSpot Device Installer, or
NetSpot Console, you can change the settings of the machine.
The items you can change are shown below.
IMPORTANT
If you are using the optional Color Network Printer Unit, see the manual provided with the optional Color
Network Printer Unit for more information on the settings (other than for e-mail/I-fax settings).
NOTE
• Use the control panel of the device or a web browser (Remote UI) to set items which cannot be set
using NetSpot Device Installer or NetSpot Console.
• In the following, "N/A" stands for "Not Applicable".
■ TCP/IP Settings
Appendix
Item
Setting Description
Default
Setting
Can be
set in
NetSpot
Device
Installer
IP Address Settings
9
IP Address
IP address
0.0.0.0
Subnet Mask
IP address
0.0.0.0
Gateway Address
IP address
0.0.0.0
DHCP
On/Off
Off
RARP
On/Off
Off
BOOTP
On/Off
Off
DNS Server Settings
Primary Server (DNS)
IP Address
0.0.0.0
N/A
Secondary Server (DNS) IP Address
0.0.0.0
N/A
CANON*****
* ("******"
represents
the last six
digits of a
MAC
address)
N/A
(NULL)
N/A
Host Name
Domain Name
9-2
Network Setting Items
47 Characters maximum
47 Characters maximum
Can be
set in
NetSpot
Console
Item
DNS Dynamic Update
Setting Description
On/Off
Default
Setting
Can be
set in
NetSpot
Device
Installer
Off
N/A
0.0.0.0
N/A
Off
N/A
Can be
set in
NetSpot
Console
PING Command
PING Command
IP Address
N/A
WINS Configuration
WINS Resolution
On/Off
WINS Server
IP Address
0.0.0.0
N/A
Scope ID
63 Characters maximum
(NULL)
N/A
Node Type
Auto Set, display only
-
-
-
N/A
LPD Settings
On/Off
On
N/A
LPD Banner Page
On/Off
Off
N/A
RAW Settings
On/Off
On
N/A
N/A
Use Bidirectional
On/Off
Off
N/A
N/A
Use SNTP
On/Off
Off
N/A
N/A
NTP Server Address
IP address or host name
(NULL)
N/A
N/A
Appendix
LPD Settings*1
Polling Interval
Interval for performing time
synchronization (1 to 48 hours)
24
N/A
N/A
9
-
-
N/A
N/A
On
N/A
N/A
RAW Settings*1
SNTP Settings
NTP Server Check
FTP Print Settings
Use FTP printing
On/Off
User
User name for FTP server login
(24 Characters maximum)
(NULL)
N/A
N/A
Password
Password for FTP server login
(24 Characters maximum)
(NULL)
N/A
N/A
On/Off
Off
N/A
N/A
IPP Settings
On/Off
On
N/A
N/A
Use Authentication
On/Off
Off
N/A
N/A
Use PASV Mode for FTP
Use PASV Mode for FTP
IPP Settings*1
Network Setting Items
9-3
Default
Setting
Can be
set in
NetSpot
Device
Installer
Can be
set in
NetSpot
Console
User name for IPP
authentication (24 Characters
maximum)
(NULL)
N/A
N/A
Password for IPP
authentication (24 Characters
maximum)
(NULL)
N/A
N/A
On/Off
On
N/A
N/A
Use Proxy
On/Off
On
N/A
N/A
Server Address
Server name or IP address
(128 Characters maximum)
(NULL)
N/A
N/A
Port Number
1 to 65535
80
N/A
N/A
Use Proxy within the
Same Domain
On/Off
Off
N/A
N/A
Item
User
Password
Setting Description
Use HTTP
Use HTTP
Proxy
Settings*2
Appendix
IP Address Range Settings*3
9
RX/Print Range:
Reject IP Address(es)
Apply Settings: On/Off
Up to 8 IP addresses can be
stored.
Off
N/A
N/A
RX/Print Range:
Permit IP Address(es)
Apply Settings: On/Off
Up to 8 IP addresses can be
stored.
Off
N/A
N/A
Setting/Browsing Range:
Reject IP Address(es)
Apply Settings: On/Off
Up to 8 IP addresses can be
stored.
Off
N/A
N/A
Setting/Browsing Range:
Permit IP Address(es)
Apply Settings: On/Off
Up to 8 IP addresses can be
stored.
Off
N/A
N/A
*1 This item is available only if the optional Color Network Multi-PDL Printer Kit (Standard equipment for the iR C3220N) or the optional
Super G3 FAX Board is installed.
*2 This item is available only if the optional Color Network Multi-PDL Printer Kit (Standard equipment for the iR C3220N) is installed.
*3 This item is available only if either one of the following optional equipment is installed.
- Color Network Multi-PDL Printer Kit (Standard equipment for the iR C3220N)
- Color Universal Send Kit
- Super G3 FAX Board
9-4
Network Setting Items
■ NetWare Settings
Item
Setting Description
Default
Setting
Can be
set in
NetSpot
Device
Installer
Cann be
set in
NetSpot
Console
Off
N/A
N/A
-
-
-
NetWare Settings
NetWare
On/Off
Frame Type
Auto Detect/Ethernet II/
Ethernet 802.2/Ethernet 802.3/
Ethernet SNAP
Auto Detect
IPX External Network
Number
Auto Set, display only
Node Number
Auto Set, display only
-
-
-
Packet Signature
Auto Set, display only
-
-
-
Print Service*1
Bindery PServer/RPrinter/NDS
PServer/NPrinter
NDS
PServer
Print Server
47 Characters maximum
(NULL)
File Server
47 Characters maximum
(NULL)
Print Server Password
20 Characters maximum
(NULL)
Service Mode
Service only currently mounted
form/
Change forms as needed/
Minimize form changes across
print queues/
Minimize form changes within
print queues
Minimize
form
changes
within print
queues
Appendix
Bindery PServer Settings*1
N/A
9
Printer Number
0 to 15
0
Polling Interval
1 to 15 seconds
5
Printer Form
0 to 255
0
N/A
Buffer Size
1 to 20 (KB units)
20
N/A
RPrinter Settings*1
Print Server
47 Characters maximum
(NULL)
File Server
47 Characters maximum
(NULL)
Printer Number
0 to 15
0
NDS PServer Settings*1
Print Server
64 Characters maximum
(NULL)
Tree
32 Characters maximum
(NULL)
Context
256 Characters maximum
(NULL)
Network Setting Items
9-5
Item
Setting Description
Print Server Password
20 Characters maximum
Service Mode
Service only currently mounted
form/
Change forms as needed/
Minimize form changes across
print queues/
Minimize form changes within
print queues
Default
Setting
Can be
set in
NetSpot
Device
Installer
Cann be
set in
NetSpot
Console
(NULL)
Minimize
form
changes
within print
queues
N/A
Printer Number
0 to 254
0
Polling Interval
1 to 255 seconds
5
Printer Form
0 to 255
0
N/A
Buffer Size
3 to 20 (KB units)
20
N/A
Appendix
NPrinter Settings*1
Print Server
64 Characters maximum
(NULL)
Tree
32 Characters maximum
(NULL)
Context
256 Characters maximum
(NULL)
Printer Number
0 to 254
0
*1 This item is available only if the optional Color Network Multi-PDL Printer Kit (Standard equipment for the iR C3220N) or the optional
Super G3 FAX Board is installed.
9
9-6
Network Setting Items
■ AppleTalk Settings*1
Item
Setting Description
Default
Setting
Can be
set in
NetSpot
Device
Installer
Can be
set in
NetSpot
COnsole
Off
N/A
N/A
AppleTalk
On/Off
Phase
Phase 2 (fixed)
Service Name
32 Characters maximum
Model name
Zone
32 Characters maximum
*
N/A
*1 This item is available only if the optional Color Network Multi-PDL Printer Kit (Standard equipment for the iR C3220N) is installed.
■ SMB Settings*1
Setting Description
On
N/A
Use SMB
On/Off
Server
15 Characters maximum
(NULL)
N/A
Printer
13 Characters maximum
(NULL)
N/A
Workgroup
15 Characters maximum
(NULL)
N/A
Comment
255 Characters maximum
(NULL)
N/A
LM Announce
On/Off
Off
N/A
Can be
set in
NetSpot
Console
Appendix
Item
Default
Setting
Can be
set in
NetSpot
Device
Installer
*1 This item is available only if the optional Color Network Multi-PDL Printer Kit (Standard equipment for the iR C3220N) or the optional
Super G3 FAX Board is installed.
■ SNMP Settings
Item
Setting Description
Use SNMP
On/Off
Community Name
Community Name
Default
Setting
Can be
set in
NetSpot
Device
Installer
Can be
set in
NetSpot
Console
On
N/A
N/A
public
N/A
N/A
Network Setting Items
9-7
9
■ Enable Dedicated Port Settings
Item
Enable Dedicated Port
Setting Description
On/Off
Default
Setting
Can be
set in
NetSpot
Device
Installer
Can be
set in
NetSpot
Console
On
N/A
N/A
Default
Setting
Can be
set in
NetSpot
Device
Installer
Can be
set in
NetSpot
Console
Off
N/A
N/A
■ Spool Settings*1
Item
Use Spooler
Setting Description
On/Off
*1 This item is available only if the optional Color Network Multi-PDL Printer Kit (Standard equipment for the iR C3220N) or the optional
Super G3 FAX Board is installed.
■ Startup Time Settings
Item
Appendix
Startup Time Settings
Setting Description
0 to 300 seconds
Default
Setting
Can be
set in
NetSpot
Device
Installer
60
N/A
Default
Setting
Can be
set in
NetSpot
Device
Installer
Can be
set in
NetSpot
Console
On
N/A
N/A
Can be
set in
NetSpot
Console
■ Ethernet Driver Settings
9
Item
9-8
Setting Description
Auto Detect
On/Off
Communication Mode
Half Duplex/Full Duplex
Half Duplex
N/A
N/A
Ethernet Type
10 Base-T/100 Base-TX
10 Base-T
N/A
N/A
MAC Address
Display only
-
-
-
Network Setting Items
■ Token Ring Settings*1
Item
Setting Description
Ring Speed and
Communication Method
Auto Detect/4 Mbps-CTR/
4 Mbps-DTR/16 Mbps-CTR
16 Mbps-DTR
Maximum Frame Size
14 to 4096
Default
Setting
Can be
set in
NetSpot
Device
Installer
Can be
set in
NetSpot
Console
Auto Detect
N/A
N/A
4096
N/A
N/A
Use Source Routing
On/Off
On
N/A
N/A
All Broadcast Request
On/Off
On
N/A
N/A
All Broadcast Response
Notice
On/Off
Off
N/A
N/A
LAA Mode
On/Off
Off
N/A
N/A
LAA
40 00 00 00 00 00 to 7F FF FF
FF FF FF
00 00 00 00
00 00
N/A
N/A
MAC Address
Display only
-
-
-
Default
Setting
Can be
set in
NetSpot
Device
Installer
Can be
set in
NetSpot
Console
*1 This item is available only if the optional Token Ring Network Interface Adapter is installed.
Item
Setting Description
SMTP Receipt
On/Off
On
N/A
N/A
POP
On/Off
On
N/A
N/A
SMTP Server
Server name or IP address (48
Characters maximum)
(NULL)
N/A
N/A
E-mail Address
64 Characters maximum
(NULL)
N/A
N/A
POP Server
Server name or IP address (48
Characters maximum)
(NULL)
N/A
N/A
POP Address
32 Characters maximum
(NULL)
N/A
N/A
POP Password
32 Characters maximum
(NULL)
N/A
N/A
POP Interval
0 to 99 (If the interval is set to
"0," the POP server is not
checked.)
0
N/A
N/A
Standard
N/A
N/A
Off
N/A
N/A
Appendix
■ E-Mail/I-Fax Settings*1
9
Authent./Encryption
POP Authentication
Standard/APOP/POP AUTH
POP Authentication
before Sending
On/Off
Network Setting Items
9-9
Item
Setting Description
Default
Setting
Can be
set in
NetSpot
Device
Installer
Can be
set in
NetSpot
Console
Off
N/A
N/A
SMTP Authentication
(SMTP AUTH)
On/Off
User
User name for SMTP
authentication (64 Characters
maximum)
(NULL)
N/A
N/A
Password for SMTP
authentication (32 Characters
maximum)
(NULL)
N/A
N/A
Password
Allow SSL (POP)
On/Off
Off
N/A
N/A
Allow SSL (SMTP)
On/Off
Off
N/A
N/A
*1 To use the e-mail/I-fax functions, the optional Color Universal Send Kit, the optional Resolution Switching Board, and the optional Color
Image Reader must be installed.
NOTE
Appendix
Use the control panel of the device or a web browser (Remote UI) to set items which cannot be set
using NetSpot Device Installer or NetSpot Console.
9
9-10
Network Setting Items
Available Software for Network Settings
You can specify the network settings of the machine using the following:
=Available
=Unavailable
=Only some of the items can be set (See "Network Setting Items," on p. 9-2.)
Type of Settings
The
Machine's
Control
Panel
Web Browser
(Remote UI)
NetSpot
Device
Installer
NetSpot
Console
NWADMIN/
PCONSOLE
TCP/IP Protocol Settings
(See p. 3-3.)
NetWare Print Server
Settings (See p. 4-3.)
NetWare Protocol Settings
(See p. 4-9.)
NetBIOS Protocol Settings
(See p. 5-3.)
Appendix
AppleTalk Protocol
Settings (See p. 6-4.)
9
Available Software for Network Settings
9-11
Confirming Settings
You can print a user's data list to confirm the network settings made from the machine's touch
panel display.
To print a user's data list, follow the procedure below.
1
Press
2
Press [Report Settings] ➞[Network] ➞ [User's Data List].
3
.
When a confirmation screen appears on the touch panel display, press
[Yes].
Appendix
The user's data list is printed.
9
9-12
Confirming Settings
Viewing the Network Access Log
This machine logs attempts to gain access from IP addresses that it has been set to reject. The
procedure for referring to the access log is as follows.
NOTE
For instruction on how to set the machine to permit or reject specific IP addresses, see step 21 in "TCP/
IP Settings," on p. 3-4.
Press [System Monitor].
2
Press [Print] ➞[Log].
Appendix
1
9
3
Select [Network] from the drop-down list.
The log pertaining to the rejected IP addresses is displayed.
NOTE
• Up to 100 logs can be displayed.
• You can export the log to a CSV format file, using the Remote UI. For instructions, see the
Remote UI Guide.
Viewing the Network Access Log
9-13
Specifications
Specifications are subject to change without notice.
Ethernet Interface Adaptor
Hardware Specifications
Network Interface
10Base-T/100Base-TX (RJ-45)
Software Specifications
Protocol Supported
TCP/IP
Frame type:
Print applications:
Ethernet II
LPD/Raw/IPP
IPX/SPX
Frame type:
Ethernet II/Ethernet 802.2/Ethernet 802.3/
Ethernet SNAP/Auto Detect
Bindery PServer/NDS PServer/RPrinter/
NPrinter/LPD/IPP
Appendix
Print applications:
NetBIOS
Frame type:
Print application:
Ethernet II
SMB
AppleTalk
Frame type:
Print application:
Ethernet SNAP
PAP (Printer Access Protocol)
9
9-14
Specifications
Token Ring Network Interface Adaptor
Hardware Specifications
Network Interface
4/16 Mbps Token Ring (RJ-45, DB-9)
Software Specifications
Protocol Supported
TCP/IP
Frame type:
Print applications:
Token Ring SNAP
LPD/Raw/IPP
IPX/SPX
Frame type:
Token Ring SNAP/Token Ring 802.2/Auto
Detect
Bindery PServer/NDS PServer/RPrinter/
NPrinter/LPD/IPP
NetBIOS
Frame type:
Print application:
Token Ring SNAP
SMB
Appendix
Print applications:
9
Specifications
9-15
Index
Numerics
100Base-TX, 2-12
10Base-T, 2-12
Appendix
A
9
All Broadcast Request, 2-15, 9-9
All Broadcast Response Notice, 2-15, 9-9
Allow SSL (POP), 9-10
Allow SSL (SMTP), 9-10
AppleTalk, 1-10, 1-12, 6-3, 6-6, 9-7, 9-14
AppleTalk network, 6-2, 8-8
AppleTalk network setup procedures, 6-2
AppleTalk settings, 6-6, 9-7
AppleTalk, 6-6, 9-7
Phase, 9-7
Service Name, 6-7, 9-7
Zone, 6-7, 9-7
Authent./Encryption, 9-9
Allow SSL (POP), 9-10
Allow SSL (SMTP), 9-10
Password, 9-10
POP Authentication, 9-9
POP Authentication Before Sending, 9-9
SMTP Authentication (SMTP AUTH), 9-10
User, 9-10
Auto Detect, 2-11, 2-15, 4-11, 9-8
Available software for network settings, 9-11
C
Checking your network, 1-8
Macintosh network, 1-10
UNIX network, 1-11
Using network with various types of computers, 1-12
Windows network, 1-8
Comment, 5-6, 9-7
Communication Mode, 2-12, 9-8
Full Duplex, 2-12
Half Duplex, 2-12
Community Name, 9-7
Connecting machine to computer or network, 2-3
Connecting to NetBIOS network, 5-10
Windows 2000/XP/Server 2003, 5-10, 5-12
Windows 98/Me, 5-10, 5-11
Windows NT 4.0, 5-10, 5-13
Connecting to NetBIOS netwrok and configueing
shared folder, 5-17
Samba (UNIX/Linux), 5-35
Windows 2000/XP/Server 2003, 5-22
Windows 95/98/Me, 5-17
Windows NT 4.0, 5-30
Container object, 4-5
Context, 4-15, 9-5
Context name, 4-15
Control panel, 2-10, 2-17, 3-4, 4-9, 5-3, 6-5
D
B
Bindery mode, 4-4, 4-6
Bindery print service, 4-4
Bindery PServer (Bindery queue server mode), 4-4,
4-12
Bindery PServer Settings, 9-5
Buffer Size, 9-5
File Server, 9-5
Polling Interval, 9-5
Print Server, 9-5
Print Server Password, 9-5
Printer Form, 9-5
Printer Number, 9-5
Service Mode, 9-5
Bindery remote printer mode (RPrinter), 4-4, 4-12
BOOTP, 3-7, 9-2
9-16
Buffer Size, 9-5
Index
DHCP, 3-6, 9-2
Direct, 3-40, 3-44, 3-46
DNS Dynamic Update, 3-7, 9-3
DNS Server Settings, 3-8, 9-2
DNS Dynamic Update, 9-3
Domain Name, 9-2
Host Name, 9-2
Primary Server (DNS), 9-2
Secondary Server (DNS), 9-2
Domain Name, 3-8, 9-2
I
E-mail Address, 9-9
E-Mail/I-Fax Settings, 9-9
E-mail Address, 9-9
POP, 9-9
POP Address, 9-9
POP Interval, 9-9
POP Password, 9-9
POP Server, 9-9
SMTP Receipt, 9-9
SMTP Server, 9-9
Enable Dedicated Port, 9-8
Ethernet, 6-3, 9-14
Ethernet board, 2-16
Ethernet driver, 2-10
Ethernet Driver Settings, 2-11, 9-8
Auto Detect, 9-8
Communication Mode, 9-8
Ethernet Type, 9-8
MAC Address, 9-8
Ethernet Type, 2-12, 9-8
100Base-TX, 2-12
10Base-T, 2-12
EtherTalk, 1-4, 1-10
Interface settings, 2-9
IP Address, 3-6, 3-8, 5-8, 9-2
IP Address Range Settings, 9-4
Permit IP Address(es), 9-4
Reject IP Address(es), 9-4
RX/Print Range, 9-4
Setting/Browsing Range, 9-4
IP Address Settings, 3-6, 9-2
BOOTP, 9-2
DHCP, 9-2
Gateway Address, 9-2
IP Address, 9-2
RARP, 9-2
Subnet Mask, 9-2
IPP, 3-14, 3-33, 3-46
IPP Client software, 3-46
IPP Settings, 9-3
IPP Settings, 9-3
Password, 9-4
Use Authentication, 9-3
User, 9-4
IPX External Network Number, 9-5
IPX/SPX, 9-14, 9-15
F
L
File Server, 9-5
Frame Type, 4-11, 9-5
FTP Print Settings, 9-3
Password, 9-3
Use FTP printing, 9-3
User, 9-3
FTP server settings, 3-54
FTP server for iW Gateway, 3-70
Mac OS X, 3-68
UNIX/Linux, 3-66
Windows 2000/XP/Server 2003, 3-54
Windows NT 4.0, 3-60
Full Duplex, 2-12
LAA (Locally Administered Address), 2-15, 9-9
LAA Mode, 2-15, 9-9
LM Announce, 5-6, 9-7
LocalTalk, 1-4, 6-3
Log on, 3-54, 3-61, 5-22, 5-30
LP, 3-40, 3-44, 3-46
LPD, 3-9, 3-33, 3-35, 3-39
LPD Banner Page, 3-10, 9-3
LPD Settings, 3-9, 9-3
LPD Banner Page, 9-3
Appendix
E
9
M
G
Gateway Address, 3-6, 9-2
MAC Address, 2-16, 9-8
Macintosh network, 1-10, 6-3
Macintosh network settings, 6-3
Maximum Frame Size, 2-15, 9-9
H
Half Duplex, 2-12
Host Name, 3-8, 9-2
HTTP, 3-33
N
NDPS (Novell Distributed Print Services), 4-4
NDS (Novell Directory Service), 4-4, 4-19
NDS print server, 4-4
Index
9-17
Appendix
9
NDS print service, 4-4
NDS PServer, 4-4, 4-12
NDS PServer Settings, 9-5
Buffer Size, 9-6
Context, 9-5
Polling Interval, 9-6
Print Server, 9-5
Print Server Password, 9-6
Printer Form, 9-6
Printer Number, 9-6
Service Mode, 9-6
Tree, 9-5
NDS remote printer mode (NPrinter), 4-4, 4-12
NetBEUI, 1-9, 5-2
NetBIOS, 1-3, 1-7, 1-8, 1-9, 1-12, 5-11, 5-12, 5-13,
9-14, 9-15
NetBIOS network, 5-2, 5-4, 5-10
NetBIOS network setup procedures, 5-2
NetWare, 1-4, 9-5
NetWare Administrator, 4-5
NetWare client software, 4-17
NetWare file server, 4-6, 4-8
NetWare network, 4-2, 4-17
NetWare network setup procedures, 4-2
NetWare print server, 4-4
NetWare print service settings, 4-3
Types of print service, 4-4
Using NetWare Administrator or PCONSOLE, 4-5
NetWare server, 1-8, 1-9, 1-12
NetWare Settings, 4-11, 9-5
Frame Type, 9-5
IPX External Network Number, 9-5
NetWare, 9-5
Node Number, 9-5
Packet Signature, 9-5
Print Service, 9-5
Network setting items, 9-2
AppleTalk settings, 9-7
E-Mail/I-Fax Settings, 9-9
Enable Dedicated Port settings, 9-8
Ethernet Driver Settings, 9-8
NetWare settings, 9-5
SMB Settings, 9-7
SNMP settings, 9-7
Spool settings, 9-8
Startup Time settings, 9-8
TCP/IP settings, 9-2
Token Ring settings, 9-9
Node Number, 4-11, 9-5
Node Type, 9-3
Novell Client, 4-3
NPrinter (NDS remote printer mode), 4-4, 4-12
NPrinter Settings, 9-6
Context, 9-6
Print Server, 9-6
Printer Number, 9-6
Tree, 9-6
NTFS format, 5-33
9-18
Index
NTP Server Address, 9-3
NTP Server Check, 9-3
NWADMIN, 4-3
P
Packet Signature, 9-5
Password, 9-10
PCONSOLE, 4-3, 4-5, 4-6
Permit IP Address(es), 9-4
Phase, 9-7
PING Command, 9-3
Polling Interval, 9-5
POP, 9-9
POP Address, 9-9
POP Authentication, 9-9
POP Authentication before Sending, 9-9
POP Interval, 9-9
POP Password, 9-9
POP Server, 9-9
Port Number, 9-4
Primary Server (DNS), 9-2
Print queue, 3-40, 3-44, 3-46
Direct, 3-40, 3-44, 3-46
LP, 3-40, 3-44, 3-46
Spool, 3-40, 3-44, 3-46
Print Server, 9-5
Print server name, 4-12
Print Server Password, 9-5
Print Service, 4-11, 9-5
Bindery PServer, 4-12
Bindery remote printer mode (RPrinter), 4-12
NDS PServer, 4-12
NDS remote printer mode (NPrinter), 4-12
Printer, 5-6, 9-7
Printer connection method for NetBIOS network, 5-14
Printer connection method for TCP/IP network, 3-35,
3-46
Solaris, 3-45
UNIX , 3-45
Windows 2000/XP/Server 2003 (IPP), 3-48
Windows 2000/XP/Server 2003 (LPD/Raw), 3-36
Windows 98/Me (LPD/Raw), 3-35
Windows 98/Me/NT 4.0 (IPP), 3-46
Windows NT 4.0 (LPD/Raw), 3-41
Printer Form, 9-5
Printer Number, 9-5
Printing or sending fax from computer, 1-2
Optional Equipment Requirements, 1-2
System Environment Requirements, 1-2
Protocol, 1-8, 3-3, 4-9, 5-3, 6-4
Protocol settings
AppleTalk, 6-4
Q
Queue server mode, 4-4, 4-6
R
RARP, 3-7, 9-2
Raw, 3-10, 3-33, 3-35
RAW Settings, 9-3
Reject IP Address(es), 9-4
Remote printer mode, 4-4, 4-6
Remote UI (Web browser), 2-9, 3-3, 4-9
Ring Speed and Communication Method, 2-14, 9-9
RPrinter Settings, 9-5
File Server, 9-5
Print Server, 9-5
Printer Number, 9-5
RX/Print Range, 9-4
S
Samba, 5-35
Scope ID, 5-8, 9-3
Secondary Server (DNS), 9-2
Sending data, 1-6
Optional Equipment Requirements, 1-6
System Environment Requirements, 1-6
Server, 5-6, 9-7
Server Address, 9-4
Service Mode, 9-5
Service Name, 6-7, 9-7
Setting up computer as file server
NetBIOS network, 5-16
NetWare network, 4-18
TCP/IP network, 3-53
Setting up computer for printing
AppleTalk network, 6-8
Setting up computer for printing/sending fax
NetBIOS network, 5-10
NetWare network, 4-17
TCP/IP network, 3-33, 5-10
Setting/Browsing Range, 9-4
Setup procedures
AppleTalk network, 6-2
NetBIOS network, 5-2
NetWare network, 4-2
Network environment, 2-2
TCP/IP network, 3-2
Setup using NetWare Administrator or PCONSOLE,
4-5
NDS queue server mode or remote printer mode, 4-5
Queue server mode or remote printer mode in
bindery mode, 4-6
SMB, 3-33
SMB Settings, 5-4, 5-5, 9-7
Comment, 5-6, 9-7
LM Announce, 5-6, 9-7
Printer, 5-6, 9-7
Server, 5-6, 9-7
Use SMB, 5-5, 9-7
Workgroup, 5-6, 9-7
SMTP Authentication (SMTP AUTH), 9-10
SMTP Receipt, 9-9
SMTP Server, 9-9
SMTP Server Settings, 3-26
SNMP Settings
Community Name, 9-7
Use SNMP, 9-7
SNTP Settings
NTP Server Address, 9-3
NTP Server Check, 9-3
Polling Interval, 9-3
Use SNTP, 9-3
SNTP, 3-11
Source routing, 2-15
Specifications, 9-14
Ethernet Interface Adaptor, 9-14
Hardware, 9-14, 9-15
Software, 9-14, 9-15
Token Ring Network Interface Adaptor, 9-15
Spool, 2-20, 3-40, 3-44, 3-46
Spooling, 3-46
Startup Time Settings, 3-30, 9-8
Subnet Mask, 3-6, 9-2
Switching hub, 3-24, 3-30
T
TCP/IP, 1-8, 1-9, 1-11, 1-12, 9-14, 9-15
TCP/IP client software, 5-10
TCP/IP network, 3-2, 3-33, 5-10
TCP/IP Settings, 3-4, 3-5, 9-2
Apply Settings, 3-18, 3-20, 3-21, 9-4
BOOTP, 3-7, 9-2
DHCP, 3-6, 9-2
DNS Dynamic Update, 3-9, 9-3
Index
9-19
Appendix
E-Mail/I-Fax settings (TCP/IP), 3-24
NetWare, 4-9
SMB and WINS settings (NetBIOS), 5-4
Startup time settings (TCP/IP), 3-30
TCP/IP settings (NetBIOS), 5-4
TCP/IP settings (TCP/IP), 3-4
Proxy Settings, 9-4
Port Number, 9-4
Server Address, 9-4
Use Proxy, 9-4
Use Proxy within the Same Domain, 9-4
9
Appendix
9
DNS Server Settings, 3-8, 9-2
Domain Name, 9-2
First Address, 3-19, 3-21
FTP Print Settings, 3-12, 9-3
Gateway Address, 3-6, 9-2
Host Name, 9-2
IP Address, 3-45, 9-2
IP Address Range Settings, 3-17, 3-20, 3-21, 9-4
IP Address Settings, 9-2
IPP Settings, 3-14, 9-3
Last Address, 3-19, 3-21
LPD Banner Page, 3-10, 9-3
LPD Settings, 3-9
Multiple Addresses, 3-19, 3-21
Node Type, 9-3
Permit IP Address(es), 3-17, 3-18, 3-20, 3-21, 9-4
PING Command, 3-23, 9-3
Port Number, 3-16, 9-4
Primary Server (DNS), 9-2
Proxy Settings, 3-16, 9-4
RARP, 3-7, 9-2
RAW Settings, 3-10, 9-3
Reject IP Address(es), 3-18, 3-19, 3-20, 3-21, 9-4
RX/Print Range, 3-17, 9-4
Scope ID, 9-3
Secondary Server (DNS), 9-2
Server Address, 3-16, 9-4
Setting/Browsing Range, 3-20, 3-21, 9-4
Single Address, 3-19, 3-21, 3-22
SNTP Settings, 9-3
Subnet Mask, 3-6, 9-2
Use HTTP, 3-15, 9-4
Use PASV Mode for FTP, 9-3
Use Proxy, 3-16, 9-4
Use Proxy within the Same Domain, 3-16, 9-4
WINS Configuration, 9-3
WINS Resolution, 9-3
WINS Server, 9-3
Token Ring, 2-9, 2-13, 6-5, 9-15
Token Ring board, 2-9, 2-16, 6-5
Token Ring Settings, 2-14, 9-9
All Broadcast Request, 2-15, 9-9
All Broadcast Response Notice, 2-15, 9-9
LAA (Locally Administered Address), 2-15, 9-9
LAA Mode, 2-15, 9-9
MAC Address, 9-8
Maximum Frame Size, 2-15, 9-9
Ring Speed and Communication Method, 2-14, 9-9
Use Source Routing, 2-15, 9-9
Tree, 9-6
Tree name, 4-15
Types of NetWare print service, 4-4
Bindery mode, 4-4
NDS (Novell Directory Service), 4-4
Queue server mode, 4-4
Remote printer mode, 4-4
U
UNIX, 3-45
UNIX network, 1-11
URL, 3-49
9-20
Index
Use Authentication, 9-3
Use Bidirectional, 9-3
Use FTP printing, 9-3
Use HTTP, 9-4
Use PASV Mode for FTP, 9-3
Use Proxy, 9-4
Use Proxy within the Same Domain, 9-4
Use SNMP, 9-7
Use SNTP, 9-3
Use Source Routing, 2-15, 9-9
Use Spooler, 2-20, 9-8
User, 9-4
W
Web browser, 2-9, 3-3, 4-9, 5-3, 7-3, 9-2
Windows network, 1-8
With NetWare server, 1-8
Without NetWare server, 1-9
WINS (Windows Internet Name Service), 5-4
WINS Configuration, 5-7, 9-3
Node Type, 9-3
Scope ID, 5-8, 9-3
WINS Resolution, 9-3
WINS Server, 5-8, 9-3
WINS Server, 5-8
WINS settings, 5-4, 5-7
Workgroup, 5-6
Z
Zone, 6-7, 9-7
CANON INC.
30-2, Shimomaruko 3-chome, Ohta-ku, Tokyo 146-8501, Japan
CANON U.S.A., INC.
One Canon Plaza, Lake Success, NY 11042, U.S.A.
CANON CANADA INC.
6390 Dixie Road Mississauga, Ontario L5T 1P7, Canada
CANON EUROPA N.V.
Bovenkerkerweg 59-61 P.O. Box 2262, 1180 EG Amstelveen, The Netherlands
CANON FRANCE S.A.
17, quai du President Paul Doumer 92414 Courbevoie Cedex, France
CANON COMMUNICATION & IMAGE FRANCE S.A. (Pour les utilisateurs de l imprimante laser uniquement)
102, avenue du General de Gaulle 92257 La Garenne-Colombes Cedex, France
CANON (U.K.) LTD.
Woodhatch, Reigate, Surrey, RH2 8BF, United Kingdom
CANON DEUTSCHLAND GmbH
Europark Fichtenhain A10, 47807 Krefeld, Germany
CANON ITALIA S.p.A.
Via Milano, 8 - 20097 San Donato Milanese (MI) Italy
CANON LATIN AMERICA, INC.
703 Waterford Way, Suite 400, Miami, Florida 33126 U.S.A.
CANON AUSTRALIA PTY. LTD
1 Thomas Holt Drive, North Ryde, Sydney, N.S.W. 2113, Australia
CANON SINGAPORE PTE. LTD.
1 HarbourFront Avenue #04-01 Keppel Bay Tower, Singapore 098632
CANON HONGKONG CO., LTD
9/F, The Hong Kong Club Building, 3A Chater Road, Central, Hong Kong
FA7-5487 (000)
© CANON INC. 2004

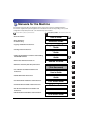

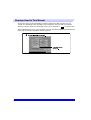


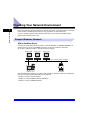
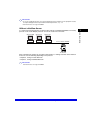
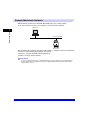

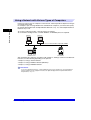
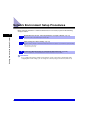
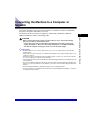
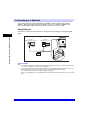

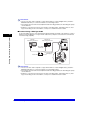
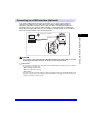

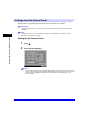
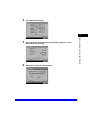
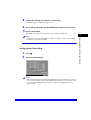
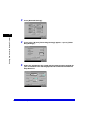

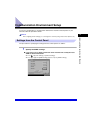
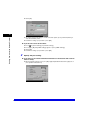
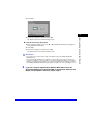
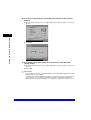


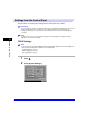
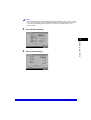
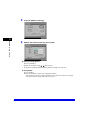
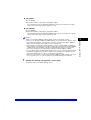
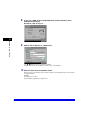

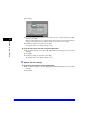
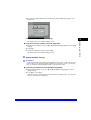
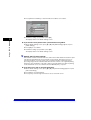

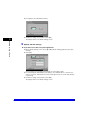
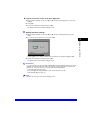

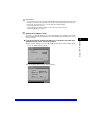
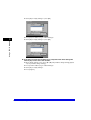
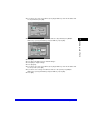
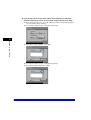
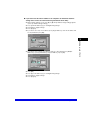
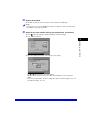
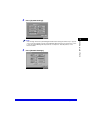
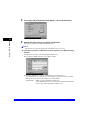
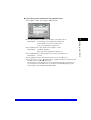
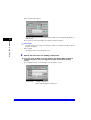
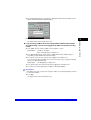
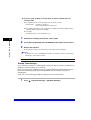

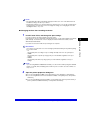

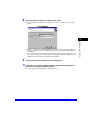
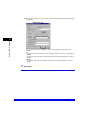
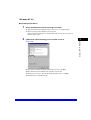
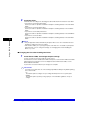
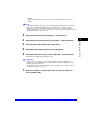
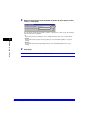

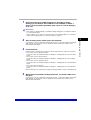

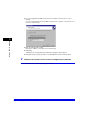

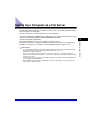
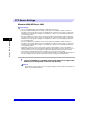
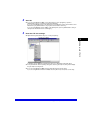
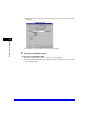


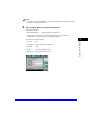
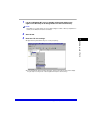
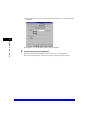
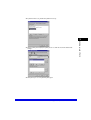
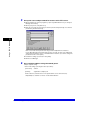
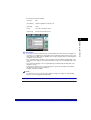
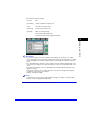


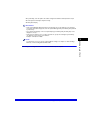

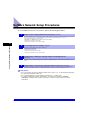

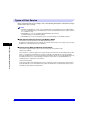
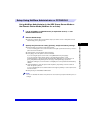
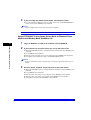

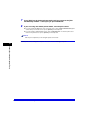
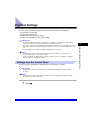
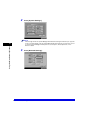
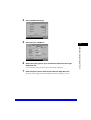
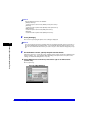
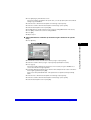
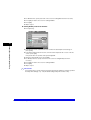

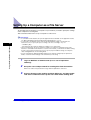
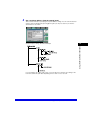


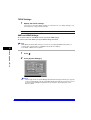
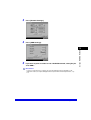
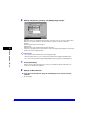
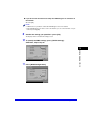
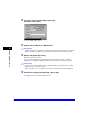
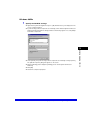
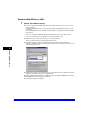


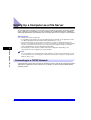
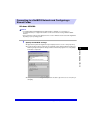

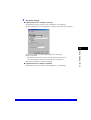
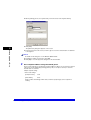
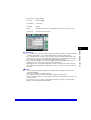
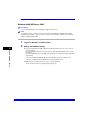
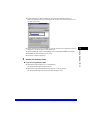
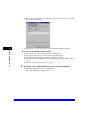
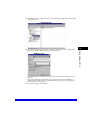
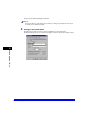
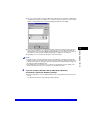
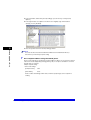
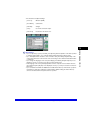
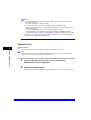
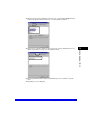
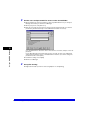
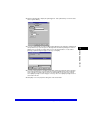
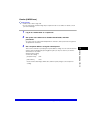
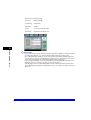
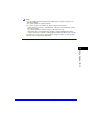


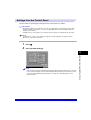
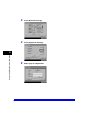


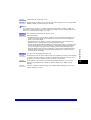
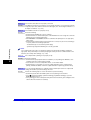
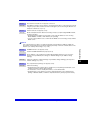
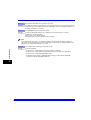


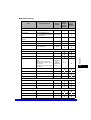
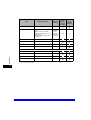
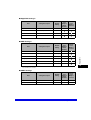
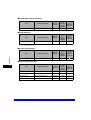
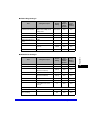
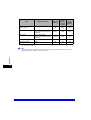

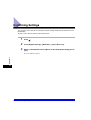
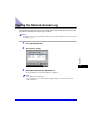


![[Impostazioni rete].](http://vs1.manualzilla.com/store/data/006126015_1-a8b230434cd1a1b69e1ac6b45a87b86d-150x150.png)