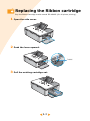
1
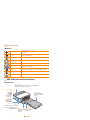
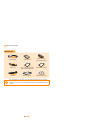
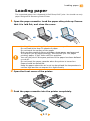
Samsung Photo Printer User’s Guide
SPP-2040 Series / SPP-2020 Series
This manual is provided for information purposes only. All information included herein is subject
to change without notice. Samsung Electronics is not responsible for any changes, direct or
indirect, arising from or related to use of this manual.
ⓒ 2005 Samsung Electronics Co., Ltd. All rights reserved.
SPP-2040 Series, SPP-2020 Series are model name of Samsung Electronics Co., Ltd.
SAMSUNG and Samsung logo are trademarks of Samsung Electronics Co., Ltd.
PictBridge and PictBridge logos are trademarks of Camera & Image Product Association (CIPA).
Memory Stick and Memory Stick PRO are trademarks of Sony Corporation.
MultiMediaCard is trademark of Toshiba Corporation.
xD-Picture Card is trademark of Fuji Photo Film Co., Ltd., Toshiba Corporation and Olympus
Optical Co., Ltd.
Mac, Mac logos and Macintosh are trademarks of Apple Computer, Inc.
Bluetooth is trademark of Bluetooth SIG, Inc.
IBM and IBM PC are trademarks of International Business Machines Corporation.
Microsoft, Windows, Windows 98, Windows ME, Windows 2000, and Windows XP are registered
trademarks of Microsoft Corporation.
Apple, AppleTalk, TrueType and LaserWriter are trademarks of Apple Computer, Inc.
All other brand or product names are trademarks of their respective companies or organizations.
CONTACT SAMSUNG WORLD WIDE
If you have any comments or questions regarding Samsung products,
contact the SAMSUNG customer care center.
Country
Customer Care Center
Web Site
CANADA
1-800-SAMSUNG (7267864)
www.samsung.com/ca
MEXICO
01-800-SAMSUNG (7267864)
www.samsung.com/mx
U.S.A
1-800-SAMSUNG (7267864)
www.samsung.com
ARGENTINE
0800-333-3733
www.samsung.com/ar
BRAZIL
0800-124-421
www.samsung.com/br
CHILE
800-726-7864 (SAMSUNG)
www.samsung.com/cl
COSTA RICA
0-800-507-7267
www.samsung.com/latin
ECUADOR
1-800-10-7267
www.samsung.com/latin
EL SALVADOR
800-6225
www.samsung.com/latin
GUATEMALA
1-800-299-0013
www.samsung.com/latin
JAMAICA
1-800-234-7267
www.samsung.com/latin
PANAMA
800-7267
www.samsung.com/latin
PUERTO RICO
1-800-682-3180
www.samsung.com/latin
REP. DOMINICA
1-800-751-2676
www.samsung.com/latin
TRINIDAD &
TOBAGO
1-800-7267-864
www.samsung.com/latin
VENEZUELA
1-800-100-5303
www.samsung.com/latin
BELGIUM
02 201 2418
www.samsung.com/be
CZECH REPUBLIC
844 000 844
www.samsung.com/cz
DENMARK
38 322 887
www.samsung.com/dk
FINLAND
09 693 79 554
www.samsung.com/fi
FRANCE
08 25 08 65 65
(€ 0,15/min)
www.samsung.com/fr
GERMANY
01805 - 121213
(€ 0,12/min)
www.samsung.de
HUNGARY
06 40 985 985
www.samsung.com/hu
Country
Customer Care Center
Web Site
ITALIA
199 153 153
www.samsung.com/it
LUXEMBURG
02 261 03 710
www.samsung.lu
NETHERLANDS
0900 20 200 88
(€ 0,10/min)
www.samsung.com/nl
NORWAY
231 627 22
www.samsung.com/no
POLAND
0 801 801 881
www.samsung.com/pl
PORTUGAL
80 8 200 128
www.samsung.com/pt
SLOVAKIA
0850 123 989
www.samsung.com/sk
SPAIN
902 10 11 30
www.samsung.com/es
SWEDEN
08 585 367 87
www.samsung.com/se
U.K
0870 242 0303
www.samsung.com/uk
RUSSIA
8-800-200-0400
www.samsung.ru
UKRAINE
8-800-502-0000
www.samsung.com/ur
AUSTRALIA
1300 362 603
www.samsung.com/au
CHINA
800-810-5858
010- 6475 1880
www.samsung.com.cn
HONG KONG
2862 6001
www.samsung.com/hk
INDIA
3030 8282
1600 1100 11
www.samsung.com/in
INDONESIA
0800-112-8888
www.samsung.com/id
JAPAN
0120-327-527
www.samsung.com/jp
MALAYSIA
1800-88-9999
www.samsung.com/my
PHILIPPINES
1800-10-SAMSUNG (7267864)
www.samsung.com/ph
SINGAPORE
1800-SAMSUNG (7267864)
www.samsung.com/sg
THAILAND
1800-29-3232
02-689-3232
www.samsung.com/th
TAIWAN
0800-329-999
www.samsung.com/tw
VIETNAM
1 800 588 889
www.samsung.com/vn
SOUTH AFRICA
0860 7267864 (SAMSUNG)
www.samsung.com/za
U.A.E
800SAMSUNG (7267864)
www.samsung.com/mea
Important Safety Information
Safety Instructions
Your system is designed and tested to meet the latest standards for safety of
information technology equipment. However, to ensure safe use of this product,
it is important that the safety instructions marked on the product and in the
documentation are followed. Always follow these instructions to help guard
against personal injury and damage to your system.
Setting Up your System
• Use only with power cord of Dongyang Instrument, ADP-4024W
• Read and follow all instructions marked on the product and in the documentation
before you operate your system. Retain all safety and operating instructions for future
use.
• Do not use this product near water or a heat source such as a radiator.
• Set up the system on a stable work surface.
• The product should be operated only with the type of power source indicated on the
rating label.
• Ensure that the electrical outlet you are using to power your equipment is easily
accessible in case of fire or short circuit.
• If your printer has a voltage selector switch, make sure that the switch is in the proper
position for your area.
• Openings in the printer case are provided for ventilation. Do not block or cover these
openings. Make sure you provide adequate space, at least 6 inches (15 cm), around
the system for ventilation when you set up your work area. Never insert objects of any
kind into the printer ventilation openings.
• Ensure that the fan vents on the bottom of the casing are clear at all times. Do not
place the printer on a soft surface, doing so will block the bottom vents.
• If you use an extension cord with this system, make sure that the total ampere rating
on the products plugged into the extension cord does not exceed the extension cord
ampere rating.
Care During Use
• Do not walk on the power cord or allow anything to rest on it.
• Do not spill anything on the system. The best way to avoid spills is to not eat or drink
near your system.
• When the printer is turned off, a small amount of electrical current still flows through
the Printer. To avoid electrical shock, always unplug all power cables, before cleaning
the system.
• Unplug the system from the wall outlet and refer servicing to qualified personnel if:
-The power cord or plug is damaged.
-Liquid has been spilled into the system.
-The system does not operate properly when the operating instructions are
followed.
-The system was dropped or the casing is damaged.
-The system performance changes.
Replacement Parts and Accessories
Use only replacement parts and accessories recommended by
manufacturer.
• To reduce the risk of fire, use only No. 26 AWG or larger telecommunications line cord.
• Do not use this product in areas classified as hazardous. Such areas include patient
care areas of medical and dental facilities, oxygen rich environments, or industrial
areas.
Power Cord Requirements
The power cord set (wall plug, cable and AC adapter plug) you received with your
printer meets the requirements for use in the country where you purchased your
equipment.
Power cord sets for use in other countries must meet the requirements of the
country where you use the printer. For more information on power cord set
requirements, contact your authorized dealer, reseller, or service provider.
General Requirements
The requirements listed below are applicable to all countries:
• The length of the power cord set must be at least 6.00 feet (1.8m) and a maximum of
9.75 feet (3.0m).
• All power cord sets must be approved by an acceptable accredited agency responsible
for evaluation in the country where the power cord set will be used.
• The power cord set must have a minimum current capacity of 7 A and a nominal
voltage rating of 125 or 250 volts AC, as required by each country’s power system.
This user’s guide is for both SPP-2040 Series and SPP-2020 Series.
However the instructions and pictures contained in this user’s guide are mainly for
SPP-2040 Series users. Make sure the model and serial number before reading
this user’s guide.
CONTENTS
Important Safety Information
Safety Instructions
Power Cord Requirements
1. Getting started
Name of each part .......................................................................1.2
SPP-2040 Series Photo Printer..............................................1.2
SPP-2020 Series Photo Printer..............................................1.4
2. Installation
Installing the Ribbon cartridge .......................................................2.2
Loading paper .............................................................................2.3
Connecting the power cord ............................................................2.4
3. Printing from memory cards (For SPP-2040 Series only)
Inserting memory cards ................................................................3.2
Printing images............................................................................3.3
Printing multiple images................................................................3.4
Printing images using multi-display ................................................3.6
Printing enlargements of
portions of an image ....................................................................3.7
Setting various effects ..................................................................3.9
Setting color mode .............................................................3.9
Setting sharpness...............................................................3.9
Setting brightness ..............................................................3.9
Setting additional functions ......................................................... 3.10
Setting borders ................................................................ 3.10
Selecting layout ............................................................... 3.11
Setting print all function .................................................... 3.12
Setting language .............................................................. 3.12
Printing DPOF files ..................................................................... 3.13
Removing memory cards.............................................................3.14
When not connected to a computer..................................... 3.14
When connected to a computer .......................................... 3.14
4. Printing directly from your digital camera
(For SPP-2020 and SPP-2040 Series)
5. Printing via a computer
(For SPP-2020 and SPP-2040 Series)
Connecting your printer to a Windows-based PC...............................5.2
Installing the program for Windows ................................................5.3
System requirements..........................................................5.3
Installing the program ........................................................5.4
Reinstalling the Program .....................................................5.6
Deleting the program ..........................................................5.7
3
Deleting the PhotoThru program ....................................................5.9
Selecting your Photo printer as the default printer in Windows .........5.10
Printing from a Windows-based computer......................................5.11
Canceling printing ............................................................ 5.12
Setting up the printer in Windows ................................................ 5.13
Opening the Properties screen............................................ 5.13
Getting to know the properties screen ................................. 5.14
Printing with the PhotoThru program in Windows............................ 5.19
Installing the program for Macintosh.............................................5.21
System requirements for Macintosh .................................... 5.21
Installing the program ...................................................... 5.21
Setting up the printer in Macintosh ............................................... 5.24
Using in MAC OS 10.3.X USB environment ........................... 5.24
Printing from a Macintosh............................................................5.26
Deleting the program ........................................................ 5.28
Printing using PhotoThru program in Macintosh ..............................5.29
Installing the program ...................................................... 5.29
Printing the image ............................................................ 5.29
Using MSC(Mass Storage Class) function(For SPP-2040 Series only) .5.31
Printing with Bluetooth (Optional: SPP-00BA)................................. 5.32
6. Maintenance
Maintaining the printer..................................................................6.2
Cleaning the outside ...........................................................6.2
Replacing the Ribbon cartridge.......................................................6.3
Troubleshooting ...........................................................................6.5
Error messages on the display .............................................6.5
Scheduling printer status checks ..........................................6.8
Specifications..................................................................................................6.9
Radio Frequency Emissions ................................................ 6.10
Declaration of Conformity (European Countries) ................... 6.11
EU Declaration of Conformity (R&TTE)................................. 6.12
Index ....................................................................................... 6.13
4
1. Getting started
You can print images with the Samsung SPP-2040 and SPP-2020 Series
photo printer directly from your digital camera and memory card without
connecting to a computer.
This package contains the SPP-2040 or SPP-2020 Series photo printer,
accessories, a user's guide and an installation CD. Please check that you
have product and accessories after unpacking.
This user's guide will explain how to print images and use the photo
printer.
Please read the user’s guide before operating the photo printer.
• Name of each part
1.1
Name of each part
This user's guide explains how to use the photo printer
SPP-2040 and SPP-2020 Series. SPP-2020 Series printer is not equipped with a
display panel.
SPP-2040 Series Photo Printer
<Front View>
Display panel
Buttons
For accessing and operating functions.
Shows printer
power-on/off
status, images,
print status,
and error
messages.
On/Off
Turn the printer
on or off.
Memory card slot
Power
adapter port
You can print images from
memory cards. For details,
see page 3.2-Inserting memory
cards.
Use this to
connect
the power
adapter
included with
the printer.
USB port
Use this port to
connect the
printer to the
computer. USB port
for digital camera
Use this port to
connect the printer to a
digital camera or a
Bluetooth device.Front cover
Put down to
install the
paper cassette.
Paper cassette
Insert paper for
printing.
1.2
Output tray
Printed photos are
discharged into
this tray.
Name of each part
<Side and Rear View >
Ribbon cartridge release level
Push upward to remove the existing Ribbon
cartridge.
Ribbon cartridge install holder
Install the Ribbon cartridge.
Side cover
Open to install the
Ribbon cartridge.
Rear aperture
When printing, the paper
moves back and forth
through the printer.
<Display>
Copies
Shows the number
of copies being
made of the current
image.
x3
:4
Total copies
Shows the total
number of copies to be
printed.
Image Number
9/9
1.3
Shows the order of
images.
Name of each part
<Buttons>
On/Off
Turn the printer on or off.
To turn the printer off, press and hold for more than 2
seconds.
Zoom In
Zoom in of the image.
Zoom Out
Zoom out of the image.
Up/Down
Select the number of copies you want to print.
Left/Right
Move to the next image in the menu.
OK
Change menu settings.
Cancel
Cancel or stop printing, or cancel menu setting changes.
Menu
Access menus to use effects and other functions.
Print
Print images.
SPP-2020 Series Photo Printer
<Front View>
On/Off button
Turn the printer on or off. To turn the printer off, press
and hold for more than 2 seconds.
Power
adapter port
Output tray
Use this to
connect
the power
adapter
included with
the printer.
Printed photos are
discharged into this
tray.
USB port
Use this port to
connect the
printer to the
computer.
USB port for digital
camera
Use this port to connect the
printer to a digital camera or
a Bluetooth device. Front cover
Paper cassette
Put down install
Insert paper for
the paper
printing.
cassette.
1.4
Name of each part
<On/Off button light indications>
Color
Blue
Red
State
Message
On
An image is ready to be printed
Flickers at 1 second of
interval
An image is being printed.
On
Paper jam, paper movement error, print
error. Turn the printer off and on.
Flickers at 1 second of
interval
The image to be printed is not of a
supported format or there is a JPEG file
error. You can do other print jobs without
any operation.
Flickers at 0.5 second
of interval
No paper, paper size error, paper type error,
cartridge error. You can do other print jobs
after solving the problems.
<Side and Rear View >
Ribbon cartridge
release lever
Put upward to remove the
existing Ribbon cartridge.
Ribbon cartridge install holder
Install the Ribbon cartridge.
Side cover
Open to install the
Ribbon cartridge.
Rear aperture
When printing, the paper moves
back and forth through the printer.
1.5
Name of each part
Accessories
Power adapter
Paper Cassette
Ribbon cartridge
(for 10 pieces printing)
Power cord
User’s guide (Memory Card)
(Only for SPP-2040 Series)
Quick installation guide
USB cable
Paper (10 pieces)
Software program CD
The appearance of the power cord may differ depending on the country’s
specifications.
Depending on your country, the USB cable may not be supplied with your
printer.
1.6
2. Installation
This photo printer prints images by moving the print paper back
and forth through the printer. This chapter details the distances
that need to be maintained between the printer and
surrounding objects, how to turn the printer on and off, and
how to load paper. To ensure quick and easy printing, please
read this chapter.
• Installing the Ribbon cartridge
• Loading paper
• Connecting the power cord
2.1
Installing the Ribbon cartridge
Only use Samsung-approved ribbon cartridges, designed for your printer.
Ribbon cartridge/photo paper: IPP-4640G
The supplied Ribbon cartridge allows you to print 10 pieces of paper.
Do not use sharp objects, such as a knife or scissors, to open the
ribbon cartridge package. You could damage the surface of the
ribbon cartridge.
Do not touch the ribbon cartridge film.
Keep the ribbon cartridge where the air is not too humid and the
temperature is not too high and expose it to light directly.
1
2
Open the side cover.
After removing the
cartridge from its package,
rotate the roller to smooth
out wrinkles or uneven
areas in the film.
Film
Roller
If the film is not even, it could be
damaged during installation.
3
4
Insert the cartridge in the
direction in the shown
illustration.
Make sure that the
cartridge is under the lever
and then close the side
cover.
2.2
Lever
Loading paper
Loading paper
The supported paper size is Postcard(102x152mm/4"x6") size. You should use only
paper designed for Samsung Photo Printer.
1 Open the paper cassette. Load the paper shiny side up. Ensure
that it is laid flat, and close the cover.
Loading the paper shiny side down may cause a problem.
Do not load more than 20 sheets of paper.
Do not touch the surface of the paper.
Only use the supplied ribbon cartridge, photo paper, and approved
IPP-4640G (for 40 pages printing), IPP-46120G (for 120 pages
printing) paper. If not, there will be a problem.
You can not print if the spare portions of the paper has been defaced
or cut off.
Do not insert the paper cassette when the printer is turned on.
Paper should be stored flat.
Keep the paper where the air is not too humid and the temperature is
not too high and do not expose it to light directly.
2
Open the front cover of the printer.
3
Push the paper cassette into the printer completely.
2.3
Connecting the power cord
To turn on the printer, you need the power cord and the power adapter. Connect the
power adapter to the printer and connect the power cord to the an wall outlet or
other power source.
1
2
Connect the end of the
power adapter to the
power adapter port of
the printer.
Connect the power cord
to the power adapter
and connect the cord to
the wall outlet or power
source.
Make sure the power adapter
does not block the printer's
rear aperture.
3
Press the On/Off button. The printer will turn on after about 5
seconds.
Do not disassemble the printer when the printer is turned on.
There is danger of electric shock.
Do not insert the paper casette when the printer is turned on.
2.4
3. Printing from memory
cards (For SPP-2040
Series only)
This printer can print images from seven kinds of memory cards. You can choose
specific copy, size and language options without connecting to a computer.
• Inserting memory cards
• Printing images
• Printing multiple images
• Printing images using multi-display
• Printing enlargements of portions of an image
• Setting various effects
• Setting additional functions
• Printing DPOF files
• Removing memory cards
3.1
Inserting memory cards
This printer can read seven kinds of memory cards. The memory cards
support up to 2GB.
Insert one memory card only. Do not force a card into the memory card slot
as this may cause damage to your printer.
There are many kinds of memory cards, and each memory card has many
different sub types.In some cases a newly launched memory card may not
be supported by your printer, even if it is a kind of memory card that is
available with your printer.
Do not attempt to insert a non-supported memory card into the printer.
Do not attempt to insert a memory card that has dust or dirt on its surface.
This may cause problems.
Insert the card according to the following instructions.
CompactFlash Type I & II
The label and the arrow should be facing up.
Insert the memory card until it stops.
xD-Picture Card
M Type is not supported.
The label should be facing up with the arrow pointing
into the printer and the metal contacts facing down.
Insert the memory card until it stops.
MultiMedia Card
The angled corner should be on the right, the label
facing up and the arrow pointing into the printer.
Insert the memory card until it stops.
Memory Stick/Memory Stick-PRO
The angled corner should be on the left, the arrow
pointing into the printer and the metal contacts facing
down. Insert the memory card until it stops.
Secure Digital
The label should be facing up and the angled corner should
be on the right with the metal contacts facing down.
Insert the memory card until it stops.
SmartMedia
The angled corner should be on the right and the arrow
pointing into the printer with the metal contacts facing up.
Insert the memory card until it stops.
3.2
Printing images
If you can see images on the display panel, select one and print it.
Insert one memory card only.
When a paper jam occurs during printing, do not pull out the jammed paper.
After turning the power off and then on again, the jammed paper should
come out automatically.
If you remove the memory card while printing a job, the printing job will be
canceled.
1
Insert the memory card.
For details about inserting memory cards, see page 3.2-Inserting memory
cards.
2 Press the Left and Right buttons to
select an image from those on the
display panel.
x3
:4
The image number displays in the bottom
right corner.
Images in file formats not supported by the
printer are not displayed and cannot be
printed.
3
9/9
Image Number
Press the Up and Down buttons to
select the number of copies to print.
Copies
If you want to print a single copy, just press
the Print button.
x3
:4
The number of copies you have selected
displays in the upper left corner.
To apply various effects, see page 3.9Setting various effects. To select additional
printing or printer functions, see page 3.10Setting additional functions.
4 Press the Print button and press it
again to start printing.
After printing, the number of copies to
print reverts to ‘0.’
When you press the Cancel button
to cancel a printing job or if a paper
jam occurs, one page of the ribbon
cartridge’s life is used, even if an
image is not completely printed.
3.3
9/9
x3
:4
Print
Cancel
Printing multiple images
You can select a group of images and a number of copies to be printed of each,
rather than separately selecting the number of copies for each photo.
Insert one memory card only.
When a paper jam occurs during printing, do not pull out the jammed paper.
After turning the power off and then on again, the jammed paper should
come out automatically.
If you remove the memory card while printing a job, the printing job will be
canceled.
1
Insert the memory card.
For details about inserting the memory cards, see page 3.2-Inserting memory
cards.
2
Press the Left and Right buttons to
select an image from those on the
display panel.
x3
:4
The image number displays in the bottom
right corner.
Images in file formats not supported by the
printer are not displayed and cannot be
printed.
3
Press the Up and Down buttons to
select the number of copies.
The number of copies you have selected
displays in the upper left corner.
9/9
Image Number
Copies
x3
:4
To apply various effects, see page 3.9Setting various effects. To select additional
printing or printer functions, see page 3.10Setting additional functions.
9/9
3.4
Printing multiple images
4
Press the Left and Right buttons to
select the previous or next image.
Copies
Follow the step 3.
x3
Total copies
:4
The total copies of the selected image
displays in the upper right corner.
9/9
5 Press the Print button and press it
again to start printing.
After printing, the number of copies to
print reverts to ‘0’ .
x3
:4
Print
Cancel
3.5
Printing images using multidisplay
You can select and print multiple images from the display panel.
Insert one memory card only.
1
Insert the memory card.
For details about inserting memory cards, see page 3.2-Inserting memory
cards.
2
Press the Zoom Out button to
display four images on the display
panel.
Press the Zoom Out button again to display
nine images on the display panel.
Press the Zoom In button to return to the
four-image display.
3
Press the Left and Right buttons to
move to an image on the display
panel and then press the OK
button to select the image.
The check mark on the bottom left means
the number of copies has already been
selected.
Press the Right button at the bottom right
corner image to move to the next nine
image.
4
The selected image displays. You
can now start printing.
x3
:4
For details about printing, see page 3.3Printing images.
To search other images after first choosing
the number of copies, press the Zoom Out
button.
9/9
5
Press the Cancel or OK button when you are finished.
3.6
Printing enlargements of
portions of an image
You can enlarge and print part of an image.
Insert one memory card only.
1
Insert the memory card.
For details about inserting memory cards, see page 3.2-Inserting memory
cards.
2
Press the Left and Right buttons to
select an image from those on the
display panel.
x3
:4
The image number displays in the bottom
right corner.
Use the Up and Down buttons to select the
number of copies to print.
Images in file formats not supported by the
printer are not displayed and cannot be
printed.
3
Press the Zoom In button.
3.7
9/9
Image Number
Printing enlargements of portions of an image
4
Press the Zoom In button until the
size you want appears.
By pressing the Zoom In button, you can see
1.25x, 1.5x, 1.75x, 2x, 2.25x. 2.5x, 2.75x,
3x enlargement.
To zoom out of the image, press the Zoom
Out button.
5
Press the Left and Right button to
select the portion you want.
6 Press the Print button and press it
again to start printing.
After printing, the number of copies to
print reverts to ‘0’ .
x3
:4
Print
Cancel
3.8
Setting various effects
You can select color, clarity, and brightness options for your images.
1
Press the Menu button after selecting
an image with the Left and Right
buttons.
The effect you set is only applied only to those
images you have selected.
The selected effect is cancelled automatically after
printing or turning off the printer.
Setting color mode
Press the Up and Down buttons to
navigate to 'Color Mode.'
Press the Left and Right buttons to select ‘Normal’,
‘Black & White’, ‘Sepia’, ’Antique’, ‘Vivid’, ‘Red’,
‘Green’, ‘Blue’, ‘Warmer’, ‘Cooler’, ‘Less Blue’, ‘Less
Yellow’.
Press the OK button to complete the selection.
Setting sharpness
Press the Up and Down buttons to
navigate to 'Sharpness.'
Press the Left and Right buttons to select 'Normal,'
'Hard' or 'Soft.'
Press the OK button to complete the selection.
Setting brightness
Press the Up and Down buttons to
navigate to 'Brightness'.
Press the Left and Right buttons to select 'Normal,'
'Darker,' 'Darkest', 'Auto', Lightest' or 'Lighter.'
Press the OK button to complete the selection.
3.9
Setting additional functions
You can set up borders for your photos, layout style and paper size. You can also
print all of your images at one time or select an alternative language with your
photo printer.
1
Press the Menu button twice after
selecting the image with the Left and
Right buttons.
If you press the Menu button once, 'Effect' screen
appears and if you press the Menu button again,
'Setting' screen appears.
When 'Setting' appears on the display panel, press
the Up and Down buttons to navigate to the
desired setting.
After printing or turning the printer off and on again, all functions return to
their default settings, except for the layout.
Setting borders
Press the Up and Down buttons to
navigate to 'Borderless.'
Press the Left and Right buttons to select 'On' or
'Off.'
Press the OK button to complete the setting.
Images printed with the Borderless setting off and on
On
Off
Selecting borderless 'off.' shrinks the image slightly to allow an empty border
around the image.
3.10
Setting additional functions
Selecting layout
Press the Up and Down buttons to
navigate to 'Layout.'
Press the Left and Right buttons to select 'Off',
'2-up', '4-up', '30x40mm', '1.18x1.57in', '20x30mm'
'0.79x1.18in', '35x45mm', '1.38x1.77in', '50x70mm'
or '1.97x2.76in' Press the OK button to complete the
selection.
Images printed with the various layout
(For example: Paper size-Postcard, Borderless-Off)
According to the layout, some portions of the image may not be printed.
Off
2-Up
4-Up
30x40mm (1.18x1.57in)
20x30mm (0.79x1.18in)
35x45mm (1.38x1.77in)
50x70mm (1.97x2.76in)
3.11
Setting additional functions
Setting print all function
Press the Up and Down buttons to
navigate to 'Print All.'
Press the Left and Right buttons to select 'No' or
'Yes.'
Press the OK button complete the selection.
Setting language
Press the Up and Down buttons to
navigate to 'Language.'
Press the Left and Right buttons to select the desired
language.
Press the OK button to complete the selection.
3.12
Printing DPOF files
If your camera is compatible with and able to store DPOF files, the Samsung Photo
Printer can print them.
1
Insert the memory card with
DPOF files.
For details about inserting the memory
cards, see page 3.2-Inserting memory
cards.
2
Press the Print button.
Press the Cancel button to print images via
the printer regardless of the DPOF file
information.
Cancel
Printing from a [DPOF] file.
see page 3.3-Printing images and see page 3.10-Setting additional functions.
What is DPOF?
DPOF stands for Digital Print Order Format. With DPOF, a user can select from
all of the photos stored on the camera, just those photos he or she wants to
print. Then those files are loaded onto a memory card, and the card is inserted
into the printer. There is no need to use a computer to separate the photos.
When printing DPOF files, make sure that the AUTPRINT.MRK file is in the
memory card's MISC folder.
The printer supports only DPOF version 1.0.
This printer supports only the number of copies indicated in the
information of the DPOF file.
When a paper jam occurs during printing, do not pull out the jammed
paper. After turning the power off and then on again, the jammed paper
should come out automatically.
If you remove the memory card while printing a job, the printing job will be
canceled.
3.13
Removing memory cards
Please do not remove a memory card until the following steps have been taken.
Insert one memory card only.
If you remove the memory card while printing a job, the printing job will be
canceled.
When not connected to a computer
Gently remove the memory card from the printer.
When connected to a computer
1
2
Close the program you’ve used.
Gently remove the memory card from the printer.
3.14
4. Printing directly from your
digital camera
(For SPP-2020 and SPP-2040
Series)
Samsung Photo Printer supports PictBridge. You can print images directly from
your digital camera through a USB cable without connecting to a computer.
You cannot use a memory card while a digital camera is connected
to the printer via a USB cable.
4.1
Printing directly from your digital camera
You can print images by connecting a PictBridge-compatible device like a digital
camera, camera phone, and camcoder to your printer.
1
2
Turn on the printer.
Connect your digital camera to the printer with the USB cable
supplied with the camera.
Digital camera
3
USB port for
digital camera
Printer
Send an order to print images from the PictBridge-compatible
device.
The manner of printing varies depending on the PictBridge-compatible device.
Please refer to your device’s user's guide.
If you print multiple images on one sheet of your digital camera, the date
will not print regardless of your settings.
You can set border, layout, date and DPOF functions from your digital
camera, if supported.
When a paper jam occurs during printing, do not pull out the jammed
paper. After turning the power off and then on again, the jammed paper
should come out automatically.
If you remove the USB cable while printing a job, the printing job will be
canceled.
4.2
5. Printing via a
computer
(For SPP-2020 and
SPP-2040 Series)
You can print images from programs such as those in the MS
Office suite, or any other. With the PhotoThru program included
in the CD-ROM, you can print all manner of useful and
entertaining images.
• Connecting your printer to a Windows-based PC
• Installing the program for Windows
• Deleting the PhotoThru program
• Selecting your Photo printer as the default
printer in Windows
• Printing from a Windows-based computer
• Setting up the printer in Windows
• Printing with the PhotoThru program in
Windows
• Installing the program for Macintosh
• Setting up the printer in Macintosh
• Printing from a Macintosh
• Printing using PhotoThru program in Macintosh
• Using MSC(Mass Storage Class) function(For
SPP-2040 Series only)
• Printing with Bluetooth (Optional: SPP-00BA)
The explanation and pictures in this chapter(Printing via a
computer) is focused on the SPP-2040 Series. All contents
except the model name of SPP-2020 Series and SPP-2040
Series are same.
5.1
Connecting your printer to a
Windows-based PC
Connect the Photo printer to the PC with the USB cable supplied with your digital
camera. You can connect the Photo printer only with the USB cable.
1
Connect the power cable to the printer.
If the power cable is connected, press the On/Off button to turn the printer on.
For details about the power connection, see page 2.4-Connecting the power
cord.
If the power cable is already connected, make sure that the printer is turned
on.
2
Connect the USB cable to printer's
USB cable port.
Make sure you insert the USB cable in the
proper port.
3
Connect the USB cable to
computer's USB cable port.
Make sure you insert the USB cable in the
proper port.
The position of the USB port varies depending on the PC.
5.2
Installing the program for
Windows
Install the program on your Windows-based PC after loading paper and connecting
cables. You should install the program version that was supplied with the printer.
System requirements
Before you begin, ensure that your system meets the minimum system
requirements.
•Supported Windows Operating System: Windows 98/Me/2000/XP (32bit)
•Windows 98/Me
- Processor: Pentium III 400MHz or more (Pentium III 933 MHz recommended)
- Memory: 128MB or more (256MB recommended)
- Free hard disk space: 500MB or more (1GB recommended)
- Internet Explorer: 5.0 or higher (6.0 recommended)
•Windows 2000/XP (32bit)
- Processor: Pentium III 1GHz or more (Pentium IV 1.5GHz recommended)
- Memory: 256MB or more (512MB recommended)
- Free hard disk space: 1GB or more (5GB recommended)
- Internet Explorer: 5.0 or higher (6.0 recommended)
You must log on as the account administrator to install and delete in
Windows 2000/XP.
5.3
Installing the program for Windows
Installing the program
1
2
3
Quit all programs.
Turn on your PC and click 'Cancel' when the 'Found New
Hardware Wizard' screen appears.
Insert the supplied software program CD(label-side up) into
into your CD-ROM drive.
The installation window appears.
If the installation window does not appear, eject the CD-ROM and insert it
again. Or click 'Start' and then 'Run.' Type X:setup.exe, replacing 'X' with the
letter of your drive and click OK.
If your printer is not already connected to the computer, the
following window opens.
◀ Windows XP screen
Connect your printer to the computer and turn the machine on.
Then click 'Next.'
4
Select 'Typical'.
If you select 'Typical,' 'Printer,' 'Photothru' and 'Status Monitor' are all installed.
If you want to install only selected functions, select ‘Custom.’
◀ Windows XP screen
5.4
Installing the program for Windows
If you select 'Custom,' a screen with the list of all program elements
appears. Select the desired features and click 'Next.'
If you select 'View User's Guide,' the PDF version of the user's guide
will come up. If the Adobe Acrobat program is not installed, it is
installed automatically.
If you select ‘PhotoThru,’ only the PhotoThru program will be
installed.
'Printer' is selected in default and you don't have to select it.
5
6
After the installation is finished, the window asking you to
print a test page appears. If you choose to print a test page,
elect the check box and click 'Next.'
When the test page prints out correctly, click 'Yes.'
If not, click 'No' to reprint it.
7
To register yourself as a user of Samsung Printers in order to
receive information from Samsung, select the checkbox and
click 'Finish'. You are now sent to the Samsung web site.
Otherwise, just click ‘Finish.’
You can print images from now. Open the file to print and start printing.
◀ Windows XP screen
5.5
Installing the program for Windows
Reinstalling the Program
Reinstallation is sometimes necessary if your installation fails or the software does
not work properly.
1
2
Select 'Start' → 'Programs' or 'All Programs' → 'Samsung SPP2040 Series' or 'Samsung SPP-2020 Series' → 'Maintenance.'
Select 'Repair' when the screen appears.
▲ Windows XP screen
If your printer is not connected to a computer, the following window
opens.
▲ Windows XP screen
After connecting the printer, click 'Next.'
If you want to reinstall the program without connecting the printer
to the computer, click 'Next' and select 'No.'
5.6
Installing the program for Windows
3
Select the components you want to reinstall and click 'Next'.
▲ Windows XP screen
If you select ‘Printer,’ the window asking you to print a test page appears.
If you choose to print a test page, select the check box and click 'Next.'
When the test page prints out correctly, click 'Yes.'
4
Click 'Finish' when the reinstallation is done.
Deleting the program
1
2
Select 'Start' → 'Programs' or 'All Programs' → 'Samsung SPP2040 Series' or 'Samsung SPP-2020 Series' → 'Maintenance.'
Select 'Remove' when the screen appears.
▲ Windows XP screen
5.7
Installing the program for Windows
3
Select the components you want to remove and click 'Next.'
▲ Windows XP screen
4
5
Click 'Yes' when the window asking you to remove the
component(s) you selected appears.
Click 'Finish' when the uninstallation is done.
5.8
Deleting the PhotoThru
program
PhotoThru is a photo-editing program. If any problems occur after installing the
program, delete the program and reinstall it.
1
2
Select 'Start' → 'Programs' or 'All Programs' → 'PhotoThru' →
'Uninstall.'
Select 'OK' when the screen for confirming to delete program
after the InstallShield Wizard screen appears.
▲ Windows XP screen
3
Select 'Finish' when the uninstallation is done.
▲ Windows XP screen
5.9
Selecting your Photo printer
as the default printer in
Windows
When one or more printers are connected to a computer, or many printers are
shared on a network, you can select one printer as the default printer. When you
print a file from an application, it is printed on the selected printer. If you install the
printer driver, the printer is automatically selected as the default printer.
1
2
3
Select 'Start' → 'Settings' → 'Printer'.
(If you are using Windows XP, select 'Start' → 'Printers and
Faxes')
Select 'Samsung SPP-2040 Series' or 'Samsung SPP-2020
Series' and right click on the 'Printer' or ' Printers and Faxes'
screen.
Click 'Set as default printer'.
▲ Windows XP screen
If the printer is selected, the check mark appears.
5.10
Printing from a Windowsbased computer
You can print images from an application on a Windows-based PC.
Print order may vary depending on the program in use.
For details about print order, see the program user's guide.
To print from a Macintosh, see page 5.26-Printing from a Macintosh.
1
2
Open the application and then the file you want to print.
Select 'Print' in 'File' menu. The print screen appears.
Check if the printer name is selected as 'Samsung SPP-2040 Series' or
'Samsung SPP-2020 Series.'
You can print the selected images by selecting the printer icon in the
bottom right corner of the Windows desktop or by selecting 'Print'
from the application's File menu.
◀ Windows XP screen
3
Select the number of copies and the page range to be printed.
Click 'Print' or 'OK' to start printing. The file(s) to be printed
are stored on the hard disk(Spooling) and the images begin
printing in order.
Click 'Properties' to access the various functions of the driver. These are
displayed as 'Setup' or 'Printer options,' depending on the program in use.
For details, see page 5.13-Opening the Properties screen.
Make sure that the image direction and the paper direction you set are in
the same direction. Use the Preview mode in your application to check the
image direction to be printed.
What does 'Spooling' mean?
'SPOOL' stands for 'Simultaneous peripheral operation on-line.' When you
make multiple print commands, the images are stored on the hard disk
until actually printed. When a program uses the spool function, the user
can do other work while images are being printed.
5.11
Printing from a Windows-based computer
Canceling printing
You can cancel a print job from the control panel or by accessing the Printer folder.
When you press the Cancel button to cancel a printnig job or if a paper jam
occurs, one page of the ribbon cartridge’s life is used, even if an image is
not completely printed.
Canceling from the control panel
(Only for Samsung SPP-2040 Series)
Press the Cancel button on the
control panel.
If you press the Cancel button,
only the image being printed at that moment
is cancelled. In order to cancel queued print
jobs already spooled, you must open the
Printer folder and cancel them from there.
Canceling from the Printers folder
If a print job is waiting in a print queue, pause, restart or cancel the job
as follows.
1
You can access this window by double-clicking the printer
icon in the bottom right corner of the Windows desktop.
Or click the 'Start' → 'Settings' → 'Printer'. (For Windows XP, click 'Start'
→ 'Printers and Faxes' and double-click 'Samsung SPP-2040 Series' or
'Samsung SPP-2020 Series')
2
From the 'Document' menu:
For Windows 98/Me, select 'Cancel Printing.'
For Windows NT4.0/2000/XP, select 'Cancel.'
To pause printing for a moment, select the file in the application and
select 'Stop printing' or ‘Pause’ from the 'Document' menu.
To change print order, select the file you want and drag it to the
desired location in the print queue.
If you remove the USB cable while printing a job, the printing job
will be canceled.
5.12
Setting up the printer in
Windows
You can use the Samsung SPP-2040 Series printer properties window, which allows
you to access all of the printer options you need when using your printer.
Opening the Properties screen
When the printer properties are displayed, you can review and change whatever
settings are needed for your print job.
Opening in an application program
Print images from the application program.
1
Click 'Properties' from the printer screen.
The printer's properties window may differ depending on your operating
system.
2
3
Click each tab to access the properties. For further details,
see page 5.14-Getting to know the properties screen.
Click 'OK' when you have finished the settings.
Your printer's Printing Preferences window has 5 tabs: Basics,
Output, Graphics,Deco and About. Refer to your Windows user's
manual for more information.
The 'Printer' tab displays only when you open the screen from a
printer folder. See page 5.11-Printing from a Windows-based
computer.
Opening from the printer folder
1
Click 'Start' → 'Settings' → 'Printers' menu.
For Windows XP, select 'Printers and Faxes.'
2
3
Double-click the Samsung SPP-2040 Series or Samsung SPP2020 Series printer icon.
Right click on the printer icon and:
In Windows 98/Me, select 'Properties.'
In Windows 2000, select 'Printing Preferences.'
In Windows XP, select 'Printing Preferences.'
4
Click each tab to access the screen.
5.13
Setting up the printer in Windows
Getting to know the properties screen
Basics tab
The Basics tab provides options to adjust how the document appears on the
printed page.
①
②
③
④
▲ Windows XP screen
1
Property
Description
Borderless
Print image with no border.
Select the direction in which information is
printed on a page.
2
Orientation
▲ Landscape
▲ Portrait
3
Quality
If you select Best, the print quality of some
colors will be better. However in most situations,
there will be no appreciable difference between
Best and Normal.
4
Paper Options
Paper Options allows you to set paper size.
Make sure that the image direction and the paper direction you set are
in the same direction. Use the Preview mode in your application to
check the image direction to be printed.
5.14
Setting up the printer in Windows
Output tab
The Output tab provides layout options.
①
②
▲ Windows XP screen
Property
1
2
Description
Copies
Select the number of copies from 1 to 99.
Layout options
Select the type in which information is printed on a page.
The layout appears differently depending on the orientation
and the quality that you selected on the Basics tab (see
page 5.14-Basics tab)
You can select the number of copies, type, pictures per
side, and whether to print a border on the page.
You can choose to have 1, 2, 4, 6, 9, or 16 pictures printed
per side.
The print order of the images changes automatically
depending on your choices.
5.15
Setting up the printer in Windows
Graphics tab
The Graphics tab allows you to choose various color and contrast options.
①
②
▲ Windows XP screen
Property
1
Color Mode
Description
Select 'Color' or 'Black/White.'
You can adjust 'Brightness,' 'Contrast,'
'Saturation' and 'Cyan Red,' 'Magenta-Green,'
'Yellow-Blue.' To adjust color automatically,
check 'Auto Adjustment' and click ‘OK.’
2
Color Adjust
▲ Windows XP screen
5.16
Setting up the printer in Windows
Deco tab
You can use the Deco tab to set options for frames, message and font attributes.
①
②
③
▲ Windows XP screen
Property
Description
Frame
Select a frame.
2
Message
You can add a date or a note, or apply a white
background to an image. If you want to use
white background, select the check box.
3
Font Attributes
You can select a name, style, color, and shade for
your font.
1
About tab
Use the About tab to display the copyright notice and the version number of the
driver. If you have an Internet browser, you can connect to the Internet by clicking
on the web site icon.
5.17
Setting up the printer in Windows
Using a favorite setting
The favorites option, available in each tab except for the About tab, allows you to
save the current properties settings for future use.
▲ Windows XP screen
1
Select 'Printer Default' or 'Untitled' in 'Favorites.'
Printer Default: You can set the current properties as the default setting
for the printer driver.
Untitled: If you apply new setting, ‘Untitled’ is displayed automatically.
2
3
Click 'Save' after entering desired name to save new setting.
Select desired name in 'Favorites' to use saved setting.
To delete a saved name, click 'Delete' after selecting the name.
If you click 'Yes' on the screen to confirm the deletion, 'Untitled' appears again.
Using help
Your machine has a help screen that can be activated using the Help button in the
printer properties window. The help screen gives detailed information about the
printer features provided by the printer driver. You can also click the question
mark in the upper right hand corner, and then click on any setting.
5.18
Printing with the PhotoThru
program in Windows
With the PhotoThru program, you can edit images for more entertaining photos.
For details about how to use PhotoThru, refer to the PhotoThru user's guide.
1
2
3
Select 'Start' → 'Program' or 'All programs' → 'PhotoThru' →
'PhotoThru' menu.
Locate the image that you want to print when the PhotoThru
program appears.
Double-click the image you selected.
The image is displayed in larger format in the work space and various editing
tools appear. Edit the image using the available functions.
5.19
Printing with the PhotoThru program in Windows
4
Click 'File' → 'Print' from the menu bar on the top.
5
Click 'Print' after selecting the number of copies to be printed
and any additional function.
Make sure that the image direction and the paper direction you set are
in the same direction. Use the Preview mode in your application to
check the image direction to be printed.
5.20
Installing the program for
Macintosh
System requirements for Macintosh
Before you begin, ensure that your system meets the system requirements.
Supported Macintosh environment:
- Macintosh OS 10.3.X
- Processor: Power PC G3, G4, or G5
- Memory: 128MB or more
- Free hard disk space: 200MB or more
Installing the program
1
2
3
4
5
Quit all programs. Connect the printer to a computer using an
appropriate USB cable. See page see page 5.2-Connecting
your printer to a Windows-based PC.
Turn on your Macintosh and insert the supplied Software
program CD(label side up) into your CD-ROM drive. The
installation window appears automatically.
Double-click the CD icon when it appears on 'Desktop' and
click ‘Installer’ → ‘Printer.’
Enter the Macintosh user’s password.
Double-click 'Samsung Photo Installer.'
5.21
Installing the program for Macintosh
6
7
Click 'Continue' when the Samsung Photo Installer screen
appears.
Select the hard disk the program will be installed and click
'Continue.'
5.22
Installing the program for Macintosh
8
9
Select 'Easy Install' as the installation type and click 'Install.'
Click 'Quit' when the installation is done.
5.23
Setting up the printer in
Macintosh
Using in MAC OS 10.3.X USB environment
1
Open the hard disk and select 'Applications' → 'Utilities' →
'Printer Setup Utility.'
2
Click 'Add' on the printer list.
3
Select 'USB' tab.
5.24
Setting up the printer in Macintosh
4
Select 'SPP-2040 Series' or 'SPP-2020 Series' and click 'Add.'
If you fail to search the printer automatically, select 'Samsung' in 'Printer Model.'
Select 'SPP-2040 Series' or 'SPP-2020 Series' and click 'Add.'
When 'SPP-2040 Series' or 'SPP-2020 Series' is added in the printer list, the setting
is finished.
5.25
Printing from a Macintosh
1
2
Open the file that you want to print.
Click 'Page Setup' after opening the file.
3
Click 'OK' after setting the format, size, orientation and scale.
4
Click 'Print' to print the selected image.
5.26
Printing from a Macintosh
5
Click 'Print' after selecting the number of copies and the page
range to be printed.
On the right side of the tab you can set various option.
You can set copies & pages, layout, output options, scheduler, paper handling,
colorSync, printer features and summary.
6
The screen confirming that the file was sent to the print
queue appears and printing begins.
Make sure that the image direction and the paper direction you set are
in the same direction. Use the Preview mode in your application to
check the image direction to be printed.
5.27
Printing from a Macintosh
Deleting the program
1
2
Click 'Uninstall' after selecting installation type as 'Uninstall'
on step 6. See page 5.21-Installing the program for
Macintosh.
Click 'Quit' when the uninstallation is done.
5.28
Printing using PhotoThru
program in Macintosh
The PhotoThru program is convenient when you modify your image files. It
provides various and interesting image editing features.
For details about how to use PhotoThru, refer to the PhotoThru user's guide.
Installing the program
1
2
3
Turn on your Macintosh and insert the supplied Software
program CD(label side up) into your CD-ROM drive. The
installation window appears automatically.
Double-click the CD icon when it appears on 'Desktop' and
click ‘Installer’ → ‘Application.’
Double-click 'PhotoThru Installer.' and follow the on-screen
instructions.
Printing the image
1
2
Select 'Application' → 'PhotoThru'.
Locate the image that you want to print when the PhotoThru
program appears.
5.29
Printing using PhotoThru program in Macintosh
3
Double-click the image you selected.
The image is displayed in larger format in the work space and various editing
tools appear. Edit the image using the available functions.
4
Click 'File' → 'Print' from the menu bar on the top.
5
Click 'Print' after selecting the number of copies to be printed
and any additional function.
Make sure that the image direction and the paper direction you set are
in the same direction. Use the Preview mode in your application to
check the image direction to be printed.
5.30
Using MSC(Mass Storage
Class) function(For SPP-2040
Series only)
If you connect your printer to a Windows-based computer via a USB cable, and
insert a memory card into the printer, the computer recognizes the memory card as
a removable disk. The computer then serves the same function as a memory card
reader and you can view and edit memory card data.
1 Connect the printer to your computer with an appropriate USB
cable and insert a memory card into the printer.
The 'Removable disk' screen appears automatically.
◀ Windows XP screen
If the 'Removable disk' screen does not appear automatically, select 'My
Computer' → 'Removable disk.' Double-click the 'Removable disk' icon.
2
Double-click 'Open folder to view files using Windows
Explorer.'
The removable disk folder screen appears.
◀ Windows XP screen
You can save or move any desired file or folder.
If you insert two memory cards, the printer recognizes the first inserted
memory card and save data in it. If you remove it, the printer recognizes the
last inserted memory card.
This function will work in Windows 98+ and in Macintosh.
5.31
Printing with Bluetooth
(Optional: SPP-00BA)
If you install the optional Bluetooth device, you can print wirelessly from only a
camera phone equipped with Bluetooth. While this product complies with the
Bluetooth Specification, it is not guaranteed to work with all devices enabled with
Bluetooth wireless technology.
Bluetooth compliance: Version 1.2
Output power: Bluetooth Class 2, Up to 10 meters
Network topology: Point to Multipoint Connections
Profiles supported: OPP (Object Push Profile) only
Supported file format: JPEG only
1
2
Insert the Bluetooth device into the USB port for use with
digital cameras.
Send an order to print images from the Bluetooth-supported
device.
Please refer to the Bluetooth supported device’s user guide and optional Bluetooth
device’s user guide for more details.
5.32
6. Maintenance
This printer can be maintained quite easily. It is light and portable. When
storing or carrying the printer, remove the paper and the paper cassette.
• Maintaining the printer
• Replacing the Ribbon cartridge
• Troubleshooting
• Specifications
• Index
Close the paper cassette when the printer is not in use.
Do not store the printer in direct sunlight or in areas that
experience temperature extremes.
Store the paper in its original package on a flat surface and
leave it in a cool and dry place.
6.1
Maintaining the printer
Cleaning the outside
1
2
Press the On/Off button to turn the printer off and disconnect
the power adapter.
Clean the outside of the printer
using a damp cloth.
If you want to use a cleanser, please contact a Samsung service center
for a recommended detergent. Do not use other cleansers and soaps as
they may cause damage to the print head.
6.2
Replacing the Ribbon cartridge
Buy the Ribbon cartridge model named IPP-4640G (for 40 pieces printing).
1
Open the side cover.
2
Push the lever upward.
Lever
3
Pull the existing cartridge out.
6.3
Replacing the Ribbon cartridge
4
After removing the cartridge from its package, rotate the
roller to smooth out wrinkles or uneven areas in the film.
If the film is not even, it could be damaged during installation.
Film
Roller
5
6
Insert the cartridge in the direction in the shown illustration.
Make sure that the cartridge is under the lever and then close
the side cover.
Lever
6.4
Troubleshooting
Error messages on the display
Display
Problem
•Error when there is no
paper.
•Load the paper. (see page
2.3-Loading paper)
•Press the Print button.
•Paper jam
•Turn the printer off.
•If the jammed paper does
not come out automatically,
remove it manually.
•Turn the printer on.
•Note that one page of the
ribbon cartridge’s life is
used when the paper
jams occurs even though
an image is not printed.
•Wrong paper size
•Reset the paper size.
•Press the Print button.
•Paper casette is not
inserted or inserted
incorrectly.
•Insert paper casette.
•Reinsert paper casette
correctly.
•Ribbon Cartridge is not
installed or installed
incorrectly.
•Reinstall Ribbon cartridge
correctly.
Insert Papers and then
press
Power Off and then
Remove Paper Jam
Troubleshooting
Check Paper Size
and then press
Insert Tray and then
press
Power Off and then
Check Ribbon Cartridge
6.5
Troubleshooting
Display
Problem
Troubleshooting
•Ribbon Cartridge is
empty.
•Replace Ribbon cartridge.
(see page 6.3-Replacing the
Ribbon cartridge)
•Ribbon Cartridge is not
installed when you turn
the printer on.
•Install Ribbon cartridge.
(see page 2.2-Installing the
Ribbon cartridge.)
•Press the OK button.
•Ribbon Cartridge is not
installed when you try to
print images.
•Install Ribbon cartridge.
(see page 2.2-Installing the
Ribbon cartridge.)
•Press the Print button.
•Images were set wrong.
•Reset image properly.
•Printer failed to read the
memory card.
•Remove and insert the
memory card again.
•If the error occurs again, try
another memory card.
•No images on the
memory card.
•Re-load images onto the
memory card and try again.
•This appears when you
try to print from a
camera that does not
support PictBridge.
•Connect a camera that
supports PictBridge.
Unsupported Image.
Image
Image Format Error.
Error
Card Access Error.
Please Remove Card.
Card
There are no images
in memory card.
card
Not PictBridge Mode.
Mode
Please Disconnect Device.
6.6
Troubleshooting
Display
Problem
Troubleshooting
•There is a problem
reading JPEG files.
•Print other images.
•Cannot print if the image
is 40 pixels x 60 pixels or
less.
•Print images of more then
40 pixels x 60 pixels or
more.
•Cannot print if the image
is 5120 pixels x 7680
pixels or more.
•Print images of less than
5120 pixels x 7680 pixels.
•Cannot read images.
•Turn the printer off and on.
•Images in the memory
card were deleted.
•Try printing images from
another source.
•xxx images are not
printed among the
several images.
•After checking the printed
images, reprint the missed
images.
•Cannot print image.
•Turn the printer off and on.
JPEG Paser Error
Unsupported Image
Image size is too small
Unsupported Image
Image size is too big.
IP Error.
Please Power Off.
Image was deleted from
memory card.
Not Printed Image(s).
xxx photo(s)
Printing Error.
Please Power Off.
6.7
Troubleshooting
Scheduling printer status checks
Your computer can automatically check the status of the printer.
1
2
3
4
Right click on the printer icon at the bottom of the screen
and click 'Options' in the menu.
Click the checkbox if you want to set the 'Status Monitor Alert
Option.'
Schedule and automatic status checking from 1 to 10
seconds.
Click 'OK' to complete the setting.
6.8
Specifications
Model Name
SPP-2020, OT20PPL, SPP-2040, OT20PPH
Type of unit
Dye Diffusion Thermal Transfer
Print
Speeda
About 60 seconds to print 4x6 inches photo
Resolution
300 x 300dpi maximum
Input document size
Postcard - 102x152mm(4"x6")
Capacity of paper cassette
up to 20 sheets
Sound pressure levelb
Printing: Less than 55 dBA
Power consumption
40W
Operating conditions
Temperature: 50℉ to 89℉ (10℃ to 32℃)
Humidity: 20% to 80% RH
Power source
See Rating Label attached on the bottom of the machine
Adapter requirements
Input : AC 110~240V/50~60Hz
Output : DC 24V / 1.7Amps
SET Dimension (WxDxH)
SPP-2020 Series : 180 x 136 x 61mm
SPP-2040 Series : 180 x 136 x 66mm
Weight
SPP-2020 Series : 0.97 Kg
SPP-2040 Series : 1.07 Kg
Memory Card Interfacec
xD-Picture Card (M Type is not supported.), CompactFlash
Type I and II, MultiMedia Card, Memory Stick, Memory
Stick-PRO (Serial Type), Secure Digital, SmartMedia
PC Interface
USB1.1 and USB2.0
Camera Interface
USB Host 1.1 (PictBridge)
Camera-Phone Interface
USB Host 1.1 (PictBridge)
Bluetooth Interface
(Optional)
Bluetooth compliance: Version 1.2
Profiles supported: OPP (Object Push Profile) only
Supported file format: JPEG only
Only a camera phone equipped with Bluetooth
Supported File Format
Exif2.2, DPOF, TIFF(non-compressed), 8bit Gray,
BMP(non-compressed) with 24bit RGB, 8 bit RGB,
Standard JPEG, RGB pixel order format only
Printing Lifetime
Up to 2,000 sheets
- Even if the warranty period has not expired, coverage
lapses after 2,000 sheets have been printed.
a. The print speed may vary depending on the operating system, capacity, application program
and file format.
b. Using Sound level ISO7779
c.There are many kinds of memory cards, and each memory card has many different sub
types.In some cases a newly launched memory card may not be supported by your printer,
even if it is a kind of memory card that is available with your printer.
6.9
Specifications
Recycling
Please recycle or dispose of packaging materials for this product
in an environmentally responsible manner.
Correct Disposal of This Product (Waste Electrical & Electronic Equipment)
(Applicable in the European Union and other European countries
with separate collection systems)
This marking shown on the product or its literature, indicates that it
should not be disposed with other household wastes at the end of
its working life. To prevent possible harm to the environment or
human health from uncontrolled waste disposal, please separate
this from other types of wastes and recycle it responsibly to
promote the sustainable reuse of material resources.
Household users should contact either the retailer where they
purchased this product, or their local government office, for details
of where and how they can take this item for environmentally safe recycling.
Business users should contact their supplier and check the terms and conditions of
the purchase contract. This product should not be mixed with other commercial
wastes for disposal.
Declaration of Conformity (European Countries)
Approvals and Certifications
The CE marking applied to this product symbolises Samsung
Electronics Co., Ltd. Declaration of Conformity with the following
applicable 93/68/EEC Directives of the European Union as of the
dates indicated:
January 1, 1995: Council Directive 73/23/EEC Approximation of the
laws of the member states related to low voltage equipment.
January 1, 1996: Council Directive 89/336/EEC (92/31/EEC), approximation of
the laws of the Member States related to electromagnetic compatibility.
March 9, 1999: Council Directive 1999/5/EC on radio equipment and
telecommunications terminal equipment and the mutual recognition of their
conformity.
A full declaration, defining the relevant Directives and referenced standards can
be obtained from your Samsung Electronics Co., Ltd. representative.
6.10
Specifications
Radio Frequency Emissions
FCC Regulations
This device complies with Part 15 of the FCC Rules. Operation is subject to the
following two conditions:
•This device may not cause harmful interference, and
•This device must accept any interference received, including interference that may cause
undesired operation.
This device has been tested and found to comply with the limits for a Class B
digital device, pursuant to Part 15 of the FCC rules. These limits are designed to
provide reasonable protection against harmful interference in a residential
installation. This equipment generates, uses and can radiate radio frequency
energy and, if not installed and used in accordance with the instructions, may
cause harmful interference to radio communications. However, there is no
guarantee that interference will not occur in a particular installation. If this
equipment does cause harmful interference to radio or television reception, which
can be determined by turning the equipment off and on, the user is encouraged to
try to correct the interference by one or more of the following measures:
•Reorient or relocate the receiving antenna.
•Increase the separation between the equipment and receiver.
•Connect the equipment into an outlet on a circuit different from that to which the receiver is
connected.
•Consult the dealer or an experienced radio/TV technician for help.
CAUTION: Changes or modifications not expressly approved by the
manufacturer responsible for compliance could void the user’s
authority to operate the equipment.
Canadian Radio Interference Regulations
This digital apparatus does not exceed the Class B limits for radio noise emissions
from digital apparatus as set out in the interference-causing equipment standard
entitled “Digital Apparatus”, ICES-003 of the Industry and Science Canada.
Cet appareil numérique respecte les limites de bruits radioélectriques applicables
aux appareils numériques de Classe B prescrites dans la norme sur le matériel
brouilleur: “Appareils Numériques”, ICES-003 édictée par l’Industrie et Sciences
Canada.
6.11
Specifications
EU Declaration of Conformity (R&TTE)
6.12
Index
A
F
About tab 5.17
accessories 1.6
favorite, set 5.18
front view 1.2, 1.4
Basics tab 5.14
borderless, set 5.14
borders, set 3.10
brightness, set 3.9
buttons 1.4
Graphics tab
B
G
H
5.16
help 5.18
I
install
driver
macintosh 5.21
windows 5.4
PhotoThru
macintosh 5.29
windows 5.4
C
cancel, print 5.12
cartridge
install 2.2
replace 6.3
clean 6.2
color adjust, set 5.16
color, set 3.9
L
language, set 3.12
layout, set 3.11
load, paper 2.3
D
Deco tab 5.17
default printer, set 5.10
delete
driver
macintosh 5.28
windows 5.7
PhotoThru
Windows 5.9
display 1.3
DPOF, print 3.13
M
memory card
insert 3.2
remove 3.14
MISC folder 3.13
MSC, use 5.31
O
On/Off button light 1.5
orientation, set 5.14
Output tab 5.15
E
error message 6.5
6.13
P
R
paper jam 6.5
paper, load 2.3
PhotoThru
install
macintosh 5.29
windows 5.4
print
macintosh 5.29
windows 5.19
power cord
connect 2.4
print
all images 3.12
macintosh 5.26
PictBridge 4.2
windows
5.11
rear view 1.3, 1.5
reinstall, driver, windows
5.6
removable disk
S
5.31
sharpness, set 3.9
side view 1.3, 1.5
spool 5.11
system requirements
macintosh 5.21
windows 5.3
6.14
Rev.2.00