1
MAYrAG USER'S GUIDE
Electric Range
with
Electronic Control
TABLE OF CONTENTS
IMPORTANTSAFETY INSTRUCTIONS ..........
2-4
RANGEFEATURES.............................
CLOCKAND OVEN CONTROL .................
5
6-7
ABOUT YOUR COOKTOP .....................
•
•
•
•
8-10
Cooktop...................................
CoilElements ..............................
DripBowls.................................
SmoothtopCooktop ........................
8
9
9
10
ABOUT YOUR OVEN ........................
11-14
• HowTo Set Oven ...........................
11
• Automatic Oven T_medCook Feature ........
12
• HowTo Set Broil ...........................
13
• Oven Characteristics ......................
14
• Oven TemperatureAdjustment ..............
31
ABOUT YOUR RANGE ......................
• OvenDoor................................
• DoorLockLever ...........................
15-17
15
15
•
•
•
•
•
•
OvenWindow .............................
OvenVent ................................
OvenLight................................
OvenRacks ..............................
StorageDrawer ...........................
LevelingLegs .............................
15
16
16
16
17
17
ABOUT CLEANING .........................
18-22
• Self-CleanOvenFeature ................
• CleaningChart .........................
18-19
20-22
ABOUT COOKING ..........................
• Surface Cooking ........................
• Aluminum Foil Usage ......................
23-28
23-24
25
• Baking & Roasting ......................
• Broiling ...................................
ABOUT SERVICE ...........................
25-27
28
29-32
• TroubleshootingChart ...................
• HowToReceiveService....................
29-31
32
WARRANTY ..................................
32
INSTALLERP ase leave
thismanualwiththisappliance.
ModelNurnber_
SerialNumber:
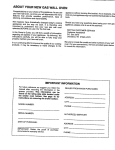
CONSUMER Please
read
and keepthismanualforfuture
of purchase.
Dateof PUrchase:....
Modeland Serialnumbersareon theratingplate.See page5 for location.
,
FOR MAY'rAG CUSTOMER
,
,
ASSISTANCE
,
CALL
,
1-800-688-9900
1-800-688-2002
US
CANADA
8111P375-E
(08-99-c
I
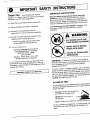
IMPORTANT
SAFETY INSTRUCTIONS
Thank You
fo,purchasing
ourcooking
]
IMPORTANT
INSTRUCTIONS
appliance.To help you obtain the maximum incooking
satisfaction,we offerthese suggestions:
Read and follow all instructions before using this
applianceto preventthe potential risk of fire, electric
shock, personal injury or damageto the appliance as a
result of improper usageof the appliance.Use appliance
only for its intended purpose as described in this manual.
Read this manual before using the appliance,
Review all safety and cautioninstructions.
To ensure proper and safe operation: Appliance must
be properlyinstalledand groundedby a qualified
technician.
(]E_ReviewtheTroubleshootingCharton
pages29 to 31 if servicebecomesnecessary.
appliance when requestingservice.
• Proofof purchasesuch as sales receipt
willbe neededfor warrantyservice.
_
WARNING
ALL RANGES CAN TIP AND
CAUSE INJURIESTO PERSONS.
cuOet e o Ian ea u erI o
Youcan contactus at:
MAYTAGCONSUMER EDUCATION
ONE DEPENDABILITYSQUARE
NEWTON, IOWA 50208
(515) 791-8911
(Monday - Friday,8 am - 5 pm CST)
Internet:http://www.maytag
.corn
INSTALL ANTI-TIP DEVICES
PACKEDWITH RANGE.
FOLLOW ALL INSTALLATION
INSTRUCTIONS.
In our continuingeffortto improvethe qua(ityand
performanceof our cookingappliances,it may be
necessaryto make changesto the appliancewithout
WARNING:
fromabnormal
usage or by excessiveloading
of the oven
door,the appliancemustbe
secured bya properly
installedanti-tipdevice.
revisingthis manual,
I
I
MODELS: MER5510and MER5530 '
Toreduceriskof tippingof the appliance
1
i
To check if device is properlyinstalled, removestorage
drawer and look underneathrange to make sure one of
the rear leveling legs is properly engaged in the bracket
slot. The anti-tip device secures the rear leveling leg to
the floor when properly engaged. You should check thi_
anytime the range has been moved.
IN CASE OF :FIRE
Turn off appliance and ventilatinghood to avoid spreadi_
the flame. Extinguishflame then turn on hoodto remove
smoke and odor.
• Cooktop: Smother fire or flame in a
panwith a lid or cookie sheet.
_.
_
NEVER pick up or move a
flaming pan.
• Oven: Smother fire or flame by closingthe oven do
Do not use water on grease fires. Use baking soda, a (
chemical or foam-type extinguisherto smother fire or
flame.
I
IMPORTANT
SAFE INSTRUCTIONS
GENERAL INSTRUCTIONS
WARNING: NEVERuse appliance
door, or drawer, if equipped,as a
COOK'TOP
l_,,,_J_,,,,_
_.....
%,=
_,
._
step
stool ortipping
seat as
may result
in possible
of this
the appliance,
_,,,
=...__''
i '_
seriousdamageinjuries.t°
the appliance,and
"__'
'_
I
If appliance is installednear a window, proper
precautionsshould be taken to prevent curtainsfrom
blowing over surface elements,
NEVERuse appliance to warm or
heatthe room. Failure to follow this
instructioncan leadto possible
burns, injury,fire, or damageto the
appliance,
NEVERwear loose-fittingor
hanginggarmentswhile using the
appliance,Clothing could catch
utensil handlesor ignite and cause
burns if garment comes in contact
with hot heating elements.
4_#
....................
%,.
,_
j
'.,,
_.._:._u'
__a_
_i
_ ), j _llJli_
:_
_i_,._
,,_,,._lJ{_":_!
_
"_'_
To ensure proper operationand to avoid damageto the
applianceor possible injury,do not adjust,service, repair
or replace any part of the appliance unlessspecifically
recommendedinthis manual. Refer all other servicingto a
qualifiedtechnician,
NEVERstore or use gasoline or other combustibleor
flammable materialsin the oven, nearsurface units or in
the vicinity of this appliance as fumes could create a fire
hazardor an explosion.
To prevent greasefires, do not let cooking grease or other
flammablematerials accumulatein or nearthe appliance,
Use only dry potholders. Moist or
_,j_!%
damp potholders on hot surfaces
_,.
,_ _
may result in a steam burn. Do not ._ "_
let potholdertouch hot heating
.#
'%,/'_ -_
elements. Do not use a towel or
__"
_""_ '_
other bulky cloth which could
___
easily touch hot heatingelements
and ignite,
NEVER leave surfaceunits
unattendedespeciallywhen using
high heat settings.
Ansmokingand
unattended a
boilovercould
cause
greasy spillovercan cause a fire.
.,,S':'_"_'_""_,=
%,,
.#%,,.
_ti{.
,,_]:'!#
'_'o ,,,t -_,
{_i!
_%i,%__i_ll_i_illi
iii
#
This appliance is equippedwith differentsize surface
elements. Select pans having flat bottoms large enough tc
cover element.Proper relationshipof pan to element will
improve cooking efficiency.
:%,.
":_
Ii
If pan is smaller than element, a
portion of the element will be
exposed to directcontact and
could ignite clothingor potholder.
Only use certaintypes of glass, glass/ceramic, ceramic,
earthenware,or other glazed utensils suitable for cookto_
or ovenservice that will not breakdue to the sudden
change in temperature.Follow utensil manufacturer's
instructionswhen using glass.
Turn pan handletoward center of
cooktop, notout intothe room or
over another surface element. This
reducesthe risk of burns, ignition of
flammablematerials, or spillage if
pan is accidently bumpedor
reached by small children.
..,_,,_,,_
_
%_
_,?_
_1_....
!_
!1___i
_,,.__,/. "_.
__F
'_l,,_J_
To
prevent damageto
heating elements,
immerse,soak
or cleanremovable
in a dishwasheror
self-cleando
oven. A damagedelement could short resulting in a fire
shock hazard.
Make sure drip bowls are in place as absence of these
bowls during cookingcould damagewiring or parts.
SMOOTHTOP
NEVER cook on broken cooktop.Contact a qualified
technician immediately.If cooktopshould break, cleani
solutions and spillovers may penetratethe broken coo
Always turn off all controls when cooking is completed,
and create a risk of electric shock.
NEVERheat unopenedcontainerson the surface unit or
in the oven. Pressurebuild-up in the container may cause
containerto burst resulting in burns,injury or damageto
the appliance,
Clean cooktopwith caution. Some cleaners can produ
noxiousfumes if appliedto a hot surface. If a wet spot
cloth,or paper towel is used to wipe spills on a hot
cooking area, be carefulto avoid steam burn.
NEVERuse aluminumfoil to line drip bowls, or to cover
an oven rack or oven bottom. Misuse could result in risk of
electric shock, fire, or damageto the appliance.Use foil
only as directed in this manual.
[0
IMPORTANTSAFETYINSTRUCTIONS
OVEN
Use care when opening door. Let hot
orair
replacingOr
steam food.escape
before removing
CHILD SAFETY
. _,,_:,_%_
I[ii_.'_ _
"%i,,
_
! _:_
,_
ii_
performance, do not block or obstruct
For proper
oven operation and
oven
vent duct.
NEVER leave children alone or
unsupervised in area where
appliance is in use or is still hot.
NEVER allow children to sit or stand
on any part of the appliance as they
could be injured or burned.
_i'_
_,,_
'#!
.
_.
::',,,,,
,,_,,,,,
.....
Always place oven racks in desired locations while oven is
cool. If rack must be moved while oven is hot, do not let
interest to children in cabinets
CAUTION:
NEVER store
of
above an appliance
or on items
backguard
,_il
_'
'*i%_{o
__ IL_LI_I_M
potholder contact hot heating element in oven.
of a range. Children climbing on
appliance, door or drawer to reach
items could damage the appliance
or be burned or seriously injured.
_.__%
%,___.,f
SELF-CLEANINGOVEN
_,
Clean only parts ]isted in this manual. Do not clean door
gasket. The gasket is essential for a good seal. Care
should be taken not to rub, damage, or move the gasket,
Children must be taught that the appliance and utensils in
or on it can be hot. Let hot utensils cool in a safe place,
out of reach of small children. Children should be taught
that an appliance is not a toy. Children should net be
DO not use oven cleaners. No
commercial oven cleaner or oven
allowed to play with controls or other parts of the unit.
.,,,"_"'
_
_t_
_'_
_;
HEATING ELEMENTS
should be used in or around any
I
liner protective coating of any kind
iU_.t
i_ !
part of the oven.
_
Before self-cleaning the oven,
_='_'_"_':"_"'_'_
remove broiler pan, oven racks and other utensils to
NEVER touch surface or oven
prevent excessive smoking, discoloration of the oven
racks or possible damage to utensils,
Wipe up excessive spillovers, especially greasy spills,
before the clean cycle to prevent excessive smoking or
flare-ups,
Heating elements may be hot even
though they are dark in color, Areas
near surface elements and interior
surfaces of an oven may become hot enough to cause
burns. During and after use, do not touch or let clothing
or other flammable materials contact heating elements,
areas near elements, or interior surfaces of oven until
they have had sufficient time to cool.
It is normal for the cooktop to become hot during a clean
cycle. Therefore, avoid touching or lifting the cooktep
during a clean cycle.
VENTILATING HOODS
Clean range hood and filters frequently to prevent grease
or other flammable materials from accumulating on hood
or filter and to avoid grease fires,
Turn the fan on when flamb_ing foods (such as Cherry
Jubilee) under the hood.
DEEP
FAT FRYERS
Use extreme caution when moving the grease kettle or
disposing of hot grease. Allow grease to cool before
attempting to move pan.
heating elements, areas near
elements or interior surfaces of
oven.
_,,,_'._'._
....
....
_L
o._]
Other potentially hot surfaces include: Coektop, areas
facing the cooktop, oven vent opening, surfaces near the
vent opening, oven door, areas around the door, and eve
window.
IMPORTANTSAFETY NOTICE & WARNING
The California Safe Drinking Water and Toxic Enforcem_
Act of 1986 (Proposition 65) requires the Governor of
California to publish a list of substances known to the
State of California to cause cancer or reproductive harm
and requires businesses to warn customers of potential
exposures to such substances.
Users of this appliance are hereby warned that when th_
oven is engaged in the self-clean cycle, there may be
some low level exposure to some of the listed substano
including carbon monoxide. Exposure to these substan_
can be minimized by properly venting the oven to the
outdoors during the self-clean cycle by opening a windo
and/or door in the room where the appliance is located.
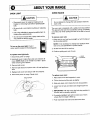
RANGEFEATURES
01
ELECTRONICCONTROL (pages 6 and 7)
OVEN LIGHT SWITCH (page 16)
_EINDICATORLIGHT (page8)
BACKGUARD
SURFACE CONTROLS (page 8)
OVEN VENT (page 15)
on smoothtop range
on coil element range
(page 8)
_.EINDICATOR
(smoothtopcooktop only)
SURFACE ELEMENTS._
(pages9 and 10)
(page 10)
LELEMENT (not shown)
(pages 13and 28)
(page 15)
(self-cleanoven - pages 18and 19_
COOKTOP
RACK SUPPORTS
ANTI-TIP BRACKET
(page 17)
OVEN RACKS
(page 16)
LEVELING LEG (page 17)
BAKE ELEMENT
(pages 11,26 and 27)
RATING PLATE
OVEN DOOR
(page 15)
STORAGE DRAWER (page 17)
DOOR GASKET
OVEN WINDOW
I UP
CLOCKANDOVENCONTROL
to cancel all
operations
except the
time of day will
reappearin the
display.
TIMER. The
and hold these
pads to enter
time, oven
Cancel
_
_Oven on
I_-)1Preheat
•Se_
Clean
_ J
L. Lo¢k
_,
ABOUT THE FUNCTION PADS
HOW TO SET CLOCK
• Function pads are the BAKE, BROIL, SELF-CLEAN,
TIMER, CLOCK, COOKTIME, STOPTIME, and
1. Press CLOCK pad.
CANCEL pads.A beepwill soundwhen these pads
are pressed.
• No beepwill sound when the • or • pad is pressed,
2. Press or press and hold
• or • pad until correct
time of day appears in
• All function pads except the CANCEL
pad feature an indicator light.
Whenthe BAKE or BROILpad is
pressed,the indicatorlight will
display.
[ """"
_
J
• If an indicator light on a function pad is lit and you set
a second operation:
- Eitherthe control will not accept the operation or
- The indicator light on the first pad will "dim" slightly
and the indicator light on the pad you just pressed
will be "full on." This lets you knowthat you have
set the control for two operations.
_"DIM"
timing
to bakeoperation,the
at 350°F and indicatorlight
then set a
l BakeI
on the BAKE pad will "dim" and
the indicator light on the TIMER pad will be "full on."
The display will show the operation
_"FULL
for the pad with the "full on" indicator | Timer|
light. Press the function pad Withthe
"dim" indicator light to recall that
operation.
[
I ,,,_--'_,_
I then
_'_
turn
that the
l Bake J
ovenon
is to
setlet
foryou
thisknow
operation.
Indicatorlights on SELF-CLEAN,TIMER,
CLOCK, COOKTIME and STOP TIME pads will
flash when the pad is pressed. These indicator lights
will
stop flashing but will remain lit once the function
starts.
Forexample: if you set the oven
to select HI or
LO
broil.
temperature
or
__
J
ON"
Displaywill flash when power is suppliedto unit.
Press CLOCK pad. To recall time of day when another
function
is displayed.
Clocktime
cannot be changed if oven is set for timed
bake or delayed clean operation. Cancelthe operation
beforesetting the clock.
If timer is in use, press CLOCK pad once to recall the
time of day or twice to reset the time of day.
CLOCK DISPLAYDISABLE FEATURE
If you preferthat the time of day is not displayed:
1. Press and hold both
_
CLOCK and CANCEL
pads for 3 seconds,
and
Lcan
When clock display is
disabled,press CLOCK pad to recall time of day for 4
seconds. Display will then blank.
If a powerfailure occurs when the clock has been
disabled,the display remains blank and will not flash
when power is restored.
Repeat step1 to reactivateclock feature.
CONTROL
HOW TO SET TIMER
CONTROL LOCK-OUT FEATURE
1. PressTIMER pad.
• or • pad until correct
time appears in display,
2. Press or press and hold
_
The ControlLock-Outfeaturepreventstheovenfrom
l_71
To
activate: hold both
1. Pressand
beingturned on.
STOPTIME
and
CANCEL pads
for 3
seconds.
then
I'_
The timer feature does not operate the oven.
_
f
L
and Cancel,
The timer can be set from 1 minute [0:01] up to 9 hours
and 50 minutes [9:50].
The timer will start automatically.The TIMER indicator on
the TIMER pad will light wheneverthe timer is in use. One
long beep and "End" will be briefly displayedto signal the
end of the timer operation.
2. "OFF"will appear in display
when this feature is activated. Only the clock and
timer functions will operate when Control Lock-Out
feature is activated.
Repeatstep 1 to deactivate.
To cancel timer: Pressand hold TIMER pad for 3
seconds.Time of day will reappear in the display.
"END OF TIMED COOK" BEEPS
12 HOUR ENERGY SAVER FEATURE
.....
The 12 HourEnergySaverfeatureautomaticallyturnsoff
the ovenif itwas accidentlyleftonfor 12 hours.To
deactivatethis featureso the oven willNOTturnoff
automaticallyat the end of 12 hours:
1. PressandholdCLOCKpad
2. appears
Press • inor•pad
until 8:88 lClockl
the display.
Currenttime of daywill
for
3 seconds.
_
reappearin
the display after
4 seconds,
Youhave a choiceof three "endof cooking"reminder
beeps for theAutomaticOvenTimerfeature.
• Option 1: Fourbeeps then onebeep every30 second:
for the next 5 minutes oruntilCANCELpad is
pressed.(Defaultoption.)
• Option 2: Fourbeeps.Thereare nootherbeeps.
_
• Option 3: Fourbeepsthen one beep everyminutefor
[_7]
Howto select the desired option:
1. Pressand holdboth
_
the
nextTIME
12 hours
or untilCANCEL pad is pressed.
COOK
and CLOCK
pads for 3 seconds,
and
then
Repeatsteps1 and 2 to reactivatethe 12 HourEnergy
Saverfeature. 12:00willappearin displayto indicatethe
EnergySaverfeature is restored,
• A single beepwillsound.
• Displaywill show current
option.
2. Press•
or•padto
selectthe option number
you wish. The current time
of day will reappear in the
display after4 seconds.
[COOe
[c,o
]L__]
[0
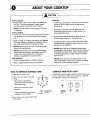
ABOUTYOURCOOKTOP
[,Ac.uT.o.
I
Before cooking o..
• Always place a panon the surface unit before you
turn it on. To preventdamage to range, never
operate surface unitwithout a pan in place,
• NEVER usethe cooktopas a storage area for food
or cookware.
Other tips..,
• To eliminatethe hazard of reaching over hot surface
elements do not install cabinet storage directly
above a unit.
During cooking..,
• Be sure you know which knob controlswhich surface
unit. Make sure you turned on the correct surface
unit.
• Begin cookingon a higher heat setting then reduce
to a lower settingto complete the operation. Never
use a high heat settingfor extendedcooking,
• NEVERallow a pan to boil dry. This could damage
the pan and the appliance.
• NEVERtouch cooktop until it has cooled. Expect
some parts of the cooktop, especially aroundthe
surface units, to become warm or hot during
cooking.Use potholdersto protect hands,
After cooking...
• Be sure surface element is off after cooking,
• Clean up greasy spills as soon as possible,
• If storage is provided,limit it te items that are
infrequently used and can be safely stored in an
area subjectedto heat.
• Temperaturesmay be unsafefor items such as
volatile liquids,cleaners or aerosol sprays.
• Aerosol-typespray cans are EXPLOSIVEor highly
flammable when exposed to heat. Avoidtheir use or
storage near an appliance.
• NEVER leave any items, especially plastic items,
unattendedon the cooktop. The hot air frem the vent
may ignite flammableitems, melt or soften plastics,
or increase pressure in closed containerscausing
them to burst.
• NEVERallow aluminumfoil, meat probesor any
other metal object, other than a utensil on a surface
element, to contact heating elements.
.J
HOW TO OPERATESURFACE UNIT
1. Place pan on surface unit.
2. Push in and turn knob to desired
SURFACEINDICATOR LIGHT
A SURFACEindicator light, located on the backguard,will
turn on whenever a surface unit is turned on. Light will
turn off when surface unit is turned off.
OFF
LOW/_"_IGH
• Each knob is identified by
internationalsymbols located
beloweach knob.
setting.
• Knob can be turned in either
direction.
_ow
°" ._. _ °" .o.
1__
s
©Q _
• Knob can be set on any number
or between any numbers.
3. After cooking,turn knob to OFF then
remove pan.
7
INTERNATIONAL
O0
SYMBOLS
,,G.T,EA,
,__
_'
/
_'
SURFACE
' '
'
°'%-[rb7" '%'L_ '
oe
oo
!
oo
INDICATOR......
LIGHT
,=._o,.°e j
I
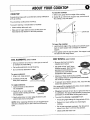
ABOUTYOURCOOKTOP
COOKTOP
Freestandingrangeswith a coil elementcooktopwill feature
a lift-up cooktop,
0 I
To raise the cooktop:
1. When cool, graspthe front edge of the cooktop.
2. Gently lift up until the two support rods, at the front of
the cooktop, snap into place.
The smoothtop cooktopdoes not lift up.
To prevent staining or discoloration of cooktop:
• Clean cooktopafter each use.
'-_
._/"
• Wipe acid or sugar stains as soon as they occur as
these stains may discolor or etch the porcelain.
SUPPORT
ROD
To lowerthe cooktop:
1. Holdthefrontedgeofthe cooktopand carefullypush
backoneach supportrodto releasethe notched
support.
2. Then gently lower the top into place. The support rods
will slide into the range frame.
COIL ELEMENTS, selectmodels
DRIP BOWLS, selectmodels
* When an elementis turned on, Jtwill cycleon and off
to maintainthe heat setting,
• Be sure drip bowl is properly
installed and in place.
• Coil surface elementsare self-cleaning.
• Do not immerseelements in water,
• Drip bowl will not "rock" when
installed properly.Notch above
opening on bowl should be
centered over screw that secures
receptacleto the cooktop.
To remove element:
._-_----_
1. When cool, raise element._(C_'- _
2. Carefully pull out and
_
away from receptacle.
_
j
ff__
f
To replace element:
1. insertterminals on the element _
• Absenceof these bowls during cooking
may subject wiring or component parts underneath
the cooktopto damage.
• To prevent risk of electric shock or fire, never line drip
bowls with aluminum foil.
Your rangewill be equippedwith eitherchrome plated or
2. Gently
lift up on outer edge of
into
receptacle.
element
while inserting terminals _
into receptacle.
TERMINALS
•porcelain
Chrome
drip bowls
blue or gold over time or
coated
steel will
dripturn
bowls.
if
overheated.
Thisnot
type
of discolorationis
normal and
permanent.
It will
affect
cooking performance.
3. Gently press down on outer edge of element until
element sits level on drip bowl.
• To protect the chrome or porcelain finish:
_
_)_
//
NOTE: When replacing element, be sure support leg on
element
bowl. is inserted into the slot in the front of the drip
• Avoid using high settings for long periods of time.
• Reduce to a lower setting once food begins
cooking.
• Do not use oversized cookware. Pan should not
extend more than 1 inch from the element.
• Clean bowls after each use.
I( Z)
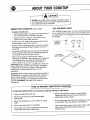
ABOUTYOURCOOKTOP
&
CAUTION
NEVER use cooktopif the smoothtopis cracked,broken,
or if metal melts onto the top. Call an authorized servicer.
Do not attempt to repair it yourself.
SMOOTHTOP COOKTOP,select
HOT SURFACE LIGHT
models
• Canadian models only:
• Freestandingranges:The right front surface element
willnot operate during a self-clean operation,
• Slide-inand drop-in ranges: The cooktopwill net
operate during a self-clean operation.
• Cooktopmay emit a light smoke and odor the first few
times cooktop is used. This is normal.
• Element under smoothtopcycles on and off to maintain
the preset heat setting. Elementwill glow red when it
cycles ON.
• Srnoothtop RETAINSheat for a period of time after the
unit is turned off. When the HOT SURFACElight turns
off, cooktopwill be cool enough to touch.
• Before usingcooktopfor the first time, clean it
thoroughly as directed in the cleaning chart on page 22.
This will protect the smoothtop and will guaranteea
clean cooktopwhen the elements are turned on.
Aluminum foil will damagethe smoothtop if it melts onto
the top. Never use aluminum foil or foil-type disposable
containerssuch as popcorn poppers.They may leave
metal marks or may permanentlymelt onto the
smoothtop.
HOT SURFACElightwillturn on whensmoothtopcooktop
is hot. Light will turn off when top cools. Hot surface light
is locatedeither on the backguard or at the back center ol
the cooktop.
HOTSURFACE
--_
LIGHTON
BACKGUARD
_"
_'__
..........
,_
,_,_o.
,
,
,o_,.
82
O0
HOTSURFACE
LIGHTONCOOKTOP_""_'h_
Important: Watch sugaryor starchysolutions carefully to
avoid boilovers.If a sugar solution (jam,jelly, candy)or a
starch solution (potatoes, rice) boils over, it may pit or
discolorthe smoothtop.Turn element to LOW and clean
believerimmediately. See page 22 for cleaning
instructions.
r
[TIPS
ToP,OTECT
SMOOT.TOP
coo rol
,
,h
,,,
,
,
,,,,
TO PROTECT SMOOTHTOPfrom scratching, chipping, etching, or metal marks:
• Clean smoothtop after each use.
• Never letpan boildry as this will permanently
damagetop.
• Never place plastics on warm or hot smoothtop.
Plastic may melt onto top. Top may chip or pit in
attemptingto removeplastic.
• Never use smoothtopas a work surface or cutting
board,
• Never leave sugar, salt, sand, soil,shortening, or fat
on smoothtop.They may scratch or damagetop.
• Never cookfood directlyon smoothtop.
• Never place trivet or wok ring between top and pan.
These items can mark or etch the top.
• Only use flat-bottom pans that are free of soil, rough
areas, nicks or scratches as these may soil or
scratchthe top.
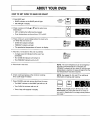
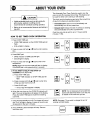
ABOUTYOUROVEN
(D
HOW TO SET OVEN TO BAKE OR ROAST
• BAKE indicator on the BAKE pad will light.
1. •Press
pad.
000 BAKE
will light
in display.
2. Press or press and hold • or •
temperature.
INDICATOR
LIGHT
BAKE _,_
pad to select oven
• 350 ° will light when either pad is pressed.
• Oven temperature can be set from 170 ° to 550 °.
3. There will be a 4 second delay before the oven turns
on. When the oven turns on:
i,._-_Ovenon
• OVEN ON indicator will light,
• PREHEAT indicator will light.
i_lPreheat
Lock
I_1
• The preselected temperature will remain in display.
4. Allow 8 to 15 minutes for the oven to preheat.
• A single beep will indicate that the oven has
i_Oven on
preheated.
• The OVEN ON indicator will remain lit.
• The PREHEAT indicator wiil turn off.
'-'1_1
Preheat
L_.,JLock
5. Place food in the oven.
NOTE: The oven temperature can be changed at
any time. If the temperature is changed, the
PREHEAT indicator will turn back on until the new
temperature is reached. A beep will signal that the
new temperature has been reached.
6. Check cooking progress at the minimum cooking
time. Cook longer if needed,
NOTE: See pages 25, 26, and 27 for additional
information on baking and roasting.
ressC,
NOL0a0andre ove,ood
• The BAKE indicator on the BAKE pad will turn off.
• The OVEN ON indicator will turn off.
• Time of day will reappear in display,
NOTE: If you forget to turn off the oven, it will
automatically turn off at the end of 12 hours. If
you wish to deactivate this energy saving feature,
see page 7.
I•
ABOUT
YOUR
OVEN
The Automatic Oven Timer Control is used to turn the
oven on and off at a preset time of day. This feature can
t_lL
CAUTION
• Highly perishablefoods such as dairy products,
pork, poultry,seafood or stuffing are not
recommendedfor a delayedcooking operation,
• Baking is not recommendedbecause preheating is
required,
be used
formust
either
cooking
or set
self-cleaning.
The
clock
beoven
functioning
and
at the correct time
of day for this featureto operate properly.
• Immediate start: Oven turns on immediatelyand
automaticallyturn off at a preset time.
• Delayedstart: Delays the start of cooking or cleaning
and automaticallyturns off at a preset time.
Cooktime can only be set for up to 11hours and 59
minutes (11:59).
HOW TO SET TIMED COOK OPERATION
• COOKTIME indicatoron the COOKTIME pad will
• 0:00 will light in display,
flash.
2.
press and hold
1. Press or
COOKTIME
pad. • orV pad to enter cooking
time,
then
[_
_
3. Press BAKE pad.
• BAKE indicator on BAKE pad will light.
• 000 will light in display.
4. Press or press and hold • cry pad to enter oven
temperature.
NOTE: Beepswill sound and 000 will flash in display
if the BAKE pad is not pressed within 4 seconds.
_
I_
I R_k_l then
I
[ --.-j
5. IF YOU WISHTO DELAYTHE STARTOF
COOKING (if not,skip to #6):
• STOP TIME indicator on STOP TIME pad will
flash,
b. Press or press and hold • orv pad to enter time
day STOPTIME
you wish oven
to turn off.
a, of
Press
pad.
c. Press CLOCK pad.
• Time of day will reappear in display.
6. When the oven turns on, the OVEN ON indicatorwill
light.The
temperature
willrecall
appear
the display.
Press
the oven
COOK
TIME pad to
thein
remaining
cooktime.
7. Oven will automaticallyturn off. Four beeps will sound
and "End" will light in display. A beep will sound every
30 secondsfor the next 5 minutes.
8. PressCANCEL pad and beepswill stop. Remove
food from oven.
then
[ S_opJ
then
I_
[_
_
NOTE:It is not necessaryto set a starttime.
[ _ooe J
Controlwill
to turn
on
basedondeterminewhen
the cook time you
set.the oven
NOTE: See page 7 if you wish to change the end of
cooking reminder beeps.
[c oce,J
ABOUTYOUROVEN
(D
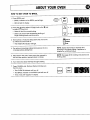
HOW TO SET OVEN TO BROIL
1. Press BROILpad.
• BROILindicator on the BROIL pad will light.
BROIL _' _
INDICATOR
LIGHT
• 000 will light in display.
2. Pressthe • pad to select HI (high) broilor the • pad
to select LO (low) broil.
• Select HI broil for normal broiling.
• Select LO broil for low temperature broiling of
longer cookingfoods such as poultry.
_
._-- Ht
_
LO
I_Oven on
3. There will be a 4 second delay before the oven turns
on. When the oventurns on:
• The OVEN ON indicatorwill light.
i_]Preheat'-'
[__.JLock
4. For optimum browning,preheat broil elementfor 3 to
4 minutes beforeadding food.
NOTE; Expect broil times to increase and
browningto be slightly lighter if appliance is
installed on a 208 volt circuit.
5. Placefood in the oven. Leave oven door opened to
the broil stop position (opened about4-inches).
NOTE; See page 28 for broiling instructionsand
broilingchart.
6. Turn meat once about halfway through cooking.
7. Press CANCEL pad. Removefood and broiler pan
• The OVEN ON indicator will turn off.
from
• The
the
BROIL
oven.indicator on the BROIL pad will turn off.
• -lime of day will reappear in display.
_
_
IiD
ABOUT
:YOUROVEN
_
CAUTION I
• Be sure all packing material is removedfrom oven
before turning on.
• Do not use oven for storingfood or cookware,
• Prepared Food Warning:Follow food manufacturer's
instructions. If a plasticfrozen food container and/or
its cover distorts,warps, or is otherwise damaged
during cooking, immediatelydiscard the food and its
container.The food could be contaminated.
• Many aerosol-typespray cans are EXPLOSIVE
when exposedto heat and may be highlyflammable.
Avoidtheir use or storage near the oven.
• Allow steam and hot air to escape before reaching
into oven to check, add, or removefood.
• Follow the manufacturer'sdirections when using
oven cooking bags.
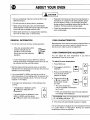
GENERAL INFORMATION
OVEN CHARACTERISTICS
• Do not lock oven door during a cooking operation.
Because each oven has its own baking characteristics, do
not expect your new oven to perform exactly like your
previous oven. Allow a period of adjustment.
- If
indicatorwill
the door is light
locked
and
the
theLOCK
operationwill be canceled.
Unlockthe doorthen reset the
on
I_lt-_'_Oven
I_1 Preheat
(,_,lLock
operation.
be unlockeduntil the oven has cooled.
• Both the bake and broil elements cycle on and offto
• If you press BAKE or BROIL pad and do not set an
oven temperature or broil setting within 30 seconds,the
programwill automatically cancel.The time of day will
reappear in the display,
• Tochange oven temperature or broil setting during
cooking:
_
,,
displayed,
l Bake J then
3. Pressand hold BAKE pad
for 3 seconds until 00°
appears in display.
4. Press and hold the •
or • pad to selectthe
IAI
you
wish. change
temperature
l BakeJ then
• The oven temperature
can be increasedor decreased
_
temperature.
• or • pad to select new temperature.
To adjust the oven temperature:
1. Press BAKE pad.
2. Press• pad until 550° is
element
on for
broiling. for baking.Only the broil
maintainturns
the oven
temperature
- If another functionis displayed,press
BAKE
BROIL
pad then
press
• or • orpad
to select
the new
ADJUSTMENT
You can adjust the oven temperature if you feel the
temperature is too hot or too cool.
- If oven temperature is above 400°F,the internal
lockingmechanismwill engage and the door can not
- If temperature is displayed,press
OVEN TEMPERATURE
• If the oven temperature was previouslyadjusted,
l_
1
the change will be displayed.
I Forby
example:
If the oven temperature was reducedby i
5° to 35°.
I 15°, the displaywill show - 15°.
I
5. Time of day will automatically reappearin display.
It is not necessaryto readjustthe oven temperature if there
is a power failure or interruption. Broiling and cleaning
temperatures cannot be adjusted.
J
ABOUTYOURRANGE
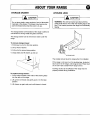
OVEN DOOR
(DI
DOOR LOCK LEVER
CAUTION
• WARNING:NEVER place excessive weight on or
stand on an open oven door. This could cause the
rangeto tip over, breakthe door, or injurethe user.
• NEVERplace fingers between hinge and front oven
frame. Hingearms are spring mounted. If
accidentlyhit, the hinge will slam shut against oven
frame and could injure your fingers.
Whenbaking, be sure oven door is completely closed.
Baking resultswill be affected if door is not closed.
NOTE:When range is new,the oven door may feel
"spongy"when you closethe door.This is normal and will
becomeless "spongy"with use.
To remove liff-off oven door:
1. When cool, open oven door to the broil stop position
(openedabout 4-inches).
2. Grasp door at each side.
3. Lift up evenly until door clears hinge arms. Do not use
door handleto lift door.
self-clean operation.To lock door, move the lever to the
right. This is the locked position for the clean cycle.
Do not move the lock lever to the right or locked position
when baking. If the door is accidently locked:
• The cooking operation will be canceled.
• If oven temperature is above 400°F,the door will not
unlock until the oven has cooled.
• Allow oven to cool then unlock and open door. (Placea
fan in front of oven to speed cooling.)
OVEN WINDOW
To protect the oven door window:
1. Do not use abrasive cleaning agents suchas steelwool
scouring pads or powdered cleansers as they may
scratchthe glass.
2. Do not hit the glasswith pots, pans,furniture, toys, or
other objects.
3. Do not close the oven door until the oven racks are in
place.
Scratching,hitting, jarring or stressingthe glass may
weaken its structure causing an increased risk of
breakage at a later date.
OVENFRAME
OVEN VENT
DOORHINGE
|
IAc.u.,o,
t
/
When oven is in use, the area near the oven vent
opening may feel warm or hot to the touch.
To replace oven door:
1. Grasp door at each side.
On
element cooktops,
oven
ventcoil
is locatedat
the RIGHTthe
REAR
element.
2. Align slots in door with hinge arms on range.
3. Slidedoor down onto hinge arms until door is
completely seatedon hinges.Then push down on top
corners of door to completely seat door on hinges.
• Be sure drip bowl for the right rear
element has a hole in the center to
OVENVENT
allow proper oven venting.
OPENING
• Do not cover this drip bowl with aluminum foil as this
will block proper oven venting and may affect baking
results.
Door is not completely seated if one side is higher or if
door appearsto be crooked.
Do not attemptto open or close door or operate oven until
door is properly replaced.
On a smoothtop, the vent is locatedat the center of the
backguard.
I(D
ABOUTYOURRANGE
OVEN LIGHT
OVEN RACKS
iAc o ,o,
t
Disconnect power to range by tripping circuit
breaker or removingfuse before replacing light
bulb.
A c oT,o.
I
/
Do not attempt to change the rack position when the |
oven is hot.
J
• Be sure bulb is cool beforetouching or replacing
bulb.
• Use a dry potholderto prevent possible harm to
hands when replacing bulb.
The oven rack is designed with a safety lock-stop position.
This prevents the rack from accidently comingcompletely
out of the oven when pulling the rack out to add or remove
food.
• Do not touch hot bulb with a damp cloth as this
may causethe bulb to break.
To remove oven rack:
To turn on the oven light: Push in
rocker switch located on the backguard.
1. When rack is cool, pull rack straight out until it stops at
NOTE: If it is necessaryto change rack positionwhen
rack is hot, use potholdersto protect hands.
2. Tilt the front end of the rack up.
3. the
Continuepulling
rack out of oven.
lock-stopposition.
To replace oven light bulb:
1. Disconnectpowerto range.
_,
_
/
\
2. Hold bulb cover in place then slide wire retaineroff
while
removingwire
retainer. fall if not held in place
cover.NOTE:
Bulb coverwill
3. Removebulb cover.
4. Removelight
bulb and replace with a 40 watt appliance
bulb.
C
,_
_
_
_k\
\ / / I
\ \ \ / I
"
J
RACK
SUPPORT
/ _
/_
-
5. Replacebulb cover and secure with wire retainer.
6. Reconnectpower to range. Reset clock,
BULBCOVER
To replace oven rack:
1. Placerack on the rack supportsin oven.
2. Tilt the front end of the rack up slightly.
3. Slide rack back until it clears the lock-stopposition.
4. Lower front of rack and slide rack straight back into
oven.
f
/
5. IMPORTANT:Pull rack out to the lock-stop position to
be sure rack is correctly replaced.
WIRE
RETAINER
6. If properly installed, rack will not come out of oven
unless the front edge is lifted up.
7. Push rack back into oven and close oven door.
RANGE
STORAGE
DRAWER
LEVELING
tA°.oT,o.
t
Do not store plastic, paper products, food er flammable
materials in this drawer. The drawer may become too
warm for these items when the oven is in use.
LEGS
LA°.OT.O.
WARNING:The anti-tip bracket provided with this
range must secure one of the rear leveling legs to the
floor. This bracket prevents the range from accidently
tipping.
The storage drawer at the bottom of the range is safe and
convenientfor storing metal and glass cookware.
I
The storage drawer can be removedto clean underthe
range.
ii
,'
To removestoragedrawer:
1, Pulldraweroutto the firststopposition,
2. Lift upfront of drawer.
3. Pull out to the secondstop position.
CKET
4. Graspsides and lift drawer up and out.
The installershould level the rangewhen it is installed.
If the range is not level,turn the leveling legs, located at
each corner of the range, until range is level. Placelevel
on an oven rack to determine if range is level.
"
To replacestorage drawer:
1. Fit the rollers located at the ends of the drawer glides
intothe rails on the range.
2. Lift up front of drawer and gently push in to first stop
position.
3. Lift drawer up again and push until drawer is closed.
Cooking results can be affected if the range was not
properly leveled during
installation.
LEVELINGLEG
I(D
ABOUTCLEANING
HOW TO SET OVEN FOR A CLEAN CYCLE
1. Move door lock lever to locked position,
2. Press SELF-CLEAN pad.
• CLEAN indicator on the SELF-CLEAN pad will
flash.
• 3:00 will light in display.
• Lock
If doordoor.
is not locked, "dr" will appear in display.
3. Press • or • pad to select clean time.
_-_
then
LcleanJ
• You can select from 2 up to 4 hours.
• Oven will automatically clean for 3 hours. Or,
• Select 2 hours for light soil.
• Select 4 hours for heavy soil.
4. IF YOU WISH TO DELAY THE START OF
a. Press STOP TIME pad.
b. Press • pad to select the time of day you wish the
oven to turn off.
• Press CLOCK
padto
and
time of day will reappear
CLEANING
(if not, skip
#5):
in display.
• Press STOP TIME pad to recall the time you set.
then
l S_peJ
_
5. When the oven turns on:
r-_ Ovenon
IL)_lPreheat
I,g, lLock ,,_
• The OVEN ON indicator will light.
• LOCK indicator will light when oven heats to 400 °.
• Internal lock will engage. Door cannot be unlocked
and opened when LOCK indicator is lit.
6. About one hour after the clean cycle ends, the LOCK
indicator will turn off. The oven door can be unlocked
and opened.
LIGHTTURNSON WHEN
OVENREACHES4OOoF.
F_Oven on
i_lPreheat
L_j Lock
TO CANCEL CLEAN CYCLE:
1. Press CANCEL pad.
2. If LOCK indicator is NOT lit, unlock and open oven
door.
If LOCK indicator is lit, allow oven to cool about one
hour then unlock and open oven door.
_
I O] Ovenon
I_1 Preheat
I,..__.J
Lock4
lCanoe'J
WHENL/GHTTURNS
OFF,UNLOCKAND
OPENDOOR.
ABOUTCLEANING
]Ac,,.,T,o,
t
• It is normal for parts of the range to becomehot during
a clean cycle.
• Avoid touching cooktop, door, window,or oven vent
area during a clean cycle.
• To prevent damageto oven door, do not attempt to
unlock the door when the LOCK indicator is displayed.
• It is normalfor excessive flare-ups and smokingto
occur during cleaning if the oven is heavily soiled.
BEFORE SELF-CLEANCYCLE
DURINGSELF-CLEANCYCLE
AFTER SELF-CLEANCYCLE
• Remove pans, broiler pan, and
oven racks. Racks may discolor
and not slide easily after cleaning,
• As oven heats, the LOCKindicator
will light in the display, At this
point, the door can not be
unlockedand opened,
• Clean oven window (see glasson
page 21), oven frame and door
frame. These areas are not
exposed to cleaningtemperatures;
soil may bake on during clean
* To prevent damageto door or lock
lever,do not force door open
when the LOCK indicator is
displayed,
• The LOCK indicator will turn off
aboutone hourafter clean cycle
ends. The door can be unlocked
and opened. Use care as oven
may still be hot.
cycle.
• To preventdamage, do not clean
gasket locatedon oven door.
Gasket seals in heat during the
• Some smoke and odor may be
detected the first few times the
oven is cleaned. This is normal
and will lessen in time.
clean cycle.
• Toprevent excessive smoke,
flare-ups or flaming,wipe up
excessgrease or spillovers from
oven bottom,
• Porcelainis acid resistant, net
acid proof and may discolor during
the clean cycle. To prevent or
reducediscoloration,wipe up
sugar or acid spills (lemon, milk,
barbecuesauce, cheese),
• Smoke may occur if oven is
heavily soiled or if broiler pan was
left in oven.
• As oven heats, you may hear
sounds of metal parts expanding
and contracting.This is normal
and will not damage oven.
[ CLEANINGTIPS,_
]
• Turn off oven lightbefore cleaning as the light
/
burn out
during arather
cleanthan
cycle,
• may
Cleanoven
regularly
allowingsoil to
build-up.
k
• Do not use oven cleaners in, on, or around any
part of the range as they will damagethe finish or
parts.
• A gray powdery ash may remain
on the oven bottom or walls. This
is
normal.Use a damp cloth to
removeash.
* If soil remains,the clean cycle
may not have been long enough.
° Wipe oven racks with a small
amount of vegetable oil if racks dc
not slide easily after clean cycle.
• Clean around oven vent opening
there is a depositfrom the fumes
vented during cleaning.
• A white discolorationmay appear
after cleaning if acid soils (milk,
tomato, lemon, etc.) or sugary
soils were not wiped up beforeth
clean cycle. This discolorationis
normal and will not affect the
performanceof the clean cycle.
( CANADIAN .MODELS ONLY}-• The right front surface element will not operate
during a self-clean operation.
ABOUTCLEANING
ABOUT
CLEANING
PRODUCTS
Read and carefullyfollow the manufacturer's instructions.
Test a small inconspicuousarea using a very light
pressureto see if the surface may scratch or discolor.
This is particularlyimportant for porcelain enamel, highly
polishedor shiny metal or plastic surfaces, and painted
surfaces.
Glass Cleaners - Bon Ami, Cinch, Glass Plus, Windex.
DishwashingLiquidDetergents - Dawn, Dove, Ivory,
Joy.
Mild LiquidSpray Cleaners - Fantastik,Formula409.
Abrasive Scouring Pads - S.O.S., Brillo Steel Wool
Soap, Scotch-Brite Pads.
NOTE: The cleaning products for the smoothtop cooktop
are listed in the chart on page 22.
(Brandnamesforthe abovecleaningproductsare registered
trademarksof therespectivemanufacturers.)
/
1 _'
CAUTION
Non-AbrasiveCleaners- Bon Ami, pasteof baking
soda and water,
Mildly Abrasive Powder or Liquid All Purpose
• Be sure appliance is off and all parts are cool
before handling or cleaning.This is to avoid
damage and possible burns.
Cleansers - Ajax, BarkeepersFriend, Cameo,Comet,
Soft Scrub, Elco CleanerConditioner.
Non-Abrasiveor ScratchlessPlastic or Nylon
Scouring Pads or Sponges- ChoreBey Plastic
Cleaning Puff, Scrunge Scrub Sponges,or Scotch-Brite
No Scratch, Cookwareor KitchenSponge.
• If a part is removed, be sure it is correctly replaced.
CLEANING
PARTS
Broiler pan and
insert, Select
models
Control knobs
Dripbowls,
chrome
Drip bowls,
porcelain
CLEANINGAGENTS
• To prevent stainingor discoloration,clean
appliance after each use.
CHART
CLEANINGPROCEDURES
• Soap and water
Never cover insertwith aluminumfoil as this prevents the fat from
• Plasticor soap
draining to pan below.
filledscouringpad 1. Removefromoven after use. Coolthen pouroffgrease.
• Dishwasher
2. Placesoapyclothoverinsert andpan;let soakto loosensoil.
3. Wash inwarm soapywater.Use soap filledscouringpadto remove
stubbornsoil.
4. Broilerpan and insertcanbe cleanedin the dishwasher.
• Soapandwater
Forease of cleaning,turnoff knoband removeby pullingforward.
• Mildliquidsprays
1. Wash, rinse,and dry.Do notuse abrasivecleaningagentsas theymay
• Glasscleaners
scratchthe finishandremovethe markings.
2. Turnon each elementto be sure knobshave been correctlyreplaced.
Do not cover drip bowls with aluminumfoil.
• Soapandwater
Bowlscanpermanentlydiscolorovertime, if exposedto excessiveheat, or
• Plasticscouring
if soilis allowedto bakeon.The discoloration
willnotaffectthe cooking
pads
performance.
• Mild abrasive
1. After each use, wash, rinse and dry.
cleaners
2. If heavilysoiled, gently scrub with plastic scouring pad. If soil is allowed
• Flitz Metal Polish
to burn on, it may be impossibleto remove.
3. A non-abrasivemetal polish such as Flitz may be used to help remove
blue/gold heat stains. Flitz is available in many automotivesupply and
hardwarestores. These stains are caused by overheating,and normally
occur over a period of time. They are usually permanent. Follow package
directions.
• Soap and water
• Mild abrasive
cleaners
• Plasticscouring
pads
• Dishwasher
Porcelainmay discolor or craze over time, if overheated, or if soil is allowed
to bake on. This is normal and will not affect cooking performance.
1. When cool, wash after each use, rinse and dry to prevent staining or
discoloration.
2. To clean heavy soil, soak in hot sudsy water, then use mild abrasive
cleaner and plasticscouring pad.
ABOUTCLEANING
PARTS
Enamel, painted
• Backguard
• Oven door
• Side panels
• Storagedrawer
or lower panel
CLEANINGAGENTS
• Soap and water
• Mild liquid cleaner
• Glass cleaner
Elements,
oven and coil
Glass
• Oven window
• Soap and water
• Glass cleaner
• Pasteof baking
soda and water
Metal finishes
such as brushed
aluminum,or
chrome
• Backguard
• Cooktop
• Oven door
• Storagedoor
• Trim parts
• Soap and water
• Glass cleaner
• Plastic or nonabrasive pad or
sponge
Oven interior
G)]
CLEANINGPROCEDURES
NOTE: Use dry towel or cloth to wipe up spills,especially acid (milk,
lemonjuice, fruit, mustard,tomato sauce) or sugaryspills. Surface may
discolor or dull if soil is not immediatelyremoved. This is especially
importantfor white surfaces.
1. When cool,wash with warm soapy water, rinse and dry. Never wipe a
warm or hot surface with a damp cloth as this may damagethe
surface and may cause a steam burn.
2. For stubborn soil, use mildly abrasive cleaning agents such as baking
soda paste or Ben Ami.
3. Do not use abrasive, caustic or harsh cleaningagents such as steel
wool pads or oven cleaners. These productswill scratch or
permanentlydamagethe surface.
1. Elementsare self-cleaning. Soil will burn off as elementsare used.
2. Do not spray oven cleaner on elements, electrical hook up or
connection.
3. Do not immerse coil-type surface elements in water.
To prevent staining of the oven window,avoid using excessive
amounts of water which may seep under or behindglass.
1. Wash with soap and water. Removestubborn soil with paste of baking
soda and water. Rinsewith clear water and dry.
2. Do not use abrasive materials such as scouring pads, steel wool or
powdered cleaning agents. They will damage glass.
1. Wash with soap and water or a glass cleaner and a soft cloth.
2. To prevent scratchingor dulling of the finish, do not use mildly
abrasive,abrasive,or harsh cleaners,or caustic cleaners such as
oven cleaners.
3. To clean brushed aluminum: Use only soap and water or a soft cloth
and glass cleaner to prevent scratching or dulling of the finish.
4. To clean brushed chrome cooktopor door:
• Use a paste of baking soda and water and a soft cloth.
• Rub with the grain to prevent scratching,dulling or streaking of the
finish.
• Use a soft cloth and mineral oil to restoreluster or to remove
fingerprints or smudges.
• Clean with an automotive chrome cleaner or polisher.
Porcelain enamel is acid resistant, not acid proof. Therefore, when cool,
wipe up sugary or acid spills (milk,fruit, tomato, etc.) as they occur. See
pages 18-19 for self-clean oven.
Oven racks
• Soap and water
• Plastic scouring
pad
• Cleansing powders
• Soap-filled
scouring pad
Plastic finishes
• Door handles
• Backguardtrim
• Knobs
• End caps
• Soap and water
• Non-abrasive
plastic pad or
sponge
• Glass cleaner
1. Cleanwith soapy water.
2. Removestubborn soil with cleansing powder or soap-filledscouring
pad. Rinse and dry.
Racks will permanentlydiscolor and may not slide smoothly if left in the
oven during a self-clean operation. If this occurs, wipe the rack and
embossed rack supports with a small amount of vegetable oil to restore
ease of movement,then wipe off excess oil.
NOTE: To prevent staining or discoloration,wipe up fat, grease or acid
(tomato, lemon,vinegar, milk, fruit juice, marinade) immediatelywith a
dry papertowel or cloth.
1. When cool, clean with soap and water, rinse, and dry.
2. Use a glass cleaner and a soft cloth.
NOTE: Never use oven cleaners, abrasive or caustic liquid or powdered
cleansers on plasticfinishes. These cleaning agentswill scratchor mar
finish.
ABOUTCLEANING
PARTS
CLEANING AGENTS
CLEANING PROCEDURES
Porcelain enamel
• Cooktopon coil
elements
• Trim on
smoothtop
cooktop
• Backguard
• Soap and water
• Paste of baking
soda and water
• Non-abrasive
plastic pad or
sponge
Porcelain enamel is glass fused on metal and may crack or chip with
misuse. It is acid resistant, not acid proof. All spillovers,especially acid or
sugar spillovers, should be wiped up immediatelywith a dry cloth. This is
especially important aroundthe vent opening for smoothtop cooktop.
Surface may discolor or dull if soil is not removed.
1. When cool, wash with soapy water, rinse and dry.
2. Never wipe off a warm or hot surface with a damp cloth. This may
cause crackingand chipping.
3. Never use oven cleaners,abrasive or caustic cleaningagents on
exterior finish of range.
Smoothtop
cooktop
Never use oven
cleaners, ammoniaor
glass cleaners with
ammonia.
NOTE:Callan authorizedservicerifthe smoothtopshouldcrack, breakor if
metal or aluminumfoil should melt on the cooktop.
• To clean light to
moderatesoil
• CooktopCleaning
Creme* or other
productspecially
formulatedfor the
smoothtop
• Soap and water
Wait until cooktophas cooled beforecleaning.Gently apply cleaningagent
with a non-abrasiveplastic brush, nylon or plasticpad, papertowel or clean
cloth. (Do not use soiledsponge or cloth as these may leave a film and discoloration.) Rinse thoroughly and completelydry.
• TOclean heavy
soil or brown/
gray stains from
hard water or
metal marks
• CooktopCleaning
Creme* or other
productspecially
formulatedfor the
smoothtop
Gently scrub with cleaningcreme and clean cloth or paper towel. Reapply
cleaner.Cover with damp papertowels to keep cleaner moist.Let standfor
30 to 45 minutes. Scrub to remove remaining stain. Do not use abrasive
powders or pads as they may scratchthe surface. Rinse and dry.
• To clean
burned-onor
crusty soils or
residue
• Single-edgesafety
razor blade
° Cooktop Cleaning
Creme*
Hold razor blade scraper at 30° angle and very carefully scrape off soil.
Clean remaining soilwith CooktopCleaning Creme.
• To clean sugar,
starch, plastic
• Single-edgesafety
razor blade held
with a potholder
• Woodenspoon or
plastic handled
metal spatula
Turn element to LOW and immediatelyscrape from hot surface to a cool
area. Then turn element OFF and cool. Clean residue with razor blade
scraper and cleaning creme.
• Aluminumfoil
* Cooktop
Cleaning
Creme
canbepurchased
fromyourdealer.
Aluminumfoil can not be removedonce it melts onto the top. If the foil melts
over a cookingarea, the cooking areacannotbe usedas it may damagethe
cookware or damagethe smoothtop.
I
SELECTING
ABOUT:
COOKING
HEAT SETTINGS
CANNING
INFORMATION
• If a higher setting is used to begin a surface cooking
operation or to bring water to a boil, always reduce to a
lower setting once cooking begins or water comes to a
boil.
• Forsmoothtop cooking, it is better to select a lower
setting and increase to a higher one later,if needed,
• Food will not cook faster at a settingthat is higher than
neededto maintain a gentle boil. The temperature of
the water is the same whether boiling vigorouslyor
gently.
Factorsaffectingthe heat setting include:
• Type,flatness and size of the cookware,
Acceptablewater bath or pressure canners should not be
oversized and should haveflat bottoms.
• Quantityand type of food being cooked.
• Use of a lid (coveringpans speeds cooking and saves
energy),
• Elementvoltage or voltage supply to your home.
When canning, usethe HIGHsetting just until the water
comes to a boil or pressure is reached in the canner,
then reduce to the lowest heat setting that maintainsthe
boil or pressure. If the heat setting is not turned down,
SUGGESTED
damage to the cooktopmay occur. _._ _-._
A special canning element
/_'I___,_
HEAT SETTING
GUIDE
the HIGHsetting,
When canners do not meet
these standards, cooking times
may
and the cooktop
may be
be longer
damaged.
_
_
_" ._,,'--=,,, _
On a smoothtop cooktop, the
canner bottom should not
extend more than one-inch
beyondthe cooking area and
must have a flat bottom.
HIGH
9: Use
toto
bring
liquid to ais an indentto
OfFidentify
When OR
turning
knob
HIGH,there
your dealer for coil element
cooktops. It elevates the canner
above
the cooktop
to reduce
(modelCE1)
is availablefrom
boil,
blanch,preheat
skillet,or
pressure
in a pressure
cooker.reach
trapped
prevents
damageheat.
to theThis
porcelainsurface
_w_.
_._I_HIGH
I
_'"
setting when liquid just begins to boil
or food begins to cook.
Always reduce to a lower heat
3"_
_
MEDIUM-HIGH(7, 8): Use to brown
or sear meat; heat oil for deepfat
frying; scald; to saute or fry. Maintainfast boil for large
amounts of liquid.
MEDIUM(4, 5, 6): Use to maintain moderateto slow boil
for largeamounts of liquid.To continue cooking
uncoveredfood and for most frying operations.
MEDIUM-LOW(2,3): Use to continue cooking covered
food and to maintain pressure in most pressure cookers.
Stew,braise or steam operations.To maintain boil for
small amountsof liquid, poach,steam or simmer.
LOW OR 1: Use to keep food warm before serving. Melt
chocolate or butter.
_,
;' ''_
_',,_ ,
CANNER
ELEMENT
(MODELCE1)
Checkwith your local Extension Serviceor a
and
drip bowls. glass canningjars for the latest canning
manufacturerof
information.
I
ABOUTCOOKING
ABOUT COOKWARE
COOKWARE MATERIALS
_i,
/
The pan material determines how evenly and quickly heat
Never allow a pan to boil dry as this may damagethe
element.
l pan, cooktopand/or heating
CAUTION
To achieve optimum surface cooking performance,select
heavy
gauge,flat,
the surface
unit. smooth bottom pans that fit the size of
Properpans
will
reducecooking
use less
energy
and
cook food
more
evenly. Usetimes,
these tests
to determine
if pan bottom is flat.
Aluminum
Heats
evenly.Avoidthin
gaugeelement
aluminum.Acidic
or
is transferredfrom
the heating
to the panfoods
bottom.
salt will cause it to discolor or pit. Anodizing improves
stain resistanceand pitting. Often used as a bottom
coating to improve the heating of other materials.
Sliding aluminum pans across smoothtop may leave metal
marks. Removethese marks fmmediatelyto prevent
Ruler Test:
1. Placea ruler acrossthe bottom of the pan.
permanent marks (see page 22).
Copper
Heats evenly; discolorseasily.Often used as a bottom
coatingto improvethe heat conduction of other materials.
2. Hold it up to the light. Little light should be visible under
the ruler,
May leave metal marks on the smoothtop (see aluminum
above).
Bubble Test:
If copper cleaner is not completely removed from pan, the
cleaningresidue may permanentlydamage or discolor the
smoothtop the next time the pan is used.
1. Put an inchof water intothe pan, place on cooktop and
turn controlto HIGH.
2. Watch the bubbleformation as the water heats.
• Uniformbubbles= good performance,
• Unevenbubbles = hot spots and uneven cooking,
Stainless Steel
Heats unevenlyunless lined with copper or has an
aluminum bottom or inner core. Durable, easy to clean
and stain resistant.
Good Pans:
• Flat bottom,straight sides,and
Cast Iron
Heats slowly and evenly; retains heat; slow to cool. Needs
__.t=-_
.,_p
• Madeof a heavy gauge
tight
materialthat
fitting covers.
conducts heat well. _
• Weight of handledoes not tilt pan.
• Pan size matches the size of the surface unit. Pan
should not extendmore than 1-inch beyond the
surface unit.
Poor Pans:
A
A
• Grooved or warped pan ,_
,_',_1_
._
and taste of some foods.
seasoningto
Porcelain
Enamel
preventsticking and rusting. May affect color
Glass-like substancefused to metal. Heating
characteristicsdepend on base material (usuallysteel or
cast iron).
Glass-Ceramic
Heatsslowly and unevenly. May scratch the smoothtop if
slid across cooktop. Some types may only be used in the
• Pan that is smallerthan
the surface unit.
ABOUT
• bottoms.
Thin gauge metal pans. _
• Unstable pan such as a small saucepan with a heavy
or loose handle,
• Oversizedpans or pans
that rest across two coil elements.These will cause
discolorationor damageto the drip bowls, damageto
the porcelaincooktop, and may lengthenthe cooking
time on the smoothtopcooktop,
• Woks with round metal rings. The ring traps heat and
may damage coil element, porcelaincooktop, and
smoothop cooktop.
SPECIALTY
COOKWARE
This
oven.appliance has beentested for safe performance
using conventionalcookware. Do not use any devices or
accessoriesthat are not specificarlyrecommended in this
manual. Do not use eyelid coversfor the surface units,
stove top grills, or add-on oven convection systems
The use of devices or accessoriesthat are not expressly
recommendedin this manual can create serious safety
hazards, result in performanceproblems, and reduce the
life of the componentsof the appliance.
I
ABOUTCOOKING
ALUMINUM FOIL USAGE
PREHEATING
• Do not cover an entire oven rack or oven bottom with
• Preheatingis necessary for baking.
aluminumfoil. This will reduce heat circulation, result in
poor baking and may damagethe oven bottom.
• A small piece of foil may be used to catch spillovers.
Place it on a lower rack several inches belowthe food.
• It is not necessaryto preheat for roasting.
• To preheat, set the oven to the desiredtemperature and
allow about 8 to 15 minutesfor the oven to preheat. A
single beep will indicate that the oven is preheated.
preheat the oven any faster, and may have a negative
_
//
on baking
results. higher than desired will NOT
• effect
Selecting
a temperature
\,
• Do not cover the broiler insert with aluminum foil.This
prevents fat from draining into the pan below and
increases flare-ups and smoke. However, the broiler
pan may be lined with foil for easier clean-up.
RACK POSITIONS
• For optimumresults, air must circulatefreely withinthe
oven and aroundthe food. To help ensure this, place
food in the center of the oven. Allow two inches
betweenthe edge of the pan(s) and the oven walls.
RACK 5 (highestposition): Usedfor toasting bread, or for
two-rack baking.
RACK 4" Usedfor most broiling and two-rack baking.
• Use one rack for optimumbaking resultsof cakes,
cookies or biscuits,
RACK 3: Usedfor most baked goods on a cookie sheet o
jelly roll pan, or frozen conveniencefoods, or for two-rack
baking.
Positionthe rack so the food is in the center of the
oven. Use either rack position 2 or 3.
RACK 2: Used for roasting small cuts of meat, large
casseroles, baking loaves of bread, cakes (in eithertube,
• If cooking on two racks,
_
staggerthe food to ensure _.._'_
bundt, or layer pans) or two-rack baking.
RACK 1: Used for roastinglarge cuts of meat and large
baking.
use rack positions2 and 4
for cakes and rack
positions 1 and 4 or 2 and 5
proper air flow.
_
5
poultry, pies, souffles,or angel food cake, or for two-rack
when using cookie sheets.
I1 ,_'_r_/
ononerack.
Never place two cookie sheets
I1_
• andthe
If roasting
side dishes
a large
onturkey,place
rack 5.
the turkey on rack 1
__
/
_Jii
" II
iii
I I
I I',,.
i i_
". _-" i'_-'_ll
'_\\_L l_ll
..... 4
'3
21
ABOUTCOOKING
BAKING TIPS
ROASTINGTIPS
Use a reliable recipe and accuratelymeasure fresh
ingredients.Carefully follow directions for oven
temperatureand cookingtime. Preheatovenif
Roastingis the method for cookinglarge, tender cuts of
meatuncovered,withoutaddingmoisture.Most meatsare
roastedat 325°F. It isnot necessaryto preheattheoven.
recommended.
Use the correct rack position. Bakingresultsmay be
affectedif the wrongrackpositionis used.
• Top browning may be darker if foodis located
• For best resultsuse tendercutsof meat weighing3-tbs.
or more.
towardthe top ofthe oven.
• Bottombrowningmay be darker if food is located
towardthe bottomofthe oven.
Bakewarematerialplaysan importantpart in baking
results.Alwaysuse thetypeand size of pancalledfor in
the recipe.Cookingtimesor cookingresultsmay be
affectedifthe wrongsize is used.
• Shiny metal pan reflectsheat awayfromthefood,
produceslighterbrowninganda softercrust.Use shiny
pans for bakingcakes orcookies,
• Dark metal pan ora pan with an anodized(dull)
bottom absorbsheat, producesdarkerbrowningand a
crispercrust.Usethis typeof pan for pies,pie crustsor
bread.
• Foroptimumbakingresults,bakecookiesand biscuits
ona flat cookiesheet. Ifthepan has sides,such as a
jellyrollpan, browningmay notbe even.
• If usingoven-proofglassware,or dark panssuch as
Baker's Secret reducetheoventemperatureby 25°F
exceptwhen bakingpies or bread.Use the same
bakingtimeas calledforin the recipe,
• If usinginsulatedbakeware,expectcookingtimes to
increaseslightly.It is not necessaryto adjustthe oven
temperature.
Checkthe cooking progress at the minimumtime
recommendedin the recipe.If necessary,continue
checkingat intervalsuntilthe food isdone.If the oven
dooris openedtoofrequently,heatwillescapefromthe
oven;thiscan affectbakingresultsand wastesenergy.
If you add additional ingredientsoralterthe recipe,
expectcookingtimesto increaseor decreaseslightly.
• Some goodchoicesare: Beef rib,ribeye,top round,
highqualitytip and rumproast,porkloinroast,leg of
lamb,veal shoulderroastand curedor smokedhams.
• Placethemeat fat-side-upon a rackin a shallow
roastingpan.Placingthe meat on a rackholdsitoutof
thedrippings,thusallowingbetterheatcirculationfor
even cooking.As the fat ontop of the roastmelts,the
meat isbastednaturally,eliminatingthe needfor
additionalbasting.
• The cookingtime is determinedbythe weightofthe
meat and the desireddoneness.
• Formoreaccurateresults,use a meatthermometer.
Insert itso the tipis inthe centerof the thickestpartof
the meat. It shouldnottouchfat orbone.
• Removethe roastfrom theovenwhenthe thermomete_
registersthe desiredaloneness.
NOTE: For more informationaboutfoodsafety, call
USDA'sMeat & PoultryHotlineat 1-800-535-4555.
Forcookinginformation,writeto the NationalCattlemen'sBeefAssociation,444 NorthMichiganAvenue,
Chicago,Illinois60611,orcall 1-800-368-3138.
ABOUTCOOKING
COMMON BAKING PROBLEMS AND WHY THEY HAPPEN
PROBLEM
POSSIBLE CAUSES
Cakes are uneven.
• Pans too close or touching each other or oven walls. • Batter uneven in pans.
• Temperatureset too low or baking time too short. • Oven not level. • Undermixing.
• Too much liquid.
Cake high in middle.
• Temperatureset too high. • Bakingtime too long. • Overmixing. • Too much flour.
• Pans touching each other or oven walls. • Incorrect rack position.
Cake falls.
• Too much shortening or sugar. • Too muchor too little liquid. • Temperatureset too
low. • Old or too little baking powder.* Pan too small. • Oven door openedfrequently.
• Added incorrecttype of oil to cake mix, • Added additional ingredientsto cake mix or
recipe.
Cakes, cookies, biscuits
don't brown evenly,
• Incorrect rack position.• Oven door not closed properly.• Door gasket not sealing
properlyor properlyattachedto door.• Incorrectuse ofaluminumfoil.• Oven not
preheated.• Pans darkened,dentedorwarped.
For optimum results, bake on one rack. If bakingcakes on two racks, place pans toward
the front of the oven on the upper rack and towardthe back of the oven on the lower
rack,
Cakes, cookies, biscuits
too brown on bottom,
• Oven not preheated. • Pans touching each other or oven walls. • Incorrect rack
position. • Incorrect use of aluminumfoil. • Placed 2 cookie sheets on one rack. • Used
glass, dark, stainedwarped or dull finish metal pans. (Use a shiny cookie sheet.)
Follow cookware manufacturer'sinstructionsfor oven temperature. Glasswareand dark
cookware such as Ecko's Baker's Secret may require loweringthe oven temperature by
25°F.
Cakes don't brown on
top.
• Incorrectrack position.• Temperatureset too low. • Overmixing.• Too much liquid.
• Pansize too largeortoo littlebatterin pan.• Oven dooropenedtoo often.
Excessive shrinkage.
• Toolittle leavening.• Overmixing.• Pan too large. • Temperatureset too high.
• Bakingtimetoo long. • Panstoocloseto each otheror ovenwalls.
Uneven texture.
• Toomuchliquid. • Undermixing.• Temperatureset too low. • Baking time too short.
Cakes have tunnels.
• Not enoughshodening. • Too much baking powder.• Overmixing or at too high a
speed. • Temperatureset too high.
Cake not done in
middle.
• Temperatureset too high. • Pan too small. • Baking time too shod.
Pie crust edges too
brown,
• Temperatureset too high. • Pans touching each other or oven walls.• Edges of crust
too thin; shield with foil.
Pies don't brown on
bottom.
• Usedshiny metalpans. • Temperatureset too low.• Incorrectrack position.
• Somefrozenpiesshouldbe placedona cookiesheet,checkpackagedirections.
I Pies have soaked crust.
Ifadditionalingredientswere addedto mix orrecipe,expectcookingtimeto increase.
• Temperaturetoolow at startof baking.• Fillingtoojuicy.• Used shinymetalpans.
ABOUTCOOKING
BROILING TIPS
Broiling is used for tender cuts of meat or marinated
meats, poultry, fish and some fruits and vegetables. The
food is placed directly under the broil element.
• When broiling in an electric oven, the door should be
opened to the broil stop position (opened about
4-inches).
Cooking
determined
by the desired
degree
of
donenesstime
andisthe
distance between
the food
and the
element.
j_ _-_-
_--
• For best results, steaks and chops should be at least
3/4-inch thick. Thinner cuts should be pan broiled.
• Before broiling, trim excess fat to prevent excessive
P_-_
-_ -_-._.-.-.-.-.-.-.-.-._
---.-__"_-_-/_/
_-/_-_--/-_z.-_/_
z___- ._
_ _/_'f',,/
ofthefattopreventcurlingduringcooking.
"_
___,,.//_
• Season meat after cooking. Salt tends to draw juices
out of the meat and delay browning.
• Preheat broil element 3 minutes for optimum browning.
• Use a broiler pan with an insert designed to drain
excess
liquid
and fat away
the in
cooking
surface.
spattering
or smoking.
Cut from
slashes
the outer
edges
This is to prevent spatters and smoke.
• For a brown exterior and rare interior, meat should be
close to the broil element. For well-done meat, place
the broiler pan farther from the element.
• Increasing the distance between the meat and the broil
element will help reduce spattering and smoking,
!_.//ir
-'_
_,_-".._..-_-'.li
• Select Lo Broil for longer cooking foods such as
chicken pieces.
• Foods that require turning should be turned only once
during broiling. Turn after half the recommended
cooking time.
BROILING CHART
TYPE OF MEAT
BACON
BEEF STEAKS
1-inchthick
CHICKEN
Pieces
'
RACK POSITION*
#4
DONENESS
Well Done
TOTAL COOK TIME
(MINUTES)**
6 to 10 min.
#4
#4
Medium
Well Done
15 to 18 min.
19 to 23 min.
#3 or #4
Well Done
LO BROIL
30 to 45 rain.
FISH
Fillets
Steaks, 1-inchthick
#4
#4
Flaky
Flaky
8 to 12 min.
t0 to 15 rain.
GROUND BEEF PATTIES
3/4-inch thick
#4
Well Done
15 to 18 min.
HAMSLICE, precooked
1/2-inch thick
#4
Warm
PORK CHOPS
1-inch thick
#4
Well Done
* The top rack position is position #5.
** Broilingtimes are approximateand may vary depending on the meat.
8 to 12 min.
22 to 26 min.
ABOUTSERVICE
IA c.u.,o.
I
• Do not attemptto service this appliance yourself
unless directed to do so in this manual or the chart
below. Refer all other servicingto a qualified servicer
or call us at 1-800-688-1120.
• Locate and mark circuit breaker or fuse. Never
replace a blownfuse or reset a circuit breaker until
you know what caused the problem. Always replace
a blownfuse with one of the correct amperage, do
not use a substitute.
• Always disconnect powerto unit before any servicin(
by tripping circuit breaker to the OFF position or by
removingthe fuse,
TROUBLESHOOTINGCHART
PROBLEM
Part or all of
appliance does not
operate.
POSSIBLECAUSES
1. Range is disconnectedfrom power
or is loosely connectedto power,
2, Tripped circuit breaker or blown
fuse.
3. Power supply has been interrupted.
4. Surface or oven controlsnot set
properly.
5. Oven door left in locked position
after clean cycle.
6, Oven set for delayedcook or clean.
Surface or oven
elementsfail to
operate or heat food.
1, Range is disconnectedfrom power
or is loosely connectedto power,
2, Tripped circuit breaker or blown
fuse.
CANADIANMODELS 3. Power supply has been interrupted.
ONLY:The right front 4. Surface or oven controls not set
' element on the
properly.
smoothtop will not
5. Surface element is not properly
operate during a clean
installed,
operation.
6. Oven was not set to correct
temperature.
7. Oven was set for delayedcook.
8. Oven was not preheated properly.
SUGGESTEDCORRECTIONS
1. Check to be sure plug is securely inserted into
wall receptacle.
2. Check or re-set circuit breaker.Check or replace
fuse.
3. Wait until power has been restored.
4. See page 8 for setting surface units; see pages
11, 12and 13for setting oven control.
5. Unlock oven door.
6, Cancel program. See page 12or 18.
1, Checkto be sure plug is securely inserted into
wall receptacle.
2. Check or re-set circuit breaker. Check or replace
fuse.
3. Wait until power has been restored.
4. See page 8 for setting surface units; see pages
11, 12 and 13 for setting oven control.
5. See page 9 for instructionson how to replace
surface element.
6. Set oven to temperature recommendedin recipe.
7. Cancel program and reset.See page 12.
8. Allow oven to preheat until PREHEATindicator
turns off and a beep is heard.Then place food in
oven.
Smoothtopcooktop.
1. Tiny scratches or
abrasions
2. Metal-marks
3. Brown streaks
and specks
4. Areas of discoloration with a metallic
sheen
5. Pitting or flaking
9. Defectivepart,
9. Have authorizedservicer replace part.
1. Coarseparticles (dust, salt, sand)
between cookware and cooktop,
Incorrect cleaner.Sliding glass or
metalpan acrosstop. Using
cookwarewith rough bottoms,
2. Slidingor scraping metal pans or
oven racks across cooktop,
3. Believers, incorrectcleaner, used
soiledcloth or sponge, soiled
cookware,
4. Mineral depositsfrom water and
foods,
1. Tiny scratches are not removable and do not
affect cooking. Intime, the scratcheswill become
less visible. Be sure cookware bottom and
cooktop are clean before use. Use cookware with
a smooth, non-scratching bottom. Do not slide
cookware across cooktop.
2, Do not slide metal object across cooktop. When
cool, clean with Cooktop CleaningCreme.
3. Clean up boiloverbefore reusing the cooktop. Be
sure cookware, especially bottoms,are clean ant
dry.
4. Use cookware with bottomsthat are clean and
dry. Use correct heat setting to prevent believers.
5. Sugary believersfrom sugar syrups,
candy,jams, jellies, dessert sauces,
etc.
5. Use correct heat setting and large enough pan.
Watch cooking operationto prevent boiloversor
spattering.
I
ABOUTSERVICE
PROBLEM
Baking results are
not what you
expected.
• Uneven browning
(too dark on top or
bottom).
• Underdoneor
overdone,
• Browningis too
dark or light,
• Cake is not level,
POSSIBLE CAUSES
1. Oven is too hot or too cool.
2. Selected BROIL ratherthan BAKE.
3. Food not positionedcorrectly in
oven.
4. Used incorrect pan.
5. Used aluminumfoil incorrectly.
6. Oven rack was crowded with pans.
7. Used unreliablerecipe or did not
follow recipe,
8. Oven vent was blocked.
9. Range is not level.
10. Door is not correctly installed.
Baking results differ
from previous oven.
SUGGESTEDCORRECTIONS
1. Select correct oven temperature. When baking,
always preheat oven before addingfood.
2. Select the BAKE pad, not BROIL, for baking.
3. See rack placement on page 25.
4. Dark pans produce dark browning.Select shiny
aluminumpans or reduce the oven temperature
by 25°E See page 26.
5. Never use foil to coveran oven rack. Placea
small piece of foil on the rack belowthe rack
holdingthe pan. See page 25.
6. Stagger pans on rack. Allow 1 to 2-inches
between pans and oven walls.
7. Select recipesfrom reliable sources. Read and
carefullyfollow instructions and do not substitute
ingredients.
8. See page 15for informationon oven vent.
9. See page 17for instructionson leveling range.
10. See page 15for instructionson replacingdoor.
1. Oven seems hotter or coolerthan
your previous oven.
1. See page 31 for instructionson adjustingthe oven
temperature. NOTE: Do not adjust temperature if
onty one or two recipes are in question. The
problemmay be the recipe ratherthan the oven.
NOTE: Oven temperatures may vary between the new and the old oven. As ovens age, the
oven temperature often "drifts" and may become hotter or cooler.Also, newer ovens may
operate differentlyfrom older ovens.You should expect some differences in baking results.
Food not broiling
properly.
1. Oven incorrectlyset.
2. Usedincorrect rack position.
3. Broilelement was not preheated.
4. Usedaluminum foil incorrectly.
5. Oven door was closed during
broiling,
Oven smokes
excessivelyduring
broiling.
Oven will not
self-clean,
1. Food placed too close to broil
element.
2. Broilerinsert coveredwithaluminum
foil.
3. Meat is toofatty.
4. Marinadenotcompletelydrained
beforebroiling,
5. Bastedmeat tooearlyduring
broiling,
6. Used a soiled broiler pan.
1. Self-cleanfeature was not properly
set.
2. Oven set for a delayed clean.
3. Oven door not closed and/or locked.
1. See page 13 for operating instructions.
2. See page 28 for informationon broiling.
3. For optimum browning, preheat the broil element
for 3 minutes before placingfood in the oven.
4. The broiler pan can be lined with foil; never line
the broiler insert with foil.
5. Always leave door opened to the broil stop
position (openedabout 4-inches) duringbroiling.
1. Move broiler pan down one rack position.
2. Nevercoverinsertwithfoil as this preventsfat
from drainingto pan below.
3. Trimexcessfat beforebroiling.
4. Completelydrainmarinadefrom meat.
5. Bastemeat duringthe lastfew minutesof
cooking.
6. Always clean broiler pan and insert after use.
1. Follow instructionson page 18.
2. Cancel program and reset clean cycle.
3. Close and lock oven door.
,, , sE.v,c
PROBLEM
Oven door will not
lock for self-clean.
POSSIBLECAUSES
1. Self-cleanwas not properlyset.
2. Oven door is not closed.
(91
SUGGESTEDCORRECTIONS
1, Fol_owinstructionson page 18.
2. Be sure door is properlyclosed.
Oven door will not
1. Clean cycle ended less than one
unlock after clean
hour ago,
cycle or if accidently
locked during baking, 2. Oven hot enoughto engage internal
lock, if accidently locked during
baking,
1. Allow about 1 hourfor oven to cool. Door can be
unlockedwhen LOCK indicator is no longer displayed.
2. Allow oven to cool until LOCK indicator no longer
is displayed.To speed cooling, allow a fan to blow
on oven door.
Moisture condensation on oven window,
1. Window may fog when cookingfood
high in moisture.
2. Used a cloth saturated with water to
clean window.
1. This conditionis normal.
1. Oven light bulb is loose or burned
out,
2. Light switch inthe OFF position,
1. Check or replace bulb.
Strong odor or light
smoke when oven is
turned on the first
few times,
1. "Burningoff" of manufacturingoils,
lubricantsused duringthe manufacturing process, or insulation,
1. This is normal for a new range and will disappear
after a few uses. A clean cycle willspeed up the
process, Opening a window or turning on a fan
will help removethe smoke and odor.
2. Use self-clean feature.
"F" plus a number or
letters appear in display.
This is called a FAULTCODE. If a fault code appears in the display and beeps sound, press
any pad except the CANCELand • or • pads. If the fault code and beeps continue, disconnect power to the appliance and call an authorized servicer.
Ovenlight does not
turn on.
2. Food soil.
2. Wring excesswater from cloth before cleaning.
2. See page 16 for instructions.
If the oven is heavilysoiled, excessiveflare-ups may result in a fault code during a clean
cycle. Press any pad except the CANCEL and • or • pads and allow oven to cool for one
hourthen resetthe clean cycle.
MAYTAG COOKING APPLIANCE WARRANTY
ONE YEAR - FULL WARRANTY (Partsand Labor)
Forone (1) year fromthe date of originalretailpurchase,any partwhichfails in normalhomeusewillbe repairedor
replacedfree of charge by the manufacturer.
ADDITIONAL FOUR YEAR - LIMITED WARRANTY (Parts only)
For an additionalfour (4)year periodbeyondthe first year of the Fullwarranty,the parts listed belowwhichfail in normal
home use will be providedby the manufacturerfree of charge for the part itself,with the owner paying all other costs,
including labor, when the appliance is located in the United States or Canada. These parts must be installed by an
authorizedservicer.
• Smoothtop heatingelement
• Gas sealed surfaceburner
• Glass.ceramiccooktop - dueto thermalbreakage
Canadian Residents: The above warrantiesonly cover an appliance installed in Canadathat has been certifiedto a
NationalStandardof Canadaunlessthe appliancewasbroughtintoCanadaduetotransferof residencefromtheUnited
Statesto Canada.
The specificwarrantiesexpressedaboveerethe onlywarrantiesprovidedbythe manufacturer.
Thesewarrantiesgiveyouspecificlegalrights,andyou
may'also haveother rights which vary from state to state.
WHATIS NOT COVEREDBY THESE WARRANTIES:
HOW TO RECEIVEWARRANTYSERVICE:
1. Conditionsand damages resultingfrom any of the
following:
a. Improperinstallation,delivery,or maintenance.
b. Any repair,modification,alterationor adjustmentnot
authorized by the manufacturer, or an authorized
1. For authorizedservice,contacttheMaytagdealerfrorr
whom you purchased the appliance or call Maytac
Customer Service at 1-800-688-9900 (USA) ol
1-800-688-2002 (Canada).
servicer,
c, Misuse,abuse, accidentsor unreasonableuse.
d. Incorrectelectrical current,voltage or supply.
2, If you are not able to satisfactorilyresolvethe complain_
with local response, call or write to:
Maytag
Appliances
Attn: CAIRsM
CenterSales Company
P.O. Box 2370
Cleveland, TN 37320-2370
1-800-688-9900 (USA)
1-800-688-2002 (Canada)
e. Impropersettingof any control.
2. Warrantiesare void if the originalserial numbers have
been removed, altered, or cannot be readily
determined.
3. Lightbulbs.
4. Productspurchasedfor commercialor industrialuse.
5. The cost of service or service call to:
a. Correct installationerrors,
b. Instruct the user on the proper use of the product.
c. Transportthe applianceto a servicer,
3. When
requestingservice, the following informationwi
be needed:
a.
b.
c.
d.
e.
Your name, address, and telephone number.
Modeland serial numbers (foundon the data plate)
Name and address of dealer or servicer.
Proof of purchase date (sales receipt).
A clear descriptionof the problemand service
history.
6. Consequentialor incidentaldamagessustainedby any
personas a resultof any breach of these warranties.
Somestates do not allow the exclusionor limitation of
consequential or incidental damages, so the above
exclusionmay not apply to you.
8109P084-60 (11-98-£
(Bl¢