1
MSUH
Safety Instructions
IB Warning!
Safety
Important
Instructions
CAUTION
CAUTION
TO REDUCE THE RISK OF ELECTRIC SHOCK, DO NOT REMOVE COVER
(OR BACK). THERE ARE NO USER SERVICEABLE PARTS INSIDE. REFERALL SERVICING
TO QUALIFIED SERVICE PERSONNEL.
This symbol indicates high voltage
with any part inside this product,
is present.
This symbol alerts you that important
been included with this product,
CAUTION
FCC/CSA
to this equipment
CAUTION
fully
regulations
may void
To prevent
literature
state that any
the user's authority
electric
shock,
It is dangerous
concerning
unauthorized
to operate
match the wide
to make any kind of contact
operation
and maintenance
changes
has
or modifications
it.
blade
of plug to the wide
slot, and
insert the plug.
ATTENTION:
Pour eviter les chocs electriques,
introduire
la lame le plus large
dans la borne correspondante
de la prise et pousserjusqu'au
fond.
de la fiche
Note to CATV system installer:
This reminder
is provided
to call CATV system installer's
attention to Article 820-40
of the National
Electrical Code (Section 54 of Canadian
Electrical Code, Part I), that provides
guidelines
for proper grounding
and, in particular,
specifies that the cable ground shall be connected
to the grounding
system of the building
as close to the point of cable entry as possible.
Important:
One Federal Court has held that unauthorized
recording
of copyrighted
TV
programs
is an infringement
of U.S. copyright
laws. Certain Canadian
programs
may
also be copyrighted
and any unauthorized
recording
in whole or in part may be in
violation
of these laws.
I
To prevent
damage
do not expose
which
may
result
this appliance
in fire or electric
to rain
or moisture.
shock,
I
Table of Contents
Introduction
Your New
.....................................................
Wide
TV ................................................
...................................................
6
Checking Parts
Side Panel Buttons
...................................................
...................................................
6
7
Side Panel Jacks ....................................................
7
Front Panel LED Indicators
8
..............................................
....................................................
Remote Control
Operation
....................................................
...................................................
VHF and UHF Antennas
Connecting
Cable
Connecting
a VCR
Connecting
a Camcorder
Connecting
Component
14
16
..................................................
18
.............................................
Video
..........................................
the Menu Language
..........................................
the Menus and Displays
Channel
Memory
........................................
..................................................
Channels
20
21
24
............................................
Viewing
Changing
.................................................
24
24
25
26
28
Setting the Clock
Sound Control
..................................................
..................................................
29
30
Picture Control
..................................................
32
Setting Up Your Remote Control .........................................
Remote Control Codes ...............................................
34
36
Viewing
37
a VCR, DVD or Camcorder
Setting Timers
Features
Tape ..................................
..................................................
.................................................
Special
38
42
Video
Features
...............................................
42
Special Audio
Features
...............................................
44
Viewing
Closed
Caption
Using External Speakers
Using Wireless
Changing
Viewing
Appendix
......................................
TV ................................................
.....................................................
Selecting
9
10
14
Connecting
Turning the TV On and Off
Special
6
List of Features
Rear Panel Jacks
Connections
2
Information
.....................................
..............................................
Headphones
...........................................
the Screen Size .............................................
Picture-in-Picture
.............................................
......................................................
45
46
47
48
49
54
Troubleshooting
..................................................
Care and Maintenance
..............................................
54
55
Using Your TV in Another
55
Country
.......................................
Specifications
..................................................
Rear Panel Air Vent .................................................
55
56
Demonstration
57
Mode
................................................
1 ............
Introduction
Thank
YouforChoosing
Samsung
Thank you for choosing Samsung! Your new Samsung projection TV represents the latest in television technology,
We designed it with easy4o-use on-screen menus and closed captioning
capabilities,
making it one
of the best products in its class, We are proud to offer you a product that will provide convenient,
dependable
service and enjoyment for years to come,
ImportantSafetyInformation
!0
Always
be careful
when using in
your
To reduce
the risk
of fire,
keep these
safety precautions
mindTV,when
installing,
using,
and electrical
maintainingshock,
your and
unit,other injuries,
• Read all safety and operating
instructions
before
• Keep the safety and operating
instructions
for future reference,
• Heed all warnings
on the TV and in the operating
• Unplug the TV from the wall outlet before cleaning,
aerosol cleaners,
operating
your TV,
instructions,
Use a damp
cloth; do not use liquid
• Never add any attachments and/or equipment without approval of the manufacturer,
additions can increase the risk of fire, electric shock, or other personal injury,
• Do not use the TV where contact
machines, swimming pools, etc,
with water
is possible,
or
Such
such as near bath tubs, sinks, washing
• Do not place the TV on an unstable cart, stand, tripod, bracket, or table where
it can fall, A falling TV can cause serious injury to a child or adult, and serious
damage to the appliance,
Use only with a cart, stand, tripod, bracket, or table
recommended
by the manufacturer
or sold with the TV, Follow the
manufacturer's
instructions when mounting the unit, and use a mounting
accessory recommended
by the manufacturer,
Move the TV and cart with care,
Quick stops, excessive force, and uneven surfaces can make the unit and cart
unsteady and more likely to overturn,
• The TV is designed with slots in the cabinet for ventilation to protect it from overheating, Do not block these openings with any object, and do not put the TV on a bed, sofa, rug, or other
similar surface. Do not put the TV near a radiator or heat register. If you do put the TV on a rack or
bookcase, make sure that there is adequate ventilation and that you've followed the manufacturer's
instructions for mounting,
• Operate your TV only from the type of power source indicated on the marking label. If you are not sure of
the type of power supplied to your home, consult your appliance dealer or local power company,
• Useonlya groundedor polarizedoutlet,Foryoursafety,thisTVisequippedwitha polarizedalternating
currentlineplughavingonebladewiderthantheother.Thisplugwill fit intothepoweroutletonlyone
way,Ifyouareunableto inserttheplugfullyintotheoutlet,try reversing
theplug,If theplugstilldoesnot
fit,contactanelectrician
to replaceyouroutlet,
• Protect
thepowercord,Powersupplycordsshouldbe routedsothattheywon'tbewalkedonor pinched
by objectsplacedonor againstthem,Payparticularattention
tocordsat plugs,convenience
receptacles,
andthepointwheretheyexitfromtheunit,
• UnplugtheTVfromthewalloutletanddisconnect
theantennaor cablesystem
duringa lightningstormor
whenleftunattended
andunusedforlongperiodsoftime,Thiswill preventdamagetotheunitfrom
lightningandpower-line
surges,
• Avoidoverheadpowerlines,An outsideantennasystem
shouldnotbeplacedinthevicinityof overhead
powerlinesor otherelectriclightor powercircuits,or whereit canfall intosuchpowerlinesor circuits,
Wheninstallinganoutsideantennasystem,
beextremely
carefultokeepfromtouchingthepowerlinesor
circuits,Contactwithsuchlinescanbefatal,
• Donotoverloadthewalloutletor extension
cords,Overloading
canresultin fireor electricshock,
• Donotinsertanythingthroughtheopeningsintheunit,wheretheycantouchdangerous
voltagepointsor
damageparts.Neverspillliquidof anykindontheTV.
• Groundoutdoorantennas,
If anoutsideantennaor cable
system
isconnected
totheTV,besuretheantennaor cable
system
isgroundedsoasto providesomeprotection
against
voltagesurgesandbuilt-upstaticcharges,Section
810 ofthe
NationalElectrical
Code,ANSI/NFPANo.70-1984,provides
information
aboutpropergrounding
of themastand
supporting
structure,
groundingof thelead-inwireto an
antennadischarge
unit,sizeofgroundingconductors,
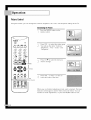
EXAMPLE
OF
,_,_TENI_A
GROUNDING
3"1_
_Dt2_RB
location of antenna discharge unit, connection
electrodes, and requirements for the grounding
to grounding
electrode.
hlE_--['II_I_"I_LELE_TFII_L_CI[IE
EI_ECTRI_:&_I_ti"_T_
• Do not attempt to service the TV yourself, Refer all servicing to qualified service personnel,
from the wall outlet and refer servicing to qualified service personnel when:
Unplug the unit
The power-supply
cord or plug is damaged
Liquid has been spilled on the unit or if objects have fallen into the unit
The TV has been exposed to rain or water
The TV does not operate normally by following the operating
instructions
The TV has been dropped or the cabinet has been damaged
The TV exhibits a distinct degradation
in performance
When the LAMP(BULB ONLY) replacement is needed
If you make adjustments yourself, adjust only those controls that are covered by the operating instructions.
Adjusting other controls may result in damage and will often require extensive work by a qualified
technician to restore the TV to normal.
• When replacement parts are required,
be sure the service technician uses replacement parts specified
the manufacturer or those that have the same characteristics
as the original part. Unauthorized
substitutions may result in additional
damage to the unit.
, Upon completion
of any service or repairs to this TV, ask the service technician
perform safety checks to determine that the TV is in a safe operating condition.
by
to
3 ............
YourNewWideTV
YourNew WideTV
ListofFeatures
Your Samsung TV was designed and engineered using the latest technology,
It is a full-featured,
high-performance
unit that exceeds industry standards, In addition,
it has these special features:
• Easy-to-operate
remote
• Easy-to-use on-screen
control
menu system you can access from the side panel or remote control
• Automatic
timer to turn the TV on and off at any time you choose
• Adjustable
picture
and sound settings and the ability
channel
tuning for up to 181 channels
• Automatic
• A special
• Fine tuning
filter to reduce or eliminate
control for the sharpest
• A built-in multi-channel
• Built-in, dual channel
• A special
reception
your favorite
settings
problems
picture possible
sound decoder
speakers
to memorize
for stereo and bilingual
listening
(13 watts per channel)
sleep timer
• Picture-in-Picture
• Headphone
capability
jack
• Widescreen
for private
that lets you watch two channels
TV with adjustable
• A three-dimensional
• COMPONENT
image size
comb filter for enhanced
VIDEO
at once
listening
INPUT jacks
to obtain
viewing
a sharper
pleasure
image
from external
sources
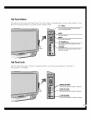
Checking
Parts
Once you have unpacked your TV, check to make sure that you have all the parts shown here, If any piece
is missing or broken, call your dealer.
Please fill out the registration
card and return it to Samsung,
This
Manual
Television
Wireless Remote
Control
300-75 ohm
Adapter
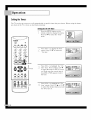
SidePanelButtons
The buttons on the side panel control your TV's basic features,
the more advanced features, you must use the remote control,
including
the on-screen
menu system. To use
TV/VI DEe
Press
toswitchbetween
viewingTVprograms
andsignals
fromtherconnected
components.
MUTE
Press
tomutethesound.
MENU
Pressto seethe on-screenmenu,
v
CHANNEL A
Pressto changechannelsandmovebetweenitemson the
on-screenmenu.
Press
VOLUME +,
toopen.
Pressto lower or raisethe volume and to selectitemswhen
usingthe on-screenmenu,
SidePanelJacks
Use the side panel jacks to connect
video game, for example) ,
a component
that is used only occasionally
(a camcorder
or
AUDIO IN JACKS
Connect
theaudio
signal
fromacamcorder
orvideo
game.
Press
to open.
VIDEO IN JACK
Connect
thevideo
signal
fromacamcorder
orvideo
game.
S-VHS IN JACK
Connect
anS-video
signal
fromacamcorder
orvideo
game.
;
............
YourNew WideTV
Front
PanelLEDIndicators
The three lights on the front panel
indicate
the status of your TV.
TIMBq [._MP TEMP
@Q
POWER
IndicatorLightKey
_:
Light is On
: Light is Blinking
_:
Light is Off
IndicatorLight
Indication
Timer Lamp Temperature
m
_
_
Normal
_
_
On time or off time is set.
operation,
_
_
On time or off time is set. Normal
_
_
Lamp is warming
_
_
Air vent cover at the rear of the TV is not
_
_
operation.
up, The normal picture comes on in about 30 seconds.
Inside temperature
properly
installed,
of the TV is too high. Turn the TV off and clean the
air vent cover on the back of the TV. Turn the TV on after 1 hour.
_
_
• It takes about
Lamp inside the TV needs to be replaced.
30 seconds
for the TV to warm
up, so normal
brightness
may not appear
immediately.
• The TV has a fan to keep the inside
working.
lamp
from overheating
occassionally
you'll
hear it
RearPanelJacks
Use the rear panel jacks to connect components such as a VCR or laserdisc player.
You can connect two
different components such as two VCRs, a laserdisc player and a DVD player etc., because there are two
sets of video input jacks and one set of component video input jacks on the rear panel of your TV. For
more information,
please see "Connections".
EXTERNAL SPEAKER jacks
VHF/UHF terminal
Connects
antenna
orcable
system
toyourTV.
S-VIDEO IN jack
Connects
an S-Videosignalfrom an
S-VHSVCRor laserdiscplayer,
VIDEO INPUT jacks
Connectvideosignalsfrom externalsources
likeV(:Rsor laserdisc
players.
VIDEO MONITOR
OUT jack
Sendsa videosignalfromtheTVtoan
externalsourcelikea V(:R.
AUDIO INPUT jacks
Connectaudiosignalsfrom externalsources
likeVCRsor laserdis¢
players.
COMPONENT
AUDIO
HEADPHONE jack
Connects
toheadphones
(notincluded).
INPUT
AUDIO MONITOR
OUT jacks
Sendaudiosignalsfrom theTVto an
externalsource
likea VCR,
acks
Usethesejacks toconnecttheaudiosignalsfrom a
DVDplayerwhenusingthecomponentvideoinput
jacks. Whennotusingthecomponentvideojacks,
theseaudiojacksfunctionasaudiofor V2(Viden2),
COMPONENT
VIDEO
INPUT
jacks
Usethesejacksto connectthecomponentvideo
signals
from a DVDplayer.
9 ............
New WideTV
Remote
Control
You can use the remote control
always
point it directly
up to a distance
of about 23 feet from the TV, When
at the TV. The remote control can also operate
using the remote,
your VCR and cable
box.
POWER
POWER
"_;_Yiii_TV
'_'n_'_
off,
0
""i
REMOTE CONTROL
,p.34,35
"'_
TV,V_R
orCABLE.
NUMBER BUI-I'ONS
SelectTVchannelsdirectlyor enter datawhenusingthe onscreen menus
)ISPLAY
+1oo
Select
channels
over100.
PIP on/off
ASPECT
SWAP
PIP STILL
CHA and CHV (Channel)
VOL - and VOL+ _vo_u_)
°0<:::£>u°O
ERASE
ADD
Addchannelsor on-screenmenusettings.
TV/VIDEO
Erasechannelsor on-screenmenusettings.
.......
MUTE
SURR
P.STD
(Picture standard)
S. STD
(Sound standard)
PRE.CH
SLEEP
P SIZE _P,!gsiz_L
(SurroundSound)
_,_.MTS.,..(Multichannel
Stereo) ............
_,;,,44
................
VCR CONTROLS
_p_................
Controls
VCR
tape
functions:
Rewind,
Flay,Fast
Forward,
Record,
Stop,
Pause.
PIP CH (PiPChannel)
LOCATE (pip Locate)
10
,p,_
3O.................
_: 51
Installing Batteries in the Remote Control
With normal use, the batteries in the remote control should last about a year, If you notice a performance
degradation
while using the remote, the batteries may need to be replaced,
Make sure you replace both
batteries and do not mix old and new batteries in the remote control, If you won't
trol for a long time, remove the batteries and store them in a cool dry place.
be using the remote con-
Slide the back cover all the way out
to open the battery
the remote control,
....
_''ii_ii
compartment
of
Install two AAA size batteries.
Make sure to match the "+" and
"-" ends of the batteries with the
diagram
inside the compartment,
Slide the cover back
into place,
11 ............
Connections
Connections
Connecting
VHFandUHFAntennas
If you do not have a cable system, you will need to connect
an antenna
to your TV.
Antennas with 300-ohm Flat Twin Leads
If your antenna
looks like this:
it has 300-ohm
flat twin leads.
it is an antenna
with 75-ohm
Place the wires from the twin leads
under the screws on the 300-75
ohm adapter (included). Use a
screwdriver
to tighten the screws.
Plug the adapter into the VHF/UHF
........
...........
terminal on the back panel of
the TV.
Antennas with 75-ohm Round Leads
If your antenna
looks like this'.
Plug the antenna lead into the
VHF/UHF terminal on the back
panel of the TV.
round leads.
SeparateVHFand UHFAntennas
If you have two separate
signals before connecting
electronics store,
antennas for your TV (one VHF and one UHF), you must combine the two antenna
them to the TV, This requires a combiner attachment, which you can buy at an
Connect both antenna
combiner.
leads to the
•
..:
....,..,
Plug the combiner into the
VHF/UHF terminal on the rear
panel of the TV.
is
............
Connections
Connecting
CableTV
Cable without a Cable Box
If you want to connect
cable,
and you do not need to use a cable box:
Plug the incoming cable into the
VHF/UHF antenna terminal on the
back of the TV.
Cable with a Cable Box that DescramblesAll Channels
Find the cable that is connected to
the ANTENNA
OUT terminal on
your cable box. This terminal might
be labeled "ANT OUT,"
"VHF
OUT,"
....
or simply,
"OUT."
Connect the other end of this cable
to the VHF/UHF antenna terminal
on the back of the TV.
Cable with a Cable Box that DescramblesSome (But Not All) Channels
To complete this connection you will need a two-way splitter,
(which you buy from your Samsung dealer or any electronics
an RF (A/B)
store).
switch and four coaxial
cables
Find and disconnect the cable that
is connected to the ANTENNA
IN
terminal on your cable box. This terminal might be labeled "ANT IN,"
"VHF IN," or simply, "IN." Connect
this cable to a two-way
Connect
a coaxial
splitter.
cable between
il;iii:iiiii!::::!!il
an OUTPUT terminal on the splitter
and the IN terminal on the cable
box.
Connect a coaxial cable between
the ANTENNA
OUT terminal on the
cable box and the B-IN terminal on
the A/B switch.
Connect
another
cable between
the
other OUT terminal on the splitter
and the A-IN terminal on the RF
(A/B) switch.
Connect
between
the last coaxial cable
the OUT terminal on the
RF (A/B) switch and the VHF/UHF
terminal on the rear of the TV.
After you've made this connection,
set the A/B switch to the "A" position for normal viewing. Set the A/B
switch to the "B" position to view scrambled channels. (When you set the A/B switch to "B," you will need
to tune your TV to the cable box's output channel, which is usually channel 3 or 4.)
17 ............
Connections
Connecting
aVCR
Unplug the cable or antenna
the back of the TV.
....
from
Connect the cable or antenna to
the ANTENNA
IN terminal on the
back of the VCR.
_;;FI I_nrl ==u'wl
C_I_ 0r
t_rrl_nna
Connect a coaxial cable between
the ANTENNA
OUT terminal on the
VCR and the antenna terminal on
the TV. A coaxial cable
included with the VCR.
Connect
a set of audio
I
1=;4-1rP,_r, _1
is usually
cables
between the AUDIO OUT jacks on
the VCR and the AUDIO jacks on
the TV. If you have a "mono" (not
stereo) VCR, use the Y-connector
(supplied) to hook up to the left and
right audio input jacks of the TV. If
your VCR is stereo, you must connect two separate sets of cables.
Connect
a video cable between
ii:i:i[_i the VIDEO OUT jack
and the VIDEO
on the VCR
IN jack on the TV.
TY F,+_r P,m-_
ConnectingS-VHSVCR
Your TV comes ready to receive
To begin,
follow
steps 1-3
high quality
S-Video signals
from an S-VHS VCR,
in the
previous section to connect an
antenna or cable to your S-VHS
VCR and your TV.
2
Connect
a set of audio
cables
between the AUDIO OUT jacks
the S-VHS VCR and the AUDIO
INPUT jacks
T'lt I_,,-v I=X_',+I
on
on the TV. Make sure
the jacks you are using are underneath the number "1 ."
Connect
an S-video cable between
the S-VIDEO OUT jack on the VCR
and the S-VHS INPUT jack on the
TV. (An S-video cable is usually
included with the S-VHS VCR.)
Connecting
a SecondVCR
Your TV can send picture and sound signals to a second, recording
for more information
on recording with this kind of connection.
Connect
VCR. Refer to your VCR's instructions
a set of audio cables
between the AUDIO OUT jacks on
the TV and the AUDIO IN jacks on
the VCR. The VCR's input jacks
might be on the front or back of the
VCR.
....
Connect a video cable between the
VIDEO OUT jack on the TV and the
VIDEO IN jack on the VCR.
C-d_l*
D
m
•_ma B
Connections
Connecting
a Camcorder
The side panel jacks on your TV make it easy to connect
use your camcorder to view tapes without using a VCR.
a camcorder
to your TV, You can
Locate the A/V output jacks on the
camcorder, They are usually found
on the side or back of the camcorder,
Connect
an audio cable between
the AUDIO
camcorder
OUTPUT jack on the
and the AUDIO termi-
G'_n,:or,_.r
0 Utl:U ,I 4,:k_
nals on the side of the TV. If your
camcorder
is stereo, you must
connect two separate cables,
(The audio cables are usually
included with the camcorder,)
Connect a video cable between the
.............
VIDEO OUTPUT jack on the camcorder and the VIDEO terminal on
the side of the TV, (A video cable
usually included with the
camcorder,)
To watch a tape, follow your camera's instructions and
the section on "Viewing
a VCR,
DVD or Camcorder
Tape" in this
manual,
is
T Y_,I_ P_I_'l
inpuM
J_
Connecting
Component
Video
The rear panel jacks
Connect
on your TV make it easy to connect
a DVD player
to your TV.
a set of audio cables
between the AUDIO IN 2,jacks on
the TV and the AUDIO OUT jacks
on the DVD player.
ti
Connect
a video cable between
the
"1_"IP'_,,urI_ldl'_ I
VIDEO IN jack on the TV and the
VIDEO OUT jack on the DVD
player.
lli
NOTE
In the Component Mode, the PICTURE SIZE (ASPECT) can not be adjusted
PIP features do not operate.
and the MONITOR
OUT,
If you want to use PIPwhile viewing DVD, select VIDEO 2 after connecting the
DVD VIDEO OUT jack to V2.
If a DVD disc (applying
Caption)
is viewed
in the Component
mode,
perform
the DVDP Caption
ON.
21 ............
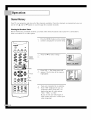
Operation
Operation
Turning
theTVOnandOff
Press the POWER button on the remote control
or on the front panel to turn your TV on and off,
Selecting
theMenuLanguage
Choose
a language
for the on-screen
menus: English, Spanish
Press the MENU
control
to display
or French,
button on the remote
the on-screen
menu,
FIOWIBR
@
TU
o
I_R
_li
POWER
_
Press CHV to select Setup, Press
VOL +, The Setup menu appears,
_00
Od_
MENU
Press CHV
to highlight
"Language,"
I
CH/VOL
I .,_il
55fD
0000
_
E
U13
5UI_.
Press VOL + to select the language,
Press the MENU button on the remote
control to exit the menu,
(:_:_ (:._
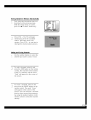
Viewing
theMenus
andDisplays
The on-screen menu system allows you to control the settings of your TV. Access the on-screen menu system
by pressing the MENU button on the remote control. Once the on-screen menu appears, use the channel
(CHA and CHV ) and volume (VOL - and VOL +) buttons on your remote control to move between menu
items, select menu items, and make adjustments. You can also view the on-screen menu system and make
some adjustments using the TV's side panel buttons.
Displayingthe Menus
With the power on, press the MENU
button on the remote control, The
main menu appears on the screen.
The Video menu is selected,
@
TU
o
LEft
E_U_
_
Use the CHA and CHV buttons to
select items in the menu, Use the
00
!_%ISPLAY
VOL - and VOL + buttons to display,
change, or use the selected items,
On-screen menus disappear from the
screen automatically
after about thirty
seconds, or you can press the MENU
button on your remote control to exit
the menu,
DisplayingStatusInformation
0000
Press the DISPLAY button on the
remote control,
The TV will display
channel, current time, audio
you are listening to,
signal
the
......
zs ............
Operation
Channel
Memory
Your TV can memorize and store all of the channels available.
use the CH • and CH • buttons to scan through the available
Once the channels
channels.
are memorized,
you can
Selecting the Broadcast Source
Before memorizing
available channels,
either an antenna or a cable system,
you must select what
Press the MENU
control
[lOWEll
@
TU
to display
broadcast
source your TV is connected
button on the remote
the on-screen
menu.
o
_l_
I_lLI
_
@
Press CH •
to select "Setup."
NUMBER
_)2
UTTONS
I
CH/VOL
Press VOL +. The Setup menu will
appear. The first line of the menu is
highlighted.
I
ADD
I
ERASE
O00O
E
!_
ISI,;
11,6
'
I_
I
If you are connected to an antenna,
leave "AIR" displayed.
If you are
connected cable, press VOL + to
display the type of cable system:
"STD," "HRC," or "IRC."
(If you are not sure which type of
cable system you have, contact your
cable company.)
to
StoringChannelsin MemoryAutomatically
First, select the broadcast
source as
described on the previous page,
With the Setup menu on screen,
press CH • to select "Auto Prog,"
Press VO/+,
21
The TV will begin
memorizing
all of the available
station, This takes about two
minutes, Press VO/+
interrupt
at any time to
the memorization
process.
AddingandErasingChannels
Use the number buttons to select the
channel you want
to add or erase.
To add a channel, select it and
............
press the ADD button on the remote
control, The channel will be added
to the TV's memory and the word
"Add" will appear in the corner of
the screen,
To erase a channel,
select it and
then press the ERASE button on the
remote control, The word "Erase"
will appear in the corner of the
screen, You can still view a channel
that has been erased from memory
by using the number buttons on the
remote control to select the channel
directly,
27 ............
Operation
Changing
Channels
You can change channels on your TV using the CH • and CH • buttons, or by direct selection using the
number buttons. You can use the number buttons to tune to any channel (even one that has been erased or
has not been memorized).
Using the Channel Buttons
_:_
POWE]:I
@
TU
o
I_1_
E_]LG
_GT
00
0
0
_t'._l
NUMBER
0
-- UTTONS
5"11L
Press the CH • or CH • buttons
to change channels, The TV
changes each channel in order,
up or down, depending
on which
button you press, You will see all
the channels that the TV has
memorized.
(The TV must have
memorized at least three
channels,) You will not see
channels that were not memorized
or have been erased,
Using the Number Buttons
To change to single-digit channels
(0-9) faster, press "0" before the
single digit,
Example:
Forchannel4,press"0," then"4,"
UM
To select a channel over 100,
press the +100 button first,
Example:
Forchannel122,press% 100,"then
"2,"then "2."
Usingthe PreviousChannel
Press the PRE-CH button on the
O00C.)
@
pRE-C.
remote control, The TV changes
to the last channel you were
watching.
Usingthe Scanning
channels
You can automatically
scan all of
the channels in memory at the
touch of just one button. Press the
CH.SCAN button on the remote
control.
The TV will change the
channels automatically,
one by
one. To stop channel scan,
press CH.SCAN
button.
SettingtheClock
This TV has a built-in clock that will appear on screen when you press the DISPLAY button on the remote
control. Setting this clock also allows you to use the TV's times, which can automatically
turn the TV on or
off.
Press the MENU
control
button on the remote
to display
the on-screen
menu.
POWER
G
TU
°
I_R
El_
_ri'
Press CH •
menu
to select the "Time"
Press VOL + to display the Time
menu. Press VOL + again. The hour
12 :O0 _M
will be highlighted.
MENU
tlOL
I
CH/VOL
Press the CH • or CH • button to
select the correct hour. Make sure the
OOOO
correct time of day (AM or PM)
appears next to the hour. After
selecting the correct hour, press VOL
+ again. The minute will be
highlighted.
Press the CH •
or CH •
select the minute. When
button to
you have
selected the correct minute, press
MENU twice to exit the menus.
_!_iiii!iiii_i_!ii_i_iii!iii!i_i!i_,!i!i!i!i!i_iiiiiiiliiii!i!i!iii_i_!_'ili_
_i_i,i_!:i_i_iiil,]i_ill
i_iiii]_]_iii]_iii]_iii]_iii]_iii]_iii]_iii]_iii]_iii]_iii]_iii]_iii]_iii]_iii]_
29 !!!!!!!!!_!
............
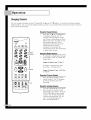
Operation
Sound
Control
You can control and customize the sound levels and settings of the TV with the remote
the on-screen menus, you can change the TV's bass, treble, and balance settings.
Adjusting the Volume
Press VOL + to raise the volume
or VOL - to lower the volume,
I_061tB:l
@
o
Usingthe Mute Button
Press the MUTE button on the
remote control to silence the
volume, The word "Mute" will
0
appear in the lower left corner of
the screen,
dP
To turn mute off, press the MUTE
button again, or raise or lower
the volume with the VOL - and
VOL + buttons,
OdP
MENU
I
,CH
CH/VOI_
Customizing
the Sound
Press the MENU
_
m5"l'n
_._)
_
_1'_
(-D_O0
UI'J
_
MUTE
_tI_,
I
S.STD
button on the
remote control to display the
on-screen menu, Press CH • to
select the audio menu,
control,
Using
PressCH• toselecttheitemyou
wantto change.
PressVOL- or VOL+ toraiseor
lowerthevalueof theitem,using
theon-screen
gaugeasyourguide.
Whenyouarefinishedadjusting
an item,waita moment.
Thelevelindicatordisappear
andtheAudiomenuwill return.Youcancontinue
to makeadjustments,
or presstheMENUbuttontoexit.
UsingAutomatic(Standard)
SoundSettings
Press the S.STD button on the
remote control to change
automatic sound setting.
the
Press the S.STD button again to
select the "Standard,"
"Music,"
"Movie,"
"Speech,"
sound setting.
Guide
•
•
•
•
•
to Automatic
Choose
Choose
Choose
Choose
Choose
or "Custom"
Sound
Settings
Standard for the "factory" settings (the best choice for most people)
Music when watching music videos or concerts.
Movie when watching a movie.
Speech when watching a show that is mostly dialogue, like a news show.
Custom if you want to adjust the settings yourself.
31 ............
Operation
PictureControl
Using the remote, you can change
the contrast,
brightness,
tint, color, and sharpness
settings of the TV,
Customizing the Picture
Press the MENU
button on the
remote control,
POWER
Press VOL + to select the video menu,
You will see the items "Contrast,"
"Brightness,"
"Sharpness."
"Tint,"
"Color,"
and
c 00
Press CH • to select the item you
want to change,
MENU
I
CH/VOL
*,k+++÷-._ ""_+..I
Press VOL - or VOL + to raise or
lower the value of the item,
_-"_
O
O
P,STD
Picture
Standard
When you are finished adjusting an item, wait a moment, The level
indicator will disappear
and the Video menu will return, You can
continue to make adjustments, or press the MENU button to exit,
UsingAutomatic("Standard")PictureSettings
Press the P,STD button on the
remote control to change
the picture
settings,
Press P.STD repeatedly to select the
"Standard,"
"Mild," or "Custom"
picture setting,
Guide
to Automatic
Picture
Settings
• Choose
Standard
to set the TV to operate
at top performance
• Choose
Mild when viewing
• Choose
Custom if you want to adjust the settings yourself.
according
the TV in low light, or when playing
video
to your TV's specifications,
games,
33 ............
Operation
SettingUpYourRemote
Control
This TV's remote control can operate almost any VCR or cable box. After it has been set up properly, your
remote control can operate in three different modes: TV, VCR or Cable. Pressing the corresponding
button
on the remote control allows you to switch between these modes, and control whichever piece of
equipment you choose.
SettingUpthe Remoteto OperateYourVCR
Turn off your VCR.
I:_,WB:I
Q
POWER
'
VCR
TU
Press the SET button on your TV's
remote control,
3;1'
S'ET
0
I
0
.................
Press
VCR button
............
remotethecontrol,
on your TV's
NUMBER
BUTTONS
Using the number buttons on your
0
remote control, enter both digits of
the VCR code listed on page 36 of
this manual for your brand of VCR,
Make sure you enter both digits of
the code, even if the first digit is a
"O."(If more than one code listed, try
the first one,)
Press the POWER
ll__fl]
55'Pro o'15
0000
5LI_.
button on the
...............
remote control, Your VCR should turn
on if your remote is set up correctly,
If your VCR does not turn on after set
up, repeat steps 2, 3, and 4, but try
one of the other codes listed for your
brand of VCR, If no other codes are
listed, try each VCR code, O0
through
72,
Setting Up the Remote to Operate Your Cable Box
Turn off your cable box,
I_1_
POWER
O
. Tu
+
_
I
CABLE
,
SET
_m/"_
+:
Press the SET button on your TV's
remote control,
ol
_
NUMBER
BUTTONS
Press the CABLE button on your TV's
remote control.
0
_l.'.+
P_'_
_'IIL
_'Pa
0000
UDII
U'i_
_-_ Ir_J ®
i_tr_
_
_+, _
Using the number buttons on your
remote control, enter both digits of
the cable box code listed on page
36 of this manual for your brand of
cable box. Make sure you enter both
digits of the code, even if the first
digit is a "0," If there is more than
one code listed, try the first one,
_LII_.
_II
+i
Press the POWER button on the
remote control, Your cable box
should turn on if your remote
correctly,
is set up
If your cable box does not turn on
after set up, repeat steps 2, 3, and 4,
but try one of the other codes listed
for your brand of cable box. If no
other codes are listed, try each code,
O0 through 35.
Noteson UsingRemoteControlModes:VCR,Cableand TV
• When your remote control is in "VCR" mode, the volume buttons still control your TV's volume,
• When your remote is in "TV" mode, the VCR control buttons (PLAY, PAUSE, etc,) still operate your VCR,
• When your remote control is in "CABLE" mode, the volume buttons still control your TV's volume, and the
VCR control buttons (PLAY, PAUSE, etc,) still operate your VCR,
3s ............
Operation
Remote
Control
Codes
VCRCodes
Cable Box Codes
_-dWml-"
a,.,4i_ .-
>_
¢"lW_'"_Ycn't,;
I ;:;
t-_-n-
II
r'Ii 11_'_d" "11,;-_n-'_ 11",;
I'1"r
"4m,""n
"4"'_,'1r
rltl
14, :@ _>
fl"r
-_t_rnq
._'vwnt"
fll
_,,'.,I L x,
II
I_1 :,=;
Tt "_'_
l'a'n
3)
T_r rm"
"n,dh _n_
fl_,, I'r), :, I
tiff
"'ln"tt
:,_
"'In "lr_".-,;d"
:q'i
la
";,,"f'cLI,;
-d _
r.m
0).
_,'n ""h
)9
I'lfl, :,fl
Viewing
aVCR,
DVDor Camcorder
Tape
Selectingthe SignalSource
Use the remote control to switch between viewing
or laserdisc players, and the TV source (broadcast
signals from connected
or cable).
Press the TV/VlDEO
o
channel
c_O_
9.'311
5"11L
_,_ I1
©
C)O00
such as VCRs, DVD
button on the
remote control repeatedly. You will
switch between viewing the signals
coming from equipment connected to
the TV's A/V jacks, and the TV signal.
On screen text indicates which signal
source you are viewing: Video 1,
Video 2, Video3, Component,
S-VHS 1, S-VHS 2 or the active TV
1_3WBet
@
equipment,
(broadcast
or cable).
To
return to until
normal
....................
TV/VIDEO
you TV
seeviewing,
the TV's press
picture.
B_
II _
When you connect equipment to the TV, you can choose between
the following sets of jacks: Video1, Video 2, Component or
S-VHS 1 on the TV's rear panel, and Video3 or S-VHS 2 on the TV's
side panel. No signal will appear from any of these inputs if no
TV,Vl0EO
I
equipment
is connected.
Remote Control VCR Buttons
Slide the bottom panel of the remote control down to access buttons
that can control the tape functions of a connected VCR, including
Rewind, Play, Fast Forward, Record, Stop and Pause.
Slide the bottom panel of your remote
control unit back for access to the
tape function controls. Press the
appropriate
buttons to control your
VCR.
37 ............
Operation
SettingtheTimers
This TV can be set to turn on or off automatically
at specific
you must set the TV's clock, as described previously.
times that you choose,
Setting the On/Off
Press the MENU
Timer
button on the
remote control to display the menu.
Press CH • to select the "Time"
menu,
0
Press VOL + to display the Time
menu. Press CH • to select the
"On time."
dP
OdP
_
II
II rl'N
MENU
I
CH/VOL
Press VOL + to highlight
the "On
time" hour. Press CH • or CH •
to select the hour for the TV to turn
on. Make sure the correct time of
day (AM or PM) appears
the hour.
m5"l'n
_5"111 UI'J
C)O00
next to
_tI_,
LEEP
Before using the timers,
Press VOL + to highlight the "On
time" minute. Press CH • or CH •
to select the minute when you want
the TV to turn on.
r"
i
-'1
, i :/
Press VOL + to highlight
the
...............
On/Off
setting, Press CH • or
CHV to turn the on-timer "On,"
VOL+,When
you are finished,
.............
:iiii
press
If you want to set the Off time,
press CH • to highlight the "Off
time," Set the "Off time"just
as you
set the "On time,"
If you want to set the volume level
when the TV turns on, press CH •
to highlight
"On time vol," Press
VOL+ to set the volume level you
want when the TV turns on, Press
the MENU button twice to return to
normal
viewing,
Setting the Sleep Timer
You can set your TV to automatically
turn off after a preset interval,
Press the SLEEP button on the
remote control.
You'll see "Sleep: Off" at the bot............
tom left of the screen, Press the
SLEEP button to select the time interval for the TV to stay on. The interval can range from 10 to 120 minutes at ten minutes step,
39 ............
Special
Features
Special Features
SpecialVideoFeatures
This TV's special
video features
can help you get a clearer
broadcast
picture.
FineTuningChannels
Fine tuning
lets you manually
adjust the TV's tuner if you have difficulty
tuning
Using the number buttons on the
remote control, select the channel
want to fine tune.
in a channel,
you
I:_OWB:t
G
TU
°
I.CR
_mLG
Press the MENU button on the remote
control to display the menu. Press
CHV to select the "Setup" menu.
5GT
0
NUMBER
0
0
0
_*
It
_t'._l
;L
AIR
ll"l=lne
"flJne
O ,_m,:,
00
q b
NR
,0JR_ATY
On
LhlA
II r_]l
5"111
I1
Press VOL + to display the Setup
menu. Press CH • to select "Fine
Tune."
(_BUTTONS
UmJ
II _J
Jil ,'[I,1_
Li[- +'_;_'L
CH/VOL
Press the VOL - and VOL + buttons to
I
adjust the fine tuning,
ADD
I
ERASE
X!
..........
IE
!_
I_ll,
',
P
R,A,'
I_
I
If you want to add the fine tuning setting to the TV's memory, press the
ADD button on the remote control. If
you want to return the setting to "00,"
press ERASE. Press the MENU button
twice to return to normal viewing.
O1
NR (NoiseReduction)
If the TV picture you are watching
nal is weak. Turning on the "NR"
has "ghosts" or "snow", it may be because the channel's
feature can help reduce this kind of picture noise.
broadcast
sig-
While watching a channel that has
excesswe
noise, press the MENU
button on the remote control to
display the menu, Press CH • to
select the "Setup" menu,
.......
: Press VOL + to display the Setup
..... menu. Press CH • to select "NR."
....
Press VOL + to activate "NR."Press
the MENU button twice to return to
normal
viewing.
LNA(Low Noise Amplification)
LNA can give you a clearer
Press the MENU
picture
by amplifying
the incoming
broadcast
signal
as it reaches your TV.
button on the
remote control to display the menu.
Press CH • to select "Setup."
Press VOL +, Press CH • to select
"LNA."
?
AIRIDATV
._J"k, R_,].
Rn¢ "mne
O_llO
m'LNn
N R
_P)I
Adj.
ep_.,_ker
Press VOL + to turn "LNA"
AIR
I_
+01
.ll.
ON
01
qll_.
_1
on.
(The LNA effect depends on each
Channel.)
Press the MENU button
twice to return to normal viewing,
IMPORTANTNOTE
When the warning "Not available in video mode" means the function you tried to activate
will not operate in video mode. Changing to TV mode will make the function available.
43 ............
Special Features
Special
AudioFeatures
This TV's special audio features can simulate the surround-sound
ambience of a movie theater,
to listen to any one of the audio soundtracks available during a television broadcast,
or allow you
SurroundSound
Press the SURR, button on the
remote control,
"Off," "Mono,"
You can choose
"Concert"
or
"Stadium" when you press the
SURR. button.
POWB:I
@
The "Concert"
o
TU
I£R
_LG
modes only work when the channel
you are watching is broadcasting
in
stereo, Press MENU twice to return to
5m'
normal
0
Guide
Q
O0
_,'._
rL.
Sill
and "Stadium"
viewing.
to Surround
Sound
• Choose
Off to cancel the surround
• Choose
• Choose
• Choose
Mono when watching programs broadcast
Concert when watching music programs.
Stadium when viewing sports programs
effect,
in mono.
Uml
II
MTSSettings:Choosing
a Soundtrack
II _J}
When watching a program broadcast in stereo, you can set your
TV to play the soundtrack in stereo or in mono. Some stations also
broadcast a Secondary Audio Program (SAP). SAP programs are
usually versions of the program in another language, but they
sometimes
O0
s RR
carry
additional
information
like news or weather,
control, You can choose between
"Stereo," "SAP" and "Mono."
The
Pressthe
MTS
button
onthe
remote
I :
_,_
E
d_'tb
¸¸
text at the bottom left of the screen
tells you if this channel is
broadcasting
a stereo, SAP, or
mono signal,
Guide
to MTS Settings
• Choose
Mono
if the channel
is broadcasting
in mono,
are having difficulty receiving a stereo signal.
• Choose Stereo for channels broadcasting
in stereo.
• Choose SAP when you want to listen to the Secondary
Program
(which
is usually
a soundtrack
in another
or if you
Audio
language).
Viewing
Closed
Caption
Information
Your TV decodes and displays the
shows. These captions are usually
All VCRs record the closed caption
deliver closed-caption
information,
your TV program-schedule,
closed-caption
information that is broadcast along with some television
subtitles for the hearing impaired or translations
into other languages,
signal from television programs, so pro-recorded
video tapes can also
Check for the closed caption symbol ( _
) on the tape's package or
Closed Captions
Press MENU to display the menu,
Press CHV to select the Caption
menu,
POWER
@
o
Press VOL + to display the caption
menu, Press VOL- or VO L+ to
turn closed captioning
on/off,
Misspelling
and unusual
characters sometimes occur in
closed caption
especially
There may be a small delay before
MENU
I
_c_
Im.9_
559D
0000
U15
transmissions,
those of live events,
captions appear when you change
channels, (These do not indicate the
VOL/CH
TV is malfunctioning,)
Press CH • to select the "Mode",
Press VOL - or VOL + to choose
"Caption"
or "Text,"
In caption
mode, captions appear at the bottom of the screen, and they usually
cover only a small portion of the
picture,
In text mode, information
unrelated to the program, such as
news or weather, is displayed,
Text often covers a large portion of
the screen,
51.11_,
E
If you wish, use CH A, CH •
NOTE
• If a DVD disc (applying Caption)
viewed in the Component mode,
perform the DVDP Caption ON.
or
............
ii.... VOL+ to change the captioning
is
• In the caption mode, the characters
are not displayed
in color,
channel or field. Then, press
MENU twice to return to normal
viewing.
Different channels and
fields display different information.
For example, Channel 1 may have
subtitles in English, while Channel
2 has subtitles in Spanish,
On
On
Special Features
UsingExternal
Speakers
You can hear more vivid stereo sound
if you connect external
speakers
to your TV.
Connecting
ExternalSpeakers
The "external speaker"jacks
on the back of your TV are only for connecting
them for any other connection can damage your TV.
Disconnect
external
system.
all cables between
speakers
"F--_____
__ ______-Y
_
POW B:_
E}(TERNAL
SPE,,_::ER
,_R-8
;'_LG
..........._..
'_L..,.,..._.._
....
!!._ :!-:_ :l::m::|:4_:=i
--ro°FF°-
Setting Up External Speakers
Press the MENU
°
_R
button on the remote
control to display the menu. Press
CHV to select "Setup,"
':ri'
@@@
d;' ,-T)
Press VOL + to display the Setup
menu. Press CHV to select
"Speaker."
_.bm
511-
IIMI
MENU
I
VOL/CH
Press VOL + to select the "Ext,"
m_--rl
5_'rl
0000
11"]
and using
and your audio
jacks on the back of the TV to the
"L" and "R"jacks
on external
speakers.
When connecting external speakers match the colors of the
jacks on the TV and speakers.
TU
speakers,
the
Connect speaker cables from the
"L" and "R" EXTERNAL SPEAKER
G
to external
_LI_.
option. Press VOL + to switch
between the "lnt," and "Ext." options,
Press MENU until the menus disappear.
UsingWireless
Headphones
Wireless headphones allow you to move around freely while you listen to your TV, When using wireless
headphones,
remember that if anything blocks the signal between the transmitter and the headphones,
the
TV's sound may be affected,
Rear of TV
Connecting
WirelessHeadphones
Connect
the transmitter
cable to the
wireless headphone jack on the
TV's back panel. Turn the
transmitter and wireless
headphones on, and adjust the
sound volume.
Selecting the Headphones' Audio
B
Press the MENU button on the remote
control for on-screen menus. Press
CH& or CHV to select the Audio
menu.
POWE_
TV
_g
E_I_
Note: you can only select "Headphone Sub" when in the PIP mode.
F,GT
@@@
Press VOL+ for the Audio
menu.
MAIN audio i_ormally
set for the
TV speakers (_
), and SUB is used
oo "
for other options. You must switch
these setitngs so that the MAIN
source to headphone ( _ ).
MENU
I
CH
....................
Press CH •
to select "Headphone."
CH/VOL
OOOO
Press VOL + to switch the Main or
Sub audio
source to headphones.
I
t._) ®
E
I_l'_nce
L:
TO R:=-:OI
l
_____.,
121d!r
47 ............
Special Features
Changing
theScreen
Size
When you press the ASPECT button on the remote control, the TV's screen mode choices appear in
sequence.
The screen displays in this order: Wide, Panorama, Zoom1, Zoom2, Normal, The name of the
screen mode will be displayed
at the bottom of the TV screen,
Wide
Sets the picture to 16:9 wide
mode,
Powm
@
?U
o
EI_
r'_l_
Panorama
Use this mode for the wide aspect ratio of a
panoramic
picture.
SGT
Zoom1
Magnifies the size of
the picture on
screen.
o
ASPECT
I
MENU
Zoom2
>
P-_'m SS'rD
0000
g'_
SLI_.
"Scroll adj" function.
To access Scroll adj, press MENU on your remote control, and select
Scroll adj from the SETUP menu. Then, press VOL - or VOL + to scroll
the picture
E
up and down.
Normal
Sets the picture to 4:3 normal
standard TV screen size.
mode. This is a
NOTE
When
PIP or CAPTION
is selected
in the ZOOM1
or ZOOM2
mode,
the Mode is automatically
converted into the WIDE mode, When PIP
or CAPTION is selected ON in the WIDE mode, the ZOOM1
and
ZOOM2
mode can't be selected,
The screen size cannot
be adjusted
in the COMPONENT
mode,
Viewing
Picture-in-Picture
One of the most best features of your TV is the Picture-in-Picture (PIP) feature. The advanced PIP system
allows you to watch two different pictures at once, even if you don't have a VCR connected to your TV.
(If you are using a cable box, you may not be able to use all of the PIP features. Contact your cable company for more information.)
Selectinga PIPScreen
Press the PIP button to display the PIP
image.
Note: If you turn the TV off while
watching and turn it on again, then
the mode will return to Normal view.
_m
G
TV
°
t£R
€_l_
5_
The PIP image will appear in the
...........
.......corner of the screen,
O0
PIP
_t_
_ltL
tlmJ
Press the PIP button again
the PIP image.
P.STtl 551_
OOC,
11_
to turn off
5LI_..
O
NOTE
In the Component
mode,
PIP cannot operated
The channel number indicated
screen is for the main image.
that one is for the PIP image.
simultaneously.
on the upper right corner of the
The channel displayed
underneath
49 ............
Special Features
Selectingan ExternalSignal
You can use PIP to view a signal
from an external
source, such as a VCR.
Press the MENU button on the
remote, to display the on-screen
menu. Press CH • to highlight PIP.
.......
: Press VOL + to display the PIP menu.
Press CH • to select "TV/Video',
POW I_1
G
°
Press VOL - or VOL + to select an
00 '
O0
PIP
MENU
I
CH/VOL
external signal. You can choose
between "Ant.," "Video 1 ," "Video
2," "Video 3/' or "S-VHS 1,2."
The signal from these inputs will not
appear if you have not connected
any equipment to the TV's input
jacks.
For more information about external
signals, see "Viewing
a VCR, DVD or
Camcorder
Tape" on page 37. If
you select "Ant." the PIP image is the
same as the main image.
NOTE
When an external signal is selected in the PIP mode,
COMPONENT
is not selected, If you turn TV off while watching
and turn it on again, then the mode will return to Normal view,
0000
Changingthe Picture-in-Picture Channel
cZ)
PIPCH
After you set the PIP signal
change
source (antenna
channels.
Press the PIP CH •
change
the channel
or CH •
to
of the PIP image,
The PIP channel will appear in the
upper right corner of the screen,
above the main image.
or cable),
it is easy to
Swapping the Contentsof the PIPImageand Main image
Press SWAP button.
The channel
the PIP image will appear
image,
POWER
G
?U
in
in the main
and vice versa.
°
_ZR
€_
SET
Freezingthe PIP image
Press STILL to freeze a moving picture
in picture. Press again to resume
picture movement.
SWAP
I
STILL
Changing
the Locationof the PIPimage
Press LOCATE button repeatedly
move the PIP image from corner
corner on the screen.
P._ftl
55171
0000
U_
to
to
5L_.
Changing
the Sizeof the PIP image
Press P.SIZE button repeatedly
to
change the size of the PIP image.
You can choose between a small
size(shown),
and a 4:3 size.
Sl
............
Appendix
Appendix
Troubleshooting
Before you call a service technician,
you time and money,
please scan this list of problems
and possible
Possible Solution
solutions,
It may save
....
Try another channel,
Adjust the antenna,
Check all wire connections,
Try another
channel,
Adjust the antenna,
Make sure the "Mute"
button is off,
Try another channel,
Press the TV/VIDEO button,
Make sure the TV is plugged
n,
Check the antenna connections.
Make sure the program
is broadcast
in color,
Adjust the picture settings
Adjust the antenna,
Check all wire connections
if you are using a VCR, check the tracking
Unplug the TV for 30 seconds
then try again.
Press the "TV" button to put your remote
nto TV mode,
Vlake sure the remote has batteries
Vlake sure the wall outlet is working.
Make sure the remote has batteries
control
CareandMaintenance
With proper care, your TV will give you many years of service.
maximum performance
from your TV.
Please follow
these guidelines
to get the
Placement
•
Do not put the TV near extremely
•
Do not put the TV near appliances
•
Keep the ventilation
•
Do not place the TV on a soft surface,
•
Place the TV in an upright
openings
hot, cold,
humid or dusty places.
that create magnetic
fields.
clear
position
such as cloth or paper.
only.
Liquids
•
Do not handle liquids
near or on the TV,
Cabinet
•
Never open the cabinet
or touch the parts inside,
•
Wipe
•
Do not put heavy objects on top of the cabinet.
your TV with a clean,
dry cloth. Never use water,
cleaning
fluids, wax,
or chemicals.
Temperature
•
If your TV is suddenly moved from a cold to a warm place, unplug the power
so that moisture that may have formed inside the unit can dry completely,
cord for at least two hours
UsingtheTVinAnotherCountry
If you plan to take your TV to a foreign country, please be aware of the different television systems that are
in use around the world. A TV designed for one system may not work properly with another system due to
differences in the TV channel frequencies,
Specifications
Model
PLH403W
Voltage
AC 1 20V
Frequency
of Operation
60Hz
ss ............
Appendix
RearPanelAir Vent
It is important to clean the panel that covers the rear vent of your projection
unit from overheating,
Airventcover,
Turn the TV off and unplug
it.
Remove the screw and take off the
cover.
Remove the dust from the vent cover
using a vacuum cleaner.
Replace the cover and the screw.
TV every six months to keep the
Demonstration
Mode
Your TV has a Demo mode that can show you all of the TV's functions,
Press the MENU
control
(b
TU
°
I.[:R
EmLI;
d;) 0
to display
in sequence.
button on the remote
the on-screen
menu.
Press CH • to select Setup. Press
VOL + to display Setup menu,
_;LT
c__
c_DC__
Press CH • until Demo is selected.
Press VOL + to activate Demo mode
and you will see all the functions of
the TV. To stop demonstratin,
press
any button (except POWER button).
Press MENU to return to normal
operation.
0000
_t_j
m
SAIiIIIUNI