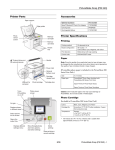
1
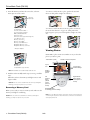
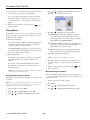
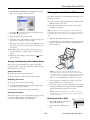
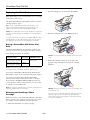
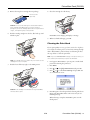
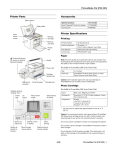
PictureMate Flash (PM 280)
Printer Parts
Accessories
Paper support
Optional accessory
®
Edge guides
Photo
viewer
screen
C12C824383
Carrying Case
PMBAG06
Rechargeable Battery
C12C831082
Printer Specifications
Memory
card light
Printing
Memory
card slots
Built-in CD
burner
(slot is on
right side)
Part number
®
Epson Bluetooth Photo Print Adapter
Output
tray
Printing method
On-demand ink jet
Nozzle configuration
90 nozzles × 4
Colors: Black, Cyan, Magenta, and Yellow
Print direction
Bidirectional with logic seeking
Control code
EPSON ESC/P raster
®
Paper
Handle
External drive port
for external devices
Note: Since the quality of any particular brand or type of paper may
be changed by the manufacturer at any time, Epson cannot guarantee
the quality of any non-Epson brand or type of paper.
Power inlet
(PictureMate photo paper is included in the PictureMate 200
Series Print Pack.)
Optional
battery cover
Cartridge
release lever
USB port for
computer
Photo cartridge
Size
4 × 6 inches
Paper type
PictureMate Photo Paper (included with
PictureMate 200 Series Print Pack)
®
Cartridge door
Epson Premium Photo Paper Glossy
Built-in CD burner
Epson Premium Photo Paper Semigloss
Turns
PictureMate
on or off
Photo viewer
screen
Saves photos
to CD
Caution: Don’t load plain paper; this may cause damage to
PictureMate. Do not load curled or folded paper.
Photo Cartridge
(Included in PictureMate 200 Series Print Pack)
On light
Displays photos
in different sizes
Select options
on the screen
Black, Cyan, Magenta, and Yellow
Cartridge life
6 months at 77 °F (25 °C) after installation; 2 years
from production date
Temperature
Storage:
–4 to 104 °F (–20 to 40 °C)
1 month at 104 °F (40 °C)
* Ink freezes at 5 °F (–15 °C). It thaws and is usable after
approximately 3 hours at 77 °F (25 °C).
Opens the
output tray
Displays optional
settings menu
Colors
Move through photos
and menu options,
and select settings
Starts
printing
Stops printing or
cancels settings
8/06
PictureMate Flash (PM 280) - 1
PictureMate Flash (PM 280)
Mechanical
Memory Card Slots
Paper path
Sheet feeder, top entry
Sheet feeder capacity
20 sheets
Dimensions
Storage
Width: 8.5 inches (215 mm)
Depth: 6.0 inches (152 mm)
Height: 6.9 inches (176 mm)
Printing
(with paper support and output tray open)
Width: 8.5 inches (215 mm)
Depth: 13.3 inches (339 mm)
Height: 11.5 inches (293 mm)
Weight
6.6 lb (3 kg) without photo cartridge,
AC adapter, or optional battery
Printable area
Border printing: 0.12 inch (3 mm) margin on
all sides of the paper
Borderless printing: no margins
Electrical
Input voltage range
CF Type II card slot
Compatible with “CF+ and
™
CompactFlash
Specification 2.0”
Sony Memory Stick®/
™
MemoryStick PRO /
Duo (requires adapter)
card slot
Compatible with “Memory
Stick Standard version
1.40-00”
Compatible with “Memory
Stick Standard Memory
Stick PRO Format
Specifications version
1.01-00”
SD™ (Secure Digital)/
™
MMC
™
(MultiMediaCard ) card
slot
Compatible with “SD
Memory Card Specifications
/ PART1. Physical Layer
Specification Version 2.0”
Compatible with
“MultiMediaCard System
Specifications Version 3.31
cards”
xD-Picture Card™ slot
Compatible with
“xD-Picture Card Card
Specification Version 1.20
Type M Card/Type H Card”
Card slots
110 to 120 V or 220 to 240 V
Power consumption (approximate)
Printing
19.0 W
Sleep mode
4.0 W
Powered off
0.4 W
Voltage
requirements
3.3 V
3.3 V/5 V combined use
Maximum current is 500 mA
Computer USB Interface
Note: Check the label on the bottom of PictureMate for voltage
information.
Connectivity
AC Adapter
Bit rate
480 Mbps (High speed device)
Connector type
USB Series B
Universal Serial Bus Specifications Revision 2.0
Universal Serial Bus Specifications Revision 1.1
Model
A381H
Data Encoding
NRZI
Rated voltage
AC 100 to 240 V
Recommended
cable length
Less than 6 feet (1.8 meters)
Input voltage range
AC 90 to 264 V
Rated frequency
50 to 60 Hz
Input frequency range
49.5 to 60.5 Hz
Rated current
0.4 to 0.8 A
Rated electrical power
42 W
Output
External Device Interface
Connectivity
20 VDC, 1.68 A
Environmental
Temperature
Humidity
Operation: 50 to 95 °F (10 to 35 °C)
Storage: –4 to 140 °F (–20 to 60 °C)
1 month at 104 °F (40 °C)
480 Mbps (High speed device)
Connector type
USB Series A
Data Encoding
NRZI
Recommended
cable length
Less than 6 feet (1.8 meters)
* Not all USB devices are supported.
Safety Approvals
Operation: 20 to 80% RH
Storage (in shipping container): 5 to 85% RH (without
condensation)
2 - PictureMate Flash (PM 280)
Universal Serial Bus Specifications Revision 2.0*
Bit rate
8/06
Safety
UL 60950-1
CSA C22.2 No. 60950-1
EMC
FCC part 15 Subpart B class B
CSA C108.8 Class B
PictureMate Flash (PM 280)
4. Slide the edge guides outward.
Loading Paper
Note: The illustrations in this document show the PictureMate Snap,
but the instructions cover both PictureMate Snap and PictureMate
Flash, except where noted.
Caution: Don’t load plain paper or you may damage PictureMate.
1. Move the handle to the back.
5. Create a stack of up to 20 sheets of paper and separate the
sheets slightly by fanning them.
6. Place your paper into the slot between the edge guides with
the glossy or whiter side up. Slide the edge guides inward
slightly.
Load glossy or
whiter side up
Make sure
paper stack is
beneath arrow
on edge guides
2. Open the paper support.
Note: Load a maximum of 20 sheets at one time. Make sure
paper is glossy or whiter side up to prevent smearing.
Store any unused paper in the original package and keep it flat
in a dry area to prevent curling.
Note: When you need more paper, order a PictureMate 200 Series
Print Pack.
3. Press the Open button to open the output tray.
Inserting a Memory Card
1. Press the
On button to turn on PictureMate.
2. Press the Open button to open the output tray.
8/06
PictureMate Flash (PM 280) - 3
PictureMate Flash (PM 280)
To remove a card from the top slot, push in the card and
release it, then pull it straight out of the slot.
3. Insert the memory card into the correct slot, as shown.
Insert just one card at a time.
Memory
card light
Top slot:
SD and SDHC™
miniSD™ and miniSDHC *
microSD and microSDHC *
MMC (MultiMediaCard)
xD-Picture Card
xD-Picture Card (Type M and Type H)
Sony Memory Stick
Memory Stick Duo *
Memory Stick PRO™
Memory Stick PRO Duo™ *
MagicGate Memory Stick
MagicGate Memory Stick Duo
To remove a card from the bottom slot, push in and release
the card release button so it pops out. Then push in the
button again to eject your card and pull it straight out of the
slot.
* Requires adapter
Viewing Photos
PictureMate’s photo viewer screen makes it easy to select the
photos you want to print.
Total number of prints
Bottom slot:
Microdrive™
CompactFlash (Type I and II)
Note: PictureMate can’t read multiple cards at once.
4. Push the card in carefully until it stops (it won’t go in all the
way).
When the card is in, the memory card light comes on and
begins to flash.
Caution: Do not remove a card while the memory card light is
flashing; you may lose photos on your card.
Removing a Memory Card
When you are ready to remove a memory card, make sure the
memory card light is not flashing.
Layout
icon
Icons showing
selected settings
Guide to
available
options
Left
selection
button
(selects
current
option on
screen)
Right selection
button (selects
current option on
screen)
Navigation buttons
for selecting photos or settings
Note: You can adjust the angle of the photo viewer screen by raising
or lowering the top of the screen. Be sure to lower the screen before
closing the printer lid.
Caution: Do not remove a card while the memory card light is
flashing; you may lose photos on your card.
4 - PictureMate Flash (PM 280)
Number of copies of this photo
8/06
PictureMate Flash (PM 280)
5. Select 90 degrees, 180 degrees, or 270 degrees (or select
Do Not Rotate). Your photo is rotated on the screen:
Changing How Many Photos Display on
the Screen
After inserting a memory card, you can change how many
photos are displayed on the photo viewer screen. Press the
Display button to switch between 1, 6, and 15 photos.
You can also select whether a photo displays with or without
the guide (the information bar near the bottom of the photo).
6. Press OK.
Saving Power
When PictureMate is not in use, the photo viewer screen goes
dark after 13 minutes. Press any button to turn it back on.
Identifying Screen Icons
When you make a change to your photos, an icon appears on
the screen next to your photo to indicate the change. (If
necessary, press
Display to view one photo per screen
and show the icons.)
Printing
PictureMate can print photos from these devices:
❏ Your digital camera’s memory card (as described here)
Icons
showing
selected
settings
®
™
❏ A PictBridge - or USB-DIRECT PRINT -enabled digital
camera
❏ A Bluetooth-enabled device (requires an optional Epson
Bluetooth Photo Print adapter, part number C12C824383)
❏ Your computer
The following icons are used:
❏ A CD inserted in the built-in CD drive (see page 11)
Frame or decoration is added
❏ An external CD drive, Zip disk, or flash memory (thumb)
drive
Cropping is applied
See the Basics book or the on-screen User’s Guide for
instructions on printing from connected devices.
Red-eye reduction is applied
Color effect is applied
Make sure your image files meet these requirements:
Color correction is applied
❏ JPEG files or uncompressed Tiff files only
Date stamp is turned on
❏ Resolutions ranging from 80 × 80 to 9200 × 9200 pixels
Rotating Photos on the Screen
Note: PictureMate supports Exif Print image enhancement features.
See your camera manual to see if this feature is included on your
camera.
You can rotate a photo on PictureMate’s photo viewer screen.
This does not affect how the photo prints, only how you see it
on the screen.
PictureMate does not support progressive-scan JPEG or RAW
images.
1. Select the photo you want to rotate.
2. Press Menu.
3. Press
or
to highlight Edit, then press OK.
4. Press
or
to highlight Rotate, then press OK.
PictureMate recognizes and prints the first 999 photos on
your memory card or device.
8/06
PictureMate Flash (PM 280) - 5
PictureMate Flash (PM 280)
Printing Individual Photos
Printing All Photos
If you have many photos on your camera’s memory card, you
can select just the ones you want to print.
You can print all the photos on your camera’s memory card,
and select the number of copies to print of each photo.
1. After inserting a card, press
1. After inserting a card, press Select All. (Select All is the left
selection button under the photo viewer screen.)
or
to view your photos.
2. When you see a photo you want, press OK to select it for
printing.
Press here to
choose
Select All
The selected photos are highlighted orange.
The selected photo is highlighted orange. If you’ve set the
screen to display one photo at a time, an orange frame
shows you the area that will print.
2. If you want more than one copy of each picture, press OK to
increase the number of copies.
(Press Copy - to decrease the number using the left selection
button under the photo viewer screen.)
Note: If you want to edit your photo, see the Basics book for
details.
3. Press Proceed.
4. To change the number of copies of an individual photo,
press or to select the photo. Then press OK to increase
the number, or Copy - to decrease it.
3. To print more than one copy, press OK to increase the
number of copies.
(Press Copy - to decrease the number using the left selection
button under the photo viewer screen.)
5. To preview your photos, press Print Preview. (Or skip
directly to step 7 to print your photos.)
4. To select more photos, press or to view a photo and
press OK to select it. Repeat step 3 to select more copies, if
necessary.
Press or to review your selected photos. If you change
your mind, press Back.
5. To preview your photos, press Print Preview. (Or skip
directly to step 8 to print your photos.)
6. Press Layout to select the layout of your photos on the
paper. (For more information, see page 8.)
6. Press or to review your selected photos. If you change
your mind, press the Back button.
7. Make sure you have enough paper loaded, then press
Print to start printing.
7. Press Layout to select the layout of your photos on the
paper. (For more information, see page 8.)
Note: If your card has more than 20 photos, you will need to
reload paper while printing. Load a maximum of 20 sheets at a
time. When you see a message that paper is out, load more
paper and press OK to continue printing. If you need to cancel
printing, press Cancel.
8. Make sure you have enough paper loaded, then press
Print to start printing.
Tip: You can check the total number of prints at the top of the
screen before printing.
6 - PictureMate Flash (PM 280)
8/06
PictureMate Flash (PM 280)
Printing a Range of Photos
Printing Photos By Date
You can choose a range (or sequence) of consecutive photos
from your camera’s memory card (for example, photos 7
through 12).
You can print photos taken on specific dates. If you have a lot
of photos on your memory card, this makes it easier to find
the ones you want.
1. After inserting a card, press Menu.
1. After inserting a card, press Menu.
2. Press
or
to highlight Select, then press OK.
2. Press
3. Press
or
to highlight Select Range, then press OK.
3. Press
or
to highlight Select By Date, then press OK.
You see a list of dates.
4. Highlight the first photo in the range, then press OK. (You
can use , , , or to select the photo.)
or
to highlight Select, then press OK.
5. Highlight the last photo in the range, then press OK.
The selected photos are highlighted orange:
4. Press
OK.
or
to highlight the date you want, then press
A checkmark appears in the box for the date you selected.
You can select additional dates, if desired.
6. Press Proceed.
5. After selecting all the dates you want, press Proceed (the
right selection button under the photo viewer screen).
7. To change the number of copies of a single photo, press
or to select the photo. Then press OK to increase the
number, or Copy - to decrease it.
The photos taken on the selected date(s) appear on the
screen.
8. To preview your photos, press Print Preview. (Or skip
directly to step 10 to print your photos.)
6. Press OK to select the current photo for printing. Or you
can print all photos or a range of photos (as described on
page 6).
Press or to review your selected photos. If you change
your mind, press Back.
7. Make sure you have enough paper loaded, then press
Print to start printing.
9. Press Layout to select the layout of your photos on the
paper. (For more information, see page 8.)
Printing Camera-Selected DPOF Photos
10. Make sure you have enough paper loaded, then press
Print to start printing.
If your camera supports DPOF (Digital Print Order Format),
you can use it to pre-select which photos and how many
copies you want to print.
See your camera’s manual to choose photos for printing with
DPOF, then insert your memory card in PictureMate.
PictureMate automatically reads your pre-selected photos and
displays the message DPOF data was found. Use the DPOF
data?
1. Select Yes (using the right selection button under the photo
viewer screen).
Your photos are previewed on the screen. Press
review your selected photos
or
to
2. Make sure you have enough paper loaded, then press
Print to print your pre-selected photos.
8/06
PictureMate Flash (PM 280) - 7
PictureMate Flash (PM 280)
You have these choices:
Viewing a Slideshow of Your Photos
You can have PictureMate display all the photos on your card
one by one.
1. After inserting a card, press Menu.
2. Press
or
to highlight Select, then press OK.
3. Press
or
to highlight Slideshow, then press OK.
After a few moments, the slideshow begins.
Borderless
Border
Wallet
Mini-wallet
ID
(portrait package with 4 copies
of each photo per page)
US Passport
(2 copies of each photo
per sheet)
2 × 2 in Photo
3 × 3 in Photo
Half Page
Digital Size
(4:3 aspect ratio)
Proof Sheet
(20 photos)
CD Index
(56 photos)
10 Per Page
(portrait package with 10
copies of each photo per
page)
PictureMate displays all the photos on your memory card,
then returns to the photo selection screen.
❏ To pause the slideshow at any time, press Pause. Press
Proceed to continue.
Note: For the fastest printing, select Border.
❏ If you see a photo you want to print, you can stop the
slideshow by pressing Stop or Cancel. Then press OK to
select it for printing, as described in the next section.
When you print without borders, your images are automatically
expanded and cropped around the edges. This may cause part of
your image to be cut off. You can control the amount of
expansion and cropping; see the Basics book for instructions.
4. At the photo selection screen, press OK to select the current
photo for printing. Or you can print all photos or a range of
photos (as described on page 6).
Choosing a Layout
By default, your photos are printed at the full 4 × 6 size,
without borders. If you want to print pictures with white
borders or place several small photos on one sheet of paper,
you can use the Layout menu to change the layout.
For the US Passport, ID (portrait package), and 10 Per Page
(portrait package) layouts, PictureMate prints multiple
copies of each photo per sheet. For other layouts, to print
two or more photos per sheet, select multiple copies or
multiple photos.
Note: The layout you choose is kept until you remove the memory
card or cancel all settings. To use the same layout whenever you
print, see the Basics book for instructions.
For example, if you want 3 mini-wallet photos of one image
and 4 of another, select 3 copies of photo A and 4 copies of
photo B. Then choose Mini-wallet as the layout setting.
1. After inserting a card, press Menu.
2. Press
or
to highlight Layout, then press OK.
Your photos will be printed on 2 sheets of paper as shown:
3. Press
or
to highlight the layout setting you want for
your photo(s), then press OK.
5. Adjust any other settings you want, then press
print your photos.
8 - PictureMate Flash (PM 280)
8/06
Print to
PictureMate Flash (PM 280)
Cropping
3. Press
or
to highlight Edit, then press OK.
You can print just part of a photo, cropping out the area that
you don’t want. The part you keep is automatically enlarged
to fit the page. (Cropping affects only your printed photo, not
your original image.)
4. Press
OK.
or
to highlight Red-Eye Reduction, then press
5. Highlight On to turn on the setting, then press OK.
6. At the next screen, select whether to apply the setting to the
current photo or all photos, then press OK.
1. Select the photo you want to crop.
2. Press Menu.
Adding a Date Stamp
3. Press
or
to highlight Edit, then press OK.
4. Press
or
to highlight Crop Photo, then press OK.
You can add the date your photos were originally taken to the
bottom right corner of each photo.
You see a blue box around the photo:
Note: The date comes from your camera, not from the printer. If this
information is incorrect, adjust the date setting on your camera.
1. Press Menu.
2. Press
or
to highlight Setup, then press OK.
3. Press
or
to highlight Date Stamp, then press OK.
4. Highlight On, then press OK.
This indicates the area that will print; the area outside the
box will be cropped.
Note: If a card is already inserted, you need to remove it and reinsert
it before the setting takes effect. (Or press Cancel and select Yes to
cancel all settings.) Your photos are automatically date-stamped until
you turn off the setting.
5. Set the area you want to print:
❏ Press Zoom In to crop more of the photo.
Printing Photos in Black-and-White or
Sepia
❏ Press Zoom Out to crop less of the photo.
❏ Press , , , or to move the blue box to a
different part of your photo.
❏ Press
You can print pictures in black-and-white or in a sepia tone
(like an old-fashioned photo) even when the originals are in
color. Your original images are not changed.
Display to rotate the blue box.
6. Press OK. You see a close-up of your photo with the crop
setting you selected.
Note: The color effect you choose is kept until you remove the
memory card or cancel all settings. To use the same color effect
whenever you print, see the Basics book.
7. Press OK to select the cropped photo for printing.
1. Select a photo to print black-and-white or sepia.
8. If you want to crop additional photos, repeat steps 1
through 7.
9. Adjust any other settings you want, then press
print your photos.
2. Press Menu.
3. Press
Print to
or
to highlight Edit, then press OK.
4. Press
or
to highlight Color Effect, then press OK.
You see this screen:
Red-Eye Removal
When you take photos of people, they sometimes appear to
have red eyes. You can use red-eye reduction to help eliminate
this problem.
Note: Red-eye reduction may not correct red eyes in all photos. The
Red-Eye Reduction setting is kept until you remove the memory
card or cancel all settings. To use red-eye reduction whenever you
print, see the Basics book.
5. Press
OK.
1. Select a photo with the red-eye problem.
or
to select Black & White or Sepia, then press
2. Press Menu.
8/06
PictureMate Flash (PM 280) - 9
PictureMate Flash (PM 280)
4. Press
or
to highlight Auto Correction, then press
OK. You see the Auto Correction menu:
6. At the next screen, select whether to apply the color effect to
the current photo or all photos, then press OK.
You see your photo(s) with the color effect you selected.
7. Press OK to select the current photo for printing. Or you
can print all photos or a range of photos (as described on
page 6).
8. Adjust any other settings you want, then press
print your photos.
Print to
Fixing Photos
5. Press
PictureMate lets you correct the color and improve the image
quality of your photos without using a computer. Two types
of adjustments are available:
or
to highlight one of these options:
❏ PhotoEnhance: This setting improves your photos’
colors and increases contrast and sharpness. It may
correct images that are too dark, too bright, or backlit.
(The default setting is PhotoEnhance.)
❏ Automatic adjustments
If your camera supports PRINT Image Matching (P.I.M.)
or Exif Print, the printer’s P.I.M. setting automatically
adjusts your photos for the best results.
❏ P.I.M.: This information helps ensure an accurate image
reproduction for files that include P.I.M. (PRINT
™
Image Matching ) or Exif Print data.
The PhotoEnhance setting improves your photos’ colors
and increases contrast and sharpness. It may correct images
that are too dark, too light, or backlit.
❏ None: Prints photos as is or bypasses P.I.M. or Exif
Print data. Select this setting for the fastest printing.
6. Press OK to apply the selected setting.
❏ Manual adjustments
If your photos are too light or too dark, you can manually
adjust their brightness or control the saturation and
sharpness.
Note: The setting you select applies to all photos.
7. Press OK to select the current photo for printing. Or you
can print all photos or a range of photos (as described on
page 6).
If you want, you can make manual adjustments while
PhotoEnhance is turned on in order to fine-tune your
automatic settings.
8. Adjust any other settings you want, then press
print your photos.
Note: These settings affect only your printed pictures. They do
not change your original image files.
Print to
Manually Fixing Your Photos
You can manually fix individual photos or fix all your photos
at once. You can make different corrections for each photo on
your memory card.
Automatically Fixing Your Photos
PictureMate’s automatic image adjustments are applied to all
your photos.
1. Select a photo that you want to adjust.
Note: The type of automatic adjustment you choose is kept until you
remove the memory card or cancel all settings. To use the same
setting whenever you print, see the Basics book.
3. Press
or
to highlight Edit, then press OK.
1. After inserting a card, press Menu.
4. Press
or
to highlight Fix Photos, then press OK.
2. Press
or
to highlight Edit, then press OK.
3. Press
or
to highlight Fix Photos, then press OK.
10 - PictureMate Flash (PM 280)
2. Press Menu.
8/06
PictureMate Flash (PM 280)
5. Select Brightness, Saturation, or Sharpness, then press
OK. You see your photo next to the menu:
Printing From the Built-in CD Drive
The built-in CD drive in your PictureMate Flash supports the
following operations:
❏ Saving your photos by burning them onto a CD-R or CDRW disc (writing on the disc).
❏ Viewing and printing your photos from a CD or DVD
(reading from the disc).
Note: You may not be able to read all types of CDs or DVDs in the
PictureMate Flash CD drive if the discs were written by another CD
or DVD drive. Epson cannot guarantee the compatibility of all CDs or
DVDs.
6. Press
or
to increase or decrease the setting. You can
see the changes on your photo.
7. When the photo looks good, press OK.
1. Make sure PictureMate Flash is turned on.
8. At the next screen, select whether to apply the setting to the
current photo or all photos, then press OK.
2. Insert the CD into the slot until it goes completely into the
printer. A light next to the slot flashes, indicating that the
CD is being read.
9. Repeat steps 3 through 8 to make other adjustments to the
same photo, if necessary. Or repeat steps 1 through 8 to fix
more photos.
10. Press OK to select the current photo for printing. Or you
can print all photos or a range of photos (as described on
page 6).
11. Adjust any other settings you want, then press
print your photos.
Print to
Storing and Displaying PictureMate Prints
Photos printed on PictureMate photo paper are beautiful,
long-lasting images. Follow these guidelines to make sure they
will look great for generations.
Note: If you also have a memory card already inserted in
PictureMate Flash, you must either remove the card or select
the CD drive as the source to see any photos on the CD or DVD.
To select the source, press Menu, highlight Select, and press
OK. Then choose Select Source, press OK, and select CD.
Storing Your Prints
❏ Do not rub the printed side of the photo.
❏ Do not stack photos with the printed sides touching.
Displaying Your Prints
3. Once your photos are displayed, you can view and print
them just like photos on a memory card.
❏ Let prints sit for 24 hours before framing.
❏ To ensure prints will last as long as possible, display them
under glass or in photo albums.
4. If you want to print a proof sheet of the photos on your CD
or DVD, press Menu, select Layout, and select CD Index.
56 photo thumbnails are printed on each sheet.
❏ Keep prints out of the sun to help prevent fading.
Note: In addition to printing from a CD or DVD, you can also
back up photos on your camera’s memory card by saving them
to a CD. See page 12.
Storing Unused Paper
Return unused paper to the original package. Store paper flat
to prevent curling, and keep it away from extreme
temperatures, high humidity, and bright light.
Ejecting the CD or DVD
1. Press the 5 eject button. The CD or
DVD comes halfway out.
2. Remove the CD or DVD from the
slot.
8/06
Eject button
PictureMate Flash (PM 280) - 11
PictureMate Flash (PM 280)
6. Press
Save. (Or press Menu, highlight
Save to CD, then press OK.)
Saving Photos to the Built-in CD
Burner
7. At the next screen, select whether to copy all
photos or just the selected photos, then press
OK.
You can save photos to a CD using the built-in CD drive in
PictureMate Flash. Use only 12-cm CDs and select a quality
brand. The following types are compatible with this printer:
8. At the confirmation screen, press OK.
❏ CD-R
9. When you see a message asking if you want to
print a proof sheet or index of your copied photos, select
Yes or No. If necessary, make sure paper is loaded. The
sheet automatically prints once the backup is complete.
❏ CD-RW Multi
❏ CD-RW High
❏ CD-RW Ultra
10. Follow the instructions on the screen to complete the
backup. The CD is ejected automatically when the backup
is finished.
Note: PictureMate supports both 650MB (74 min.) and 700MB (80
min.) capacities for each type of CD.
Each time you copy photos to the same CD, PictureMate
creates a new numbered folder (001, 002, etc.) where it
stores your photos.
You can also have PictureMate automatically print a “proof
sheet” of your saved photos. A proof sheet provides small
thumbnail images—up to 56 per sheet—of all the photos
you’ve copied.
Caution: Avoid handling the printer during backup. Also, do not
remove the memory card or CD while photos are being saved, or you
may lose photos on your card or CD. If you need to stop the backup,
press Cancel.
1. Make sure PictureMate Flash is turned on.
Note: Saving to a CD takes extra energy. If you’re using the
optional battery, make sure it’s fully charged, or connect the AC
power adapter.
Note: If you have any problems writing to a particular CD, set the CD
Backup Speed setting to Normal in the Setup menu and save to the
CD again.
2. Insert your memory card into PictureMate.
3. Insert a CD into the slot until it goes completely into the
printer. A light next to the slot flashes, indicating that the
CD is being read.
Using the Optional Battery
To buy the optional battery, check with your PictureMate
retailer or go to www.MyPictureMate.com.
With a fully charged battery, you can print about 100 photos
(or 60 photos when printing from PictureMate Flash’s built-in
CD drive).
Installing the Battery
1. Make sure PictureMate is turned off.
2. Unplug the AC adapter from PictureMate.
3. Release the latch and remove the battery cover from the
back of the printer.
4. If you see a message that frames are not found on the disk,
press OK.
5. If you want to copy all the photos on your memory card,
skip to the next step. To copy individual photos, select the
ones you want to copy. (Press or to view your photos.
Then press OK when you see a photo you want to copy.)
12 - PictureMate Flash (PM 280)
8/06
PictureMate Flash (PM 280)
4. Insert the battery as shown until it clicks into place.
Note: If you are running PictureMate with the battery, the printer
turns off automatically after 15 minutes if it is not being used (unless
PictureMate is connected to a computer and a memory card is
inserted). Press the
On button to turn it back on.
Removing the Battery
If there is a problem with your battery, or you want to replace
it with one that is already charged, you need to remove the
battery.
1. Make sure PictureMate is turned off.
Charging the Battery
2. Release the latch and remove the battery.
After you install the battery, you need to charge it by
connecting the AC adapter and plugging in the printer.
3. Replace the battery cover.
Checking the Print Pack Status
You can check the status of your Print Pack on the
PictureMate photo viewer screen.
The power light flashes during charging when PictureMate is
off. It takes about 2 hours to fully charge the battery when
PictureMate is off. It takes longer when you use PictureMate
while it is charging.
1. Press Menu.
2. Press or to highlight Check Print Pack and press OK.
You see the status displayed on the photo viewer screen:
The power light turns off when the battery is fully charged (if
PictureMate is turned off).
– 100%
The following battery status icons appear in the upper right
corner of the photo viewer screen:
Charging
2/3 full
– 50%
Low
Almost out
3. Press OK to exit.
Note: If the screen displays a Print Pack low message, you should
buy a new PictureMate 200 Series Print Pack.
1/3 full
Battery
status icon
8/06
PictureMate Flash (PM 280) - 13
PictureMate Flash (PM 280)
2. Open the cartridge door on the back of PictureMate.
Replacing the Print Pack
When PictureMate needs a new Print Pack, you see a message
on the photo viewer screen.
The PictureMate 200 Series Print Pack contains a new photo
cartridge and photo paper.
Tip: If you see a replacement message while printing, you can
replace the Print Pack and continue the current print job. Just
replace it without turning off and unplugging PictureMate.
Caution: Do not attempt to refill the photo cartridge. This could result
in ink spills or other damage to PictureMate not covered by Epson’s
warranty.
3. Slide the cartridge lever left, to the Release position.
To ensure good results, use a genuine PictureMate 200 Series photo
cartridge and do not refill it. Other products may cause ink spills or
other damage to your printer not covered by Epson’s warranty.
Buying a PictureMate 200 Series Print
Pack
The PictureMate 200 Series Print Pack has everything you
need to print in one box: photo paper and a photo cartridge.
The following Print Packs are available:
Print Pack contents
Part number
Glossy photo paper (150
sheets) and photo cartridge
T5846
Matte photo paper (100
sheets) and photo cartridge
T5845-M
Caution: Do not try to pull out the cartridge without moving the
lever.
Supported
PictureMate models
All PictureMate 200
Series models
4. Pull out the cartridge and dispose of it properly. (For
appropriate disposal, check local resources for recycling
guidelines.)
Note: If you need more paper for any reason, use Epson Premium
Photo Paper Glossy or Semigloss, borderless 4 × 6 inch size.
You can buy a PictureMate 200 Series Print Pack wherever
PictureMate is sold or from retailers that sell printer supplies.
You can also buy a Print Pack and other PictureMate
accessories from an Epson authorized reseller. To find the
nearest reseller, call 800-GO-EPSON (800-463-7766). Or
you can purchase online at www.epsonstore.com (U.S. sales)
or www.epson.ca (Canadian sales).
Note: Use your photo cartridge within six months of installing it and
before the expiration date on the package.
Warning: Keep photo cartridges out of the reach of children and
do not drink the ink.
Removing and Installing a Photo
Cartridge
If ink gets on your hands, wash them thoroughly with soap and
water. If ink gets in your eyes, flush them thoroughly with
water. If discomfort or vision problems continue after flushing,
see a doctor immediately.
Make sure you have a new PictureMate 200 Series Print Pack
before you remove the old photo cartridge. Once you remove
the cartridge, you must install the new one right away.
1. Make sure PictureMate is on but not printing.
14 - PictureMate Flash (PM 280)
8/06
PictureMate Flash (PM 280)
5. Remove the new photo cartridge from its package.
8. Close the cartridge door all the way.
Don’t touch the
green chip
Caution: Don’t touch the small green circuit board. Install the
photo cartridge immediately after you remove it from its
package. If you leave a cartridge unpacked for a long time before
using it, normal printing may not be possible.
6. Slide the cartridge straight into the slot, label side up, until
it clicks in place.
PictureMate starts charging and displays a message.
9. When it’s finished charging, press OK.
Cleaning the Print Head
If your print quality is not as good as it used to be—if photos
are too light, are missing colors, or have lines running through
them—PictureMate’s print head may need cleaning. Follow
the steps below to clean the print head.
Note: If you see a Print Pack low message on the photo viewer, you
can’t clean the print head until you replace the Print Pack.
Note: The cartridge won’t go in all the way. You need to use the
cartridge lever to lock it in place.
1. Load paper in PictureMate so you can print a nozzle check
pattern after cleaning the print head.
7. Slide the lever all the way right, to the Lock position.
2. Press Menu.
3. Press
or
to highlight Maintenance and press OK.
4. Press
or
to select Auto Cleaning and press OK. You
see a confirmation screen:
Caution: If the cartridge is not inserted correctly, PictureMate
will not be able to print.
5. Press OK again to clean the print head. Cleaning takes about
60 seconds. PictureMate makes some noise and you see a
Cleaning message.
When cleaning is complete, PictureMate prints a nozzle
check pattern.
8/06
PictureMate Flash (PM 280) - 15
PictureMate Flash (PM 280)
6. Check the pattern to see if there are any gaps in the lines.
6. Press
Print. The alignment pattern is printed:
Best pattern
OK
Misaligned pattern
Needs
cleaning
7. Look at the printed squares to determine which one is the
most even, with no streaks or white lines. (You may need to
use a magnifying glass.)
7. If there are no gaps, press Yes to finish.
If there are gaps, press No to clean the print head again. You
may need to clean it two or three times before the nozzles
are clean.
8. Press
or
to highlight the number for the best square
(1 to 9) in set #1. Then press OK.
9. Press
or
to highlight the number for the best square
(1 to 9) in set #2. Then press OK.
If you don’t see any improvement after cleaning three times,
refer to the on-screen User’s Guide for additional solutions.
PictureMate aligns the print head and exits the
Maintenance menu.
Aligning the Print Head
Note: The number that you enter becomes the default setting (#5)
the next time you align the print head.
If you have moved PictureMate and the print quality is not as
good as it used to be—if your prints look fuzzy or have light
or dark lines running through them—you may need to align
the print head.
Taking PictureMate With You
PictureMate’s handle makes it easy to carry short distances.
1. Load paper in PictureMate so you can print the head
alignment pattern.
If PictureMate is going to travel a longer distance, pack it
carefully to protect it from getting damaged.
2. Press Menu.
3. Press
or
Caution: Keep PictureMate out of the sun and don’t leave it in your
car or other location where it can get too hot or too cold. Otherwise,
PictureMate may be damaged or ink may leak.
to highlight Maintenance and press OK.
4. Press
or
to select Head Alignment and press OK.
You see a confirmation screen:
1. Remove any CDs, if you have one installed in the CD drive
(PictureMate Flash only).
2. Remove any installed memory cards.
3. Press the
5. Press OK again to continue.
On button to turn off PictureMate.
4. Wait until the On light goes out, then unplug the power
cord from the power outlet.
5. Remove all paper and printed photos.
6. Unplug the power cable and any connected USB cables or
device from PictureMate.
16 - PictureMate Flash (PM 280)
8/06
PictureMate Flash (PM 280)
7. Close the paper support and output tray.
8. Pack PictureMate in the box that it came in or in the
optional carrying case. Place the power cable and adapter in
the accessory box that came with PictureMate and pack it
with the PictureMate.
Caution: Make sure the photo cartridge is installed. Do not remove
the photo cartridge before transporting. Don’t place PictureMate on
its side or upside down, or ink may leak.
Note: If your prints don’t look as good after PictureMate has been
moved, try aligning the print head. See page 16.
Related Documentation
CPD-22153
PictureMate Snap/PictureMate Flash Start
Here
CPD-22154
PictureMate Snap/PictureMate Flash Basics
book
CPD-22158
PictureMate Flash (PM 280)
CD-ROM with HTML User’s Guide
8/06
PictureMate Flash (PM 280) - 17
PictureMate Flash (PM 280)
18 - PictureMate Flash (PM 280)
8/06