1
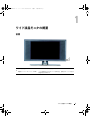
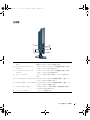
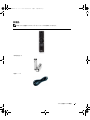
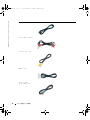
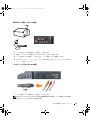
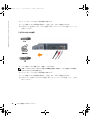
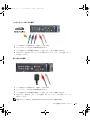
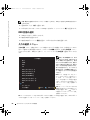
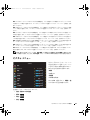
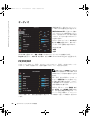
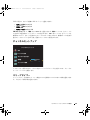
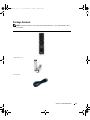
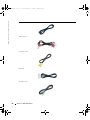
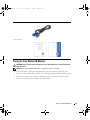
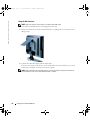
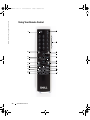
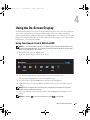
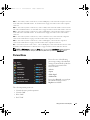
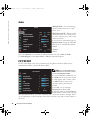
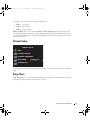
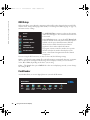
PMS 300 PLATE BLACK PLATE center spine Dell™ W2600 26 (TV ) TM W2600 Model W2600 Printed in China www.dell.com/jp | support.dell.com center PRINTER: Adjust the spine width according to the number of pages in the book. Then strip into the center of the book. Dell™ W2600 26 (TV ) Dell™ W2600 26” Wide LCD Monitor (With TV Functionality) W2600A00.book 1 ページ 2004年8月4日 水曜日 午後6時48分 Dell™ ワイド液晶モニタ (TV 機能付 ) オーナーズマニュアル モデル W2600 w w w. d e l l . c o m / j p | s u p p o r t . j p . d e l l . c o m W2600A00.book 2 ページ 2004年8月4日 水曜日 午後6時48分 メモ、注意、警告 メモ : ワイド液晶モニタの操作上、知っておくと便利な重要情報が記載されています。 注意 : ハードウェアの損傷やデータの損失の可能性があることを示し、その危険を回避するための方法を説明し ています。 警告 : 物的損害、けがまたは死亡に至る可能性があることを示します。 ____________________ このマニュアルに記載されている情報は、将来予告なしに変更されることがあります。 © 2004 Dell Inc. All rights reserved. Dell Inc. の書面による許諾を受けることなく、このマニュアルを複製することは、どのような形態であっても厳しく禁じられています。 このマニュアルで使用されている商標:Dell、DELL のロゴ。 TruSurround XT、SRS、および(o)は SRS Labs, Inc. の商標です。 このマニュアルでは、上記以外の商標や会社名を使用して、マークや名称の権利を主張する団体、もしくはその団体の製品に言及してい る場合があります。これらの商標や会社名は、当社のものを除き、一切 Dell Inc. に所属するものではありません。 2004 年 8 月 Rev. A00 W2600A00.book 3 ページ 2004年8月4日 水曜日 午後6時48分 目次 1 ワイド液晶モニタの概要 前面 . . . . . . . . . . . . . . . . . . . . . . . . . . . . . . . . . . . . . . 5 右側面 . . . . . . . . . . . . . . . . . . . . . . . . . . . . . . . . . . . . 6 左側面 . . . . . . . . . . . . . . . . . . . . . . . . . . . . . . . . . . . . 7 下面 . . . . . . . . . . . . . . . . . . . . . . . . . . . . . . . . . . . . . . 8 同梱品 . . . . . . . . . . . . . . . . . . . . . . . . . . . . . . . . . . . . 9 ワイド液晶モニタのお手入れ . . . . . . . . . . . . . . . . . . . . . . . . 2 3 4 11 ワイド液晶モニタのセットアップ ワイド液晶モニタの適切な設置場所 . . . . . . . . . . . . . . . . . . . . 13 ワイド液晶モニタの接続 . . . . . . . . . . . . . . . . . . . . . . . . . . 13 リモコン 電池の挿入 . . . . . . . . . . . . . . . . . . . . . . . . . . . . . . . . . 21 リモコンの使用 . . . . . . . . . . . . . . . . . . . . . . . . . . . . . . . 22 汎用リモコンまたは学習機能付きリモコンによる ワイド液晶モニタの使用 . . . . . . . . . . . . . . . . . . . . . . . . . . 24 オンスクリーンディスプレイの使用 リモコンによる OSD の使用 . . . . . . . . . . . . . . . . . . . . . . . . . 25 OSD 言語の選択 . . . . . . . . . . . . . . . . . . . . . . . . . . . . . . . 26 入力の選択 メニュー . . . . . . . . . . . . . . . . . . . . . . . . . . . . 26 ピクチャ メニュー . . . . . . . . . . . . . . . . . . . . . . . . . . . . . 27 オーディオ . . . . . . . . . . . . . . . . . . . . . . . . . . . . . . . . . 28 PIP/POP/PBP 28 . . . . . . . . . . . . . . . . . . . . . . . . . . . . . . . . 目次 3 W2600A00.book 4 ページ 5 6 2004年8月4日 水曜日 午後6時48分 チャンネルセットアップ . . . . . . . . . . . . . . . . . . . . . . . . . . 29 スリープタイマー . . . . . . . . . . . . . . . . . . . . . . . . . . . . . . 29 OSD 設定 . . . . . . . . . . . . . . . . . . . . . . . . . . . . . . . . . . 30 カードリーダ . . . . . . . . . . . . . . . . . . . . . . . . . . . . . . . . 30 ワイド液晶モニタのトラブルシューティング トラブルシューティングのヒント . . . . . . . . . . . . . . . . . . . . . . 33 一般的な問題 . . . . . . . . . . . . . . . . . . . . . . . . . . . . . . . . 34 OSD メッセージ . . . . . . . . . . . . . . . . . . . . . . . . . . . . . . . 38 リモコンの問題 . . . . . . . . . . . . . . . . . . . . . . . . . . . . . . . 39 カードリーダの問題. . . . . . . . . . . . . . . . . . . . . . . . . . . . . 39 ワイド液晶モニタをコンピュータに接続しているときの Self-Test 機能の使用 . . . . . . . . . . . . . . . . . . . . . . . . . . . . 40 ワイド液晶モニタをモニタとして使用するときの問題 . . . . . . . . . . . 40 ワイド液晶モニタの仕様 索引 4 目次 . . . . . . . . . . . . . . . . . . . . . . . . . . . . . . . . . . . . . . 47 W2600A00.book 5 ページ 2004年8月4日 水曜日 午後6時48分 1 ワイド液晶モニタの概要 前面 1 2 1 赤外線受光部 2 電源インジケータライト(LED) ワイド液晶モニタがオンのときは青色、省電力モードのときは 黄色が表示されます。 リモコンからの信号を受信します。 ワイド液晶モニタの概要 5 W2600A00.book 6 ページ 2004年8月4日 水曜日 午後6時48分 www.dell.com/jp | support.jp.dell.com 右側面 7 6 5 4 3 2 1 6 1 電源ボタン ワイド液晶モニタの電源のオン / オフを切り替えます。 2 OSD メニューボタン OSD(オンスクリーンディスプレイ)を有効にします。 3 ボリュームボタン ボリュームを下げるか、OSD 内を移動します。 4 ボリュームボタン ボリュームを上げるか、OSD 内を移動します。 5 チャンネルボタン 前のチャンネルを選択するか、OSD 内を移動します。 6 チャンネルボタン 次のチャンネルを選択するか、OSD 内を移動します。 7 Input Source ボタン Input Select メニューを表示します。 ワイド液晶モニタの概要 W2600A00.book 7 ページ 2004年8月4日 水曜日 午後6時48分 左側面 8 1 2 7 6 5 1 2 コンポジットビデオコネクタ (AV1) R(コンポジット右オーディオ 3 4 ビデオゲームシステムなど、一時的に接続する外部機器用に 側面のコンポジットコネクタを使用します。 コネクタ) コンポジットコネクタ(AV1)に外部機器を接続した場合、 このオーディオコネクタを使用します。 3 L(コンポジット左オーディオ コネクタ) コンポジットコネクタ(AV1)に外部機器を接続した場合、 このオーディオコネクタを使用します。 4 カードリーダパネル カードリーダを取り付ける場合は、このパネルを取り外し ます。 5 L(S ビデオ左オーディオコネクタ) S ビデオコネクタ(AV3)に外部機器を接続した場合、この オーディオコネクタを使用します。 6 R(S ビデオ右オーディオコネクタ) S ビデオコネクタ(AV3)に外部機器を接続した場合、この オーディオコネクタを使用します。 7 8 S ビデオコネクタ(AV3) ヘッドフォンコネクタ ビデオカメラなど、一時的に接続する外部機器用に側面の S ビデオコネクタを使用します。 ヘッドフォンを接続します。 ワイド液晶モニタの概要 7 W2600A00.book 8 ページ 2004年8月4日 水曜日 午後6時48分 www.dell.com/jp | support.jp.dell.com 下面 1 2 14 3 13 12 5 4 11 7 6 10 9 8 1 電源コネクタ 電源コードを接続します。 2 コンポジットビデオおよびオー ディオコネクタ(AV2) ビデオデッキや DVD プレーヤなどの外部機器を接続します。 3 DVI オーディオコネクタ(L) DVI コネクタに外部機器を接続した場合、この DVI オーディ オコネクタを使用します。 4 VGA コネクタ ワイド液晶モニタをコンピュータのモニタとして使用するに は、この VGA コネクタを使用します。 5 コンポーネントオーディオおよび ビデオコネクタ(AV6) DVD プレーヤ、衛星放送受信機、ケーブルテレビチューナー 6 ANT/Cable アンテナまたはケーブルテレビチューナーを接続します。 7 コンポジットオーディオ / ビデオ 出力コネクタ ANT/Cable コネクタにアンテナまたはケーブルを接続した場 合に、ビデオデッキなどの外部機器を接続します。 8 D4 オーディオコネクタ D4 コネクタに外部機器を接続した場合、この D4 オーディオ コネクタを使用します。 9 D4 コネクタ DVD プレーヤなどの外部機器を接続します。 などの外部機器を接続します。 10 コンポーネントオーディオおよび ビデオコネクタ(AV5) DVD プレーヤ、衛星放送受信機、ケーブルテレビチューナー 11 コンピュータ用オーディオ コネクタ コンピュータからのオーディオケーブルをワイド液晶モニタに 接続します。 12 DVI コネクタ DVD プレーヤ、セットトップボックス、コンピュータなどの などの外部機器を接続します。 外部機器を接続します。 13 DVI オーディオコネクタ(R) DVI コネクタに外部機器を接続した場合、この DVI オーディ オコネクタを使用します。 14 S ビデオコネクタ(AV4) 8 ワイド液晶モニタの概要 ビデオゲームシステムや DVD プレーヤなどの外部機器を接続 します。 W2600A00.book 9 ページ 2004年8月4日 水曜日 午後6時48分 同梱品 メモ : ワイド液晶モニタにコンポーネントケーブルは付属していません。 リモコン 単四乾電池(2) 電源ケーブル ワイド液晶モニタの概要 9 www.dell.com/jp | support.jp.dell.com W2600A00.book 10 ページ 2004年8月4日 水曜日 午後6時48分 S ビデオケーブル オーディオケーブル(2) コンポジットケーブル DVI ケーブル コンピュータ用 オーディオケーブル 10 ワイド液晶モニタの概要 W2600A00.book 11 ページ 2004年8月4日 水曜日 午後6時48分 VGA ケーブル マニュアル ワイド液晶モニタのお手入れ 警告 : ワイド液晶モニタの修理は、許可された専門家だけが行ってください。ワイド液晶モニタを 分解しないでください。 メモ : ワイド液晶モニタのクリーニングを実行する前に、コンセントから電源プラグを抜いてくだ さい。 • パネルの表面をクリーニングするには、柔らかくて糸くずのないきれいな布に少し水を含ませ ます。 • ワイド液晶モニタのキャビネットをクリーニングするには、中性洗剤を少し含ませた布を使用 します。 • ベンゼン、シンナー、アンモニアなどの化学薬品や、研磨用の洗浄剤は使用しないでください。 • 圧縮空気でワイド液晶モニタをクリーニングしないでください。 ワイド液晶モニタの概要 11 12 ページ 2004年8月4日 水曜日 午後6時48分 www.dell.com/jp | support.jp.dell.com W2600A00.book 12 ワイド液晶モニタの概要 W2600A00.book 13 ページ 2004年8月4日 水曜日 午後6時48分 2 ワイド液晶モニタのセットアップ 警告 : ここで説明する操作を行う前に、『製品情報ガイド』にある「安全にお使いいただくために」 の説明に従ってください。 ワイド液晶モニタの適切な設置場所 ワイド液晶モニタの設置場所については、環境面に関する以下の要素を考慮してください。 • 高温、直射日光、厳しい冷気にさらされる場所で、ワイド液晶モニタを使用したり保管したり しない。 • 温度差の激しい場所間でワイド液晶モニタを移動することを避ける。詳細については、 「仕様」 を参照してください。 • ワイド液晶モニタに激しい振動や強い衝撃を与えない。ワイド液晶モニタを車のトランク内に 置かない。 • 湿度が高い場所やほこりの多い場所で、ワイド液晶モニタを使用したり保管したりしない。 • 水などの液体がかかる場所にワイド液晶モニタを置かない。 ワイド液晶モニタの接続 ワイド液晶モニタには、4 種類の標準コネクタが装備されています。 品質 良 ケーブルおよびコネクタ 使用時の注意 同軸(RF)は、1 本のケーブルで映像と音声 を伝送します。ワイド液晶モニタの同軸コネ クタには、ANT/Cable というラベルが付いて います。このコネクタの場所については、 8 ページの「下面」を参照してください。 ワイド液晶モニタのセットアップ 13 www.dell.com/jp | support.jp.dell.com W2600A00.book 品質 14 ページ 2004年8月4日 水曜日 午後6時48分 ケーブルおよびコネクタ 使用時の注意 良 コンポジットは、1 本のケーブルでビデオ信 号を伝送します。コンポジットビデオコネク タを使用する場合は、コンポジットオーディ オケーブルも接続する必要があります。この コネクタの場所については、7 ページの「左 側面」と 8 ページの「下面」を参照してくだ さい。 優 S ビデオでは、ビデオ信号を白黒信号とカ ラー信号の 2 つに分割します。S ビデオコネ クタを使用する場合は、オーディオ用の AV ケーブルも接続する必要があります。これら のコネクタの場所については、7 ページの 「左側面」と 8 ページの「下面」を参照して ください。 コンポーネントでは、ビデオ信号を 2 つのカ ラー信号と 1 つの白黒信号の 3 つに分割しま す。必ず、5 つのケーブルすべてを接続して ください。このコネクタの場所については、 8 ページの「下面」を参照してください。 最良 14 ワイド液晶モニタのセットアップ W2600A00.book 15 ページ 2004年8月4日 水曜日 午後6時48分 ANT/Cable(同軸)コネクタの使用 1 ワイド液晶モニタの電源を切り、電源コードを抜きます。 2 同軸ケーブルをワイド液晶モニタの ANT/Cable コネクタに接続します。 3 ワイド液晶モニタの電源コードを差し込み、ワイド液晶モニタの電源を入れます。 4 OSD(オンスクリーンディスプレイ)に入り、TV を選択します。26 ページの「入力の選択 メ ニュー」を参照してください。 コンポジットビデオコネクタの使用 1 ワイド液晶モニタの電源を切り、電源コードを抜きます。 メモ : ビデオカメラなど、取り外し可能な外部機器を接続する場合は、ワイド液晶モニタの側面に あるコンポジットビデオコネクタを使用します。 ワイド液晶モニタのセットアップ 15 www.dell.com/jp | support.jp.dell.com W2600A00.book 16 ページ 2004年8月4日 水曜日 午後6時48分 2 オーディオケーブルを含めて外部機器を接続します。 3 ワイド液晶モニタと外部機器の電源コードを差し込み、それらの電源を入れます。 4 OSD に入り、適切なコンポジット入力を選択します。26 ページの「入力の選択 メニュー」を 参照してください。 S ビデオコネクタの使用 1 ワイド液晶モニタの電源を切り、電源コードを抜きます。 メモ : ビデオカメラなど、取り外し可能な外部機器を接続する場合は、ワイド液晶モニタの側面に ある S ビデオコネクタを使用します。 16 2 オーディオケーブルを含めて外部機器を接続します。 3 ワイド液晶モニタと外部機器の電源コードを差し込み、それらの電源を入れます。 4 OSD に入り、適切な S ビデオ入力を選択します。26 ページの「入力の選択 メニュー」を参 照してください。 ワイド液晶モニタのセットアップ W2600A00.book 17 ページ 2004年8月4日 水曜日 午後6時48分 コンポーネントコネクタの使用 1 ワイド液晶モニタの電源を切り、電源コードを抜きます。 2 オーディオケーブルを含めて外部機器を接続します。 3 ワイド液晶モニタと外部機器の電源コードを差し込み、それらの電源を入れます。 4 OSD に入り、適切なコンポーネント入力を選択します。26 ページの「入力の選択 メニュー」 を参照してください。 D4 コネクタの使用 1 ワイド液晶モニタの電源を切り、電源コードを抜きます。 2 オーディオケーブルを含めて外部機器を接続します。 3 ワイド液晶モニタと外部機器の電源コードを差し込み、それらの電源を入れます。 4 OSD に入り、適切なコンポジット入力を選択します。26 ページの「入力の選択 メニュー」を 参照してください。 メモ : コンピュータ用には、VGA か DVI のいずれかのコネクタだけを使用できます。 ワイド液晶モニタのセットアップ 17 W2600A00.book 18 ページ 2004年8月4日 水曜日 午後6時48分 www.dell.com/jp | support.jp.dell.com DVI コネクタの使用 1 ワイド液晶モニタの電源を切り、電源コードを抜きます。 2 カバーを手前に引いて持ち上げて、ワイド液晶モニタから背面カバーを取り外します。 3 白の DVI ケーブルとオーディオケーブルを接続します。 ビデオ外部機器を使用する場合は、オーディオコネクタ(赤と白)を使用します。コンピュー タを接続する場合は、コンピュータ用オーディオコネクタ(緑)を使用します。 メモ : DVI コネクタを装備していますが、DVI 接続をサポートしていないケーブルテレビチューナー もあります。詳細については、ケーブルテレビチューナーの製造元に問い合わせてください。 18 ワイド液晶モニタのセットアップ W2600A00.book 19 ページ 2004年8月4日 水曜日 午後6時48分 4 背面カバーを元に戻します。 5 ワイド液晶モニタと外部機器の電源コードを差し込み、それらの電源を入れます。 6 OSD に入り、DVI を選択します。26 ページの「入力の選択 メニュー」を参照してください。 VGA の使用 VGA コネクタを使用すれば、ワイド液晶モニタをコンピュータのモニタとして使用できます。 メモ : コンピュータ用には、VGA か DVI のいずれかのコネクタだけを使用できます。 1 ワイド液晶モニタの電源を切り、電源コードを抜きます。 2 カバーを手前に引いて持ち上げて、ワイド液晶モニタから背面カバーを取り外します。 ワイド液晶モニタのセットアップ 19 20 ページ 2004年8月4日 水曜日 午後6時48分 www.dell.com/jp | support.jp.dell.com W2600A00.book 20 3 青の VGA ケーブルを、ワイド液晶モニタとコンピュータに接続します。 4 緑のオーディオケーブルを、ワイド液晶モニタのコネクタとコンピュータに接続します。 5 背面カバーを元に戻します。 6 ワイド液晶モニタと外部機器の電源コードを差し込み、それらの電源を入れます。 7 OSD に入り、VGA を選択します。26 ページの「入力の選択 メニュー」を参照してください。 ワイド液晶モニタのセットアップ W2600A00.book 21 ページ 2004年8月4日 水曜日 午後6時48分 3 リモコン 電池の挿入 リモコンを使用する前に、単四電池 2 本を挿入します。 1 電池カバーをはずします。 2 電池を挿入します。電池の + と - を、電池挿入部に記された + と - の印に合わせてください。 3 電池カバーを閉じます。 リモコン 21 W2600A00.book 22 ページ 2004年8月4日 水曜日 午後6時48分 www.dell.com/jp | support.jp.dell.com リモコンの使用 21 1 2 20 3 4 19 18 5 17 16 15 14 13 12 22 リモコン 6 7 8 9 10 11 W2600A00.book 23 ページ 2004年8月4日 水曜日 午後6時48分 1 電源ボタン 2 数字ボタン ボタンを押してチャンネルを選択します。 3 ミュート 音を消します。もう一度押すと、音が出ます。 4 チャンネル(上向 きアイコン) 次のチャンネルを表示します。 ワイド液晶モニタの電源のオン / オフを切り替えます。 OSD 内では、チャンネルボタンを使用して OSD(オンスク リーンディスプレイ)のメニュー間を移動します。 5 決定 OSD オプションの選択、チャンネル選択の確認を行い、 カードリーダモードではイメージの選択を行います。 6 チャンネル(下向 きアイコン) 前のチャンネルを表示します。 OSD 内では、チャンネルボタンを使用して OSD(オンスク リーンディスプレイ)のメニュー間を移動します。 7 前画面 前に表示していたチャンネルに戻ります。 8 画面位置 ピクチャーインピクチャー(PIP)ウィンドウの位置を変更 します。 9 画面操作 ピクチャーインピクチャー(PIP)、ピクチャーアウトピク チャー(POP)、またはピクチャーバイピクチャー(PBP) の使用時に、ウィンドウを切り替えます。 10 サウンド オーディオ のプリセットオプションを順に切り替えます。 11 ワイド サイズ メニューのサイズオプションを順に切り替えます。 12 スリープ スリープタイマーをオンにします。 13 ピクチャ ピクチャ メニューのプリセットオプションを順に切り替え ます。 14 画面入替 PIP、POP、または PBP 使用時にイメージを入れ替えます。 15 子画面 PIP モードを開始 / 終了します。 16 マルチ POP または PBP モードを開始 / 終了します。 17 画面表示 ワイド液晶モニタに関する情報を表示します(たとえば、 TV Mode の場合、現在視聴しているチャンネルが表示され ます) 。 18 音量 + 19 音量 - ボリュームを上げます。 OSD では、音量ボタンを使用してメニュー内を移動します。 ボリュームを下げます。 OSD では、音量ボタンを使用してメニュー内を移動します。 20 メニュー OSD メインメニューを開始 / 終了します。 21 入力切換 入力の選択 メニューを開始 / 終了します。 リモコン 23 W2600A00.book 24 ページ 2004年8月4日 水曜日 午後6時48分 www.dell.com/jp | support.jp.dell.com 汎用リモコンまたは学習機能付きリモコンによるワイド液晶 モニタの使用 プログラム済みの汎用リモコンのプログラミングを実行して、Dell ワイド液晶モニタに関する以下 の機能を制御することができます。 • 電源 • チャンネル上げ(+) • チャンネル下げ(-) • 音量上げ(+) • 音量下げ(-) • ミュート • 入力の選択 メモ : 今後利用できるようになるプログラム済み汎用リモコンでは、制御可能な機能が増える可能 性があります。 以下の方法で、Dell ワイド液晶モニタで使用できるように汎用リモコンのプログラミングを実行で きます。 • リモコンに検索機能が付いている場合は、その機能を使用して正しいコードを見つけられる可 能性があります。 • リモコンに学習機能が付いている場合は、上に示したボタンに加えて、そのリモコンの特定の ボタンについて Dell のリモコンからプログラミングを実行できます。 メモ : 汎用リモコンの特定の操作については、リモコンのマニュアルを参照してください。 24 リモコン W2600A00.book 25 ページ 2004年8月4日 水曜日 午後6時48分 4 オンスクリーンディスプレイの使用 ワイド液晶モニタには、オンスクリーンディスプレイ(OSD)機能があります。OSD を使用する と、適切な入力源を選択したり、イメージやオーディオの設定を調整したり、ピクチャーインピク チャー、ピクチャーアウトピクチャー、ピクチャーバイピクチャーの表示を選択することができま す。また、カードリーダを使用するときのイメージの表示方法を選択したり、ワイド液晶モニタを コンピュータのモニタとして使用する場合にイメージを調整したりすることもできます。 リモコンによる OSD の使用 メモ : ワイド液晶モニタの側面パネルまたはリモコンの音量ボタンとチャンネルボタンを使用して、 OSD にアクセスして選択を行うことができます。注記しないかぎり、ここではリモコンで OSD を 使用する方法について説明します。 1 OSD に入るには、メニュー ボタンを押します。 画面の底辺に沿って 8 つのアイコンが表示されます。 ιͼϋιΣνȜ ਞၭ 2 වႁ఼͈ ά·Ιλ ȜΟͻ PIP/POP PBP ͼΒ ΑςȜί! ΗͼζȜ ΓΛΠͺΛί アイコン間を移動するには、左および右ボタン(音量ボタン)を使用します。 メニュー内を移動すると、移動先のアイコンが強調表示されます。 3 オプションを選択するには、そのアイコンが強調表示されたときに 決定 ボタンを押します。 4 オプションメニューでは、上および下(チャンネル)ボタンを使用してさまざまな設定に移動 します。 メモ : オプション間を移動すると、設定の横に赤色の矢印が表示されます。選択されているオプショ ンの横にはチェックマークが表示されます。 5 上および下ボタン(チャンネルボタン)と 決定 ボタンを使用して、設定を調整または選択し ます。 オンスクリーンディスプレイの使用 25 W2600A00.book 26 ページ 2004年8月4日 水曜日 午後6時48分 www.dell.com/jp | support.jp.dell.com メモ : 終了 を選択すればメインメニューに戻ることができ、メニュー を押すと OSD を終了するこ とができます。 6 選択が終わったら、終了 を選択します。 7 OSD を終了するには、リモコンの メニュー を押すか、メインメニューの 終了 を選択します。 OSD 言語の選択 1 メニュー を押して OSD に入ります。 2 セットアップ を選択します。 3 セットアップ メニューの 言語 を選択し、OSD で表示する言語を選択します。 入力の選択 メニュー 入力の選択 メニューを使用すると、ワイド液晶モニタとビデオ装置をどのように接続しているかに 基づいて適切な入力源を選択できます。リモコンの 入力切換 を押すと、直接 入力の選択 メニュー にアクセスできます。メニュー を押して、メインメニューから 入力の選択 を選択することもでき ます。 メモ : 入力の表示 では、アク ティブ または すべて を選択できま す。アクティブ を選択すると、使用 中のコネクタが検索されます。使用で きる入力源が白色で表示され、使用で きない入力源は灰色で表示されます。 すべて を選択すると、すべての入力 源が表示され、外部機器を接続してい ない場合でもすべての入力源を選択 できます。 වႁ఼͈ ਞၭ VG A DV I TV AV 1 ( ϋ ε ΐ Λ Π 1 ) AV 2 ( ϋ ε ΐ Λ Π 2 ) AV 3 ( S - V I D E O 1 ) VGA—ワ イ ド 液 晶 モ ニ タ を コ ン ピュータのモニタとして使用してい て、VGA ケ ー ブル を 使 っ て コン ピュータと接続している場合に選択 します。VGA コネクタの位置につい ては、8 ページの「下面」を参照して ください。 AV 4 ( S - V I D E O 2 ) AV 5 ( ϋ ε Ȝ Υ ϋ Π 1 ) AV 6 ( ϋ ε Ȝ Υ ϋ Π 2 ) D4 ȜΡςȜΘ වႁ͈ນা ̳͓̀ ͺ·Ξͻή DVI—セットトップボックスなどの外 部機器を DVI コネクタに接続してい る場合に選択します。DVI コネクタ の位置については、8 ページの「下面」 を参照してください。 TV—アンテナまたはケーブルを ANT/Cable コネクタに接続している場合に選択します。ANT/Cable コ ネクタの位置については、8 ページの「下面」を参照してください。 26 オンスクリーンディスプレイの使用 W2600A00.book 27 ページ 2004年8月4日 水曜日 午後6時48分 AV1—ビデオゲームシステムなどのビデオ外部機器を、ワイド液晶モニタの側面のコンポジットコネクタ に接続している場合に選択します。コンポジットコネクタの位置については、7 ページの「左側面」を参 照してください。 AV2—DVD プレーヤなどのビデオ外部機器を、ワイド液晶モニタの背面のコンポジットコネクタに接続 している場合に選択します。コンポジットコネクタの位置については、8 ページの「下面」を参照してく ださい。 AV3—ビデオデッキなどのビデオ外部機器を、ワイド液晶モニタの側面の S ビデオコネクタに接続してい る場合に選択します。S ビデオコネクタの位置については、7 ページの「左側面」を参照してください。 AV4—DVD プレーヤなどのビデオ外部機器を、ワイド液晶モニタの背面の S ビデオコネクタに接続して いる場合に選択します。S ビデオコネクタの位置については、8 ページの「下面」を参照してください。 AV5—衛星放送受信機などのビデオ外部機器をコンポーネントコネクタに接続している場合に選択しま す。コンポーネントコネクタの位置については、8 ページの「下面」を参照してください。 AV6—DVD プレーヤなどのビデオ外部機器をコンポーネントコネクタに接続している場合に選択しま す。コンポーネントコネクタの位置については、8 ページの「下面」を参照してください。 D4—DVD プレーヤなどのビデオ外部機器を、ワイド液晶モニタの背面の D4 コネクタに接続している 場合に選択します。D4 コネクタの位置については、8 ページの「下面」を参照してください。 メモ : セットアップ メニューにある OSD 設定 で、接続中の外部機器を 入力の選択 に表示されるよ うに設定できます。たとえば、入力の選択 メニューで、AV2 に DVD が表示されるよう設定できます。 ピクチャ メニュー ά·Ιλ ࿗ͥ ίςΓΛΠ ΩȜΕσ ܵഽ ϋΠρΑΠ 38 38 ྶഽ 0 أഽ ুட द କ֊൲ 38 以下のいずれかのプリセットイメージ 設定を選択すると、 選択したコンテンツ に合わせて最良の画像を提供するよう、 個々の設定が自動的に更新されます。 •映画 •スポーツ •弱信号 •マルチメディア パーソナル を選択すると、輝度 や 色 などの個々の設定を調整できます。 38 38 色温度のプリセットは以下のとおりです。 • 自然:固有のパネル温度 • 標準:6500K • 青色:9300K • 赤色:5700K オンスクリーンディスプレイの使用 27 W2600A00.book 28 ページ 2004年8月4日 水曜日 午後6時48分 www.dell.com/jp | support.jp.dell.com オーディオ ナイトモード — 音声とアクションシー ンの間の大きな音量変化を平滑化します。 ȜΟͻ ࿗ͥ ͼΠκȜΡ ϋ έ ϋ έ ρ;ϋΡκȜΡ ΩȜΕσ ࣞإ 0 ೩إ ࡥ •ミュージック ΑΞτ ίυΈρθ ηνȜΠ ϋ サウンドを実現します。深く豊かな低音 とともに、より広がり感のあるサウンド が生成されます。 以下のいずれかのプリセット サラウンド モード の設定を選択すると、個々のオー ディオレベルが自動的に更新されます。 0 TV ႁإၾ SRS TruSurround XT— 任 意 の 入 力 源 か ら、2 つのスピーカで仮想的なサラウンド έ •映画 •音声 パーソナル を選択すると、低音 や 高音 などの個々のオーディオレベルを調整できます。 Program を使用して、ステレオ、モノラル、または SAP(Second Audio Program)を選択します。 PIP/POP/PBP ピクチャーインピクチャー(PIP)、ピクチャーアウトピクチャー(POP)、またはピクチャーバイ ピクチャー(PBP)を使用すると、同時に複数のアクティブソースを表示できます。 PIP/POP/PBP ࿗ͥ PIP/POP/PBP PIP ൫ྶഽ 38 ͼΒ 38 କպ 38 ೄպ メモ : リモコンの 子画面 ボタンまたは マルチ ボタンを使用して、PIP、POP、およ び PBP のオン / オフを切り替えることがで きます。 PIP、POP、または PBP モードでは、リ モコンの 画面入替 ボタンを使用して主 信号源と副信号源を切り換え、リモコン の 画面操作 ボタンを使用してウィンド ウ間で制御を切り換えます。 OSD で、PIP ウィンドウの 透明度、サイ ズ、水平位、および 垂直位 を調整できま す。水平位置を調整する場合には、- で ৽ ȜΟͻ࡙ ウィンドウが左に移動し、+ でウィンド ウが右に移動します。垂直位置を調整する場合には、100 が画面の一番上、0 が画面の一番下にな ります。 PIP ΕȜΑ 28 オンスクリーンディスプレイの使用 38 TV W2600A00.book 29 ページ 2004年8月4日 水曜日 午後6時48分 POP の場合は、以下の 3 種類の POP オプションを選択できます。 • POP1 — 1 個のウィンドウ • POP3 — 3 個のウィンドウ • POP12 — 12 個のウィンドウ POP スキャンモード で、順次 または フロート を選択できます。順次 モードでは、各ウィンドウ に表示される選択済みチャンネルのソースが再生されます。フロート モードでは、各ウィンドウを 循環させることで、前もって選択されたチャンネルがすべて再生されます。循環はすべての使用可 能なチャンネルについて行われた後、最低のチャンネルから再度行われます。 チャンネルセットアップ ΙλϋΥσΓΛΠͺΛί ࿗ͥ ΙλϋΥσ॑ ΙλϋΥσ͈ͤڬ൚̀ ା +0000 ΙλϋΥσ͈༎ਬ リモコンのキー番号と特定チャンネルの表示についてプログラミングを実行するには、チャンネル セットアップ の xxx を使用します。 スリープタイマー スリープタイマー を使用すると、ワイド液晶モニタが自動的にオフになるまでの時間を選択できま す。10 分から 3 時間の間で選択できます。 オンスクリーンディスプレイの使用 29 W2600A00.book 30 ページ 2004年8月4日 水曜日 午後6時48分 www.dell.com/jp | support.jp.dell.com OSD 設定 OSD 設定を使用すると、OSD の外観を調整したり、ワイド液晶モニタモードでのチャンネルを設 定したり、OSD の言語を変更したり(26 ページの「OSD 言語の選択」を参照) 、出荷時の設定に 戻したりすることができます。 OSD 一時待機時間 を使用して、OSD が表示される時間を 増減します。最大時間は 60 秒です。 ΓΛΠͺΛί ࿗ͥ OSD 設定 メニューの ボタンロック を選択して、側面パネ ルのボタンをロックすることができます。このオプション が有効なときは、電源ボタンだけが機能します。音量上げ ボタンとチャンネル上げボタンを一緒に 10 秒間押したま まにすると、ボタンのロックが解除されます。 OSD ୭ ΙλϋΥσΓΛΠͺΛί ࡞ࢊ 特定のチャンネルにリモコンのキー番号をプログラムし、 画面に表示する番号を選択するには、チャンネルセット アップ メニューの チャンネルの割り当て を選択します。 كশ୭ͅςΓΛΠ DVI ୭ DVI コネクタを使用している場合は、以下の設定の確認が必要になる場合があります。 信号源 — 既定の設定は 自動 です。コンピュータ(PC)またはビデオ外部機器が使用されている 場合、ワイド液晶モニタは自動的にこれらの外部機器を検出します。イメージが正しく表示されな い場合は、使用中の外部機器に応じて、信号源として PC または ビデオ を選択することができます。 色 — 既定の色空間は RGB です。色が正しく表示されない場合は、設定を YUV に変更することが できます。 カードリーダ カードリーダを使用すると、ワイド液晶モニタにデジタル写真を表示できます。 ιͼϋιΣνȜ ਞၭ 30 වႁ఼͈ ͼιȜΐ! ۯၑ オンスクリーンディスプレイの使用 ά·Ιλ ୭ PIP/POP PBP ͼΒ ΓΛΠͺΛί W2600A00.book 31 ページ 2004年8月4日 水曜日 午後6時48分 カードリーダでは、次の種類のカードがサポートされています。 • コンパクトフラッシュ • SD メモリカード • メモリースティック • スマートメディア • マルチメディアカード(MMC) メモ : カードリーダを購入される場合は、デルにお問い合わせください。 ͼιȜΐۯၑ ࿗ͥ ນাκȜΡ ΠρϋΐΏοϋ イメージ管理 メニューを使用すると、写真の表示方法 を選択できます。たとえば、スライドショーとして写 真を表示したり、写真を回転したり、写真ごとに異な るトランジションを選択したり、撮影日時などの写真 情報を表示したりすることができます。 ষ͈ͼιȜΐ ஜ͈ͼιȜΐ ͼιȜΐ͈ॉੰ ٝഢ ৢ૯ૂ༭ ْ௨ͼΒ オンスクリーンディスプレイの使用 31 32 ページ 2004年8月4日 水曜日 午後6時48分 www.dell.com/jp | support.jp.dell.com W2600A00.book 32 オンスクリーンディスプレイの使用 W2600A00.book 33 ページ 2004年8月4日 水曜日 午後6時48分 5 ワイド液晶モニタのトラブルシューティング 警告 : ワイド液晶モニタから煙や火花が出ている場合は、ただちにワイド液晶モニタの電源コード を抜き、デルに連絡してください。トラブルシューティングは行わないでください。 トラブルシューティングのヒント メモ : ワイド液晶モニタに接続した外部機器に関連して、問題が発生する場合もあります。こうし た問題のトラブルシューティング情報については、ワイド液晶モニタに接続した外部機器のマニュ アルを参照してください。 ワイド液晶モニタの問題のほとんどは、正しい入力源を選択しなかったことによるものです。ワイ ド液晶モニタの各コネクタ(側面および下面)は 1 つの入力源に関連付けられていて、入力の選択 メニューではそれぞれに AV1 から AV6 までのラベルが付けられています。 • AV1 — ワイド液晶モニタの側面のコンポジットコネクタ • AV2 — ワイド液晶モニタの下面のコンポジットコネクタ • AV3 — ワイド液晶モニタの側面の S ビデオコネクタ • AV4 — ワイド液晶モニタの下面の S ビデオコネクタ • AV5 — ワイド液晶モニタの下面のコンポーネントコネクタ • AV6 — ワイド液晶モニタの下面のコンポーネントコネクタ 以下の入力源も選択できます。 • TV - ワイド液晶モニタの下面の ANT/Cable コネクタ • VGA - ワイド液晶モニタの下面の VGA コネクタ • DVI - ワイド液晶モニタの下面の DVI コネクタ • D4 - ワイド液晶モニタの下面の D4 コネクタ ワイド液晶モニタのトラブルシューティング 33 W2600A00.book 34 ページ 2004年8月4日 水曜日 午後6時48分 www.dell.com/jp | support.jp.dell.com 一般的な問題 問題 DVD プレーヤやビデオデッキなどの 外部機器を使用しているとき、ワイド液晶 モニタの画質が悪い 考えられる解決策 1 OSD で縦横比の設定をチェックします。リモコンの メニュー ボタンを押し、サイズ を選択します。OSD の使用法の詳細については、25 ページの「オンスク リーンディスプレイの使用」を参照してください。 2 同じタイプのコネクタを使用して外部機器を接続しな おします。たとえば、下面のコンポジットコネクタを 使用している場合は、ワイド液晶モニタの側面のコン ポジットコネクタに外部機器を接続します。コネクタ の位置については、5 ページの「ワイド液晶モニタの 概要」を参照してください。 外部機器を接続したら、OSD で入力源を変更しま す。詳細については、26 ページの「入力の選択 メ ニュー」を参照してください。 3 異なるコネクタを使用して外部機器を接続します。た とえば、コンポジットコネクタの使用時に問題が発生 した場合は、コンポーネントコネクタを使用します。 メモ : 異なるコネクタに接続するには、そのコネクタに 合ったケーブルが必要です。サポートされるコネクタに ついては、お使いの外部機器のマニュアルを参照してく ださい。 外部機器を接続したら、OSD で入力源を変更しま す。詳細については、26 ページの「入力の選択 メ ニュー」を参照してください。 4 出荷時の設定にリセットします。リモコンの メニュー を押し、セットアップ を選択して、出荷時 設定にリセット を選択します。 5 色温度を調整します。リモコンの メニュー を押し、 ピクチャ を選択して、色温度 を選択します。 メモ : 一部のセットトップボックスでは、縦横比を設定 できます。詳細については、お使いの外部機器のマニュ アルを参照してください。 34 ワイド液晶モニタのトラブルシューティング W2600A00.book 35 ページ 2004年8月4日 水曜日 午後6時48分 問題 ANT/Cable(同軸)コネクタに接続した 外部機器を使用しているとき、ワイド液晶 モニタの画質が悪い 考えられる解決策 1 入力の選択 メニューで、ワイド液晶モニタが入力源 として選択されていることを確認します。詳細につい ては、26 ページの「入力の選択 メニュー」を参照し てください。 2 リモコンの メニュー を押し、セットアップ を選択し て、チャンネルセットアップ を選択します。これで、 チャンネルがリセットされます。 3 OSD で縦横比の設定をチェックします。リモコンの メニュー ボタンを押し、サイズ を選択します。OSD の使用法の詳細については、25 ページの「オンスク リーンディスプレイの使用」を参照してください。 4 出荷時の設定にリセットします。リモコンの メニュー を押し、セットアップ を選択して、出荷時 設定にリセット を選択します。 5 色温度を調整します。リモコンの メニュー を押し、 ピクチャ を選択して、色温度 を選択します。 6 問題は接続した外部機器によるものかもしれません。 外部機器のメーカーに問い合わせてください。 ワイド液晶モニタに何も表示されない 1 ワイド液晶モニタの電源が入っていることを確認し ます。 2 電源ケーブルも含めて、すべてのケーブルがワイド液 晶モニタに正しく接続されていることを確認します。 3 ワイド液晶モニタの右下隅に、青色または黄色のライ トが点灯しているかどうかチェックします。青色のラ イトは、ワイド液晶モニタの電源が入っていることを 示します。黄色のライトは、ワイド液晶モニタが省電 力モードにあることを示します。 4 入力の選択 メニューで、正しい入力源が選択されて いることを確認します。詳細については、26 ページ の「入力の選択 メニュー」を参照してください。 5 現在、ワイド液晶モニタに接続されている外部機器を 接続しなおします。複数の外部機器を使用している場 合は、一度に 1 つの外部機器を接続してテストしま す。 6 正しく動作することがわかっている別の外部機器を接 続します。 7 出荷時の設定にリセットします。リモコンの メニュー を押し、セットアップ を選択して、出荷時 設定にリセット を選択します。 ワイド液晶モニタのトラブルシューティング 35 www.dell.com/jp | support.jp.dell.com W2600A00.book 36 ページ 2004年8月4日 水曜日 午後6時48分 問題 音が出ない 考えられる解決策 1 ミュートがオンになっていないことを確認します。 リモコンの ミュート ボタンを押すと、ミュート機能 のオン / オフが切り替わります。 2 ワイド液晶モニタの特定のチャンネルだけで音が出な い場合は、入力の選択 メニューで正しい入力源が選 択されていることを確認します(詳細については、 26 ページの「入力の選択 メニュー」を参照してくだ さい)。 3 ワイド液晶モニタのオーディオ入力コネクタと、外部 機器のオーディオ出力コネクタの両方に、オーディオ ケーブルがしっかりと接続されていることを確認しま す。ケーブルの色とコネクタの色が一致していること を確認します。 4 オーディオケーブルがビデオケーブルと同じ列に接続 されていることも確認します。コネクタの位置につい ては、5 ページの「ワイド液晶モニタの概要」を参照 してください。 5 同じタイプのコネクタを使用して外部機器を接続しな おします。たとえば、下面のコンポジットコネクタを 使用している場合は、ワイド液晶モニタの側面のコン ポジットコネクタに外部機器を接続します。コネクタ の位置については、5 ページの「ワイド液晶モニタの 概要」を参照してください。 外部機器を接続したら、OSD で入力源を変更しま す。詳細については、26 ページの「入力の選択 メ ニュー」を参照してください。 6 異なるコネクタを使用して外部機器を接続します。た とえば、コンポジットコネクタの使用時に問題が発生 した場合は、コンポーネントコネクタを使用します。 メモ : 異なるコネクタに接続するには、そのコネクタに 合ったケーブルが必要です。サポートされるコネクタに ついては、お使いの外部機器のマニュアルを参照してく ださい。 外部機器を接続したら、OSD で入力源を変更しま す。詳細については、5 ページの「ワイド液晶モニタ の概要」を参照してください。 7 別のワイド液晶モニタで外部機器をテストします。 メモ : PIP/POP/PBP を使用している場合は、正しい オーディオ信号源 が選択されていることを確認します。 リモコンの メニュー を押し、PIP/POP/PBP を選択し ます。 36 ワイド液晶モニタのトラブルシューティング W2600A00.book 37 ページ 2004年8月4日 水曜日 午後6時48分 問題 考えられる解決策 DVD 使用時に画像が二重になる、 DVD プレーヤのプログレッシブスキャンをオフにしま す。Dell™ ワイド液晶モニタには、DVD プレーヤのデ または画像が表示されない インタレーサと同等以上の品質を持つデインタレーサが 内蔵されています。DVD プレーヤのプログレッシブス キャンの詳細については、お使いの DVD プレーヤのマ ニュアルを参照してください。 画像が暗すぎる、または明るすぎる 画面が中央に表示されない OSD で色の設定を更新します。リモコンの メニュー を 押し、ピクチャ を選択します。 1 OSD でサイズの設定を更新します。リモコンの メニュー を押し、サイズ を選択します。 2 出荷時の設定にリセットします。リモコンの メニュー を押し、セットアップ を選択して、出荷時 設定にリセット を選択します。 画面に 1 本または複数の線が表示される 1 OSD で縦横比の設定をチェックします。リモコンの メニュー ボタンを押し、サイズ を選択します。OSD の使用法の詳細については、25 ページの「オンスク リーンディスプレイの使用」を参照してください。 2 入力の選択 メニューで、正しい入力源が選択されて いることを確認します。詳細については、26 ページ の「入力の選択 メニュー」を参照してください。 3 別の外部機器を接続してみます。ケーブルが正しく接 続され、OSD で入力源を更新していることを確認し ます。 4 OSD でサイズの設定を更新します。リモコンの メニュー を押し、サイズ を選択します。 5 出荷時の設定にリセットします。リモコンの メニュー を押し、セットアップ を選択して、出荷時 設定にリセット を選択します。 側面パネルのボタンが機能しない OSD で、ボタンがロックされているかどうかをチェッ クします。リモコンの メニュー を押し、セットアップ を選択します。 リモコンを使用できない場合は、ワイド液晶モニタの側 面にある音量上げボタンとチャンネル上げボタンを 10 秒間押して、ボタンのロックを解除します。 画像が小さすぎる 1 サイズの設定を調整します。リモコンの メニュー を 押し、サイズ を選択します。 2 お使いの外部機器の問題かもしれません。外部機器の マニュアルを参照してください。 ワイド液晶モニタのトラブルシューティング 37 W2600A00.book 38 ページ 2004年8月4日 水曜日 午後6時48分 www.dell.com/jp | support.jp.dell.com OSD メッセージ ワイド液晶モニタの使用中、以下のようなメッセージが表示されることがあります。 メッセージ 考えられる解決策 自動調整 何もする必要はありません。ワイド液晶モニタが自 動調整を行っています。 範囲外 最適な解像度の設定をチェックします。 新しいビデオドライバのダウンロードが必要な場合 があります。詳細については、support.jp.dell.com にアクセスしてください。 ビデオ入力なし 1 すべてのケーブルが正しく接続されていること をチェックします。 2 入力の選択 メニューで、正しい入力源が選択さ れていることを確認します。詳細については、 26 ページの「入力の選択 メニュー」を参照して ください。 TV Button Lock ロックを解除するには、リモコンの メニュー を押 し、セットアップ を選択します。 リモコンを使用できない場合は、ワイド液晶モニタ の側面にある音量上げボタンとチャンネル上げボタ ンを 10 秒間押して、ボタンのロックを解除します。 省電力モード キーボードのいずれかのキーを押すか、 マウスを動かします。 ワイド液晶モニタにコンピュータを接続していて、 信号が検出されない場合、ワイド液晶モニタはス リープモードに入ります。ワイド液晶モニタがス リープモードの状態にある場合、電源ライトは黄色 になります。 キーボードのいずれかのキーを押すか、マウスを動 かして、ワイド液晶モニタをオンにします。 省電力モード ビデオ信号を確認してください。 Self Test 38 ワイド液晶モニタのトラブルシューティング ビデオ外部機器を使用中、外部機器がアクティブで ない状態が 30 分続くと、ワイド液晶モニタは省電 力モードに入ります。ワイド液晶モニタが省電力 モードの状態にある場合、電源ライトは黄色になり ます。 コンピュータの入力源について、何も接続されてい ないときに表示されます。入力の選択 メニューの VGA または DVI を選択していますが、何も接続さ れていません。コンピュータを VGA または DVI に 接続してください。 W2600A00.book 39 ページ 2004年8月4日 水曜日 午後6時48分 メッセージ 考えられる解決策 カードリーダにカードが挿入されていません。 カードを取り出し、挿入しなおします。 カードリーダがサポートするカードを使用している ことを確認します。カードリーダでは、次の種類の カードがサポートされています。 • コンパクトフラッシュ • SD メモリカード • メモリースティック • スマートメディア • マルチメディアカード リモコンの問題 問題 考えられる解決策 リモコン使用時、 ワイド液晶モニタが応答しない 1 リモコンをワイド液晶モニタの右下隅にまっすぐに向けます。 ワイド液晶モニタの前面をふさがないでください。リモコン 受光部の位置については、5 ページの「前面」を参照してくだ さい。 2 電池が正しく挿入されていることを確認します。 3 電池が古い場合は、新しい電池に入れ替えます。 メモ : 明るい光や他の赤外線外部機器が、リモコンおよびワイド 液晶モニタのリモコン受光部と干渉することがあります。 カードリーダの問題 カードリーダは、jpeg ファイル形式と以下の種類のカードをサポートします。 • コンパクトフラッシュ • SD メモリカード • メモリースティック • スマートメディア • マルチメディアカード (MMC) カードリーダに付属の取り付け説明書に従ってください。カードリーダを取り付けるときは、カー ドリーダの挿入時にカードリーダの前面にある矢印が上を向いていることを確認します。 カードリーダを取り付けたら、リモコンの メニュー を押し、入力の選択 を選択して カードリーダ を選択します。 ワイド液晶モニタのトラブルシューティング 39 W2600A00.book 40 ページ 2004年8月4日 水曜日 午後6時48分 www.dell.com/jp | support.jp.dell.com ワイド液晶モニタをコンピュータに接続しているときの Self-Test 機能の使用 DVI または VGA コネクタを介してコンピュータをワイド液晶モニタに接続しているときは、selftest 機能を利用してワイド液晶モニタが正しく動作しているかどうかをチェックできます。ワイド 液晶モニタとコンピュータが正しく接続されているのに、ワイド液晶モニタの画面が暗いままの場 合は、以下の手順でワイド液晶モニタの self-test を実行します。 1 コンピュータとワイド液晶モニタの電源を切ります。 2 コンピュータの背面からビデオケーブルを外します。 3 ワイド液晶モニタの電源を入れます。 ワイド液晶モニタがビデオ信号を検知できず、かつ正常に動作している場合は、Dell - SelfTest Feature Check フローティングダイアログボックスが画面に表示されます(背景は黒)。 self-test モードの間、電源ライトは緑色のままで、self-test パターンが画面に連続して表示さ れます。システムが正常に動作している場合も、ビデオケーブルが外れたり損傷を受けたりす ると、このダイアログボックスが表示されます。 4 ワイド液晶モニタの電源を切り、ビデオケーブルを再接続してから、コンピュータとワイド液 晶モニタの電源を入れます。依然としてワイド液晶モニタの画面に何も表示されない場合は、 コンピュータかグラフィックカードに問題が発生している可能性があります。 詳細については、お使いのコンピュータのマニュアルを参照してください。 ワイド液晶モニタをモニタとして使用するときの問題 メモ : VGA を使用しているワイド液晶モニタには、コンピュータだけが接続できます。 問題 画像が中心を外れている、 または小さすぎる 考えられる解決策 1 自動調整 を使用して、イメージング設定 をチェックしま す。メニュー を押して OSD に入り、イメージング設定 を選択して 自動調整 を選択します。 2 最適な解像度の設定をチェックします。 新しいビデオドライバのダウンロードが必要な場合があ ります。詳細については、support.jp.dell.com にアクセ スしてください。 メモ : 古いビデオカードの中には、ワイド液晶モニタの解像 度の設定をサポートしていないものがあります。 40 ワイド液晶モニタのトラブルシューティング W2600A00.book 41 ページ 2004年8月4日 水曜日 午後6時48分 問題 音が出ない 考えられる解決策 1 緑色のオーディオケーブルが、ワイド液晶モニタとコン ピュータのオーディオコネクタに接続されていることを 確認します。ワイド液晶モニタのコネクタの位置につい ては、19 ページの「VGA の使用」を参照してください。 コンピュータのコネクタの位置については、お使いのコ ンピュータのマニュアルを参照してください。 オーディオケーブルをヘッドフォンジャックに接続しな いでください。 2 コンピュータのボリュームがミュートになっていないこ とを確認します。 3 スピーカをチェックして、コンピュータのサウンドが機 能していることを確認します。コンピュータのトラブル シューティング情報については、お使いのコンピュータ のマニュアルを参照してください。 4 コンピュータからワイド液晶モニタを取り外し、ワイド 液晶モニタのボリュームが機能するかどうかをテストし ます。 PIP/POP/PBP が機能しない 1 OSD の設定が正しいことを確認します。メニュー を押 して OSD に入り、PIP/POP/PBP を選択します。 2 ビデオおよびオーディオソースを取り換えます。 ビデオが表示されない メモ : self-test を表示している場合、ビデオカードに問題が あるか、間違った入力源を使用しています。 1 ワイド液晶モニタの電源が入っていることを確認します。 2 電源ケーブルも含めて、すべてのケーブルがワイド液晶 モニタに正しく接続されていることを確認します。 3 ワイド液晶モニタの右下隅に、青色または黄色のライト が点灯しているかどうかチェックします。青色のライト は、ワイド液晶モニタの電源が入っていることを示しま す。黄色のライトは、ワイド液晶モニタが省電力モード にあることを示します。 4 入力の選択 メニューで、VGA が選択されていることを確 認します。詳細については、26 ページの「入力の選択 メ ニュー」を参照してください。 5 コンピュータを再接続します。 6 正しく動作することがわかっている別の外部機器を接続 します。 7 出荷時の設定にリセットします。リモコンの メニュー を 押し、セットアップ を選択して、出荷時設定にリセット を選択します。 ワイド液晶モニタのトラブルシューティング 41 42 ページ 2004年8月4日 水曜日 午後6時48分 www.dell.com/jp | support.jp.dell.com W2600A00.book 42 ワイド液晶モニタのトラブルシューティング W2600A00.book 43 ページ 2004年8月4日 水曜日 午後6時48分 6 ワイド液晶モニタの仕様 一般 型番 W2600 LCD ワイド液晶モニタ ディスプレイタイプ TFT アクティブマトリックス(カラー TFT 液晶) 画面サイズ 26 インチ 表示可能範囲 566.4 x 339.8 mm(22.3 インチ x 13.38 インチ) 画像縦横比 ワイド画面 解像度 15:9 縦横比 16:9 ビデオ表示機能 480i 480p 720p 1080i 576i(欧州) 576p(欧州) その他の機能 : SAP 機能 あり CC 機能 なし テレテキスト機能 あり(欧州のみ) ペアレンタルコントロール機能 あり 外形寸法 ディスプレイ(スタンド含む) 830 x 504 x 209 mm ディスプレイ(スタンドなし) 830 x 421 x 107 mm スピーカ含む -、分離不可 重量(スタンド含む) 約 19 kg / 41 ポンド ネイティブ解像度 1280 x 768(WXGA) 高密度ワイド液晶モニタ機能 あり ワイド液晶モニタの仕様 43 www.dell.com/jp | support.jp.dell.com W2600A00.book 44 ページ 2004年8月4日 水曜日 午後6時48分 ピクチャーインピクチャー ピクチャーインピクチャー(PIP) あり ピクチャーアウトピクチャー(POP) あり ピクチャーバイピクチャー(PBP) あり チューナー数 2(アナログ) 輝度(通常) 450 cd/m2(通常) コントラスト比 500:1(通常) 応答時間(黒 : 白) 25 ミリ秒(通常) 視野角度 水平 +/- 85 度 垂直 +/- 85 度 入力 ビデオ コンポジット(CVBS) 2(側面および下面) S ビデオ 2(側面および下面) コンポーネント 2(下面) ワイド液晶モニタ入力(同軸) 1(下面) オーディオ(RCA L+R) 7組 DVI(コンピュータのモニタとしても使用可能) 1(下面) D4 1(下面) コンピュータ VGA(コンピュータモニタとして使用する場 1(下面) 合) オーディオ(PC) 1(下面) その他 カードリーダ 1(側面) 出力 ビデオ 44 コンポジット(CVBS) 1(下面) オーディオ(RCA L+R) 1組 ヘッドフォン 1(側面) ワイド液晶モニタの仕様 W2600A00.book 45 ページ 2004年8月4日 水曜日 午後6時48分 オーディオ 効果 SRS TruSurround XT ナイトモード スピーカ(内蔵) 15 W/ チャンネル 合計 30 W ワイド液晶モニタの仕様 45 46 ページ 2004年8月4日 水曜日 午後6時48分 www.dell.com/jp | support.jp.dell.com W2600A00.book 46 ワイド液晶モニタの仕様 W2600A00.book 47 ページ 2004年8月4日 水曜日 午後6時48分 索引 D V く DVI-HDCP, 18 VGA , 19 クリーニング , 11 I あ け IR レシーバー , 5 アンテナ , 15 ケーブル , 9 アンテナの接続 , 15 ケーブルの接続 同軸 , 15 O OSD , 22, 25 PBP, 28 PIP, 28 POP, 28 オーディオ , 28 カードリーダ , 30 外観 , 30 言語 , 26 使用 , 25 スリープタイマー , 29 設定 , 30 入力の選択 , 26 ピクチャ , 27 メインメニュー , 25 メッセージ , 38 リモコン , 25 S S ビデオ , 16 Self Test , 40 SRS , 28 お オーディオ , 28 効果 , 28 ステレオ , 28 オンスクリーンディスプレイ , 25 か カードリーダ サポートされるカード , 30 カードリーダー , 7 外部機器の接続 DVD プレーヤ , 13 衛星放送受信機 , 13 ケーブルテレビチューナー , 13 ビデオカメラ , 13 ビデオデッキ , 13 概要 側面のコネクタ , 5 側面パネルのボタン , 5 ワイド液晶モニタ , 5 こ コネクタ , 7 AV1, 7 AV2, 7, 8 AV4, 8 AV5, 8 AV6, 8 DVI, 18 DVI HDCP, 13 DVI-HDCP, 8, 18 S ビデオ , 13, 16 VGA, 19 位置 , 8 コンポーネント , 8, 13, 17 コンポジット , 13, 15 側面パネル , 7 電源 , 8 同軸 , 8, 13 品質 , 13 コンポーネント , 17 索引 47 48 W2600A00.book ç ௠48 ページ 2004年8月4日 水曜日 午後6時48分 し 出荷時設定 復元 , 30 仕様 , 43 トラブルシューティング , 33 OSD, 38 self test, 40 一般的な問題 , 34 コンピュータ , 40 モニタ , 40 リモコン , 39 す スリープタイマー , 29 な ナイトモード , 28 せ 設定 , 30 に ち チャンネル , 30 調整 , 28 輝度 , 27 色 , 27 入力の選択 , 22 名前変更 , 30 入力源 , 26 は 背面カバー 取り外し , 18, 19 て 汎用リモコン , 24 電源インジケータ 青ライト , 5 黄ライト , 5 電源ライト 青, 5 黄, 5 ひ ピクチャーアウトピクチャー , 28 ピクチャーインピクチャー , 28 ほ ボタン OSD, 6 PIP, 22 決定 , 22 前後のチャンネルへの移動 , 6 側面パネル , 6 チャンネル , 22 電源 , 6 入力の選択 , 6 ボリューム , 6, 22 リモコン , 22 ロック , 30 ロック解除 , 30 も モニタ , 19 問題 リモコン , 39 ワイド液晶モニタ , 33 り リモコン , 25 使用 , 21 電池 , 21 汎用リモコン , 24 ボタン , 22 問題 , 39 ピクチャーバイピクチャー , 28 と わ 同梱品 , 9 へ 同軸 , 15 ヘッドフォン , 7 48 索引 ワイド液晶モニタ コネクタ , 13 セットアップ , 13 場所 , 13 W2600A00.book 49 ページ 2004年8月4日 水曜日 午後6時48分 Dell™ Wide LCD Monitor (With TV Functionality) Owner’s Manual Model W2600 w w w. d e l l . c o m | s u p p o r t . d e l l . c o m W2600A00.book 50 ページ 2004年8月4日 水曜日 午後6時48分 Notes, Notices, and Cautions NOTE: A NOTE indicates important information that helps you make better use of your wide LCD monitor. NOTICE: A NOTICE indicates either potential damage to hardware or loss of data and tells you how to avoid the problem. CAUTION: A CAUTION indicates a potential for property damage, personal injury, or death. ____________________ Information in this document is subject to change without notice. © 2004 Dell Inc. All rights reserved. Reproduction in any manner whatsoever without the written permission of Dell Inc. is strictly forbidden. Trademarks used in this text: Dell, the DELL logo; TruSurround XT, SRS, and (o) symbol are trademarks of SRS Labs, Inc.; Other trademarks and trade names may be used in this document to refer to either the entities claiming the marks and names or their products. Dell Inc. disclaims any proprietary interest in trademarks and trade names other than its own. August 2004 Rev. A00 W2600A00.book 51 ページ 2004年8月4日 水曜日 午後6時48分 Contents 1 About Your Wide LCD Monitor Front View . . . . . . . . . . . . . . . . . . . . . . . . . . . . . . . . . Right Side View . . . . . . . . . . . . . . . . . . . . . . . . . . . . . . 54 Left Side View . . . . . . . . . . . . . . . . . . . . . . . . . . . . . . . 55 . . . . . . . . . . . . . . . . . . . . . . . . . . . . . . . 56 Bottom View . Package Contents . . . . . . . . . . . . . . . . . . . . . . . . . . . . . Caring for Your Wide LCD Monitor 2 . . . . . . . . . . . . . . . . . . . . . 59 . . . . . . . . . . . . . . . . 61 . . . . . . . . . . . . . . . . . . . . 61 . . . . . . . . . . . . . . . . . . . . . . . . . . . . 69 Connecting Your Wide LCD Monitor Your Remote Control Installing Batteries Using Your Remote Control . . . . . . . . . . . . . . . . . . . . . . . . . Using Your Wide LCD Monitor With a Universal or Learning Remote Control . . . . . . . . . . . . . 4 57 Setting Up Your Wide LCD Monitor Proper Location for Your Wide LCD Monitor 3 53 70 . . . . . . . . . . . . . 72 . . . . . . . . . . . . . . . . . 73 . . . . . . . . . . . . . . . . . . . . . . . 74 . . . . . . . . . . . . . . . . . . . . . . . . . . . . 74 . . . . . . . . . . . . . . . . . . . . . . . . . . . . . . . 75 . . . . . . . . . . . . . . . . . . . . . . . . . . . . . . . . . . . 76 Using the On-Screen Display Using Your Remote Control With the OSD . Selecting Your OSD Language Input Select Menu . Picture Menu Audio PIP/POP/PBP . . . . . . . . . . . . . . . . . . . . . . . . . . . . . . . 76 Contents 51 W2600A00.book 52 ページ 2004年8月4日 水曜日 午後6時48分 Channel Setup . . . . . . . . . . . . . . . . . . . . . . . . . . . . . . . 77 Sleep Timer . . . . . . . . . . . . . . . . . . . . . . . . . . . . . . . . 77 OSD Setup . . . . . . . . . . . . . . . . . . . . . . . . . . . . . . . . . 78 Card Reader . 5 . . . . . . . . . . . . . . . . . . . . . . . . . . . . . . . Troubleshooting Your Wide LCD Monitor Troubleshooting Tips . . . . . . . . . . . . . . . . . . . . . . . . . . . . 81 . . . . . . . . . . . . . . . . . . . . . . . . . . . . . 82 . . . . . . . . . . . . . . . . . . . . . . . . . . . . . . 86 General Problems OSD Messages Remote Control Problems . . . . . . . . . . . . . . . . . . . . . . . . . Problems With the Card Reader . . . . . . . . . . . . . . . . . . . . . . Using the Self-Test Feature When Your Wide LCD Monitor is Connected to Your Computer . . . . . . . . . . . . . . . . 87 88 . . . . . . . . . 88 . . . . . . . . . . . . . . . . . . . . . . . . . . . . . . . . . . . . 95 Specifications for Your Wide LCD Monitor Index 52 87 . . . . . . . . Problems When Using the Wide LCD Monitor as a Monitor 6 78 Contents W2600A00.book 53 ページ 2004年8月4日 水曜日 午後6時48分 1 About Your Wide LCD Monitor Front View 1 2 1 IR receiver Senses the signal from the remote control 2 Power indicator light (LED) The light is blue when the wide LCD monitor is on and amber when the wide LCD monitor is in power save mode About Your Wide LCD Monitor 53 W2600A00.book 54 ページ 2004年8月4日 水曜日 午後6時48分 www.dell.com | support.dell.com Right Side View 7 6 5 4 3 2 1 54 1 Power button Push to turn the wide LCD monitor on and off 2 OSD menu button Push to enable the on-screen display (OSD) 3 Volume button Push to decrease the volume or navigate through the on-screen display (OSD) 4 Volume button Push to increase the volume or navigate through the OSD 5 Channel button Push to select the previous channel or navigate through the OSD 6 Channel button Push to select the next channel or navigate through the OSD 7 Input Source button Push to display the Input Select menu About Your Wide LCD Monitor W2600A00.book 55 ページ 2004年8月4日 水曜日 午後6時48分 Left Side View 8 1 2 7 6 5 3 4 1 Composite video connector (AV1) Use the side composite connector for devices you connect occasionally such as a video game system 2 R (composite right audio connector) Use the audio connector if you have connected a device to composite connector (AV1) 3 L (composite left audio connector) Use the audio connector if you have connected a device to composite connector (AV1) 4 Card reader panel Remove this panel if you are installing a card reader 5 L (S-Video left audio connector) Use the audio connector if you have connected a device to the S-Video connector (AV3) 6 R (S-Video right audio connector) Use the audio connector if you have connected a device to S-Video connector (AV3) 7 S-Video connector (AV3) Use the side S-Video connectors for devices that you connect occasionally, such as a camcorder 8 Headphone connector Connect headphones About Your Wide LCD Monitor 55 W2600A00.book 56 ページ 2004年8月4日 水曜日 午後6時48分 www.dell.com | support.dell.com Bottom View 1 2 14 3 13 12 5 4 11 10 7 6 9 8 1 Power connector Connect your power cord. 2 Composite video and audio connector (AV2) Connect devices such as a VCR or DVD player. 3 DVI audio connector (L) Use the DVI audio connector if you have connected a device to the DVI connector. 4 VGA connector Use the VGA connector to use your wide LCD monitor as a monitor for your computer. 5 Component audio and video connectors (AV6) Connect devices such as a DVD player, satellite or cable box. 6 ANT/Cable Connect an antenna or cable box. 7 Composite Audio/Video Out connector Connect a device such as a VCR if you have connected an antenna or cable through the ANT/Cable connector. 8 D4 audio connector Use the D4 audio connector if your have connected a device to the D4 connector. 9 D4 connector Connect device such as a DVD player. 10 Component audio and video connector (AV5) Connect devices such as a DVD player, satellite or cable box. 11 Audio connector for your computer Connect the audio cable from your computer to the wide LCD monitor. 56 12 DVI connector Connect devices such as a DVD player, set-top box, or your computer. 13 DVI audio connector (R) Use the DVI audio connector if you have connected a device to the DVI connector. 14 S-Video connector (AV4) Connect devices such as a video game system or a DVD player. About Your Wide LCD Monitor W2600A00.book 57 ページ 2004年8月4日 水曜日 午後6時48分 Package Contents NOTE: Component cables are not included with the wide LCD monitor . If you need additional cables, contact Dell. Remote Control AAA batteries (2) Power Cable About Your Wide LCD Monitor 57 www.dell.com | support.dell.com W2600A00.book 58 ページ 2004年8月4日 水曜日 午後6時48分 S-Video cable Audio cable (2) Composite cable DVI cable PC Audio cable 58 About Your Wide LCD Monitor W2600A00.book 59 ページ 2004年8月4日 水曜日 午後6時48分 VGA cable Documentation Caring for Your Wide LCD Monitor CAUTION: Only a licensed technician should service the wide LCD monitor . Do not disassemble the wide LCD monitor . NOTE: Before cleaning the wide LCD monitor , unplug it from the electrical outlet. • To clean the surface of the panel, lightly dampen a soft, clean, lint-free cloth with water. • To clean the wide LCD monitor cabinet, use a cloth lightly dampened with a mild detergent. • Do not use chemicals such as benzene, thinner, ammonia, or any type of abrasive cleaner. • Do not use compressed air to clean the wide LCD monitor . About Your Wide LCD Monitor 59 60 ページ 2004年8月4日 水曜日 午後6時48分 www.dell.com | support.dell.com W2600A00.book 60 About Your Wide LCD Monitor W2600A00.book 61 ページ 2004年8月4日 水曜日 午後6時48分 2 Setting Up Your Wide LCD Monitor CAUTION: Before you begin any of the procedures in this section, follow the safety instructions located in the Product Information Guide. Proper Location for Your Wide LCD Monitor Consider the following environmental factors when you are deciding where to put your wide LCD monitor : • Do not store or use the wide LCD monitor in locations that are exposed to high heat, direct sunlight, or extreme cold. • Avoid moving the wide LCD monitor between locations with extreme temperature differences. For more information, see Specifications. • Do not subject the wide LCD monitor to severe vibration or high impact conditions. Do not place the wide LCD monitor inside a car trunk. • Do not store or use the wide LCD monitor in locations where the wide LCD monitor would be exposed to high humidity or dusty environment. • Do not place the wide LCD monitor in a location where water or other liquids could spill on or into the wide LCD monitor . Connecting Your Wide LCD Monitor Your wide LCD monitor has four types of standard connectors. Quality Good Cable and Connector When to Use Coaxial (RF) carries the video and audio through a single cable. The coaxial connector is labeled ANT/Cable on your wide LCD monitor . To locate the connector, see "Bottom View" on page 56. Setting Up Your Wide LCD Monitor 61 www.dell.com | support.dell.com W2600A00.book Quality 62 ページ 2004年8月4日 水曜日 午後6時48分 Cable and Connector When to Use Good Composite carries the video signal through a single cable. If you are using a composite video connector, you also need to connect composite audio cables. To locate the connector, see "Left Side View" on page 55 and "Bottom View" on page 56. Better S-Video splits the video signal into two signals, black-and-white and color. If you are using an S-Video connector, you also need to connect the AV cables for audio.To locate the connectors, see "Left Side View" on page 55 and "Bottom View" on page 56." Best Component splits the video signal into three signals, two color and one black-and-white. Ensure that you connect all five cables. To locate the connector, see "Bottom View" on page 56. 62 Setting Up Your Wide LCD Monitor W2600A00.book 63 ページ 2004年8月4日 水曜日 午後6時48分 Using the ANT/Cable (Coaxial) Connector 1 Turn off the wide LCD monitor and unplug the power cord. 2 Connect the coaxial cable to the ANT/Cable connector of the wide LCD monitor . 3 Plug in the power cord for the wide LCD monitor and turn on the wide LCD monitor . 4 Enter the on-screen display (OSD) and select TV . See "Input Select Menu" on page 74. Using the Composite Video Connector 1 Turn off the wide LCD monitor and unplug the power cord. NOTE: If you are connecting a device that you want to be able to remove, such as a camcorder, use the composite video connector on the side of the wide LCD monitor . Setting Up Your Wide LCD Monitor 63 www.dell.com | support.dell.com W2600A00.book 64 ページ 2004年8月4日 水曜日 午後6時48分 2 Connect your device including the audio cables. 3 Plug in the power cords for the wide LCD monitor and devices and turn them on. 4 Enter the OSD and select the proper composite input. See "Input Select Menu" on page 74. Using the S-Video Connector 1 Turn off the wide LCD monitor and unplug the power cord. NOTE: If you are connecting a device that you want to be able to remove, such as a camcorder, use the S-Video connector on the side of the wide LCD monitor . 64 2 Connect your device including the audio cables. 3 Plug in the power cords for the wide LCD monitor and devices and turn them on. 4 Enter the OSD and select the proper S-Video input. See "Input Select Menu" on page 74. Setting Up Your Wide LCD Monitor W2600A00.book 65 ページ 2004年8月4日 水曜日 午後6時48分 Using Component Connectors 1 Turn off the wide LCD monitor and unplug the power cord. 2 Connect your device including the audio cables. 3 Plug in the power cords for the wide LCD monitor and devices and turn them on. 4 Enter the OSD and select the proper component input. See "Input Select Menu" on page 74. Using the D4 Connector 1 Turn off the wide LCD monitor and unplug the power cord. 2 Connect your device including the audio cables. 3 Plug in the power cords for the wide LCD monitor and devices and turn them on. 4 Enter the OSD and select the proper composite input. See "Input Select Menu" on page 74. NOTE: Only one connector can be used for a computer, either VGA or DVI. Setting Up Your Wide LCD Monitor 65 W2600A00.book 66 ページ 2004年8月4日 水曜日 午後6時48分 www.dell.com | support.dell.com Using the DVI Connector NOTE: Only one connector can be used for a computer, either VGA or DVI. 1 Turn off the wide LCD monitor and unplug the power cord. 2 Remove the back cover from the wide LCD monitor by pulling the cover toward you and lifting it away. 3 Connect the white DVI cables and the audio cables. If you are connecting a video device, use the audio connectors (red and white) or if you are connecting a computer use the stereo connector (green). NOTE: Some cable boxes may have DVI connectors, but do not support using a DVI connection. For more information, contact your cable wide LCD monitor company. 66 Setting Up Your Wide LCD Monitor W2600A00.book 67 ページ 2004年8月4日 水曜日 午後6時48分 4 Replace the back cover. 5 Plug in the power cords for the wide LCD monitor and devices and turn them on. 6 Enter the OSD and select DVI. See "Input Select Menu" on page 74. Using VGA (PC Analog). You can use your wide LCD monitor as a computer monitor using a VGA connector NOTE: Only one connector can be used for a computer, either VGA or DVI. 1 Turn off the wide LCD monitor and unplug the power cord. 2 Remove the back cover from the wide LCD monitor by pulling the cover toward you and lifting it away. Setting Up Your Wide LCD Monitor 67 68 ページ 2004年8月4日 水曜日 午後6時48分 www.dell.com | support.dell.com W2600A00.book 68 3 Connect the blue VGA cable to your wide LCD monitor and to your computer. 4 Connect the green audio cable to the connector on the wide LCD monitor and to your computer. 5 Replace the back cover. 6 Plug in the power cords for the wide LCD monitor and devices and turn them on. 7 Enter the OSD and select the VGA. See "Input Select Menu" on page 74. Setting Up Your Wide LCD Monitor W2600A00.book 69 ページ 2004年8月4日 水曜日 午後6時48分 3 Your Remote Control Installing Batteries Before you can use your remote control, install two-AAA batteries. 1 Open the battery cover. 2 Install the batteries. Make sure that you match the + and - on the batteries with the + and symbols in the battery compartment. 3 Close the battery cover. Your Remote Control 69 W2600A00.book 70 ページ 2004年8月4日 水曜日 午後6時48分 www.dell.com | support.dell.com Using Your Remote Control 21 1 2 20 3 4 19 18 5 17 16 15 14 13 12 70 Your Remote Control 6 7 8 9 10 11 W2600A00.book 71 ページ 2004年8月4日 水曜日 午後6時48分 1 Power Button Turns the wide LCD monitor on and off 2 Number buttons Press to select a channel 3 Mute Press to turn off the sound. Press again to turn on the sound 4 CH (up icon) Push to view the next channel In the OSD, use the channel button to navigate through the menus in the on-screen display (OSD) 5 Enter Select an OSD option, confirms a channel selection, selects an image when in card reader mode 6 CH (down icon) Push to view the previous channel In the OSD, use the channel button to navigate through the menus in the on-screen display (OSD) 7 Last Returns you to the previously viewed channel 8 Pos Changes the position of the Picture-In-Picture (PIP) window 9 PIP Sel Toggles between windows when you use Picture-In-Picture (PIP), Picture-Outside-Picture (POP), or Picture-By-Picture (PBP) 10 Audio Cycles through the preset Audio options 11 Size Cycles through the size options from the Size menu 12 Sleep Turns on the sleep timer 13 Pict Cycles through the preset options for the Picture menu 14 Swap Swaps images when using PIP, POP, or PBP 15 PIP Enters and exits PIP mode 16 POP PBP Enters and exits POP or PBP mode 17 Disp Displays information about your wide LCD monitor (for example, in TV Mode displays the channel you are watching) 18 Vol + Increases the volume In the OSD, use the volume button to navigate through the menus. 19 Vol - Decreases the volume In the OSD, use the volume button to navigate through the menus. 20 Menu Enters and exits the OSD main menu 21 Input Enters and exits the Input Select menu Your Remote Control 71 W2600A00.book 72 ページ 2004年8月4日 水曜日 午後6時48分 www.dell.com | support.dell.com Using Your Wide LCD Monitor With a Universal or Learning Remote Control Preprogrammed universal remote controls can be programmed to control the following functions on your Dell wide LCD monitor : • Power • Channel Up (+) • Channel Down (-) • Volume Up (+) • Volume Down (-) • Mute • Input Select NOTE: Future preprogrammed universal remote controls may be able to control more functions. You can program universal remote controls to work with your Dell wide LCD monitor in the following ways: • If the remote control has a search function, this function may be used to find the correct code. • If the remote control has a learning function, you can program specific buttons on it from the Dell remote control, in addition to those buttons listed above. NOTE: See the remote control documentation for specific instructions for your universal remote control. 72 Your Remote Control W2600A00.book 73 ページ 2004年8月4日 水曜日 午後6時48分 4 Using the On-Screen Display Your wide LCD monitor has an on-screen display (OSD) that allows you to select the proper input source, make adjustments to the image and audio settings, select to view Picture-In-Picture, Picture-Outside-Picture, and Picture-By-Picture. The OSD also allows you to chose how to view the images when using the card reader and to make adjustments to the image if you are using the wide LCD monitor as your computer monitor. Using Your Remote Control With the OSD NOTE: You can access and make selections to the OSD using the volume and channel buttons on the side panel of the wide LCD monitor or the remote control. Except where noted, this section describes how to use the OSD with the remote control. 1 To enter the OSD, press the Menu button. Eight icons appear along the bottom of the screen. MAIN MENU EXIT 2 INPUT SELECT PICTURE AUDIO PIP/POP PBP SIZE SLEEP TIMER SETUP Use the left and right buttons (volume buttons) to move between the icons. The icon appears highlighted as you move through the menu. 3 To select an option, push the Enter button when the icon is highlighted. 4 In the option menu, use the up and down (channel) buttons to move through the various settings. NOTE: A red arrow appears next to the setting as you navigate through the options. A check mark appears next to the option that is selected. 5 Use the up and down buttons (channel buttons) and the Enter button to adjust or select settings. NOTE: You can select Exit to return to the main menu or press Menu to exit the OSD. Using the On-Screen Display 73 www.dell.com | support.dell.com W2600A00.book 74 ページ 2004年8月4日 水曜日 午後6時48分 6 After you have made your selections, select the Exit. 7 To exit the OSD, press Menu on the remote or select Exit from the main menu. Selecting Your OSD Language 1 Press Menu to enter the OSD. 2 Select Setup. 3 In the Setup menu, select Language and select the language that you want the OSD to appear in. Input Select Menu The Input Select menu allows you to select the proper source based on how you have your wide LCD monitor and video equipment connected. Press Input on the remote to go directly to the Input Select menu. You can also press Menu and select Input Select from the main menu. NOTE: Show Inputs allows you to select Active or All. Active searches for which connectors are being used. The available input sources appear in white and input sources that are not available appear in grey. All shows all the input sources and allows you to select all the input sources even if you do not have a device connected. INPUT SELECT EXIT VG A DV I TV AV 1 ( C O M P O S I T E 1 ) AV 2 ( C O M P O S I T E 2 ) VGA — Select when your wide LCD monitor is being used as a computer monitor and you have connected the computer using a VGA cable. See "Bottom View" on page 56 for the location of the VGA connector. AV 3 ( S V I D E O 1 ) AV 4 ( S V I D E O 2 ) AV 5 ( C O M P O N E N T 1 ) AV 6 ( C O M P O N E N T 2 ) D4 CARD READER S H OW I N P U T S ALL AC T I V E DV I — Select when you have a device, such as a set-top box, connected to the DVI connector. See "Bottom View" on page 56 for the location of the DVI connector. T V — Select when you have your antenna or cable connected to the ANT/Cable connector. See "Bottom View" on page 56 for the location of the ANT/Cable connector. AV1 — Select when you have a video device, such as a video game system, connected to the composite connector on the side of the wide LCD monitor . See "Left Side View" on page 55 for the location of the composite connector. 74 Using the On-Screen Display W2600A00.book 75 ページ 2004年8月4日 水曜日 午後6時48分 AV2 — Select when you have a video device, such as a DVD player, connected to the composite connector on the back of the wide LCD monitor . See "Bottom View" on page 56 for the location of the composite connector. AV3 — Select when you have a video device, such as a VCR, connected to the S-Video connector on the side of the wide LCD monitor . See "Left Side View" on page 55 for the location of the S-Video connector. AV4 — Select when you have a video device, such as a DVD player, connected to the S-Video connector on the back of the wide LCD monitor . See "Bottom View" on page 56 for the location of the S-Video connector. AV5 — Select when you have a video device, such as a satellite receiver, connected to the component connector. See "Bottom View" on page 56 for the location of the component connector. AV6 — Select when you have a video device, such as a DVD player, connected to the component connector. See "Bottom View" on page 56 for the location of the component connector. D4 — Select when you have a video device , such as a DVD player, connected to the D4 connector on the back of the wide LCD monitor. See "Bottom View" on page 56 for the location of the D4 connector. NOTE: In OSD Settings, located in the Setup menu, you can set the Input Select to display the device that you have attached. For example, AV2 would say DVD when you view the Input Select menu. Picture Menu PICTURE BACK PRESET PERSONAL BRIGHTNESS 38 CONTRAST 38 SHARPNESS COLOR TEMP. 3 NATURAL COLOR TINT COLOR SATURATION HORIZONTAL SHIFT 38 38 38 If you select one of the following preset image settings, the individual settings are automatically updated to provide the best picture for the selected content: •Movies •Sports •Weak Signal •Multimedia If you select Personal, you can adjust the individual settings, such as Brightness and Color. The color temperature presets are: • Natural: the native panel temperature • Normal: 6500K • Blue: 9300K • Red: 5700K Using the On-Screen Display 75 W2600A00.book 76 ページ 2004年8月4日 水曜日 午後6時48分 www.dell.com | support.dell.com Audio Midnight Mode — Evens out the large volume variations between voice and action scenes. AUDIO BACK MIDNIGHT MODE ON OFF ON OFF EQUALIZER MODE PERSONAL TREBLE 0 BASS If you select one of the following preset Equalizer Mode settings, the individual audio levels are automatically updated: 0 TV OUT VOLUME FIXED PROGRAM •Music STEREO MUTE ON SRS TruSurround XT— Delivers virtual surround sound over two speakers from any source, which creates a wider sound with deep rich bass. OFF •Theater •Voice If you select Personal, you can adjust the individual audio levels, such as Bass and Treble. Use Audio Program to select Stereo, Mono, or SAP (Second Audio Program). PIP/POP/PBP You can view multiple active sources simultaneously using Picture-In-Picture (PIP), PictureOutside-Picture (POP), or Picture-By-Picture (PBP). NOTE: You can use the PIP button or the POP/PBP button on the remote control to turn on and off PIP, POP, and PBP. PIP/POP/PBP BACK PIP/POP/PBP PIP TRANSPARENCY 38 SIZE 38 H. POSITION 38 V. POSITION 38 If you are in PIP, POP, or PBP mode, use the SWAP button on the remote control to switch primary and secondary sources Use PIP Sel button on the remote control to switch control between windows. In the OSD, you can adjust the Transparency, the Size, and H PRIMARY AUDIO SOURCE (horizontal) and V (vertical) Position of the PIP windows. When you are selecting the horizontal orientation, - moves the window left and + moves the window to the right. When you are adjusting the vertical orientation, 100 is at the top of the screen and 0 is at the bottom of the screen. PIP SOURCE 76 Using the On-Screen Display TV W2600A00.book 77 ページ 2004年8月4日 水曜日 午後6時48分 For POP, you can select from three different POP options: • POP1 — one window • POP3 — three windows • POP12 — twelve windows POP Scan Mode allows you to select Sequential or Float. Sequential mode plays the source for selected channels that appear in the windows. Float rotates through each window and plays all of the preselected channels. The rotation runs through all the available channels before it starts again at the lowest channel. Channel Setup CHANNEL SETUP BACK CHANNEL SEARCH CHANNEL ASSIGNMENT FINE TUNING +0000 CHANNEL EDIT To program a remote control key number and the display for a specific channel, use xxx in Channel Setup. Sleep Timer Sleep Timer allows you to select an increment of time after which the wide LCD monitor turns off automatically. You can select from 10 minutes to 3 hours. Using the On-Screen Display 77 W2600A00.book 78 ページ 2004年8月4日 水曜日 午後6時48分 www.dell.com | support.dell.com OSD Setup OSD setup allows you to adjust the appearance of the OSD, set the channels when in wide LCD monitor mode, change the language of the OSD (see "Selecting Your OSD Language" on page 74), and restore factory settings. Use OSD Hold Time to increase or decrease the amount of time the OSD appears. The maximum amount of time is 60 seconds. SETUP BACK In the OSD Setup menu, you can select TV Button Lock to lock the buttons on the side panel. When this option is enabled, only the power button functions. Hold the volume increase and the channel increase buttons together for 10 seconds to unlock the buttons. OSD SETTINGS CHANNEL SETUP LANGUAGE FACTORY RESET To program a remote control key number for a specific channel and select the number that displays on the screen, select Channel Assignment from the Channel Setup menu. DVI SETTINGS If you are using the DVI connector, you may need to verify the following settings: Source — The default setting is Auto. The wide LCD monitor automatically detects if a computer (PC) or video device is being used. If the image does not display correctly, you can select the source, PC or Video, depending on the device you are using. Color — The default color space is RGB. If the colors are not displaying correctly, you can change the setting to YUV. Card Reader A card reader allows you to view digital photos on your wide LCD monitor . MAIN MENU EXIT 78 INPUT SELECT IMAGE MGMT Using the On-Screen Display PICTURE COLOR PIP/POP SETTINGS PBP SIZE SETUP W2600A00.book 79 ページ 2004年8月4日 水曜日 午後6時48分 Your card reader supports the following card types: • Compact Flash • Secure Digital • Memory Stick • Smart Media • Multimedia Card (MMC) NOTE: To purchase a card reader, contact Dell. IMAGE MANAGEMENT BACK DISPLAY MODE TRANSITIONS NEXT IMAGE The Image Management menu allows you select how to display your photos, including viewing the photos as a slide show, rotating photos, selecting different transitions between photos, and displaying photo information, such as date and time the photo was taken. PREVIOUS IMAGE DELETE IMAGE ROTATE PHOTO INFO IMAGE SIZE Using the On-Screen Display 79 80 ページ 2004年8月4日 水曜日 午後6時48分 www.dell.com | support.dell.com W2600A00.book 80 Using the On-Screen Display W2600A00.book 81 ページ 2004年8月4日 水曜日 午後6時48分 5 Troubleshooting Your Wide LCD Monitor CAUTION: If at any time you see smoke or sparks coming from your wide LCD monitor , unplug the wide LCD monitor immediately and contact Dell. Do not try to perform any troubleshooting steps. Troubleshooting Tips NOTE: Some problems may be related to devices you have connected to your wide LCD monitor . For additional troubleshooting help, see the documentation for any devices connected to your wide LCD monitor . Most problems with your wide LCD monitor may be caused by not having the correct input source selected. Each connector on the wide LCD monitor (side and bottom) is associated with an input source, which are labeled AV1 through AV6 in the Input Select menu. • AV1 — Composite connector on the side of the wide LCD monitor • AV2 — Composite connector on the bottom of the wide LCD monitor • AV3 — S-Video connector on the side of the wide LCD monitor • AV4 — S-Video connector on the bottom of the wide LCD monitor • AV5 — Component connector on the bottom of the wide LCD monitor • AV6 — Component connector on the bottom of the wide LCD monitor You can also select the following input sources: • TV - ANT/Cable connector on the bottom of the wide LCD monitor • VGA - VGA connector on the bottom of the wide LCD monitor • DVI - DVI connector on the bottom of the wide LCD monitor • D4 - D4 connector on the bottom of the wide LCD monitor Troubleshooting Your Wide LCD Monitor 81 W2600A00.book 82 ページ 2004年8月4日 水曜日 午後6時48分 www.dell.com | support.dell.com General Problems Problem Poor picture quality while watching wide LCD monitor and using a device such as a DVD player or a VCR 82 Troubleshooting Your Wide LCD Monitor Possible Solution 1 Check the aspect ratio settings in the OSD. Press the Menu button on the remote control and select Size. For more information on using the OSD, see "Using the OnScreen Display" on page 73. 2 Reconnect the device using the same type of connector. For example, if you are using the composite connector on the bottom, try connecting the device to the composite connector on the side of the wide LCD monitor . See "About Your Wide LCD Monitor" on page 53 for the location of the connectors. After you connect the device, change the input source in the OSD. See "Input Select Menu" on page 74 for more information. 3 Connect the device using a different connector. For example, if you are experiencing the problem using a composite connector, try using the component connector. NOTE: To connect to a different connector, you need the appropriate cables for that connector. See your device documentation for a list of supported connections. After you connect the device, change the input source in the OSD. See "Input Select Menu" on page 74 for more information. 4 Reset the original factory defaults. Press Menu on the remote control, select Setup, and then select Factory Reset. 5 Adjust the color temperature. Press Menu on the remote control, select Picture, and then select Color Temperature. NOTE: Some set top boxes offer aspect ratio. See your device documentation for more information. W2600A00.book 83 ページ 2004年8月4日 水曜日 午後6時48分 Problem Possible Solution Poor picture quality when using a device connected to the ANT/Cable (coaxial) connector 1 Ensure wide LCD monitor is selected as the input Nothing appears on my wide LCD monitor 1 Ensure the wide LCD monitor is turned on. source in the Input Select menu. See "Input Select Menu" on page 74 for more information. 2 Press Menu on the remote control, select Setup, and then select Channel Setup. This resets the channels. 3 Check the aspect ratio settings in the OSD. Press the Menu button on the remote control and select Size. For more information on using the OSD, see "Using the OnScreen Display" on page 73. 4 Reset the original factory defaults. Press Menu on the remote control, select Setup, and then select Factory Reset. 5 Adjust the color temperature. Press Menu on the remote control, select Picture, and then select Color Temperature. 6 The problem may be with your device, contact your service provider. 2 Verify that all the cables are properly connected to the wide LCD monitor , including the power cable. 3 Check to see if there is a blue or amber light on the lower, right-hand corner of the wide LCD monitor . A blue light indicates the wide LCD monitor is on. An amber light, means the wide LCD monitor is in power save mode. 4 Ensure the proper source is selected in the Input Select menu. See "Input Select Menu" on page 74 for more information. 5 Reconnect any devices that are currently connected to the wide LCD monitor . If you are using multiple devices, connect and test one device at a time. 6 Connect another device that you know is working properly. 7 Reset the original factory defaults. Press Menu on the remote control, select Setup, and then select Factory Reset. Troubleshooting Your Wide LCD Monitor 83 www.dell.com | support.dell.com W2600A00.book 84 ページ 2004年8月4日 水曜日 午後6時48分 Problem No sound 84 Troubleshooting Your Wide LCD Monitor Possible Solution 1 Ensure mute is not turned on. Pressing the Mute button on the remote control turns the mute function on and off. 2 If only certain wide LCD monitor channels do not have sound, verify that the proper source is selected in the Input Select menu.(For more information, see "Input Select Menu" on page 74). 3 Verify that the audio cables are firmly connected to both the audio input connectors on your wide LCD monitor and audio output connectors on your devices. Ensure that the cable colors match the connectors colors. 4 Also, ensure that the audio cables are connected to the same row as the video cables. See "About Your Wide LCD Monitor" on page 53 for the location of the connectors. 5 Reconnect the device using the same type of connector. For example, if you are using the composite connector on the bottom, try connecting the device to the composite connector on the side of the wide LCD monitor . See "About Your Wide LCD Monitor" on page 53 for the location of the connectors. After you connect the device, change the input source in the OSD. See "Input Select Menu" on page 74 for more information. 6 Connect the device using a different connector. For example, if you are experiencing the problem using a composite connector, try using the component connector. NOTE: To connect to a different connector, you need the appropriate cables for that connector. See your device documentation for a list of supported connections. After you connect the device, change the input source in the OSD. See "Input Select Menu" on page 74 for more information. 7 Test the device on a different wide LCD monitor . NOTE: If you are using PIP/POP/PBP, ensure the proper Audio Source is selected. Press Menu on your remote control, and select PIP/POP/PBP. W2600A00.book 85 ページ 2004年8月4日 水曜日 午後6時48分 Problem Possible Solution Double image or no image with DVD Turn off the progressive scan on the DVD player. Your Dell™ wide LCD monitor offers built-in deinterlacer that is equal to or better quality than the deinterlacer on your DVD player. For more information about progressive scan on your DVD player, see the documentation for your DVD player Picture is too dim or too bright Update the color settings in the OSD. Press Menu on the remote control and select Picture. The screen is not centered correctly 1 Update the size settings in the OSD. Press Menu on the Screen has one or more lines 1 Check the aspect ratio settings in the OSD. Press the The side panel buttons do not work remote control and select Size. 2 Reset the original factory defaults. Press Menu on the remote control, select Setup, and then select Factory Reset. Menu button on the remote control and select Size. For more information on using the OSD, see "Using the OnScreen Display" on page 73. 2 Ensure the proper source is selected in the Input Select menu. See "Input Select Menu" on page 74 for more information. 3 Try connecting a different device. Ensure that you properly connect the cables and update the input source in the OSD. 4 Update the size settings in the OSD. Press Menu on the remote control and select Size. 5 Reset the original factory defaults. Press Menu on the remote control, select Setup, and then select Factory Reset. Check the OSD to see if the buttons have been locked. Press Menu on your remote control, select Setup. If you are unable to use the remote control, press the volume up and the channel up buttons on the side of the wide LCD monitor for 10 seconds to unlock the buttons. The picture is too small 1 Adjust the size settings. Press Menu on the remote control, and select Size. 2 This may be a problem with your device. See the documentation for the device. Troubleshooting Your Wide LCD Monitor 85 W2600A00.book 86 ページ 2004年8月4日 水曜日 午後6時48分 www.dell.com | support.dell.com OSD Messages While using your wide LCD monitor , the following messages may appear. Message Possible Solution Auto Adjust No action required, the wide LCD monitor is performing an auto adjustment. Out of Range Check the optimal resolution settings. You may need to download a new video driver. For more information, go to support.dell.com. No Video Input 1 Check all cables are properly connected. 2 Ensure the proper source is selected in the Input Select menu. See "Input Select Menu" on page 74 for more information. TV Button Lock To unlock, press Menu on your remote control, select Setup. If you are unable to use the remote control, press the volume up and the channel up buttons on the side of the wide LCD monitor for 10 seconds to unlock the buttons. In Power Save Mode Press any key on keyboard or move mouse If you have a computer connected to the wide LCD monitor and there is no signal detected, the wide LCD monitor goes in to sleep mode. The power light is amber when the wide LCD monitor in is sleep mode. Press any key on the keyboard or move the mouse to wake the wide LCD monitor . In Power Save Mode Please Check Video Signal Self Test 86 Troubleshooting Your Wide LCD Monitor If you are using a video device and it has been inactive for 30 minutes the wide LCD monitor goes in to power save mode. The power light is amber when the wide LCD monitor is in power save mode. Appears for computer source when there is nothing plugged in. Select VGA or DVI from Input Select menu and nothing is plugged in. Plug a computer in to the VGA or DVI. W2600A00.book 87 ページ 2004年8月4日 水曜日 午後6時48分 Message Possible Solution No Card Detected in Card Reader Remove and reinstall the card. Ensure you are using a card that is supported by the card reader. Your card reader supports the following card types: • Compact Flash • Secure Digital • Memory stick • Smart Media • Multimedia card Remote Control Problems Problem The wide LCD monitor does not respond when using the remote control Possible Solution 1 Point the remote control directly at the lower right corner of the wide LCD monitor . Be sure that nothing is blocking the front of the wide LCD monitor . For the location of the IR, see "Front View" on page 53. 2 Verify that the batteries are properly installed. 3 If the batteries are old, install new batteries. NOTE: Bright lights or other infrared devices may interfere with your remote control and IR on the wide LCD monitor . Problems With the Card Reader Your card reader supports jpeg file formats and the following card types: • Compact Flash • Secure Digital • Memory Stick • Smart Media • Multimedia Card (MMC) Follow the installation instructions that came with your card reader. When you install the card reader, locate the arrow on the front of the card reader and ensure that the arrow is pointing up when you slide the card reader in to place. When the card reader is installed, press Menu on the remote control, select Input Source, and then select Card Reader. Troubleshooting Your Wide LCD Monitor 87 W2600A00.book 88 ページ 2004年8月4日 水曜日 午後6時48分 www.dell.com | support.dell.com Using the Self-Test Feature When Your Wide LCD Monitor is Connected to Your Computer When your computer is connected to the wide LCD monitor through DVI or VGA connector you can use the self-test feature to check whether your wide LCD monitor is functioning properly. If your wide LCD monitor and computer are properly connected but the wide LCD monitor screen remains dark, run the wide LCD monitor self-test by performing the following steps: 1 Turn off both your computer and the wide LCD monitor . 2 Unplug the video cable from the back of the computer. 3 Turn on the wide LCD monitor . If the wide LCD monitor cannot sense a video signal and is working correctly, the floating "Dell - Self-Test Feature Check" dialog box appears on the screen (against a black background). While in self-test mode, the power light remains green and the self-test pattern scrolls through the screen continually. This box also appears during normal system operation if the video cable becomes disconnected or damaged. 4 Turn off your wide LCD monitor and reconnect the video cable; then turn on both your computer and the wide LCD monitor . If your wide LCD monitor screen remains blank, the problem may be with your computer or graphic card. See your computer documentation for more information. Problems When Using the Wide LCD Monitor as a Monitor NOTE: You can only connect your computer to the wide LCD monitor using a VGA connector. Problem The picture is off-centered or too small 88 Troubleshooting Your Wide LCD Monitor Possible Solution 1 Use Auto Adjust to check the Image Settings. Press Menu to enter the OSD, select Image Settings, and then select Auto Adjust. 2 Check the optimal resolution settings. You may need to download a new video driver. For more information, go to support.dell.com. NOTE: Some older video cards may not support the resolution settings for the wide LCD monitor . W2600A00.book 89 ページ 2004年8月4日 水曜日 午後6時48分 Problem Possible Solution No audio 1 Ensure the green audio cable is connected to audio PIP/POP/PBP not working 1 Ensure the settings in the OSD are properly set. Press Menu connector on the wide LCD monitor and on the computer. For the location of the connector on the wide LCD monitor see, "Using VGA (PC Analog)." on page 67." See your computer documentation for the location of connectors on your computer. Do not connect the audio cable to the headphone jack. 2 Ensure the volume on the computer is not muted. 3 Verify that sound on your computer is working by checking the speakers. See your computer documentation for information on troubleshooting your computer. 4 Disconnect the wide LCD monitor from the computer and test to see if the wide LCD monitor volume works. to enter the OSD, and select PIP/POP/PBP. 2 Swap the video and audio source. No video NOTE: If you see a self-test, it means there is a problem with your video card or you are using the wrong input source. 1 Ensure the wide LCD monitor is turned on. 2 Verify that all the cables are properly connected to the wide LCD monitor , including the power cable. 3 Check to see if there is a blue or amber light on the lower, right-hand corner of the wide LCD monitor . A blue light indicates the wide LCD monitor is on. An amber light, means the wide LCD monitor is in power save mode. 4 Ensure VGA is selected in the Input Select menu. See "Input Select Menu" on page 74 for more information. 5 Reconnect the computer. 6 Connect another device that you know is working properly. 7 Reset the original factory defaults. Press Menu on the remote control, select Setup, and then select Factory Reset. Troubleshooting Your Wide LCD Monitor 89 90 ページ 2004年8月4日 水曜日 午後6時48分 www.dell.com | support.dell.com W2600A00.book 90 Troubleshooting Your Wide LCD Monitor W2600A00.book 91 ページ 2004年8月4日 水曜日 午後6時48分 6 Specifications for Your Wide LCD Monitor General Model number W2600 LCD wide LCD monitor Display type TFT Active Matrix (Color TFT LCD) Screen size 26 inches Viewable area 566.4 x 339.8 mm (22.3 inches x 13.38 inches) Image aspect ratio Wide screen 15:9 resolution 16:9 aspect ratio Video Display Capabilities 480i 480p 720p 1080i 576i (Europe) 576p (Europe) Additional Features: SAP capable CC capable Teletext capable Parental control capable Yes Yes Yes (Europe only) Yes Physical Dimension Display (with stand) 830 x 504 x 209 mm Display (no stand) 830 x 421 x 107 mm With Speakers N/A, non-detachable Weight (with stand) 19 kg/41 lbs (est) Native Resolution 1280x768 (WXGA) HD wide LCD monitor Capable Yes Specifications for Your Wide LCD Monitor 91 www.dell.com | support.dell.com W2600A00.book 92 ページ 2004年8月4日 水曜日 午後6時48分 Picture-In-Picture Picture-In-Picture (PIP) Yes Picture-Outside-Picture (POP) Yes Picture-By-Picture (PBP) Yes Number of Tuners 2 analog Brightness (typical) 450 nits (typical) Contrast Ratio 500:1 (typical) Response time (black:white) 25 ms (typical) Viewing Angle Horizontal +/- 85 degrees Vertical +/- 85 degrees Inputs Video Composite (CVBS) two (side and bottom) S-Video two (side and bottom) Component two (bottom) Wide LCD monitor In (coaxial) one (bottom) Audio (RCA L+R) 7 pair DVI (also can use as computer monitor) 1 (bottom) D4 1 (bottom) Computer VGA (for use as computer monitor) 1 (bottom) Audio(PC) 1 (bottom) Other Card reader one (side) Outputs Video 92 Composite (CVBS) one (bottom) Audio (RCA L+R) one pair Headphone one (side) Specifications for Your Wide LCD Monitor W2600A00.book 93 ページ 2004年8月4日 水曜日 午後6時48分 Audio Effects SRS TruSurround XT Midnight Mode Speakers (integrated) 15 watts/channel 30 watts total Specifications for Your Wide LCD Monitor 93 94 ページ 2004年8月4日 水曜日 午後6時48分 www.dell.com | support.dell.com W2600A00.book 94 Specifications for Your Wide LCD Monitor W2600A00.book 95 ページ 2004年8月4日 水曜日 午後6時48分 Index A C About side connectors, 53 side panel buttons, 53 Wide LCD Monitor, 53 Cables, 57 Adjust, 76 brightness, 75 color, 75 Card reader, 55 supported cards, 78 Channel, 78 Cleaning, 59 Coax, 63 Antenna, 63 Component, 65 Audio, 76 effects, 76 stereo, 76 Connecting an Antenna, 63 B Back cover removal, 66, 67 Button lock, 78 unlock, 78 Buttons channel up and down, 54 channels, 70 Enter, 70 Input Source, 54 OSD, 54 PIP, 70 power, 54 remote control, 70 Side panel, 54 volume, 54, 70 location of, 56 power, 56 quality, 61 side panel, 55 S-Video, 61, 64 Connecting Cable coax, 63 Connecting devices Cable box, 61 camcorder, 61 DVD player, 61 Satellite box, 61 VCR, 61 Connector VGA, 67 Connectors, 55 AV1, 55 AV2, 55, 56 AV4, 56 AV5, 56 AV6, 56 coax, 56, 61 component, 56, 61, 65 composite, 61, 63 DVI, 66 DVI HDCP, 61 DVI-HDCP, 56, 66 D DVI-HDCP, 66 F Factory settings restore, 78 H headphones, 55 I Input Select Input sources, 74 Input Source, 70 rename, 78 IR receiver, 53 M Midnight Mode, 76 Monitor, 67 Index 95 96 W2600A00.book Index 96 ページ 2004年8月4日 水曜日 午後6時48分 O R V On-Screen Display, 73 Remote Univeral remote, 72 VGA, 67 OSD, 70, 73 appearance of, 78 Audio, 76 card reader, 78 Input Select, 74 language, 74 Main Menu, 73 messages, 86 PBP, 76 Picture, 75 PIP, 76 POP, 76 remote control, 73 setup, 78 sleep timer, 77 using, 73 Remote control, 73 batteries, 69 buttons, 70 problems with, 87 using, 69 S Self Test, 88 setup, 78 Sleep Timer, 77 Specifications, 91 SRS, 76 S-Video, 64 P Package contents, 57 T Power indicator amber light, 53 blue light, 53 Troubleshooting, 81 computer, 88 general problems, 82 monitor, 88 OSD, 86 remote control, 87 self test, 88 Power light amber, 53 blue, 53 U Picture-By-Picture, 76 Picture-In-Picture, 76 Picture-Outside-Picture, 76 Problems remote control, 87 Wide LCD Monitor, 81 96 Index Univeseral remote, 72 W Wide LCD Monitor connectors, 61 location, 61 set up, 61


![取扱説明書 [PDF形式]](http://vs1.manualzilla.com/store/data/006601037_2-10bc8f24b8376219fcdc7f09b4e303dd-150x150.png)