1
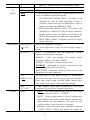
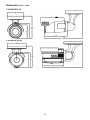
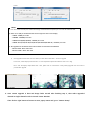
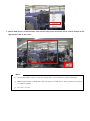
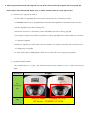
1. Check Frame rate setting based on power frequency - Set Frame rate to 25Hz if your region is using 50Hz(PAL) power frequency, or set to 30Hz for 60Hz(NTSC) region. (OSD : System Frame rate). 2. Focus setup To aviod losing focus at night time, please adjust camera focus as follows. 1) Move Tele, Wide to adjust Zoom and Near, Far to adjust Focus. 2) Press joystick shortly to activate Auto focusing. 3) If no further action during 5sec, adjust focusing mode will be closed automatically. ※ To get fine focusing, video will be zoomed twice in Adjust Focusing mode. 3. Shutter mode setup based on installation environment Choose shutter mode based on installation environment as follows to minimize motion blur of a moving object. - Auto : This mode can maximize sensitivity under low light condition, but if the target object is moving fast, motion blur could appear. You can use DSS, WDR functions at this mode. - Indoor : This mode can provide more clear moving image such as person in indoor environment. - Outdoor : This mode can provide more clear moving image such as vehicle in outdoor environment. * Under Indoor/Outdoor mode, DSS, WDR functions cannot be used and low-light performance will be decreased. If you do not consider the environmental condition of the installation site, malfunction of exposure might appear. 4. DC12V or AC24V(500mA over) power adapter must be used. 5. Please contact to qualified service personnel in case of product damage. Do not attempt to repair product by yourself. 6. Please avoid external shock and vibration on the product. 7. Do not install product under excessive heat or cold environment. (recommended operation temperature is 0°C~50°C) 8. Do not target lens to the sun. Image sensor might be damaged 9. Do not open the product under any circumstances, it could void the warranty. Natural disaster like lightning, flood will need charge for repair. 1 English Caution for installation and usage Feature HD-SDI video digital signal HD-SDI(High Definition Serial Digital Interface) is non-compressed digital signal for broadcasting, and there is no quality loss of high definition images. 2MP, Full HD high resolution picture quality Full HD(1920x1080) provides 6 times higher resolution than SD level camera, and more clear video image can be achieved through 1/3”, 2Megapixel progressive CMOS. High performance under low light environment High performance quality can be achieved under low light environment by optimizing the image handling technology on CMOS sensor. (B/W : 0.0005 Lux / Color : 0.2Lux@50IRE, F.1.4, 3100K, DSS OFF) Indoor/Outdoor function Indoor mode provides clear image by minimizing Motion Blur from slow moving person indoors, and outdoor mode provides clear images for fast moving vehicles outdoors by optimizing video signal handling according to each environment. 3D-DNR 3D-DNR function efficiently removes video noise in dark environment, and shows clear image as a result. True Day & Night function Camera senses the surrounding brightness automatically, and insert/remove the IR-CUT filter to get the best sensitivity performance. WDR/BLC/ACE/HLC Under backlight condition, you can select the most suitable function among WDR, BLC, ACE and HLC. Auto Focusing function provides simple one-click auto focus function for easy installation. Privacy support Camera can support up to 28 privacy masking areas. OSD control and F/W upgrade OSD control and Firmware upgrade of camera can be achieved from PC or Webgate DVR through RS485 communication. 2 Supplied accessories Please check if all the supplied accessories are included. Camera Installation / User Manual Monitoring Cable(IR18) Hood Screw Iron Screw L Wrench C1080BL-IR48-AF Hood C1080BL-IR18-AF Hood Product description No Name 1 Camera 2 Camera Hood 3 RS485 Port 4 Power input connector 5 Video output BNC connector Camera installation Auto Iris connector wiring We recommend to use ‘Adjust Focusing’ mode for camera focusing. 1) Move Tele, Wide to adjust Zoom and Near, Far to adjust Focus. 2) Press joystick shortly to activate Auto focusing. 3) If no further action during 5sec, Adjust Focusing mode will be closed automatically. 3 ※ To get fine focusing, video will be zoomed twice in Adjust Focusing mode. Notice for Auto Focus operation Following conditions might make failure of auto focusing . 1. When there are changes of the scene while Auto Focus is working(sudden movement, appearance or disappearance). 2. When there are sudden change of the brightness. 3. When shooting low contrast image. 4. When there is strong light in the scene. 5. When there is foreign substance on the lens. 6. If auto focusing is failed, please try to adjust focus manually or try auto focus again with the scene which have strong contrast. Monitor connection 1. Use coaxial cable to connect camera with monitor. 2. Monitor needs to support SDI. 3. If monitor does not have SDI input connector, you may use additional SDI to HDMI converter. Cautions when you connect BNC cable The impedance of BNC connector should be 75Ω. If 50Ω connector is used, the transmission distance will be reduced approx. 10m. Caution in cable selection The maximum transmission distance of HD-SDI will vary depending on cable manufacturer and installation environment. Please refer to the below table to select suitable coaxial cable. Cable type Transmission distance Purpose 2V about 100M For analog signal 4C-FB(T), 4C-HFB(T), RG59 about 150M High-foamed, double or triple shielded cable is recommended 5C-FB(T), 5C-HFB(T), L-6CHD, RG6 about 200M Dedicated cable for HD-SDI Power connection Adapter should be DC12V or AC24V. But in case use DC power, Please be careful in the polarity when connect power. OSD control and Firmware upgrade using RS485 communication 1. Connect Webgate’s HD-SDI DVR with camera through RS485. 4 2. Configure PTZ settings such as Protocol(C1080), Baudrate, Address in DVR. 3. Run HD Camera Upgrade program then enter IP address of DVR which is connected to camera and enter channel number of camera. - PC for Firmware upgrade and DVR need to be connected with network. - HD Camera Upgrade program and firmware can be downloaded from Webgate’s website. 4. Select a Firmware and click Load button. Then firmware upgrade will proceed and the camera will reboot automatically after completion. - Image will stop until boot completes. - If image stops over 1min, select Aux1 of selected channel to reboot camera again. 5. After firmware upgrade, DVR or CMS(Control Center) can change camera configuration by controlling camera’s OSD menu remotely. How to use OSD menu OSD menu function If pressing MENU button over 1 sec continuously, OSD menu will be shown. - If OSD menu is not closed, it will be closed automatically in 1 minute. (Changed configuration value will not be saved) - Bold font with underline means factory default. OSD MENU ADJUST FOCUSING LENS Function If pressing Menu button less than 1 sec, Adjust Focusing mode will be activated. - After Focus Adjustment, if you press the MENU button again, Adjust Focusing mode will be closed. - If you do not exit the menu, it will be closed automatically in 1 minute. DC(AF Model) This is DC Iris Auto Focus lens which can make a focus either by automatically and manually. - Autofocus : Autofocusing by joystick one-click. - Zoom(AF) : Autofocusing after Tele, Wide action. - Manual : Move joystick to up(Tele), down(Wide), left(Near),right(Far) to adjust angle and focus manually. 5 - D&N AF : Autofocusing after Day&Night chages DAY Color Maintains Color(Day) mode regardless brightness. & NIGHT B&W Maintains B&W(Night) mode regardless brightness. Auto In accordance with brightness, camera switches Color mode and B&W mode automatically. - LUX LEVEL(LOW, MIDDLE, HIGH) : This value is the standard for Day & Night switching. If high is selected, camera will turn to Night(B/W) mode at higher LUX level than MIDDLE or LOW. - ANTI HUNT(LOW, MIDDLE, HIGH) : This value is the standard for threshold of Day & Night switching. Higher setting value will reduce the flickering by IR-CUT filter switching caused from misjudgment. - DELAY TIME(3~30sec) : Judgment period for Day & Night switching EXPOSURE BRIGHTNESS (8, 0~20) Adjust the brightness of image. The more High value it has, the more bright image it shows SHUTTER AUTO : In accordance with the brightness, shutter speed is automatically changed MANUAL : User can change the shutter speed manually between 1/30 and 1/60000. INDOOR : Optimized to indoor environment. OUTDOOR : Optimized to outdoor environment like fast moving object like car running. ANTI-FLICKER : Removes Flicker problem due to the discordance of light frequency. COLOR DSS (OFF, x2~x10) At night time or very dark condition, it accumulates the amount of light into the image pixels and provides more clear video image. But the higher setting value may make more severe motion blur accordingly. AGC (7, 1~10) It will amplify video gain according to the light condition, but it will also increase noise level. AWB - AUTO : This mode automatically adjusts color white balance between 1,700°K ~ 11,000°K. - PRESET : Shoot a white paper in front of camera and press MENU button then white balance working will stop suitable for the condition. You must do this process again if light condition is changed. - MANUAL : User can select color temperature among 3300°K, 4300°K, 7600°K and adjust the details by 6 KELVIN, R-GAIN and B-GAIN value. CHROMA Adjust Chroma level. (10, 0~20) IMAGE SHARPNESS (5, 0~10) Adjust sharpness. The higher value will show more clear video image H-MIRROR Mirror image. Left and right will be reversed V-MIRROR Flip image. Up and down will be reversed. Digital ZOOM Zoom image by 16 steps. (1~16) PRIVACY This is for privacy zone masking - ZONE NO : Supports total 28 areas (0~27) - ZONE OP : Whether to use or not of selected area X, Y-POS : Set the X,Y start position of an area X, Y-SIZE : Set the width and height of an area COLOR(WHT,YEL,CYN,GRN,MAG,RED,BLU,BLK) : Select color for masking. - TRANS(0~4) : Set transparency of masking. WDR BLC SHADING DET Before execute the SHADING function, shoot a white paper in front of the camera, and do SHADING DET. If not, abnormal video might be output. SHADING It compensates the difference of light caused by lens. To use this function, you should run Shading DET function first at System menu. This 3D backlight compensation function allows bright and dark area to be seen clearly together. - WDR WGT(0~4) : Select image mix ratio. The higher value, the bright part of the image appear more clearly Back light compensation function. - BLC LEVEL(LOW, MIDDLE, HIGH) : Set BLC level. - BLC OSD : Displays BLC area on the screen. - BLC POS-X, Y : Set X, Y start position. - BLC SIZ-X,Y : Set Width and Height size. - MASK : If there is very bright portion inside BLC area, this portion can be removed from the calculation of BLC compensation. This brightness level for masking can be decided by below MASK LEVEL. - MASK LEVEL(0~10) : Set brightness level for Masking. HLC High Light Compensation. If there is very bright portion inside a scene, camera can mask the portion, and the portion is removed from the calculation for exposure control. - LEVEL(5, 0~10) : Set the brightness level for masking. - Color : Set masking color ACE Adaptive Contrast Enhancement. Enhances image quality by raising the 7 (ON, OFF) brightness of dark areas. DNR Reduce image noise under low light condition (LOW, MIDDLE, HIGH) FRAMERATE (25Hz, 30Hz) SYSTEM Power frequency 60Hz(NTSC) : 30Hz(fps) video output Power frequency 50Hz(PAL) : 25Hz(fps) video output MODEL Displays model name CAM ID Max. 8 digits for camera name. Supports alphanumeric and some special characters RS485 ID Set ID for RS485 VERSION Displays firmware version RESOLUTION Set output resolution (1080p/720p). DIGITAL OUT / IR-LED Provides control signal output for sub light which is synchronized with image process. - DURATION(0~20) : Set the one cycle duration of TTL signal output (unit : msec) - POLARITY : Set the output level of TTL signal. (0 : 0V , 1 : 3.3V) * Output cycle is decided by 30Hz/25Hz. EXIT BAUDRATE (9600, 57000) Set RS485 communication speed. RESET Makes all setting values to factory default condition SAVE&EXIT Save configuration and exit menu. EXIT Without saving configuration, exit menu. If there is no further action in menu, after 1 minute, OSD menu will exit without saving changes. Product Specification Model C1080BL-IR48-AF / C1080BL-IR18-AF Video Sensor Type 1/3” 2.1Megapixel CMOS Total Pixels 1920(H) x 1080(V) = 2.1M pixels Scanning System Progressive Scan Min B/W 0.0005Lux@50IRE, F1.2, 3100K, DSS(OFF), AGC(10) Illumination Color 0.2Lux@50IRE, F1.2, 3100K, DSS(OFF), AGC(10) Lens DC 3 ~ 10mm F1.3 type DC Auto Iris Output 1(BNC 1.0 Vp-p, 75Ω) Resolution 1080p 30fps / 25fps HD-SDI SMPTE 292M compatible Lens Video Output 8 Video Control Distance approx. 200m of RG6, 150m of RG59 Control Method OSD(Internal Joystic), DVR, CMS(Control Center) Filter True Day & Night AGC 1 ~ 10 steps Mirror Horizontal / Vertical WDR OFF, 0 ~ 4 setup BLC OFF, LOW, MIDDLE, HIGH ACE OFF, ON DNR OFF, LOW, MIDDLE, HIGH DSS OFF, x2 ~ x10 White Balance AUTO, PRESET, MANUAL Electric Shutter AUTO, MANUAL(12 steps), INDOOR, OUTDOOR ANTI-FLICKER Digital Zoom 0 ~ 16 steps Lens Shading OFF, ON HLC 0 ~ 10 steps Privacy OFF/ON (28 Zones ) Control Interface RS485 Upgrade Firmware / OSD Control Strobe for external light TTL level(3.3v) Electricity Power Consumption C1080BL-IR18-AF DC 12V ± 10%, 4W / AC 24V ± 10%, 6W C1080BL-IR48-AF DC 12V ± 10%, 5W / AC 24V ± 10%, 8W C1080BL-IR18-AF 88(W) x 118(H) x 198(D) mm C1080BL-IR48-AF 120(W) x 140(H) x 254(D) mm C1080BL-IR18-AF 720g C1080BL-IR48-AF 1600g Mechanical Dimension Weight Environments Operation Temp. / Humidity 0 ºC ~ 50 ºC / 0%RH ~ 80%RH Certifications Certifications KC, FCC, CE, RoHS 9 Dimension (unit : mm) C1080BL-IR18-AF C1080BL-IR-48-AF 10 How to upgrade C1080 Series Camera through DVR 1. Check F/W version of DVR and Camera. - Camera : Over v1.2.x (System Version info. v1.0.x doesn’t support remote upgrade) - DVR : Over v3.9.30 - Control Center : Over v2.26.x 2. Connect Com2/Com3(RS-485) port of DVR with RS-485 of C1080 camera. - GND need to be connected as well as + , - when connect RS-485. - Use twist pair cable in case the distance between DVR and Camera is far(over 5m). - Set (Termination) On , in case the distance between DVR and Camera is far (over 5m). 3. If the F/W of DVR is lower than v3.9.30, please update DVR F/W. 4. After upgrade DVR, Please set up Com2 or Com3 port and PTZ as follow. Com 2 / Com 3 PTZ Device PTZ Enable Check(√) Connection Interface : RS-485 Port Dependency : COM2/COM3 RS485 Baudrate : 9600 / 57600 Address : 1~255 Data Bits : 8bits Stop Bits : 1bits Parity : None PTZ Device : C1080 <Note> 1) In case multi cameras in same Serial port will be upgrade, please assign different ID per each camera. EX) C1080B x 3ea in same port RS485 ID is No.1 camera : 1 , No.2 camera : 2 , No.3 camrea : 3. 2) In case multi cameras are updated in same serial port, upgrade will halt when power of camera in same serial line reboot. 5. Please run “HD_Camera_Upgrader” and follow below steps. 1) Run the HD_Cam_Upgrade then select camera F/W to upgrade. 2) Enter IP address of DVR where to-be upgrade camera is connected then select channel and select upgrade file and click ‘Load’ button. <Note> 1) User doesn’t need to enter port number even though connected DVR has specific port. Just enter IP address of DVR. 2) Select correct F/W per model. Otherwise camera might not show correct display. - C1080B : C1080B_v1.xx.x.bin - C1080BM : C1080BM_v1.xx.x.bin - C1080D Series(D,VD,D-IR,VD-IR) : C1080VD_v1.xx.x.bin - C1080AF Series(D-AF,D-IR-AF,VD-AF,VD-IR-AF,BL-IR18-AF,BL-IR48-AF) : C1080AF_v1.xx.x.bin 3) The upgrade time via Network will be various based on environment and Baudrate. - Baudrate 9600 : About 2min 20sec - Baudrate 57600 : About 1min 30sec 3) Once upgrade is done after click ‘Load’ button, it takes about 1min 20sec ~ 2min for upgrade. In this case, camera display looks white as if it is over exposed but please be noted that this is not a bug. But in case the display keeps halted after 2 min, please click on Load button in HD_Camera_Upgrader one more time to proceed with upgrade. 6. Once camera upgrade is done and image looks normal after finishing step 5, then select upgraded channel in single channel mode in Control Center Monitor. Then click on right button of mouse to enter popup menu and go to “Camera Setup”. 7. Camera OSD menu is activated when click Camera Setup menu and there will be control window at the right bottom side of the screen. <Note> 1) The possible delay could be occurred during menu control based on network situation. 2) Make single channel in DVR then click PTZ button of DVR then it will be same as control in C.C (Control Center). 3) ESC button is not used. 8. Please pay attention while F/W upgrade into the latest version and F/W upgrade with wrong F/W will make camera work abnormally. Please refer to below classified table to check F/W version. 1) Directions for upgrade of camera + If the camera is upgraded with wrong F/W, camera will not be working normally. + C1080B/BM model can be upgraded with the latest F/W regardless of mechanical part and lens. + Please upgrade B type after checking lens. + Please be noted not to disconnect power and RS485 connection during upgrade + The image of camera will remain stop while it is being upgraded and it takes maximum 3 minutes to complete upgrade. + Please try upgrade one more time once the camera is not working normally after 9 minutes from the beginning of upgrade. + A type model without RS485(green, white) line in cable will not be supporting upgrade. 2) Upgrade classified table + By mechanical part = A type : OLD mechanical part, B type : NEW / by lens = a type : OLD, b type : NEW Classification A type By mechanical part F/W Non AF Series : C1080BM_v1.13.0 AF Series : C1080AF_v1.13.0b B type Classification By mechanical part F/W Classification Non AF Series : C1080VD_v1.14.0 a type b type By lens F/W AF Series C1080AF_v1.13.0a Upgrade not required