1
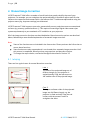
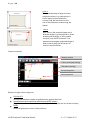
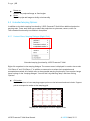
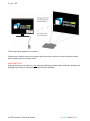
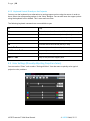
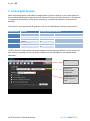
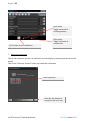
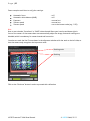
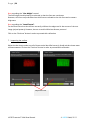
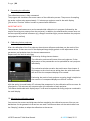
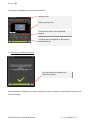
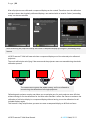
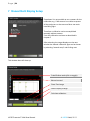
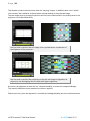
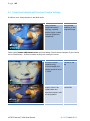
User Manual for VIOSO Presenter Multi program version: 4.2.1 manual version: 2.2 Table of Contents 1 PREFACE .............................................................................................................................1 2 INSTALLATION / SETUP .....................................................................................................2 2.1 2.1.1 2.2 2.2.1 2.2.2 3 Activation ........................................................................................................................................... 2 HARDWARE SETUP AND CONFIGURATION ................................................................................................. 2 Hardware Setup ................................................................................................................................. 2 Projector Configuration ..................................................................................................................... 3 USING VIOSO PRESENTER™ MULTI..................................................................................4 3.1 PROGRAM COMPONENTS ............................................................................................................................ 4 3.2 TOOLBAR ...................................................................................................................................................... 5 3.3 DISPLAY PICTURES & VIDEOS .................................................................................................................... 6 3.3.1 3.3.2 3.3.3 3.3.4 4 SOFTWARE INSTALLATION AND ACTIVATION ........................................................................................... 2 Media Playback ................................................................................................................................. 7 Using the Slideshow ........................................................................................................................... 7 Importing PowerPoint Presentations ................................................................................................. 8 File Types ........................................................................................................................................... 9 3.4 USING DEVICES ............................................................................................................................................ 9 3.5 OPTIONS .................................................................................................................................................... 10 3.6 LOAD AND SAVE........................................................................................................................................ 11 3.7 PRESENTATION AREA .............................................................................................................................. 12 MANUAL IMAGE CORRECTION ....................................................................................... 13 4.1 WARPING ................................................................................................................................................... 13 4.2 EXTENDED WARPING OPTIONS ............................................................................................................... 15 4.2.1 4.2.2 4.2.3 4.3 Context Menu, Warping Dialogue (Right-Click) ............................................................................... 15 Directly on the Projector .................................................................................................................. 16 Keyboard Control Directly on the Projector ..................................................................................... 18 COLOR SETTINGS (MANUALLY ADJUSTING PROJECTION COLORS) ....................................................... 18 5 SCREEN SPLIT FEATURE ................................................................................................ 20 6 CAMERA-BASED MULTI DISPLAY SETUP ...................................................................... 22 6.1 IMPORTANT HINTS AND CONSIDERATIONS ............................................................................................ 22 6.2 EXECUTING CAMERA-BASED SETUP FOR A BLENDED DESKTOP AND MULTI DISPLAY ......................... 22 6.3 CREATING A COMPOUND DISPLAY OUT OF SINGULARLY CALIBRATED PROJECTORS ............................ 32 7 MANUAL MULTI DISPLAY SETUP ................................................................................... 34 8 APPLYING SOFTEDGE BLENDING ON A WINDOWS 7™ DESKTOP .............................. 36 8.1 DESKTOP HOOKING .................................................................................................................................. 36 8.2 DEFINING A REGION OF INTEREST (ROI) ................................................................................................ 38 9 FREQUENTLY ASKED QUESTIONS AND ANSWERS ...................................................... 41 9.1 PROJECTION EXAMPLES WITH INCORRECT CAMERA SETTINGS ............................................................ 42 10 VIOSO PRESENTER AUTOMATION................................................................................. 44 10.1 CALLING THE VIOSO PRESENTER PROGRAM FILE................................................................................ 44 10.2 OVERVIEW OF COMMAND LINE PARAMETERS ........................................................................................ 45 11 OVERVIEW OF KEYBOARD SHORTCUTS ....................................................................... 46 11.1 KEYBOARD COMMANDS FOR THE PROGRAM AND PROJECTION INTERFACE ........................................ 46 11.2 DIRECT WARPING KEYBOARD COMMANDS (PROJECTOR OR DISPLAY) ................................................ 47 12 CONTACT INFORMATION / HELP ................................................................................... 48 Page |1 1 Preface We are pleased you have decided to purchase the VIOSO Presenter™ Multi software from VIOSO. With VIOSO Presenter™ Multi, you have acquired a versatile projection tool that will significantly simplify the use of your projectors and offer entirely new projection options. This user manual will help you configure and operate the system. It describes the functions of the VIOSO Presenter™ Multi software. For help with specific hardware specifications, please consult the documentation provided by the respective manufacturer. Do you have suggestions for improvements? Do you require additional information? We are always working on our documentation and appreciate your assistance. Please send your suggestions, complaints, constructive criticism or compliments to: info@vioso.com. Note: Please be advised that this e-mail address is not intended for technical support. We take your feedback seriously and use it to improve the VIOSO Presenter™ Multi documentation. All the best with your projections. Your VIOSO team VIOSO Presenter™ Multi User Manual © VIOSO GmbH, 2011 Page |2 2 Installation / Setup This chapter contains information for setting up and configuring the projectors and camera as well as installing and uninstalling VIOSO Presenter™ Multi. 2.1 Software Installation and Activation You can install VIOSO Presenter™ Multi by inserting the product CD, or download it directly from http://download.vioso.com. In either case, you may test our software for 30 days free of charge. The installation wizard starts when double clicked. Please refer to the installation procedure for further details. 2.1.1 Activation In order to prevent unauthorized use of VIOSO Presenter™ Multi, the software you have purchased must be activated. The activation dialogue is automatically displayed when VIOSO Presenter™ Multi is started. You may choose to activate the software immediately or test it for up to 30 days. Please note that activation should take place within the 30-day trial period in order to guarantee a smooth activation process. Note: The VIOSO Presenter™ Multi software can only be activated once! If you wish to use VIOSO Presenter™ Multi on a second computer or if you delete the software, you require a new license prior to installation. 2.2 Hardware Setup and Configuration This section contains all required information regarding the setup and configuration of the camera and projectors. Tips for optimum camera setup are also included. 2.2.1 Hardware Setup In order to begin projecting or carrying out automatic image correction, all required components (notebook / PC, projectors and camera if applicable) must be connected properly and the software must be installed. VIOSO Presenter™ Multi User Manual © VIOSO GmbH, 2011 Page |3 2.2.2 Projector Configuration Ensure all projectors are properly connected to your PC. Focus the projectors onto the desired projection surface. The projection should be as clear as possible, and the brightness of the surroundings should be adapted according to the light output of the projectors. Ensure that the projectors are set up so they are stable, since they should not be moved during and after calibration. VIOSO Presenter™ Multi User Manual © VIOSO GmbH, 2011 Page |4 3 Using VIOSO Presenter™ Multi The fundamental use of VIOSO Presenter™ Multi is easy to explain: Simply drag & drop images, videos and PowerPoint presentations into the program pane in order to display them. Images and videos can be output to the projectors quickly and easily. This section of the manual explains specific VIOSO Presenter™ Multi functions. The manual is based on the structure of the 3 main categories (Playback, Image Correction, Extras) in the user interface. First the essential program components are first described in more detail: 3.1 Program Components Playlist Minimize program Show extras Close program Main menu and toolbar Playlist With this list you can manage the media files you want to show. Drag & drop and a context menu (on right-click) are available. For more information on supported file formats, please consult Section 3.3.4. Minimize program Clicking this icon minimizes the program interface, offering you a full view of your desktop. You do not have to close the program in order to edit your projection slides or carry out other tasks on your computer. Show Extras Clicking this icon launches a context menu with various items like “Help”, “License information”, etc. VIOSO Presenter™ Multi User Manual © VIOSO GmbH, 2011 Page |5 Close program Please click this icon once you have successfully completed your projection or presentation and wish to close the program. You are asked to confirm this choice before the program closes. Main menu and toolbar Use the items in the menu to access program functions directly; the currently selected tool is identified in color. Please see Section 3.2 for more information about the toolbar. Note: Some of the functions described here may not be available depending on the version of VIOSO Presenter™ Multi you selected. Function area and function bar This is the main part of the program. Various windows, buttons and input fields are displayed in this area, depending on the selected function. 3.2 Toolbar The toolbar provides frequently used functions in the form of tools. Home Device Manager Media Manager Colors Warping s Options Desktop Hooking Wall correction Home: Overview over the main functions of VIOSO Presenter™ Multi Media Manager: Media Manager is used for file administration and slideshow management in addition to offering a preview function. Please see Section 3.3 for more information. Device Manager: This is where you can change the settings for connected devices. Please see Section 3.4 for more information. Colors: This is where you can correct color rendering on the projectors. Please see Section 3.4 for more information. Warping: This is used to adjust the shape of the projection image, which is described in Section 0. Wall Correction: This is used to adjust the blending area of the multi display manually and to VIOSO Presenter™ Multi User Manual © VIOSO GmbH, 2011 Page |6 adjust how far how far the geometric correction is used. Options: This is where you can change the program settings such as the language and startup behavior. Please see Section 3.4 for more information. Desktop Hooking: This button hooks the Windows Desktop on to your calibrated multi display 3.3 Display Pictures & Videos With adding files to the playlist you can easily arrange your content (images, videos & PowerPoint presentations). Fast, simple playback on the projectors is supported. Click the “Media Manager” tool to open this function area. The following graphic illustrates the various options and functionality: Preview pane (5) Context menu (1) Show next/previous item in playlist Show/hide playlist (2) Sort entries of playlist Delete marked entry from list VIOSO Presenter™ Multi User Manual (4) Start slideshow Add media to list (3) Start slideshow (quick) Delete complete list © VIOSO GmbH, 2011 Page |7 3.3.1 Media Playback The functions to organize media files are briefly presented below: To add files, use drag & drop to bring them into the program pane or load them using the function bar button. Use the display buttons (1) or the <Right Arrow> / <Left Arrow> on the keyboard to control the playback of your content according to your requirements. Automated playback in the form of a slideshow is described in the next section. To sort the files in your presentation, use drag & drop to change the sequence. Drag a file to the desired position and drop it or use the positioning buttons (2). When you remove files from the playback list, the files themselves are not deleted. The context menu (5), which appears when you right-click the media playback list or Media Manager, offers additional functions. The display functions are also listed under “Display” in the menu. Notes: If you are using several projectors or if you want to change the output device, you can use Device Manager to make changes to the output device settings. See section 3.4 for more information. To warp, move, turn or rotate the projection image or make color adjustments, click the Warp tool in the navigation menu. More information about these functions is found in Section 4 of the manual. 3.3.2 Using the Slideshow All of the files in the playback list can be played back in the form of a slideshow. This means the next respective media file is displayed after a specified period of time. You can also specify whether the slideshow should start over at the beginning as soon as the end is reached (loop). Click the button (4) to open the slideshow options. There you can enter the display duration and select continuous playback, and then confirm your settings. To quick-start the slideshow, click the button (3), press <F6> on the keyboard or click “Display Start Slideshow” in the menu. To pause the slideshow, click the button (3) again or select “Display Pause Slideshow” from the menu. VIOSO Presenter™ Multi User Manual © VIOSO GmbH, 2011 Page |8 3.3.3 Importing PowerPoint Presentations If you want to display a PowerPoint presentation, bring it into the program pane using drag & drop or select “Files Import PowerPoint File” from the menu. Here you have two options: 1. PowerPoint without animations (recommended) If you have no integrated animations in your PowerPoint file or if you do not need them, you can simply use drag & drop to add the file to the file list. VIOSO Presenter™ Multi will now export the individual slides as images and add them to the playback list. The individual files appear in the list with preview thumbnails and can be sorted and moved as desired. Now you can display single slides as described in Section 3.3.3 or launch a presentation according to Section 3.3.2. The files that are stored for this process can be deleted by selecting “Extras / Clear PPT Cache” from the menu. 2. PowerPoint including animations If animations are integrated into a presentation and these are to be included, a link has to be created from the existing file that is brought into the program pane using drag & drop. This opens PowerPoint in the usual display mode upon double-clicking in the VIOSO Presenter™ Multi file list. Return to the program interface as usual by pressing the ESC button; now the next file in the file list can be selected. Note on the playback of PowerPoint files: For the playback of PowerPoint slides, PowerPoint 2007 or newer needs to be installed on the computer in either case. VIOSO Presenter™ Multi User Manual © VIOSO GmbH, 2011 Page |9 3.3.4 File Types The following file types are supported: Images: Color and grayscale Windows Bitmap Format JPEG File Interchange Format Portable Network Graphics Formats Tagged Image File Format file extension BMP JPG, JPEG PNG TIF, TIFF Videos: Note: additional codecs must be available and proper configured file extension Windows Media Video Audio Video Interleave WMV AVI Microsoft PowerPoint: Note: Microsoft Office 2007 or newer must be installed PowerPoint Binary PowerPoint 2007 / XML file extension PPT PPTX Note regarding video playback: In order to play back videos, the corresponding video codecs must be installed on your computer and configured in such a way, that they are used by generic DirectShow-players . Playback of some video files may fail if the required codecs are missing or not proper configured. Please refer to the documentation and configuration utilities of the codec packs. This software does not include video codecs. 3.4 Using Devices VIOSO Presenter™ Multi also allows you to access connected input devices (e.g. a live camera) for playback in addition to files. In addition, the selected output devices (projectors or displays) can be changed and adjusted. Click the “Device Manager” tool or select “Settings Device Manager” from the menu to open Device Manager and display all available input and output devices. Use the mouse to select the input device (blue on the screen) and output device (green on the screen) to be used. VIOSO Presenter™ Multi User Manual © VIOSO GmbH, 2011 P a g e | 10 As soon as the corresponding device is active and the corresponding functions are available, the box below the device (3) is activated so that additional settings can be selected. (1) Input devices (2) Output devices (3) Device-specific functions Note: If the desired devices are not available, check the connections and ensure the drivers are properly installed. There may be a brief recognition delay after a new device is connected. 3.5 Options In order to change general program settings, choose this tool by clicking the button on the toolbar or select “Extras Options” from the menu. Screen split: This setting splits a compound display created by the graphics cards into physical distinct displays for a camera –based setup (see chapter 5 for more details about splitting displays). Language This is where you can change the language for the program interface. VIOSO Presenter™ Multi User Manual © VIOSO GmbH, 2011 P a g e | 11 Run minimized If activated, the program minimizes immediately after startup as a taskbar icon. This comes in handy when setting up a kiosk or installation. Run with system startup If activated, the program starts immediately after Windows startup. This comes in handy when setting up a kiosk or installation. Check for updates at next startup If activated, the program checks via internet if there is an update or patch for the current installed version. In this case an appropriate notice is displayed. Load configuration file automatically If this option is activated, the program and projector settings are automatically loaded from the specified *.sps file when the program starts. 3.6 Load and Save The load / save function allows you to save your correction settings as a project and load them at a later date. In order to do so, select “Files Load settings” or “Files Save all settings” from the menu. File Manager opens. Please select the desired target directory. Note: The playback list is also saved and loaded correctly as long as the image and / or video files are still found at the location where they were upon saving. VIOSO Presenter™ Multi User Manual © VIOSO GmbH, 2011 P a g e | 12 3.7 Presentation Area The presentation area includes a context menu displayed by right-clicking. This menu contains the main functions you require during a presentation. Open context menu via right-click Select “LIVE! off” from the context menu to close the presentation area. VIOSO Presenter™ Multi User Manual © VIOSO GmbH, 2011 P a g e | 13 4 Manual Image Correction VIOSO Presenter™ Multi offers a number of useful tools that greatly simplify the use of your projectors. For example, you can straighten the projected image in seconds or adjust specific color values to the respective environment with a few mouse-clicks. Troublesome adjustments using the projector menu (e.g. keystone settings) are eliminated. VIOSO Presenter™ Multi supports true-color, geometrically correct projections onto unconventional surfaces (e.g. masonry, painted walls etc.).* This requires connecting a digital video camera (see system requirements) to your notebook or PC in addition to your projectors. All of the image correction functions are described below. Manual correction options are described below, followed by a more detailed explanation of automatic image correction. Note: Some of the functions are not included in the free version. Please purchase the full version to access these functions. Some functions are only supported and / or activated after automatic image correction. Until this process is completed, those functions are grayed out and therefore inactive. To change the output device, use Device Manager as described in Section 3.5. 4.1 Warping There are four typical cases for manual distortion correction: Case 1: The sides of the projected image are of different length, e.g. the projector is angled laterally. Drag the red corners to the smallest size of the projected image. Case 2: The upper and lower sides of the projected image are of different length, e.g. the projector is tilted vertically. Drag the red corners with the mouse in order to straighten the sides. VIOSO Presenter™ Multi User Manual © VIOSO GmbH, 2011 P a g e | 14 Case 3: The projected image is larger than the projection surface, e.g. the projector is too far away from the projection surface. Drag the red corners to the size of the projection surface using the mouse. Case 4: All 4 sides of the projected image are of different length, e.g. the projector is tilted laterally and vertically. In this extreme situation, only VIOSO Presenter™ can generate a rectangular projected image. In order to do so, drag the red corners as shown in the illustration. Function overview: Warping toolbar Corner point (keystoning) point Side point (scaling) Rotate projection Move projection Options via right-click on drag area: Grid size X/Y: Increase and decrease number of grid points for manual distortion Interpolation and extrapolation method (only WARP edition) Toggle between linear and cubic interpolation (cubic is for projection on curved surfaces) Reset: Resets all grid points to their initial positions. VIOSO Presenter™ Multi User Manual © VIOSO GmbH, 2011 P a g e | 15 Rotate to: Rotates the projected image to fixed angles. Mirror: Flips the projected image vertically or horizontally 4.2 Extended Warping Options In addition to the basic warping functionality, VIOSO Presenter™ Multi offers additional projection warping tools. These tools allow you to adapt the projection to cycloramas, corners, stairs etc. This extended functionality is available in two places: 4.2.1 Context Menu, Warping Dialogue (Right-Click) Extended warping functionality, VIOSO Presenter™ Multi Right-click anywhere in the warping dialogue. The context menu is displayed. It contains the entries “Grid Points X” and “Grid Points Y” in addition to two entries to select the interpolation and extrapolation method, all of which refer to the extended warping functionality. You can also change these settings in the “warping dialogue”. You will find it by selecting “Warp” and then clicking “Options”. Grid points: Use this function to insert warping support points on the horizontal and vertical axis. Support points correspond to nodes on the warping grid. Refining the warping grid with 4x4 support points VIOSO Presenter™ Multi User Manual © VIOSO GmbH, 2011 P a g e | 16 Interpolation method: Here you switch between linear and cubic support point interpolation. Linear interpolation is suitable for corners, edges etc. while cubic interpolation is suitable for rounded surfaces. Cubic interpolation is the default. Linear support point interpolation: For corners, stairs etc. Cubic support point interpolation: For cycloramas, columns etc. Extrapolation method: This is where you select the extrapolation method used for cubic warping. The changes affect the details. Making changes to these settings is generally not required. 4.2.2 Directly on the Projector Once you check off “On Projector”, you can easily warp the projection image directly by using the mouse. In order to do so, select the checkbox and then use the available support points (see preceding section) visualized as red spheres in the projection image: = Support point = Active support point Support point visualization on the projector Now move the mouse out of the main screen onto the projector. VIOSO Presenter™ Multi User Manual © VIOSO GmbH, 2011 P a g e | 17 The mouse pointer appears as crosshairs. Position the crosshairs close to the support point you want to move. An inverse selection shows which support point is currently active. IMPORTANT NOTE: Warping directly on the projector is not supported following camera-based calibration. However, all warping functionality in the warping dialogue remains available. VIOSO Presenter™ Multi User Manual © VIOSO GmbH, 2011 P a g e | 18 4.2.3 Keyboard Control Directly on the Projector You may use the keyboard as an alternative to moving support points using the mouse. In order to do so, select the corresponding options in the “Warp” dialogue. You can also move the support points using the keyboard in this window. This is even more accurate. The following keyboard commands are now available to you: F1 Help F2 Shows the user interface when hidden behind the output F5 Reduce the horizontal control points (X-axis) F6 Increase the horizontal control points (X-axis) F7 Reduce the vertical control points (Y-axis) F8 Increase the vertical control points (Y-axis) Fine-tune the selected control point SHIFT + Coarse adjustment of the selected control point TAB Jump to the next support point SHIFT + TAB Jump to the previous support point 4.3 Color Settings (Manually Adjusting Projection Colors) You can use the “Colors” tool or select “SettingsColors” from the menu to quickly solve typical projection color problems: VIOSO Presenter™ Multi User Manual © VIOSO GmbH, 2011 P a g e | 19 Contrast/brightness The sliders allow you to control the contrast and brightness of the projected image in detail. Color channels Three sliders allow you to control each color channel of the projected image. This affects the overall brightness until the sliders are synchronized. VIOSO Presenter™ Multi User Manual © VIOSO GmbH, 2011 P a g e | 20 5 Screen Split Feature Some multihead graphics cards allow the combination of distinct displays to one entire display so that the Windows desktop is spanned over all outputs. The look and native behavior of all programs is adapted on the dimension of the entire display (e.g. a maximized window is covering entire desktop). This feature is not supported by all graphics cards and is called different by each manufacturer: Manufacturer Product Creating an entire Desktop NVIDIA x GeForce Quadro ATI Radeon FirePro Matrox Dualhead2Go Triplehead2Go not supported supported as „Mosaic“ supported as „Display Group“ standard support VIOSO Presenter™ Multi enlists such entire displays as one display per default. For this reason the split-feature is available, so that the distinct displays can be used again for the camera based calibration. Options Selection of possible display arrangments Selection of available graphics cards VIOSO Presenter™ Multi User Manual © VIOSO GmbH, 2011 P a g e | 21 The split-feature determines how many projectors were combined to an entire desktop as well as how they are arranged and to which graphic they are connected. List of available graphics cards List of possible display arrangements Examples: Projector alignment 1 2 1 2 3 4 Windows desktop Split setting 1 1 Important Hint: In order to use the split-feature all projectors must be set to the same resolution. VIOSO Presenter™ Multi User Manual © VIOSO GmbH, 2011 P a g e | 22 6 Camera-based Multi Display Setup VIOSO Presenter™ Multi allows you to create a projection out of multiple displays. The program is able to identify the position and overlap of the used displays and blends them to create a big single display. Please ensure that both the projector and your camera are properly connected to your PC or notebook. 6.1 Important Hints and Considerations The visual result of a projection onto a non-white and non-even surface will not ever match the result as if projecting onto a white canvas because of physical reasons. Please consider this fact whenever you plan to project onto an unusual surface. There are some limitations regarding suitable projection surfaces: The projection surface and projectors have to remain motionless. The surface must not be so dark that the projectors are unable to create an image of sufficient brightness and contrast. Reflecting surfaces such as shimmering or gleaming synthetic materials cannot be used. Metal and glass surfaces are also unsuitable. Ambient light must be reduced to a minimum. The correction effect becomes more pronounced as ambient light is reduced. 6.2 Executing camera-based setup for a blended desktop and multi display Before starting the calibration, the projectors should be adjusted manually so that the overlap of the projectors is as accurate as possible. Choose menu item “Settings Wall Correction” in the main menu. Click button (1) in order to launch the calibration wizard. VIOSO Presenter™ Multi User Manual © VIOSO GmbH, 2011 P a g e | 23 After setup: Toggle correction of surface geometry (1) Click here to start calibration. After setup: Toggle correction of surface color 1. Select your projectors Choose the projectors you want to combine to a entire display by selecting them from the list shown. Click on the “Continue” button in order to proceed with calibration. Select projectors Now click this button to proceed to the next step VIOSO Presenter™ Multi User Manual © VIOSO GmbH, 2011 P a g e | 24 2. Select surface and calibration type Select your surface as described in the “Select surface” window. The options “proceeding setup” and “manual setup” will be explained in chapter 6.3 and 7. Further options for the Calibration are available under “More options” Click on the “Continue” button in order to proceed with calibration. Surface type Calibration type More Options 3. Select camera Choose from the list of connected cameras the one you want to use for the calibration. Click on the “Continue” button in order to proceed with calibration. Select camera VIOSO Presenter™ Multi User Manual © VIOSO GmbH, 2011 P a g e | 25 4. Align your camera with the projection surface The camera is an essential component for whole calibration prozess. Configure the camera so that the entire surface being used is visible and the entire projection is captured by the camera: Correct camera image Incorrect camera image Incorrect camera image Important considerations regarding the use of a camera: The more realistic the camera image, the better the calibration results. In many cases, automatic calibration fails as the result of incorrect camera settings. To adjust the camera right, use the “Options” and “Options 2” Button Alignment of the live camera Picture Options VIOSO Presenter™ Multi User Manual © VIOSO GmbH, 2011 P a g e | 26 Deactivate the camera’s auto-focus feature and focus the camera manually. Deactivating other automatic camera settings such as white balance or brightness adjustment is also essential. Experiment with different brightness levels on your camera in order to achieve optimum correction results. VIOSO Presenter™ Multi User Manual © VIOSO GmbH, 2011 P a g e | 27 Some examples and hints to verify the settings: Automatic focus Automatic white balance (AWB) Exposure Shutter speed Shutter speed = off = off = manual set = manual set = set to the lowest value (e.g. 1/50) Hint: How to test whether “Autofocus” or “AWB” is deactivated: Move your hand up and down right in front of the camera. If the camera does not automatically adjust the image, automatic settings are disabled, which is mandatory for camera-based wall correction. You also can mask the live Picture shown in the alignment window with the tools on the left side, so that the camera only recognizes the important areas. Masking tools Masking Click on the “Continue” button in order to proceed with calibration. VIOSO Presenter™ Multi User Manual © VIOSO GmbH, 2011 P a g e | 28 5. Adjusting the camera brightness You can manually adjust the brightness using the corresponding control. The color of the surface visible in the camera image must be optimized for color rendering that is as realistic as possible – not too dark or too bright. Live image for instant feedback Avoid a bad camera image. Try to get a more realistic image of the surface. Click on the “Continue” button in order to proceed with calibration. 6. Adjusting the camera interference level In the next step, select the interference level used for rastering the test patterns. The objective is to obtain continuous lines with no visible camera interference (see illustration below). Experiment with the controls in order to achieve optimum results. Lines are too thin and not continuously visible. Lines are too thick and no longer visible at the top edge. Noise is visible in the centre of the image. The level is set too high. VIOSO Presenter™ Multi User Manual © VIOSO GmbH, 2011 P a g e | 29 Note regarding the “Line Weight” control: The line weight should primarily be selected so that the lines are continuous. However, thin lines are preferable since thick lines are related to the risk of excessive camera brightness. Note regarding the “Level Control”: Set the level control so that all lines are easily visible at the edges and in the corners of the test image (striped pattern). However, be sure to avoid visible interference patterns! Click on the “Continue” button in order to proceed with calibration. 7. Inspecting the surface Adjust the dot size to make sure all of them can be identified correctly. Avoid red dots these mean mismeasurement. Click on the “Continue” button in order to proceed with calibration. Adjust dot size VIOSO Presenter™ Multi User Manual © VIOSO GmbH, 2011 P a g e | 30 8. Processing the calibration The calibration process is fully automated. The progress bar visualizes the current status of the calibration process. The process of sampling the entire surface takes approximately 1 ½ minutes per projector used in the multi display. Click on the “Continue” button in order to proceed with calibration. IMPORTANT NOTE: The projectors and camera must not be moved while calibration is in progress (indicated by the output of moving test patterns from the projector). In addition, the measurement process must not be interrupted by external influences (e.g. changes in ambient light, persons between the projector and projection surface). 9. Calibrating further projectors After the calibration of the first projector the assistant will pause and show you the result of the measurement. If there are errors in the displayed image simply go back to the adjustment of the parameters and optimize them for the next measurement. Repeat until the result is satisfying. Continue by clicking the next button. The calibration assistant will pause after each projector. So the adjustments of the parameters can be optimized for each projector individually. The evaluation window contains the tools known from chapter 4. All changes to the virtual canvas taking place her with these tools will not affect the compound display to be created. Evaluating the result of each projector scanning singly is helpful on the creation of a compound displays on difficult surfaces. With the option “proceed hands off” activated the parameters for the calibration will be set once for all projectors. The assistant will not pause after the calibration of each projector. To achieve the blended multi display steps 5 to 8 must be repeated for every projector contained in the multi display. 10. Adjusting the calibration results You can test the contrast and brightness before completing the calibration process. Also you can decide how far the geometrical corrections are used. Furthermore there are the tools known from the “Warping” window, to adapt the calibration to the canvas. VIOSO Presenter™ Multi User Manual © VIOSO GmbH, 2011 P a g e | 31 The settings established at this point are retained. Warping tools Adjust geometry use This contrast refers to the calibrated images This brightness is adjusted on the camerameasured values 11. Finishing the calibration process Click this button to complete the calibration process After calibration is complete, you have to assign your input to the new “camera based” output in the “device manager”. VIOSO Presenter™ Multi User Manual © VIOSO GmbH, 2011 P a g e | 32 Assign designated input to ”camera based” output and apply After that you can play back your digital content as usual by dragging your images or videos under the menu item “Pics/Videos” or directly from the desktop via “Device Manager”. During playback, you can manually adjust the brightness and color of the displayed content as required under the menu item “Color Settings”. You can also format the shape of the projection as desired via “Warping”. 6.3 Creating a compound display out of singularly calibrated projectors When creating a multi display on difficult surfaces it can be helpful to handle each projector individually. To do so simply choose only one of the available projectors form the list of the calibration assistant. Proceed as described in chapter 6. Calibrate the projectors one by one VIOSO Presenter™ Multi User Manual © VIOSO GmbH, 2011 P a g e | 33 After all projectors are calibrated a compound display can be created. Therefore start the calibration assistant choose the singularly calibrated displays, now marked with an asterisk. Select “preceeding setup” on the next window. After calibrating the projectors one by one create a compound display by using the “preceeding setup” feature VIOSO Presenter™ Multi will now calculate a compound display out of the selected prior calibrated projectors. The result will only be satisfying if the camera and the projectors were not moved during the whole calibration process. The camera must capture the whole scenery and is not allowed to move during the calibration of all single projectors Calibrating each projector one by one allows you to optimize your for each projector more efficient without having to run the calibration for the other ones. Besides it offers the chance to enhance the calibration of a distinct display in a compound display without having to run the calibration for all included displays again. This feature is very helpful when you want to create a compound display on difficult surfaces. VIOSO Presenter™ Multi User Manual © VIOSO GmbH, 2011 P a g e | 34 7 Manual Multi Display Setup Sometimes it is not possible to use a camera for the calibration, e.g. if the camera is not able to capture all the projectors or the canvas reflects too much interfering light. Therefore a calibration can be accomplished manually without camera. Start the calibration assistant as described in chapter 6. After selecting the target displays on the next window the manual calibration type can be chosen by selecting “manual setup” and clicking next. This window then will show up: Scale/Deform mode (click to toggle) Mouse inverted Show Test image Select Display to align Calculate calibration VIOSO Presenter™ Multi User Manual © VIOSO GmbH, 2011 P a g e | 35 This window contains the tools know from the “warping” chapter. In addition there is the “mouse invert button” that should be activated when working looking at the projected image. The test image must be arranged in position and size so that aberrations in the overlap area of the projectors can be identified easily. Use the tools to position the test image for an optimal better visualization of the alignment of the projectors Use the tools to position the projectors so that the test image is aligned on all projectors; the overlapping area is visible with higher brightness. As soon as the alignment is done click on “calculate blending” to create the compound display. This manual calibration can be reworked as often as required. Please note: Every time the alignment is touched the softedge blending has to be calculated anew. VIOSO Presenter™ Multi User Manual © VIOSO GmbH, 2011 P a g e | 36 8 Applying softedge blending on a Windows 7™ desktop VIOSO Presenter™ Multi is intended to create compound displays out of multiple projectors and comes with an integrated player to show images and videos on such compound displays. But VIOSO Presenter™ Multi additionally allows you to use a wide range of applications on the whole blended, corrected and calculated compound display. Therefore the soft edges (with content duplications) and all corrections are embedded into the render chain of the Windows 7TM desktop. This is called “Desktop Hooking”. 8.1 Desktop Hooking After accomplishing the calibration as described in chapter 6 and 7 the compound display is found in the display list of the “device manager”. Assign “Windows Desktop” to “Compound Display” and apply. De/activate hooking by clicking the “Desktop” Button After the desktop hooking is enabled you can start your applications on the whole blended display. Please note: - The mouse curser is handled differently in 32bit and 64bit applications. Because of that there may be two mouse cursors visible at 64 bit versions of Windows. To avoid this effect there are two VIOSO Presenter™ Multi shortcuts on your desktop: o “VIOSO Presenter Multi for 64 bit applications”: Starting this mode shows one mouse cursor over all 64 bit applications; when hovering above 32 bit applications a second cursor appears. o “VIOSO Presenter Multi for 32 bit applications”: Starting this mode shows one mouse VIOSO Presenter™ Multi User Manual © VIOSO GmbH, 2011 P a g e | 37 cursor over all 32 bit applications; when hovering above 64 bit applications a second cursor appears. Note that the entire Windows desktop is such a 64 bit application, therefore two mouse cursors are displayed when hovering over typical windows components like start menu, task bar, etc. - For an optimal user experience the display management should be set to a spanned display ( NVIDIA: “Display Group”, ATI: “Mosaic”) VIOSO Presenter™ Multi User Manual © VIOSO GmbH, 2011 P a g e | 38 8.2 Defining a Region of Interest (ROI) When combining multiple displays to a “Display Group” or “Mosaic” the graphic card adds the resolution of the single displays. Since we have an overlap between the projectors the resolution the graphic card sends is higher than the actual resolution. 1024x768 1024x768 1024x768 Example: Resolution of three displays 1024x768 1024x768 1024x768 Native resolution created when displays are combined (3072x768) 1024x768 1024x768 1024x768 Actual resolution resulting from the graphic card resolution minus overlap (2772x768) This difference between the output resolution and the native resolution causes a deformation of the the hooked Desktop. The option “Desktop ROI” allows you to prevent the deformation effect by cutting parts of the desktop content. The field “Left” and “Top” describe the starting point of the region to be displayed. Thus the value “0/0” means the upper left corner. The next two fields specify the number of pixels in height and width that are to be displayed. VIOSO Presenter™ Multi User Manual © VIOSO GmbH, 2011 P a g e | 39 Principle of ROI: Original content without ROI Left Top Starting Point described by ”left” and “top” Height Width Cropped content with ROI activated VIOSO Presenter™ Multi User Manual © VIOSO GmbH, 2011 P a g e | 40 Changes to the ROI parameters are applied instantly if desktop hooking is activated. The changes must be confirmed within 15 seconds. Hint: - Make sure that important areas like the taskbar not get cut out. If accidently the ROI was set to values so that nothing can be identified anymore or applications can not be reached press “Ctrl + Alt + Del” and restart your system. VIOSO Presenter™ Multi User Manual © VIOSO GmbH, 2011 P a g e | 41 9 Frequently Asked Questions and Answers What is VIOSO Presenter™? VIOSO Presenter™ is an innovative new technology suitable for any projector. It supports distortionfree projection onto almost any surface. How does VIOSO Presenter™ Pro wall correction work? VIOSO Presenter™ Pro initially projects some test patterns onto the surface. This process calculates the surface characteristics, shape and color. VIOSO Presenter™ uses this information in order to support real-time corrected projection. Do I need a special projector to use VIOSO Presenter™ Pro? No, VIOSO Presenter™ works with any conventional projector. Both DLP and CRT projectors are supported. Do I need a special camera to use VIOSO Presenter™? Please see the section on “Hardware Setup and Configuration” for requirements regarding the camera used for calibration. How can I tell what graphics card I have? Right-click on the desktop. Information about your hardware, including your graphics card, can be found under Properties / Settings / Advanced. This information can also be found under Control Panel / System / Hardware / Device Manager. Do I require total darkness during calibration? While total darkness is desirable, it is not essential. In principle, the projector must be able to provide suitable coverage of the selected surface. In general, the following applies: The less ambient light the better. What surfaces are not suitable for the use of VIOSO Presenter™? VIOSO Presenter™ does not work on surfaces where physics makes projection impossible. For example, this applies to highly reflective surfaces (metal, mirrors) and transparent materials. What is the difference between brightness and contrast? “Brightness” refers to the brightness of the image as a whole. When you adjust the brightness, all parts of the image get lighter or darker. “Contrast” refers to the difference between light and dark. When you increase the contrast, light sections become lighter and dark areas become darker. VIOSO Presenter™ Multi User Manual © VIOSO GmbH, 2011 P a g e | 42 9.1 Projection Examples with Incorrect Camera Settings A brilliant, error-free projection is the ideal result: Illustration Situation Results Ideal situation: Optimized camera settings, reduced ambient light, camera captures projection completely Best possible rendering of the projected image Some typical camera adjustment errors are listed below. Consult these examples if your results are not satisfactory – incorrect camera settings are usually the cause. Illustration VIOSO Presenter™ Multi User Manual Situation Results Incorrect shutter speed setting: In this example, the shutter speed is set to 1/2000. Contrast is too low Widescreen on: The aspect ratio of the camera does not match the aspect ratio of the projector The image width is distorted © VIOSO GmbH, 2011 P a g e | 43 VIOSO Presenter™ Multi User Manual Auto focus on: The camera automatically adjusts the focus multiple times during calibration Patterns similar to a mosaic, grainy, frayed edge Automatic white balance (AWB) on: The camera automatically adjusts the aperture multiple times during calibration Image is too bright Automatic exposure: The camera automatically adjusts the sensitivity of the image sensor multiple times during calibration Regular, rastered image errors Camera image is out of focus (manual focus not set to projection surface) Random image distortion, missing parts of the image © VIOSO GmbH, 2011 P a g e | 44 10 VIOSO Presenter automation Command line parameters can be used to modify the startup behavior of VIOSO Presenter™ Multi. This allows you to adapt the program behavior at startup to local conditions, for example in case of fixed installations. The following description of command line parameters is based on calling the program using the Windows prompt. Consult your Windows documentation for other ways to call the program using command line parameters. 10.1 Calling the VIOSO Presenter Program File By default, the VIOSO Presenter™ Multi program files are located under “C:\Program Files\VIOSO Presenter Multi”. If you selected a different directory during installation, the program files will be found there. First switch to the program directory (example): cd C:\Programme\VIOSO\VIOSO Presenter Multi The name of the executable file that launches the program is “presenter.exe”. A simple program start is accomplished with the following command: presenter VIOSO Presenter™ Multi User Manual © VIOSO GmbH, 2011 P a g e | 45 10.2Overview of Command Line Parameters The following command line parameters are available and may be combined as desired: Parameter /c [FILE] /m [FILE1] [FILE2] … /h /s [repeat] /f Description Applies the configuration file [FILE] (file type: *.sps) Displays the media file [FILE1] (video or image file) in Media Manager; additional files are added to the list Minimizes the program’s user interface at startup Content playback as a slideshow, [repeat] plays the show unlimited times Shows the content in fullscreen at startup Shows the media file „zoomed in“. /z Example presenter /c config.sps presenter /m movie.avi presenter /h presenter /s repeat presenter /f presenter /z Note: It’s mandatory to specify one or more media files to show (use /m or /c) Examples of command line parameter combinations: presenter /h /m movie.avi VIOSO Presenter™ Multi is minimized on startup (/h) and launched in LIVE mode (/r); the video file “movie.avi” is played back once. presenter /f /z /h /c config.sps /s repeat VIOSO Presenter™ Multi starts in fullscreen mode (/f) and fully zoomed in without 3D-effect, it’s user-interface is minimized on startup (/h) and the previously saved configuration file “config.sps” is applied (/c confic.sps); the playlist specified in the configuration file is played back continuously (/s repeat). Note: The command line parameters may be used in any sequence. VIOSO Presenter™ Multi User Manual © VIOSO GmbH, 2011 P a g e | 46 11 Overview of Keyboard Shortcuts Here you will find all VIOSO Presenter™ Multi keyboard shortcuts. 11.1Keyboard Commands for the Program and Projection Interface These keyboard shortcuts are available when the focus is on the program window. F5 Launches the projection with the first element in the playback list SHIFT + F5 Launches the projection with the selected media file F6 Launches the slideshow IMAGE IMAGE Displays the previous / next element in the playback list + - Switches the display of the current image between full screen mode / presentation view SPACEBAR RETURN Displays the next element in the playback list F2 Brings the program interface to the foreground (only available in the presentation area) CTRL + + - Changes the magnification level CTRL + Shifts the area of the image selected for magnification ESC Closes VIOSO Presenter™ VIOSO Presenter™ Multi User Manual © VIOSO GmbH, 2011 P a g e | 47 11.2Direct Warping Keyboard Commands (Projector or Display) These keyboard shortcuts are available when the mouse pointer is over the output display (i.e. over the content being presented). This is indicated by the mouse pointer, which changes into red crosshairs. The “Direct Warping” option also has to be selected. F1 Help F2 Shows the user interface when hidden behind the output F6 Increase the horizontal control points (X-axis) F7 Reduce the vertical control points (Y-axis) F8 Increase the vertical control points (Y-axis) Fine-tune the selected control point SHIFT + Coarse adjustment of the selected control point TAB Jump to the next support point <SHIFT> + <TAB > Jump to the previous support point VIOSO Presenter™ Multi User Manual © VIOSO GmbH, 2011 P a g e | 48 12 Contact Information / Help Helpful information and answers related to the VIOSO Presenter™ Multi Software from VIOSO are available at www.vioso.com. You will also find the following: Contact information E-mail support Updates Help with activation FAQ based on questions from other users Please send us any question about the usage of VIOSO Presenter via E-Mail: support@vioso.com. We will reply as fast as possible. VIOSO Presenter™ Multi User Manual © VIOSO GmbH, 2011