1
Version 4.0 - Standard
and Premium
Brooks Internet Software, Inc.
May 2010
Affordable IPDS Printing
• Print IBM host IPDS documents to
Windows®-based printers
• Save IPDS documents to electronic
archives in common formats like
PDF, TIFF, and PCL
• Reduce processor demand on the
host system
• Lower costs and maintenance in
your IPDS print environment
• Consolidate multiple IPDS printers
with minimal server-side
modifications
• Replace twinax IPDS printers with
common printers
Copyright
Copyright © 2010 Brooks Internet Software, Inc.
"ALL RIGHTS RESERVED"
The copyright for the ExcelliPrint software, including but not limited to the ExcelliPrint executable, the
Brooks License Manager executable and help files, is owned by Brooks Internet Software, Inc. This
software is not shareware or freeware. It is licensed commercial software. You are expressly prohibited
from reproducing this software in any form, including making the software available on a network, except
as allowed by the license agreement endorsed by Brooks Internet Software, Inc.
Disclaimer
Neither Brooks Internet Software, Inc. nor its employees make any warranty, express or implied, or
assumes any legal liability or responsibility for the accuracy, completeness, or usefulness of any
information, apparatus, product, or process disclosed, or represents that its use would not infringe privatelyowned rights.
Contact Information
We invite you to contact us with your questions or comments on this manual or our software products:
Brooks Internet Software, Inc.
1820 E. 17th Street, Suite 330
Idaho Falls, ID 83404-6400 USA
Phone:
Fax:
Email:
Web Page:
(800) 523-9175
(208) 523-6970
(208) 523-9482
support@brooksnet.com
http://www.brooksnet.com
Copyright
Revised: 5/25/2010
i
Trademark Acknowledgments
Adobe, the Adobe logo, Acrobat, the Acrobat logo, and PostScript are either registered trademarks or
trademarks of Adobe Systems Incorporated in the United States and/or other countries.
IBM, AS/400, iSeries, OS/400, MO:DCA, zSeries, and OS/390 are trademarks or registered trademarks of
International Business Machines Corporation.
iText Library – Copyright © 1999-2006 by Bruno Lowagie and Paulo Soares. All Rights Reserved
(http://www.lowagie.com/iText/).
Java and all Java-based trademarks are trademarks of Sun Microsystems, Inc. in the United States, other
countries, or both.
Microsoft, Windows, Windows NT, and the Windows logo are trademarks of Microsoft Corporation in the
United States, other countries, or both.
Other company, product, or service names may be trademarks or service marks of others.
This product includes software developed by The Apache Software Foundation (http://www.apache.org/).
Trademark Acknowledgments
Revised: 5/25/2010
ii
Table of Contents
Copyright .............................................................................................................. i
Disclaimer ......................................................................................................... i
Contact Information ........................................................................................... i
Trademark Acknowledgments ........................................................................... ii
Table of Contents................................................................................................ 1
Introduction ......................................................................................................... 1
Features ............................................................................................................... 2
Additional Features .......................................................................................... 3
iSeries device and spooled file management .......................................................... 3
Security and input features ...................................................................................... 3
Installation Guide ................................................................................................ 5
Minimum Requirements ................................................................................... 5
zSeries (OS/390) Minimum Requirements .............................................................. 5
Install ExcelliPrint ............................................................................................. 6
Quick Start ........................................................................................................... 7
Host IPDS Device .................................................................................................... 7
Setup .................................................................................................................... 8
ExcelliPrint Printers .......................................................................................... 9
ExcelliPrint Printers .......................................................................................... 9
Working with ExcelliPrint Printers ............................................................................ 9
iSeries (AS/400) Management (Premium only) .............................................. 14
Working with iSeries Devices (Premium only) ....................................................... 14
iSeries (AS/400) General Setup ..................................................................... 16
Accounts ........................................................................................................ 17
Working with Accounts .......................................................................................... 18
Status Logs .................................................................................................... 20
Appendix I: Advanced ExcelliPrint Settings................................................... 21
Changing the Port Number for the User Interface .......................................... 21
Stopping, Starting, and Restarting the ExcelliPrint Service ............................ 22
Secure Sockets Layer (SSL) Settings ............................................................ 22
Appendix II: AS/400 Version-Specific Setup .................................................. 24
AS/400 Setup for V3R1 (Version 3.1) ............................................................ 25
AS/400 Setup for V3R2 (Version 3.2) ............................................................ 27
AS/400 Setup for V3R6 (Version 3.6) ............................................................ 29
AS/400 Setup for V3R7 (Version 3.7) ............................................................ 31
AS/400 Setup for V4R1 (Version 4.1) ............................................................ 33
AS/400 Setup for V4R2 (Version 4.2) ............................................................ 35
AS/400 Setup for V4R3 (Version 4.3) ............................................................ 37
AS/400 Setup for V4R4 (Version 4.4) and Later ............................................ 39
Appendix III: zSeries (OS/390) Setup .............................................................. 41
Appendix IV: VSE/ESA Setup .......................................................................... 44
Table of Contents
Revised: 5/25/2010
1
Appendix V: IBM Printer Limitations ............................................................... 45
IBM 3812 ........................................................................................................ 45
IBM 3816 ........................................................................................................ 45
IBM 4028 ........................................................................................................ 46
Appendix VI: IPDS Background ....................................................................... 47
Glossary ............................................................................................................ 48
Table of Contents
Revised: 5/25/2010
2
Introduction
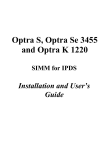
ExcelliPrint, running on a Windows®-based PC, replaces any IPDS printer: it receives and
processes IPDS print requests generated on iSeries™ and zSeries® computers, which see
ExcelliPrint as a high-end IPDS printer. After receiving the data over a TCP/IP network,
ExcelliPrint converts and saves the data in a variety of standard formats (Premium only), sends it
to an email recipient, or, more commonly, prints the documents to non-IPDS, Windows-based
printers.
»
IPDS Device
>> Spooled Files
»
»
»
Host System
Print or Archive
Receive
IPDS Print
Requests
PCL
GDI
PDF
Listen on
ports for
requests
Emulate
IPDS
printer
Windows PC
»
Convert
to other
formats
PDF, PCL,
EMF, JPG,
PNG, TIF
Printer
or PC Folder
TCP/IP
ExcelliPrint Workflow: The host sends print requests to ExcelliPrint, which converts the requests to other formats and sends them
either to printers or folders (Premium only).
So whether you want to lower your print center costs by using existing Windows-based printers,
or you want to archive or electronically distribute IPDS print jobs, ExcelliPrint helps you do more
with your IPDS data.
There are two versions of ExcelliPrint: Premium and Standard. ExcelliPrint Standard allows you
to print IPDS documents to PCL-enabled printers. ExcelliPrint Premium adds the ability to
convert documents to various formats and archive or distribute them by email and provides builtin iSeries device and spool file management. The latter also provides you access to the Windows
print driver (GDI) to format your IPDS print jobs for your printer.
Introduction
Revised: 5/25/2010
1
Features
With ExcelliPrint, you can print your AFP documents how and where you want while saving time
and money. If your organization prints large business reports, bar code labels, invoices,
statements, or other documents (both monochrome and full AFP/IPDS color), you will find
ExcelliPrint offers unique options for managing these IPDS print jobs, options that bring your
AFP documents to the Windows environment.
Support for all IPDS
Towers
Supports the Text, IM Image, IO Image, Graphics, Font, and
Bar Code (Barcode) towers of the IPDS architecture. Support of
all IPDS towers allows you to harness the power of IBM's
Advanced Function Presentation (AFP). ExcelliPrint also
supports FS45 for color documents.
Custom File Naming
Patterns
ExcelliPrint can name converted documents using information
received from the host system. Now, find the file you’re
looking for without opening the document.
Driver-independent printing
(Premium only)
ExcelliPrint prints directly to ANY Windows-based printer. No
need to purchase an IPDS printer or additional hardware for
your printer; ExcelliPrint spools your mainframe and mid-range
AFP data to any Windows printer.
AFP (IPDS & AFPDS) and
SCS to PDF (Premium
only)
Easily convert AFP documents into PDF for easy viewing,
archiving, email distribution, etc. Windows-generated
watermarks (BMP, JPG, PNG, etc) can be applied when
converting to PDF for easy electronic forms.
Multiple output printers
ExcelliPrint supports multiple output printers. Now replace all
of your existing IPDS printers with lower-cost Windows-based
printers.
Print-to-file archiving
(Premium only)
The ability to save files to selected folders on the user's
computer or on the network. You can save the converted IPDS
output to a network storage unit, a Windows share, or your own
PC.
Multiple formats
Conversion of IPDS, AFPDS, and SCS to widely used formats
including PDF, PCL, and plain text, as well as common image
formats (TIFF, PNG, JPEG, etc.).
Features
Revised: 5/25/2010
2
Additional Features
In addition to saving files in other formats and printing to Windows-based printers, ExcelliPrint
Premium provides iSeries device and spooled file management functions, unique functionality not
found in comparable print servers, and additional security and input features. ExcelliPrint’s
features are designed to save you time and money, simplify your printing processes, protect your
IPDS data, and give you more control of your IPDS print environment.
iSeries device and spooled file management
IBM iSeries device
management (Premium
only)
Users are able to create iSeries print devices or redirect existing
devices using the browser-based interface. Easily configure an
iSeries to print to ExcelliPrint.
Spooled file management
(Premium only)
Spooled files on the iSeries can be held, released, or moved
without the need of an additional emulator. ExcelliPrint provides
a convenient and efficient interface to manage spooled files.
Runs as a Windows service
The service receives print jobs without requiring a Windows
user to be logged in to the computer where ExcelliPrint is
running.
Security and input features
Browser-based interface
Platform-independent browser allows simple, efficient
administration from ANY authorized computer. All you need is
a browser for easy local and remote administration; quickly and
easily view your log, setup, printers, and more. Make changes to
your devices and jobs within your existing Web browser.
Secure Web interface
The application uses a secure Web interface that supports Secure
Sockets Layer (SSL) and offers role-based administration. The
embedded web server supports SSL and does not require
Apache or IIS to be installed. With the use of SSL, sensitive
information remains protected.
Role-based administration
Role-based administration allows fine control of ExcelliPrint
settings and functions. ExcelliPrint provides different levels of
administrative privilege to fit your company's security needs.
Features
Revised: 5/25/2010
3
System tray utility
A system tray utility provides quick access to advanced settings.
You can access advanced settings such as stopping, starting, or
restarting the ExcelliPrint service, changing the interface's port
number, and enabling secure access to the interface through
SSL. The tray icon also indicates the status of the ExcelliPrint
service.
4
Revised: 5/25/2010
Installation Guide
Prior to installing ExcelliPrint, log in as the computer Administrator account or another account
with administrative privileges. This is required for all applications that install a Windows service.
Minimum Requirements
ExcelliPrint installation computer requirements:
•
•
•
Windows 2000, XP, Server 2003, or Vista
Java Runtime Environment 1.5
256 MB RAM (more may be required based on usage)
ExcelliPrint client requirements:
•
•
Internet Explorer, Firefox, or compatible
JavaScript and cookies enabled
iSeries (AS/400) Minimum Requirements
•
•
V3R1 or greater
PSF/400 required for IPDS printing; any one of the following licensed features is
required:
o 5112, 5113, 5114, or 5115
If you want to administer the iSeries remotely:
•
You must enable the QUSER user profile, start the "host servers," and have TCP/IP
running. The following software resources must also be installed: 57xxJC1 *Base 5050
IBM Toolbox for Java and 57xxJC1 *Base 2924 IBM Toolbox for Java. Read more in the
iSeries (AS/400) Management section.
zSeries (OS/390) Minimum Requirements
•
•
•
•
•
PSF/MVS Version 2 Release 2.0 with APAR OW15599, OW15018 and OW16442.
PSF/MVS Version 3.1 or later.
MVS Scheduler APAR OW12236 to support two new PRINTDEV keywords: IPADDR
and PORTNO.
TCP/IP Version 3 Release 1, or higher installed and configured on MVS.
MVS Maintenance Level Required in TCP/IP Profile
o IBM PTF UQ03848
o IBM PTF UQ11550
Installation Guide
Revised: 5/25/2010
5
Install ExcelliPrint
1
2
3
4
5
6
7
Run the setup program downloaded from our website or the single file executable located
on the installation CD.
At the Welcome screen, click Next.
License Agreement After reading and agreeing to the terms of the end-user license
agreement, choose I accept the agreement and click Next to proceed. If you do not accept
the terms, setup will not continue.
ExcelliPrint Startup Enter a username for the account that will be the administrator of
ExcelliPrint. Also, enter a password and confirm the password. Passwords must be at least
8 characters in length. Note that both the username and password are case-sensitive. Click
Next to continue.
ExcelliPrint Setup Select the port that ExcelliPrint will listen on for HTTP requests (for
information on changing the port number after installation or configuring SSL security, see
Appendix I: Advanced ExcelliPrint Settings). Select the Restrict Access to Local Host
Only option to limit access to ExcelliPrint to the computer on which ExcelliPrint is
installed. Click Next to continue.
Select Destination Location Click Browse if you want to change the destination folder for
ExcelliPrint. We recommend that you accept the default, C:\Program Files\Brooks
Internet Software\ExcelliPrint. Click Next.
Ready to Install Review the installation information and click Install. The application files
will now be installed to the destination folder. A Windows Firewall exception is created for
ExcelliPrint during installation to enable printing, the ExcelliPrint service is registered and
started, and your administrator account and port number are configured. After installation is
complete, click Finish. Typically, setup does not require your computer to be restarted, but
will prompt you to do so in certain circumstances. If so, choose Yes.
The ExcelliPrint service is configured to start automatically. To begin configuring the software,
select ExcelliPrint Administration from the program group in the Start menu or right-click the
ExcelliPrint system tray icon and select Open (or simply double-click the icon).
If, during setup, you turned off Restrict Access to Local Host, substitute the computer name or IP
address of the computer on which ExcelliPrint is installed to connect from any computer on your
network. If you changed the port number during setup, you must add :[port] to the address, for
example, http://localhost:8080.
Installation Guide
Revised: 5/25/2010
6
Quick Start
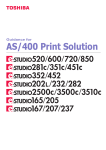
You can quickly start printing with ExcelliPrint by following the steps in this Quick Start section.
1
2
ExcelliPrint Printer By default, an ExcelliPrint printer named Default is created and listens on
port 5001 for host print requests. In Premium, incoming requests are archived as PDF files in
the Archive folder, a subfolder of the ExcelliPrint installation folder. With ExcelliPrint
Standard, documents are printed to the system’s default printer. You can use ExcelliPrint’s
Default printer to quickly archive or print host print requests: simply point a host IPDS device
to this ExcelliPrint printer using port 5001 (see the Host IPDS Device section below).
Firewall Exception For ExcelliPrint to receive host print requests, your firewall must be
configured properly. If you are using the Windows Firewall, the ExcelliPrint installation adds
an exception automatically to allow host print requests. If you are using another firewall, you
will need to configure it to allow ExcelliPrint to receive requests via TCP/IP; the application
requiring this exception is eprintsrv.exe, or add an exception for each port ExcelliPrint listens
on.
ExcelliPrint® Quick Start
1
3
»
Host System
Print or Archive
Printout
on default
printer
»
Listens on
port 5001
Print to PDF (Premium)
or system default
printer (Standard)
PDF in
ExcelliPrint
Archive
folder
2
»
TCP/IP
Host IPDS Device
3
Point host IPDS device to ExcelliPrint If you are using the ExcelliPrint printer named Default, all
you need to do to start printing is point a host IPDS device to ExcelliPrint using port 5001. To
point an iSeries IPDS device to ExcelliPrint Premium, click iSeries in the menu, log in to the
iSeries, select an IPDS device, click Point to ExcelliPrint, select port 5001, and click Update.
The IPDS device will now send print requests to port 5001 and Default will archive the
requests as PDF files (Premium) or print them (Standard) to the system’s default printer.
Quick Start
Revised: 5/25/2010
7
Setup
When setting up and managing ExcelliPrint, there are four general areas to configure:
•
•
•
•
ExcelliPrint Printers Configure ExcelliPrint printers, including ports to listen on, IPDS
emulation, and output format and destination.
iSeries Devices Manage iSeries IPDS devices and related spooled files (Premium only).
Accounts You can set up login accounts and assign a role to each account.
Status You can view detailed log messages.
»
Setup
Revised: 5/25/2010
»
»
8
ExcelliPrint Printers
ExcelliPrint Printers An ExcelliPrint printer describes the destination (i.e. printer, folder, or email
address) and format (e.g. PDF, PCL, TXT, TIF, and so on) for converted IPDS documents.
You create one or more printers in ExcelliPrint, each mapped to a printer, archive folder
(Premium only), or email address (Premium only). If the destination is a shared printer or folder,
you must enter a Windows account (username, password, and domain) with permission sufficient
to create files in the folder or print to the printer. To use multiple ExcelliPrint printers, each needs
a unique port number on which to listen for incoming IPDS requests.
Host Printers Devices (or printers) on the host system send IPDS to ExcelliPrint. Before
ExcelliPrint can receive IPDS communication from a host system, the host device (or devices)
must be pointed to an ExcelliPrint printer using the computer’s IP address or hostname on which
ExcelliPrint is installed. Read more about iSeries devices and management.
Firewall Exception For ExcelliPrint to receive host print requests, your firewall must be configured
properly. If you are using the Windows Firewall, the ExcelliPrint installation adds an exception
automatically to allow host print requests. If you are using another firewall, you will need to
configure it to allow ExcelliPrint to receive requests via TCP/IP; the application requiring this
exception is eprintsrv.exe, or add an exception for each port on which ExcelliPrint listens.
Working with ExcelliPrint Printers
Adding or Modifying ExcelliPrint Printers
Complete the following steps to add a new printer.
1
2
Log in to ExcelliPrint at the admin level. Click Printers.
Enter a name for the new ExcelliPrint printer in the Add Printer field. Click Add. Select
the settings you want for the ExcelliPrint printer:
a. Printer Name and Type The printer's name is displayed next to a graphic representing
whether the destination is a printer, folder, or email address. The tabs contain more
detailed information about the printer's input, emulation, and output settings.
b. Input Tab The Input tab is used to configure the ports on which the ExcelliPrint
printer will listen for IPDS host print requests.
Port Number Displays the numbers of the ports on which the printer is listening.
i.
Valid values are 1 through 65,535. To display a list of ports currently in use by
your computer, use the Windows netstat.exe command at the Windows
command prompt. A port cannot be used by ExcelliPrint and another
application simultaneously or by two different ExcelliPrint printers.
ii.
Sessions Displays the number of current connections that are open with the
host on each port.
Setup
Revised: 5/25/2010
9
iii.
Status Displays the current status (enabled/disabled) of the port. If the port is
Disabled, it is not listening for print requests. To enable or disable a port, click
Turn On or Turn Off depending on the current state of the port.
iv.
Capture Displays if data is being captured on this port. Data capture is used for
troubleshooting purposes and is turned off by default. To turn capture on or off,
click Turn On or Turn Off depending on the current capture state.
v.
Delete To delete an existing port from the printer, click Delete under the Action
column in the port's row. This will remove the port from the Listening on Ports
list and the current printer will no longer receive print requests. You must be
logged in at the admin level to delete ports.
vi.
Add Port Enter a port number in the Add Port field and click Add to add it to
the Listening on Ports list. By default the port will be enabled and will begin
listening for print requests.
c. Emulation Tab The Emulation tab is used to configure how the printer will process
documents received from the host system.
Update Click Update to save any changes to the printer's emulation
i.
configuration.
ii.
IPDS Printer Emulation Displays the IBM printer ExcelliPrint is emulating. Read
more about IBM printer limitations. Choose a printer from the list.
Letter Gothic Support Deselect this option if you do not want the Brooks Letter
iii.
Gothic fonts to be used, in which case, a Courier font will be used.
Ignore Font Attributes When ExcelliPrint receives a print job, a Load Font
iv.
Equivalent (LFE) command is sent with font attributes. Some IPDS printers
ignore these attributes. When Ignore Font Attributes is not selected and printed
output appears italic or bold when previously it did not, select this option to see
if the issue is resolved.
v.
Codepage Displays the default codepage ExcelliPrint uses when not instructed
otherwise. This should match the default codepage used on the host system.
Choose a codepage from the list.
vi.
Paper Sizes Displays the paper size selected for each bin. Choose the
appropriate size for each bin. When the Crop Output option is not selected,
paper sizes are only used by ExcelliPrint during IPDS emulation when the host
requests bin and paper size information.
vii.
Crop Output Select whether you want to crop output to the bin paper size.
Selecting the Crop Output to Bin Paper Size option will crop the printed output
to the paper size in the corresponding bin. For example, if the host wants to
print an 8.5"x14" page to ExcelliPrint to a bin with an 8.5"x11" page size
selected, the bottom 3" will not be displayed on the resulting printout; they will
have been cropped. If the host wants to print a page smaller than 8.5"x11" to a
bin with 8.5"x11" page size selected, the job will print as expected except with
extra white space to fill the entire page. If the Crop option is not selected, pages
will continue to be sized based on the page size requested by the host.
d. Output Tab The Output tab is used to configure the printer's output, including where
and in what format the printer will send converted documents.
Update Click Update to save any changes to the printer's output configuration.
i.
Setup
Revised: 5/25/2010
10
ii.
iii.
iv.
Type Displays the physical destination for output documents. Select Printer,
Folder, or Email from the list depending on your desired destination.
Description Enter a description for the printer.
Output Destination Select the actual printer or folder, or desired email options to
which documents will be sent.
Note If the printer type is selected, the list displays only the printers that are accessible to the
current Run As user, which is ExcelliPrint User [SYSTEM] by default. To access printers not
on the list, you will need to add the appropriate Run As user. Printers shared from another
computer are user specific.
v.
Setup
Revised: 5/25/2010
If Folder is selected, enter the directory in which you want the files to be saved.
The default directory is Archive, a subfolder of the ExcelliPrint installation
folder. To archive jobs to another folder on your computer, enter a directory
using a format similar to the following: C:\[Folder]\[Folder]\[Folder]\.
Jobs can be stored in network locations using the standard Universal Naming
Convention (UNC); for example, enter \\[Computer Name]\[Share
Name]\[Folder].
If Email is selected, the following options are configurable.
1. From Enter a valid email address from which the email will be
sent.
2. To Enter a valid email address to which the email will be sent.
3. Subject The subject of the email message. You can enter any
subject you want. Click the Pattern Options link to access a list
of variable data which can be used as part of the email subject.
4. Message The body of the email message. The converted print
document will be attached.
5. Max Attachment Size (MB) The maximum size of a message which
will be sent to the recipient. If the resulting email message with
the included attachment exceeds this limit, it will not be sent.
Note that it is common for messages to be rejected if they exceed
a certain size limit (10MB is common).
6. SMTP Server An optional field which contains the name of an
SMTP server through which the software will relay messages.
7. Login If you configure an SMTP relay server which requires
authentication, enter the username here.
8. Password If you configure an SMTP relay server which requires
authentication, enter the password here.
9. Port If your email server listens for email requests on a nonstandard port, enter it here. The default is 25.
10. Test Connection Press this button to test the configured values.
Don't forget to click the Update button if the connection
succeeds.
File name pattern Configure the pattern for the filenames or name of the print job
passed to the Windows print manager. Click Pattern Options to show a list of
variable data that can be used as part of the file name. The device, sequence
number, port and various date and time options are always available where the
11
vi.
vii.
others may not depending upon whether they are received from the IBM host
system.
Overwrite existing file When selected, if a file already exists with the name
ExcelliPrint generates, the existing file will be overwritten. Use this option to
create new files daily or monthly. For instance, if your file name pattern is
{weekday} and a file is printed daily, ExcelliPrint will create a file called
Monday, Tuesday, and so on. On the following Monday, the first file will be
overwritten.
Destination Permissions From the Run As list, select the user account with
permissions to access the printer or folder. If the desired account is not in the
list, it must be added.
Note To access printers (or folders) shared from another Windows computer, the Run As user
you add will need permission to Logon As a Batch Job, which is granted through the Local
Security Policy in Windows. Follow these steps to add these rights to a user: 1) In the Control
Panel, open Administrative Tools and then Local Security Policy. 2) Beneath Security Settings,
open Local Policies and highlight User Rights Assignment. 3) On the right side of the window,
locate Log on as a Batch Job. Open the properties and add any users that need this right. 4)
When finished, save your changes and close the Local Security Settings window.
viii.
Output Format Displays the format to which documents will be converted prior
to output. Select a format and the options available for the format will be
displayed. If applicable, choose the options to be applied to the converted
documents.
1. Margins Select Use Margins to set specific values for each margin. The
original document that is received from the host will be offset by the
amounts indicated for each margin.
a.
Top Enter the top margin's height.
b.
Bottom Enter the bottom margin's height.
c.
Left Enter the left margin's width.
d.
Right Enter the right margin's width.
e.
Unit Select the unit of measurement used for the margins.
f.
Fit Printed Pages Within Margins Select this option to fit the original
host document within the specified margins.
2. Watermarks Select Use Watermarks if you want to apply watermarks to
the current printer's pages.
a.
Options If you are using watermarks, select an option for their use.
b.
Watermark 1 Enter the file path of the graphic you want to use as the
first watermark. The path can be relative or absolute. You can use
JPEG, PNG, TIFF, GIF, or BMP graphics as watermarks.
c.
2 Enter the file path of the second watermark, if necessary. The path
can be relative or absolute. You can use JPEG, PNG, TIFF, GIF, or
BMP graphics as watermarks.
3.
PDF Encryption
a.
Encryption Select Use Encryption if you want to add PDF encryption
b.
c.
Setup
Revised: 5/25/2010
to the converted document.
Encryption Options Choose Standard or AES encryption.
Owner Password Enter the owner password for the PDF document.
12
d.
e.
4.
User Password Enter the user password if desired. User passwords
usually require you to enter a password prior to viewing the
document in a PDF viewer.
Allowed Options Select which functions users are allowed or
prohibited from performing on the PDF file.
JPEG Options
a.
Modify Quality Select Modify Quality if you want a smaller, but lower-
quality JPEG image.
b.
Quality slider Select from 1 to 100 percent of quality. This lets you
choose the best balance between small file sizes and higher quality.
5.
PCL Options
a.
Tray Mapping Map an IPDS tray to a particular source tray on your
PCL printer. To do so, select the IPDS tray number, then enter the
PCL number for the tray you desire to use. You can add a tray
mapping to each of the trays supported by ExcelliPrint.
6.
TIFF Options
a.
Color Depth Choose from 24 or 32 bits per pixel (bpp). Selecting 24
should result in a smaller file size but also reduced quality.
ix.
Update Click Update to save any changes to the printer's output configuration.
Viewing Printers
To view the current printers in ExcelliPrint, complete the following steps:
1
2
3
In the ExcelliPrint menu, click Printers. A list of current ExcelliPrint printers is displayed
in the table.
The table contains the following information about each printer:
a. Printers Available The number of printers being used and the number available are
displayed above the table.
b. Type Displays either a folder or printer depending on the output destination of the
printer.
c. Name Displays the name of the printer.
d. Description Displays a description of the printer.
e. Ports Displays the ports on which the printer is listening for host print requests.
f. Action If you are logged in at the Admin level, the Action column allows you delete a
printer.
To view more detail about a printer, click the printer's name. If you are logged in to
ExcelliPrint, you will be able to modify the printer's settings. If you are not logged in to
ExcelliPrint, you will be able to view the printer's settings. See the Adding ExcelliPrint
Printers section for more detail on each setting.
Modifying Printers
To modify printers, you must be logged in at the Operator or Admin level. Complete the
following steps to modify a printer:
Setup
Revised: 5/25/2010
13
1. Log in to ExcelliPrint. Click Printers.
2. In the printers table, select the ExcelliPrint printer to modify by clicking its name.
3. In the Input, Emulation, and Output tabs, select the new settings you want for the
ExcelliPrint printer. See the Adding ExcelliPrint Printers section for more detail on each
setting.
Deleting Printers
To delete printers, you must be logged in at the Admin level. Complete the following steps to
delete a printer:
1. Log in to ExcelliPrint at the Admin level. Click Printers.
2. Click Delete in the row of the printer you want to delete. To receive host print requests,
there must be at least one printer in the printers table.
iSeries (AS/400) Management (Premium only)
ExcelliPrint allows you to access an iSeries remotely without an emulator. You can create, view,
and modify iSeries IPDS devices and view, hold, release, and move related spool files.
To use remote host administration, there are a number of required OS/400 options. You must
enable the QUSER user profile, start the host servers, and have TCP/IP running.
•
•
•
QUSER user profile is needed to start the host servers
ExcelliPrint connects as a client to "host servers"
OS/400 Host Servers option (licensed product 5722SS1) is included with the base option of
OS/400
From an iSeries command line, start the host servers by doing the following:
1
2
3
Make sure the QUSER profile is enabled.
To start the host servers, type STRHOSTSVR *ALL and press Enter.
To start the TCP/IP distributed data management (DDM) server, type STRTCPSVR
SERVER(*DDM) and press Enter.
Working with iSeries Devices (Premium only)
To work with iSeries devices, you must log in to the iSeries host. Complete the following steps to
work with iSeries devices:
1
2
3
In the ExcelliPrint menu, click iSeries.
Enter your iSeries IP address, username, and password and click Login.
A list of IPDS-supported devices is displayed. The device table columns are as follows:
Setup
Revised: 5/25/2010
14
a.
b.
Refresh Click the refresh icon just above the IPDS printers table to refresh the table.
Printer Displays the name of each IPDS device. Clicking a device's name opens the
iSeries Device Spool Files page, which lists detailed information about the device's
current print jobs. To the left of each printer, a radio button allows you to select a
specific printer and vary it on or off, start or stop its writer, view its jobs, or point it
to ExcelliPrint, depending on which button you press at the bottom of the table.
c. Description Displays a description of each IPDS device.
d. Status Displays the current status of each device (for example, active, varied on, and
so on).
e. State Displays the current state of each device's writer (for example, waiting for
queue, stopped, and so on).
f. Vary On/Off, Start/Stop Writer To vary a device on/off or to start/stop a writer, select the
device's radio button and click the button corresponding to the action you want to
take. In order to change the settings on an IPDS print device, such as to point it to
ExcelliPrint, the writer must be stopped and the device varied off.
g. View, Hold, Release, and Move Spool Files To view a device's spool files, click the
device's name. The corresponding spool files are displayed. To hold or release a
spool file or files, select the appropriate file or files and click Hold or Release
depending on the action you want to take. To move a spool file or files to another
IPDS device, select the file or files, select the IPDS device to which you want to
move the file or files, and click Move.
h. Point Device to ExcelliPrint Selecting an IPDS device and clicking Point to ExcelliPrint
allows you to modify the selected device's settings on the iSeries, such as its Text
'description' (TEXT), Remote location: Name or address (RMTLOCNAME), and Port
Number (PORT). ExcelliPrint automatically populates the Remote location field with
your computer's name, effectively pointing the IPDS device to ExcelliPrint. If the
iSeries is not in your DNS scope, enter the IP address manually. Next, select the
ExcelliPrint port on which this device will send print requests and click Update.
i. Create Printer To create a new device on the iSeries, enter a name and click Create
Printer. You will then be able to enter a Text ‘description’ (TEXT) , Remote Location:
Name or address (RMTLOCNAME), and Port Number (PORT). ExcelliPrint automatically
populates the Remote location field with your computer's name, effectively pointing
the IPDS device to ExcelliPrint. If the iSeries is not in your DNS scope, enter the IP
address manually. Next, select the ExcelliPrint port on which this device will send
print requests and click Update.
Note When creating a new IPDS device or pointing an existing device to ExcelliPrint, make sure the
device has an associated PSF Configuration object (PSFCFG). If there is not an associated PSFCFG,
see Appendix II: AS/400 Version-Specific Setup for further information.
4
When you are finished working with the iSeries, click Log Off iSeries to log off the host.
After a period of inactivity, you will be logged off automatically.
Setup
Revised: 5/25/2010
15
iSeries (AS/400) General Setup
This section describes general steps for setting up IPDS printing on an iSeries (AS/400). More
detailed and version-specific instructions are found in Appendix II: iSeries (AS/400) VersionSpecific Setup. Complete the following general steps to set up IPDS printing:
1
2
Obtain the IP address of the computer and port number of the ExcelliPrint printer.
From the AS/400, verify that the AS/400 can communicate with ExcelliPrint by entering the
following command:
PING RMTSYS(*INTNETADR) INTNETADR('[ADDRESS]')
3
4
5
To verify the ping command was successful, move the cursor to the white message line
(“Verifying connection to host system [IP]”) at the bottom of the screen, press F1 (Help) then
F10 (Display messages in job log).
Create a device that points to the IP address and port described in Step 1.
Vary the device on (for [DEVICE], substitute the name of the device):
VRYCFG [DEVICE] CFGTYPE(*DEV) STATUS(*ON)
6
Start the writer (for [DEVICE], substitute the name of the device):
STRPRTWTR [DEVICE]
Setup
Revised: 5/25/2010
16
Accounts
Role-based administration ExcelliPrint uses role-based administration to prevent unauthorized users
from modifying key ExcelliPrint settings. Depending on the role assigned to a login account,
certain actions can be performed. The three basic roles are Anonymous Users, Operators, and
Administrators. Anyone who has not logged in is considered an Anonymous User.
•
Administrator Administrators can add, modify, and delete ExcelliPrint printers and user
•
•
login accounts. When ExcelliPrint is installed, an administrator name and password are
created. This administrator is able to create other user accounts and set permissions for
each account.
Operator Operators can modify existing ExcelliPrint printers and view the log.
Anonymous User An Anonymous User can view existing printers and view the log.
Login Accounts
There are three distinct sets of login information used within ExcelliPrint:
•
•
•
ExcelliPrint Login (discussed above) This is the username and password you use to log in to
ExcelliPrint and which gives you Admin or Operator privileges. New login accounts can
be added by ExcelliPrint Admins.
iSeries Login (Premium only) This is the username, password, and hostname used to log in
to the IBM iSeries host. You log in to the host after clicking the iSeries tab in
ExcelliPrint. After logging in to the host, you can manage and create host IPDS devices,
as well as manage the print jobs for each device.
Printer or Network Device Login This is the Windows credentials (username, password, and
domain) required for ExcelliPrint to access network printers or folders. These credentials
or permissions can be added when setting up an ExcelliPrint printer.
Account Security
ExcelliPrint works with current network permissions so there is no need to change to existing
devices and folders. Within the application, all the printers available to the current login ID are
shown. These login IDs and passwords are stored in encrypted form.
ExcelliPrint usernames and passwords are different than Windows usernames and passwords.
You will need to make sure that the same safeguards used to protect your Windows usernames
from compromise are used with ExcelliPrint usernames. If ExcelliPrint will be located on a
computer accessible from the public Internet, SSL should be used to view and modify
ExcelliPrint settings. Learn more about SSL.
Setup
Revised: 5/25/2010
17
Working with Accounts
Logging in to ExcelliPrint
To log in to ExcelliPrint, complete the following steps:
1
2
3
In the ExcelliPrint menu, click Login
Enter your login information in the Username and Password fields and click Login. You
will be able to perform the operations available for your permission level.
After you have logged in to ExcelliPrint, click Logout when you are finished to log off.
Adding a Login Account
To add new login accounts, you must be logged in at the Admin level. Complete the following
steps to add new login accounts:
1
2
3
4
5
Log in to ExcelliPrint at the Admin level. Click Home.
Under More Options, click Manage Users.
In the Add New Account field, enter a username for the new account and click Add.
Select the role for the new account. Enter and confirm the password for the account.
Click Add. The account is displayed in the Current Accounts list.
You can also add or delete user accounts in the command prompt (cmd.exe). If you want to add
additional login accounts, you must be on the computer where the software is installed and be
logged in as the local or domain administrator.
1
2
3
4
Choose Run from the Start menu. Type cmd and press OK.
Change to the directory where the software has been installed. For example, type the
following command and press Enter: cd "\Program Files\Brooks Internet
Software\ExcelliPrint"
Type EPrintSrv.exe -u username -p password -r role. Substitute your new
username, password, and role. Roles can be admin or operator.
To remove a user, type EPrintSrv.exe -u username -del. Substitute the username
where appropriate.
Modifying/Deleting a Login Account
To modify the permissions or passwords of existing login accounts or to delete accounts, you
must be logged in at the Admin level.
1
2
3
4
5
Log in to ExcelliPrint at the Admin level. Click Home.
Under More Options, click Manage Users.
Select the login account you want to modify or delete.
Modify the role and password and click update, or click Delete to delete the account.
The login account is updated or deleted.
Setup
Revised: 5/25/2010
18
Changing Your Login Password
You can change your ExcelliPrint account login password after you have logged in to the
application. Complete the following steps to change your login password:
1
2
3
4
Log in to ExcelliPrint. Click Home.
Under More Options, click Change Password.
Enter your old password, new password, and password confirmation.
Click Update. You will be logged out of ExcelliPrint and will need to use your new
password to log in again.
Setup
Revised: 5/25/2010
19
Status Logs
The Status tab displays the history of what has taken place in ExcelliPrint. You can select the
type of messages you want to see, the amount of detail you want displayed, and the number of
records you want to see per page. The information shown can be highlighted, copied, and pasted
into a different application.
Working with Status Logs
To work with status logs, complete the following steps:
1
2
3
4
5
Click the Status tab. The Detailed Log Information table is displayed, along with the Log
View Options table.
Select the type of records you want to view by selecting Info, Warning, and Error, or any
combination of message types.
Select the level of detail to view by selecting None, Low, or High from the lists next to
Network Detail, Device Detail, and Application Detail.
Select the number of records to view per page by choosing a number from the list next to
Records per Page.
Click Update View to update the records table based on the settings selected. To sort a
column, click the column heading.
Changing Logging Options
To change the status logging options, you must be logged in to ExcelliPrint. Complete the
following steps to change the log options:
1
2
3
4
5
Log in to ExcelliPrint. Click the Status tab.
Click the Change Log Options link.
In the Remove Items Older Than field enter the amount of time before log items are
removed.
In the Log Directory field enter the file directory where you want the log file to be stored. If
the field is left blank, the log file will be stored in the ExcelliPrint installation directory.
Click Update to save your changes.
Setup
Revised: 5/25/2010
20
Appendix I: Advanced ExcelliPrint Settings
There are a number of advanced ExcelliPrint settings and options that can be accessed from the
ExcelliPrint system tray icon and the command line. Use the sections below to learn how to
access these settings.
To access the ExcelliPrint command line help and view current settings, complete the following
steps:
1
2
3
4
Choose Run from the Start menu. Type cmd and press OK.
Change to the directory where the software has been installed. For example, type the
following command and press Enter: cd "\Program Files\Brooks Internet
Software\ExcelliPrint"
Type EPrintSrv.exe -h. Alternatively, you can substitute -help or -?.
Type EPrintSrv.exe -info to view the current port and SSL settings.
Changing the Port Number for the User Interface
During installation, you are prompted to enter a port number on which the user interface will
listen. The service includes a customized web server to process those requests. Later, if you need
to change the port number, you can do so by completing the following steps:
1
2
3
Right-click the ExcelliPrint system tray icon and select Settings.
In the HTTP Settings section, enter the new port on which ExcelliPrint will listen for HTTP
requests from your web browser.
The Restrict to Localhost option restricts users from other computers from accessing
ExcelliPrint.
You can also change the port number setting from the command line by completing the following
steps:
1
2
3
4
Choose Run from the Start menu. Type cmd and press OK.
Change to the directory where the software has been installed. For example, type the
following command and press Enter: cd "\Program Files\Brooks Internet
Software\ExcelliPrint"
Type EPrintSrv.exe -http local -port portnumber. Substitute a valid
place of portnumber. Valid port numbers are 1 through 65535 although we
port number in
recommend
port numbers greater than 1024. Remember that ports may already be in use by another
program; choose a port that is not in use (for example, if you use port 5001 for IPDS
requests, do not use it as your HTTP port). Substitute remote for local if you do not want
to restrict remote access to ExcelliPrint.
Restart the ExcelliPrint service for the changes to take effect.
Appendix I: Advanced ExcelliPrint Settings
Revised: 5/25/2010
21
Stopping, Starting, and Restarting the ExcelliPrint Service
If at any time you need to stop, start, or restart the ExcelliPrint service, complete one of the
following steps:
•
•
Right-click the ExcelliPrint system tray icon and select Settings. In the Server Status
section of the General tab, click the Start, Stop, or Restart button depending on the action
you want to take.
Open the Administrative Tools folder and select Services. Locate and highlight the
ExcelliPrint IPDS Solution service. From the Action menu, select Start, Stop, or Restart
depending on the action you want to take. You can also use the corresponding toolbar
buttons or the menu that appears when you right-click the service.
You can also stop and start the service from the command line by completing the following steps:
1
2
3
Choose Run from the Start menu. Type cmd and press OK.
Change to the directory where the software has been installed. For example, type the
following command and press Enter: cd "\Program Files\Brooks Internet
Software\ExcelliPrint"
Type EPrintSrv.exe -stop
to stop the service, or EPrintSrv.exe -start to start the
service.
Secure Sockets Layer (SSL) Settings
Secure Sockets Layer, or SSL, is a protocol that provides secure communications on the Internet
through cryptography. Privacy and authentication are ensured through SSL.
In order for ExcelliPrint to receive SSL connections, it needs to have a private key and a signed
public key (called a certificate). When a connection is received from a client, ExcelliPrint sends
the certificate to the client. The client then decides whether to trust the ExcelliPrint computer or
not.
If the client continues, the public key found in the certificate is used to encrypt a session key.
This session key can only be decrypted by ExcelliPrint using its private key. ExcelliPrint then
uses the session key to encrypt the data that is sent to the client. In this way, third parties cannot
view or understand the data sent back and forth.
Caution: If the public key is not signed by a third party, man-in-the-middle attacks are possible
because the man in the middle can send a certificate to the client pretending to be ExcelliPrint.
Without trusted third-party verification, the client cannot know if the application providing the
certificate actually is ExcelliPrint.
If you want to use SSL, you will need to create a certificate. The certificate will be "self signed,"
meaning it is susceptible to a man-in-the-middle attack.
Appendix I: Advanced ExcelliPrint Settings
Revised: 5/25/2010
22
A certificate request is also generated and found in the installation directory. This can be sent to
trusted third parties, such as Verisign, Thawte, GeoTrust, etc., to sign the public key and to get a
certificate.
The certificate, or "signed public key," from the trusted third party can then be imported into
ExcelliPrint so that it will be sent to client browsers attempting to view ExcelliPrint using SSL.
The following command line options are for importing a signed certificate from a trusted third
party:
eprintsrv.exe -keytool -import "filename" -password password
eprintsrv.exe -keytool -sign days -password password
Certificates expire and need to be renewed. The following command line options will generate a
new certificate signing request:
eprintsrv.exe -keytool -csr "filename" -password password
A self-signed certificate is not recommended because it makes you susceptible to man-in-middleattacks; however, self signing may be useful to some organizations for use during product testing
or those that do not wish to purchase a certificate.
Caution: Always take warning messages and certificate messages seriously.
The following steps allow you to create a public/private key used by ExcelliPrint:
1
2
3
4
5
Right-click the ExcelliPrint system tray icon and select Settings.
Click the Security icon.
In the SSL Settings section, select SSL Enabled to enable SSL. Also select a port for SSL
use. Click Apply. You will now need to create an SSL certificate for SSL to work properly.
In the SSL Certificate section, enter an appropriate value in each field: Domain Name (the
domain address without http:// or https://), Company Name, Organizational Unit, City, State (or
Province), and Country Code.
Enter and confirm a password and click Create. This will create a self-signed SSL
certificate and allow SSL to work properly.
Note Commas are not allowed within each item (for example, Company, Inc should be Company
Inc). Any items you do not want to fill in can be set to unknown.
Appendix I: Advanced ExcelliPrint Settings
Revised: 5/25/2010
23
Appendix II: AS/400 Version-Specific Setup
The following sections describe the IPDS printing setup process for the different versions of
AS/400. General setup instructions are found above under iSeries (AS/400) General Setup. The
following versions are covered:
•
•
•
•
•
•
•
•
AS/400 Setup for V3R1 (Version 3.1)
AS/400 Setup for V3R2 (Version 3.2)
AS/400 Setup for V3R6 (Version 3.6)
AS/400 Setup for V3R7 (Version 3.7)
AS/400 Setup for V4R1 (Version 4.1)
AS/400 Setup for V4R2 (Version 4.2)
AS/400 Setup for V4R3 (Version 4.3)
AS/400 Setup for V4R4 (Version 4.4) and later
For the following instructions, you will need to know the [DEVICE], [ADDRESS], and [PORT].
•
•
•
•
[DEVICE]
[OBJECT]
[ADDRESS]
[PORT]
The name of a device you create on the AS/400 system
The name of an object you create on the AS/400 system
IP address of the computer on which ExcelliPrint is installed
The TCP/IP port number on which ExcelliPrint listens for IPDS print
requests
Note: ExcelliPrint requires that each of these steps is followed. PSF/400 is required for proper
ExcelliPrint operation. You must create either a WRKAFP2 or PSFCFG object depending on your
AS/400 version and release.
Appendix II: AS/400 Version-Specific Setup AS/400 Setup for V3R1 (Version 3.1)
Revised: 5/25/2010
24
AS/400 Setup for V3R1 (Version 3.1)
The following commands are used to set up IPDS printing in V3R1: CRTDEVPRT and WRKAFP2.
1
CRTDEVPRT in V3R1 Enter the following command, all in one line, in the AS/400 command
line and then press Enter (for [DEVICE], enter the name you want assigned to the device):
CRTDEVPRT
DEVD([DEVICE])
DEVCLS(*RMT)
TYPE(*IPDS)
MODEL(0)
AFP(*YES)
AFPATTACH(*APPC)
FONT(11)
RMTLOCNAME(TCPIP)
FORMFEED(*AUTOCUT)
TEXT('EXCELLIPRINT [ADDRESS]:[PORT]')
Note: Once the previous CRTDEVPRT command is complete, the information on the screen
should be similar to the following example:
Device description . . . . . .
Option . . . . . . . . . . . .
Category of device . . . . . .
Automatically created . . . .
Device class . . . . . . . . .
Device type . . . . . . . . .
Device model . . . . . . . . .
Advanced function printing . .
AFP attachment . . . . . . . .
Online at IPL . . . . . . . .
Font . . . . . . . . . . . . .
Identifier . . . . . . . . . .
Point size . . . . . . . . . .
Form feed . . . . . . . . . .
Separator drawer . . . . . . .
Separator program . . . . . .
Library. . . . . . . . . . . .
Printer error message . . . .
Message queue (V3R1) . . . . .
Shadowing message queue (V3R6)
Library. . . . . . . . . . . .
Maximum pending requests . . .
Print while converting . . . .
Print request timer . . . . .
Form definition . . . . . . .
Library. . . . . . . . . . . .
Character identifier . . . . .
Remote location . . . . . . .
Local location . . . . . . . .
Remote network identifier . .
Mode . . . . . . . . . . . . .
Text . . . . . . . . . . . . .
.
.
.
.
.
.
.
.
.
.
.
.
.
.
.
.
.
.
.
.
.
.
.
.
.
.
.
.
.
.
.
.
:
:
:
:
:
:
:
:
:
:
:
:
:
:
:
:
:
:
:
:
:
:
:
:
:
:
:
:
:
:
:
:
Appendix II: AS/400 Version-Specific Setup AS/400 Setup for V3R1 (Version 3.1)
Revised: 5/25/2010
DEVD
OPTION
DEVCLS
TYPE
MODEL
AFP
AFPATTACH
ONLINE
FONT
FORMFEED
SEPDRAWER
SEPPGM
[DEVICE]
*ALL
*PRT
NO
*RMT
*IPDS
0
*YES
*APPC
*YES
011
*NONE
*AUTOCUT
*FILE
*NONE
PRTERRMSG
MSGQ
MSGQ
*INQ
QSYSOPR
QSYSOPR
*LIBL
MAXPNDRQS
6
PRTCVT
*YES
PRTRQSTMR
*NOMAX
FORMDF
F1C10110
*LIBL
CHRID
*SYSVAL
RMTLOCNAME TCPIP
LCLLOCNAME *NETATR
RMTNETID
*NETATR
MODE
QSPWTR
TEXT
EXCELLIPRINT [ADDRESS]:[PORT]
25
2
WRKAFP2 in V3R1 Enter the following command, all in one line, in the AS/400 command line
and then press Enter (for [OBJECT], enter the name assigned to the device):
WRKAFP2
DEVD([OBJECT])
IPDSPASTHR(*YES)
TCPIP(*YES)
RMTSYS('[ADDRESS]')
PORT([PORT])
INACTTMR(*SEC15)
Note: Once the previous WRKAFP2 command is complete, the information should be similar to the
following example:
DEVD
IPDSPASTHR
TCPIP
RMTSYS
PORT
ACTTMR
INACTTMR
SBP
PSC
DRF
DRR
EDGSNSTV
3
[DEVICE]
*YES
*YES
[ADDRESS]
[PORT]
*NOMAX
*SEC15
*NO
*YES
*NO
*NO
*NO
From the AS/400, verify that the AS/400 can communicate with ExcelliPrint by entering the
following command (for [ADDRESS], enter the IP address of the ExcelliPrint host computer):
PING RMTSYS(*INTNETADR) INTNETADR('[ADDRESS]')
4
Vary the device on by entering the following command, all in one line, and then press Enter
(for [DEVICE], enter the name assigned to the device):
VRYCFG [DEVICE] CFGTYPE(*DEV) STATUS(*ON)
5
Start the writer:
STRPRTWTR [DEVICE]
Appendix II: AS/400 Version-Specific Setup AS/400 Setup for V3R1 (Version 3.1)
Revised: 5/25/2010
26
AS/400 Setup for V3R2 (Version 3.2)
The following commands are used to set up IPDS printing in V3R2: CRTDEVPRT and
CRTPSFCFG.
1
CRTDEVPRT in V3R2 Enter the following command, all in one line, in the AS/400 command
line and then press Enter (for [DEVICE], enter the name you want assigned to the device):
CRTDEVPRT
DEVD([DEVICE])
DEVCLS(*RMT)
TYPE(*IPDS)
MODEL(0)
AFP(*YES)
AFPATTACH(*APPC)
FONT(11)
RMTLOCNAME(TCPIP)
FORMFEED(*AUTOCUT)
TEXT('EXCELLIPRINT [ADDRESS]:[PORT]')
Note: Once the previous CRTDEVPRT command is complete, the information on the screen should
be similar to the following example:
Device description . . . .
Option . . . . . . . . . .
Category of device . . . .
Automatically created. . .
Device class . . . . . . .
Device type. . . . . . . .
Device model . . . . . . .
Advanced function printing
AFP attachment . . . . . .
Online at IPL. . . . . . .
Font . . . . . . . . . . .
Identifier . . . . . . . .
Point size . . . . . . . .
Form feed . . . . . . . .
Separator drawer . . . . .
Separator program . . . .
Library . . . . . . . . .
Printer error message . .
Message queue . . . . . .
Library. . . . . . . . . .
Maximum pending requests .
Print while converting . .
Print request timer. . . .
Form definition. . . . . .
Library. . . . . . . . . .
Character identifier . . .
Remote location. . . . . .
Local location . . . . . .
Remote network identifier.
Mode . . . . . . . . . . .
Dependent location name .
Text . . . . . . . . . . .
.
.
.
.
.
.
.
.
.
.
.
.
.
.
.
.
.
.
.
.
.
.
.
.
.
.
.
.
.
.
.
.
.
.
.
.
.
.
.
.
.
.
.
.
.
.
.
.
.
.
.
.
.
.
.
.
.
.
.
.
.
.
.
.
.
.
.
.
.
.
.
.
.
.
.
.
.
.
.
.
.
.
.
.
.
.
.
.
.
.
.
.
.
.
.
.
.
.
.
.
.
.
.
.
.
.
.
.
.
.
.
.
.
.
.
.
.
.
.
.
.
.
.
.
.
.
.
.
.
.
.
.
.
.
.
.
.
.
.
.
.
.
.
.
.
.
.
.
.
.
.
.
.
.
.
.
.
.
.
.
:
:
:
:
:
:
:
:
:
:
:
:
:
:
:
:
:
:
:
:
:
:
:
:
:
:
:
:
:
:
:
:
DEVD
OPTION
[DEVICE]
*ALL
*PRT
NO
DEVCLS
TYPE
MODEL
AFP
AFPATTACH
ONLINE
FONT
*RMT
*IPDS
0
*YES
*APPC
*YES
FORMFEED
SEPDRAWER
SEPPGM
PRTERRMSG
MSGQ
MAXPNDRQS
PRTCVT
PRTRQSTMR
FORMDF
CHRID
RMTLOCNAME
LCLLOCNAME
RMTNETID
MODE
DEPLOCNAME
TEXT
011
*NONE
*AUTOCUT
*FILE
*NONE
*INQ
QSYSOPR
*LIBL
6
*YES
*NOMAX
F1C10110
*LIBL
*SYSVAL
TCPIP
*NETATR
*NETATR
QSPWTR
*NONE
EXCELLIPRINT [ADDRESS]:[PORT]
Appendix II: AS/400 Version-Specific Setup - 29BAS/400 Setup for V3R2 (Version 3.2)
Revised: 5/25/2010
27
2
CRTPSFCFG in V3R2 Enter the following command, all in one line, in the AS/400 command
line and then press Enter (for [OBJECT], enter the name assigned to the device):
CRTPSFCFG
PSFCFG([OBJECT])
IPDSPASTHR(*YES)
RLSTMR(*SEC15)
TEXT(EXCELLIPRINT [ADDRESS]:[PORT])
RMTLOCNAME('[ADDRESS]')
PORT([PORT)
Note: Once the previous CRTPSFCFG command is complete, the information should be similar to
the following example:
PSF configuration . . . . . .
Library . . . . . . . . . . .
User resource library . . . .
IPDS pass through . . . . . .
Activate release timer . . .
Release timer . . . . . . . .
Restart timer . . . . . . . .
SNA retry count . . . . . . .
Delay time between retries. .
Blank page. . . . . . . . . .
Page size control . . . . . .
Resident fonts. . . . . . . .
Resource retention. . . . . .
Edge orient . . . . . . . . .
Remote location . . . . . . .
Name or address . . . . . . .
TCP/IP port . . . . . . . . .
TCP/IP activation timer . . .
PSF defined options . . . . .
Text description. . . . . . .
Device resource library list.
3
.
.
.
.
.
.
.
.
.
.
.
.
.
.
.
.
.
.
.
.
.
.
.
.
.
.
.
.
.
.
.
.
.
.
.
.
.
.
.
.
.
.
.
.
.
.
.
.
.
.
.
.
.
.
.
.
.
.
.
.
.
.
.
.
.
.
.
.
.
.
.
.
.
.
.
.
.
.
.
.
.
.
.
.
.
.
.
.
.
.
.
.
.
.
.
.
.
.
.
.
.
.
.
.
.
:
:
:
:
:
:
:
:
:
:
:
:
:
:
:
:
:
:
:
:
:
[OBJECT]
QGPL
*JOBLIBL
*YES
*NORDYF
*SEC15
*IMMED
2
0
*YES
*YES
*YES
*YES
*NO
[ADDRESS]
[PORT]
170
*NONE
EXCELLIPRINT [ADDRESS]:[PORT]
*DFT
From the AS/400, verify that the AS/400 can communicate with ExcelliPrint by entering the
following command:
PING RMTSYS(*INTNETADR) INTNETADR('[ADDRESS]')
4
Vary the device on by entering the following command and then pressing Enter (for
[DEVICE], enter the name assigned to the device):
VRYCFG [DEVICE] CFGTYPE(*DEV) STATUS(*ON)
5
Start the writer:
STRPRTWTR [DEVICE]
Appendix II: AS/400 Version-Specific Setup - 29BAS/400 Setup for V3R2 (Version 3.2)
Revised: 5/25/2010
28
AS/400 Setup for V3R6 (Version 3.6)
The following commands are used to set up IPDS printing in V3R6: CRTDEVPRT and WRKAFP2.
1
CRTDEVPRT in V3R6 Enter the following command, all in one line, in the AS/400 command
line and then press Enter (for [DEVICE], enter the name you want assigned to the device):
CRTDEVPRT
DEVD([DEVICE])
DEVCLS(*RMT)
TYPE(*IPDS)
MODEL(0)
AFP(*YES)
AFPATTACH(*APPC)
FONT(11)
RMTLOCNAME(TCPIP)
FORMFEED(*AUTOCUT)
TEXT('EXCELLIPRINT [ADDRESS]:[PORT]')
Note: Once the previous CRTDEVPRT command is complete, the information on the screen should
be similar to the following example:
Device description . . . . . .
Option . . . . . . . . . . . .
Category of device . . . . . .
Automatically created . . . .
Device class . . . . . . . . .
Device type . . . . . . . . .
Device model . . . . . . . . .
Advanced function printing . .
AFP attachment . . . . . . . .
Online at IPL . . . . . . . .
Font . . . . . . . . . . . . .
Identifier . . . . . . . . . .
Point size . . . . . . . . . .
Form feed . . . . . . . . . .
Separator drawer . . . . . . .
Separator program . . . . . .
Library. . . . . . . . . . . .
Printer error message. . . . .
Message queue (V3R1) . . . . .
Shadowing message queue (V3R6)
Library. . . . . . . . . . . .
Maximum pending requests . . .
Print while converting . . . .
Print request timer . . . . .
Form definition . . . . . . .
Library. . . . . . . . . . . .
Character identifier . . . . .
Remote location . . . . . . .
Local location . . . . . . . .
Remote network identifier . .
Mode . . . . . . . . . . . . .
Text . . . . . . . . . . . . .
2
.
.
.
.
.
.
.
.
.
.
.
.
.
.
.
.
.
.
.
.
.
.
.
.
.
.
.
.
.
.
.
.
:
:
:
:
:
:
:
:
:
:
:
:
:
:
:
:
:
:
:
:
:
:
:
:
:
:
:
:
:
:
:
:
DEVD
OPTION
[DEVICE]
*ALL
*PRT
NO
DEVCLS
TYPE
MODEL
AFP
AFPATTACH
ONLINE
FONT
*RMT
*IPDS
0
*YES
*APPC
*YES
FORMFEED
SEPDRAWER
SEPPGM
011
*NONE
*AUTOCUT
*FILE
*NONE
PRTERRMSG
MSGQ
MSGQ
*INQ
QSYSOPR
QSYSOPR
*LIBL
MAXPNDRQS
6
PRTCVT
*YES
PRTRQSTMR
*NOMAX
FORMDF
F1C10110
*LIBL
CHRID
*SYSVAL
RMTLOCNAME TCPIP
LCLLOCNAME *NETATR
RMTNETID
*NETATR
MODE
QSPWTR
TEXT
EXCELLIPRINT [ADDRESS]:[PORT]
WRKAFP2 in V3R6 Enter the following command, all in one line, in the AS/400 command line
and then press Enter (for [OBJECT], enter the name assigned to the device):
Appendix II: AS/400 Version-Specific Setup -30BAS/400 Setup for V3R6 (Version 3.6)
Revised: 5/25/2010
29
WRKAFP2
DEVD([OBJECT])
IPDSPASTHR(*YES)
TCPIP(*YES)
RMTSYS('[ADDRESS]')
PORT([PORT])
INACTTMR(*SEC15)
Note: Once the previous WRKAFP2 command is complete, the information should be similar to the
following example:
DEVD
IPDSPASTHR
TCPIP
RMTSYS
PORT
ACTTMR
INACTTMR
SBP
PSC
DRF
DRR
EDGSNSTV
3
[OBJECT]
*YES
*YES
[ADDRESS]
[PORT]
*NOMAX
*SEC15
*NO
*YES
*NO
*NO
*NO
From the AS/400, verify that the AS/400 can communicate with ExcelliPrint by entering the
following command:
PING RMTSYS(*INTNETADR) INTNETADR('[ADDRESS]')
4
Vary the device on by entering the following command, all in one line, and then pressing
Enter (for [DEVICE], enter the name assigned to the device):
VRYCFG [DEVICE] CFGTYPE(*DEV) STATUS(*ON)
5
Start the writer:
STRPRTWTR [DEVICE]
Appendix II: AS/400 Version-Specific Setup -30BAS/400 Setup for V3R6 (Version 3.6)
Revised: 5/25/2010
30
AS/400 Setup for V3R7 (Version 3.7)
The following commands are used to set up IPDS printing in V3R7: CRTDEVPRT and
CRTPSFCFG.
1
CRTPSFCFG in V3R7 Enter the following command, all in one line, in the AS/400 command
line and then press Enter (for [OBJECT], enter the name assigned to the device):
CRTPSFCFG
PSFCFG(QUSRSYS/[OBJECT])
IPDSPASTHR(*YES)
RLSTMR(*SEC15)
TEXT('EXCELLIPRINT [ADDRESS]:[PORT]')
Note: Once the previous CRTPSFCFG command is complete, the information should be similar to
the following example:
PSF configuration . . . . .
Library . . . . . . . . . .
User resource library. . . .
IPDS pass through. . . . . .
Activate release timer . . .
Release timer . . . . . . .
Restart timer . . . . . . .
SNA retry count . . . . . .
Delay time between retries .
Blank page . . . . . . . . .
Page size control . . . . .
Resident fonts . . . . . . .
Resource retention . . . . .
Edge orient . . . . . . . .
Remote location. . . . . . .
Name or address. . . . . . .
TCP/IP port. . . . . . . . .
TCP/IP activation timer. . .
PSF defined options. . . . .
Text description . . . . . .
Device resource library list
2
.
.
.
.
.
.
.
.
.
.
.
.
.
.
.
.
.
.
.
.
.
.
.
.
.
.
.
.
.
.
.
.
.
.
.
.
.
.
.
.
.
.
.
.
.
.
.
.
.
.
.
.
.
.
.
.
.
.
.
.
.
.
.
.
.
.
.
.
.
.
.
.
.
.
.
.
.
.
.
.
.
.
.
.
.
.
.
.
.
.
.
.
.
.
.
.
.
.
.
.
.
.
.
.
.
.
.
.
.
.
.
.
.
.
.
.
.
.
.
.
.
.
.
.
.
.
:
:
:
:
:
:
:
:
:
:
:
:
:
:
:
:
:
:
:
:
:
[OBJECT]
QUSRSYS
*JOBLIBL
*YES
*NORDYF
*SEC15
*IMMED
2
0
*YES
*YES
*YES
*YES
*NO
*NONE
*NONE
170
*NONE
EXCELLIPRINT [ADDRESS]:[PORT]
*DFT
CRTDEVPRT in V3R7 Enter the following command, all in one line, in the AS/400 command
line and then press Enter (for [DEVICE], enter the name you want assigned to the device):
CRTDEVPRT
DEVD([DEVICE])
DEVCLS(*LAN)
TYPE(*IPDS)
MODEL(0)
LANATTACH(*IP)
AFP(*YES)
PORT([PORT])
FONT(11)
FORMFEED(*AUTOCUT)
RMTLOCNAME('[ADDRESS]')
USRDFNOBJ(QUSRSYS/[OBJECT]*PSFCFG)
TEXT('EXCELLIPRINT [ADDRESS]:[PORT]')
Appendix II: AS/400 Version-Specific Setup -31BAS/400 Setup for V3R7 (Version 3.7)
Revised: 5/25/2010
31
Note: Once the previous CRTDEVPRT command is complete, the information on the screen should
be similar to the following example:
Device description . . . . . . . . :
Option . . . . . . . . . . . . . . :
Category of device . . . . . . . . :
Device class . . . . . . . . . . . :
Device type. . . . . . . . . . . . :
Device model . . . . . . . . . . . :
LAN attachment . . . . . . . . . . :
User-defined object. . . . . . . . :
Library. . . . . . . . . . . . . . :
Object type. . . . . . . . . . . . :
Data transform program . . . . . . :
User-defined driver program . . . .:
Advanced function printing . . . . :
Port number. . . . . . . . . . . . :
Online at IPL. . . . . . . . . . . :
Font . . . . . . . . . . . . . . . :
Identifier . . . . . . . . . . . . :
Point size . . . . . . . . . . . . :
Form feed. . . . . . . . . . . . . :
Separator drawer . . . . . . . . . :
Separator program. . . . . . . . . :
Library. . . . . . . . . . . . . . :
Printer error message. . . . . . . :
Message queue. . . . . . . . . . . :
Library. . . . . . . . . . . . . . :
Activation timer . . . . . . . . . :
Maximum pending requests . . . . . :
Print while converting . . . . . . :
Print request timer. . . . . . . . :
Form definition. . . . . . . . . . :
Library. . . . . . . . . . . . . . :
Remote location. . . . . . . . . . :
Name or address. . . . . . . . . . :
Dependent location name. . . . . . :
Text . . . . . . . . . . . . . . . :
User-defined options . . . . . . . :
3
DEVD
OPTION
DEVCLS
TYPE
MODEL
LANATTACH
USRDFNOBJ
QUSRSYS
USRDTATFM
USRDRVPGM
AFP
PORT
ONLINE
FONT
FORMFEED
SEPDRAWER
SEPPGM
PRTERRMSG
MSGQ
ACTTMR
MAXPNDRQS
PRTCVT
PRTRQSTMR
FORMDF
[DEVICE]
*ALL
*PRT
*LAN
*IPDS
0
*IP
[OBJECT]
*PSFCFG
*NONE
*NONE
*YES
[PORT]
*YES
011
*NONE
*AUTOCUT
*FILE
*NONE
*INQ
QSYSOPR
*LIBL
170
6
*YES
*NOMAX
F1C10110
*LIBL
RMTLOCNAME
DEPLOCNAME
TEXT
USRDFNOPT
'[ADDRESS]'
*NONE
EXCELLIPRINT [ADDRESS]:[PORT]
From the AS/400, verify that the AS/400 can communicate with ExcelliPrint by entering the
following command:
PING RMTSYS(*INTNETADR) INTNETADR('[ADDRESS]')
4
Vary the device on by entering the following command, all in one line, and then pressing
Enter (for [DEVICE], enter the name assigned to the device):
VRYCFG [DEVICE] CFGTYPE(*DEV) STATUS(*ON)
5
Start the writer:
STRPRTWTR [DEVICE]
Appendix II: AS/400 Version-Specific Setup -31BAS/400 Setup for V3R7 (Version 3.7)
Revised: 5/25/2010
32
AS/400 Setup for V4R1 (Version 4.1)
The following commands are used to set up IPDS printing in V4R1: CRTDEVPRT and
CRTPSFCFG.
1
CRTPSFCFG in V4R1 Enter a command in the following format in the AS/400 command line
(for [OBJECT], enter the name you want assigned to the device):
CRTPSFCFG PSFCFG(QUSRSYS/[OBJECT]) IPDSPASTHR(*YES) RLSTMR(*SEC15)
TEXT('EXCELLIPRINT [ADDRESS]:[PORT]')
Note: Once the previous CRTPSFCFG command is complete, the information should be similar to
the following example:
PSF configuration . . . . . .
Library . . . . . . . . . . .
User resource library . . . .
IPDS pass through . . . . . .
Activate release timer. . . .
Release timer . . . . . . . .
Restart timer . . . . . . . .
SNA retry count . . . . . . .
Delay time between retries .
Blank page. . . . . . . . . .
Page size control . . . . . .
Resident fonts. . . . . . . .
Resource retention. . . . . .
Edge orient . . . . . . . . .
Remote location . . . . . . .
Name or address . . . . . . .
TCP/IP port . . . . . . . . .
TCP/IP activation timer . . .
PSF defined options . . . . .
Text description . . . . . .
Device resource library list.
2
.
.
.
.
.
.
.
.
.
.
.
.
.
.
.
.
.
.
.
.
.
.
.
.
.
.
.
.
.
.
.
.
.
.
.
.
.
.
.
.
.
.
.
.
.
.
.
.
.
.
.
.
.
.
.
.
.
.
.
.
.
.
.
.
.
.
.
.
.
.
.
.
.
.
.
.
.
.
.
.
.
.
.
.
.
.
.
.
.
.
.
.
.
.
.
.
.
.
.
.
.
.
.
.
.
:
:
:
:
:
:
:
:
:
:
:
:
:
:
:
:
:
:
:
:
:
[OBJECT]
QUSRSYS
*JOBLIBL
*YES
*NORDYF
*SEC15
*IMMED
2
0
*YES
*YES
*YES
*YES
*NO
*NONE
*NONE
170
*NONE
EXCELLIPRINT [ADDRESS]:[PORT]
*DFT
CRTDEVPRT in V4R1 Enter a command in the following format in the AS/400 command line
(for [DEVICE], enter the name you want assigned to the device):
CRTDEVPRT DEVD([DEVICE]) DEVCLS(*LAN) TYPE(*IPDS) MODEL(0) LANATTACH(*IP)
AFP(*YES) PORT([PORT]) FONT(11) FORMFEED(*AUTOCUT) RMTLOCNAME('[ADDRESS]')
USRDFNOBJ(QUSRSYS/[OBJECT]*PSFCFG) TEXT('EXCELLIPRINT [ADDRESS]:[PORT]')
Note: Once the previous CRTDEVPRT command is complete, the information on the screen should
be similar to the following example:
Device description .
Option . . . . . . .
Category of device .
Device class . . . .
Device type . . . .
Device model . . . .
LAN attachment . . .
User-defined object.
.
.
.
.
.
.
.
.
.
.
.
.
.
.
.
.
.
.
.
.
.
.
.
.
.
.
.
.
.
.
.
.
.
.
.
.
.
.
.
.
.
.
.
.
.
.
.
.
.
.
.
.
.
.
.
.
:
:
:
:
:
:
:
:
DEVD
OPTION
DEVCLS
TYPE
MODEL
LANATTACH
USRDFNOBJ
[DEVICE]
*ALL
*PRT
*LAN
*IPDS
0
*IP
[OBJECT]
Appendix II: AS/400 Version-Specific Setup -35BAS/400 Setup for V4R4 (Version 4.4) and Later
Revised: 5/25/2010
33
Library . . . . . . . . . . . . . :
Object type. . . . . . . . . . . . :
Data transform program . . . . . . :
User-defined driver program . . . .:
Advanced function printing . . . . :
Port number. . . . . . . . . . . . :
Online at IPL. . . . . . . . . . . :
Font . . . . . . . . . . . . . . . :
FONT Identifier . . . . . . . . . :
Point size . . . . . . . . . . . . :
Form feed. . . . . . . . . . . . . :
Separator drawer . . . . . . . . . :
Separator program. . . . . . . . . :
Library. . . . . . . . . . . . . . :
Printer error message. . . . . . . :
Message queue. . . . . . . . . . . :
Library. . . . . . . . . . . . . . :
Activation timer . . . . . . . . . :
Maximum pending requests . . . . . :
Print while converting . . . . . . :
Print request timer. . . . . . . . :
Form definition. . . . . . . . . . :
Library. . . . . . . . . . . . . . :
Remote location. . . . . . . . . . :
Name or address. . . . . . . . . . :
Dependent location name. . . . . . :
Text . . . . . . . . . . . . . . . :
User-defined options . . . . . . . :
3
QUSRSYS
USRDTATFM
USRDRVPGM
AFP
PORT
ONLINE
*PSFCFG
*NONE
*NONE
*YES
[PORT]
*YES
FORMFEED
SEPDRAWER
SEPPGM
011
*NONE
*AUTOCUT
*FILE
*NONE
PRTERRMSG
MSGQ
ACTTMR
MAXPNDRQS
PRTCVT
PRTRQSTMR
FORMDF
*INQ
QSYSOPR
*LIBL
170
6
*YES
*NOMAX
F1C10110
*LIBL
RMTLOCNAME
DEPLOCNAME
TEXT
USRDFNOPT
'[ADDRESS]'
*NONE
EXCELLIPRINT [ADDRESS]:[PORT]
From the AS/400, verify that the AS/400 can communicate with ExcelliPrint by entering the
following command:
PING RMTSYS(*INTNETADR) INTNETADR('[ADDRESS]')
4
Vary the device on (for [DEVICE], enter the name assigned to the device):
VRYCFG [DEVICE] CFGTYPE(*DEV) STATUS(*ON)
5
Start the writer:
STRPRTWTR [DEVICE]
Appendix II: AS/400 Version-Specific Setup -35BAS/400 Setup for V4R4 (Version 4.4) and Later
Revised: 5/25/2010
34
AS/400 Setup for V4R2 (Version 4.2)
The following commands are used to set up IPDS printing in V4R2: CRTDEVPRT and
CRTPSFCFG.
1
CRTPSFCFG in V4R2 Enter a command in the following format in the AS/400 command line
(for [DEVICE], enter the name you want assigned to the device):
CRTPSFCFG PSFCFG(QUSRSYS/EXCELLPSF) IPDSPASTHR(*YES) RLSTMR(*SEC15)
TEXT('EXCELLIPRINT [ADDRESS]:[PORT]')
Note: Once the previous CRTPSFCFG command is complete, the information should be similar to
the following example:
PSF configuration . . . . . .
Library . . . . . . . . . . .
User resource library . . . .
IPDS pass through . . . . . .
Activate release timer. . . .
Release timer . . . . . . . .
Restart timer . . . . . . . .
SNA retry count . . . . . . .
Delay time between retries. .
Blank page. . . . . . . . . .
Page size control . . . . . .
Resident fonts. . . . . . . .
Resource retention. . . . . .
Edge orient . . . . . . . . .
Remote location . . . . . . .
Name or address . . . . . . .
TCP/IP port . . . . . . . . .
TCP/IP activation timer . . .
PSF defined options . . . . .
Text description. . . . . . .
Device resource library list.
2
.
.
.
.
.
.
.
.
.
.
.
.
.
.
.
.
.
.
.
.
.
.
.
.
.
.
.
.
.
.
.
.
.
.
.
.
.
.
.
.
.
.
.
.
.
.
.
.
.
.
.
.
.
.
.
.
.
.
.
.
.
.
.
.
.
.
.
.
.
.
.
.
.
.
.
.
.
.
.
.
.
.
.
.
.
.
.
.
.
.
.
.
.
.
.
.
.
.
.
.
.
.
.
.
.
:
:
:
:
:
:
:
:
:
:
:
:
:
:
:
:
:
:
:
:
:
EXCELLPSF
QUSRSYS
*JOBLIBL
*YES
*NORDYF
*SEC15
*IMMED
2
0
*YES
*YES
*YES
*YES
*NO
*NONE
*NONE
170
*NONE
EXCELLIPRINT [ADDRESS]:[PORT]
*DFT
CRTDEVPRT in V4R2 Enter a command in the following format in the AS/400 command line
(for [DEVICE], enter the name you want assigned to the device):
CRTDEVPRT DEVD([DEVICE]) DEVCLS(*LAN) TYPE(*IPDS) MODEL(0) LANATTACH(*IP)
AFP(*YES) PORT([PORT]) FONT(11) FORMFEED(*AUTOCUT) RMTLOCNAME('192.168.1.23)
USRDFNOBJ(QUSRSYS/EXCELLPSF *PSFCFG) TEXT('EXCELLIPRINT [ADDRESS]:[PORT]')
Note: Once the previous CRTDEVPRT command is complete, the information on the screen should
be similar to the following example:
Device description
Option . . . . . .
Category of device
Device class . . .
Device type. . . .
Device model . . .
LAN attachment . .
.
.
.
.
.
.
.
.
.
.
.
.
.
.
.
.
.
.
.
.
.
.
.
.
.
.
.
.
.
.
.
.
.
.
.
.
.
.
.
.
.
.
.
.
.
.
.
.
.
.
.
.
.
.
.
.
:
:
:
:
:
:
:
DEVD
OPTION
DEVCLS
TYPE
MODEL
LANATTACH
[DEVICE]
*ALL
*PRT
*LAN
*IPDS
0
*IP
Appendix II: AS/400 Version-Specific Setup -35BAS/400 Setup for V4R4 (Version 4.4) and Later
Revised: 5/25/2010
35
User-defined object. . . . . . . . :
Library. . . . . . . . . . . . . . :
Object type. . . . . . . . . . . . :
Data transform program . . . . . . :
User-defined driver program . . . .:
Advanced function printing . . . . :
Port number. . . . . . . . . . . . :
Online at IPL. . . . . . . . . . . :
Font . . . . . . . . . . . . . . . :
Identifier . . . . . . . . . . . . :
Point size . . . . . . . . . . . . :
Form feed. . . . . . . . . . . . . :
Separator drawer . . . . . . . . . :
Separator program. . . . . . . . . :
Library. . . . . . . . . . . . . . :
Printer error message. . . . . . . :
Message queue. . . . . . . . . . . :
Library. . . . . . . . . . . . . . :
Activation timer . . . . . . . . . :
Maximum pending requests . . . . . :
Print while converting . . . . . . :
Print request timer. . . . . . . . :
Form definition. . . . . . . . . . :
Library. . . . . . . . . . . . . . :
Remote location. . . . . . . . . . :
Name or address. . . . . . . . . . :
Dependent location name. . . . . . :
Text . . . . . . . . . . . . . . . :
User-defined options . . . . . . . :
3
USRDFNOBJ
QUSRSYS
USRDTATFM
USRDRVPGM
AFP
PORT
ONLINE
FONT
FORMFEED
SEPDRAWER
SEPPGM
PRTERRMSG
MSGQ
ACTTMR
MAXPNDRQS
PRTCVT
PRTRQSTMR
FORMDF
EXCELLPSF
*PSFCFG
*NONE
*NONE
*YES
[PORT]
*YES
011
*NONE
*AUTOCUT
*FILE
*NONE
*INQ
QSYSOPR
*LIBL
170
6
*YES
*NOMAX
F1C10110
*LIBL
RMTLOCNAME
DEPLOCNAME
TEXT
USRDFNOPT
'[ADDRESS]'
*NONE
EXCELLIPRINT [ADDRESS]:[PORT]
From the AS/400, verify that the AS/400 can communicate with ExcelliPrint by entering the
following command:
PING RMTSYS(*INTNETADR) INTNETADR('[ADDRESS]')
4
Vary the device on (for [DEVICE], enter the name assigned to the device):
VRYCFG [DEVICE] CFGTYPE(*DEV) STATUS(*ON)
5
Start the writer:
STRPRTWTR [DEVICE]
Appendix II: AS/400 Version-Specific Setup -35BAS/400 Setup for V4R4 (Version 4.4) and Later
Revised: 5/25/2010
36
AS/400 Setup for V4R3 (Version 4.3)
The following commands are used to set up IPDS printing in V4R3: CRTDEVPRT and
CRTPSFCFG.
1
CRTPSFCFG in V4R3 Enter a command in the following format in the AS/400 command line
(for [OBJECT], enter the name you want assigned to the PSF Configuration Object
(PSFCFG)):
CRTPSFCFG PSFCFG(QUSRSYS/[OBJECT]) IPDSPASTHR(*YES) RLSTMR(*SEC15)
TEXT('EXCELLIPRINT [ADDRESS]:[PORT]')
Note: Once the previous CRTPSFCFG command is complete, the information should be similar to
the following example:
PSF configuration . . . . . .
Library . . . . . . . . . . .
User resource library . . . .
IPDS pass through . . . . . .
Activate release timer. . . .
Release timer . . . . . . . .
Restart timer . . . . . . . .
SNA retry count . . . . . . .
Delay time between retries. .
Blank page. . . . . . . . . .
Page size control . . . . . .
Resident fonts. . . . . . . .
Resource retention. . . . . .
Edge orient . . . . . . . . .
Remote location . . . . . . .
Name or address . . . . . . .
TCP/IP port . . . . . . . . .
TCP/IP activation timer . . .
PSF defined options . . . . .
Text description. . . . . . .
Device resource library list.
2
.
.
.
.
.
.
.
.
.
.
.
.
.
.
.
.
.
.
.
.
.
.
.
.
.
.
.
.
.
.
.
.
.
.
.
.
.
.
.
.
.
.
.
.
.
.
.
.
.
.
.
.
.
.
.
.
.
.
.
.
.
.
.
.
.
.
.
.
.
.
.
.
.
.
.
.
.
.
.
.
.
.
.
.
.
.
.
.
.
.
.
.
.
.
.
.
.
.
.
.
.
.
.
.
.
:
:
:
:
:
:
:
:
:
:
:
:
:
:
:
:
:
:
:
:
:
[OBJECT]
QUSRSYS
*JOBLIBL
*YES
*NORDYF
*SEC15
*IMMED
2
0
*YES
*YES
*YES
*YES
*NO
*NONE
*NONE
170
*NONE
EXCELLIPRINT [ADDRESS]:[PORT]
*DFT
CRTDEVPRT in V4R3 Enter a command in the following format in the AS/400 command line
(for [DEVICE], enter the name you want assigned to the device):
CRTDEVPRT DEVD([DEVICE]) DEVCLS(*LAN) TYPE(*IPDS) MODEL(0) LANATTACH(*IP)
AFP(*YES) PORT([PORT]) FONT(11) FORMFEED(*AUTOCUT) RMTLOCNAME('[ADDRESS]')
USRDFNOBJ(QUSRSYS/EXCELLPSF *PSFCFG) TEXT('EXCELLIPRINT [ADDRESS]:[PORT]')
Note: Once the previous CRTDEVPRT command is complete, the information on the screen should
be similar to the following example:
Device description
Option . . . . . .
Category of device
Device class . . .
Device type. . . .
Device model . . .
LAN attachment . .
.
.
.
.
.
.
.
.
.
.
.
.
.
.
.
.
.
.
.
.
.
.
.
.
.
.
.
.
.
.
.
.
.
.
.
.
.
.
.
.
.
.
.
.
.
.
.
.
.
.
.
.
.
.
.
.
:
:
:
:
:
:
:
DEVD
OPTION
DEVCLS
TYPE
MODEL
LANATTACH
[DEVICE]
*ALL
*PRT
*LAN
*IPDS
0
*IP
Appendix II: AS/400 Version-Specific Setup -35BAS/400 Setup for V4R4 (Version 4.4) and Later
Revised: 5/25/2010
37
User-defined object. . . . . . . . :
Library. . . . . . . . . . . . . . :
Object type. . . . . . . . . . . . :
Data transform program . . . . . . :
User-defined driver program . . . .:
Advanced function printing . . . . :
Port number. . . . . . . . . . . . :
Online at IPL. . . . . . . . . . . :
Font . . . . . . . . . . . . . . . :
Identifier . . . . . . . . . . . . :
Point size . . . . . . . . . . . . :
Form feed. . . . . . . . . . . . . :
Separator drawer . . . . . . . . . :
Separator program. . . . . . . . . :
Library. . . . . . . . . . . . . . :
Printer error message. . . . . . . :
Message queue. . . . . . . . . . . :
Library. . . . . . . . . . . . . . :
Activation timer . . . . . . . . . :
Maximum pending requests . . . . . :
Print while converting . . . . . . :
Print request timer. . . . . . . . :
Form definition. . . . . . . . . . :
Library. . . . . . . . . . . . . . :
Remote location. . . . . . . . . . :
Name or address. . . . . . . . . . :
Dependent location name. . . . . . :
Text . . . . . . . . . . . . . . . :
User-defined options . . . . . . . :
3
USRDFNOBJ
QUSRSYS
USRDTATFM
USRDRVPGM
AFP
PORT
ONLINE
FONT
FORMFEED
SEPDRAWER
SEPPGM
PRTERRMSG
MSGQ
ACTTMR
MAXPNDRQS
PRTCVT
PRTRQSTMR
FORMDF
[OBJECT]
*PSFCFG
*NONE
*NONE
*YES
[PORT]
*YES
011
*NONE
*AUTOCUT
*FILE
*NONE
*INQ
QSYSOPR
*LIBL
170
6
*YES
*NOMAX
F1C10110
*LIBL
RMTLOCNAME
DEPLOCNAME
TEXT
USRDFNOPT
'[ADDRESS]'
*NONE
EXCELLIPRINT [ADDRESS]:[PORT]
From the AS/400, verify that the AS/400 can communicate with ExcelliPrint by entering the
following command:
PING RMTSYS(*INTNETADR) INTNETADR('[ADDRESS]')
4
Vary the device on (for [DEVICE], enter the name assigned to the device):
VRYCFG [DEVICE] CFGTYPE(*DEV) STATUS(*ON)
5
Start the writer:
STRPRTWTR [DEVICE]
Appendix II: AS/400 Version-Specific Setup -35BAS/400 Setup for V4R4 (Version 4.4) and Later
Revised: 5/25/2010
38
AS/400 Setup for V4R4 (Version 4.4) and Later
The following commands are used to set up IPDS printing in V4R4, and later: CRTDEVPRT and
CRTPSFCFG.
1
CRTPSFCFG Enter a command in the following format in the AS/400 command line (for
[OBJECT],
enter the name you want assigned to the device):
CRTPSFCFG PSFCFG(QUSRSYS/[OBJECT]) IPDSPASTHR(*YES) RLSTMR(*SEC15)
TEXT('EXCELLIPRINT [ADDRESS]:[PORT]')
Note: Once the previous CRTPSFCFG command is complete, the information should be similar to
the following example:
PSF configuration . . . . . .
Library . . . . . . . . . . .
User resource library . . . .
IPDS pass through . . . . . .
Activate release timer . . . .
Release timer . . . . . . . .
Restart timer . . . . . . . .
APPC and TCP/IP retry count .
Delay time between retries . .
Auto Session Recovery:
Enabled . . . . . . . . . .
Acknowledgment frequency . . .
Printer response timer . . . .
Blank page . . . . . . . . . .
Page size control . . . . . .
Resident fonts . . . . . . . .
Resource retention . . . . . .
Edge orient . . . . . . . . .
Use outline fonts . . . . . .
PSF defined options . . . . .
Font substitution messages . .
Capture host fonts at printer
Cut sheet emulation mode . . .
Font resolution for formatting
Font mapping table . . . . . .
Use DBCS simulation font . . .
Generate PDF output . . . . .
Save AFP data . . . . . . . .
Device resource library list .
2
.
.
.
.
.
.
.
.
.
.
.
.
.
.
.
.
.
.
.
.
.
.
.
.
.
.
.
.
.
.
.
.
.
.
.
.
.
.
.
.
.
.
.
.
.
.
.
.
.
.
.
.
.
.
:
:
:
:
:
:
:
:
:
[OBJECT]
QUSRSYS
*JOBLIBL
*YES
*NORDYF
*SEC15
*IMMED
15
0
.
.
.
.
.
.
.
.
.
.
.
.
.
.
.
.
.
.
.
.
.
.
.
.
.
.
.
.
.
.
.
.
.
.
.
.
.
.
.
.
.
.
.
.
.
.
.
.
.
.
.
.
.
.
.
.
.
.
.
.
.
.
.
.
.
.
.
.
.
.
.
.
.
.
.
.
.
.
.
.
.
.
.
.
.
.
.
.
.
.
.
.
.
.
.
.
.
.
.
.
.
.
.
.
.
.
.
.
.
.
.
.
.
.
:
:
:
:
:
:
:
:
:
:
:
:
:
:
:
:
:
:
:
*NO
100
*NOMAX
*YES
*YES
*YES
*YES
*NO
*NO
*NONE
*YES
*NO
*NONE
*SEARCH
*NONE
*NO
*NONE
*NO
*DFT
CRTDEVPRT in V4R4, and later Enter a command in the following format in the AS/400
command line (for [DEVICE], enter the name you want assigned to the device):
CRTDEVPRT DEVD([DEVICE]) DEVCLS(*LAN) TYPE(*IPDS) MODEL(0) LANATTACH(*IP)
AFP(*YES) PORT([PORT]) FONT(11) FORMFEED(*AUTOCUT) RMTLOCNAME('[ADDRESS]')
USRDFNOBJ(QUSRSYS/[OBJECT] *PSFCFG) TEXT('EXCELLIPRINT [ADDRESS]:[PORT]')
Note: Once the previous CRTDEVPRT command is complete, the information on the screen should
be similar to the following example:
Device description . . . . . . . . :
Option . . . . . . . . . . . . . . :
DEVD
OPTION
[DEVICE]
*ALL
Appendix II: AS/400 Version-Specific Setup -35BAS/400 Setup for V4R4 (Version 4.4) and Later
Revised: 5/25/2010
39
Category of device . . . . .
Device class . . . . . . . .
Device type . . . . . . . .
Device model . . . . . . . .
LAN attachment . . . . . . .
Advanced function printing .
Port number . . . . . . . .
Online at IPL . . . . . . .
Font . . . . . . . . . . . .
Identifier . . . . . . . .
Point size . . . . . . . .
Form feed . . . . . . . . .
Separator drawer . . . . . .
Separator program . . . . .
Printer error message . . .
Message queue . . . . . . .
Current message queue . . .
Library . . . . . . . . .
Activation timer . . . . . .
Image configuration . . . .
Maximum pending requests . .
Print while converting . . .
Form definition . . . . . .
Library . . . . . . . . .
Character identifier . . . .
Remote location . . . . . .
Name or address . . . . .
User-defined object . . . .
Library . . . . . . . . .
Object type . . . . . . .
Data transform program . . .
User-defined driver program
Dependent location name . .
Text . . . . . . . . . . . .
User-defined options . . . .
3
.
.
.
.
.
.
.
.
.
.
.
.
.
.
.
.
.
.
.
.
.
.
.
.
.
.
.
.
.
.
.
.
.
.
.
.
.
.
.
.
.
.
.
.
.
.
.
.
.
.
.
.
.
.
.
.
.
.
.
.
.
.
.
.
.
.
.
.
.
.
.
.
.
.
.
.
.
.
.
.
.
.
.
.
.
.
.
.
.
.
.
.
.
.
.
.
.
.
.
.
.
.
.
.
.
:
:
:
:
:
:
:
:
:
:
:
:
:
:
:
:
:
:
:
:
:
:
:
:
:
:
:
:
:
:
:
:
:
:
:
DEVCLS
TYPE
MODEL
LANATTACH
AFP
PORT
ONLINE
FONT
FORMFEED
SEPDRAWER
SEPPGM
PRTERRMSG
MSGQ
ACTTMR
IMGCFG
MAXPNDRQS
PRTCVT
FORMDF
CHRID
RMTLOCNAME
USRDFNOBJ
USRDTATFM
USRDRVPGM
DEPLOCNAME
TEXT
USRDFNOPT
*PRT
*LAN
*IPDS
0
*IP
*YES
[PORT]
*YES
011
*NONE
*AUTOCUT
*FILE
*NONE
*INQ
*CTLD
QSYSOPR
QSYS
170
*NONE
6
*YES
F1C10110
*LIBL
*SYSVAL
[ADDRESS]
[OBJECT]
QUSRSYS
*PSFCFG
*NONE
*NONE
*NONE
*BLANK
From the AS/400, verify that the AS/400 can communicate with ExcelliPrint by entering the
following command:
PING RMTSYS(*INTNETADR) INTNETADR('[ADDRESS]')
4
Vary the device on (for [DEVICE], enter the name assigned to the device):
VRYCFG [DEVICE] CFGTYPE(*DEV) STATUS(*ON)
5
Start the writer:
STRPRTWTR [DEVICE]
Appendix II: AS/400 Version-Specific Setup -35BAS/400 Setup for V4R4 (Version 4.4) and Later
Revised: 5/25/2010
40
Appendix III: zSeries (OS/390) Setup
This section describes general steps for setting up IPDS printing on a mainframe (OS/390). Some
of the following information is cited from IBM publication S510-2679-01.
Prerequisites
•
•
•
•
•
PSF/MVS Version 2 Release 2.0 with APAR OW15599, OW15018 and OW16442.
OW08340 for font capture.
PSF/MVS Version 3.1 or later.
MVS Scheduler APAR OW12236 to support two new PRINTDEV keywords: IPADDR
and PORTNO.
TCP/IP Version 3 Release 1, or higher installed and configured on MVS.
MVS Maintenance Level Required in TCP/IP Profile
o IBM PTF UQ03848
o IBM PTF UQ11550
Summary of Steps
1
2
3
Choose a TCP/IP port on which to receive IPDS data.
Configure JES.
Add a printer to the PSF STARTUP PROC.
For the following steps, you will need to know the [DEVICE], [ADDRESS], and [PORT].
•
•
•
[DEVICE] The name of the device as known on the mainframe system
[ADDRESS] IP address of the computer on which ExcelliPrint is installed
[PORT]
The TCP/IP port number on which ExcelliPrint listens for IPDS print
requests
Steps
1
2
By default ExcelliPrint is ready to receive print jobs on Port 5001; other valid port numbers
may be used instead. Add the desired port to ExcelliPrint, and remember the port number for
setting up JES.
Set up JES.
a. JES2 example:
FSS(FSS1)
PRT7
PROC=PSFPROC,HASPFSSM=HASPFSSM
FSS=FSS1,MODE=FSS,
PRMODE=(LINE,PAGE,SOSI1),
CLASS=C,UCS=0,SEP,NOSEPDS,CKPTPAGE=100,
DRAIN,MARK,TRKCELL=YES
Appendix III: zSeries (OS/390) Setup
Revised: 5/25/2010
41
b.
JES3 example:
FFSDEF,TYPE=WTR,FSSNAME=FSS3,PNAME=SAMPLE01,
SYSTEM=SYS1,TERM=NO,
DEVICE,DTYPE=PRTAFP1,NAME=PRT7,
JUNIT=(,SYS1,,OFF),FSSNAME=FSS3,
MODE=FSS,PM=(LINE,PAGE,SOSI1),CHARS=(YES,GT12),
CARRIAGE=(YES,A868),CKPNTGP=100,HEADER=YES,
WC=(C)
3
Add printer to PSF STARTUP PROC. The following is an example PSF STARTUP PROC.
Explanations of the parameters in bold follow this example.
//*****************************************************
//*
*
//*
PSF START-UP FOR GRP5E - TEST EXCELLIPRINT
*
//*
*
//*
TEST PRINTER
*
//*
*
//*****************************************************
//PSFGRP5 EXEC PGM=APSPPIEP,REGION=6144K
//STEPLIB DD DSN=SYS1.CAI.TCP60.LINK,DISP=SHR
//
DD DSN=TCP.CAI.V60.LOAD,DISP=SHR
//
DD DSN=TCP.CAI.V60.SASLINK,DISP=SHR
//KEEPLIST DD DSN=SYS2.AFP.KEEPLIST,DISP=SHR
//JOBHDR OUTPUT PAGEDEF=V06483,
/*JOB HEADER SEPARATOR*/
//
FORMDEF=C10110,CHARS=GT12
//JOBTLR OUTPUT PAGEDEF=V06483,
/*JOB TRAILER SEPARATOR*/
//
FORMDEF=C10110,CHARS=GT12
//DSHDR OUTPUT PAGEDEF=V06483,
/*DATA SET HEADER*/
//
FORMDEF=C10110,CHARS=GT12
//MSGDS OUTPUT PAGEDEF=A06462,
/*MESSAGES*/
//
FORMDEF=C10110,CHARS=GT12
//[DEVICE] DD DSN=SYS2.PRT5.TRACE,DISP=SHR
//FONT01 DD DSN=SYS1.FONT300.CUSTOM,DISP=SHR
//
DD DSN=SYS1.FONT300,DISP=SHR
//PSEG01 DD DSN=SYS1.PSEGLIB.XEROX,DISP=SHR
//
DD DSN=SYS1.PSEGLIB,DISP=SHR
//OLAY01 DD DSN=SYS1.OVERLIB.XEROX,DISP=SHR
//PDEF01 DD DSN=SYS1.PDEFLIB.XEROX,DISP=SHR
//FDEF01 DD DSN=SYS1.FDEFLIB.XEROX,DISP=SHR
//PRT5 CNTL
//PRT5 PRINTDEV TRACE=NO,
/*PSF TRACING
*/
//
DUMP=(,APS797I,3),
/*CONDITIONAL DUMP
*/
//
FONTDD=*.FONT01,
/*FONT LIBRARY DD
*/
//
OVLYDD=*.OLAY01,
/*OVERLAY LIBRARY DD
*/
//
PSEGDD=*.PSEG01,
/*PAGE SEGMENT LIB. DD */
//
PDEFDD=*.PDEF01,
/*PAGEDEF LIBRARY DD
*/
//
FDEFDD=*.FDEF01,
/*FORMDEF LIBRARY DD
*/
//
JOBHDR=*.JOBHDR,
/*JOB HEADER OUTPUT
*/
//
JOBTRLR=*.JOBTLR,
/*JOB TRAILER OUTPUT
*/
//
DSHDR=*.DSHDR,
/*DATA SET HDR OUTPUT */
//
MESSAGE=*.MSGDS,
/*MESSAGE OUTPUT
*/
//
PAGEDEF=1PRT,
/*DEFAULT
*/
//
FORMDEF=1PRT,
/*DEFAULT
*/
//
PIMSG=YES,
/*DATA SET RELATED MSG */
//
FAILURE=WCONNECT,
/*ATTEMPT RECONNECT
*/
//
TIMEOUT=REDRIVE,
/*PSF ACTION ON TIMEOUT*/
//
CONNINTV=0,
/*NO TIMEOUT
*/
//
DISCINTV=15,
/*TIMEOUT=15 SECONDS
*/
//
MGMTMODE=OUTAVAIL,
/*PRINTER MANAGEMENT MODE */
Appendix III: zSeries (OS/390) Setup
Revised: 5/25/2010
42
//
IPADDR='[ADDRESS]',
//
PORTNO='[PORT]',
//
DATACK=UNBLOCK
//
TRACE=NO,
//[DEVICE]
ENDCNTL
/*IP ADDRESS OF EXCELLIPRINT PRINTER*/
/*PORT NUMBER FROM STEP 2 */
/*DATA CHECK ERRORS
*/
/*INTERNAL TRACE
*/
Note Explanations of some of the key parameters follow:
•
•
•
•
•
CONNINTV Specifies the connect interval, in seconds. This is the limit on the time during
which PSF is to attempt to start a session or a dialog with a printer. If the connect interval
expires before connection is complete, PSF issues a message and ends the FSA. If
CONNINTV is not specified, or CONNINTV=0, PSF continues attempting to connect for an
unlimited time.
DISCINTV Specifies the disconnect interval in seconds. The value can range from zero to
86400. IBM suggests you set the value to 15. When no output is available from JES for this
time period, PSF ends the session with the network printer. If the value is set to zero, PSF
does not end the session because of lack of output, and other IPDS hosts will not be able to
share the printer.
FAILURE Specifies the action PSF is to take after a printer failure or a TCP/IP network
failure. If FAILURE=WCONNECT and the printer is connected to another host when PSF
attempts to establish a connection on TCP/IP, PSF continuously retries (up to the limit
specified by CONNINTV) until the printer becomes available. If FAILURE=STOP, PSF must
be restarted by an operator command.
TIMEOUT Specifies the action that PSF is to take after a timeout when no output is available
on JES. The DISCINTV parameter specifies the timeout interval. TIMEOUT=REDRIVE
requests that PSF redrive the printer FSA using the value of the MGMTMODE parameter.
TIMEOUT=STOP requests that PSF stop the printer FSA, which can then be restarted only by
an operator command.
MGMTMODE Set this parameter to OUTAVAIL. OUTAVAIL requests that PSF start a
communications session with the printer only when output is available on the JES spool.
Appendix III: zSeries (OS/390) Setup
Revised: 5/25/2010
43
Appendix IV: VSE/ESA Setup
PSF/VSE is the print “driver” that sends IPDS data to ExcelliPrint. PSF interfaces with the
POWER VSE Print Spool. For each printer that PSF supports, a 'PRINTDEV' macro needs to be
defined in the PSF Startup Job (it is the same definition for ExcelliPrint as for other printers).
PSF figures out what kind of printer it is talking to at the defined IP Address and Port when
communication is started.
For the following steps, you will need to know the [DEVICE], [ADDRESS], and [PORT].
•
•
•
[DEVICE] The name of the device as known on the mainframe system
[ADDRESS] IP address of the computer on which ExcelliPrint is installed
[PORT]
The TCP/IP port number on which ExcelliPrint listens for IPDS print
requests
A sample PRINTDEV is shown below.
[DEVICE] PRINTDEV IPADDR=[ADDRESS], (EXCELLIPRINT)
PORTNO=[PORT],
CHARS=GT12,
DATACK=BLOCK,
DISCINTV=30,
CONNINTV=0,
FAILURE=WCONNECT,
FORMDEF=010110,
MESSAGE=(V06481,010110),
MGMTMODE=OUTAVAIL,
PAGEDEF=V06481,
PIMSG=YES,
SEPPAGE=(V06481,010110),
SPBUFFER=2
Appendix IV: VSE/ESA Setup
Revised: 5/25/2010
44
Appendix V: IBM Printer Limitations
The following information (cited from IBM manual S544-5349-01) outlines the limitations of
specific types of IBM printers. The information is related to the IPDS Emulation field displayed
on the Device Properties page and the IPDS Emulation list available on the Modify Device
Properties page. The following printers are available for selection in ExcelliPrint:
•
•
•
IBM 3812
IBM 3816
IBM 4028
IBM 3812
The IBM 3812 has the following limitations:
•
•
•
•
•
•
Double Byte Character Sets are not supported.
Enlarged or reduced characters are not printed if its font is font type 2 (specified with
a coded font) or font type 3 (specified with a code page and a font character set).
Vertical format is not supported if the font is type 1 (specified with a font and a
character identifier).
Only *DEFAULT and 8=Black are allowed for the Color prompt.
Bar code types Code 128 and POSTNET are not supported.
You can print graphic elements only with *CONTENT print fidelity, because
graphics (GDF) have color orders that are not supported.
IBM 3816
The IBM 3816 has the following limitations:
•
•
•
•
•
Double Byte Character Sets are not supported.
Enlarged or reduced characters are not printed if its font is font type 2 (specified with
a coded font) or font type 3 (specified with a code page and a font character set).
Vertical format is not supported if the font is type 1 (specified with a font and a
character identifier).
Only *DEFAULT and 8=Black are allowed for the Color prompt.
You can print graphic elements only with *CONTENT print fidelity, because
graphics (GDF) have color orders that are not supported.
Appendix V: IBM Printer Limitations
Revised: 5/25/2010
45
IBM 4028
The IBM 4028 has the following limitations:
•
•
•
•
•
Double Byte Character Sets are not supported.
Enlarged or reduced characters are not printed if its font is font type 2 (specified with
a coded font) or font type 3 (specified with a code page and a font character set).
Vertical format is not supported if the font is type 1 (specified with a font and a
character identifier).
Only *DEFAULT and 8=Black are allowed for the Color prompt.
You can print graphic elements only with *CONTENT print fidelity, because
graphics (GDF) have color orders that are not supported.
Appendix V: IBM Printer Limitations
Revised: 5/25/2010
46
Appendix VI: IPDS Background
Background In 1984 IBM created a primary set of standards and rules known as Systems
Application Architecture (SAA). SAA was created to give programmers and system designers an
easier way to link data applications with any IBM platform. Intelligent Printer Data Stream
(IPDS) is the host-to-printer data stream used by SAA for Advanced Function Printing (AFP).
IPDS provides the interface for identifying, monitoring, and controlling all-points-addressable
(APA) printers, an interface that enables the presentation of pages with combinations of various
data types including text, vector graphics, images, and bar codes. IPDS allows these different
data types, often produced by independent applications, to be merged at print time.
IPDS also offers two-way printer communication. This collaborative interaction provides
detailed exception reporting and allows IPDS to adapt to specific printer resources and to deal
with errors in real time.
ExcelliPrint preserves the advantages of IPDS, including two-way communication and complex
printing abilities, but frees the user from purchasing and maintaining costly IPDS printing
environments. With print-to-file and Windows printer capabilities, ExcelliPrint bridges the gap
between advanced printing and output device choice.
Advanced Function Printing (AFP) Also developed by IBM, AFP is a print management architecture
that uses IPDS to interact with printers. Unlike IPDS, which is device-dependent, AFP is deviceindependent and object-oriented. AFP uses the Mixed Object Document Content Architecture
(MO:DCA) to define a document’s presentation. MO:DCA allows various data types, including
text, images, graphics, and bar codes, to be incorporated into the final print job. When a job is
ready for printing, AFP incorporates the MO:DCA elements and then the AFP data stream is
converted into an IPDS data stream by the Print Service Facility (PSF)—the IBM software
product that drives IPDS printers. Even though the AFP data stream is device-independent, it
becomes device-dependent when converted to IPDS.
Appendix VI: IPDS Background
Revised: 5/25/2010
47
Glossary
AFP Advanced Function Printing (or Presentation); IBM’s object-oriented architecture that
covers a wide range of text, graphics, and color and black-and-white printing.
IPDS Printer A printer that supports the common IPDS printer interface.
IPDS Intelligent Printer Data Stream; IBM’s host-to-printer data stream that contains both data
and controls for data presentation.
MO:DCA Mixed Object Document Content Architecture. A device-independent data stream for
interchanging documents.
Port In TCP/IP, a 16-bit number used to communicate between TCP and a higher-level protocol
or application. Some protocols, such as the File Transfer Protocol (FTP) and the Simple Mail
Transfer Protocol (SMTP), use the same port number in all TCP/IP implementations.
SAA Systems Application Architecture; a set of rules and guidelines developed by IBM in 1984.
TCP/IP Transmission Control Protocol/Internet Protocol.
Glossary
Revised: 5/25/2010
48