1
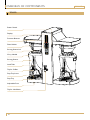
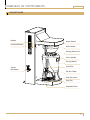
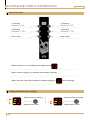
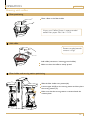
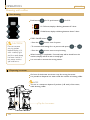
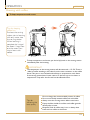
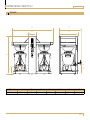
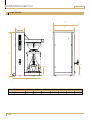
TOWER
USER MANUAL
UM_EN
Part No.: 1704519_02
CONTENT
TOWER
CONTENT......................................................................................................................................................... 2
GENERAL............................................................................................................................................................ 4
Introduction...............................................................................................................................................................4
Warnings.....................................................................................................................................................................4
Precautions.................................................................................................................................................................4
Intended use...............................................................................................................................................................4
Facts & weight ..........................................................................................................................................................5
General functional description..............................................................................................................................5
OVERVIEW OF COMPONENTS......................................................................................................... 6
TOWER.......................................................................................................................................................................6
SINGLE TOWER.......................................................................................................................................................7
BUTTONS AND DISPLAY INFORMATION................................................................................. 8
Button functions........................................................................................................................................................8
Display indications when brewing.........................................................................................................................8
INSTALLATION AND START-UP......................................................................................................... 9
Positioning..................................................................................................................................................................9
Water connection.....................................................................................................................................................9
Electrical connection and start-up..................................................................................................................... 10
OPERATION.................................................................................................................................................. 11
Brewing with coffee............................................................................................................................................... 11
Filter positioning.................................................................................................................................................... 11
Add coffee............................................................................................................................................................... 11
Filter holder and serving station positioning................................................................................................... 11
Start brewing........................................................................................................................................................... 12
Dispensing hot water............................................................................................................................................ 12
To keep temperature and aroma........................................................................................................................ 13
CLEANING AND CARE......................................................................................................................... 14
Cleaning.................................................................................................................................................................... 14
Cleaning serving station....................................................................................................................................... 14
Exterior cleaning when necessary...................................................................................................................... 14
PROGRAMMING........................................................................................................................................ 15
Adjusting water temperature.............................................................................................................................. 15
Adjusting water quantity...................................................................................................................................... 15
2
CONTENT
TOWER
MESSAGE SHOWN ON DISPLAY................................................................................................... 16
Error message......................................................................................................................................................... 16
DIMENSION SKETCH.............................................................................................................................. 17
TOWER.................................................................................................................................................................... 17
Single TOWER........................................................................................................................................................ 18
Serving station........................................................................................................................................................ 19
Some important information may appear in textboxes seen below
IMPORTANT!
INFO.
CAUTION!
More INFO.
Note
INFO.
INFO.
3
GENERAL
TOWER
Introduction
Thank you for choosing a TOWER coffee brewer.
We hope you enjoy it !
Read the user guide before using the machine.
This guide contains important instructions for
proper and safe use of the vending machine.
Always keep this guide close at hand for future
reference.
Warnings
Never immerse the machine, plug or mains
cable in water because there is a danger of
electric shock.
The appliance is not intended for use by
persons (including children) with reduced
physical, sensory or mental capabilities, or
lack of experience and knowledge, unless they
have been given supervision or instruction
concerning the use of the appliance by a person
responsible for their safety.
Children should be supervised to ensure they
do not play with the appliance.
Do not use the machine if the mains cable, plug
is damaged or the machine has fallen down.
If the mains cable is damaged it must be
replaced by the manufacturer, service agent or
similarly qualified persons in order to avoid a
hazard.
Only plug the machine into a properly installed
earthed safety socket whose line voltage
matches the technical data for the machine.
Precautions
Do not use the machine outdoors so it can be
exposed to weather (rain, snow, frost). It will
cause material damage to the machine.
Do not try to open the machine or repair it in
any way. To avoid danger only have the machine
repaired in a technical workshop, Service
Centre or by a qualified person.
Remove the mains cable from the socket when
the machine is not in use for longer periods. To
do this, pull the plug not the cable.
This appliance must be placed in a horizontal
position which is resistant to any water that
may leak.
Place the machine out of the reach of children.
Position the mains cable so that people cannot
trip over it. Keep it away from sharp edges and
heat sources.
The new hose-sets supplied with this appliance
are to be used, old hose-sets must not be reused.
This appliance is not suitable for installation in
an area where a water jet could be used.
This appliance must not be cleaned by a water
jet.
Intended use
This appliance is intended to be used in
household and similar applications such as:
- Staff kitchen areas in shops.
- Offices and other commercial working
environments.
- On agricultural estates.
- By clients in hotels, motels and other
residential type environments.
- Bed and breakfast type environments.
4
For the optimal performance of the machine
these parameters shall not be exceeded:
- Maximum permissible inlet water pressure :
800KPa (8Bar)
- Minimum permissible inlet water pressure:
200KPa (2Bar)
- Maximum working temperature: 40°ºC
- Minimum working temperature: 10°ºC
GENERAL
TOWER
Facts & weight
FACTS
TOWER
SINGLE TOWER
Hot water tap
Yes
Yes
Electronic temperature control
Yes
Yes
934, 928, 500mm
934,610, 500mm
25L
25L
Height, Width, Depth
Tank volume
Power supply
400V 3N~ 9000W 50/60Hz
Cold water connection
Capacity
½” External thread
350 cups / hour
175 cups / hour
2x5L
1x5L
Serving station
MODEL/NAME
WEIGHT
TOWER
53 kg
SINGLE TOWER
41 kg
General functional description
TOWER bulk brewer
Coffee brewer with automatic water supply.
Equipped with a separate tap for hot water.
Brewing in a removable serving station.
Brewing in paper filters.
Brew time for 5L. approx. 7min(SINGLE TOWER),
2x5L approx. 7min(TOWER)
5
OVERVIEW OF COMPONENTS
TOWER
Power Switch
Display
Function Buttons
Filter Holder
Serving Station Lid
Carry Handle
Serving Station
Level Tube
Tap for Coffee
Drip Tray Insert
Drip Tray
Adjustable Foot
Tap for Hot Water
6
TOWER
OVERVIEW OF COMPONENTS
TOWER
SINGLE TOWER
Display
Power Switch
Function Buttons
Filter Holder
Serving Station Lid
Carry Handle
Serving Station
Tap for
Hot Water
Level Tube
Tap for Coffee
Drip Tray Insert
Drip Tray
Adjustable Foot
7
BUTTONS AND DISPLAY INFORMATION
TOWER
Button functions
1/1 Brewing
1/1 Brewing
Full brew = 5.0L
Full brew = 5.0L
1/2 Brewing
1/2 Brewing
Half brew = 2.5L
Half brew = 2.5L
Pause / Stop
Pause / Stop
When machine is in use and filling water, display shows
When machine is filling up and heating water, display is blinking.
When water has reach right temperature, display will light up
with steady light.
Display indications when brewing
While machine is brewing
A
Full brew
Display shows: see A
8
While machine is brewing
B
Half brew
Display shows: see B
INSTALLATION AND START-UP
TOWER
Positioning
MIN. 10cm
Adjustable feets
Place the brewer unit on a flat horizontal surface that will support the weight
of the machine.
Note
Make sure that air is able to circulate behind the machine
(minimum 10cm).
Water connection
Bottom Side
Connect the supplied water hose to the cold water connection using a ½’’
R-connection. When pushing the machine into position make sure there is no
interference to the hose to ensure proper water flow.
Water supply to the machine is the customer’s responsibility according to
instruction and advice from the supplier.
In areas with high level lime problem, a descaling filter should be mounted.
Note
The new hose set supplied with the appliance shall be used and
that old hose sets shall not be reused. Connection to a closable
valve is recommended. Min. water pressure; 2bar (200kPa). Max.
water pressure; 8bar (800kPa).
9
INSTALLATION AND START-UP
TOWER
Electrical connection and start-up
The brewer is not reconnectable and may only be installed to the electric
supply network with a voltage that is stated on the brewer and shall be carried
out by an authorized electrician.
Recommended: install a line circuit breaker and a earth fault breaker to the
machine.
CAUTION!
Connect to a separate 3 phase only
- Brewer should be connected to 400 V with Zero and earth.
- Use 16 Amp fuses.
IMPORTANT!
Electrical installations must be done of an certificated electrician.
400V 3N~ 9000W 50/60Hz
A
B
Power Switch
Turn on the power switch(B), machine will start filling with water.
While machine is heating up, display is blinking.
Once the water has reached the correct temperature, the display will stop
blinking and show a steady light (A). (approx 17 minutes).
Machine is now ready to use.
10
OPERATION
TOWER
Brewing with coffee
Filter positioning
Place a filter in the filter holder.
Always use Coffee Queen´s recommended
coffee filter paper: Part No. 110102
Add coffee
Recommended powder
amount is 60g/l
Add coffee (restaurant / catering ground coffee).
Make sure that the coffee is evenly spread.
Filter holder and serving station positioning
Slide the filter holder into position(A).
Loosen upper lid (B) on the serving station and then place
the serving station (C).
A
B
Make sure that the serving station is centered with the
rotation plate.
C
11
OPERATION
TOWER
Brewing with coffee
Start brewing
Push button
for 5L, push button
for 2.5L
-
1/1 Full brew, display is blinking between all 3 lines.
-
1/2 Half brew, display is blinking between lower 2 lines.
STOP / PAUSE button
CAUTION!
Do not remove
serving station
before display is lit
with a steady light
and the ready beep
has been heard, it
can cause serious
spill and burns.
- Press the
button once for pause.
- To continue the brewing if it is in pause mode press
- Press the
or
button twice to stop brewing.
When brewing is completed a 3 second beep will be heard from the
machine, display will be lit with a steady light.
It is now safe to remove the serving station.
Dispensing hot water
On front of the brewer unit there is tap for serving hot water.
It is possible to dispense hot water while the machine is brewing coffee.
NOTE
You can as a maximum dispense 2 pitchers (1.8L each) of hot water,
while brewing coffee.
Tap for hot water
12
OPERATION
TOWER
Brewing with coffee
To keep temperature and aroma
A
Tips for keeping
coffee hot
Pre-heat the serving
station, start a brewing
with only water into
the serving station.
When brewing is
complete let it stand
for about 1 hour. Pour
out the water. Then
start a brew with
coffee.
To keep temperature and aroma, put the lid (A) back on the serving station
immediately after the brewing.
IMPORTANT!
The temperature in the serving station will decrease with ~1.5°C/h. There is
~40ml of coffee standing in the tubes from the inner container to the coffee
faucet. This part is not insulated and will drop in temperature much faster.
If the serving station haven’t been used in 1h the first cup can be lower in
temperature. Cups after the first will not be affected of this.
Tips for
achieving the
best quality
Do not change the recommended portion of coffee.
Do not mix freshly brewed coffee with old coffee.
Always rinse the serving station before next brew.
Empty the filter holder from filter and coffee grounds directly after a brew.
Dispense 50ml of coffee every hour to always have fresh and hot coffee to the faucet.
13
CLEANING AND CARE
TOWER
Cleaning
The filter holder
and serving station
should be cleaned
every day.
Rinse the serving
station before each
new brewing.
To keep the serving stations clean. It is effective to start a half brew with
water only.
This will disolve the coffee remains.
Empty the serving station by opening the tap and this will also be cleaned.
Repeat this every day.
Disassemble the level tube and clean it every week with the enclosed brush.
Cleaning serving station
IMPORTANT!
Rinse the serving
station on the inside
several times with
fresh tap water.
Disassemble the level tube and clean it every
week with the enclosed brush.
A
Turn off the bigger lid, and clean the mixer
tube(A).
Cleaning of serving station 5L
Fill the serving station with hot water. ( Full brewing without coffee and filter ).
B
Put 2 tablespoons with cleaning powder in the serving station and wait at least
15 minutes.
Tap off 2/3 of the cleaning solution.
Clean the serving station with the following cleaning brush(B).
Rinse the serving station with fresh tap water sereral times before a new brew.
Part No.
OPTIONS
110102-02
CLEANING PARTS
Cleaning powder
1104231
Cleaning brush
1103360
Cleaning brush for level tube,
mixer tube
Exterior cleaning when necessary
To clean the exterior of the machine, use a soft rag with liquid
cleaning agent to prevent scratches.
14
PROGRAMMING
TOWER
Adjusting water temperature
A
Press left buttons
and
at the same time for 5 seconds until
you hear1 beep. Display shows the present setting(A).
Adjust with the left buttons
(increase water temp.) and
(decrease water temp.)
Confirm the new settings by pressing the left
70°0C = min. temperature.
96°0C = max. temperature.
button once.
Adjusting water quantity
ADJUST
SIGNAL
Off
6
25%
5
Press left buttons
20%
4
15%
3
same time for 5 seconds until you hear 3
beeps. the display shows the current setting.
10%
2
Adjust with the left buttons
5%
1
0%
0
-5%
-1
-10%
-2
-15%
-3
-20%
-4
-25%
-5
For left side
and
(increase) and
at the
(decrease)
Confirm the new settings by pressing the
left
button once.
For right side
Press right buttons
and
at the same time for 5 seconds until
you hear 3 beeps. the display shows the current setting.
Adjust with the right buttons
(increase) and
Confirm the new settings by pressing the right
(decrease)
button once.
15
MESSAGE SHOWN ON DISPLAY
TOWER
Error message
Error message, Display shows: E1, E2, E3, E4.
IMPORTANT!
All maintenance
and installations
must be done
of an authorized
technician.
LEVEL CONTROL
shown on the display
shown on the display
- The water high level
sensor is triggerd before
the low level sensor.
- Clean the level sensor.
- Change the level
sensor.
- Cables connected is
incorrectly.
- Filling time too long.
- Poor water pressure.
- Water tap is not open
- Restart machine.
TEMPERATURE CONTROL
shown on the display
shown on the display
16
- Temperature sensor out
of range.
- Temperature sensor is
broken.
- Cable loose.
- 50C - 1050C.
- Change temp. sensor
- Connect cable
- Heating time is too long.
- Solid state broken.
- Element broken.
- High limit control defect.
- Restart machine.
- Change solid state
- Change heating
element.
DIMENSION SKETCH
TOWER
TOWER
B
C
D
E
A
G
F
Model
A
B
C
D
E
F
G
Tower
934mm
928mm
500mm
174mm
410mm
233mm
244mm
17
DIMENSION SKETCH
TOWER
Single TOWER
C
D
E
A
G
F
B
18
Model
A
B
C
D
E
F
G
Single Tower
934mm
610mm
500mm
174mm
410mm
233mm
244mm
DIMENSION SKETCH
TOWER
Serving station
B
C
A
D
E
Model
A
B
C
D
E
Serving Station
483mm
373mm
325mm
449mm
110mm
19
For the warranty to be valid the conditions for maintenance must have been
followed according to our instructions, proper precaution has been made and
warranty claim been issued without delay.
The affected equipment may not be used during awaiting service if there is any risk
that the damage or defect would worsen.
The warranty will not cover consumption supplies such as glassware, normal
maintenance such as cleaning of filters, contaminations in water, lime, incorrect
voltages, pressure or adjustment of water amounts.
The warranty will not cover damages of defects caused by incorrect handling and
operation of the appliance.
FOR SERVICE
Please contact your dealer
Your Dealer
www.creminternational.com