1
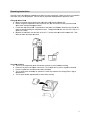
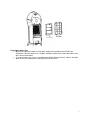
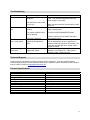
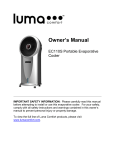
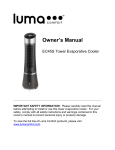
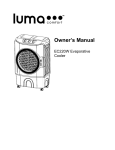
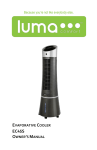
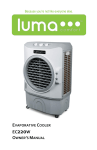
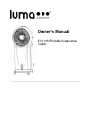
Ow wnerr’s Manua al EC110S P Portablle Evap porative e Coo oler Contents Introduction ..................................................................................................................... 1 Product Benefits .............................................................................................................. 1 Important Safety Information ........................................................................................... 1 Parts List ......................................................................................................................... 2 Operating Instructions ..................................................................................................... 3 Filling the Water Tank .............................................................................................. 3 Using the Ice Pack ................................................................................................... 3 Using the Remote Control ........................................................................................ 4 The Control & Display Panels .................................................................................. 5 Maintenance .................................................................................................................... 6 General Maintenance Instructions............................................................................ 6 Cleaning the Dust Filter & Cooling Pad .................................................................... 6 Cleaning the Water Tank ......................................................................................... 7 Troubleshooting .............................................................................................................. 8 Technical Support ........................................................................................................... 8 Product Specifications ..................................................................................................... 8 Warranty.......................................................................................................................... 9 Introduction Thank you for purchasing this evaporative cooler from Luma Comfort, the world leader in home appliances and home comfort products. This owner’s manual provides specific operating instructions for your evaporative cooler. Use the evaporative cooler only as instructed in this owner’s manual. Product Benefits Designed for cooling small to medium size bedrooms, living rooms, sunrooms, patios and offices Sleek, modern design makes it an attractive addition to your home High-efficiency, rigid cooling pad holds more water Removable water tank makes refilling and emptying easy Powerful motor results in more powerful airflow, faster evaporation and cooler air Consumes about as much electricity as your typical 100 watt light bulb Eco-friendly evaporative cooling system cools the air by the natural process of evaporating water with no Freon or harmful chemicals Adds moisture to dry environments and eliminates airborne dust particles Covers up to 250 square feet Important Safety Information These instructions are not meant to cover every possible condition and situation that may occur. Please read all instructions before using this evaporative cooler. Failure to carefully read all instructions may result in possible electric shock or fire hazard, and will void the manufacturer’s warranty. 1. Use this evaporative cooler only as instructed in this owner’s manual. Other uses may cause electric shock, injury or fire. 2. Close supervision is required if this cooler is used near children or pets. 3. To protect against electric shock, do not immerse this cooler or its plug and cord in water. 4. If the cooler is being transported or will not be in use, disconnect it from the power supply by tightly gripping the plug and pulling it from the power outlet. Do not disconnect the power supply by pulling on the evaporative cooler’s power cord. 5. Avoid contact with any of the evaporative cooler’s moving parts. 6. Place the evaporative cooler on a level surface. 7. This evaporative cooler is intended to fit into a matching receptacle. Under no circumstances should the plug be altered in any way. An improper connection can result in electric shock. 8. If possible, avoid using extension cords with this evaporative cooler. If an extension cord is absolutely necessary, do not use more than one extension cord to operate more than one cooler. 9. Do not insert objects or allow fingers to enter into the cooler’s grills, as this may cause electric shock or bodily injury. Do not block or tamper with the evaporative cooler while it is in operation. 10. Do not run the power cord under mats or carpeting, and do not cover the power cord with runners. Arrange the power cord away from room traffic and where it can be tripped over. 11. Do not operate this evaporative cooler in the presence of flammable substances or explosives. 12. Do not place the cooler near an open flame or cooking/heating appliances. 13. If the evaporative cooler will not be in use, empty the tank of any remaining water. 14. If the cooler’s plug or power cord is damaged, do not attempt to repair the components yourself. Please contact Luma Comfort’s customer service hotline at 1-866-737-6390 or have the unit examined by an authorized service provider. SAVE THESE INSTRUCTIONS 1 Parts Liist 1. 2. 3. 4. 5. 6. 7. 8. Fan head Display D panel Water W level ind dicator Caster C Control C panel Remote R contro ol storage slott Carrying C handlles Cooling C pad kn nob 9 9. 1 10. 1 11. 1 12. 1 13. 1 14. 1 15. 1 16. Cooling p pad slot Dustproo of air filter Water tan nk Power co ord bracket Power co ord Water tan nk knob Ice pack Remote ccontrol 2 Operating Instruc ctions Carefully remove all pa ackaging mate erials and retain for future storage/use. Make sure tthere is no ressidual foam left in No tools will be required tto assemble tthis evaporative cooler. i any of the components. c e Water Tank k Filling the a. Remove R the water w tank by turning t the wa ater tank knob b counterclocckwise 90°. b. Before using th he evaporativ ve cooler for th he first time, w we recommend cleaning the tank with a warm w water an nd light deterg gent solution. c. Fill the tank witth clean wate er. Pay attenttion to the wa ater level indiccator located on the front o of the co ooler to avoid d overfilling the evaporative e cooler. The e approximate e tank size of the EC110S is 1.5 ga allons (5.5 lite ers). d. Replace R the ta ank back onto the back of the t unit. Turn n the water ta ank knob clockkwise 90°. Th his lo ocks the water tank back in nto place. e Ice Pack Using the a. The EC110S evaporative e co ooler includes s an optional ice pack for a added cooling g. b. Place the ice pack p in the fre eezer until frozen. Do not o open the ice pack or ingesst its contentss. c. Put the ice pac ck into one off the water tan nk’s chamberrs. d. The ice pack is s not necessa ary for operatiion, but will h elp enhance the cooling effect in higher te emperatures. e. The ice pack will w last approx ximately 4 ho ours before m elting. 3 Using the e Remote Co ontrol a. The EC110S is s equipped with w a remote control. c A CR R2032 3V coin-type replaccement batteryy is in ncluded for yo our convenien nce. b. To use the rem mote control, aim a it at the unit u and selecct one of the fu unctions on th he remote control. d is approximately 24”. 2 The effective distance c. ON/SPEED O = Power ON an nd adjusts spe eed d. OFF O = Power OFF O e. TIMER = Time er function of up u to 7.5 hours f. SWING = Swin nging air louvers g. COOLER/HUM C MIDIFIER = Controls C coolin ng/humidificattion function h. MODE M = Adjus sts the airflow w mode 4 The Conttrol & Display y Panels ON/SPEE ED & OFF Bu uttons a. After A the tank is i filled with water, w connec ct the evapora ative cooler to o a power outlet. The unit will be eep twice, ind dicating that the power sou urce is conneccted. The co ooler will be in n standby mod de at th his time. Pres ss the ON/SP PEED button to t turn on the evaporative cooler. b. To adjust the fan f speed, pre ess the ON/SPEED button n again until yyour desired sspeed has bee en re eached. The current fan sp peed will be indicated on tthe display pa anel. To turn the unit off an nd re evert back to standby mode, press the OFF O button. COOL/HU UMIDIFIER Button a. After A the desire ed fan speed has been sellected, press the COOLER R/HUMIDIFIE ER button to ac ctivate the co ooling/humidify fying function.. This powerss the water pu ump and will cool and add d moisture m to the e air at the same time. The e blue cooling g icon will also be visible o on the displayy pa anel. b. Please note that if the initiall fan speed is s set to 3, the unit will reve rt back to the e second spee ed se etting for 5 minutes. After 5 minutes, th he unit will auttomatically sw witch to the th hird fan speed d. This is to allow w the cooling pad p to be thoroughly abso rbed with watter, which ressults in optimized ooling. The cooler c will not revert back to t other speed ds if the initia al fan speed w was set to eith her 1 co orr 2. utton MODE Bu a. The EC110S has h 2 differentt automatic airflow modes.. Setting the airflow mode e is optional. ess the MODE E button. b. To set the airflow mode, pre ode – Indicate ed by the palm m tree icon on n the display panel, this se etting will adju ust 1.. Natural Mo the airflow speed betwe een 1, 2 and 3. 3 2. Sleep Mod de – Indicated d by the moon n icon on the display panel, this setting will graduallyy lower the speed s at diffe erent intervals s, depending o on the selecte ed fan speed. If the fan sp peed is set to 3, the cooler will run for 30 minutes m on hig gh speed, 30 0 minutes on m medium spee ed and then continue c to op perate on low speed. If the e fan speed iss set to 2, the cooler will ru un for 30 minutes s on medium speed and th hen continue tto operate on n low speed. If the fan spe eed is set to 1, th he cooler will continuously c run on low sp peed. 5 TIMER Button a. This evaporative cooler is equipped with a 7.5 hour programmable timer. To set the timer, press the TIMER button. Each press of this button will add 0.5 hours to the set time. b. The set time will be indicated in the middle of the display panel. SWING Button To activate the oscillation feature, press the SWING button. The fan head will automatically oscillate counterclockwise, which directs cool air into a cyclone for a more focused cooling effect. Additional Features a. If the water level in the tank drops below the minimum level, the unit will produce an audible alert that will last for 10 seconds. After 10 seconds, the evaporative cooler will automatically turn off. b. If the water tank is removed while the unit is on, it will automatically turn off. Maintenance Regular cleaning and maintenance is an essential step in maintaining the longevity of your evaporative cooler and ensuring that it operates free of defects. Maintain your evaporative cooler by following these steps: General Maintenance Instructions Always unplug the evaporative cooler from the power supply before servicing or cleaning. Use a soft cloth and a mild soap and warm water solution to clean the unit’s exterior. Do not use harsh cleaners, gasoline, paint thinner, benzene, etc., as these substances can damage the evaporative cooler. Thoroughly dry all of the cooler’s parts with a soft cloth before reconnecting the unit to the power supply. Empty the water tank after the evaporative cooler has been in use. Regular, scheduled cleaning of the water tank before each use is also recommended. If the evaporative cooler will not be in use for an extended period of time, place the unit back in its original carton and keep it stored in a clean, dry place. The evaporative cooler’s filter, tank and cooling pad will need to be removed prior to cleaning. Once all of the different components have been cleaned, place them back into the unit in this order: water tank, cooling pad and dust filter. Cleaning the Dust Filter & Cooling Pad To prevent clogging of the dust filter, we recommend cleaning the filter at least once a month. To clean the dust filter, remove it from the back of the unit by pushing down on the two tabs located above the filter and pull it out. Gently scrub it with a soft brush and rinse with water. Allow it to thoroughly air dry before placing it back in the unit. To clean the cooling pad, first remove the dust filter to expose the pad. Turn the knob on the pad clockwise and pull it out from the back of the unit. Rinse it with clean water and allow it to thoroughly air dry before placing it back in the unit. 6 Cleaning g the Water Tank T Unplug U the eva aporative coo oler from the power p supply and empty th he water tankk after the ev vaporative co ooler has been n in use. Reg gular, schedu uled cleaning of the water ttank before each us se is also rec commended. To clean the water w tank, rinse it in a warm m water and llight detergen nt solution. R Rinse it with cllean water w and dry it thoroughly before placing it back into the cooler. 7 Troubleshooting Problem There is no airflow. Possible Cause(s) The power cord is not plugged in. The water tank is not locked into the unit. The unit does not cool. There is insufficient water in the tank. The cooler/humidifier button was not pressed. The unit does not cool on high speed. The pump is defective. The cooling pad is not sufficiently saturated with water. Water is coming out of the vents. The cooling pad may be clogged with debris. Possible Solution Check to make sure the plug is plugged into an outlet. The unit should beep twice once the power supply is connected. Make sure the water tank is locked into the back of the unit. Check the water level in the tank and make sure there is enough water. Press the COOLER/HUMIDIFIER button. Contact customer service if there is an issue with the water pump. If speed 3 is selected when in cooling mode, the unit will automatically revert to speed 2 for 5 minutes to allow the pad to be fully soaked. The cooler will automatically turn to speed 3 when the pad is soaked. Clean the cooling pad by rinsing it in water and allowing it to thoroughly dry. If the problem persists, contact customer service. Technical Support Luma Comfort is committed to providing a premier service experience. If you are experiencing any technical issues with your product related to either setup or operation, please contact our product support team at 1-866-737-6390 or support@lumacomfort.com. Product Specifications Model: Product Dimensions: Product Weight: Voltage: Wattage: Coverage Area: Tank Size: Fan Speeds: Noise Level (dB): Airflow: Oscillation: Warranty: EC110S 12.75" x 11.25" x 34.5" 16.2 pounds 110V-120V 110W Up to 250 square feet 1.76 gallons 3 66 500 CFM Yes 1 year manufacturer’s warranty 8 Warranty Luma Comfort products are warranted to be free from defects in workmanship or materials for one (1) year from the date of purchase. If the product is found to be defective within this period, Luma Comfort, at its sole option, will repair or replace any components that fail during normal operation. The repairs or replacement will be made at no charge to the customer for parts and labor, assuming that the customer shall be responsible for all transportation costs to and from Luma Comfort. Luma Comfort retains the right to repair or replace (with a new or newly-refurbished replacement product) the appliance at its sole discretion. This warranty does NOT apply to the following: Products without a proof of purchase Products purchased from a source other than an authorized Luma Comfort dealer Cosmetic damage such as scratches or dents Damage caused by service performed by anyone who is not an authorized service provider of Luma Comfort Damage in transit Damage caused by accident, abuse, misuse, water, flood, fire, improper installation, maintenance negligence, commercial use for a non-commercial unit, acts of God or any other acts of nature or external causes Damage to a product caused by modifications or alterations without the written permission of Luma Comfort Normal wear and tear of parts that are designed to be replaced, such as filters or batteries Power failure and improper power supply such as low voltage, defective wiring or inadequate fuses Use of force or damage caused by external influences Complete or partially dismantled appliances THE WARRANTIES AND REMEDIES CONTAINED HEREIN ARE EXCLUSIVE AND IN LIEU OF ALL OTHER WARRANTIES EXPRESS, IMPLIED, OR STATUTORY, INCLUDING ANY LIABILITY ARISING UNDER ANY WARRANTY OF MERCHANTABILITY OR FITNESS FOR A PARTICULAR PURPOSE, STATUTORY OR OTHERWISE. THIS WARRANTY GIVES YOU SPECIFIC LEGAL RIGHTS, WHICH MAY VARY FROM STATE TO STATE. IN NO EVENT SHALL LUMA COMFORT BE LIABLE FOR ANY INCIDENTAL, SPECIAL, INDIRECT, OR CONSEQUENTIAL DAMAGES, WHETHER RESULTING FROM THE USE, MISUSE, OR INABILITY TO USE THIS PRODUCT OR FROM DEFECTS IN THE PRODUCT. SOME STATES DO NOT ALLOW THE EXCLUSION OF INCIDENTAL OR CONSEQUENTIAL DAMAGES, SO THE ABOVE LIMITATIONS MAY NOT APPLY TO YOU. If you believe your product is defective, contact Luma Comfort for warranty service at 1-866-737-6390 or support@lumacomfort.com. In your correspondence with Luma Comfort, please describe the problem and request a return material authorization (RMA) number. You will also need to provide the proof of purchase, return shipping address and a daytime phone number. After a Luma Comfort representative confirms that your product is defective and is still under warranty, you will receive an RMA and return shipping instructions. Products sent to our headquarters without an RMA will be refused. 9