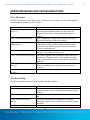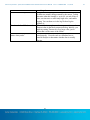
1
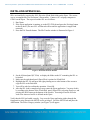
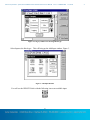
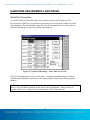
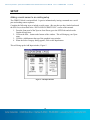
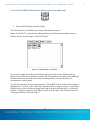
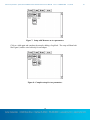
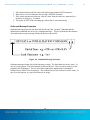
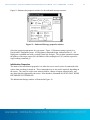
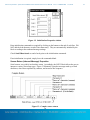
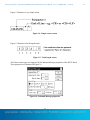
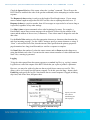
Xpert / XLite
GPRS232 Serial Interface Block
USERS
MANUAL
Part No. 8800-1164
Rev. 3.3
July 27, 2009
Sutron Corporation | 22400 Davis Drive | Sterling, VA 20164 | 703.406.2800 | www.sutron.com | sales@sutron.com
Table of Contents
INTRODUCTION .......................................................................................................................... 3
OVERVIEW ................................................................................................................................... 4
INSTALLING GPRS232.SLL........................................................................................................ 5
What the Block Does ...................................................................................................................... 8
Interaction with the Hardware .................................................................................................... 8
Software Operations.................................................................................................................... 8
Sample Intervals...................................................................................................................... 8
Hardware Requirements and Wiring .............................................................................................. 9
Serial Port Connection ................................................................................................................ 9
Setup ............................................................................................................................................. 10
Adding a serial sensor to an existing setup ............................................................................... 10
The Property Dialogs ................................................................................................................ 13
How the Block Works ........................................................................................................... 13
Outbound Message Properties .............................................................................................. 14
Initialization Properties ......................................................................................................... 15
Sensor Return (Inbound Message) Properties....................................................................... 16
Error Messages and Troubleshooting ........................................................................................... 20
Error Messages.......................................................................................................................... 20
Troubleshooting ........................................................................................................................ 20
Table of Figures
Figure 1: Xterm File Transfer Window .......................................................................................... 5
Figure 2: Category Window for Selecting Block Type .................................................................. 6
Figure 3: Add Input Window .......................................................................................................... 6
Figure 4: Typical COM settings - Note Com2: set to None ........................................................... 9
Figure 5: Add Input Window ........................................................................................................ 10
Figure 6: Setup following “Use Wizard” ...................................................................................... 11
Figure 7: Setup with Measure on two parameters ....................................................................... 12
Figure 8: Complete setup for two parameters .............................................................................. 12
Figure 9: RS232 Block Properties ................................................................................................ 13
Figure 10: Outbound Message Structure ..................................................................................... 14
Figure 11: Outbound Message properties window ...................................................................... 15
Figure 12: Initialization Properties window ................................................................................ 16
Figure 13: Complex sensor return................................................................................................ 16
Figure 14: Simple sensor return ................................................................................................... 17
Figure 15: Fixed length return ..................................................................................................... 17
Figure 16: Inbound Message properties ....................................................................................... 17
Figure 17: Log options for inbound message ............................................................................... 18
2
Sutron Corporation Xpert/XLite GPRS232 Serial Interface Block Users Manual
Rev. 3.3 #8800-1164
07/2009
INTRODUCTION
The Xpert and 9210 data loggers have been designed to be easily expandable by adding
additional software libraries, called Sutron Link Libraries (SLLs). One such library is
GPRS232.sll, which adds the ability to obtain data from a variety of RS-232 serial output
sensors. This document is the user manual for GPRS232.sll. The following topics are discussed:
Overview
How to install the library.
How to wire the serial connection to a sensor.
Operating instructions.
Error messages and troubleshooting.
3
1
Sutron Corporation Xpert/XLite GPRS232 Serial Interface Block Users Manual
Rev. 3.3 #8800-1164
07/2009
OVERVIEW
The purpose of the GPRS232 SLL is to allow an Xpert or 9210 logger to obtain data from certain
types of serial output sensors. The class of sensors supported is those that provide ASCII output
when requested to do so by issuing a command.
The GPRS232 SLL provides a great deal of flexibility in both the commands that can be sent to a
sensor and also in configuring the interpretation of what the sensor sends back. The following
features are supported:
COM PORT CHARACTERISTICS
Port number
Communications rate (BAUD rate)
Parity
7/8 bit data structures
Stop bits
Timeout period
INITIALIZATION
Up to five distinct command strings can be issued automatically when recording is
turned on. These strings may be used to place the sensor in the proper state for
polling data
OUTBOUND COMMANDS
Several types of lead character
Any printable ASCII “get data” command
Several types of command terminators (<CR>, <CR><LF>, etc.)
INTERPRETATION OF SENSOR RETURN
Support for fixed length return, or variable length return with end of line termination
character(s)
Wide variety of user-selectable end of line characters, or user defined character or
string
Ability to skip the first “n” characters of a response to reach data
Parsing (separation) of up to twenty parameters embedded in return message
User defined parsing character or string, such as comma, slash, and blank
4
2
Sutron Corporation Xpert/XLite GPRS232 Serial Interface Block Users Manual
Rev. 3.3 #8800-1164
07/2009
INSTALLING GPRS232.SLL
SLLs are installed by copying the .SLL file to the \Flash Disk folder on the Xpert. The easiest
way to accomplish this is to use Sutron’s Xterm utility. Connect a PC or laptop computer to
COM 1 on the Xpert. The steps to load the SLL are as follows:
1. Run Xterm
2. If the Xpert application is running, go to the STATUS tab and press the Exit App button
to shut it down. (The new SLL will not take effect until the application is stopped and
restarted.)
3. Press the File Transfer button. The File Transfer window is illustrated in Figure 1.
Figure 1: Xterm File Transfer Window
4. Set the left hand panel (PC Files) to display the folder on the PC containing the SLL to
be loaded
5. Make sure the right hand panel (Xpert Files) is pointed to \Flash Disk
6. Highlight the SLL file and press the right-pointing arrow at the bottom of the screen to
copy the SLL to the flash disk
7. You will be asked to confirm the operation. Press OK.
8. After the SLL load is completed you may restart the Xpert application. You may do this
by scrolling to the bottom of the \Flash Disk panel (Xpert Files), selecting Xpert.exe, and
pressing the RUN button at the bottom of the window. Powering off and on will also
work if an Autoexec.bat file is defined on the Xpert.
Verify that the SLL has loaded correctly. Log on to the Xpert application (either through the
front panel or using Xterm) with SETUP access privileges. Go to the SETUP tab and press the
ADD button. The Select Category window (see Figure 2) will appear.
5
3
Sutron Corporation Xpert/XLite GPRS232 Serial Interface Block Users Manual
Rev. 3.3 #8800-1164
07/2009
Figure 2: Category Window for Selecting Block Type
Select Input as the block type. This will bring up the Add Input window, Figure 3.
Figure 3: Add Input Window
You will see the GPRS232 block with the following icon as an available input.
RS232
6
4
Sutron Corporation Xpert/XLite GPRS232 Serial Interface Block Users Manual
Rev. 3.3 #8800-1164
07/2009
If the block does not appear in the list, or if you received an error message when the Xpert
application started regarding a failure to load the GPRS232.sll, then try powering down the Xpert
and restarting it. If you still can’t find the block or you still receive an error message, it is likely
that the SLL is not compatible with the version of Xpert software that you are running. Contact
Sutron or access the Sutron web site to obtain the latest updates.
If the block is available, the installation is successful. Press Cancel twice (once in the Output
Module window and once in the Select Category window) to return to the Setup window. Using
the Display block in a setup is covered later in this manual.
7
5
Sutron Corporation Xpert/XLite GPRS232 Serial Interface Block Users Manual
Rev. 3.3 #8800-1164
07/2009
WHAT THE BLOCK DOES
Interaction with the Hardware
The GPRS232 block makes use of one serial port on the Xpert.
Software Operations
The GPRS232 block is a passive input. That is, it must be connected to an active block (e.g.,
Measure, Average, etc.) that governs how often it will get data.
When the Xpert recording is turned on, the block can issue up to five instrument-initialization
commands out the selected COM port.
Each time the GPRS232 block is sampled it will issue a user-defined “get data” command to the
serial sensor. It will then wait either for a fixed number of characters (set by the user), or for the
end of line character or string, or until timeout. After the message is complete, the block will
determine if only one parameter is present, or more than one (selected by user setup). If more
than one parameter is present, the block separates out all the parameters, and assigns each to an
output of the block, up to 20.
If no data are received from the sensor, then the outputs where parameters were expected are set
to zero with B (Bad) quality.
Sample Intervals
The rate at which the GPRS232 block can be sampled will be determined by the characteristics
of the serial sensor that you are using. You will have to determine the maximum sample rate by
experimentation. Start out conservatively (perhaps once every 30 seconds) and reduce the
sample time until you see the Xpert start skipping sample cycles. “Skipping” will show up as
missing time tags in the log.
8
6
Sutron Corporation Xpert/XLite GPRS232 Serial Interface Block Users Manual
Rev. 3.3 #8800-1164
07/2009
HARDWARE REQUIREMENTS AND WIRING
Serial Port Connection
Use of the GPRS232 block will require one available serial port on the Xpert or 9210.
Be sure that the COM port you use has its first property set to None in the COMS item in the
Xpert Setup tab. This is the default setting and you will not normally have to worry about it
unless the port has previously been used for something else.
Figure 4: Typical COM settings - Note Com2: set to None
There is NO standard way to wire a serial sensor. Consult the instrument maker’s manual
carefully and be absolutely sure that you are using a properly wired cable with any required
adapters.
NOTE: Some serial sensors – Notably the ParoScientific Digiquartz – require that pins 7 (RTS)
and 8 (CTS) of the DB-9 connector on the Xpert to be wired together. If they are not, no
response will be seen. Again, the exact requirements will be sensor-specific.
9
7
Sutron Corporation Xpert/XLite GPRS232 Serial Interface Block Users Manual
Rev. 3.3 #8800-1164
07/2009
SETUP
Adding a serial sensor to an existing setup
The GPRS232 block is an input block. It gets its information by issuing commands out a serial
port and reading sensor responses.
Complete the following steps to include a serial sensor. (Be sure that you have loaded and tested
the SLL first, as described in the “INSTALLING GPRS232.SLL” section of this manual.
1. From the front panel of the Xpert or from Xterm, go to the SETUP tab and select the
Graphical Setup item.
2. Click on the Edit… button at the bottom of the window. This will bring up your Xpert
setup.
3. Click the +Add button at the top of the graphical setup window.
4. When the Select Category dialog appears, click on the Input button.
This will bring up the Add Input window, Figure 5.
Figure 5: Add Input Window
10
8
Sutron Corporation Xpert/XLite GPRS232 Serial Interface Block Users Manual
Rev. 3.3 #8800-1164
07/2009
You will see the GPRS232 block with the following icon as an available input.
RS232
5. Select the RS232 block and click on OK.
The block will now be included in your setup as illustrated in Figure 6.
When “Use Wizard” is selected in the Add Input dialog, the Wizard automatically connects a
Measure block to the first output of the RS232 block.
Figure 6: Setup following “Use Wizard”
If your sensor outputs more than one parameter, then you need to connect Measure and Log
blocks to each of the other parameters expected. The Time and Interval settings of the additional
Measure blocks must be set the same as the first Measure block, to assure that only one
measurement is actually made.
To add a Measure block to the second parameter, click the RS232 block and use Select Output to
highlight Out2. Click on +Add. Select Processing in the Select Category window. Scroll down
about half way in the available processing blocks and click on the Measure block. Click on OK
to add it. Change the properties of the Measure block to be the same as the first Measure block.
Your setup should now look like Figure 7.
11
9
Sutron Corporation Xpert/XLite GPRS232 Serial Interface Block Users Manual
Rev. 3.3 #8800-1164
07/2009
Figure 7: Setup with Measure on two parameters
Click on +Add again and complete the setup by adding a Log block. The setup will then look
like Figure 8, and be wired correctly for one output.
Figure 8: Complete setup for two parameters
12
10
Sutron Corporation Xpert/XLite GPRS232 Serial Interface Block Users Manual
Rev. 3.3 #8800-1164
07/2009
The Property Dialogs
You must set a substantial number of properties after the RS232 block is included in the setup.
Click on the RS232 block to select it and then click on Edit Properties. This will bring up the
main properties dialog, as illustrated in Figure 9.
Figure 9: RS232 Block Properties
The main properties dialog is used to select the instrument COM port and set the port
characteristics. For Parity, Data bits, Stop bits, and Flow, you need to consult the instrument
manual and ensure that the settings you select match those specified.
The Timeout property specifies the number of milliseconds to wait for the sensor to respond.
This value must be set high enough to allow the sensor enough time to respond, but not so high
that the measurement will stall into the next measurement interval when the sensor fails to
respond.
There are three additional property windows, accessed by pressing the Out, In, and Init buttons.
It is necessary to have some understanding of how the block works before discussing the
additional settings.
How the Block Works
The RS232 block is designed to do three things:
1. Send initialization commands to the sensor when recording is turned on
2. Send a “get data” command to the sensor each time the block is sampled
3. Separate out one or more data values from a string returned by the sensor each time the
“get data” command is issued
There are some fundamental assumptions about how the serial sensor works. If ANY of these
assumptions is incorrect, then the RS232 block WILL NOT work with the sensor.
13
11
Sutron Corporation Xpert/XLite GPRS232 Serial Interface Block Users Manual
Rev. 3.3 #8800-1164
07/2009
1. All communications with the sensor take place using standard ASCII characters
2. Data can be recovered from the sensor using a SINGLE command
3. If the sensor returns more than one value at a time, then the values are separated by a
character or string (e.g., a comma).
4. The sensor is NOT of the streaming type where data is sent continuously
Outbound Message Properties
Outbound message properties are discussed first because the “get data” command and the
initialization commands are all of type “outbound message”. Figure 10 illustrates the structure
of an outbound message (message sent by the Xpert to the sensor).
Figure 10: Outbound Message Structure
Outbound messages begin with a lead character or string. The lead character can be “none”, or
one of several options. The lead character is followed by text. The text can be made up of any
printable ASCII characters. The text (Get Data command or Initialization Command) is
followed by the End of Line character(s). The outbound end of line characters can be “none”, or
one of several options, or a specified character or string.
14
12
Sutron Corporation Xpert/XLite GPRS232 Serial Interface Block Users Manual
Rev. 3.3 #8800-1164
07/2009
Figure 11 illustrates the properties window for the outbound message structure.
Figure 11: Outbound Message properties window
Select the properties appropriate for your sensor. Figure 11 illustrates settings typical for a
ParoScientific DigiQuartz sensor. All DigiQuartz commands begin with an asterisk (*). All
DigiQuartz commands end with a carriage return-line feed pair. The get data command contains
the address of the target sensor (00), the address of the sending device (01), and the request for
single reading command, p3.
Initialization Properties
The intent of the initialization properties is to allow the user to send a series of commands to the
sensor when recording is turned on. These commands may or may not be required, depending on
the sensor. They may be used to clear memory buffers, change averaging characteristics, and
any other function supported by the sensor. Note that these commands are SENT ONLY WHEN
RECORDING IS TURNED ON.
The Initialization Strings window is illustrated in Figure 12.
15
13
Sutron Corporation Xpert/XLite GPRS232 Serial Interface Block Users Manual
Rev. 3.3 #8800-1164
07/2009
Figure 12: Initialization Properties window
Enter initialization commands as required by clicking on the buttons at the end of each line. DO
NOT add the lead character or end of line character(s). They are automatically included by the
block according to the outbound message settings.
Check Send 500ms break to send a break prior to the initialization commands.
If no initialization is required, simply leave the commands blank.
Sensor Return (Inbound Message) Properties
Serial sensors vary widely in what they return. Accordingly, the RS232 block allows the user to
interpret a variety of message types. Figure 13 illustrates a complex message made up of lead
characters, data values separated by commas, and an end of line sequence.
Figure 13: Complex sensor return
16
14
Sutron Corporation Xpert/XLite GPRS232 Serial Interface Block Users Manual
Rev. 3.3 #8800-1164
07/2009
Figure 14 illustrates a very simple return.
Figure 14: Simple sensor return
Figure 15 illustrates a fixed-length return.
Figure 15: Fixed length return
All of these return types are supported by the Inbound Message properties of the RS232 block.
These properties are illustrated in Figure 16.
Figure 16: Inbound Message properties
17
15
Sutron Corporation Xpert/XLite GPRS232 Serial Interface Block Users Manual
Rev. 3.3 #8800-1164
07/2009
Check the Ignore Echo box if the sensor echoes the “get data” command. This will cause the
RS232 block to read back the echo of the get data command, before attempting to read the sensor
response.
The Response # chars setting is used to set the length of fixed-length returns. If your sensor
returns random length messages then DO NOT set this value to anything other than zero. If
Response # chars is a positive number, then ALL messages are expected to be at least as long as
is specified, regardless of any other settings.
Use Skip # chars to ignore unwanted values at the beginning of a return. For example, a
ParoScientific sensor starts a return message with an asterisk, followed by the address of the
sensor and the address of the receiver (5 characters). These values must be skipped to reach the
data value.
Use the End of Line setting to select the appropriate character or characters that determine the
end of an incoming message. Use the “Other” setting to specify a custom character or string. If
“None” is selected for End of line, then the timeout value specified on the primary properties
page determines how long (in milliseconds) to wait for a response to complete.
Set Num Vals to the number of values the sensor returns, and set Parse on to the character or
string that delimits each value. If at run time the sensor returns a number of values different from
Num Vals, a warning is generated.
Logging
To log the values parsed from the sensor response to a standard log file (e.g., ssp.log), connect
Log blocks to each of the outputs of the RS232 block that you expect to produce a parameter.
However, you may also wish to log the raw data received from a sensor to a text file. This
allows you to view exactly how the sensor responds. To do this, press the Log… button, check
Enable log, and specify the log file. Note that all data in a sensor response is logged, including
skip chars, end of line chars, and parse chars.
Specify a text file
here (NOT a
standard log file
like ssp.log!!)
Figure 17: Log options for inbound message
18
16
Sutron Corporation Xpert/XLite GPRS232 Serial Interface Block Users Manual
Rev. 3.3 #8800-1164
07/2009
When logging is enabled, the data from the sensor can be sent to a single file, or it can be sent to
different files for each poll of the sensor. When you want to send the data to a single file, clear
the Separate files check box. In this scenario, Num entries controls the number of sensor
responses that will be written to the file. After this number of responses have been written,
subsequent responses are written starting from the beginning of the file (i.e., writes to the file are
wrapped).
When you want to send each poll response to a separate file, check the Separate files check-box.
In this scenario, Num entries is renamed to Num files, and refers to the total number of
files/sensor responses to write. The file name specified in the “File” field is used to derive the
names of the subsequent files. As new poll responses are retrieved, old files are renamed with an
iteration value appended. For example…
ADCPLog.txt
ADCPLog 001.txt
ADCPLog 002.txt
ADCPLog 003.txt
ADCPLog 004.txt
…
ADCPLog 009.txt
-- Most recent data.
-- Next most recent data.
-- Oldest data.
19
17
Sutron Corporation Xpert/XLite GPRS232 Serial Interface Block Users Manual
Rev. 3.3 #8800-1164
07/2009
ERROR MESSAGES AND TROUBLESHOOTING
Error Messages
The RS232 block may on occasion output a warning or error message.. Use the following table
to understand the meaning of the messages.
Message
RS232: Expected <x> values,
found <y>
RS232: Failed opening log file.
RS232 : Failed reading echo
within timeout
RS232: Failed to open COMx.
RS232: Too few chars in response.
RS232: Timed out before EOL
detected.
RS232: Failed writing log,
errcode: x
Explanation
When parsing the sensor response, the number of values
parsed did not match the number of values that were
expected (Num Values from the Inbound Properties
dialog).
When attempting to log the sensor response, the log file
specified by the user could not be opened.
When “Ignore Echo” was selected, the block attempted to
read the echo of the get data command within the time
specified by the Timeout property, but the echo was not
received within that time.
The specified com port could not be opened, most likely
because it’s in use by another process.
The sensor response did not contain as many characters as
specified in “Response # chars” (only applies when this
value is greater than 0), after waiting the time specified in
Timeout.
The sensor response did not contain the end of line
character or string, after waiting the time specified in
Timeout.
An error occurred while trying to write to the text log file.
Troubleshooting
The following table presents common problems and their solution.
Problem
Mismatch in num values
Failed opening/writing to log file
Failed reading echo within
timeout
Failed to open COMx
Solution
The sensor is either responding with more parameters than
specified in Num Values, or the ParseOn character/string is
incorrect.
Verify the flash disk or other media being written to is not
full.
The sensor is probably not returning an echo, and is
returning a response that is smaller in size than the get data
command.
Make sure you are not using the selected COM port for
20
18
Sutron Corporation Xpert/XLite GPRS232 Serial Interface Block Users Manual
Too few chars in response
Timed out before EOL detected.
Sensor does not respond, no
matter what you do
Rev. 3.3 #8800-1164
07/2009
something else.
Change the value of Response # chars to match the number
of characters actually being returned by the sensor. To help
determine what this number is, set it to 0, set end of line to
None, set timeout to a sufficiently high value, and enable
logging. You can then see in the log file how big the
response is.
The serial device may have a slow response. Increase the
Timeout value in the block properties dialog. Initially, you
might try setting Timeout to a very large value, just to
ensure that it is the cause of the failure.
Make certain the cable between the Xpert and the device is
wired properly. Use tools such as a breakout box or
protocol analyzer to determine whether data is actually
flowing.
21
19