1
Document Title
KMOS User Manual
Document Number
VLT-MAN-KMO-146603-001
Issue
6.0
Date
30th June 2013
Prepared by
M. Cirasuolo, R. Sharples
Doc No:
Vers:
Category
Doc Type:
State:
Author:
Date:
2 of 61
VLT-MAN-KMO-146603001
6.0
Manual
Word
Issued
M. Cirasuolo, R Sharples
30 June 2013
User Manual
Doc No:
Vers:
Category
Doc Type:
State:
Author:
Date:
VLT-MAN-KMO-146603001
6.0
Manual
Word
Issued
M. Cirasuolo, R Sharples
30 June 2013
CHANGE RECORD
Issue
Date
Section
affected
Change Description
1.0
01-Jun-2012
All
First draft
2.0
01-Sep-2012
All
Second draft
3.0
03-Feb-2013
All
First release
4.0
10-May-2013
All
Second release
5.0
14-May-2013
All
Third release
6.0
30-Jun-2013
All
Fourth release
3 of 61
User Manual
Doc No:
Vers:
Category
Doc Type:
State:
Author:
Date:
VLT-MAN-KMO-146603001
6.0
Manual
Word
Issued
M. Cirasuolo, R Sharples
30 June 2013
Applicable and Reference Documents
Applicable documents
Reference
Document Title
Document Number
Issue &
Date
AD-1
Reference Documents
Reference
Document Title
Document Number
Issue &
Date
RD-1
Abbreviations
AD
ESO
FWHM
IFU
KMOS
PAE
PSF
RD
RTD
TBC
TBD
UT
VLT
4 of 61
Applicable Document
European Southern Observatory
Full Width at Half Maximum
Integral Field Unit
K Band Multi-Object Spectrometer
Provisional Acceptance (Europe)
Point Spread Function
Reference Document
Real Time Display
To Be Confirmed
To Be Decided
Unit Telescope
Very Large Telescope
User Manual
Doc No:
Vers:
Category
Doc Type:
State:
Author:
Date:
VLT-MAN-KMO-146603001
6.0
Manual
Word
Issued
M. Cirasuolo, R Sharples
30 June 2013
TABLE OF CONTENTS
1. INTRODUCTION ......................................................................................................7 1.1 Scope of the Document ..................................................................................................................................... 7 1.2 KMOS in a nutshell .......................................................................................................................................... 7 1.3 Integral Field Spectroscopy ............................................................................................................................. 8 2. TECHNICAL DESCRIPTION OF THE INSTRUMENT.............................................9 2.1 Overview of the instrument ............................................................................................................................. 9 2.2 Description of the instrument sub-systems................................................................................................... 10 2.2.1 The pick-off system................................................................................................................................... 10 2.2.2 Integral Field Units and filters................................................................................................................... 11 2.2.3 Spectrographs ............................................................................................................................................ 12 2.2.4 Detectors.................................................................................................................................................... 13 2.2.5 Calibration unit.......................................................................................................................................... 14 2.2.6 Infrastructure and electronics .................................................................................................................... 14 2.3 Overall performances ..................................................................................................................................... 15 2.3.1 Image quality ............................................................................................................................................. 15 2.3.2 Spectral bands............................................................................................................................................ 16 2.3.3 Spectral resolving power ........................................................................................................................... 17 2.3.4 Sensitivity .................................................................................................................................................. 17 2.3.5 Recommended DITs.................................................................................................................................. 17 2.3.6 Saturation and persistence limits ............................................................................................................... 18 2.4 The Exposure Time Calculator ..................................................................................................................... 18 3. OBSERVING WITH KMOS ....................................................................................19 3.1 Overview .......................................................................................................................................................... 19 3.2 KARMA: the observation preparation tool for KMOS .............................................................................. 19 3.3 Target acquisition ........................................................................................................................................... 21 3.4 Observing modes............................................................................................................................................. 22 3.4.1 Nod to sky mode........................................................................................................................................ 22 3.4.2 Stare mode ................................................................................................................................................. 23 3.4.3 Free-dither mode ....................................................................................................................................... 23 3.4.4 Mosaic mode ............................................................................................................................................. 23 3.4.5 Strategy for sky subtraction....................................................................................................................... 25 3.4.6 Offsetting and dithering............................................................................................................................. 28 3.4.7 The influence of the Moon ........................................................................................................................ 29 3.4.8 The influence of precipitable water vapour (PWV) .................................................................................. 30 3.5 Overheads ........................................................................................................................................................ 30 4. CALIBRATING AND REDUCING KMOS DATA ...................................................31 5 of 61
User Manual
Doc No:
Vers:
Category
Doc Type:
State:
Author:
Date:
VLT-MAN-KMO-146603001
6.0
Manual
Word
Issued
M. Cirasuolo, R Sharples
30 June 2013
4.1 KMOS calibration plan .................................................................................................................................. 31 4.1.1 Darks ......................................................................................................................................................... 32 4.1.2 Flat field calibration .................................................................................................................................. 32 4.1.3 Wavelength calibration.............................................................................................................................. 32 4.1.4 Spectroscopic sky-flats.............................................................................................................................. 32 4.1.5 Spectro-photometric Calibration and telluric standards ............................................................................ 32 4.1.6 Attached calibrations ................................................................................................................................. 35 5. INSTRUMENT FEATURES AND KNOWN PROBLEMS TO BE AWARE OF ......36 5.1.1 Ghosts ........................................................................................................................................................ 36 5.1.2 Stray light .................................................................................................................................................. 38 5.1.3 Flexures ..................................................................................................................................................... 38 6. SUMMARY OF HINTS AND TIPS FOR PREPARING OBSERVATIONS.............40 7. TEMPLATES REFERENCE...................................................................................41 7.1 Notes on some common parameters.............................................................................................................. 41 7.2 Acquisition Templates .................................................................................................................................... 42 7.2.1 KMOS_spec_acq....................................................................................................................................... 43 7.2.2 KMOS_spec_acq_mapping....................................................................................................................... 44 7.2.3 KMOS_spec_acq_stdstar .......................................................................................................................... 45 7.2.4 KMOS_spec_acq_stdstarscipatt ................................................................................................................ 46 7.2.5 KMOS_spec_acq_skyflat .......................................................................................................................... 47 7.3 Science Templates ........................................................................................................................................... 48 7.3.1 KMOS_spec_obs_stare ............................................................................................................................. 48 7.3.2 KMOS_spec_obs_nodtosky ...................................................................................................................... 49 7.3.3 KMOS_spec_obs_freedither ..................................................................................................................... 50 7.3.4 KMOS_spec_obs_mapping8..................................................................................................................... 52 7.3.5 KMOS_spec_obs_mapping24................................................................................................................... 53 7.4 Calibration Templates .................................................................................................................................... 54 7.4.1 KMOS_spec_cal_stdstar ........................................................................................................................... 54 7.4.2 KMOS_spec_cal_stdstarscipatt................................................................................................................. 54 7.4.3 KMOS_spec_cal_skyflat........................................................................................................................... 55 7.4.4 KMOS_spec_cal_dark............................................................................................................................... 55 7.4.5 KMOS_spec_cal_calunit........................................................................................................................... 56 7.4.6 KMOS_spec_cal_calunitflatnight ............................................................................................................. 56 7.4.7 KMOS_spec_cal_wave ............................................................................................................................. 57 7.4.8 KMOS_spec_cal_linearity ........................................................................................................................ 58 8. APPENDIX .............................................................................................................59 8.1 Rotator optimization....................................................................................................................................... 59 8.1.1 Fits headers................................................................................................................................................ 59 6 of 61
User Manual
Doc No:
Vers:
Category
Doc Type:
State:
Author:
Date:
1.
Introduction
1.1
Scope of the Document
VLT-MAN-KMO-146603001
6.0
Manual
Word
Issued
M. Cirasuolo, R Sharples
30 June 2013
The aim of the KMOS User Manual is to provide information on the technical characteristics of
the instrument, its performance, observing and calibration procedures and data reduction from
a user (astronomer) perspective.
1.2
KMOS in a nutshell
The K-band Multi Object Spectrograph (KMOS) is a second-generation instrument designed for
operation on the VLT. The key feature of KMOS is its ability to perform Integral Field
Spectroscopy in the near-infrared bands for 24 targets simultaneously.
The instrument design employs 24 configurable arms that position pickoff mirrors at userspecified locations in the Nasmyth focal plane. The sub-fields thus selected are then fed to 24
image slicer integral-field units (IFUs) that partition each sub-field into 14 identical slices, with
14 spatial pixels along each slice. Light from the IFUs is then dispersed by three cryogenic
grating spectrometers which generate 14x14 spectra with ~1000 Nyquist-sampled spectral
resolution elements for each of the 24 independent sub-fields.
The patrol field of the pickoffs is 7.2 arcmin in diameter, which is the diameter of the
unvignetted field at the VLT Nasmyth focus, thus minimising the thermal background in the Kband. Each IFU has a square field of view of 2.8 x 2.8 arcsec; anamorphic magnification in the
IFU foreoptics ensures uniform spatial sampling of 0.2 x 0.2 arcsec whilst maintaining Nyquist
sampling (~2 pixel) of the spectral resolution element at the detector.
The use of focal-plane pick-off arms allows considerable flexibility in selecting targets and in
particular the important capacity to deal with strongly clustered or close-paired sources. In
addition to observing multiple individual sources, KMOS has the capability for integral field
mapping of contiguous areas in a 9-point or 16-point dither pattern. The spectral resolving
power of R~3000-4000 is optimal for OH-avoidance in the J & H bands. A lower spectral
resolution mode is also available in the combined H+K band.
KMOS main specifications are summarized in the following table:
Wavelength coverage
0.8µm to 2.5µm
Spectral bands
IZ, YJ, H, K, HK
Spectral resolving power
R = 3400, 3600, 4000, 4200, 2000
Number of IFUs
24
Extent of each IFU
2.8” x 2.8”
Spatial sampling
0.2” x 0.2”
Patrol field
7.2 arcmin diameter circle
Closest approach of IFUs
≥ 2 IFUs separated by ~6 arcsec centre to centre of the
IFU, depending on the details of the configuration.
(IZ, YJ, H, K, HK)
Table 1. KMOS specifications.
7 of 61
User Manual
Doc No:
Vers:
Category
Doc Type:
State:
Author:
Date:
1.3
VLT-MAN-KMO-146603001
6.0
Manual
Word
Issued
M. Cirasuolo, R Sharples
30 June 2013
Integral Field Spectroscopy
In traditional spectroscopy a slit or a single aperture is placed into the focal plane, which is reimaged through the spectrograph onto the detector. While this measure is necessary to
arrange detector space in dispersion direction to allow the spectra spread, the disadvantage is
that only a point or (in case of a slit) a line through the object is sampled at the same time. To
cover an object two-dimensionally requires several consecutive exposures with altered slit
positions. This method is not only time consuming, but also prone to errors in pointing and in
stability as all sorts of changes can happen while these lots of exposures are done.
Integral-field spectroscopy aims at addressing these problems by allowing spectroscopy of a
two-dimensional area of the image plane in a simultaneous way. As the spectrum of each
spatial element (also referred to as a "spaxel" to distinguish from the detector pixels) is taken at
the same time, the result is stable with respect to temporal changes. Furthermore effects of
pointing errors and atmospheric dispersion can be addressed later during data reduction as no
light is lost if the field covered is large enough. Each spaxel can be referred to as being a slit.
However, as the spectra of several adjacent spaxels can be added together, there are no slit
losses caused e.g. by bad seeing conditions.
There are different techniques to realize an integral field unit ("IFU") technically, and in KMOS
this is performed by using image slicers. With this technique the image of the object hits a
mirror array that dissects slices of the image to send them to different channels. Each slice is
re-imaged onto a slit via a pupil mirror and imaged along a row forming a large pseudo slit, with
the dissection in the second dimension happening by the detector pixels similar to a classical
long-slit spectrograph. In the case of KMOS each target is dissected in 14 slices, each
dispersed on 14 pixels.
Figure 1. Example of Integral Field Unit Spectroscopy. A 2-dimensional image will first be sliced, the slices then
dispersed on a common slit and finally a 3D data cube is reconstructed from the obtained spectra. In KMOS the
image is sliced in14 elements instead of 6 as in this figure.
8 of 61
User Manual
Doc No:
Vers:
Category
Doc Type:
State:
Author:
Date:
2.
Technical description of the instrument
2.1
Overview of the instrument
VLT-MAN-KMO-146603001
6.0
Manual
Word
Issued
M. Cirasuolo, R Sharples
30 June 2013
From a hardware perspective the instrument partitions into the following key subsystems:
Pickoff subsystem
IFU subsystem
Spectrograph subsystem
Detector subsystem
Infrastructure subsystems and electronics
The opto-mechanical parts of the instrument are all contained within a cryostat, operated at a
temperature of 120K, while the electronics are on the Nasmyth platform and inside the cable
rotator (CACOR; see Figure 2 and Section 2.2.6).
KMOS has been designed to have effectively three independent modules, each of them
comprising 8 pick-off systems, a set of 8 Integral Field Units (IFUs), one spectrograph and one
2kx2k HgCdTe near-IR detector. The following section describes the different sub-systems of
KMOS in the order they are encountered along the optical path going from the telescope to the
detector.
Figure 2. Schematic view of KMOS on the Nasmyth platform
9 of 61
User Manual
Doc No:
Vers:
Category
Doc Type:
State:
Author:
Date:
2.2
VLT-MAN-KMO-146603001
6.0
Manual
Word
Issued
M. Cirasuolo, R Sharples
30 June 2013
Description of the instrument sub-systems
2.2.1 The pick-off system
The selection of the pick-off fields is achieved by means of 24 telescopic pick-off arms, which
patrol the instrument focal plane of 7.2 arcmin diameter. Each pick-off arm contains a pick-off
mirror and associated relay optics, which are positioned inside the telecentric instrument focal
plane by means of an articulated arm. The pick-off arms are arranged into two different planes
(“top” and “bottom”) of twelve arms each, so that adjacent arms cannot interfere with each
other. One of the planes is placed above the nominal focal plane and one below. Each layer of
twelve pick-off arms can patrol 100% of the field. The two motions (radius and theta) of the
pick-off arms are both driven by stepping motors, which are modified for cryogenic operation.
Whilst the positioning of the arms is open-loop via step-counting from datum switches, there is
a linear variable differential transformer (LVDT) encoder on each arm which is used to check
for successful movement. In addition a hardware collision-detection system is also
implemented as a third level of protection which can sense if any two arms have come into
contact and stop the movement of arms within 10µm. All 24 arms can be commanded to move
simultaneously and a typical arm movement takes ~120 seconds. The reconfiguration of all 24
arms from one science field to another requires typically 4mins.
Figure 3. Top: one of the pick-off arms; Bottom: the full 24 pick-off arms in the front end of the KMOS cryostat.
10 of 61
User Manual
Doc No:
Vers:
Category
Doc Type:
State:
Author:
Date:
VLT-MAN-KMO-146603001
6.0
Manual
Word
Issued
M. Cirasuolo, R Sharples
30 June 2013
2.2.2 Integral Field Units and filters
The IFUs contain the optics that collect the output beam from each of the 24 pick-offs and
reimage it with appropriate anamorphic magnification on the image slicers. All the slices from a
group of 8 sub-fields are aligned and reformatted into a single slit for each of the three
spectrographs. The IFU sub-system has no moving parts and has gold-coated surfaces
diamond-machined from aluminium for optical performance in the near-infrared and at
cryogenic temperatures.
Each pick-off arm contains a fold mirror located at the tip of the arm to divert the input beam
along the arm. A lens is used to collimate the beam and re-image the telescope pupil onto the
cold stop located in the arm. A roof mirror which moves in a direction opposite to the fold mirror
maintains the optical path length to the cold stop. A subsequent fold mirror then directs the
beam along the arm’s rotational axis and away from the telescope and towards the K-mirror
assemblies. These are used to focus the pick-off fields onto the intermediate focal plane and
also to orient each of the 24 fields correctly onto the IFU’s image slicer. A set of band pass
filters is used to select the appropriate waveband for each observation. As the filters are
located in the converging beam produced by the K-mirrors, they are also utilised to correct the
chromatic aberrations (focus) induced by the collimating lens in the arm.
Figure 4. Top left: Optical path in the KMOS pick-off system. Top right: one of the 3 front segments showing the 8
pick-off arms on top of the plate and the filter wheel and mirrors of the IFU sub-system underneath the plate.
Bottom: One of three complete sets of IFU mirrors before assembly.
11 of 61
User Manual
Doc No:
Vers:
Category
Doc Type:
State:
Author:
Date:
VLT-MAN-KMO-146603001
6.0
Manual
Word
Issued
M. Cirasuolo, R Sharples
30 June 2013
2.2.3 Spectrographs
The spectrograph sub-system is comprised of three identical units, which supply three
detectors sub-systems. Each spectrograph uses a single off-axis toroidal mirror to collimate the
incoming light, which is then dispersed via a reflection grating and refocused using a 6-element
transmitting camera. The five available gratings (IZ, YJ, H, K, HK) are mounted on a 5-position
wheel which allows optimized gratings to be used for the individual bands. A ‘blank’ position in
the filter wheel is used for calibrations.
Figure 5. Top: Perspective view of a single KMOS spectrograph module. Bottom: the three spectrographs
mounted in the KMOS cryostat.
12 of 61
User Manual
Doc No:
Vers:
Category
Doc Type:
State:
Author:
Date:
VLT-MAN-KMO-146603001
6.0
Manual
Word
Issued
M. Cirasuolo, R Sharples
30 June 2013
2.2.4 Detectors
KMOS uses 3 Teledyne substrate-removed HgCdTe, 2kx2k, 18µm pixel Hawaii 2RG detectors,
one for each spectrograph. The detectors are operated at a temperature of 35K, while the rest
of the cryostat is at 120K. Typical characteristics and performances are given in following
Table.
Detector type
Operating temperature
QE
Number of pixels
Pixel size
Gain (e-/ADU)
Readout noise (e- )
Saturation (ADU)
Non-linearity
Hot pixels
Minimum DIT (s)
Substrate removed Hawaii 2RG
35K
>90%
2048 x 2048
18 µm
2.08
9 for short DIT
2.6 for long integration with Fowler sampling
>60,000 ADU
> 55,000 ADU
~1%
2.47
Sample-up-the-ramp (non-destructive) readout is always used. This means that during
integration, the detector is read out at regular short intervals without resetting it and counts in
each pixel are computed by fitting the slope of the signal vs. time. In addition, Threshold
Limited Integration (TLI) mode is used to extend the dynamical range for long exposure times:
if one pixel is illuminated by a bright source and reaches an absolute value above a certain
threshold (close to detector saturation), only detector readouts before the threshold is reached
are used to compute the slope and the counts written in the FITS image for this pixel are
extrapolated to the entire exposure time. This is an effective way to remove cosmic rays on
these devices (see Finger et al. 2008, Proc. SPIE, Vol. 7021 for a more detailed description).
Important Warning: adjacent pixels can follow different regimes by using this readout mode,
one can follow the normal regime and its neighbour can follow and extrapolated regime (if the
counts reach the extrapolation threshold). This may lead to bad line profiles, which could then
affect chemical abundances determinations, for example. Therefore we strongly recommend to
select the shortest possible DITs so that the typical counts never reach 114000e- (or 55000
ADUs) in the ETC (meaning that the counts will not be extrapolated).
Figure 6. Extrapolation threshold for nondestructive sampling and extrapolation of detector signal for high flux
levels. For pixels with high flux (red) only readout values below EXTLEVEL (orange rectangles) are taken into
account in the calculation of the slope and values written in the FITS files are extrapolated to the full DIT (SIG2). For
low flux pixels (blue) all nondestructive readouts are used (light blue rectangles). This is a modified figure from
Finger at al. (2008). A document explaining in detail this readout mode, and its different regimes with their
consequences, is available at:
http://www.eso.org/sci/facilities/paranal/instruments/xshooter/doc/reportNDreadoutpublic.pdf
13 of 61
User Manual
Doc No:
Vers:
Category
Doc Type:
State:
Author:
Date:
VLT-MAN-KMO-146603001
6.0
Manual
Word
Issued
M. Cirasuolo, R Sharples
30 June 2013
2.2.5 Calibration unit
The internal Calibration Unit is located inside the cryostat and provides a quasi-uniform light
distribution simultaneously to all 24 fields via an 180 mm diameter integrating sphere having 24
output apertures or ports. These ports are divided into sets of 12 (corresponding to the upper
and lower arms) and the light from a specific port is directed toward its corresponding pick-off
field via one of 24 calibration mirrors located above the focal plane and just outside the patrol
field. All calibration sources, tungsten lamp for flat fielding and spectral lamps (argon and neon)
for wavelength calibration, are located inside a second external integrating sphere, connected
to the internal sphere via a gold-coated light-pipe.
Figure 7. View of the internal calibration unit, showing the 24 output apertures or ports illuminated by the flat-field
tungsten lamp.
2.2.6 Infrastructure and electronics
The instrument housekeeping electronics (IHE) are mounted on the Nasmyth Platform in two
electronics cabinets. The instrument control electronics (ICE) are mounted in a further three
electronics cabinets which co-rotate with the instrument. An instrument specific cable co-rotator
(CACOR – see Fig. 2) is used to house the ICE cabinets and interface the cables to the
instrument, able to rotate ±270 degrees. This sits on an instrument handling carriage which
slides on rails, allowing the instrument to be pulled back to give access to the Nasmyth Rotator
during maintenance operations. The controller for the cable rotator mechanism is located in a
fifth electronics cabinet mounted on the Nasmyth Platform to one side of the CACOR.
14 of 61
User Manual
Doc No:
Vers:
Category
Doc Type:
State:
Author:
Date:
2.3
VLT-MAN-KMO-146603001
6.0
Manual
Word
Issued
M. Cirasuolo, R Sharples
30 June 2013
Overall performances
2.3.1 Image quality
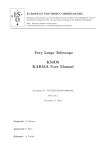
Figure 8 shows one full detector illuminated with the arc calibration lamp (argon and neon) in
the H-band. Each detector collects the light from 8 IFUs, marked at the top of the image. As in
the traditional long slit spectrographs, the spectrum across the array is curved by design,
however, this slit curvature is relatively straightforward to correct in software and it is done as
part of the data reduction pipeline.
As shown in the zoom-in image in the right panel of Figure 8, the image quality in both spectral
and spatial directions is good across the entire array.
The measured FWHM of the spectral lines is 2 pixels, providing a good Nyquist sampling. In
the spatial direction, the image of an unresolved (pinhole) point source (no seeing included),
shows a FWHM of < 1 pixel (0.2 arcsec) in the direction across the slices and ~1.3 pixels (0.25
arcsec) in the spatial direction within the slices.
Figure 8. Left: One full detector showing the light from the arc calibration lamp (argon + neon) in the H-band. The
location of the edges of the 8 IFU imaged onto the detector is shown at the top of the image. The yellow squares on
the image mark 9 positions for which a zoom-in is provided in the right panel.
15 of 61
User Manual
Doc No:
Vers:
Category
Doc Type:
State:
Author:
Date:
VLT-MAN-KMO-146603001
6.0
Manual
Word
Issued
M. Cirasuolo, R Sharples
30 June 2013
2.3.2 Spectral bands
KMOS allows observations across five bands, mostly corresponding to the atmospheric
windows in the near-infrared. Due to the spectral curvature, not all the IFUs have the same
wavelength coverage. The IFUs imaged at the centre of the array have a slightly different
wavelength coverage compared to the IFUs at the edge of the array. For completeness the
wavelength coverage for IFUs at the centre and edge of the array, for all three detectors are
reported in Table 3 and Table 4. The common wavelength coverage for each of these bands
that is observed in all IFUs is reported in the following table 2.
Band
Wavelength Coverage (µm)
IZ
0.779 – 1.079
YJ
1.025 – 1.344
H
1.456 – 1.846
K
1.934 – 2.460
HK
1.484 – 2.442
Table 2: Spectral coverage guaranteed in all three detectors.
Band
Wavelength Coverage (µm)
Spectrograph A
Spectrograph B
Spectrograph C
IZ
0.778 – 1.092
0.779 – 1.094
0.771 – 1.085
YJ
1.022 – 1.359
1.025 – 1.361
1.015 – 1.352
H
1.452 – 1.866
1.456 – 1.870
1.443 – 1.857
K
1.921 – 2.460
1.922 - 2.461
1.919 – 2.460
HK
1.474 – 2.471
1.484 – 2.481
1.458 - 2.456
Table 3: Spectral Coverage at the centre of the detector
Band
Wavelength Coverage (µm)
Spectrograph A
Spectrograph B
Spectrograph C
IZ
0.772 – 1.086
0.773 – 1.087
0.764 – 1.079
YJ
1.014 - 1.351
1.016 – 1.353
1.007 – 1.344
H
1.441 – 1.855
1.445 – 1.859
1.432 – 1.846
K
1.932 – 2.472
1.934 - 2.473
1.931 – 2.472
HK
1.465 – 2.462
1.470 – 2.442
1.445 – 2.442
Table 4: Spectral Coverage at the edge of the detector
16 of 61
User Manual
Doc No:
Vers:
Category
Doc Type:
State:
Author:
Date:
VLT-MAN-KMO-146603001
6.0
Manual
Word
Issued
M. Cirasuolo, R Sharples
30 June 2013
2.3.3 Spectral resolving power
The measured spectral resolving power in all 5 bands is shown in the following Table:
Band
Pixel scale
nm/pixel
Resolving
power
Resolving
power
Resolving
power
Short
wavelength
Band centre
Long
wavelength
IZ
0.143
2795
3406
3773
YJ
0.165
3089
3582
4088
H
0.203
3570
4045
4555
K
0.266
3809
4227
4883
HK
0.489
1514
1985
2538
2.3.4 Sensitivity
The total efficiency of KMOS in all bands has been measured on sky using several standard
stars observed during commissioning. Based on these values the expected limiting Vega
magnitudes in 1 hour on-source observation for S/N of 5 per spectral bin are given in the
following table:
Band
IZ
YJ
H
HK
K
Magnitude (Vega)
19.9
20.1
19.8
19.8
17.9
2.3.5 Recommended DITs
For short exposures the minimum DIT is 2.47s and to reduce the calibration load and share
calibrations with other projects we recommend especially in service mode the following DIT
values for bright targets: 2.5s, 3s, 4s, 5s, 10s, 15s, 20s, 30s, 60s or 100s.
For long exposures on faint targets with no risk of saturation we recommend to work with
NDIT=1 and a DIT depending on the frequency of sky frames needed. To avoid excessive
daytime calibrations, only a limited choice of DIT values for longer exposures is recommended
in service mode: DIT = 300s, 450s, 600s, 900s (1200s allowed only for IZ). For DIT values
different from these a waiver is required.
It is worth noting that background limited performance between the OH lines is reached in
300s. Therefore exposure times ≥300s are recommended for faint sources.
17 of 61
User Manual
Doc No:
Vers:
Category
Doc Type:
State:
Author:
Date:
VLT-MAN-KMO-146603001
6.0
Manual
Word
Issued
M. Cirasuolo, R Sharples
30 June 2013
2.3.6 Saturation and persistence limits
Saturation should be avoided at any time, since it produces persistence artefacts that can last
up to several hours and severely affect subsequent observations. For this reason, targets
should not be brighter than 6th magnitude in J,H,K bands.
The detectors can show a strong persistence effect even after being illuminated below the
saturation level (typically > 40,000 ADUs/DIT/pixel equivalent to ~20,000 e-/DIT/pixel).
Therefore, to exclude any risk of artefacts produced by detector persistence, DITs and NDIT
must be selected using the ETC such that fluxes are at most 40,000 ADUs/DIT/pixel, even for
significantly better conditions than foreseen (e.g. using seeing 0.4” in the ETC).
2.4
The Exposure Time Calculator
The KMOS Exposure Time Calculator (ETC) can be found at the following link:
http://www.eso.org/observing/etc/
It returns a realistic estimation of the integration time (on source) needed to achieve a given
S/N as a function of the band selected and the atmospheric conditions. In building the OB
please remember to add the overheads for time spent on sky and telescope/instrument setting
as described in section 3.5.
The parameters to be provided for the input are self-explanatory. The magnitudes for the
targets can be specified for a point source or for an extended source. Results can be given as
exposure time on source needed to reach a given S/N or as the S/N reached in a given
exposure time on source.
18 of 61
User Manual
Doc No:
Vers:
Category
Doc Type:
State:
Author:
Date:
3.
Observing with KMOS
3.1
Overview
VLT-MAN-KMO-146603001
6.0
Manual
Word
Issued
M. Cirasuolo, R Sharples
30 June 2013
As for all ESO instruments the P2PP software is used to prepare KMOS observations. The
generic guidelines for Phase 2 and the P2PP software can be found at the following links:
-‐
http://www.eso.org/sci/observing/phase2/SMGuidelines.html
-‐
http://www.eso.org/sci/observing/phase2/P2PP3.html
KMOS observations are all coded via templates, and two or more templates make up an
Observing Block (OB), which contains all the necessary information to execute the observing
sequence. KMOS specific templates for acquisitions, science observations and calibrations are
described in detail in Section 7.
For the vast majority of projects, the night-time OBs will contain only one science template and
the mandatory target acquisition template. The usual darks, arc (for wavelength calibration)
and lamp (for flat-field) exposures are taken during day-time as part of the calibration plan (see
Section 4.1). If for some observations flats and arc data are needed immediately after the
science exposure, this can be obtained by attaching specific calibration templates at the end of
the OB.
The following sections describe the observing modes available for KMOS and some highlights
on how to prepare the OBs.
3.2
KARMA: the observation preparation tool for KMOS
The P2PP software is predominantly intended for the specification of simple parameters like
exposure time, filter band or other settings, which essentially are common to the majority of
VLT instruments. However, the nature of a multi-object spectrometer in general, and the
complexity of KMOS in particular, require that the standard P2PP tool must be complemented
by an additional piece of software, which allows a more detailed configuration, including the
individual robotic pick-off arm positions, to be specified. The optimal allocation of the pick-off
arms to their target positions is achieved by a dedicated tool, called KARMA, which also takes
into account the target priorities and several mechanical and optical constraints.
Detailed information on how to download, install and run the KARMA software can be found
here: http://www.eso.org/sci/observing/phase2/SMGuidelines/KARMA.html
In the following we briefly describe the essential steps performed by KARMA to create the
instrument configuration files to be attached to the OBs.
-‐
As input, KARMA requires a catalogue in ASCII format containing the coordinates of the
science targets, their relative priority, and a list of potential reference and telescope guide
stars.
-‐
The reference stars are used for acquisition and alignment of the IFU on the target
objects. The magnitudes must be specified in the KARMA file and be of sufficient
brightness to be observed in <60s (see section 3.3 for details) and should refer to a band
as close as possible to the observing band for the science exposure.
-‐
Guide stars are used by the telescope to guide the field during the exposures, once the
acquisition is complete. They must be given in R-band (the guider wavelength) and must
be in the range 8<RVega<12. It is preferred to provide several guide stars.
19 of 61
User Manual
Doc No:
Vers:
Category
Doc Type:
State:
Author:
Date:
VLT-MAN-KMO-146603001
6.0
Manual
Word
Issued
M. Cirasuolo, R Sharples
30 June 2013
-‐
It is very essential for successful KMOS observations that all entries in the user-provided
catalogue are on the same astrometric system and that proper motions are considered
(i.e. for bright reference targets and potential guide stars).
-‐
A fits image of the field is also needed to determine a suitable sky background position for
the telescope nodding.
-‐
The first step is to choose one of the three observing modes available in KMOS: Nod-toSky, Stare or Mosaic (see Section 3.4).
-‐
Then the pick-off arm allocation is performed by using two predefined algorithms
(Hungarian and Stable Marriage) or manually by the user. The automated algorithms have
been implemented with the aim of maximising the number of pick-off arms allocated to
targets, considering the relative priorities and accounting for all the restrictions to avoid
collisions or vignetting of the pick-off arms.
-‐
KARMA also allows the users to define the arm configuration for acquisition, which can be
done using science targets or reference targets.
-‐
Finally, the user creates the instrument configuration file to be used in P2PP in order to
complete the observation preparation.
All the previous steps are supported by a graphical interface, as shown in Figure 9 below.
Figure 9: KARMA graphical interface showing the two layers of pick-off arms allocated to targets, with the IFU field
of view for each arm shown on the right hand side.
20 of 61
User Manual
Doc No:
Vers:
Category
Doc Type:
State:
Author:
Date:
3.3
VLT-MAN-KMO-146603001
6.0
Manual
Word
Issued
M. Cirasuolo, R Sharples
30 June 2013
Target acquisition
Before any science observation, it is necessary to perform the target acquisition, a mandatory
step to correct for any mis-alignment between the astrometry of the catalogue provided by the
user and the actual telescope position and rotator angle of the instrument.
Since KMOS does not have an imaging mode, the target acquisition is obtained by observing
bright reference stars with short exposures and the Quick Reduction and Real Time Display
(RTD) to iteratively centre the reference objects in the IFUs. For this task it is necessary to
allocate at least 2, and preferably 3 or more, pick-off arms to reference targets, provided by the
user along with the input catalogue. If the science targets (stars only) are bright enough they
can be used directly for acquisition, otherwise, bright reference stars must be used. In this
latter case, during the OB execution, KMOS will first allocate the arms specified to the
corresponding reference targets and allow the alignment of telescope and instrument. Then the
arms will be retracted again and finally deployed to their science positions.
IMPORTANT:
1. To reduce overheads during acquisition we recommend exposure times for
acquisition to be in the range [10s - 60s]. The recommended brightness for
reference stars for acquisition is JVega < 14 mag for 1min integration. Note that the
reference stars MUST be observed in the same band as the science targets. The
following table gives some guidelines for the J-band, but these apply to the other
bands as well (IZ, H, K):
Magnitude of acquisition targets
6 < JVega < 10
10 < JVega < 12
JVega ≈ 13
JVega ≈ 14
Typical exposure time for acquisition
3sec
10sec
25sec
60sec
2. Please, also remember that the magnitude range for guide stars for the VLT is
8 < RVega < 12 mag.
3. Saturation and strong persistence must be avoided at any time. Please take care!
To exclude any risk of artefacts produced by detector persistence, DITs and NDIT
must be selected using the ETC such that fluxes are at most 40,000
ADUs/DIT/pixel (~20,000 e-/DIT/pixel), even for significantly better conditions than
foreseen (e.g. using seeing 0.4” in the ETC).
4. IMPORTANT: Accurate astrometry is essential for KMOS observations. In case of
reference and guide stars (as well as for stellar science targets) it is important to
correct the coordinates for proper motions. For this we recommend to use the
latest UCAC catalogue (UCAC4), that can be queried via Vizier.
5. Science targets as well as guide and reference stars must be on the same
astrometric reference frame, with an accuracy of ~0.2 arcsec or better.
6. Proper motions for stellar sources must be checked and if they are greater than
10mas per year then the corrections must be calculated and included in the
catalogue positions (for guide stars, reference stars and science targets).
21 of 61
User Manual
Doc No:
Vers:
Category
Doc Type:
State:
Author:
Date:
3.4
VLT-MAN-KMO-146603001
6.0
Manual
Word
Issued
M. Cirasuolo, R Sharples
30 June 2013
Observing modes
Although KMOS is a rather complex instrument, it offers essentially only a single observation
mode: Integral Field Spectroscopy, (at least as far as the term “observation mode” is usually
understood within the context of VLT instrumentation). Beyond that, however, KMOS allows
three different observing strategies, whereof two are mainly differing by the way the sky
background signal is determined: Nod to Sky and Stare. The third allows for the observation of
contiguous fields on sky (Mosaic) instead of multiple isolated targets. See figure below.
Figure 10 Schematics of the three observation modes configurable by KARMA: Nod to Sky, Stare and Mosaic.
Depending on the current telescope position, an arm is either allocated to a science target or to sky background.
The offsets between Science and Sky position are performed by the telescope alone while the pick-off arms remain
fixed at their positions in the focal plane. (Only a few IFUs are depicted). Not drawn to scale.
3.4.1 Nod to sky mode
In this mode the sky background signal is obtained by moving (nodding) the telescope and/or
rotating the instrument between two previously defined positions, depicted by the two
schematic configurations in the left column of Figure 10. Therefore each pick-off arm (IFU
represented schematically by a black square) switches between its scientific target (red bullet)
and a corresponding own sky background position (blue square). The sky position has to be
determined using KARMA. In the process of nodding only the telescope and/or instrument
rotator positions are altered, the pick-off arm configuration remains unchanged. In the nod-tosky mode there is a fixed sequence: AB AB … where A is the science position and B is the sky
position. Please note that in position B some IFUs can contain science targets if they are
located on sky in position A. In case that not all 24 arms can be allocated at once to scientific
22 of 61
User Manual
Doc No:
Vers:
Category
Doc Type:
State:
Author:
Date:
VLT-MAN-KMO-146603001
6.0
Manual
Word
Issued
M. Cirasuolo, R Sharples
30 June 2013
targets within a single telescope/instrument position, it is possible to assign not used arms to
blank sky.
It is possible to introduce a small dither between each exposure, effectively shifting the targets
within the IFUs (note the dither is the same for all IFUs). A choice of a 3,5,9 points dither with a
fixed pattern and user specified sizes is available as described in details in section 7.3.2 and
illustrated in Figure 20.
3.4.2 Stare mode
The characteristic feature of this mode is that the telescope always points (stares) to the same
position and the instrument rotation angle doesn’t change (upper part of second column in
Figure 10). The sky background then will be obtained by dedicated sky arms, which, in contrast
to the Nod to Sky mode, deliver a signal which is picked not by the same IFU as for the
scientific target. All pick-off arms allocated to science targets can, however, serve for sky
background subtraction simultaneously if their IFUs contain a sufficient number of empty sky
pixels. A dedicated sky position where all arms are on blank sky in addition is necessary only
once (lower part of second column in Figure 10). As for the nod-to-sky mode, there is the
possibility to introduce a dither patter with 3,5,9 points. More details are given in section 7.3.1.
3.4.3 Free-dither mode
A hybrid mode can be obtained by using the free-dither template, in which the user can specify
the size and the pattern of the dither for each exposure, as well as the frequency with which to
observe the sky (see sections: 3.4.5; 3.4.6 and 7.3.3). From the KARMA preparation point of
view either nod-to-sky or stare mode can be used, since the specific setup for the free-dither
are only done in P2PP.
3.4.4 Mosaic mode
For the spectroscopic observation of extended contiguous fields on the sky, KMOS provides
two dedicated configurations, known as Mosaic mode, where the individual IFUs, either all 24
or a subset of 8, are arranged in such a way that with successive telescope pointings a
contiguous rectangular area can be covered (see section 7.3.4 and 7.3.5). For data reduction a
single sky background position as in the other modes is necessary (Figure 10, third column).
For the two existing predefined configurations the participating arms are allocated to fixed
positions forming a 6x4 or a 4x2 array. Figure 11 shows the positions of the IFU’s (red squares)
in these arrangements for the first telescope pointing, starting in the upper left corner. The
observation block that you prepare will contain just this first pointing along with the appropriate
arm positions. All subsequent telescope offsets, however, will be calculated by the instrument
control software automatically during the OB execution. To ensure there are no gaps, the
spacings between the IFU’s are slightly smaller than an integer multiple (here: three and two)
of the IFU size. With the given configurations it is thus possible to map rectangular areas of
64.9” x 43.3” (2810 sq. arcsec) and 32.5” x 16.3” (530 sq. arcsec) with 16 and 9 telescope
pointings, respectively, in a single OB. In the unlikely case that even such a comparatively
large field as the 6x4 one is still too small to fulfill your scientific requirements, KMOS and
KARMA open up the possibility to combine more than one of these rectangular areas, leading
to an equivalent number of PAF files and OBs. The size of your “super field”, must be specified
in KARMA. It is worth noticing that depending on the exposure time in each tile, the full OB
might exceed the one hour limit (e.g. 16 pointings x DIT + sky positions). Hence there exist the
possibility to break down the mosaic and execute in one OB just a fraction of the mosaic. The
small mosaic can be split in 3 OBs while the large mosaic in 4.
23 of 61
User Manual
Doc No:
Vers:
Category
Doc Type:
State:
Author:
Date:
VLT-MAN-KMO-146603001
6.0
Manual
Word
Issued
M. Cirasuolo, R Sharples
30 June 2013
Figure 11. Left. The size of the continuous area (~0.8 sq. arcmin) covered by a single OB in Mosaic mode with the
large configuration with 24 IFUs, which requires 16 telescope pointings. The red squares indicate the IFU positions
at the start of the OB. Right. The small Mosaic configuration with 8 IFUs, which requires 9 telescope pointings to
cover the rectangular area of ~0.15 sq. arcmin.
24 of 61
User Manual
Doc No:
Vers:
Category
Doc Type:
State:
Author:
Date:
VLT-MAN-KMO-146603001
6.0
Manual
Word
Issued
M. Cirasuolo, R Sharples
30 June 2013
3.4.5 Strategy for sky subtraction
Unlike long slit spectrographs, the field of view of each KMOS IFU is too small (2.8” x 2.8”) to
nod and keep the target within the field of view. Thus the classical “nod along the slit” cannot
be performed and therefore, sky measurements must be obtained by nodding the telescope to
offset sky fields.
The scale of the offset (e.g. how many arcsec from the science targets) and rotator angle can
be specified in KARMA during the OB preparation. In KARMA it is also set a maximum
distance for the nodding (6 arcmin), necessary to retain the guide star during the OB. The
frequency with which the sky measurements are obtained depends on the observing band, the
brightness of the source and on the accuracy of sky subtraction required. Figure 12 shows the
sky emission as a function of wavelength across the range observed by KMOS.
Figure 12. Sky emission as a function of wavelength.
In the science templates, the number of sky frames is determined by 2 parameters: the “sky
frequency” and “optional long sky exposure” (see Section 7.3).
The “sky frequency” parameter (in P2PP labelled as “Sky will be observed every X science
exposures”) sets the intervals with which sky frames are taken with respect to the science
frames and it is described in details below. The “optional long sky exposure” on the other hand
is simply an additional sky frame (of user-specified length) that can be taken at the end of the
template, after all the science frames.
In the nod-to-sky template the “sky frequency” parameter is fixed to one, meaning that a sky
frame is taken after each object frame. In the other templates it is possible to specify the
frequency of the sky observations. In the stare mode the default value is 0 (e.g. no sky frame at
all), but it can be modified to allow more sky frames, by setting the “sky frequency” parameter
larger than zero. Note that with the “sky frequency” parameter the time exposure for the sky
frames is always the same as the science frames (e.g. 300sec on science and 300sec on sky).
25 of 61
User Manual
Doc No:
Vers:
Category
Doc Type:
State:
Author:
Date:
VLT-MAN-KMO-146603001
6.0
Manual
Word
Issued
M. Cirasuolo, R Sharples
30 June 2013
Defining “A” the object observations and “B” the sky observations the following object-sky
sequences are recommended:
1. AB AB - one sky frame for each object frame (sky frequency = 1)
2. ABA ABA – one sky frame for 2 object frames (sky frequency = 2)
3. AABAA AABAA – one sky frame for 4 object frames (sky frequency = 4)
NOTE: The “sky frequency” MUST be ≤ the number of object frames (e.g. for an OB with 4
science frames the sky frequency parameter must be ≤ 4).
It is recommended to use always the closest sky frame to the object frame to perform sky
subtraction – this is done automatically by the pipeline. The frequency of sky frames depends
on the sky subtraction accuracy needed and the brightness of the targets. For faint targets a
sky frame every one or two object frames is recommended (sky frequency = 1 or 2), while for
bright sources (e.g. mag < 17th -18th ) it is possible to reduce the number of sky frames to 1 sky
every 4 object frames or more (sky frequency ≥ 4).
The key parameter to define the object-sky sequence is the “sky frequency”, labelled in P2PP
as: “ Sky observed every X science”. The table below illustrates the possible combinations of
object and sky frames that can be obtained.
# science
frames
2
2
3
3
3
4
4
4
4
5
5
5
5
5
6
6
6
6
6
6
Sky
frequency
1
2
1
2
3
1
2
3
4
1
2
3
4
5
1
2
3
4
5
6
Object – sky pattern
AB AB
ABA
AB AB AB
ABA A
ABAA
AB AB AB AB
ABA ABA
ABAA A
AABAA
AB AB AB AB AB
ABA ABA A
ABAA AA
AABAA A
AABAAA
AB AB AB AB AB AB
ABA ABA ABA
ABAA ABAA
AABAA AA
AABAA AA
AAABAAA
Recommended
Recommended
Recommended
Recommended
Recommended
Recommended
Recommended
Recommended
Table 5. Illustration of the possible sequences that can be obtained in P2PP with the combination of object frames
and sky frequency. The sequences are shown for up to 6 object frames, but it can be extended to a larger number of
frames.
26 of 61
User Manual
Doc No:
Vers:
Category
Doc Type:
State:
Author:
Date:
VLT-MAN-KMO-146603001
6.0
Manual
Word
Issued
M. Cirasuolo, R Sharples
30 June 2013
•
Simple sky subtraction: IFU j (on source) - IFU j (on sky)
All the discussions so far assume a “simple” sky subtraction in which the sky in a given IFU
is subtracted from the same IFU in a subsequent exposure to sky, e.g. the classical A-B
nodding.
•
Optimal sky subtraction: IFU j (on source) - IFU j (on sky after rescaling the OH-lines)
An improvement can be obtained by using an “optimal” sky subtraction, in which the sky is
determined as before by a subsequent exposure on the same IFU (classical A-B nodding),
but this time applying a wavelength dependent scaling of the various OH-sky lines in the sky
frame following the algorithm presented in Davies 2007 (MNRAS, 375, 1099). This method
gives smaller residuals and is currently being implemented in the KMOS pipeline.
•
Cross-arm sky subtraction: IFU j (on source) - IFU k (on sky with/out rescaling the OH-lines)
Another possibility is to remove the sky-background by subtracting one arm from another in
the same exposure, e.g. having only few arms dedicated to sky during the whole OB and
using them to subtract the sky in all the other IFUs. This can be done with or without
applying the “optimal” rescaling of the OH-sky lines. Based on preliminary results obtained
during commissioning this cross-arm subtraction leaves sky residuals which are a factor 2-3
higher compared to the normal nod-to-sky method (A-B) described before (see Figure 13,
Figure 14).
Figure 13. An illustration of the quality of sky subtraction, on the left for the “simple” sky subtraction method, and on
the right using the “optimal” sky subtraction method following the algorithm presented in Davies (2007). The matrix
shows arm-to-arm subtraction in the same exposure, e.g. the sky residual in IFU j using IFU k to do sky subtraction
in the same exposure. For comparison, the vector at the bottom shows the sky residual when the sky is subtracted
from the same IFU, but from the subsequent exposure, e.g. IFU j – IFU j in the classical A-B sequence.
27 of 61
User Manual
Doc No:
Vers:
Category
Doc Type:
State:
Author:
Date:
VLT-MAN-KMO-146603001
6.0
Manual
Word
Issued
M. Cirasuolo, R Sharples
30 June 2013
Figure 14. Example of residual sky on the left for the classical not-to-sky sequence (sky subtracted from the same
arm in subsequent exposure, e.g. A-B) and on the right for the cross-arm subtraction, in this case IFU1 – IFU7
(which are imaged onto the same detector). The fluxes are in arbitrary units. The top panels are for the simple
subtraction and the bottom panels for the optimised method following Davies 2007. Please note the different Y-axis
scales, on the right and left hand panels. The cross-arm subtraction leaves sky residuals which are a factor 2-3
higher compared to the normal nod-to-sky method, and the residuals are even worse when using IFUs from different
detectors for the sky subtraction, as shown in Figure 13.
3.4.6 Offsetting and dithering
On top of the nodding between object and sky position that is defined in KARMA, it is also
possible in P2PP to define small dithers between different exposures, essentially moving the
source within the IFU after each exposure. This small dithering within the IFU is particularly
useful for faint sources because the small offsets will result in different parts of the array being
used for the same target, hence small cosmetic artefacts which are not removed by flat-fielding
will be averaged out. The recommended amplitude of the dither is 0.2”- 0.3” and should be
<0.6” to avoid that part of the object goes outside the IFU.
The offsets for dithering corresponds to the telescope positions on sky, i.e. they are defined as
absolute offsets, and follow the astronomical convention (i.e. top is North and left is East),
therefore the objects move in the opposite direction on the reconstructed cube.
In the case of the nod-to-sky template, the dither pattern is fixed and there is a choice between
3,5,9 points dither. For the free-dither template the user can specify the full dither pattern as
well as the frequency with which to observe the sky (i.e. the sky frequency). The dither offsets
specified in P2PP are in arcsec and always refer to the initial position defined in
KARMA, they are NOT cumulative offsets (i.e. relative to the previous position as for
other VLT instruments).
Objects and sky positions are both dithered. The dithering pattern in specified in P2PP, but the
sequences are followed independently according to the frequency of sky observations.
The figure below shows an example with free-dither template, 6 object frames and 3 sky
frames in the pattern ABA ABA ABA.
28 of 61
User Manual
Doc No:
Vers:
Category
Doc Type:
State:
Author:
Date:
VLT-MAN-KMO-146603001
6.0
Manual
Word
Issued
M. Cirasuolo, R Sharples
30 June 2013
Figure 15. An illustration of the dither pattern that can be constructed with the free-dither template in P2PP. The
sequence for just 1 IFU is shown, since it will be identical for all of them. This example is for 6 object frames and sky
frequency = 2, which gives in total 3 sky frames in the sequence ABA ABA ABA.
3.4.7 The influence of the Moon
Moonlight can produce an increase of the continuum sky background, especially at short
wavelengths. The effect of the Moonlight on a specific observation can be quantified using the
KMOS Exposure Time Calculator. As a guideline, observations in H and K band are not
noticeably affected by Moonlight and therefore can be performed in any condition, including
bright time. Observations in the YJ band can be affected by Moonlight, especially when the
target is very close to the Moon (e.g. observations at 15 degrees away from the Moon have a
background 3 times higher compared to 90 degrees away from Moon). Therefore, it is
recommended to perform YJ observations in dark and grey time, or in bright time if the target is
>90 degrees away from the Moon. Observations in IZ band should be performed in dark time.
However, it is always recommended not to observe targets closer than 30° to the Moon to
avoid problems linked to the telescope guiding.
29 of 61
User Manual
Doc No:
Vers:
Category
Doc Type:
State:
Author:
Date:
VLT-MAN-KMO-146603001
6.0
Manual
Word
Issued
M. Cirasuolo, R Sharples
30 June 2013
3.4.8 The influence of precipitable water vapour (PWV)
In general the precipitable water vapour is not critical for near-IR observations with KMOS. By
default the PWV limit in P2PP is set to 20mm. If a more stringent PWV constraint is required
this can be done by a waiver.
3.5
Overheads
The telescope and instrument overheads are summarised in the following Table:
Action
Acquisition, MOSAIC setup
Acquisition, non-MOSAIC setup, without exposure time, per cycle
(2 cycles usually necessary):
- : read-out + writing image to disk
- : interaction + image reconstruction
Acquisition (2nd OB in a concatenation, MOSAIC and non-MOSAIC setups):
arms parking and deployment
Read-out + writing image to disk
Image reconstruction
Offset (dither, i.e. within individual IFUs)
Offset to sky
Time
(mins)
0
0.10
0.58
4
0.10
0.33
0.15
0.75
The table gives overheads assuming a typical scenario for catalogues with good astrometry in
which two cycles of acquisition offsets are required. The total time for the acquisition cycle is
dependent on the exposure time selected.
The set-up for grating and filter wheel is included within the time to park and deploy the arms.
For a normal OB, for which the acquisition and re-centering of the reference stars is
straightforward (e.g. only one iteration) the total initial overheads are ~10 minutes – including
presetting, acquisition and reconfiguration of the arms. The readout time is very short (few
seconds). For OBs in which the astrometry of the catalogue is not very good and the
acquisition process requires several iterations or in the case the reference stars are too faint (>
14mag) requiring longer exposures, then the overheads can be longer by several.
30 of 61
User Manual
Doc No:
Vers:
Category
Doc Type:
State:
Author:
Date:
4.
Calibrating and reducing KMOS data
4.1
KMOS calibration plan
VLT-MAN-KMO-146603001
6.0
Manual
Word
Issued
M. Cirasuolo, R Sharples
30 June 2013
A summary of the calibration plan is given in the table below:
Calibration
Darks
Frequency
Daily
Purpose
Master dark; bad pixel map
Notes
Flats
Daily
Pixel-to-pixel variation;
location of the slits on the array
Taken at optimised
rotator angles,
based on night
observations
Arcs (Argon/Neon)
Daily
Wavelength calibration
Taken at optimised
rotator angles,
based on night
observations
Flats – fixed rotator
angles
Daily
Pixel-to-pixel variation;
location of the slits on the array.
(Mostly used by the RTD)
Taken at 6
different rotator
angles (every 60°)
to correct flexure
Arcs (Argon/Neon) –
fixed rotator angles
Daily
Wavelength calibration
(Mostly used by the RTD)
Taken at 6
different rotator
angles (every 60°)
to correct flexure
Attached arc or flat
On demand
(charged to
the user)
Telluric standars
3 IFU only
as needed
Correct for telluric absorption
Within 2 hours of
the science data
airmass difference
of 0.2
Maximum
S/N~100
Spectro-photometric
standard
Spectroscopic skyflats
Radial velocity
standards
31 of 61
- all IFU on
request
(charged to
the user)
- 3 IFU or 24
on demand,
charged to
the user.
Monthly
On request
charged to
the user.
Correct response curve;
absolute flux calibration
Twilight spectroscopic flats
Accurate radial velocity
calibration
User Manual
Doc No:
Vers:
Category
Doc Type:
State:
Author:
Date:
VLT-MAN-KMO-146603001
6.0
Manual
Word
Issued
M. Cirasuolo, R Sharples
30 June 2013
4.1.1 Darks
Produced by: KMOS_spec_cal_dark
Dark frames with exposure times corresponding to the exposure time of the object. Dark
frames are used to correct for the instrument bias especially if no off- or sky-frames are
available. In addition, dark frames are used to generate bad pixel maps.
4.1.2 Flat field calibration
Produced by: KMOS_spec_cal_calunit
Flat fields are used to correct for pixel to pixel sensitivity variations. The flats are taken during
daytime calibration using the internal flat lamp with constant intensity. The flats are generated
daily for all the bands that have been observed during the night, and a set of flats in all bands
are also taken regularly (e.g. every week or month) to run the RTD (Real Time Display). The
flats are taken at a rotator angle as close as possible to one used during observations to
reduce the effect of flexures.
4.1.3 Wavelength calibration
Produced by: KMOS_spec_cal_wave
Arc lamp frames for wavelength calibration (Argon and Neon) are obtained for each spectral
band observed during the night. As for the flats, the arc lamp frames are taken at a rotator
angle as close as possible to the one used during observations to reduce the effect of flexure.
The sky frames containing OH-lines can be used to improve the wavelength calibration by
removing residual flexure and obtain a better registration of the frames before combining them.
4.1.4 Spectroscopic sky-flats
Produced by: KMOS_spec_cal_skyflat
Twilight spectroscopic skyflats are taken regularly by the observatory (weekly or monthly) and
must be used to determine the illumination correction, especially important in the mosaic mode
to produce uniform images. Based on the initial measurements this should deliver an
illumination correction good to a few percent level. Better characterization will be obtained by
the end of commissioning. If the user requires a higher accuracy for the illumination correction,
it is possible to request twilight sky-flats in Phase 1 in the special calibration section of the
proposal.
4.1.5 Spectro-photometric Calibration and telluric standards
Produced by: KMOS_spec_cal_stdstar
Calibration of spectroscopic data in the IR is a complicated procedure that requires care. It is
generally done in three steps. The first step removes telluric features, with what is commonly
called a telluric standard; the second step removes the spectral features of the telluric standard
that are imprinted onto the science spectrum because of the first step; and the third step sets
the absolute scale with what one may call a spectroscopic (flux) standard. In general the
spectroscopic standard and the telluric standard are the same star, but this does not need to
be the case.
32 of 61
User Manual
Doc No:
Vers:
Category
Doc Type:
State:
Author:
Date:
VLT-MAN-KMO-146603001
6.0
Manual
Word
Issued
M. Cirasuolo, R Sharples
30 June 2013
The most prominent features in IR spectra are the telluric lines of the Earth’s atmosphere.
Unfortunately, many of the telluric lines do not scale linearly with airmass, so it is necessary to
observe a standard at the same airmass and with the same instrument setup as that used for
of the science target. Furthermore, the strength of the telluric lines varies with time, so it is also
necessary to observe the standard soon after or soon before the science target. The spectrum
of the telluric standard is divided directly into that of the science target. Ideally, the spectrum of
the telluric standard should be known, so that features belonging to it can be removed.
However, this is normally not the case, so one has to use standards for which the spectrum is
approximately known.
In general, we use either hot stars or solar analogs as telluric standards and, generally, these
stars are selected from the Hipparcos Catalog. The spectra of hot stars, those hotter than B4,
are relatively featureless and are well fit by blackbody curves. So, by knowing the spectral type
of the star, one uses a blackbody curve with the appropriate temperature to fit the continuum of
the standard. The spectra of stars that are cooler than A0 start to have many more features
and cannot be fit with a blackbody curve for wavelengths below 1.6 microns.
Unfortunately, hot stars do contain some features, usually lines of hydrogen and helium, that
can be difficult to remove. If the regions around the hydrogen and helium lines are of interest,
then one can also observe a late type star, which should have weak hydrogen and helium
lines. This star is then used to correct for the helium and hydrogen absorption in the spectrum
of the hot star. Some hot stars also have emission lines or are in dusty regions. These stars
should be avoided. The V-I colour of the star can be used as an indicator of dust. For stars
hotter than A0, it should be negative. And lastly, hot stars tend to lie near the galactic plane, so
there may be positions on the sky where there are no nearby hot stars available.
Solar analogs, (for the purpose of removing telluric features) are stars with spectral type G0V
to G4V. These standards have many absorption lines in the IR, particularly in the J band. The
features can be removed by dividing by the solar spectrum that has been degraded to the
resolution of the observations.
In addition to hot stars and solar analogs, IR astronomers have used other stellar types as
telluric standards. For example, F dwarfs are commonly used. We would like users to think
carefully about which star is best for their program. Although the observatory will automatically
observe a telluric standard for service programs, we cannot guarantee that we will make the
best choice, as this depends on the science users wish to do. If you think that a specific
spectral type suits your program better than others, we recommend that you submit calibration
OBs.
The observatory selects telluric standards from four catalogs: the IRIS Photometric Standards,
the MSSSO photometric standards, a composite list of bright spectroscopic standards and the
Hipparcos Catalog. The majority of the standards come from the Hipparcos Catalog. Although,
the Hipparcos Catalog is an excellent source of telluric standards for ISAAC, most of the stars
in the catalog do not have IR magnitudes, which means that IR magnitudes have to be inferred
from the spectral type. Such an extrapolation leads to an uncertainty of 5-20% in the absolute
flux calibration. If users wish to have a more certain absolute flux calibration, they should
provide their own standards (and should have included these observations in their requested
time in Phase 1). Alternatively, if the broad-band magnitudes of the object are known, the
absolute flux calibration can be derived by convolving the measured spectrum with the broadband filter curves. In this case, the IR magnitude of the standard is irrelevant, only the spectral
type is important.
KMOS offers two possibilities to observe a standard star:
1. The template KMOS_spec_cal_stdstar allows the user to observe a standard star in only
3 IFUs (one per each spectrograph). Then the calibration from these 3 IFUs needs to be
applied to the remaining IFUs. These standard star observations will be taken
automatically by the observatory and will not be charged to the user programme. The
33 of 61
User Manual
Doc No:
Vers:
Category
Doc Type:
State:
Author:
Date:
VLT-MAN-KMO-146603001
6.0
Manual
Word
Issued
M. Cirasuolo, R Sharples
30 June 2013
telluric will be taken within 2 hours from the science observations and difference in
airmass of ≤0.2. However, it is possible for the user to submit his/her own preferred
standard-star for the programme. The accuracy in the calibration that can be achieved by
observing the standard-star only in 3 IFU of course will introduce some uncertainty in the
other IFUs (due to the IFU-to-IFU variation), but the accuracy is in the range of 2% to 5%.
2. If the user requires a more accurate calibration it is possible to use the
KMOS_spec_cal_stdstarscipatt template in which the standard star is observed
sequentially through all IFUs. The larger overheads for this template depend on the
exposure time needed in each IFU. For a given exposure time, the overall time needed to
execute this template will be a factor ~8-10 longer compared to the previous
KMOS_spec_cal_stdstar template. For a 10sec exposure in each IFU the overhead are
~10min including preset and acquisition. In this case this must be requested by the user in
the proposal and the total execution time will be charged to the programme.
Figure 16. Comparison between the measurements of the 3-arm standard star template and all 24-arms
sciencepattern standard star template. In the 3-arm standard star the IFU used are number 3,12 and 20 (one per
each spectrograph). The blue curve in the background shows the extracted spectrum for a standard star in the Kband. The overplotted green curves are the ratio (in arbitrary scales and offsetted) between the spectra in each IFU
respect to those taken in the just the 3 reference arms (3,12,20) taken via the 3-arm standard star template, as
labelled on the left hand side. For each IFU on the right it is indicated the mean ratio and the standard deviation.
34 of 61
User Manual
Doc No:
Vers:
Category
Doc Type:
State:
Author:
Date:
VLT-MAN-KMO-146603001
6.0
Manual
Word
Issued
M. Cirasuolo, R Sharples
30 June 2013
4.1.6 Attached calibrations
Produced by: KMOS_spec_cal_calunitflatnight
The daytime calibrations provide flatfield and arc, which are slightly shifted on the detector
compared to the night-time science observations due to the grating repeatability. This shift is
very small, with a standard deviation of 0.2 pixels. This has no impact on the reconstruction
except to shift everything by that amount; and to produce small 'edge effects' at the ends of the
slitlets. If the user requires more accuracy it is possible to include arc and/or flat calibration in
an OB. The attached calibration template MUST be placed after the corresponding science
template because it will use the same setup of the instrument performed by the science
template, e.g. without moving the grating. These calibrations are charged to the user
programme.
35 of 61
User Manual
Doc No:
Vers:
Category
Doc Type:
State:
Author:
Date:
5.
VLT-MAN-KMO-146603001
6.0
Manual
Word
Issued
M. Cirasuolo, R Sharples
30 June 2013
Instrument features and known problems to be aware of
5.1.1 Ghosts
Because KMOS works in second-order for all of the high dispersion gratings, it is susceptible to
first-order Littrow grating ghosts. Figure 17 shows an image in the YJ-band obtained with only
one arm in its calibration position fully illuminated with the Argon+Neon lamps. The remaining 7
arms are parked in the field, outside the calibration position. A ghost image is clearly visible on
the left of the array. The colour scale has been enhanced to show the ghost, since the level of
the ghost is less than 1 part in 100 for all bands.
This ghost image has been predicted by modelling and it is produced by light reflected from the
detector and re-dispersed by the grating. By design, KMOS gratings IZ, YJ, H and K work in
2nd order. The light reflected by the detector is dispersed back in 1st order by the grating and
produces an in-focus image of the science spectrum at lower spectral resolution and with the
wavelengths reversed. The ghost appears on the opposite side of the array with respect to the
position of the arm that generates it. For example in the following figure, only one IFU on the
right side of the array is illuminated and the ghost is visible to the left side, symmetrical with
respect to the centre of the array. When all the IFUs are illuminated, their ghosts will fall onto
pixels that contain science data.
Figure 17. Image in the YJ-band, with one single IFU illuminated with a Argon+Neon calibration lamp (on the right).
The ghost is visible on the left side of the array. The colour scale has been enhanced to show the ghost, since the
level of the ghost is less than 1% for all bands.
36 of 61
User Manual
Doc No:
Vers:
Category
Doc Type:
State:
Author:
Date:
VLT-MAN-KMO-146603001
6.0
Manual
Word
Issued
M. Cirasuolo, R Sharples
30 June 2013
Figure 18 shows the ghost level - defined as the intensity of the ghost image divided by the
intensity of the source that has generated it - for all three detectors and all bands. The results
can be summarised as follow:
-‐
The ghost is present in all 3 detectors and for all 24 arms.
-‐
It is present in the IZ, YJ, H, K bands, but not in HK-band, as predicted, as this latter
grating works already in first order.
-‐
The intensity of the ghosts vary slightly from detector to detector, but on average it is:
0.6% in IZ band; 0.4% in YJ; 0.06% in H and 0.2% in K.
-‐
The ghost covers only a fraction of the observable wavelength, especially in the IZ and YJ
bands
Figure 18. Ghost level as a function of wavelength, for all three detectors. The ghost level is defined as the intensity
of the ghost image divided by the intensity of the source that has generated it. The coloured boxes identify the full
wavelength coverage in each band (IZ, YJ, H, K). The horizontal error bars denote the fraction of the band affected
by the ghost. It can be noted that the level is less than 1 part in 100 and only affects a fraction of the wavelengths,
especially in the IZ and YJ bands. The ghost is not present in the HK band.
5.1.1.1
Impact of ghost on science observations
The potential science impact of the ghost is that bright OH lines are re-imaged onto pixels that
should contain only continuum from in-between OH lines, therefore, increasing the background.
The ghosts produced by bright OH lines are, in the vast majority of the cases, well below the
level of the intra-OH continuum, except for the very brightest OH lines. In a more quantitative
way, the average ratio between strong OH lines and intra-line continuum is ~50 in the YJ band
37 of 61
User Manual
Doc No:
Vers:
Category
Doc Type:
State:
Author:
Date:
VLT-MAN-KMO-146603001
6.0
Manual
Word
Issued
M. Cirasuolo, R Sharples
30 June 2013
and significantly higher (~500) in the H band. Therefore, using the values of the intensity for the
ghosts described above the ghost of OH lines will be: 50 x 4.0e-3 = 0.2 of the continuum in the
YJ band and 500 x 6.0e-4 = 0.3 of the continuum in the H band. Quantitatively, <0.5% of the
wavebands is affected by ghost lines with flux comparable to the intra-OH continuum; and < 11.5% of the wavebands is affected by ghost lines with flux > 0.5 x flux of intra-OH continuum.
It is worth noticing that he ghost spectrum will only contribute to increasing the noise in regions
in between the OH sky-lines. In fact, the lines themselves produced by the ghost will be
subtracted off during sky subtraction. However, since the sky-lines vary with time, some
residual will remain, as for any other OH sky-line. Therefore it is recommended not to use too
long exposure (e.g. >> 600sec).
5.1.2 Stray light
There is a low level of diffuse scattered light at each side of an IFU, when illuminated with a
source of light. At a distance of 4 pixels from the edge of the IFU the level is < 2% in all bands,
being weaker at long wavelengths: 2% in IZ, 1.5% in YJ, 1% in H, 0.8% in K and 0.8% in HK.
At a distance of ~100 pixels from the edge of the IFU the stray light level drops to values <
0.5% in all bands.
Therefore, the scattered light will only affect science observations when a bright
extended source completely filling the IFU is observed with other faint ones. For this
reason it is recommended to observe simultaneously only sources with similar
magnitudes (within a range of 3-4 magnitudes).
Please, note that in some specific configurations when one arm is in park position and the
neighbouring arms are deployed in the field, some scattered light is visible in the arm in the
park position. This is of course scientifically irrelevant, since the scattered light is only visible in
the arm in the park position, which is outside the field of view and not allocated to any science
or sky target.
5.1.3 Flexures
Three different types of flexure can affect observations with KMOS: 1) the flexure of the bench;
2) the flexure of the pick-off arms; 3) the flexure of the spectrographs. The first two affect the
spatial position of the source on the IFUs, while the last one produces a shift mainly in the
spectral direction. However, all of them are small and their effect is mostly corrected in
software.
5.1.3.1
Flexure of the bench and pick-off arms
The flexure of the bench and pick-off arms subject to gravity has a net effect of spatially
displacing the targets on the IFUs. However, this shift is always in the opposite direction to the
gravity vector and during a complete rotation (360º) the image of the source moves on the fieldof view of the IFU describing a well defined ellipse with semi-major axis = 1.5 pixels. The effect
of this flexure is compensated in software.
In fact, at the start of any OB the flexure at that specific rotator angle position is removed
during acquisition. In this phase, the 3 (or more) acquisition sources are centred in the 3 IFUs,
effectively removing the flexure of the bench and the pick-off arms. Therefore, during the
execution of the OB, the maximum uncorrected image movement due to the flexure of the
bench and pick-off arms, corresponds to the rotation angle in the longest DIT. At 10º zenith
distance an integration of 10-15min gives a maximum instrument rotation of 13º - 20º. The
maximum image motion in such integration time is only 0.1 - 0.2 pixels. This gives a negligible
effect on the image quality.
38 of 61
User Manual
Doc No:
Vers:
Category
Doc Type:
State:
Author:
Date:
5.1.3.2
VLT-MAN-KMO-146603001
6.0
Manual
Word
Issued
M. Cirasuolo, R Sharples
30 June 2013
Flexure of the spectrograph
The spectrograph flexure does not affect spatial image quality, but produces a shift in the
spectral direction of +/- 1 pixel in a complete rotation of 360º. To compensate for this effect,
day-time calibrations (flat field and arcs) are carried out at a number of different rotator
positions (every 60º) to ensure that the flat field is valid for all rotator angles. Otherwise there is
no effect on the spectral image quality as the effect in an observation is much less than the
linewidth. Co-added frames can be fitted together using sky-lines to remove the image
displacement (at the time of writing this is not yet implemented in the pipeline, but hopefully will
be by the time of the first observations are taken).
5.1.3.3
Impact of flexure on science
There is no major impact of flexure on science observations since KMOS software and data
reduction pipeline take into account and correct the effect of flexure.
39 of 61
User Manual
Doc No:
Vers:
Category
Doc Type:
State:
Author:
Date:
6.
VLT-MAN-KMO-146603001
6.0
Manual
Word
Issued
M. Cirasuolo, R Sharples
30 June 2013
Summary of hints and tips for preparing observations
•
Astrometry. Make sure that science targets, guide stars and reference stars are all on
the same coordinate system. UCAC4 on Vizier can be used to find stars with accurate
astrometry or use stars extracted from the same images as the science targets.
•
Always correct for proper motion.
•
Choose Telescope Guide stars with magnitude in the R-band: 8 < RVega < 12
•
Choose at least 3-4 Reference stars in the magnitude range 8-14, in the same band as
the science observations. However, the more stars you provide the better the alignment
will be.
•
To avoid persistence, it is recommended to observe simultaneously only sources with
similar magnitudes - within a range of 3-4 magnitudes. Choose the DIT and NDIT using
the ETC such that fluxes are at most 40,000 ADUs/DIT/pixel (~20,000 e-/DIT/pixel),
even for significantly better conditions than foreseen (e.g. using seeing 0.4” in the ETC).
•
Dot not observe sources brighter than 6th magnitude (Vega) in all bands, because that
would saturate and cause severe persistence.
•
For observations of faint targets (which will not be detected in each single exposure), it
might be useful to have one or two IFUs dedicated to observe a brighter star, which will
be detected in a single exposure and therefore can be used to cross-check the
registration of the frames. For example if the main science targets are faint galaxies
(HAB ~ 23) observed with several 300sec exposures, it can be useful to dedicate one of
the 24 IFUs to observe simultaneously a star of HAB ~ 19-20 in the field.
•
Use a [AB AB … ] or [ABA ABA …] nodding pattern to obtain best sky subtraction (sky
frequency 1 or 2).
•
IZ observations in dark time; YJ observations in dark and grey time, or bright time if >90
degrees away from the moon; H and K observations in any conditions.
•
Background dominated observations are reached for exposures longer than 300 sec .
40 of 61
User Manual
Doc No:
Vers:
Category
Doc Type:
State:
Author:
Date:
7.
VLT-MAN-KMO-146603001
6.0
Manual
Word
Issued
M. Cirasuolo, R Sharples
30 June 2013
Templates reference
All scientific and calibration observations with ESO instruments are prepared as observing
blocks (OBs) with the Phase 2 Proposal Preparation tool (P2PP). The scheduling of these
OBs is then done on the site with the Broker of Observing Block (BOB) and P2PP in visitor
mode and with bob and the Observation Tool (OT) during service mode observation runs.
Observing blocks consist of the target information, a small number of user selected
templates, the constraints sets and the scheduling information. The observing templates,
which are described below are lists of keywords (parameters of the respective templates)
to define the configuration and setup to be used for the respective observations.
Parameters can be either selectable by users or they are hidden to the user to compact
and to simplify the appearance of the parameter lists. Hidden parameters cannot be
changed by the users but only by the instrument operators. Since the hidden parameters
will be rarely changed during science observation runs we do not provide an explanation
here in the template reference section.
The table below gives a summary of KMOS acquisition, science and calibration templates. It
shows also the correspondence between science or calibration templates with corresponding
acquisition templates. Calibration templates dark, calunit flats and arcs do not need acquisition
templates.
All the acquisition templates using KARMA setup files do not need the specification of the
target RA and Dec and proper motion, except for the standard_star_science_pattern
(stdstarscipatt), where the coordinates have to be entered by the user.
Acquisition templates
Science and calibration templates
KMOS_spec_acq
KMOS_spec_obs_stare
KMOS_spec_obs_nodtosky
KMOS_spec_obs_freedither
KMOS_spec_obs_mapping8
KMOS_spec_obs_mapping24
KMOS_spec_acq_mapping
KMOS_spec_acq_stdstar
KMOS_spec_acq_stdstarscipatt
KMOS_spec_acq_skyflat
KMOS_spec_cal_stdstar
KMOS_spec_cal_stdstarscipatt
KMOS_spec_cal_skyflat
KMOS_spec_cal_dark
KMOS_spec_cal_calunit
KMOS_spec_cal_wave
KMOS_spec_cal_calunitflatnight
7.1
Notes on some common parameters
DIT and NDIT are the user defined Detector Integration Time and the number of DITs to be
integrated before writing the data to the disk.
41 of 61
User Manual
Doc No:
Vers:
Category
Doc Type:
State:
Author:
Date:
7.2
VLT-MAN-KMO-146603001
6.0
Manual
Word
Issued
M. Cirasuolo, R Sharples
30 June 2013
Acquisition Templates
KMOS does not have an imaging mode and all data is taken in the format of an integral field
spectrograph - the slices sorted in x-direction and the light dispersed in y-direction on the
detector. Interactive acquisition procedures are done on the reconstructed images. These
images are calculated in real time on the instrument control workstations.
The main function of the acquisition template is to preset the telescope, to setup the instrument
(e.g. choose wave-band, move arms in position, etc) and perform the acquisition from
reference stars, which can be science targets themselves if the stars are bright enough (mag <
14). This acquisition is necessary to correct for any mis-alignment between the astrometry of
the catalogue provided by the user and the actual telescope position and rotator angle of the
instrument.
The acquisition sequence is (important for astronomers in visitor mode):
1. Retract the arms to park position.
2. Preset the telescope and simultaneously move the arms to acquire the reference stars
as defined in KARMA.
3. Take an exposure, reconstruct the cubes and show images in the RTD.
4. At the end of the integration a dialogue panel will pop-up (see Figure 19) showing the
required offset in Ra and Dec and rotation to be applied to centre the reference stars in
the IFUs. A this point the user can inspect the results and have the following choices:
a. Accept. Apply the offset and proceed to the science observations without taking a
new image of the reference stars after the offset.
b. Accept new image. Apply the offset but take a new image of the reference stars and
recalculate the offset. This iterative process can be repeated until the required
centering accuracy is achieved (recommended: residual <0.1”).
c. Accept no offset. Proceed to science observations with no offset applied.
d. Sky image. Takes a sky image to increase the S/N
e. Repeat. Takes a new image allowing the user to increase the exposure time,
inserting the new value in the “new exposure time” box.
f. Abort. Terminate the OB.
5. Once the centering of the reference stars is completed (residual offset <0.1”), the arms
are retracted and re-deployed to the science targets as defined in KARMA.
Figure 19. Screen-shot of the gui for the acquisition.
42 of 61
User Manual
Doc No:
Vers:
Category
Doc Type:
State:
Author:
Date:
VLT-MAN-KMO-146603001
6.0
Manual
Word
Issued
M. Cirasuolo, R Sharples
30 June 2013
Here we describe in details the parameters required by the acquisition templates to be set in
P2PP.
7.2.1 KMOS_spec_acq
This template performs acquisition i.e. telescope preset and instrument setup. Then a testexposure is taken. From this exposure the telescope and instrument misalignment is
determined and a corresponding telescope offset is performed.
Parameter
DET1.SEQ.DIT
P2PP Label
Integration
time
Range (Default)
0..3600 (10)
DET1.NDIT
Number of
DITs
1..100 (1)
SEQ.TPLSCI.DURATION
Duration
SCI
template
Right
Ascension
0..36000 (3600)
TEL.TARG.DELTA
Declination
(NODEFAULT)
TEL.TARG.EQUINOX
Equinox
2000
OCS.INS.TARG.SETUP
KARMA
target set
up file
GratingFilter
*.ins
TEL.TARG.ALPHA
OCS.GRFI.NAME
43 of 61
(NODEFAULT)
IZ, YJ, H, K, HK
(NODEFAULT)
Notes
Individual integration time (DIT)
in seconds for the reference
stars
Number of DITs to combine
before writing the data to the
disk.
Duration of SCI template in
seconds, needed to calculate
atmospheric refraction.
RA (Central coordinate of the
acquisition position).Taken
automatically from the KARMA
target set up file.
DEC (Central coordinate of the
acquisition position). Taken
automatically from the KARMA
target set up file.
Equinox. Taken automatically
from the KARMA set up file.
KARMA target set up file
Grating name
User Manual
Doc No:
Vers:
Category
Doc Type:
State:
Author:
Date:
VLT-MAN-KMO-146603001
6.0
Manual
Word
Issued
M. Cirasuolo, R Sharples
30 June 2013
7.2.2 KMOS_spec_acq_mapping
For this acquisition only telescope PRESET and instrument SETUP are performed (no
alignment is necessary so test exposure is not taken). Note that no acquisition exposure is
executed for this template.
Parameter
TEL.TARG.ALPHA
P2PP label
Right
Ascension
Range (Default)
(NODEFAULT)
TEL.TARG.DELTA
Declination
(NODEFAULT)
TEL.TARG.EQUINOX
Equinox
2000
OCS.INS.TARG.SETUP
KARMA
target set
up file
GratingFilter
*.ins
OCS.GRFI.NAME
44 of 61
IZ, YJ, H, K, HK
(NODEFAULT)
Notes
RA (Central coordinate of the
acquisition position). Taken
automatically from the KARMA
target set up file.
DEC (Central coordinate of the
acquisition position). Taken
automatically from the KARMA
target set up file.
Equinox. Taken automatically
from the KARMA target set up
file.
KARMA target setup file
Grating name
User Manual
Doc No:
Vers:
Category
Doc Type:
State:
Author:
Date:
VLT-MAN-KMO-146603001
6.0
Manual
Word
Issued
M. Cirasuolo, R Sharples
30 June 2013
7.2.3 KMOS_spec_acq_stdstar
Three arms are positioned near the centre of the FoV. The telescope is positioned in such a
way that the standard star will be located in first of the used arms. Then the alignment process
with one star is performed. NOTE: The position of the guide star should be outside the
KMOS field of view and in the annulus between 4arcmin and 12arcmin from the
standard star.
In the target tab it is possible to insert the coordinates of the standard star already corrected for
proper motion or the J2000 coordinates and the value of the proper motion in arcsec per year.
Parameter
DET1.SEQ.DIT
P2PP label
Integration
time
Range (Default)
0..3600 (10)
DET1.NDIT
Number of
DITs
1..100 (1)
ADA.GUID.ALPHA
RA
guide star
ADA.GUID.DELTA
DEC
guide star
OCS.GRFI.NAME
GratingFilter
IZ, YJ, H, K, HK
(NODEFAULT)
Notes
Individual integration time (DIT)
in seconds for the reference
stars
Number of DITs to combine
before writing the data to the
disk.
RA coordinate of the guide star.
Need to be added by the user in
P2PP and corrected for proper
motion.
DEC coordinate of the guide star.
Need to be added by the user in
P2PP and corrected for proper
motion.
Grating name
The following parameters need to be implemented in the target section (second icon on the top panel)
TEL.TARG.NAME
TEL.TARG.ALPHA *
Name
Right
Ascension
(NODEFAULT)
(NODEFAULT)
TEL.TARG.DELTA *
Declination
(NODEFAULT)
TEL.TARG.EQUINOX
TEL.TARG.EPOCH
Equinox
Epoch
J2000
2000
TEL.TARG.PMA
Proper
motion RA
Proper
motion Dec
0.0
TEL.TARG.PMD
0.0
Name of the standard star
RA coordinate of the standard
star. Need to be added by the
user in P2PP
DEC coordinate of the standard
star. Need to be added by the
user in P2PP
Equinox
Epoch of observation (used with
the next two parameters to
correct for proper motion).
Proper motion of the standard
star in RA in arcsec/yr
Proper motion of the standard
star in Dec in arcsec/yr
* NOTE: The Coordinates for the standard star can be provided in two equivalent formats:
1) Ra and Dec corrected for proper motion and set proper motions in Ra and Dec =0.0, or
2) Ra and Dec non corrected for proper motion and provide the values of the proper motion.
45 of 61
User Manual
Doc No:
Vers:
Category
Doc Type:
State:
Author:
Date:
VLT-MAN-KMO-146603001
6.0
Manual
Word
Issued
M. Cirasuolo, R Sharples
30 June 2013
7.2.4 KMOS_spec_acq_stdstarscipatt
The acquisition process is very similar to the one described above. The difference is that the
arm pattern is the one from science observation. NOTE: The position of the guide star
should be outside the KMOS field of view and in the annulus between 4arcmin and
12arcmin from the standard star. In the target tab the coordinates of the standard star must
be introduced. This can be done already corrected for proper motion or the J2000 coordinates
and the value of the proper motion in arcsec per year.
Parameter
DET1.SEQ.DIT
P2PP label
Integration
time
Range (Default)
0..3600 (10)
DET1.NDIT
Number of
DITs
1..100 (1)
ADA.GUID.ALPHA
RA guide
star
ADA.GUID.DELTA
DEC guide
star
OCS.GRFI.NAME
GratingFilter
OCS.INS.TARG.SETUP
KARMA
target set up
file
IZ, YJ, H, K, HK
(NODEFAULT)
*.ins
Notes
Individual integration time (DIT)
in seconds for the reference
stars
Number of DITs to combine
before writing the data to the
disk.
RA coordinate of the guide star.
Need to be added by the user in
P2PP and corrected for proper
motion.
DEC coordinate of the guide
star. Need to be added by the
user in P2PP and corrected for
proper motion.
Grating name
KARMA target setup file
The following parameters need to be implemented in the target section (second icon on the top panel)
TEL.TARG.NAME
TEL.TARG.ALPHA *
Name
Right
Ascension
(NODEFAULT)
(NODEFAULT)
TEL.TARG.DELTA *
Declination
(NODEFAULT)
TEL.TARG.EQUINOX
TEL.TARG.EPOCH
Equinox
Epoch
J2000
2000
TEL.TARG.PMA
Proper
motion RA
Proper
motion Dec
0.0
TEL.TARG.PMD
0.0
Name of the standard star
RA coordinate of the standard
star. Need to be added by the
user in P2PP
DEC coordinate of the standard
star. Need to be added by the
user in P2PP
Equinox
Epoch of observation (used with
the next two parameters to
correct for proper motion).
Proper motion of the standard
star in RA in arcsec/yr
Proper motion of the standard
star in Dec in arcsec/yr
* NOTE: The Coordinates for the standard star can be provided in two equivalent formats:
1) Ra and Dec corrected for proper motion and set proper motions in Ra and Dec =0.0, or
2) Ra and Dec non corrected for proper motion and provide the values of the proper motion.
46 of 61
User Manual
Doc No:
Vers:
Category
Doc Type:
State:
Author:
Date:
VLT-MAN-KMO-146603001
6.0
Manual
Word
Issued
M. Cirasuolo, R Sharples
30 June 2013
7.2.5 KMOS_spec_acq_skyflat
This acquisition consists of telescope preset without guiding and instrument setup as it was
done for science observation (same arm pattern). No alignment is performed.
Parameter
OCS.GRFI.NAME
P2PP label
GratingFilter
OCS.INS.TARG.SETUP
KARMA
target set
up file
47 of 61
Range (Default)
IZ, YJ, H, K, HK
(NODEFAULT)
*.ins
Notes
Grating name
KARMA target setup file to allow
the arms to be configured in the
field. The actual RA and Dec
defined in the KARMA files will
be ignored and only the arm
configuration will be retained.
User Manual
Doc No:
Vers:
Category
Doc Type:
State:
Author:
Date:
7.3
VLT-MAN-KMO-146603001
6.0
Manual
Word
Issued
M. Cirasuolo, R Sharples
30 June 2013
Science Templates
The five science templates provide various observation modes (e.g. mosaics or individual arms
allocations) as well as various strategies for nodding between object and sky position and jitter
offsets between the images.
7.3.1 KMOS_spec_obs_stare
This observing mode is recommended only for bright objects and/or very compact objects, for
which the sky background can be determined within the same IFU. See Section 3.4.5 for
details on the sky subtraction strategy.
Parameter
DET1.SEQ.DIT
P2PP label
Integration
time
Range (Default)
0..43200 (600)
DET1.NDIT
Number of
DITs
1..100 (1)
SEQ.DET1.DIT
Option long
sky
exposure /
Time
0..3600 (0)
SEQ.DITHER.NO
Number of
dithers
Dither size
Sky will be
observed
every X
science
exposures
3, 5 or 9 (5)
SEQ.DITHER.SIZE
SEQ.SKYOBS.FREQ
0..2 arcsec (0.2)
0..100 (0)
Notes
Individual integration time (DIT)
in seconds for the science
targets.
Number of DITs to combine
before writing the data to the
disk.
Exposure time for a long
exposure on sky (if = 0 then no
additional sky exposure, if ≠ 0,
additional exposure with this
specified duration will be
executed at the end of
template)
Number of dithers (dither
pattern – see Figure 20).
Dither size in arcsec
Frequency of sky exposure .
See Section 3.4.5 for details
(e.g. 0 - no sky exposures, 1 sky after every science
exposure, etc.)
NOTE:
In this template the number of sky frames is determined by 2 parameters: the “sky frequency”
(SEQ.SKYOBS.FREQ) and “optional long sky exposure”. The number of science frames is
determined by the “number of dithers” (SEQ.DITHER.NO), in this template limited to 3, 5 or 9.
For example, let assume we need 3 science frames (“Number of dithers” = 3) of 30sec each
(“Integration time” = 30). With the same convention as in Section 3.4.5, we define “A” the
science frame and “B” the sky frame.
• If sky frequency is = 0 and “optional long sky exposure” is = 0, then no sky will be taken at all.
The observing sequence will be: AAA
• If sky frequency is = 0 and “optional long sky exposure” is >0 (e.g. 30), then a single sky
frame of 30sec will be taken at the end of the science sequence (e.g. after all science frames
are taken). The observing sequence will be: AAAB
• If sky frequency > 0 (e.g. = 1) and “optional long sky exposure” > 0 (e.g. =60), then sky
frames of 30sec (as the science frames) will be taken after each science frame, plus an
additional “long” sky frame of 60sec at the end. In this case the observing sequence will be:
AB AB AB B60sec
48 of 61
User Manual
Doc No:
Vers:
Category
Doc Type:
State:
Author:
Date:
VLT-MAN-KMO-146603001
6.0
Manual
Word
Issued
M. Cirasuolo, R Sharples
30 June 2013
NOTE: The “sky frequency” MUST be ≤ the number of object frames (e.g. for an OB with 4
science frames the sky frequency parameter must be ≤ 4)
Figure 20 The standard KMOS dither patterns (3, 5 and 9 point dither)
7.3.2 KMOS_spec_obs_nodtosky
This is another possibility to do observations with KMOS. The parameters are the same as for
KMOS_spec_obs_stare except for the parameter SEQ.SKYOBS.FREQ. This parameter is set
for KMOS_spec_obs_nodtosky frozen and equal to 1, whereas for KMOS_spec_obs_stare it
can be freely defined in P2PP. Hence, for the nod-to-sky mode there is a fixed sky frequency
with a sky frame taken after every science frame (e.g. AB AB AB). As for the stare mode, it is
possible to take an “optional long sky exposure” at the end of the observing sequence.
49 of 61
User Manual
Doc No:
Vers:
Category
Doc Type:
State:
Author:
Date:
VLT-MAN-KMO-146603001
6.0
Manual
Word
Issued
M. Cirasuolo, R Sharples
30 June 2013
7.3.3 KMOS_spec_obs_freedither
In this template the user can define any dither pattern, it is not limited to 3, 5 or 9 as in the stare
and nod-to-sky template. See Section 3.4.5 and 3.4.6 for details on the sky subtraction strategy
and offset/dithering.
Parameter
DET1.SEQ.DIT
P2PP label
Integration
time
Range (Default)
0..43200 (600)
DET1.NDIT
Number of
DITs
1..100 (1)
SEQ.DET1.DIT
Option long
sky
exposure /
Time
0..3600 (0)
SEQ.DITHER.ALPHA
DITHER
pattern in
ALPHA
-2.8.. 2.8
NO DEFAULT
SEQ.DITHER.DELTA
DITHER
pattern in
DELTA
-2.8 .. 2.8
NO DEFAULT
SEQ.SKYOBS.FREQ
Sky will be
observed
every X
science
exposures
0..100 (0)
Notes
Individual integration time (DIT)
in seconds for the science
targets.
Number of DITs to combine
before writing the data to the
disk.
Exposure time for a long
exposure on sky (if = 0 then no
additional sky exposure, if ≠ 0,
additional exposure with
specified duration will be
executed at the end of
template)
Dither pattern within the IFU in
Ra. Expressed in arcsec and
always referred to the initial
position. See Section 3.4.6 for
details.
Dither pattern within the IFU in
Dec. Expressed in arcsec and
always referred to the initial
position. See Section 3.4.6 for
details.
Frequency of sky exposure .
See Section 3.4.5 for details
(e.g. 0 - no sky exposures, 1 sky after every science
exposure, etc.)
NOTE:
In this template the number of sky frames is determined by 2 parameters: the “sky frequency”
(SEQ.SKYOBS.FREQ) and “optional long sky exposure”. The number of science frames is
determined by the number of dithers set by the DITHER pattern.
For example, let assume we need 4 science frames with 0.2 arcsec dither around the central
position (DITHER pattern ALPHA = 0.2 0.2 -0.2 -0.2; DITHER pattern DELTA = 0.2 -0.2 -0.2
0.2 ) of 30sec each (“Integration time” = 30). With the same convention as in Section 3.4.5, we
define “A” the science frame and “B” the sky frame.
• If sky frequency is = 0 and “optional long sky exposure” is = 0, then no sky will be taken at all.
The observing sequence will be: AAAA
50 of 61
User Manual
Doc No:
Vers:
Category
Doc Type:
State:
Author:
Date:
VLT-MAN-KMO-146603001
6.0
Manual
Word
Issued
M. Cirasuolo, R Sharples
30 June 2013
• If sky frequency is = 0 and “optional long sky exposure” is >0 (e.g. 30), then a single sky
frame of 30sec will be taken at the end of the science sequence (e.g. after all science frames
are taken). The observing sequence will be: AAAAB
• If sky frequency > 0 (e.g. = 2) and “optional long sky exposure” > 0 (e.g. =60), then sky
frames of 30sec (as the science frames) will be taken every 2 science frame, plus an
additional “long” sky frame of 60sec at the end. In this case the observing sequence will be:
ABA ABA B60sec
NOTE: The “sky frequency” MUST be ≤ the number of object frames (e.g. for an OB with 4
science frames the sky frequency parameter must be ≤ 4).
51 of 61
User Manual
Doc No:
Vers:
Category
Doc Type:
State:
Author:
Date:
VLT-MAN-KMO-146603001
6.0
Manual
Word
Issued
M. Cirasuolo, R Sharples
30 June 2013
7.3.4 KMOS_spec_obs_mapping8
With this template 8 arms are positioned as shown in figure below. Using the pre-defined set of
dithers with 9 pointings uninterrupted coverage of 32.5” x 16.3” (530 sq. arcsec) is achieved.
See Section 3.4.4 for details. Using the keyword “Part of mosaic to be observed” it is possible
to split the mosaic and observe only a fraction of it. This feature is needed if for example the
individual exposures are long and it will take more than 1 hour to complete the 9 pointings full
mosaic. In this case the observations can be broken down into several OBs and in each of
them observes a third of the mosaic.
Figure 21 Positions of arms during observations with template KMOS_spec_obs_mapping8.
Parameter
DET1.SEQ.DIT
P2PP label
Integration
time
Range (Default)
0..43200 (600)
DET1.NDIT
Number of
DITs
1..100 (1)
SEQ.DET1.DIT
Option long
sky
exposure /
Time
0..3600 (0)
SEQ.MAP.PART
Part of
mosaic to
be
observed
SEQ.SKYOBS.FREQ
Sky will be
observed
every X
science
exposures
WHOLE,
ONETHIRD1,
ONETHIRD2,
ONETHIRD3
(WHOLE)
0..100 (0)
52 of 61
Notes
Individual integration time (DIT)
in seconds for the science
targets.
Number of DITs to combine
before writing the data to the
disk.
Exposure time for a long
exposure on sky (if = 0 then no
additional sky exposure, if ≠ 0,
additional exposure with
specified duration will be
executed at the end of
template)
Part of mosaic to be observed.
This keyword allows to observe
the whole mosaic or just a
fraction of it (the first third, the
second third or last third)
Frequency of sky exposure .
See Section 3.4.5 for details
(e.g. 0 - no sky exposures, 1 sky after every science
exposure, etc.)
User Manual
Doc No:
Vers:
Category
Doc Type:
State:
Author:
Date:
VLT-MAN-KMO-146603001
6.0
Manual
Word
Issued
M. Cirasuolo, R Sharples
30 June 2013
NOTE: The “sky frequency” MUST be ≤ the number of object frames (e.g. for an OB with 4
science frames the sky frequency parameter must be ≤ 4).
7.3.5 KMOS_spec_obs_mapping24
This template is very similar to the previous one. In this case all 24 arms are positioned as in
the figure below. Using the pre-defined set of dithers with 16 pointings uninterrupted coverage
of 64.9” x 43.3” (2810 sq. arcsec) is achieved. See Section 3.4.4 fro details.
Using the keyword “Part of mosaic to be observed” it is possible to split the mosaic and
observe only a fraction of it. This feature is needed if for example the individual exposures are
long and it will take more than 1 hour to complete the 16 pointings full mosaic. In this case the
observations can be broken down into several OBs and in each of them observe one fourth of
the mosaic.
Figure 22 Positions of arms during observations with template KMOS_spec_obs_mapping24.
The parameters are the same as for KMOS_spec_obs_mapping8 above. The exception is the
parameter SEQ.MAP.PART.
SEQ.MAP.PART
Part of
WHOLE,
Part of mosaic to be observed.
mosaic
HALF1, HALF2, This keyword allows to observe
to be
QUART1,
the whole mosaic or just a
observed QUART2,
fraction of it.
QUERT3,
QUART4
(WHOLE)
53 of 61
User Manual
Doc No:
Vers:
Category
Doc Type:
State:
Author:
Date:
7.4
VLT-MAN-KMO-146603001
6.0
Manual
Word
Issued
M. Cirasuolo, R Sharples
30 June 2013
Calibration Templates
7.4.1 KMOS_spec_cal_stdstar
This template works together with KMOS_spec_acq_stdstar (see 7.2.3). After acquisition the
standard star is located in the first IFU. With the template KMOS_spec_cal_stdstar the star is
observed only in 3 pre-defined IFUs, one per each spectrograph. With telescope offsets the
star is observed in sequence through the 3 IFUs and at the end again through the first
.
Parameter
DET1.SEQ.DIT
P2PP label
Integration
time
Range (Default)
0..43200 (600)
DET1.NDIT
Number of
DIT
1..100 (1)
OCS.TARG.FLUXSTD
Magnitude
of the
standard
star /Vega
Spectral
type of
standard
star
OCS.TARG.TELLUR
(NODEFAULT)
(NODEFAULT)
Notes
Individual integration time
(DIT) in seconds for the
science targets.
Number of DITs to
combine before writing
the data to the disk.
Magnitude in the Vega
system of the standard
star in the observed
band.
Spectral type of the
standard star (see
section 4.1.5 for details).
7.4.2 KMOS_spec_cal_stdstarscipatt
The actions are very similar as in KMOS_spec_cal_stdstar above. The difference here is that
the position of the IFUs is as in the science observation. The calibration star is positioned
sequentially in all IFUs and spectra are taken.
The parameters are the same as for KMOS_spec_cal_stdstar.
54 of 61
User Manual
Doc No:
Vers:
Category
Doc Type:
State:
Author:
Date:
VLT-MAN-KMO-146603001
6.0
Manual
Word
Issued
M. Cirasuolo, R Sharples
30 June 2013
7.4.3 KMOS_spec_cal_skyflat
Sky flats are taken with the arm pattern as in science observation. Dithering is performed to
improve signal-to-noise.
Parameter
DET1.SEQ.DIT
P2PP label
Integration
time
Range (Default)
0..43200 (3)
DET1.NDIT
Number of
DITs
1..100 (1)
SEQ.DITHER.NO
Number of
dithers
Dither size
3, 5 or 9 (5)
SEQ.DITHER.SIZE
0..2 arcsec (0.2)
Notes
Individual integration time
(DIT) in seconds for the
twilight flat.
Number of DITs to
combine before writing the
data to the disk.
Number of dithers (dither
pattern – see Figure 20).
Dither size in arcsec
7.4.4 KMOS_spec_cal_dark
Simple darks are taken – lamps are off, filter wheels are in position block.
Parameter
DET1.SEQ.DIT
DET1.NDIT
SEQ.NEXPO
55 of 61
P2PP label
Integration
time
Number of
DITs
Range (Default)
0..43200 (3)
Number of
exposures
1..100 (1)
1..100 (1)
Notes
Individual integration time
(DIT) in seconds.
Number of DITs to
combine before writing the
data to the disk.
Number of dark exposures
to take.
User Manual
Doc No:
Vers:
Category
Doc Type:
State:
Author:
Date:
VLT-MAN-KMO-146603001
6.0
Manual
Word
Issued
M. Cirasuolo, R Sharples
30 June 2013
7.4.5 KMOS_spec_cal_calunit
Internal flats are taken using calibration lamps. Arms are set in calibration position.
Detector integration time and attenuator are set automatically for the used lamp(s) and defined
grating filter combination - GRFI. The corresponding parameters are stored in the
configuration. The default parameters can be overwritten during execution of the OB if
parameter SEQ.ASK.ATTEN.TIME is set to T.
Parameter
DET1.NDIT
P2PP label
Number of
DITs
Range (Default)
1..100 (1)
SEQ.ASK.ATTEN.TIME
Ask for
attenuator
and time
T or F (T)
SEQ.NEXPO
Number of
exposures
Rotator
position
1...100 (1)
INS.FLATLAMP.NAME
FlatfieldLamp
OCS.GRFI.NAME
GratingFilter
LAMP3, LAMP4,
LAMP3+4
(DEFAULT)
IZ YJ H K HK
(NODEFAULT)
SEQ.ROT
-270..270
Notes
Number of DITs to combine
before writing the data to the
disk.
Setting for interactive
execution. If TRUE it will ask
for the level of attenuator
and exposure time during
execution. If FALSE it will
use the default value without
asking.
Number of exposures at a
given position of the rotator
List of rotator positions at
which the flat field is taken.
The default is 6 rotator
positions separated by 60
degrees
(-60 0 60 120 180 240).
Flat field lamp to be used for
the observation.
Grating to be used for the
observation.
7.4.6 KMOS_spec_cal_calunitflatnight
Attached calibration flat, taken during the night just after the science observation (see Section
4.1.6.). NOTE: The grating must be the same as the same as the science observation.
Parameter
DET1.NDIT
P2PP label
Number of
DITs
Range (Default)
1..100 (1)
SEQ.NEXPO
Number of
exposures
FlatfieldLamp
1...100 (1)
INS.FLATLAMP.NAME
OCS.GRFI.NAME
56 of 61
GratingFilter
LAMP3, LAMP4,
LAMP3+4
(DEFAULT)
IZ YJ H K HK
(NODEFAULT)
Notes
Number of DITs to combine
before writing the data to the
disk.
Number of exposures at a
given position of the rotator
Flat field lamp to be used for
the observation.
Grating to be used for the
observation. MUST be the
same as the science
observations.
User Manual
Doc No:
Vers:
Category
Doc Type:
State:
Author:
Date:
VLT-MAN-KMO-146603001
6.0
Manual
Word
Issued
M. Cirasuolo, R Sharples
30 June 2013
7.4.7 KMOS_spec_cal_wave
Wavelength calibration spectra are taken using internal lamps. Arms are set in calibration
position.
Detector integration time and attenuator are set automatically for the used lamp(s) and defined
grating filter combination - GRFI. The corresponding parameters are stored in the
configuration. The default parameters can be overwritten during execution of the OB if
parameter SEQ.ASK.ATTEN.TIME is set to T.
Parameter
DET1.NDIT
P2PP label
Number of
DITs
Range (Default)
1..100 (1)
SEQ.ASK.ATTEN.TIME
Ask for
attenuator
and time
T or F (T)
SEQ.NEXPO
Number of
exposures
Rotator
position
1...100 (1)
INS.FLATLAMP.NAME
Wave-Lamp
Ar, Ne, Ar+Ne
(Ar+Ne)
OCS.GRFI.NAME
GratingFilter
IZ YJ H K HK
(NODEFAULT)
SEQ.ROT
57 of 61
-270..270
Notes
Number of DITs to combine
before writing the data to the
disk.
Setting for interactive
execution. If TRUE it will ask
for the level of attenuator
and exposure time during
execution. If FALSE it will
use the default value without
asking. (Attenuator positions
x1 = fully open, x0.01 = open
to 1%, Block = all light is
blocked).
Number of exposures at a
given position of the rotator
List of rotator positions at
which the arcs are taken.
The default is 6 rotator
positions separated by 60
degrees
(-60 0 60 120 180 240).
Arc lamp to be used for the
observation. There is an
Argon lamp and a Neon
lamp, which can be used
simultaneously (Ar+Ne). This
latter (Ar+Ne) is the default
and it is the recommended
mode.
Grating to be used for the
observation.
User Manual
Doc No:
Vers:
Category
Doc Type:
State:
Author:
Date:
VLT-MAN-KMO-146603001
6.0
Manual
Word
Issued
M. Cirasuolo, R Sharples
30 June 2013
7.4.8 KMOS_spec_cal_linearity
This template acquires images for assessment of detector linearity.
Parameter
DET1.NDIT
P2PP label
Number of
DITs
Range (Default)
1..100 (1)
SEQ.EXPO.TIME.LIST
List of
exposure
times [s]
INS.ATTEN.NAME
Attenuator
2.47624..43200
(2.5 5.0 7.5 10.0 12.5
15 15 12.5 10.0 7.5 5.0
2.5)
Block, x1, x0.5, x0.1,
x0.05, x0.01
(x0.1)
INS.FLATLAMP.NAME
Flatfieldlamp
OCS.GRFI.NAME
GratingFilter
58 of 61
LAMP3, LAMP4,
LAMP3+4
(DEFAULT)
IZ YJ H K HK
(NODEFAULT)
Notes
Number of DITs to
combine before writing the
data to the disk.
List of exposures
expressed in seconds
Attenuator position (x1 =
fully open, x0.01 = open to
1%, Block = all light is
blocked).
Flat-Lamp to be used for
the observation.
Grating to be used for the
observation.
User Manual
Doc No:
Vers:
Category
Doc Type:
State:
Author:
Date:
8.
Appendix
8.1
Rotator optimization
VLT-MAN-KMO-146603001
6.0
Manual
Word
Issued
M. Cirasuolo, R Sharples
30 June 2013
KMOS is able to do observations even in the case of restricted hardware availability (e.g.
locked pick-off arms or locked devices in one of the spectrographs). The idea is to create a
“rotated setup” at the time of the observation, i.e. to do a suitable rotation of the instrument and
to recalculate the mapping between pickoff-arms and science targets in order to reach
optimized observation efficiency even with constrained hardware. This process is called
“rotator optimization” (see Figure 23).
Figure 23 Idea behind rotator optimization: Let Arm 1 be locked e.g. after a hardware failure. Left: In the original
configuration given by the KARMA set up file the red target cannot be observed. Right: After rotating the instrument
and recalculating the mapping between targets and arms all targets are observable. An optimization like this might
be of special interest if the red target has higher priority than the others.
As can be seen from the figure, rotator optimization always takes place in steps of 30 degrees
(= angle which is necessary to move a target from one pick-off arm to the next in the same
level.) During optimization, all 12 possible rotated setups are checked for their observation
efficiency, considering how many targets can be observed and what is the priority of the
observable targets). Then the best of these setups is selected.
A detailed description of the optimization is given in the KMOS Instrument Software User and
Maintenance Manual (VLT-MAN-KMO-146606-001).
From the user point of view what is important is the information given in the fits headers when
the rotator optimization is performed.
8.1.1 Fits headers
The information if a rotated setup (as compared to the KARMA set up file) was used for an
exposure is given by the keyword OCS.ROT.OFFSET. This keyword holds the rotational offset
59 of 61
User Manual
Doc No:
Vers:
Category
Doc Type:
State:
Author:
Date:
VLT-MAN-KMO-146603001
6.0
Manual
Word
Issued
M. Cirasuolo, R Sharples
30 June 2013
(in degrees) which was calculated during rotator optimization1; any value different from 0
indicates that a “real” rotator optimization took place, i.e. that the targets were assigned to new
arms.
For each arm the fits header holds all the information which was available in the KARMA set
upƒ file for the original arm (i.e. the arm holding the same target before rotator optimization.)
Additional information is given by the following two keywords:
•
OCS.ARMi.ORIGARM:
This keyword holds the number of the arm to which the target was assigned originally in
the KARMA set up file.
•
OCS.ARMi.NOTUSED:
If this keyword is present, arm i was not used for the observation. There are several
possibilities why this might be the case:
o
No target was assigned to the “original” arm in the KARMA set up file and this
information was rotated on to arm i.
o
Arm i is locked.
o
Arm i would collide, go into a limit switch or be eclipsed by a lock arm.
o
The spectrograph connected with arm i is not useable.
Of course, several of these things may happen simultaneously. The value given in the
fits header for the keyword tries to summarize these things in a short text message, but
the really important information is if the keyword is present or not.
It should be noted, that the OCS.ARMi.NOTUSED keyword has no influence on the rest
of the information given for an arm in the fits header, i.e. even if an arm was removed
from the setup by rotator optimization, it is for example listed in the header which target
was assigned to it (but could not be observed). This information is important for the user
who otherwise might wonder where a target allocated in KARMA might have gone to.
An example fits header after rotator optimization is given below:
HIERARCH ESO OCS ROT OFFANGLE=
30.000 / [+/-DDD.TTT] Rotator offset angle
HIERARCH ESO OCS ROT OFFSET =
30.000 / [deg] Angle used during rotator o
HIERARCH ESO OCS ARM3 ALPHA = 52415.822 / [HHMMSS.TTT] Target alpha hosted
HIERARCH ESO OCS ARM3 DELTA = -242952.620 / [DDMMSS.TTT] Target delta hosted
HIERARCH ESO OCS ARM3 NAME = '328-007849' / Target name hosted by arm i
HIERARCH ESO OCS ARM3 PRIOR =
2 / Target priority hosted by arm i
HIERARCH ESO OCS ARM3 ORIGARM=
1 / Original arm number before rotato
HIERARCH ESO OCS ARM4 NAME = '328-007827' / Target name hosted by arm i
HIERARCH ESO OCS ARM4 ORIGARM=
2 / Original arm number before rotato
HIERARCH ESO OCS ARM4 NOTUSED= 'Coll. ' / Reason why arm was not used
HIERARCH ESO OCS ARM14 NAME = '
' / Target name hosted by arm i
HIERARCH ESO OCS ARM14 ORIGARM=
12 / Original arm number before rotato
HIERARCH ESO OCS ARM14 NOTUSED= 'NotInPAF/Locked' / Reason why arm was not used
We can see here, that during rotator optimization an offset of 30.0 deg was calculated
(OCS.ROT.OFFSET), i.e. each target was shifted to the next arm in the same layer. Obviously,
a rotator angle of 0 was defined in the KARMA set up file, since the angle sent to the TCS
(OCS.ROT.OFFANGLE) is identical with the rotator optimization offset.
The following lines display the fits header information for three different arms (3, 4, and 14):
1
The real rotator angle, which is sent to the TCS, is given by the keyword OCS.ROT.OFFANGLE and is
the sum of the rotator angle defined in the PAF file and OCS.ROT.OFFSET.
60 of 61
User Manual
Doc No:
Vers:
Category
Doc Type:
State:
Author:
Date:
VLT-MAN-KMO-146603001
6.0
Manual
Word
Issued
M. Cirasuolo, R Sharples
30 June 2013
•
Arm3 was used during the observation - the OCS.ARM3.NOTUSED keyword is not
present; the arm holds the target 328-007849, which was assigned in the PAF-file to
arm1, as can be seen from the OCS.ARM3.ORIGARM keyword.
•
Arm4 was not used during the observation - the OCS.ARM4.NOTUSED keyword is
present and tells us that the arm would have collided if it had moved to its position. The
target which was assigned to this arm (but could not be observed), was assigned in the
KARMA set up file to arm2 (OCS.ARM4.ORIGARM)
•
ARM14 was again not used during the observation – the OCS.ARM14.NOTUSED is
present and tells us the reasons for this:
o There was no target assigned in the PAF file to the original arm (“NotInPAF”).
o The arm is locked and hence cannot be used for an observation (“Locked”).
The corresponding original arm (12) is again given by the OCS.ARM14.ORIGARM
keyword.
The following reasons for an arm not to be used in an observation can appear (in every
combination) as value of OCS.ARMi.NOTUSED:
Acronym
NotInPaf
Locked
Coll.
BrghObj.
Ecl.
Spectr.
Cal.
LimitSw.
Meaning
No target was assigned in KARMA to the original arm.
The arm is locked.
The arm would collide if going to its target position.
The arm would hit a bright object (this should never occur, see above).
The arm is eclipsed.
The spectrograph belonging to the arm is not useable.
The arm is not used during calibration.2
The arm would run into a limit switch.
2
This is a special case which can only occur during the creation of the lookup tables ATC and has no
meaning for the normal observer/operator.
61 of 61
User Manual