1
Preface
RaceTrak
Race Management Software
User's Manual
Now in its fourth major release, RaceTrak continues to provide powerful yet easy-to-use race management
functionality. RaceTrak would not be possible without the help of many individuals. In particular, I would like to
thank my wife Carol, who is the world's best wife, mother, and friend, and whose unflagging support, good
humor, advice, patience, patience, and patience continues to make this software possible.
I would also like to thank the Tom Murphy (Fort Myers Track Club), Vince Veltre and Deborah Schwartz (MidHudson Road Runners Club), Brett Pfleiger (York Road Runners), Peg Griffin (Gulf Winds Track Club), and
Kenny Auyer (Auyer Race Timing) for their valuable feedback in beta testing the RaceTrak 6 release.
And finally, a huge thanks to all RaceTrak users whose advice, comments, and recommendations are incorporated
in this version and without whom RaceTrak would not be possible.
RACETRAK®
INFORMATION
FORUM
RaceTrak Race Management Software 2013 by Information Forum. All rights reserved.
RaceTrak Licensing Agreement
Thank you for purchasing the RaceTrak Race Management Software product. This feature-laden product provides an easy to
use, yet powerful method to register runners, process results, and report race activities. Every attempt has been made to
simplify your race management process.
Please read carefully before installing RaceTrak Software.
THIS IS AN AGREEMENT BETWEEN YOU AND INFORMATION FORUM, LLC. PLEASE READ THE ENTIRE
LICENSING SECTION IN ITS ENTIRETY. IF YOU DO NOT AGREE WITH THE FOLLOWING TERMS AND
CONDITIONS, PROMPTLY RETURN THE ORIGINAL MEDIA AND ALL ACCOMPANYING MATERIALS TO THE
PLACE FROM WHICH YOU OBTAINED THEM FOR A FULL REFUND.
License: Information Forum grants you a non-exclusive license to load and use the software on a single designated computer
or networked computer system. The RaceTrak Program File (RaceTrak_06.mde) software may be installed and run on all
machines in the network, provided that the RaceTrak Data File (RaceTrak_06_Data.mdb) is shared and pointed to by
computers on the network.
Other Restrictions: You may not rent or lease the software, but you may transfer your rights under the Agreement on a
permanent basis provided that you transfer this license agreement, the software, and all accompanying written materials and
retain no copies, and that the recipient agrees to these terms. You may not modify, adapt, translate, reverse-code, decompile,
nor disassemble the software or make attempts to discover the source code of the software.
This agreement constitutes all agreements between Information Forum and you, and supersedes all prior agreements between
Information Forum and you concerning the RaceTrak product.
Term: This License is in effect until terminated. You may terminate it at any time by uninstalling and destroying the software
and all copies you have made.
Limited Warranty: INFORMATION FORUM WARRANTS THAT THE SOFTWARE WILL PERFORM
SUBSTANTIALLY ACCORDING TO THE ACCOMPANYING WRITTEN MATERIALS FOR 90 DAYS FROM THE
DATE OF ORIGINAL PURCHASE. INFORMATION ALSO WARRANTS THAT THE MEDIA ON WHICH THE
SOFTWARE IS PROVIDED ARE FREE FROM DEFECTS AND WORKMANSHIP, UNDER NORMAL USE FOR 180
DAYS FROM THE DATE OF ORIGINAL PURCHASE.
Information Forum's entire liability, and your exclusive remedy, shall be, at Information Forum's option, either 1) a return of
the full price paid or 2) repair or the replacement (at Information Forum's discretion) of RaceTrak software.
INFORMATION FORUM DISCLAIMS ALL OTHER WARRANTIES, EITHER EXPRESSED OR IMPLIED
(INCLUDING WITHOUT LIMITATION, IMPLIED WARRANTIES OF MERCHANTABILITY AND FITNESS FOR A
PARTICULAR PURPOSE), CONCERNING THIS SOFTWARE AND ITS ACCOMPANYING WRITTEN MATERIALS.
Because some states do not allow limitations on duration of an implied warranty, the above limitation may not apply to you.
This limited warranty gives you specific legal rights. You may have others that vary by state.
UNDER NO CIRCUMSTANCES SHALL INFORMATION FORUM OR ITS SUPPLIERS BE LIABLE FOR ANY
DAMAGES WHATSOEVER (INCLUDING, BUT NOT LIMITED TO, DAMAGES FOR LOSS OF PROFITS, LOSS OF
TIME, LOSS OF INFORMATION, OR ANY OTHER TYPE OF LOSS) ARISING FROM THE USE OF THIS PRODUCT,
EVEN IF INFORMATION FORUM HAS BEEN ADVISED OF THE POSSIBILITY OF SUCH DAMAGES. Because
some states do not allow limitations on duration of an implied warranty, the above limitation may not apply to you. This
limited warranty gives you specific legal rights. You may have others that vary by state.
In developing RaceTrak, Information Forum has attempted to offer the most current, correct, and functioning program
possible. However, errors can occur. Therefore, Information Forum does not warrant that RaceTrak is free from bugs, errors,
or other program limitations.
Information Forum - 8577 Dark Hawk Circle - Columbia, MD 21045-5614 - Copyright 2013
RaceTrak Race Management Software and accompanying documentation are owned by Information Forum and are protected
by United States copyright laws and international treaty provisions. There is no transfer to you of any title of ownership of
the software. You must treat the software and documentation like any other copyrighted materials (e.g., books, magazines),
except that you may make a copy of the software for backup purposes. Copies of the User's Manual may be made for training
purposes or for each user in a network environment; however, these copies must be collected and kept together after their use.
Avery® is a registered trademark of Avery, Inc.
CC737 and CC5000 are trademarks of Chronomix Corporation.
ii
ChampionChip is a registered trademark of ChampionChip International.
ChronoTrack, B-Tag, D-Tag, and D-Tag Interrogator are trademarks of ChronoTrack Systems, Inc.
Jaguar Timing System is a trademark of Innovative Timing Systems, LLC
Microsoft®, Windows®, and Microsoft Access® are registered trademarks of Microsoft, Inc.
PocketTimer and RaceBase are trademarks of Stevens Creek Software.
RFID Race Timing System is a trademark of RFID Race Timing, Inc.
Rivers Edge® is a registered trademark of Rivers Edge, Inc.
Runner's World® is a registered trademark of Rodale Press, Inc.
Taz Information Services® is a trademark of Taz Information Services, Inc.
Time Machine is a trademark of Flying Feet Computers, Inc.
Sprint8 is a trademark of TimeTech USA.
Winning Time Chip is a trademark of Winning Time Chip.
iii
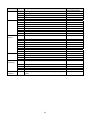
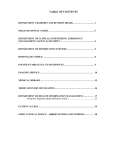
Table of Contents
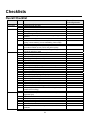
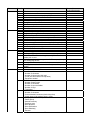
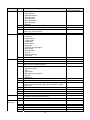
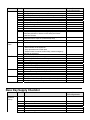
Preface .................................................................................................................................................................. i RaceTrak Licensing Agreement .......................................................................................................................... ii Introduction ......................................................................................................................................................... 1 What is RaceTrak? ......................................................................................................................................... 1 What's New in RaceTrak ................................................................................................................................ 1 Overview and Features ................................................................................................................................... 2 Conventions Used in this Documentation ...................................................................................................... 2 System Requirements ..................................................................................................................................... 5 RaceTrak Files ................................................................................................................................................ 5 Installation ........................................................................................................................................................... 7 Installation Overview ..................................................................................................................................... 7 Installing RaceTrak ........................................................................................................................................ 7 Migrating RaceTrak 5 Data to RaceTrak 6 .................................................................................................... 7 Rules of the Road ................................................................................................................................................ 8 RaceTrak Rules .............................................................................................................................................. 8 Quick Start ........................................................................................................................................................... 9 Quickly Set Up and Manage Races ................................................................................................................ 9 RaceTrak Menu ................................................................................................................................................. 10 Overview of RaceTrak Main Modules ......................................................................................................... 10 RaceTrak Menu Screen ................................................................................................................................ 11 Race Management ............................................................................................................................................. 14 Race Management Overview ....................................................................................................................... 14 Race Management List Screen ..................................................................................................................... 14 Race Management (to Add a New Race) Screen ......................................................................................... 14 Race Management (to Edit an Existing Race) Screen .................................................................................. 17 Awards Tab .................................................................................................................................................. 18 Award Generation Screen ............................................................................................................................ 21 Bibs Tab ....................................................................................................................................................... 23 Bib Generation Screen.................................................................................................................................. 27 Batch Edit Bibs Screen ................................................................................................................................. 30 Chip Management Tab ................................................................................................................................. 32 Batch Add Chips Screen............................................................................................................................... 34 Manually Add a Transponder to Bib Screen ................................................................................................ 35 Chip Return Tab ........................................................................................................................................... 36 Divisions Tab ............................................................................................................................................... 38 Fees Tab ....................................................................................................................................................... 39 Preferences Tab ............................................................................................................................................ 40 Customize Registration Screen..................................................................................................................... 41 Random Prizes Tab ...................................................................................................................................... 43 Registrants Tab/Screen ................................................................................................................................. 44 Registrants (Club Membership Race Mode) Tab/Screen ............................................................................. 46 Mailings Screen ............................................................................................................................................ 49 Race Series Tab ............................................................................................................................................ 51 Race Series Awards Screen .......................................................................................................................... 53 Race Series Awards Generate Screen........................................................................................................... 55 Race Series Team Slot List Screen ............................................................................................................... 56 Race Series Results - Series Team Actuals for Race Tab ............................................................................ 57 Race Series Results - Series Team Slots for Race Tab................................................................................. 59 Race Series Results - Series Awards for Race Tab ...................................................................................... 60 Race Series Results - Series Award Winners for Race Tab ......................................................................... 62 Race Special Categories Tab ........................................................................................................................ 63 Race Specials Tab ........................................................................................................................................ 65 Race Splits/Legs Tab .................................................................................................................................... 66 Race Team Categories Tab ........................................................................................................................... 67 Race Teams Tab ........................................................................................................................................... 70 Waves Tab .................................................................................................................................................... 73 Wave Generation Screen .............................................................................................................................. 75 Registration ....................................................................................................................................................... 77 Registration Overview .................................................................................................................................. 77 Race Registration List Screen ...................................................................................................................... 77 Select Runner for Registration Screen ......................................................................................................... 78 Registration Screen....................................................................................................................................... 80 Registration (Add New Runner) Screen ....................................................................................................... 80 Registration (Add New Registration) Screen ............................................................................................... 84 Registration (Edit Registration) Screen ........................................................................................................ 89 Registration (Fees Tab) Screen .................................................................................................................... 91 Registration (Results Tab) Screen ................................................................................................................ 92 Registration (Specials Tab) Screen .............................................................................................................. 94 Registration (Race Chips Tab) Screen ......................................................................................................... 95 Results Processing ............................................................................................................................................. 97 Results Processing Overview ....................................................................................................................... 97 Race List (for Results Processing) Screen.................................................................................................... 98 Transmit Data Screen ................................................................................................................................. 100 Time Transmit (Batch Mode) Screen ......................................................................................................... 101 Time Transmit (Live Mode) Screen ........................................................................................................... 102 Communications Settings Screen ............................................................................................................... 104 RaceTrak Stopwatch Screen ....................................................................................................................... 105 Timing Device List Screen ......................................................................................................................... 106 Scan Bibs Screen ........................................................................................................................................ 107 Results Reconciliation Screen .................................................................................................................... 110 Time Entry Screen (Manual Time Entry Mode) ........................................................................................ 117 Time Entry Screen (Interpolate) ................................................................................................................. 118 Race Results Management Screen.............................................................................................................. 119 Offset Race Times Screen .......................................................................................................................... 121 Award Assignment Screen ......................................................................................................................... 122 Runner Management ....................................................................................................................................... 124 Runner Management Overview .................................................................................................................. 124 Runner List Screen ..................................................................................................................................... 124 Runner Screen ............................................................................................................................................ 127 Combine Persons Screen ............................................................................................................................ 131 Runner Series Screen.................................................................................................................................. 133 Utilities ............................................................................................................................................................ 135 Utility List Screen ...................................................................................................................................... 135 Clubs Screen ............................................................................................................................................... 140 Club Screen ................................................................................................................................................ 141 Series Overview ......................................................................................................................................... 141 Series List Screen ....................................................................................................................................... 142 Series Screen Tab ....................................................................................................................................... 143 Series Team Categories Tab ....................................................................................................................... 145 Series Teams Tab ....................................................................................................................................... 146 Series Reports Tab...................................................................................................................................... 147 Reports/Labels Overview ................................................................................................................................ 150 Reports/Labels ................................................................................................................................................. 151 Race Report Select List Screen .................................................................................................................. 151 Race Report Screen .................................................................................................................................... 152 Race Report Settings Screen ...................................................................................................................... 159 Custom Reports Screen .............................................................................................................................. 161 Custom Output Screen................................................................................................................................ 163 Registrant Import ............................................................................................................................................. 165 Data Import Screen ..................................................................................................................................... 165 Networking RaceTrak ..................................................................................................................................... 169 Networking RaceTrak ................................................................................................................................ 169 Windows Performance Tuning ........................................................................................................................ 171 Performance Tuning ................................................................................................................................... 171 Race Management 101 .................................................................................................................................... 172 Overview .................................................................................................................................................... 172 Key Roles and High-Level Responsibilities............................................................................................... 172 Race Scoring Detailed Responsibilities...................................................................................................... 174 Finish Line Management ............................................................................................................................ 178 Checklists ........................................................................................................................................................ 181 Overall Checklist ........................................................................................................................................ 181 Race Day Supply Checklist ........................................................................................................................ 184 Time Machine Data Transmit .......................................................................................................................... 186 Time Machine Data Transmission Steps .................................................................................................... 186 RaceTrak Administration ................................................................................................................................ 187 RaceTrak Administration ........................................................................................................................... 187 Troubleshooting............................................................................................................................................... 188 RaceTrak Primer .............................................................................................................................................. 192 Introduction
What is RaceTrak?
One runner can run many races and one race can have many runners.
Since 1996, the underlying premise of RaceTrak Management Software is to provide total race management
from race inception to well beyond its conclusion. Because all races, runners and results are retained in a single
database, historical data can be accessed at the touch of a button, providing valuable tools in race planning,
marketing, and post-race reporting.
Although RaceTrak is extremely easy to learn and use, it is also a very powerful product with an extraordinary
number of features that contribute to speedy and accurate race management. RaceTrak also provides full network
capability, a host of administrative tools, and many other powerful features.
What's New in RaceTrak
RaceTrak 6 introduces an extensive set of flexibility and customization features, while retaining the hallmarks of
earlier versions of RaceTrak:
Ultimate ease-of-use
Powerful relational database stores all runners, races, and results in a single database
Fast and accurate race scoring
And extensive customization, configuration, and flexibility is now offered in RaceTrak 6
While RaceTrak 6 has the same look and feel as earlier versions, RaceTrak 6 is a complete revision of RaceTrak
5a with a 100% rewrite of the underlying programming code and utilizes Microsoft Access 2010. Existing users
will be comfortable with the new interface while new users will find RaceTrak very easy to learn and master.
RaceTrak 6 includes hundreds of changes over previous versions and a summary of some of the major new
RaceTrak features is provided below. RaceTrak users can now:
Quickly customize registration screens through an easy-to-use interface
Utilize bib is tag/chip functionality to more easily setup and score transponder races.
Setup race preferences to allow expanded control over results processing
Save and reuse previous import mappings when importing registrant data
Re-assign a different a bib to a registered runner (without the need to unregister the runner)
Use the new RaceTrak Stopwatch capability that allows PC to act as a timing device
Track club memberships with greatly improved tools and features
Move directly from reconciliation through results processing and award assignment
Time races longer than 24 hours
Specify how times are loaded (faster over slower, slower over faster, overwrite all)
Customize reports, labels, and queries
Output report data to many different file formats, including PDF
Quickly identify and remove duplicate runners through a cleanup wizard
And More! - Numerous other improvements are available in RaceTrak, and many more are planned. Each
section of this User’s Manual includes a summary of changes for a specific aspect of RaceTrak.
The following features available in earlier versions of RaceTrak are no longer available:
MultiTimer PC timer has been replaced by RaceTrak Stopwatch
Custom registration fields screen, which has been replaced by three customizable text fields each for
runners and registrants.
Overview and Features
Road racing is a popular sport in America attracting hundreds of thousands of runners annually. Advances in
training techniques, nutrition, and equipment have resulted in dramatic reductions to world records. Developed by
runners for runners, the RaceTrak race management program is very easy to use, powerful, and highly
configurable. RaceTrak provides for the fast, accurate, and efficient processing of race-related data for a wide
variety of races.
In addition to the new RaceTrak features in the preceding section, key features of RaceTrak include:
Numerous drop-down lists avoid lengthy typing and allow selection of coded values
Automatic age calculation
Complete team processing includes gender-based scorers and displacers
Team processing with options to include or exclude incomplete teams
File generation to multiple file formats
Race logo display on reports and screens
Complete runner, race, and results histories maintained in a single database
Single database saves time, money, and duplication
Postal Code builder
Bib reservation and assignment by age and/or sex
Bar code label production
Extensive mailing and email outputs
Sophisticated awards, including award prioritization
Series and series point standings tracking
RaceTrak directly communicates with many timing devices including Flying Feet’s Time Machine I and II,
Summit Systems SRT500 and SRT1000, Chronomix 737, TimeTech Sprint 8, and others.
Ability to import time data from files created from chip technologies including ChronoTrack, RFID Race
Timing, My Laps, ChampionChip, Winning Time Chip, Jaguar, Ipico, and others.
Many tools to mine past data for analysis, mailings, and planning
Age grade results
And More!
Conventions Used in this Documentation
This document assumes a minimal knowledge of the Windows operating system and utilizes the following
conventions.
Keyboard
When a reference is made to a specific key on the keyboard, the key name is enclosed in brackets to indicate that
it is a key. For example, [ENTER] is the symbol for the enter key; likewise, [F4] is the symbol for function key 4.
A plus sign (+) is used to indicate when two keys are pressed simultaneously.
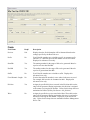
This document refers to keyboard function keys as follows:
[ARROW UP]
A cursor positioning key which moves cursor to the next available
field or record. Note: This key has an "up arrow" symbol.
2
[ARROW DOWN]
A cursor positioning key which moves cursor to the previous available
field or record. Note: This key has a "down arrow" symbol.
[ALT]
Use in conjunction with other keys to provide shortcuts to various
actions. For example, [ALT]+C closes many RaceTrak windows in the
same manner as using the CLOSE button.
[CTRL]
Use in conjunction with other keys to provide shortcuts to various
actions. For example, [CTRL]+C copies selected data to the clipboard.
[ENTER]
The key which initiates an action.
[ESC]
The cancel key. If data has not been saved, data will revert to previous
unchanged state.
[PAGE DOWN]
A scrolling key which refreshes the screen to display the previous set
of data.
[PAGE UP]
A scrolling key which refreshes the screen to display the next set of
data.
[TAB]
A cursor positioning key which moves cursor to the next available
field or record.
[F1]
Invokes online help system on RaceTrak screens.
[CTRL] + P
Invokes printer dialogue box to allow printing of reports while in
preview mode.
Windows Conventions
RaceTrak was developed for the Microsoft Windows operating systems and environments. RaceTrak is a
Windows-Compliant product, utilizing standard Windows features. A summary of the features most commonly
used is presented below.
Drop-downs are used to pick from valid values stored in the database. For example, a drop-down for zip codes
allows the user to view and select from a list of valid zip codes. Drop-downs are opened by clicking the down
arrow next to the drop-down or by positioning the cursor in the drop-down and pressing [F4]. Users can select
from drop-down values by typing the beginning letters of the desired value or by using the keyboard down arrow.
Command buttons are user-selectable buttons that are displayed on RaceTrak forms. Invoke a Command Button
by clicking the button or using short cut keys (for example [ALT] + the underlined letter). When referring to
command buttons (as well as radio buttons), this document uses a capitalized Arial font convention as follows:
ADD NEW.
3
Hint: When a command button has "focus" (i.e. it is highlighted), pressing [ENTER] serves the same
purpose as a mouse click and invokes the command button.
Hint: When a command button as a underline, the command can be invoked by pressing
[ALT]+underlined letter, In addition, in most cases, users can simply press [ENTER] to invoke the OK
command button.
Cursor indicates the current location where typing or mouse clicking can occur. The cursor position is indicated
by a blinking vertical line.
allow selection of one value from two or more selections. Only one
Radio buttons
button can be selected (indicated by a filled-in circle) at a time. When referring to radio buttons (as well as
command buttons), this document uses an all caps, Arial font convention as follows: NAME.
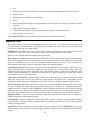
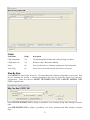
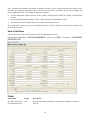
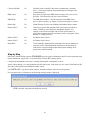
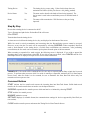
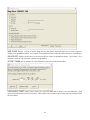
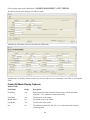
Record selectors are square controls just to the left of data and provide a means for selecting a desired record.
Selection is used in conjunction with displaying, deleting, and copying the selected record. In the screen shot
below, three record selectors are displayed, where the first record selector includes a triangle, indicating that data
in this row has been selected.
Record selector selected mode indicator. As shown below, the white triangle indicates that the entire row has
been selected (by clicking the record selector). Record selectors can generally be used to delete unwanted data,
by clicking the record selector and depressing DELETE on your keyboard.
Record selector edit mode indicator. As shown below, the pencil icon indicates that the record is being edited
but has not been saved. The row entry with an asterisk indicates that a new record can be added here.
allow the user to move up/down or left/right through a screen when the
Scroll bars
complete screen or its contents will not fit on a single screen. Movement is accomplished by clicking on the arrow
buttons or dragging the box between the arrows.
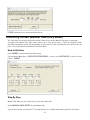
Navigation Buttons
utilize VCR-style controls to move quickly
between records. Clicking a single triangle moves one record at a time. Clicking a "rewind" or "fast forward"
control (triangle and vertical line) moves to either the first or last record in a list. Move to a specific position in a
list by typing the desired position number and pressing [ENTER].
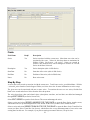
Status Text Bars
are located at the bottom of RaceTrak screens and provide
on-screen descriptions of all RaceTrak fields and command buttons.
Cursor Movement
Typically, the instructions in this manual indicate the use of [TAB] to move the cursor from one field to another.
However, the arrow keys and mouse can also be used to move from one field to the next.
4
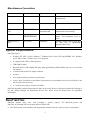
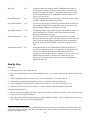
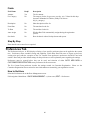
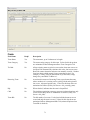
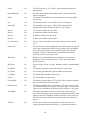
Miscellaneous Conventions
Convention
Example
Applies to
Action Performed
Plus sign
+
Keyboard key
Combination of keystrokes pressed
simultaneously.
Italics
your name
Instructions
Type the italicized information.
Bold, italics, often all IMPORTANT!
caps
Rules, warnings, and Pay careful attention to
important points
important notes and warnings.
these
Navigation shortcut
Main Menu >
REGISTRATION
Instructions
Describes the screens, command
buttons, and (optionally) items to
select.
Italicized New in
RT6.
New in RT6.
Instructions
Describes features and/or items that
are either new or significantly
changed in RaceTrak 6.
System Requirements
RaceTrak requires:
Windows XP (SP3) (32-bit), Windows 7, Windows Server 2003 (SP2 and MSXML 6.0), Windows
Server 2008, or later. Windows Vista is not supported.
A computer with 2 GHz or faster processor
2GB RAM or higher
Hard disk with 3.0 GB available disk space (plus approximately 1MB available space for every race with
500 runners)
A monitor with 1024x576 or higher resolution
A mouse
Laser printers and ink-jet printers to print reports
Avery style 5160 labels to print labels; laser printers are recommended for bar code bib labels (as the
ink does not smear when wet).
A 3 of 9 bar code reader to scan bar code labels.
RaceTrak optionally produces Postnet barcode fonts for zip codes. However, this feature requires the licensing of
the font software through Taz Information Services, Inc. Please review the Read_Taz.txt for registration
information.
RaceTrak Files
RaceTrak includes many files, each providing a specific
RaceTrak_06_Data.mdb files are the heart and soul of RaceTrak.
purpose.
The
RaceTrak_06.mde
RaceTrak_06.mde is the main RaceTrak program that includes all screens, queries, reports, and programs.
5
and
RaceTrak_06_Data.mdb contains all your data (all races, all runners, and all results are located in this file).
Backup this file on a frequent and regular basis.
Other RaceTrak files are listed below.
RaceTrak_06_Data_Sample.mdb - exact copy of shipped RaceTrak_06_Data.mdb file containing sample data
RaceTrak_06_Migration.mdb - for RaceTrak 5/5a users upgrading to RaceTrak 6; converts users’ data into
RaceTrak 6 data formats.
Bar Code fonts - licensed c39ei.ttf and c39fi.ttf bar code fonts shipped with RaceTrak.
PostNet Zip Code Font - shareware uspsttf.ttf font that must be registered after 30 days of use
Read_Taz.txt - licensing information file for use of PostNet Zip Code Font (uspsttf.ttf)
Sample timing files
ChronoTrack_Master_Database.mdb and ChronoStore.dll used to pull Chronotrack controller data into
RaceTrak
RaceTrak_06_User_Manual.pdf - the RaceTrak User's Manual in PDF format ***
RaceTrak_06.hlp - RaceTrak help system available on most screens via [F1].
6
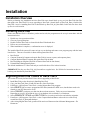
Installation
Installation Overview
Before performing any installation activities, RaceTrak users should back up any previous RaceTrak data files
that might exist (RaceTrak 5/5a users upgrading to RaceTrak 6 should back up RaceTrak_Data_05.mdb while
RaceTrak 6 users re-installing RaceTrak 6 should back up RaceTrak_06_Data.mdb). Label and store these back
up files in a safe location.
Installing RaceTrak
Please note that RaceTrak is a Windows product and as such, the programs must be set up in accordance with the
instructions below.
1.
2.
3.
4.
5.
Disable any virus-protection utilities.
Close any open applications.
Double-click the RaceTrak.exe located in the RaceTrak thumb drive.
Follow on-screen instructions.
When installation is complete, a confirmation screen is displayed.
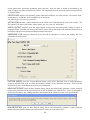
The installed RaceTrak system will create an icon on your desktop and create a new program group with the items
listed below. These are accessible via Start>All Programs>RaceTrak
RaceTrak 6.0
Compact Frontend (Compacts and repairs RaceTrak 06 screens, reports, and temporary data)
Compact Backend Data (Compacts and repairs RaceTrak 06 data)
RaceTrak Migrate (Migrates RaceTrak 05 data to RaceTrak 06 data format)
Uninstall Race Management Software
The default installation is C:\RaceTrak and you can find the above files in these locations.
IMPORTANT! Backup your RaceTrak_06_Data.mdb on a regular basis. See Utilities for instruction on how to
back up your data directly from RaceTrak.
Migrating RaceTrak 5 Data to RaceTrak 6
This section is for only for RaceTrak 5 Users who are upgrading to RaceTrak 6.
1.
2.
3.
4.
5.
6.
7.
8.
Install RaceTrak per the directions in Installing RaceTrak.
Copy your RaceTrak_Data_05.mdb file into the c:\RaceTrak folder.
From Start > All Programs > RaceTrak > run the Migrate RaceTrak program.
Select DELETE data to remove prepopulated RT6 data (intended for NEW users, but this data needs to be
cleared so your RT5 data can be used).
Select CONVERT to migrate your data into the new data structures. Follow on-screen instructions.
Depending on your PC speed and the size of your database, this could take 5 to 20 minutes.
Select GENERATE TOTALS and VIEW TOTALS to see total records before and after the migration.
From Start > All Programs > RaceTrak > select Compact Backend Data to reduce the size of the newly
created RaceTrak_06_Data.mdb database.
After exiting Migrate RaceTrak, open RaceTrak and reset Hometown data in Runner Management > Fix
Hometown.
7
Rules of the Road
RaceTrak Rules
RaceTrak incorporates several rules to be considered while managing and setting up races:
Race Management
A race must be set up before any subsequent race processing can be performed.
Race bib numbers must be generated and available (in Race Management>Bibs) for a race before registration
or registrant import can occur.
If the race has awards and/or teams, awards and teams (and team categories) must be set up (in Race
Management). Additional generic award categories can be set up in Utilities.
Specify a Timing Method (in the main Race Management screen) to expedite race scoring.
Awards
Runners must have an age and sex (M or F) to qualify for age and/or gender based awards.
Age groups awards should be set up to start at age 1 (because RaceTrak defaults runners not providing an age
or birthdate to 0).
Awards are distributed within Division. Therefore, a person registered in the Run Division can only qualify
for Run division awards while a person registered in the Walk division can only qualify for Walk Division
awards.
Awards are based on Award Value, where lower is better, so be sure that Overall Awards have the lower
values than Master/Grandmaster awards, which should have lower values than age group awards. Renumber
as necessary.
Registration
All registrants must receive a single, unique bib number.
When a date of birth or age is not provided, the runner is assigned age 0.
Runners cannot have future birthdates and cannot be more than 100 years old.
While a runner can be registered to many different races at the same time, a runner can only be registered
once in a given race (e.g, John Smith cannot be registered twice in the 2012 Main Street Run).
Teams
Every team must be assigned a team category.
Team results are calculated within team category (for example, team scoring is separately calculated for open
men, open women, and coed).
A runner can only be on one team per race.
A team can be assigned a team bib (via advanced features -- for purposes of relays where team members use
same bib or chip).
Waves
For races with waves, it is recommended to set up waves before generating bibs and then to associate the
waves with bibs as part of the bib generation process.
Results Processing
Live mode data transfer from external timing devices should only be performed from one computer.
RaceTrak stores multiple times for each runner: the official finish (gun) time, an adjustment time (e.g., a chip
start time), an adjusted (chip) time (the official time minus the adjustment time), plus up to 9998 split times.
In addition, times can be associated with waves; these times are either added or subtracted to calculate
adjusted times for each runner.
Work Arounds
By cloning races and changing various settings, alternate processing can be performed to bypass some of the
above rules. Please contact us for your race needs to determine how to configure RaceTrak to meet your
specific needs.
8
Quick Start
Quickly Set Up and Manage Races
After installing the RaceTrak software and its components, you are ready to begin setting up and managing races.
Before conducting a live race, please set up test races and become comfortable with RaceTrak and its features.
Create a test database.
We recommend that you work with a test database by following the steps below:
Go to the folder where RaceTrak_06_Data.mdb is located (by default, this file is installed to c:\RaceTrak.
Make a copy of the RaceTrak_06_Data.mdb file and name it RaceTrak_06_Data.mdb_ORIGINAL.
You can test RaceTrak without later having to clean up the database. After testing is completed, delete the
RaceTrak_06_Data.mdb file and rename the RaceTrak_06_Data.mdb_ORIGINAL copy back to the original name
(RaceTrak_06_Data.mdb).
To score a race using RaceTrak, the following major activities take place.
Set up a new race. From Race Management, create a new race (or clone an existing race) and set up Bibs. As
necessary, create Awards, Team Categories and Teams, and other race related items.
Register your runners. Manually enter (via Registration) or import runners (with Registrant Import) into your
race.
Generate Registration Materials. Go to Reports/Labels to find reports and queries of registered runners and/or
print labels to affix to runners’ bibs/packets.
Process results. Load timing data, calculate results, and assign awards. Note: you can quickly set up a dummy
chute in Results Processing>Reconcile> Advanced Display Options - Add New Chute; add a new chute, select the
chute, and insert times (and chips) into that chute and subsequently load/merge these times.
Back up your data. After every RaceTrak session, back up your RaceTrak_06_Data.mdb file. RaceTrak Utilities
provides a way to quickly back up your data or you can manually make your own back ups: by default, the file is
installed in the c:\RaceTrak folder and you can go to this folder and copy this file to a compressed file format.
Please refer to the RaceTrak Primer at the end of this document for specific instruction on setting up a simple test
race.
9
RaceTrak Menu
Overview of RaceTrak Main Modules
RaceTrak is organized into seven main modules available from the RaceTrak Menu Screen. These modules are
briefly discussed below.
RACE MANAGEMENT allows the creation and management of race and race-related information (bibs,
awards, team categories, teams, waves, and series). Key features include:
Reserve and/or assign bibs by age and sex.
Set up bib numbers for specific divisions, waves, and/or hat colors.
Prioritize all awards at the individual award level.
Specify whether duplicate awards are allowed.
Specify the scoring basis (actual finish time or adjusted time) for award categories.
Specify any size and/or composition of team categories and associated teams.
Specify the scoring basis (actual finish time or adjusted time) for team categories.
Fully customizable team categories accommodate any combination of scorers and displacers for male, female,
and coed teams.
Set up one or many waves for your race and specify the time adjustment for each wave.
Set up and assign special race categories (teacher, firefighter, etc.) for runners.
Set up scoring preferences and customize the registration screen for a given race.
Specify the timing method for a given race.
Special tools for races that are used to store club memberships.
REGISTRATION provides fast and accurate registration of runners. Because a database of all runners is
maintained, once a runner is in the database, very little if any new typing is required. Key features include:
Automatic age calculation.
Automatic determination of race shirt size based on runner's default shirt size.
Calculation of city and state from zip code.
Postal Code builder, once a postal/zip code is created, just enter that code.
Smart bib numbers, which allow bib number reservation and assignment by age and sex.
On registering a runner, the bib’s division, wave, and hat color are copied to the registration record.
On registering a runner, the default settings for the runner’s shirt size, grade, and club are copied to the
current registration data record.
RESULTS PROCESSING provides interfaces to electronic timing devices, import/conversion, reconciliation,
individual results processing, team results processing, and awards processing. Key features include:
Automatic calculation of team scorers and displacers for male, female, and coed teams.
Sophisticated reconciliation processes that allow the fast and accurate matching of bib scans to timing device
data.
Printing of race results at the touch of a button.
Complete team processing.
Automatic calculation of team scorers and displacers.
Team results processing by team category.
Unlimited number of teams and team categories.
Team results by points, total time, and/or average time.
RaceTrak directly communicates with many timing devices including Flying Feet’s Time Machine I and II,
Summit Systems SRT500 and SRT1000, Chronomix 737, TimeTech Sprint 8, and others.
10
Ability to import time data from files created from chip technologies including ChronoTrack, RFID Race
Timing, My Laps, ChampionChip, Winning Time Chip, Jaguar, Ipico, and others.
Ability to score teams within categories by either actual finish times or adjusted times.
Adjust times before or after loading the times into RaceTrak.
RUNNER MANAGEMENT allows the search, add, and update of runner data records. Key features include:
Complete runner racing history.
Club membership tracking and reporting.
Reports to print runner results and race histories.
Ability to search and sort runners by name, birthdate, zip code, and more.
Track runner mileage.
Runner defaults, which allow for default settings for club, grade, and shirt size.
Sophisticated tools to reconcile duplicate runners.
Manage key runner data from main list screen.
Tools to clean up your data (set various fields to upper case, lower case, title case; format phone numbers; or
standardize streets).
Tools to set up valid name and gender combinations whereby during the registration process, users are warned
if invalid name is detected (e.g., Susan is a Male).
UTILITIES allows for the management of system-wide supporting tables. In addition, Utilities includes features
to back up the RaceTrak data file and build a Satellite database (a subset of user-specified races that can be scored
on their own or used for archival purposes). At the time of writing this User’s Manual, the ability to import
Satellite data back into a master database is not available.
REPORTS/LABELS allows the preview and print of a wide variety of reports to any laser or inkjet printer.
Most reports can be highly customized by users. In addition, customizable queries are available to generate userspecified data in spreadsheet format. Most results reports can display results by either adjusted time or actual
finish time. Custom reports can be displayed via the Custom Reports drop-down. Highly customizable labels are
available for affixing to bibs and for mailings.
REGISTRANT IMPORT allows the import data from external sources via mapping of source data to RaceTrak
fields. Import mappings can be saved and reused. Error report provides details regarding import issues.
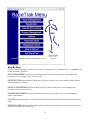
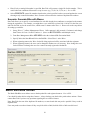
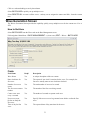
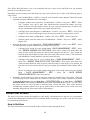
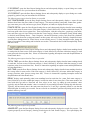
RaceTrak Menu Screen
The RaceTrak Menu provides access to all RaceTrak modules.
11
Step By Step
Select the desired activity by clicking on the button or pressing [ALT] + underlined letter or highlighting the
button and pressing [ENTER]:
RACE MANAGEMENT displays the Race Management List Screen, listing all races in the database and
providing access to configure, clone, or delete a race.
REGISTRATION displays the Race Registration List Screen, listing all races in the database and allowing the
manual registration of runners.
RESULTS PROCESSING displays the Race Results List Screen, listing all races in the database and
providing tools to score a given race.
RUNNER MANAGEMENT displays the Runner List Screen, which provides a way to view and manage
runners in the database.
UTILITIES displays the Utility List Screen, which allows users to backup RaceTrak and manage generic lookup
tables.
REPORTS/LABELS displays the Race Report Select List Screen, which allows users many report options for a
specific race or across one or more races.
12
REGISTRANT IMPORT displays the Data Import Screen, which allows users to import registrant data into
RaceTrak.
USER’S MANUAL displays the table of contents for the RaceTrak User’s Manual help file. Most screens
provide help via [F1].
EXIT RACETRAK exits RaceTrak.
13
Race Management
Race Management Overview
The Race Management module provides race creation and update. In addition, this module provides for the
management of race bibs, awards, team categories, teams, series, special registration categories, registered
runners, preferences, and other race configurations. The first screen displayed in Race Management is the Race
Management List Screen.
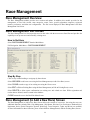
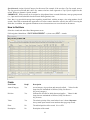
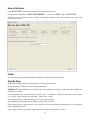
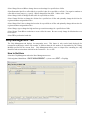
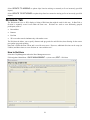
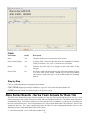
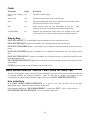
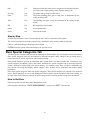
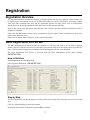
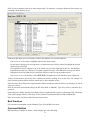
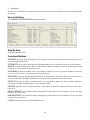
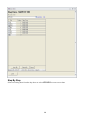
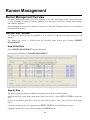
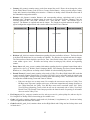
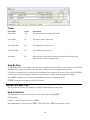
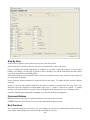
Race Management List Screen
The Race Management List Screen presents races in date order with the newest races listed first and provides the
capability to set up new races and/or modify existing races.
How to Get Here
Select RACE MANAGEMENT from the Main Menu.
Full Navigation: Main Menu > RACE MANAGEMENT
Step By Step
Click on any column heading to sort/group by that column.
Select ADD NEW to add a new race using the Race Management (to Add a New Race) screen.
Select CLONE to make a copy of an existing race using the Clone screen.
Select EDIT to Edit an Existing Race using the Race Management (to Edit an Existing Race) screen.
Select DELETE to delete (upon confirmation) an existing race and related race data. While registration and
results data are deleted, runners remain in the database.
CLOSE returns the user to the RaceTrak Menu Screen.
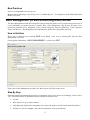
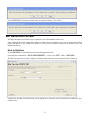
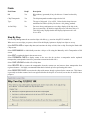
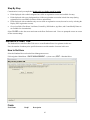
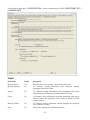
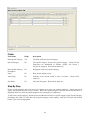
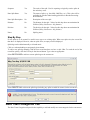
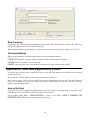
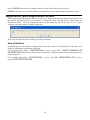
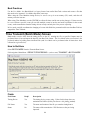
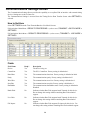
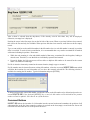
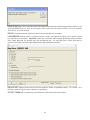
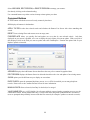
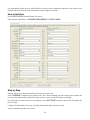
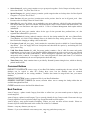
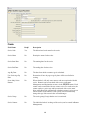
Race Management (to Add a New Race) Screen
The Race Management (to Add a New Race) Screen allows the creation of a new race. On saving the new race,
additional functions (Awards, Bibs, Chip Management, Chip Return, Divsions, Fees, Preferences, Random Prizes,
Registrants, Series, Special Categories, Specials, Splits/Legs, Team Categories, Teams, and Waves) are available;
for more information on these functions, please consult the Race Management (to Edit an Existing Race) Screen.
14
How to Get Here
Select ADD NEW from the Race Management List screen.
Full navigation: Main Menu > RACE MANAGEMENT > ADD NEW
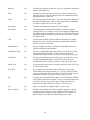
Fields
Field Name
Reqd?
Description
Race Name
Yes
The name of the race.
Race Date
Yes
The date of the race.
Start Time
No
The start time of the race; use military time or add p.m. to indicate
times after noon.
Race Description
Yes
A brief text description of the race.
Default Distance
No
Based on the Distance table to indicate the coded distance for the race.
Values for this drop-down are maintained in Utilities (Utility List
Screen > tbl_distance). Use this for single division races.
Abbrev
No
Abbreviation of the race.
Location
No
The location of the race.
State/Province
No
State or Province where the race is conducted. Values for this dropdown are maintained in Utilities (Utility List Screen >
tbl_state_province).
Country
No
Country where the race is conducted. Values for this drop-down are
maintained in Utilities (Utility List Screen > tbl_country).
Race Mode
No
Disabled and pre-set to Road Race. Reserved for future use.
15
Default Club
No
Default club for runners in this race. Used during registrant import to
set registrant’s club and also used for Membership Races. Values for
this drop-down are maintained in Utilities (Utility List Screen >
tbl_club).
Membership
Checkbox
No
Designates a race as a “Membership Race” and provides additional
capability to manage club memberships (see Registrants (Club
Membership Race Mode) tab/screen).
Timing Method
No
Designates how the race will be scored and is used as the default
scoring type throughout Results Processing. Values for this dropdown are maintained in Utilities (Utility List Screen >
tbl_timing_method). New in RT6.
Event Type
No
Based on data in Event Type table to indicate the event type (e.g., long
distance, ultra, short distance)
Chip Usage
No
Displayed for chip races only, designates what kind of chips are used
(race chips and/or runner-owned chips) and if multiple chips can be
used by a runner. New in RT6.
Hotline
No
Phone number for race information.
Fax
No
Fax number for the race.
Difficulty
No
A text description of the course difficulty.
Field Limit
No
The total number of entrants allowed.
Notes
No
Free-form field to type paragraph style notes regarding the race.
Certification No
No
USATF or other certification number.
Certification Date
No
Date of certification.
Cert Type
No
Type of certification - USATF, TAC, etc. Values for this drop-down
are maintained in Utilities (Utility List Screen >
tbl_certification_type).
Picture Block
No
Image field that stores various image formats (.bmp, .vsd) that will
appear on most reports for this race.
Show?
No
Hides race from all screens, except the Race Management List.
Sort Order
No
Allows users to sort how races are displayed in lists. By default, the
sort order is 0. Sort orders are in ascending order (low to high), so to
have a race show at the top of your list, set the sort order to -1.
Step By Step
Obtain the race information and
Enter race information into the appropriate RaceTrak fields.
The Race Name, Date, and Race Desc are required entries.
IMPORTANT! While not required, it is highly recommended that you specify a Timing Method from the
drop-down. For chip races, a Timing Method should always be specified.
A logo or picture can be added to the screen by double-clicking on the picture box and following the onscreen instructions.
Select SAVE to save the current record and displays the Race Management (to Edit an Existing Race) Screen.
Select CANCEL to return to the RaceTrak Menu Screen without saving the record.
16
Best Practices
Specify a Timing Method for all your races.
Manage club memberships by specifying a race as “membership race.” See Registrants (Club Membership Race
Mode) Tab/Screen.
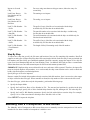
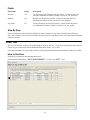
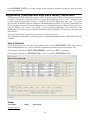
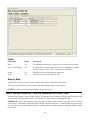
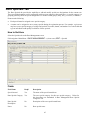
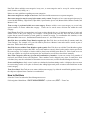
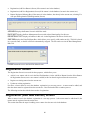
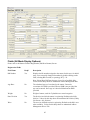
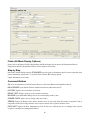
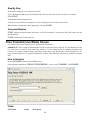
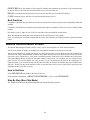
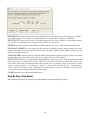
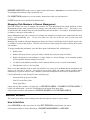
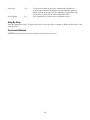
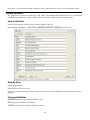
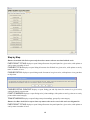
Race Management (to Edit an Existing Race) Screen
The Race Management (to Edit an Existing Race) Screen allows the update of race records and provides access to
several additional race-related functions (Awards, Bibs, Chip Management, Chip Return, Divisions, Fees,
Preferences, Random Prizes, Registrants, Series, Special Categories, Specials, Splits/Legs, Team Categories,
Teams, and Waves). Chip Management and Chip Return are displayed for transponder races only.
How to Get Here
This screen is displayed after selecting SAVE when adding a new race or selecting Edit from the Race
Management List screen.
Full navigation: Main Menu > RACE MANAGEMENT > (select a race) EDIT
Please refer to Race Management (to Add a New Race) Screen for Fields on this screen.
Step By Step
Determine which Race Management features are appropriate for this race and set up accordingly. Please refer to
“tab” sections that follow for instruction on how to utilize the features below.
Awards
Bibs (must be set up to register runners)
Chip Mgt (only displayed for transponder races whose chip numbers are different from the bib number)
Divisions (if you have multiple events, Divisions distances can be specified here)
17
Fees
Preferences (set up extended features for scoring and customizing the registration screen for this race)
Random Prizes
Registrants (view and update race registrants)
Series
Specials and Special Categories (set up and manage special categories for runners; for example, Teacher,
Top Cop)
Splits/Legs (set up splits for the race)
Teams and Team Categories (set up and manage team categories and associated teams)
Waves (setup waves for a race)
Select SAVE/CLOSE to save the current data and return to the RaceTrak Menu Screen.
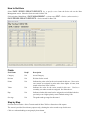
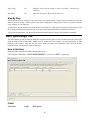
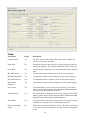
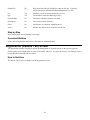
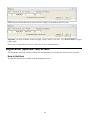
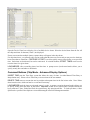
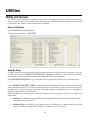
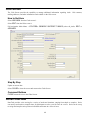
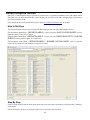
Awards Tab
The Awards Tab allows users to set up and manage awards for a given race. To perform awards processing, a pool
of awards must be created/generated. The Awards Tab lists awards set up for the current race and provides tools
to create new awards and edit existing awards.
IMPORTANT! When RaceTrak assigns award winners, awards are assigned in priority order where the lower
award value is better. So be sure to set up awards so that overall winners have lower award values.
Below are some guidelines and hints regarding award processing.
How Awards Are Assigned. When processing awards, RaceTrak first clears all award winners from each award.
Then RaceTrak starts with the first award (based on award value), and finds the first qualifier for the award and
assigns it. RaceTrak then moves to the next unassigned award and repeats the process. If the award does not
allow duplicates, RaceTrak excludes existing award winners from award assignment.
Award Value Priority. RaceTrak allows great precision in Award distribution. For example, a race may have an
award of $5,000 for the overall masters' woman, but only $1,000 for the overall woman's winner. Under this
situation, RaceTrak (at your option) could make the overall masters' woman as a higher priority than the overall
woman's winner and therefore give the higher paying award to its logical recipient. See Award Value Priority
Order below for how to set award priorities.
Award Value Priority Order. RaceTrak assigns award values in the order they are created, with the first award
getting the lowest (best) Award Value. Therefore, assign awards in the logical order of importance (overall
runners first, overall masters next, then age groups). If Award Values are incorrect, update the Award Values.
Start Age Group Awards at Age 1. RaceTrak assigns an age of 0 when individuals do not provide a date of birth
or an age. Therefore, the youngest age groups should be started at age 1 and not age 0. Overall and Open awards
should start at age 0. Masters Awards, Grandmaster Awards, and Senior awards start at 40, 50, and 60 years and
should end at 99 years. Such awards should be positioned (by award value) after Overall and Open awards, but
before Age Group Awards. Please see Award Value Priority above for adding more precision to these awards.
Duplicate Awards. At the race director's discretion, duplicate awards can be provided; however, RaceTrak''s
default setting does not allow duplicate awards.
Award Division. Awards are matched to the division in which the runner is registered, and awards are not allowed
between divisions. Therefore, a runner would not qualify for a walker award, and conversely, a walker would not
qualify for a runner award.
Award Basis. RaceTrak can process awards by guntime or by chip-adjusted time. IMPORTANT! To properly
calculate awards, all awards in a given Award Category MUST have the same award basis and the same duplicate
setting.
18
Special Award: Assign a Special Category for this award. For example, if the race has a Top Cop award, create a
Top Cop special record and add it here. Any runners who have been registered as Top Cops are eligible for this
award. Please see Scenario: Special Awards.
IMPORTANT! While awards can be assigned as chip adjusted time or actual finish time, non-age group awards
(i.e., Open and Overall) should be based on actual finish (guntime) time.
Note: there is a great divide among timers regarding Award Basis, with the stronger voice using guntimes for all
awards. RaceTrak recommends this approach as we believe runners should be scored in the order of crossing the
finish line; in addition, this approach eliminates errors when start times are not collected for all runners.
How to Get Here
Select the Awards tab on the Race Management screen.
Full navigation: Main Menu > RACE MANAGEMENT > (select a race) EDIT > Awards
Fields
Field Name
Reqd?
Description
Award Category
Yes
Award category is grayed out and cannot be edited. . Values for this
drop-down are maintained in Utilities (Utility List Screen >
tbl_award_category).
Division
Yes
Indicates the division for which the award applies. . Values for this
drop-down are maintained in Utilities (Utility List Screen >
tbl_division).
Value
Yes
The relative priority of the award where lower is better. Important:
always make open awards lower numbers than age group awards.
Place
No
The ordinal position of the award. New in RT6.
Description
No
Description of the award.
19
Dupe?
Yes
Indicates whether this award can be assigned to an individual who has
previously won a higher priority award. General custom is to leave
setting as No.
Sex
Yes
Indicates the sex for which the award applies.
Low Age
Yes
Indicates the low age for which the award applies. Must be equal to or
less than the high age.
High Age
Yes
Indicates the high age for which the award applies. Must be equal to or
greater than the low age.
Low Weight
Yes
Indicates the low weight for which the award applies. Must be equal to
or less than the high weight.
High Weight
Yes
Indicates the high weight for which the award applies. Must be equal
to or greater than the low weight.
Awd Basis
Yes
Indicates the basis for determining the award (either actual finish time
"F" or adjusted time "A")" Important: To properly calculate awards,
all awards in a given category MUST have the same award basis.
Special Award
No
Indicates if award is limited to runners designated with "special"
codes.
Step by Step
For races with awards, perform the steps below.
Select ADD NEW to create new awards via the Award Generation screen.
Select EDIT to allow editing of awards on this screen.
Select COPY FROM to copy awards from a previous race (only available when the current race has no awards)
via the Race Select List screen.
Select DUPE ALL AWDS to allow set all existing awards to allow duplicate awards (see Dupe field
description). New in RT6.
Select UNDUPE ALL AWDS to allow set all existing awards to NOT allow duplicate awards (see Dupe field
description). New in RT6.
Select BATCH UPDATE AWD BASIS to change all existing awards to a desired Award Basis (e.g., assign
awards based on guntime or chiptime; see Awd Basis field description). The desired Award Basis value for the
award must be selected from the drop-down next to this button.
Select DELETE ALL AWARDS to delete (upon confirmation) awards in this race.
Click on a column heading to sort/group by that column.
Scenario: Special Awards
While RaceTrak provides Special awards for items such as Fastest Teacher or Top Cop as a powerful way to
quickly to score virtually any kind of award, to ensure the correct issuance of special awards, please follow the
steps below for a race that has awards for the fastest M/F Firefighters where this award allows duplicates.
1. Setup two Firefighter award categories (“Firefighter Male” and “Firefighter Female”) in Utilities>select
tbl_award_category. Select Run as the Division and Open as the Category Type. Leave the default
values, but specify M and F in the Gender fields. Close and return to Main Menu.
2. Setup “Firefighter Special Cat” as a race special category in Race Management>Special Cat.
3. Setup “Firefighter Special Item” as a race special item in Race Management>Specials.
20
4. Generate Firefighter awards: Race Management>Awards>ADD NEW>specify “Firefighter Female” as
Category and change the number of awards to 1. Select Advanced View options and select the
“Firefighter Special Category” in the Special Category drop-down. Check Allow Dupes and select
GENERATE.
5. Repeat steps 2-4 but select “Firefighter Male” as the Category.
6. When registering Firefighters, select the Special Tab and select “Firefighter Special Item” in the dropdown.
7. After scoring the race, runners with the “Firefighter Special Item’ will show on Award Reports.
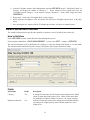
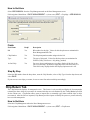
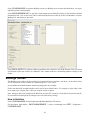
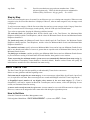
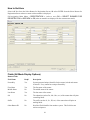
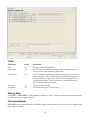
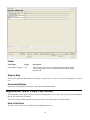
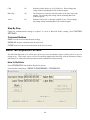
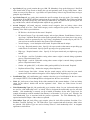
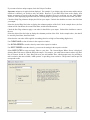
Award Generation Screen
The Award Generation Screen provides the capability to generate a pool of awards for the current race.
How to Get Here
Select ADD NEW from the Awards tab on the Race Management screen.
Full navigation: Main Menu > RACE MANAGEMENT > (select a race) EDIT > Awards > ADD NEW
The Award Generation screen in Default mode is displayed. Select the Default radio button to view this mode.
The Advanced mode unlocks the Special Category, Description, and Category Restrictions fields.
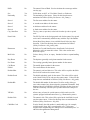
Fields
Field Name
Reqd?
Description
Category
Yes
A lookup field (from the Award Categories table) that provides default
values for most other fields on the screen. Values for this drop-down
are maintained in Utilities (Utility List Screen > tbl_award_category).
Duplicates Allowed?
Yes
Indicates whether this award can be assigned to an individual who has
previously won a higher priority award. General custom is to leave
setting as No.
21
Division
Yes
Indicates the division for which the award applies. Values for this
drop-down are maintained in Utilities (Utility List Screen >
tbl_division).
Award Basis
Yes
Indicates the basis for determining the award (either actual finish time
"F" or adjusted time "A"). Awards for the same category (M30-35)
must have the same award basis.
Special
No
Indicates if award is limited to runners designated with "special"
codes. See special awards discussion above.
Sex
Yes
Indicates the sex for which the award applies. Set as None if award
can go to either Male or Female.
Age Low
Yes
Indicates the low age for which the award applies. Must be equal to or
less than the high age. For open awards, set the low age to 0, while
youngest age groups should start at age 1 (and not 0). Never leave the
Age Low field blank.
Age High
Yes
Indicates the high age for which the award applies. Must be equal to or
greater than the low age. For open awards, set the high age to 99.
Never leave the Age High field blank.
Weight Low
Yes
Indicates the low weight for which the award applies. Must be equal to
or less than the high weight. Used for Clydesdale awards. If not a
Clydesdale category, leave default of 0. New in RT6.
Weight High
Yes
Indicates the high weight for which the award applies. Must be equal
to or greater than the low weight. Used for Clydesdale awards. If not a
Clydesdale category, leave default of 999. New in RT6.
Awards - Totals
Yes
Indicates the total number of awards available for this award category.
Step by Step
If awards are given out for this race:
Obtain a list of awards for this race.
Determine the order you need to enter awards (typically enter overall first, then masters awards, then age
group awards).
Determine if duplicate awards are needed.
Determine if race will have different divisions requiring awards (e.g., 10K and Fun Run).
If special awards (Teacher, Firefighter) are used in this race, please see Scenario: Special Awards in the
previous section.
Using above information, create awards as follows.
Select an Award Category in the Category box. Once selected, values from the Award Category will be filled
in for the entire screen.
Category Restrictions can be modified on the screen; however, such modification is not recommended as it
may be confusing to have a Female 1-10 category's awards distributed to 30-year-old men.
Note that awards are generated in priority order from best award to worst, alternating male and female
awards. For example, set up awards in the following order: Overall Male, Overall Female, Masters' Male,
Masters' Female, 1-14 Male, 1-14 Female, 15-19 Male, 15-19 Female, and so on.
Always select award categories in consecutive order with no gaps and no overlaps. For example, do not setup
awards for M20-24 and M20-29.
22
Select Advanced options to edit the locked settings.
Select GENERATE to create awards based on above settings.
Best Practices
Confirm all settings for all awards.
After awards are generated, they are displayed on the Awards tab in Award Value number order from lowest
number (best) to highest, which is how awards will be distributed. This value should be changed if the awards are
not in the correct priority.
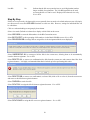
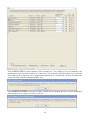
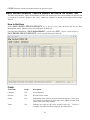
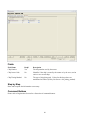
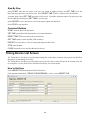
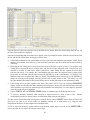
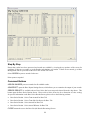
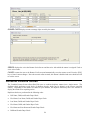
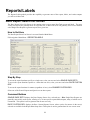
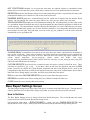
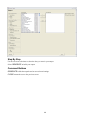
Bibs Tab
The Bibs Tab allows users to edit current bib settings and provides access to the other bib management functions
(add new, batch edit, reassign bibs, unreserved bibs, delete bibs, and find bibs).
The Bibs Tab has two modes, default and advanced. Most users typically only need the default fields.
Note: during registration, RaceTrak will automatically assign bib numbers based on the configuration of the bibs.
For example, if bibs 1 to 10 are set up Females age 20-29, the first female registrant in this age range will get bib
1 assigned. In addition, the division, wave, and hat color for this bib will be copied to the registration data record.
However, users can change the division, wave, and hat color in Registration and the Registration settings will be
used to score the runner. Although RaceTrak will reserve bib 2 for Females age 20-29, if no other bibs are
available, bib 2 will be the default bib for the next registrant (without regard to gender or age). RaceTrak users
can override the bib settings and select bib 2 for any runner.
IMPORTANT! Bib numbers must be available in order to complete the registration process. Bib numbers are
unique by race, and no two runners can have the same bib number. RaceTrak provides bib number reservation and
the capability to generate bib numbers by age and/or gender. Furthermore, bibs can be setup for relay teams
where teams share the same bib or chip.
How to Get Here
Select the Bibs tab on the Race Management screen.
Full navigation: Main Menu > RACE MANAGEMENT > (select a race) EDIT > Bibs
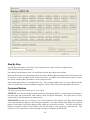
The Bibs Tab has two display modes. Select the Default radio button to view standard settings.
23
Select the Advanced radio button to view this mode.
Fields
Field Name
Reqd?
Description
Bib Number
Yes
Bib number(s) generated (if any) for this race. Cannot be altered by
user.
24
Rsvd
No
Indicates if the bib number is reserved. A reserved bib can only be
issued by selecting it during the registration process, it is not
automatically distributed to runners. Hint: It is sometimes faster to
generate all bibs and then update those bib numbers that need to be
reserved or assigned. For example, generate bib numbers 1 through
500 and then individually reserve the first ten bib numbers.
Division
Yes
The division associated with this bib number. On registration, the
runner receiving this bib number will be assigned to this division.
Values for this drop-down are maintained in Utilities (Utility List
Screen > tbl_division).
Low Age
Yes
The low age restriction for the bib. Do not leave blank.
High Age
Yes
The high age restriction for the bib. Do not leave blank.
Sex
Yes
The gender code restriction for the bib.
Wave
No
The wave associated with this bib number. On registration, the runner
receiving this bib number will be assigned this wave. Values for this
drop-down are maintained in Race Management Waves Tab.
Hat Color
No
The hat color associated with this bib number. On registration, the
runner receiving this bib number will be assigned this hat color.
Values for this drop-down are maintained in Utilities (Utility List
Screen > tbl_hat_color).
Team Bib
No
Designates the bib as a team bib and not available in the bib dropdown when registering runners. It is intended to be assigned to teams
whose members share the same bib number (e.g. relay races), and can
be assigned to teams during team setup. Please review Scenario:
Relay Teams for more information. Displayed in Advanced view
only. New in RT6.
In Use
N/A
A system generated locking field that ensures that in network
environments the same bib number is not available to more than one
user at the same time (when set to "Yes"). Under rare conditions
(when the user erroneously exits in the middle of processing), the In
Use field may be set to Yes when the bib number actually has not been
assigned. Under these situations, change the In Use to No to free the
bib number for assignment. Otherwise, never change this field.
Used
N/A
A system generated locking field that ensures that a previously issued
bib is not distributed to another runner. Only unused bibs can be
assigned to runners.
Prefix
No
Used if the bib numbers are to include a prefix. A common prefix
utilized is "F" that often precedes the number on bibs for women.
Displayed in Advanced view only.
Numeric
Yes
The numeric value for the current bib (e.g., bib F1 is 1, bib 2 is 2).
Displayed in Advanced view only.
Suffix
No
Used if the bib numbers are to include a suffix. Displayed in
Advanced view only.
Fixed#
No
Used to format the bib number in cases where lead zeroes are used.
For example, bib 1needs to be formatted as 0001 because the actual
bib number has lead zeroes. Displayed in Advanced view only. New
in RT6.
25
Lost Bib
No
Indicate that the bib was reported as lost (as set in Registration) and no
longer available for registration. The Lost Bib hyperlink can be used
to restore this bib so it can be used. Displayed in Advanced view only.
New in RT6.
Step By Step
If bibs are set up correctly, the data on this screen generally does not need to be edited and most users will simply
use this screen to access the ADD NEW functions to create new bibs. However, settings for individual bibs can
be edited here.
Click on a column heading to sort/group by that column.
Select view mode (Default or Advanced) to display or hide fields on the screen.
Select ADD NEW to create the bib numbers via the Bib Generation screen.
Select BATCH EDIT to edit a grouping of bib numbers via the Batch Edit Bibs screen. New in RT6.
Select REASSIGN BIB to reassign bibs or assign bibs via the Assignment Mode screen displayed.
Select UNRESERVE ALL to unreserved all the bibs in the current race, allowing them to be automatically
issued to the next registrant. New in RT6.
Select DELETE ALL to remove (on confirmation) the bibs from the current race and removes these bibs from
registered runners. It is highly recommended that data be backed up before performing this action.
Select DELETE BIB to remove (on confirmation) a selected bib (click to bib to select it) from the current race
and removes this bibs from registered runners.
Select FIND BIB to search for a bib.
Select SYNC DIV to assign the bib divisions to registered runners. New in RT6.
Select SYNC WAVE to assign the bib waves to registered runners. New in RT6.
26
Select SYNC HAT to assign the bib hat colors to registered runners. New in RT6.
Bib Generation Screen
The Bib Generation screen allows users to generate a pool of bib numbers for the race.
Note: Although RaceTrak assigns bib numbers to runners during registration, users can override the RaceTrak
default bib number to any available bib number in the bib pool by double-clicking the bib number field in the
Registration Screen.
How to Get Here
Select ADD NEW from the Bibs tab on the Race Management screen.
Full navigation: Main Menu > RACE MANAGEMENT > (select a race) EDIT > Bibs > ADD NEW
The Bib Generation Screen can be displayed in Default mode where the most common fields are displayed.
Alternatively, the Bib Generation Screen can be displayed in Advanced mode with selections available for more
complex races.
27
Fields
Field Name
Reqd?
Description
Preview
N/A
Displays how the first bib number will be formatted based on the
settings specified by the RaceTrak user.
Prefix
No
Used if the bib numbers are to include a prefix. A common prefix
utilized is "F" that often precedes the number on bibs for women.
Displayed in Advanced view only.
Start Bib
Yes
The starting number for the range of bibs to be generated. Must be
equal to or lower than End Bib.
End Bib
Yes
The ending number for the range of bibs to be generated. Must be
equal to or greater than Start Bib.
Suffix
No
Used if the bib numbers are to include a suffix. Displayed in
Advanced view only.
Fixed Numeric Length
No
Used to format the bib number in cases where lead zeroes are used.
For example, bib 1needs to be formatted as 0001. Displayed in
Advanced view only.
Division
Yes
Assigns the specified division (as stored in the Division table) to the
range of bibs generated. During registration, this division is assigned
to the runner receiving the bib number. Values for this drop-down are
maintained in Utilities (Utility List Screen > tbl_division).
Wave
No
Assigns the specified wave (as stored in the Race Wave table) to the
range of bibs generated. During registration, this wave is assigned to
the runner receiving the bib number. Displayed in Advanced view
only. Values for this drop-down are maintained in Race Management
Waves Tab.
28
Hat Color
No
Assigns the hat color (generally used in Triathlons) to the range of
bibs generated. During registration, this hat color is assigned to the
runner receiving the bib number. Displayed in Advanced view only.
Values for this drop-down are maintained in Utilities (Utility List
Screen > tbl_hat_color).
Gender Restriction
No
Used to assign bibs for the specified range exclusively to male, female,
or neither. Displayed in Advanced view only.
Age Low Restriction
Yes
The low age for the range of bibs to be generated. Must be equal to or
lower than Age High. Used to assign bibs based on age. Never leave
this field blank. Displayed in Advanced view only.
Age High Restriction
Yes
The high age for the range of bibs to be generated. Must be equal to or
greater than Age Low or blank. Used to assign bibs based on age.
Displayed in Advanced view only.
Reserved Restriction
No
Check this box to reserve the bib numbers specified. For example,
many race directors set aside low numbers for faster runners. Reserved
bibs are user-selectable during registration but do not automatically
appear as the next available number. Displayed in Advanced view
only.
Team Bib Restriction1
No
Designates the bib as a team bib and not available in the bib dropdown when registering runners. It is intended to be assigned to relay
teams whose members share the same bib number, and can be
assigned to teams during team setup. Example: a relay race where all
athletes share the same bib. Displayed in Advanced view only.
Please refer to Scenario: Relay Overview for more information on
shared bibs and chips.
Step By Step
Determine:
The range of bibs to be used for this race
How to set up bib ranges for races with multiple divisions (e.g., use bibs 1-500 for 10K and 501-1000 for Fun
Run)
If any bib numbers need to be reserved (e.g., reserve bib numbers 1-10 for fast runners)
If special bibs assignments are needed (e.g., bibs F1-F1000 are issued to women only)
If wave assignments are needed (e.g., bibs 1-100 are for Wave 1, 101-200 are for Wave 2, etc.)
If bibs will be reserved for team use only (i.e., relays where team members share the same bib).
Using the information above:
Specify a starting and ending bib number. Specify any other bib settings as necessary. Note: most users will
rarely (if ever) use Advanced features.
Select the Advanced Bib Generation Mode to display additional settings. Note: to assign specific waves to a
series of bibs, set up waves before generating bibs.
1
Please note that at the time of this User’s Manual, RT6 does not allow penalty times logged against team bibs and uses the
Relay report to display results for teams sharing shared bibs/chips. Please contact info@racetrakonline.com if you have any
questions regarding this feature.
29
Hint: If only a starting bib number is specified, RaceTrak will generate a single bib for this number. This is
useful when non-continuous bibs must be set up in a race (e.g., 24, 26, 29, 55, 59, etc.). New in RT6.
Select GENERATE creates bib numbers based on the criteria specified on the screen and updates the screen
showing newly created bib numbers. Note: Generate will not allow the creation of duplicate bib numbers.
Scenario: Generate Bibs with Waves
RaceTrak allows you to specify several attributes for each bib whereby these attributes are assigned to the runners
during the registration. For example, you might have a race with Waves where bibs 1-199 are for the first wave
and bibs 200-299 are for the second wave, which starts 15 minutes after Wave 1. Please refer to the steps below
for setting up such bibs.
1. Setup “Wave 1” in Race Management>Waves. Offset amount is 900 seconds (15 minutes) and change
Start Time to 8:15 am. Set Wave Order to 1. (Note: use BATCH ADD to add multiple waves).
2. From Race Management>Bibs>ADD NEW>select the Advanced Bib Generation Mode.
3. Specify 200 as the Start Bib and 299 as the End Bib. Select Wave 1 as the Wave.
4. When registering runners, the Wave for the bib being registered will be associated with the registrant.
5. When registering runners, the wave can be changed to another wave if necessary. Note: change the wave
for the bib does not change the wave for a runner currently registered with that bib.
Batch Edit Bibs Screen
The Batch Edit Bibs screen allows users to batch update bibs and registered runners. New in RT6.
Care should be taken before using these features. Always backup your data before perform these actions. Please
contact RaceTrak if you have any questions regarding the use of these features.
Note: RaceTrak does not allow duplicate bib numbers, so some batch edits may not be possible if they result in
duplicate bibs.
Users may need to use these features if they set up bibs 1001 to 2000, but bibs 2001 to 3000 were delivered.
30
How to Get Here
Select BATCH EDIT from the Bibs tab on the Race Management screen.
Full navigation: Main Menu > RACE MANAGEMENT > (select a race) EDIT > Bibs > BATCH EDIT
RaceTrak users can perform a variety of batch edits through selection of the radio button specific to the batch
update mode desired.
Fields
The fields displayed dynamically change, depending on the Batch Edit mode selected.
Step By Step
Determine if Batch Updates are appropriate for your current circumstance.
Always backup your data before performing Batch Updates.
IMPORTANT! Batch Edit Bibs uses searches based on the parameters provided, so only those bibs matching the
selections are updated.
Select Renumber All to offset bibs by the specified value. Use negative numbers to offset bibs to lower range
(e.g., specify -1000 to change bibs from 2001 - 3000 to 1001 - 2000).
Select Change Prefix to change the bib prefix for a specified set of bibs.
Select Reformat Bib to change the bib format for a specified set of bibs.
Select Change Wave to change the wave for a specified set of bibs and optionally change the wave for registered
runners assigned these bibs.
Select Change Gender to change the gender restriction settings for a specified set of bibs.
31
Select Change Reserved Bibs to change the reserved settings for a specified set of bibs.
Select Renumber Specific to offset bibs by a specified value for a specified set of bibs. Use negative numbers to
offset bibs to lower range (e.g., specify -1000 to change bibs from 2001 - 3000 to 1001 - 2000).
Select Change Suffix to change the bib suffix for a specified set of bibs.
Select Change Division to change the division for a specified set of bibs and optionally change the division for
registered runners assigned these bibs.
Select Change Hat Color to change the hat color for a specified set of bibs and optionally change the hat color for
registered runners assigned these bibs.
Select Change Age to change the high and low age restriction settings for a specified set of bibs.
Select Change Team Bib to restrictions to reserve bibs for teams. Be sure to only change for bibs that have not
been issued.
Select OK to perform the batch edit.
Chip Management Tab
The Chip Management tab displays for transponder races. This feature is only needed (and displayed) for
transponder technologies whose chip number is different than the bib number (as determined by the Timing
Method specified for the current race). Chip Management allows users to import files containing the chip
identifiers and associate them with bibs in the current race. New in RT6.
How to Get Here
Select the Chip Management tab on the Race Management screen.
Full navigation: Main Menu > RACE MANAGEMENT > (select a race) EDIT > Chip Mgt
32
Fields
Field Name
Reqd?
Description
Bib
Yes
Bib number(s) generated (if any) for this race. Cannot be altered by
user.
Chip/Transponder
Yes
The chip/transponder number assigned to the bib.
Type
No
The type of chip used. New in RT6. Values for this drop-down are
maintained in Utilities (Utility List Screen > tbl_timing_method).
1st-2nd Chip
Yes
For races where participants use two chips, displays if the chip is the
first or second chip. By default, single chip races will show value of 1.
This field is only displayed when the Display Options mode is All.
New in RT6.
Step By Step
Use the Chip Management tab to associate chips with bibs (e.g., associate chip RT123 with bib 1).
When races uses two chips per person, select All in the Display Options to display how chips are set up.
Select BATCH ADD to import chip data (and associate the chips to bibs) from a chip file using the Batch Add
Chips screen.
Select ADD MANUAL to individually associate a chip to a bib using the Manually Add a Transponder to Bib
screen.
Select EDIT to update the data in the current screen.
Select PROBLEM CHIPS to display runner in the race who do not have a transponder and/or orphaned
transponders (a transponder issued to a person but not associated with a bib).
Select CHIP UPLOAD to build a file of chip data.
Select DELETE ALL to remove the transponders from the current race and removes these transponders from
registered runners. It is highly recommended that data be backed up before performing this action.
Select REGISTER CHIPS to associate the chips with runners already registered in the current race. This feature
is generally used when runners have been registered before the chip file is received, but can also be used for other
purposes
33
Batch Add Chips Screen
The Batch Add Chips Screen provides the import of chip files and associates these chip numbers with existing bib
numbers. Batch Add is only needed for transponder races where the transponder number is not equal to the chip
number.
How to Get Here
Select BATCH ADD from the Chip Management tab on the Race Management screen.
Full navigation: Main Menu > RACE MANAGEMENT > (select a race) EDIT > Chip Mgt > BATCH ADD
Note: Bibs must be generated before chips can be loaded. The Import As selections are available depending on the
Chip Usage settings for the race.
Fields
Field Name
Reqd?
Description
Path & File Name
Yes
The name and location of the file to be imported.
Import Type
Yes
Indicates the type of import file to be imported.
Chip Length
Yes
The fixed number of characters in the chip identifier.
First Row Has
Headings
No
Whether or not the first row in the file contains header information
(e.g., Chip Number, Bib Number).
Delimiter
No
For delimited files, the delimiter used.
Chip Position
No
The position of the chip in the file (where 3 indicates that the chip
starts in the third position in the file).
Import Mode: Import
from lowest to highest
available bib
No
Assigns chips starting at the lowest available bib to the highest
available bib.
Import Mode: Import
per user specified
settings below.
No
Assigns chips using user specified settings.
Import As: First Chip
No
Default.
34
Import As: Second
Chip
No
For races using more than one chip per runner, allows the entry of a
second chip.
Load From: Row or
Line Number in File Start Row
No
The starting row to import.
Load From: Row or
Line Number in File End Row
No
The ending row to import.
Load To: Bib Number
- Prefix
No
The prefix (if any) of the bibs to be associated with the chips.
Available only for files that do not include bibs.
Load To: Bib Number
- Start Bib
Yes
The start bib number to be associated with the chips. Available only
for files that do not include bibs.
Load To: Bib Number
- End Bib
Yes
The end bib number to be associated with the chips. Available only for
files that do not include bibs.
Load To: Bib Number
- Suffix
No
The suffix (if any) of the bibs to be associated with the chips.
Available only for files that do not include bibs.
Load To: Bib Number
- Fixed Numeric
Length
No
The length of bibs (if formatting used) of the bib number.
Step By Step
To import new chip data, specify the file name and location of the text file containing chip numbers. RaceTrak
supports several types of import chip files that will be associated with bibs. Such files may or may not include the
bib numbers and must follow pre-established standards. RaceTrak currently support the import of five chip file
types (four from ChampionChip and one from Winning Time). In addition, RaceTrak provides a customization
feature that allows users to build custom imports for fixed text and comma separated files.
IMPORTANT! Duplicate chips are not allowed for the race, and errors will be reported. Therefore, the import file
must not include duplicate chip numbers. As a work around, the chip return function can be used to check and
build a chip file that does not contain duplicates.
Specify the type of file to be imported.
Because certain files include chip numbers already associated with bib numbers, there is no need to select ranges
of chips or bibs for these file types. Where matches are found, the chip number will be written to the bib record.
For other file types, (which have only the chip number), perform the following steps:
Specify the Import Mode.
Specify the Load From: Row or Line Number in File. The start and end positions (by position in the chip
file). For example, specify 101 to 500 to load 400 chips from the chip file, starting at row 101 in the chip file.
Specify the Load To: Bib Number parameters. Specify the bibs with which to associate chips. For example,
specify 1101 to 1500 to associate the 400 chips above with bibs 1101 to 1500.
Select IMPORT to import the chip data.
Manually Add a Transponder to Bib Screen
The Manually Add a Transponder to Bib screen allows users to manually associate transponders to bibs and is
intended for use when a handful of transponders is added to a race.
35
How to Get Here
Select ADD MANUAL from the Chip Management tab on the Race Management screen.
Full navigation: Main Menu > RACE MANAGEMENT > (select a race) EDIT > Chip Mgt > ADD MANUAL
Fields
Field Name
Reqd?
Description
Bib
Yes
Bib number for the chip. Values for this drop-down are maintained in
Race Management Bibs Tab.
Chip Number
Yes
The chip/transponder number assigned to the bib.
Type
No
The type of chip used. Values for this drop-down are maintained in
Utilities (Utility List Screen > tbl_timing_method).
1st-2nd Chip
Yes
For races where participants use two chips, displays if the chip is the
first or second chip. By default, single chip races will show value of 1.
This field is only displayed when the Display Options mode is All.
Step By Step
Select the Bib number from the drop-down, enter the Chip Number, select a Chip Type from the drop-down, and
select SAVE.
If your race uses two chips per runner, be sure to enter first and second chips accordingly.
Chip Return Tab
The Chip Return tab displays for transponder races. This feature is only needed (and displayed) for transponder
technologies whose chips are expected to be returned after the race as determined by the Timing Method specified
for the current race). Chip Return allows users to import files (or manually type) either returned chips or chips
not returned. After the files are imported, Chip Return provides reports to identify the person or persons who may
have used the transponder.
How to Get Here
Select the Chip Management tab on the Race Management screen.
Full navigation: Main Menu > RACE MANAGEMENT > (select a race) EDIT > Chip Return
36
Fields
Field Name
Reqd?
Description
Chip/Transponder
Yes
The chip/transponder number that is either missing or returned.
Chip Reported As
Yes
Whether a chip is Returned or Missing.
Notes
No
User specified notes or comments regarding the Chip/Transponder.
Active Flag
No
Allows user to de-activate the chip and not show on reports.
Step By Step
Select IMPORT to import chips from a file. The Import Returned or Missing Transponders screen opens. Find
the file containing the missing or returned transponders and select the appropriate Import Type and other
configurations. Select the respective IMPORT RETURNED CHIP FILE or IMPORT MISSING CHIP
FILE to import the data.
Select PEOPLE MISSING CHIP to display a spreadsheet view of runners having either missing or returned
chips.
Select BIB MISSING CHIP to display a spreadsheet view of bibs associated with either missing or returned
chips.
37
Select UPDATE TO MISSING to update chips listed as missing to returned (to fix an incorrectly specified
import).
Select UPDATE TO RETURNED to update chips listed as returned to missing (to fix an incorrectly specified
import).
Divisions Tab
The Divisions tab (new in RT6) displays a listing of Divisions that might be used for this race. In RaceTrak, a
division is separately scored event within the same race. Divisions are used to score differently grouped
participants, such as:
Racewalkers
Runners
Fun Run
5K event when scored simultaneously with another event
The Divisions tab allows you to specify distances and age grades for each Division, thus allowing for the correct
pace and/or age grade reporting.
RaceTrak’s default division is Run and is used for most races. However, additional divisions can be setup (in
Utilities) and allow timers to score divisions as “races within a race.”
How to Get Here
Select the Chip Management tab on the Race Management screen.
Full navigation: Main Menu > RACE MANAGEMENT > (select a race) EDIT > Divisions
38
Fields
Field Name
Reqd?
Description
Division
Yes
The Division for the Distance and Age Grade. Values for this dropdown are maintained in Utilities (Utility List Screen > tbl_division).
Distance
No
Distance for the Division selected. Values for this drop-down are
maintained in Utilities (Utility List Screen > tbl_distance).
Age Grade
No
The Age Grade for the Division selected. Values for this drop-down
are maintained in Utilities (Utility List Screen > tbl_age_grade).
Step By Step
Select a Division from the drop-down and specify either a Distance or Age Grade (or both) for the Division.
Note: New divisions can be created in Utilities>select tbl_division (the Run division is the RaceTrak default and
cannot be altered).
Fees Tab
The Fees tab displays a listing of Fees that might be used for this race. Fees can be specified by dates and fees
can be set up for extra items such as additional shirts and/or meals. New in RT6.
Fees can be designates as “auto assign’ and these will be automatically added when manually registering a runner.
How to Get Here
Select the Fees tab on the Race Management screen.
Full navigation: Main Menu > RACE MANAGEMENT > (select a race) EDIT > Fees
39
Fields
Field Name
Reqd?
Description
Amount
Yes
The fee amount.
Fee Category
No
The category for the fee (pre-race, race day, etc). Values for this dropdown are maintained in Utilities (Utility List Screen >
tbl_fee_category).
Description
No
Short description of the fee.
From Date
No
The start date for the fee.
To Date
No
The end date for the fee.
Auto Assign
No
Whether RaceTrak automatically assigns during the registration
process.
Sort Order
No
How the data is ordered in drop-downs and reports.
Step By Step
Enter data for one or more fees as required.
Preferences Tab
The Preferences tab (new in RT6) displays a listing of race-specific preferences that can be applied to the current
race. Preferences allow extended scoring and capability, which allow RaceTrak users to bypass typical race
scoring rules and (with the exception of the Use Custom Form preference) preferences should be used with
caution. RaceTrak provides default settings for the preferences as well explanatory notes regarding the settings.
Preferences must be created before they can be used, and selection of either AUTO ADD NEW or
CUSTOMIZE REGISTRATION create preferences for the current race.
The Use Custom Form preference invokes the settings created via Customize Registration. Please see the
Customize Registration Screen section for more information on customizing your registration screens.
How to Get Here
Select the Preferences tab on the Race Management screen.
Full navigation: Main Menu > RACE MANAGEMENT > (select a race) EDIT > Preferences
40
Fields
Field Name
Reqd?
Description
Preference Name
Yes
The preference stated in a question.
Description
Yes
Short description of the preference, what it does, and recommended
usage.
Yes/No
No
Whether the Preference is used or not.
Step By Step
Select AUTO ADD NEW to add new preferences into the current race.
Invoke the settings for a given Preference by checking the Yes/No checkbox. Most preferences are selfexplanatory and the Description provides additional information on each preference.
Select CUSTOMIZE REGISTRATION to customize the registration screen for the current race using the
Customize Registration screen.
Best Practices
With the exception of the Customize Registration Screen, it is best to leave default settings as set-up by RaceTrak.
The on-screen descriptions provide instruction regarding each preference.
Customize Registration Screen
The Customize Registration screen (new in RT6) allows users to customize the registration screens for the current
race.
41
Note: by default customization will display and enable all fields, so users will need to hide and/or disable fields
they don’t use during the registration process. However, these fields are available if the user selects Display All
on the registration screen. The settings are indicated as follows:
A white background indicates that the field is visible, unlocked, and available for editing on Registration
screens.
A gray background indicates that the field is visible and locked on Registration screens.
An underscore indicates that the field is not visible on Registration screens..
The customizations for a given race can be globally turned on or off by checking or unchecking the Yes/No value
in the Preferences Tab.
How to Get Here
From the Preferences tab, select Customize on the Race Management screen.
Full navigation: Main Menu > RACE MANAGEMENT > (select a race) EDIT > Preferences > CUSTOMIZE
REGISTRATION
Fields
Field Name
Reqd?
Description
The name of the field
in registration screens.
N/A
Non-grayed fields are available to customize the registration screen for
this race.
42
Step By Step
Customization is easily accomplished: double-click on a field to toggle its setting:
Fields displayed with a white background are visible on registration screens and available for entry.
Fields displayed with a gray background are visible on registration screens but locked from entry (during
registration users can double-click these fields to unlock them).
Fields displayed with an underline only are not visible on registration screens, but can be seen by selecting the
Display All in registration screens).
Greyed out fields (First Name, Last Name, Person Key, Bib Number, Age Race, and Create/Modify Dates are
not available for customization).
Select CLOSE to close the screen and return to the Race Preferences tab. Users are prompted to turn on or turn
off the custom settings.
Random Prizes Tab
The Random Prizes tab allows RaceTrak users to create Random Prizes for registrants in this race.
Note: the number of random prizes specified cannot exceed the number of runners in this race.
How to Get Here
Select the Random Prizes tab on the Race Management screen.
Full navigation: Main Menu > RACE MANAGEMENT > (select a race) EDIT > Random Prizes
Fields
Field Name
Reqd?
Description
43
No. Random Prizes
Yes
The number of random prizes to be generated.
Step By Step
Specify a total number of random prizes to be generated and select GENERATE to build a new listing of random
prize winners.
Select RANDOM REPORT to view a listing of random prize wines.
Registrants Tab/Screen
The Registrants Tab/Screen provides RaceTrak user the capability to view and update data for runners already
registered in a race, sort these registrants by any column listed, and display different data via the Show selection.
Please refer to Registration and Registrant Import for details on how to register runners into a race.
How to Get Here
Select the Registrants tab on the Race Management screen or select REGISTRANT LIST from the Select
Runner for Registration screen.
Note: after system re-boot, on initial open for large races this screen may take a minute or two to open.
Full navigation: Main Menu > RACE MANAGEMENT > (select a race) EDIT > Registrants
Full navigation: Main Menu > REGISTRATION > (select a race) OK > REGISTRANT LIST
Fields
Field Name
Reqd?
Description
Name
Yes
Registrant’s name in last first name order.
Bib
Yes
Registrant’s bib.
All Views
44
Sex
Yes
Registrant’s gender.
Birthdate
No
Registrant’s birthdate.
Age
Yes
Registrant’s age (defaults to zero when Birthdate is not provided).
Division
Yes
Registrant’s division. Values for this drop-down are maintained in
Utilities (Utility List Screen > tbl_division).
Team
No
Registrant’s Team. Values for this drop-down are maintained in Race
Management Teams Tab.
Grade
No
Registrant’s scholastic grade.
Values for this drop-down are
maintained in Utilities (Utility List Screen > tbl_division).
Shirt
No
Registrant’s shirt size in this race.
Wave
No
Registrant’s Wave. Values for this drop-down are maintained in Race
Management Waves Tab.
Email
No
Registrant’s Email.
Phone - Day
No
Registrant’s daytime phone number.
Phone - Eve
No
Registrant’s evening phone number.
Phone - Cell
No
Registrant’s cell phone number.
Street 1
No
Registrant’s first street address.
Postal Code
No
Registrant’s zip code or postal code. Values for this drop-down are
maintained in Utilities (Utility List Screen > tbl_postal_code).
Hometown
No
Registrant’s hometown (new in RT6); derived from person’s zip code
or can be manually added.
Address 2 View
Same as Address 1 view; adds Street 2 for entry of second address line
Address 3 View
Same as Address 2 view; adds Street 3 for entry of third address line
Address 4 View
Same as Address 3 view; adds Street 4 for entry of fourth address line
Standard View
Email/Phone View
Address 1 View
Club View
Default Club
No
Person’s default club. Values for this drop-down are maintained in
Utilities (Utility List Screen > tbl_club).
Registrant Club
No
Registrant’s club for this race. Values for this drop-down are
maintained in Utilities (Utility List Screen > tbl_club).
Step By Step
Click on a column heading to sort/group by that column.
Select EDIT REGISTRATION to open the full registration screen (see Registration (Edit Registration) Screen)
for a selected registrant.
Select FIND to search for and go to a specific entry based on your search settings.
Select one of the SHOW options to change the fields displayed on the screen.
Select FIX STREET to standardize streets (e.g. Street to St) based on settings in Utilities (see tbl_street_fix).
45
Select RUNNERS CHIPS to view chips assigned or not assigned to registrants (for chip races only where chip
is not equal to the bib).
Registrants (Club Membership Race Mode) Tab/Screen
The Registrants (Club Membership Race Mode) tab/screen includes all the features of the Registrants tab/screen,
but adds several features to allow RaceTrak users manage club memberships within a “race.” Such features are
available when the Membership Checkbox is checked (via the Race Management Race Tab). This section
discusses only the additional features available in Club Membership Race Mode. New in RT6. Club members can
also be managed and tracked in Runner Management, but Club Membership Races Mode provides many more
tools for handling club members and geared toward non-rolling memberships (where RaceTrak’s Club
Membership Race Mode supports membership management when all members share the same membership start
and end dates).
Note: this screen can take a minute to load on first use of a RaceTrak session.
In Club Membership Race Mode, membership specific command buttons and the Show - Membership option are
available.
How to Get Here
Select the Registrants tab on the Race Management screen or select REGISTRANT LIST from the Select
Runner for Registration screen. The race must have the Membership checkbox checked in the Race Tab.
Full navigation: Main Menu > RACE MANAGEMENT > (select a race) EDIT > Registrants
Full navigation: Main Menu > REGISTRATION > (select a race) OK > REGISTRANT LIST
Fields
Field Name
Reqd?
Description
Membership View
46
Default Club
No
Person’s default club. Values for this drop-down are maintained in
Utilities (Utility List Screen > tbl_club).
Registrant Club
No
Registrant’s club for this race. Values for this drop-down are
maintained in Utilities (Utility List Screen > tbl_club).
Club Member Type
No
Registrant’s membership type. Values for this drop-down are
maintained in Utilities (Utility List Screen > tbl_club_member_type).
Street 1
No
Registrant’s first street address.
Postal Code
No
Registrant’s zip code or postal code. Values for this drop-down are
maintained in Utilities (Utility List Screen > tbl_postal_code).
Primary Member
No
The primary member in a membership. As depicted above, Jim Disco
is the primary member for himself and four other family members.
Curr (Current)
Checkbox
No
Person’s membership status. When checked, the person is currently a
club member.
Pending Checkbox
No
A registrant field used to limit mailings by the pending status.
Member Cd (Code)
No
Person’s membership code. Can be any value; can be used to
designate the year of membership for display in various outputs.
Step By Step
Click on a column heading to sort/group by that column.
See Registrants tab for EDIT REGISTRATION, FIND, SHOW, FIX STREET, and RUNNERS CHIPS
definitions.
Select SET CLUB to set the Registrant’s club the default club for this membership race. Runner’s default clubs
are set for runners without default clubs.
Select SET PRIMARY MEMBERS to allow RaceTrak to determine primary members for registrants at the
same address. The primary member is the eldest (based on birthdate) of members at the exact same address.
Options are available to set only those registrants without a primary member or to reset all registrants.
Select SET MEMBER CODE to allow RaceTrak to determine the runner’s membership code. RaceTrak
prompts users for various choices to allow previous codes to be quickly updated.
Select MBR SHP RACES to quickly setup other races as membership races and opens the Race List screen.
47
Select SYNCH CLUB to set the registrants’ clubs in another race. For example, five of your members in the
membership race are registered in next week’s Turkey Run. The synchronize club feature allows you to select the
Turkey Run and these registrants will be assigned the membership race’s default club. By Note: the default club
must be specified in the Race Management Race Tab.
Select REMOVE EXPIRED to remove the runner’s default club and uncheck the active (current) membership
status checkbox for any runners not in the current race.
48
Select CLUB MAILINGS to open the Mailings screen (see Mailing screen section) and build letters, envelopes,
and labels geared to club members.
Select BUILD MEMBER LIST to open the Custom Output screen and build a listing of club members and their
membership code. One or more races can be selected and preferences to limit by Active Cub Members, Location,
Mailing List, and Gender are provided.
Select RRCA OUTPUT to build an address spreadsheet that conforms to the Road Runners Club of America
specifications (at the time of this User’s Manual). Note: runners must have valid mailing address to display in the
output.
Mailings Screen
The Mailings screen allows for the production of customized letters, envelopes, and labels. In the initial release
of RT6, this feature is only available for “membership races.” New in RT6.
Several additional command buttons and the reporting option are available.
Please note that fields in angled brackets can be used to insert default values. For example, to place today’s date
in an output, type <current_date> where you want the current to appear.
Note: messages data is not included in the RaceTrak_06_Data file; instead it is in the RaceTrak_06.mde and file.
If you install a RaceTrak patch, the settings will revert to the factory settings.
How to Get Here
Select CLUB MAILINGS from the Registrants (Membership Mode) Tab/Screen.
Full navigation: Main Menu > RACE MANAGEMENT > (select a membership race) EDIT > Registrants >
CLUB MAILINGS
49
Full navigation: Main Menu > REGISTRATION > (select a membership race) OK > REGISTRANT LIST >
CLUB MAILINGS
Fields
Field Name
Reqd?
Description
Message Name
Yes
RaceTrak name of the message; cannot be altered by users.
Message Opening
No
255 character opening information (date, salutation, opening
paragraph) contained in a letter.
Header
No
255 character heading information (main paragraphs)) that appear
immediately after the Message Opening contained in a letter.
Footer
No
255 character footer information (secondary paragraphs)) that appear
after the Header and immediately after a listing of members for this
primary member.
Message Closing
No
255 character closing information (closing paragraph and signature
area) contained in a letter.
Notes
No
Instructions regarding use of the Mailing feature.
50
Display
Yes
Allows users to determine what information shows for each club
member.
Filters
Yes
Allows users to apply filters to the output being generated.
Step By Step
Select LETTERS to generate letters in accordance with on-screen settings and filters.
Select LABELS to generate labels to the primary member in accordance with on-screen settings and filters.
Select ENVELOPES to generate envelopes to the primary member in accordance with on-screen settings and
filters.
Select CLOSE to close this screen and return to the previous screen.
Race Series Tab
The Race Series tab provides the capability to add and modify series for the current race, providing a convenient
way to score series as well as group races together. RaceTrak provides extensive series scoring capabilities, so
please refer to the Series Overview section for more details on series setup and capabilities. Below is summary of
the series process:
Create a series in Main Menu > Utilities > select tbl_series from the Generic Support Tables list box and
optionally configure additional series-wide settings (see Series Overview).
Associate the series to a race (Main Menu > RACE MANAGEMENT > (select a race) EDIT > Series Tab)
and optionally configure additional series settings for a given race (discussed in this section).
Register runners to a series so only those runners are included in the series results (see Series Screen Tab Score only Series Runner field). (This optional step is not necessary if series settings allow any runner to
count in the series scoring.)
How to Get Here
Select the Series tab on the Race Management screen.
Full navigation: Main Menu > RACE MANAGEMENT > (select a race) EDIT > Series
51
Fields
Field Name
Reqd?
Description
Series
Yes
Series associated with the current race. More than one series can be
associated with a race. Values for this drop-down are maintained in
Utilities (Utility List Screen > tbl_series). Series are created in
Utilities; once created series can be managed in Utilities or via Edit
Series on the Race Series tab.
Description
Yes
Series description (edit via Edit Series).
Start Date
No
Start date of the series (edit via Edit Series).
End Date
No
End date of the series (edit via Edit Series).
Notes
No
Race series notes.
Step By Step
A series must exist in order to associate it with the current race. To add a new series, go to Main Menu > Utilities
> select tbl_series from the Generic Support Tables (see Series Overview for more information on series setup).
The given race can be associated with one or more series. To associate the race to a new series, find the first
blank series record and select a Series from the Series drop-down.
The series drop-down value and related values (description, start date, and end date) are added and managed
through EDIT SERIES (see Series Screen Tab).
Select EDIT SERIES to open the Series Screen Tab screen and manage the series.
Select a series and select SERIES AWARDS FOR THIS RACE to open the Race Series Awards screen,
which allows the set up and management of series awards for this race (see Race Series Awards Screen).
Select a series and select SERIES TEAM SLOTS FOR THIS RACE to open the Race Series Team Slot List
screen (see Race Series Team Slot List Screen), which allows the set up and management of race series team
scoring slots for this race. For example, if you plan on scoring ten teams in this race, set up 10 slots.
52
Select a series and select RACE SERIES RESULTS/REPORTS to open the Race Series Results screen (see
Race Series Results - Series Team Actuals for Race Tab), which allows the view and reporting of series results for
this race.
Race Series Awards Screen
The Award Series Setup Screen provides the capability to set up and manage series awards for the current race
series (e.g., the association of a race and a series). All current race series awards (if any) are displayed on this
screen.
RaceTrak provides powerful features to score series awards and will accumulate the results for the entire series.
In order to utilize these features, series awards must be set up for the current race. RaceTrak provides tools to
copy awards from other races to greatly simplify this task.
Race series awards are performed through standard results processing. New in RT6.
How to Get Here
Select SERIES AWARDS FOR THIS RACE for a specific series from the Series tab on the Race
Management screen.
Full navigation: Main Menu > RACE MANAGEMENT > (select a race) EDIT > Series > (select a series) >
SERIES AWARDS FOR THIS RACE
Fields
Field Name
Reqd?
Description
Awd Category
Yes
A lookup field that provides default values for most other fields on the
screen. Values for this drop-down are maintained in Utilities (Utility
List Screen > tbl_award_category).
53
Division
Yes
Indicates the division for which the award applies. Values for this
drop-down are maintained in Utilities (Utility List Screen >
tbl_division).
Award Value
Yes
The relative priority of the award. Important: unlike race awards, race
series awards are scored in order of point value (where the higher
point awards are scored first) and then award value.
Award Description
No
Description of the actual award.
Allow Dups
(Duplicates)?
Yes
Indicates whether this award can be assigned to an individual who has
previously won a higher priority award. General custom is to leave
setting as No.
Age Low
Yes
Indicates the low age for which the award applies. Must be equal to or
less than the high age. For open awards, set the low age to 0, while
youngest age groups should start at age 1 (and not 0). Never leave the
Age Low field blank.
Age High
Yes
Indicates the high age for which the award applies. Must be equal to or
greater than the low age. For open awards, set the high age to 99.
Never leave the Age High field blank.
Sex
Yes
Indicates the sex for which the award applies. Set as None if award
can go to either Male or Female.
Low Wgt (Weight)
Yes
Indicates the low weight for which the award applies. Must be equal to
or less than the high weight. Used in Clydesdale type races.
High Wgt (Weight)
Yes
Indicates the high weight for which the award applies. Must be equal
to or greater than the low weight. Used in Clydesdale type races.
Award Basis
Yes
Assigns awards based on user selected Adjusted Time (Chip or Wave
time) or actual Finish Time (Guntime).
Points
No
Indicates the point value to be assigned for this award. Important:
unlike race awards, race series awards are scored in order of point
value (where the higher point awards are scored first).
Special Category
No
The special category for this award. Values for this drop-down are
maintained in Utilities (Utility List Screen > tbl_special_category).
Award Place
No
The numeric value of an award within an award category (e.g., 1 for
first, 2 for second, 3 for third, etc).
Step by Step
Click on a column heading to sort/group by that column.
Select ADD NEW to create new awards (see Race Series Awards Generate Screen).
Select EDIT to edit selected award data on the current screen.
Select COPY FROM to copy awards from another race series. Note: this feature can only be used when there
are no awards for the current race series.
Select DUP ALL AWARDS to set all awards to allow duplication (e.g., the overall winner is also eligible to win
his or her age group).
Select UNDUP ALL AWARDS to set all awards to not allow duplication (e.g., an award winner can only win
one award).
54
Select BATCH UPDATE AWD BASIS to set all awards to a selected award basis (change all awards to either
Adjusted Time (Chip or Wave time) or actual Finish Time (Guntime).
Select DELETE ALL AWARDS to delete (upon confirmation) all race series awards for this race.
Select CLOSE to close the current screen and return to the previous screen.
Race Series Awards Generate Screen
The Award Series Setup Screen provides the capability to generate a pool of awards and associated points for the
current race series. As a powerful RaceTrak feature, points for individual runners and for club teams can be
accumulated for an entire series.
How to Get Here
Select ADD NEW from the Race Series Awards Screen.
Full navigation: Main Menu > RACE MANAGEMENT > (select a race) EDIT > Series > (select a series) >
SERIES AWARDS FOR THIS RACE > ADD NEW
Fields
Field Name
Reqd?
Description
Category
Yes
A lookup field that provides default values for most other fields on the
screen. Values for this drop-down are maintained in Utilities (Utility
List Screen > tbl_award_category).
Duplicates Allowed?
Yes
Indicates whether this award can be assigned to an individual who has
previously won a higher priority award. General custom is to leave
setting as No.
Division
Yes
Indicates the division for which the award applies. Values for this
drop-down are maintained in Utilities (Utility List Screen >
tbl_division).
55
Award Basis
Yes
Assigns awards based on user selected Adjusted Time (Chip or Wave
time) or actual Finish Time (Guntime).
Total New Awards
Yes
Indicates the total number of awards to be generated for this award
category.
Points for Best Place
Yes
Indicates the highest point value for an award in this award category.
Decrement Value
Yes
How much to decrement from the Points for Best Place. In the
example in the screenshot above, three awards would be generated
with values of 30, 27, and 24.
Gender
Yes
Indicates the gender for which the award applies. Set as None if award
can go to either Male or Female.
Age Low
Yes
Indicates the low age for which the award applies. Must be less than or
equal to the high age. For open awards, set the low age to 0, while
youngest age groups should start at age 1 (and not 0). Never leave the
Age Low field blank.
Age High
Yes
Indicates the high age for which the award applies. Must be greater
than or equal to the low age. For open awards, set the high age to 99.
Never leave the Age High field blank.
Weight Low
Yes
Indicates the low weight for which the award applies. Must be less
than or equal to the high weight.
Weight High
Yes
Indicates the high weight for which the award applies. Must be greater
than or equal to the low weight.
Step by Step
GENERATE creates awards based on the criteria specified on the screen and updates the screen showing newly
created series awards.
CLOSE closes the current screen and returns to the previous screen.
Race Series Team Slot List Screen
The Race Series Team Slot List Screen provides the capability to specify point values to be associated with team
places for the current series. For each race, a series team can receive points for that race. These points can then be
totaled to determine series winner.
Please note that a Series Team Category must be set up in Utilities.
Race series team scoring is performed through standard results processing. New in RT6.
How to Get Here
Select RACE SERIES TEAM SLOT LIST for a specific series from the Series tab on the Race Management
screen.
Full navigation: Main Menu > RACE MANAGEMENT > (select a race) EDIT > Series > (select a series) >
RACE SERIES TEAM SLOT LIST
56
Fields
Field Name
Reqd?
Description
Place
Yes
The place for the race series team slot to be created.
Series Team Category
Yes
A lookup field. Values for this drop-down are maintained in Utilities
(Utility List Screen > tbl_series - (select the series for Edit)).
Points
Yes
Indicates the point value to be assigned to the team winner in this
category.
Series Team
No
Not shown: under Advanced options only, allows the manual selection
of a series team for the award. Should only be used when manual
intervention is needed to resolve a tie or results needed to be manually
entered.
Step by Step
Click on a column heading to sort/group by that column.
COPY FROM displays provides the capability to copy race series team slots from another race.
CLOSE closes the current screen and returns to the previous screen.
Race Series Results - Series Team Actuals for Race Tab
The Race Series Results Screen provides the capability to view race series results and reports for this race. Four
tab screens display team results, team slots, awards, and award winners for this race. The data in these tabs can be
accumulated to show overall series winners (see Series Reports Tab). In addition, several reports are available for
the series results for this race. This section discusses race series reports and the Race Series Results - Series Team
Actuals for Race tab. For a more complete discussion on other race series management features, please see the
following sections, which immediately follow this section:
Race Series Results - Series Team Slots for Race Tab
57
Race Series Results - Series Awards for Race Tab
Race Series Results - Series Awards for Race Tab
The Series Team Actuals for Race Tab shows all teams and their associated total team score after the race has
been scored. IMPORTANT Please note that many settings can impact the team scores: if incomplete teams are
allowed, the scoring will show teams having no official finishers and/or teams not meeting team category criteria.
These teams will appear to be the winners, so be very careful when using allowing incomplete teams, which is
intended to provide “what if” or “do we have any potential teams not yet scored” views of data.
The data on the Actuals screen shows what teams actually scored and will include the totals for teams that may
not have enough qualifying runners.
IMPORTANT: Series Team scoring requires that runners be associated with series teams:
Series Teams Categories and Series Teams must be setup (and check Team Category settings (check all total
scorers and whether incomplete teams are scored)
Runners must be setup for a series, a team must be selected, and runners’ eligibility start date must be on or
before the race date.
If Race Series Team Actuals appear incorrect, check the above settings and correct as necessary, then recalculate
the results.
How to Get Here
Select RACE SERIES RESULTS/REPORTS for a specific series from the Series tab on the Race
Management screen. Select the Series Actuals for Race tab.
Full navigation: Main Menu > RACE MANAGEMENT > (select a race) EDIT > Series > (select a series) >
RACE SERIES RESULTS/REPORTS > Series Team Actuals for Race Tab.
58
Fields
Field Name
Reqd?
Description
Series Team Category NA
Name
The Series Team Category.
Series Team
NA
The Series Team for this Series Team Category.
Score
NA
Indicates the total point value to be assigned to the team (based on the
criteria set for the Series Team Category).
DQ
No
When checked, team has been disqualified in this race.
rescoring the race, this team will not be included in the results.
Tie Brk Winner
No
Indicates the priority-based point value to be assigned to the team
winner where lower is better. Does not require rescoring of the race.
After
Step by Step
RACE SRS AWD RPT is a customizable report and displays the series awards for this race.
RACE SRS ENTRANTS displays a spreadsheet view of registrants associated with the series.
RACE SRS TEAM MBRS displays a spreadsheet view of registrants associated with the series and on series
teams.
RACE SRS FINISHERS displays a spreadsheet view of finishers associated with the series by gun or chip
time.
RACE SRS TEAM RESULT displays a spreadsheet view of either team scores or individual results for teams
associated with the series.
EDIT SERIES/SRS REPORTS displays the series and its associated settings. Reports for the entire series are
also available.
CLOSE closes the current screen and returns to the previous screen.
Race Series Results - Series Team Slots for Race Tab
The Race Series Results - Series Team Slots for Race Tab shows how team slots have been awarded to teams and
is presented primarily for verification purposes. While the data can be changed, such changes are not
recommended. In general changes should be made to the series using EDIT SERIES/SRS REPORTS.
How to Get Here
Select RACE SERIES RESULTS/REPORTS for a specific series from the Series tab on the Race
Management screen. Select the Series Team Slots for Race tab.
Full navigation: Main Menu > RACE MANAGEMENT > (select a race) EDIT > Series > (select a series) >
RACE SERIES RESULTS/REPORTS > Series Team Slots for Race tab.
59
Fields
Field Name
Reqd?
Description
Place
Yes
The finishing position/place for the race series team slot to be created.
Series Team Category
Yes
A lookup field. Values for this drop-down are maintained in Utilities
(Utility List Screen > tbl_series - (select the series for Edit)).
Points
Yes
Indicates the point value assigned to each team.
Team
Yes
The team (if any, awarded this team slot).
Step by Step
See Race Series Results - Series Team Actuals for Race Tab for a discussion of the reports.
The screen is provided for reference purposes and data should generally not be changed.
CLOSE closes the current screen and returns to the previous screen.
Race Series Results - Series Awards for Race Tab
The Race Series Results - Series Awards for Race Tab displays the series awards currently setup for this race and
is presented for reference purposes only. See Race Series Awards Screen for managing this data.
IMPORTANT: Do not mix Open and Age Group awards within the same series (if you wish to do so, create a
second series). With both Open and Age Group awards within the same series, a runner might get Open award in
one race and an Age Group in another, thereby “splitting” his/hers awards among two categories, which is unfair
to the runner.
60
How to Get Here
Select RACE SERIES RESULTS/REPORTS for a specific series from the Series tab on the Race
Management screen. Select the Series Awards for Race Tab.
Full navigation: Main Menu > RACE MANAGEMENT > (select a race) EDIT > Series > (select a series) >
RACE SERIES RESULTS/REPORTS > Series Awards for Race Tab.
Fields
Field Name
Reqd?
Description
Category
NA
Award Category.
Divison
NA
Division for the award.
Points
NA
Indicates the point value for the series award for this race. Note: series
race awards are assigned in point order where higher is better, then
award value where lower is better.
Value
NA
Indicates the value for the series award for this race. Used as a
secondary sort when awards are assigned. See Points above.
Dup
NA
Indicates whether this award can be assigned to an individual who has
previously won a higher priority award. Default setting is No.
Sex-Age
NA
The gender and age range for this award.
Step by Step
See Race Series Results - Series Team Actuals for Race Tab for a discussion of the reports.
The screen is provided for reference purposes only, showing the series awards set up for this race.
Click on a column heading to sort/group by that column.
61
CLOSE closes the current screen and returns to the previous screen.
Race Series Results - Series Award Winners for Race Tab
The Race Series Results - Series Award Winners for Race Tab displays the series award winners for this race and
is presented for reference purposes only. Note: awards are assigned via Results Processing>Awards>Assign
Awards.
How to Get Here
Select RACE SERIES RESULTS/REPORTS for a specific series from the Series tab on the Race
Management screen. Select the Series Award Winners for Race tab.
Full navigation: Main Menu > RACE MANAGEMENT > (select a race) EDIT > Series > (select a series) >
RACE SERIES RESULTS/REPORTS > Series Awards Winners for Race tab.
Fields
Field Name
Reqd?
Description
Category
NA
Award Category.
Division
NA
Division for the award.
Points
NA
Indicates the point value for the series award for this race. Note: series
race awards are assigned in point order where higher is better, then
award value where lower is better.
Value
NA
Indicates the value for the series award for this race. Used as a
secondary sort when awards are assigned. See Points above.
62
Dup
NA
Indicates whether this award can be assigned to an individual who has
previously won a higher priority award. Default setting is No.
Sex-Age
NA
The gender and age range for this award.
Place
NA
The runner finishing place (gun or chip place as determined by the
setting for this award).
Time
NA
The finishing time (gun or chip as determined by the setting for this
award).
Bib
NA
Bib assigned to award winner.
Name
NA
Award winner name.
Series
NA
Series for the award.
Step by Step
See Race Series Results - Series Team Actuals for Race Tab for a discussion of the reports.
The screen is provided for reference purposes only, showing the series awards winners for this race.
Click on a column heading to sort/group by that column.
CLOSE closes the current screen and returns to the previous screen.
Race Special Categories Tab
The Race Special Categories tab provides the capability to add and modify special categories for the current race.
Race special categories allow the development of different categories under which to sort the finish order of
runners and can be used in conjunction with award processing.
Race special categories are used in conjunction with “special items” (see Race Specials tab). Examples of race
special categories are Military, Police, and School, and these race special categories can be associated with race
awards. Specials are subsets of the race special category. For example, Army, Navy, Air Force, and Marines are
race specials all having the Military special category. Race specials can be associated with runners during
registration.
Note: Race special categories differ from special categories. Race special categories are required to set up special
items. Special categories are set up and managed in Utilities and are used in conjunction with series scoring. At
the time of this User’s Manual, selection of special categories has no bearing on the scoring of the current race.
How to Get Here
Select the Special Cats tab on the Race Management screen.
Full navigation: Main Menu > RACE MANAGEMENT > (select a race) EDIT > Special Cats
63
Fields
Field Name
Reqd?
Description
Race Special Category
Yes
The name of the race special category.
Special Category
No
The special category for this race special category. Values for this
drop-down are maintained in Utilities (Utility List Screen >
tbl_special_category). Reserved for future use.
Race Special Category
Description
No
Description of the race special category.
Notes
No
Race special category notes.
Active Flag
No
Indicates of the current record is active or inactive. Reserved for
future use.
Sort Order
No
Sort order for reports. Reserved for future use.
Step By Step
If new special categories are to be created, be careful not to type over existing categories - always start on an
empty row (with the asterisk) for new records. When race special categories exist, the screen like that above is
displayed. However, when no special categories exist, an empty row is displayed.
To add a new special category, find the first record that does not have a special category in the Special Category
Description box. Hint: To reach the end of special category records quickly, click the VCR-style fast forward
button. Type values as appropriate.
64
Race Specials Tab
The Race Specials tab provides the capability to add and modify special race designations for the current race.
These special designations work in conjunction with race team categories discussed above. A special category is a
grouping (military) while the special designation is a member of that group (Army, Navy, Air Force, or Marine).
Please not the following:
Each special must be assigned a race special category.
A runner can be assigned to one or many specials during the registration process. For example, a given race
may have a race special category of college and specials of teacher, alumni, and student. It is conceivable that
a given individual could qualify for all three of these specials.
How to Get Here
Select the Specials tab on the Race Management screen.
Full navigation: Main Menu > RACE MANAGEMENT > (select a race) EDIT > Specials
Fields
Field Name
Reqd?
Description
Special Award
Yes
The name of the special award/item.
Race Special Category
Yes
The race special category for this race special category. Values for
this drop-down are maintained in Race Management Race Special
Categories Tab.
Race Special
Description
No
Description of the race special award/item.
Notes
No
Race special notes.
65
Active Flag
No
Indicates of the current record is active or inactive. Reserved for
future use.
Sort Order
No
Sort order for reports. Reserved for future use.
Step By Step
If new specials are to be created, be sure not to type over existing special - always start on an empty row (with the
asterisk) for new records. When specials exist, data is displayed as shown above. However, when no specials
exist, an empty row is displayed.
To add a new special, find the first blank special record. Hint: To reach the end of special records quickly, click
the VCR-style fast forward button; then go to the next record which should have a blank special record.
Type values as appropriate. The Special Description and Race Special Category fields must be completed.
Race Splits/Legs Tab
The Race Splits/Legs tab provides the capability to add and modify splits (or legs) for the current race. Race splits
allow the setup of one or more splits "headers" for the current race. For example, a one mile split and a 3.1 Mile
(halfway) split could be setup for the race. From results processing (reconciliation), times captured at these
locations can be loaded into the splits created here.
How to Get Here
Select the Splits/Legs tab on the Race Management screen.
Full navigation: Main Menu > RACE MANAGEMENT > (select a race) EDIT > Splits/Legs
Fields
Field Name
Reqd?
Description
66
Sequence
Yes
The order of the split. Used in reporting to logically sort the splits in
the order they occur.
Race Split Name
Yes
The name of split (e.g., One Mile, Half-Way, etc.). This value will be
available for selection when loading split times in Results Processing Reconciliation.
Race Split Description
No
Description of the race split.
Distance
No
The distance for the split. Values for this drop-down are maintained in
Utilities (Utility List Screen > tbl_distance).
Division
No
The division for the split. Values for this drop-down are maintained in
Utilities (Utility List Screen > tbl_division).
Notes
No
Split/leg notes.
Step By Step
If new splits are to be created, be careful not to type over existing splits. When race splits exist, the screen like
that above is displayed. However, when no splits exist, an empty record is displayed.
Splits/legs can be added manually or in batch mode.
Click on a column heading to sort/group by that column.
To add a new split/leg manually, find the first record that does not have a split. Hint: To reach the end of the
record list quickly, click the VCR-style fast forward button. Type values as appropriate.
Select BATCH ADD to add one or more splits/legs to the current race.
Select DELETE ALL to delete the splits/legs (including any splits recorded for runners) in the current race.
Race Team Categories Tab
The Race Team Categories tab provides the capability to add and modify race team categories for the current race.
67
RaceTrak allows multiple team categories in any race, so team categories can be set up for various categoires
(male, female, coed, family, etc.)
Below are some guidelines regarding race team categories.
Race team categories are unique to each race. Races that include teams must set up team categories.
Race team categories must be set up before teams can be created. Examples of race team categories that may be
created include Military, High School, Open Male, Open Female, Open Coed, Masters Male, Masters Female, and
Masters Coed.
Team scoring is performed within race team category. Runners within a race team category are scored only
against runners on teams within that category. Teams can be scored across divisions but within the same
category.
Coed Teams. RaceTrak accommodates coed team scoring through the use of minimum numbers of male and
female scorers in the given category. For example, a seven-person coed team may have four total scorers and
require that at least one member of each gender be counted in scoring. To accommodate this situation, set the
Minimum Male Scorers to 1, the Minimum Female Scorers to 1, and Total Scorers to 4.
RaceTrak does not validate Team Members against age. RaceTrak does not check that all entrants match the
Team Category. For example, a 25-year-old could be placed on a Masters' team and would be scored as part of
that team. Please check these manually.
RaceTrak does not validate Team Members against gender. RaceTrak does not validate Team Members against
gender for registration purposes but WILL score team members correctly based on the gender criteria specified in
the team category. For example, a female could be placed on an all-Male team. However, if this female were one
of the top 4 runners on a 4 person scoring team, she would not be scored. Please check these manually.
Race Team Categories allow any size team and combination of members. A team can consist of any number of
total male and female Scorers and Displacers. These numbers can be changed at any time; if results have been
calculated, they must be recalculated to determine correct team scores (see Race Results Management Screen).
Scorers and Displacers. Only scorers' results are calculated when determining results. A displacer does not count
in team scoring, but his or her place is allowed, thus adding higher total points to runners who finish later in that
team's category.
Team Score Basis. RaceTrak can score teams (within team category) by either the actual finish (guntime) time or
the chip/wave adjusted time. Guntime is recommended.
How to Get Here
Select the Team Cats tab on the Race Management screen.
Full navigation: Main Menu > RACE MANAGEMENT > (select a race) EDIT > Team Cats
68
Fields
Field Name
Reqd?
Description
Category Name
Yes
The name of race team category. This value will be available for
selection when setting up teams.
Print Order
No
Determines where the team category will print on reports relative to
other team categories. The lower the number the earlier it will print.
Score Basis
Yes
Used to identify which time to use: the actual finish time or adjusted
time.
Min Male Scorers
Yes
The minimum number of male scorers for the current category.
Max Male Displacers
Yes
The maximum number of male displacers for the current category.
Min Female Scorers
Yes
The minimum number of female scorers for the current category.
Max Female
Displacers
Yes
The maximum number of female displacers for the current category.
Total Scorers
Yes
The total number of scorers for the current category. This number
must be greater than or equal to the total number of Minimum Male
Scorers plus the Minimum Female Scorers.
Total Displacers
Yes
The total number of displacers for the current category. This number
must be greater than or equal to the total number of Maximum Male
Displacers plus the Maximum Female Displacers.
Total Others
Yes
The total number of other team members not to be counted as scorers
or displacers. Currently, this is an information only field.
Remove Incomplete
Teams
No
Will remove incomplete teams from results. This field is typically set
to Yes, but in certain circumstances you may need to see incomplete
teams.
69
Age Grade
No
Provides a mechanism to age grade team member times. Under
advanced options only. Values for this drop-down are maintained in
Utilities (Utility List Screen > tbl_age_grade). New in RT6.
Step by Step
If new race team categories are to be created, be careful not to type over existing team categories. When race team
categories exist, the screen like that above is displayed. However, when no team categories exist, an empty record
is displayed.
To add a new team category, find the first record that does not have a team category in the Category Name box.
Hint: To reach the end of team category records quickly, click the VCR-style fast forward button.
Type values as appropriate, keeping the following guidelines in mind.
For male-only teams, the Minimum Male Scorers should equal to the Total Scorers, the Maximum Male
Displacers should equal the Total Displacers, and the values for Minimum Female Scorers and Maximum Female
Displacers should be 0.
For female-only teams, the Minimum Female Scorers should equal the Total Scorers, the Maximum Female
Displacers should equal the Total Displacers, and the values for Minimum Male Scorers and Maximum Male
Displacers should be 0.
For standard coed teams, specify at least one Minimum Male Scorer and at least one Minimum Female Scorer,
and be sure that the total number of scorers is greater than or equal the total of Minimum Male Scorers plus the
Minimum Female Scorers.
For family-type coed teams, consider specifying zero Minimum Male Scorers and zero Minimum Female Scorers
to prevent incorrect scoring of all-male and/or all-female families when gender is not a criterion.
Teams not meeting the minimum number of team scorers are automatically eliminated from team scoring by
when the Remove Incomplete Teams checkbox is checked (default). Runners on these teams will qualify for
individual race awards but will be eliminated from team scoring.
Race Teams Tab
The Race Teams Tab provides the capability to add and modify Teams for the current race.
Below are some guidelines and hints regarding teams.
Each team must be assigned a race team category. A race team category (Open Male, Open Female, Open Coed,
etc.) is required for each team. Race team categories are created and managed in the Race Team Categories tab.
A disqualified team's members do not displace other runners in the race team category. If a Team is
disqualified, it will not be reported on RaceTrak Team Reports, and its runners, while still qualifying for race
awards, are eliminated from team scoring.
A runner can be on only one team in a given race. A runner cannot be on several different teams in a single race.
However, a runner can be assigned to both a team and a club during the registration process.
How to Get Here
Select the Teams tab on the Race Management screen.
Full navigation: Main Menu > RACE MANAGEMENT > (select a race) EDIT > Teams
70
Fields
Field Name
Reqd?
Description
Team Name
Yes
The team name, up to 50 characters in length.
Team Category
Yes
The team scoring category for this team. Values for this drop-down
are maintained in Race Management Race Team Categories Tab.
Tie Brkr
No
Allows winning teams to print in correct order when team scores are
tied. RaceTrak automatically calculates this value, but in some cases
RaceTrak cannot determine and users can manually override. Number
from low (best) to high (worst) for any teams that are tied. For
example, if Valley View HS should beat Guys and Dolls, simply
change Guys and Dolls Tie Brkr to 1.
Recurring Team
No
Associates this team to a Recurring Team to speed team data entry
where members of a recurring can be quickly picked and registered
into a race. Advanced options only. Values for this drop-down are
maintained in Utilities (Utility List Screen > tbl_recurring_team).
DQ
No
When checked, indicates that the team is disqualified.
Club
No
The club that a particular team may represent. Advanced options only.
Values for this drop-down are maintained in Utilities (Utility List
Screen > tbl_club).
Team Bib
No
The bib number for a team. Used when individual runners are not
scored and only the team is scored. Values for this drop-down are
maintained in Race Management Bibs Tab (advanced options when
Team Bib is checked).
71
Team Chip 1
No
Used when individual runners are not scored, only the team is scored,
and each team only gets one chip.
Note: a chip must be specified when teams use a shared bib even
when “bib is chip.”
Team Chip 2
No
The second chip number for a team. Used when individual runners are
not scored, only the team is scored, and each team two chips.
Wave
No
The wave a team is assigned. Used when individual runners are not
scored and only the team is scored.
Step by Step
If new teams are to be created, be sure not to type over existing teams. When teams exist, data is displayed as
shown above. However, when no teams exist, an empty record is displayed.
To add a new team, find the first blank team record. Hint: To reach the end of team records quickly, click the
VCR-style fast forward button; then go to the next record which should have a blank team record.
Type values as appropriate. The Team Name and Team Category fields must be completed.
Click on a column heading to sort/group by that column.
IMPORTANT! When using team bibs and chips (i.e., relay teams where team members share the same bib), such
bibs and chips must be assigned to teams and assignment can only occur manually. Therefore, after teams are
created, the team bib or chip must be assigned to the Team.
Scenario: Relay Overview
When scoring relay races, please keep the following in mind:
RaceTrak can score relays by adding up the individual times for the members of a team or by using the
time associated with a team bib when team members share the same bib number. However, scoring both
individually and a shared bib should not be performed within the same race.
Be sure to specify your Timing Method in the Race Management drop-down.
In most cases (except in a Relay-only race), you should create a separate Relay Division and setup a predetermined range of bibs for the Relay division. If your race only has relay participants, you can skip this
step.
The Relay report will display both the cumulative individual team finish times as well as the time for a
shared bib, so be sure to not capture both sets of times for a given team.
Important: many of the chip systems read chips up to long distances, so if you are individually timing
relay participants, you need to be sure to keep them away from split and finish mats.
Scenario: Relay Teams Using Chip System Where Team Members Share
the Same Chip
Designate the bib as Team Bib (in Race Management > (advanced options) Bibs. Once teams are added, you
need to assign the bib to the team in Race Management > Teams (advanced options).
Under this scenario, runners are scored as a team by the team bib and not by their individual bib, so it is important
that you do not collect times for individual’s bib. For example, if Team One has been assigned bib and chip 1001,
you do not want to collect individual times for of Team One’s individuals who have been assigned bibs 2001,
2002, and 2003. To avoid collecting times for these team members, simply assign them bibs that do not have
chips. In this scenario, bibs 2001, 2002, and 2003 do not have chips, but bib 1001 does.
If your relay has a known number of team members, you may consider setting up dummy bibs for individual team
members to match the shared bib. For example, if you have a three-person relay, you could setup bibs 1001-2000
72
as team bibs for the relay division and setup bibs 1001a-2000a, 1001b-2000b, and 1000c-2000c for individual
team members. However, you must double-check your bib assignments after imports and must then assign the
bib to the teams. Important: this method is not recommended if you cannot control the number of team members
on each team; for example, if you’ve setup bibs for three-person teams (with a, b, and c suffixes) but you have
some one or two-person teams in your registration file, resulting in team 1 getting bibs 1a and 1b while team 2
gets bibs 1c, 2a, and 2b.
In this scenario, you are scoring a team based on team members sharing the same bib, so please consider the
following:
Setup a relay division in Utilities.
In Race Management, use advanced bib generation settings to generate a range of bibs for the relay division
and set the bibs to be Team Bibs, which will not be automatically assigned during manual or import
registration processes. In addition, create a set of dummy bib numbers for the registrants where the bibs are
not Team Bibs but are setup for the Relay division.
After registering runners, be sure to select a bib and a chip for the relay teams. When importing registrants,
assign bibs in team import order (so that team members will be assigned consecutive numbers). Please refer
to Registrant Import for tips on import order.
When generating labels, both individual labels and team labels are printed.
After scoring the race, generate the Relay report
IMPORTANT! Review the Relay report and check for duplicate teams (which can occur if individual team
members received times).
Scenario: Relay Teams Using Non-Chip System
Under this scenario, runners are scored individually, and because RaceTrak will add up the times for relay
finishers, be sure to only collect finish time for the anchor leg.
In this scenario, you are scoring a team based on individual team members’ results, so please consider the
following:
Setup a relay division in Utilities.
In Race Management, use advanced bib generation settings to generate a range of bibs for the relay division.
In general, you only want to collect a finish time for the anchor leg, so just limit your finish chute to anchor
legs. Note: you can separately pull tags and get times for non-anchor legs but you need to have a pairing of
spindles and timing devices for each split; RaceTrak recommends you perform imports of such data after the
race has been fully scored and backed up.
After scoring the race, generate the Relay report, which will list the cumulative finish times for runners.
IMPORTANT! Review be sure that all relay runners are assigned the Relay division.
Waves Tab
The Waves Tab provides the capability to set up waves for the current race. Each wave can be assigned an offset
time (seconds), a time of day start time, and an order.
Runner adjusted times are automatically calculated during results processing and subtract wave times to
determine adjusted times. RaceTrak users can use race preferences to adjust the finish time by the wave time.
Results reports can be generated to report on the adjusted time or on the actual time. Furthermore, awards and
teams can be scored by either actual finish time or adjusted time.
73
How to Get Here
Select the Waves tab on the Race Management screen.
Full navigation: Main Menu > RACE MANAGEMENT > (select a race) EDIT > Waves
Fields
Field Name
Reqd?
Description
Wave
Yes
A unique description of the wave name. It is recommended that the
order of waves be indicated in this description.
Offset Amount
(seconds)
Yes
The amount of time in seconds to offset the runners time when
calculating adjusted times. For example, the initial wave is generally
offset by 0 seconds. The second wave starts 5 minutes later, so 300 is
specified and 5 minutes is subtracted to this wave’s times. If a wave
starts before Wave 1, the offset must be specified as a negative
number.
Offset Time
No
The offset amount expressed in hours-minutes-seconds format.
Start Time
No
The expected start time for the wave. Note: the time does not change
when offsets are changed.
Wave Order
No
The order the waves will be run.
Step By Step
Specify a unique wave description, an offset amount, and a wave order.
Specify a negative offset amount to have times added for runners in this wave.
Note: The offset amount can be estimated and later updated to reflect the actual start time. However, results must
be re-calculated to determine updated times.
74
Click on a column heading to sort by that column.
Select BATCH ADD to quickly set up multiple waves.
Select DELETE ALL to remove all the waves - and any waves assigned to runners and bibs - from the current
race.
Wave Generation Screen
The Waves Generation Screen provides the capability quickly set up multiple waves for the current race. New in
RT6.
How to Get Here
Select BATCH ADD from the Waves tab on the Race Management screen.
Full navigation: Main Menu > RACE MANAGEMENT > (select a race) EDIT > Waves > BATCH ADD
Fields
Field Name
Reqd?
Description
Wave Name
Yes
A unique description of the wave name.
Race clock time for
first wave
Yes
The expected “race clock” start time for the wave. For example, the
first wave usually starts at race clock time 00:00:00.
Number of waves to
create
Yes
The total number of waves to be created.
The first wave starts at
number
Yes
The number of the first wave being created.
Create a new wave
every x seconds
Yes
The number of seconds to separate each wave.
New waves occur
[before or after] the
first wave
Yes
Specify if the new waves to be generated come before or after the first
wave.
Time of day for first
wave
Yes
The expected time of day start time for the wave.
75
Step By Step
Complete all fields on the screen. Note: RaceTrak will automatically append a number to the wave name as it
creates the waves.
Select GENERATE to build waves based on screen settings.
Select CLOSE to close the current screen and return to the previous screen. .
76
Registration
Registration Overview
The Registration module provides the capability to quickly register and edit race registrants. Before runners can
be registered, the race must have a pool of available bib numbers; the pool of bib numbers is created (see Bibs
Tab). Once these conditions have been met, the registration process can begin. Please refer to the Registrant
Import Screen for importing registrations from online services and customer data files).
Hint: the bibs can be setup with special characteristics (wave, division, hat color) and these characteristics will be
assigned to registrants.
Please note that Registration Screen can be customized by the user (under Utilities) and therefore, the screens
depicted may not match yours.
Please refer to Reports/Labels Screen for various registration reports.
Race Registration List Screen
The Race Registration List Screen provides the capability to view races and select a race in which to register
runners. The screen lists all races in reverse date time order with the most recent race shown at the top of the list.
Note: if the Race Show Flag has been unchecked in Race Management, the race is not displayed.
The Race Registration List Screen is accessed from the Race Management Screen upon selecting
REGISTRATION.
How to Get Here
Select Registration from the Main Menu.
Full navigation: Main Menu > REGISTRATION
Step by Step
The Race Registration List Screen displays a summary list of races in date order where the newest races are listed
first.
Click on a column heading to sort by that column.
Position the cursor on the desired race and select OK to continue.
77
Command Buttons
OK displays the Select Runner for Registration Screen.
CLOSE returns the user to the RaceTrak Menu Screen.
Select Runner for Registration Screen
The Select Runner for Registration Screen provides the capability to search, view, and select all runners who have
ever been entered into the RaceTrak database. After a runner is entered into RaceTrak, little if any information
needs to be retyped.
The Select Runner Screen is accessed from the Select Race for Registration Screen upon selecting OK.
How to Get Here
Select OK from the Race Registration List Screen.
Full navigation: Main Menu > REGISTRATION > (select a race) OK
Step by Step
The default option is to search by runner name. Use Search Options (new in RT6) to perform alternate searches.
Set the Bib Issue mode (new in RT6) to the appropriate setting:
Next Available Bib assigns the next available bib as the default bib during Registration (the next available bib
is the next unassigned, unreserved numerical bib)
Next Bib > Last Bib assigns the next highest bib greater than the last assigned bib (if last bib assigned was
100, 101 will be next default bib during Registration, even if number 99 is available)
Manually Type All bib field is empty and cursor positioned for user to type bib into this field (useful in when
RaceTrak is networked to avoid conflicts in bib assignment)
Type the letters, special characters, or numbers for your search until a match is found.
78
Hint: The most common search is by name and generally 3-4 characters is enough to determine if the runner you
searching is in the database or not.
Please note that runner you are searching is either in the database or is not in the database.
If the runner is in the database, highlight and select the desired name.
For the fastest selection of an existing runner, use the down arrows on the keyboard to highlight the desired
name and press [ENTER].
The Registration Screen is displayed, or, if the runner was previously registered for this race, the Duplicate
Registration message box is displayed. To update a registered runner, select OK in the message box and the
Registration Screen in Update mode is displayed; otherwise cancel to register another runner.
If the runner is not in the database, select ADD NEW. The Runner Screen in Add New mode is displayed.
Always consider that the person may have submitted an alternate spelling of his or her name. For example, an
entry form may indicate Robert while the runner may be in the database as Bob.
Hint: Check the Keep Drop-down Open checkbox and the drop-down names will always be displayed as search
values are entered.
Hint: In networked environments change the Bib Issue Mode to Manually Type All to remove contention for a
given bib.
Other functions available from the Select Runner Screen include alternate searches by Permanent Chip, Recurring
Team (which groups runners by Recurring Teams), Runner ID, Permanent Bib, Race Bib, and Birthdate.
Note: New runners can only be added from the Name Search.
Best Practices
For networked environments, use the Manually Type All in the Bib Issue mode.
Command Buttons
OK depending on whether the runner’s status, displays one of the following:
79
Registration (Add New Runner) Screen (if the runner in not in the database)
Registration (Add New Registration) Screen (if the runner is in the database, but not in the current race)
Runner Registered Message Box (if the runner is in the database, but already in the current race; selecting Yes
will open the Registration (Edit Registration) Screen)
ADD NEW displays the Runner Screen in Add New mode.
RACE MGT displays the Race Management Screen (with reduced functionality) for this race.
REGISTRANT LIST displays all runners in this race via the Registrants Tab/Screen for this race.
SKIP BIB displays the Enter Bib Input Box, which allows you to specify a bib number to skip. This bib is placed
in a reserved status, so the bib will not be automatically assigned. The bib can be reset in the Race Management Bibs Tab.
CLOSE returns the user to the RaceTrak Menu Screen.
Registration Screen
The Registration Screen is accessed for three purposes, which allow you to
Add of a new runner who is not in the RaceTrak database (via the Add New Button from the Select Runner
for Registration Screen; once a new runner is added, he/she can then be registered into the current race.
Register an existing runner into the current race
Update an existing registration
Per above, when a runner is not in the database, registration is a two-step process. A runner must be added, and
then the runner must be registered into the current race. RaceTrak makes this a seamless process.
The following sections describe the three modes of registration.
Registration (Add New Runner) Screen
When a runner is not in the database, registration is a two-step process: 1) the runner must be added and 2) the
runner must be registered into the current race.
This section describes the steps for adding a new runner who does not exist in the database.
80
How to Get Here
Select Add New from the Select Runner for Registration Screen OR select ENTER from the Select Runner for
Registration Screen when new name with no matches is displayed.
Full navigation: Main Menu > REGISTRATION > (select a race) OK > SELECT RUNNER FOR
REGISTRATION > ADD NEW or OK (when no matches are displayed for the current name search)
Fields (All Mode Display Options)
Runner Fields
Field Name
Reqd?
Description
PersonKey
Yes
System generated unique identifier for the runner; locked and cannot
be altered. Every runner has a unique PersonKey.
First Name
Yes
The first name of the runner.
Middle Name
No
The middle name of the runner.
Last Name
Yes
The last name of the runner.
Sal
No
The salutation (such as Dr., Mr., Ms., etc.) of the runner that will print
on mailing labels.
Suffix
No
The suffix (such as Jr., Sr., III, etc.) of the runner that will print on
mailing labels.
Other Runner ID
No
Non-RaceTrak identifier from another system. This field does not
enforce uniqueness.
81
DOB
No
The runner's Date of Birth. Used to calculate the current age and the
race day age.
Sex
Yes
Valid values are M, F, or U for Male, Female, or Unknown.
Nationality
No
The nationality of the runner. Values for this drop-down are
maintained in Utilities (Utility List Screen > tbl_country).
Street 1
No
The first street address for the runner.
Street 2
No
A second street address for the runner.
Street 3
No
A third street address for the runner.
Street 4
No
A fourth street address for the runner.
City, State/Prov
No
The city, state (or province) as derived from the zip code or postal
code.
Postal Code
N
The US Zip Code or the foreign postal code for the runner. New postal
codes can be automatically added on entry with the Zip Code Builder.
Select Show Drop-down to view available Postal Codes in a dropdown list. Values for this drop-down are maintained in Utilities
(Utility List Screen > tbl_postal_code).
Hometown
No
Defaults to City and State/Province when Postal Code selected.
Otherwise, users can enter their values. This value used in most
RaceTrak reports.
Mail Code
No
Values: Always, Never, or empty. Intended to limit or expand mailing
lists.
Day Phone
No
The daytime (generally work) phone number for the runner.
Eve Phone
No
The evening (generally home) phone number for the runner.
Cell Phone
No
The mobile phone number for the runner.
E-Mail
No
The e-mail address for the runner.
Default Shirt
No
The runner's preferred shirt size. This value will be copied to the Shirt
Size field for each race the runner enters.
Default Grade
No
The default scholastic grade for the runner. This value will be copied
to the Grade Field (Gr) for each race the runner enters. Values for this
drop-down are maintained in Utilities (Utility List Screen > tbl_grade).
Default Bib
No
The default bib number for the runner. Used for weekly club-type
races where runners have been assigned a permanent bib number. Only
displayed when Use Dflt Bib is checked in Utilities for the given race.
This bib is manually selected by the operator and must be unique for
the race.
VIP Info
No
Allows entry of notes for special runners, which can be used for
systems equipped with announcer lines (e.g. Chronotrack systems).
Default Club
No
The runner's club. This value will be copied to the club field for each
race the runner enters. Values for this drop-down are maintained in
Utilities (Utility List Screen > tbl_club).
Club Mbr Code
No
Used to identify the club member’s membership type; for example,
could be used to show 2013 as membership year. Can be autoassigned when memberships are managed via a “membership race” or
otherwise through Runner Management.
82
Current Club Mbr
No
Checkbox used to identify if the runner’s membership is currently
active. Can be auto-assigned when memberships are managed via a
“membership race.”
SMS Carrier
No
Drop-down to select major SMS (short message service) text service
providers. RaceTrak users can enter values not listed.
SMS Phone
No
The SMS phone number. Used in conjunction with SMS Carrier
above to allow systems (e.g. Jaguar) to send text messages to runners.
Runner Info
No
64,000 character field to store additional information about a runner.
Runner Field 1
No
Contains any special data that RaceTrak users want to store about a
runner. Should be used consistently throughout database. For
example, a RaceTrak user might want to track certain runners as
giving large donations and may use Runner Field 1 to designate “Deep
Pockets” or “Empty Pockets.”
Runner Field 2
No
See Runner Field 1 above.
Runner Field 3
No
See Runner Field 1 above.
Household
No
Can be manually updated and/or populated when various mailings are
created to send to a household name and thus provide the ability to
send mail to a single household rather than separate mailings to all
people at the same household.
Step by Step
RaceTrak's default Display Options (STANDARD) provides input to information specific to the registration with
runner information "grayed-out." To open all fields, click the ALL Display Option.
Complete all information as necessary, carefully checking that existing data is correct.
Always check that age, sex, and registration-specific data (teams, clubs, shirt size) are correct. Hint: Much of this
data can be checked when performing the runner search.
Use PASTE LAST copy the last name, address, and phone number of the last saved registrant.
If a new postal code is encountered, the following message prompt is displayed.
If OK is selected, the postal code builder is invoked.
83
Best Practices
On race day, enter only scoring and reporting data: name fields, date of birth, gender, and zip code. Add teams
and special categories for races with such scoring items.
When entering birthdate, use the spacebar to separate date parts (instead of entering 9/12/1993 enter 9 12 1993.
Command Buttons
OK saves the registration record and returns the user to the Select Runner Screen.
PASTE LAST copies the last name, address, and phone number of the last saved registrant.
FIND ZIP allows the search by city for a zip code.
CANCEL returns the user to the Select Runner for Registration Screen without saving the data.
Registration (Add New Registration) Screen
As noted in the previous section, a runner must first be in the RaceTrak database before he/she can be registered
into the current race.
This section describes the steps for registering a runner into the current race.
Note: when a runner is not in the race, RaceTrak opens the Registration Screen in Add New mode without a
prompt. If the runner is in the race, RaceTrak will prompt you that runner is in the race (and you can edit the
runner on the subsequent screen).
How to Get Here
Select OK from the Select Runner for Registration Screen (for a runner in the drop-down) or open this screen
automatically when a new runner is added for purposes of registration.
Full navigation: Main Menu > REGISTRATION > (select a race) OK > SELECT RUNNER FOR
REGISTRATION > OK (for the person selected in drop-down).
84
Fields (All Mode Display Options)
Please refer to the Runner Fields in Registration (Add New Runner) Screen.
Registration Fields
Field Name
Reqd?
Description
Bib Number
Yes
Displays the bib number assigned to the runner for this race. On initial
entry, users can easily change bib numbers by double-clicking on the
field, selecting Bib Override, or pressing [ALT] + B.
Note: Select Show Bib Drop-down to view a list of available bibs.
Values for this drop-down are maintained in Race Management Bibs
Age Race
No
The calculated age as of race date for the runner. Cannot be
overwritten if a DOB is provided. When a DOB is not provided, the
age can be entered. Saves age as 0 when left blank and no DOB
provided.
Weight
No
Weight of runner; used for Clydesdale race award categories.
Race Division
Yes
The division in which the runner is registering. Defaults to the bib's
division. Values for this drop-down are maintained in Utilities (Utility
List Screen > tbl_division).
Wave
No
The wave in which the runner is registering. Defaults to the bib's wave
when available. Values for this drop-down are maintained in Race
Management Waves Tab.
85
Shirt Size
No
The shirt size requested for this race. On a new registration, defaults to
runner's default shirt size.
Team
No
The team on which the runner is running. A runner can only run on
one team per race. Values for this drop-down are maintained in Race
Management Race Teams Tab.
Grade
No
The scholastic grade for the runner. On a new registration, defaults to
the runner’s default grade. Values for this drop-down are maintained
in Utilities (Utility List Screen > tbl_grade).
Team Captn
No
Checkbox to designate the registrant as Team Captain.
Team Desig
No
Team designation to differentiate members of teams for manual
scoring purposes. For example, in a two person mother-daughter team,
the mother would be designated as "must score." While RaceTrak does
not automatically use this field, it provides results processors a means
to validate teams.
Club
No
The club with which the runner is affiliated. Defaults to the runner
default club. Values for this drop-down are maintained in Utilities
(Utility List Screen > tbl_club).
Prime Member
No
Used to designate the primary member in a household when race is
used for tracking club memberships.
Club Member Type
No
The type of membership (Individual, Family, etc) when race is used
for tracking club memberships. Values for this drop-down are
maintained in Utilities (Utility List Screen > tbl_club_member_type).
Club Officer
No
The type of club officer (President, Secretary, etc) when race is used
for tracking club memberships. Values for this drop-down are
maintained in Utilities (Utility List Screen > tbl_club_officer_type).
Recent Time
No
A time provided by the runner. Generally associated with a Time Type
(see Time Type below).
Time Type
No
As a reference to Recent Time, this provides time types (such as
Personal Record, Predicted, Recent, etc.) The type of time provided
can be specified in the Time Type field. Values for this drop-down are
maintained in Utilities (Utility List Screen > tbl_time_type).
Hat
No
The hat color associated with the runner. Used in Triathlons. Defaults
to the bib's hat color when available. The type of time provided can be
specified in the Time Type field. Values for this drop-down are
maintained in Utilities (Utility List Screen > tbl_hat_color).
Leg
No
Future use: intended to designate runner’s leg in a relay.
Entry Complete
No
Indicates if registration entry form is complete; defaults to checked
(meaning entry is complete). Can be used as problem identifier in
conjunction with the Registrant Info field below. For example, set
Entry Complete to No and in the Info field type the reason.
86
Action Pending
No
Indicates if action is pending for the current registration. Defaults to
checked (yes, action is pending). Generally used when race is used for
tracking club memberships and user wants to selectively send mailings
to club members.
For example, the action pending can be used to only send membership
package to new and renewed members (those whose action pending is
checked; after the mailing is sent, action pending can be unchecked.
Please refer to Registrants (Club Membership Race Mode)
Tab/Screen.
Entry Source
No
Source of the entry form (mailing, store, race day). Values for this
drop-down are maintained in Utilities (Utility List Screen >
tbl_entry_source).
Occupation
No
The occupation of the runner. Values for this drop-down are
maintained in Utilities (Utility List Screen > tbl_occupation).
Registration Date
No
The date of registration. Defaults to the current computer system date.
Point Category
No
The point category with which the runner is associated for this race.
Generally used in conjunction with series races where different awards
may be provided by age, sex, religious affiliation, etc. A RaceTrak
legacy feature that has been replaced by more functional race series
scoring.
Pts Awarded
No
Associated with the point category to provide a quick, manual way to
tally series points. A RaceTrak legacy feature that has been replaced
by more functional race series scoring.
Registration Info
No
Used to type text information particular to this registration. When used
with the Entry Complete field, could specify that signature is missing,
money not paid, check not signed, etc.
Emergency Contact
No
Used to input emergency contact name and contact info (phone,
email).
Medical Info
No
Used to input special medical needs.
Other Info
No
Used to input any other information not captured in above fields.
Other Reg ID
No
Alternate identifier for registration.
Commemorative Bib
No
Future use: allow runners in race to share same bib number (for
display purposes only). For example, runner would get real bib 1234
but could have commemorative bib “John” printed on bib.
Select
No
Used by RaceTrak for various batch updates.
Active
No
Future use: indicates if the current registration is active (checked) or
voided (unchecked).
Dq?
No
Disqualification indicator. When set to Yes, runner will not be given
an official place. Therefore, runner is ineligible for Awards or Team
scoring.
Reg Field 1
No
Contains any special data that RaceTrak users want to store about a
registrant. Should be used consistently throughout database. For
example, a RaceTrak user might want to track certain runners as
giving large donations and may use Runner Field 1 to designate “Deep
Pockets” or “Empty Pockets.”
87
Reg Field 2
No
See Reg Field 1 above.
Reg Field 3
No
See Reg Field 1 above.
Runr Create/Mod
No
Dates the runner data was created and modified.
Reg Create/Mod Date
No
Dates the registrant data was created and modified.
Step by Step
RaceTrak's default Display Options (STANDARD) provides input to information specific to the registration with
runner information "grayed-out." To open all fields, click the ALL Display Option.
Complete all information as necessary, carefully checking that existing data is correct.
Note that bibs are automatically assigned by RaceTrak based on several criteria and as controlled by a variety of
RaceTrak settings; please refer to the Bib Issue mode discussed in Select Runner for Registration Screen and see
Bibs Tab in Race Management.
Always check that age, sex, and registration-specific data (teams, clubs, shirt size) are correct. Hint: Much of this
data can be checked when performing the runner search.
The bib number can be changed by manually -- by either double-clicking on the bib box or selecting the BIB
OVERRIDE button -- and then either selecting or typing a new bib number.
Add or update registration-specific data as applicable (shirt size, team, club, fees, etc.).
If the runner did not provide a date of birth (DOB), type the correct age (if provided) in the Age Race Date field.
Please refer to Registration (Add New Runner) Screen if new postal codes are encountered.
Command Buttons
OK saves the registration record and returns the user to the Select Runner for Registration Screen.
BIB OVERRIDE opens the bib field for manual bib selection (without the mouse).
HISTORY displays on-screen runner race history.
RESULT RPT displays report preview of runner race history.
MILEAGE opens the Runner Mileage Screen to record mileage totals by date.
OWNED CHIPS opens screen to manage chip owner chips.
SERIES displays the Runner Series Screen and the series (if any) with which the runner is assigned. Used in
conjunction with series scoring when the series requires runners to be registered with the series.
RACE MGT displays the Race Management screen for this race, allowing the user to manage teams, special
categories, and other race management features.
LOST BIB displays a message box, allowing user to designate the bib as lost and allow a new bib to be assigned
to the registrant.
UN-REGISTER will bibs cannot be unregistered when adding a new registration, so a message is displayed that
this action cannot be performed.
FIND ZIP allows the search by city for a zip code.
88
Note: the MORE option formerly available in earlier versions of RaceTrak has been removed.
CANCEL returns the user to the Select Runner for Registration Screen without saving the registration record.
Registration (Edit Registration) Screen
The Registration (Edit Registration) Screen is similar to the Registration (Add New Registration) Screen except
that the Edit Registration Screen is proceeded by a message box when accessing from the Select Runner for
Registration Screen. The Edit Registration Screen includes additional tabs for the entry of fees, special
categories, race chips, and the viewing of results data.
This section describes the steps for editing an existing registration.
How to Get Here
Select OK from the Select Runner for Registration Screen (for a runner in the drop-down) or open this screen
from Race Management’s Registrants Tab/Screen.
Full navigation: Main Menu > REGISTRATION > (select a race) OK > SELECT RUNNER FOR
REGISTRATION > OK (for the person selected in drop-down) > OK (in response to the message that runner is
already registered)
Full navigation: Main Menu > REGISTRATION > (select a race) OK > REGISTRANT LIST> (select a
registrant) EDIT REGISTRATION
89
Fields (All Mode Display Options)
Please refer to the Runner Fields in Registration (Add New Runner) Screen and to the Registration fields in
Registration (Add New Registration) Screen for descriptions of the fields.
Step by Step
RaceTrak's default Display Options (STANDARD) provides input to information specific to the registration with
runner information "grayed-out." To open all fields, click the ALL Display Option.
Update information as necessary.
Command Buttons
OK saves the registration record and returns the user to the Select Runner for Registration Screen.
BIB OVERRIDE opens the bib field for manual bib selection (without the mouse).
HISTORY displays on-screen runner race history.
RESULT RPT displays report preview of runner race history.
MILEAGE opens the Runner Mileage Screen to record mileage totals by date.
OWNED CHIPS opens screen to manage chip owner chips.
SERIES displays the Runner Series Screen and the series (if any) with which the runner is assigned. Used in
conjunction with series scoring when the series requires runners to be registered with the series.
RACE MGT displays the Race Management screen for this race, allowing the user to manage teams, special
categories, and other race management features.
90
LOST BIB displays a message box, allowing user to designate the bib as lost and allow a new bib to be assigned
to the registrant.
UN-REGISTER prompts the user to confirm the removal of the registrant from this race. When confirmed, the
registration record (but not the runner) is deleted and the user is returned to the previous screen.
FIND ZIP allows the search by city for a zip code.
Note: the MORE option formerly available in earlier versions of RaceTrak has been removed.
CANCEL returns the user to the Select Runner for Registration Screen without saving the registration record.
Registration (Fees Tab) Screen
The Registration (Fees Tab) Screen allows the management of race fees for the current registrant.
How to Get Here
The Registration (Fees Tab) Screen is available from the Registration screen.
Fields
Field Name
Reqd?
Description
91
Default Fee
No
Drop-down that will pull default fees setup for this race. Values for
this drop-down are maintained in Race Management Fees Tab.
Fee
Yes
The basic cost for an item (typically the race fee).
Qty
Yes
The number of items purchased (typically 1).
Payment Date
No
The date in which the payment was made.
Description
No
Free-text description of the fee.
Notes
No
Special notes or comments regarding the fee.
Active
No
Whether the data record is counted in overall fees.
Step by Step
Enter and/or update the information as necessary.
Command Buttons
Please refer to Registration Screens for a discussion of command buttons.
Registration (Results Tab) Screen
The Registration (Results Tab) Screen allows the management of registrant results for the current registrant.
Existing times can be edited and new times can be added. However, it is generally better to use timing devices or
tools in Results to manually add new times.
How to Get Here
The Results Tab Screen is available from the Registration screen.
92
Fields
Field Name
Reqd?
Description
Place
No
The place for the time displayed.
Device Time
Yes
The raw time as provided by the timing device or manually entered.
This is the basic time without any adjustments.
Official Time
Yes
The re-calculated reported time, which accounts for wave, penalty, and
other adjustments. Note: the time types reflect the various times that
may be collected for a given race. Do not confuse the Official Time
column header with the Time Type drop-down, which indicates the
type of time that has been collected.
Time Type
Yes
The type of time collected.
Tie Breaker
No
Used to break ties, where lower is better.
Step by Step
Select EDIT or ADD NEW to make changes or additions to results. Because Adjusted times are automatically
calculated, these times cannot be edited.
Command Buttons
ADD NEW opens the Results Window in add new mode, where new times can be entered. Note: duplicate time
types cannot be entered.
93
EDIT opens the Results Window in edit mode where changes can be made to the device time.
Important: you must recalculate results and apply various offsets to the time. Use ADJUSTMENT to apply
penalty times.
Please refer to Registration Screens for a discussion of other command buttons.
Registration (Specials Tab) Screen
The Registration (Specials Tab) Screen allows the management of special categories for the current registrant. .
How to Get Here
The Specials Tab Screen is available from the Registration screen.
94
Fields
Field Name
Reqd?
Description
Special Race Category
Yes
Allows input of one or more special designations for the runner.
Values for this drop-down are maintained in Race Management
Specials Tab.
Step by Step
Enter and/or update the information as necessary. A person can be in one or more special categories in a given
race.
Command Buttons
Please refer to Registration Screens for a discussion of command buttons.
Registration (Race Chips Tab) Screen
The Registration (Race Chips Tab) Screen allows the management of race chips when chip system uses identifiers
that are not equal to the bib number.
This screen is not available when the chip system uses the same chip number as the bib number.
How to Get Here
The Race Chips Tab Screen is available from the Registration screen.
95
Fields
Field Name
Reqd?
Description
Chip Number
Yes
The chip number used by the runner.
Chip Owner Code
No
Identifies if the chip is owned by the runner or by the race; used to
retrieve race owned chips.
Chip Timing Method
No
The type of chip being used. Values for this drop-down are
maintained in Utilities (Utility List Screen > tbl_timing_method).
Step by Step
Enter and/or update the information as necessary.
Command Buttons
Please refer to Registration Screens for a discussion of command buttons.
96
Results Processing
Results Processing Overview
The Results Processing module manages all aspects of results processing, including transmitting, importing, and
reconciling data from external timing devices; bar code bib scanning; individual and team results processing, and
award assignment.
In general there are three ways to collect times: 1) using a timing device, 2) using a chip technology or 2)
manually entering times.
If a non-chip timing device is used, the times are generally obtained using RaceTrak’s Transmit’s functions where
times are directly imported in RaceTrak. In most cases, the Reconcile and Scan Bib Functions will also be
utilized. A typical scenario would include the following steps:
Transmit timing device data via the Transmit Live Mode feature OR import data files when direct
communication with the timing device is not available in RaceTrak.
Scan bar coded bibs or type bib numbers in the Scan Bibs function.
Reconcile times with bibs, and Load/Merge the times and bibs in the Reconcile function, and follow onscreen instructions to compute results and awards (if awards are setup for your race). Note: results and
awards can be separately computed on their own.
Print reports.
If chip timing is used, the times are generally obtained by importing files created from chip manufacturing
software. A typical scenario would include the following steps:
Import files created from chip technologies.
Load/Merge the times in the Reconcile function and follow on-screen instructions to compute results and
awards.
Print reports.
If manually entering times, results are best handled by:
Manually entering times (see Reconcile).
Scanning bar coded bibs or type bib numbers in the Scan Bibs function.
Reconciling times with bibs, and Load/Merge the times and bibs in the Reconcile function, and follow onscreen instructions to compute results and awards (if awards are setup for your race). Note: results and
awards can be separately computed on their own.
Printing reports.
In addition, a RaceTrak Stopwatch allows your PC to act as a timing device, where a file is created and can be
imported into RaceTrak.
RaceTrak operates in two modes for transmitting data from external timing devices: a live mode whereby the
computer is attached to the timing device and times are loaded to RaceTrak as they are captured; and a batch
mode whereby times are uploaded to RaceTrak after the timing machine is shut down. When live data transfer is
used, results can be processed as soon as runners start finishing; however, reconciliation cannot be performed
unless the transmission is suspended.
A powerful RaceTrak feature is the ability to suspend and later restart the live mode transmission, allowing results
personnel to reconcile results while the live mode is suspended and then restart the live mode of transmission,
with a choice to append data to the previous data file or start a new file. In either case, careful coordination with
finish line personnel is essential.
97
Best Practices
During the race planning phase, work closely with the Race Director, online registration, Packet Pickup, and
Finish Line to ensure that everyone is on the same page with regard to the requirements for the race. Any changes
from one year to the next should be fully vetted to ensure that the race will be successfully scored. For example:
If race has multiple events, be sure that online registration and paper forms have a choice for each event.
If race has multiple events, it is generally to have separate batches of bibs reserved for each event (low
numbers for first event and high numbers for second).
If race has multiple events, consider the impacts and your capabilities for the following scenarios:
o
Events start at the same time and share the same starting and finish lines (generally pretty easy to
handle).
o
Events start at the different times and share the same starting and finish lines (a little more complex
than preceding bullet, but can be handled with waves and other techniques).
o
Events start at the different times and share the same starting and finish lines.
o
Events start at the same
Ensure that online registration and paper forms match in terms of information and data collected.
Ensure that online registration and paper forms convey and obtain all the information needed to score the
race.
o
If the race has teams, team data must be collected and team members must provide the right team
name.
o
If the race teams with multiple team categories, the forms must provide for selection of the team
categories.
o
If race has special categories, the forms must provide for their selection.
Coordinate with finish line to ensure that equipment can be and is properly setup to handle the number of
registrants in race.
Coordinate with packet pickup with regard to reports, labels, and bibs needed for race. Determine how and
when such materials will be handed off.
Alert Packet Pickup of any special needs or issues with registration (you may need signed waivers for people
who did not properly complete entry forms).
Ensure that Finish line equipment has been tested and remains online until RaceTrak scoring has been
completed.
Race List (for Results Processing) Screen
The Race List (for Results Processing) Screen presents all RaceTrak races in date order with the newest races
listed first. The Race List (for Results Processing) Screen provides the capability to select a race for which results
are to be processed.
A process summary is provided below:
Transmit or Import Times
Scan Bibs (for races where bib tear-off tags are pulled and entered in order of finish into RaceTrak)
Reconcile (check/correct times and then Load/Merge them into Registrant data records
Results (calculate and/or view actual results)
Awards (assign and/or view awards data)
98
Print Reports
The Race List (for Results Processing) Screen is accessed from the RaceTrak Menu Screen upon selecting Results
Processing.
How to Get Here
Select RESULTS PROCESSING from the Main Menu.
Step By Step
Select the function desired.
Command Buttons
TRANSMIT opens the Transmit Data Screen. This module is utilized when data from external timing devices is
to be downloaded to RaceTrak.
STOPWATCH (new in RT6) opens the RaceTrak Stopwatch screen for collection of times from your computer.
IMPORT opens the Timing Device Screen. This module is utilized to import and convert the data from external
timing devices when batch transmit mode is used.
SCAN BIBS opens the Scan Bibs Screen. This module is utilized to scan or type the bib numbers in the order
received for a given chute. It is generally used in non-chip races.
RECONCILE opens the Results Reconciliation Screen. This module is utilized to check (and correct) times as
well as provides the Load/Merge mechanism to associate the times with runners’ bibs and/or chips.
RESULTS provides an option to calculate results or to open the Race Result List Screen, which is utilized to
view results, manually disqualify runners, and re-calculate results.
AWARDS opens the Award Assignment Screen. This module is utilized to assign awards when awards have
been set up.
RESULT REPORT opens the Race Reports Setting Screen, which allows users to customize, preview, and print
results for the selected race.
AWARD REPORT opens the Race Reports Setting Screen, which allows users to customize, preview, and print
awards for the selected race.
CLOSE returns the user to the RaceTrak Menu Screen.
99
Transmit Data Screen
The Transmit Data Screen provides the capability directly transfer data from external timing devices into
RaceTrak. RaceTrak communicates with many timing devices including Flying Feet’s Time Machine I and II,
Summit Systems SRT500 and SRT1000, Chronomix 737, TimeTech Sprint 8, and others.
The Transmit Data Screen allows users to select either Batch or Live Mode of data transfer, where the Live Mode
is the recommended and preferred mechanism for obtaining times. Live Mode can be used either during or after a
races; Batch Mode creates a data file for import into RaceTrak while Live Mode skips this step.
The RaceTrak Transmit process must be initiated before data is sent from external timing devices.
The Transmit Data modules pulls timing data into RaceTrak, but this data must be reconciled and results
calculated to provide final results.
Most computers no longer include a serial port (RS232), so you may need to purchase a RS232 connector at
electronics shops such as RadioShack.
How to Get Here
Select TRANSMIT from the Race Results List Screen.
Full navigation: Main Menu > RESULTS PROCESSING > (select a race) TRANSMIT
Step By Step
Connect the timing device to your computer’s RS232 Serial Port.
Select the function desired.
If any problems are encountered, please confirm that your computer’s serial port is recognized. Serial ports are
found in Device Manager, usually found in Control Panel’s System -Hardware ‘s Device Manager and/or
Advanced Settings under Ports (COM & LPT). The serial port is the COM port and its number must match those
in RaceTrak’s settings (see Communications Settings Screen).
Command Buttons
BATCH MODE displays the Batch Mode Transfer Screen.
LIVE displays the Live Data Import Screen.
CLOSE returns the user to the Race Results List Screen.
100
Best Practices
Use the Live Mode - the Batch Mode is a legacy feature from earlier RaceTrak versions and creates a file that
then needs to be imported. Live Mode skips these extra steps.
When using the Time Machine timing devices, be sure to set up in cross-country (XC) mode, and clear all
memory since the last race.
When using Time Machines, use the [ENTER] to collect all times (and do not use the plunger). If times need to
be retrieved from a specific event (you are time multiple events in one day and need to pull data for the second
event), set the transmission from the timing devices to only send only the event you are expecting.
In live mode, carefully coordinate the changing of events with finish line personnel and be sure that RaceTrak has
stopped the Time Transmit.
Time Transmit (Batch Mode) Screen
Batch mode transfers data from the timing device to the PC, creating the file as specified. Import must be
performed later to convert/import the data file into RaceTrak format. The Live Mode in the next section is the
preferred method of pulling times into RaceTrak (and Live Mode can be performed after all times have been
collected on a given device).
How to Get Here
Select BATCH MODE from the Transmit Data Screen.
Full navigation: Main Menu > RESULTS PROCESSING > (select a race) TRANSMIT > BATCH MODE
Fields
Field Name
Reqd?
Description
Timing Device
Yes
The timing device you are using. Values for this drop-down are
maintained in Utilities (Utility List Screen > tbl_timing_method).
File Name
Yes
The name and location of the file you want the timing data to.
Status
No
The status of the transmission. Will list times as they are being
imported.
101
Step By Step
Be sure that a timing device is connected to the PC.
Type a file name and path for the file that RaceTrak will create. Note the file name for later use in import.
Select START.
Transmit data from the timing device.
As times are received from the timing device, they are displayed on the bottom of the screen.
When all data is transmitted, end the program by selecting CLOSE.
Command Buttons
START initiates the batch transfer and creates a text file that must be converted to RaceTrak format with the
Import function.
CLOSE ends the batch transfer process.
Time Transmit (Live Mode) Screen
Live mode transfers and converts/imports data into RaceTrak format.
IMPORTANT! The live mode of transmission can only be performed from a single PC. Do not attempt to run the
live mode from several PCs at the same time. However, several timing devices be multiplexed together and
connected to a single computer, thereby providing a single input to the PC from the several timing devices. As
long as each timing device is separately identified as a unique chute, RaceTrak will properly format the incoming
data.
How to Get Here
Select LIVE MODE from the Transmit Data Screen.
Full navigation: Main Menu > RESULTS PROCESSING > (select a race) TRANSMIT > LIVE MODE
Fields
Field Name
Reqd?
Description
102
Timing Device
Yes
The timing device you are using. Values for this drop-down are
maintained in Utilities (Utility List Screen > tbl_timing_method).
Device Name
Yes
The name used to describe the batch of times being imported. The
device name is used in the reconciliation process to find this batch of
times.
Status
No
The status of the transmission. Will list times as they are being
imported.
Step By Step
Be sure that a timing device is connected to the PC.
Type a file name and path for the file that RaceTrak will create.
Select START.
Transmit data from the timing device.
As times are received from the timing device, they are displayed on the bottom of the screen.
While live mode is actively transmitting and converting data, the Reconciliation process cannot be accessed.
However, at any time the live mode can be suspended by selecting SUSPEND. When suspended, RaceTrak
sends a “halt transmit” to the timing device, at which time reconciliation can commence. After performing
reconciliation, the live mode can be restarted to pick up times from the point of the last transmit.
When restarting a suspended live mode session, the following screen is displayed. If you wish to append the
incoming times to the current chute, select OK. If you wish to start a new chute, select CANCEL and the Live
Data Import Screen is displayed for input of new device header information.
IMPORTANT! If live mode will be continued later, be sure only to suspend (and not Stop or Quit) the live mode
process. To perform other processes while live mode is running or suspended, minimize the Live Data Import
Screen. Later, when live mode is to be restarted, be sure to maximize the form; RaceTrak allows only one
transmit session to open at a time.
Command Buttons
START initiates the live transfer and converts the incoming data into RaceTrak format. Unlike batch mode
transfer, the live mode transfer does not need to use the Import function.
SUSPEND suspends the live transfer process which can later be re-initiated by selecting START.
STOP ends the live transfer process.
MINIMIZE minimizes screen.
SETTINGS displays (in editable format) the communications settings for devices supported by RaceTrak (see
next section).
CLOSE ends the transfer process and returns the Timing Device Data Transfer Screen.
103
Communications Settings Screen
The Communications Settings Screen provides the capability to set up RaceTrak to interface with external timing
devices. Settings are saved for future use.
The Communications Settings is accessed from the Timing Device Data Transfer Screen when SETTINGS is
selected.
How to Get Here
Select SETTINGS from the Time Transmit Batch or Live Mode Screens.
Full navigation: Main Menu > RESULTS PROCESSING > (select a race) TRANSMIT > BATCH MODE >
SETTINGS
Full navigation: Main Menu > RESULTS PROCESSING > (select a race) TRANSMIT > LIVE MODE >
SETTINGS
Fields
Field Name
Reqd ?
Description
Device
Yes
The device being set.
Comm Port
Yes
The PC’s Comm Port. Factory setting is defaulted to 1.
Baud Rate
Yes
The communications baud rate. Factory setting is defaulted to 9600.
Parity
Yes
The communications parity. Factory setting is defaulted to N.
Word Size
Yes
The communications word size. Factory setting is defaulted to 8.
Stop Bits
Yes
The communications stop bits. Factory setting is defaulted to 1.
Handshake
Yes
The communications handshake status. Factory setting is defaulted to
Disabled.
Batch Xmit
No
Indicates whether RaceTrak supports batch Transmit for this device.
Do not change this setting without consulting RaceTrak technical
support.
Live Xmit
No
Indicates whether RaceTrak supports batch Transmit for this device.
Do not change this setting without consulting RaceTrak technical
support.
File Import
No
Indicates whether RaceTrak supports file import for this device. Do
not change this setting without consulting RaceTrak technical support.
104
Chip
No
Indicates whether the device is a Chip Device. Do not change this
setting without consulting RaceTrak technical support.
Bib=Chip
No
For Chip Devices, indicates if the bib number is the same as the chip
number. Do not change this setting without consulting RaceTrak
technical support.
Active
No
Indicates if the device is currently available for use. Do not change
this setting without consulting RaceTrak technical support.
Step By Step
Update the communications settings as required. To revert to RaceTrak factory settings, select FACTORY
SETTINGS.
Command Buttons
SAVE saves the current communications settings.
SHOW ALL displays communications for all devices.
CLOSE closes the current screen and returns to the previous screen.
RaceTrak Stopwatch Screen
The RaceTrak Stopwatch (new in RT6) provides an easy-to-use and intuitive feature to allow your PC to act as a
timing device. These times can be saved to file and then imported into RaceTrak, with the intention of using a
dedicated PC to collect times while another performs standard RaceTrak processing.
How to Get Here
Select STOPWATCH from the Race Results List Screen.
Full navigation: Main Menu > RESULTS PROCESSING > STOPWATCH
105
Step By Step
Select START when the race starts; if the race was started at another location, use SET TIME to set the
RaceTrak Stopwatch to the current race time. Select RESET TIME TO 0 to set times back to 00:00:00.00.
As runner finish, select GET TIME and a time will be saved. If possible, obtain the runner’s bib and type it into
the Next Bib box and then press GET TIME to save the time.
Select EXPORT to save the times to a file for subsequent import into RaceTrak.
Select STOP to stop the timer.
Command Buttons
START starts the RaceTrak Stopwatch.
SET TIME sets the RaceTrak Stopwatch to a user-determined time.
RESET TIME TO 0 resets times back to 00:00:00.00.
GET TIME captures a time (and Bib, if Bib recorded).
EXPORT saves the times to a file for subsequent import into RaceTrak.
STOP stops the timer.
CLOSE returns the user to the Race Results List Screen.
Timing Device List Screen
The Timing Device List Screen is used to import timing files such as those created by chip systems, the RaceTrak
Stopwatch, or other timing device files.
The Timing Device List Screen provides input boxes to provide a device name and specify the location of the file
to be imported. Use the folder icon to find and select the file you want to import.
How to Get Here
Select IMPORT FILE from the Race Results List Screen.
Full navigation: Main Menu > RESULTS PROCESSING > (select a race) IMPORT FILE
106
Step By Step
Type a Device Name (unique to the current race). Because many imports may be performed, it is recommended
that you follow a naming convention for your finish times by using the Finish or Fin followed by 01, 02, 03, etc.
Type or use the folder icon to select the file you want to import.
Select an Import Method. Note: the Import Method will default to your Timing Method if specified in Manage
Races.
Select IMPORT to import the times into RaceTrak.
Please note that while the data has been imported, you must still perform the reconciliation process to finish
scoring the race.
IMPORTANT: The import program expects .txt files, so be sure that your files use this extension.
Hint: Use the sort order to sort data on this screen in the order desired.
If the file found is not found, a message box will be displayed; please re-specify the exact file name and its
complete path.
RaceTrak expects data to be in predefined standard formats for most timing devices and a check is performed to
ensure that data is properly formatted. If the file is not in the correct format, a message box will be displayed.
Make sure you have specified the correct Import Method.
Note: If the race is designated a chip race, the following message box will appear before loading the times. For
the most part, chip races are conducted with the mats considered a single chute; however, some races may
separate runners by mat whereby 10K runners go to the left and Marathon runners finish on the left. Under these
circumstances, the mats would be separated as different chutes.
Command Buttons
IMPORT imports and converts the file specified into RaceTrak format. Message boxes indicate the status of the
import and conversion.
CLOSE returns the user to the Race List (for Results Processing) Screen.
Scan Bibs Screen
For non-chip races, the Scan Bibs Screen is used to enter the bib numbers for a user-specified chute in the order
they were received. Please determine how times and bibs will be delivered so that the correct setup of bib
scanning records is provided. See instructions in the Finish Line Management section.
Scan Bibs is best accomplished by utilizing a bar code scanning device in conjunction with bib bar codes. Note:
RaceTrak will generate industry standard (3 of 9, Code 39) bar codes on either laser (recommended) or inkjet
printers (not recommended as the inks bleed).
How to Get Here
Select SCAN BIBS from the Race Results List Screen.
Full navigation: Main Menu > RESULTS PROCESSING > (select a race) SCAN BIBS
107
Step By Step
Select an existing chute from the drop-down or select ADD NEW to create a new chute.
108
After a chute is selected from the drop-down, if bibs already exist for this chute, they will be displayed.
Otherwise, an empty box is displayed.
Position the cursor in the first empty box on the left side of the screen. When no previous bibs have been entered,
this will be the first and only box available. When previous bibs have been entered, scroll down to the first empty
record.
Type or scan (with bar code wand) bib numbers in the bib number box. As each bib number is entered, its position
order is recorded. To assist in later reconciliation, it is recommended that every tenth or twentieth bib be marked
with a note indicating its position. Please note:
While bar code scanning is a fast and reliable method of data entry, sometimes bibs stick together, leading to
missed scans. Therefore, be sure that bibs are individually separated and scanned.
Except for blanks, the bib scan process will not allow a duplicate bib number to be entered for the current
chute. Use blanks for bandit tags.
If a bib is missed or incorrectly scanned at the current location, simply retype or rescan it.
If a bib number must be inserted between existing bib numbers, select the on-screen INSERT BIB button which
will allow the insertion of a new bib number one row above the currently selected bib. The following window is
available for entering the bib number. Type the bib number and press [ENTER].
To delete an incorrectly entered bib number, position the cursor on the bib number to be deleted and press the onscreen DELETE BIB. If the keyboard [DELETE] key is used, the bib number will be deleted but the position
number will not be updated. Select Recalc to refresh this data.
Command Buttons
INSERT BIB allows the insertion of a bib number into the current location and renumbers the positions of all
subsequent bibs in the list. Insert cannot be used nor is required on the last (empty) record in the list. Insert will
refresh the list and return the user to the point of the insert.
109
DELETE BIB allows the deletion of the current bib number and renumbers the positions of all subsequent bibs
in the list. Delete will refresh the list and return the user to the start of the list.
RECALC recalculates the bib positions in rare occurrence that this step is omitted (not shown).
CLOSE returns the user to the Race List (for Results Processing) Screen.
Best Practices
Coordinate with finish line personnel so that bibs are collected face-down and placed onto sequentially numbered
spindles.
Coordinate with finish line personnel to ensure that bandit tags are available so that you can enter a dummy bandit
number.
Pre-number ‘post-it” flags (20, 40, 60, 80, etc) and affix to the associated bib scan position.
Write the starting and ending bib scan position on the first and last bib in each spindle.
Have a second person count and confirm that the post-it flag numbers (and ending position) match the manual
count.
Results Reconciliation Screen
The Results Reconciliation Screen is used to verify, correct, and load the device times and bib numbers.
Note that two modes of display are available for reconciliation: standard (non-chip races) and chip.
Times can also be directly loaded from the Device Data portion of the screen without the need for scanned bibs.
This RaceTrak feature accommodates situations where times and bibs have been captured for runners at the same
time from a given Timing device. This mode is available when the Load Device Time checkbox in the Preference
Tab (under Manage Races) is checked (this mode cannot for chip races). For example, you have collected select
times for 90% of your 200 finisher race and you have (or you can determine) the bibs for the remaining 10%.
Under this mode, you can enter the bibs for the times currently not having bibs and then directly load these times
and bibs. Please note that exact matches to bibs are needed and you may need to either add or trim lead zeros
depending on how your bibs are setup.
How to Get Here
Select RECONCILE from the Race Results List Screen.
Full navigation: Main Menu > RESULTS PROCESSING > (select a race) RECONCILE
Step By Step (Non-Chip Mode)
The standard (non-chip) mode includes Standard and Advanced Display options.
110
Open the Device Chute box to display a list of available device chutes. Select the desired chute from the list. All
the times for that chute are displayed.
Open the corresponding Bib Scan Chute box to display a list of available bib chutes. Select the desired chute from
the list. All the bibs for that chute are displayed. Please note:
Under ideal circumstances, the total number of Device Data times will match the total number of Bibs. When
numbers do not match, select times (e.g., bibs associated with times) provide a quick and accurate method of
correcting.
Depending on the Timing Device used, select times can be collected in a variety of ways. For example, some
Timing Devices include all times in a single chute, with the select times denoted by a bib. In most cases, only
one time is recorded for each runner, with or without bib. Other Timing Devices separate the select times
from the non-selects. For example, the Time Machine non-select times are collected with a plunger while
select times are collected when the timer presses the ENTER key on the Time Machine. By default, Time
Machine select times are placed into Chute 11. Some Time Machine timers exclusively use the ENTER key
and do not even plug in the plunger, collecting all times into a single stream of data. This works very well,
but Time Machine data must be fully cleared before the race so that past times are not accidentally loaded.
If the timing device provides separate select times, these times can be viewed by selecting ADVANCED
display options and selecting the chute containing the select times. Review this list and find select times that
can be isolated to a given device time and type the bib number next to that time. Use select times to determine
where the results got out of alignment.
Use the SCROLL UP and SCROLL DOWN buttons to simultaneously scroll through the screens.
To correct a problem, determine what correction is required (insert or delete a time or bib).
reconciliation provides on-screen features to insert/delete either times or bibs quickly.
Results
If a time must be inserted between existing times, select the Device Chute’s INSERT button which will allow the
insert of a new time in one of two modes: by manually entering one or many times or by using the time
interpolation function to let the computer insert multiple times.
If a bib is missed or incorrectly scanned at the current location, simply retype or rescan it. Use INSERT BIB to
insert a new bib one row above the currently selected bib.
111
To delete an incorrectly entered bib number, position the cursor on the bib number to be deleted and press the onscreen DELETE BIB. If the keyboard [DELETE] key is used, the bib number will be deleted but the position
number will not be updated. Select Recalc to refresh this data.
LOAD/MERGE: After reconciling times, load the times. A prompt screen allows you to specify exactly how and
where to load times.
When results are loaded, RaceTrak which will take the contents of the two left screens and load them into official
results. The times and bibs are matched by row, whereby the Device Chute time in row 1 will be assigned to the
Bib Scan Chute bib in row 1. Note in the figure below that time in row four will be assigned to bib 45, not bib 44.
Please note that the times are loaded by finding a matching registered bib number. If an unregistered bib is
encountered, a message box is presented and the problem can be skipped (which will continue with load/merge)
or corrected (which cancels the load/merge).
When problems are encountered, remember that only four possibilities exist:
You have an extra device time (the timer accidently punched a time twice).
You have a missing device time (the timer missed a punch).
You have an extra bib (rarely happens if scanning bibs with bar code).
You have a missing a bib (can happen often due to bibs sticking together).
Once you’ve determined what happened, apply one of these recommended corrective actions:
If you have an extra device time, create a dummy bib to go with this time.
If you have a missing device time, insert a new time.
If you have an extra bib, insert a new time to go with this bib.
If you have a missing a bib, determine the missing bib and insert it into the correct location.
Command Buttons (Non Chip Mode - Advanced Display Options)
INSERT TIME pens the Time Entry screen that allows the entry of times via either Manual Time Entry or
Interpolation entry. Please refer to Time Entry screen sections of the user manual.
DELETE TIME removes current time and re-positions subsequent times in the list in time order. Note: Delete
deactivates the time, which can later be re-activated if necessary.
INSERT BIB opens the Insert Bib Screen. Allows the insertion of a bib number above the current location and
renumbers the positions of all subsequent bibs in the list. Insert cannot be used nor is it required on the last
(empty) record in the list. Insert will refresh the list and return the user to the start of the list.
112
DELETE BIB deletes the current bib number and renumbers the positions of all subsequent bibs in the list. If the
keyboard [DELETE] key is used, the bib number will be deleted but the position number will not be updated.
Select Recalc to refresh this data.
RECALC recalculates the bib positions in rare occurrence that this step is omitted.
LOAD/MERGE loads the times to registered runners’ results. A prompt screen allows you to specify exactly
how and where to load times. Important: results are not official until Calculate Results has been performed.
Note: Under RaceTrak, the operator may skip unregistered bibs. To load split times, a Race Split must be
specified. Race Splits are created and managed in the Race Management module.
DEVICE RPT displays all the times for the selected Device Chute in spreadsheet format. Use Control + P to
print these times or copy the entire contents to a spreadsheet.
OFFSET TIMES adds or subtracts user-specified time for the times in the current chute.
113
BAD BIBS RPT displays all bibs for the chute displayed on the screen that have not been registered. Display is
in spreadsheet format. Use Control + P to print these times or copy the entire contents to a spreadsheet.
BIB SCAN RPT displays all the bibs for the chute displayed on the screen. Display is in spreadsheet format.
Use Control + P to print these times or copy the entire contents to a spreadsheet.
REFRESH if either the Device Chute or Bib Scan Chute data fails to re-sort, use this button to reset their order
RECONCILE WIZARD for races using bib scans and times collected separately and the timing device data
includes select times, will insert times and bibs to make lists match. While generally reliable, this tool may not
handle very complex situations.
TRIM LEAD ZERO removes lead zeros from bib numbers and useful in situations where user needs exact match
on bib number (e.g., Reconcile Wizard or when user is using Load Device Times feature).
WRITE SELECTS aids in reviewing data and comparing device times to bib scans. Used when select times and
actual times stored in separate device chutes. Writes the select bibs from the device chute with selects to the
device chute within a user specified time when a bib does not exist. For example, you have select times in Chute
11 but no selects in Chute 1. The first time in Chute 11 is 00:17:00.01 with select bib 123. The first time in
Chute 1 is 00:16:59.99 with no select. Writing the select from Chute 11 to Chute 1 will add bib 123 to the Chute
1 time of 00:16:59.99 (using the default .25 precision range).
CLOSE returns the user to the Reconciliation Screen.
Step By Step (Chip Mode)
Reconciliation for chip races (chip mode) provides Standard and Advanced Display Options.
114
Open the Device Chute box to display a list of available device chutes. Select the desired chute from the list. All
the chips and times for that mat ("chute") are displayed.
If mats were treated as multiple chutes, separate chutes will appear in the drop-down.
For chip timed races, you generally only need to confirm that the times are correct and you may need to deactivate
know times that are inaccurate. CHIP EARLY START is useful to quickly remove times before a user-specified
time. Such times are deactivated, but can be reactivated. In a similar fashion, OFFSET TIMES can be used to
reset the times for a given chute.
LOAD/MERGE: After reconciling times, load the times. A prompt screen (in advanced mode) allows you to
specify exactly how and where to load times.
Command Buttons (Chip Mode - Advanced Display Options)
INSERT TIME pens the Time Entry screen that allows the entry of times via either Manual Time Entry or
Interpolation entry. Please refer to Time Entry screen sections of the user manual.
DELETE TIME removes current time and re-positions subsequent times in the list in time order. Note: Delete
deactivates the time, which can later be re-activated if necessary.
LOAD/MERGE loads the times to registered runners’ results. A prompt screen (in advanced mode) allows you
to specify exactly how and where to load times. Important: results are not official until Calculate Results has
been performed. Note: Under RaceTrak, the operator may skip unregistered bibs. To load split times, a Race
Split must be specified. Race Splits are created and managed in the Race Management module.
115
BAD CHIPS displays a report of all the chips for the mat (chute) displayed that have not been registered.
Display is in spreadsheet format. Use Control + P to print these times or copy the entire contents to a spreadsheet.
DEVICE RPT displays all the times for the selected Device Chute in spreadsheet format. Use Control + P to
print these times or copy the entire contents to a spreadsheet.
OFFSET TIMES adds or subtracts user-specified time for the times in the current chute.
CHIP EARLY START quickly remove times for a specified chute that are before a user-specified time. Such
times are deactivated, but can be reactivated. Often used to remove athletes whose start time was recorded before
the race started.
116
CLOSE returns the user to the Reconciliation Screen.
Time Entry Screen (Manual Time Entry Mode)
The Time Entry Screen allows the quick insertion of times in two modes: Manual Time Entry or Interpolate.
As implied, the Manual Time Entry mode allows you to enter specific times. Under the interpolate mode,
RaceTrak automatically inserts the total number of times desired, evenly spreading the times between the two
times. This section describes the Manual Time Entry Mode.
How to Get Here
Select INSERT from the Results Reconcile Screen.
Full navigation: Main Menu > RESULTS PROCESSING > (select a race) RECONCILE > (select a Device
Chute) > INSERT
Step By Step
Manual Time Entry provides a quick way to enter times and/or bibs.
Select MANUAL DATA ENTRY for manual data entry.
Type the hour, minute, second, and 10th of seconds desired. As available and needed, type the bib for the time.
117
Press ADD TIME. The time is added.
Continue until all desired times are entered.
If many times need to be added, users can lock any of the settings to a given number by typing the number and
then selecting OFF.
Command Buttons
ADD TIME inserts a single time for each click.
ON/OFF locks or unlocks the current value to allow the user to add new times quickly.
CLOSE returns the user to the Results Reconciliation Screen, which will re-display the new times.
Time Entry Screen (Interpolate)
The Time Entry Screen allows the quick insertion of times in two modes: Manual Time Entry or Interpolate.
Under the interpolate mode, RaceTrak automatically inserts the total number of times desired, evenly spreading
the times between the two times. This section describes the Interpolate Mode.
How to Get Here
Select INSERT from the Results Reconcile Screen.
Full navigation: Main Menu > RESULTS PROCESSING > (select a race) RECONCILE > (select a Device
Chute) > (position your cursor on the second of the two times you wish to interpolate between) INSERT
Step By Step (Interpolate)
Interpolate time entry will insert the number of times specified between the second of the two times where your
cursor was last positioned.
Select INTERPOLATE TIMES to add the interpolated times.
118
Command Buttons
INTERPOLATE TIMES inserts the specified number of times "evenly" between the two times displayed on the
screen.
CLOSE returns the user to the Reconciliation Screen, which will re-display the new times.
Race Results Management Screen
The Race Results Management Screen is used to view and calculate race results. Note: in most cases, RaceTrak
users simply calculate results and bypass this screen. However, the screen provides tools to view results,
disqualify a runner, clear times, re-calculate results, and other tools.
IMPORTANT! After loading times, results must be calculated. Select Calculate Results, which will assign places
to runners (based on time) and determine team results. If awards have been set up, they must be assigned in the
Award Assignment Screen after all results are calculated.
How to Get Here
Select RESULTS from the Race Results List Screen.
Full navigation: Main Menu > RESULTS PROCESSING > (select a race) RESULTS (and select No to view
the results screen). Note the screen provides Default and Advanced Display modes.
Fields
Field Name
Reqd?
Description
Place
N/A
The overall finish place of the runner.
Device Time
N/A
The unaltered time from timing device in hh:mm:ss.th format where
hh is hours, mm is minutes, ss is seconds, and th is the tenths/hundreds
decimal.
Official Time
N/A
The time scored for the runner, which is generally the Device Time,
but if penalty times or wave adjustments have been applied, the time
will be offset by that amount.
Bib Number
N/A
Display of runner's bib number. Not user modifiable.
Name
N/A
Display of runner's name. Not user modifiable.
Sex
N/A
Display of runner's sex. Not user modifiable.
Age
N/A
Display of runner's race day age. Not user modifiable.
Division
Yes
Display of runner's division. Can be modified by double-clicking on
the field..
119
Registration Notes
No
Display of notes recorded in the Registration Info field for this runner
in this race. Can be modified by double-clicking on the field..
DQ
No
Allows the runner to be disqualified and precludes the runner from
receiving a place or awards. Can be modified by double-clicking on
the field.
Tie Brk
No
If runners have exact same time, you can assign tie breakers where
lower is better. Can be modified by double-clicking on the field..
Pts
No
Allows the assignment of points to a runner for the race. Can be
modified by double-clicking on the field..
View Result Type
No
Allows the view of results by start times, adjusted times, and/or splits
available for this race. Only available in advanced mode. Split and
leg values for this drop-down are maintained in Race Management
Race Splits/Legs Tab.
Race Series
No
Allows selection of any series associated with this race and displays
the Race Series button, which accesses the series data. Only available
in advanced mode. Values for this drop-down are maintained in Race
Management Race Series Tab.
Display
No
Used in conjunction with View Result Type to show All Runners in
race, only finishers, finishers plus non-participants (no other times), or
finishers plus non-finishers (has start time but no finish time).
Step By Step
Double click Division, Registration Notes, DQ, Tie Brk, and Pts and edit as needed.
Select EDIT REGISTRN to edit data from the Registration Screen.
Select CALCULATE RESULTS! to recalculate results.
IMPORTANT! Always be sure that all results have been calculated (use Calculate Results) before posting results.
The Calculate Results button will determine official places, calculate team results, and calculate adjusted times
and results.
Command Buttons
CALCULATE RESULTS processes all results and determines places for all qualified runners. Qualified
runners are runners who have a time and have not been disqualified. In addition, team scoring is performed.
Calculations of adjusted times are performed whereby the Official subtracts (or adds, depending on wave setting)
the Wave time and subtracts any individual adjustment time (e.g. a Chip Start time).
RESULT RPT opens the Race Reports Settings Screen where you can customize and subsequently print or save
results to various file formats.
FIND allows you to search for data displayed on this screen. Settings can be adjusted to specify specific fields to
search in and how the search is performed. Only unlocked fields can be edited. New in RT6.
120
FIX/CLEAR TIMES opens the Offset Race Times Screen, which allows the adjustment and removal of times for
all runners by a selected division. IMPORTANT! Be extremely careful in using this feature.
CLOSE returns the user to the Race List (for Results Processing) Screen.
Offset Race Times Screen
The Offset Race Times Screen is used to adjust race times in a variety of ways. Times for the entire race or a
given division can be offset. If times for a race are totally messed up, you can delete all times in the race from
here.
IMPORTANT! This feature should NOT be used in conjunction with the wave adjustment functions.
IMPORTANT! This feature should only be used AFTER all times have been entered and must be used very
judiciously. This feature can be used to clear all times in a race if times have been totally messed up or can be
used to change all times by division when times are known to be incorrect. However, note that time adjustments
should only be made when all times have been collected: otherwise, if times are adjusted for one set of times, and
then more times are obtained, and times are again adjusted, the first of times will have been adjusted twice, and
thus provide incorrect results.
How to Get Here
Select FIX/CLEAR TIMES from the Race Result List Screen (advanced mode).
Full navigation: Main Menu > RESULTS PROCESSING > (select a race) RESULTS (and select No to view
the results screen) > (select advanced options) FIX/CLEAR TIMES
121
Step By Step
Enter the amount of time (in seconds) to be changed.
Select the division for which to adjust times.
Select the adjustment operator: add or subtract times.
Use DELETE TIMES to delete times for a specified division or all the times in the race.
Command Buttons
ADD TIME adds the number of seconds to all finishers in the division selected.
SUBTRACT TIME subtracts the number of seconds to all finishers in the division selected.
DELETE TIMES clears the times of all finishers in the division selected or all times in the race if no division is
selected. This feature should only be used when times have been erroneously loaded and you wish to start all
over.
Award Assignment Screen
The Award Assignment Screen is used to process, view, and print race awards that were previously set up on the
Award Generation Screen.
Note: Awards are distributed in priority order where the lower number is better. Therefore, be sure that open
awards (and masters/senior) awards have lower numbers than age group awards.
RaceTrak also allows awards to be designated as duplicate awards whereby previous award winners can be
awarded this award. In addition, awards can be assigned based on finish/guntime or adjusted/chip time. All
awards in a given category should be setup with the same settings. Please check your award configurations in
Manage Races.
Results must be calculated before awards can be assigned.
The Award Assignment Screen is made up of three parts: the top left portion displays processed runners; the top
right portion displays awards that have been set up for the race; and the bottom portion will display processed
results.
How to Get Here
Select AWARDS from the Race Results List Screen.
Full navigation: Main Menu > RESULTS PROCESSING > (select a race) AWARDS
The Award Assignment Screen is made up of three parts: the top left portion displays processed runners; the top
right portion displays awards that have been set up for the race; and the bottom portion displays processed awards.
122
Step By Step
Ensure that results have been processed and awards are available by viewing the top portions of the screen for
such data. If there are no results, go to the Results and calculate your results. If there are no awards, go to Race
Management and set up awards for the race in the Awards Tab screen.
Select ASSIGN to process awards for the race.
Print reports as required.
Command Buttons
ASSIGN AWARDS processes awards for all available results.
AWARD RPT opens the Race Report Settings Screen, which allows you to customize the output of your awards.
SERIES RESULTS is available when a Race Series has been setup and selected from the drop-down. This
button opens the Race Series Results Screen. Please refer to Series Overview for a discussion of series scoring;
for specific information on the Race Series Results Screen, please refer to the following sections:
Race Series Results - Series Team Actuals for Race Tab
Race Series Results - Series Team Slot List Screen for Race Tab
Race Series Results - Series Awards for Race Tab
Race Series Results - Series Award Winners for Race Tab
CLOSE returns the user to the Race List (for Results Processing) Screen.
123
Runner Management
Runner Management Overview
The Runner Management module provides the capability to view, add, and/or modify runner. RaceTrak provides
a variety of features to manage you runners, including views and reports of past races, tracking runner mileage,
and combining duplicates.
Runner Management provides the capability to search, view, and select all runners who have ever been entered
into the RaceTrak database.
Runner List Screen
The Runner List Screen provides the capability to view, search, sort, add, edit, and report on runners in the
database.
The Runner List Screen is accessed from the RaceTrak Menu Screen upon selecting RUNNER
MANAGEMENT.
How to Get Here
Select RUNNER MANAGEMENT from the Main Menu.
Full navigation: Main Menu > RUNNER MANAGEMENT
Step by Step
The Runner List Screen displays an alphabetized summary list of all runners in the database.
Search for runner by typing his/her name in the Field Value text box. Select APPLY FILTER to invoke this
filter.
If you need to search on other values, select one of the Filter By choices, enter a Filter Value, and select Apply
Filter.
Use the letter buttons or the “all” button and select APPLY FILTER to view large groups of runners.
Change the display of the current screen by changing the SHOW options.
124
Select ADD NEW, EDIT PERSON, or DELETE PERSON to manage your runners.
Sort data by clicking on the column heading.
Use command buttons to perform various cleanup actions against your data.
Command Buttons
A TO Z buttons refresh the screen to list only runners by that letter.
ALL displays all runners in the database.
APPLY FILTER invokes the selected search and refreshes the Runner List Screen with values matching that
search.
RESET clears existing filters and returns screen to empty state.
FIND/REPLACE allows you quickly find and update on-screen data by user-selected criteria. Only data
displayed on your screen is updated, so be sure to display the pool of data you want to update. With your pool of
data displayed, click in the field you want to update and select Find/Replace. Examine the options and set your
Replace options as intended.
ADD NEW displays the Add Runner Screen that allows the entry of new runner biographical data.
EDIT PERSON displays the Runner Screen in edit mode that allows the view and update of an existing runner.
SHOW options provide different ways to display on-screen data.
DUPE CHECK opens the automated duplicate process (new in RT6) from which you can merge duplicate
records. Please refer to the Combine Persons Screen for more information.
MANUAL DUPE allows selected (when Dup? is checked) to be merged.
VALID NAME SEX (new in RT6) builds a list of names and their expected gender, prompting users to save the
combinations found. During manual data entry, if unexpected name and gender combinations are encountered
users are prompted that potentially incorrect data has been entered (for example Cynthia was entered as a male).
125
CONVERT CASE provides choices for cleansing runner names (title case, upper case, or lower case). When
converting to title case, RaceTrak will prompt you for known items that may require fix and automatically fix
Mcdonald to McDonald and O’brien to O’Brien.
GENDER UPPER changes all gender values to upper case.
FORMAT PHONE provides options to format runners’ phone numbers.
REFRESH NAME removes lead spaces from runner name fields and resets runner full name to last name
+comma + first name + space + middle + space + suffix format.
FIX STREET prompts users to standardize street address values to common abbreviations.
126
MEMBER UPDPDATE prompts users to update member information. Important: do not use this feature if you
are managing club members using a membership race.
FIX HOMETOWN prompts users to reset runners’ hometowns to their zip code hometown.
CLOSE returns the user to the RaceTrak Menu Screen.
Managing Club Members in Runner Management
RaceTrak provides two ways to manage club members: the Club Membership Race Mode described in Race
Management provides many powerful tools to manage your club members within a “race.” This mode is very
useful when all club members share the same membership start and end dates. For example, all membership start
on January 1 and expire on December 31.
Runner Management provides a second way to manage club members, but requires more manual data entry than
using a “club membership race.” In any case, please use only one of the two ways to track your club
memberships.
Managing club members in Runner Management utilizes the Current Club Member field to identify anyone who
is considered a current club member. Therefore, RaceTrak users must manage this field to identify their current
club members.
To display membership information, select the Show option Club Member Info, which displays:
Runner Name
Runner Club (drop-down to specify the runner’s default club, which are setup in Utilities)
Runner Household (to limit mailings to a single address in various mailings; can be manually updated
and/or populated when the mailings are created)
Cur Mbr (Current Member) Checkbox (used to indicate that the person is a current club member)
Mbr (Member) Code is a free form field
Hint: use the Mbr (Member) Code to track your members is to specify the Year-Month that the membership will
expire as in 2013-Apr or 2013-04. You can then sort on these fields and quickly identify members whose
membership is expired or about to expire. Member Update and Find/Replace provide tools to update this field.
Current club members can be displayed via the following steps:
Select the Filter By option Club Mbr
Enter Yes as the Filter Value
Select Apply Filter
Output data for these members can generated via REPORTS/LABELS > RUNNER CUSTOM QUERY >
(select Club Membership - All Active Club Members in the Report Name drop-down.
Labels for these members can generated via REPORTS/LABELS > ACTIVE MBR LABELS.
Runner Screen
The runner screen allows users to manage runner data and generate reports for a given runner.
How to Get Here
Select ADD NEW (to add a new runner) or select EDIT PERSON from the Runner List Screen.
Full navigation (add new mode): Main Menu > RUNNER MANAGEMENT > ADD NEW
127
Full navigation (edit mode): Main Menu > RUNNER MANAGEMENT > EDIT PERSON
The Runner screen can be displayed in Add New mode.
Alternatively, the Runner screen can be displayed in Edit mode.
Standard and All Display options respectively provide either the most commonly used fields or all available
fields.
Fields (All Mode Display Options)
Runner Fields
Field Name
Reqd?
Description
PersonKey
Yes
System generated unique identifier for the runner; locked and cannot
be altered. Every runner has a unique PersonKey.
First Name
Yes
The first name of the runner.
Middle Name
No
The middle name of the runner.
Last Name
Yes
The last name of the runner.
Sal
No
The salutation (such as Dr., Mr., Ms., etc.) of the runner that will print
on mailing labels.
128
Suffix
No
The suffix (such as Jr., Sr., III, etc.) of the runner that will print on
mailing labels.
Other Runner ID
No
Non-RaceTrak identifier from another system. This field does not
enforce uniqueness.
DOB
No
The runner's Date of Birth. Used to calculate the current age and the
race day age.
Sex
Yes
Valid values are M, F, or U for Male, Female, or Unknown.
Nationality
No
The nationality of the runner. Values for this drop-down are
maintained in Utilities (Utility List Screen > tbl_country).
Street 1
No
The first street address for the runner.
Street 2
No
A second street address for the runner.
Street 3
No
A third street address for the runner.
Street 4
No
A fourth street address for the runner.
City, State/Prov
No
The city, state (or province) as derived from the zip code or postal
code.
Postal Code
N
The US Zip Code or the foreign postal code for the runner. New postal
codes can be automatically added on entry with the Zip Code Builder.
Select Show Drop-down to view available Postal Codes in a dropdown list. Values for this drop-down are maintained in Utilities
(Utility List Screen > tbl_postal_code).
Hometown
No
Defaults to City and State/Province when Postal Code selected.
Otherwise, users can enter their values. This value used in most
RaceTrak reports.
Mail Code
No
Values: Always, Never, or empty. Intended to limit or expand mailing
lists.
Day Phone
No
The daytime (generally work) phone number for the runner.
Eve Phone
No
The evening (generally home) phone number for the runner.
Cell Phone
No
The mobile phone number for the runner.
E-Mail
No
The e-mail address for the runner.
Default Shirt
No
The runner's preferred shirt size. This value will be copied to the Shirt
Size field for each race the runner enters.
Default Grade
No
The default scholastic grade for the runner. This value will be copied
to the Grade Field (Gr) for each race the runner enters. Values for this
drop-down are maintained in Utilities (Utility List Screen > tbl_grade).
Default Bib
No
The default bib number for the runner. Used for weekly club-type
races where runners have been assigned a permanent bib number. Only
displayed when Use Dflt Bib is checked in Utilities for the given race.
This bib is manually selected by the operator and must be unique for
the race.
VIP Info
No
Allows entry of notes for special runners, which can be used for
systems equipped with announcer lines (e.g. Chronotrack systems).
129
Default Club
No
The runner's club. This value will be copied to the club field for each
race the runner enters. Values for this drop-down are maintained in
Utilities (Utility List Screen > tbl_club).
Club Mbr Code
No
Used to identify the club member’s membership type; for example,
could be used to show 2013 as membership year. Can be autoassigned when memberships are managed via a “membership race” or
otherwise through Runner Management.
Current Club Mbr
No
Checkbox used to identify if the runner’s membership is currently
active. Can be auto-assigned when memberships are managed via a
“membership race.”
SMS Carrier
No
Drop-down to select major SMS (short message service) text service
providers. RaceTrak users can enter values not listed.
SMS Phone
No
The SMS phone number. Used in conjunction with SMS Carrier
above to allow systems (e.g. Jaguar) to send text messages to runners.
Runner Info
No
64,000 character field to store additional information about a runner.
Runner Field 1
No
Contains any special data that RaceTrak users want to store about a
runner. Should be used consistently throughout database. For
example, a RaceTrak user might want to track certain runners as
giving large donations and may use Runner Field 1 to designate “Deep
Pockets” or “Empty Pockets.”
Runner Field 2
No
See Runner Field 1 above.
Runner Field 3
No
See Runner Field 1 above.
Household
No
Can be manually updated and/or populated when various mailings are
created to send to a household name and thus provide the ability to
send mail to a single household rather than separate mailings to all
people at the same household.
Step by Step
RaceTrak's default Display Options (STANDARD) shows basic runner information. To view and open all fields,
click the ALL Display Option.
Complete all information as necessary, carefully checking that existing data is correct.
If a new zip code is entered, a message prompt to add the zip code will be presented.
Hint: When adding new family members, use Paste Last to copy data from the last family into the current screen.
Command Buttons
OK saves the runner record and returns the user to the Runner List Screen.
PASTE LAST (add new mode) copies the last name, address, and phone number of the last saved registrant.
FIND ZIP allows the search by city for a zip code.
CANCEL returns the user to the Select Runner for Registration Screen without saving the data.
HISTORY (edit mode) displays the runner's RaceTrak racing history.
RESULT RPT (edit mode) displays a report of the runner's RaceTrak racing history.
MILEAGE displays the Runner Mileage Screen that allows the entry and tracking of runner mileage by date.
130
OWNED CHIPS displays screen to manage chips owned by the runner.
SERIES displays the series the Runner Series Screen and the series with which the runner is assigned. Used to
score series results.
CANCEL returns the user to the Runner List Screen and automatically saves the runner record. Press the [ESC]
key to Cancel current changes. Note when certain edits are made, this button is disabled and users should use OK
to exit the screen.
Combine Persons Screen
The Combine Persons Screen allows RaceTrak users to combine duplicate runners into a single runner. The
duplicate check performs several levels of duplicate checks, which can be skipped or the process cancelled
entirely. Depending on the number of runners in your database, the duplicate check may take a few minutes to
display the initial screen requiring action.
Duplicate checks are performed in the following order:
Full Name, DOB, and Gender Dupe Check
First Name, Last Name, DOB, and Gender Dupe Check
Last Name, DOB, and Gender Dupe Check
First Name, DOB, and Gender Dupe Check
First Name and Last Name and Gender Dupe Check
DOB and Gender Dupe Check
131
For each duplicate found, users are offered choices of actions to take: combine the duplicates, skip, or mark as not
duplicate (which will not show this combination in future duplicate searches).
How to Get Here
Select DUPE CHECK from the Runner List Screen.
Full navigation: Main Menu > RUNNER MANAGEMENT > DUPE CHECK
Step by Step
Examine the on-screen data and determine the action you want to take.
Select COMBINE to combine the two data records. Note: when combining two data records, please examine the
on-screen data and determine which field values you may want to use and select them accordingly.
If you know the two data records are not duplicates, select NOT DUPE and future dupe checks will ignore this
pair of records.
Complete all information as necessary, carefully checking that data is entered correctly.
Always check that age and sex are correct.
132
Command Buttons
COMBINE merges the two data into one, keeping the right-hand runner data record and deleting the left-hand
runner data record.
SKIP takes no action and finds the next duplicate.
NOT DUPE d marks the on-screen pair of duplicates as not duplicates and will not show this pair in future dupe
checks.
SELECT LEFT selects all data on the left side of the screen. This data will be used to the merged data record.
SELECT RIGHT selects all data on the right side of the screen. This data will be used to the merged data
record.
STOP DUPE CHECK stops the duplicate check process.
Runner Series Screen
The Runner Series Screen is used to associate a runner to a particular series when runners must be registered into
the series in order to be scored in series awards. Once a runner is associated with a series, he/she does not have to
be setup for that series again.
There are several related actions to be performed when scoring a series awards and related series processing.
Please refer to the Series Overview for more information.
Fields
The following data fields are included in the Runner Series Screen:
Field Name
Reqd?
Description
Series for Runner
Yes
The series with which the runner is assigned. The runner can be
assigned to zero, one, or many series. Values for this drop-down are
maintained in Utilities (Utility List Screen > tbl_series).
Series Team
No
The series team with which the runner is associated for this series.
Series teams are setup in the Series Team Tab screen.
Values for this drop-down are maintained in Utilities (Utility List
Screen > (select tbl_series) Series List > EDIT and select the Series
Teams Tab.
Eligibility Start Date
Yes
The date the runner started in the series.
133
Series Age
Yes
The age of the runner for the series. Automatically calculates on
creation, but if runner DOB changes, user must manually change by
double clicking on the age field. The calculation is based on the Age
As Of Date (see Series Screen) minus the Runner DOB.
Series Weight
No
For Clydesdale series, allows entry of weight for a series.
Step By Step
Enter the appropriate values. To update the runner's series age (due to a change in DOB), double click on the
series age field.
Command Buttons
CLOSE closes the Runner Series screen and returns to the previous screen.
134
Utilities
Utility List Screen
The Utilities module provides the capability to add, modify, and manage the generic (not race-specific) lookup
values provided by RaceTrak. In addition, RaceTrak users can backup their RaceTrak database to a compressed
(zip) file and create satellite verisons of their RaceTrak database.
How to Get Here
Select UTILITIES from the Main Menu.
Full navigation: Main Menu > UTILITIES
Step By Step
To build a satellite version of RaceTrak (where the races selected can be copied and scored separately, select one
or more races and select EXPORT TO SATELLITE. Important: At the time of writing this User’s Manual,
RaceTrak does not have the ability to merge satellite data back into the current database.
Select BACKUP RACETRAK to copy your database into a compressed (zip) file to a user-selected location.
Click a GENERIC SUPPORT TABLE to manage the data contained in these tables, which provide the lookup
values throughout RaceTrak. The most commonly used tables are asterisked (*) below and most tables open is
spreadsheet view for quick editing of generic data. Some tables planned for future RaceTrak use. A summary of
the generic support tables is provided below.
Please note that many tables display FK, which is the abbreviation of foreign key where the value comes from
another table.
Affiliation (tbl_affiliation) contains affiliation (for example RRCA). Includes a field for affiliation type.
Intended for future RaceTrak use.
Affiliation Type (tbl_affiliation_type) contains the type of affiliation (e.g., running organization, on-line
website, etc) that can be used in tbl_affiliation. Intended for future RaceTrak use.
135
Age Grade (tbl_age_grade) contains the type (10M, 5K, Marathon) of age grade being used. RaceTrak
users should enter an Age Grade to identify the type and optionally enter an Age Grade Name. Other
values are reserved for future use. Age Grades are required lookup values in Age Grade Data, serving to
group the Age Grade Data.
Age Grade Data (tbl_age_grade_data) contains the specific settings for an age grade. For example, the
age grades for 5K would have different settings than an age grade for a Marathon. RaceTrak users should
enter the FK Age Grade (foreign key value from Age Grade above), the gender for the specific grade, the
age, and the factor, which is the multiplier that adjusts the age graded data.
Award Category* (tbl_award_category) contains award categories that are lookup values when
generating awards for a race. Each award category can be configured for specific scoring criteria. A
summary of the fields is provided below:
o
FK Division - the division for the award. Required.
o
FK Award Category Type - the award category such as Open, Masters, Grand Masters, Senior, or
Age Group. Important: RaceTrak results reports optionally allow you to show place in age group,
and these values are generated by the “Age Group” designation for awards setup in your race. If
your race has no awards, the data in the reports will be incomplete.
o
Award Category - a text description of the award. Required and must be unique.
o
Low Age - Required numeric value. Specify 0 for open awards so that runner not providing age
could still win overall award. Specify specific age ranges for age group awards.
o
High Age - Required numeric value. Specify 99 for Open awards and your highest age group
awards.
o
Low Weight - used for Clydesdale scoring where runner weight is entered during registration
process. Required numeric value.
o
High Weight - used for Clydesdale scoring where runner weight is entered during registration
process. Required numeric value.
o
Gender - the gender (M, F, or N (where either gender qualifies)) for the award. Required.
o
Duplicate Allowed Flag - whether the category allows duplicates.
o
Award Category Sort Order - dictates how the award category will be sorted on your award
reports where lower numbered categories will be displayed at the beginning of your reports.
Certification Type (tbl_certification_type) contains values the type of certification for the race course
(for example USATF). Used in Manage Races to designate how the race was certified.
Club* (tbl_club) opens a form listing all the clubs contained in the current database. Clubs are lookup
values for the runner’s default club and the registrant’s club. Please see Clubs Screen for more
information.
Club Membership Type (tbl_club_membership_type) contains values for your club memberships and
are used for “club membership races” as lookup values to designate the membership type for each club
member. Club membership is currently set up to handle all members for the same yearly basis, for
example all members would be members from January 1 to December 31 of a given year. Therefore, the
Club Membership Type is associated with the person’s registration. The Club Membership Type is
required and must be unique. Other values are optional.
Club Officer Type (tbl_club_officer_type) contains values for club officer positions: President, VicePresident, Treasurer, Secretary, etc. The Club Officer Type is required and must be unique. Other values
are optional. Club Officer Types are used as lookup values in “club membership races” to designate
registrants as club officers.
136
Country (tbl_country) contains country codes from around the world. Please do not change the values
for the United States Country Code (USA) or Country (United States). Always provide unique Country
Codes and Countries when adding new countries. Countries are lookup values in State/Provinces and in
the Nationalities assigned to runners.
Distance* (tbl_distance) contains distances and corresponding mileage equivalents and is used to
determine pace. Distances are lookup values for your race or your race divisions. Distance Types are
currently limited to MI - mile, KM - kilometer, YD - Yard, and MT - meter. The Distance Type is
required. The Distance is required and must be unique. The Length is required and must be unique. A
typical configuration might include values such as those listed in the User’s Manual.
FK DISTANCE TYPE
MI
MI
MI
MI
MI
MI
MI
MI
MI
DISTANCE DISTANCE NAME LENGTH
PACE NAME
1M
1 Per Mile
5K
3.1 Per Mile
8K
4.98 Per Mile
5M
5 Per Mile
10K
6.21 Per Mile
15K
9.3 Per Mile
10M
10 Per Mile
26.2K
16.3 Per Mile
Marathon Marathon
26.2 Per Mile
PACE UNIT DIVISOR
1
3.1
4.98
5
6.21
9.3
10
16.3
26.2
Division* (tbl_division) contains information regarding divisions available to all races. The Run division
is the RaceTrak default and is not viewable nor editable. The Division is required and must be unique.
The Division Score Basis should be specified as Time. RaceTrak divisions allow you to score multiple
events within a given “race.” Divisions are lookup values in setting up bibs, awards, and registering
runners.
Entry Source (tbl_entry_source) contains information regarding how the registrant learned about and/or
registered in a race (e.g. Website, Email Campaign, Mailer, Jim's Running Feet Store, Boston Marathon
Handout, etc.) Entry Sources are lookup values available for selection during Registration.
Eternal Team (tbl_eternal_team) contains values such as Valley View Boys High School (HS) such that
a newly created recurring team (Valley View Boys HS 2013) can be associated with an eternal team
(Valley View Boys HS). Eternal Teams are lookup values in Recurring Teams. An Eternal Team is used
in conjunction with Recurring Teams and Teams as follows:
o
Each race can have one or many teams. For example, the current race may have a Valley View
HS Boys team. This team is unique to this race, as the team composition may change from race to
race. Under RaceTrak, the Valley View HS Boys team can be associated with a 2013 Valley
View HS Boys (Recurring Team), which in turn can be associated with a Valley View Boys
Eternal Team. The Eternal Team concept provides the future benefit of reporting on all runners
who ever ran for Valley View.
Fee Category (tbl_fee_category) contains race fees such as pre-race fee, packet pickup fee, and race day fee.
Fee Categories are lookup values when setting up fees within a race.
Grade* (tbl_grade) contains scholastic grades such as 9 (freshman), 10 (sophomore), etc. Grades are lookup
values in registration and runner data records.
Grade Level (tbl_grade_level) contains values such as High School and College and are lookup values used
in Grade above.
137
Hat Color (tbl_hat_color) contains hat colors that can assigned to bibs and/or to runners for events like
Triathlons where swimmers wear designated hat colors. Hat Colors are lookup values when setting up bibs
and/or registering runners.
Occupation (tbl_occupation) contains occupations that can be associated with a registrant. Occupations are
lookup values when registering runners.
Postal Code (tbl_postal_code) contains all postal codes in your database and are lookup values assigned to
runners.
Preference* (tbl_preference) contains generic preferences (Default Country, Owner Name, Report Footer,
etc.) whose values are used by RaceTrak in reports and various processes. Please do not change the
Preference Names, which are reserved for RaceTrak use. The Default Country value of United States is used
to more quickly find zip codes for United States users. Important: Add your company, club, or short
description as the Report Footer Preference Value and this value will appear in all your reports. The Owner
Name value is used for customized purposes where RaceTrak programs will perform specific operations not
available to other customers.
PREFERENCE NAME
Default Country
Owner Name
Report Footer
United States
RaceTrak Software
Race Report
Recurring Team (tbl_recurring_team) contains values such as Lincoln High 2013 such that newly created
race teams can be associated with a recurring team.
o
PREFERENCE VALUE
Each race can have one or many teams. For example, the current race may have a Valley View HS
Boys team. This team is unique to this race, as the team composition may change from race to race.
Under RaceTrak, the Valley View HS Boys team can be associated with a 2013 Valley View HS
Boys (Recurring Team). By designating teams as Recurring Teams, registration of team members
can be accomplished by using the Recurring Team Search Option during registration to quickly find
team members on a given team. In addition, The Recurring Team concept provides the future benefit
of reporting on all runners for a given season.
RRCA Region (tbl_rrca_region) contains Road Runner Club of America region codes to better align with
reporting with RRCA. RRCA Regions are lookup values for RRCA States. You can add regional
representatives into RaceTrak via Runner Management and they will be available for selection in the FK
Person Dropdown. The RaceTrak default settings are provided below.
REGION NAME
Central
East
South
West
FK PERSON
REGION DIRECTOR TITLE
Central Regional Director
Eastern Regional Director
Southern Regional Director
Western Regional Director
WEBSITE
RRCA State (tbl_rrca_ state) contains Road Runner Club of America state codes to better align with
reporting with RRCA. RRCA States are lookup values in Clubs. You can add state representatives into
RaceTrak via Runner Management and they will be available for selection in the FK Person Dropdown. Each
RRCA State can be associated with an RRCA Region. RRCA States can be associated with your Club.
Series* (tbl_series) opens the Series List Screen which shows all series in your RaceTrak database. Series are
lookup values for Race Series and Person Series data records. Please see Series Overview and related
sections for series setup and management.
138
Series Group (tbl_series_group) contains a way to group series together. Series Groups are lookup values in
Series data records. For future RaceTrak use.
Special Category (tbl_special_category) contains special categories that are lookup values for Race Special
Categories. For future RaceTrak use.
State Province (tbl_state_province) contains state and/or province data for use in tbl_postal_code. State
Province codes are lookup values for Postal Codes.
Street Fix (tbl_street_fix) allows you to standardize your street addresses, which will reduce postal mailings
sent unique addresses. Street Fix contains search and replace values for street names and abbreviations. For
example, you can find Street and replace with St. Used to in Runner Management batch update address
information.
Time Type (tbl_time_type) contains values for the type of time (personal best, predicted time, etc.) the
registrant has submitted for a given race.
Timing Method (tbl_timing_method) contains values for the timing method for this race (ChronoTrack,
Time Machine, etc.) and is used in Manage Races to be default for many scoring processes. Please contact
RaceTrak before changing or adding values to this table.
User Query Local (tbl_user_query_local) contains the customized queries available in Custom Reporting
drop-downs. User can supply their own descriptions and show/hide the queries by unchecking the User
Query Active Flag.
Valid First Name Gender (tbl_valid_first_name_gender) contains a list of valid first name and gender
combinations previously setup in your database (Runner Management provides a tool to create user selected
Valid First Name and Gender combinations). When entering new registrants, user will be prompted if an
unexpected value is entered. For example, if user enters M gender for Susan (and Susan F is a valid first
name gender combination), the user will prompted to check their entry.
Timer Data (timer_data) contains times as provided by Summit Systems timing devices, which are directly
pushed into RaceTrak.
Command Buttons
EXPORT TO SATELLITE creates a copy of your RaceTrak database containing only the races selected. This
database can be copied to other PCs scoring these races, but the database must be renamed
RaceTrak_06_Data.mdb on the scoring machines. Satellite data cannot be merged back into your master
database.
BACKUP RACETRAK creates a compressed file of your RaceTrak database.
GENERIC SUPPORT TABLES (list screen) selection allows user to manage the lookup tables that are
available throughout RaceTrak.
CLOSE returns the user to the RaceTrak Menu Screen.
Best Practices
Award Category - update Award Category Sort Order to reflect how you want award reports to display your
award categories.
Award Category -update Award Category Type to correctly identify all Age Group Awards. Please note: the Age
Group designation is used to print the runners Age Group Placement in results reports.
Award Category -setup special awards (Firefighter, Teacher, etc.) and use these as Race Awards. Please see
Scenario: Special Awards discussed in the Awards Tab of this User’s Manual.
Distance - setup any distances you may use.
Distance - if you score scholastic cross-country races, setup any grades that you may use.
139
Preferences - for the Preference Name of Report Footer, set the Preference Value to your organization’s name.
Clubs Screen
The Clubs Screen provides the capability to add, modify, and maintain club information for use in conjunction
with Registration functions. Clubs are lookup values for runners’ default clubs and registrants’ clubs.
How to Get Here
Select tbl_club from the Utilities screen’s Generic Support Tables list.
Full navigation: Main Menu > UTILITIES> GENERIC SUPPORT TABLES (select tbl_club).
Step By Step
Update on screen data.
Select Add New to add a new race.
Select a an existing club and select Edit to open the Club Screen, where additional information about the Club is
managed.
Command Buttons
ADD NEW opens the Club Screen in Add New mode.
EDIT opens the Club Screen in Edit mode.
CLOSE returns the user to the Race Utility List Screen.
140
Club Screen
The Club Screen provides the capability to manage additional information regarding clubs. Club contacts,
mailing addresses, and other information can be added via the Club screen.
How to Get Here
Select ADD NEW from the Clubs screen’s.
Select EDIT from the Clubs screen’s.
Full navigation: Main Menu > UTILITIES> GENERIC SUPPORT TABLES (select tbl_club)> EDIT or
ADD NEW
Step By Step
Update on screen data.
Select CLOSE to close the screen and return to the Clubs Screen.
Command Buttons
CLOSE returns the user to the Clubs Screen.
Series Overview
RaceTrak provides series scoring for a variety of needs and situations, ranging from simple to complex. Series
can merely track totals or compile times for participants over the years for races in a series. Series can be set up
to assign and compile series points to individuals and teams in a series of races.
141
Note: While RaceTrak allows a race to be associated with one or more series, RaceTrak users will generally
associate a race with just one series.
Depending on series scoring needs, RaceTrak users may need to perform one or more of the following steps to
setup a series.
Create a series in Main Menu > Utilities > select tbl_series from the Generic Support Tables list box and
optionally configure additional series-wide settings:
o
Configure extended series parameters via Main Menu > Utilities > tbl_series > EDIT > Series
Tab. Configure a the "age by date" from which RaceTrak calculates the runner's series age,
whether to use the series age (requires runners to be pre-registered into the series) or runner's race
day age, and whether runners need to pre-registered for the series.
o
Configure series team categories via Main Menu > Utilities > tbl_series > EDIT > Series Team
Categories Tab. Series team categories must be setup if you plan on scoring teams in a series.
o
Configure series teams via Main Menu > Utilities > tbl_series > EDIT > Series Teams Tab.
o
Generate reports across the entire series via Main Menu > Utilities > tbl_series > EDIT > Series
Reports Tab.
Associate the series to a race (Main Menu > RACE MANAGEMENT > (select a race) EDIT > Series
Tab) and optionally configure additional series settings for a given race:
o
Configure series awards for a race in Main Menu > RACE MANAGEMENT > EDIT > Series
Tab > SERIES AWARDS FOR THIS RACE > Race Series Awards Tab, which allows the
setup of series awards with points for various award categories for this race. Note: awards are
issued by point (where higher is better), then value order (where lower is better). This is different
from standard race awards which are issued in award value only.
o
Configure series team slots for a race in Main Menu > RACE MANAGEMENT > EDIT >
Series Tab > SERIES TEAM SLOTS FOR THIS RACE > Race Series Team Slots List.
Team slots allow RaceTrak users to specify points for teams by team category. For example, the
first place coed series team for this race may get 10 points, the second place team 9 points, and so
on.
o
Review and edit race series results settings and generate series results reports for a race in Main
Menu > RACE MANAGEMENT > EDIT > Series Tab > RACE SERIES
RESULTS/REPORTS > Race Series Results.
Optionally, register runners to a series so only those runners are included in the series results. (This step
is not necessary if series settings allow any runner to count in the series scoring.) Runners can be added
to during the Registration process (Main Menu > REGISTRATION) or via Main Menu > RUNNER
MANAGEMENT and selecting the SERIES button on the Registration/Runner screen. For each series,
the runner can have a series age and be associated with a series club team. Note: while RaceTrak
automatically calculates runner's series age on initial creation of the runner's series record, users must
manually change this age if the runner's date of birth changes.
Series List Screen
The Series List Screen provides the capability to add, modify, and maintain Series data for use in conjunction
with the Race Management (for Series) Screen functions. Before associating a race with a series, the series must
be created in the Series Screen.
How to Get Here
The Series List Screen is accessed from the Utility List Screen upon selecting tbl_series.
142
Fields
Field Name
Reqd?
Description
Series Code
Yes
The abbreviated code name for the series.
Series Name
No
Descriptive name for the series.
Series Start Date
No
The starting date for the series.
Series End Date
No
The ending date for the series.
Sort Order
No
How the data is sorted when selecting from various RaceTrak screens,
where the lower value is displayed first.
Step By Step
To add basic data for a new Series, click the fast forward button at the bottom of the screen (or press [PAGE
DOWN]) until an empty record line with an asterisk is displayed. Enter the appropriate Series data.
To modify an existing Series, click the fast forward button at the bottom of the screen (or press [PAGE DOWN])
until the desired record is displayed. Position the cursor on the record and enter the appropriate changes.
Select EDIT to display the Series Screen with additional options to configure the Series.
CLOSE returns the user to the Race Utility List Screen.
Series Screen Tab
The Series Screen provides the capability to configure additional Series scoring data.
How to Get Here
The Series Screen is accessed from the Series List Screen upon selecting EDIT.
Full navigation:
Utilities > (select tbl_series) Series List > EDIT
Race Management > (select your race) EDIT > Race Series Tab > EDIT (a selected race series)
143
Fields
Field Name
Reqd?
Description
Series Code
Yes
The abbreviated code name for the series.
Series Name
No
Descriptive name for the series.
Series Start Date
No
The starting date for the series.
Series End Date
No
The ending date for the series.
Age By Date
No
The date from which a runners age is calculated.
Use Series Age By
Date
No
Determines if race day age or age by date will be used in Series
scoring.
Score Only Series
Runner
No
When checked, will only score runners who are associated with this
series. Runners can be associated with a series via Runner
Management and Registration screens via the SERIES button. Each
runner can be associated with one or more series. For each series, the
runner can have a series age and be associated with a series team.
Note: while RaceTrak automatically calculates runner's series age on
initial creation of the runner's series record, users must manually
change this age if the runner's date of birth changes.
Series Group
No
The series group (if any) that the race is associated.
Series Contact
No
The individual who is in charge of the series (can be created in Runner
Management).
144
Contact Day Phone
No
The contact’s day phone number.
Contact Evening
Phone
No
The contact’s evening phone number.
Contact Mobile Phone
No
The contact’s mobile phone number.
Contact Email
No
The contact’s email address.
Notes
No
Notes or comments regarding the series.
Step By Step
Add new data as required. See field definitions and Series Overview.
CLOSE closes the current screen and returns to the previous screen.
Series Team Categories Tab
The Series Team Categories Tab provides the capability to configure the scoring rules for teams in this series.
How to Get Here
The Series Team Categories Tab is accessed from the Series Screen Tab.
Full navigation:
Utilities > (select tbl_series) Series List > EDIT and select the Series Team Categories Tab
Race Management > (select your race) EDIT > Race Series Tab > EDIT (a selected race series) and select the
Series Team Categories Tab
145
Step by Step
Configure the team categories for teams in this race. Please refer Race Team Categories (in Race Management)
as these two functions work in the same way.
CLOSE returns the user to the previous screen.
Series Teams Tab
The Series Teams Tab provides the capability to setup teams in this series.
How to Get Here
The Series Teams Tab is accessed from the Series Screen Tab.
Full navigation:
Utilities > (select tbl_series) Series List > EDIT and select the Series Teams Tab
Race Management > (select your race) EDIT > Race Series Tab > EDIT (a selected race series) and select the
Series Teams Tab
146
Step by Step
Enter new series teams and assign a series Team Category.
CLOSE returns the user to the previous screen.
Series Reports Tab
The Series Reports Tab provides the capability to view reports for the series.
How to Get Here
The Series Reports Tab is accessed from the Series Screen Tab.
Full navigation 1: Main Menu > Utilities > (select tbl_series) Series List > EDIT and select the Series Reports
Tab
Full navigation 2: Main Menu > Race Management > (select your race) EDIT > Race Series Tab > EDIT (a
selected race series) and select the Series Reports Tab
147
Step by Step
Runners Associated with Series reports only show those runners who are associated with the series.
PARTICIPANT TOTALS displays a report listing all runners who participated in a given series, with options to
sort by name or number of races.
FINISHER TOTALS displays a report listing all runners who finished in a given series, with options to sort by
name or number of races.
FINISHER DETAIL displays a report listing results for runners in a given series, with options to view gun times
or chip times.
FINISHER DETAIL GUN/CHIP displays a report listing gun and chip times for runners in a given series,
sorting the data by runner name.
POINT STANDINGS displays a report listing series' point standings, with options to sort by points or to sort by
points within award category.
TEAM STANDINGS displays a report listing team point standings, grouped by team category.
Runners in a Race in this Series reports show any runners who ran in a race in this series (as designated in
PARTICIPANT TOTALS displays a report listing all runners who participated in a given series, with options to
sort by name or number of races.
148
FINISHER TOTALS displays a report listing all runners who finished in a given series, with options to sort by
name or number of races.
FINISHER DETAIL displays a report listing gun and chip results for runners in a given series.
POINT STANDINGS AWARD SERIES displays a report listing series' point standings, with options to sort
by points or to sort by points within award category.
POINT STANDINGS REGISTRATION PTS displays a report listing series' point standings as designated in
the registration screen (and not as calculated using series points scoring).
CLUB PARTICIPATION displays a report listing total club participation for registrants in this series (as
determined by the registrant’s club).
CLOSE returns the user to the previous screen.
149
Reports/Labels Overview
RaceTrak provides a wide selection of reporting features, which include professionally formatted reports, labels,
spreadsheet-like query results, and direct outputs to popular file formats. In addition, most reports are
customizable and RaceTrak offers Custom Reports for generating queries based on user selected settings.
Most RaceTrak reports are found in the Reports/Labels module, but other reports can be found in:
Race Management>Random Prizes Tab (Random Report)
Race Management>Registrants Tab>(Build Member List for “club membership races”)
Race Management>Registrants Tab>(RRCA Output for “club membership races”)
Race Management>Registrants Tab>Club Mailings (Letters, Labels, and Envelopes can be produced for
“club membership races)
Race Management>Registrants Tab>(select an existing registrant and select History Report)
Race Management>Series Tab>(select an existing series and select Race Series Results/Reports; please
see Series Overview and related series screens)
Results Processing>Reconcile>(provides several reports regarding times and bib scans)
150
Reports/Labels
The Reports/Labels module provides the capability to generate most of the reports, labels, and various outputs
you will use in RaceTrak.
Race Report Select List Screen
The Race Report Select List Screen is the starting point to access most RaceTrak reports and labels. The most
widely used reports are generally those for a specific race, so RaceTrak users will generally select a race and then
select Single Race Reports to generate reports for a given race.
How to Get Here
The Race Report Select List Screen is accessed from the Main Menu.
Full navigation: Main Menu > REPORTS/LABELS.
Step By Step
To access the report functions specific to a single race, select your race and select SINGLE RACE RPTS.
To access the report functions specific to a more than one race, select your races and select RACE CUSTOM
QRY.
To access the report functions for runners (regardless of race), select RUNNER CUSTOM QRY.
Select one of the Generic Reports and Queries to run other reports.
Command Buttons
SINGLE RACE RPTS displays the Race Reports Screen for a selected race. Hint: Single Race Reports are
generally most widely used reports, offering over 70 race-specific reports/lables/outputs, many of which can be
customized. This option is used to generate data for one race only.
RACE CUSTOM QRY displays the Race Custom Reports Screen, where queries for runners in the race(s)
selected are available in the Report Name drop-down. This option is used to generate data for one or more races.
151
RUNNER CUSTOM QRY displays the Race Custom Reports Screen, where queries for runner data (regardless
of race) are available in the Report Name drop-down. This option is used to generate data for any runners in your
database, irrespective of races.
ACTIVE MBR QRY displays contact (name, address, phone, email) information for Current Club Members
(those whose runner Current Club Member checkbox is checked and whose Mail Code is not “Never”) in a
spreadsheet-like format.
ACTIVE MBR LABELS displays address labels for Current Club Members, with a choice to send to individual
members or their household. Note: households are only assigned when a person has a valid street address.
ADDRESS QUERY displays the various options for generating a spreadsheet-like view of mailing addresses of
data in your database.
ADDRESS LABEL displays the various options for generating address labels for data in your database.
CUSTOM MAIL LABEL displays the Custom Output for Mailing Labels Screen where you can generate
mailing labels filtered to your needs.
CUSTOM ADDRESSES displays the Custom Output for Output Screen where you can generate mailing
address outputs filtered to your needs.
CUSTOM EMAIL displays the Custom Output for Email Screen where you can generate email outputs filtered
to your needs.
RRCA builds a spreadsheet of Current Club Members in RRCA required format.
TOTAL MILES prompts you for date ranges and builds a listing of total miles for runners during that date range.
Obtains data from as stored via the Runner Mileage Screen
CLOSE returns the user to the RaceTrak Main Menu Screen.
Race Report Screen
The Race Report Screen provides the capability to generate a number of powerful reports for a given race,
grouped by report type (Registration, Results, Team, Labels, etc.) for a given race. Most reports are highly
customizable, where you control the display of the output data. In addition, most reports allow you to save your
data to common file formats, including text, spreadsheet, rich text, and portable document format (PDF).
Note: Two modes exist to display reports for GunTime or by Adjusted Time (when Chip or Wave adjustments are
used).
How to Get Here
The Race Report Select List Screen is accessed from the Race Reports List upon selection of SINGLE RACE
RPTS.
Full navigation: Main Menu > REPORTS/LABELS > (select your race) SINGLE RACE RPTS
152
Step By Step
If producing results reports, select Time Type to build reports for either GunTime or Adjusted Time.
Select the button for the desired report.
If producing Custom Reports, select a Custom Report from the drop-down and select Run.
Most RaceTrak reports are customizable and are preceded by the Race Reports Setting Screen, which allows users
to customize, preview, and print awards for the selected race. In addition, most reports can be output to various
file formats, including PDF, spreadsheet, text file, and rich text file.
Some reports display data in a spreadsheet-like view. These column widths in this view can be adjusted and the
entire set of data can be copied to spreadsheet programs. Select CTRL+P to print the spreadsheet-like reports.
Command Buttons
The following registration-related reports are provided:
ADDRESS opens the Race Report Settings Screen and subsequently displays a report listing all registrants in
last name order with registrant bib, name, address, email, and phone information. This report can be used by
medical staff or followup purposes to contact runners.
ANNOUNCER prompts you for display of one or three columns of data and then opens Race Report Settings
Screen and subsequently displays a report listing all registrants. The single column report displays all registered
runners in bib number order with registrant name, gender-age, hometown, and notes. The three column report
displays all registered runners in bib number order with bib number, name, gender-age, and hometown. This
report is for use by announcers or anyone needing a summary of registrants by bib number.
153
BIRTHDATE opens the Race Report Settings Screen and subsequently displays a report listing all registrants in
birthdate order with bib number, name, birthdate, age, hometown, shirt size, and division. This report is intended
to aid in finding registration data in the event that name data was mistyped.
BIB FNAME opens the Race Report Settings Screen and subsequently displays a report listing all registrants all
registered runners in first name order with bib number, name, gender-age, hometown, and shirt size. This report is
intended to aid in finding registration data in the event that last name data was mistyped.
BIB LNAME opens the Race Report Settings Screen and subsequently displays a report listing all registrants in
last name order with bib number, name, gender-age, hometown, and shirt size. This report is intended for posting
at packet pickup and race registration sites so that runners can determine their bib numbers.
BIB NUMBER opens the Race Report Settings Screen and subsequently displays a report listing all registrants in
bib number order with bib number, name, gender-age, hometown, and shirt size. This report is intended as a
quality control report on the data entry process.
E-MAIL opens the Race Report Settings Screen and subsequently displays a report listing all registrants in last
name order with bib number, name, gender-age, and email address.
ENTRY SOURCE opens the Race Report Settings Screen and subsequently displays a report showing the totals
of runners for each entry source.
FEES prompts user to display summary or detailed fees. The summary report provides breakdowns by fee type
and overall totals. The detailed report provides breakdowns by fee type, lists each individual runner portion of the
fee type, and overall totals.
FOLLOWUP opens the Race Report Settings Screen and subsequently displays a report listing all registrants
requiring follow-up (whose registration Entry Complete is unchecked) in last name order with address, email, and
phone.
PROBLEM ENTRIES opens the Race Report Settings Screen and subsequently displays a report listing
incomplete registrations (no signature, no check, etc. whose Entry Complete is unchecked). The report displays
registrants in name order with bib number, name, hometown, and notes.
QC REPORT prompts user to print in portrait or landscape (allows more data to be displayed) modes. Opens
the Race Reports Settings Screen and subsequently opens a report listing all registrants in bib order, and displays
the bib number, registrant name, gender-age, hometown, shirt size, and team. This report is used to review and
confirm the correctness of registrant data.
REG BY DATE prompts user to display totals by day, hour, or group by month. Provides race directors a
method to gauge daily registrations as well as race day registration. It also helps to identify manpower needs for
upcoming races.
REG CHIP opens the Race Report Settings Screen and subsequently displays a report listing registrants with
chip number for chip systems where the chip number is different than the bib number.
154
RUNNER CHIPS provides prompts user to display all runners and their assigned chips or only runners without
chips. This spreadsheet-like report is used for chip systems where the chip number is different from the bib
number.
SHIRT SIZE opens the Race Report Settings Screen and subsequently displays a report listing the total number
and percentages of shirts size requests. This report provides race directors a history of shirt sizes as well as a
method to gauge future shirt orders.
SPECIAL CATS opens the Race Report Settings Screen and subsequently displays a report listing all runners
assigned to special codes. Grouped by Special Category.
SCHOOL ROSTER prompts user for inserting a page break between teams and then opens the Race Report
Settings Screen. Subsequently displays a report listing a report listing all team members signed up for teams. The
report is grouped by team category and team, listing the team members’ bib, name, gender, and scholastic grade.
This report helps team captains ensure that all team members properly entered the race.
TEAM ROSTER prompts user for inserting a page break between teams and then opens the Race Report
Settings Screen. Subsequently displays a report listing a report listing all team members signed up for teams. The
report is grouped by team category and team, listing the team members’ bib, name, gender, and age. This report
helps team captains ensure that all team members properly entered the race.
TEAM SUMMARY opens the Race Report Settings Screen and subsequently displays a report listing teams and
their total team members grouped by team category. This report helps race directors quickly determine how many
"qualified" teams have entered the race.
5 YR COUNT opens the Race Report Settings Screen and subsequently displays a report listing total registrants
in five year increments and provides race directors with both a snapshot of participants. Note: the report can be
customized to further breakdown by Gender by selecting Group By Gender.
10 YR COUNT opens the Race Report Settings Screen and subsequently displays a report listing total
registrants in ten year increments and provides race directors with both a snapshot of participants. Note: the
report can be customized to further breakdown by Gender by selecting Group By Gender.
1 YR COUNT opens the Race Report Settings Screen and subsequently displays a report listing total registrants
in one year increments and provides race directors with both a snapshot of participants. Note: the report can be
customized to further breakdown by Gender by selecting Group By Gender.
The following results-related reports are provided:
ALL TIMES prompts user to display results with split name or split number (useful when multiple splits are
taken in a race). Presents data in spreadsheet-like format, which can be printed (CRTL+P) or copied to
spreadsheet. Column widths can be adjusted. Displays all results from the first to last recorded finisher. This
report shows division, runner name, gender, age, scholastic grade, club, team, hometown, adjusted time, official
time, adjusted place, and official place. If split times have been recorded, the split time and split place are
displayed with each runner.
155
AGE GRADED opens the Race Report Settings Screen and subsequently displays a report listing age graded
runner times and positions. Note: Age grading is only applied to runners who match the age grade criteria for the
age standard specified. For example, if age grades start at age 50 and end at 60 for men, only men aged 50 to 60
will appear on the report. If RaceTrak cannot determine the Age Grade to use (based on distance you’ve setup for
your race), you will be prompted for the appropriate age grade code as maintained in the Age Grade of Utilities
(where you can add your own age grades or update existing ones).
AGE RANGE opens the Race Report Settings Screen and subsequently displays a results report within a userselectable age range. For example, all runners between 17 and 28 could be specified.
BY DIVISION opens the Race Report Settings Screen and subsequently displays a report that groups runners'
results by division. The report provides a handy way to separately identify runners, wheelchair, challenged, etc.,
who have been entered in the same race but under different divisions.
CLUB RESULTS opens the Race Report Settings Screen and subsequently displays a report listing only runners
whose registration includes a club. The runners are listed in finishing place order.
CLUB AVG TIME prompts user for Gun Time or Adjusted Time and then opens the Race Report Settings
Screen. Subsequently displays a report that lists only runners whose registration includes a club. The runners
grouped by club, and the club average time is calculated.
DISPLAY opens the Race Report Settings Screen and subsequently displays a report that displays results in a 12
point font report that lists race results that can be posted and viewed from several feet away.
FINISH MIN prompts user for Gun Time or Adjusted Time and then prompts to split by gender. Subsequently
displays a report that lists the total number and the running total of finishers per minute. This report assists race
directors in finish line management.
GUN & CHIP TIME opens the Race Report Settings Screen and subsequently displays a report that displays
results listing both Gun Time and Chip Adjusted Time.
GENDER opens the Race Report Settings Screen and subsequently displays a report that groups runners' results
by division then gender.
OVERALL RESULTS opens the Race Report Settings Screen and subsequently displays a report that lists
runners in order of finish. The place, runner name, gender-age, hometown, age category, age place, pace, and
time are on the report. Users can select to show Gun Time or Chip Adjusted Time. Note: “Age Group” Award
Categories must be properly designated in Utilities Award Categories and such awards must be setup in your race
for results to display.
PREDICTION opens displays predicted results in a spreadsheet-like format. Registrants must have a Recent
Time greater than 0 as specified in their registration data to be included in this report. RaceTrak displays results
in the closest finisher to his or her predicted time. The difference in seconds displays negative times for runners
whose time is earlier than their predicted time. Results can be by either GunTime or by Adjusted Time, based on
the Time Type selected.
ROUND UP opens the Race Report Settings Screen and subsequently displays a report that lists runners in order
of finish with their times rounded up to whole seconds per USATF guidelines. The place, runner name, genderage, hometown, age category, age place, and rounded time are on the report. Users can select to show Gun Time
or Chip Adjusted Time. Note: “Age Group” Award Categories must be properly designated in Utilities Award
Categories and such awards must be setup in your race for results to display.
SPECIAL opens the Race Report Settings Screen and subsequently displays a report that lists runners grouped
by Special Race Category then by the Special Item in the runners' order of finish for that category.
156
5 YR RESULT opens the Race Report Settings Screen and subsequently displays a report listing race results
grouped by gender in five-year increments for all finishers.
10 YR RESULT opens the Race Report Settings Screen and subsequently displays a report listing race results
grouped by gender in ten-year increments for all finishers.
The following team reports based on Points are provided.
ALL TEAM RUNNER opens the Race Report Settings Screen and subsequently displays a report all team
finishers from first to last place within a Team Category. The runners position, team points, runner name, genderage, team name, pace, time, and scorer type (Scorer, Displacer, or blank) are displayed on the report.
POINTS DETAIL opens the Race Report Settings Screen and subsequently displays detailed team standings
based on total points for team scorers. Each team category is listed, followed by all teams within that category in
total team point order (lowest points first). Then team members, with their team place, gender-age, team name,
time, and Scorer type are listed. Please note that the Team Category’s Remove Incomplete Teams default setting
is checked (under Manage Races - Team Categories, Advanced Functions), and as such, RaceTrak eliminates
incomplete teams from team scoring and runners on these teams will not be listed. Similarly, disqualified teams,
set in the Race Management (for Team) Screen, are not officially scored. To show incomplete teams, change the
Remove Incomplete Teams setting and recalculate race results. Then uncheck the Exclude Incomplete/DQ Teams
and non-scorers.
POINT SUMM opens the Race Report Settings Screen and subsequently displays detailed team standings based
on total points for team scorers. Each team category is listed, followed by all teams within that category in total
team point order (lowest points first). Please see instructions regarding incomplete teams and disqualifications in
Points Detail above.
The following team reports based on Time are provided.
TOTAL TIME opens the Race Report Settings Screen and subsequently displays detailed team standings based
on total time for team scorers. Each team category is listed, followed by all teams within that category in total
team time order (lowest total time first). Please see instructions regarding incomplete teams and disqualifications
in Points Detail above.
AVG TIME opens the Race Report Settings Screen and subsequently displays detailed team standings based on
the average time for team scorers. Each team category is listed, followed by all teams within that category in
average team time order (lowest average time first). Please see instructions regarding incomplete teams and
disqualifications in Points Detail above.
RELAY displays (and optionally prints) team standings based on total time for a team. Each team category is
listed, followed by all teams within that category in total time order (lowest times first). Then team members are
listed with their age and sex. RaceTrak can score relays in two ways: by adding up team members’ times
(typically only the final team member’s time is recorded) or by associating bib and/or a timing chip with the team.
Typically, the last runner's time is the total team time; however, if each leg is separately timed, be sure that the
individual splits for each leg are recorded. Be sure to decide on a method to perform relay timing and do not mix
methods within a given race.
The following award reports are provided.
AWARD RPT opens the Race Reports Setting Screen and subsequently displays the awards for you race. The
reportis grouped by Award Category, showing award winners for each Award Category. The report displays the
157
award winner name, gender-age, hometown, place, and time. Note: the order of awards is determined by the
Award Category sort order as specified in Utilities. The time displayed is the time setup for the award (GunTime
or Adjusted Time).
CERTIFICATE displays (and optionally prints) individual certificates for award winners. The runner's name,
award category, overall time, and overall place are on the report.
The following special reports are provided.
ACTIVE.COM generates a comma delimited text file which can be imported into the Active.com website. The
file contains: bib, oplace, time, fname, lname, gender, age, city, state, zip, and country.
AGATE OUTPUT provides opens the Agate Report Format screen and subsequently displays a report in
paragraph format. Note that you can save the report to various file formats and provide the data to entities such as
newspapers who prefer the compressed data presented in this report.
ANNOUNCE LIVE opens the Announcer screen and allows announcers to enter a bib number and view
information about the runner.
CUSTOM QUERY opens the Custom Reports Screen, which allows RaceTrak users to build spreadsheet
outputs of selected fields in the sort order desired based on filters (if any) that have been setup. Please refer the
instructions for the Custom Reports Screen for more information.
NEW PARTICIPANT opens the Race Reports Setting Screen and subsequently generates a report listing all
runners who participated in the current race, but are not in another (user-selected) race. Users are prompted to
further filter the data by date, finding only those runners added to the current race since a user-specified date.
NON-RETENTION opens the Race Reports Setting Screen and subsequently generates a report listing all
runners who participated in another (user-selected) race, but are not in the current race.
158
NOT START/FINISH Intended for use when chip start times are captured, displays in spreadsheet format
runners who received a start time but not a finish time or runner who received a finish time but not a start time.
RETENTION opens the Race Reports Setting Screen and subsequently generates a report listing all runners who
participated in another (user-selected) race, but are also in the current race.
RUNNERS WORLD generates a comma delimited text file which can be imported into the Runners World
website. The file contains: first_name, last_name, address, city, state_province, postal_code, and email.
TRIATHLON UPDATE prompts user with informational message box and subsequently provides splits results
in a spreadsheet format from which data can be copied and pasted into other Windows programs for analysis and
custom reporting. The output includes identifiers showing the participant as a team or individual, the race name,
the team or individual name, gender, age, division, division overall place, wave and penalty adjustments, and the
time and place for each split. Once generated, users can use the qry_user_triathlon to view the same results and
automatically save to spreadsheet file.
24 HOUR RELAY is intended for races such as 24 hour relay where the winner is determined by the number of
laps, not the overall time. Times must be loaded as Lap Times during the reconciliation process and therefore
laps must be setup in manage races prior to the race. RaceTrak users can run three lap reports available in the
custom
reports
drop-down:
rpt_user_result_lap
(shows
runner
and
his/her
total
laps),
rpt_user_result_lap_individual (shows runner and the times for each lap), rpt_user_result_lap_team_relay_split
(shows the team and the times for each lap).
CUSTOM REPORTS (drop-down) lists customized reports and queries created for RaceTrak users. These
selections are prefaced by rpt_ or qry_. To run these, select an item from the dropdown and press the RUN
button. Please do not confuse the Custom Reports drop-down with the Custom Reports Screen. Items in the
Custom Reports drop-down are pre-built reports and queries that users can run; the Custom Reports Screen allows
RaceTrak users to change display, sort orders, and filters of pre-built RaceTrak queries.
RUN is invoked when CUSTOM REPORTS drop-down is open. Runs the report created.
REFRESH not available at the time of writing this User’s Manual. Intended for future use.
CLOSE returns the user to the Race Report List Screen.
Race Report Settings Screen
The Race Report Settings Screen allows RaceTrak users to customize most RaceTrak reports. Through intuitive
controls, RaceTrak users can hide fields, change field widths, set report sort order, group data, and more.
How to Get Here
The Race Report Settings Screen is accessed from most RaceTrak Reports. The Overall Results and Award
reports are also accessible from the Results Processing Screen.
Full navigation: Main Menu > REPORTS/LABELS > (select your race) SINGLE RACE RPTS> Race
Reports Screen (select a report - most reports can be customized and open the Race Report Setting Screen)
159
Step By Step
Select a Sort By option to sort the data on your report by the selected item.
Select a Font Size to increase or decrease the font size in the detailed section of the report.
Select a Grouping and desired subgrouping (if available) of your data. Group allow data to be listed under a
heading; for example, you can group by gender to show a headings of F and M, with female and male runners
respectively listed under each heading (group).
Select Show Details to list the detailed section of the report, usually the runners data. Uncheck to get a high level
of various totals for the data.
Set the Separator Width (maximum) for each data field on your report. To display the field, check the Display
checkbox.
Increase or decrease the Separator Width (how far apart one column is separated from the next). Note: most
RaceTrak reports are displayed in Portrait Mode where up to 7.5 inches of data can be printed. A warning
message is provided when this is exceeded. Note: the Registration QC Report can be run in Landscape mode.
Check the Alternate gray background to highlight every other line with a gray background.
Command Buttons
RUN generates the report per your settings and displays the report in preview mode.
CLOSE returns the user to the previous screen (most often the Race Report Screen).
Best Practices
The customized settings are not saved, so note your settings if you need to run a desired report again in the exact
same format. Such settings can be described in the notes field for your race.
160
Custom Reports Screen
RaceTrak’s Custom Reports Screen provides a powerful way to generate spreadsheet views and outputs where
RaceTrak users can select the fields they want to display, the sort order of the data, and apply filters to the data to
get exactly what they want.
New custom reports will be added all the time so please www.RaceTrakOnline.com for updates.
How to Get Here
The Custom Reports Screen is accessed from the Race Report Select List or the Race Reports Screen.
Full navigation: Main Menu > REPORTS/LABELS > (select your race) RACE CUSTOM QUERY (used to
generate reports for one or more races)
Full navigation: Main Menu > REPORTS/LABELS > (select your race) SINGLE RACE RPTS > CUSTOM
QUERY (used to generate reports for a single race)
Full navigation: Main Menu > REPORTS/LABELS > RUNNER CUSTOM QUERY (used to generate
reports for any runners in your database, irrespective of races)
Step By Step
Select a report from the Report Name drop-down and review the report’s description, which provides a summary
of the report.
Review the Race(s) text box to ensure the correct race or races have been selected.
161
If you want to limit to unique outputs, check the Unique Checkbox.
Important: uniqueness is applied to data displayed. For example, if you display only the last name and the unique
checkbox is checked, you would see only one Smith. However, if you added First Name to the display, then
unique occurrences of people with last name Smith are displayed (but you would not see two John Smiths).
Therefore, when displaying registration data, the checking unique is generally not a useful tool to limit your data.
Check the Displ Flag column to display the field on your output. Uncheck the checkbox to remove the field from
your output.
Select the desired Displ Ord value to display the columnar position of the field. In the example above, the first
column will be Last Name, the second First Name, and the third Hometown.
Check the Sort Flag column to apply a sort order for that field to your output. Uncheck the checkbox to remove
the sort.
Select the desired Sort Ord value to display the columnar position of the field. In the example above, the data ill
be sorted by Last Name, then First Name.
Select how the sort order will be applied: Ascending (from low to high) or Descending (high to low).
Use CLEAR VALS to clear all values in the respective window.
Use ALPHA ORDER to sort the values by name in the respective window.
Use SORT ORDER to sort the values by your sort order settings in the respective window.
Select ADD FILTER to setup and apply filters to your data. The Custom Report Where Screen is displayed,
allowing RaceTrak users to limit the data in the output. For example, you could limit to runners whose Age Race
Day is between 40 and 49. Note: RaceTrak users can Add Another filter, which prompts users for providing a
more restrictive (but more reliable) “AND operator” or providing a less-restrictive “OR operator” and can provide
unexpected results.
162
Select RUN QUERY to run the report.
Command Buttons
CLEAR VALS clears on-screen settings in the respective window.
ALPHA ORDER sorts the onscreen values based on name in the respective window.
SORT ORDER sorts the onscreen values based on sort order settings in the respective window.
ADD FILTER opens the Custom Report Where screen, which allows user to specify filters.
RUN QUERY runs generates a spreadsheet display of your data, with options to save the data to spreadsheet or
delimited text file.
CLOSE returns the user to the previous screen.
Custom Output Screen
The Custom Output Screen provides a tool to generate file outputs and labels by race, location, club members, and
more.
How to Get Here
The Custom Output Screen is accessed from the Registrants Tab/Screen Screen (membership races only), the
Race Reports Screen, and the Race Report Select List Screen.
Full navigation: Main Menu > RACE MANAGEMENT > (select a membership race) EDIT > Registrants Tab >
BUILD MBR LIST
Full navigation: Main Menu > REPORTS/LABELS > CUSTOM MAIL LABEL
Full navigation: Main Menu > REPORTS/LABELS > CUSTOM EMAIL
Full navigation: Main Menu > REPORTS/LABELS > CUSTOM ADDRESSES
Note: depending on the specific type of output the screen will display either Output or Mailing Label.
163
Step By Step
Use the on-screen selections to select the data you want in your output.
Select GENERATE to build your output.
Command Buttons
GENERATE builds the output based on user-selected settings.
CLOSE returns the user to the previous screen.
164
Registrant Import
Registrant Import allows RaceTrak users to import data from external sources such as the files created by online
registration services. At the time of this document, the import file must be a comma separated value file (.CSV).
Data Import Screen
The Data Import Screen provides options for importing registrant and runner via mapping external file data to
RaceTrak data. Users can save and re-use prior mappings.
How to Get Here
The Data Import Screen is accessed from the Main Menu.
Full navigation: Main Menu > REGISTANT IMPORT.
Step By Step
Always back-up your RaceTrak_06_Data.mdb data file before performing an import. You can back-up your
RaceTrak data to a compressed file in Utilities.
Find the .csv file to be imported and select an Import Type. Be careful not to re-import data previously imported.
The following import types are available: Registrant CSV, Person CSV, and Registrant - No Birthdate CSV.
The Registrant CSV is the most common import type where a participant file is loaded into a given race. If
RaceTrak finds one and only RaceTrak runner with the same name, gender, and birthdate combination as in
the import file, RaceTrak will associate the import data with the RaceTrak runner. As the preferred method of
collecting registrant data, this selection keeps duplicates to minimum.
165
The Person CSV imports person runner data only, which does not get associated with a given race.
The Registrant - No Birthdate CSV is similar to the Registrant CSV but does not perform a duplicate check
on the date or birth, instead matching on name and gender. If RaceTrak finds one and only RaceTrak runner
with the same name and gender combination as in the import file, RaceTrak will associate the import data
with the RaceTrak runner. In all other situations, RaceTrak will create a new runner (so potential duplicates
are more prevalent).
Review the on-screen Rules and ensure that your import file conforms to these rules:
Back-up your RaceTrak_06_Data.mdb
Import files must have headers.
Import file header names cannot contain apostrophes (‘) or quotes (“).
Import file header names should contain only letters and underscores.
The import file cannot contain quotation marks. Please remove all quotes from the import file.
Most fields can only be mapped once.
If importing Recent Time (used for predicted times, predicted pace, personal record), the times in the import
file must be formatted in of the following hhh:mm:ss, hh:mm:ss, h:mm:ss, mm:ss, or m:ss. Please note that
decimal points are not imported.
Depending on the file being imported, the import order may or may import data as expected. To ensure that
your data imports in the order imported, the import file’s first column should include a fixed length numbers
such as 1000001, 1000002, 1000003, etc. When imported this data will be converted text converted to a text
equivalent and used to sort the data.
Select STEP 1 - IMPORT EXT DATA to import the data into RaceTrak readable format. After the data is
imported, users can view the import data.
After completing step 1, you must map import values to those in RaceTrak. Not all fields need to be mapped.
Select a field in the Import File Fields list and then select the associated field in the RaceTrak Fields list, and then
select STEP 2 - MAP VALUES, which display the mapped fields in the center list.
If you have previously saved a mapping for this file, use the saved mapping. New in RT6.
If the Import File contains the new or different headings from a previously imported file, select CLEAR
MAPPING to clear the current mapping.
For any unmapped fields you wish to import, select a value from the left window (the import file) and a
matching value on the right window (the RaceTrak field). Select STEP 2 - MAP VALUES to re-display
the mapped value in the center window.
Note that most values are limited to one-to-one mapping.
Continue until all mappings are completed.
To save the current mapping, provide a name for your mapping in the Saved Mappings drop-down and click
an Import File Field or a RaceTrak Field. You will prompted to save this mapping, which can be reused. New
in RT6.
Select STEP 3 - LOAD DATA to begin the import process. An error log will be created on your c:\ drive,
listing warning level and critical level (runner or registrant failed) errors. Select a Race for Registrant files.
If teams are specified, you will be prompted to confirm any new teams and assign them to a valid RaceTrak
team category.
At the end of import you will prompted on how to assign new bib numbers (alphabetically, import order, or
by team).
166
Review the error log, which includes significant data conversion failures. Warnings indicate that non-critical
data was not successfully imported. Critical notations indicate that either the person or registration for that
person could not be completed and will need to manually reconciled.
Command Buttons
STEP 1 - IMPORT EXT DATA imports a .csv file into a format that RaceTrak can read.
STEP 2 - MAP VALUES allows user to map fields in import file to their RaceTrak equivalent.
STEP 3 - LOAD DATA loads data into RaceTrak in accordance with mappings into RaceTrak fields.
VIEW IMPORT FILE displays the contents of the data from the .csv file.
CLEAR MAPPING clears the current mapping specification to allow the creation of a new spec.
DELETE SAVED MAPPING upon user confirmation, deletes a previously saved mapping.
CLOSE closes the current screen and returns to the Main Menu.
Best Practices
Always backup your data before importing.
It is best to map Names based on First and Last Name (not First, Middle, and Last).
If your race has multiple events/divisions, consider splitting your file for each event:
Create a “clean” master version of your file (remove special categories, fix headings, etc).
Copy the master for each event/division and name accordingly. Remove non-event participants so your
file on contains the intended participants for the event/division for the file.
Import each file separately.
When importing runner (e.g., person) data please note the following rules specific to the import of this data:
When importing person data, if a match is found between the first name, last name, dob, and sex, the record is
considered a match and the matched RaceTrak person record is used. Otherwise, a new person record is
created. Therefore, if the import file does not include a DOB, all person records are added as new.
The import program defaults to US Zip Code processing. If foreign postal codes are received, they are
written to the “no zip” field to allow mailings, but do not use foreign postal code table data.
First name and last must be in import file.
If Person Sex is not in the import file, a value of U (for unknown) is written to the gender field for all runners.
When importing registrant data please note the following rules specific to the import of this data:
Above runner rules must be satisfied.
A race must be specified.
The import program defaults to the Run division when no division is specified.
Be sure to create a pool of bib numbers before importing data.
When bib assignments are made the import program, the import program utilizes any “smart bib” settings and
imports according to those rules. Further, the import will never use any bibs that have been previously
assigned. The import will not assign reserved bibs unless the import file contains those bib numbers.
If a DOB is available, RaceTrak will always automatically calculate the AgeRaceDay. Therefore, if
AgeRaceDay is provided in the import file, it will be recalculated and overwritten by the RaceTrak import.
167
AgeRaceDay cannot be less than 0 or greater than 150 and must be valid number. If data does not meet these
rules, age is calculated as 0.
If Team data is specified, a popup window will be presented and users must assign the team to a team
category. Therefore, users must set up at least one Team Category before processing. After teams are
imported, you will need to assign to correct category if that could not be determined during import.
When importing Club, Occupation, Country (Nationality), Grade, and Entry Source, if a new value is
encountered it is automatically imported to RaceTrak. Therefore, it is important that RaceTrak values for
these fields be provided to preclude two codes for the same value. For example, if RaceTrak contains 9, 10,
11, 12 for school grades, you would want online service to use these same values and not use FR, SO, JR, and
SR as this results in two values for the same data.
After importing, review your data to ensure that it imported as expected (go to Race Management > Registrants
Tab).
After importing, review the error log text file.
168
Networking RaceTrak
Networking RaceTrak
RaceTrak is designed to be used in both standard and networked mode. In most cases, the networked mode is
used only on race day where multiple users “point” their PCs to the master PC containing the RaceTrak database
(RaceTrak_06_Date.mdb).
RaceTrak uses standard Windows networking features where computers are connected through a hub or router.
Wireless connections should not be used as the underlying MS Access database is subject to major issues
(performance and corruption) when using wireless.
Windows networking instruction is beyond the scope of this User’s Manual. Please search the Internet for
instruction on how to network and map a network drive for the Windows Operating System(s) that you will be
using.
Please keep in mind the following regarding networking RaceTrak:
RaceTrak must be installed on all PCs in the network.
A Windows shared mapped folder must be setup for folder where the master database
(RaceTrak_06_Data.mdb) resides (so client computers can access this file).
When you install RaceTrak, the factory RaceTrak_06_Data.mdb file is loaded onto your computer along
with other RaceTrak files.
On opening RaceTrak, RaceTrak always looks for the RaceTrak_06_Data.mdb file, which contains all
your races, runners, registrants, and results.
If RaceTrak cannot find the RaceTrak_06_Data.mdb file, you will prompted to find it.
To find the RaceTrak_06_Data.mdb file on a network, a mapped drive with a shared folder containing the
RaceTrak_06_Data.mdb file must be available.
Given above, when you network RaceTrak, you will need to rename the RaceTrak_06_Data.mdb file on all client
machines (not your master PC containing the master version of RaceTrak_06_Data.mdb file). When opening
RaceTrak, the networked client PCs will not find the RaceTrak_06_Data.mdb file and then prompt you for the
location of this file.
A brief summary of how to network RaceTrak is provided below.
Obtain a 100MB or faster Ethernet hub/router that will support the number of PCs in your network.
Obtain Cat 5 Ethernet cables long enough to connect each computer to the hub/router.
Determine how you which computer will be your master PC and which will be connected to it.
Be sure that RaceTrak is installed on all computers in your network.
Rename the RaceTrak_06_Data.mdb file on the client (non-master) PCs.
Determine how to map and share a networked drive for the Windows Operating System(s) in your network.
The master PC must share the folder in which RaceTrak_06_Data.mdb resides (by default the c:\RaceTrak
folder).
Each non-master PC must be mapped to the folder containing the master database.
When you open RaceTrak from a non-master PC, you will be prompted to find the RaceTrak_06_Data.mdb
file. Use the dialog box to find the mapped folder and select the master RaceTrak_06_Data.mdb located in
that folder.
169
170
Windows Performance Tuning
Performance Tuning
Windows performance is impacted by a variety of factors. To improve the speed of your computer, have your
local technical expert consider the following recommendations:
Frequently compact and repair RaceTrak (available in the RaceTrak Programs Group)
Defragment your hard drive.
Ensure your computer has the minimum 2GB amount of RAM recommended.
Close any programs not in use.
Restart your computer to clear memory.
Consider additional RAM.
171
Race Management 101
Overview
This section provides high level guidance on Race Management, including key roles and responsibilities, finish
line management, and race scoring. In addition, checklists identifying time frames for various actions are also
provided.
Key Roles and High-Level Responsibilities
Race Director
Orchestrates the race
Identifies key leads and makes sure they have what they need
Approves race announcements and makes sure that they are same/consistent online, on paper, etc
Maintains race checklist
Determines race fees and gain race owner approval for any changes to fee structure
Determines maximum time to shut down finish line
Has no race day responsibilities
Registration Lead
Ensures that packet pickup has adequate space, power, tables, and chairs
Coordinates with Scoring Lead on types of reports, labels, etc needed
Coordinates with Scoring Lead on when reports, labels, bibs, and tags needed
Coordinates with Scoring Lead on how changes (e.g. sex change) should be handled
Ensures that volunteers understand basic steps in process for new registrants:
Collect money
Review form and make sure it’s complete
Write bib # on form
Provide shirt and bib to runner (plus other stuff)
Ensures that volunteers understand basic steps in process for pre-registrants:
Post list so participants can provide number
Verify that right person gets right bib
Provide basic instruction regarding special circumstances (wear chip, don’t bend tags embedded in bibs)
Handle any changes in a consistent manner
172
Ensures that volunteers understand how to handle special circumstances (complimentary entries, forms needing
waiver signed, etc.)
Scoring Lead
Please refer to Race Scoring Detailed Responsibilities for more information.
Reviews online registration, paper forms, announcements
Reviews awards and team scoring, ensuring that race can be scored as intended
Maintains supplies
Ensures that bibs, tags, etc are ordered and received 10 days before race
Ensures that paper and online registrations are entered into scoring software
Provides labels, reports to Registration Lead prior to race
Coordinates with Registration Lead on changes
Provides tag check equipment to Registration Lead as needed
Ensures that scoring location has adequate shelter, power, tables, and chairs
Ensures that all computers, peripherals, cables, etc are in good working condition and brings to race
Enlists help for race day scoring
Coordinates with Finish Line lead on connections to computers, obtaining times, and special circumstances
Provides post race reports and files to webmaster
Finish Line Lead
Please refer to Finish Line Management for more information.
Identifies and recruits volunteers (timers, spindlers, chute personnel, equipment handlers) needed for finish line
Ensures that all equipment required for start and finish line is in good working condition and it is brought to race.
Ensures that race starter and timers are coordinated such that race does not start if timers not ready.
Ensures that adequate backup timing is provided
Ensure that start and finish areas are set up properly
Ensures that timing equipment is fully powered prior to race
Ensures that timing equipment communicates with computers
Works with Scoring Lead to ensure optimal finish line setup to score race
173
Web Master
Sets up online registration
Reviews and synchronizes information in online registration, paper forms, website
Posts emergency messages and late-breaking updates on website
Posts results on website
Course Lead
Identifies lead car/bike who will guide runners through the race
Identifies water stops and ensures that volunteers and supplies are available for each
Identifies course sweep (follows behind last runner) to ensure that last runner or runners who cannot complete
race are is accounted for
Identifies and ensures that course marshals are correctly positioned and know direction runners coming from and
going to
Obtains course certifications
Ensures that course is properly marked
Coordinates with finish line personnel to ensure that clocks and/or required splits are properly positioned on
course
Ensures that course is properly coned
Ensures that permits are obtained
Race Scoring Detailed Responsibilities
This section expands on the scoring needs identified above.
Determine Scoring Needs for Race
Complete 4 to 6 months before race
Identify any changes from past race
Review any documented race materials (registration forms, announcements, etc.)
Obtain input from Race Director and others on possible changes from prior years
Determine how to configure race, online registration, and bibs/chips to score race
Determine sources of power
Evaluate onsite facilities (if any) and determine placement of scoring equipment
174
Examine start/finish in terms of equipment setup
Examine course start/finish/splits in terms of equipment setup
Contact vendor(s) for special scoring needs
Advise on tiered packet pickup and fees
Determine how to handle complimentary and discounted registrations
Set up Online Registration/Develop Paper Registration Form
Complete 4 to 12 months before race
Prepare, review, and/or synchronize online registration, paper forms, announcements, etc.
Reviews awards and team scoring, ensuring that race can be scored as intended
Determine online registration closure dates and times
Order Bibs/Order Chips
Complete 1 to 3 months before race (order in time for placing a re-order in case if issues; avoid late orders - if
bibs/chips ordered for delivery within one week of race and order is delayed, you may not have for race)
Consider special orders such as inclusion of runner name and other info pre-printed on bibs.
Ensure that bibs, tags, etc are ordered and received at least 10 days before race
Coordinate the Tag order with Bib order
Track above orders
Configure RaceTrak Race
Configure RaceTrak to handle race requirements
Maintain Backup Copies of RaceTrak Data
Backup the RaceTrak Data file (RaceTrak_06_Data.mdb) after every RaceTrak session
Backup the RaceTrak Data file after each Registrant Import, if several complex imports are performed
Download Registrations
Map online registration fields to scoring program fields
Import data
Review imported data and error log
175
Obtain and Enter Mail-in Registrations
Determine sources of forms
Ensure that paper registrations are entered into scoring software
Obtain and enter complimentary registrations
Coordinate with Packet Pickup
Ensure that packet pickup personnel understand any special requirements of the race (teams, race divisions, bib
number assignments). For example, if two races are conducted at the same location, the bib number assignment
must be clearly understood: Will different ranges of bib numbers be required, will one range of bib numbers be
used for both races without duplicates, or will one range of bib numbers with duplicate bib numbers be used?
Below is listing of considerations that may need to be addressed with packet pickup:
Identify locations and dates for packet pickup
Arrange handoff of bibs, labels, reports
Determine who will affix labels to bibs (if necessary)
Determine pickup/exchanges of new entrants
Convey special considerations (for example, multiple races needing different ranges of bibs)
Identify procedures for handling special situations: runner has lost bib, runner needs to sign waiver, runner signed
up but not listed on registration reports, etc.
Arrange for pickup/delivery of packet pickup registration forms so they can be entered into scoring software prior
to race
Provide RFID check equipment and instructions if runners need to confirm their tags/chips prior to race
Develop procedures to convey changes to incorrect information. A sample for handling multiple registrants in a
list form is provided below. This form works well, but bib number must be clearly written and verified.
Bib
Number
Field to Change
Old Value
New Value
A sample for handling multiple registrants in single form for each registrant is provided below.
176
Race Week Activities
Ensure that scoring location has adequate shelter, power, tables, and chairs
Ensure that all computers, peripherals, cables, etc are in good working condition and brings to race
Confirm help for race day scoring
Identify all race reporting and file output needs (and recipients of this data)
Coordinate with Finish Line Lead
Coordinate with Finish Line Lead on equipment needed, who will bring, time to meet
Coordinate with Finish Line Lead on how start/finish lines will be setup
Coordinate with Finish Line lead on connections to computers, obtaining times, and special circumstances
Race Day
Organize and bring equipment to race
Setup computer
Setup network (if required)
Setup peripherals
Complete setup one hour before race start
Test and confirm connections to timing devices
Perform Race Day Data Entry and corrections as needed
Post-Race
177
Backup database
Reconcile and respond to questions
Format and post results
Provide post-race reports and files to webmaster and others
Maintain supplies (paper, safety pins, printer ink, etc.) and equipment (tents, chairs, generators, computers,
printers, etc.)
Inventory supplies after race and re-order as necessary
Organize equipment so that cables, connectors, etc are in expected packages for next race
Check equipment for damage and schedule for maintenance/replacement
Return to storage location
Finish Line Management
Finish Line All Races
IMPORTANT! Obtaining correct results requires coordination among registration, finish line, and results
processing. Race results management is best accomplished when the following items are addressed. Course
marshaling, measuring, water stops, etc. are beyond the scope of this manual so please consult the internet for
more information on these topics.
Prior to race:
Obtain course certifications and permits as necessary to ensure safety, correct distance, and adherence to local
laws and regulations
Test and ensure that all timing equipment is in good working condition, fully charged, and ready for use. Clear
data as necessary
Inventory all equipment and ensure that all peripherals, connectors, power cables, etc. are available
Determine and ready finish line materials (tables, arches, power supplies, fencing, chutes, tables, etc.)
Identify and recruit volunteers needed for race (equipment delivery and setup, finish line oversight and
management, equipment take down and return to storage)
Work with Scoring Lead to ensure optimal finish line setup to score race
Race Day:
Setup equipment so that it will not impede runners
Setup equipment so that spectators can clearly see the finish
Setup a perimeter around the finish to keep spectators away from the finish
Setup a perimeter around the finish such that finishers can clearly determine how to enter and exit the finish area
Setup a perimeter around the finish such that non-finishers are kept away from the finish area and not accidentally
included in results
Setup finish line wide enough to accommodate multiple runners crossing the finish at the same time
Setup all equipment so it does not impede or cause safety risks to runners
178
Have a clearly designated finish line where the clock, finish line, and perimeter ensure that runners know when
they have finished
Have an adequate number of volunteers to guide runners out of finish area
Ensure that timers are ready when race starter starts the race
Ensure that backup timing is provided
Coordinate with scoring to ensures that timing equipment communicates with computers; run some test times
through the system
Finish Line - Chip Races
Race Day:
Setup start line, finish line, and announcer lines as necessary
Coordinate movement of equipment as necessary
Synchronize timing devices to computers as necessary
Finish Line - Non-Chip Races
Prior to race:
Determine the length and number of chutes required
Identify and recruit volunteers for the following key positions: finish line manager (oversees entire finish area),
finish line referee (ensures that runners are positioned correctly as they enter chute), chute personnel (keep
runners in order in the chute, keep runners in the chute, and keep runners moving through the chute), and tag
puller (takes, positions, and hands bib tear-off tags to spindler), and spindlers (places tags face-down on spindles)
Ensure that spindles are available and properly labeled, if pulling tags from runners’ bibs
Race Day:
If runner enters the chute, the runner should get a time
If possible, obtain select times for runners. (When using the Time Machine, the author removes the plunger and
timers use the ENTER KEY exclusively for obtaining times, resulting in one stream of data for times)
Position volunteers in front of chutes to properly guide runners to the correct chute
Obtain a time for any runner who enters a chute. Let spindle managers and results processing correct problems
Keep runners in order in the chute and keep them moving through the chute
Keep runners in the chute (don’t allow runners to exit until they have reached the chute exit)
Keep clearly marked dummy bib tear-off tags on hand to use for bandits. (Such tags can also be used if runner is
not a bandit but does not have tag)
Keep bib tear-off tags must be kept in exact order received and placed on clearly differentiated and well-marked
spindles
179
Ensure that bib tear-off tags are placed face-down onto sequentially numbered spindles
Use a two-person spindle management team whereby one person collects the bib tear-offs tags, readies them for
the spindler, and hands them one-at-a-time to the spindler
Lock the spindle prior to deliver to scoring
Deliver bibs to scoring
180
Checklists
Overall Checklist
Date
18 months
15 months
8 months
6 months
5 months
4 months
Done?
Action Item
Responsible
Person/Organization
Determine preliminary race date
Determine final race date
Place race announcement on websites
Select race course, date, and time
Identify potential sponsors
Get police approval for date and course
Get other necessary permissions for course, parking, and
facilities
Prepare race budget
Identify and contact key volunteers (finish line, scoring, packet
pickup, course marking, course marshalling, water stops)
Finalize course
Ensure room, adequate shelter, and power is available or can
be made available for start, finish, and packet pickup
Determine number of email blasts, mailings, and approximate
schedule and size of each
Make determinations for race/entry form
- Date, time, place
- Fee structure
- Ancillary events (fun run, walk)
- Field limit
- Cutoff dates for entries (mail-in, online)
- Time limit for last scored runners
- Timing method (chip vs tag vs bib/manual time)
- Awards
- Award categories
- Award basis (chiptime vs guntime)
- Race premiums (shirts, etc.)
- Date(s), time, place for packet pickup
- Will course be certified?
- Create draft race entry form
- Create final race entry form
- Determine number of entry forms needed
- Determine post-race food and drink
- Determine number of mailings needed
- Request production of email list and/or mailing labels (3
weeks before mailing)
Owner approval of all aspects of race
Distribute race entry from and/or announcement (form,
postcard, flyer)
- Races
- Stores
- Mailing list (8 -12 weeks before race)
- Setup online registration
- Other clubs
Race info to local and national publications, email lists, and
websites
Send email and/or letter to invited runners as needed
181
Date
3 months
2 months
1 month
Done?
Action Item
Responsible
Person/Organization
Finalize course with police/other authorizations
Measure/re-measure course as necessary
Determine course water stops (every 2M)
Create course map
Obtain insurance for race
Arrange for race photographer
Design shirts
Finalize race premiums
Develop schedule for email blasts
Send email blasts as required
Schedule shirt orders
Finalize computer registration procedures
Begin computer registration
Schedule and perform downloads of online registration
File parade permit for race
Alert hospital/emergency response officials of race
Order and obtain premiums, random awards, and race awards
Check race equipment and re-order supplies (safety pins)
Design race bibs
Order chips (chip races only)
Send email blasts as required
Recruit volunteers
Order/arrange post-race food and drink
Order port-a-johns
Order bibs: if Feet First obtaining bibs, notify Feet First 8
weeks prior to race
Order tags and coordinate tag order with Bib company if they
are affixing tags to bibs
Arrange for ambulance and medical help
Arrange phone and radio communications (course & key
areas)
Send email blasts as required
Identify housing for invited runners
Finalize finish line needs:
- Number of volunteers
- Number of chutes (non-chip race)
- Corral (size and barriers for chip races)
- Equipment needed
Finalize water stop needs:
- Number of water stops
- Number of volunteers
- Number of cups and tables
- Number of Jugs
- Trash bags
Determine Traffic Needs:
- Number of volunteers
- Course Marshall Locations (check with police)
- Cones, signs, mile markers, timers, clocks
Identify reports and files required for:
- Packet pickup
- Awards ceremony
- Posting at race
- Race sponsors
- Race publications
- Race website(s)
- Entrants
182
Date
2 weeks
1 week
1 day
Race Day
Summary
Done?
Action Item
Responsible
Person/Organization
Identify reports and files required for:
- Packet pickup
- Awards ceremony
- Posting at race
- Race sponsors
- Race publications
- Race website(s)
- Entrants
Finalize arrangements w/facility custodian
Race info to local newspapers
Measure and mark course (check before race); clearly mark
start, finish, and mile marks.
Send email blasts as required
Finalize volunteers for following:
- Finish line
- Water stations
- Traffic control
- Registration
- Packet pickup
- Split timers
- Lead bike and sag wagon
- Race sweep
- Refreshments
- Cleanup
- Water at finish line
- Announcer
Send email blasts as required
Close online registration 2-3 days before initial packet pickup
Arrange raceday water and electrical hookup
Prepare bar coded labels and reports for packet pickup (1-2
days before initial packet pickup).
Obtain packet pickup supplies:
- Tables and chairs
- Pens
- Entry forms
- Bibs (with bar code labels)
- Reports
- Safety pins
Arrange for tables and chairs for raceday registration
Make signs for raceday registration
Collect and confirm operability of equipment (timing device(s),
clock(s), generator, sound system, gas, computers, network,
printer, tent.
Collect scaffolding
Determine where to post awards
Remind hospital/emergency response officials of race
Send email blasts as required
Prepare equipment (recharge timing devices, clocks, and
computers, fill generator with gas, etc.)
Check course and re-mark as necessary
See separate Race Day checklist for full details
Open facilities
Place cones on course
Setup packet pickup
Setup race day registration
183
Date
Done?
Action Item
Responsible
Person/Organization
Setup cups, water, tables to water stops
Setup port-a-johns
Establish power to computers and finish line (as necessary)
Get tables and chairs to computer area
Setup computer equipment
Test computer and ensure communications with timing system
Setup water at start/finish
Setup trash bags at finish area
Position course marshals
Position mile markers
Setup start line (for tag races, setup controllers, mats, etc.)
Setup finish line (chutes, scaffolding, chip system, clock) with
adequate perimeter to ensure runner safety and correct
collection of times
Setup corral with benches/chairs and a single exit point (for
chip races where chips are collected after race)
Setup awards area and position awards for distribution
Score race
Conduct
Race
Manage finish line
- Move runners out of finish area
- Keep spectators out of finish area
- Assist runners in need of medical help; contact emergency
services as necessary
Post results for runner review
Collect chips (for chip races only)
Produce reports for awards ceremony
Pack equipment and return to storage
Remove trash
Identify any re-supply items
Document lessons learned
Produce results file(s) for website
Write story about race for newspapers & publications
Produce files and provide to recipients
Disposition remaining awards
Collect chips as needed
Race post-mortem meeting
Finalize race date for next year’s race (if not already done)
Identify race director for next year’s race
Post Race
1 week
2 weeks
Race Day Supply Checklist
Date
Registration
& Packet
Pickup
Done?
Action Item
Responsible
Person/Organization
Tables and chairs
Stapler and staples
Safety pins
Bibs
Shirts
Pens
Cash (for change)
184
Date
Finish line
Traffic &
course
Done?
Action Item
Responsible
Person/Organization
Masking tape
Scotch tape
Registration reports
Scissors
Entry forms
Bandit tags
Spindles
Pens
Finish line box
Timing equipment
Clocks
Scaffolding
Paint/chalk to mark finish
Cones
Vests
Paint/chalk
Communications equipment
Mile markers
Mile timers
Mile clocks
Course marshals
Water Stops
Awards
Ceremony
Lessons
Learned
Cups
Water containers
Tables
Trash bags
Food and refreshments
Awards
Random prizes
Sound system
Fun run
Immediately following race, obtain feedback regarding race
issues.
185
Time Machine Data Transmit
Time Machine Data Transmission Steps
When pulling times after a race, the times must be sent from the Time Machine to RaceTrak per the instructions
below.
1. Initiate RaceTrak transmit in "awaiting data" state BEFORE attempting to load times.
2. Press Time Machine [SETUP] times until RS232 appears. Note if you need to pull times from an earlier
event, change the event number in the first setup option and then follow the steps below. Be sure to reset the
event to a new event when done.
3. Press Time Machine [ENTER] until XMIT starts.
4. RaceTrak displays times as they are received.
5. Time Machine displays numbers as they are sent.
6.
186
RaceTrak Administration
RaceTrak Administration
RaceTrak is shipped with MS Access tools to allow you to maintain both the application (RaceTrak_06.mde)
database and the data (RaceTrak_06_Data.mdb) databases. In addition, frequent and regular backups of the
RaceTrak_06_Data.mdb file should be performed. At a minimum, backups should be made after each race. It is
recommended that backups be created upon completion of a RaceTrak session and before importing registration
data.
IMPORTANT! Be sure that you run the following actions from the master PC and that any networked users have
exited RaceTrak.
RaceTrak 6 provides a quick way to backup your data to zipped file (compressed to save data) via Utilities (Main
Menu > UTILITIES > BACKUP RACETRAK).
Frequently "tune" the RaceTrak_06_Data.mdb by running the repair programs in the RaceTrak program group
(Start > All Programs > RaceTrak). Note: If RaceTrak was not installed into the default directory, the shortcut
properties must be reset to point to the correct directory.
187
Troubleshooting
Provided below are some typical situations you may encounter or actions you wish to perform during the course
of managing a race. Please familiarize yourself with these items as they become increasingly important as various
situations occur that can easily be resolved with just a little practice.
If the RaceTrak data file is not found in the expected location, the following Locate RaceTrak_Race_06_Data
Database Screen is displayed.
Navigate to the location of your RaceTrak_06_Data.mdb and select it. Note: RaceTrak always looks for
this file on start up, so when networking RaceTrak you may need to move or rename the
RaceTrak_06_Data.mdb on non-master PCs.
You encounter unexpected errors or RaceTrak.
Close and restart RaceTrak. If problem persists, backup your RaceTrak_06_data.mdb file and then run
Compact Backend Data and Compact Frontend in the RaceTrak program group icon to repair the
database. If the problem persists, backup your data and reinstall RaceTrak and restore your
RaceTrak_06_Data.mdb backup. If problem persists, contact Information Forum.
Your RaceTrak_06.mde file or RaceTrak_06_Data.mdb file have gotten very big or RaceTrak is running very
slowly.
Backup your RaceTrak_06_data.mdb file and then run Compact Backend Data and Compact Frontend in
the RaceTrak program group icon to repair the database. If the problem persists, backup your data and
reinstall RaceTrak and restore your RaceTrak_06_Data.mdb backup. If problem persists, contact
Information Forum.
You try to add a record but get a duplicate value in index error.
The data cannot be entered because the exact same data is already in the system. This would occur if you
tried to enter John M Smith as a male with an identical birthdate. If you really have two different John M
Smith's born on the same day, you can provide full middle names to differentiate. Note: RaceTrak will
allow two male John Smiths (no middle initials) with same birthdate.
In a network environment, you try to add a record and receive a record locking error.
188
Wait a few seconds until the other user causing the record lock saves the record on which he/she is
working.
You cannot view the entire screen.
In Control Panel, check your display settings and select the display where RaceTrak best fits your screen.
Fonts are truncated or incorrectly sized on your PC.
Search the Internet for “Applications using Bitmap Font gets effected with rendering issues if during
Windows 7 Setup High DPI is deteted and DPI is set to 120 or higher” which at the time of this writing
was documented by Microsoft under http://support.microsoft.com/kb/2396756.
You want to run RaceTrak on another computer.
Install RaceTrak from the original executable. After successfully installing RaceTrak, the computer has
an empty database (a fresh RaceTrak_06_Data.mdb file) in which to enter data. If you wish to provide
your existing database (with your current runners and races), make a copy of this existing database
(RaceTrak_06_Data.mdb) and copy over the empty database. Always make a backup copy of
RaceTrak_06_Data.mdb on both computers. Note: the RaceTrak licensing agreement allows you to
install RaceTrak on different machines for purposes of networking or convenience in scoring on another
PC, but the licensing does not allow you to run RaceTrak to score different races at different locations
simultaneously. In such cases, a separate license should be purchased.
You want to run RaceTrak on separate computers and merge the data later.
RaceTrak does not support the merging of data from separate PCs at this time.
You try to add awards but the award category you need is not available.
From the Utilities module, select tbl_award_category and add the award you desire. Be sure to specify
all data correctly according to the category.
You are sponsoring a team race and you want runners from incomplete teams to be counted among the team
scorers (not recommended).
From the Race Management module, select Edit for the desired race and uncheck the Remove Incomplete
Teams checkbox on the Team Cats Tab.
You need to re-assign a new bib number to a registered runner.
Navigate to the desired to runner via
Main Menu > REGISTRATION > (select a race) OK > REGISTRANT LIST> (select a registrant)
EDIT REGISTRATION
A message box indicating the runner is already registered is displayed. Select OK to update the existing
runner and the Registration screen is displayed. Select Un-Register. Note the old bib number is available
for re-assignment (in case it was used by another runner). Re-select the desired runner and register with
the appropriate number.
You need to assign a different bib number from the one the computer is issuing.
Double-click on the bib number field or select ALT+B, thereby changing the background from gray to
white. Then type the bib number desired.
The bib number you want to select is not available.
One of three conditions exists: 1) the bib number has already been used, 2) the bib number was never
created or has been deleted, or 3) the bib number is "in use." You can check for these settings by looking
at the pool bib numbers in the Race Management module. If the bib has been used, you may need to
determine why and correct the problem. If the bib number is not in the bib pool, you can generate a new
one. If the bib number is "in use" it is likely that an abnormal exit from registration occurred. Under this
case, change the in use to No. Note: use the Bib-Drop down to see a listing of available bibs.
189
You don't want ever to send mail to a given runner (the runner has requested not to be on mailing list, the runner
is deceased, etc.)
From Registration or Runner Management, select Mail Code = “Never” and/or remove the street
address or email from the runner’s data record.
In a network, a runner was just added but you cannot see on your PC.
The Registration screen needs to be "refreshed" which will occur when you exit and re-enter the
Registration Select Runner screen. This should happen very infrequently as the Registration process has
built-in refreshes.
You try to register a runner but get a message indicating that there are no bibs available.
From the Race Management module, check that bibs are available for the person you are trying to enter.
You may need to "un-reserve" bibs or generate new bib numbers.
You are registering a runner and need to change the runner's date of birth or other information on the runner.
In the Fields Available radio button at the bottom the screen, select All. All the fields that can be updated
are opened for update.
You are transmitting data in a "live" mode and wish to perform results reconciliation.
You must suspend the live mode in order to perform results reconciliation. Be sure to "suspend" and not
"quit" the live mode. IMPORTANT: While performing bib scans in a network, entering and exiting the
transmit program functions from another PC can cause the bib scan to reset to the first position;
therefore, when scanning bibs in a network, be careful to note your current location when scanning bibs
You are processing bibs and determine that you skipped a bib when typing/scanning. You need to insert the bib
in its proper place in the bib listing.
Position your cursor on the bib number where you need to insert the new bib. Select Insert and type the
desired bib number. RaceTrak will insert the bib number directly above the record insertion point. After
inserting the bib number, the bib list is refreshed and repositioned at the start of the list.
You are processing bibs and need to start from where you last left off.
Go to the end of the list and begin scanning in the next available bib scan position.
You are processing bibs and scanned ten bibs in reverse order.
Go the position where the incorrect bib scans started and type dummy bib numbers for the ten bad bib
numbers. Then, scan the bib numbers in the correct sequence. Note: RaceTrak does not allow duplicate
bib numbers to be entered for the same chute and this is why the entry of dummy bib numbers is
recommended.
You try to calculate results but receive a message that no times are available.
Check that you have times entered for runners. Note: RaceTrak calculates results based on times, and
therefore, times must be available for results to be calculated.
During race day data entry, you did not enter the addresses for new runners and you wish to now add them.
Sort the registration forms in bib number order.
From the Race Management module, select the desired race and select the Registrants tab and select the
appropriate setting to display the data you need to update. Sort runners by bib and scroll down the
runner list to find street addresses that are blank and update as necessary. Note: If the zip code cannot be
found, select Full Record and add the zip code there.
You need to disqualify a runner.
From Results Processing, Results, find the desired record and check the DQ checkbox.
Several bandits cross the finish line in a race using bib tear-off tags.
190
Be sure to coordinate bandit handling with finish line personnel. We recommend that anyone crossing the
finish line be given a time and a bandit tear-off be placed in their spot in the spindle. Under RaceTrak,
bandits can be ignored during reconciliation.
When you try to load/merge the times with bib scans, you get a message that a bib number cannot be found.
The load/merge program merges displayed times and bib numbers and attempts to load them into data
records for the associated bib number. A bib number has to be registered for this to occur. A report is
available listing all bibs that have not been registered. If this occurs, find the bib number and register the
runner with the correct bib number.
You are scanning bibs and receive a duplicate bib message.
RaceTrak does not allow a chute to have duplicate bib numbers, as bib numbers are assumed unique for
each race. Re-type the correct bib number.
191
RaceTrak Primer
After installing the RaceTrak software and its components, you are ready to begin setting up and managing races.
Before conducting a live race, we strongly urge you to set up some test races and become comfortable with
RaceTrak and its features. Before doing this, you may want to make a backup copy the RaceTrak_06_Data.mdb
file. You can then test RaceTrak without later having to clean up the database. After testing is completed, delete
the test .mdb file and rename the backup copy as RaceTrak_06_Data.mdb.
The basic RaceTrak steps to score a race are:
Setup and configure your race (via Race Management)
Register your participants (via Registration and Registrant Import)
Score your race (via Results Processing)
Report your race results (via Reports/Labels)
In addition, Runner Management and Utilities provide RaceTrak users a variety tools to manage runner and
related data.
A detailed summary of steps is provided below.
Determine how to score your race. Races range from simple to complex, where an almost infinite number of
possibilities can exist. For purposes of this manual, a “simple race” is a single event race with awards (no special
awards) and no teams. Races get increasingly complex when special award categories, teams (cross country point
based scoring and/or relay scoring), multiple events, waves, and splits are introduced.
If you have questions regarding specific race configurations, please email info@racetrakonline.com
Score a simple race. Use the following scenario to setup and score a simple race. You have been given the
following information: the race is a 5K for the Homeless and will be one month from this coming Sunday. The
race director has ordered bibs 1 to 100 and the race will have awards for the top three male and female finishers.
There are no teams nor any other special requirements for this race. The primer below will step you through the
full scoring of this race when using the RaceTrak Stopwatch as your timing device.
Set up a new race. Follow the steps below to set up a your race:
1. Select Main Menu > RACE MANAGEMENT > ADD NEW > to open the Race Management screen
2. Enter a Race Name, Race Date, Start Time, and select RaceTrak Stopwatch in the Timing Method drop-down.
3. Select SAVE and the Race Management screen is refreshed to display more options.
4. Select the Bibs tab and select ADD NEW. The Bib Generation Screen opens.
5. Enter 1 in the Start Bib field and enter 100 in the End Bib field. Select GENERATE to create the bibs.
Select CLOSE to close the Bib Generation screen. The Race Management screen is displayed.
6. Select the Awards tab and select ADD NEW. The Award Generation screen opens.
7. Select Overall Female in the award Category drop-down and select GENERATE. Three new awards are
added for Overall Female.
8. Select Overall Male in the award Category drop-down and select GENERATE. Three new awards are added
for Overall Male.
9. Select SAVE/CLOSE > CLOSE to exit Race Management and return to the Main Menu.
Register your runners. Follow the steps below to manually enter some runners into the current race.
1. Select Main Menu > REGISTRATION > select your race > OK to open the Select Runner screen.
192
2. Select ADD NEW and enter your First Name, Last Name, DOB, and Gender in the fields provided. Select
OK. The Registration screen is displayed.
3. Review the data on the bottom half of the screen. You have been assigned bib 1 and your age is calculated as
the race date minus your birthdate.
4. Double-click on the Bib Number field and change the bib to 2.
5. Click OK to save the record. The Select Runner is displayed.
6. Register four new runners into this race. If you don’t know a person’s DOB, leave it blank and enter the
person’s approximate age on race day when the Registration screen opens.
7. After adding the four new runners, select CLOSE until you return to the Main Menu.
Run a Report of Registered Runners. It’s the day before your race and the race director wants a list of entrants
and bar coded labels to affix to the bibs.
1. Select Main Menu > REPORTS/LABELS > select your race > SINGLE RACE REPORTS. The Race
Reports screen opens for your race.
2. Select BIB LNAME and the Race Report Settings screen opens.
3. Uncheck Hometown and select RUN. The rpt_registration_result is displayed, showing the registrants you
added for this race. Among other choices, a ribbon allows you to print or export the data.
4. Print the report and select CLOSE PRINT PREVIEW to close the report and select CLOSE until the Race
Reports screen is displayed.
5. From the Race Reports screen, select BAR CODE LABELS and the Race Report Settings screen opens.
6. Uncheck Team and select RUN. The rpt_lbl_registration_bar_code is displayed, showing the registrants you
added for this race. The labels include bar codes and the data is formatted to print on label paper (Avery 5160
or compatible stock). Note: racing labels should be printed on label printers or special inkjet label stock to
ensure that the ink that does not run.
7. Print the report and select CLOSE PRINT PREVIEW to close the report and select CLOSE until the Main
Menu screen is displayed. (This step can be skipped or you can print on label stock to ensure that margins are
properly set for your printer.)
Process results. It’s race day and there are no race day registrations, so you are ready to time the race. Note: in
live race environment, a dedicated computer should be used to run the RaceTrak Stopwatch, which is a handy tool
but dedicated timing devices and chip technologies provide far more flexibility and capability.
1. Select Main Menu > RESULTS PROCESSING > select your race > STOPWATCH. The RaceTrak
Stopwatch opens.
2. You know the race started almost 15 minutes ago and runners will be finishing shortly.
3. Select SET TIME and set the minutes field (mm) to 15 and select SAVE.
4. Select START to start the Stopwatch.
5. You see the first runner approaching the finish line and you type 2 into the select bib field and press [ENTER]
(or click GET TIME) as the runner crosses the finish line.
6. The next 2 runners are too close together for you to type their bibs, so you press [ENTER] to get their times.
7. The last 2 runners are bibs 1 and 4 and you are able to type their bibs and press enter as they each cross into
the finish line, with about 5 seconds between them.
193
8. Select EXPORT and select YES in the message box (to get times since the last output). A save file dialog
box open. Note the name and location of the file and save it.
9. Select STOP and CLOSE in the RaceTrak Stopwatch screen. The Race Results List is displayed.
10. Select IMPORT FILE. The Timing Device List screen is displayed. At the bottom of the screen, the Import
Method is RaceTrak Stopwatch.
11. Provide a Device Name (unique within this race) and select the FILE OPEN icon to find and select the file
created in Step 8.
12. Select IMPORT. The file is imported and a message box indicates when processing is finished.
13. Close the Timing Device List screen. The Race Results List screen is displayed.
14. Select SCAN BIBS. The Scan Bibs screen is displayed. Select ADD NEW. The Add a New Chute screen
is displayed.
15. Enter 1 in the Chute Number field and My First Chute in the Chute Description field. Select OK. The Scan
Bibs screen is displayed.
16. Select My First Chute from the Bib Scan Chute drop-down.
17. Enter 2 in the Bib field and select [TAB] or [ENTER].
18. Enter 3 in the Bib field and select [TAB] or [ENTER].
19. Enter 5 in the Bib field and select [TAB] or [ENTER].
20. Enter 1 in the Bib field and select [TAB] or [ENTER].
21. Enter 4 in the Bib field and select [TAB] or [ENTER].
22. Select CLOSE in the Scan Bibs screen. The Race Results List screen is displayed.
23. Select RECONCILE. The Results Reconciliation screen is displayed.
24. Select the Device created in Step 11 from the Device Chute drop-down. The times for the device are listed.
25. Select the Bib Scan Chute created in Steps 14 and 15. The bibs for the chute are displayed.
26. Review the order of times and bibs in both screens. You are satisfied that the results are correct, so select
LOAD/MERGE. The Load Race Times screen is displayed. Since these are finish times, you don’t need to
change any settings.
27. Select OK in the Load Race Times screen. The Missing Bib Check screen is displayed. Select NO. The
Processing Completed screen is displayed.
28. Select OK to calculate results. The Calculate Results screen is displayed. Select CALCULATE RESULTS!
and the Assign Awards screen is displayed. Select OK to assign awards. Select OK in Process Completed
message boxes. The Results Reconciliation screen is displayed.
194
29. Select RESULT REPORT from the Results Reconciliation screen. The Race Report Settings screen is
displayed. Uncheck Pace. Select RUN to generate the report. The race results are displayed in print preview
mode. Select CLOSE PRINT PREVIEW to close the report.
30. Select AWARD REPORT from the Results Reconciliation screen. The Race Report Settings screen is
displayed. Select RUN to generate the report. The race awards are displayed in print preview mode. Select
CLOSE PRINT PREVIEW to close the report.
31. Select CLOSE until the Main Menu is displayed.
Administration, 187
Affiliation Data, 135
Affiliation Type Data, 135
Age Grade
Age Grade Data, 136
Age Grade Type Data, 136
Announcer Live Screen, 158
Awards
Award Assignment Screen, 122
Award Category Data, 136
Award Generation Screen, 21
Awards Tab, 18
Backup RaceTrak, 139
Bibs
Batch Edit Bibs Screen, 30
Bib Generation Screen, 27
Bibs Tab, 23
Insert Bib Screen (Results), 112
Scan Bibs Screen, 107
Certification Type Data, 136
Checklists, 181
Chips
Batch Add Chips Screen, 34
Chip Management Tab, 32
Chip Return Tab, 36
Manually Add Transponder to Bib Screen, 35
Clubs
Club List, 136
Club Membership Race Mode Tab Screen, 46
Club Membership Type Data, 136
Club Officer Type Data, 136
Club Screen, 141
Clubs Screen, 140
Managing Club Members in Runner Management, 127
Conventions, 2
Keyboard, 2
Miscellaneous, 5
Windows, 3
Country Data, 137
Custom Reporting
User Query Local Data, 139
Distance Data, 137
Division Data, 137
195
Divisions
Divisions Tab (Race Divisions), 38
Entry Source Data, 137
Fee Category Data, 137
Fees Tab, 39
Generic Support Tables, 135
Grade (Scholastic)
Grade Data, 137
Grade Level Data, 137
Hat Color Data, 138
Import
Registrant Data Import, 165
Installation, 7
Installing RaceTrak, 7
Migrating RaceTrak 5 Data to RaceTrak 6, 7
Overview, 7
Networking RaceTrak, 169
Occupation Data, 138
Performance, 171
Postal Code Data, 138
Preferences
Preferences Tab, 40
System Wide Preferences, 138
Race Management
Add a New Race Screen, 14
Edit an Existing Race Screen, 17
Race Management List Screen, 14
Race Management 101, 172
Finish Line Management, 178
Race Scoring Detailed Responsibilities, 174
Responsibilities, 172
Race Special Categories Tab, 63
Race Special Items Tab, 65
Race Splits/Legs Tab, 66
RaceTrak, 1
Main Modules, 10
Overview and Features, 2
Quick Start, 9
Rules of the Road, 8
What's New, 1
RaceTrak Files, 5
RaceTrak_06.mde, ii, 5, 49, 187, 188
RaceTrak_06_Data.mdb, ii, 5, 6, 7, 9, 165, 166, 169, 175, 187, 188, 189, 192
RaceTrak Menu Screen, 11
RaceTrak Primer, 192
Random Prizes
Random Prizes Tab, 43
Registrant
Data Import Screen, 165
Import, 165
Registration, 77
Add a New Registration Screen, 84
Add a New Runner Screen, 80
Customize Registration Screen, 41
196
Edit Registration Screen, 89
Race Registration List Screen, 77
Registrants Tab Screen, 44
Registration Fees Tab Screen, 91
Registration Overview, 77
Registration Race Chips Tab Screen, 95
Registration Results Tab Screen, 92
Registration Screen Overview, 80
Registration Specials Tab Screen, 94
Select Runner for Registration Screen, 78
Reports
Custom Output Screen, 163
Custom Reports Screen (Spreadsheet Display), 161
Custom Reports Where Screen, 162
Mailings Screen, 49
Overview, 150
Race Report Screen, 152
Race Report Select List Screen, 151
Race Reports Settings Screen, 159
Series Reports, 147
Results
Communications Settings Screen, 104
Load Merge Times Screen, 113
Offset Race Times Screen, 121
Offset Times for Device Chute Screen, 113
Race List for Results Processing Screen, 98
Race Results Management Screen, 119
RaceTrak Stopwatch Screen, 105
Reconciliation Screen, 110
Results Processing Overview, 97
Time Entry Screen Interpolate, 118
Time Entry Screen Manual, 117
Time Transmit Batch Mode Screen, 101
Time Transmit Live Mode Screen, 102
Timing Device List Screen, 106
Transmit Data Screen, 100
Runner Management
Combine Persons Screen, 131
Convert Case Screen, 126
Overview, 124
Runner List Screen, 124
Runner Screen, 127
Satellite Database, 139
Series
Overview, 141
Race Series Awards Generate Screen, 55
Race Series Awards Screen, 53
Race Series Results - Series Award Winners for Race Tab, 62
Race Series Results - Series Awards for Race Tab, 60
Race Series Results - Series Team Slots Tab, 59
Race Series Results - Series Teams Actuals Tab, 57
Race Series Tab, 51
Race Series Team Slot List Screen, 56
Runner Series Screen, 133
197
Series Data, 138
Series Group Data, 139
Series List Screen, 142
Series Reports Tab, 147
Series Screen Tab, 143
Series Team Categories Tab, 145
Series Teams Tab, 146
Special Category Data, 139
State Province Data, 139
Street Fixup Data, 139
System Requirements, 5
System Wide Tables, 135
Teams
Eternal Team Data, 137
Race Team Categories Tab, 67
Recurring Team Data, 138
Relay Chip Scenario, 72
Relay Non-Chip Scenario, 73
Scenario
Relay Overview, 72
Teams Tab, 70
Time Machine Data Transmit, 186
Time Type Data, 139
Timer Data (Summit Systems Data), 139
Timing Method Data, 139
Troubleshooting, 188
Utilities
Utlities List Screen, 135
Valid First Name and Gender Data, 139
Waves
Wave Generation Screen, 75
Waves Tab, 73
Zip Code Data, 138
198