1
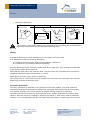
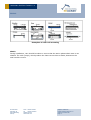
HANDLING INSTRUCTIONS V1.0 Solar Cell Handling Instructions ECS3x0 October 26, 2009 EnOcean GmbH Kolpingring 18a 82041 Oberhaching Germany Phone +49.89.67 34 689-0 Fax +49.89.67 34 689-50 info@enocean.com www.enocean.com Subject to modifications ECS3x0 User Manual V1.0 October 26, 2009 5:29 PM Page 1/7 HANDLING INSTRUCTIONS V1.0 ECS3X0 REVISION HISTORY The following major modifications and improvements have been made to the first version of this document: No 1.0 Major Changes Initial version Published by EnOcean GmbH, Kolpingring 18a, 82041 Oberhaching, Germany www.enocean.com, info@enocean.com, phone ++49 (89) 6734 6890 © EnOcean GmbH All Rights Reserved Important! This information describes the type of component and shall not be considered as assured characteristics. No responsibility is assumed for possible omissions or inaccuracies. Circuitry and specifications are subject to change without notice. For the latest product specifications, refer to the EnOcean website: http://www.enocean.com. As far as patents or other rights of third parties are concerned, liability is only assumed for modules, not for the described applications, processes and circuits. EnOcean does not assume responsibility for use of modules described and limits its liability to the replacement of modules determined to be defective due to workmanship. Devices or systems containing RF components must meet the essential requirements of the local legal authorities. The modules must not be used in any relation with equipment that supports, directly or indirectly, human health or life or with applications that can result in danger for people, animals or real value. Components of the modules are considered and should be disposed of as hazardous waste. Local government regulations are to be observed. Packing: Please use the recycling operators known to you. By agreement we will take packing material back if it is sorted. You must bear the costs of transport. For packing material that is returned to us unsorted or that we are not obliged to accept, we shall have to invoice you for any costs incurred. EnOcean GmbH Kolpingring 18a 82041 Oberhaching Germany Phone +49.89.67 34 689-0 Fax +49.89.67 34 689-50 info@enocean.com www.enocean.com Subject to modifications ECS3x0 Handling Instructions V1.0 October 26, 2009 5:29 PM Page 2/7 HANDLING INSTRUCTIONS V1.0 ECS3X0 TABLE OF CONTENT Handling ............................................................................................................ 4 Soldering ........................................................................................................... 4 Gluing ............................................................................................................... 6 Corrosion protection ............................................................................................ 6 Shade ............................................................................................................... 7 EnOcean GmbH Kolpingring 18a 82041 Oberhaching Germany Phone +49.89.67 34 689-0 Fax +49.89.67 34 689-50 info@enocean.com www.enocean.com Subject to modifications ECS3x0 Handling Instructions V1.0 October 26, 2009 5:29 PM Page 3/7 HANDLING INSTRUCTIONS V1.0 ECS3X0 The EnOcean solar cell technology guarantees the highest stabilized efficiency values. At the front, the solar modules have a glass covering that protects the photovoltaic layer from the effects of the environment and weather. The rear features contacts for the electrical connection. Handling Prevent injuries due to the sharp glass edges. Always handle the modules carefully, avoid damage of the glass edges that leads to glass breakage or glass chips. The layers are sensitive to punctual pressure, scratching or grinding. During handling and processing, always make sure that no particles are pushed into the coating. Scratches, imprints or particles pushed into the layer can lead to short-circuiting of the module, thus deterioration. The processing of the modules with lacquer spray processes or edge grinding could lead to an impairment of the electrical function of the module (electrostatic influences). In case of necessary module cleaning, the following cleaning agents are suggested: Kleenex (200 tissues, Code 7107, D 0261 8930, Kimberly-Clark) / highpure DI- water / Ethanol (min. 99,8 Vol.%). Soldering The solar panel has 2 connection pads on the rear side. On one side you will see the minus sign. This is the GND connection. Apparatus Soldering iron: Temperature-controlled type with 60W heater at least and +/- 5°C control range is recommended. Soldering iron tip: Slant type or point type. Temperature Measuring Device: A calibrated contact-type temperature meter (e.g. Anritsu Model No. HL-100). Materials Pb-free solder wire: Sn96.5/Ag3.0/Cu0.5, ∅ 0.8 mm, (e.g. Kester 245) Lead wire: Dependent on the type of solar cell, use 20 - 30 AWG multi-threads stranded type. For Pb-free soldering, the lead wire component shall be complied with RoHS requirement. EnOcean GmbH Kolpingring 18a 82041 Oberhaching Germany Phone +49.89.67 34 689-0 Fax +49.89.67 34 689-50 info@enocean.com www.enocean.com Subject to modifications ECS3x0 Handling Instructions V1.0 October 26, 2009 5:29 PM Page 4/7 HANDLING INSTRUCTIONS V1.0 ECS3X0 Procedure for hand soldering Environment: Soldering operation shall be performed in a clean environment with ventilation to remove soldering fume during the operation. Soldering temperature calibration o Temperature measuring device: The device (e.g. Anritsu Model No. HL-100) shall be stabilized at room temperature prior to and during calibration. o Timing: Calibrate the soldering iron tip before the operation or every 30 minutes after the soldering. o Procedure (a) In Pb alloy soldering, the soldering iron shall be set up and stabilized at 240°C before and in the calibration. For Pb-free solder wire, the soldering iron shall be set up and stabilized at 255°C before and in the calibration. (b) Take little solder wire on the soldering iron tip and put the tip in contact with the contact-pad of the temperature meter for 1 minute. (c) Temperature shown on the temperature meter shall be 255°C (Pbfree) at least for one minute otherwise re-adjust the temperature setting of the soldering iron. Soldering operation Step 1: Make soldering iron tip and solder wire contact with the copper paste of solar cell together. At this moment, tin pot formed in a shape of half ball type or makes a plane type on the copper paste. All the processes shall be well done less than 2 seconds. Step 2: Melt solder wire on the top of solder lead wire. Weld the tin pot again and put the lead wire into the inside of tin pot. Take off the solder iron tip. Finish this step within 2 second also. Soldering operation on the solar cell shall be non-destructive. At any time, only make the soldering iron tip contact the copper paste of the solar cell less than 2 seconds. Attention o Hold the soldering iron at an angle of 30° to 45° with the solar cell in the welding process o Lead wire is in the contact with the copper paste at an angle of 15° o Make sure the welding process not more than the time limit and the lead wire in good contact with copper paste through the solder. Please watch out the loose contact between the lead wire and the copper paste if any o Do not move the lead wires and solar cell before cooling the tin pots o Weld soldering is always with smooth surface and with shine. Test criteria o Pull strength in vertical direction: more than 500 gram o Pull strength in horizontal direction: more than 200 gram Note 1: For pull strength test, the lead wire used should be 28-30 AWG multithreads stranded type Note 2: Lead wire breakage is excluded EnOcean GmbH Kolpingring 18a 82041 Oberhaching Germany Phone +49.89.67 34 689-0 Fax +49.89.67 34 689-50 info@enocean.com www.enocean.com Subject to modifications ECS3x0 Handling Instructions V1.0 October 26, 2009 5:29 PM Page 5/7 HANDLING INSTRUCTIONS V1.0 ECS3X0 Operation illustration Step 1 Step 2 Some solder Step 3 Solder Step 4 30°-45° Lead Solder SOLAR CELL Lead wire Soldering iron Temperature meter Less than 2 sec Some solder SOLAR CELL 15° Less than 2 sec The function of the solar module may be impaired by exceeding the recommended soldering temperature and the specified soldering time! Gluing Instead of soldering it is also possible to glue the solar cell onto a PCB. It is proposed to use the following adhesives: a) GE Bayer Silicones XE16-508 (electroconductive adhesive) b) Loctite 403 (to increase mechanical stability) First the XE16-508 is put onto the contact pads of the solar cell. Then a drop of Loctite 403 is put in the middle of the solar cell. After that the solar cell is put onto the PCB. Then the solar cell is pressed onto the PCB accompanied by small rotary movements (<<1mm). Wear gloves to avoid finger prints on solar cell! The curing time of Loctite 403 is only 5 seconds once the solar cell is pressed onto the PCB. Positioning must be finished by then! Corrosion protection Corrosion protection is essential to the lifetime of the solar module. The solar module is extremely resistant to temperature effects. But mounting must particularly provide protection against humidity. The proper choice of suitable sealing material is important. The best method is protection by a transparent cover, mainly important for outdoor applications. Also well-suited is a casing by silicone (not acrylic!). With every kind of protection solution, it is very important that the cell edges and the metallic contact areas are covered. EnOcean GmbH Kolpingring 18a 82041 Oberhaching Germany Phone +49.89.67 34 689-0 Fax +49.89.67 34 689-50 info@enocean.com www.enocean.com Subject to modifications ECS3x0 Handling Instructions V1.0 October 26, 2009 5:29 PM Page 6/7 HANDLING INSTRUCTIONS V1.0 ECS3X0 Examples of solar cell mounting Shade During installation, care should be taken to ensure that the active photovoltaic area is not shaded. The cells (strips), which produce the least current due to shade, determine the total module current. EnOcean GmbH Kolpingring 18a 82041 Oberhaching Germany Phone +49.89.67 34 689-0 Fax +49.89.67 34 689-50 info@enocean.com www.enocean.com Subject to modifications ECS3x0 Handling Instructions V1.0 October 26, 2009 5:29 PM Page 7/7