1
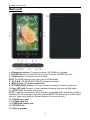
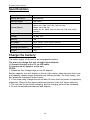
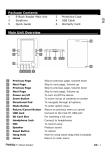
Noodle
7’’ E-Book reader
Model NO.: NEB-7010
USER MANUAL
E-reader user manual
Table of contents
Safety instructions……………………………………………………………………………….....2
Features………………………………………………..........................................3
Accessories………………………………………………………………………………………….…...3
Main unit…………………………………………………………………………………………………….4
Main menu operation…………………………………………………………………………..5-11
Document management………………………………………………………………………….12
Precautions and maintenance………………………………………………………...12-13
Specifications………………….……………………………………………………………….…....14
Charge the battery………………………………………………………………………….…....14
1
E-reader user manual
Safety instructions
WARNING -- To reduce the risk of fire, electric shock, or serious
personal injury:
l Do not use this product near water; e.g. near a bathtub, washbowl, kitchen sink,
laundry tub, in a wet basement, near a swimming pool, or the like.
l Situate this product away from heat sources such as radiators, heat registers,
stoves or other appliances (including amplifiers) that produce heat.
l Operate the product only with the supplied power adapter. Route power cords so
they are not likely to be walked on or pinched by items placed upon or against
them, paying particular attention to cords at plugs, convenience receptacles and
the point where they exit from the product.
l Clean the product only as recommended by the manufacturer (see the
"Precautions and Maintenance" section for details). Unplug the power cord from
the wall outlet before cleaning.
l Unplug the power cord from the wall outlet when left unused for an extended
period.
l For pluggable product, the power outlet should be installed nearby and should be
accessible.
l Take care that objects do not fall and liquids are not spilled into the product case
through product openings.
l Do not operate this product under the following conditions:
-When the power-supply cord or plug is damaged.
-If liquid has been spilled into or objects have fallen into the product.
-If the product has been exposed to rain or water.
-If the product does not operate when used according to the operating instructions.
-If the product has been dropped or damaged in any way.
l Do not attempt to service the product; take it to the electronics repair shop of
your choice for any servicing or repair.
l Do not overload wall outlets, extension cords or integral convenience
receptacles.
CAUTION-- To reduce the risk of personal injury or product/property
damage:
l This product is intended solely for non-commercial, non-industrial, personal use
as a portable player. Do not use this product for any other purpose.
l Do not subject the product to violent shocks, extreme temperatures or lengthy
periods of direct sunlight.
l Keep the product away from magnetic objects, motors and transformers.
l Do not use outdoors in inclement weather.
l Do not wall or ceiling-mount this product.
l Do not use this player while driving; this is dangerous and is illegal in some areas.
PLEASE READ THIS USER MANUAL BEFORE USEING THIS PRODUCT
AND SAVE THESE INSTRUCTIONS FOR FUTURE REFERENCE.
2
E-reader user manual
Features
7 INCH SCREEN DISPLAY
This player has a built-in 7" TFT display window to provide clear vision and low
radiation.
BUILT-IN 4GB MEMORY
BUILT-IN RECHARGEABLE LITHIUM BATTERY
SUPPORT E-BOOK FILE FORMATS: RTF, UNICODE TXT, PDF, HTML, FB2, PDB and
EPUB.
SUPPORT VIDEO FILE FORMATS: RM, AVI, RMVB, 3GP, FLV, MP4, DAT, VOB, MPG,
MPEG and MKV.
SUPPORT MUSIC FILE FORMATS: MP3, WMA, FLAC, AAC, WAV and OGG.
SUPPORT IMAGE FILE FORMATS: JPEG, BMP and GIF.
SUPPORT CALENDAR FUNCTION
SUPPORT SD/MMC CARD READER
SUPPORT MIC RECORDING FUNCTION
SUPPORT ZOOM & ROTATE FUNCITON
Accessories
The package contains e-book device, USB data cable, AC power adaptor, earphone,
hand strap and user manual (one each). Check your parts carefully before you open
the package to use, if any part missing, please contact with retailer as soon as
possible.
USB data cable: used to connect the e-book and computer.
AC power adaptor: used to connect with AC power to charge the e-book device.
3
E-reader user manual
Main unit
1-4 Navigation buttons: To move the cursor UP/DOWN or flip page.
5. POWER button: Press and hold this button to power ON/OFF this unit.
6. ZOOM button: To enlarge current e-book.
NOTE: Do ZOOM function four times to exit ZOOM mode.
7. ▲/▼/◄/►: UP/DOWN/LEFT/RIGHT navigation buttons
8. MENU button: To confirm a selection.
9. RETURN/CANCEL button: To return to previous menu or cancel a selection.
10. Mini USB jack: Connect to the computer/charging this unit via USB cable.
11. RESET hole: To restart the device.
NOTE: If appear this situation which the unit is drop-dead halt and press any key is
malfunction, put a needle or the like into the RESET hole and press it to shut down
the unit, then press and hold [Power] button to turn on the unit.
12. POWER input jack
13. SD/MMC card slot
14. EARPHONE output jack
15. RECORD hole
16. Built-in speaker
4
E-reader user manual
Main menu operation
Press and hold the POWER button for several seconds to turn on this unit, and then
the main menu will appear on the screen.
1. Browser History
- Press navigation buttons to select this option, and then press MENU button to
enter it.
- This option allows the user to explore e-books that have been viewed.
Note:If the files are saved in SD/MMC memory card, they will still be displayed
even SD/MMC card is removed, but they can’t be opened.
2. E-book
- Press navigation buttons to select this option, and then press MENU button to
enter it.
- Press navigation buttons to select wanted file, and then press MENU button to
view it.
- Press LEFT/RIGHT buttons to view NEXT/PREVIOUS page of current e-book.
- Press ZOOM button repeatedly to enlarge the e-book to desired effect.
NOTE: Press ZOOM button four times to exit ZOOM mode and view the e-book in its
original size.
- When viewing a TTS e-book, press POWER button to turn on/off the sound.
- Press MENU button to enter E-book setup menu page.
1) Page Jump
- Press LEFT/RIGHT navigation buttons to select the digit.
- Press UP/DOWN navigation buttons to adjust the value.
- Press MENU button to confirm it.
2) SaveMark
- Press navigation buttons to move the cursor up or down.
- Press MENU button to save a mark.
NOTE: Five book marks can be saved for each e-book.
3) LoadMark
- Press navigation buttons to move the cursor up/down.
- Press MENU button to load a mark.
4) DelMark
- Press navigation buttons to move the cursor up/down.
- Press MENU button to delete a mark.
5) Browser Mode
- Press navigation buttons to select Auto Mode or Manual Mode.
- Press MENU button to confirm selection.
6) Flip Time
- Press navigation buttons to select 10 Sec, 20 Sec, 30 Sec, 45 Sec, 60 Sec.
- Press MENU button to confirm selection.
5
E-reader user manual
7) Set Color
- Press navigation buttons to select desired color.
- Press MENU button to confirm selection.
8) Code Type
- Press navigation buttons to select desired type.
- Press MENU button to confirm selection.
9) Remove Enter Set
- Press navigation buttons to select Off or On.
- Press MENU button to confirm selection.
10) Mode
- Press navigation buttons to select desired mode.
- Press MENU button to confirm selection.
11) TTS Options
- Press navigation buttons to select Speaker role, Speaker style, voice effect, Speak
speed or Speak tone, and then press MENU button to enter the submenu page.
- Press navigation buttons to select desired option.
- Press MENU button to confirm selection.
- Press RETURN/CANCEL button to return to previous menu page or cancel a
selection.
3. Music
- Press navigation buttons to select this option, and then press MENU button to
enter it.
- Press navigation buttons to select wanted folder, and then press MENU button to
enter it.
1) Resume Play
- Press navigation buttons to select this option, and then press MENU button to
resume last playback.
- Press POWER button to play/pause playing.
NOTE: Resume Play function is available only when music files has been played
already. And if RETURN/CANCEL button is pressed during music playback, “Resume
Play” will turn to “Current Play”.
2) All Music
- This folder contains all the available music files. Press navigation buttons to
select wanted file, and then press MENU button to start playback.
- When selecting wanted music files, press POWER button to enter “Add to
Favorite” dialog box, and then use navigation buttons to select YES or NO.
3) Artist
- The music files in this folder are classified by Artist. Press navigation buttons to
select wanted file, and then press MENU button to start playback.
- When selecting wanted music files, press POWER button to enter “Add to
Favorite” dialog box, and then use navigation buttons to select YES or NO.
6
E-reader user manual
4) Album
- The music files in this folder are classified by Album. Press navigation buttons to
select wanted file, and then press MENU button to start playback.
- When selecting wanted music files, press POWER button to enter “Add to
Favorite” dialog box, and then use navigation buttons to select YES or NO.
5) Genre
- The music files in this folder are classified by Genre. Press navigation buttons to
select wanted file, and then press MENU button to start playback.
- When selecting wanted music files, press POWER button to enter “Add to
Favorite” dialog box, and then use navigation buttons to select YES or NO.
6) My Favorite
- This folder contains the music files which have been set as Favorite. Press
navigation buttons to select wanted file, and then press MENU button to start
playback.
- When selecting wanted music files, press POWER button to enter a menu page,
and then press navigation buttons to select Delete File, Clear Up or Exit. Press
MENU button to confirm selection.
7) Record
- This folder contains the recorded music files. Press navigation buttons to select
wanted file, and then press MENU button to start playback.
8) Dir List
- This folder is used to select wanted files in Nor Flash or SD/MMC card. Press
navigation buttons to select wanted file, and then press MENU button to start
playback.
9) Media Library Update
- This item is used to refresh the available music files.
NOTE: During music playback:
- Press POWER button to play/pause playing.
- Press UP/DOWN navigation buttons to increase/decrease the volume level.
- Press LEFT/RIGHT navigation buttons to play previous/next music file.
- Press MENU button to enter Music setup menu page.
1) Repeat Mode
- Press navigation buttons to select this option, and then press MENU button to
enter it.
Available options:
Once: Play the selected music file once.
Repeat: Play the selected music file repeatedly.
All: Play all the available music files once.
All Repeat: Play all the available music files repeatedly.
Intro: All the available music files will be played 10 seconds only.
2) Play Mode
- Press navigation buttons to select this option, and then press MENU button to
enter it.
7
E-reader user manual
Available options:
In Order: Play the music files in order.
Random: Play the music files randomly.
3) EQ Sel
- Press navigation buttons to select this option, and then press MENU button to
enter it.
- Press navigation buttons to select wanted effect: Normal, Rock, Pop. Classic, Bass,
Jazz and User EQ. Then press MENU button to confirm selection.
4) User EQ Setup
- Press navigation buttons to select this option, and then press MENU button to
enter a dialog box.
- Press LEFT/RIGHT navigation buttons to move the cursor to desired column.
- Press UP/DOWN navigation buttons to adjust the value.
- Press MENU button to confirm the settings. Or you can press LEFT/RIGHT
navigation buttons to select YES or NO in the dialog box, and then press MENU
button to confirm it.
5) Display
- Press navigation buttons to select this option, and then press MENU button to
enter it.
- Press navigation buttons to select Lyric or Closed. Then press MENU button to
confirm selection.
- Press RETURN/CANCEL button to return to previous menu page or cancel a
selection.
4. Video
- Press navigation buttons to select this option, and then press MENU button to
enter it. If a SD/MMC memory card has been inserted, the user will see two options
(Flash and TF Card) after entering the Video item.
- Press navigation buttons to select wanted folder or file, and then press MENU
button to play the selected video file.
NOTE: During video playback:
- Press POWER button to play/pause playing.
- Press LEFT/RIGHT navigation buttons to increase/decrease the volume level.
- Press UP/DOWN navigation buttons to play previous/next video file.
- Press MENU button to enter Video setup menu page.
1) Select Time Play
- Press navigation buttons to select this item, and then press MENU button to enter
a dialog box.
- Press UP/DOWN navigation buttons to select HH (hour) or MM (minute).
- Press LEFT/RIGHT navigation buttons to adjust the value.
8
E-reader user manual
- Press MENU button to confirm settings and this unit will play the video from the
selected point. Or you can press UP/DOWN to select YES or NO in the dialog box,
and then press MENU button to confirm it.
2) Full screen
- Press navigation buttons to select this item, and then press MENU button
repeatedly to switch the video display mode among: Full screen, Normal, and
Original screen.
3) Brightness
- Press navigation buttons to select this item, and then press MENU button to enter
it.
- Press navigation buttons to select One to Five. Then press MENU button to confirm
selection.
- Press RETURN/CANCEL button to return to previous menu page or cancel a
selection.
5. Photo
- Press navigation buttons to select this option, and then press MENU button to
enter it. If a SD/MMC memory card has been inserted, the user will see two options
(Flash and TF Card) after entering the Photo item.
- Press navigation buttons to select wanted folder or file, and then press MENU
button to display the selected photo file.
NOTE: During photo playback:
- Press ZOOM button to repeatedly to enlarge or shrink the select photo.
- Press navigation buttons to display next/previous photo.
- Press MENU button to enter photo setup menu page:
Rotate Right: Rotate the selected photo 90° counterclockwise.
Rotate Left: Rotate the selected photo 90° clockwise.
Zoom In: To enlarge the selected photo.
Zoom Out: To shrink the selected photo.
Browse: This item is used to set the slideshow interval. Available options: Turn Off,
5 Sec, 10 Sec and 20 Sec.
NOTE: If Browse item is not set as Turn Off, press MENU button will only display
Browse item during photo playback.
- Press RETURN/CANCEL button to return to previous menu page or cancel a
selection.
6. Record
- Press navigation buttons to select this option, and then press MENU button to
enter it.
- Press MENU button to enter Record Setting menu page. Then press MENU button to
enter Volume item. The user can press navigation buttons to select 1 to 5 and press
MENU button to confirm it.
9
E-reader user manual
- Press POWER button to start or pause recording.
- If Recording is finished, press RETURN/CANCEL button to enter a dialog box. Use
navigation buttons to select YES or NO, and then press MENU button to confirm it to
decide whether save the recorded file or not.
NOTE: To playback the recorded files, enter Music item in the main menu. The
recorded files are saved in Record folder.
7. Explorer
- Press navigation buttons to select this option, and then press MENU button to
enter it. All the available multimedia files will be included in this folder. The user
can press navigation buttons to select wanted file, and press MENU button to start
playback.
8. Settings
- Press navigation buttons to select this option, and then press MENU button to
enter it.
1) Display Setting
- Press navigation buttons to select this item, and then press MENU button to enter
it.
Light Time: To set the lasting time of backlight. Available options: 5 Seconds, 10
Seconds, 15 Seconds, 20 Seconds, 30 Seconds and Always On.
Brightness: The user can adjust the brightness of this unit from One to Five.
2) System Setting
- Press navigation buttons to select this item, and then press MENU button to enter
it.
Restorable: This item is used to reset the system settings.
Key Lock Time: This item is used to set the key lock. Available options: 10 Seconds,
30 Second, 5 Minutes, 10 Minutes, No Locking. If the Key Lock works, press POWER
button to release the lock.
3) Language
- Press navigation buttons to select this item, and then press MENU button to enter
it.
This unit supports multiple OSD languages. Press navigation buttons to select
desired language, and then press MENU button to confirm it.
4) System Information
- Press navigation buttons to select this item, and then press MENU button to
display the Product name, Local Memory Size, Card Memory Size and so on
information.
5) AutoShut Time
- Press navigation buttons to select this item, and then press MENU button to enter
it.
- If no operations are performed for this unit, it will power off automatically when
the selected AutoShut Time elapsed. Available options: 3 Minutes, 5 Minutes, 10
Minutes, 15 Minutes, 20 Minutes and No automatic shutdown.
10
E-reader user manual
6) Sleep Power off Time
- Press navigation buttons to select this item, and then press MENU button to enter
it.
- The users can press navigation buttons to adjust the Sleep Power off Time from 0
to 99 Minutes. If no operations are performed for this unit, it will power off
automatically when the selected time elapsed.
7) Time
- Press navigation buttons to select this item, and then press MENU button to enter
Time and Date setup menu page.
- Press LEFT/RIGHT navigation buttons to select Time Setting or Date Setting.
- Press UP/DOWN navigation buttons to adjust the value.
- Press MENU button to confirm it. The users can also press LEFT/RIGHT navigation
buttons to select YES or NO in the dialog box decide whether change settings or
not.
9. Calendar
- Press navigation buttons to select this option, and then press MENU button to
enter it.
- Press MENU button repeatedly to select Year/Month/Date, and then press
navigation buttons to adjust the value.
11
E-reader user manual
Document Management
Connecting to computer
Use the supplied USB cable to plug into the device, and connect the other end to
computer. A“USB Connected” window will pop out upon successful connection to
computer. Computer will detect both the built-in memory and SD/MMC card on the
device as a removable.
Managing Files
You will be able to access built-in memory and SD/MMC card (if SD/MMC card is
plugged in) from “My Computer” after the device is connected to computer. You
can move, copy or delete the existing files or folders from computer. At this
moment, the device is under key lock mode. The device will resume normal
operation automatically after disconnected from computer.
Precautions and Maintenance
On Battery
Charge the battery only in temperature that ranges from 0 to 35 degree celsius.
Do not charge the device if the battery is found damaged or leaking.
On Operation
Never subject the device to extremes of light, temperature, moisture or vibration.
Never wrap the device in anything when it is being used or charged. Heat may build
up in the device while charging or if it used for an extended period of time.
Do not use or store the device in a location subject:
Extreme high temperature, such as in a sun-heated car; Direct sunlight; high
humidity or places with corrosive substances; sub-zero condition, especially during
winter.
On Headphone
Listening to audio at high volume for extended periods of time can cause hearing
damage. To avoid damage to your hearing, keep the volume at moderate level.
Do not use earphones while driving, cycling or operating any motorized motors. It
can also be potentially dangerous to play at a high volume while walking, especially
at pedestrian crossings.
On Cleaning and Maintenance
l Be sure to press and hold POWER button to power off the player and disconnect
the AC adaptor before maintaining the player.
l Wipe the player with a dry, soft cloth.
l If the surfaces are extremely dirty, wipe clean with a cloth which has been
dipped in a weak soap-and-water solution and wrung out thoroughly, and then
wipe again with a dry cloth.
l Never use alcohol, benzine, thinner, cleaning fluid or other chemicals. And do
not use compressed air to remove dust.
12
E-reader user manual
l
l
If the device does get wet, turn off the device immediately. Wait for the device
to dry completely before turning on the device again.
When carrying your device in bag, keep the device in the protecting case
supplied to avoid scratches.
On SD/MMC card
After inserted a SD/MMC card, if the device has no response, please take out and
insert again.
Do not remove SD/MMC card or turn off the device during data writing or reading to
prevent damage to data and to the device.
Make sure the SD/MMC card is unlocked before writing or deleting data in the
SD/MMC card.
Backup your files and data before formatting the SD/MMC card. Please format the
SD/MMC card in FAT.
13
E-reader user manual
Specifications
Screen
7 inch LCD
Display Resolution
800(RGB)x480
Dimension(mm)
200x130x13
E-Book: RTF, UNICODE TXT, PDF, HTML, FB2, PDB and EPUB.
Music: MP3, WMA, FLAC, AAC, WAV and OGG.
Image: JPEG, BMP, GIF.
Video: RM, AVI, RMVB, 3GP, FLV, MP4, DAT, VOB, MPG, MPEG
and MKV.
Format Support
Response Time
10 ms
Storage
SD/MMC card
Memory
4GB
AC Adaptor
5V DC output, center positive polarity
Battery Pack
3.7V 2300mAh Polymer Lithium
Working Temperature
0OC to 45OC
Weight
305g
Charge the battery
The power supply of this unit is by rechargeable battery.
The users can charge this unit through below methods:
1) Connect this unit with a PC via USB cable.
2) Connect the AC Adaptor to this unit.
NOTES:
1. Please see the voltage scope on the AC adaptor.
Battery capacity icon will display on the up-right corner, when the icon shows one
grid capacity, please charge the battery as soon as possible. For fully charge, this
unit should be charged at least 4 hours.
2. If first time using, charge this unit at least 12 hours when its power is completely
exhausted. Please do the above-mentioned process in the first three times use.
3. The unit can be used while charging, but the charging time will be increased.
4. Do not use unauthorized battery and adaptor.
14