1
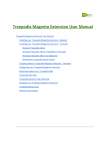
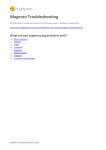
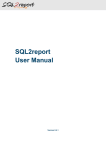
“Help Desk Pro” User Manual
Version:
Website:
Support:
1.0
http://www.mage-world.com/
support@mage-world.com
Help Desk Pro – User Manual
Table of contents
I.
HELP DESK PRO OVERVIEW ........................................................................ 3
II.
FUNCTIONALITY DEFINING........................................................................... 3
III.
INSTALLATION. .............................................................................................. 3
IV.
INTRODUCE FRONT-END. ............................................................................. 4
1. Help Desk Pro page ........................................................................................... 4
2. Magento Contact form ....................................................................................... 7
V.
INTRODUCE BACK-END ................................................................................ 8
1. Software Setting step by step ........................................................................... 8
2. Configuration ..................................................................................................... 9
3. Manage Operators............................................................................................ 12
4. Manage Departments....................................................................................... 12
5. Manage Email Gateways ................................................................................. 15
6. Manage Ticket .................................................................................................. 17
7. Manage Quick Response................................................................................. 21
8. Ticket statistics ................................................................................................ 22
VI.
CRON CONFIGURATION .............................................................................. 23
VII.
EMAIL TEMPLATES ...................................................................................... 23
©2009 – 2010 Mage-World.com
2
Help Desk Pro – User Manual
I. Help Desk Pro overview
Nowadays, it is time of the era of ecommerce. Trading online is a hard competition, in
which every one want to take advantage. They compete against each other by all ways, from
quality, price to service. Market researchers showed that “customer support” was one of the
best keys to win customers’ hearts and this determining issue affects on customers
purchasing behavior directly. So, no company can ignore this, then owning a system that
helps their supporting activity become efficiency is a must.
Basing on the need of market, Mage-World determines to develop Help Desk Pro
extension. We are sure that this extension will match all your requirements of a customer
support system and push you toward your customers quickly.
II. Functionality Defining
Help Desk Pro provides an efficient and flexible mechanism of receiving and replying
customers’ request. Your customer can send ticket from Help Desk form, Magento contact
form or by their emails. For enterprise, you can manage replies easily with reasonable
decentralization and have a general look of all support activities with ticket statistic. That is
the reason why even with a large support system or professional supporting companies,
Help Desk Pro is still a perfect choice.
Due to the fact that it is hard to control the vulnerability from message auto-senders that
attack directly to your system via mail receiving system, Help Desk Pro contains a secure
method, which protects your data from spam and detections.
Beside, for saving time, you can create popular questions and answers with the feature
Quick Response.
If you are interested in our extension and wonder the ways it works, please following the
next.
III. Installation.
-
Copy folder app, skin, js to your Magento root folder.
-
Make sure to clear cache in admin of Magento.
©2009 – 2010 Mage-World.com
3
Help Desk Pro – User Manual
-
Go to System/Configuration, Help Desk Pro is on the left side. Click on it and change
the configuration as you wish. Also, you can find the tab Help Desk Pro on the top
menu.
-
Refresh the front-end and see how Help Desk Pro works.
Note that:
At the first time, if you login admin after installing extension, then you see message
"access denied", please try to logout and login again.
If you have any problem please email to: support@mage-world.com.
IV. Introduce Front-end.
Help Desk Pro is integrated with Magento Contact Form, so customer can send ticket
from Magento Contact Form or Help Desk Pro page.
1.
Help Desk Pro page
To access on Help Desk Pro page, customer have to have an account. They login their
account and the Help Desk Pro tab can be find at left bar in My Account page.
Help Desk Pro includes 2 sub-tabs, Submit Ticket and My Ticket.
My Ticket displays ticket history.
Submit Ticket is the place for customer to send their request. When customers click
on the tab Submit Ticket, they will see a screen like the image above. The first box shows
information of business time and support status. Customer chooses a department that he
©2009 – 2010 Mage-World.com
4
Help Desk Pro – User Manual
wants to shoot an email to at the second box. Admin can choose to hide this box in
configuration, and all ticket sent from Help Desk Pro page will be sent directly to the default
department, which is set by admin at back-end.
After customer select a department, this box will be loaded:
Customer will see description of the selected department and the Submit Ticket area.
This form allows customer to select ticket priority, assign related-order for his ticket, and
attach file. If customer does something wrong, don’t worry, alert message will direct him to
correct. Max size upload notification is an example.
©2009 – 2010 Mage-World.com
5
Help Desk Pro – User Manual
If customer wants to assign an order for his ticket, he can choose this order in the
field Assign To Order #. To see detail, move mouse to Click on link to view order in detail, all
information of this order will be shown.
After customer sends a ticket successfully, system will notify him on screen and drop
a notification into his email, then update history immediately. The customer can review all his
tickets by clicking on My Ticket.
My Ticket shows all information of created tickets such as date, subject, assigned
department, priority, status. To view detail and reply, click on View Detail, and you can see
the screen below:
©2009 – 2010 Mage-World.com
6
Help Desk Pro – User Manual
2.
Magento Contact form
As we said above, Help Desk Pro integrates with Magento Contact Form, so customer
can create ticket by clicking on Contact Us at the footer of site.
When customer chooses department, he can see some login required departments and
not-required ones. If customer chooses a department that requires to login, system will direct
him to login page. Otherwise, My Account page is shown, customer finds the Help Desk Pro
tab and he can start creating ticket as normal.
©2009 – 2010 Mage-World.com
7
Help Desk Pro – User Manual
V. Introduce Back-end
At back-end, you can find the menu Help Desk Pro at the top bar.
1.
Software Setting step by step
To make sure the Help Desk Pro system works properly, you should follow steps in
correct order below:
1/ Turn on Help Desk Pro by set the field Enable in configuration to Yes
2/ Add operators (please view Manage Operator)
©2009 – 2010 Mage-World.com
8
Help Desk Pro – User Manual
3/ Create Department (Please view Manage Department)
4/ Create Gateway (Please view Manage Gateway)
5/ Now, you can test how Help Desk Pro works (create ticket at front-end or send
mail, then check at Manage Ticket)
2.
Configuration
To set a general configuration for this system, please access on Configuration by
following the path System/ Configuration/ Help Desk Pro or click on Configuration in the
menu Help Desk Pro at top bar.
Firstly, you can turn on/off Help Desk Pro by set the field Enable to Yes/No.
Next, free choose the below options as you want:
Gateway Update Interval: time to auto-update gateway (in minutes).
Notify operator of missed ticket: After a specific time that operator don’t reply a ticket,
the system will send a notification to him for warning (in hours).
Time to auto-close ticket: After a specific time that operator reply ticket and no more
request is sent from customer, this ticket will be closed (in hours).
©2009 – 2010 Mage-World.com
9
Help Desk Pro – User Manual
Allow Display Working Time: Choose Yes if you want to display your company’s
working time at front-end.
Start Time: Select Start business time for supporting customer of your company.
End Time: Select End business time for supporting customer of your company.
Working Days: Select business time of your company (multi-selected).
Allow Customer to select Department: Choose Yes if you wish to allow customer to
select department at front-tend.
Default Department: Choose a department. When you set the field Allow Customer to
select Department to No, every customers’ tickets, creating from Help Desk form and
Magento Contact Form will be sent directly to this default department(Note: not be applied for
ticket sent from email, this will be set when creating Gateway).
©2009 – 2010 Mage-World.com
10
Help Desk Pro – User Manual
Allow Customer to Select Priority: Choose Yes if you wish to allow customer to assign
priority for ticket.
Allow Link Tickets to Orders: Choose Yes if you wish to allow customer to assign
order for ticket.
Allow Customer to Attach File: Choose Yes if you wish to allow customer to attach
file.
Max Upload File Size (Mb): Insert capacity limitation for attachment file (there is alert
massage if customer choose an over-size file.)
Auto Create Ticket from Email: Choose Yes if you wish the system auto-creates ticket
when customer send request via email.
Override Contact Form: Choose Yes to activate Magento Contact Form Integration.
The fields below allow you to choose default email template, we will provide more
information at the part of Email Template.
©2009 – 2010 Mage-World.com
11
Help Desk Pro – User Manual
3.
Manage Operators
You can add and manage operators by going to Help Desk Pro – Manage Operator.
This page display list of operators, click on the one that you want to edit or click to Add
Operator if you want to add new.
Edit operator
Add Operator
4.
Manage Departments
At backend, go to Help Desk Pro – Manage Departments page.
©2009 – 2010 Mage-World.com
12
Help Desk Pro – User Manual
To create a new department, click on Add Department, it contains 2 sub-tabs:
Department Information and Department Staff.
Department Staff displays the list of all operators, tick on the ones who belong to this
department.
Department Information has all necessary fields such as Department Name, Dcode,
Active, Store View, Required Login, Defaut Email Gateway, Moderator, Auto-notification, and
Description.
©2009 – 2010 Mage-World.com
13
Help Desk Pro – User Manual
Note: Pay attention to the followings
-
Dcode: will be stick at the start of ticket id array (see image below).
-
Required Login: This field’s values (Yes/No) determine to show the required login
department or non-required ones when customer create ticket at front-end.
-
Moderator: Type email of department’s moderator. When a department is assigned
for a ticket, the ticket will be sent to Moderator’s email address (please remember that
moderator must belong to department, tick on his mail in Department’s Staff).
-
Auto-Notification: Choose Yes if you want the system send notification to this
department if any ticket, sent to the department was missed.
-
Description: will be displayed together name if customer selects this department.
©2009 – 2010 Mage-World.com
14
Help Desk Pro – User Manual
You can choose Email template for this department. If you choose Email template
here, the system will apply these templates instead of the selected ones in configuration.
5.
Manage Email Gateways
Help Desk Pro allows you to create more than one email gateways. You can manage
and add new gateway by go to Help Desk Pro – Manage Email Gateways.
©2009 – 2010 Mage-World.com
15
Help Desk Pro – User Manual
There are some required fields, you must fulfill: Gateway Name, Gateway Host,
Gateway Email, Password and Default Department.
Gateway Name: Specify a name for this gateway
Gateway Host: Specify the address of email server
Gateway Email: Specify the email address that will be used to receive mail from
customer.
Login: Specify the login for server access
Password: Define password for server access
Port: Specify the port number to setup the connection with your email server (110 for
POP3, 995 for POP3-SSL, 143 for IMAP-TLS, and 993 for IMAP-SSL). This is not a required
field, you can pass it.
Default Department: All tickets from mail will be sent to this department.
Type: choose IMAP or POP3 (POP3 and IMAP are two different protocols used to
access
e-mail.)
If
you
want
to
learn
more
about
it,
please
visit
the
link
http://www.businesscreatorpro.com/articles/what-is-imap-and-pop3.php
©2009 – 2010 Mage-World.com
16
Help Desk Pro – User Manual
Use SSL/TLS: Use them for securing your data. If you want to learn about it, please
visit the link
http://technet.microsoft.com/en-us/library/cc784450(WS.10).aspx
Delete Email from Host: Choose value for this field when you select IMAP for the field
Type. If you choose POP3, mails are auto-deleted from host after these mails were
transferred to the system.
Note:
-
After finishing, click on the button Test Connect to check. If it notifies “The Gateway
connects successfully”, the system can create ticket from mail. If it notifies “The
Gateway connection is fail”, it means you did something wrong, then the system can
not create ticket from mail.
-
You can create as many gateways as you want but must sure that not use the same
Gateway Email (same Gateway Host is ok).
6.
Manage Ticket
You can find all tickets that customer sent to by going to Help Desk Pro – Manage
Ticket. There are 2 sub-tabs, Open Tickets – list the tickets in “open” status and All Tickets –
list all ones.
Admin can create new ticket here by choosing Add Ticket.
©2009 – 2010 Mage-World.com
17
Help Desk Pro – User Manual
Click on View to view a ticket in detail. One ticket has 3 sub-tabs: Ticket Information,
Ticket Thread and Additional Information.
Ticket Information:
Ticket Information contains all information of a ticket such as Customer Email,
Created Time, Status, Priority, Assigned Department, Assigned Operator, Order link (if any),
and File Attachment.
Ticket Thread: You can view history of ticket and reply in Ticket Thread.
©2009 – 2010 Mage-World.com
18
Help Desk Pro – User Manual
Additional Information: Store 2 direct links for operator and customer (these links are
stick with content in mail of operator and customer)
Customer Direct Link: Customers can view all information of ticket while not need to
login site. Also, they can reply in direct link and choose close ticket by themselves if wish.
©2009 – 2010 Mage-World.com
19
Help Desk Pro – User Manual
Operator Direct Link: Operators can view, reply (quick response included) and
manage ticket while not need to login site. At this step, operator can reassign this ticket to
the others and close the ticket if wish.
In Open Ticket page, you can see the button Refresh on top. Click on this button to
run Cron, the system will get mails from host. Refresh page to update the list of open tickets,
you might see new tickets if any.
©2009 – 2010 Mage-World.com
20
Help Desk Pro – User Manual
Note:
If you meet the problem that can not receive ticket from mail, and when click on the
button Refresh, it shows alert message “System have not got any email from gateway”,
please check at Manage Gateways. If you created multi-gateways, you must sure email
gateways of them are not the same.
The system also displays the alert message above when there is no mail, being sent to
host. Therefore, don’t worry.
7.
Manage Quick Response
You can build a question bank and answers, which are interested by most of your
customer by using Quick Response. This helps operator save time. Instead of having to
answer the same questions more than one time, they select quick response.
Go to Help Desk Pro – Manage Quick Response to create new by your own.
©2009 – 2010 Mage-World.com
21
Help Desk Pro – User Manual
8.
Ticket statistics
Ticket statistics provide general view of ticket (status) by departments and operators.
Thank to it, you can see your works’ efficiency.
Go to Help Desk Pro – Ticket statistic.
©2009 – 2010 Mage-World.com
22
Help Desk Pro – User Manual
VI. Cron Configuration
You can read the following instructions on cron job setting for your Magento store:
http://www.magentocommerce.com/wiki/1installation_and_configuration/how_to_setup_a_cr
on_job
Generally it would be enough to run in SSH console of your server:
crontab -e
And insert the following line:
*/3 * * * * php /<path-to-your-installation>/cron.php
or
*/3 * * * * wget -O - 'http://yourstore.com/cron.php' > /dev/null
Then exit having the "Save" request confirmed.
VII. Email Templates
Email templates will be sent together with content when the system sends mail.
We provide some samples in the folder mw_helpdesk, you can access it by following
the path app/locale/en_US/template/email/mw_helpdesk.
When you choose email templates in configuration or for one department, choose the
ones having the term “Default Template from Locale” in title.
©2009 – 2010 Mage-World.com
23
Help Desk Pro – User Manual
If don’t want to use available templates, you can create your own email templates by going to
System – Transactional Emails.
Note that:
-
Templates are chosen in configuration will be applied for all departments.
©2009 – 2010 Mage-World.com
24
Help Desk Pro – User Manual
-
In case of you choose other templates for a department; these templates will be
applied for this department only.
-
Please be aware of this line in our templates:
========= Please enter your reply ABOVE this line =========
The system will get the part of content that is above that line, any below will be discard.
©2009 – 2010 Mage-World.com
25