1
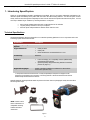
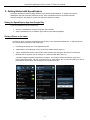
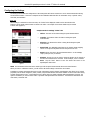
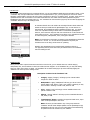
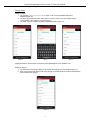
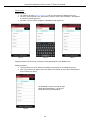
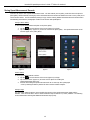
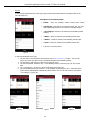
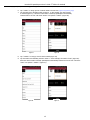
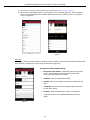
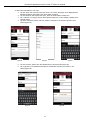
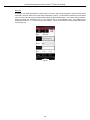
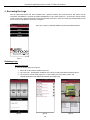
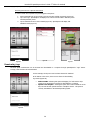
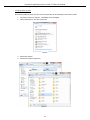
Laser Technology, Inc. LaserSoft® SpeedCapture User’s Guide 1st Edition for Android LaserSoft® SpeedCapture User’s Guide 1st Edition for Android Part Number 3210002 Copyright Notice: Information in this document is subject to change without notice and does not represent a commitment on the part of Laser Technology, Inc. No part of this manual may be reproduced in any form or by any means, electronic or mechanical, including photocopying, recording, or information storage and retrieval systems, for any purpose other than the purchaser’s personal use, without the express written consent of Laser Technology, Inc. Copyright © Laser Technology, Inc., 2013. All rights reserved. Printed in the United States of America. First Edition: October 2013 Trademarks: LaserSoft SpeedCapture and TruSpeed are registered trademarks of Laser Technology, Inc. All other trademarks are the property of their respective owner. How to Contact LTI: Street Address: Phone: Fax: Web Site: Email: 6912 S. Quentin Street Centennial, CO 80112 USA 1-303-649-1000 1-800-790-7364 (USA and Canada) 1-303-649-9710 www.lasertech.com service@lasertech.com LaserSoft SpeedCapture User’s Guide 1st Edition for Android Copyright © [2013] Laser Technology, Inc. All rights reserved. Unauthorized duplication, in whole or in part, is strictly prohibited. Contents. 1. Introducing SpeedCapture .......................................................................................................................................... 2 Technical Specifications ....................................................................................................................................................... 2 2. Getting Started with SpeedCapture .......................................................................................................................... 3 Getting the SpeedCapture App from Google Play ............................................................................................................. 3 Pairing a Phone to the Laser ................................................................................................................................................ 3 Launching the SpeedCapture App ...................................................................................................................................... 4 Using the Main Menu ............................................................................................................................................................ 4 Configuring the Settings ....................................................................................................................................................... 5 Ticket Tab .......................................................................................................................................................................... 5 Load Data Tab................................................................................................................................................................... 6 3. Enforcing with SpeedCapture .................................................................................................................................. 11 Taking Speed Measurements ............................................................................................................................................ 12 Saving Speed Measurement Records .............................................................................................................................. 13 Car Tab............................................................................................................................................................................. 14 Ticket Tab ........................................................................................................................................................................ 16 Basic Tab ......................................................................................................................................................................... 18 4. Accessing the Logs ........................................................................................................................................................... 19 Reviewing Logs ................................................................................................................................................................... 19 Reviewing All Records .................................................................................................................................................. 19 Reviewing Records from a Specific Time Period ...................................................................................................... 20 Downloading Logs ............................................................................................................................................................... 20 Accessing HTML Log Files ........................................................................................................................................... 21 1 LaserSoft SpeedCapture User’s Guide 1st Edition for Android Copyright © [2013] Laser Technology, Inc. All rights reserved. Unauthorized duplication, in whole or in part, is strictly prohibited. 1. Introducing SpeedCapture Thank you for downloading LaserSoft SpeedCapture for Android! Now you can capture undeniable confirmation of an offender’s speed and instantly send a photo down the road to the officer writing citations. You have the option to show exactly what was seen through the TruSpeed® Sx laser from the moment the speed measurement took place. You can even keep a detailed log of violations by archiving the data to a computer. Enter relevant violation data along with a captured photo of the offender. Log daily activity and store it all on your computer. Send the photo and speed data to another officer down the road. Technical Specifications LaserSoft SpeedCapture has been designed to run on Android operating platforms for use in conjunction with Laser Technology speed measurement devices. Specification Description Supported Operating Systems Supported Devices Android version 2.2-4.2.2 Connectivity Bluetooth Hardware Supported Languages Galaxy S3 & S4 Galaxy Tab Other smartphones running Android 2.2-4.2.2** Laser Technology, Inc. TruSpeed® S Series w/Bluetooth® Speed Measurement Device Optional specially designed mounting brackets for Android phones etc (Figure 1) English; templates available for translation for approved law enforcement personnel only ** Listed phones and devices have been tested. It is likely that SpeedCapture will perform as designed on other smartphones running Android 2.2‐4.2.2; however, it cannot be guaranteed. The devices tested were chosen because brackets already exist for attachment to the laser. Specially designed mounting brackets attach the phone to the laser device to photograph exactly what the officer saw through the scope: NOTE Contact LTI for further information on compatible mounting brackets and other accessories. Figure 1 2 LaserSoft SpeedCapture User’s Guide 1st Edition for Android Copyright © [2013] Laser Technology, Inc. All rights reserved. Unauthorized duplication, in whole or in part, is strictly prohibited. 2. Getting Started with SpeedCapture This chapter describes the basic knowledge necessary to get started with SpeedCapture. It explains how to get the SpeedCapture app from Google Play and launch the app. Once the application has been successfully launched, follow the directions in this chapter to use the main menu and configure the settings. Getting the SpeedCapture App from Google Play To get the SpeedCapture app from Google Play: 1. Search for “SpeedCapture” using the Google Play search function. 2. Tap the SpeedCapture icon to install the app as with any other Android application. Pairing a Phone to the Laser To ensure the phone is properly communicating with the laser, it must connected with Bluetooth. To begin this process, verify that the laser is powered on and within range: 1. Find and tap the Settings icon on the Applications screen. 2. Tap Bluetooth on the Settings list to bring up the list of available devices (Figure 2). 3. Tap the TruSpeed laser device’s serial number, which should be listed among the other devices connected via Bluetooth with on the phone. For this example, it is “TXXS-TJ001488*7A56” (Figure 3). A prompt will appear requesting confirmation of a passkey. This number is random and different every time a phone is paired with a laser. Tap “OK” to confirm (Figure 4). After tapping “OK” to confirm the passkey, the laser is paired with the Android phone and will appear in the “Paired Devices” list. Figure 2 Figure 3 3 Figure 4 LaserSoft SpeedCapture User’s Guide 1st Edition for Android Copyright © [2013] Laser Technology, Inc. All rights reserved. Unauthorized duplication, in whole or in part, is strictly prohibited. Launching the SpeedCapture App To launch the SpeedCapture app: 1. 2. Find the SpeedCapture icon on the Applications screen. Tap the SpeedCapture icon (Figure 5). Icon enlarged to show detail Figure 5 Using the Main Menu This is the SpeedCapture main menu screen (Figure 6): • Tap the “Enforce” button to begin taking speed measurements. For more information on using “Enforce” see page 11. • Tap the “Logs” button access all saved speed measurements. For more information about “Logs,” see page 19. • Tap the “Settings” button to enter the information constant to the set of measurements you are taking during an enforcement session. For more information about “Settings” see the following section. Figure 6 4 LaserSoft SpeedCapture User’s Guide 1st Edition for Android Copyright © [2013] Laser Technology, Inc. All rights reserved. Unauthorized duplication, in whole or in part, is strictly prohibited. Configuring the Settings The Settings area enables the configuration of the settings that will remain constant to a set of measurements taken during an enforcement session. This area is composed of three individual tabs that allow for information entry or upload: Ticket, Load data, and Database. Ticket Tab When Settings is selected from the main menu, the “Ticket” tab is displayed. Details can be entered about the location in which speed measurements are about to be taken. An example of how these details may be entered is shown here (Figure 7): Sample entries in Settings “Ticket” tab: Officer: The name of the officer taking the speed measurements. Location: The location where the officer is taking the speed measurements. Direction: The direction the officer is facing while taking the speed measurements. Speed Limit: The applicable speed limit for the location. NOTE Tapping “Done” on the phone’s keyboard removes the phone from view. Speed: Choose the unit for the speed measurements. In this example, “mph” (miles per hour) is selected. Distance: Choose the unit in which to measure distance to the vehicle at the time the measurement is recorded. In this example, “feet” is selected. Save: Tap the “Save” button to save the entries and return to the SpeedCapture main menu.. Figure 7 NOTE The saved data will be listed in the saved logs of all the speed measurements taken at the listed location. When you move to a different location, you will need to edit these settings to match the new location. In addition to entering information about the current enforcement session’s location, SpeedCapture also allows you to upload proprietary lists of vehicle categories, makes, models, and potential offenses that will be available to choose from when saving a speed measurement record. A comprehensive set of these choices is already included within SpeedCapture; however, the option is available if you wish to either create or purchase and upload data from elsewhere. This feature is described in the next section, Load Data Tab. 5 LaserSoft SpeedCapture User’s Guide 1st Edition for Android Copyright © [2013] Laser Technology, Inc. All rights reserved. Unauthorized duplication, in whole or in part, is strictly prohibited. Load Data Tab As you take a speed measurement for a potential offense, you can save additional details about the offender’s vehicle. In the “Load Data” tab, if the pre-loaded lists of choices are not comprehensive to you, you may upload your own lists of vehicle categories, makes/models, and colors as well as types of offenses for which you are making stops. Currently, these areas are uploaded with the most current data on car makes and models from The Vehicle List and will be updated through the SpeedCapture app when new vehicles come out. The “Load data” tab is shown below (Figure 8) and is located by tapping the “Load Data” tab at the top of the Settings screen An extensive data file from The Vehicle List including all known vehicle makes and models has been pre-loaded into the SpeedCapture app. As new vehicles are manufactured, the preloaded lists will be updated through the app. You should never have a problem locating a vehicle make or model within SpeedCapture. However, some customers may have their own vehicle lists in .csv file format and would rather use those. The “Load data” screen allows you to upload their own lists of vehicle categories, makes/models, colors, and types of offenses. NOTE The checkboxes in this section are inactive unless SpeedCapture detects the existence of a .csv file. If a .csv file has been uploaded to the phone, the checkboxes next to the file(s) will be active for uploading. Whether using SpeedCapture’s pre-loaded vehicle and offense choices or user proprietary choices, these choices may be edited further in the “Database” tab of the Settings screen. Figure 8 Database Tab When you have taken a speed measurement and wish to save the file, you are offered choices on vehicle category, make/model, color, and the offense for which the vehicle has been stopped. In the “Database” tab, you may edit existing choices or add a choice that is not listed. The “Database” tab is shown below (Figure 9) and is located by tapping the “Database” tab at the top of the Settings screen: Description of Choices in the “Database” tab: Figure 9 • Category: Tapping “Category” will bring up a list of broad vehicle categories to delete or add to. • Make/Model: Tapping “Make/Model” will bring up a list of current vehicle makes to edit, delete, or add. Once a make is selected, you may move forward in selecting a model to edit, delete or add. • Color: Tapping “Color” will bring up a list of available vehicle color options to delete or add. • Offense: Tapping “Offense” will bring up a list of available offenses to edit, delete, or add. • “SpeedCapture” button: Located in the upper left-hand corner, tap to return to the SpeedCapture main menu. NOTE All entries you have added to any of the groups within the “Database” tab will remain despite updates from the SpeedCapture app. SpeedCapture will only copy over new vehicle makes and models during an update and will not overwrite any user additions. 6 LaserSoft SpeedCapture User’s Guide 1st Edition for Android Copyright © [2013] Laser Technology, Inc. All rights reserved. Unauthorized duplication, in whole or in part, is strictly prohibited. Category Section Adding a category: 1. Tap “Category” (Figure 9 previous page) to begin. A list of current available categories is displayed (Figure 10). 2. Tap in the empty field next to the “Add” button to enter the name of your new vehicle category, in this example, “New Category” is used (Figure 11). 3. Tap “Add.” The new category will appear in alphabetical order (Figure 12). Figure 11 Figure 10 Figure 12 Tapping the Back key at the bottom of the phone returns SpeedCapture to the “Database” tab. Deleting a category: 1. Tap the checkbox next to the category to be deleted, “New Category” in this example (Figure 13). 2. Once a green check mark appears next to the category to be deleted, tap the “Remove checked items” button to delete the category. Figure 13 7 LaserSoft SpeedCapture User’s Guide 1st Edition for Android Copyright © [2013] Laser Technology, Inc. All rights reserved. Unauthorized duplication, in whole or in part, is strictly prohibited. Make/Model Section Adding a vehicle make: 1. Tap “Make/Model” (Figure 9 on page 6) to begin. A list of current available vehicle makes is displayed (Figure 14). 2. Tap in the empty field next to the “Add” button to enter the name of the new vehicle make, in this example, “New Make” is used (Figure 15). 3. Click “Add.” The new make will appear in alphabetical order (Figure 16). Figure 14 Figure 15 Figure 16 Tapping the Back key at the bottom of the phone returns SpeedCapture to the “Database” tab. Deleting a vehicle make: 1. Tap the checkbox next to the make to be deleted, “New Make” in this example (Figure 17). 2. Once a green check mark appears next to the make to be deleted, tap the “Remove checked items” button to delete the vehicle make. NOTE Every vehicle make has corresponding models that go with it. To add or delete a model, the steps are the same as adding and deleting a make except first tap the make and then either enter the name of the model to be added or enter a green check mark next to the model to be deleted and tap the “Remove checked items” button. Please be aware that if any vehicle model is deleted, all the accompanying makes for that model will also be deleted. Figure 17 8 LaserSoft SpeedCapture User’s Guide 1st Edition for Android Copyright © [2013] Laser Technology, Inc. All rights reserved. Unauthorized duplication, in whole or in part, is strictly prohibited. Color Section Adding a vehicle color: 1. Tap “Color” (Figure 9 on page 6) to begin. A list of current available colors is displayed (Figure 18). 2. Tap in the empty field next to the “Add” button to enter the name of the new vehicle color. In this example, “New Color” is used (Figure 19). 3. Click “Add.” The new color will appear in alphabetical order (Figure 20). Figure 18 Figure 19 Figure 20 Tapping the Back key at the bottom of the phone returns SpeedCapture to the “Database” tab. Deleting a vehicle color: 1. Tap the checkbox next to the vehicle color to be deleted, “New Color” in this example (Figure 21). 2. Once a green check mark appears next to the vehicle color to be deleted, tap the “Remove checked items” button to delete the vehicle color. Figure 21 9 LaserSoft SpeedCapture User’s Guide 1st Edition for Android Copyright © [2013] Laser Technology, Inc. All rights reserved. Unauthorized duplication, in whole or in part, is strictly prohibited. Offense Section Adding an offense: 1. Tap “Offense” to begin (Figure 9 on page 6). A list of current offenses is displayed (Figure 22). 2. Tap in the empty field next to the “Add” button to enter the name of the new offense. “New Offense” is used in this example (Figure 23). 3. Tap “Add.” The new offense will appear in alphabetical order (Figure 24). Figure 22 Figure 23 Figure 24 Tapping the Back key at the bottom of the phone returns SpeedCapture to the “Database” tab. Deleting an offense: 1. Tap the checkbox next to the offense to be deleted, “New Offense” in this example (Figure 25). 2. Once a green check mark appears next to the offense to be deleted, tap the “Remove checked items” button to delete the offense. The SpeedCapture app is now ready to begin taking speed measurements – see the next section “Enforcing with SpeedCapture.” Figure 25 10 LaserSoft SpeedCapture User’s Guide 1st Edition for Android Copyright © [2013] Laser Technology, Inc. All rights reserved. Unauthorized duplication, in whole or in part, is strictly prohibited. 3. Enforcing with SpeedCapture Now that all the settings have been entered, SpeedCapture is ready to begin taking speed measurements. To begin, tap “Enforce” from the SpeedCapture main menu (Figure 26). Tap “Enforce” to begin taking speed measurements. NOTE The laser is designed to take speed measurements in various different modes: speed mode, weather mode, continuous mode, and survey mode. Speed and weather modes are utilized by the SpeedCapture app. SpeedCapture does not currently support the use of the laser while in continuous mode or survey mode. For more information on how to switch modes with the laser device, please refer to the user’s manual that shipped with the laser. Figure 26 The “Enforce” main screen is shown below (Figure 27): Description of Enforce main screen: Figure 27 • Ensure that the Bluetooth icon in the upper right-hand corner of the screen is white to verify that the laser and phone are communicating properly. If it is not, tap it for available connection options. • When a measurement is captured, “--- mph” will display the offender’s speed; “--- ft” will display the distance of the vehicle at the time the speed measurement was recorded. • The crosshairs in the middle of the screen are displayed exactly the same as what is seen if looking directly through the scope of the laser. • Tap the crosshairs. • Tap the icon returns SpeedCapture back the “Enforce” screen to take a new speed measurement. • Tap the icon to save a speed measurement with image to the phone’s photo gallery, or sent it via email, text, etc to another officer. • Tap the icon in the lower right-hand corner to save the measurement and input details about the offender and offending vehicle. • Tap the back button on the Android phone to close the “Enforce” screen and return the SpeedCapture main screen to review/edit the current settings or review/download saved logs. 11 icon to take a speed measurement of whatever is in the LaserSoft SpeedCapture User’s Guide 1st Edition for Android Copyright © [2013] Laser Technology, Inc. All rights reserved. Unauthorized duplication, in whole or in part, is strictly prohibited. Taking Speed Measurements 1. To begin, aim the crosshairs at the target vehicle (Figure 28). 2. With the target vehicle in sight, press the icon in the lower left-hand corner of the screen to take a speed measurement. Pressing the “Fire” button on the TruSpeed laser will also work with SpeedCapture for taking measurements. For further operational information about the laser device, refer to the user’s manual that shipped with the laser. 3. The SpeedCapture screen should depict the speed measurement recording that was just taken (Figure 29). Along with the speed, the record will show a photograph of the offending vehicle, the current date and time, and the distance of the vehicle at the time the speed measurement was taken. If the speed warrants a citation, proceed on to save the speed measurement record for later reference. See more on how to save a record in the next section. Figure 29 Figure 28 12 LaserSoft SpeedCapture User’s Guide 1st Edition for Android Copyright © [2013] Laser Technology, Inc. All rights reserved. Unauthorized duplication, in whole or in part, is strictly prohibited. Saving Speed Measurement Records There are two ways to save a speed measurement record. The first method, Save to gallery, sends the shot to the phone’s photo gallery without manually entering any further information about the offense OR attaches the shot to a text, email, etc to send to another officer. The second method, Saving to Logs, involves entering detailed information about the offense that is automatically paired with the photographic evidence from the laser and SpeedCapture. Saving to Photo Gallery To save a speed measurement with photo to the photo gallery: 1. 2. Tap the icon at the bottom of the screen (Figure 30) to begin. Tap “Save to gallery” (Figure 31) to save the record to the photo gallery. The speed measurement record will now appear in the photo gallery. Figure 30 Figure 31 Figure 32 Send to Others To send a speed measurement to others: 1. 2. 3. Tap the icon at the bottom of the screen (Figure 30) to begin. Tap “Send to others” (Figure 31) to launch a list of options for sending the speed measurement (Figure 32). Proceed with sending the speed measurement file as if it were any other photograph or file by selecting the delivery method of choice and the intended recipient. Saving to Logs The Save option within the Enforce screen enables the entering of the speed measurement details and the offender. There are three tabs in Save in which information may be entered: Car, Ticket, and Basic. The following section demonstrates entering this additional information step-by-step. 13 LaserSoft SpeedCapture User’s Guide 1st Edition for Android Copyright © [2013] Laser Technology, Inc. All rights reserved. Unauthorized duplication, in whole or in part, is strictly prohibited. Car Tab To save a speed measurement file to the Logs, begin by entering information about the offending vehicle in the “Car” tab (Figure 33): Description of Car Tab Entry Fields: • Plate#: • Commercial: If the vehicle is a commercial vehicle, tap “Yes”. This field automatically defaults to “No” unless it is manually changed. • <Car Category>: Allows for the selection of the offending vehicle category. • <Make>: Allows for selection of the offending vehicle make. • <Model>: Allows for selection of the offending vehicle model. • <Color>: Allows for selection of the offending vehicle color. • Tap “Save” to save the entries. Enter the offending vehicle’s license plate number. Figure 33 To Save Car Information to the Logs: 1. Tap the “Save” icon at the bottom of the Enforce screen (Figure 28 page 11) to begin. The “Car” tab (Figure 34) comes up to allow for entry of detailed information about offending vehicle. 2. Tap the “Plate#” field at the top of the screen to place the cursor. 3. The field “Commercial” defaults to “No.” If the offending vehicle is commercial, tap “Yes” next to that field. 4. Tap “<Car Category>” to bring up a list of broad vehicle types (Figure 35). 5. Tap the offending vehicle type to select it. In this example, the vehicle type is “SUV.” When the vehicle type is selected, SpeedCapture automatically redirects back to the “Car” tab where “SUVs” now replaces “<Car Category>” (Figure 36). Figure 34 Figure 35 14 Figure 36 LaserSoft SpeedCapture User’s Guide 1st Edition for Android Copyright © [2013] Laser Technology, Inc. All rights reserved. Unauthorized duplication, in whole or in part, is strictly prohibited. 6. 7. Tap “<Make>” to bring up a list of vehicle makes to choose from (Figure 36 previous page). Tap the make of the offending vehicle to select it. In this example, the make “Suzuki” is selected (Figure 37). When the vehicle make is selected, SpeedCapture automatically redirects back to the “Car” tab where “Suzuki” now replaces “<Make>” (Figure 38). Figure 37 8. Figure 38 Tap “<Model>” to bring up a list of vehicle models (Figure 39). 9. Tap the model of the offending vehicle to select it. In this example, the model is “Aerio” (Figure 40). When the vehicle model is selected, SpeedCapture automatically redirects back to the “Car” tab where “Aerio” now replaces “<Model>” (Figure 41). Figure 40 Figure 41 15 LaserSoft SpeedCapture User’s Guide 1st Edition for Android Copyright © [2013] Laser Technology, Inc. All rights reserved. Unauthorized duplication, in whole or in part, is strictly prohibited. 10. Tap “<Color>” to bring up a list of vehicle colors to choose from (Figure 41 previous page). 11. Tap the color of the offending vehicle. In this example, “Silver” is selected (Figure 42). When the vehicle color is selected, SpeedCapture automatically redirects back to the “Car” tab where “Silver” now replaces “<Color>” (Figure 43). Figure 42 Figure 43 Ticket Tab In addition to entering information about the offending vehicle, information may also be entered about the ticket issued. This information is entered in the “Ticket” tab of the Save screen (Figure 44): Description of Ticket Tab Entry Fields: • Date/Time of the offense: Automatically listed at the top of the screen. This information is brought forward from the speed measurement itself and cannot be edited. • Citation#: Enter the issued citation number. • Offense: Allows for the selection of the offense committed by the driver. • Occupants: Enter the number of occupants inside the vehicle at the time of the offense. • License#: Enter the driver’s license number of the offender. • “Type Note”: Enter any other additional information about the offense. Figure 44 16 LaserSoft SpeedCapture User’s Guide 1st Edition for Android Copyright © [2013] Laser Technology, Inc. All rights reserved. Unauthorized duplication, in whole or in part, is strictly prohibited. To Save Ticket Information to Your Logs: 1. Tap the “Ticket” tab at the top of the Save screen. The “Ticket” tab (Figure 45) is displayed where detailed information with regard to the actual citation is entered. 2. Tap the “Citation#” field to place the cursor. Enter the issued citation number here. 3. Tap “<Offense>” to bring up a list of offense options (Figure 46). In this example, speeding is the selected offense. 4. Tap in the “Occupants” field to enter the number of occupants in the vehicle at the time of the offense (Figure 47). Figure 45 5. 6. Figure 47 Figure 46 Tap the “License#” field to enter the offender’s driver’s license number (Figure 48). Tap “Type Note” if any additional information is needed about the ticket, the vehicle, or the offense (Figure 49). Figure 48 Figure 49 17 LaserSoft SpeedCapture User’s Guide 1st Edition for Android Copyright © [2013] Laser Technology, Inc. All rights reserved. Unauthorized duplication, in whole or in part, is strictly prohibited. Basic Tab At this point, the speed measurement is almost ready to be saved. After all the information is entered in the Car and Ticket tabs, check the “Basic” tab to verify that the information is correct. The information contained in this tab should carry over from what was entered in Settings before taking any speed measurements. If the officer changes locations, he/she can adjust that information here or in the Settings area of the SpeedCapture app. See Configuring the Settings/Ticket Tab on page 5 for help entering these settings. Tap the “Save” button to save the speed measurement record (Figure 50). Figure 50 18 LaserSoft SpeedCapture User’s Guide 1st Edition for Android Copyright © [2013] Laser Technology, Inc. All rights reserved. Unauthorized duplication, in whole or in part, is strictly prohibited. 4. Accessing the Logs Once an enforcement session has been completed from a particular location, the saved records for that session may be reviewed or downloaded to a computer by utilizing SpeedCapture’s “Logs” section (Figure 51). In this section, choose to either look at records from a specific time period or all the records listed on the phone. Also, the records may be downloaded as .html files to iTunes or to Dropbox for access from a computer. Tap “Logs” to review or download detailed records of speed measurements. Figure 51 Reviewing Logs Reviewing All Records To review all records logged on the phone: 1. 2. 3. Select “All” across all three scrollbars (Figure 52). Tap “View Logs.” SpeedCapture will display a list of all the records made with that particular phone.. Tap a record to view its details (Figure 53). In this example, the record “Aerio / Silver” was selected.SpeedCapture will display that individual record (Figure 54). Figure 52 Figure 53 19 Figure 54 LaserSoft SpeedCapture User’s Guide 1st Edition for Android Copyright © [2013] Laser Technology, Inc. All rights reserved. Unauthorized duplication, in whole or in part, is strictly prohibited. Reviewing Records from a Specific Time Period To review records from a specific time period logged on the phone: 1. 2. 3. Select month/day/year of the records to view across each scrollbar respectively (Figure 55). Tap “View Logs”. SpeedCapture will display a list of all the records made in that time period with that particular phone. Tap an individual record to view its details (Figure 56). SpeedCapture will display that individual record (Figure 57). Figure 55 Figure 56 Figure 57 Downloading Logs All saved speed measurements can be accessed and downloaded to a computer through SpeedCapture’s “Logs” section. To begin, select the dates to be downloaded: For this example, the day 09-3-2013 has been selected for download. At the bottom of the screen, there are two choices for downloading log records (Figure 58): • • Figure 58 Make an HTML: Selecting this option and tapping “Go” will save the day’s records to an HTML file that can later be downloaded to a computer. Upload to the Dropbox: Selecting this option also creates an HTML file of the day’s records and then uploads the file to a Dropbox account. This option is currently unavailable for the Android operating system. 20 LaserSoft SpeedCapture User’s Guide 1st Edition for Android Copyright © [2013] Laser Technology, Inc. All rights reserved. Unauthorized duplication, in whole or in part, is strictly prohibited. Accessing HTML Log Files After selecting “Make an HTML” and “Go” from the Logs section, do the following to access those records: 1. 2. Connect the phone to a computer. An AutoPlay screen will display. Select “Open device to view files” (Figure 59). Figure 59 3. 4. Double-click “Phone.” Double-click “Pictures” (Figure 60). Figure 60 21 LaserSoft SpeedCapture User’s Guide 1st Edition for Android Copyright © [2013] Laser Technology, Inc. All rights reserved. Unauthorized duplication, in whole or in part, is strictly prohibited. 5. 6. 7. Double-click the folder “SpeedCapture” to view the saved HTML files. Copy the time specific folder of choice to a location off of the phone and on a computer (Figure 61). Double-click any of the saved HTML files to view the full contents (Figure 62). Figure 61 Figure 62 22 LaserSoft SpeedCapture User’s Guide 1st Edition for Android Copyright © [2013] Laser Technology, Inc. All rights reserved. Unauthorized duplication, in whole or in part, is strictly prohibited. 8. 9. Single-click on any of the records in blue to display the full saved contents of the record including the photograph of the vehicle (Figure 63). Click the record a second time to close it. Figure 63 23