1
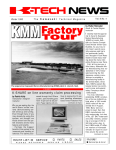
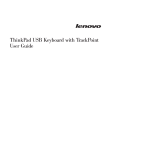
IR PTZ DOME CAMERA User Manual 1. Auto Tracking Dome Order Table....................................................................................................... 2 2.Safty measures ........................................................................................................................................ 2 3. Attention matters ................................................................................................................................... 2 4. Main feature ............................................................................................................................................. 3 5. Fuction introduction and operation guide ...................................................................................... 5 6. Auto track and manual track (special for track dome) ................................................................. 9 7. Intelligent analysis (special for track dome)................................................................................. 11 8. Installing preparation .......................................................................................................................... 11 9. Installation method guide .................................................................................................................. 12 10. Install hole and size of various often used bracket ............................................................................. 12 11. Menu operation................................................................................................................................... 15 12.Menu index ........................................................................................................................................... 16 13.System setup ....................................................................................................................................... 17 14. Camera setup ...................................................................................................................................... 25 15. Pan-tilt data setup.............................................................................................................................. 34 16. Alarm setup ......................................................................................................................................... 41 17. Auto Tracking Set (special for track dome) ................................................................................ 43 18. Intelligent analysis(special for track dome)................................................................................ 44 19. Infrared Mode ...................................................................................................................................... 44 20. Switch table ......................................................................................................................................... 45 Attach table ................................................................................................................................................ 45 Table 2 ......................................................................................................................................................... 45 Table 3 ......................................................................................................................................................... 46 Appendix VI: Simple malfunction debugging ................................................................................... 53 Appendix Ⅶ:technic parameter ........................................................................................................ 53 1 IR PTZ DOME CAMERA 1. Auto Tracking Dome Order Table SORT ORDER FUNCTION ANNOTATION Scan CALL 75-80 Run Scan1-6 Scan setting in Menu—PTZ setting Pattern PRESET 81-84 Setup Pattern Scan 1-4 Pattern CALL 81-84 Run Pattern Scan1-4 Frame Scan CALL 92 Run F Scan Speed.time in Menu—other scan setting Auto Scan CALL 99 Run A Scan Speed in Menu—other scan setting Alarm CALL 89 Relieve Alarm Track CALL 88 Enter Track Menu CALL 95 Enter Menu System Restart CALL 94 System Restart 2.Safty measures 1. Qualification for installation and debugging personnels ① Having qualification certificiates of installing and debugging CCTV system . ② Having qualification certificates of aloft working. ③ Having the basic knowledge and operation skills of low voltage wires and low voltage electronic wires. ④ Please read the m anual and understand all the contents. 2. Requirements for lifting appliances Using safe lifting appliances which are fit for installing places and ways of dome. 3. Attention matters 1. Careful transportation Protect the damages from heavy pressing, strong staking and soaking during the transportation and storage. This products have to be carried with split packages. Both in delivering by suppliers and on the returning way to factories to debugging, any damage happened because of comprehensive transport after assembling is out of the scope of guarantee repair. 2. When malfuctions happen When there are fume and unusual odor coming out of this product, please shut the switch, turn off the power wire, stop using and contact our company. 3. Be sure not to disconnect and refit Be sure not to open the body, or it may lead to danger or damage. If any inside setting or debugging is needed, please contact our company. 4. Be sure not to put other articles into this products 2 IR PTZ DOME CAMERA Be sure that there is no medal or tinder in the camera. If there is any foreign body, it may lead fire, short circuit or other damages. If water or other liquid come into camera, please shut the power and ture off the power wire and contact our company. Carefully protect the camera from rain and seawater. 5. Carefully carry and put the product aside. To avoid damage, don’t drop it or lash or shake it strongly. 6. Set this product far away from electric field and magnetic field If it is set near TVs, wireless transmitters, calutrons, electric motors, transformers, speakers which produce electromagnetic field to interfere with the images. 7. To avoid moisture and dust To avoid the damage to camera, don’t put the camera in some places where there is a lot of lampblack and steam or high temperature and dust. 8. To avoid high temperature Don’t set this product near heating stoves and other heat sources, such as spotlights. Don’t set this product in the sun, or it will make it deformated, faded and so on. When it is set near ceiling, kitchen and boiler room, it will get high temperature. 9. Cleansing Wipe the dirt away with soft cloth. Wipe the fouling by sofe cloth with washing agent on it when it is wired out, then dry it with dry soft cloth. 10. Don’t aim at hard light articles. 11. Use the products according to work environment requirements Environment temperature: -40~+60 ℃ Humidity: <90% Atmospheric pressure: 86~106KPa Alternating current: 24V/3A,50/60HZ 4. Main feature ●10PCS Osram lights 150m ir distance. ●In 4X zoom low-beam open.If more than 4X zoom high-beam open ●Camera module and ir lights isolation desigh ●Aluminium ir lights board fully next to shell, keep 45°c of the body. ●LDR is isolated with ir lights and camera. 1. Built-in decoder Programmable Digital design,keep the data or action after power outage . Integrated design,high reliability Me m ory prote cte d whe n powe r outa ge :the dom e a uto re s um e s its prior pos ition be fore the powe r outa ge after reboot. P owe r up a uto run funcion,s e tting a utom a tica lly re s ume s its prior pos ition or a ction be fore the powe r outa ge ,run 3 IR PTZ DOME CAMERA home position,preset,cruising tracks,pattern scan,right&left scan,frame scan Le is ure a uto run function,run hom e pos ition,pr eset,cruising tracks,pattern scan,right&left scan,frame scan. 8 cha nne ls time ing function,s e le ct tim ing s ta rtup pre s e t,a uto cruis ing,pa tte rn s ca n,a uto s ca n e ct.a ctions (a ppoint type dome) 256 pre s e ts s a ve d a t ca s ua lly Auto cruis ing function,6 cruisgintracks,each cruising track set up 18 preset postions,set staying time of each preset position and scan speed by menu. 4 pa tte rn s ca n,e a ch pie ce ca n re cord-500 5 minutes Thre-dimensional e position magnify, Point and magnify,point by mouse and frame the object,then it display in the centre of screen and magnify. coordina te dis pla y, dis pla y curre nt flip a nd pa n a ngle a nd le ns m a gnify tim e s . S upport RS 485 Bus inte rfa ce . 8 priva cy m a s king zone s (zone ma s king) Hiding the title information(except dome title) Tim e ing Color/B& W Auto S hift Tim e ,te m pe ra ture dis pla y a nd tim e ca libra te d function S oft a ddre s s s witch a me nd function,s oft protocol a nd s oft ba ud ra te :a me nd front a ddre s s s witch of the dom e by back controlling equipment,setup according to actual needs after installing all domes. S upport broa dca s t a ddre s s ,the NO.255 is broa dca s t a ddre s s . Front e quipm e nt m a lfunction inform a tion fe e dba ck:tra ns fe r front m a lfunction inform a tion to ba ck comm a nd centre through video signal that the users find cause of equipment malfunction conveniently. Ala rm linka ge ,7 a la rm input,2 a la rm output 2、Built-in pan-tilt Exa ct drive r,run pla cidly,s e ns itive re s pons e ,a ccura te de finition. Integrated design,compact fabric Inge nious m e cha nica l drive r de vice ,s upport P a n 360° continous ly rota te ,without m onitor blind points . Horizontal 0.25°/s slowly rotate,image not quiver,maximum rotate speed 200°/s Vertical 180°continous monitor. 3. Built-in integrated digital color camera which takes it’s own zoom lens,high a uto focus a uto light control a uto white ba la nce a uto color/B&W shift 4. Screen menu Chine s& e English menu P a s s word prote cte d Dis pla y the control protocol,a ddre s s code ,ba ud ra te a nd dom e own chccking inform a tion S e tting Chine s e pre s e t,dome title ,s ca n title 4 IR PTZ DOME CAMERA S upport Chine s e s pe lling input,locaon ti code input and capital&lowercase letter and number input S e tting ma nua l ope ra tion with wide s ca le ,ca ta ch ta rge t a ccura te ly. 5. Work environment,electrical index Environment temperature: -40~+60 ℃ Humidity: <90% Atmospheric pressure: 86~106KPa Alternating current: 24V/3A,50/60HZ 5. Fuction introduction and operation guide The setting of control protocol, camera type and dome address code. There are two pushwheel switches SW1 and SW2 under the driver. SW1 is ued to set baud rate and control protocol, while SW2 is used to set address code. Supports PELCO-D/P protocol and three baud rates like 2400/4800/9600, and can be set by SW 1,2. Power check When the dome is powered on, the camera automatically moves towards horizontal and vertical direction,the screen displays auto-check normally when it checks the pan and vertical origin point,the screen clews horizontal error or vertical error if it does not check the pan and vertical origin point,then check the camera,the screen displays the type or normal of the camera if auto identified,ensures the dome run normally throuh auto- check.At the same time,screen displays all dome information.They always display until operate the dome. Display informaiton: ×××××× CORP HTTP:××××××××× SOFT VERSION:2.1 ADDRESS:001 PROTOCOL:PELCO D BAUDRATE:2400 REFERENCE:OK ××× CAMERA RS485 OK If setting power action or Leisure action,the dome will auto run its prior action when boot or over leisure time. Focus/rotate speed auto matching The dome’s fast response possibly makes the image move quickly and causes the loss of the image only through slightly operating the joystick when manually adjusting the long focus. However, the dome can automatically adjust the position of pan/tilt and vertical rotation speed and make it easy to operate the objective tracing manually. Auto flip 5 IR PTZ DOME CAMERA When the camera tilts downward and goes just beyond the vertical position, the dome rotates 180 degrees,then flips up 90 degrees,can see the rear scenery directly. When the dome rotates (flips), the camera starts moving upward as long as you continue to hold the joystick in the down position. Once you let go of the joystick after the dome rotates, joystick control returns to normal operation. The auto-flip feature is useful for following a person who passes directly beneath the camera. In screen menu,users set the ‘AUTO FLIP’ in ‘PAN-TILT’ PTZ setting data to ‘ON’,the above function is ok.System defaults ‘ON’ Power up act Power up act is a prearranged one that starts as soon as the dome is power up, such as pattern tour. cruising scanning, preset and automatic scanning, and also put it back automatically to the situation before power cut. This function could be realized by ‘Power up act’ item in the menu. Sometimes dome will be accidentally stopped by some irresistible factors in monitoring system. For instance, the dome is back to reset when systematic power cut happens, the dome may stop at an angle that it should not watch, power up act is very important at that time. Leisure time Leisure time mean that dome waiting orders after a period time,it automatically perform one promissory action,such as pattern tracing,cruising scan,preset point,auto scan,etc.,actualize to intelligently monitor. Through setting Menu’Self act’ and ‘Leisure Time’ to realize this function. In the monitor system,sometimes because of nonresist factors,which can stop current action accidently,such as the dome goes into restoration state shortage the power,or goes into waiting orders state when users go away so that the dome possibly staying an unsuitalbe looking angle.The Self act and Lesisure time are very important at this time.Time is 3 seconds to 100 minutes Setting and call preset position Preset function is that dome can deposit the position data of currently PTZ’s pan angle,tilt angle and camera’s lens zoom in the storage,users can deposit and call preset position expediently and quickly through controlling keyboard to adjust the PTZ and camera towards it’s position,this dome support 256pcs preset position. Auto cruising Auto cruising is a built-in function of the dome,which let the dome automatically cruising according to definite sequeue in a group of many preset points,can set staying time of preset and the running scan speed. This dome has 6 groups of cruising queue,every group can set 18pcs points.Cruising speed.preset and staying time can be adjusted by following sub-menu of ‘PAN/TILT’ →’TOUR SCAN’,call 75st-80th preset point to run 6 groups of auto cruising queue separately. Auto scan function Auto scan is the built-in function of camera of intelligent dome,which can setup right and left limited position,only 6 IR PTZ DOME CAMERA one outside order can let the dome move repeatedly according to the prior setting of menu between two liited position,so relize to auto cruising when no users operate it. th Call 99 preset to realize this function. Other scan Other scan is the built-in special scan function,which can auto pan scan several seconds through prior setting speed,stopping several seconds,then scan again.This cycle scan to realize cruising without users operation.Setting data by sub-menu of ‘PAN/TILT’→’ OTER SCAN’. th Call 98 preset to realize this function. Pattern scan Pattern scan is the built-in function of camera,which can record the running tracing of the dome.It can record up.down.left.right.lens and call preset.The dome runs repeatedly through recorded running tours when perform pattern scan,this dome can be set 4 pattern tours.Each tour can record at least 5-500 minutes. th th th th st Users can set 4 tours through calling 81 ,82 ,83 , 84 preset apartly.Such setup 1 tour: 1. th Call 81 preset,screen display ‘SAVE PATTERN 1’. 2.Operate Pan up.down.left.right,or lens.or call preset. th 3.Then call 81 preset just conserve all action performed by second step,finish setting.. th th th th Perform 3 tours partly through calling 81 ,82 ,83 , 84 preset.Display running on screen,such as display ‘RUN rd PATTERN 1 ‘ when calling 81 preset. Soft address amend function and soft Baud rate Amend front address switch of the dome through back controlling equipment,reset address of every dome according to actual need after installing all dome. Support broadcast address 255 th is broadcast address,the back controlling equipment can use this address to control random dome in system wherever the address currently. Front equipment malfunction information feedback Transfer the front malfunction information to back command centre through video signal that the users find cause of equipment malfunction conveniently,the screen display ‘video frequency’ when the camera loses the video frequency. Three-dimension position magnify Point or frame the object by mouse,then it displays in the center of screeen and auto magnify when users use DVR or computer soft roof controlling the dome..Accelerateing orientation of monitor object for users. Privacy masking setting(this function depends on camera type,this function is inefficacious if the camera has no this function ) 7 IR PTZ DOME CAMERA Users can use black shadow to mask privacy zone by ‘CAMERA’ →’PRIVACY’,this dome supports 8 privacy protected zones. Alarm linkage The dome perform prior setting action when it receives the outside alarm signal(can select no action,call preset,pattern scan,auto cruising,etc.,also can select closed and assistant switch AUX1 or AUX2) until cancel alarm.The dome can set 6 routes alarm input at most and 2 routes alarm output. Set relational data by ‘ALARM’. Longitude and Latitude display function Dome screen display the current pan/tilt angle of the dome,easy to know current location for observer.Through ‘DISPLAY SETUP’ →’ORIENTATION’menu to ON or OFF display. Zoom control Users can adjust far and near focus through ‘WIDE/TELE’ on keyboard or matrix,perform ‘WIDE’ to get full view,or perform ‘TELE’ to get feature. Adjust zoom speed under ‘CAMERA’ →’ZOOM SPEED’menu, ‘007’is top speed. Focus control When system defaults auto focus and change focus camera will auto adjust focus according to get legible image,users also can manually focus to get the expectant image.Users can manually adjust focus’NEAR/FAR’ in keyboard,’NEAR’ focus near,’FAR’ focus far. Adjust zoom speed under ‘CAMERA’ →’ZOOM SPEED’menu, ‘007’is top speed. Automatically resume auto focus through operating zoom lens or moving the position when it is in the position of manual focus. The camera can’t focus the object as followed: 1.Target is not the certre of the image. 2.Observation the target near and far at the same time,can not be clear. 3.Target is a strong light object,such as FI light,spotlight and so on. 4.Target is behind the glass with beads or dust. 5.Target moves too fast. 6.Target is very large such as the wall. 7.Target is too dark or vague itself. Iris control System defaults Auto Iris. Camera can rapidly adjust size of Iris,through the automatically induct the changing of environment ray,and thus make the brightness of deferent image stable. Users can change the auto Iris size manually through the keyboard ‘OPEN/CLOSE’ to get required brightness.’OPEN’ iris adjusted lager,brightness changed higher,’CLOSE’ iris adjusted smaller,brightness changed 8 IR PTZ DOME CAMERA lower.Dome locks current iris position when it is in manual iris.Users can resume the Iris into auto focus through performing joystick up down left and right.(Suggest users use auto Iris) Color/B& W Auto Shift The camera will automatically shift CCD light level according to various lighting conditions. Such as:Use common light to insure vivid colored image because of the enough light level by daylight. At night it will automatically adjust to low light level and displays clearer black & white view. Users open or close ‘Auto ICR’ through ‘Camera’->‘Other’menu,open or close ‘ICR’. Automatic backlight compensation Camera sub-area can carry out auto back light compensation.Under a strong light background,camera will auto compensation light for the darker object and adjust daylight to the bright background.In order to aviod making the image lack fidelity by the back line is too bright,and the object is unable to recognize because of darkness,thus gain ledible image. Users can open or close backlight compensation through ‘Camera’->‘Exposure’->‘Back Light’ Note: The camera can realize the function of the backlight compensation only when it is in the auto Iris,system defaults ‘OFF’. 6. Auto track and manual track (special for track dome) Track dome have two modes,including auto track and manual locked track. 1. Auto track Enter auto track mode by call 88th preset. Under autonomous mode, when a moving object enters the field of view, track dome will detect it, and trace its movement locus and pull the object in the middle of the field of view all the time.Exit the auto track mode when users have any manual operation, the dome will return to the original detection point when the tracking target is out of defined area. The selection of tracking target: Auto track mode can select two track algorithm,track the target which one of the most Vigorous movement and the first enters the field of view.Users can select in ‘MAIN MENU’→’TRACK’→’TRACK TARGET’ Sensitivity setting: The sensitivity of auto track devided into low,medium,high and very high,select in ‘MAIN MENU’→’TRACK’→’TRACK SENSE.Display and close the Assisted information:including the display and colse of cross centre,track window,select in ‘MAIN MENU’→’TRACK’. Track alarm: When the object enters the field of the view,users can set alarm linkage by menu after starting the track.. Select in ‘MAIN MENU’→’TRACK’→’TRACK ALAM’. 9 IR PTZ DOME CAMERA 2. Maual locked track The users select the object in the field of view,move the object to the middle of the field of view,pressing ‘OPEN’key,the track dome enters manual locked mode, the dome will trace the motion path of this target by itself after that.It will exit manual track mode when there is any manual operation. Motion detecting and path tracing of track dome are achieved by high-speed DSP. Advanced motor control algorithm makes the track fast and smooth. It is also convenient to use by choosing the mode of Auto/manual, area track. Sony 480 camera the speed of track 1Xzoom maximum track speed Horizontal maximum track speed:60 Degree/Second Vertical maximum track speed:60 Degree/Second Calculation formula: Maximum Track Speed(meter/second)=Target Distance(meter) *1.6 Maximum Track Speed(k/h)= Maximum Track Speed(m/s) *3.6 Target Distance Maximum Track Speed(m/s) Maximum Target Movement speed(k/h) 5m 8m/s 28.8k/h 10m 16 m/s 57.6 k/h 20 m 32 m/s 115.2 k/h 30 m 48 m/s 172.8 k/h 40 m 64 m/s 230.4 k/h 50 m 80 m/s 288 k/h 100 m 160 m/s 576 k/h Precision of Track Still precision of track(still targets):0.2 degree(±1 pixel) Moving track(moving targets):0.2 degree(±1 pixel) Area track: 4 areas are available. 3. Motion detection and give an alarm ( Special for track dome) 1. Intrusion Detection 2. Auto tracking dome can detect the features of moving object when it intrude into the vision and give an alarm. 3. Unattended Baggage Detection 4. Tracking dome will detect and give an alarm when package, debris, baggage is deposited or appears in a 10 IR PTZ DOME CAMERA protection area. 5. Moving object removal detection 6. Tracking dome will detect removed object automatically and give an alarm when the object is removed or took away in the protection area. 7. Illegal vehicle stopping Detection 8. When the vehicle stopped in the protection area illegally the auto tracking dome will detect it and give an alarm. 9. Loitering Detection 10. Auto tracking dome will detect and give an alarm or do other actions when the object and some person loitering for a long time or surpassed the specified time. 7. Intelligent analysis (special for track dome) The dome can analyse video sence to judge if the foreign object bursts in or not.Can select alarm output when the foreign object bursts in(The first alarm output,the second alarm output,two alarm at the same time ) or video image display information’have (or not have) foreign object’.Can be set 3 video analysis sence,corresponding 111th ,112th,113th preset,every sence can set 3 erea,dome will analyse if there have foreign object burst in set erea. 8. Installing preparation 11. Basic requirements All the electric work must obey the latest electric, fireproof and other rules; Inspect if all the attachments are complete according to packing lists and make sure that all the application places should match installation ways. If they don’t match, please contact the supplier. Please use this product according to the requied working environment. 12. Check the installation space and the strength of structure of installing place Be sure that there is enough space for installation of this product and its attachments. Be sure that the carrying capacity of ceiling, wall and bracket could support the total weight of this product and its attachments. It requires 4 times safety factor. 13. Cable preparation work Choose cables needed according to the distance of transportation The minimum specification requirements of visual coaxical cables: 1) 75Ωimpedance; 2) all copper core wire; 3) 95% braid copper net for shielding. Domestic type International type Maximum distance(foot/meter) RG59/U RG59/U 750ft (229m) 5C-2V RG6/U 1,000ft (305m) 11 IR PTZ DOME CAMERA 7C-2V RG11/U 1,500ft (457m) RS 4 85 comm unica tion ca ble (s e e Appe ndix Ⅲ) 24VAC comm unicaon ti cable(see Appendix Ⅳ) 14. Set the pushwheel switches up Set the pushwheel switches up according to the control protocol and dome address. 15. Please keep all the packing materials of dome After open the packages, please keep all the original packing materials to pack it again and send it to the agent or the factory when there’s something wrong. Non-original packing materials may lead to some accidental damage in the transportation that will cost extra fee. 9. Installation method guide Installation conditions Wall mounting dome applied in indoor or outdoor with hard wall structure. ⑴ T he thickness should be thicker than screw s ⑵ T he w allcan endure 4 tim es w eights of dom e at least Housings Installation: Note:If you install outdoor dome,should ensure that the sealing performance of the dome and avoid hot or humid environment. ⑴First of all,you should lead the lines from the bracket and then fix the bracket on the wall.Second,wind the adapter with raw material strip and screw into the bracket. Last,screwed into 3 SHCS on the adapter (Note:Don’t screwed in the end,just let the connector of dome can insert)。 ⑵Loosen the ir dome on both sides of the two ⑶Set up the DIP switches SW1 and SW2, you can flathead screws and open the decorative laps,you decide the dome address and control protocol. will see 2 Dip switches on the dome classis. (Reference switch setting tables)。 12 IR PTZ DOME CAMERA ⑷Connect the video cable、power cords and 485 control lines. ⑸Set the dome into the bracket. First tighten the SHCS at the arc section of the connector,and then tighten the other 3 SHCS.After that ,the dome installation is complete. Note:The above work must be completed by a qualified professional and technical personnel in accordance with local regulations.Power wiring must not take the wrong! 13 IR PTZ DOME CAMERA 10. Install hole and size of various often used bracket Wall-mount Bracket Dimension Drop ceiling Fixed Underpan Dimension 14 IR PTZ DOME CAMERA 11. Menu operation Call dome menu Call 95th preset Move up menu option Pan up odrer Move down menu option Pan down order Select menu option ‘Iris+’ (open) order Enter submenu ‘Iris+’ (open) order Return previous menu ‘Iris-‘ (close) order Exit menu ‘Iris-’ (close) order Change menu Pan up down order Conserve change and return ‘Iris+’ (open) order Cancel change and return ‘Iris-‘( close) order There are different operation when call menu or preset for different keyboard,according to operation of currently using keyboard. The dome support shortcut order function of keyboard etc controlling equipment,can save preset,call preset,setup scan border,startup scan,startup cruising etc. by easy operation.Detailed operation refer to using specification of current controlling equipment. 15 IR PTZ DOME CAMERA 12.Menu index 16 IR PTZ DOME CAMERA 13.System setup SYSTEM MAIN MENU →1.PROTOCOL > →1.SYSTEM > 2.CAMERA > 2.DOME TETLE > 3.PAN/TILT > 3.DISPLAY SETUP > 4.ALARM > → 4.PASSWORD > 5.TRACK > 5.BOOTUP SCREEN > 6.VIDEO ANALYSIS > 6.SET DEFAULT 7. IR MODE 7.SYSTEM REBOOT 8.EXIT 8.EXIT A dome information setup Setup soft ID,caption of the dome. B display setup Setup display clock,dome caption,temperature of inside dome, camera orientation,preset caption,cruising scan caption,pattern scan caption,alarm direction. Examine dome address, communication speed,control protocol,soft version number. C setup password Factory defaults ‘OFF’ password protect function,can setup password to turn on this function when it is necessary. D power up screen Examine dome address, communication speed,control protocol,soft version number. E restore factory defaults Restore the dome setup data to factory defaults. F system reboot All operation are stopped when operate system reboot,the dome powered up again,operating all setting before reboot are effectively anew power up. A . dome information setup adjust setting dome soft address and caption. Adjust dome address 1.call 95th preset to open main menu 17 IR PTZ DOME CAMERA MAIN MENU →1.SYSTEM > 2.CAMERA > 3.PAN/TILT > 4.ALARM > 5.TRACK > 6.VIDEO ANALYSIS > 7. IR MODE 8.EXIT 2. Remove joystick or to select’system setup’, Iris’OPEN’order enter.Screen display system setup menu. SYSTEM →1.PROTOCOL > 2.DOME TETLE > 3.DISPLAY SETUP > 4.PASSWORD > 5.BOOTUP SCREEN > 6.SET DEFAULT 7.SYSTEM REBOOT 8.EXIT 3.Remove joystick,select ‘SITE INFO’, Iris’OPEN’order enter.Screen display location information menu. PROTOCOL →1.SOFT ID:001 2.ID ENABLE:OFF 3.PROTOCOL:PELCO D 4.BAUDRATE:2400 5.PROTOCOL EN:OFF 6.EXIT Remove joystick to select ‘SOFT ID’. PROTOCOL *1.SOFT ID:001 2.ID ENABLE:OFF 3.PROTOCOL:PELCO D 4.BAUDRATE:2400 5.PROTOCOL EN:OFF 6.EXIT 18 IR PTZ DOME CAMERA ① Iris’OPEN’order enter into ‘dome soft ID’, becomes to’*’. ② Remove joystick ③ to the number which you want. ④ Iris’OPEN’order confirm the number to complete input. Iris’CLOSE’order exit this setup if want to revert to or ,the number of dome soft ID will be adjusted following the movement till primary ID. ⑤ Remove joystick to select ‘SOFT ID’, Iris’OPEN’order enters into. Note:the dome uncontrolled after amending dome ID,users have to amend the dome ID of keyboard’s menu.The dome can be controlled unless changing dome ID and keyboard’s are the same.Refer to use specification of keyboard when amend the dome ID of the keyboard. edit dome caption ‘WIDE’order can select input ways: number input,English capitalization and lowercase input.Refer to following setup. 1. Remove joystick in menu of ‘SYSTEM’ to select ‘SITE INFO’,then Iris’OPEN’order enters into. SYSTEM DOME TETLE →1.DOME TITLE: 1.PROTOCOL > →2.DOME TETLE > 2..EXIT 3.DISPLAY SETUP > → 4.PASSWORD > 5.BOOTUP SCREEN > 6.SET DEFAULT 7.SYSTEM REBOOT 8.EXIT 2. Remove joystick to select ‘TITLE’, Iris’OPEN’order enters into. ‘■’under caption character denotes character’s position currently edited.Users can delete the character input currently position by ‘WIDE’order. DOME TITLE * 1.DOME TITLE:XIHU 2.EXIT ■ Remove joystick ,entering edition,then switch the input ways by ‘WIDE’order. Remover the joystick or ,selecting English capitalization,lowercase or number needed,then confirm by Iris ‘OPEN’, ‘CLOSE’order denotes to give up. 19 IR PTZ DOME CAMERA DOME TITLE * 1.DOME TITLE:XIHU 2.EXIT ■ ABCDEFGHIJKLMN Remover the joystick or or ,select required sign,now the character is flickering, remover the joystick ,select required character,confirming by remover the joystick to Remover the joystick the joystick to or ,otherwise denotes to give up. again,then enter into modification of other position.Selecting ‘return’ and removing ,finish setup. DOME TITLE * 1.DOME TITLE:XIHU 2.EXIT B DISPLAY SETUP DOME TITLE.TEMPERATURE.ORIENTATION.PRESET TITLE.TOUR TITLE.PATTERN TITLE 1. Select ‘DISPLAY SETUP’, Iris’OPEN’order enters into.Screen display information setting menu. SYSTEM DISPLAY SETUP →1.CLOCK > 1.PROTOCOL > 2.DOME TETLE > 2.DOME TITLE:ON →3.DISPLAY SETUP > 4.PASSWORD > 2. 3.TEMPERATURE:ON → 4.ORIENTATION:ON 5.BOOTUP SCREEN > 5.PRESET TITLE:ON 6.SET DEFAULT 6.TOUR TITLE:ON 7.SYSTEM REBOOT 7.PATTERN TITLE:ON 8.EXIT 8.EXIT Remover the joystick or to select ‘CLOCK’, then use Iris+’OPEN’ order to enter into.This time bofore the ‘CLOCK’ becomes to’*’ Amend system date and time 1.Select ‘DISPLAY SETUP’,then used Iris ‘OPEN’order to enter.The screen display ‘DISPLAY SETUP’menu.Select ‘CLOCK’,then enter by ‘OPEN’order. SYSTEM 1.PROTOCOL > 2.DOME TETLE > DISPLAY SETUP → →1.CLOCK > 2.DOME TITLE:ON 20 IR PTZ DOME CAMERA →3.DISPLAY SETUP > 3.TEMPERATURE:ON 4.PASSWORD > 4.ORIENTATION:ON 5.BOOTUP SCREEN > 5.PRESET TITLE:ON 6.SET DEFAULT 6.TOUR TITLE:ON 7.SYSTEM REBOOT 7.PATTERN TITLE:ON 8.EXIT 8.EXIT 2.Remover the joystick or to select ‘DATE’ or ‘TIME’, then use Iris+’OPEN’ order to enter.This time bofore the ‘DATE’ or’TIME’ becomes to’*’ CLOCK CLOCK →1.CLOCK DISPLAY:ON * → 2.DATE:09/01/30 1.CLOCK DISPLAY:ON 2.DATE:09/01/30 3.TIME:21:02:07 3.TIME:21:02:07 4.EXIT 4.EXIT 4. Remover the joystick or to change display data as ‘ON’ or ‘OFF’. 5. Iris+‘OPEN’order save and exit,or Iris-‘CLOSE’order not save and exit after finishing. Display ‘DOME TITLE’、’TEMPERATURE’’ORIENTATION’、’PRESET TITLE’、’TOUR TITLE’、’PATTERN TITLE’ 1. Select ‘DISPLAY SETUP’,then enter by ‘OPEN’order.Screen display ‘DISPLAY SETUP’menu. SYSTEM DISPLAY SETUP →1.CLOCK > 1.PROTOCOL > 2.DOME TETLE > 2.DOME TITLE:ON →3.DISPLAY SETUP > 3.TEMPERATURE:ON → 4.PASSWORD > 4.ORIENTATION:ON 5.BOOTUP SCREEN > 5.PRESET TITLE:ON 6.SET DEFAULT 6.TOUR TITLE:ON 7.SYSTEM REBOOT 7.PATTERN TITLE:ON 8.EXIT 8.EXIT 2.Remover the joystick or to select ‘DOME TITLE’、’TEMPERATURE’’ORIENTATION’、’PRESET TITLE’、’TOUR TITLE’、’PATTERN TITLE’,then use Iris+’OPEN’ order to enter into relevent menu, menu term becomes to’*’ DISPLAY SETUP 1.CLOCK > →2.DOME TITLE:ON 3.TEMPERATURE:ON DISPLAY SETUP → 1.CLOCK > * 2.DOME TITLE:ON 3.TEMPERATURE:ON 21 before IR PTZ DOME CAMERA 4.ORIENTATION:ON 4.ORIENTATION:ON 5.PRESET TITLE:ON 5.PRESET TITLE:ON 6.TOUR TITLE:ON 6.TOUR TITLE:ON 7.PATTERN TITLE:ON 7.PATTERN TITLE:ON 8.EXIT 8.EXIT 4. Remover the joystick or to change display data as ‘ON’ or ‘OFF’. 5. Iris+‘OPEN’order save and exit,or Iris-‘CLOSE’order not save and exit after finishing. C Amend dome password Setup open or close password protection function,can set new password. Setup and repeal password protection function Open ‘PASSWORD’firstly when setup the password protection function.Necessary to reinstall the password when when use password protection firstly. or 1. Remover the joystick to select ‘password’,then Iris+‘OPEN’order enters.Screen display password setting menu. SYSTEM PASSWORD 1.PROTOCOL > →1.PASSWORD 2.DOME TETLE > PROTECT:OFF 3.DISPLAY SETUP > →4.PASSWORD > 2.PASSWORD INPUT:****** → 5.BOOTUP 3.CONFIRM:****** 4.EXIT SCREEN > 6.SET DEFAULT 7.SYSTEM REBOOT 8.EXIT or 2.Remover the joystick to ‘PASSWORD’, Iris+’OPEN’ order to enter, becomes to’*’ PASSWORD * 1.PASSWORD PROTECT:OFF 2.PASSWORD INPUT:****** 3.CONFIRM:****** 4.EXIT 3.Remover the joystick or to change display data as ‘ON’ or ‘OFF’. Iris+‘OPEN’order save and exit,or Iris-‘CLOSE’order not save and exit after finishing. 22 IR PTZ DOME CAMERA Amend password 1.Remover the joystick or to ‘PASSWORD’, Iris+’OPEN’ order to enter. Screen display password setting menu SYSTEM PASSWORD 1.PROTOCOL > →1.PASSWORD 2.DOME TETLE > PROTECT:OFF 3.DISPLAY SETUP > →4.PASSWORD > 2.PASSWORD INPUT:****** 3.CONFIRM:****** → 5.BOOTUP 4.EXIT SCREEN > 6.SET DEFAULT 7.SYSTEM REBOOT 8.EXIT 2. Remover the joystick or to ‘PASSWORD INPUT’ PASSWORD 1.PASSWORD PROTECT:OFF →2.PASSWORD INPUT:****** 3.CONFIRM:****** 4.EXIT 3. Iris+’OPEN’ order to enter, becomes to’*’ PASSWORD 1.PASSWORD PROTECT:OFF * 2.PASSWORD INPUT:****** 3.CONFIRM:****** 4.EXIT 4. Remover the joystick or to change the number,then remove or that the cursor move to next position. 5. Iris+’OPEN’ order save and exit after inputing 6 password,and the cursor auto to ‘CONFIRM’. 6. Remover the joystick or to change the number,then remove or that the cursor move to next position. 7. Iris+’OPEN’ order save and exit after inputing 6 password. 8.The cursor auto jump to ‘PASSWORD INPUT’if the number input in ‘CONFIRM’and’PASSWORD INPUT’are the same,and changed to ‘ ’,finishing password setting.The cursor auto jump to ‘******’after ‘PASSWORD INPUT’,input password again and confirm until the number are the same in ‘CONFIRM’and’PASSWORD INPUT’ D Power up screen 23 IR PTZ DOME CAMERA Power up screen display the dome bootup content.There are protocol display,baud rate display,camera information display and self inspect information display. Select ‘BOOTUP SCREEN’, Iris+’OPEN’ order enter.Screen appers system bootup information. ×××××× CORP HTTP:×××××××× SOFT VERSION:2.1 ADDRESS:001 PROTOCOL:PELCO D BAUDRATE:2400 REFERENCE:OK ××× CAMERA RS485 OK Iris -‘CLOSE’order return to superior submenu. E Resume factory setup Select ‘SET DEFAULT’ in setting menu of system information, Iris+’OPEN’ order enter and setup all dome data to factory default setting.The system auto reboot after operation. SYSTEM 1.PROTOCOL > 2.DOME TETLE > 3.DISPLAY SETUP > 4.PASSWORD > 5.BOOTUP SCREEN > →6.SET DEFAULT 7.SYSTEM REBOOT 8.EXIT F system reboot Select ‘SYSTEM REBOOT’ in setting menu of system information, Iris+’OPEN’ order enter, the system auto reboot. SYSTEM 1.PROTOCOL > 2.DOME TETLE > 3.DISPLAY SETUP > 4.PASSWORD > 5.BOOTUP SCREEN > 6.SET DEFAULT →7.SYSTEM REBOOT 24 IR PTZ DOME CAMERA 8.EXIT 14. Camera setup MAIN MENU CAMERA →1.EXPOSURE > 1.SYSTEM > →2.CAMERA > 2.WHITE BALANCE > 3.PAN/TILT > 4.ALARM > 3.PRIVACY > → 4.OTHER > 5.TRACK > 5.ZOOM SPEED:007 6.VIDEO ANALYSIS > 6.FOCUS SPEED:007 7. IR MODE 7.EXIT 8.EXIT A Exposure setup Users can setup different exposure modes,can adjust PWL by exposure data following different modes.Setup shutter speed,iris speed,gain adjustment,bright adjustment,backlight compensation,slow shutter. B Whithe blance setup Dome auto adjust present image color depend on the change of enviornment and ray of taken object,appering true color. C Privacy masking Users can setup privacy masking in any position of monitor zone,maximum 8pcs zones. D Other setup Setup Digital focus, Color/B&W shift mode, Color/B&W shift,On or Off camera information display. A Exposure setup 1. Call 95 preset,call main menu. MAIN MENU →1.SYSTEM > 2.CAMERA > 3.PAN/TILT > 4.ALARM > 5.TRACK > 6.VIDEO ANALYSIS > 7. IR MODE 8.EXIT 25 IR PTZ DOME CAMERA 2. ‘CAMERA’Remove joystick to select ‘CAMERA’. or MAIN MENU 1.SYSTEM > →2.CAMERA > 3.PAN/TILT > 4.ALARM > 5.TRACK > 6.VIDEO ANALYSIS > 7. IR MODE 8.EXIT 3. ’OPEN’ order enter into ‘CAMERA’menu. CAMERA →1.EXPOSURE > 2.WHITE BALANCE > 3.PRIVACY > 4.OTHER > 5.ZOOM SPEED:007 6.FOCUS SPEED:007 7.EXIT 4.Remove joystick or to select ‘EXPOSURE’, ’OPEN’ order enter into ‘EXPOSURE’menu. EXPOSURE →1.EXP MODE:AUTO 2.SHUTTER SPEED:1/50 3.IRIS:F5.6 4.GAIN:05DB 5.BRIGHT:010 6.BACK LIGHT:OFF 7.SLOW SHUTTER:OFF 8.EXIT 5.Remove joystick to select ‘EXPOSURE’, ’OPEN’ order enter,then move the joystick to 5 kinds mode: 1 Auto 2 Manual 3 ShutterP 4 IrisP 26 or to select data. IR PTZ DOME CAMERA 5 Bright ‘SHUTTER SPEED’、’IRIS’、’GAIN’、’BRIGHT’can be set or not depend on the setting data of ‘EXPOSURE’mode. Remove the joystick after finishing setting,exit setting. EXPOSURE * 1.EXP MODE:AUTO 2.SHUTTER SPEED:1/50 3.IRIS:F5.6 4.GAIN:05DB 5.BRIGHT:010 6.BACK LIGHT:OFF 7.SLOW SHUTTER:OFF 8.EXIT The camera auto adjust all parameter when it is in atuomatic mode.And allowed to open back light compensation.This function can not be used in other mode.The backlighting object has shadow when it is under a strong light background.The back light compensation function let the dome automaiclly adjust iris to fit light changes,auto correct the light of image subject,let the image apper clearly. Remark:the day and night auto shift and frame accumulation are invalid when the Exposure set as ‘AUTO:OFF’. Camera sub-area can carry out auto back light compensation.Under a strong light background,camera will auto compensation light for the darker object and adjust daylight to the bright background.In order to aviod making the image lack fidelity by the back line is too bright,and the object is unable to recognize because of darkness,thus gain ledible image. B Whithe blance setup Dome auto adjust present image color depend on the change of enviornment and ray of taken object,appering true color. 1. Call 95 preset,call main menu 27 IR PTZ DOME CAMERA MAIN MENU →1.SYSTEM > 2.CAMERA > 3.PAN/TILT > 4.ALARM > 5.TRACK > 6.VIDEO ANALYSIS > 7. IR MODE 8.EXIT 2. Remove joystick to select ‘CAMERA’. or MAIN MENU 1.SYSTEM > →2.CAMERA > 3.PAN/TILT > 4.ALARM > 5.TRACK > 6.VIDEO ANALYSIS > 7. IR MODE 8.EXIT 3.‘OPEN’ order enter into ‘CAMERA’menu. CAMERA 1.EXPOSURE > →2.WHITE BALANCE > 3.PRIVACY > 4.OTHER > 5.ZOOM SPEED:007 6.FOCUS SPEED:007 7.EXIT 4.Remove joystick or to select ‘WHITE BALANCE’, ‘OPEN’ order enter into ‘WHITE BALANCE’menu. WHITE BALANCE →1.WB MODE:AUTO 2.R GAIN:208 3.B GAIN:163 WHITE BALANCE → * 1.WB MODE:AUTO 2.R GAIN:208 3.B GAIN:163 28 IR PTZ DOME CAMERA 4.EXIT 4.EXIT 5.Remove joystick to select ‘WB MODE’, white balance mode, ‘OPEN’ order enter,then move the joystick to or to select data. Iris ‘OPEN’ order select menu option,changed curor to ‘*’.Adjust parameter through Pan up down order,can select 6 mode:: Auto OPW Manual OutDoor ATW InDoor Users can adjust the‘ R GAIN’and ‘B GAIN’under manual mode only,the higher the number the higher the gain. C Privacy masking 1. Call 95 preset,call main menu MAIN MENU →1.SYSTEM > 2.CAMERA > 3.PAN/TILT > 4.ALARM > 5.TRACK > 6.VIDEO ANALYSIS > 7. IR MODE 8.EXIT 2. ‘CAMERA’ Remove joystick or to select ‘CAMERA’. MAIN MENU 1.SYSTEM > →2.CAMERA > 3.PAN/TILT > 4.ALARM > 5.TRACK > 6.VIDEO ANALYSIS > 7. IR MODE 8.EXIT 3. ‘OPEN’order enter into ‘CAMERA’menu ,remove joystick CAMERA 1.EXPOSURE > 2.WHITE BALANCE > PRIVACY → →1.PRIVACY:001 2.DISPLAY:OFF 29 or to select ‘PRIVACY’,. IR PTZ DOME CAMERA →3.PRIVACY > 3.EDIT 4.OTHER > 4.DELETE 5.ZOOM SPEED:007 5.EXIT 6.FOCUS SPEED:007 7.EXIT 4.‘OPEN’ order enter into ‘PRIVACY’privacy masking menu PRIVACY PRIVACY →1.PRIVACY:001 * 1.PRIVACY:001 2.DISPLAY:OFF → 3.EDIT 3.EDIT 4.DELETE 4.DELETE 5.EXIT 5.EXIT 5.Remove joystick or to select ‘PRIVACY’, ‘OPEN’ order enter into privacy masking number. PRIVACY * 2.DISPLAY:OFF PRIVACY * 1.PRIVACY:002 1.PRIVACY:001 2.DISPLAY:OFF → 3.EDIT 2.DISPLAY:OFF 3.EDIT 4.DELETE 4.DELETE 5.EXIT 5.EXIT 6.Remove joystick or to select the data of ‘PRIVACY’number,1-8,then ‘OPEN’ order confirm. PRIVACY PRIVACY 1.PRIVACY:002 1.PRIVACY:002 → 2.DISPLAY:OFF → 3.EDIT * 2.DISPLAY:ON 3.EDIT 4.DELETE 4.DELETE 5.EXIT 5.EXIT 7.Remove joystick or to select ‘DISPLAY’, ‘EDIT’, ‘DELETE’,select ON or OFF when enter into ‘DISPLAY’,that select to display or not display current privacy masking number corresponding masking zone. PRIVACY 1.PRIVACY:002 2.DISPLAY:ON * 3.EDIT → ■ 4.DELETE 5.EXIT 30 IR PTZ DOME CAMERA or Remove joystick to select ‘EDIT’ when the data of ‘DISPLAY’is ON, a black little square appears in center of screen when use ‘OPEN’order to enter into ‘EDIT’.Users can use ‘NEAR’.’FAR’.’WIDE’.’TELE’ order to adjust black square size,use ‘OPEN’order to confirm when gain right size. PRIVACY 1.PRIVACY:002 2.DISPLAY:ON 3.EDIT * 4.DELETE 5.EXIT Remove joystick or to select ‘DELETE’,then can delete current privacy masking zone when use ‘OPEN’ order. D Other setup Users can setup digital zoom, color/B&W shift mode, color/B&W shift,ON or OFF camera information display. 1. Call 95 preset,call main menu MAIN MENU CAMERA →1.EXPOSURE > 1.SYSTEM > →2.CAMERA > 2.WHITE BALANCE > 3.PAN/TILT > 3.PRIVACY > → 4.ALARM > 4.OTHER > 5.TRACK > 5.ZOOM SPEED:007 6.VIDEO ANALYSIS > 6.FOCUS SPEED:007 7. IR MODE 7.EXIT 8.EXIT 2.Remove joystick or to select ‘CAMERA’, ‘OPEN’ order enter into ‘CAMERA’menu CAMERA OTHER →1.DIGITAL ZOOM:ON 1.EXPOSURE > 2.WHITE BALANCE > 3.PRIVACY > →4.OTHER > 2.AUTO ICR:ON → 3.ICR:OFF 4.TIMER ICR > 5.ZOOM SPEED:007 5.WIDE-D:OFF 6.FOCUS SPEED:007 6.DISPLAY:OFF 7.EXIT 7.EXIT 31 IR PTZ DOME CAMERA Digital zoom 1.Remove joystick or to select ‘OTHER’setting, ’OPEN’ order enter into ‘DIGITAL ZOOM’. CAMERA OTHER →1.DIGITAL ZOOM:ON 1.EXPOSURE > 2.WHITE BALANCE > 3.PRIVACY > 2.AUTO ICR:ON 3.ICR:OFF → →4.OTHER > 4.TIMER ICR > 5.ZOOM SPEED:007 5.WIDE-D:OFF 6.FOCUS SPEED:007 6.DISPLAY:OFF 7.EXIT 7.EXIT 2.Remove joystick or to select ‘ON’或’OFF’, then use ’OPEN’ order to confirm. ‘DIGITAL ZOOM’ is effective when select ON,and noneffective when select OFF. Color/B&W Auto Shift 1.Remove joystick or to select ‘AUTO ICR’, then use ’OPEN’ order to enter. OTHER OTHER 1.DIGITAL ZOOM:ON 1.DIGITAL ZOOM:ON 2.AUTO ICR:ON 2.AUTO ICR:ON →3.ICR:OFF * 3.ICR:OFF 4.TIMER ICR > 4.TIMER ICR > 5.WIDE-D:OFF 5.WIDE-D:OFF 6.DISPLAY:OFF 6.DISPLAY:OFF 7.EXIT 7.EXIT 2.Remove joystick or to select ‘ON’或’OFF’, then use ’OPEN’ order to confirm.It is auto mode of Color/B& W Shift mode when select ‘ON’,the camera auto shift color or white according to light and shade of environment ray.It is manual mode when select OFF,and Color/B& W Shift or not depend on setting of ‘ICR’. Timer Color/B&W Shift 1.Remove joystick or to select ‘ICR’when enter into ‘OTHER’of’CAMERA’, then use ’OPEN’ order to enter. TIMER ICR →1.START TIME:00:00:00 2.END TIME:01:02:11 3.TIMER ICR:OFF 4.EXIT 2. Remove joystick or to select ‘ START TIME’ or ‘END TIME’, ‘START TIME’sets to start black&white time, ‘END TIME’as shift back color mode time. TIMER ICR →1.START TIME:00:00:00 32 IR PTZ DOME CAMERA 2.END TIME:01:02:11 3.TIMER ICR:OFF 4.EXIT 3. Iris+’OPEN’ order enter corresponding menu. Remove joystick or to change number,then move to ←or→side so that the cursor move to next position.Iris+‘OPEN’order save and exit,or Iris-‘CLOSE’order not save and exit after finishing TIMER ICR * 1.START TIME:20:00:00 2.END TIME:01:02:11 3.TIMER ICR:OFF 4.EXIT TIMER ICR 1.START TIME:20:00:00 * 2.END TIME:06:05:11 3.TIMER ICR:OFF 4.EXIT 4.Remove joystick or to select ‘TIMER ICR’. TIMER ICR 1.START TIME:20:00:00 2.END TIME:06:05:11 →3.TIMER ICR:OFF 4.EXIT 5. Iris+’OPEN’ order enter. Remove joystick or to change parameter,select ‘ON’ is timer Color/B&W Shift,select ‘OFF’ as not start Color/B&W Shift .Iris+‘OPEN’order save and exit,or Iris-‘CLOSE’order not save and exit after finishing TIMER ICR 1.START TIME:20:00:00 2.END TIME:06:05:11 * 3.TIMER ICR:ON 4.EXIT Camera information display 1.Enter into ‘OTHER’menu of ‘CAMERA’,then remove joystick 33 or to select ‘DISPLAY’, then use ’OPEN’ order IR PTZ DOME CAMERA to confirm. OTHER OTHER 1.DIGITAL ZOOM:ON 1.DIGITAL ZOOM:ON 2.AUTO ICR:ON 2.AUTO ICR:ON 3.ICR:OFF 3.ICR:OFF 4.TIMER ICR > 4.TIMER ICR > 5.WIDE-D:OFF 5.WIDE-D:OFF →6.DISPLAY:OFF * 6.DISPLAY:OFF 7.EXIT 7.EXIT 2.Remove joystick or to select ‘ON’或’OFF’, then use ’OPEN’ order to save and exit,or use ‘CLOSE’ order to cancel save and exit.The screen display the zoom times etc.information of the camera when it is ON. 15. Pan-tilt data setup MAIN MENU PAN/TILT 1.SYSTEM > →1.PRESET > 2.CAMERA > 2.SCAN > →3.PAN/TILT > 4.ALARM > 5.TRACK > 3.AUTO RUN > → 6.VIDEO ANALYSIS > 7. IR MODE 8.EXIT 4.SPEED SETTING > 5.HOME PLACE:OFF 6.AUTO FLIP:ON 7.EXIT A preset title Edit preset title and support Chinese spell input.English input and number input. B cruising scan Setup scan cyclely between multi-preset,can setup 6 tours total,each one tour support 1-18pcs preset,can setup scan speed and staying time on each point. C other scan Can setup auto scan speed,frame scan speed,frame scan time,track sensitivetatiy(only for high speed dome with track function) D manual speed proportion There are 1.1/2.1/3.1/4 grades of limited speed proportion.Users can setup according to own need. E home place Hompe place is used to let dome auto go to important place which need to be monitored without operation, setup any point between 1-32 preset as home position,also can select close home function. 34 IR PTZ DOME CAMERA F auto flip The dome can be set 180 degree auto flip function for continuity of upright monitoring. A preset title 1. Call 95 preset,call main menu MAIN MENU →1.SYSTEM > 2.CAMERA > 3.PAN/TILT > 4.ALARM > 5.TRACK > 6.VIDEO ANALYSIS > 7. IR MODE 8.EXIT 2. Remove joystick or to select ‘PAN/TILT’ MAIN MENU 1.SYSTEM > 2.CAMERA > →3.PAN/TILT > 4.ALARM > 5.TRACK > 6.VIDEO ANALYSIS > 7. IR MODE 8.EXIT 3.Use ’OPEN’ order enter into ‘PAN/TILT’menu,then remove joystick or to select ‘PRESET’. PAN/TILT →1.PRESET > 2.SCAN > 3.AUTO RUN > 4.SPEED SETTING > 5.HOME PLACE:OFF 6.AUTO FLIP:ON 7.EXIT 4. Use ‘OPEN’ order enter into ‘PRESET’, select ‘PRESET NUMBER’ PRESET →1.PRESET NUMBER:001 2.TITLE: 3.EXIT 5. Use ’OPEN’ order enter into ‘PRESET NUMBER’, select ‘PRESET NUMBER’, remove joystick 35 or to IR PTZ DOME CAMERA select number,then use ’OPEN’ confirm, save and exit. PRESET PRESET * * 1.PRESET NUMBER:002 1.PRESET 2.TITLE: NUMBER:001 3.EXIT 2.TITLE: 3.EXIT 6. remove joystick or to select ‘TITLE’ PRESET 1.PRESET NUMBER:001 →2.TITLE: 3.EXIT 7. Use ’OPEN’ order enter into ‘TITLE’,edit preset and dome title way are the same,refer 20th ‘edit dome title’ PRESET 1.PRESET NUMBER:002 * 2.TITLE:ab2 ■ Aa2 B Tour scan 1. Select ‘TOUR SCAN’,then use ‘OPEN’order to enter. PAN/TILT SCAN →1.TOUR SCAN > 1.PRESET > →2.SCAN > 2.AUTO SCAN S:016 3.AUTO RUN > → 4.SPEED SETTING > 5.HOME PLACE:OFF 3.FRAME SCAN S:001 4.FRAME SCAN T:005 5.EXIT 6.AUTO FLIP:ON 7.EXIT 2. Remove joystick or to select ‘TOUR NUMBER’,use ‘OPEN’order to enter. TOUR SCAN * 1.TOUR NUMBER:001 2.TOUR SPEED:011 3.TOUR EDIT > 4.EXIT 3.Remove joystick or to select ‘TOUR NUMBER’1-6,such as select 2,use ‘OPEN’order to confirm and exit. TOUR SCAN 36 IR PTZ DOME CAMERA * 1.TOUR NUMBER:002 2.TOUR SPEED:011 3.TOUR EDIT > 4.EXIT 4.Remove joystick or to select ‘TOUR SPEED’,use ‘OPEN’order to enter. TOUR SCAN TOUR SCAN 1.TOUR NUMBER:002 1.TOUR NUMBER:002 → →2.TOUR SPEED:011 * 2.TOUR SPEED:011 3.TOUR EDIT > 3.TOUR EDIT > 4.EXIT 4.EXIT 5.Remove joystick or to select the data of ‘TOUR SPEED’0-11, ‘0’is the lowest speed, ‘011’is highest speed.Such as select ‘005’speed,use ‘OPEN’order to confirm and exit. TOUR SCAN 1.TOUR NUMBER:002 * 2.TOUR SPEED:005 3.TOUR EDIT > 4.EXIT 6.Remove joystick or to select ‘TOUR EDIT’,use ‘OPEN’order to enter.There are 6 rows 3 tiers,18pcs point.Such as following table,the first row and tier ‘01’is preset,and ‘009’is staying time 9 seconds on this point.Finish tour when the preset number is ‘00’,will tour from the first point anew.Overleap the point staying time ‘000’ to next one. TOUR SCAN PRESET TIME TOUR 01 1.TOUR NUMBER:002 01-009 02-008 03-000 2.TOUR SPEED:005 00-000 00-000 00-000 →3.TOUR EDIT > 4.EXIT 00-000 00-000 00-000 00-000 00-000 00-000 00-000 00-000 00-000 00-000 00-000 00-000 C Other scan Can setup auto scan speed,frame scan speed,frmae scan time,track sensitivetatiy(only for high speed dome with track function).Select ‘OTHER SCAN’,then use ‘OPEN’order to enter. PAN/TILT SCAN 1.PRESET > →2.SCAN > 1.TOUR SCAN > → →2.AUTO SCAN S:016 3.AUTO RUN > 3.FRAME SCAN S:001 4.SPEED SETTING > 4.FRAME SCAN T:005 37 IR PTZ DOME CAMERA 5.EXIT 5.HOME PLACE:OFF 6.AUTO FLIP:ON 7.EXIT D Auto run Timer act 1. Select ‘AUTO RUN’,then enter by ‘OPEN’order to select ‘TIMER ACT’,then enter by ‘OPEN’order. PAN/TILT AUTO RUN →1.TIMER ACT > 1.PRESET > 2.SCAN > 2.POWERUP →3.AUTO RUN > : ACT NOTHING 4.SPEED SETTING > 3.PARK ACT:NOTHING 5.HOME PLACE:OFF 4.PARK TIME:001M 6.AUTO FLIP:ON 5.EXIT 7.EXIT 2.Remove joystick or to select ‘NUMBER’,use ‘OPEN’order to enter. Use or to shift timer action number,then enter by ‘OPEN’order TIMER ACT →1.NUMBER:001 2.START TIME:00:00:00 3.END TIME:01:02:11 4.TIMER ACT:NOTHING 5.EXIT 3. Remove joystick or to select ‘START TIME’,enter by ’OPEN’ order.then move to ←or→side so that the cursor move to next position.Iris+‘OPEN’order save and exit,or Iris-‘CLOSE’order not save and exit after finishing TIMER ACT TIMER ACT 1.NUMBER:001 4.Remove joystick 1.NUMBER:001 →2.START TIME:00:00:00 * 2.START TIME:08:00:00 3.END TIME:01:02:11 3.END TIME:01:02:11 4.TIMER ACT:NOTHING 4.TIMER ACT:PNOTHING 5.EXIT 5.EXIT or to select ‘END TIME’,enter by ’OPEN’ order.then move to ←or→side so that the cursor move to next position.Iris+‘OPEN’order save and exit,or Iris-‘CLOSE’order not save and exit after finishing TIMER ACT TIMER ACT 1.NUMBER:001 1.NUMBER:001 2.START TIME:08:00:00 2.START TIME:08:00:00 38 IR PTZ DOME CAMERA →3.END TIME:01:02:11 5. Remove joystick * 3.END TIME:09:15:00 4.TIMER ACT:NOTHING 4.TIMER ACT:PNOTHING 5.EXIT 5.EXIT or to select ‘TIMER ACT’,enter by ’OPEN’ order. TIMER ACT 1.NUMBER:001 2.START TIME:08:00:00 3.END TIME:09:15:00 →4.TIMER ACT:NOTHING 5.EXIT 6.Remove joystick or to change act mode:home place,pattern scan,tour scan,auto scan,frame scan,preset,auto track,video sence 1-8 intelligent analysis, Iris+‘OPEN’order save and exit after setting. TIMER ACT 1.NUMBER:001 2.START TIME:08:00:00 3.END TIME:09:15:00 * 4.TIMER ACT: PATTERN 1 5.EXIT E Limited speed set Manual speed proportion There are 1.1/2.1/3.1/4 grades of limited speed proportion.Users can setup according to own need. or Remove joystick to select ‘MANUAL SPEED’,use ‘OPEN’order to enter PAN/TILT SPEED SETTING →1.MANUAL SPEED:1/2 1.PRESET > 2.SCAN > 2.MAX 3.AUTO RUN > SPEED: 250 DEGREE/S →4.SPEED 3.EXIT SETTING > 5.HOME PLACE:OFF 6.AUTO FLIP:ON 7.EXIT 1. Remove joystick or to select manual speed proportion(1、1/2、1/3、1/4), the higher the figure, the faster the speed, then use ‘OPEN’order to save and exit after finishing setting. SPEED SETTING * 1.MANUAL SPEED:1 2.MAX SPEED: 250 DEGREE/S 39 IR PTZ DOME CAMERA 3.EXIT The maximum run speed Can set the maximum run speed of calling preset,common is 250°/s,the maximum can be set 400°/s.The higher maximum run speed the higher manual speed.(set way is the same as set manual limited speed). SPEED SETTING 1.MANUAL SPEED:1 →2.MAX SPEED: 250 DEGREE/S 3.EXIT SPEED SETTING 1.MANUAL SPEED:1 * 2.MAX SPEED: 400 DEGREE/S 3.EXIT F Home place Hompe place is used to let dome auto go to important place which need to be monitored without operation, setup any point between 1-32 preset as home position,also can select close home function. 1. Remove joystick or PAN/TILT PAN/TILT 1.PRESET > 1.PRESET > 2.SCAN > 2.SCAN > 3.AUTO RUN > 3.AUTO RUN > 4.SPEED SETTING > 4.SPEED SETTING > →5.HOME PLACE:OFF 2. to select ‘HOME PLACE’,then use ‘OPEN’to enter. * 5.HOME PLACE:OFF 6.AUTO FLIP:ON 6.AUTO FLIP:ON 7.EXIT 7.EXIT Remove joystick or to change the data of ‘HOME PLACE’,can select OFF or any point between 1-32 preset,then use ‘OPEN’to save and exit. PAN/TILT 1.PRESET > 2.SCAN > 3.AUTO RUN > 4.SPEED SETTING > * 5.HOME PLACE:001 6.AUTO FLIP:ON 7.EXIT G Auto flip 40 IR PTZ DOME CAMERA The dome can be set 180 degree auto flip function for continuity of upright monitoring. or Remove joystick to select ‘AUTO FLIP’,then use ‘OPEN’to enter. PAN/TILT PAN/TILT 1.PRESET > 1.PRESET > 2.SCAN > 2.SCAN > 3.AUTO RUN > 3.AUTO RUN > 4.SPEED SETTING > 4.SPEED SETTING > 5.HOME PLACE:OFF 5.HOME PLACE:OFF →6.AUTO FLIP:ON * 6.AUTO FLIP:ON 7.EXIT 1. 7.EXIT Remove joystick or to change the data of ‘AUTO FLIP’,can select ON or OFF.Select OFF,the dome can not auto flip,select ON, the dome auto flip 180 degree when it flips to -90 degree.Use ‘OPEN’order to save and exit after selecting. PAN/TILT 1.PRESET > 2.SCAN > 3.AUTO RUN > 4.SPEED SETTING > 5.HOME PLACE:001 * 6.AUTO FLIP:OFF 7.EXIT 16. Alarm setup MAIN MENU ALARM 1.SYSTEM > →1.ALARM ACT > 2.CAMERA > 2.AUX1 OUT > 3.PAN/TILT > 3.AUX2 OUT > →4.ALARM > → 4.EXIT 5.TRACK > 6.VIDEO ANALYSIS > 7. IR MODE 8.EXIT Alarm function The dome perform prior setting action when it receives the outside alarm signal(can select no action,call preset,pattern scan,auto cruising,etc.,also can select closed and assistant switch AUX1 or AUX2) until cancel alarm.The dome can set 7 routes alarm input at most and 2 routes alarm output.Input and output are switch quantity. 41 IR PTZ DOME CAMERA Setup data by ‘ALARM’setting menu. A alarm action management Setup the action which the dome operate when receive the alarm signal. B alarm output1 management Setup 1-6 alarm are effective that assistant switch AUX1 is ON or OFF. C alarm output2 management Setup 1-6 alarm are effective that assistant switch AUX12is ON or OFF. A alarm action management 1. Call 95 preset,call main menu MAIN MENU →1.SYSTEM > 2.CAMERA > 3.PAN/TILT > 4.ALARM > 5.TRACK > 6.VIDEO ANALYSIS > 7. IR MODE 8.EXIT 2. Remove the joystick to select ‘ALARM’,then use ‘OPEN’to enter. MAIN MENU ALARM 1.SYSTEM > * 1.ALARM ACT > 2.CAMERA > 2.AUX1 OUT > 3.PAN/TILT > 3.AUX2 OUT > → →4.ALARM > 4.EXIT 5.TRACK > 6.VIDEO ANALYSIS > 7. IR MODE 8.EXIT 3. Remove the joystick to select ‘ALARM ACT’management,then use ‘OPEN’to enter. ALARM ACT ALARM ACT →1.ALARM 1 ACT:NOTHING * 1.ALARM 1 ACT: TOUR SCAN 001 2.ALARM 2 ACT:NOTHING 2.ALARM 2 ACT:NOTHING 3.ALARM 3 ACT:NOTHING 3.ALARM 3 ACT:NOTHING 4.ALARM 4 ACT:NOTHING 4.ALARM 4 ACT:NOTHING 5.ALARM 5 ACT:NOTHING 5.ALARM 5 ACT:NOTHING 6.ALARM 6 ACT:NOTHING 6.ALARM 6 ACT:NOTHING 7.ALARM 7 ACT:NOTHING 7.ALARM 7 ACT:NOTHING 42 IR PTZ DOME CAMERA 8.EXIT 8.EXIT 4. Remove the joystick to select ‘ALARM ACT’,then use ‘OPEN’to enter. 17. Auto Tracking Set (special for track dome) MAIN MENU TRACK 1.SYSTEM > →1.TRACK TARGET:MOTION 2.CAMERA > 2.TRACK SENSE:MIDDLE 3.PAN/TILT > 3.TRACK WINDOW:DISPLAY → 4.ALARM > 4.TRACK CROSS:DISPLAY →5.TRACK > 5.TRACK ALAM:OFF 6.VIDEO ANALYSIS > 6.TRACK STATUS:DISPLAY 7. IR MODE 7.EXIT 8.EXIT Track dome have two modes,including auto track and manual locked track. th Enter auto track mode by call 88 preset. The users select the object in the field of view,move the object to the middle of the field of view,pressing ‘OPEN’key,the track dome enters manual locked mode, the dome will trace the motion path of this target by itself after that.It will exit manual track mode when there is any manual operation. 1. tracking target Can set to track the target which one of the most Vigorous movement and the first enters the field of view. 2. Track sensitivity Can set sensitivity of auto track, devided into low,medium,high and very high 3. track window It is convenient for users to check the current target,can display or close the track window. 4. cross centre The cross centre is the middle position of screen,can display or close the cross centre. 5. Track alarm When the object enters the field of the view,users can set alarm linkage by menu after starting the track.. Tracking target 1. th Call 95 preset to call-out main menu.Remove the joystick up and down,select ‘TRACK’,enter ‘TRACK’menu by ‘OPEN’oder. MAIN MENU TRACK →1.TRACK TARGET:MOTION 1.SYSTEM > 2.CAMERA > → 2.TRACK SENSE:MIDDLE 3.PAN/TILT > 3.TRACK WINDOW:DISPLAY 4.ALARM > 4.TRACK CROSS:DISPLAY 43 IR PTZ DOME CAMERA →5.TRACK > 5.TRACK ALAM:OFF 6.VIDEO ANALYSIS > 6.TRACK STATUS:DISPLAY 7. IR MODE 7.EXIT 8.EXIT 2. Select ‘TRACK TARGET’,enter ‘TRACK TARGET’ by ‘OPEN’oder,remove joystick or to select ‘FIRST IN’(the first enters the field of view) or ‘MOTION’(the most Vigorous target), Use ‘OPEN’order to save and exit after selecting. TRACK TRACK * 1.TRACK TARGET:FIRST IN * 1.TRACK TARGET:MOTION 2.TRACK SENSE:MIDDLE 3.TRACK WINDOW:DISPLAY 4.TRACK CROSS:DISPLAY 2.TRACK SENSE:MIDDLE 3.TRACK WINDOW:DISPLAY → 4.TRACK CROSS:DISPLAY 5.TRACK ALAM:OFF 5.TRACK ALAM:OFF 6.TRACK STATUS:DISPLAY 6.TRACK STATUS:DISPLAY 7.EXIT 7.EXIT 18. Intelligent analysis(special for track dome) MAIN MENU VIDEO ANALYSIS →1.SCENE NUMBER:001 1.SYSTEM > 2.CAMERA > 2.AREA SET > 3.PAN/TILT > 3.SCENE ALARM 4.ALARM > → 4.SCENE STATUS:DISPLAY 5.TRACK > 5.SAVE CURRENT SCENE →6.VIDEO ANALYSIS > 6.EXIT 7. IR MODE 8.EXIT The dome can analyse video sence to judge if the foreign object bursts in or not.Can select alarm output when the foreign object bursts in(The first alarm output,the second alarm output,two alarm at the same time ) or video image display information’have (or not have) foreign object’.Can be set 3 video analysis sence,corresponding 111th ,112th,113th preset,every sence can set 3 erea,dome will analyse if there have foreign object burst in set er 19. Infrared Mode This function mainly set switch control of illumination concerned with optical zoom of camera module lens. There have three modes: AUTO HI-BRIGHT, AUTO LOW POWER, ALL BRIGHT ON. 1. Call No.95 preset for OSD display. Then move joystick, chose ''IR MODE'' , press ''OPEN''→''IR MODE'', then move joystick up and down to switch over IR mode, chose one mode and press''OPEN'' and 44 IR PTZ DOME CAMERA quit. The status of switch with distant or near IR lamp are as followings: MODE English menu DEZOOMING ZOOMING AUTO HI BRIGHT NEAR LAMP ON, DISTANT LAMP OFF NEAR LAMP ON, DISTANT LAMP ON AUTO LOW POWER NEAR LAMP ON, DISTANT LAMP OFF NEAR LAMP OFF, DISTANT LAMP ON ALL BRIGHT ON NEAR LAMP ON, DISTANT LAMP ON NEAR LAMP ON, DISTANT LAMP ON 20. Switch table Attach table SW1 SETUP SW SETUP control 1 2 3 4 5 6 7 8 AD Machester OFF OFF OFF × × × × × D 2400B ON OFF OFF × × × × × P 2400B OFF ON OFF × × × × × P 4800B ON ON OFF × × × × × P 9600B OFF OFF ON × × × × × D 4800B ON OFF ON × × × × × D 9600B OFF ON ON × × × × × Table 2 SW2 SETUP-P CONTROL CODE(BAUD AVALIBALE SELECT) SW SETUP Dome addres 1 2 3 4 5 1 OFF OFF OFF OFF OFF 2 ON OFF OFF OFF OFF s SW SETUP Dome addres 1 2 3 4 5 17 OFF OFF OFF OFF ON 18 ON OFF OFF OFF ON s 45 IR PTZ DOME CAMERA 3 OFF ON OFF OFF OFF 19 OFF ON OFF OFF ON 4 ON ON OFF OFF OFF 20 ON ON OFF OFF ON 5 OFF OFF ON OFF OFF 21 OFF OFF ON OFF ON 6 ON OFF ON OFF OFF 22 ON OFF ON OFF ON 7 OFF ON ON OFF OFF 23 OFF ON ON OFF ON 8 ON ON ON OFF OFF 24 ON ON ON OFF ON 9 OFF OFF OFF ON OFF 25 OFF OFF OFF ON ON 10 ON OFF OFF ON OFF 26 ON OFF OFF ON ON 11 OFF ON OFF ON OFF 27 OFF ON OFF ON ON 12 ON ON OFF ON OFF 28 ON ON OFF ON ON 13 OFF OFF ON ON OFF 29 OFF OFF ON ON ON 14 ON OFF ON ON OFF 30 ON OFF ON ON ON 15 OFF ON ON ON OFF 31 OFF ON ON ON ON 16 ON ON ON ON OFF 32 ON ON ON ON ON Table 3 SW2 SETUP-D CONTROL CODE 46 IR PTZ DOME CAMERA ADDRESS SW setup Dome 1 – 64 SW setup Dome address 1 2 3 4 5 6 7 8 address 1 2 3 4 5 6 7 1 ON OFF OFF OFF OFF OFF OFF OFF 33 ON OFF OFF OFF OFF ON OFF OFF 2 OFF ON OFF OFF OFF OFF OFF OFF 34 OFF ON OFF OFF OFF ON OFF OFF 3 ON ON OFF OFF OFF OFF OFF OFF 35 ON ON OFF OFF OFF ON OFF OFF 4 OFF OFF ON OFF OFF OFF OFF OFF 36 OFF OFF ON OFF OFF ON OFF OFF 5 ON OFF ON OFF OFF OFF OFF OFF 37 ON OFF ON OFF OFF ON OFF OFF 6 OFF ON ON OFF OFF OFF OFF OFF 38 OFF ON ON OFF OFF ON OFF OFF 7 ON ON ON OFF OFF OFF OFF OFF 39 ON ON ON OFF OFF ON OFF OFF 8 OFF OFF OFF ON OFF OFF OFF OFF 40 OFF OFF OFF ON OFF ON OFF OFF 9 ON OFF OFF ON OFF OFF OFF OFF 41 ON OFF OFF ON OFF ON OFF OFF 10 OFF ON OFF ON OFF OFF OFF OFF 42 OFF ON OFF ON OFF ON OFF OFF 11 ON ON OFF ON OFF OFF OFF OFF 43 ON ON OFF ON OFF ON OFF OFF 12 OFF OFF ON ON OFF OFF OFF OFF 44 OFF OFF ON ON OFF ON OFF OFF 13 ON OFF ON ON OFF OFF OFF OFF 45 ON OFF ON ON OFF ON OFF OFF 14 OFF ON ON ON OFF OFF OFF OFF 46 OFF ON ON ON OFF ON OFF OFF 15 ON ON ON ON OFF OFF OFF OFF 47 ON ON ON ON OFF ON OFF OFF 16 OFF OFF OFF OFF ON OFF OFF OFF 48 OFF OFF OFF OFF ON ON OFF OFF 17 ON OFF OFF OFF ON OFF OFF OFF 49 ON OFF OFF OFF ON ON OFF OFF 18 OFF ON OFF OFF ON OFF OFF OFF 50 OFF ON OFF OFF ON ON OFF OFF 19 ON ON OFF OFF ON OFF OFF OFF 51 ON ON OFF OFF ON ON OFF OFF 20 OFF OFF ON OFF ON OFF OFF OFF 52 OFF OFF ON OFF ON ON OFF OFF 21 ON OFF ON OFF ON OFF OFF OFF 53 ON OFF ON OFF ON ON OFF OFF 22 OFF ON ON OFF ON OFF OFF OFF 54 OFF ON ON OFF ON ON OFF OFF 23 ON ON ON OFF ON OFF OFF OFF 55 ON ON ON OFF ON ON OFF OFF 24 OFF OFF OFF ON ON OFF OFF OFF 56 OFF OFF OFF ON ON ON OFF OFF 25 ON OFF OFF ON ON OFF OFF OFF 57 ON OFF OFF ON ON ON OFF OFF 26 OFF ON OFF ON ON OFF OFF OFF 58 OFF ON OFF ON ON ON OFF OFF 27 ON ON OFF ON ON OFF OFF OFF 59 ON ON OFF ON ON ON OFF OFF 28 OFF OFF ON ON ON OFF OFF OFF 60 OFF OFF ON ON ON ON OFF OFF 29 ON OFF ON ON ON OFF OFF OFF 61 ON OFF ON ON ON ON OFF OFF 30 OFF ON ON ON ON OFF OFF OFF 62 OFF ON ON ON ON ON OFF OFF 31 ON ON ON ON ON OFF OFF OFF 63 ON ON ON ON ON ON OFF OFF 32 OFF OFF OFF OFF OFF ON OFF OFF 64 OFF OFF OFF OFF OFF OFF ON OFF 47 8 IR PTZ DOME CAMERA ADDRESS 65 – 128 SW setup Dome SW setup Dome address 1 2 3 4 5 6 7 8 address 1 2 3 4 5 6 7 65 ON OFF OFF OFF OFF OFF ON OFF 97 ON OFF OFF OFF OFF ON ON OFF 66 OFF ON OFF OFF OFF OFF ON OFF 98 OFF ON OFF OFF OFF ON ON OFF 67 ON ON OFF OFF OFF OFF ON OFF 99 ON ON OFF OFF OFF ON ON OFF 68 OFF OFF ON OFF OFF OFF ON OFF 100 OFF OFF ON OFF OFF ON ON OFF 69 ON OFF ON OFF OFF OFF ON OFF 101 ON OFF ON OFF OFF ON ON OFF 70 OFF ON ON OFF OFF OFF ON OFF 102 OFF ON ON OFF OFF ON ON OFF 71 ON ON ON OFF OFF OFF ON OFF 103 ON ON ON OFF OFF ON ON OFF 72 OFF OFF OFF ON OFF OFF ON OFF 104 OFF OFF OFF ON OFF ON ON OFF 73 ON OFF OFF ON OFF OFF ON OFF 105 ON OFF OFF ON OFF ON ON OFF 74 OFF ON OFF ON OFF OFF ON OFF 106 OFF ON OFF ON OFF ON ON OFF 75 ON ON OFF ON OFF OFF ON OFF 107 ON ON OFF ON OFF ON ON OFF 76 OFF OFF ON ON OFF OFF ON OFF 108 OFF OFF ON ON OFF ON ON OFF 77 ON OFF ON ON OFF OFF ON OFF 109 ON OFF ON ON OFF ON ON OFF 78 OFF ON ON ON OFF OFF ON OFF 110 OFF ON ON ON OFF ON ON OFF 79 ON ON ON ON OFF OFF ON OFF 111 ON ON ON ON OFF ON ON OFF 80 OFF OFF OFF OFF ON OFF ON OFF 112 OFF OFF OFF OFF ON ON ON OFF 81 ON OFF OFF OFF ON OFF ON OFF 113 ON OFF OFF OFF ON ON ON OFF 82 OFF ON OFF OFF ON OFF ON OFF 114 OFF ON OFF OFF ON ON ON OFF 83 ON ON OFF OFF ON OFF ON OFF 115 ON ON OFF OFF ON ON ON OFF 84 OFF OFF ON OFF ON OFF ON OFF 116 OFF OFF ON OFF ON ON ON OFF 85 ON OFF ON OFF ON OFF ON OFF 117 ON OFF ON OFF ON ON ON OFF 86 OFF ON ON OFF ON OFF ON OFF 118 OFF ON ON OFF ON ON ON OFF 87 ON ON ON OFF ON OFF ON OFF 119 ON ON ON OFF ON ON ON OFF 88 OFF OFF OFF ON ON OFF ON OFF 120 OFF OFF OFF ON ON ON ON OFF 89 ON OFF OFF ON ON OFF ON OFF 121 ON OFF OFF ON ON ON ON OFF 90 OFF ON OFF ON ON OFF ON OFF 122 OFF ON OFF ON ON ON ON OFF 91 ON ON OFF ON ON OFF ON OFF 123 ON ON OFF ON ON ON ON OFF 92 OFF OFF ON ON ON OFF ON OFF 124 OFF OFF ON ON ON ON ON OFF 93 ON OFF ON ON ON OFF ON OFF 125 ON OFF ON ON ON ON ON OFF 94 OFF ON ON ON ON OFF ON OFF 126 OFF ON ON ON ON ON ON OFF 95 ON ON ON ON ON OFF ON OFF 127 ON ON ON ON ON ON ON OFF 96 OFF OFF OFF OFF OFF ON ON OFF 128 OFF OFF OFF OFF OFF OFF OFF ON 48 8 IR PTZ DOME CAMERA ADDRESS 129 – 192 SW setup Dome SW setup Dome address address 1 2 3 4 5 6 129 ON OFF OFF OFF OFF OFF 1 2 3 4 5 6 OFF ON 161 ON OFF OFF OFF OFF ON OFF ON 130 OFF ON OFF OFF OFF OFF OFF ON 162 OFF ON OFF OFF OFF ON OFF ON 131 ON ON OFF OFF OFF OFF OFF ON 163 ON ON OFF OFF OFF ON OFF ON 132 OFF OFF ON OFF OFF OFF OFF ON 164 OFF OFF ON OFF OFF ON OFF ON 133 ON OFF ON OFF OFF OFF OFF ON 165 ON OFF ON OFF OFF ON OFF ON 134 OFF ON ON OFF OFF OFF OFF ON 166 OFF ON ON OFF OFF ON OFF ON 135 ON ON ON OFF OFF OFF OFF ON 167 ON ON ON OFF OFF ON OFF ON 136 OFF OFF OFF ON OFF OFF OFF ON 168 OFF OFF OFF ON OFF ON OFF ON 137 ON OFF OFF ON OFF OFF OFF ON 169 ON OFF OFF ON OFF ON OFF ON 138 OFF ON OFF ON OFF OFF OFF ON 170 OFF ON OFF ON OFF ON OFF ON 139 ON ON OFF ON OFF OFF OFF ON 171 ON ON OFF ON OFF ON OFF ON 140 OFF OFF ON ON OFF OFF OFF ON 172 OFF OFF ON ON OFF ON OFF ON 141 ON OFF ON ON OFF OFF OFF ON 173 ON OFF ON ON OFF ON OFF ON 142 OFF ON ON ON OFF OFF OFF ON 174 OFF ON ON ON OFF ON OFF ON 143 ON ON ON ON OFF OFF OFF ON 175 ON ON ON ON OFF ON OFF ON 144 OFF OFF OFF OFF ON OFF OFF ON 176 OFF OFF OFF OFF ON ON OFF ON 145 ON OFF OFF OFF ON OFF OFF ON 177 ON OFF OFF OFF ON ON OFF ON 146 OFF ON OFF OFF ON OFF OFF ON 178 OFF ON OFF OFF ON ON OFF ON 147 ON ON OFF OFF ON OFF OFF ON 179 ON ON OFF OFF ON ON OFF ON 148 OFF OFF ON OFF ON OFF OFF ON 180 OFF OFF ON OFF ON ON OFF ON 149 ON OFF ON OFF ON OFF OFF ON 181 ON OFF ON OFF ON ON OFF ON 150 OFF ON ON OFF ON OFF OFF ON 182 OFF ON ON OFF ON ON OFF ON 151 ON ON ON OFF ON OFF OFF ON 183 ON ON ON OFF ON ON OFF ON 152 OFF OFF OFF ON ON OFF OFF ON 184 OFF OFF OFF ON ON ON OFF ON 153 ON OFF OFF ON ON OFF OFF ON 185 ON OFF OFF ON ON ON OFF ON 154 OFF ON OFF ON ON OFF OFF ON 186 OFF ON OFF ON ON ON OFF ON 155 ON ON OFF ON ON OFF OFF ON 187 ON ON OFF ON ON ON OFF ON 156 OFF OFF ON ON ON OFF OFF ON 188 OFF OFF ON ON ON ON OFF ON 157 ON OFF ON ON ON OFF OFF ON 189 ON OFF ON ON ON ON OFF ON 158 OFF ON ON ON ON OFF OFF ON 190 OFF ON ON ON ON ON OFF ON 159 ON ON ON ON ON OFF OFF ON 191 ON ON ON ON ON ON OFF ON 160 OFF OFF OFF OFF OFF ON OFF ON 192 OFF OFF OFF OFF OFF OFF ON 7 8 49 7 8 ON IR PTZ DOME CAMERA ADDRESS 193 – 254 SW setup Dome SW setup Dome address 1 2 3 4 5 6 7 8 address 1 2 3 4 5 6 7 8 193 ON OFF OFF OFF OFF OFF ON ON 224 OFF OFF OFF OFF OFF ON ON ON 194 OFF ON OFF OFF OFF OFF ON ON 225 ON OFF OFF OFF OFF ON ON ON 195 ON ON OFF OFF OFF OFF ON ON 226 OFF ON OFF OFF OFF ON ON ON 196 OFF OFF ON OFF OFF OFF ON ON 227 ON ON OFF OFF OFF ON ON ON 197 ON OFF ON OFF OFF OFF ON ON 228 OFF OFF ON OFF OFF ON ON ON 198 OFF ON ON OFF OFF OFF ON ON 229 ON OFF ON OFF OFF ON ON ON 199 ON ON ON OFF OFF OFF ON ON 230 OFF ON ON OFF OFF ON ON ON 200 OFF OFF OFF ON OFF OFF ON ON 231 ON ON ON OFF OFF ON ON ON 201 ON OFF OFF ON OFF OFF ON ON 232 OFF OFF OFF ON OFF ON ON ON 202 OFF ON OFF ON OFF OFF ON ON 233 ON OFF OFF ON OFF ON ON ON 203 ON ON OFF ON OFF OFF ON ON 234 OFF ON OFF ON OFF ON ON ON 204 OFF OFF ON ON OFF OFF ON ON 235 ON ON OFF ON OFF ON ON ON 205 ON OFF ON ON OFF OFF ON ON 236 OFF OFF ON ON OFF ON ON ON 206 OFF ON ON ON OFF OFF ON ON 237 ON OFF ON ON OFF ON ON ON 207 ON ON ON ON OFF OFF ON ON 238 OFF ON ON ON OFF ON ON ON 208 OFF OFF OFF OFF ON OFF ON ON 239 ON ON ON ON OFF ON ON ON 209 ON OFF OFF OFF ON OFF ON ON 240 OFF OFF OFF OFF ON ON ON ON 210 OFF ON OFF OFF ON OFF ON ON 241 ON OFF OFF OFF ON ON ON ON 211 ON ON OFF OFF ON OFF ON ON 242 OFF ON OFF OFF ON ON ON ON 212 OFF OFF ON OFF ON OFF ON ON 243 ON ON OFF OFF ON ON ON ON 213 ON OFF ON OFF ON OFF ON ON 244 OFF OFF ON OFF ON ON ON ON 214 OFF ON ON OFF ON OFF ON ON 245 ON OFF ON OFF ON ON ON ON 215 ON ON ON OFF ON OFF ON ON 246 OFF ON ON OFF ON ON ON ON 216 OFF OFF OFF ON ON OFF ON ON 247 ON ON ON OFF ON ON ON ON 217 ON OFF OFF ON ON OFF ON ON 248 OFF OFF OFF ON ON ON ON ON 218 OFF ON OFF ON ON OFF ON ON 249 ON OFF OFF ON ON ON ON ON 219 ON ON OFF ON ON OFF ON ON 250 OFF ON OFF ON ON ON ON ON 220 OFF OFF ON ON ON OFF ON ON 251 ON ON OFF ON ON ON ON ON 221 ON OFF ON ON ON OFF ON ON 252 OFF OFF ON ON ON ON ON ON 222 OFF ON ON ON ON OFF ON ON 253 ON OFF ON ON ON ON ON ON 223 ON ON ON ON ON OFF ON ON 254 OFF ON ON ON ON ON ON ON 50 IR PTZ DOME CAMERA Appendix I: preventing lightening stoke and surging This product could prevent effectively under 1500w P lightening, surge and other pulsing signals from striking it with lightening proof like a discharge lamp and TVS plate. However, on the premise of electric safety, protecting measures is necessary in outside installing according to the real situation: ● Signal transmission line should keep the distance at least 50 meters to high pressure equipments and high pressure cables; ● Outside wiring could choose to put under the eaves; ● Arrange the cables through sealed steel pipes laiding underground in the wide area. Don’t arrange cables overhead; ● Extra big power lightening proof and lightening rod should be set in the instense thunderstorm area or high induction pressure area; ● The design of lightening protection and earthing in outside setting and line paths should intergrate the building’s protection of lightening and meet the requirements of national and industrial standard; ● The system should be electrical bonding. Earthing setting must satisfy double needs of anti-jamming system and electrical safety. Don’t short or mix with strong current net’s null lines. When gounded separately, impedance can’t be more than 4Ω, and earthing lead lines’s sectional area can’ be less than 25 mm 2 Appendix II: Cleansing of transparent cover To make sure the images made by dome are clean, the dome needs regular cleansing. Take care when cleansing. Hold the external ring of cover with hands to avoid touching the cover directly. The acid sweat on fingers coat will corrode the outside coating of cover. Hard articles may scrach it that makes the images vague. Please use dry and soft cloth or other substitutes to wipe inside and outside. If there is much dirt, normal cleanser could be used. Any advanced furniture cleanser could be used to clean the cover. Appendix II: Common knowledge of RS485 1. Basic features of RS485 according to the standard of RS485 industry bus, it is a half duplex bus with 120Ω special impedence. The largest load capacity is 32 effective loads, including main control equipments and controlled equipments. 2. transmission distance of RS485 When using 0.56mm(24AWG) cross wire as communication cables, based on different baud rate, the longest transimission distance theoretical value is as follows: baud rate the longest distance 2400BPS 1800m 4800BPS 1200m 9600BPS 800m When using thin cables, or using this product under strong electromagnetic interference; when there are many devices on bus, the longest transmission distance will be shortened, on the contrary, it will be lengthened. 51 IR PTZ DOME CAMERA 3. The troubles in the real practice during the practical using, users will install it through star connection. Terminal resistance needs be to connect to two devices(pictutr 63) 1# and 15# which are at the farthest place from the line. But as the connection mismatches the using requirement of RS485 industry standard, when the line distance of devices is a little far, it is easy to reflect signal, decline the capacity of anti-jamming and so on, which leads to the decline of the possibility of control the signal, marked by disfluent control of dome and even being out of control. It is suggested that DR-HB16 RS485 distributor produced by our company could be used in this condition. It could effectively transfer star connection to other connections that obey RS485 industry standard so as to avoid troubles and improve communication reliability.(see picture 64) Picture64 4. The solutions of commom malfunctions of RS485 Malfuction possible causes solutions A、host body, dome address and baud rate dome can self-check but not be controlled dome can be controlled but not fluent are different A、make host body, dome address and baud B、wrong connection between +,-poles of rate are the same. RS485 B、correct the wrong connection of +,-poles. C、connection lines get loose C、tighten the connection D、RS485 connection lines are stopped D、change the RS485 A、loose connection of RS485. A、reconnect the RS485 B、one of the RS485 lines is broken B、change the RS485 C、from dome. C、install terminal matched load resistance D、too much dome splices D、install RS485 distributor DR-HB16 52 IR PTZ DOME CAMERA Appendix VI: Simple malfunction debugging malfuntion possible cause 1. 24v solution alternating current doesn’t connect to pinboard’s jack or doesn’t connect well. no action Red LED on and images the power when panel power up come on 2. power or transformer 1. check if 24v AC power connects or not. Make sure jack connects well. 2. Check if power and 24v AC transforemer work well. troubles 1. measure load voltage on dome with doesn’t 1. 24v AC transformer outputs low pressure. multimeter. If the voltage is lowere than 24VAC, it is beyond the dome’s working voltage range. 2. pinboard troubles 2. Please contant the suppliers and change another pinboard. Appendix :technic parameter Ⅶ Power AC24±4V,50Hz Power consumption indoor ball:15W Demoder Build in Electric motor Stepper moter Sync. system Mains hold Preset 256 presets Cruising scan 6 lines Pattern scan 4 lines, each piece can record 5-500 minutes left-right scan 1 line Privacy protection 8 zones Alarm input/output input:6, output:2 Information display Automatic control of focus speed outdoor ball:55W Dome tilt,preset tilt,mode scan tilt,right and left tilt,location scan tilt,lens zoom times,alarm index,time index Self regulate the control speed according to the focus length(when proportion control setting is open) Automatic rotate function automatically rotate 180° when vertical 90° Automatic aclinic scan 360°is available Call highest speed of transferring preset 400°/s The speed of aclinic manual rotation 0.5°—200°/s Aclinic rotation range 360°constant rotate The speed of vertical manual rotation 0.5°—180°/s Pitching range vertical 90° Control ways RS485 Communication baud rate 2400/4800/9600/19200bps Network Interface 10Base-T / 100Base-TX,RJ45(Optional fiber optic interface) Default IP ID 192.0.0.64 53 IR PTZ DOME CAMERA Image Resolutio 704×576 video compression H.264 Network protocol the number of users visit at the same time TCP/IP, HTTP, DHCP,DNS,RTP/RTCP,PPPoE (FTP,SMTP,NTP,SNMP, Can be added) A maximum of 6 Dual-stream support user’s privileges 3 users: administrator, operator and can only visit safe mode Authorized user name and password, and MAC Address Binding Environment temperature indoor ball:-10~+50 54 ,outdoor ball:-40~+60 ℃ ℃