1
Q
U
I
C
K
S
T
A
R
T
INtime 6 Quick Start Guide
October, 2014
TenAsys Corporation
1400 NW Compton Drive, #301
Beaverton, OR 97006 USA
+1 503 748-4720
fax +1 503 748-4730
info@tenasys.com
www.tenasys.com
Copyright © 2005–2014 TenAsys Corporation.
20141020
Q
U
I
C
K
S
T
A
R
T
This document is protected by US and international copyright laws.
TENASYS, INTIME, EVM and IRMX are registered trademarks of the
TenAsys Corporation.
† Other companies, products, and brands mentioned herein may be
trademarks of other owners.
Information regarding products other than those from TenAsys has been
compiled from available manufacturers’ material. TenAsys cannot be
held responsible for inaccuracies in such material.
TenAsys makes no warranty for the correctness or for the use of this
information, and assumes no liability for direct or indirect damages of
any kind arising from the information contained herewith, technical
interpretation or technical explanations, for typographical or printing
errors, or for any subsequent changes in this article.
TenAsys reserves the right to make changes to specifications and
product descriptions at any time, without notice, and without incurring
any liability. Contact your local TenAsys sales office or distributor to
obtain the latest specifications and product descriptions.
Copyright © 2005–2014, TenAsys Corporation, All Rights Reserved
No part of this guide may be copied, duplicated, reprinted, and stored in
a retrieval system by any means, mechanical or electronic, without the
written permission of the copyright owner.
October, 2014 Edition
Copyright © 2005–2014 TenAsys Corporation.
20141020
INtime 6 Quick Start Guide
Contents
Welcome! — Before You Begin ............................................................... 5 Notational Conventions ...................................................................... 6 Requirements ..................................................................................... 7 INtime SDK and INtime for Windows Requirements ...................... 7 INtime Distributed RTOS Target Requirements ............................. 7 SDK Installation ........................................................................................ 8 Locating your License keys ................................................................ 9 INtime Distributed RTOS Target Installation ......................................11 Example #1: The INtime Application Wizard – HelloWorld .............16 Using the INtime Application Wizard ................................................ 16 Stop and start the application from Visual Studio ............................. 20 Introducing the INtime Explorer ........................................................ 22 Debugging HelloWorld with Visual Studio ........................................ 24 Example #2: Working Together – Windows and Real-time.............26 Two processes – one application ..................................................... 26 Creating the Real-Time Process ...................................................... 27 Creating the Windows Process ........................................................ 30 Create the Project and Setup the Environment............................ 30 Creating a Graphical User Interface ............................................ 32 Edit the Code ............................................................................... 34 Running the Complete Solution........................................................ 38 EXAMPLE #3 – Working with multiple INtime Nodes ......................39 Creating the RtSend application....................................................... 39 Edit the code ................................................................................ 40 Running the solution ....................................................................... 41 Adding a second node ..................................................................... 42 INtime for Windows. ..................................................................... 42 INtime Distributed RTOS - Setting up a second Node ................ 44 Copyright © 2005–2014, TenAsys Corporation
page 1 of 64
Modifying RtData application ........................................................... 45 Running the complete solution ......................................................... 45 Example #4: The INscope Performance Analyzer .............................47 How Fast is Deterministic? ............................................................... 47 Fast Does Not Equal Deterministic .................................................. 47 A Multi-threaded Example ................................................................ 48 Trace the Threads With INScope ..................................................... 52 Next Steps ...............................................................................................57 A. Configuring the INtime for Windows Kernel (local Node) ............58 INtime for Windows Node Management ........................................... 58 INtime for Windows Device Manager ............................................... 62 B. INtime for Windows Sample Applications .....................................63 page 2 of 64
Copyright © 2005–2014, TenAsys Corporation
Figures
Figure 1 INtime for Windows configuration:.............................. 6 Figure 2 INtime Distributed RTOS configuration: ...................... 6 Figure 3: Entering License Codes .............................................. 10 Figure 4: Bootloader screen ....................................................... 14 Figure 5: Boot status and tethering ............................................ 14 Figure 6: Creating a new project ................................................ 16 Figure 7: Creating a New INtime Project ................................... 17 Figure 8: Selecting Process Elements ....................................... 17 Figure 9: Specifying Polling Thread Parameters ....................... 18 Figure 10: Wizard Summary Screen .......................................... 18 Figure 11: Files Generated by the wizard .................................. 19 Figure 12: Selecting INtime Project ........................................... 20 Figure 13: Selecting Node from Visual Studio. .......................... 21 Figure 14: HelloWorld Console Window .................................... 22 Figure 15: Configuring INtime Explorer Options ........................ 23 Figure 16: HelloWorld Console Window .................................... 23 Figure 17: Terminating the HelloWorld Process ........................ 24 Figure 18: Setting a Breakpoint.................................................. 25 Figure 19 Basic INtime Solution Architecture ............................ 26 Figure 20: Data-flow ................................................................... 27 Figure 21: Selecting the MFC Application Template ................. 31 Figure 22: MFC Application Type Selections ............................. 31 Figure 23: Specifying Additional Include Directories.................. 32 Figure 24: Dialog Editor in the Toolbox...................................... 33 Figure 25: NTXData Dialog Box ................................................. 33 Figure 26: Accessing the dialog resource screen ...................... 36 Figure 27: Running the Complete Solution ................................ 38 Figure 28: RtData process console output................................. 42 Figure 29: RtSend process console output. ............................... 42 Figure 30: INtime Configuration Panel applet ............................ 43 Figure 31: INtime Node Management Applet............................. 43 Figure 32: NodeA and NodeB are shown as local nodes. ......... 44 Figure 33: Selecting Node within Visual Studio (2008 & 2010) . 46 Figure 34: Comparison of Real-time Systems ........................... 47 Figure 35: Modifying Thread Parameters .................................. 49 Figure 36: Modifying Thread Parameters .................................. 49 Figure 37: MultiThread Project Summary .................................. 50 Figure 38: MultiThread Application Output ................................ 52 Figure 39: INscope Event Trace ................................................ 53 Figure 40: Zoomed Inscope Trace ............................................. 55 Figure 41: Intex View of the Multithread App ............................. 56 Figure 42: INtime Control Panel Applet ..................................... 58 Copyright © 2005–2014, TenAsys Corporation
page 3 of 64
Figure 43: Node Management Kernel Tab................................. 59 Figure 44: Node Management System Wide Tab ...................... 60 Figure 45: Device Configuration Applet ..................................... 62 page 4 of 64
Copyright © 2005–2014, TenAsys Corporation
Welcome! — Before You Begin
Thank you for your interest in our INtime® 6 SDK (Software
Development Kit) supporting the INtime RTOS. The INtime 6 SDK
supports the following usage configurations:
INtime for Windows, where the INtime RTOS runs
simultaneously alongside the Microsoft® Windows® operating
system.
INtime Distributed RTOS, where INtime runs as a stand-alone
RTOS. Configurations run the same binary application and
support multicore implementations with one or more one
instance of the INtime RTOS running on the same platform.
INtime for Windows offers a unique solution for developing embedded
real-time applications for the Microsoft Windows platform. Your real-time
application can run in conjunction with Windows applications or as two
independent applications, running alongside each other.
Both configurations use Microsoft Visual Studio and the same TenAsys
tools to create and debug INtime applications. With INtime for Windows
the INtime SDK typically resides on the same platform as the real-time
application being developed, while in INtime Distributed RTOS, the
INtime applications and the Windows-based SDK run on separate
platforms connected by Ethernet, as shown in the next figures.
Copyright © 2005–2014, TenAsys Corporation
page 5 of 64
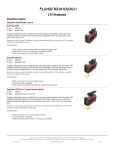
Figure 1 INtime for Windows configuration:
With Windows running the SDK and the INtime OS (local node) on the
Same platform
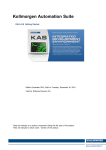
Figure 2 INtime Distributed RTOS configuration:
With Windows running the SDK and the INtime OS (target node)
running on separate platforms
This guide familiarizes you with the INtime development tools. You can
find detailed technical information about the INtime software
architecture, kernel, and APIs in the online help files and user manuals.
When running the examples in the INtime for Windows configuration
setup; Examples 1, 2 and 4 can be performed in the default shared
mode (Windows and INtime sharing) with a single core processor or in
dedicated mode (Windows and INtime running on a dedicated HW
thread1) with a processor that support two HW threads. Examples 3
requires the processor support three (3) or more HW threads.
When running the Example 1, 2 and 3 in the INtime Distributed RTOS
configuration setup, you will need a second PC-Platform to install INtime
on. Example 3 requires the second platform to have a processor
supporting two (2) or more HW threads.
Notational Conventions
This guide uses the following conventions:
All numbers are decimal unless otherwise stated.
1
A HW thread is defined as a single processor core or one side of a single core
Hyper threaded processor. For example, a Dual-Core processor and a Singlecore Hyper- threaded processor supports two (2) HW threads. A Dual core
hyper-threaded processor supports four HW threads.
page 6 of 64
Copyright © 2005–2014, TenAsys Corporation
Bit 0 is the low-order bit. If a bit is set to 1, the associated
description is true unless stated otherwise.
Data structures and syntax strings appear in this font.
Notes indicate important information about the product.
Tips indicate alternate techniques or procedures that you can use to
save time or better understand the product.
Requirements
INtime SDK and INtime for Windows Requirements
The tutorial applications in this guide will be built and executed directly
on your development machine. Your development machine needs to
meet the following minimum requirements:
Pentium class (or better) processor
(See note above listing the kind of processor required to support
each example application.)
16MB of free RAM for INtime and your real-time applications
75MB hard disk space for tools, examples, and documentation
Windows 8, Windows 7, Windows Vista, Windows Server 2012,
Windows Server 2008, Windows Server 2003, or Windows XP with
Service Pack 3 (See the Knowledge Base at
www.tenasys.com/support for updated Windows version support
information). Both 32- and 64-bit versions of Windows are
supported.
Visual Studio (2013, 2012, 2010 and 2008). (See the Knowledge
Base at www.tenasys.com/support for updated Visual Studio
version support information.)
INtime for Windows applications run with Windows 8, Windows 7,
Windows Vista, Windows XP, Windows XP Embedded, Windows 2003
Server, Windows Server 2008, and Windows Server 2012. The
examples in this guide focus on the Windows 7 environments. Check
the installer readme file for any amendments to these requirements.
INtime Distributed RTOS Target Requirements
The target machine needs to be a standard PC with the following
requirements:
Pentium class (or better) processor with APIC enabled.
(See note above listing the kind of processor required to support
each example application.)
At least 64 MB of RAM per hardware thread plus additional for your
applications
Copyright © 2005–2014, TenAsys Corporation
page 7 of 64
An ATA or SATA interface with hard drive with at least 32 MB of
free space available.
For initial installation the machine must be capable of booting from
CD media (an alternate method using a USB “thumb” drive is
supported – see the help file for further details).
A keyboard is required for installation; both PS/2 and USB types
are supported.
A supported network card is required for connection to the
Windows development system. (See the Knowledge Base at
www.tenasys.com/support for updated list of supported network
cards.)
SDK Installation
The following describes how to install the INtime development tools and
kernel on your development platform.
Before you begin
Make sure that your development platform meets the requirements
listed in the Platform Requirements section above.
Install Visual Studio
Note: If you install Visual Studio after installing INtime, use
the INtime Configuration Manager to add the INtime
development tools to Visual Studio.
Make sure you are logged on with Administrator privileges.
If you plan to install a network-licensed product, get the address or
name of the license server. Contact your company’s IT personnel
for this information.
Insert your USB license key, if your product includes one.
Install the software
Insert the INtime CD-ROM. A welcome dialog appears.
If the welcome dialog does not appear, double-click readme.htm,
located in the root directory of the INtime CD-ROM. The file appears in
your default browser. Click the “SDK Installation” link at the bottom of
the page. The installation starts.
The installation procedure is similar to that of most standard Windows
applications. You are prompted to accept the INtime software license
agreement, and to supply one or more registration keys to complete the
installation procedure.
Files are installed in the following locations:
page 8 of 64
Copyright © 2005–2014, TenAsys Corporation
Files
Location
INtime development
tools and sample files
%ProgramFiles%\INtime (default)¹
Sample projects
My Documents\INtime\Projects (for the
user who installed INtime).
Configuration files
%AllUsersProfile%\Application
Data\TenAsys\INtime²
¹
Typically C:\Program Files\INtime. Make note of this directory so
you can locate it again if you wish to inspect header files and other
INtime system files.
²
On Windows versions after Windows XP the path is
%AllUsersProfile%\TenAsys\INtime.
Two basic install options are provided:
Development Tools Only
This option installs only the SDK; it does not install INtime for
Windows runtime software. Select this option to set up a
development system for use with an INtime Distributed RTOS
target. The INtime Distributed RTOS components not are installed.
Development Tools and Local nodes.
This option installs the SDK and the components required to
configure and run local INtime node. Select this option to develop
applications for INtime for Windows.
You can also select this option to develop INtime Distributed
RTOS applications. You will, however, have to ensure that you
select the target node to develop and run the application on target
system.
Locating your License keys
Depending on the product you purchased, the installation program may
prompt you for a combined development license code (CMBL). You will
find this license code on the license card that came with your software.
Note: If you cannot locate your license card or license key please
contact TenAsys directly. Contact information is available at
www.tenasys.com.
Copyright © 2005–2014, TenAsys Corporation
page 9 of 64
Figure 3: Entering License Codes
If you are installing a network-licensed product, the installation program
prompts you to enter the address or name of the license server. Contact
your company’s IT personnel or your INtime site coordinator for the
license server information you will need to complete this licensing step.
After installation completes the installation program prompts you to
reboot the system. If you have a hardware key, insert it before
rebooting. After the system reboots, you can configure the INtime
runtime environment and services. For the purposes of this document
the default configuration will suffice.
page 10 of 64
Copyright © 2005–2014, TenAsys Corporation
INtime Distributed RTOS Target Installation
The steps below describe the INtime Distributed RTOS target
installation process. This description assumes that you are booting from
the SDK CD-ROM media. See the online documentation for an alternate
method for booting from a USB Flash drive.
IMPORTANT: Once the target system installation is complete, the
target system checks for the appropriate license to run. You must do
one of the following:
For development: Connect to your SDK system and run the
tethering server application:
\Program Files\INtime\bin\tetherserver.exe.
The tethering server application allows a target system loaded
with INtime to run during development.
For deployment: Load and activate run-time license on the target
system. For details, see the User Manual.
On boot, an automatic installation script runs that prompts you to
respond to a number of configuration questions.
Note: At each step, the script prompts you to continue. If you choose
not to continue, the previous step generally repeats.
Configuration questions include:
Prompt
Description
Keyboard
selection
Select a keyboard type from the menu by entering its
number, and then press Enter.
Disk selection
A list of disk devices with drive names appears. Select
the drive where you plan to install INtime.
Copyright © 2005–2014, TenAsys Corporation
page 11 of 64
Prompt
Description
Partitioning
the disk
Note: The following installation instructions assume you
have an empty hard disk on which to install the INtime
RTOS. If your disk is already partitioned, you must either
delete your existing partition in step 4 before creating a
new partition, or you must create a second partition and
activate that partition for booting.
1.
Create a bootable partition on the disk:
A.
From the initial menu, select option 2 to modfiy
the partition table and then option 2 to create a
partition.
B.
Type 1 to create partition 1. Choose option 2 to
create a FAT32 partition.
C.
Enter the partition limits. Enter cylinder 0 for
the start of the partition, then reading the
information above the menu, select an ending
cylinder number to create a partition of at least
100 Mbytes.
D.
Press Enter to return to the original menu
E.
Select option 3 to activate (make bootable)
your partition and select your partition number
(number 1 in the above example)
F.
Press Enter once more to return to the initial
menu then Enter again to exit the utility,
following the prompts to save your new
partition table.
2.
Format the partition
Type 'y' to start the format utility then enter
'yes' to start the format operation.
3.
Install the files
Type 'y' to unpack the INtime software files
into your partition.
Set the default
time zone
If the default does not apply, follow the prompts to select
your time zone.
Set time and
date
Adjusts the PC real-time clock (battery clock),
depending on whether you want time kept in UTC or
your local time zone.
Most PCs keep their clock in local time, but you can
adjust the battery clock to keep time in UTC (Universal
Coordinated Time, or GMT).
page 12 of 64
Copyright © 2005–2014, TenAsys Corporation
Prompt
Description
Network
configuration
Interfaces detected by the installer appear. Choose
the default system interface, used to connect to your
development system.
DHCP. Enter ‘y’ if you wish your network address to
be assigned by your local DHCP server
IP Address (if DHCP not selected). Enter an IPv4
address appropriate for your local network.
Netmask. Enter an appropriate netmask for your
local network.
Gateway. May be left blank, otherwise the address
of the forwarding gateway for your local subnet.
Type hostname.Should be a unique name
recognizable among the devices on your network.
Host name may contain only the ASCII letters 'a'
through 'z' (in a case-insensitive manner), the digits
'0' through '9', and the characters ('-',’_’).
Type Domainname. May be left blank, or choose
your local internet domain name. For
example,mydomain.com. Domain name has the
same character restrictions as hostname. Use '.' to
separate subdomain names.
SDK
Configuration
Enter the IP address or domain name for your
development system. This is used to connect your target
to the development system during development to grant
a license to the target. This connection is called
"tethering" and is described in the licensing section of
the User Manual.
Set
Administrator
password
This password is used to gain access to the web-based
configuration utility on the target. You can enter a blank
password if desired. If you enter a non-blank password
you are prompted to re-enter it for confirmation
purposes.
Reboot the
system
Remove the installation media and allow the system to
reboot
After rebooting, the INtime RTOS load process appears, as shown
below.
Copyright © 2005–2014, TenAsys Corporation
page 13 of 64
Figure 4: Bootloader screen
When complete, the INtime RTOS starts and searches for the tether
server at the IP address set up during installation. In the example below,
the tether server address was set to IP address 172.16.10.5 and shows
“System now TETHERED”.
Figure 5: Boot status and tethering
Another way to verify that the INtime Distributed RTOS system is up is
to check whether its web-server responds by opening a browser and
entering its IP address 172.16.10.63 (displayed in the screen above
“dhclient: bound to 172.16.10.63 – renewal in 691200 seconds.”)
When the following screen appears, click “INtime Configuration”. A login
screen appears.
page 14 of 64
Copyright © 2005–2014, TenAsys Corporation
Copyright © 2005–2014, TenAsys Corporation
page 15 of 64
Example #1: The INtime Application Wizard – HelloWorld
This exercise introduces the INtime Application Wizard, which you use
to create a simple real-time process. The Wizard adds template code for
elements to a new project, such as semaphores, threads, shared
memory allocation, interrupt handling, and client threads. The Wizard
creates the foundation for the HelloWorld example project.
In the HelloWorld project you will create a thread that executes in an
infinite loop. The thread will sleep approximately 1000 milliseconds and
print the phrase “HelloWorld” ten times in an INtime console window,
per each loop iteration.
Note: For the sake of brevity, only screenshots of significant
value are shown within the tutorials of this guide.
Using the INtime Application Wizard
1)
2)
3)
Create a directory on your development machine called INtimeApps
(suggested to store the examples from this Guide).
Start Visual Studio. (Select C++ environment )
Select File|New|Project to create a new Visual Studio project.
Figure 6: Creating a new project
4)
Under Installed Templates:
a. Select INtime Projects.
b. Enter Hello World as the project name
c. Set the location (path) to the INtimeApps directory
that you create above.
d. Click Application Wizard. The wizard dialog appears.
page 16 of 64
Copyright © 2005–2014, TenAsys Corporation
Figure 7: Creating a New INtime Project
5)
6)
Select A full-featured application and leave the C++ box
unchecked.
Note: This tutorial does not use the INtime wizard’s Hello World
application because the features of this sample project will be more
interesting.
Click OK to continue.
The Add Elements dialog appears. This is where you add elements
to your real-time process, such as mailboxes, semaphores, and
threads. You can create these elements manually, but, using the
INtime Wizard saves time and minimizes errors.
Figure 8: Selecting Process Elements
Copyright © 2005–2014, TenAsys Corporation
page 17 of 64
7)
Select Thread which operates at a regular interval from the list of
real-time process elements. The element detail dialog appears.
Figure 9: Specifying Polling Thread Parameters
8)
Keep the default settings for the polling thread, so the thread will
wake up every 1000 milliseconds. Click OK to return to the Add
Elements dialog.
Highlight -global- in the elements list on the right of the dialog
and click the Edit Element button. In the dialog box that appears,
you can modify real-time process parameters. The default
parameters are fine for this example.
10) Click OK and then the Finish button. The final wizard summary
screen appears.
9)
Figure 10: Wizard Summary Screen
11) Click the OK button . The wizard generates project files.
The Visual Studio solutions explorer displays the following .C files
generated by the wizard:
page 18 of 64
Copyright © 2005–2014, TenAsys Corporation
HelloWorld.c: the main() function which contains initialization
and cleanup code. The file name is derived from the project
name.
Pollthread1.c: the polling thread code generated by the add
real-time elements section of the wizard.
Util.c: contains general-purpose utility routines.
Figure 11: Files Generated by the wizard
12) Edit Pollthread1.c :
a. Open Pollthread1.c.
b.
Add an integer named ‘x’ at the start of the polling thread.
c.
Add a for loop and printf() statements after the TODO
comment. The resulting code should look like the following
(additions are shown in bold):
void
PollThread1(void)
{
int x;
`
#ifdef _DEBUG
printf("PollThread1 started\n");
#endif
while (1)
{
RtSleep(1000);
#ifdef _DEBUG
printf("PollThread1 waking up\n");
#endif
// TODO: do what has to be done every 1000
milliseconds
// Print HelloWorld 10 times
for(x=0; x<10; x++)
printf("HelloWorld!\n");
}
}
Make sure the build type is set to Debug (go to the Build|Configuration
Manager menu, or select on the menu bar. and build the solution
(Build|Build Solution). The HelloWorld program compiles and links.
Copyright © 2005–2014, TenAsys Corporation
page 19 of 64
Stop and start the application from Visual Studio
1)
2)
INtime for Windows:
Start the NodeA application:
a. Start the Node by clicking the hidden icon in the Windows
Toolbar.
b. Click the INtime (e icon).
c. Click on Start NodeA.
INtime Distributed RTOS:
Make sure that the target is booted and tethered.
Select the target node in INtime Properties:
a. In Visual Studio 2008 & 2010, select the INtime project icon in
the Solution Explorer window (as shown in Figure below) and
right-click it.
b. Select Properties from the window.
Figure 12: Selecting INtime Project
page 20 of 64
Copyright © 2005–2014, TenAsys Corporation
Figure 13: Selecting Node from Visual Studio.
3)
4)
Select the node on which you wish to run your program.
The figure above shows “NodeA” running on INTIMEDEMO
system, the system on which the Windows and INtime SDK is
running (also known as a local Node). This represents an INtime for
Windows configuration setup.
“NodeA” running on Target_System repesents an INtime
Distributed RTOS configuration setup.
For this tutorial, select the local “NodeA”.
To run the application with Debug, do one of the following:
Select Debug|Start Debugging
Press F5
Click the green arrow
on the tool bar.
An INtime console window appears and the message HelloWorld!
appears ten times each second inside the console window.
Copyright © 2005–2014, TenAsys Corporation
page 21 of 64
Figure 14: HelloWorld Console Window
5)
To stop the application, click the Stop icon (square) on the Toolbar
or press Shift-F5.
Introducing the INtime Explorer
In this Example, the INtime Explorer (aka INtex) will load and run the
just-built HelloWorld application. INtex displays the real-time objects
present on an INtime node (an INtime real-time kernel).
1) Start the INtime kernel, if it is not already running, from the INtime
Status Monitor in the Windows system tray, select NodeA|Start
NodeA. Note that NodeA is the default name of the INtime kernel,
you can create other nodes with different names.
2) Start INtime Explorer using its shortcut in the INtime program
group.
3) Select your node from the dialog box, and click the OK button.
4) Turn on the INtex automatic refresh:
This feature is useful when debugging a local INtime node
c. Select View|Options… on the INtex menu
d. Select the Refresh tab.
e. Check the Enable refresh every box and set the interval for two
seconds
f. Click OK.
page 22 of 64
Copyright © 2005–2014, TenAsys Corporation
Figure 15: Configuring INtime Explorer Options
5)
Load and run HelloWorld using one of these methods:
6)
7)
Click the second button on the INtex toolbar
Select File|Load RT app.
Navigate to the debug folder in your HelloWorld project directory
and select the real-time executable file HelloWorld.rta.
Click the Open button to load and start the real-time process on the
INtime kernel.
INtime for Windows: A console window and the message
HelloWorld! appears ten times each second inside the console
window.
Figure 16: HelloWorld Console Window
INtime Distributed RTOS: the output appears on the target system
console.
Copyright © 2005–2014, TenAsys Corporation
page 23 of 64
Terminate the HelloWorld process by doing the following:
1) Go to the INtime Explorer main window.
2) Find the HelloWorld real-time process in the left window of INtime
Explorer (each INtime icon represents one real-time process).
3) Click the line to select the HelloWorld process.
4) Click the red ‘X’ button in the toolbar to delete the process
Figure 17: Terminating the HelloWorld Process
Answering Yes to the deletion warning pop-up terminates the real-time
process. The HelloWorld process icon disappears from the INtime
Explorer process list. Notice that the HelloWorld console window
remains on your desktop, but the console window’s title bar displays
Finished.
Debugging HelloWorld with Visual Studio
With INtime, you can debug real-time processes directly from within
Visual Studio (from Visual Studio 2008 onwards). Using the just-created
HelloWorld project, you can step through the code and perform basic
debugging tasks. (Note: If you are continuing directly from the previous
section, steps 1 to 4 are not necessary.)
1) If the INtime kernel is not already running, start it using INtime
Status Monitor|NodeA|Start NodeA. (in the Windows Toolbar)
2) Start the Visual Studio development environment.
3) Open the HelloWorld project.
4) Open Pollthread.c within the HelloWorld solution.
5)
Set a breakpoint on the for loop, using one of these methods:
Double-click the vertical bar to the left of the source window.
Place the cursor on the line and press the F9 key.
page 24 of 64
Copyright © 2005–2014, TenAsys Corporation
Figure 18: Setting a Breakpoint
6)
Start the debugger using one of these methods:
Press the F5 key.
Click the Start button on the Visual Studio tool bar.
The HelloWorld.RTA process launches.
Note: If you are not running the default configuration, you may
need to select the target INtime node in the INtime project settings.
The HelloWorld process runs to the breakpoint. Following the
break, you can step through the code and watch variables change
(e.g., ‘x’) as you step through the loop. Debugging an INtime realtime thread in this way is virtually identical to debugging a Windows
thread.
Copyright © 2005–2014, TenAsys Corporation
page 25 of 64
Example #2: Working Together – Windows and Real-time
The typical INtime for Windows solution consists of these executables:
A standard Windows process that provides access to the Windows
user interface, database functions, and other Windows-specific
functions.
A real-time INtime process containing time-critical threads.
The INtime NTX library manages communication between the two parts.
This example uses INtime data mailbox objects to demonstrate how a
simple Windows MFC dialog process can exchange data with real-time
threads running on the INtime kernel.
Two processes – one application
Three data mailboxes, MY_MBOX_1, MY_MBOX_2, and a third
mailbox, MBOX_Signal, that will be used to send data between two
processes: NTXData.exe (a Windows process) and RTData.rta (a realtime process) and to signal between two real-time threads. Together
these two processes comprise a single INtime software application.
Figure 19 Basic INtime Solution Architecture
Application
INtime real-time processes
Real-time
C library
Windows
process
Real-time
.
application
library
NTX
Libraries
Windows executive
Windows
kernel
Transport
Driver
Transport
mechanisn
Real-time
kernel
This data mailbox example is only one possible solution for sharing data
between an INtime real-time application and a Windows application;
other solutions might incorporate shared memory or exchanging
semaphores between Windows processes and real-time processes.
Tip: To learn more, locate the topic “INtime System
Description” in the INtime Help.
page 26 of 64
Copyright © 2005–2014, TenAsys Corporation
Creating the Real-Time Process
First we will create RTData.rta, the real-time process launched by
NTXData.exe. The real-time process sets up the mailboxes and waits
for the Windows process to send a data message through the first
mailbox. After a message is received, the real-time process sends data
back to the Windows process using the second mailbox. The third
mailbox is used for internal communication between real-time threads
within the real-time process.
Figure 20: Data-flow
1)
Open Visual Studio, create a real-time project called RTData, and
place it in the INtimeApps directory you created for the HelloWorld
example.
Note: It is important to name this project “RTData,” exactly as
shown above. The name you specify is used as a real-time
process object identifier and is referenced in later code. INtime
object names are case-sensitive.
2)
3)
4)
5)
6)
7)
8)
9)
Choose A full-featured application from the INtime Application
Wizard and click OK (leave C++ unchecked for this example).
Add a Data mailbox element by selecting Mailbox or Semaphore
Thread from the list of available elements. (Set the Type of object
this thread waits at to Data mailbox in the options dialog.)
Type MY_MBOX_1 for the Catalog the object with this name field.
Click OK to return to the elements setup dialog.
Repeat the preceding three steps to add a second data mailbox,
but this time name it MY_MBOX_2.
Click OK to return to the elements setup dialog.
From the elements setup dialog add a Client Thread (last element
in the list).
Check the Send to data mailbox item (upper left),leave all other
items unchecked, then click OK to return to the elements setup
dialog.
Copyright © 2005–2014, TenAsys Corporation
page 27 of 64
10) Click Finish followed by OK. The wizard automatically generates
real-time code templates.
The code generated by the above steps is only a starting point.
Modifications are required to turn this project into a running program.
Data mailbox MY_MBOX_1 receives messages from the Windows
process, and data mailbox MY_MBOX_2 sends messages to the
Windows process.
The client thread in ClientThread1.c sends messages to the Windows
process via MY_MBOX_2. The code in MY_MBOX_2.c is only used to
create that data mailbox. In addition, we will manually add a third data
mailbox for inter-thread communication.
Note: This file and function structure is not necessarily the
most efficient or elegant solution; it is being used to quickly
demonstrate the INtime architecture and the use of INtime
wizards to generate template code.
Make the modifications shown below in bold to RTData.c. This file
contains the real-time process’ main() function. These modifications add
a third data mailbox to coordinate receiving data from MY_MBOX_1 and
sending data via MY_MBOX_2. The last lines added take control of the
region object and release that control after thread initialization is
complete.
Tip: Open the electronic (PDF) version of this Guide and use
the Adobe Acrobat “Text Tool” to copy and paste these code
fragments directly from the documentation into your Visual
Studio project.
Changes to RTData.c
// global variables
RTHANDLE
hRootProcess;
DWORD
dwKtickInUsecs;
RTHANDLE
hMBOX_Signal;
…intervening lines removed for brevity…
// create mailbox and semaphore threads
hMBOX_Signal = CreateRtMailbox(DATA_MAILBOX | FIFO_QUEUING);
if (hMBOX_Signal == BAD_RTHANDLE)
Fail("Cannot create signaling data mailbox");
Do not forget to include a global declaration for the region object,
hMBOX_Signal, at the end of RTData.h.
Changes to RTData.h
extern RTHANDLE
extern DWORD
extern RTHANDLE
page 28 of 64
hRootProcess;
dwKtickInUsecs;
hMBOX_Signal;
Copyright © 2005–2014, TenAsys Corporation
Open MY_MBOX_1.c. The Wizard generated code to create, initialize,
and retrieve data from the mailbox. We are adding code to print
received data to a console window and signal to ClientThread1 that a
reply message can be sent.
Changes to MY_MBOX_1.c
// TODO: operate on byMmessage (and dwActual)
//Print the message received from the mail box
printf("This is the message: %s\n", byMessage);
//Indicate that the message was received
SendRtData(hMBOX_Signal, "go", 3);
}
}
Next, open MY_MBOX_2.c and remove the lines in the while loop that
wait for data to be received from the data mailbox; in the code fragment
below they are commented out. In this example we use only this thread
to initialize the data mailbox.
The Windows process receives from this data mailbox and the real-time
process sends through this data mailbox. Add a line at the end of the
while loop to suspend the thread.
Changes to MY_MBOX_2.c
//
//
//
wActual = ReceiveRtData(hMY_MBOX_2, byMessage, WAIT_FOREVER);
if (wActual == 0)
Fail("Receive from data mailbox MY_MBOX_2 failed");
// TODO: operate on byMmessage (and dwActual)
SuspendRtThread(GetRtThreadHandles(THIS_THREAD));
Finally, open ClientThread1.c and add the retMessage[] array that will
build return messages. Remove the lines used to look up the process
handle, since the data mailbox we will reference in this thread was
created in this process. And, modify the parameters accordingly in the
line that gets the handle to the MY_MBOX_2 data mailbox.
Changes to ClientThread1.c
void ClientThread1(void)
{
RTHANDLE
hProcess;
RTHANDLE
hDmbx;
char
retMessage[128];
int
x = 0;
int
y;
// TODO: adjust process and mailbox name
// TODO: remove the next lines if the data mailbox
// was created in this process
//
hProcess = LookupRtHandle(hRootProcess, "DMBX_OWNER",
WAIT_FOREVER);
//
if (hProcess == BAD_RTHANDLE)
//
Fail("Cannot find data mailbox process");
//
// TODO: replace hProcess by NULL_RTHANDLE
// if the data mailbox was created in this process
hDmbx = LookupRtHandle(hProcess, "DMBX_NAME", WAIT_FOREVER);
Copyright © 2005–2014, TenAsys Corporation
page 29 of 64
hDmbx = LookupRtHandle(NULL_RTHANDLE, "MY_MBOX_2",
WAIT_FOREVER);
if (hDmbx == BAD_RTHANDLE)
Fail("Cannot find data mailbox");
Finally, add code in the while loop to wait for the signal indicating that
we should send a message to the Windows process. We will assemble
the message sent by including an incremented count value so each
response message is unique.
//
while (1)
{
// TODO: put client code that must be repeated here
// the RtSleep call is just an example
RtSleep(1000);
ReceiveRtData(hMBOX_Signal, retMessage, WAIT_FOREVER);
//
if (!SendRtData(hDmbx, "test", 5))
y = sprintf(retMessage, "%s %i", "Msg rcvd: ", x++);
if (!SendRtData(hDmbx, retMessage, ++y))
Fail("Cannot send to data mailbox");
}
We are ready to build the application. Choose Build|Build Solution
from the Visual Studio menu to compile and link. Check the Debug
folder in your RTData project directory and you should find an
RTData.rta file, among others. This is the real-time process’ executable
(equivalent to a Windows EXE file). Ignore any warnings regarding
unreferenced local variables; these are vestiges of code deleted in the
edits above.
Creating the Windows Process
When we create the Windows part of our application, we need to setup
the project environment so it includes NTX support. Creating the
Windows application takes a few steps.
Create the Project and Setup the Environment
Note: These instructions are specific to Visual Studio 2010, but
should also work for 2008.
1)
2)
3)
4)
Start Visual Studio.
From the menu, select File|New|Project.
Within Visual C++ Projects open the MFC folder and select the
MFC Application template.
Specify NTXData as the project name, and save the project to your
INtimeApps folder.
page 30 of 64
Copyright © 2005–2014, TenAsys Corporation
Figure 21: Selecting the MFC Application Template
5)
6)
In the MFC Application Wizard dialog box, select Application Type
(on the left side of the dialog box).
Within the Application Type options, select Dialog based under
Application type and Use MFC in a static library under Use of MFC.
Ensure that “Use Unicode libraries” is not selected (If you wish to
use Unicode libraries you should not use the _T() function when
passing text into functions requiring LPSTR)
Figure 22: MFC Application Type Selections
7) Click Finish.The Wizard generates template code.
Before proceeding with the MFC code, you must modify the project
properties to include the NTX library and header files.
Note: These instructions are specific to Visual Studio 2010, but
should also work for 2008 and 2005.
1)
From the Visual Studio menu select Project|NTXData
Properties…(right click NTXData and select Properties)
Copyright © 2005–2014, TenAsys Corporation
page 31 of 64
2)
3)
On the property pages dialog choose All Configurations in the
Configuration pull down.
In the C/C++ category of the property list, select General and type
$(INTIME)nt\include in the Additional Include Directories field.
Keep “Inherit from parent….” checked.
Figure 23: Specifying Additional Include Directories
4)
5)
6)
Similarly, in the General section of the Linker category type
$(INTIME)nt\lib in the Additional Library Directories field.
Under the Input section of the Linker category type ntx.lib in the
Additional Dependencies field.
Click OK to save changes and close the property pages dialog.
Creating a Graphical User Interface
The following steps create the GUI for the Windows process.
1) Remove the TODO: Place dialog controls here test object.
2) Select View|Toolbox or type Ctrl-Alt-X. The Dialog Editor appears.
page 32 of 64
Copyright © 2005–2014, TenAsys Corporation
Figure 24: Dialog Editor in the Toolbox
3)
Add two Edit Control objects, two Static Text objects, and one
Button object. The figure below shows a layout for the controls in
the NTXData dialog box.
Figure 25: NTXData Dialog Box
4)
Modify the properties of each control as follows. Right click each
element to access Properties.
IDC_Button1
ID
IDC_txDATA
Caption
Send Data
Default Button
IDC_Edit1
ID
IDC_DATA
True
IDC_Edit2
ID
IDC_rxDATA
Read Only
IDC_Static2
True
IDC_Static3
ID
IDC_STDATA
ID
Caption
Data to Send
Caption
IDC_STRM
Reply Message
Leave the OK and Cancel buttons as part of the dialog box. You can
use them to close the NTXData application.
5) Save and build the solution, Build|Build Solution, to make sure
that it compiles without errors.
Copyright © 2005–2014, TenAsys Corporation
page 33 of 64
Edit the Code
These steps add code to start the RTData.rta process when
NTXData.exe starts, using the INtime NTX API.
Changes to NTXDataDlg.h
1)
Open the NTXDataDlg.h header file.
2)
Add a #include "ntx.h" line at the top of the file.
3)
Declarations for the real-time handles must be marked as
protected. In the protected section of the class definition, add
declarations for the handles needed to locate the RTData process
and access the data mailboxes.
// NTXDataDlg.h : header file
//
#include "ntx.h"
#pragma once
…intervening lines removed for brevity…
// Implementation
protected:
HICON m_hIcon;
//The handles to the root processes, RTData, and mailboxes
NTXHANDLE
m_RootProcess;
NTXHANDLE
m_TestNTXProcess;
NTXHANDLE
m_RtMailbox_1, m_RtMailbox_2;
// Generated message map functions
virtual BOOL OnInitDialog();
afx_msg void OnSysCommand(UINT nID, LPARAM lParam);
afx_msg void OnPaint();
afx_msg HCURSOR OnQueryDragIcon();
DECLARE_MESSAGE_MAP()};
Changes to NTXDataDlg.ccp
4)
Open NTXDataDlg.cpp.
When NTXData.exe starts, it must load the RTData.rta application.
Add the following initialization code to load and start the
RTAData.rta application in CNTXDataDlg::OnInitDialog.
BOOL CNTXDataDlg::OnInitDialog()
{
NTXHANDLE
hNtx, hRemoteApp;
CString
tmp;
…intervening lines removed for brevity…
// TODO: Add extra initialization here
//Launch RTA Application
//First set the location of the node
//Typically you would want to use a browser
page 34 of 64
Copyright © 2005–2014, TenAsys Corporation
//to select from the available nodes
//For this example we will hard code the node to Local
hNtx = ntxGetLocationByName("Local");
//check to see that the node is there
if( ntxGetRtStatus( hNtx ) != E_OK ) {
MessageBoxEx(NULL, _T( "RT Machine not present" ),
_T( "NTXData"),
MB_ICONERROR | MB_OKCANCEL, LANG_ENGLISH );
exit(0);
}
//Now launch the RTData.rta application
hRemoteApp = ntxCreateRtProcess(
hNtx,_T("C:\\INtimeApps\\RTData\\Debug\\RTData.rta"),
NULL, NULL, NTX_PROC_SHOW_PROGRESS);
if (hRemoteApp == NTX_BAD_NTXHANDLE) {
tmp = "Cannot load file";
MessageBox(tmp);
EndWaitCursor();
exit(0);
}
return TRUE;
// return TRUE unless you set the focus to
a control
}
Note: If RTData.rta is located some place other than
“C:\INtimeApps\RTData\Debug\” , make the appropriate
changes to your code (see the directory name used in the code
above).
The last change necessary to complete the application is in the code
behind the Send Data button. This code consists of a sequence of NTX
API calls to retrieve handles for the real-time root process, the RTData
process, and the data mailboxes, MY_MBOX_1 and MY_MBOX_2. The
member variables defined in the NTXDataDlg.h header file are used
here to store those handles. Once we have a handle to the data
mailboxes, we can send the text typed into the IDC_DATA Edit Control
to the MY_MBOX_1 data mailbox using ntxSendRtData(). The last part
of the function waits for a return message from RTData from the
Copyright © 2005–2014, TenAsys Corporation
page 35 of 64
MY_MBOX_2 data mailbox using ntxReceiveRtData(), and displays the
message returned in the IDC_rxDATA Edit Control.
1) In the NTXData dialog resource, double-click the Send Data button.
This will create the empty function into which we can add the code.
(Get to the dialog resource by double-clicking NTXData.rc2 and a
Window appears. Expand NTXData.rc and double-click
IDD_NTXDATA_DIALOG.)
Figure 26: Accessing the dialog resource screen
2)
Go back to NTXDataDLg.cpp by double clicking it and insert the
following code inside the empty CNTXDataDlg::OnBnClickedtxdata()
function and build the solution after you finish editing the code.
Tip: Open the electronic (PDF) version of this guide and use
the Adobe Acrobat “Text Tool” to copy and paste these code
fragments directly from the documentation into your Visual
Studio project.
void CNTXDataDlg::OnBnClickedtxdata()
{
char
rt_my_mbx_1[] = "MY_MBOX_1";
char
rt_my_mbx_2[] = "MY_MBOX_2";
char
rt_TestNTXData_process[] = "RTData";
NTXHANDLE
hNtx;
char
send_buf[128];
char
recv_buf[128];
int
recv_buf_size;
//Get a handle to the local INtime node
hNtx = ntxGetLocationByName("Local");
//check to see that the INtime kernel is available
if( ntxGetRtStatus( hNtx ) != E_OK ) {
MessageBoxEx(NULL,
_T( "RT Machine not present" ),
_T( "NTXData"),
MB_ICONERROR | MB_OKCANCEL, LANG_ENGLISH );
exit(0);
page 36 of 64
Copyright © 2005–2014, TenAsys Corporation
}
//Get root process handle, needed to get RTData process handle
if( (m_RootProcess = ntxGetRootRtProcess(hNtx))
== NTX_BAD_NTXHANDLE ) {
MessageBoxEx( NULL,
_T( "Could not find INtime root process" ),
_T( "NTXData" ),
MB_ICONERROR | MB_OKCANCEL, LANG_ENGLISH );
exit(0);
}
//Get RTData process handle
if ( (m_TestNTXProcess = ntxLookupNtxhandle(m_RootProcess,
rt_TestNTXData_process, 0xffff)) == NTX_BAD_NTXHANDLE) {
MessageBoxEx(NULL,
_T( "Could not find RTData process" ),
_T("NTXData"),
MB_ICONERROR | MB_OKCANCEL, LANG_ENGLISH);
exit(0);
}
//Now get a handle for each mailbox
if ( ((m_RtMailbox_1 = ntxLookupNtxhandle(m_TestNTXProcess,
rt_my_mbx_1, 0xffff)) == NTX_BAD_NTXHANDLE)
|| ((m_RtMailbox_2 = ntxLookupNtxhandle(m_TestNTXProcess,
rt_my_mbx_2, 0xffff)) == NTX_BAD_NTXHANDLE) ) {
MessageBoxEx(NULL,
_T( "Could not find data mailboxes" ),
_T("NTXData"),
MB_ICONERROR | MB_OKCANCEL, LANG_ENGLISH);
exit(0);
}
//Get the user information typed in IDC_DATA
//and send it to mailbox MY_MBOX_1
GetDlgItemText(IDC_DATA, send_buf, 30);
ntxSendRtData(m_RtMailbox_1 , send_buf, 128);
//Look for response back from RTData
if( (recv_buf_size
= ntxReceiveRtData( m_RtMailbox_2, recv_buf, INFINITE ))
== NTX_ERROR ) {
if(ntxGetLastRtError()!=E_TIME) {
MessageBoxEx( NULL,
_T( "Received data failed" ),
_T( "NTXData" ),
MB_ICONERROR | MB_OKCANCEL, LANG_ENGLISH );
exit(0);
}
}
//Convert message from ASCI to Unicode
LPTSTR lpsz = new TCHAR[recv_buf_size +1];
_tcscpy(lpsz, recv_buf);
//Update Edit box with value
SetDlgItemText(IDC_rxDATA, lpsz);
UpdateData();
}
Copyright © 2005–2014, TenAsys Corporation
page 37 of 64
Running the Complete Solution
1)
2)
3)
4)
5)
6)
Start the INtime kernel.
Open the INtime Explorer, select the Local node, and press OK.
INtex displays all processes running on the INtime kernel. It also
shows any mailboxes associated with those processes.
Start NTXData.exe within Visual Studio by pressing the F5 key.
Recall that NTXData automatically loads and starts RTData.
After NTXData starts, locate RTData in the INtex process tree
(remember to enable automatic refresh in the INtex options if you
do not see RTData appear in the process list).
Open the RTData process to see the data mailbox objects,
MY_MBOX_1 and MY_MBOX_2, and the INtime region object.
Type something into the IDC_DATA Edit Control, and click the
Send Data button. Your message displays in the RTData console
window, and the words Msg rcvd: # appears in the IDC_rxDATA
Edit Control, where # corresponds to the message sequence
number.
Figure 27: Running the Complete Solution
7) Close NTXData by pressing either the OK or Cancel button.
RTData continues to run, even though you closed NTXData, because
we did not include any code to stop RTData when NTXData terminates.
Use INtime Explorer to shut down the RTData process by right-clicking
the RTData process icon in the INtime Explorer window and selecting
Delete from the context menu.
page 38 of 64
Copyright © 2005–2014, TenAsys Corporation
EXAMPLE #3 – Working with multiple INtime Nodes
Note:
To run this example in INtime for Windows, the platform
running the Windows and INtime SDK requires a processor
supporting no less than three (3) hardware-threads.
To run this example in INtime Distributed RTOS configuration
setup, the target system needs to support no less than two (2)
hardware-threads.
A key feature of INtime is the ability for processes to communicate with
each other even when they run on different nodes. This communication
uses the same methods – interaction with system objects – as between
two processes running on the same node.
In this example we will use the same RTdata.rta application built in the
previous example, and create a new one, RTSend.rta, to replace the
ntxdata.exe application. We will use the same interface to the
application, but from an INtime application using the console.
The example goes through the following steps:
a. Creating the RtSend process.
b. Running the processes RtData and RtSend on the same node.
c. Stopping the processes.
d. Setting up a second node.
INtime for Windows configuration:
Note: This requires that the platform have a multicore
processor with 4 or more hardware threads.
e.
f.
INtime Distributed RTOS configuration:
Note: This requires that the target platform have a
multicore processor with 2 or more hardware threads.
Modifying the RtData application to enable the applications to
run on separate nodes.
Running the applications.
Creating the RtSend application
This real-time process looks for the RTData application and its
mailboxes, prompts the user for the input string, and sends it. It then
receives a reply.
1) Open Visual Studio, create a real-time project called RTSend, and
place it in the INtimeApps directory you created in the HelloWorld
example.
2) Choose A full-featured application from the INtime Application
Wizard and click OK (leave C++ unchecked for this example).
Copyright © 2005–2014, TenAsys Corporation
page 39 of 64
3)
From the elements setup dialog, add a Client Thread (last element
in the list).
4) Check the Send to data mailbox item (upper left),leave all other
items unchecked, then click OK to return to the elements setup
dialog.
5) Click Finish followed by OK. The wizard automatically generates
real-time code templates.
The client thread in ClientThread1.c sends messages to the RTData
process via MY_MBOX_1, then receives the response from
MY_MBOX_2.
Edit the code
Open ClientThread1.c. Add the process and mailbox names, and modify
ClientThread1, adding the following code:
// Process and mailbox catalog names
char rt_RTData_process[] = "RTData";
char rt_my_mbx_1[] = "MY_MBOX_1";
char rt_my_mbx_2[] = "MY_MBOX_2";
#undef _MULTI_NODE_
void ClientThread1(void)
{
LOCATION
hLoc;
RTHANDLE hOtherRoot;
RTHANDLE
hProcess;
RTHANDLE
hDmbx;
RTHANDLE
hRmbx;
char
nodename[32];
char
message[128];
WORD
status;
WORD
n_recvd;
#ifndef _MULTI_NODE_
do {
do {
printf("Enter the name of the target node: ");
gets(nodename);
hLoc = GetRtNodeLocationByName(nodename);
if (hLoc == BAD_LOCATION)
printf("Could not find location of node \"%s\"\n",
nodename);
} while (hLoc == BAD_LOCATION);
if ((status = GetRtNodeStatus(hLoc)) != E_OK) {
printf("Node \"%s\" is not ready: %s\n", nodename,
GetRtErrorText(GetLastRtError()));
continue;
}
hOtherRoot = GetRemoteRootRtProcess(hLoc);
if (hOtherRoot == BAD_RTHANDLE) {
printf("Could not get remote root process: %s\n",
GetRtErrorText(GetLastRtError()));
continue;
}
} while (hOtherRoot == BAD_RTHANDLE);
page 40 of 64
Copyright © 2005–2014, TenAsys Corporation
#else
hOtherRoot = GetRtThreadHandles(ROOT_PROCESS);
#endif
// Lookup the mailbox
hProcess = LookupRtHandle(hOtherRoot, rt_RTData_process,
WAIT_FOREVER);
if (hProcess == BAD_RTHANDLE)
Fail("Cannot find data mailbox process");
// Look up MY_MBOX_1
hDmbx = LookupRtHandle(hProcess, rt_my_mbx_1, WAIT_FOREVER);
if (hDmbx == BAD_RTHANDLE)
Fail("Cannot find data mailbox 1");
// Look up MY_MBOX_2
hRmbx = LookupRtHandle(hProcess, rt_my_mbx_2, WAIT_FOREVER);
if (hDmbx == BAD_RTHANDLE)
Fail("Cannot find data mailbox 2");
while (1) {
// prompt the user for a message
printf("\nType a message: ");
gets(message);
// send the message
SendRtData(hDmbx, message, 128);
// receive a response message
n_recvd = ReceiveRtData(hRmbx, message, WAIT_FOREVER);
if (n_recvd == 0) {
break;
}
printf("Received %u bytes: \"%s\"\n", n_recvd, message);
}
Fail("Failed to receive message from mailbox 2\n");
}
Running the solution
1)
Start Node A:
With INtime for Windows, start the local NodeA
2)
3)
4)
With INtimeDistributed RTOS, make sure the target node
is booted.
Start RTData.rta
Start RTSend.rta on the same node.
At the prompt, type a message and observe the response
when the message is returned.
Copyright © 2005–2014, TenAsys Corporation
page 41 of 64
Figure 28: RtData process console output.
Shown running in debug mode (with notifications) waiting for a message
from the RtSend process. Then displaying the message that it received.
Figure 29: RtSend process console output.
Shown running in debug mode (with notifications), prompting (Type a
message:) for message to be entered. Upon sending the message
(hello) the application acknowledges receipt of the message and
prompts for another message.
Adding a second node
So far we have two cooperating processes running on the same node.
Now we will create a second node and run the processes on different
nodes.
INtime for Windows.
This section explains how to create a second node in INtime for
Windows. (For INtime Distributed RTOS see the next section.)
This section requires that you have at least a four-core processor, or
dual-core with Hyperthreading enabled.
page 42 of 64
Copyright © 2005–2014, TenAsys Corporation
In INtime for Windows, open the INtime Configuration Panel, and open
the Windows Control Panel. If you have Windows Vista or later, click the
“System and Security” group. When that expands, or if you have a
different version of Windows, select the “INtime” icon.
Figure 30: INtime Configuration Panel applet
Open the Node Management applet.
On the left side of the dialog you see a map of all the known INtime
nodes. Currently there is just one – NodeA – showing. Before creating a
new node we have to (1) reconfigure the INtime boot mode so that
NodeA has a dedicated processor core. To do this, change the Boot
mode setting in the right-hand panel to “Dedicated”. Click the Save
button.
Figure 31: INtime Node Management Applet
Copyright © 2005–2014, TenAsys Corporation
page 43 of 64
Then (2) Click the New Node button, and (3) Select Local and insert
Node name “NodeB” or some other preferred name.
Click OK. Reboot the system.
Check that you have two local Nodes running upon rebooting.by going
to the INtime Congurator|INtime Node Management – left side window
should show both two local nodes.
Figure 32: NodeA and NodeB are shown as local nodes.
INtime Distributed RTOS - Setting up a second Node
Open the INtime configuration panel and the Node Management applet,
as in the previous section. This operation requires the Target system to
have a multi-core processor.
Select your node (“intimehost/NodeA” in this case) and click “Configure
over internet”. A web browser appears.
Enter the password you assigned during installation.
Select the Nodes option from the bar.
page 44 of 64
Copyright © 2005–2014, TenAsys Corporation
Click the (add) link for one of the unused nodes, accept the defaults,
and save.
Reboot your target.
Modifying RtData application
Edit the project once more and in clientthread1.c change this line:
#undef _MULTI_NODE_
to this:
#define _MULTI_NODE_
This adds a sequence of code which prompts for a node name,
searches for it, and discovers its root process handle.
Running the complete solution
1) Start both INtime nodes
2) Make sure that NodeA is selected in the INtime Properties for the
RTData project, and launch it from Visual Studio. Click menu
View|Property Pages, and then click NodeA.
Copyright © 2005–2014, TenAsys Corporation
page 45 of 64
Figure 33: Selecting Node within Visual Studio (2008 & 2010)
3)
In a second instance of Visual Studio, open the RTSend project
and set its target node to NodeB. Launch the application.
4) At the prompt type a message and observe the response when the
message returns.
The text output to the NodeA and NodeB console ports should be
identical to that when the example was running on same Node (as
shown above).
page 46 of 64
Copyright © 2005–2014, TenAsys Corporation
Example #4: The INscope Performance Analyzer
Determinism is a key attribute of real-time systems. Speed is always a
useful attribute to have in any embedded system, but the ability to
ensure the correct timing and sequence of events can be even more
important. This is a key difference between a real-time system and a
system that is simply fast.
The INscope performance analyzer is a software tool that provides you
with precise information regarding the timing and sequence of real-time
events in a multi-threaded application, so you can measure the
determinism of your real-time process. INscope traces events while your
application runs in real-time.
In this section we will use the INscope to monitor a multi-threaded realtime process.
How Fast is Deterministic?
The deterministic nature of a real-time system forces a unique set of
requirements upon software applications. A simple definition of a realtime system is one in which the time required to respond to an event is
just as important as the logical correctness of that response. Hard realtime systems require the highest degree of determinism and
performance. Typically, their worst-case event response requirements
are measured in microseconds.
Bounded response to events is the key to defining a hard real-time
system. Real-time systems require determinism to ensure predictable
behavior of the system. Without determinism, a system cannot be called
real-time and, without bounded determinism, a system cannot be
classified as hard real-time.
Figure 34: Comparison of Real-time Systems
The specific degree of determinism required is a function of the
frequency of the real-time events (size of the time interval between
events) and the effect of delays on the dynamic characteristics of that
system. That is, how often do events occur and how quick and
repeatable must the system be in response to those events. Being able
to place a finite and acceptable bound on the value of these numbers is
what distinguishes a hard real-time system from soft real-time systems.
Fast Does Not Equal Deterministic
Faster processors, memory, and peripherals improve the aggregate
performance of a system, but they generally do not directly affect the
bounded determinism of a system. The worst-case response time to an
Copyright © 2005–2014, TenAsys Corporation
page 47 of 64
event may not be significantly changed by using a faster processor;
increased speed can decrease the average jitter, the spread and
intensity of the variations in response to an event, but it will not
eliminate the worst-case jitter.
Improving the performance (or speed) of a real-time system is useful.
More performance allows one to increase the complexity of the
algorithms that can be implemented in a given period of time (i.e., within
a sample interval or cycle). Therefore, the quality of the control and data
acquisition system that one can implement in software is improved by
using a faster system. However, bounded determinism is still needed to
ensure that a stable and accurate system, regardless of the
performance level, can be deployed.
A Multi-threaded Example
This example application will contain three alarm threads, or fixed
interval timing events. Two will be set for the same priority level, and the
third will be set one priority level higher.
Tip: Complete the HelloWorld example before performing this
example to familiarize yourself with the INtime development
system.
1)
8)
Open Visual Studio.
Create an INtime project called MultiThread and place it in the
INtimeApps directory you created for the HelloWorld example.
9) Select A full-featured application from the INtime application wizard
dialog and click OK.
10) In the next dialog, add a Thread that operates at a regular interval
element.
11) Change the Method for waiting parameter from Sleep to Low level
Sleep, change the Thread Priority from 170 to 160, and change the
Number of microseconds to wait from 1000 to 5000. This creates
PollThread1 as a thread that will start on a precise time interval of
every five-thousand microseconds (every 5 milliseconds).
page 48 of 64
Copyright © 2005–2014, TenAsys Corporation
12) Click on Thread that operates at a regular interval again. Change
the Method for waiting parameter from Sleep to Low level Sleep,
change the Thread Priority from 170 to 165, and leave the Number
of microseconds to wait parameter set at 10000.
Figure 35: Modifying Thread Parameters
This sets up PollThread2 as a thread that will be started by the
INtime scheduler at a precise time interval of every ten
milliseconds.
13) Choose Thread that operates at a regular interval a third time.
However, this time, specify the following parameters for the thread:
Method for waiting is Sleep, Number of milliseconds to wait is 20
and Thread Priority is 170.
Figure 36: Modifying Thread Parameters
Copyright © 2005–2014, TenAsys Corporation
page 49 of 64
This sets up PollThread3 as a simple delay thread, not a precise
timer-based interval thread like the previous two threads. As a
simple delay thread, PollThread3 will run approximately once every
twenty milliseconds. The imprecision of PollThread3 is due to the
variable amount of processing, especially by higher-priority threads
that can occur between each sleep call.
14) Click OK. You now have three time-based threads.
15) Click Finish and double-check the summary screen to be sure it
lists the following threads and parameters for those threads.
Figure 37: MultiThread Project Summary
16) If everything is fine, click OK at the summary screen; otherwise
push the Cancel button, and create a MultiThread project that
matches the parameters specified above.
17) After clicking OK, the wizard builds your project files. Three
PollThread#.c files are created. Each PollThread#.c file
corresponds to one of the three polling thread elements we created
using the INtime application wizard.
18) Add the two global variables shown below to the beginning of
MultiThread.c for communicating between our timing threads.
void
DWORD
DWORD
PollThread3(void);
dwPollThread1;
dwPollThread2;
// module variables
19) Remember to include external declarations in the header file
MultiThread.h for the two global variables we added above.
extern DWORD
extern DWORD
dwPollThread1;
dwPollThread2;
20) To easily identify the three threads in our process from within
INtime Explorer and INscope, add their names to the MultiThread
process object directory.
Add the following code to MultiThread.c, the file that contains
main().
page 50 of 64
Copyright © 2005–2014, TenAsys Corporation
CatalogRtHandle(NULL_RTHANDLE,strInit.hPollThread1,"PollThread1");
CatalogRtHandle(NULL_RTHANDLE,strInit.hPollThread2,"PollThread2");
CatalogRtHandle(NULL_RTHANDLE,strInit.hPollThread3,"PollThread3");
// indicate that initialization has finished
strInit.state = INIT_DONE;
21) PollThread1.c and PollThread2.c have nearly identical code. Make
the following modifications to each of these files and be sure the
variable specified after the TODO line matches the thread number.
void
PollThread1(void)
{
#ifdef _DEBUG
printf("PollThread1 started\n");
#endif
while (1)
{
if (!knWaitForRtAlarmEvent(hAlarmPollThread1,
KN_WAIT_FOREVER))
Fail("Cannot wait for alarm PollThread1");
//#ifdef _DEBUG
//
printf("PollThread1 waking up\n");
//#endif
// TODO: do what has to be done every 5000 microseconds
++dwPollThread1;
}
}
Note: The code immediately following the while(1) statement
differs for each thread, as a function of the time interval and
the sleep method specified when you used the wizard to
generate the template code. Also, unlike the previous
examples, in this example remove (or comment out) the
#ifdef _DEBUG lines of code inside the while(1) statement; we
do not want the printf() statements to interfere with the
output and timing of these threads.
22) PollThread3.c contains more code than the prior two. Make the
following modifications to this file; again, make sure that the
number specified in the putchar('#') line matches the thread
number.
void
{
int i = 0;
int x = 0;
PollThread3(void)
#ifdef _DEBUG
printf("PollThread3 started\n");
#endif
while (1)
{
RtSleep(20);
//#ifdef _DEBUG
Copyright © 2005–2014, TenAsys Corporation
page 51 of 64
//
printf("PollThread3 waking up\n");
//#endif
// TODO: do what has to be done every 20 milliseconds
for(i=0; i<10; i++){
putchar(0x0a);
for(x=0; x<50; x++)
putchar('.');
if(dwPollThread1>0 || dwPollThread2>0) {
printf(" %.0u %.0u",dwPollThread1,dwPollThread2);
dwPollThread1 = dwPollThread2 = 0;
}
}
}
}
The for() loops in PollThread3 keep the thread alive so we can see
pre-emption using INScope. PollThread1 and PollThread2 are at higher
priorities than PollThread3. PollThread3 can run only when PollThread1
and PollThread2 are idle.
23) Make sure the build type is set for Debug and compile the project.
Note: Synchronization code to coordinate setting the values of
the two global variables in PollThread1 and PollThread2, and
reading and resetting those values in PollThread3 is included
for ease of instruction.
Trace the Threads With INScope
1) Start INtime Explorer.
24) Using INtime Explorer, start the MultiThread.rta application. The
application’s console window appears, and all three threads start
running. Pollthread3 prints a series of dots in the console window
followed by the number of times it was interrupted by the two higher
priority threads, PollThread1 and PollThread2.
Figure 38: MultiThread Application Output
25) Start INScope using its shortcut in the INtime programs group
(Start|INtime|INScope).
page 52 of 64
Copyright © 2005–2014, TenAsys Corporation
26) The INScope Trace Control dialog box appears. Click Nodes… and
select NodeA.
27) While MultiThread.rta is running, click Start Trace.
28) In a few moments the View Trace button appears, indicating that
the trace buffer is full. Click the View Trace button. The event trace
for MultiThread appears in the INscope upper-right pane.
Figure 39: INscope Event Trace
The left pane lists the INtime processes that were running on the kernel
when the trace started, and each of the threads running inside those
processes. The name of the MultiThread executable file appears along
with the three polling threads, also listed by name. The thread names
appear courtesy of the CatalogRtHandle() calls we added to main().
The exact length of time associated with your trace, and the order of the
threads on the display, may differ from the figure above. The time it
takes PollThread3 to run through the while(1) loop depends on the
speed and configuration of your machine; remember that all INtime
printf() statements (and other console I/O functions) go through
Windows, which affects some of the timing in this example program.
Scrolling left to right you will see that PollThread1 and PollThread2
execute at precise five and ten millisecond intervals, but the timing of
PollThread3 is variable.
Copyright © 2005–2014, TenAsys Corporation
page 53 of 64
Note: INscope timestamps are derived from your processor’s
Time Stamp Counter (TSC). If your system has a variable
speed clock (such as a laptop with SpeedStep) the timing
measurements within INscope may be inconsistent. For more
information regarding this phenomenon, visit the TenAsys
Knowledge Base at www.tenasys.com.
When all real-time threads are in an idle state the NT_TASK and
WIN_EXEC_TSK threads run. These threads represent Windows, its
drivers, applications, and the transfer of information between the INtime
kernel and Windows; In shared mode CPU cycles are allocated to
Windows only when all real-time processes are idle.
The exact set of Windows threads you observe with the INscope tool,
and the rate at which those threads run, depends on the number of CPU
cores in your system and how your system is configured. In a singlecore system, INtime and Windows always share cycles on the single
core. In a multi-core system, INtime and Windows can share one of the
processor cores or INtime can be configured to use one core exclusively
for real-time threads. In either case, all remaining CPU cores are
allocated to Windows.
On a single-core processor, had we not included a sleep() in the
PollThread3 while(1) loop, Windows would never have run, and the
user interface on your development machine would have frozen. In
other words, the system would appear to have “hung” when, in fact, the
real-time threads were simply consuming all the available CPU cycles.
If your development system contains a multi-core processor, Windows
would not have frozen if we had omitted the call to sleep() in the
PollThread3 while(1) loop, because the INtime kernel and its
applications only utilize the resources of one core. Thus, on a multi-core
system, Windows always has at least one core available.
Use the zoom controls on the menu or toolbar to see the trace more
clearly and inspect the task switches between threads. By depressing
the ‘Z’ button on the toolbar and tracing a rectangular region with the
page 54 of 64
Copyright © 2005–2014, TenAsys Corporation
mouse, you can zoom to a specific segment. In the screenshot below
we can see all three threads running in a zoomed view.
Figure 40: Zoomed Inscope Trace
Let your mouse hover over one of the arrows on a ‘C’ event and you
can see it is the putchar() function call made inside the PollThread3
while(1) loop. An up arrow is a return from a prior putchar() call, and
the down arrow is a new call into putchar(). Since a putchar() call
results in a transfer of data to the Windows side of the system, it forces
PollThread3 into an idle state. Hovering over the ‘A’ events shows
similar information for PollThread1 and PollThread2. Right-click an
event arrow and select the Display Details item that appears, and data
regarding that event appears in the Event Info tab at the bottom of the
screen.
Copyright © 2005–2014, TenAsys Corporation
page 55 of 64
An interesting and useful feature of INtime Explorer is the ability to
suspend and resume threads on the fly.
Figure 41: Intex View of the Multithread App
1)
Right-click the PollThread2 thread icon in the INtime Explorer
process tree while MultiThread is running (xpand the MultiThread
process to see its individual threads).
2) Select Suspend from the context menu.
29) Note the change in the MultiThread console window.
The numbers at the end of each line of dots in the console window
indicate how many times each of the two high-priority threads ran since
the last time the low-priority thread ran. These high-priority threads can
and will pre-empt the low-priority thread (as shown by the figure above).
If no number appears after the dots it means zero precise timer events
were detected. The numbers vary because the time to run PollThread3
varies in length.
30) Suspend PollThread1 and again watch the console window’s
output.
31) Suspend and resume any of the threads, including PollThread3. Do
the results match your expectation?
page 56 of 64
Copyright © 2005–2014, TenAsys Corporation
Next Steps
This guide introduces a variety of INtime development tools and
features. The example applications were designed to help you become
familiar with developing INtime real-time applications for Windows. The
next step is to become familiar with the INtime architecture and API.
See the online help and User’s Manual for more detailed information
about these subjects.
Once you are familiar with the INtime kernel architecture, you might
want to review the sample real-time applications that were installed
along with the INtime development package. Appendix B includes a list
of the sample applications with their descriptions.
Your final step is to review how to deploy INtime real-time applications.
You have the option of creating real-time applications that share the
hardware platform with Windows, or stand-alone INtime nodes with
INtime Distributed RTOS. For more information, see the documentation.
Copyright © 2005–2014, TenAsys Corporation
page 57 of 64
A. Configuring the INtime for Windows Kernel (local Node)
The INtime Configuration Applet in the Windows Control Panel can be
used to modify run-time parameters in the INtime kernel and your
development environment. This appendix describes some of those
parameters.
Figure 42: INtime Control Panel Applet
Double-clicking an icon in the applet window starts the individual
configuration application.
The Export Settings button can be used to save a configuration file from
a reference machine that can then be applied to other machines (i.e., for
use on a production line) using the Import Settings button. The Export
Settings button will export a single INtime configuration file for all
applets that have been selected.
Tip: Hold the Ctrl key down while clicking the left mouse button
to highlight multiple configuration applets before exporting your
INtime configuration file.
INtime for Windows Node Management
Use this configuration applet to select the best kernel timer rate for your
INtime application. In the MultiThread example the fastest timer (or
alarm) event we could specify was 500 microseconds, because that is
the default rate at which the INtime kernel is configured. Changing the
page 58 of 64
Copyright © 2005–2014, TenAsys Corporation
Kernel Clock Rate to 100 microseconds would have allowed us to
create threads that wake with 100 microsecond resolution.
Figure 43: Node Management Kernel Tab
Following are some useful details regarding this applet:
Kernel Clock Rate specifies the number of microseconds that
elapse between system clock interrupts. The default is 500 with a
range of 100 to 10,000 microseconds.
Round Robin Priority Threshold specifies the priority level at which
threads will be scheduled to run using a round-robin schedule. The
priority range is 128 to 254. Only threads with identical priorities
that are at or below the Round Robin Priority Threshold are
scheduled for round-robin operation.
Note: INtime priority levels are numbered from 0 to 254, where
zero is the highest priority level in the system and 254 is the
lowest. Thus, a priority level that is at or below the Round
Robin Priority Threshold means a priority number equal to or
higher than that specified as the Round Robin Priority
Threshold.
Round Robin Time Slice specifies the time allocated for a roundrobin time slice. Values range from 20 to 100 milliseconds in
multiples of 10 milliseconds.
Spin Control Threshold and AutoLoad Spin Control (scroll the
Kernel Parameters screen down to locate these items) specify the
behavior of a special function of the INtime kernel that can be used
to detect real-time threads that may be running without pause. In
other words, it can be used to identify and stop misbehaving realtime threads that are “locking up” the system.
Copyright © 2005–2014, TenAsys Corporation
page 59 of 64
INtime Memory specifies the total amount of physical memory
allocated to the INtime real-time kernel. This is memory reserved
exclusively for use by the INtime kernel and all real-time processes
and threads. This memory is never paged and is, therefore,
guaranteed to be deterministic.
Figure 44: Node Management System Wide Tab
Settings which affect all nodes on this host are in the System Wide tab.
Following are some useful details regarding this tab:
Boot Mode specifies how INtime should allocate CPU resources
between INtime and Windows: shared or dedicated. Dedicated
means one core of a multi-core system is dedicated to an INtime
kernel and all real-time applications. In this mode you may
configure multiple INtime kernels on a multi-core host system.
Shared means one core is shared between INtime and Windows.
This configuration parameter has no meaning on a single-core
processor, since the CPU is always shared between Windows and
INtime when there is only one CPU core.
INtime Memory Allocation specifies where INtime should allocate
memory resources from.
In the INtime for Windows configuration setup: In the default case,
INtime allocates memory from the Windows non-paged pool. The
amount of memory that can be allocated in this way is limited to
128 Mbytes in order that Windows performance is not restricted. If
more memory is required for INtime then the “Exclude memory from
Windows” option limits the amount of memory that Windows can
access at boot time, and assigns the rest to INtime. This mode may
also be used when it is not possible to allocate enough memory
because of pool fragmentation.
page 60 of 64
Copyright © 2005–2014, TenAsys Corporation
Standby Power Option and Hibernate Power Option specify
whether or not INtime should prevent Windows XP from entering
these power management states. Allowing Windows to enter these
states causes the INtime kernel to shut down.
Note: These options are not available for Windows Vista and
later because that functionality was removed from the
Windows product.
Copyright © 2005–2014, TenAsys Corporation
page 61 of 64
INtime for Windows Device Manager
Use this applet to allocate hardware device resources (especially
interrupts) for use by an INtime kernel and your real-time applications.
The applet presents a view of all hardware devices in the system,
similar to that presented by the Windows Device Manager.
To remove this device from Windows and make it available to the realtime environment, right-click a device in the list of Windows devices and
select Pass to INtime from the context menu.
Figure 45: Device Configuration Applet
Passing a device to INtime results in Windows no longer recognizing
and loading a device driver for that hardware. Your real-time
applications now have exclusive access to the interrupt and hardware
registers of that device. This process is needed to ensure that Windows
drivers and applications do not interfere with your use of the device.
INtime includes support for MSI devices (Message Signaled Interrupts).
If you have an MSI-capable device you can pass it to INtime, even if
there is a potential legacy interrupt conflict with Windows, by right
clicking the device, and selecting the Pass to INtime using MSI.
page 62 of 64
Copyright © 2005–2014, TenAsys Corporation
B. INtime for Windows Sample Applications
The following table describes the sample applications that are installed
with the INtime system. These can be found in the My
Documents\INtime\Projects folder of the user who installed INtime on
your system.
Sample Application
Description
C and C++ Samples for
Debugger
The C++ program demonstrates several
components of the C++ language available to
real-time applications, as well as basic classes,
dynamic instantiation, operator overloading,
and so on. It also shows the libraries and
startup modules needed.
Exception Handling Sample
Includes a Windows and a real-time portion.
The Windows portion allows the user to set up
timing parameters that control how often a
real-time thread will cause a hardware fault.
The application demonstrates how another
real-time thread can detect and log the failure,
delete the offending thread, and recreate it,
without affecting Windows or other real-time
processes
Floating Point Exception
Handling
Demonstrates floating point exception
handling.
Graphical Jitter Sample
Measures the minimum, maximum, and
average times between low-level ticks using an
alarm event handler (precise timer). This
application is comprised of both real-time and
Windows executables and illustrates use of the
NTX API.
Global Objects Sample
Illustrates various aspects of global objects
and node management.
High-Performance Ethernet
Sample
Illustrates the use of the High-Performance
Ethernet drivers included with INtime.
INtime API Sample
Exercises most INtime software system calls.
INtimeDotNet Samples
Sample applications showing the use of the
INtimeDotNet assembly for use in Windows
applications that use the CLR to communicate
to the RT side.
Network Datagrams Sample
Examples of how to send unicast, multicast
and broadcast datagrams.
Copyright © 2005–2014, TenAsys Corporation
page 63 of 64
Sample Application
Description
NTX Sample (MsgBoxDemo)
This INtime application has both a Windows
and a real-time portion. The Windows portion
looks up a mailbox created by the real-time
portion and waits at the mailbox. Whenever a
real-time thread sends a message to the
mailbox, the Windows portion displays the
received data in a Windows message box.
Semaphore and shared memory usage are
also demonstrated.
PCAP Sample Application
Illustrates the use of the PCAP library to filter
specific Ethernet packets from the network
stack.
Real-time Interrupt Sample
This application illustrates the use of real-time
interrupt system calls using the Transmitter
Ready interrupt on COM1.
A real-time thread takes over COM1 and
toggles its TransmitterReady interrupt. COM1
is disabled when the test ends. Make sure
COM1 is available on your system before
running this application. When you run the
application, continuous activity occurs on the
real-time side, preempting Windows for eight
10-second time periods.
RSL Examples
Demonstrates the creation and use of realtime Shared Libraries, the INtime analog of
Windows DLLs.
Serial Communications Sample
This project demonstrates how to use the
INtime Serial Communications library.
TCP Samples
Demonstrates TCP communications between a
client and a server. Client and server code is
provided for INtime and server code for
Windows.
UDP Samples
UDP ping-pong sample application. Datagrams
are exchanged between INtime and Windows.
USB Keyboard Sample Client
Demonstrates how to use the INtime USB
subsystem by monitoring a USB keyboard and
printing a dump of each keystroke as it occurs.
Windows STOP Detection
Sample
Shows how an INtime application can detect
either a Windows crash (blue screen) or a
Windows shutdown event and prevent
Windows from completing its normal actions
until the real-time application has had a
chance to perform a “graceful” shutdown.
page 64 of 64
Copyright © 2005–2014, TenAsys Corporation