1
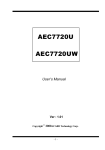
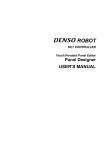
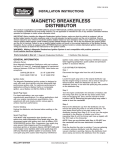
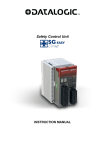
ROBOT Vertical articulated VS-G SERIES GENERAL INFORMATION ABOUT ROBOT Copyright © DENSO WAVE INCORPORATED, 2005-2010 All rights reserved. No part of this publication may be reproduced in any form or by any means without permission in writing from the publisher. Specifications are subject to change without prior notice. All products and company names mentioned are trademarks or registered trademarks of their respective holders. Preface Thank you for purchasing this high-speed, high-accuracy assembly robot. Before operating your robot, read this manual carefully to safely get the maximum benefit from your robot in your assembling operations. Robot series and/or models covered by this manual Series Small-sized, vertical articulated VS-G (Models configured with RC7M controller) Model Floor-mount Overhead-mount VS-6556G VS-6577G Same as left. NOTE 1: Model names listed above apply to the models of robot systems. The model names of robot units are followed by M. If the robot system model is VS-6556G, for example, the robot unit model is VS-6556GM. Important To ensure operator safety, be sure to read the precautions and instructions in "SAFETY PRECAUTIONS". i How the documentation set is organized The documentation set consists of the following books. If you are unfamiliar with this robot and option(s), please read all books and understand them fully before operating your robot and option(s). GENERAL INFORMATION ABOUT ROBOT - this book Provides the packing list of the robot and outlines of the robot system, robot unit, and robot controller. INSTALLATION & MAINTENANCE GUIDE Provides instructions for installing the robot components and customizing your robot, and maintenance & inspection procedures. STARTUP HANDBOOK Introduces you to the DENSO robot system and guides you through connecting the robot unit and controller with each other, running the robot with the teach pendant, and making and verifying a program. This manual is a comprehensive guide to starting up your robot system. SETTING-UP MANUAL Describes how to set up or teach your robot with the teach pendant or mini-pendant. For the panel designer functions, refer to the Panel Designer User's Manual (SUPPLEMENT). WINCAPSIII GUIDE Provides instructions on how to use the programming support tool WINCAPSIII which runs on the PC connected to the robot controller for developing and managing programs. PROGRAMMER'S MANUAL I, Program Design and Commands Describes the PAC programming language, program development, and command specifications in PAC. This manual consists of two parts; Part 1 provides the basic programming knowledge, and Part 2, details of individual commands. PROGRAMMER'S MANUAL II, PAC Library Describes the program libraries that come with WINCAPSIII as standard. RC7M CONTROLLER MANUAL Provides the specifications, installation and maintenance of the RC7M controller. It also describes interfacing with external devices, system- and user-input/output signals, and I/O circuits. ERROR CODE TABLES List error codes that will appear on the teach pendant or mini-pendant if an error occurs in the robot system. These tables also provide detailed description and recovery ways. OPTIONS MANUAL Describes the specifications, installation, and use of optional devices. For the extension board "conveyer tracking board," refer to the OPTIONS MANUAL (SUPPLEMENT). ii How this book is organized This book is just one part of the robot documentation set. This book consists of SAFETY PRECAUTIONS, chapters one through five, and appendix. SAFETY PRECAUTIONS Defines safety terms and related symbols and provides precautions that should be observed. Be sure to read this section before operating your robot. Chapter 1 Packing List of the Robot Lists the standard components contained in the product package and optional components. Chapter 2 Configuration of the Robot System Illustrates the configuration of the robot system and describes the component names of the robot unit and controller. Chapter 3 Specifications of the Robot Unit Describes the specifications, motion space, robot positioning time, air piping and signal wiring, and engineering-design notes for robot hands. Chapter 4 Specifications of the Robot Controller Lists the specifications of the robot controller and controller setting table (SETPRM LIST). Chapter 5 Warranty Describes the warranty period and coverage. Appendix How to Use the Manual Pack CD iii SAFETY PRECAUTIONS SAFETY PRECAUTIONS Be sure to observe all of the following safety precautions. Strict observance of these warning and caution indications are a MUST for preventing accidents, which could result in bodily injury and substantial property damage. Make sure you fully understand all definitions of these terms and related symbols given below, before you proceed to the text itself. WARNING Alerts you to those conditions, which could result in serious bodily injury or death if the instructions are not followed correctly. CAUTION Alerts you to those conditions, which could result in minor bodily injury or substantial property damage if the instructions are not followed correctly. Terminology and Definitions Maximum space: Refers to the space which can be swept by the moving parts of the robot as defined by the manufacturer, plus the space which can be swept by the end-effector and the workpiece. (Quoted from the ISO 10218-1:2006.) Restricted space: Refers to the portion of the maximum space restricted by limiting devices (i.e., mechanical stops) that establish limits which will not be exceeded. (Quoted from the ISO 10218-1:2006.) Motion space: Refers to the portion of the restricted space to which a robot is restricted by software motion limits. The maximum distance that the robot, end-effector, and workpiece can travel after the software motion limits are set defines the boundaries of the motion space of the robot. (The "motion space" is DENSO WAVE-proprietary terminology.) Operating space: Refers to the portion of the restricted space that is actually used while performing all motions commanded by the task program. (Quoted from the ISO 10218-1:2006.) Task program: Refers to a set of instructions for motion and auxiliary functions that define the specific intended task of the robot system. (Quoted from the ISO 10218-1:2006.) 1. Introduction This section provides safety precautions to be observed for the robot system. The installation shall be made by qualified personal and should confirm to all national and local codes. 2. Warning Labels The robot unit and controller have warning labels. These labels alert the user to the danger of the areas on which they are pasted. Be sure to observe the instructions printed on those labels. Warning label Instructions printed on the label Risk of injury. Never enter the restricted space. Label (1) <Except HM> For UL-Listed robot units only Risk of injury. This label alerts the user that pressing the brake release switch could drop the arm. (Example: Location of labels) <HM> Label (2) Risk of electrical shock. Never open the controller cover when the power is on. Label (3) Never touch the inside of the controller for at least 3 minutes even after turning the power off and disconnecting the power cable. Risk of injury. Label (4) Be sure to perform lockout/tagout before starting servicing. Turning the power ON when a person is inside the safety fence may move the arm, causing injuries. SAFETY PRECAUTIONS 3. Installation Precautions 3.1 Insuring the proper installation environment For standard type and cleanroom type The standard and cleanroom types have not been designed to withstand explosions, dust-proof, nor is it splash-proof. Therefore, it should not be installed in any environment where: (1) there are flammable gases or liquids, (2) there are any shavings from metal processing or other conductive material flying about, (3) there are any acidic, alkaline or other corrosive material, (4) there is a mist, (5) there are any large-sized inverters, high output/high frequency transmitters, large contactors, welders, or other sources of electrical noise. For dust- & splash-proof type The dust- & splash-proof type has an IP54-equivalent structure, but it has not been designed to withstand explosions. (The HM/HS-G-W and the wrist of the VM/VS-G-W are an IP65-equivalent dust- and splash-proof structure.) Note that the robot controller is not a dust- or splash-proof structure. Therefore, when using the robot controller in an environment exposed to mist, put it in an optional protective box. The dust- & splash-proof type should not be installed in any environment where: (1) there are any flammable gases or liquids, (2) there are any acidic, alkaline or other corrosive material, (3) there are any large-sized inverters, high output/high frequency transmitters, large contactors, welders, or other sources of electrical noise, (4) it may likely be submerged in fluid, (5) there are any grinding or machining chips or shavings, (6) any machining oil not specified in this manual is in use, or Note: Yushiron Oil No. 4C (non-soluble) is specified. (7) there is sulfuric cutting or grinding oil mist. 3.2 Service space The robot and peripheral equipment should be installed so that sufficient service space is maintained for safe teaching, maintenance, and inspection. 3.3 Control devices outside the robot's restricted space The robot controller, teach pendant and mini-pendant should be installed outside the robot's restricted space and in a place where you can observe all of the robot’s movements and operate the robot easily. 3.4 Positioning of gauges Pressure gauges, oil pressure gauges and other gauges should be installed in an easy-to-check location. 3.5 Protection of electrical wiring and hydraulic/pneumatic piping If there is any possibility of the electrical wiring or hydraulic/pneumatic piping being damaged, protect them with a cover or similar item. 3.6 Grounding resistance The protective grounding resistance of the robot power supply should not be more than 100Ω. 3.7 Positioning of emergency stop switches Emergency stop switches should be provided in a position where they can be reached easily should it be necessary to stop the robot immediately. (1) The emergency stop switches should be red. (2) Emergency stop switches should be designed so that they will not be released after pressed, automatically or mistakenly by any other person. (3) Emergency stop switches should be separate from the power switch. 3.8 Positioning of operating status indicators Operating status indicators should be positioned in such a way where workers can easily see whether the robot is on a temporary halt or on an emergency or abnormal stop. Note: The UL-Listed robot units have motor ON lamps on their robot arms. SAFETY PRECAUTIONS 3.9 Setting-up a safety fence A safety fence should be set up so that no one can easily enter the robot's restricted space. (1) The fence should be constructed so that it cannot be easily moved or removed. (2) The fence should be constructed so that it cannot be easily damaged or deformed through external force. (3) Establish the exit/entrance to the fence. Construct the fence so that no one can easily get past it by climbing over the fence. (4) The fence should be constructed to ensure that it is not possible for hands or any other parts of the body to get through it. (5) Take any one of the following protections for the entrance/ exit of the fence: 1) Place a door, rope or chain across the entrance/exit of the fence, and fit it with an interlock that ensures the emergency stop device operates automatically if it is opened or removed. 2) Post a warning notice at the entrance/exit of the fence stating "In operation--Entry forbidden" or "Work in progress--Do not operate" and ensure that workers follow these instructions at all times. When making a test run, before setting up the fence, place an overseer in a position outside the robot’s restricted space and one in which he/she can see all of the robot’s movements. The overseer should prevent workers from entering the robot's restricted space and be devoted solely to that task. 3.10 Setting the robot's motion space The area required for the robot to work is called the robot's operating space. If the robot’s motion space is greater than the operating space, it is recommended that you set a smaller motion space to prevent the robot from interfering or disrupting other equipment. Refer to the INSTALLATION & MAINTENANCE GUIDE, Chapter 2. 3.11 No robot modification allowed Never modify the robot unit, robot controller, teach pendant or other devices. 3.12 Cleaning of tools If your robot uses welding guns, paint spray nozzles, or other end-effectors requiring cleaning, it is recommended that the cleaning process be carried out automatically. 3.13 Lighting Sufficient illumination should be assured for safe robot operation. 3.14 Protection from objects thrown by the end-effector If there is any risk of workers being injured in the event that the object being held by the end-effector is dropped or thrown by the end-effector, consider the size, weight, temperature and chemical nature of the object and take appropriate safeguards to ensure safety. 3.15 Affixing the warning label Place the warning label packaged with the robot on the exit/entrance of the safety fence or in a position where it is easy to see. 3.16 Posting the moving directions of all axes Post a notice showing axes names and moving directions in a visible location on the robot unit. The posted moving directions should match the actual directions. No posting or wrong direction posting may result in bodily injuries or property damages due to incorrect operation. SAFETY PRECAUTIONS 4. Precautions while Robot is Running Warning Touching the robot while it is in operation can lead to serious injury. Please ensure the following conditions are maintained and that the cautions listed from Section 4.1 and onwards are followed when any work is being performed. 1) Do not enter the robot's restricted space when the robot is in operation or when the motor power is on. 2) As a precaution against malfunction, ensure that an emergency stop device is activated to cut the power to the robot motor upon entry into the robot's restricted space. 3) When it is necessary to enter the robot's restricted space to perform teaching or maintenance work while the robot is running, ensure that the steps described in Section 4.3 "Ensuring safety of workers performing jobs within the robot's restricted space" are taken. 4.1 Creation of working regulations and assuring worker adherence When entering the robot’s restricted space to perform teaching or maintenance inspections, set "working regulations" for the following items and ensure workers adhere to them. (1) Operating procedures required to run the robot. (2) Robot speed when performing teaching. (3) Signaling methods to be used when more than one worker is to perform work. (4) Steps that must be taken by the worker in the event of a malfunction, according to the contents of the malfunction. (5) The necessary steps for checking release and safety of the malfunction status, in order to restart the robot after robot movement has been stopped due to activation of the emergency stop device (6) Apart from the above, any steps below necessary to prevent danger from unexpected robot movement or malfunction of the robot. 1) Display of the control panel (See Section 4.2 on the next page.) 2) Assuring the safety of workers performing jobs within the robot's restricted space (See Section 4.3 on the next page.) 3) Maintaining worker position and stance Position and stance that enables the worker to confirm normal robot operation and to take immediate refuge if a malfunction occurs. 4) Implementation of measures for noise prevention 5) Signaling methods for workers of related equipment 6) Types of malfunctions and how to distinguish them Please ensure "working regulations" are appropriate to the robot type, the place of installation and to the content of the work. Be sure to consult the opinions of related workers, engineers at the equipment manufacturer and that of a labor safety consultant when creating these "working regulations". 4.2 Display of operation panel To prevent anyone other than the worker from accessing the start switch or the changeover switch by accident during operation, display something to indicate it is in operation on the operation panel or teach pendant. Take any other steps as appropriate, such as locking the cover. 4.3 Ensuring safety of workers performing jobs within the robot's restricted space When performing jobs within the robot’s restricted space, take any of the following steps to ensure that robot operation can be stopped immediately upon a malfunction. (1) Ensure an overseer is placed in a position outside the robot’s restricted space and one in which he/she can see all robot movements, and that he/she is devoted solely to that task. c An emergency stop device should be activated immediately upon a malfunction. d Do not permit anyone other than the worker engaged for that job to enter the robot’s restricted space. (2) Ensure a worker within the robot's restricted space carries the portable emergency stop switch so he/she can press it (the emergency button on the teach pendant) immediately if it should be necessary to do so. 4.4 Inspections before commencing work such as teaching Before starting work such as teaching, inspect the following items, carry out any repairs immediately upon detection of a malfunction and perform any other necessary measures. (1) Check for any damage to the sheath or cover of the external wiring or to the external devices. (2) Check that the robot is functioning normally or not (any unusual noise or vibration during operation). (3) Check the functioning of the emergency stop device. (4) Check there is no leakage of air or oil from any pipes. (5) Check there are no obstructive objects in or near the robot’s restricted space. SAFETY PRECAUTIONS 4.5 Release of residual air pressure Before disassembling or replacing pneumatic parts, first release any residual air pressure in the drive cylinder. 4.6 Precautions for test runs Whenever possible, have the worker stay outside of the robot's restricted space when performing test runs. 4.7 Precautions for automatic operation (1) At start-up Stay out of the safeguarded space with a safety fence when starting the robot; in particular, take extra caution in Internal automatic operation. Before starting the robot, check the following items as well as setting the signals to be used and perform signaling practice with all related workers. 1) Check that there is no one inside the safeguarded space (with a safety fence). 2) Check that the teach pendant and tools are in their designated places. 3) Check that no lamps indicating a malfunction on the robot or related equipment are lit. (2) Check that the display lamp indicating automatic operation is lit during automatic operation. (3) Steps to be taken when a malfunction occurs Stop the robot's operation by activating the emergency stop device when it is necessary to enter the safeguarded space with a safety fence to perform emergency maintenance in the case of malfunction of the robots or related equipment. Take any necessary steps such as posting a notice on the start switch to indicate work is in progress to prevent anyone from accessing the robot. 4.8 Precautions in repairs (1) Do not perform repairs outside of the designated range. (2) Under no circumstances should the interlock mechanism be removed. (3) When opening the robot controller's cover for battery replacement or any other reasons, always turn the robot controller power off and disconnect the power cable. (4) Use only spare tools specified in this manual. 5. Daily and Periodical Inspections (1) Be sure to perform daily and periodical inspections. Before starting jobs, always check that there is no problem with the robot and related equipment. If any problems are found, take any necessary measures to correct them. (2) When carrying out periodical inspections or any repairs, maintain records and keep them for at least 3 years. 6. Management of Floppy Disks (1) Carefully handle and store the "Initial settings" floppy disks packaged with the robot, which store special data exclusively prepared for your robot. (2) After finishing teaching or making any changes, always save the programs and data onto floppy disks. Making back-ups will help you recover if data stored in the robot controller is lost due to the expired life of the back-up battery. (3) Write the names of each of the floppy disks used for storing task programs to prevent incorrect disks from loading into the robot controller. (4) Store the floppy disks where they will not be exposed to dust, humidity and magnetic field, which could corrupt the disks or data stored on them. 7. Safety Codes The safety standards relating to robot systems are listed below. As well as observing the safety precautions given in this manual, ensure compliance with all local and national safety and electrical codes for the installation and operation of the robot system. Standards ANSI/RIA R15.06-1999 ANSI/UL1740: 1998 CAN/CSA Z434-03 ISO10218-1: 2006 NFPA 79: 2002 8. Battery Recycling Title Industrial Robots and Robot Systems--Safety Requirements Safety for Robots and Robotic Equipment Industrial Robots and Robot Systems--General Safety Requirements Robots for industrial environments--Safety requirements--Part 1: Robot Electrical Standard for Industrial Machinery DENSO Robot uses lithium batteries. Discard batteries according to your local and national recycling law. Contents Preface ................................................................................................................................................................................ i How the documentation set is organized ........................................................................................................................ii How this book is organized .............................................................................................................................................iii SAFETY PRECAUTIONS Chapter 1 Packing List of the Robot............................................................................................................................... 1 1.1 Standard Components ........................................................................................................................................... 1 1.2 Optional Components............................................................................................................................................ 2 Chapter 2 Configuration of the Robot System............................................................................................................... 4 2.1 Configurators ........................................................................................................................................................ 4 2.2 Names of Robot Unit Components ....................................................................................................................... 5 2.2.1 Robot Unit Components and Rotation Direction ....................................................................................... 5 2.2.2 Name Plate................................................................................................................................................. 6 2.2.3 Warning and Caution Labels...................................................................................................................... 7 2.3 Names of the Robot Controller Components ........................................................................................................ 8 Chapter 3 Specifications of the Robot Unit .................................................................................................................... 9 3.1 Robot Specifications ............................................................................................................................................. 9 3.2 Outer Dimensions and Workable Space of the Robot Unit ................................................................................. 15 3.2.1 Models Except UL-Listed Ones............................................................................................................... 15 3.2.2 UL-Listed Models.................................................................................................................................... 27 3.3 Robot Positioning Time....................................................................................................................................... 29 3.4 Air Piping, Signal Wiring, and Solenoid Valve Specifications............................................................................ 36 3.4.1 Air Piping and Signal Wiring................................................................................................................... 36 3.4.2 Instructions for Using Splash-proof Connector Sets................................................................................ 41 3.4.3 Solenoid Valve Specifications (VS-G series)........................................................................................... 42 3.4.4 Existing Internal Threads for Wiring and Piping ..................................................................................... 42 3.5 Precautions When Designing the End-effectors .................................................................................................. 43 3.6 Stopping Time and Distance (Angle) at an Emergency Stop .............................................................................. 46 Chapter 4 Specifications of the Robot Controller........................................................................................................ 48 4.1 Specifications ...................................................................................................................................................... 48 4.2 Outer Dimensions................................................................................................................................................ 50 4.3 Controller Setting Table ...................................................................................................................................... 51 Chapter 5 Warranty ....................................................................................................................................................... 52 Chapter 1 Packing List of the Robot Chapter 1 Packing List of the Robot 1.1 Standard Components The components listed below are contained in the product package. Standard Components No. Item Q'ty (1) Robot unit 1 (2) Robot controller 1 (3) Power cable (5 m) 1 (4) Motor & encoder cable (Note 1) 1 (5) Manuals (“Manual Pack CD” and “Safety Precautions”) (6) NetwoRC CD (containing WINCAPSIII beta version) 1 set 1 (7) Spare fuses for robot controller 3 (8) Initialization floppy disk (1.44 MB format) (Note 2) 1 (9) Pendantless connector (Dummy connector) (not contained in UL-Listed robot systems) 1 (10) Connector set for hand control signals (for CN20 and CN21) (11) Direction indicator label (Note 3) 1 (12) Warning label (Note 4) 1 (13) Spare output IC for robot controller 1 (14) Dowel pins (internally threaded positioning pin and diamond-shaped pin) (15) Short sockets for robot controller 1 set 1 set 2 Note 1: Choose a motor & encoder cable from the table below. The 20-m motor & encoder cable (standard/splash-proof) is not available for controllers equipped with extended-joint options or UL-Listed robot units. The internal cable bending radius shall at least be 200 mm. Excessively bending will result in broken lead wires. Part No. Item Standard cable 2m 410141-4400 Standard cable 4m 410141-3611 Standard cable 6m 410141-3621 Standard cable 12 m 410141-3631 Standard cable 20 m 410141-4440 Splash-proof cable 2m 410141-4420 Splash-proof cable 4m 410141-3681 Splash-proof cable 6m 410141-3691 Splash-proof cable 12 m 410141-3701 Splash-proof cable 20 m 410141-4460 Note 2: Preserve the initialization floppy disk in a safe place. The disk contains CALSET-related arm data exclusively prepared for your robot. If a memory error appears on the teach pendant due to a memory failure, use the disk to load the arm data to the robot controller. (Refer to the INSTALLATION & MAINTENANCE GUIDE, "Using the Initialization Floppy Disk.") Note 3: After installation, attach the direction indicator label in a position on the robot unit that can be easily seen. Note 4: Attach the warning label on the robot safety fence or other location where workers will easily notice it. If necessary, prepare a plate for attaching the seal. When placing an order for UL-Listed robot systems, be sure to order the optional teach pendant or mini-pendant also which is essential to UL-Listed ones. 1 1.2 Optional Components The table below lists the optional components. Optional Components (1) Classification No. 1 1-1 I/O cables 1-2 Item Remarks Standard I/O cable set I/O cable for “Mini I/O” (68pins) I/O cable for “HAND I/O” 2 I/O cable for “Parallel I/O board” (96 pins) 3 I/O cable for “SAFETY I/O” (36 pins) (Only for global type) 4 Teach pendant (8 m) Incl. Nos. 1-1 and 1-2. 410149-0940 (15 m) Incl. Nos. 1-1 and 1-2. 410149-0950 (8 m) 410141-2700 (15 m) 410141-2710 (8 m) 410141-1740 (15 m) 410141-1750 (8 m) 410141-3050 (15 m) 410141-3060 (8 m) 410141-3580 (15 m) 410141-3590 (4 m) With cable 410100-1570 (8 m) With cable 410100-1580 (12 m) With cable (4 m) Operation devices 5 Mini-pendant kit (Incl. cable and WINCAPSIII Light) (8 m) (12 m) 6 Programming support tool 7 8 Pendant extension cable WINCAPSIII Shipped as installed on the Parallel I/O controller board Shipped as individual boards (supply part) 9 Optional boards for the robot controller 10 11 DeviceNet board Shipped as installed on the controller Shipped as individual boards (supply part) CC-Link board Conveyor tracking board 2 Part No. Japanese indication 410100-1590 410109-0390 English indication 410109-0400 Japanese indication 410109-0410 English indication 410109-0420 Japanese indication 410109-0430 English indication 410109-0440 (4 m) For TP, MP 410141-3710 (8 m) For TP, MP 410141-3720 CD-ROM (common to the languages--Japanese, English, German, Korean, and Chinese) 410090-0980 NPN 410010-3320 PNP 410010-3330 NPN 410010-3340 PNP 410010-3350 For Slave station 410010-3370 For Master station 410010-3380 For Master & slave station 410010-3390 For Slave station 410010-3400 For Master station 410010-3410 For Master & slave station 410010-3480 Shipped as installed on the controller 410010-3430 Shipped as individual boards (supply part) 410010-3440 Shipped as installed on the controller 410010-3460 Shipped as individual boards (supply part) 410010-3470 Chapter 1 Packing List of the Robot Optional Components (2) Classification No. 12 13 Optional functions (For own optional board etc.) 14 15 Optional box CD Manuals Remarks Optional function for RS232C board Board manufacturer: CONTEC CO., LTD. Model: COM-2P(PCI)H Optional function for S-LINK V board Board manufacturer: SUNX CO., LTD Model: SL-VPCI Optional function for PROFIBUS-DP slave board Board manufacturer: Hilscher GmbH Model: CIF50-DPS\DENSO EtherNet/IP function Board manufacturer: Hilscher GmbH Model: CIFX 50-RE\DENSO 16 Optional function for memory extension 17 Controller protection box Part No. Shipped after integrated in the controller 410006-0260 Added when the board is purchased as a spare part 410006-0270 Shipped after integrated in the controller 410006-0280 Added when the board is purchased as a spare part 410006-0290 Shipped after integrated in the controller 410006-0300 Added when the board is purchased as a spare part 410006-0310 Shipped after integrated in the controller 410006-0800 Added when the board is purchased as a spare part 410006-0810 Extension only upon controller shipment (3.25MB to 5.5 MB) 410006-0320 410181-0090 18 I/O conversion box For interchangeability with RC5 type controller 19 Manual Pack CD Contained in the robot package. 410002-2661 20 Instruction manual for VS-G, full set Includes No. C and No. D 410009-0300 Instruction manual for VS-G, basic set Includes No. C-1 to No. C-3 410009-0200 C Optional manuals (Printed materials, English edition) Item 410181-0100 C-1 GENERAL INFORMATION ABOUT ROBOT For VS-G 410002-2490 C-2 RC7M CONTROLLER MANUAL For RC7M controller 410002-2430 C-3 ERROR CODE TABLES 410009-0080 410002-3370 D Instruction manual for VS-G, extension set Includes No. D-1 to No. D-7 D-1 INSTALLATION & MAINTENANCE GUIDE For VS-G D-2 STARTUP HANDBOOK 410002-2510 410002-2750 D-3 SETTING-UP MANUAL 410002-3310 D-4 PROGRAMMER'S MANUAL (I) 410002-3330 D-5 PROGRAMMER'S MANUAL (II) 410002-3350 D-6 Panel Designer USER’S MANUAL 410002-6480 D-7 OPTIONS MANUAL For RC7M controller 3 410002-2650 Chapter 2 Configuration of the Robot System 2.1 Configurators The figure below shows configurators of the typical robot system. Note 1: Items (1) to (15) are the standard components listed on page 1. Note 2: The pendantless connector should be attached to the robot controller when no teach pendant or mini-pendant is connected. Note 3: The components illustrated above are typical models or parts. Configurators of the Robot System (VS-G series) 4 Chapter 2 Configuration of the Robot System 2.2 Names of Robot Unit Components 2.2.1 Robot Unit Components and Rotation Direction The figure below shows the names of the components of the robot unit and the rotation direction of each axis. Note: The UL-Listed robot unit has the motor ON lamps on the 2nd arm, and the brake release switch and axis selector on the base. UL-Listed robot unit Robot Unit Components and Rotation Direction (VS-G series) 5 2.2.2 Name Plate The robot unit has a name plate pasted on the base. The serial number printed on the name plate, which is the same as that printed on the controller's name label, identifies an individual robot. Note: The design of the name plate has changed to the one shown above in 2006. The conventional name plate is as shown below. Conventional name plate sample Name Plate Sample (VS-G series) 6 Chapter 2 Configuration of the Robot System 2.2.3 Warning and Caution Labels The robot unit has warning and caution labels pasted as shown below. They alert the user to the dangers of the areas on which they are pasted. Be sure to observe the instructions printed on those labels. Warning and Caution Labels on the Robot Unit Location of labels Warning and caution labels on the robot unit Label 1 Additional description Contact with the robot unit which is in motion can cause serious injuries. Observe the following: (1) Never enter the robot's restricted space when the robot is in motion or the motor power is on. (2) When you need to enter the robot's restricted space for recovery from robot failures, be sure to cut the power to the robot motors by activating an emergency stop device or the like. Label 2 (on UL-Listed robot units only) When the controller power is on, pressing the brake release switch causes the arm to fall. It is DANGEROUS. Observe the following: (1) Never press the brake release switch except in an emergency. (2) Before pressing the brake release switch, be sure to check that there is no danger of injuries or damages on equipment. Label 3 There is a high voltage part. This label alerts the user to the dangers of electrical shocks. Label 4 Instructions on how to hoist the robot unit. Label 5 Cautions when performing CALSET. For details, refer to the INSTALLATION & MAINTENANCE GUIDE. 7 2.3 Names of the Robot Controller Components The figure below shows the names of the robot controller components. Note: For warning and caution labels pasted on the controller, refer to the RC7M CONTROLLER MANUAL. Connectors for the VS-G series (Encoders connected via bus) Connector No. Marking Name CN1 RS-232C Serial interface connector CN2 USB USB connector (2 lines) CN3 PENDANT Teach pendant connector CN4 LAN Ethernet connector CN5 Mini I/O I/O connector CN6 INPUT AC Power supply connector CN7 MOTOR Motor/encoder connector CN9 HAND I/O HAND I/O connector CN10 SAFETY I/O SAFETY I/O connector (Only for global type) Names of Robot Controller Components 8 Chapter 3 Specifications of the Robot Unit Chapter 3 Specifications of the Robot Unit 3.1 Robot Specifications The following tables list the specifications of the VS-G series. For UL-Listed robot units, see (3) "VS-65**G-BW-UL." (1) VS-6556G (configured with RC7M controller) VS-6556G Specifications Specifications Item Standard type Dust- & splashproof type Model name of robot system (Note 1) VS-6556G VS-6556G-W Model name of robot unit VS-6556GM VS-6556GM-W Overall arm length Dust- & splash- UL-Listed type proof type with (Dust- & splashproof type with brakes brakes) VS-6556G-B VS-6556G-BW VS-6556GM-B VS-6556GM-BW VS-6556G-BWUL VS-6556GM-BW -UL 270 (first arm) + 295 (second arm) = 565 mm Arm offset J1 (swing) 75 mm, J3 (front arm) 90 mm R = 733 mm (end-effector mounting face) R = 653 mm (Point P: J4, J5, J6 center) Maximum motion area Motion range With brakes J1 170, J4 190, J2 +135, -100, J5 120, J3 +166, -119 J6 360 Maximum payload 7 kg (Note 2) Maximum composite speed 8200 mm/s (at the center of an end-effector mounting face) Position repeatability (Note 3) In each of X, Y and Z directions: 0.02 mm (at the center of an end-effector mounting face) Maximum allowable inertia moment 0.413 kgm2 for around J4 and J5, 0.063 kgm2 for around J6 Position detection Absolute encoder Drive motor and brake Brake releasing AC servomotors for all joints, Brakes for joints J2 to J4 AC servomotors for all joints, Brakes for joints J2 to J6 Enter a brake release command with the teach pendant or mini-pendant. AC servomotors for all joints, Brakes for all joints Use the brake release switch. (Note 5) User air piping (Note 4) 7 systems (4x6, 6x1), 3 solenoid valves (2-position, double solenoid) contained. User signal line 10 (for proximity sensor signals, etc.) Air source Operating pressure 0.10~0.39MPa Maximum allowable pressure 0.49MPa Degree of protection IP40 IP54 (Wrist: IP65) IP40 IP54 (Wrist: IP65) Airborne noise (A-weighted equivalent continuous sound pressure level) 80 dB or less Weight Approx. 35 kg (77 lbs) (See the name plate on each model.) IP54 (Wrist: IP65) Note 1 The model name of robot set refers to the model name of a complete set including a robot unit and robot controller. Note 2 If the payload exceeds 6 kg, the robot unit must be used with the flange facing down at 45 degrees from vertical. Note 3 Position repeatability is the value at constant ambient temperature. Note 4: Only the 4x6 air piping system may be controlled by built-in solenoid valves. Note 5: When the controller power is ON, use the brake release switch to release the brake of the selected joint. Brake releasing with the teach pendant or mini-pendant is not possible. 9 (2) VS-6577G (configured with RC7M controller) VS-6577G Specifications Specifications Item Standard type Model name of robot system (Note 1) VS-6577G Model name of robot unit VS-6577GM Dust- & splashproof type VS-6577G-W UL-Listed type Dust- & splash(Dust- & proof type with splash-proof type brakes with brakes) With brakes VS-6577G-B VS-6577GM-W VS-6577GM-B VS-6577G-BW VS-6577G-BWUL VS-6577GM-BW VS-6556GM-BW -UL Overall arm length 365 (first arm) + 405 (second arm) = 770 mm Arm offset J1 (swing) 75 mm, J3 (front arm) 90 mm R = 934 mm (end-effector mounting face) R = 854 mm (Point P: J4, J5, J6 center) Maximum motion area Motion range J1 170, J4 190, J2 +135, -100, J5 120, J3 +169, -119 J6 360 Maximum payload 7 kg (Note 2) Maximum composite speed 7600 mm/s (at the center of an end-effector mounting face) Position repeatability (Note 3) In each of X, Y and Z directions: 0.03 mm (at the center of an end-effector mounting face) Maximum allowable inertia moment 2 2 0.413 kgm for around J4 and J5, 0.063 kgm for around J6 Position detection Absolute encoder Drive motor and brake Brake releasing AC servomotors for all joints, Brakes for joints J2 to J4 AC servomotors for all joints, Brakes for joints J2 to J6 Enter a brake release command with the teach pendant or mini-pendant. User air piping (Note 4) 7 systems (4x6, 6x1), 3 solenoid valves (2-position, double solenoid) contained. User signal line 10 (for proximity sensor signals, etc.) Air source Operating pressure 0.10~0.39MPa Maximum allowable pressure 0.49MPa Degree of protection IP40 IP54 (Wrist: IP65) IP40 IP54 (Wrist: IP65) AC servomotors for all joints, Brakes for all joints Use the brake release switch.(Note 5) IP54 (Wrist: IP65) Airborne noise (A-weighted equivalent continuous sound pressure level) 80 dB or less Weight Approx. 36 kg (80 lbs) (See the name plate on each model.) Note 1 The model name of robot set refers to the model name of a complete set including a robot unit and robot controller. Note 2 If the payload exceeds 6 kg, the robot unit must be used with the flange facing down at 45 degrees from vertical. Note 3 Position repeatability is the value at constant ambient temperature. Note 4: Only the 4x6 air piping system may be controlled by built-in solenoid valves. Note 5 When the controller power is ON, use the brake release switch to release the brake of the selected joint. Brake releasing with the teach pendant or mini-pendant is not possible. 10 Chapter 3 Specifications of the Robot Unit (3) VS-6556G-P10, VS-6556G-BP10 VS-6556G-P10 & VS-6556G-BP10 Specifications Specifications Item Standard type With brakes Model name of robot set (Note 1) VS-6556G-P10 VS-6556G-BP10 Model name of robot unit VS-6556GM-P10 VS-6556GM-BP10 Overall arm length 270 (first arm) + 295 (second arm) = 565 mm Arm offset J1 (swing) 75 mm, J3 (front arm) 90 mm Maximum motion area Motion range R = 733 mm (end-effector mounting face) R = 653 mm (Point P: J4, J5, J6 center) J1 170, J4 190, J2 +135, -100, J5 120, J3 +166, -119 J6 360 Maximum payload 7 kg (Note 2) Maximum composite speed 8200 mm/s (at the center of an end-effector mounting face) Position repeatability (Note 3) In each of X, Y and Z directions: 0.02 mm Maximum allowable inertia moment Around J4 and J5: 0.413 kgm2 Around J6 0.063 kgm2 Position detection Drive motor and brake Absolute encoder AC servomotors for all joints, Brakes for joints J2 to J4 AC servomotors for all joints, Brakes for joints J2 to J6 User air piping 6 systems (4x6), 3 solenoid valves (2-position, double solenoid) contained. User signal line 10 (for proximity sensor signals, etc.) Air source Operating pressure Maximum allowable pressure Weight Clean class for cleanroom type (FED-STD-209D) 0.10~0.39MPa 0.49MPa Approx. 35 kg (77 lbs) (See the name plate on each model.) Class 10 (0.1μ) at point-of-use Note 1 The model name of robot set refers to the model name of a complete set including a robot unit and robot controller. Note 2: If the payload exceeds 6 kg, the robot unit must be used with the flange facing down at ±45 degrees from vertical. Note 3: Position repeatability is the value at constant ambient temperature. 11 (4) VS-6577G-P10, VS-6577G-BP10 VS-6577G-P & VS-6577G-BP Specifications Specifications Item Standard type With brakes Model of robot system (Note 1) VS-6577G-P10 VS-6577G-BP10 Model of robot unit VS-6577GM-P10 VS-6577GM-BP10 Overall arm length 365 (first arm) + 405 (second arm) = 770 mm Arm offset J1 (swing) 75 mm, J3 (front arm) 90 mm Maximum motion area Motion range R = 934 mm (end-effector mounting face) R = 854 mm (Point P: J4, J5, J6 center) J1 170, J4 190, J2 +135, -100, J5 120, J3 +169, -119 J6 360 Maximum payload 7 kg (Note 2) Maximum composite speed 7600 mm/s (at the center of an end-effector mounting face) Position repeatability (Note 3) In each of X, Y and Z directions: 0.03 mm Maximum allowable inertia moment Around J4 and J5: 0.413 kgm2 Around J6 0.063 kgm2 Position detection Drive motor and brake Absolute encoder AC servomotors for all joints, Brakes for joints J2 to J4 AC servomotors for all joints, Brakes for joints J2 to J6 User air piping 6 systems (4x6), 3 solenoid valves (2-position, double solenoid) contained. User signal line 10 (for proximity sensor signals, etc.) Air source Operating pressure 0.10~0.39MPa Maximum allowable pressure 0.49MPa Weight Approx. 36 kg (80 lbs) Clean class for cleanroom type (FED-STD-209D) (See the name plate on each model.) Class 10 (0.1μ) at point-of-use Note 1: The model name of robot set refers to the model name of a complete set including a robot unit and robot controller. Note 2: If the payload exceeds 6 kg, the robot unit must be used with the flange facing down at ±45 degrees from vertical. Note 3: Position repeatability is the value at constant ambient temperature. 12 Chapter 3 Specifications of the Robot Unit (5) VS-6556G-P100, VS-6556G-BP100 VS-6556G-P100 & VS-6556G-BP100 Specifications Specifications Item Standard type With brakes Model name of robot set (Note 1) VS-6556G-P100 VS-6556G-BP100 Model name of robot unit VS-6556GM-P100 VS-6556GM-BP100 Overall arm length 270 (first arm) + 295 (second arm) = 565 mm Arm offset J1 (swing) 75 mm, J3 (front arm) 90 mm Maximum motion area Motion range R = 733 mm (end-effector mounting face) R = 653 mm (Point P: J4, J5, J6 center) J1 170, J4 190, J2 +135, -100, J5 120, J3 +166, -119 J6 360 Maximum payload 7 kg (Note 2) Maximum composite speed 8200 mm/s (at the center of an end-effector mounting face) Position repeatability (Note 3) In each of X, Y and Z directions: 0.02 mm Maximum allowable inertia moment Around J4 and J5: 0.413 kgm2 Around J6 0.063 kgm2 Position detection Drive motor and brake Absolute encoder AC servomotors for all joints, Brakes for joints J2 to J4 AC servomotors for all joints, Brakes for joints J2 to J6 User air piping 6 systems (4x6), 3 solenoid valves (2-position, double solenoid) contained. User signal line 10 (for proximity sensor signals, etc.) Air source Operating pressure Maximum allowable pressure Weight Clean class for cleanroom type (FED-STD-209D) 0.10~0.39MPa 0.49MPa Approx. 35 kg (77 lbs) (See the name plate on each model.) Class 100 (0.3 μ) at point-of-use Note 1: The model name of robot set refers to the model name of a complete set including a robot unit and robot controller. Note 2: If the payload exceeds 6 kg, the robot unit must be used with the flange facing down at ±45 degrees from vertical. Note 3: Position repeatability is the value at constant ambient temperature. 13 (6) VS-6577G-P100, VS-6577G-BP100 VS-6577G-P100 & VS-6577G-BP100 Specifications Specifications Item Standard type With brakes Model of robot system (Note 1) VS-6577G-P100 VS-6577G-BP100 Model of robot unit VS-6577GM-P100 VS-6577GM-BP100 Overall arm length 365 (first arm) + 405 (second arm) = 770 mm Arm offset J1 (swing) 75 mm, J3 (front arm) 90 mm Maximum motion area Motion range R = 934 mm (end-effector mounting face) R = 854 mm (Point P: J4, J5, J6 center) J1 170, J4 190, J2 +135, -100, J5 120, J3 +169, -119 J6 360 Maximum payload 7 kg (Note 2) Maximum composite speed 7600 mm/s (at the center of an end-effector mounting face) Position repeatability (Note 3) In each of X, Y and Z directions: 0.03 mm Maximum allowable inertia moment Around J4 and J5: 0.413 kgm2 Around J6 0.063 kgm2 Position detection Drive motor and brake Absolute encoder AC servomotors for all joints, Brakes for joints J2 to J4 AC servomotors for all joints, Brakes for joints J2 to J6 User air piping 6 systems (4x6), 3 solenoid valves (2-position, double solenoid) contained. User signal line 10 (for proximity sensor signals, etc.) Air source Operating pressure 0.10~0.39MPa Maximum allowable pressure 0.49MPa Weight Clean class for cleanroom type (FED-STD-209D) Approx. 36 kg (80 lbs) (See the name plate on each model.) Class 100 (0.3 μ) at point-of-use Note 1: The model name of robot set refers to the model name of a complete set including a robot unit and robot controller. Note 2: If the payload exceeds 6 kg, the robot unit must be used with the flange facing down at ±45 degrees from vertical. Note 3: Position repeatability is the value at constant ambient temperature. 14 Chapter 3 Specifications of the Robot Unit 3.2 Outer Dimensions and Workable Space of the Robot Unit The outer dimensions and workable space of the VS-G series are shown on the following pages. 3.2.1 Models Except UL-Listed Ones (1) VS-6556G (Standard type) Outer Dimensions and Workable Space [VS-6556G] 15 (2) VS-6556G-W (Dust- & splash-proof type) Outer Dimensions and Workable Space [VS-6556G-W] 16 Chapter 3 Specifications of the Robot Unit (3) VS-6556G-B (with brakes) Outer Dimensions and Workable Space [VS-6556G-B] 17 (4) VS-6556G-BW (Dust- & splash-proof type with brakes) Outer Dimensions and Workable Space [VS-6556G-BW] 18 Chapter 3 Specifications of the Robot Unit (5) VS-6556G-P10/P100(cleanroom type) Outer dimensions and workable space (VS-6556G-P10/P100) 19 (6) VS-6556G-BP10/BP100(cleanroom type with brakes) Outer dimensions and workable space (VS-6556G-BP10/BP100) 20 Chapter 3 Specifications of the Robot Unit (7) VS-6577G (Standard type) Outer Dimensions and Workable Space [VS-6577G] 21 (8) VS-6577G-W (Dust- & splash-proof type) Outer Dimensions and Workable Space [VS-6577G-W] 22 Chapter 3 Specifications of the Robot Unit (9) VS-6577G-B (With brakes) Outer Dimensions and Workable Space [VS-6577G-B] 23 (10) VS-6577G-BW (Dust- & splash-proof type with brakes) Outer Dimensions and Workable Space [VS-6577G-BW] 24 Chapter 3 Specifications of the Robot Unit (11) VS-6577G-P10/P100 (cleanroom type) Outer dimensions and workable space (VS-6577G-P10/P100) 25 (12) VS-6577G-BP10/BP100 (cleanroom type with brakes) Outer dimensions and workable space (VS-6577G-BP10/BP100) 26 Chapter 3 Specifications of the Robot Unit 3.2.2 UL-Listed Models (1) VS-6556G-BW-UL (UL-Listed) Outer Dimensions and Workable Space [VS-6556G-BW-UL] 27 (2) VS-6577G-BW-UL (UL-Listed) Outer Dimensions and Workable Space [VS-6577G-BW-UL] 28 Chapter 3 Specifications of the Robot Unit 3.3 Robot Positioning Time VS-G series robot positioning time 1. Following figures show the positioning times used to calculate the cycle time. 2. Positioning time means the time from the start of robot operation to the arrival at the target positioning point. 3. After the robot moves to and passes the target positioning point, vibration will be dampened and the robot positioned at the target positioning point as shown in Figure below. This vibration dampening time is not considered in the graph. Caution (1) The vibration dampening time depends on factors such as the weight of the end-effector. If the robot is to be used in such a way that it overshoots or if the vibration damping time is of great concern, test the robot carefully beforehand. (2) If acceleration begins before residual vibration of the robot stops, an overcurrent error (code starts from ERROR6120; the first digit represents the axis number) may be displayed. In this case, take one of the following measures: Lower the deceleration of the preceding operation with a DECEL command to reduce residual vibration. Keep the robot in stand-by with a DELAY command until residual vibration stops. Lower acceleration with an ACCEL command. (3) Operate the robot with the optimum load setting in accordance with the end-effector weight and workpiece weight. If not, a robot failure may result. Vibration Dampening Time 29 (1) VS-6556G robot positioning time VS6556G J1 axis 1.6 1.4 7kg Positioning time (s) 1.2 1 1kg 0.8 0.6 0.4 0.2 0 0 20 40 60 80 100 120 140 160 180 Motion angle (deg.) J1 Axis [VS-6556G] VS6556G J2 axis 1.6 7kg 1.4 Positioning time (s) 1.2 1kg 1 0.8 0.6 0.4 0.2 0 0 20 40 60 80 100 Motion angle (deg.) J2 Axis [VS-6556G] 30 120 140 160 180 Chapter 3 Specifications of the Robot Unit VS6556G J3 axis 1.4 7kg 1.2 Positioning time (s) 1 1kg 0.8 0.6 0.4 0.2 0 0 20 40 60 80 100 120 140 160 180 Motion angle (deg.) J3 Axis [VS-6556G] VS6556G J4,5 axis 1.6 1.4 7kg Positioning time (s) 1.2 1 1kg 0.8 0.6 0.4 0.2 0 0 20 40 60 80 100 Motion angle (deg.) J4, J5 Axis [VS-6556G] 31 120 140 160 180 VS6556G J6 axis 1.2 1 7kg Positioning time (s) 0.8 1kg 0.6 0.4 0.2 0 0 20 40 60 80 100 120 140 160 180 Motion angle (deg.) J6 Axis [VS-6556G] VS6556G,VS6577G CP operation 0.7 0.6 7kg Positioning time (s) 0.5 1kg 0.4 0.3 0.2 0.1 0 0 50 100 150 Travel distance (mm) CP Operation [VS-6556G] 32 200 250 300 Chapter 3 Specifications of the Robot Unit (2) VS-6577G robot positioning time VS6577G J1 axis 2 7kg 1.8 1.6 Positioning time (s) 1.4 1kg 1.2 1 0.8 0.6 0.4 0.2 0 0 20 40 60 80 100 120 140 160 180 Motion angle (deg.) J1 Axes [VS-6577G] VS6577G J2,3 axis 2 1.8 7kg 1.6 Positioning time (s) 1.4 1kg 1.2 1 0.8 0.6 0.4 0.2 0 0 20 40 60 80 100 Motion angle (deg.) J2, J3 Axes [VS-6577G] 33 120 140 160 180 VS6577G J4,5 axis 1.6 1.4 7kg Positioning time (s) 1.2 1 1kg 0.8 0.6 0.4 0.2 0 0 20 40 60 80 100 120 140 160 180 Motion angle (deg.) J4, J5 Axes [VS-6577G] VS6577G J6 axis 1.2 1 7kg Positioning time (s) 0.8 1kg 0.6 0.4 0.2 0 0 20 40 60 80 100 Motion angle (deg.) J6 Axis [VS-6577G] 34 120 140 160 180 Chapter 3 Specifications of the Robot Unit VS6556G,VS6577G CP operation 0.7 0.6 7kg Positioning time (s) 0.5 1kg 0.4 0.3 0.2 0.1 0 0 50 100 150 Travel distance (mm) CP Operation [VS-6577G] 35 200 250 300 3.4 Air Piping, Signal Wiring, and Solenoid Valve Specifications The VS-G series is equipped with 7 air pipes for air chuck, 10 signal lines, and 3 solenoid valves in it. Caution: - Supply dry air filtered through an air filter (Recommended filtration rating: 5 μm or below). - Before piping, blow the air tube out with dry air to clean out the inside (flushing); otherwise, any chips, cutting oil, dust or dirt remaining in the air tube may result in a damaged valve. 3.4.1 Air Piping and Signal Wiring (1) VS-6556G(-B) / VS-6577G(-B) Valve Symbols and Air Intake/Exhaust States (1A and 1B are piping joint symbols.) Air piping joint Air intake AIR1 Valve signal Solenoid A B ON OFF OFF ON ON OFF OFF ON ON OFF OFF ON Solenoid Exhaust valve 1A 1B 2A 2B 3A 3B AIR2 1B 1A 2B 2A 3B 3A 1 1 2 2 3 3 CN20 Pin Assignment For controller I/O unit, NPN type (source IN, sink OUT) Used for: CN20 pin No. 12 +24V 13 Solenoid 1A (solenoid valve 1) 14 Solenoid 1B (solenoid valve 1) 15 Solenoid 2A (solenoid valve 2) 16 Solenoid 2B (solenoid valve 2) 17 Solenoid 3A (solenoid valve 3) 18 Solenoid 3B (solenoid valve 3) For controller I/O unit, PNP type (sink IN, source OUT) Used for: CN20 pin No. 12 0V 13 Solenoid 1A (solenoid valve 1) 14 Solenoid 1B (solenoid valve 1) 15 Solenoid 2A (solenoid valve 2) 16 Solenoid 2B (solenoid valve 2) 17 Solenoid 3A (solenoid valve 3) 18 Solenoid 3B (solenoid valve 3) Note 1: Pins #1 to #10 on CN21 and those on CN20 are connected with each other. The allowable current per line is 1 A. Note 2: Use the attached connector sets for CN20 and CN21. Connector set part No. Part No. Model and part name 410887-0170 (for CN20) SRCN6A25-24S (round type connector) Japan Aviation Electronics Industry Ltd. 410877-0180 (for CN21) JMLP1610M (L type plug connector) DDK Electronics, Inc. 410889-0030 Air Piping and Signal Wiring [VS-6556G(-B) / VS-6577G(-B)] 36 Appearance Chapter 3 Specifications of the Robot Unit (2) VS-6556G-(B)W / VS-6577G-(B)W Valve Symbols and Air Intake/Exhaust States (1A and 1B are piping joint symbols.) Air piping joint Air intake AIR1 1A 1B 2A 2B 3A 3B AIR2 Valve signal Solenoid A B ON OFF OFF ON ON OFF OFF ON ON OFF OFF ON Exhaust Solenoid valve 1B 1A 2B 2A 3B 3A 1 1 2 2 3 3 CN20 Pin Assignment For controller I/O unit, NPN type (source IN, sink OUT) CN20 pin No. Used for: M +24V N Solenoid 1A (solenoid valve 1) P Solenoid 1B (solenoid valve 1) R Solenoid 2A (solenoid valve 2) S Solenoid 2B (solenoid valve 2) T Solenoid 3A (solenoid valve 3) U Solenoid 3B (solenoid valve 3) For controller I/O unit, PNP type (sink IN, source OUT) CN20 pin No. Used for: M 0V N Solenoid 1A (solenoid valve 1) P Solenoid 1B (solenoid valve 1) R Solenoid 2A (solenoid valve 2) S Solenoid 2B (solenoid valve 2) T Solenoid 3A (solenoid valve 3) U Solenoid 3B (solenoid valve 3) Note 1: Pins A to K on CN20 and pins #1 to #10 on CN21 are connected with each other as shown below. The allowable current per line is 1 A. CN20 A B C D E F G H J K CN21 1 2 3 4 5 6 7 8 9 10 Note 2: Use the attached connector sets for CN20 and CN21. Connector set part No. 410889-0010 Part No. Model and part name 410877-0120 (for CN20) H/M3106A22-14S (straight plug) HIROSE ELECTRIC CO., LTD. 410877-0130 (for CN20) H/MS3057-12A (cord clamp) HIROSE ELECTRIC CO., LTD. Applicable wire diameter 11.4 to 15.9 410877-0140 (for CN20) H/MS3057-12A1 (cord clamp) HIROSE ELECTRIC CO., LTD. Applicable wire diameter 8 to 11.6 410877-0070 (for CN21) EBLP1610M (L type plug connector) DDK Electronics, Inc. Appearance Air Piping and Signal Wiring [VS-6556G-(B)W / VS-6577G-(B)W] 37 (3) VS-6556G-P10(B)/VS-6577G-P10(B) CN20 Pin Assignment For controller I/O unit, NPN type (source IN, sink OUT) CN20 pin No. Used for: M +24V N Solenoid 1A (solenoid valve 1) P Solenoid 1B (solenoid valve 1) R Solenoid 2A (solenoid valve 2) S Solenoid 2B (solenoid valve 2) T Solenoid 3A (solenoid valve 3) U Solenoid 3B (solenoid valve 3) For controller I/O unit, PNP type (sink IN, source OUT) CN20 pin No. Used for: M 0V N Solenoid 1A (solenoid valve 1) P Solenoid 1B (solenoid valve 1) R Solenoid 2A (solenoid valve 2) S Solenoid 2B (solenoid valve 2) T Solenoid 3A (solenoid valve 3) U Solenoid 3B (solenoid valve 3) Note 1:Pins A to K on CN20 and pins #1 to #10 on CN21 are connected with each other as shown below. The allowable current per line is 1 A. CN20 A B C D E F G H J K CN21 1 2 3 4 5 6 7 8 9 10 Note 2:Use the attached connector sets for CN20 and CN21. Connector set part No. 410889-0010 Part No. Model and part name 410877-0120 (for CN20) H/M3106A22-14S (straight plug) (HIROSE ELECTRIC CO., LTD.) 410877-0130 (for CN20) H/MS3057-12A (cord clamp) (HIROSE ELECTRIC CO., LTD.) Applicable wire diameter 11.4 to 15.9 410877-0140 (for CN20) H/MS3057-12A1 (cord clamp) (HIROSE ELECTRIC CO., LTD.) Applicable wire diameter 8 to 11.6 410877-0070 (for CN21) EBLP1610M (L type plug connector) (DDK Electronics, Inc.) Air Piping and Signal Wiring 38 Appearance Chapter 3 Specifications of the Robot Unit (4) VS-6556G-P100(B)/VS-6577G-P100(B) CN20 Pin Assignment For controller I/O unit, NPN type (source IN, sink OUT) CN20 pin No. Used for: M +24V N solenoid 1A (solenoid valve 1) P Solenoid 1B (solenoid valve 1) R Solenoid 2A (solenoid valve 2) S Solenoid 2B (solenoid valve 2) T Solenoid 3A (solenoid valve 3) U Solenoid 3B (solenoid valve 3) For controller I/O unit, PNP type (sink IN, source OUT) CN20 pin No. Used for: M 0V N Solenoid 1A (solenoid valve 1) P Solenoid 1B (solenoid valve 1) R Solenoid 2A (solenoid valve 2) S Solenoid 2B (solenoid valve 2) T Solenoid 3A (solenoid valve 3) U Solenoid 3B (solenoid valve 3) Note 1:Pins A to K on CN20 and pins #1 to #10 on CN21 are connected with each other as shown below. The allowable current per line is 1 A. CN20 A B C D E F G H J K CN21 1 2 3 4 5 6 7 8 9 10 Note 2:Use the attached connector sets for CN20 and CN21. Connector set part No. 410889-0010 Part No. Model and part name 410877-0120 (for CN20) H/M3106A22-14S (straight plug) (HIROSE ELECTRIC CO., LTD.) 410877-0130 (for CN20) H/MS3057-12A (cord clamp) (HIROSE ELECTRIC CO., LTD.) Applicable wire diameter 11.4 to 15.9 410877-0140 (for CN20) H/MS3057-12A1 (cord clamp) (HIROSE ELECTRIC CO., LTD.) Applicable wire diameter 8 to 11.6 410877-0070 (for CN21) EBLP1610M (L type plug connector) (DDK Electronics, Inc.) Air Piping and Signal Wiring 39 Appearance (3) UL-Listed models (VS-6556G-BW-UL / VS-6577G-BW-UL) CN20 Pin Assignment For controller I/O unit, NPN type (source IN, sink OUT) CN20 pin No. Used for: M +24V N Solenoid 1A (solenoid valve 1) P Solenoid 1B (solenoid valve 1) R Solenoid 2A (solenoid valve 2) S Solenoid 2B (solenoid valve 2) T Solenoid 3A (solenoid valve 3) U Solenoid 3B (solenoid valve 3) For controller I/O unit, PNP type (sink IN, source OUT) CN20 pin No. Used for: M 0V N Solenoid 1A (solenoid valve 1) P Solenoid 1B (solenoid valve 1) R Solenoid 2A (solenoid valve 2) S Solenoid 2B (solenoid valve 2) T Solenoid 3A (solenoid valve 3) U Solenoid 3B (solenoid valve 3) Note 1: Pins A to K on CN20 and pins #1 to #10 on CN21 are connected with each other as shown below. The allowable current per line is 1 A. CN20 A B C D E F G H J K CN21 1 2 3 4 5 6 7 8 9 10 Note 2: Use the attached connector sets for CN20 and CN21. Connector set part No. Part No. Model and part name H/M3106A22-14S (straight plug) HIROSE ELECTRIC CO., LTD. H/MS3057-12A (cord clamp) HIROSE ELECTRIC CO., LTD. H/MS3057-12A1 (cord clamp) HIROSE ELECTRIC CO., LTD. 410877-0120 (for CN20) 410877-0130 (for CN20) 410889-0130 410877-0140 (for CN20) Appearance Applicable wire diameter 11.4 to 15.9 Applicable wire diameter 8 to 11.6 WEBLP1610M-2-D (L type plug connector) DDK Electronics, Inc. 410877-0620 (for CN21) Air Piping and Signal Wiring [VS-6556G-BW-UL / VS-6577G-BW-UL] 40 Chapter 3 Specifications of the Robot Unit 3.4.2 Instructions for Using Splash-proof Connector Sets The splash-proof connector sets for CN20 and CN21 assure the waterproof degree of as long as they are properly assembled and connected. When using those connector sets, be sure to observe the following notes. (1) The degree of protection of the splash-proof robot unit, which is specified in Section 3.1 "Robot Specifications," is assured as long as the splash-proof connectors are joined with connectors CN20 and CN21 on the robot unit. If there is no connection on CN20 and CN21, the splash-proof rating is not assured. (2) Use a sheathed cable for a splash-proof connector. Using an unsheathed cable cannot assure the splash-proof rating. (3) Each connector set contains two types of cord clamps for CN20. Use the one that matches the cable diameter. (4) Each connector set should be assembled according to the instructions specified by the connector manufacturer. The table below shows an assembly procedure example of a connector set for CN21. The actual assembly procedure should be in accordance with the instructions specified by the connector manufacturer. Overview of assembly procedure example of connector set for CN21 Components of connector set for CN21 Assembly procedure example (1) Treatment of wire ends: Strip the wire ends of the cable (prepared by the customer). The cable diameter and the lengths "A" and "B" should be in accordance with the instructions given by the connector manufacturer. (For straight plug) (2) Tinning: Tin both the core wires and the connector contacts. (3) Pass the cable through the heat-shrinkable tube for splash-proof purpose (with adhesive inside, prepared by the customer) and the rubber bushing. (4) Solder the core wires onto the connector contacts to connect them each other. (5) Press the rubber bushing against the shell to fit the hood. Then cover the rubber bushing with the heat-shrinkable tube and apply heat to shrink the tube. (For L type plug) 41 3.4.3 Solenoid Valve Specifications (VS-G series) Note: Do not cover the valve exhaust port behind the second arm. Item Specifications Switching system 2-position double Applicable fluid Air Operating system Pilot type Valve Effective cross section (Cv value) A・B→R:1.188mm2(0.066) Lubrication Oilless Operating pressure range 0.1 to 0.7 MPa (Note 1) Response time 15 ms or less (at 0.5 MPa) Maximum operating frequency 10 Hz -5 to 50C Ambient temperature Solenoid P→A・B:1.116mm2(0.062) (No dew condensation allowed. When dry air is used) Operating voltage 24 V 10% Power consumption (current) 0.5 W (21 mA) Surge voltage protection circuit Zener diode Note 1: The air source connected to the robot unit must be used within the operating pressure range from 0.10 to 0.39 MPa (specified in Chapter 3 "Specifications of the Robot Unit"). 3.4.4 Existing Internal Threads for Wiring and Piping 104.5(VS-6556G) 100 (VS-6577G) Existing Internal Threads for Wiring and Piping (VS-G series) 42 Chapter 3 Specifications of the Robot Unit 3.5 Precautions When Designing the End-effectors Design an end-effector such that it is in compliance with items (1) to (3) described below. CAUTION If the end-effector design precautions are not observed, the clamped parts of the robot unit may become loose, rattle or be out of position. In the worst case, the mechanical parts of the robot and robot controller may become damaged. (1) Mass of end-effector Design the end-effector so that the total mass of the end-effector (including workpiece) will be lighter than the maximum payload capacity of the robot. The total mass includes the wiring, piping, etc. Maximum total mass of end-effector (including workpiece) Maximum payload capacity (7 kg) *1 *1: If the payload exceeds 6 kg, the robot unit must be used with the flange facing down at 45 degrees from vertical. (2) Center of gravity position of end-effector Design an end-effector so that the center of gravity position of the end-effector (including workpiece) is within the range shown in Figure below. Allowable Range of Center of Gravity Position of End-effector (VS-G series) 43 (3) Moment of inertia around J4, J5 and J6 Design an end-effector so that its moments of inertia around J4, J5 and J6 (including workpiece) do not exceed the maximum allowable moment of inertia of the robot. Moment of inertia around J4, J5 and J6 of end-effector (incl. mass of workpiece) Max. allowable moment of inertia Mass of payload (kg) ~1 ~2 ~3 ~4 ~5 ~6 ~7 Max allowable moment of inartia (kg・m2) Around J4 & J5 Around J6 0.059 0.118 0.177 0.009 0.018 0.027 0.236 0.295 0.354 0.413 0.036 0.045 0.054 0.063 When calculating the moment of inertia around J4, J5 and J6 of the end-effector, use the formulas given in Following Table and Figure. Moment-of-Inertia Formulas 4. Sphere 1. Cylinder (1) (Axis of rotation = Center axis) 2. Cylinder (2) (Axis of rotation = Center axis) 5. Center of gravity not on the axis of rotation (The axis of rotation passes through the center of gravity.) 3. Rectangular parallelepiped (The axis of rotation passes through the center of gravity.) 44 l: m: r: a, b, c, : Moment of inertia Mass Radius Length kgm2 kg m m Chapter 3 Specifications of the Robot Unit Calculation example : When calculating the moment of inertia of a complicated shape, divide it into simple parts as much as possible for easier calculations. As shown in the figure below, divide the end-effector into three parts (, , ). (1) Moment of inertia around J6 Around J6 A d J6 (2) Moment of inertia around J4 and J5 For the end-effector shown below, the moment of inertia around J4 and J5 can be calculated according to the same formula. End-effector Moment of Inertia Calculation Example 45 3.6 Stopping Time and Distance (Angle) at an Emergency Stop Pressing the emergency stop button when the robot is in motion stops the robot. The stopping time required from activation of a stop signal and the distance (angle) for major three joints vary with the robot speed as shown in the graphs below. The measuring conditions are: Robot arm extended, 33%, 66% and 100% of the maximum payload. Note : The acceleration differs depending upon the mass of payload setting. The graphs below show the cases where the stopping distance or stopping time comes to be the maximum. (1) VS-6556G series J1, J2, J3 stopping time (VS-6556G) 33%, 66%, 100% of maximum payload 1 stopping time (second) 0.9 J1(33%,66%) 0.8 J2,J3(33%,66%) 0.7 J1(100%) 0.6 J2,J3(100%) 0.5 0.4 0.3 0.2 0.1 0 0 20 40 60 speed (%) 80 100 120 J1, J2, J3 stopping time vs. speed at an emergency stop (VS-6556G series) J1, J2, J3 stopping distance (VS-6556G) 33%, 66%, 100% of maximum payload 70 stopping distance (deg) 60 J1,J2(33%,66%) J3(33%,66%) 50 J1,J2(100%) 40 J3(100%) 30 20 10 0 0 20 40 60 80 100 120 speed (%) J1, J2, J3 stopping distance vs. speed at an emergency stop (VS-6556G series) 46 Chapter 4 Specifications of the Robot Controller (2) VS-6577G series J1, J2, J3 stopping time (VS-6577G) 33%, 66%, 100% of maximum payload 1 0.9 J1(33%,66%) stopping time (second) 0.8 J2,J3(33%,66%) 0.7 J1(100%) 0.6 J2,J3(100%) 0.5 0.4 0.3 0.2 0.1 0 0 20 40 60 80 100 120 speed (%) J1, J2, J3 stopping time vs. speed at an emergency stop (VS-6577G series) J1, J2, J3 stopping distance (VS-6577G) 33%, 66%, 100% of maximum payload 40 35 stopping distance (deg) J1(33%,66%) 30 J2,J3(33%,66%) J1(100%) 25 J2,J3(100%) 20 15 10 5 0 0 20 40 60 speed (%) 80 100 120 J1, J2, J3 stopping distance vs. speed at an emergency stop (VS-6577G series) 47 Chapter 4 Specifications of the Robot Controller 4.1 Specifications Table below lists the robot controller specifications. RC7M Controller Specifications (1) (VS-G series) Item Specifications Applicable robot Small-sized, vertical articulated type (VS-G series) Controller model RC7M-VSG6***-** Control system PTP, CP 3-dimensional linear, 3-dimensional circular No. of controllable axes Up to six axes simultaneously Drive system All axes: Full-digital AC servo Language used DENSO robot language (conforming to SLIM) Memory capacity 3.25 MB (equivalent to 10,000 steps, 30,000 points) Teaching system 1) Remote teaching 2) Numerical input (MDI) Mini I/O Standard I/O HAND I/O SAFETY I/O (Only for Global type) External signals (I/O) Parallel I/O board (Option) CC-Link board (option) Input signals: 6 fixed system points Output signals: 5 fixed system points Input signals: Additional 80 user open points Output signals: Additional 96 user open points 1 board Input signals: Additional 40 user open points Output signals: Additional 48 user open points Input signals: 1024 points (Master) + 256 points (Slave) Output signals: 1024 points (Master) + 256 points (Slave) Master Input signals: 1024 points Output signals: 1024 points Slave Input signals: 256 points Output signals: 256 points Slave Input signals: 384 points Output signals: 384 points (including remote registers RWw and RWr) External communication RS-232C: 1 line Ethernet: 1 line USB: 2 lines Extension slot 3 (For an optional board) Self-diagnosis function Timer function Error display Cables Input signals: 8 user open points Output signals: 8 user open points 2 boards Master & slave DeviceNet board (Option) Input signals: 8 user open points + 11 fixed system points Output signals: 8 user open points + 14 fixed system points Note: In global type, some fixed system points are not used. Overrun, servo error, memory error, input error, etc. 0.02 to 10 sec. (in units of 1/60 sec.) Error codes will be outputted on the external I/O. Error messages will be displayed in English on the teach pendant (option). Error codes will be displayed on the mini pendant (option). Motor & encoder cable (option) 2 m, 4 m, 6 m, 12 m, 20 m (Standard / Splash-proof) I/O cable (option) 8 m, 15 m (For Mini I/O, HAND I/O, Optional parallel I/O) and SAFETY I/O Power cable 5m 48 Chapter 4 Specifications of the Robot Controller RC7M Controller Specifications (2) (VS-G series) Item Specifications Environmental conditions (in operation) Temperature: 0 to 40C Humidity: 90% RH or less (no condensation allowed) Three-phase, 200 VAC-15% to 230 VAC+10%, 50/60 Hz, 1.85 kVA Single-phase, 230 VAC-10% to 230 VAC+10%, 50/60 Hz, 1.85 kVA Power source Degree of protection IP20 Standard type: Approx. 18 kg (40 lbs) Global type with safety board: Approx. 19 kg (42 lbs) Global type with safety box: Approx. 22 kg (49 lbs) Weight WARNING DO NOT touch fins. Their hot surfaces may cause severe burns. DO NOT insert fingers or foreign objects into openings. Doing so may cause bodily injury. Before opening the controller cover and accessing the inside of the controller for maintenance, be sure to turn off the power switch, disconnect the power cable, and wait 3 minutes or more. This is for protecting you from electric shock. DO NOT connect or disconnect connectors to/from the controller while the power switch is on. Doing so may cause electric shock or controller failure. CAUTION IN INSTALLATION This controller is not designed to be dust-proof, splash-proof, or explosion-proof. Read operation manuals before installation. Do not place anything on the controller. 49 4.2 Outer Dimensions Figure below shows the outer dimensions of the robot controller. Outer Dimensions of Robot Controller (VS-G series) Outer Dimensions of RC7M Robot Controller (Example: Global type with safety board) 50 Chapter 4 Specifications of the Robot Controller 4.3 Controller Setting Table The controller setting table given in Figure below is attached to the controller. It shows the software version, the next replacement dates of the memory backup battery and encoder backup battery, etc. <Content THE SETPRM LIST> SOFTWARE Ver. The version of the main software for the controller is entered. DATE OF RENEWING BAT. The next replacement dates of the memory backup battery and encoder backup battery are entered. TYPE The model of the robot system is entered. The coding of the set model is described below: SUBASSEMBLY The type and position of the controller IPM board are described. The coding of the set model (VS-G series) VS -6 5 56 G-BW/ Variation None: Standard type B: Standard type with brakes W: Dust- & splash-proof type BW: Dust- & splash-proof type with brakes Arm length 56: 560 mm 77: 770 mm Standard payload (5 kg) Number of axes (6 axes) Vertical articulated robot, small-sized 51 Chapter 5 Warranty DENSO robots are manufactured under strict quality control. In case of failure, we warranty the robot under the following conditions: Warranty Period The warranty shall be effective for one year from the date of purchase. Warranty Coverage DENSO WAVE shall repair the robot free of charge when a failure occurs and is attributable to the design, manufacture or material of the robot within the warranty period in spite of proper use. Items Not Covered Failures, which arise from one of the following, shall not be covered by the warranty even if the robot is under warranty: (1) Failures caused by improper repair, modification, transfer or handling by you or a third party; (2) Failures caused by the use of a part or oil/fat other than those specified in the related manuals; (3) Failures caused by a fire, salt damage, earthquake, storm/flood or other acts of God; (4) Failures caused by the use of the robot in an environment other than the environment specified in the related manuals, such as dust and water ingress; (5) Failures caused by a worn-out consumable, such as a fan filter; (6) Failures caused by improper performance or non-performance of lubrication, maintenance or inspections stated in this owner's manual; and (7) Damages other than the robot repair costs. 52 Vertical Articulated Robot VS-G SERIES GENERAL INFORMATION ABOUT ROBOT First Edition Eighth Edition Ninth Edition July 2005 April 2009 March 2010 DENSO WAVE INCORPORATED 3M**C The purpose of this manual is to provide accurate information in the handling and operating of the robot. Please feel free to send your comments regarding any errors or omissions you may have found, or any suggestions you may have for generally improving the manual. In no event will DENSO WAVE INCORPORATED be liable for any direct or indirect damages resulting from the application of the information in this manual.