1
-
Océ
VarioPrint®
6000 MICR
series
Exceptional versatility
o
User manual
Operating
information
Copyright
© 2011 Océ
All rights reserved. No part of this work may be reproduced, copied, adapted, or transmitted
in any form or by any means without written permission from Océ.
Océ makes no representation or warranties with respect to the contents hereof and specifically disclaims any implied warranties of merchantability or fitness for any particular purpose.
Further, Océ reserves the right to revise this publication and to make changes from time
to time in the content hereof without obligation to notify any person of such revision or
changes.
Edition: 2011-03
Trademarks
Trademarks
List of trademarks
Océ, VarioPrint, PRISMAaccess, PRISMAprepare, PRISMAproduction and DPlink are
registered trademarks of Océ-Technologies B.V.
Xerox, DocuTech, DigiPath and FreeFlow are registered trademarks of Xerox Corporation.
Adobe and PostScript are registered trademarks of Adobe Systems Incorporated.
Products in this publication are referred to by their general trade names. In most, if not
all cases, these designations are claimed as trademarks or registered trademarks of their
respective companies.
3
Contents
Contents
Chapter 1
Introduction.........................................................................................................5
Notes for the reader...................................................................................6
Introduction to the Océ VarioPrint® 6000 MICR series...........................8
Introduction to the main system components.........................................9
Available documentation.........................................................................11
Chapter 2
Transaction printing.........................................................................................13
Introduction to the 'Transaction' section ..............................................14
Activate the transaction printing function..............................................18
Activate the MICR mode..........................................................................20
Shift the image in the transaction printing mode.................................23
Handle the media messages...................................................................25
Create a transaction setup.......................................................................28
Chapter 3
Secure printing..................................................................................................31
Error handling and secure printing.........................................................32
Chapter 4
MICR fonts.........................................................................................................37
MICR fonts.................................................................................................38
Chapter 5
MICR Toner........................................................................................................39
Check the status of the toner reservoirs.................................................40
Add toner..................................................................................................42
Appendix A
Miscellaneous....................................................................................................45
Product specifications..............................................................................46
4
Chapter 1
Introduction
Notes for the reader
Notes for the reader
Introduction
This manual helps you to use the Océ VarioPrint® 6000 MICR series. The manual
contains a description of the product and guidelines to use and operate the Océ VarioPrint® 6000 MICR series.
Definition
Attention-Getters
Parts of this manual require your special attention. These parts can provide the following:
■ Additional general information, for example, information that is useful when you
perform a task.
■ Information to prevent personal injuries or property damage.
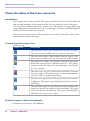
Note, Attention, and Caution
The words Note, Attention and Caution draw your attention to important information.
Overview of the attention-getters#
Word
6
Icon
Indicates
Note
Tips or additional information about the correct use
of the product.
Attention
Information to prevent property damage, for example
damage to the product, documents, or files.
Caution
Information to prevent personal injuries.
The Caution indication has several icons that warn
against various hazards. The icons are shown below.
Caution
General hazard
Caution
Hot surface
Caution
Electric shock
Chapter 1 - Introduction
Notes for the reader
Word
Icon
Indicates
Caution
Moving parts
Caution
Laser beam
The use of heat-resistant gloves is mandatory when you
carry out these actions.
Safety information
Before using this Océ product, make sure that you read and understand the safety information which is part of the user documentation. You can download the safety information
via http://global.oce.com/support/ or, if applicable, find it on the user documentation
CD/DVD that is delivered together with the machine or obtain the safety information
from your local Océ representative. To avoid potential hazards, maintenance is strictly
preserved to properly qualified and trained service technicians.
Sustainability Information
Océ is focused on creating value for all stakeholders by realizing profitable, sustainable
growth. The Océ strategy is aimed at optimizing business processes, strengthening its
product portfolio and boosting distribution power. Sustainability underpins these strategic
aims. A strong performance in sustainability contributes to operational efficiency as well
as generating stronger product propositions and a more powerful market image. It is no
coincidence that Océ embraced sustainability as part of its core proposition decades ago.
You can find more information about the sustainability policy of Océ via www.sustainability.oce.com.
Chapter 1 - Introduction
7
Introduction to the Océ VarioPrint® 6000 MICR series
Introduction to the Océ VarioPrint® 6000 MICR series
Introduction
The Océ VarioPrint® 6000 MICR series is a series of high-volume, cut-sheet printers.
These printers support magnetic ink character recognition (MICR). MICR printing is
intended primarily for transaction printing of valuable documents like cheques. A magnetic reader can read documents printed with MICR toner.
The Océ VarioPrint® 6000 MICR series uses the Océ Gemini Instant Duplex Technology. This technology enables the machine to print MICR toner on both the front side
and the back side of a sheet at the same time. Depending on your version, the sustained
print speed ranges from 170, 200 to 250 images per minute (A4 / Letter) when you print
a 2-sided document. The print speed for 1-sided documents (A4/Letter) is 125 images
per minute.
The Océ VarioPrint® 6000 MICR series prints only with MICR toner. A combination
of MICR toner and regular toner is not possible. However, you can also print regular
documents with MICR toner.
This section gives a short description of the main features of the machine.
Note:
Not all the configurations mentioned in this user manual are available worldwide. Please
contact your local dealer for the available configurations in your country.
Overview of the main features
■
■
■
■
■
■
■
■
■
■
■
■
8
Support of magnetic ink character recognition (MICR) printing
Océ Gemini Instant Duplex Technology that enables the printing on both sides of a
sheet at the same time.
Advanced scheduling concept on the operator panel to keep the machine running.
Load and assign the media while the machine prints.
Support of up to 12 paper trays (total input capacity up to 13,800 sheets) and a roll
feeder.
Support of up to 3 stackers, a finisher, a stacker/stapler and other external finishers.
Support of a large range of media, media sizes and media weights.
Support of secure printing.
Support of IPDS/PS/PCL/PDF and streaming PS.
Support of a large range of software products, for example the Océ PRISMA series,
Xerox® DigiPath® and Xerox® FreeFlow® Makeready, Kodak® KDK Link.
Support of RDO files via Océ DP Link.
Support of a direct copy path from the optional Océ DS60 scanner to the printer.
Chapter 1 - Introduction
Introduction to the main system components
Introduction to the main system components
Introduction
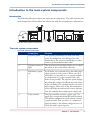
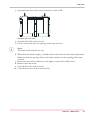
The following illustration shows the main system components. The table describes the
main components. Please follow the links in the table for comprehensive information.
1
2
1
2
3
3
4
4
5
6
6
7
[10] The main system components
The main system components
The main system components#
Component
Function
1
Operator panel
The operator panel helps you with your daily
work, for example the scheduling of the jobs.
Furthermore, the operator panel helps you solve
errors or perform maintenance tasks.
2
Operator attention
light
The operator attention light enables you to check
the status of the system from a distance.
3
Roll feeder (optional)
A roll feeder is an optional device that adds paper
input capacity to your printer. When you use a
roll feeder, you can only use 1 or 2 paper modules.
A combination of 3 paper modules and a roll
feeder is not possible. The operator panel displays
the roll feeder and gives feedback about the status
of the roll feeder. For example whether the roll is
full or empty. Please refer to the documentation
of the roll feeder manufacturer for more information, for example about replacing an empty roll.
4
Paper module
The paper module contains 4 paper trays. The
paper trays contain the media that will be printed.
The default configuration of the system contains
1 paper module. You can add 1 or 2 additional
paper modules to the default configuration to increase the media input capacity.
Chapter 1 - Introduction
9
Introduction to the main system components
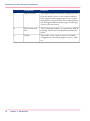
10
Component
Function
5
Engine module
The engine module contains the components that
print the media. Access to the engine module is
only required when a paper jam occurs or when
maintenance is required. The doors at the left-hand
side and right-hand side of the engine module give
access to the toner units.
6
PrintGuard modules
The PrintGuard modules are required for MICR
printing. The PrintGuard modules postfuse the
prints.
7
Stacker
The stacker is the output location of a default
configuration. The system supports up to 3 stackers.
Chapter 1 - Introduction
Available documentation
Available documentation
Introduction
This machine is delivered with a documentation set that consists of the following items.
■ A hardcopy 'Safety Information Sheet'.
■ A hardcopy 'Documentation Notice'.
You can find and download the user manuals at www.oce.com.
#
User manuals
Availability
User manual - Operating information
(MICR printing)
Available as a PDF file (English only).
User manual - Operating information
(Document printing)
Available as a PDF file in multiple languages.
User manual - Maintenance tasks
Available as a PDF file in multiple languages.
User manual - Safety information
Available as a PDF file in multiple languages.
Note:
Please check www.oce.com for the latest version of the documentation.
Main Content of the User Manuals
The following table provides an overview of the main content of the user manuals.
Main Content of the User Manuals#
User Manual
Main content
Operating information (MICR printing)
■
Operating information (Document
printing)
■
■
■
■
■
■
■
Maintenance tasks
■
■
■
Introduction to MICR Printing
Printing with MICR
Add toner
Overview of the main system components
Working with the operator panel
Handling and managing jobs on the operator panel
Optional finishers and other devices
Add media, toner and staples
Replacing parts
Cleaning parts
Solve a paper jam in the engine module
Chapter 1 - Introduction
11
Available documentation
12
User Manual
Main content
Safety information
■
Chapter 1 - Introduction
Instructions for safe use
Chapter 2
Transaction printing
Introduction to the 'Transaction' section
Introduction to the 'Transaction' section
Introduction
When the printer contains the optional IPDS or PCL license for transaction printing,
the printer can be used both for document printing and transaction printing. Then you
can print typical transactional documents like invoices, salary slips or other variable data
streams. If you want to use the printer for transaction printing, you must first switch the
printer from the document printing mode to the transaction printing mode. This is only
possible when the list of 'Scheduled jobs' is empty. When the list of 'Scheduled jobs' is
empty, you can activate the transaction printing function on the operator panel and send
jobs from a server or mainframe. The 'Transaction' section on the operator panel contains
the settings that you need to prepare the printer for transaction printing.
The following information is described below.
■ An overview of the items in the 'Transaction' section on the operator panel
■ The sequence of steps for transaction printing on this printer.
The activation of the transaction printing function on the printer is described in a separate
section (see ‘Activate the transaction printing function’ on page 18).
Note:
The operator panel displays the 'Transaction' section only when the printer has a license
for transaction printing.
14
Chapter 2 - Transaction printing
Introduction to the 'Transaction' section
Overview of the 'Transaction' section
1
3
2
4
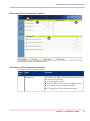
[11] Overview of the 'Transaction' section
The items of the 'Transaction' section
Description of the 'Transaction' section#
Number
Item
Function
1
Dashboard
The dashboard displays the following information
for transaction printing.
■ The connection status
■ The IP address of the server sending the jobs
■ The name of the transaction stream
■ The progress of the transaction stream
Chapter 2 - Transaction printing
15
Introduction to the 'Transaction' section
Number
Item
Function
2
'Connection'
The 'Connection' section gives access to the following functions.
■ Turn the transaction printing function on or
off
■ Put the printer on-line. This is required to
connect the printer to the server
■ Select the setup for the transaction stream
3
'Print protocol'
Display the active printer description language
(read-only)
4
'Image shift'
Display and change the image shift
Sequence of steps for transaction printing
The following table describes the sequence of steps for transaction printing in general.
#
Actions at the printer side
Actions on the server side
1. Switch the printer into the transaction
printing mode
2. Select the required job setup via the
operator panel. You must define the
properties of the job setup in the Settings
Editor application on the Controller
3. Load the required media into the paper
trays
4. Place the printer on-line
5. Connect to the printer
6. Start the transaction stream
7. Print the transaction stream
Note:
You must perform all the regular
activities, for example loading the
media, emptying the output locations, adding supplies and solving
errors
16
Chapter 2 - Transaction printing
Introduction to the 'Transaction' section
Actions at the printer side
Actions on the server side
8. Place the printer off-line when the
transaction stream is ready
9. Switch the printer back to document
printing mode
Chapter 2 - Transaction printing
17
Activate the transaction printing function
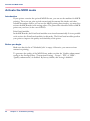
Activate the transaction printing function
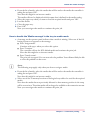
Introduction
To use the transaction printing function, you must first activate this function (see ‘Introduction to the 'Transaction' section ’ on page 14). This section describes the following:
■ How to activate transaction printing mode
■ How to switch back to document printing mode.
Before you begin
Make sure that the list of 'Scheduled jobs' is empty.
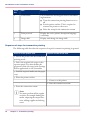
Illustration
[12] The transaction printing pane
Switch to transaction printing mode
1. On the operator panel, press the 'System' button.
2. Press the 'Transaction' button.
18
Chapter 2 - Transaction printing
Activate the transaction printing function
3. Press the 'Transaction printing mode' button.
The text on the button changes from 'Off' to 'On'.
4. Press the 'Active transaction setup' button and select the required setup.
The attributes of the transaction setup are defined in the Settings Editor application on
the Controller.
5. Load the required media into the paper trays.
6. Press the 'Transaction on-line' button.
The text on the button changes from 'Off' to 'On'.
7. On the server, connect to the printer and start the job.
Note:
When a job is ready, you can start another transactional job or switch back to the document printing mode.
Switch to the document printing mode
1. On the operator panel, press the 'System' button.
2. Press the 'Transaction' button.
3. Press the 'Transaction on-line' button.
The text on the button changes from 'On' to 'Off'.
Note that you can only switch the 'Transaction on-line' function to off-line when
■ the transaction stream is ready
■ the printer contains no more print data
■ the printer has stopped normally (not due to an error).
When you switch the 'Transaction on-line' function to off-line, the connection to the
host is disconnected.
4. Press the 'Transaction printing mode' button.
The text on the button changes from 'On' to 'Off'.
Chapter 2 - Transaction printing
19
Activate the MICR mode
Activate the MICR mode
Introduction
If your printer contains the optional MICR license, you can use the machine for MICR
printing. Then you can print typical transactional documents like checks and other
valuable documents. Before you can use the MICR printing functionality, you must first
activate the MICR mode in the settings editor. The printer then identifies itself as a MICR
printer on your host (in the case of IPDS).
PrintGuard modules
In the MICR mode, the PrintGuard modules are activated automatically. It is not possible
to de-activate the PrintGuard modules in this mode. The PrintGuard modules postfuse
your prints to improve the quality and durability of the prints.
Before you begin
Make sure that the list of 'Scheduled jobs' is empty. Otherwise, you cannot activate
transaction printing.
To guarantee the quality of the MICR fonts, make sure that the 'Quality enhancement'
setting in the Settings Editor ('Transaction Printing' - 'Setups' - 'PCL' or 'IPDS' 'Quality enhancement') is disabled. By factory default, this setting is disabled.
20
Chapter 2 - Transaction printing
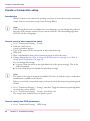
Activate the MICR mode
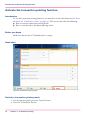
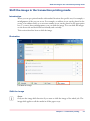
Illustration
[13] Activated MICR mode
Activate the MICR mode
1.
2.
3.
4.
Create a transaction printing setup (see ‘Create a transaction setup’ on page 28).
In the Settings Editor, go to 'Transaction printing' - 'Settings'.
Select 'PCL' or 'IPDS'
Check the 'MICR mode (if licensed)' box.
Note:
When you select 'IPDS', you can also activate the 'Output recovery' setting by putting
a check mark in the box (see ‘Error handling and secure printing’ on page 32).
5. Go to 'Transaction Printing' - 'Setups', select the required Setup, then click 'Load'.
6. On the operator panel, activate the'Transaction printing mode' function in the 'System'
view (see ‘Activate the transaction printing function’ on page 18).
Chapter 2 - Transaction printing
21
Activate the MICR mode
Note:
You can see that you activated the 'MICR mode (if licensed)' on the operator panel in
the 'System' view - 'Transaction' section and in the remote viewer.
22
Chapter 2 - Transaction printing
Shift the image in the transaction printing mode
Shift the image in the transaction printing mode
Introduction
When you use pre-printed media with marked locations for specific text, for example, a
misalignment of the text can occur. For example, an address is not exactly placed in the
center of an address field, or an account number is not exactly placed in the appropriate
box. To correct these misalignments, you can shift the image. You can shift the images
on the front side and back side horizontally and vertically.
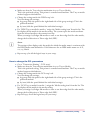
This section describes how to shift the image.
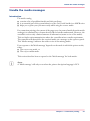
Illustration
[14] Shift the image
Shift the image
Note:
Only use the image shift function if you want to shift the image of the whole job. The
image shift applies to all the media in all the paper trays.
Chapter 2 - Transaction printing
23
Shift the image in the transaction printing mode
1. On the operator panel, press the 'System' button.
2. Press 'Transaction'.
3. Press the - or + buttons to shift the image on the front side or back side of the sheet.
24
Chapter 2 - Transaction printing
Handle the media messages
Handle the media messages
Introduction
The media catalog
■ contains a list of predefined media and their attributes
■ is an essential part of the system behavior of the Océ VarioPrint® 6000 MICR series
■ helps you to print your jobs more easily while using the correct media
For transaction printing, the content of the paper trays (in terms of media from the media
catalogue) is translated into a format that the SRA controller understands. However, the
controller receives only a limited amount of information (name or size of the media).
This can lead to miscommunication where the controller misses a media requirement.
The controller will then ask for the required media via a message on the operator panel.
This 'Media message' indicates the name or size of the missing media.
Your response to the'Media message' depends on the mode in which the printer works,
either:
■ The tray-to-tray mode, or
■ The tray-to-media mode.
This section describes how to respond to the 'Media message' for both modes.
Note:
A 'Media message' will only occur when the printer description language is PCL.
Chapter 2 - Transaction printing
25
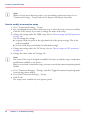
Handle the media messages
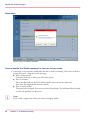
Illustration
[15] Example of a 'Media message'
How to handle the 'Media message' in the tray-to-tray mode
1. A message on the operator panel indicates that a media is missing. Select one of the following actions as a response to the message.
■ Press 'Assign media'.
Continue with step 2 when you select this option.
■ Press 'Continue'.
The controller will use the PCL default media and continue the print job.
Note that this might be an incorrect media.
■ Press 'Cancel stream'.
The print job is stopped. You can now solve the problem. You will most likely be able
to solve the problem on the server.
Note:
Steps 2 and 3 apply only when you chose to assign a media.
26
Chapter 2 - Transaction printing
Handle the media messages
2. From the list of media, select the media that will be used as the media the controller is
asking for and press 'OK'.
Note that this might be an incorrect media.
The media will now be displayed with the name that is defined in the media catalog.
Select
the paper tray where you want to load the required media and press 'OK'.
3.
4. Load the media.
5. Close the paper tray.
6. Press 'OK'.
Now you can assign other media or continue the print job.
How to handle the 'Media message' in the tray-to-media mode
1. A message on the operator panel indicates that a media is missing. Select one of the following actions as a response to the message.
■ Press 'Assign media'.
Continue with step 2 when you select this option.
■ Press 'Continue'.
The controller will use the PCL default media and continue the print job.
Note that this might be an incorrect media.
■ Press 'Cancel stream'.
The print job is stopped. You can now solve the problem. You will most likely be able
to solve the problem on the server.
Note:
The following steps apply only when you chose to assign a media.
2. From the list of media, select the media that will be used as the media the controller is
asking for and press 'OK'.
Note that this might be an incorrect media.
3. Select one of the 16 memory locations of the logical-tray table to be used for the required
media.
Note that the media that was previously allocated to that memory position in the setup
will be overwritten. Then that media will no longer be available to the transaction stream.
Now you can assign other media or continue the print job.
Chapter 2 - Transaction printing
27
Create a transaction setup
Create a transaction setup
Introduction
When you want to use transaction printing, you have to create the necessary transaction
setups. You can create these setups in the Settings Editor.
Note:
If the Settings Editor does not display the correct language, you can change the preferred
language in the internet options of your internet browser. The desired language must
be first in the list of languages.
How to create a new transaction setup
1. Go to 'Transaction Printing' - 'Setups' .
2. Click the 'Add' button.
A pop-up window appears.
3. Type in the name and the description of the transaction setup.
4. Click 'Ok'.
5. Place a checkmark in front of the transaction setup to select the setup.
6. Change the settings (see ‘How to change the IPDS parameters’ on page 28 or ‘How to
change the PCL parameters’ on page 29).
You can change the settings:
■ by group (click the pencil at the right-hand side of the group settings). This is the
preferred method.
■ by item (click the pencil behind the individual settings).
Note:
The status of the setup is changed to modified. You have to load the setup to make these
modifications available on the printer.
Before you can load a transaction setup, you have to switch the transaction printing mode
off-line.
7. Go to 'Transaction Printing' - 'Settings', and click 'Toggle the transaction printing mode'
to switch the printer off-line.
8. Go to 'Transaction Printing' - 'Setups', and click 'Load'.
The setup is now available on your operator panel.
How to change the IPDS parameters
1. Go to 'Transaction Printing' - 'IPDS setup'.
28
Chapter 2 - Transaction printing
Create a transaction setup
2. Make sure that the Tray selection mechanism is set to Tray to Media.
This is the preferred setting. This printer is a media-based machine. The Tray-to-media
method supports this behavior.
3. Change the settings under the 'IPDS setup' tab.
You can change the settings:
■ by group (click the pencil at the right-hand side of the group settings). This is the
preferred method.
■ by item (click the pencil behind the individual settings).
4. For 'IPDS Tray to media for media 1' assign the 'Media catalog item' from the list. The
list displays all the media in the media catalog. The system copies the media attributes
from the selected media to the transaction setup.
When you assign A3/Ledger-like media or want to use short-edge feed for other media,
change the feed direction to 'Short-edge feed (SEF)'.
Note:
The settings editor displays only the media for which the media name is consistent with
the IPDS media name definitions. Valid characters for an IPDS media name are: A-Z,
a-z, 0-9, blank.
5. Repeat step 4 for all the logical trays in your setup.
How to change the PCL parameters
1. Go to 'Transaction Printing' - 'PCL setup'.
2. Make sure that the Tray selection mechanism is set to Tray to Media.
This is the preferred setting. This printer is a media-based machine. The Tray-to-media
method supports this behavior.
3. Change the settings under the 'PCL setup' tab.
You can change the settings:
■ by group (click the pencil at the right-hand side of the group settings). This is the
preferred method.
■ by item (click the pencil behind the individual settings).
4. For 'PCL Tray to media for media 1' assign the 'Media catalog item' from the list. The
list displays all the media in the media catalog.
When you assign A3/Ledger-like media or want to use short-edge feed for other media,
change the feed direction to 'Short-edge feed (SEF)'.
Repeat
Step 4 for all the logical trays in your setup.
5.
Chapter 2 - Transaction printing
29
Create a transaction setup
Note:
When you have more than one printer, you can exchange transaction setups. Go to
'Transaction Printing' - 'Setups' and use the 'Import' and 'Export' functions.
How to modify a transaction setup
1.
2.
3.
4.
Go to 'Transaction Printing' - 'Setups'.
Put a checkmark in front of the transaction setup to select the setup you want to modify.
Click the 'Edit' button, if you want to change the name of the setup.
Change the settings under the 'IPDS setup' tab (see ‘How to change the IPDS parameters’
on page 28).
You can change the settings:
■ by group (click the pencil at the right-hand side of the group settings). This is the
preferred method.
■ by item (click the pencil behind the individual settings).
5. Change the settings under the 'PCL setup' tab (see ‘How to change the PCL parameters’
on page 29).
6. Change the values under the 'Settings' tab.
Note:
The status of the setup is changed to modified. You have to load the setup to make these
modification available on the printer.
Before you can load a transaction setup, you have to switch the transaction printing mode
off-line.
7. Go to 'Transaction Printing' - 'Settings', and click 'Toggle the transaction printing mode'
to switch the printer off-line.
8. Go to back'Transaction Printing' - 'Setups'.
9. Click 'Load'.
The setup is now available on your operator panel.
30
Chapter 2 - Transaction printing
Chapter 3
Secure printing
Error handling and secure printing
Error handling and secure printing
Introduction
TheOcé VarioPrint® 6000 MICR series is equipped with very efficient and reliable error
recovery. Some printing environments, however, require that multiple copies be avoided.
For example, in transactions involving the printing of valuable documents such as cheques.
In such an environment, you can enable the secure printing functionality.
Secure printing means that automatic error recovery is suppressed. Errors are recovered
by the server. All pending pages in the printer will be deleted. An error results in a stack
eject. This means that it is the responsibility of the operator to restart the job manually
on the correct page, in case of an error. By default, secure printing is disabled. In the
Settings Editor, you can enable secure printing in the IPDS transaction printing setups.
PCL transaction printing does not support secure printing.
This section describes the difference between the default error handling and error handling
with secure printing enabled.
Note:
You can enable secure printing in IPDS transaction printing setups only.
Note:
When you enable secure printing, the intermediate check print and the sample sheet
interval are automatically disabled.
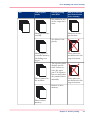
Error handling with secure printing in IPDS
The table shows what happens when an error occurs during a print job transaction with
secure printing. Pages that are copied to the memory of the controller are deleted from
the system. The operator must send these missing pages to the printer as a (new) print
job transaction.
32
Chapter 3 - Secure printing
Error handling and secure printing
#
Job
Job progress
states
Secure printing
with IPDS
End up in the output location after
error recovery
Are stacked at one
of the output locations.
Sheets printed successfully
Sheets are in output location
Are deleted completely.
Sheets copied to
controller memory
(including error
pages).
Sheets jammed in
the machine.
These sheets are
not delivered to the
output location.
The operator panel
displays instructions on how to
solve the paper
jam. The operator
has to remove these
the jammed sheets
manually.
These sheets are
not delivered to the
output location.
Remain in host
memory.
Sheets in host
memory.
Chapter 3 - Secure printing
33
Error handling and secure printing
Job
Job progress
states
Secure printing
with IPDS
End up in the output location after
error recovery
Once the error is
resolved, the printer restarts by printing the first page in
the host memory.
34
Chapter 3 - Secure printing
Error handling and secure printing
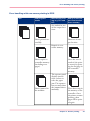
Error handling with non-secure printing in IPDS
#
Job
Job progress
states
Non-Secure printing (e.g. PCL and
PS)
End up in the output location after
error recovery
Are stacked at one
of the output locations.
Sheets printed successfully.
Sheets are in output location
Remain in controller memory.
Sheets copied to
controller memory
(including error
pages).
Sheets jammed in
the machine.
Once the error is
resolved, the printer restarts by printing the first page in
the controller
memory.
The operator panel
displays instructions on how to
solve the paper
jam. The operator
has to remove these
the jammed sheets
manually.
These sheets stay in
the memory of the
controller. Once
the printer resumes
printing, these
pages will be printed again.
Chapter 3 - Secure printing
35
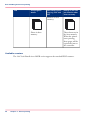
Error handling and secure printing
Job
Job progress
states
Non-Secure printing (e.g. PCL and
PS)
End up in the output location after
error recovery
Remain in host
memory.
Sheets in host
memory.
These sheets stay in
the host memory.
When the printer
starts printing,
these pages will be
copied and sent to
the controller.
Available counters
The Océ VarioPrint® 6000 MICR series supports the standard IPDS counters.
36
Chapter 3 - Secure printing
Chapter 4
MICR fonts
MICR fonts
MICR fonts
Introduction
Magnetic Ink Character Recognition, or MICR, is a character recognition technology
used primarily by the banking industry to facilitate the processing of cheques. The technology allows computers to read information such as account numbers of printed documents. The magnetic reader requires specific MICR fonts. The major MICR fonts used
around the world are E-13B and CMC-7.
You can send both outline and bitmap MICR fonts from the host with the datastream
of the transaction print job. You can also install outline MICR fonts in the Settings Editor.
Note:
Do not alter the MICR fonts in any way. Altering the MICR fonts can cause read errors.
Support of MICR fonts
The Océ VarioPrint® 6000 MICR series supports all standard MICR fonts with this
machine.
Error handling
IPDS
In IPDS, a transaction print job with MICR fonts requires that the machine is in MICR
mode. When the machine is not in MICR mode, you will receive an error massage on
your host that MICR printing is not supported. This error can only be resolved by cancelling the stream.
PCL
In PCL, this is not prevented. The data stream in PCL has no information on the used
MICR fonts and therefore, the system does not check whether it is in MICR mode. It is
the responsibility of the operator to check this.
38
Chapter 4 - MICR fonts
Chapter 5
MICR Toner
Check the status of the toner reservoirs
Check the status of the toner reservoirs
Introduction
The machine has 2 toner reservoirs. The toner reservoirs are located at the left-hand side
and the right-hand side of the engine module. You can check the status of the toner
reservoirs in the dashboard and in the 'System' view. The 'System' view also displays the
current filling level of each toner reservoir as a percentage. The icons in the following table
indicate the status of the toner reservoirs.
This section gives an overview of the possible toner statuses. Furthermore, this section
describes how to check the status.
The meaning of the toner icons
The toner icons#
Toner icon
Description
The toner icon is blue. All 2 blocks of the status bar are green.
The toner reservoir is filled over 75%. Do not add toner.
The toner icon is blue. 1 Block of the status bar is green. The
toner reservoir is filled over 50%. You can add 1 bottle of toner.
The toner icon is orange. The status bar contains no more green
blocks.The toner reservoir is filled less than 25%. The printer
can print another 600 sheets. You must add up to 2 toner bottles
as soon as possible.
The toner icon is red. The status bar has a red frame. The toner
reservoir is empty. The printing stops. You must add maximum
2 toner bottles to continue the printing.
The toner icon is grayed out. The status of the toner reservoir
is unknown. This status is only displayed when the system is
initializing.
The toner icon is grayed out and has a blue dotted frame. The
status bar is grayed out and has a red dotted frame. The status
of the toner reservoir is unknown. This status is only displayed
when the toner access cover is open.
Check the status of the toner reservoirs
1. Check the toner icons in the dashboard.
40
Chapter 5 - MICR Toner
Check the status of the toner reservoirs
Note:
Follow the steps 2 and 3 to view the status of the toner reservoirs as a percentage.
2. Press the 'System' button.
3. Press 'Printer'.
The 'System' view displays the current filling level of the toner reservoirs as a percentage.
The percentage matches the blocks that are indicated in the dashboard.
Chapter 5 - MICR Toner
41
Add toner
Add toner
Introduction
This section describes how to add toner to the 2 toner reservoirs of the machine.
When to do
When a toner reservoir is empty or almost empty.
Attention:
Only use the Océ VarioPrint 6000 MICR toner.
Attention:
Never add more than 2 bottles at a time. The status bars of the toner indicators indicate
the amount of bottles you are allowed to fill.
Attention:
The printer must be switched on to add the toner. You can add toner while the printer
is busy.
Add toner
1. Shake the toner bottle well (see the instructions on the bottle).
2. Remove the screw cap from the bottle.
Attention:
Do not remove the seal from the bottle.
42
Chapter 5 - MICR Toner
Add toner
3. Open the front door of the toner reservoir you want to fill.
[40] Open the front doors
4. Open the lid of the toner reservoir.
5. Put the toner bottle into the opening of the toner reservoir.
Note:
The toner bottle only fits one way.
6. When the toner bottle is empty, carefully tilt the toner bottle into the horizontal position.
Make sure that the opening of the toner bottle remains over the opening of the toner
reservoir.
7. Rotate the toner bottle a half turn to the right to remove the residual toner.
8. Remove the toner bottle.
9. Close the lid of the toner reservoir.
10. Close the front door of the toner reservoir.
Chapter 5 - MICR Toner
43
Add toner
44
Chapter 5 - MICR Toner
Appendix A
Miscellaneous
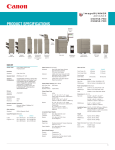
Product specifications
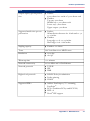
Product specifications
Note:
The media specifications in the following table are based on plain paper of 80 g/m² or
20 lb bond.
Overview of the main product specifications
Product specifications#
Item
Specification
Technology
Océ Gemini Instant Duplex technology
Print speed (2-sided)
Océ VarioPrint® 6160:
■ 170 images/minute (A4/Letter)
■ 88 images/minute (A3/Ledger)
Océ VarioPrint® 6200:
■ 200 images/minute (A4/Letter)
■ 106 images/minute (A3/Ledger)
Océ VarioPrint® 6250:
■ 250 images/minute (A4/Letter)
■ 132 images/minute (A3/Ledger)
Supported media sizes
■
■
Supported media weights
■
■
33 - 202 lb. bond for Océ recommended media
40 - 135 lb. bond for other media
Printable area
Long edge: maximum 19.1 inches
Short edge: maximum 12.5 inches
Active registration
< .02 inches
Input capacity per paper module
■
■
46
Minimum 8 x 8 inch
Maximum 12.5 x 19.2 inch
Appendix A - Miscellaneous
Normal trays 1 and 2:
600 sheets each
Bulk trays 3 and 4:
1,700 sheets each
Product specifications
Item
Specification
Output capacity per output location
■
■
Supported media sizes per output location
■
■
Stacker:
6,000 sheets in 2 stacks of 3,000 sheets each
Finisher:
Top tray: 900 sheets
Middle tray: 1,000 sheets each
Lower tray: 1,800 sheets.
Upper output: 500 sheets
Stacker:
All media sizes between 8 x 8 inch and 12.5 x
19.2 inches
Finisher:
Long edge: 10.8 - 12.04 inches
Short edge: 8.18 - 8.66 inches
Finisher: 100 sheets
Stapling capacity
■
Toner
Océ VarioPrint 6000 MICR toner
Resolution
■
■
1200 dpi
180 lpi
Warm-up time
< 12 minutes
Network connectivity
10/100 Mbit and 1 Gbit Ethernet
Network protocols
■
■
■
Higher level protocols
■
■
■
Supported PDLs
■
■
■
■
TCP/IP
IPX
SMB
LPR/LPD for job submission
Socket printing
SNMP
Adobe® PostScript® 3™ / streaming
PostScript®
PCL 6 (combines PCL5e and PCL XL)
PDF 1.6
Xerox® PPP support
Appendix A - Miscellaneous
47
Product specifications
Item
Specification
Supported applications
■
■
■
■
■
■
Certification
48
Appendix A - Miscellaneous
Océ VarioPrint® 6000 MICR series printer
driver
Océ PRISMAprepare
Océ PRISMAaccess
Océ PRISMAproduction
Océ DPlink emulation of Xerox® DocuTech™
61xx (Xerox® DigiPath® and Xerox®
FreeFlow™)
Kodak® Smartboard
PIRA
Index
Quality enhancement .....................................20
Index
P
Add
Toner .............................................................42
Add toner
Add toner .......................................................42
Available documentation
Available documentation ................................11
C
Change
Image shift ......................................................23
Check
Toner level .....................................................40
Content of the manuals
Content of the manuals ..................................11
F
Features
Features ............................................................8
Fonts
Install .............................................................38
MICR fonts ....................................................38
Product specifications
Product specifications .....................................46
S
Secure printing
Secure printing ...............................................32
SRA controller
Missing media ................................................25
System components
Engine module .................................................9
Operator attention light ....................................9
Operator panel ..................................................9
Paper module ....................................................9
Printguard modules ..........................................9
Roll feeder ........................................................9
Stacker ..............................................................9
System view
Transaction on-line ........................................18
Transaction printing .......................................18
Transaction section ..................................14, 18
Transaction setup ...........................................18
T
I
Image shift
Transaction printing mode .............................23
IPDS
Secure printing ...............................................32
J
Job
Shift the image ...............................................23
Toner
Toner .............................................................42
Toner icons
Toner icons ....................................................40
Toner indicator
Status bar ........................................................42
Toner icon ......................................................42
Trademarks
Trademarks .......................................................3
Transaction setups
Transaction setups ..........................................28
M
Media message
General ...........................................................25
Tray-to-media mode .......................................27
Tray-to-tray mode ..........................................26
MICR Mode
MICR Mode ..................................................20
Activate ..........................................................20
49
+2
+2
-
Beyond the Ordinary
o
Printing for
Professionals
Creating global leadership in printing
Canon and Océ have joined forces to create the global
leader in the printing industry. For our customers, this
combines Canon and Océ technology with the support
of the Océ direct sales and service organizations. Look
to the new Canon-Océ combination for:
• Enterprise printing in the office and corporate
printroom
• Large format printing of technical documentation,
signage, and display graphics
• Production printing for marketing service bureaus and
graphic arts
• Business Services for document process outsourcing
©
2011 Océ. Illustrations and specifications do not necessarily apply to
products and services offered in each local market. Technical
specifications are subject to change without prior notice. Trademarks
mentioned in this document are the property of their respective owners.
For more information visit us at:
2011-03
www.oce.com
US