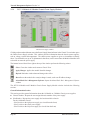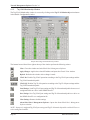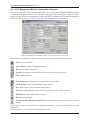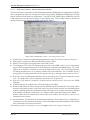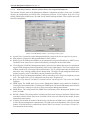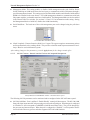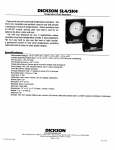
1
Network Management Software User Manual Release 3.4 www.blackbox.com Network Management Software Version 3.4 TRADEMARKS All applied-for and registered trademarks are the property of their respective owners. FEDERAL COMMUNICATIONS COMMISSION AND CANADIAN DEPARTMENT OF COMMUNICATIONS RADIO FREQUENCY INTERFERENCE STATEMENTS This equipment generates, uses, and can radiate radio frequency energy and if not installed and used properly, that is, in strict accordance with the manufacturer’s instructions, may cause interference to radio communication. It has been tested and found to comply with the limits for a Class A computing device in accordance with the specifications in subpart J of Part 15 of FCC rules, which are designed to provide reasonable protection against such interference when the equipment is operated in a commercial environment. Operation of this equipment in a residential area is likely to be cause interference, in which case the user at his own expense will be required to take whatever measures may be necessary to correct the interference. Changes or modifications not expressly approved by the party responsible for compliance could void the user’s authority to operate the equipment. This digital apparatus does not exceed the Class A limits for radio noise emission from digital apparatus set out in the Radio Interference Regulation of the Canadian Department of Communications. Le présent appareil numérique n’émet pas de bruits radioélectriques dépassant les limites applicables aux appareils numéirques de las classe A prescrites dans le Règlement sur le brouillage radioélectrique publié par le ministère des Communications du Canada. NORMAS OFICIALES MEXICANAS (NOM) ELECTRICAL SAFETY STATEMENT 1. Todas las instrucciones de seguridad y operación deberán ser leídas antes de que el aparato eléctrico sea operado. 2. Las instrucciones de seguridad y operación deberán ser guardadas para referencia futura. 3. Todas las advertencias en el aparato eléctrico y en sus instrucciones de operación deben ser respetadas. 4. Todas las instrucciones de operación y uso deben ser seguidas. 5. El aparato eléctrico no deberá ser usado cerca del agua—por ejemplo, cerca de la tina de baño, lavabo, sótano mojado o cerca de una alberca, etc. 6. El aparato eléctrico debe ser usado únicamente con carritos o pedelstales que sean recomendados por el fabricante. 7. El aparato eléctrico debe ser montado a la pared o al techo sólo como sea recomendado por el fabricante. 8. Servicio—El usuario no debe intentar dar servicio al equipo eléctrico más allá a lo descrito en las instrucciones de operación. Todo otro servicio deberá ser referido a personal de servicio calificado. 9. El aparato eléctrico debe ser situado de tal manera que su posición no interfiera su uso. La colocación del aparato eléctrico sobre una cama, sofá, alfombra or superficie similar puede bloquea la ventilación, no se debe colocar en libreros o gabinetes que impidan el flujo de aire por los orificios de ventilación. 10. El equipo eléctrico deber ser situado fuera del alcance de fuentes de calor como radiadores, registros de calor, estufas u ostros aparatos (incluyendo amplificadores) que producen calor. 11. El aparato eléctrico deberá ser connectado a una fuente de poder sólo del tipo descrito en el instructivo de operación, o como se indique en el aparato. 12. Precación debe ser tomada de tal manera que la tierra fisica y la polarización del equipo no sea eliminada. 13. Los cables de la fuente de poder deben ser guiados de tal manera que no sean pisados ni pellizcados por objetos colocados sobre o contra ellos, poniendo particular atención a los contactos y receptáculos donde salen del aparato. 14. El equipo eléctrico debe ser limpiado únicamente de acuerdo a las recomendaciones del fabricante. 15. En caso de existir, una antena externa deberá ser localizada lejos de las lineas de energia. 16. El cable de corriente deberá ser desconectado del cuando el equipo no sea usado por un largo periodo de tiempo. 17. Cuidado debe ser tomado de tal manera que objectos liquidos no sean derramados sobre la cubierta u orificios de ventilación. 18. Servicio por personal calificado deberá ser provisto cuando: A: El cable de poder o el contacto ha sido dañado; u B: Objectos han caído o líquido ha sido derramado dentro del aparato; o C: El aparato ha sido expuesto a la lluvia; o D: El aparato parece no operar normalmente o muestra un cambio en su desempeño; o E: El aparto ha sido tirado o su cubierta ha sido dañada. Page 2 Black Box Network Services Network Management Software Version 3.4 Table of Contents 1.0 OVERVIEW............................................................................................................5 1.1 1.2 1.3 1.4 Using This Guide.....................................................................................................5 Technical Support Contact Information.................................................................5 General Black Box Management Software Description.........................................5 DFCS Overview........................................................................................................5 1.4.1 1.4.2 1.4.3 1.4.4 1.4.5 2.0 SNMP Management of DFCS Equipment..................................................................................6 DFCS IP OAM Chassis Cascading............................................................................................6 Remote OAM Management Modes............................................................................................7 IEEE 802.3ah OAM Mode .........................................................................................................7 Secure OAM Mode (IP-Less)......................................................................................................8 Windows 98/NT/2000/XP/Vista Installation.........................................................9 2.1 Recommended System Requirements..................................................................9 2.2 Windows 98/NT/2000/XP/Vista New Installation....................................................9 2.3 Windows 98/NT/2000/XP/Vista Upgrade Installation............................................9 3.0 USING Black Box’s Management Software.................................................... 10 3.1 Getting Started.......................................................................................................12 3.1.1 Start Black Box’s Management Software. ..................................................................... 12 3.1.2 Add/Select IP Addresses..........................................................................................................13 3.1.3 Setting Black Box’s Management Software Auto-Discovery Parameters.................................16 3.1.4 Setting Black Box’s Management Software Preferences.........................................................19 3.2 Common Black Box’s Management Software Windows......................................20 3.2.1 Chassis View............................................................................................................................20 3.2.2 IP OAM and Remote OAM Chassis Views...............................................................................20 3.2.2.1 19-Module Chassis View..........................................................................................22 3.2.2.2 5-Module Chassis View............................................................................................23 3.2.2.3 2-Module Chassis View............................................................................................24 3.2.2.4 Single-Module Chassis Models.................................................................................25 3.2.3 Table View................................................................................................................................28 3.2.4 DFCS 19-Module & 5-Module Chassis Power Supply Windows..............................................30 3.2.5 DFCS 1-Module Redundant Power Chassis Windows............................................................32 3.2.5.1 DFCS 1-Module Redundant Power Chassis Configuration Overview......................32 3.2.5.2 Power Supply 1 and 2 Panels...................................................................................33 3.2.5.3 Modes of Operation Panel........................................................................................34 3.2.5.4 Contact Closure Panel..............................................................................................35 3.2.5.5 Port Access Control Window.....................................................................................36 3.2.6 Trap Log Window......................................................................................................................37 3.2.6.1 Trap Logging Preferences Window.........................................................................38 4.0 Module Configuration.........................................................................................39 4.1 DFCS Module Configuration Overview...............................................................39 4.1.1 4.1.2 4.1.3 4.1.4 4.1.5 Page 3 Port Bandwidth Control Window...............................................................................................41 Tag VLAN Membership Window...............................................................................................42 Port VLAN and Port Access Control Window...........................................................................46 MIB Statistics Window..............................................................................................................47 Event Notification Window........................................................................................................50 Black Box Network Services Network Management Software Version 3.4 4.2 DFCS Management Module Configuration Overview........................................51 4.2.1 Configuring the System using the Management Modules........................................................52 4.2.1.1 IP and Control Preferences.......................................................................................52 4.2.1.2 SNMP Preferences...................................................................................................53 4.2.1.3 Networking Features - Network Management Module..............................................54 4.2.1.4 Networking Features - Network Interface Device with Integrated Management.......55 4.2.1.5 802.3ah Features - Network Interface Devices with Integrated Management..........56 5.0 INDIVIDUAL DFCS Module Windows...................................................................59 5.1 DFCS NMM - Network Management Module ......................................................60 5.2 10/100M Module.....................................................................................................61 5.2.1 5.2.2 5.2.3 5.2.4 5.2.5 5.2.6 5.2.7 10/100M Modes of Operation Panel.........................................................................................63 10/100M 802.3ah Features Panel............................................................................................64 10/100M Port Bandwidth Control Window................................................................................64 10/100M Tag VLAN Membership Window................................................................................65 10/100M Port VLAN and Port Access Control Window............................................................65 10/100M MIB Statistics Window...............................................................................................66 10/100M Event Notification Window.........................................................................................66 5.3 10/100/1000T-Gfiber Module.................................................................................67 5.3.1 10/100/1000T-Gfiber Tag VLAN Membership Window.............................................................68 5.3.2 10/100/1000T-Gfiber Port VLAN and Port Access Control Window.........................................68 5.3.3 10/100/1000T-Gfiber MIB Statistics Window............................................................................69 5.4 GigaTx-GigaFx Module..........................................................................................70 5.5 GigaTx-GigaFiber Module (R2).............................................................................71 5.6 10/100T-100Fx TVLAN Module..............................................................................72 5.6.1 5.6.2 5.6.3 5.6.4 10/100T-100Fx TVLAN Port Bandwidth Control Window.........................................................73 10/100T-100Fx TVLAN Tag VLAN Membership Window.........................................................73 10/100T-100Fx TVLAN Port VLAN and Port Access Control Window......................................74 10/100T-100Fx TVLAN MIB Statistics Window........................................................................74 5.7 10/100T-Fx Module.................................................................................................75 5.8 100Tx-100Fx Module..............................................................................................76 5.9 FF Fiber-to-Fiber Modules....................................................................................77 5.10 FF SFP Fiber-to-Fiber Module...............................................................................78 5.10.1 FF SFP Information Window.....................................................................................................79 5.11 10G Fiber-Fiber Modules.......................................................................................81 5.11.1 10G XFP/SFP+ Information/Block Windows............................................................................82 5.12 100Tx/2Fx and 100Tx-2Tx Redundant Fast Ethernet Modules..........................86 5.13 10T-10FL Module....................................................................................................87 5.14 10BaseT-10Base2 Module.....................................................................................88 5.15 4Tx/L2 Module........................................................................................................89 5.15.1 4Tx/L2 Port VLAN and Port Access Control Window ..............................................................90 5.15.2 4Tx/L2 MIB Statistics Window..................................................................................................90 5.16 T1/E1-fiber Module.................................................................................................91 Page 4 Black Box Network Services Network Management Software Version 3.4 1.0 OVERVIEW 1.1 Using This Guide This manual describes how to use Black Box’s Management Software to manage the DFCS family of media converters. This guide is organized to help you install and configure Black Box’s Management Software. In addition, each section has been written to allow the network administrator the ability to easily review the management requirements of each individual DFCS Module. 1.2 Technical Support Contact Information If you encounter problems while installing or operating this product, contact Black Box Customer Support. In order for Black Box Engineers to best assist you, please make sure you have the following information when calling Black Box Customer Support: Black Box’s Management Software version number (located in the lower right-hand corner of any Black Box Management Software window or on the Introduction window that loads upon Black Box’s Management Software start-up). Version of firmware on the Management Module. Management station hardware specifications (RAM, operating system, and CPU). 1.3 General Black Box Management Software Description Black Box’s Management Software is a general purpose SNMP-based graphical network management program that provides convenient access to all Operations, Administration and Maintenance (OAM) functions specifically designed to remotely manage the DFCS family of media converters. It operates under Microsoft Windows 98/XP/NT/2000, as well as under popular network management environments. Black Box’s Management Software provides an efficient, user-friendly way to configure and manage devices installed on a single network or on a series of networks by providing an intuitive graphical display with real-time status and alarm (trap) information. The user can easily manage DFCS equipment on a large Enterprise network or Metropolitan Area network (MAN) from a single location without the need of additional resources. 1.4 DFCS Overview DFCS media converters provide Ethernet in the First Mile fiber access to support Fiber-to-the-X Metropolitan and Enterprise LAN networks. DFCS media converters are used in managed end-to-end fiber links from the Central Office/Network Core to copper and fiber ports at the Customer Premises/Network Edge. The DFCS family is suitable for LAN and MAN networks where copper to fiber, multimode fiber to singlemode fiber, or dual fiber to single-fiber conversions are required. To support Next Generation E-Line and E-LAN services (also called Ethernet Virtual Channel or EVC), DFCS media converters support advanced features such as built-in management and switch technology, Tag VLAN, Port VLAN, QoS, Port MIB statistics, Bandwidth Control, Port Access Control and the IEEE 802.3ah OAM management. DFCS modules are hot-swappable and can be mounted in a 19-Module, 5-Module, 2-Module and 1-Module power chassis. DFCSs are NEBS Level 3 certified and support a standard temperature range of 0 to +50 degrees Celsius and wide temperature ranges of -40 to +60 degrees Celsius. DFCS media converters can be managed or unmanaged. When managed, the DFCS management system provides the ability to remotely monitor network status, configure hardware parameters, generate statistic reports and receive a variety of user-selected traps. Page 5 Black Box Network Services Network Management Software Version 3.4 1.4.1 SNMP Management of DFCS Equipment Management is accomplished by using an optional DFCS Management Module. The Management Module can be accessed via Telnet, Black Box’s Management Software or other third-party SNMP-based software. There are several types of DFCS management modules. The DFCS NMM is a dedicated management module that can monitor, control and manage other DFCS modules installed in the same chassis from a single IP address. Network Interface Devices (NIDs) with built-in management capability (such as the DFCS 10/100M) are DFCS modules that provide media conversion and management of a single chassis. Black Box’s Management Software provides network administrators with detailed real-time port and module information as well as serial modem parameter configuration and event monitoring. Using Black Box’s Management Software, the network administrator can configure DIP-Switch-selectable parameters. Some of the configurable parameters on various DFCS modules include Link modes, Auto/ Manual Negotiation modes and Duplex modes. Using this software management system, these parameters can be configured to override the physical DIP-Switch settings of a module. Fixed module parameters that can be monitored include the module type and model number, manufacturing date, hardware and software revisions and serial numbers. Dynamic real-time parameters that can be monitored include link and data receive/transmit transfer status, MIB statistics, as well as voltage, current and temperature for each power supply in a chassis. By using SNMP, Black Box’s Management Software is capable of monitoring and reporting events and alarms (traps). Some of the events that can be monitored include module or chassis insertion/removal, module port link up/link down, or a power supply that is out of voltage or temperature range. All of these events can selectively be enabled or disabled to display SNMP traps that alert the network administrator. 1.4.2 DFCS IP OAM Chassis Cascading The DFCS 2-Module, 5-Module and 19-Module chassis have the ability to communicate directly with other DFCS 2-Module, 5-Module and 19-Module chassis via the pair of multi-chassis management ports located on the front of the Network Management Module (NMM). This gives network administrators the ability to communicate with up to 19 chassis using a single IP address. 1) Locate the Management Link Cable (model number 8080-3). This cable will be used to link each pair of chassis by connecting their NMM modules together in a daisy-chain fashion. 2) Plug one end of the management link cable into either of the multi-chassis management ports on the front of the NMM. 3) Plug the other end of the management link cable into the connector on the front of the next NMM module. 4) Repeat steps 1-3 until all of the NMM units have been cascaded together. Up to 19 chassis may be cascaded together using this method. 5) When using a multi-chassis configuration, each chassis must have a unique chassis number. Refer to the NMM User Manual for details on assigning chassis numbers. NOTE: Chassis cascading is not supported when multiple management modules are present in the chassis (i.e. NMM, 10/100M) Page 6 Black Box Network Services Network Management Software Version 3.4 DFCS Chassis in IP OAM Cascaded Configuration If required, separate IP addresses may be assigned to each cascaded NMM, controlling the multiple chassis as a group, and at the same time providing redundancy in case of a failure of the main NMM or its connection to the managing workstation. 1.4.3 Remote OAM Management Modes To enable a Remote OAM Management Mode, an NMM and a management module (such as the 10/100M) must first be installed into the local chassis at the network core. This module configuration allows the local chassis to act as a master chassis, which can facilitate Remote OAM Management through one of two management channels: ah OAM (IEEE 802.3ah OAM) or Secure OAM (IP-less). 1.4.4 IEEE 802.3ah OAM Mode Black Box’s Management Software versions 3.2 and higher support ah OAM (IEEE 802.3ah OAM), a standard Ethernet protocol that allows network managers using DFCS devices to connect to and monitor 802.3ah compliant third-party devices. 802.3ah features include Discovery, Information TLVs, Loopback control and Organization Specific Extensions. These local and remote status indicators provide the ability to both identify and isolate problems and determine the health of a network. 802.3ah OAM mode requires the use of Black Box’s Management Software version 3.2 or higher, a Network Management Module in the master chassis, and an DFCS media converter module with built-in management (such as the 10/100M Network Interface Device) at each end of the link that is utilizing the ah OAM management channel. All of the DFCS modules in ah OAM mode must use Firmware version 3.2 or higher. The 802.3ah modes of the Fiber optic and UTP ports are enabled in the management modules through the 802.3ah Features configuration panel. NOTE: Black Box’s Management Software Version 3.2 or higher supports access to remote chassis through 802.3ah Organization Specific Extensions by the user selecting ah OAM on the management modules in the chassis. However, it is recommended to use the latest version to ensure compatibility with earlier version. See section 4.2.1.5 for information on enabling and configuring 802.3ah OAM mode. Page 7 Black Box Network Services Network Management Software Version 3.4 1.4.5 Secure OAM Mode (IP-Less) Black Box’s Management Software supports a Secure OAM management channel. Secure OAM mode is an encrypted, IP-less management channel that enhances the OAM capability of the DFCS system and provides two benefits. First, it allows management of a large number of individual media converters and chassis through one IP address, and second, it provides an added level of security for the management channel that is not affected by customer/end-user actions or traffic on the system. IP-less communication is a unique Omnitron communication protocol using fixed MAC addresses that allows DFCS equipment to communicate over optical links at the physical layer. This communication channel is similar to the 802.3ah OAM channel defined by IEEE 802.3ah specifications, but provides an increased level of security. Secure OAM mode requires the use of Black Box’s Management Software version 2.1 or higher, a Network Management Module in the master chassis, and an DFCS media converter module with built-in management (such as the 10/100M) at each end of the link that is utilizing the Secure OAM management channel. All of the DFCS modules in Secure OAM mode must use Firmware version 2.0 or higher. NOTE: Every DFCS module in a Secure OAM network configuration should utilize the same firmware version. Following is an example of a Secure OAM link using two 10/100M media converters. A 10/100M local proxy is installed at a Central Office or Point of Presence in a master chassis that is connected via a fiber link to a remote standalone 10/100M at the customer premises. The master chassis is managed by an NMM with Secure OAM mode enabled. The local 10/100M in the master chassis acts as a proxy to the remote 10/100M for the Secure OAM management channel, and the management traffic on the user data lines is encrypted and does not use IP-based communication. Secure OAM mode and IP OAM mode operate independently of each other and can be used as parallel management channels on the same fiber link. When using the Secure OAM management channel, one chassis is assigned as Master, and it can control up to 19 chassis (18 remote chassis and itself) using a single IP address. NOTE: 802.3ah OAM and Secure OAM management channels ignore VLAN, Port Access Control and Bandwidth Control restrictions. The user can only select one secure mechanism at a time. See section 3.2.2 for information on viewing and navigating between chassis in Secure OAM mode. See sections 3.2.3, 4.2.1.3, and 4.2.1.4 for information on enabling and configuring Secure OAM mode. Page 8 Black Box Network Services Network Management Software Version 3.4 2.0 Windows 98/NT/2000/XP/Vista Installation 2.1 Recommended System Requirements IBM or compatible PC with 500MHz CPU or better Microsoft Windows 98/NT/2000/XP/Vista CD-ROM Ethernet Network Interface Card 640MB RAM 30MB hard drive space SVGA monitor with 1024x768 resolution (1280x1024 recommended) Windows compatible mouse 2.2 Windows 98/NT/2000/XP/Vista New Installation 1) Run the installer file setup.exe on the CD-ROM to install Black Box’s Management Software. 2) Select the destination directory to install the software. The default destination directory is “C:\Program Files\Black Box’s Management Software\.” 3) A Black Box’s Management Software application icon is inserted in the Programs Section of the Start Menu located on the Windows Task Bar. The installation program also places a Black Box’s Management Software shortcut icon on the desktop. 2.3 Windows 98/NT/2000/XP/Vista Upgrade Installation 1) Run the installer file setup.exe on the CD-ROM to install the new version of Black Box’s Management Software. 2) Select the destination directory to install the software. The default destination directory is “C:\Program Files\Black Box’s Management Software\.” 3) Click Next button to complete installation process. Black Box’s Management Software automatically overwrites any previous version of Black Box’s Management Software. 4) A Black Box’s Management Software application icon is inserted in the Programs section of the Start menu located on the Windows task bar. The installation program can also place a shortcut icon on the desktop if that box is checked. NOTE: For Windows 2003 Server, Black Box’s Management Software explicitly uninstalls the previous version as part of the upgrade procedure. Page 9 Black Box Network Services Network Management Software Version 3.4 3.0 USING Black Box’s Management Software When using Black Box’s Management Software, the user will encounter the following window types. Detailed window descriptions are provided in their respective sections in this manual. Section 3.1.1 - Introduction The Introduction window provides the software version number and Omnitron’s technical support contact information. This information is also found on the About Black Box’s Management Software window. Section 3.1.2 - IP Selection The IP Selection window provides the means to select, auto-discover, add, modify, and/or delete IP addresses of the Management Modules and their respective chassis. Section 3.1.3 - Preferences The Preferences window allows users to set specific parameters for communication between Black Box’s Management Software and the DFCS chassis. Section 3.2.1 - Chassis View The Chassis View windows provide a graphical view of the monitored chassis and converter modules. They show a representation of the module and display the active LEDs on the module. Section 3.2.3 - Table View The Table View windows provide a tabular view of the monitored chassis and converter modules. Clicking on a numbered button in the left-hand column opens the Module Details window for that individual module. Secure OAM, ah OAM, OAM off mode and IP OAM settings can be changed for any module in the system. The Status columns show the same icons found in the Chassis View window. Section 3.2.4 and 3.2.5 - Chassis Power Supply The Chassis Power Supply windows provide power input status, fan status, power output usage and temperature readings of the modular power supplies used in the 19-Module and 5-Module chassis. Section 3.2.6 - Trap Log The Trap Log window displays all the traps that occur in the system. The Trap Log tracks and records information such as trap type, trap source and trap event time. Section 3.2.5.1 - Trap Logging Preferences The Trap Logging Preferences window allows the user to enable SNMP traps to be invoked upon the occurrence of specific events. Traps can be configured to be ignored or monitored. They can also be configured to invoke a pop-up trap window upon the occurrence of a monitored trap type. Section 4.1 - Module Configuration The Module Configuration window provides specific module manufacturing and status information as well as configuration buttons that allow the user to control and set parameters to override the individual hardware DIP-switch settings. Changing and applying parameters on the Module Details windows changes the configuration of the modules. Section 4.1.1 - Port Bandwidth Control The Port Bandwidth Control window provides rate limiting control on modules with this feature. Egress and ingress bandwidth of each port can be managed separately. Section 4.1.2 - Tag VLAN Membership The Tag VLAN Membership window provides enabling and disabling of the port-based Tag VLAN operation. The windows also allow configuration of the ingress and egress policy of individual ports, and assigning VLAN ID membership. The Tag VLAN settings of a module can be saved to the drive of the system that is running Black Box’s Management Software. Black Box’s Management Software can load the saved Tag VLAN settings onto other modules of the same type. Page 10 Black Box Network Services Network Management Software Version 3.4 Section 4.1.3 - Port VLAN and Port Access Control The Port VLAN and Port Access Control windows allow the enabling or disabling of traffic flows between ports on the module, and the disabling or enabling of all packet traffic flow on individual ports. Section 4.1.4 - MIB Statistics The MIB Statistics window allows configuring of Port Polling parameters for MIB statistics collection and display. The Port Selection, Polling Rate and View Values parameters can be configured in this window. Section 4.1.5 - Event Notification The Event Notification window allows the configuration of error conditions for the fiber and/or UTP ports. Section 4.2 - Management Module Configuration - Preference Panels The Management Module Configuration window displays the essential parameters which are collected from the controlling Network Management Module or media converters with built-in management (such as a 10/100M). These windows also provide the configuration menus that allow the user to change these parameters. The NMM Module window consists of four configuration preference panels: IP and Control Preferences, SNMP Preferences, Networking Features and Modes of Operation. Management modules such as the 10/100M have five configuration preference panels: IP and Control Preferences, SNMP Preferences, Networking Features, Modes of Operation and 802.3ah Features. Page 11 Black Box Network Services Network Management Software Version 3.4 3.1 Getting Started To start using the Black Box’s Management Software client application under Windows, follow the instructions below. 3.1.1 1) Start Black Box’s Management Software Click on the Black Box’s Management Software Start Menu shortcut or double click the desktop icon created earlier in the installation to start the Black Box’s Management Software application (refer to section 2.0). An Introduction window will appear. Introduction window 2) In the Introduction window, click on Continue to open the IP Select window. If Continue is not selected, the IP Select window will open after five seconds. IP Select window Black Box’s Management Software will locate any previously saved IP addresses and display the results in the IP Select window. If there are no default IP addresses defined by the program, a new IP address must be added (see section 3.1.2) or auto-discovered (see section 3.1.3) before a chassis can be viewed. Page 12 Black Box Network Services Network Management Software Version 3.4 3.1.2 Add/Select IP Addresses The IP Select window provides the means to select, add, auto-discover, modify, or delete IP addresses of the Management Modules and their respective chassis and modules. IP Select window The buttons located from left to right at the top of the window perform the following actions: Close: Closes the window and exits Black Box’s Management Software Apply Changes: Applies the selected IP address and opens the Chassis View window Refresh: Starts the IP auto discovery process Add: Opens the IP List Update window and adds a new IP address to the bottom of the list Insert: Inserts a new IP address above the highlighted entry in the list Edit: Modifies an existing IP address and its description field Trap Log: Opens the trap log window Preferences: Opens the Black Box’s Management Software Preferences window SNMP Profile: Creates a new SNMP user profile Auto-Discovery Configuration: Opens the Auto-Discovery List window Delete Single: Deletes the selected IP address from the list Clear All: Clears the IP address list About Black Box’s Management Software: Opens the About Black Box’s Management Software window Page 13 Black Box Network Services Network Management Software Version 3.4 1) Click on the Add button ( ). The IP List Update - Black Box’s Management Software dialog box will appear. IP List Update dialog box Enter the new IP address in the New IP field and select the SNMP version to be used with this IP address. By selecting the Auto radio button, SNMPv1, SNMPv2c and SNMPv3 are activated. Select an SNMP Profile to be used with the IP address. The General Profile uses factory default settings for all SNMPv1 community names and SNMPv3 passwords and usernames. This profile can be changed (see step 3). Selecting No Profile will cause Black Box’s Management Software to prompt for the SNMP username and password when the IP address is accessed. To change or create a new SNMP Profile, go to step 2. Click the Save button to add the new IP address to the IP Select list. You may add as many IP addresses as needed. 2) An unique SNMP profile may be assigned for each IP address. Select from the predefined profiles by selecting the appropriate radio button or create a new profile by clicking on the Create New Profile button on the IP List Update dialog box. Clicking on the Create New Profile will display the Profile Input dialog box. Profile Input dialog box Add a unique profile name and enter the SNMPv1 and/or SNMPv3 settings in the boxes below. Click the Save button when all inputs have been entered. NOTE: By creating a new SNMP profile, the module associated with the IP address must have the same SNMP parameters programmed or the module will not be accessible. Page 14 Black Box Network Services Network Management Software Version 3.4 3) Each predefined and created profile can be viewed and managed by selecting SNMP Profile button ( ). The Profile Management window will be displayed. Profile Management window To edit a profile, double click on the desired profile. The Profile Input dialog box will be displayed. Profile Input - General Settings dialog box The “Default Factory Settings” and “General Settings” can not be deleted. Any user created profile can be deleted or edited. The “General Settings” profile can be edited. Click the Save button when all inputs have been entered. To add a profile, select the Add Profile button ( ) from the Profile Management window. 4) To access an IP address from the IP Select window, double-click on IP address or highlight the IP address and click the Apply button ( ). The notification “Retrieving data from the chassis” will be displayed. The Chassis View window will then appear. See section 3.2.1 for more information about the chassis view windows. See section 4.0 for information on configuring the DFCS modules. 5) To verify connectivity to the IP addresses in the IP Select window, use the Refresh button ( ). The SNMP Ver column will indicate active (green) or inactive (red) addresses. Page 15 Black Box Network Services Network Management Software Version 3.4 IP Select window 3.1.3 Setting Black Box’s Management Software Auto-Discovery Parameters Black Box’s Management Software detects and lists IP enabled DFCS equipment in the Discovered Systems IP List panel of the IP Select window. IP Select window - Discovered Systems IP List To add a new IP address range for Black Box’s Management Software to detect, click on the Auto Discovery Configuration button to open the Auto Discovery Preferences window. Page 16 Black Box Network Services Network Management Software Version 3.4 Auto Discover Preferences window The Auto Discovery List window displays the range of IP addresses Black Box’s Management Software will scan for DFCS equipment. To add a new IP address range, click on the Add button ( ) and the Add IP Range window will appear. Enter the new IP address range for Black Box’s Management Software to scan for during auto-discovery and click the Save button. Add IP Range window To run the auto discovery, click on the Refresh button ( ). IP Select window - Discovered Systems IP List panel Page 17 Black Box Network Services Network Management Software Version 3.4 The Auto-Discovery Setup tab on the Auto Discovery Preference window provides SNMP configuration parameters for the auto discovery process. Auto Discovery Preferences window Click on the Auto Discovery Setup panel to display the SNMP configuration parameters. The Auto-Discovery Setup tab on the Auto Discovery Preference screen provides SNMP configuration parameters for the auto discovery process. Auto Discovery Setup Select window If the “SNMP v1: Include the user defined IP list” check box is active, SNMP v1 parameters from the “User Supplied IP List” will be used during auto-discovery. If the “SNMPv1: Use the following Profile for all IPs in range” check box is active, the parameters from the defined Profile will be used during auto-discovery. The user will be able to select from the range of defined profiles. If the “SNMP v1: Use factory default community names” check box is active, the factory default SNMP v1 settings will be used during auto-discovery. If the “SNMP v3: Use user information for all IPs in range found in the user defined list” check box is selected, SNMP v3 parameters from the “User Supplied IP List” will be used during auto-discovery. Page 18 Black Box Network Services Network Management Software Version 3.4 If the “SNMP v3: Use the profile selected above for all IPs in range” check box is active, the defined profile will be used during auto-discovery. If the “SNMP v3: Use factory user information for all IPs in range” check box is active, the factory default SNMP v3 settings will be used during auto-discovery. Changes made to the Auto Discovery Preferences panel will not take affect until the screen is closed. 3.1.4 Setting Black Box’s Management Software Preferences The Preferences dialog box is used to set the following parameters for communication between Black Box’s Management Software and the DFCS chassis. To access the Black Box’s Management Software Preference dialog box, click on the Preference button ( ) located in the top left corner of the IP Select window. Black Box’s Management Software Preferences dialog box Polling interval measured in seconds – the frequency at which Black Box’s Management Software retrieves SNMP data from a chassis. The default value is 5 seconds. Use the drop-down list to select a different value from the following choices: 3, 4, 5, 10, 15, 30, 60 or Never. SNMP Time-out measured in seconds – the maximum time allowed for a response from a chassis before initiating a retry. The default value is 2 seconds. Use the drop-down list to select a different value from the following choices: 1, 2, 3, 4, 5 or 10. Number of Retries – the maximum number of polling retry attempts following an SNMP Time-out before generating an error. The default value is 3 retries. Use the drop-down list to select a different value from the following choices: 0, 1, 2, 3, 4 or 5. Page 19 Black Box Network Services Network Management Software Version 3.4 3.2 Common Black Box’s Management Software Windows 3.2.1 Chassis View The Chassis View windows provide a graphic representation of the different chassis devices for the DFCS family of products. The Chassis View windows are available for the 19-Module, 5-Module, 2-Module, 1-Module and fixed-configuration standalone chassis. From the Chassis View windows, module information can be viewed and modified, power supply health can be monitored, and both Secure OAM Mode and 802.3ah OAM mode can be enabled. By clicking the action buttons at the top of the window, IP addresses can be accessed, added or modified, the trap log can be viewed and trap filtering can be set, Black Box’s Management Software preferences can be set and modified, and the Table View window can be accessed. The buttons located from left to right at the top of the window perform the following actions: Close: Closes Chassis View and exits Black Box’s Management Software IP Select: Opens the IP Select window Trap Log: Opens the Trap Log window Refresh: Refreshes the window after a change is made Preferences: Opens the Preferences dialog box Table View: Opens the Table View window About Black Box’s Management Software: Opens the About Black Box’s Management Software window Configuration Menu The graphic modular section shows the plug-in modules with their real-time activities represented by LEDs. Any installed power supplies are represented by a status button. Viewing the details of any module is achieved by double clicking on the faceplate of a module. Placing the mouse cursor over a module faceplate will enable a flyover with information about the module, such as model number, module identifier and chassis name. Viewing the details of any power supply is achieved by pointing and clicking on the power supply’s numbered selection button located above the chassis. Right-clicking the faceplate of a module brings up the Configuration Menu, (shown above) which can copy and paste configurations from one module to another, and can print, save and load module configuration to and from a file. The Status Bar at the bottom of the window shows the polling status (green for active, gray for idle, yellow for retry operations, red for lost connectivity), the selected IP address, the chassis description, the chassis number and the software version number. Placing the cursor over any of these areas will enable a flyover that provides descriptive information. The Chassis View windows can display one of two modes: IP OAM mode or Remote OAM mode. The mode of the Chassis View is determined by enabling or disabling Remote OAM mode on the NMM. 3.2.2 IP OAM and Remote OAM Chassis Views IP OAM mode: In the IP OAM mode, only the addressed chassis can be managed. The NMM is the chassis master management module, and will have an open padlock icon with a monitor icon below it to indicate that it is the master with secure mode disabled. Any modules with built-in management (such as the 10/100M) will have an opened or closed padlock icon (see description on the following page). The 19-Module Chassis View window in IP OAM mode figure in Section 3.2.2.1 illustrates a sample screen of a chassis view in IP OAM mode. Remote OAM mode: In the Remote OAM mode, icons indicate the secure state of the connection between Page 20 Black Box Network Services Network Management Software Version 3.4 the local and remote modules. The NMM is the chassis master management module, and will have a padlock icon with a monitor icon below it to indicate that it is the master in secure mode. Any modules with built-in management (such as the 10/100M) will have a padlock icon and a downward-pointing arrow. The 5-Module Chassis View window in Secure OAM mode figure in Section 3.2.2.2 illustrates a sample screen of a chassis view in Remote OAM mode. NOTE: Remote OAM Management supports: ah OAM (IEEE 802.3ah OAM) or Secure OAM (IP-less). There are four indicators in the Chassis View window that show the security status of a fiber link. This link is comprised of two module types. The local proxy is a Secure OAM-capable converter with built-in management in the local master chassis. The remote secure partner (via fiber) is a Secure OAM-capable converter with built-in management that is managing the remote chassis. The first indicator is whether the lock is open or closed Open Lock – Indicates the local proxy does not have Secure OAM enabled. Closed Lock – Indicates the local proxy has Secure OAM enabled. The second indicator is the color of the lock Gray – Indicates the local proxy does not have Secure OAM or IP OAM enabled. Yellow – Indicates that the local proxy has not established a Secure OAM channel with its remote secure partner, or that the local proxy has established a Secure OAM channel with the remote secure partner, but detects that either itself or the remote secure partner has IP OAM mode also enabled. Green – Indicates the local proxy has established a Secure OAM channel with its remote secure partner, and the local proxy detects that neither itself nor the remote secure partner also has IP OAM enabled. The third indicator is the color of the arrow or diamond Gray – Indicates that the local proxy does not have Secure OAM enabled. Red – Indicates the local proxy has Secure OAM enabled, but the remote secure partner is not connected. Yellow – Indicates the local proxy has Secure OAM enabled, and the fiber link is connected, or is in the process of establishing a Secure OAM channel with the remote secure partner. Green – Indicates the local proxy has Secure OAM enabled, the fiber link is connected, and has established a Secure OAM channel with the remote secure partner. Blue Arrow – Indicates the local proxy has 802.3ah OAM enabled, and has established an 802.3ah channel with the remote partner. Blue Diamond – Indicates the local proxy has enabled 802.3ah operation with a remote device that does not support Omnitron vendor specific extensions. When in this mode, the local proxy does not participate in or initiate 802.3ah OAM operations. 1. The 5-Module Chassis View window in Secure OAM mode figure is a sample screen of a Chassis View window in Secure OAM mode. 2. The figures in the following sections show sample screens of the 19, 5, 2, 1-Module and standalone chassis in IP OAM and Secure OAM modes. Also see sections 3.2.3, 4.2.1.3 and 4.2.1.4 for information on how to configure a system for Secure OAM mode. Page 21 Black Box Network Services Network Management Software Version 3.4 3.2.2.1 19-Module Chassis View Power Supply Numbered Selection Button Cursor Flyover showing Module Information 19-Module Chassis View window in IP OAM mode Click the Arrow to view Module Information of Secure Remote Chassis NMM in Remote OAM Mode 19-Module Chassis View window in Remote OAM mode Page 22 Black Box Network Services Network Management Software Version 3.4 3.2.2.2 5-Module Chassis View 5-Module Chassis View window in IP OAM mode 5-Module Chassis View window in Secure OAM mode Page 23 Black Box Network Services Network Management Software Version 3.4 3.2.2.3 2-Module Chassis View 2-Module Chassis View window in IP OAM mode 2-Module Chassis View window in Secure OAM mode Page 24 Black Box Network Services Network Management Software Version 3.4 3.2.2.4 Single-Module Chassis Models 1-Module Chassis View 1-Module Chassis View window in IP OAM mode 1-Module Chassis View window in Secure OAM mode Page 25 Black Box Network Services Network Management Software Version 3.4 1-Module Redundant Power Chassis 1-Module Redundant Power Chassis View window in IP OAM mode 1-Module Redundant Power Chassis View window in Secure OAM mode 1-Module Redundant Power Chassis View window in 802.3ah OAM mode Page 26 Black Box Network Services Network Management Software Version 3.4 Standalone Chassis View Standalone Chassis View window in IP OAM mode Standalone Chassis View window in Secure OAM mode Standalone Chassis View window in 802.3ah OAM mode Page 27 Black Box Network Services Network Management Software Version 3.4 3.2.3 Table View Table View window showing fiber links in ah OAM mode The Table View window is accessed by clicking the Table View button at the top of a Chassis View window. The Table View window gives a summary view for all of the modules in the chassis and the Secure OAM and IP OAM settings. The Status columns show the same Secure OAM mode icons found in the Chassis View window. The Table View allows the user to easily change OAM settings for any module with built-in management in the system by clicking on the radio buttons under Management Mode, Auto OAM, Local IP OAM and Remote IP OAM columns. See sections 3.2.2, 4.2.1.3 and 4.2.1.4 for information on how to configure a system for Secure OAM Mode. The buttons located from left to right at the top of the window perform the following actions: Close: Closes the Table View window and returns to Chassis View Trap Log: Opens the Trap Log Apply Changes: Applies mode and identifier changes Refresh: Refreshes screen data after a change is made Preferences: Opens Black Box’s Management Software Preferences dialog box Chassis View: Opens Chassis View window (the Table View window stays open) About Black Box’s Management Software: Opens About Black Box’s Management Software window Page 28 Black Box Network Services Network Management Software Version 3.4 The Status Bar at the bottom of the window shows the polling status (green for active, gray for idle, yellow for retry operations, red for lost connectivity), the selected IP address, the chassis description and number and the software revision number. Column Function Slot Clicking on a numbered button will open the screen view for the module that is located in that specific slot position in the chassis. Closing the module window will return you to the Table View. Model Number The model number of the module in this slot position. Description The module type. Module Identifier User-defined text of up to 32 alpha-numeric characters. This can be a description of specific remote chassis information such as location. Remote Chassis Name User-defined text of up to 32 alpha-numeric characters. This can be a description of specific remote chassis information such as location. Status Indicates the Security mode of the fiber links. Click on an arrow to view the remote fiber partner chassis. Management Mode Clicking on the Remote OAM Enable check box next to an NMM enables the chassis to operate in Remote OAM mode. Clicking on the ah OAM or Auto ah OAM radio button next to a module such as the 10/100M enables the module to operate as a Local Proxy in ah OAM mode. When set to ah OAM it will only communicate with a remote module via the ah OAM protocol. When set to Auto ah OAM protocol it will communicate with the remote with the ah OAM protocol or force the remote to communicate via the ah OAM protocol. Clicking on the Secure OAM radio button next to a module such as the 10/100M enables the module to operate as a Local Proxy in Secure OAM mode. When set to Secure OAM it will only communicate with a remote module via the Secure OAM protocol. When set to Auto Secure OAM protocol it will communicate with the remote with the Secure OAM protocol or force the remote to communicate via the Secure OAM protocol. Clicking on the OAM Off button next to a module such as the 10/100M disables ah OAM and Secure OAM. Local Enable IP OAM Clicking on the Local Enable IP OAM radio button next to a module such as the 10/100M enables the Local module to operate in IP OAM mode. The NMM is only available with Local Enable IP OAM, because it is located at the Central Office/ Network Core. Remote Enabled IP OAM Clicking on the Remote Enable IP OAM radio button next to module such as the 10/100M enables the Remote module to operate in IP OAM mode. See sections 3.2.2, 4.2.1.3 and 4.2.1.4 for information on configuring a system for IP OAM and Secure OAM modes. Page 29 Black Box Network Services Network Management Software Version 3.4 DFCS 19-Module & 5-Module Chassis Power Supply Windows 3.2.4 DFCS Power Supply window Clicking on the numbered button next to the Power Supply Status indicator in the Chassis View window opens the Chassis Power Supply window. This window provides information about the chassis power supplies, such as voltage, current and temperature. The chassis power supplies are given a slot number to identify them. User-definable text (up to 32 alphanumeric characters) can be entered into the Module Identifier field to describe or name the power supply. The buttons located from left to right at the top of the window perform the following actions: Close: Closes the window and returns to Chassis View Apply Changes: Applies the module identifier changes Refresh: Refreshes window data and changes take effect Reset: Resets the module after a major change is made, such as an IP address change About Black Box’s Management Software: Opens the About Black Box’s Management Software window The DFCS 19-Module and 5-Module Chassis Power Supply Module window includes the following sections: General Information Section This section provides general information about the 19-Module or 5-Module Chassis power supplies: Chassis Number - Reports the user-assigned chassis number of the power supply Slot Number - Reports the power supply slot location within a chassis: For the 19-Module Chassis: - Slot 20 refers to the right power supply (as viewed from the front) - Slot 21 refers to the center power supply - Slot 22 refers to the left power supply (as viewed from the front) Page 30 Black Box Network Services Network Management Software Version 3.4 For the 5-Module Chassis: - Slot 6 refers to the right power supply (as viewed from the front) - Slot 7 refers to the left power supply (as viewed from the front) Model Number - Reports the model number of the power supply Description - Provides the manufacturer’s description of the power supply Module Identifier - Provides a user-defined description of the power supply Status Section This section displays the status of the power supply unit: Input Voltage Applied: LED is on Not applied: LED is off Fan Status Active: LED is on, fan is operational Not Active: LED is off, fan is non-operational Power Supply Output Voltage Status Shows the output voltage status of the power supply in both graphical and numerical formats, where 3.1-3.5 Volts is the safe voltage output range. When the associated trap is enabled, voltage outside of this range will cause a trap to be generated. Power Supply Output Current Status Shows the output current status of the power supply in both graphical and numerical formats, where 0-18 Amps is the safe current range. Power Supply Temperature Status Shows the temperature status of the power supply in both graphical and numerical formats. When the associated trap is enabled, a warning trap will be generated if the power supply temperature is approaching the maximum limit. Power Supply Specific Information Section This section provides manufacturing information about the power supply, including its serial number, manufacture date, hardware and software revisions. Fan Status This scale displays the speed of the fan. Support Information This section provides URL links to the chassis’ data sheet and support pages on Omnitron’s web site. It also provides phone numbers for product and technical support. Page 31 Black Box Network Services Network Management Software Version 3.4 DFCS 1-Module Redundant Power Chassis Windows 3.2.5 The DFCS 1-Module Redundant Power Chassis Configuration windows are accessed from the Chassis View window by pointing and clicking on the faceplate of the chassis. DFCS 1-Module Redundant Power Chassis Configuration Overview 3.2.5.1 1-Module Redundant Power Chassis window - Power Supply 2 panel The DFCS 1-Module Redundant Power Chassis Configuration window has a unique set of buttons located from left to right at the top of the windows. The buttons perform the following actions: Close: Closes the window Apply Changes: Applies configuration changes Refresh: Refreshes window data FTP: Updates firmware Port Access: Opens Port Access Control window Reset: Resets the Module General Chassis Information Section The General Module Information Section includes the following: Chassis Number - Reports the user-assigned chassis number (refer to the user manual of the management module for details on assigning chassis numbers). In Secure OAM mode, this number is set by the slot number of the Master NMM2 or the slot number of the proxy in the chassis. Slot Number - Reports the slot location within a chassis Model Number - Reports the model number of the module Description - Provides a description of the module Module Identifier - Provides a user-defined description of the module (a 64-character field) Power over Ethernet - Indicates if the optional power source is installed Page 32 Black Box Network Services Network Management Software Version 3.4 LEDs and Alarm Section This section on the left side of the window provides status and real-time monitoring information for each of the LEDs and Alarm sensors on the chassis. Module Specific Section This section provides module-specific manufacturing information about the chassis, including its serial number, manufacturing date, hardware and software revisions. Configuration Panels Section The chassis may have four panels depending on the model: Power Supply 1, Power Supply 2, Contact Closures and Mode of Operation. At the minimum, the chassis will have two panels: Power Supply 1 and Power Supply 2. 3.2.5.2 Power Supply 1 and 2 Panels 1-Module Redundant Power Chassis window - Power Supply 2 panel Power Supply Output Voltage Status Shows the output voltage status of the power supply in both graphical and numerical formats, where 3.1-3.5 Volts is the safe voltage output range. When the enable voltage out of range trap is enabled, voltage outside of this range will cause a trap to be generated (see section 3.2.6.1, Trap Logging Preferences). Power Supply Output Current Status Shows the output current status of the power supply in both graphical and numerical formats, where 0-3 Amps is the safe current range. Power Supply Temperature Status Shows the temperature status of the power supply in both graphical and numerical formats. When the enable high temperature warning trap is enabled, a warning trap will be generated if the power supply temperature is approaching the maximum limit (see section 3.2.6.1, Trap Logging Preferences). Page 33 Black Box Network Services Network Management Software Version 3.4 3.2.5.3 Modes of Operation Panel This section provides information about the modes of operation controlled by DIP-switches and the forced settings available via the software to override the physical DIP-switch settings. Each parameter display includes two fields. The field on the left depicts the actual settings on the module. The pull-down menu field on the right allows overriding of the current setting (forced settings). 1-Module Redundant Power Chassis window - Mode of Operation panel For chassis configured with optional UTP ports, the following parameters can be monitored and configured. Refer to this module’s User Manual for more information on the following settings. Port A/B Control - UTP Auto-Negotiation, 10/100 and Full/Half-Duplex Control Pause Enable/Disable Control Page 34 Black Box Network Services Network Management Software Version 3.4 3.2.5.4 Contact Closure Panel 1-Module Redundant Power Chassis window - Contact Closure panel This section allows the enabling or disabling of the alarm sensors located on the back of the chassis. On models with the contact closure sensor feature, the chassis provides an optional 8-pin connector (4 contact sensors) on the back of the chassis that can be used to sense the state of external alarm conditions. Each of the four sensor pins can detect if the wired circuit is open or closed, or has high or low voltage from the external equipment. A DIP-switch, located on the back of the chassis, is used to enable or disable alarm reporting. If no external equipment is connected to the 8-pin connector, it is important to disable the alarm reporting by configuring each DIP-switch to the DISABLE position. SNMP traps are generated when the contact closures are opened and closed. The user can add names for each of the alarm sensors to help isolate problems. These names are only available when using DFCS. Page 35 Black Box Network Services Network Management Software Version 3.4 3.2.5.5 Port Access Control Window Port Access Control is available on chassis configured with optional UTP ports. The Port Access Control window is accessed by clicking on the Port Access action button ( )in the Chassis Configuration window. 1-Module Redundant Power Chassis Port Access Control window This section allows enabling or disabling of all traffic flow on individual ports on the front of the chassis. The factory default is set to Enabled. To change current settings, choose the appropriate new Forced Setting selection(s) from the pull down menus, and then use the Apply Changes action button at the top of the window to apply the changes. Note: All UTP port settings remain intact when the ports are re-enabled. Page 36 Black Box Network Services Network Management Software Version 3.4 3.2.6 Trap Log Window Trap Log window Traps are status change events that occur during the operation of a network that may require special attention from the network administrator. Black Box’s Management Software can be configured to monitor and log the presence of various types of SNMP traps. It can also be configured to invoke a pop-up Trap Log window upon the occurrence of a monitored trap type. When this occurs, the network administrator is alerted of a potential problem and can check this window for the type of trap that was reported and then take appropriate action. The buttons located from left to right at top of window perform the following actions: Close: Closes the Trap Log window and returns to Chassis View or Table View Lock Port: Allows Black Box’s Management Software to establish a connection to the TCP/IP port for SNMP traps. Button will be bold when the TCP/IP port needs to be manually established. Preferences: Opens Trap Preferences window Delete trap: Deletes a highlighted trap from the list Clear: Clears the entire trap log About Black Box’s Management Software: Opens the About Black Box’s Management Software window The traps may also be sorted by the column headings. Clicking on each heading will sort the list by that column’s parameters in ascending or descending order. Page 37 Black Box Network Services Network Management Software Version 3.4 3.2.6.1 Trap Logging Preferences Window Trap Logging Preferences window Click on the check-box next to each trap to specify whether each trap is to be enabled or disabled. The default screen has all traps enabled except for “Enable Pop-Up Window on Trap”. Clicking on the “Enable Pop-Up Window on Trap” check-box will enable the Trap Log Window to display whenever a trap occurs. Unchecking this box disables the Trap Log pop-up; the trap log will have to be manually opened to view traps. Some of the possible trap events that can be enabled using this window include: Pop-Up Window On Trap Module Insertion / Removal Module Link Up / Down Module Switch Change Software Configuration Change Hardware Configuration Change Power Application / Removal (of individual power supply) Power Supply Temperature or Voltage Out of Range Chassis Insertion / Removal Primary / Secondary Link Up / Down (when in Redundancy mode) FTP Session Start / Stop Telnet Session Start / Sop Dying Gasp (power loss) Page 38 Black Box Network Services Network Management Software Version 3.4 4.0 Module Configuration The DFCS Module Configuration windows are accessed from the Chassis View window by pointing and clicking on the faceplate of the module. They can also be accessed from the Table View by clicking on the numbered button in the Slot column. 4.1 DFCS Module Configuration Overview Sample DFCS Module Configuration window Each DFCS Module Configuration window has a unique set of buttons located from left to right at the top of the windows. The buttons perform the following actions: Close: Closes the window Apply Changes: Applies configuration changes Refresh: Refreshes window data System Clock: Synchronizes the management module clock with the system clock FTP: Updates firmware Event Notification: Opens 802.3ah event notification setup window Port Bandwidth: Opens Port Bandwidth Control window Tag VLAN: Opens Tag VLAN Membership window Port VLAN and Port Access: Opens Port VLAN and Port Access Control window MIB Statistics: Opens MIB Statistics window Reset: Resets the Module About Black Box’s Management Software: Opens the About Black Box’s Management Software window Page 39 Black Box Network Services Network Management Software Version 3.4 General Module Information Section All modules have a General Module Information Section. The General Module Information Section includes the following: Chassis Number - Reports the user-assigned chassis number (refer to the user manual of the management module for details on assigning chassis numbers). In Secure OAM mode, this number is set by the slot number of the Master NMM or the slot number of the proxy in the chassis. Slot Number - Reports the slot location within a chassis Model Number - Reports the model number of the module Description - Provides a description of the module Module Identifier - Provides a user-defined description of the module (a 64-character field) LEDs Section All modules have a LEDs Section. This section provides status and real-time monitoring information for each of the LEDs on the front of the DFCS modules. The LEDs section varies per module and is described in each module section in this manual. Modes of Operation Section All modules have this section except for the NMM. This section provides information about the modes of operation controlled by DIP-Switches and the forced settings available via the software to override the physical DIP-Switch settings. Each parameter display includes three fields. The field on the left depicts the physical hardware DIP-Switch setting on the module. The pull-down menu field on the right allows overriding of the hardware setting. The field in the center shows the actual parameter presently in use by the module. Module Specific Section All modules have a Module Specific Section. This section provides module-specific manufacturing information about the module, including its serial number, manufacturing date, hardware and software revisions. Status Section All modules have a Status Section. For a management module such as the 10/100M, this section displays the Management Mode and Port status fields. A module can be in a “Complete”, “Connected”, “Connecting,” “Incomplete”, “In Process”, “Disabled” or “Disconnected” State. These status fields are not present in nonmanagement modules. Management Configuration Panels Section Only management modules (such as the NMM and 10/100M) have a Management Configuration Panels section. The NMM has four panels: IP and Control Preferences, SNMP Preferences, Modes of Operation and Networking Features. A management module such as the 10/100M has five panels: IP and Control Preferences, SNMP Preferences, Networking Features, Modes of Operation and 802.3ah Features. See section 4.2 for information on how to configure the settings in these panels. Support Information Section This section provides URL links to the module’s data sheet and support pages on Black Box’s web site. It also provides phone numbers for product and technical support. Page 40 Black Box Network Services Network Management Software Version 3.4 4.1.1 Port Bandwidth Control Window The Port Bandwidth Control window is accessed by clicking on the Port Bandwidth Control action button on the DFCS Module Configuration window. Sample DFCS Port Bandwidth Control window The buttons located from left to right at the top of the window close the window, apply mode changes and refresh window data. The Port Bandwidth Control windows for DFCS modules with this feature include General Information and Port Bandwidth Control sections. General Information Section This section provides general information about the module: Chassis Number: Reports the user-assigned chassis number Slot Number: Reports the slot location within a chassis Model Number: Reports the model number of the module Description: Provides a description of the module Module Identifier: Provides a user-defined description of the module (not changeable on this window) Port Bandwidth Control Section This section allows configuring of ingress and egress traffic bandwidth for individual ports. Factory default is Full Bandwidth on all ingress and egress port traffic. See the specific module for more information. To change current settings, choose the appropriate new selection(s) from the pull down menus, and then use the Apply action button at the top of the window to apply the changes. Each DFCS module has different types of ports, so this section will vary accordingly for each module. Page 41 Black Box Network Services Network Management Software Version 3.4 4.1.2 Tag VLAN Membership Window The Tag VLAN Membership window is accessed by clicking on the Tag VLAN Membership action button in the Module Configuration window. Sample DFCS Tag VLAN Membership window The buttons located from left to right at the top of the window perform the following actions: Close: Closes the window and exits Black Box’s Management Software. Apply Changes: Applies the selected IP address and opens the Chassis View window. Refresh: Refreshes the window after a change is made. VLAN On: Enables Tag VLAN operation according to the Tag VLAN port settings and the Tag VLAN membership table. VLAN Off: Disables Tag VLAN operation according to the Tag VLAN port settings and the Tag VLAN membership table. Load Settings: Load Tag VLAN port settings and Tag VLAN membership table from a saved configuration file on a drive in the SNMP client PC. Save Settings: Save Tag VLAN port settings and Tag VLAN membership table to a drive on the SNMP client PC as a configuration file. Clear Settings: Restores default settings About Black Box’s Management Software: Opens the About Black Box’s Management Software window NOTE: Improperly configured Tag VLAN port settings and Tag VLAN membership tables can block IP access to the management module. Page 42 Black Box Network Services Network Management Software Version 3.4 The Tag VLAN Membership windows for DFCS modules with this feature include a General Information Section and VLAN Settings per Port sections. NOTE: The parameters selected in this window are not active until Tag VLAN processing is turned on with the VLAN On button. General Information Section This section provides general information about the module: Chassis Number: Reports the user-assigned chassis number Slot Number: Reports the slot location within a chassis Model Number: Reports the model number of the module Description: Provides a description of the module Module Identifier: Provides a user-defined description of the module (not changeable in this window) Setup Progress: Current status of update VLAN Status: Current state of VLAN enable VLAN Settings per Port This section describes the parameters required for VLAN configuration. Each Tag VLAN capable DFCS module supports different port configurations, which will cause the depicted screen to change slightly in support of the different ports. Sample DFCS Tag VLAN Port settings The following parameters are configured for each port: Port Priority (PRI) – This (IEEE 802.1p based) user-specified value of 0 through 7 can be assigned as a QoS priority level (0 being lowest and 7 being highest) to packets ingressing (entering) a port. If no value is specified by the user, a default priority value of “0” is assigned. The PRI value is always assigned to all untagged packets. Tagged packets are assigned the PRI value when the “PVID” option is selected in the “Tagged Packet Use” section. Port VLAN ID (PVID) – This (IEEE 802.1Q based) user-specified value of 2 through 4094 can be assigned as a Port VLAN ID (PVID) to packets ingressing a port. If no value is specified by the user a default PVID value of “2” is assigned. The PVID value is always assigned to untagged packets. Tagged packets are assigned the PVID value when the “PVID” option is selected in the “Tagged Packet Use” section. Tagged Packet Use – This section defines how tagged packets ingressing a port are processed. Selecting the “PVID” option causes the PRI and PVID user-specified values to be used as the packet’s VLAN ID (VID) for processing of the packet. Selecting the “TVID” (Tagged VLAN ID) option causes the packet’s original Tag VLAN ID (TVID) and priority level to be used as the packet’s VLAN ID (VID) for processing of the packet. Page 43 Black Box Network Services Network Management Software Version 3.4 NOTE:Untagged packets are always assigned the port’s PRI and PVID values as their VID. Ingress Security – This section selects the ingress security level of a port. Selecting the “Low” option allows any packet to ingress a port. Selecting the “High” option allows only packets that are assigned a VLAN ID (VID) value of which this port is a member (according to the Membership Table) to ingress a port. Egress Policy – This section defines how a packet which is egressing (exiting) a port is processed. Selecting the “Pass” option allows an egressing packet to egress a port unmodified. Selecting the “Tag” option causes a tag to be added to an egressing packet. The added tag consists of the packet’s ingress PVID and PRI assignments. NOTE: Modules that support Q-in-Q multi-tagging (10/100T-100FX TVLAN and 10/100M), the new tag and priority are added “on top” of any previous tag and priority. The added new priority has the same value as the previous priority found on the egressing packet, if the PRI assigned to the ingress port are both even or both odd. If the priority and the PRI are not both even or both odd, then the new priority would be based on the following table: Previous Priority PRI EVEN PRI ODD 0 0 1 1 0 1 2 2 3 3 2 3 4 4 5 5 4 5 6 6 7 7 6 7 Selecting the “Untag” option causes egressing tagged packets to have their original tag and priority removed. NOTE: In modules that support Q-in-Q multi-tagging, only the top tag and priority are removed, making the lower tag and its associated priority the active ones. Untagged packets are not affected and are passed unmodified. Membership Table – This table lists the permitted egress ports for each supported VLAN ID (VID). Only packets that are assigned a VID value that matches one of the egress port’s VID memberships are allowed to egress through the port. Sample DFCS Tag VLAN Membership table The table is filled by the user by typing in the desired VID values and selecting their desired port members by clicking on their associated buttons. Page 44 Black Box Network Services Network Management Software Version 3.4 When the “Ingress Security” is set to “High” for a specific port, the membership table is used to list the VIDs of the packets that are allowed to ingress that port. Enabling and Disabling VLAN Operations Once all the parameters are entered, clicking the Apply button transfers the parameters to the module. After the transfer is completed, the Tag VLAN mode can be enabled by clicking on the VLAN On button. Saving the Configuration The Tag VLAN Membership settings can be saved to a file on the management workstation disk for future use. To save the settings to a file, perform the following steps: Click on the Save button. The Save VLAN Configuration File window will open. Navigate to an appropriate location where the file will be saved and type a filename in the File name: field. Click on the Save button to save the file the specified location. Loading a Saved File 1) 2) 1) 2) 3) To open a saved file, click on the Load Settings button. The Open a VLAN Configuration File window will open. Black Box’s Management Software remembers the location of the last saved file. Highlight the correct file and click on the Open button to load the VLAN Membership settings. If you need to load a file from a different location, navigate to it, highlight the filename and click Open. Click on the Apply button in the VLAN Membership window to enable the settings. Page 45 Black Box Network Services Network Management Software Version 3.4 4.1.3 Port VLAN and Port Access Control Window The Port VLAN and Port Access Control window is accessed by clicking on the Port VLAN action button in the Module Configuration window. Sample DFCS Port VLAN and Port Access Control window The buttons located from left to right at the top of the window close the window, apply mode changes, and refresh window data. Close: Closes the window Apply Changes: Applies configuration changes Refresh: Refreshes window data About Black Box’s Management Software: Opens the About Black Box’s Management Software window The Port VLAN and Port Access Control window for DFCS modules with this feature include General Information, Port VLAN and Port Access Control sections. General Information Section This section provides general information about the module: Chassis Number: Reports the user-assigned chassis number Slot Number: Reports the slot location within a chassis Model Number: Reports the model number of the module Description: Provides a description of the module Module Identifier: Provides a user-defined description of the module (not changeable on this window) Port VLAN Section This section allows enabling or disabling of the traffic flow between ports on the module. On DFCS modules with built-in management, access to the internal management port from other ports can also be enabled or disabled. The factory default is all Port VLAN combinations set to Enabled (traffic can flow between all ports). To change current settings, click on the appropriate Enable/Disable check box for each port, or double-click the connection path on the graphic image, then use the Apply Mode Changes action button at the top of the window to apply the changes. Each DFCS has different types of ports, so this section will vary accordingly for each module. Page 46 Black Box Network Services Network Management Software Version 3.4 Port Access Control Section This section allows enabling or disabling of all packet traffic flow on individual ports on the front of a module. Note that Port Access Control must be enabled for a port in order for other ports to connect to it according to the Port VLAN configuration settings. The factory default is all Port Access Control configurations set to Enabled (traffic can flow across all ports). To change current settings, choose the appropriate new Forced Setting selection(s) from the pull down menus, and then use the Apply Changes action button at the top of the window to apply the changes. Each DFCS has different types of ports, so this section will vary accordingly for each module. 4.1.4 MIB Statistics Window The MIB Statistics window is accessed by clicking on the MIB Statistics action button in the Module Configuration window. Sample DFCS MIB Statistics window The buttons located from left to right at the top of the window close the window, refresh window data and open the About Black Box’s Management Software window. Close: Closes the window Refresh: Refreshes window data About Black Box’s Management Software: Opens the About Black Box’s Management Software window The MIB Statistic window for DFCS modules with this feature include General Information, Port Selection and MIB Statistic Data Display sections. Page 47 Black Box Network Services Network Management Software Version 3.4 General Information Section This section provides general information about the module: Chassis Number: Reports the user-assigned chassis number Slot Number: Reports the slot location within a chassis Model Number: Reports the model number of the module Description: Provides a description of the module Module Identifier: Provides a user-defined description of the module (not changeable on this window) Port Polling Configuration This section allows the configuration of Port Polling parameters for MIB statistics collection and display. The following parameters can be set: Port Selection - Allows selection of the port from which the MIB statistics are collected Polling Rate - Allows selection of statistics poll and display rate in seconds (Never, 3, 5, 10, 15, 30, 60 seconds) View Values - Allows selection to view statistics either in Cumulative Mode or Since Last Baseline The Reset Button to the right of the Port Polling parameters pull down menus resets all of the Tx and Rx MIB statistics to zero. MIB Statistics Data Display This section displays SNMP MIB data collected for the following statistics. Transmitted (Tx) Good Packets – Total Octets - The total number of good bytes of data transmitted by a port – Good Packets - The total number of good Unicast, Multicast and Broadcast packets transmitted by a port – Pause - The total number of Pause frames transmitted by a port – Unicast - The total number of Unicast packets transmitted by a port – Multicast - The total number of Multicast packets transmitted by a port – Broadcast - The total number of Broadcast packets transmitted by a port Received (Rx) Good Packets – Total Octets - The total number of good bytes of data received by a port – Good Packets - The total number of good Unicast, Multicast and Broadcast packets received by a port – Total Received Packets - The total number of good and error packets received by a port – Pause - The total number of PAUSE frames received by a port – Unicast- The total number of Unicast packets received by a port – Multicast - The total number of Multicast packets received by a port – Broadcast - The total number of Broadcast packets received by a port Transmitted (Tx) Errored Packets – Error - The total number of Excessive Collision and Late Collision packets transmitted by a port – Dropped - The total number of packets dropped due to lack of resources during transmission by a port – Bad Events - The total number of Dropped Transmitted and Dropped Received packets on a port – Deferred - The total number of packets transmitted by a port for which the first transmission attempt was delayed because the medium was busy Received (Rx) Errored Packets – Error - The total number of Alignment Error, FCS Error, Fragments, Oversized and Jabber packets received by a port Page 48 Black Box Network Services Network Management Software Version 3.4 – Dropped - The total number of good packets dropped due to lack of resources during reception by a port – FCS - The total number of packets received by a port with a length between 64 and 1522 bytes that have a bad FCS with an integral number of bytes – Symbol- The total number of valid length packets received by a port with at least one invalid data symbol detected – CRC Align - The total number of packets received by a port with CRC and alignment errors Transmitted (Tx) Collisions – Total - The total number of collisions experienced by a port during packet transmissions – Single - The total number of packets successfully transmitted by a port that experienced exactly one collision – Multiple - The total number of packets successfully transmitted by a port that experienced multiple collisions – Late - The total number of times that a collision is detected later than 512 bit-times into the transmission – Excessive - The total number of packets not transmitted by a port because the packet experienced 16 transmission attempts Received (Rx) Size Errors – Undersized - The total number of good packets received by a port with a length less than 64 bytes – Oversized - The total number of good packets received by a port with a length greater than 1522 bytes – Fragments - The total number of packets received by a port with a length less than 64 bytes that have either an FCS or an alignment error – Jabber - The total number of packets received by a port with a length greater than 1522 bytes that have either an FCS or an alignment error – Alignment - The total number of packets received by a port with a length between 64 and 1522 bytes that have a bad FCS with a non-integral number of bytes Received (Rx) Packets by Size – 64 Octets - The total number of packets (including bad packets) received that were 64 octets in length. – 65-127 Octets - The total number of packets (including bad packets) received that were between 65 and 127 octets in length – 128-255 Octets - The total number of packets (including bad packets) received that were between 128 and 255 octets in length – 256-511 Octets - The total number of packets (including bad packets) received that were between 256 and 511 octets in length – 512-1023 Octets - The total number of packets (including bad packets) received that were between 512 and 1023 octets in length – 1024-[max size] Octets - The total number of packets (including bad packets) received that were between 1024 and maximum allowed frame size in length Page 49 Black Box Network Services Network Management Software Version 3.4 4.1.5 Event Notification Window The Event Notification window is accessed by clicking on the Event Notification action button in the Module Configuration window of an DFCS NID. This window allows the configuration of the required error conditions that predicate the generation of 802.3ah Link Event Notifications on the fiber port or UTP port. Sample DFCS Event Notification window The buttons located from left to right at the top of the window close the window, refresh window data and open the About Black Box’s Management Software window. Close: Closes the window Apply Changes: Applies the selected IP address and opens the Chassis View window. Refresh: Refreshes window data About Black Box’s Management Software: Opens the About Black Box’s Management Software window The Event Notification window for DFCS management modules (NIDs) with this feature, include the following sections: General Information Section This section provides general information about the module: Chassis Number - Reports the user-assigned chassis number Slot Number - Reports the slot location within a chassis Model Number - Reports the model number of the module Description - Provides a description of the module Module Identifier - Provides a user-defined description of the module (not changeable in this window). Event Notification Configuration This section allows configuration of Event Notifications, which include Errored Symbol Period Event, Errored Frame Event, Errored Frame Period Event and Errored Frame Seconds Summary Event. Enter the duration (in seconds) for Period and the number of packets for Threshold. The following parameters can be set: Errored Symbol Period Event Errored Frame Event Page 50 Errored Frame Period Event Errored Frame Seconds Summary Event Black Box Network Services Network Management Software Version 3.4 4.2 DFCS Management Module Configuration Overview There are several types of DFCS management modules. The DFCS Network Management Module (NMM) is a dedicated management module and is capable of managing multiple chassis from a single IP address. Media converters with built-in management, such as the DFCS 10/100M are DFCS management modules that also provide media conversion but can only provide management of a single chassis. Sample DFCS Management Module window - IP and Control Preferences panel The buttons located from left to right at the top of the window perform the following functions: Close: Closes the window Apply Changes: Applies configuration changes Refresh: Refreshes window data Set Time: Synchronizes the management module clock with the system clock FTP: Updates firmware Event Notification: Opens 802.3ah event notification setup window Port Bandwidth: Opens Port Bandwidth Control window Tag VLAN: Opens Tag VLAN Membership window Port VLAN and Port Access: Opens Port VLAN and Port Access Control window MIB Statistics: Opens MIB Statistics window Reset: Resets the Module About Black Box’s Management Software: Opens the About Black Box’s Management Software window Not all action buttons are available on all management modules. See the specific module for more information. Refer to section 4.1 for a description of the following sections: Page 51 Black Box Network Services Network Management Software Version 3.4 General Information Section LEDs Section Module Specific (Manufacturing Information) Section Support Information Section Status Section Management Configuration Panels (see the following section). 4.2.1 Configuring the System using the Management Modules Configuring the system is accomplished by setting preferences in the Management Configuration Panels section. The NMM section includes three management configuration panels: IP and Control Preferences, SNMP Preferences and Networking Features. The modules with integrated management such as the 10/100M include these three panels along with two additional panels: Modes of Operation and 802.3ah Features. 4.2.1.1 IP and Control Preferences The figure in Section 4.2 shows an example of the IP and Control Preferences panel. IP Address - To manually configure the IP address of a Management Module, input a new IP address in x.x.x.x format. Subnet Mask - To manually configure the Subnet mask of a Management Module, input a new Subnet mask in x.x.x.x format. System Gateway - To manually configure the system gateway address of a Management Module, input a new system gateway address in x.x.x.x format. Chassis Number - In a single chassis configuration, the Chassis Number can remain as 1 (factory default). When cascading multiple chassis using the NMM cascade cables, the NMM in each chassis must be assigned a different Chassis Number. When multiple Management Modules are in a chassis, they inherit the chassis number of the chassis master. The Chassis Number can range from 1-19. Chassis Name - The Chassis Name, or sysName, can be assigned for identification of the Chassis. The Chassis Name can be any 1-32 character alphanumeric string. Telnet Enable/Disable - Telnet Access can be enabled or disabled by selecting the labeled radio button. FTP Enable/Disable - FTP Access can be enabled or disabled by selecting the labeled radio button. Soft-switch Reload - The Soft-switch Reload function can be enabled or disabled by selecting the labeled radio button. The Soft-switch Reload function controls the software override configurations of the DIP-Switch settings of the DFCS modules managed by the Management Module following a power-up or reset. When the Soft-switch Reload is disabled, the physical DIP-Switch settings overwrite any previous software settings stored in the Management Module’s FLASH memory following a loss of power. When the Soft-switch Reload is enabled, the configurations of the managed modules DIP-Switch settings are determined by the previous software settings stored in the Management Module’s FLASH memory after a loss of power. When the physical DIP-Switch settings are configured, the software DIP-Switch settings are overwritten and the hardware settings of the module are enabled. Telnet Password - To change the password for Telnet access to the Management Module, click the New Password button and enter an alphanumeric string of 1-32 characters. FTP Password - To change the password for FTP access to the Management Module, click the New Password button and enter an alphanumeric string of 1-32 characters. Serial Password - To change the password for Serial Console Port access to the Management Module, click the New Password button and enter an alphanumeric string of 1-32 characters. After making changes to the parameters, press the Apply button for the changes to take effect. Page 52 Black Box Network Services Network Management Software Version 3.4 4.2.1.2 SNMP Preferences Sample DFCS Management Module window - SNMP Preferences panel The SNMP Preferences panel of the Management Module window displays configurations for SNMPv1/v2c settings, SNMPv3 settings, SNMP community names, passwords and SNMP Traphosts. System Contact: User-defined System Contact information (such as information about the network administrator) assigned to the management module. System Location: User-defined System Location name assigned to the management module. SNMP Writes: To enable or disable SNMP write, click the appropriate radio button. SNMP Agents Enabled: To enable the appropriate SNMP agent, select the desired radio button. Read Community Name: To change the SNMP Read Community Name for the Management Module, click the New Name button and enter an alphanumeric string of 1-32 characters. Write Community Name: To change the SNMP Write Community Name for the Management Module, click the New Name button and enter an alphanumeric string of 1-32 characters. SNMPv3 User Name: The Read-Only User (guest) will be allowed to request information from the module only. The Read/Write User (admin) will be allowed to request information from and set configuration information to the module. Both default names can be changed. Security Level: The module supports the three levels of Authentication and Encryption (Security Levels) for Read Only User and Read/Write User; noAuthNoPriv, authNoPriv and authPriv. - noAuthNoPriv uses username for authentication - authNoPriv provides authentication based on the HMAC-MD5 algorithm - authPriv provides DES 56-bit encryption based on the HMAC-MD5 algorithm. Passwords: Each user has an authentication and privacy password. The default authentication and privacy passwords for Read Only User is publicguest; and Read/Write User is privateadmin. The passwords are used to create keys to authenticate and encrypt the data. Passwords can be any alphanumeric string of 1-16 characters. Traphost Address (1-8): To change the Traphost address where the SNMP Traps are sent to by the Management Module, input the IP address of the SNMP Traphost in x.x.x.x format. After making changes to the parameters, press the Apply button for the changes to take effect. Page 53 Black Box Network Services Network Management Software Version 3.4 4.2.1.3 Networking Features - Network Management Module The Network Features panel of the Network Management Module (NMM) displays configurations for DHCP client, management processor VLAN support, Keep Alive Trap settings, SNMP agent, SNMP writes, IP OAM, Remote OAM and serial baud rate configuration. The DHCP Client, SNMP Agent, SNMP Writes and IP OAM settings have been grayed out and are for status display only. These settings cannot be modified on the Networking Features panel of the NMM configuration window. Sample DFCS NMM Module window - Networking Features panel System Time: Current time on the Management Module’s internal clock (reset upon loss of power). MAC Address: Displays the Management Module’s MAC address. DHCP Client: Displays the assigned status of the DHCP client. VLAN Support (VLAN ID): The Management processor on the NMM is able to receive and transmit tagged VLAN management data between the management workstation and NMM module. The VLAN support can be enabled or disabled by selecting the labeled radio button. The VLAN ID membership for management data can be set by entering a number from 2 through 4094. The VLAN PRI (priority) for tagged VLAN management data can be assigned a priority by entering a number between 0 and 7. Keep Alive Trap: The Management Module is able to send a Keep Alive Trap to the Traphost(s) at each cycle. The length of the cycle is configured by the Keep Alive Trap Interval. Keep Alive Trap Interval (10-600sec): Seconds between each Keep Alive Trap sent to the SNMP Traphosts. IP OAM: Displays the enabled status of IP OAM mode on the NMM. Remote OAM: Places the chassis managed by the NMM into Remote OAM mode. This setting enables Remote OAM capable modules in the same chassis to provide Secure OAM or ah OAM management channels. Enabling the Remote OAM button changes the Chassis View window of the chassis managed by the NMM to the Remote OAM mode view. Remote OAM is the default setting for the NMM. Remote OAM can also be enabled in the Chassis Table View window. See sections 3.2.2 and 3.2.3 for information on this setting. Serial Baud Rate: The Baud Rate on the Management Module’s Serial Console Port is configurable by selecting the speed from the drop-down menu. Set the Baud Rate to match the Baud Rate of the modem when connecting to the Serial Console Port. After making changes to the parameters, press the Apply button for the changes to take effect. Page 54 Black Box Network Services Network Management Software Version 3.4 4.2.1.4 Networking Features - Network Interface Device with Integrated Management The Network Features panel of the Management Module Configuration windows (such as the 10/100M) displays the configurations for DHCP client, management processor VLAN support, Keep Alive Trap settings, SNMP agent, SNMP writes, IP OAM, Secure OAM, enabling the Bank 1 Soft-switches and serial baud rate configuration. Sample 10/100M Module window - Networking Features panel System Time: Current time on the Management Module’s internal clock (reset upon loss of power). MAC Address: Displays the Management Module’s MAC address. DHCP Client: The Management Module can be automatically assigned an IP address by a DHCP server. The DHCP client feature can be enabled or disabled by selecting the labeled radio button. VLAN Support (VLAN ID): Management modules, such as the 10/100M are able to receive and transmit tagged VLAN management data independently of the Secure OAM channel. The VLAN support can be enabled or disabled by selecting the labeled radio button. The VLAN ID membership for management data can be set by entering a number from 2 through 4094. The tagged VLAN management data can be assigned a priority in the VLAN PRI by entering a number between 0 and 7. Keep Alive Trap: The Management Module is able to send a Keep Alive Trap to the Traphost(s) at each cycle. The length of the cycle is configured by the Keep Alive Trap Interval. Keep Alive Trap Interval (10-600sec): Seconds between each Keep Alive Trap sent to the SNMP Traphosts. SNMP Agent: The SNMP Agent service on the Management Module can be enabled or disabled by selecting the labeled radio button. Disabling the SNMP Agent will block SNMP management software such as Black Box’s Management Software from accessing the Management Module. SNMP Writes: This setting enables the SNMP Write functionality on the Management Modules (such as the 10/100M). DIP SW 1 Enable: This setting enables or disables the Soft-switch settings of the Bank 1 DIP-Switches on modules with this feature (such as the 10/100M). Refer to the user manual for the module for more information on this setting. IP OAM: The IP OAM on modules with this feature (such as the 10/100M) can be enabled or disabled to allow IP-based management communication. IP OAM can be set independently of the Secure OAM channel. IP OAM can also be enabled in the Chassis Table View window. See sections 3.2.2 and 3.2.3 for information on this setting. Page 55 Black Box Network Services Network Management Software Version 3.4 Management Mode: This setting enables or disables OAM management modes (ah OAM or Secure OAM). Enabling an OAM mode allows the local proxy to communicate with its link partner through a specific management channel. This setting requires OAM enabled modules and a Remote OAM enabled NMM to be installed in the same chassis. For OAM management channels to communicate with both link partner modules, each module must have OAM enabled. The Management Mode can also be enabled in the Chassis Table View window. See sections 3.2.2 and 3.2.3 for information on this setting. Setting the Management Mode to OAM Off, disables the OAM functionality. Serial Baud Rate: The baud rate of the serial management port can be changed using the pull-down menu. Serial Baud Rate Pull-Down Menu cNode Loopback: Features Iometrix cNode Level 1 agent. The agent recognizes measurement packets and loops them back to the sending cNode. This provides a detailed round-trip measurement for localloops. Must be used with Iometrix system. After making changes to the parameters, press the Apply button for the changes to take effect. 4.2.1.5 802.3ah Features - Network Interface Devices with Integrated Management Sample DFCS 10/100M Module window - 802.3ah Features panel The following 802.3ah parameters can be monitored and/or configured in the 802.3ah Features panel: 802.3ah OAM State - Port 1 and Port 2 “Enable/Disable” control pull-down menus. The 802.3ah OAM State pull-down menus turn 802.3ah processing on or off on the selected port. When the port is configured as “Disabled” it will not respond to OAMPDUs (OAM Protocol Data Units). They will be dropped by the processor and not acted upon. When the port is configured as “Enabled”, it will respond to and be involved in the Discovery process and other supported 802.3ah OAM functions. Page 56 Black Box Network Services Network Management Software Version 3.4 802.3ah OAM Mode - Port 1 and Port 2 “Active/Passive” control pull-down menus. The 802.3ah OAM Mode pull-down menus set the selected port to “Passive” or “Active” configuration mode. A port in “Passive” mode cannot initiate Discovery, send Variable Requests or initiate Loopback Mode. It can observe and report only the port status of its 802.3ah enabled remote partner. An “Active” port can initiate Discovery, send Variable Requests and initiate loopback mode. Loopback Mode - Port 1 and Port 2 “On/Off” pull-down menus. The Loopback Mode pull-down menu turns loopback operations “On” or “Off”. When Loopback Mode is set to “Off”, the port of the 802.3ah enabled local device will not initiate Loopback operations. It can respond to loopback commands from its 802.3ah enabled remote partner if set to “Passive” or “Active”. When Loopback Mode is set to “On”, the port of 802.3ah enabled local device will initiate Loopback operations and set the 802.3ah enabled remote partner into loopback. In this mode, the 802.3ah enabled local device will not respond to any other configuration changes until its port is set to “Off.” Loopback Mode Timeout (sec) - The Loopback Mode Timeout field controls the length of time that the port will be set to Loopback “On” mode. Loopback can be set between 0 and 300 seconds. The 0 setting disables the timer. Unidirectional Mode - Port 1 and Port 2 “Enable/Disable” pull-down menus. The 802.3ah unidirectional link can be enabled on the Port 1 when Port 1 is set to manual (MAN) mode. Unidirectional fiber link allows a fiber port to send link fault OAMPDUs when a link fault is detected. This feature is not available on all management modules. Local Status Section The Local Status section displays the status of the Port 1 and Port 2 of the 802.3ah enabled local device. The local device is controlled directly by SNMP, Telnet or via the Serial Port and has the ability to communicate with a 802.3ah enabled remote partner. Discovery State - Indicates the Discovery state (“Complete”, “In Process” or “Incomplete”) of the local ports. If “Complete” is displayed, Discovery has been completed. If “In Process”, Discovery has been initiated but no response from the 802.3ah enabled remote partner has been received by the local device. If “Incomplete”, Discovery has received a response from the 802.3ah enabled remote partner but the Discovery process is not yet completed. Multiplexer State - Indicates the Multiplexer state (“Discard” or “Forward”) of the local ports. If “Forward” is displayed, the local device is forwarding non-OAMPDU network frames to the lower sublayer. If “Discard”, the local device is discarding non-OAMPDU network frames. Parser Action - Indicates the Parser Action (“Discard”, “Forward” or “Loopback”) of the local ports. If “Forward” is displayed, the local device is forwarding non-OAMPDU network frames to the higher sublayer. If “Loopback”, the local device is looping back non-OAMPDUs network frames. If “Discard”, the device is discarding non-OAMPDUs network frames. Critical Event - Indicates the Critical Event state (“Yes” or “No”) of the remote partner. If “Yes” is displayed, the local device has detected a Critical Event. If “No”, the local device has not detected a critical event. Link Fault - Indicates the remote partner has detected a fault in the receive direction (“Yes” or “No”). If “Yes” is displayed, the receive link is down. If “No”, the receive link is up. Supports - Indicates the supported options (Variable Access “Var”, Critical Events “Events”, Loopback “LB”, Unidirectional “UNI” or blank if no options are supported). Remote Status Section The Remote Status section displays the status of the ports of the 802.3ah enabled remote partner. These remote ports are connected to Port 1 and Port 2 of the local device. The remote partner is managed by the local device via the 802.3ah OAM channel. Discovery State - Indicates the Discovery state (“Complete”, “In Process” or “Incomplete”) of the Page 57 Black Box Network Services Network Management Software Version 3.4 remote ports. If “Complete” is displayed, Discovery has been completed. If “In Process”, Discovery has been initiated but no response from the local device has yet been received by the remote partner. If “Incomplete”, Discovery is in process, but is not yet completed. Multiplexer State - Indicates the Multiplexer state (“Discard”, “Forward” or “Unknown”) of the remote ports. If “Forward” is displayed, the remote partner is forwarding non-OAMPDUs to the lower sublayer. If “Discard”, the remote partner is discarding non-OAMPDUs network frames. If “Unknown”, the Multiplexer state of the remote partner is indeterminate. Parser Action - Indicates the Parser Action state (“Discard”, “Forward” or “Loopback”) of the remote ports. If “Forward” is displayed, the remote partner is forwarding non-OAMPDUs network frames to the higher sublayer. If “Loopback” is displayed, the remote partner is looping back non-OAMPDUs network frames. If “Discard” is displayed, the remote partner is discarding non-OAMPDUs network frames. Critical Event - Indicates the Critical Event state (“Yes” or “No”) of the remote partner. If “Yes” is displayed, the local device has detected a Critical Event. If “No”, the local device has not detected a critical event. Link Fault - Indicates the remote partner has detected a fault in the receive direction (“Yes” or “No”). If “Yes” is displayed, the receive link is down. If “No”, the receive link is up. OAM Mode - Indicates the OAM mode (“Active” or “Passive”) of the remote partner. Supports - Indicates the supported options (Variable Access “Var”, Critical Events “Events”, Loopback “LB”, Unidirectional “UNI” or blank if no options are supported) of the remote partner. OUI - Indicates the three hex byte IEEE organizational specific identifier (or “Unknown” if unknown) of the remote partner. Page 58 Black Box Network Services Network Management Software Version 3.4 5.0 INDIVIDUAL DFCS Module Windows The Black Box’s Management Software SNMP software provides a customized graphical user interface for each DFCS module. Each module has a Module Configuration window that provides real-time LED status, configurable option menus, comprehensive module information and a user-defined module identifier. Configuration of advanced features, such as Tag VLAN Membership and Port Bandwidth Control, can also be accessed from the Module Configuration windows on modules that support these features. The following DFCS modules are covered in this section: 5.1 DFCS NMM - Network Management Module 5.2 10/100M Module 5.3 10/100/1000T-Gfiber Module 5.4 GigaTx-GigaFx Module 5.5 GigaTx-GigaFiber Module (R2) 5.6 10/100T-100Fx TVLAN Module 5.7 10/100T-Fx Module 5.8 100Tx-100Fx Module 5.9 FF (Fiber-to-Fiber) Modules (DFCS Fiber-to-Fiber and DFCS Gfiber-Gfiber) 5.10 FF SFP Fiber-to-Fiber Module 5.11 10G Fiber-Fiber Module 5.12 100Tx/2Fx and 100Tx-2Tx Redundant Ethernet Module 5.13 10T-10FL Module 5.14 10BaseT-10Base2 Module 5.15 4Tx /L2 Module 5.16 T1/E1-fiber Module Page 59 Black Box Network Services Network Management Software Version 3.4 5.1 DFCS NMM - Network Management Module DFCS NMM window - Networking Features panel The DFCS NMM monitors, controls and manages up to 19 managed chassis and their individual modules. The NMM features a serial configuration port, front-plane Ethernet port, a backplane Ethernet port and a pair of multi-chassis management ports. LED Section Power LED - Monitors the power status of the NMM internal power supplies supported by the chassis being managed Power Supply LEDs (1-3 LEDs) - Monitors the status of up to three chassis-based power supplies (the number of active LEDs is dependent on the number of internal power supplies supported by the chassis being managed) Master/Slave LED - Indicates the role of the NMM as a Master module or a Slave module in a multichassis configuration Management Activity LED - Monitors the polling function of the NMM UTP Link LED - Monitors the Ethernet front-plane or backplane port connection Status Management Mode - displays Remote OAM state NMM Management Configuration Panels IP and Control Preferences - Please refer to section 4.2.1.1 for information on configuring the IP and Control Preferences panel. SNMP Preferences - Please refer to section 4.2.1.2 for information on configuring the SNMP Preferences panel. Networking Features - Please refer to section 4.2.1.3 for information on configuring the Networking Features panel. Page 60 Black Box Network Services Network Management Software Version 3.4 5.2 10/100M Module DFCS 10/100M window - Networking Features panel The DFCS 10/100M is a media converter and Network Interface Device (NID) that provides 10BASE-T or 100BASE-TX to Fast Ethernet Fiber conversion with built-in management. The 10/100M monitors and controls other DFCS modules installed in the same chassis, and features a front-plane serial port for configuration. LED Section Power LED - Monitors the power status of the 10/100M module Power Supply LEDs (1-3 LEDs) - Monitors the status of up to three chassis-based power supplies (The number of active LEDs is dependent on the number of internal power supplies supported by the chassis being managed) Fiber Link LED - Monitors the link of the fiber port Backplane Master LED - Indicates the 10/100M is the management Master in a chassis UTP 10 Mbps LED - Indicates the data rate of the UTP port is 10Mbps UTP 100 Mbps LED - Indicates the data rate of the UTP port is 100Mbps UTP Full/Half-Duplex LED - Monitors the Duplex mode of the UTP port Status The Status Section shows the management mode and port status of the module. The management mode will display the selected mode of operation which includes OAM Off, Auto Secure OAM, Secure OAM, Auto ah OAM and ah OAM. There are two port connection state status boxes labeled Port 1 (Fiber) Status and Port 2 (UTP) Status. The Port 1 status box can contain the following: When OAM is off, the background will be gray and will display “Disabled”. When OAM is on, but a link: has not been established, the background will be red and will display “Connecting”. When OAM is on with Secure OAM or Auto Secure OAM selected, but the connection is in process of being established, the background will be yellow and will display “Connecting”. When OAM is on with Secure OAM or Auto Secure OAM selected and the link has been established, the background will be green and will display “Secure OAM Connected”. Auto Secure OAM will force the remote partner to communicate Page 61 Black Box Network Services Network Management Software Version 3.4 using the Secure OAM protocol while Secure OAM will only attempt to communicate with the remote partner over the secure protocol. When OAM is on with ah OAM or Auto ah OAM enabled, but the connection is in process of being established, the background will be yellow and will display “Connecting”. When OAM is on with ah OAM or Auto ah OAM enabled and the link has been established, the background will be blue and will display “Std 802.3ah Connected”. When OAM is on with ah OAM or Auto ah OAM enabled and a link has been established with ah OAM completed, the background will be blue and will display “Ext 802.3ah Connected”. Auto ah OAM will force the remote partner to communicate using ah OAM protocol while ah OAM will only attempt to communicate with the remote partner over the ah protocol. The Port 2 status box can contain the following: When 802.3ah is disabled, the background will be grey and will display “Disabled”. When 802.3ah is enabled, but no link has been established, the background will be red and will display “Connecting”. When 802.3ah is enabled but has not completed, the background will be yellow and will display “Connecting”. When 802.3ah enabled and the link has been established with ah OAM, the background will be blue and display “Std 802.3ah Connected”. 10/100M Management Configuration Panels IP and Control Preferences - Please refer to section 4.2.1.1 for information on configuring the IP and Control Preferences panel. SNMP Preferences - Please refer to section 4.2.1.2 for information on configuring the SNMP Preferences panel. Networking Features - Please refer to section 4.2.1.4 for information on configuring the Networking Features panel. Modes of Operation - Please refer to the following section for information on configuring the Modes of Operation panel. 802.3ah Features - Please refer to section 4.2.1.5 for information on configuring the 802.3ah Features panel. Page 62 Black Box Network Services Network Management Software Version 3.4 5.2.1 10/100M Modes of Operation Panel DFCS 10/100M window - Modes of Operation panel The following parameters can be monitored and configured. Refer to this module’s User Manual for more information on the following settings. Link Control - Link Propagate (LP), Link Segment (LS), Remote Fault Detection (RFD) or Symmetrical Fault Detection (SFD) Fiber Full/Half-Duplex Control UTP Port Selection - UTP Auto-Negotiation, 10/100 and Full/Half-Duplex Control Pause Enable/Disable Control Chassis Management Master/Slave, Slave-Only Select - When Slave-Only is selected, the 10/100M will work as a standard media converter. Backplane A - Enable/Disable Control Backplane B - Enable/Disable Control After making changes to the parameters using the pull-down menus, press the Apply button for the changes to take effect. Page 63 Black Box Network Services Network Management Software Version 3.4 5.2.2 10/100M 802.3ah Features Panel DFCS 10/100M window - 802.3ah Features panel Please refer to section 4.2.1.5 for information on configuring the DFCS 10/100M 802.3ah Features window. 5.2.3 10/100M Port Bandwidth Control Window DFCS 10/100M Port Bandwidth Control window Please refer to section 4.1.1 for information on configuring the DFCS 10/100M Port Bandwidth Control window. Page 64 Black Box Network Services Network Management Software Version 3.4 5.2.4 10/100M Tag VLAN Membership Window DFCS 10/100M Tag VLAN Membership window Please refer to section 4.1.2 for information on configuring the DFCS 10/100M Tag VLAN Membership window. 5.2.5 10/100M Port VLAN and Port Access Control Window DFCS 10/100M (Plug-In Module) Port Bandwidth and Port Access Control window Please refer to section 4.1.3 for information on configuring the DFCS 10/100M Port Bandwidth and Port Access Control window. Page 65 Black Box Network Services Network Management Software Version 3.4 5.2.6 10/100M MIB Statistics Window DFCS 10/100M MIB Statistics window Please refer to section 4.1.4 for information on configuring the DFCS 10/100M MIB Statistics window. 5.2.7 10/100M Event Notification Window DFCS 10/100M Event Notification window Please refer to section 4.1.5 for information on configuring the DFCS 10/100M Event Notification window. Page 66 Black Box Network Services Network Management Software Version 3.4 5.3 10/100/1000T-Gfiber Module DFCS 10/100/1000T-Gfiber Mode of Operation window The DFCS 10/100/1000T-Gfiber provides 10/100/1000T to 1000X fiber conversion. LED Section Power LED - Monitors the power status of the module Fiber Full/Half-Duplex LED - Monitors the duplex mode of the fiber port Fiber Link LED - Monitors the link of the fiber port Backplane Link LED - Monitors the link of the Backplane Ethernet port Auto-Negotiation LED - Monitors the negotiation mode of the UTP port UTP 10 Mbps LED - Indicates the data rate of the UTP port is 10Mbps UTP 100 Mbps LED - Indicates the data rate of the UTP port is 100Mbps UTP 1000 Mbps LED - Indicates the data rate of the UTP port is 1000Mbps UTP Full/Half-Duplex LED - Monitors the duplex mode of the UTP port Modes of Operation The following parameters can be monitored and configured: Link Control - Link Propagate (LP), Link Segment (LS), Remote Fault Detection (RFD) or Symmetrical Fault Detection (SFD) Backplane A - Enable/Disable Control Backplane B - Enable/Disable Control Fiber Port - Auto-Negotiation, Manual Select UTP Port - Port Selection, Auto-Negotiation and Full/Half-Duplex Control, Auto Crossover and Manual Select After making changes to the parameters using the pull-down menus, press the Apply button for the changes to take effect. Page 67 Black Box Network Services Network Management Software Version 3.4 5.3.1 10/100/1000T-Gfiber Tag VLAN Membership Window DFCS 10/100/1000T-Gfiber Tag VLAN Membership window Please refer to section 4.1.2 for information on configuring the DFCS 10/100/1000T-Gfiber Tag VLAN Membership window. 5.3.2 10/100/1000T-Gfiber Port VLAN and Port Access Control Window DFCS 10/100/1000T-Gfiber Port VLAN and Port Access window Please refer to section 4.1.3 for information on configuring the DFCS 10/100/1000T-Gfiber Port VLAN and Port Access Control window. Page 68 Black Box Network Services Network Management Software Version 3.4 5.3.3 10/100/1000T-Gfiber MIB Statistics Window DFCS 10/100/1000T-Gfiber MIB Statistics window Please refer to section 4.1.4 for information on configuring the DFCS 10/100/1000T-Gfiber MIB Statistics window. Page 69 Black Box Network Services Network Management Software Version 3.4 5.4 GigaTx-GigaFx Module DFCS GigaTx-GigaFx Mode of Operation window The DFCS GigaTx-GigaFx provides Gigabit 1000BASE-T (UTP) to 1000BASE-X fiber conversion. LED Section Power LED - Monitors the power status of the module Fiber Link LED - Monitors the link of the fiber port UTP Full/Half-Duplex LED - Monitors the duplex mode of the converter UTP Link LED - Monitors the link of the UTP port Modes of Operation The following parameters can be monitored and configured: Link Control - Link Propagate (LP), Link Segment (LS) and Remote Fault Detection (RFD) Pause Enable/Disablel UTP - Auto-negotiation and Full/Half-Duplex Control After making changes to the parameters using the pull-down menus, press the Apply button for the changes to take effect. Page 70 Black Box Network Services Network Management Software Version 3.4 5.5 GigaTx-GigaFiber Module (R2) DFCS GigaTx-GigaFiber Mode of Operation window The DFCS GigaTx-GigaFiber provides Gigabit 1000BASE-T (UTP) to 1000BASE-X fiber conversion. LED Section Power LED - Monitors the power status of the module Port 1 (Fiber Link) LED - Monitors the link of the fiber port Port 2 (UTP) Full/Half-Duplex LED - Monitors the duplex mode of the converter Port 2 (UTP) Link LED - Monitors the link of the UTP port Modes of Operation The following parameters can be monitored and configured: Link Control - Link Propagate (LP), Link Segment (LS), Remote Fault Detection (RFD) or Symmetrical Fault Detection (SFD) Pause Enable - Pause Disable, Asymmetrical Pause, Symmetrical Pause or Symmetrical + Asymmetrical Port 1 - Auto-negotiation or Manual Port 2 - Auto-negotiation and Full/Half-Duplex Control After making changes to the parameters using the pull-down menus, press the Apply button for the changes to take effect. Page 71 Black Box Network Services Network Management Software Version 3.4 5.6 10/100T-100Fx TVLAN Module DFCS 10/100T-100Fx TVLAN Mode of Operation window The DFCS 10/100T-100Fx TVLAN provides 10BASE-T or 100BASE-TX to Fast Ethernet Fiber conversion. LED Section Power LED - Monitors the power status of the module Fiber Full/Half-Duplex LED - Monitors the duplex mode of the fiber port Fiber Link LED - Monitors the link of the fiber port Backplane Link LED - Monitors the link of the Backplane Ethernet port Auto-Negotiation LED - Monitors the negotiation mode of the UTP port UTP 100 Mbps LED - Indicates the data rate of the UTP port is 100Mbps UTP 10 Mbps LED - Indicates the data rate of the UTP port is 10Mbps UTP Full/Half-Duplex LED - Monitors the duplex mode of the UTP port UTP Link LED - Monitors the link of the UTP port Modes of Operation The following parameters can be monitored and configured: Link Control - Link Propagate (LP), Link Segment (LS), Remote Fault Detection (RFD) or Symmetrical Fault Detection (SFD) Fiber Full/Half-Duplex Control Backplane A - Enable/Disable Control Backplane B - Enable/Disable Control UTP Auto-Negotiation, 10/100 and Full/Half-Duplex Control After making changes to the parameters using the pull-down menus, press the Apply button for the changes to take effect. Page 72 Black Box Network Services Network Management Software Version 3.4 5.6.1 10/100T-100Fx TVLAN Port Bandwidth Control Window DFCS 10/100T-100Fx TVLAN Port Bandwidth Control window Please refer to section 4.1.1 for information on configuring the DFCS 10/100T-100Fx TVLAN Port Bandwidth Control window. 5.6.2 10/100T-100Fx TVLAN Tag VLAN Membership Window DFCS 10/100T-100Fx TVLAN Tag VLAN Membership window Please refer to section 4.1.2 for information on configuring the DFCS 10/100T-100Fx TVLAN Tag VLAN Membership window. Page 73 Black Box Network Services Network Management Software Version 3.4 5.6.3 10/100T-100Fx TVLAN Port VLAN and Port Access Control Window DFCS 10/100T-100Fx TVLAN Port VLAN and Port Access Control window Please refer to section 4.1.3 for information on configuring the DFCS 10/100T-100Fx TVLAN Port VLAN and Port Access Control window. 5.6.4 10/100T-100Fx TVLAN MIB Statistics Window DFCS 10/100T-100Fx TVLAN MIB Statistics window Please refer to section 4.1.4 for information on configuring the DFCS 10/100T-100Fx TVLAN MIB Statistics window. Page 74 Black Box Network Services Network Management Software Version 3.4 5.7 10/100T-Fx Module DFCS 10/100T-Fx Mode of Operation window The DFCS 10/100T-Fx provides 10/100BASE-TX to 100BASE-FX fiber conversion. LED Section Power LED - Monitors the power status of the module Fiber Full/Half-Duplex LED - Monitors the duplex mode of the fiber port Fiber Link LED - Monitors the link of the fiber port Backplane Link LED - Monitors the link of the Backplane Ethernet port Auto-Negotiation LED - Monitors the negotiation mode of the UTP port UTP 100 Mbps LED - Indicates the data rate of the UTP port is 100Mbps UTP 10 Mbps LED - Indicates the data rate of the UTP port is 10Mbps UTP Full/Half-Duplex LED - Monitors the duplex mode of the UTP port UTP Link LED - Monitors the link of the UTP port Modes of Operation The following parameters can be monitored and configured: Link Control - Link Propagate (LP), Link Segment (LS) or Remote Fault Detection (RFD) Fiber Full/Half-Duplex Control Backplane Enable/Disable Control UTP Auto-Negotiation, 10/100 and Full/Half-Duplex Control After making changes to the parameters using the pull-down menus, press the Apply button for the changes to take effect. Page 75 Black Box Network Services Network Management Software Version 3.4 5.8 100Tx-100Fx Module DFCS 100Tx-100Fx Mode of Operation window The DFCS 100Tx-100Fx provides 100BASE-TX to 100BASE-FX fiber conversion. LED Section Power LED - Monitors the power status of the module Fiber Link LED - Monitors the link of the fiber port Auto-Negotiation LED - Monitors the negotiation mode of the UTP port UTP Full/Half-Duplex LED - Monitors the duplex mode of the UTP port UTP Link LED - Monitors the link of the UTP port Modes of Operation The following parameters can be monitored and configured: Link Control - Link Propagate (LP), Link Segment (LS), Remote Fault Detection (RFD) or Symmetrical Fault Detection (SFD) UTP Auto-Negotiation or Manual Full/Half-Duplex Control After making changes to the parameters using the pull-down menus, press the Apply button for the changes to take effect. Page 76 Black Box Network Services Network Management Software Version 3.4 5.9 FF Fiber-to-Fiber Modules DFCS FF Fiber-to-Fiber Module window The DFCS FF products provide fiber-to-fiber conversion. The fiber-to-fiber modules include the DFCS Fiber-to-Fiber and the DFCS Gfiber-Gfiber. Typically, they convert between multimode and single-mode fibers or between single-mode fibers requiring different wavelength or different optical power levels. LED Section Power LED - Monitors the power status of the module Fiber Link LED - Monitors the link of fiber port 1 Fiber Link LED - Monitors the link of fiber port 2 Modes of Operation The following parameters can be monitored and configured: Link Propagate (LP) or Link Segment (LS) Remote Fault Detection (RFD) After making changes to the parameters using the pull-down menus, press the Apply button for the changes to take effect. Page 77 Black Box Network Services Network Management Software Version 3.4 5.10FF SFP Fiber-to-Fiber Module DFCS FF SFP Fiber-to-Fiber Module window The DFCS FF SFP Fiber-to-Fiber Module is a protocol-transparent managed media converter that provides conversion between different wavelengths, multimode and single-mode, and dual and single-fiber networks. LED Section Power LED - Monitors the power status of the module Port 1 Link LED - Monitors the link of fiber port 1 Port 2 Link LED - Monitors the link of fiber port 2 Modes of Operation The following parameters can be monitored and configured: Link Propagate (LP) or Link Segment (LS) Remote Fault Detection (RFD) After making changes to the parameters using the pull-down menus, press the Apply button for the changes to take effect. Page 78 Black Box Network Services Network Management Software Version 3.4 5.10.1 FF SFP Information Window The SFP window is accessed by clicking on an SFP button ( ) in the Module Configuration window on an DFCS module. DFCS xFF A0 SFP Information window DFCS xFF A2 SFP Information window SFP A0 Information Display This section displays fixed SFP Module information for the following areas. Identifier Values Extended Identifier Connector Values Transceiver Codes Encoding Rules Normal Bit Rate Link Length Vendor Name Vendor OUI Vendor Revision Number Laser Wavelength Options Vendor Serial Number Date Code Diagnostic Monitoring Type Enhanced Options SFF-8472 Compliance Part Number SFP A2 Information Display This section displays decoded SFP data collected for the following statistics (when available). Measured Temperature Measured Vcc Measured Bias Measured Tx Power Measured Rx Power Temperature High Alarm Setting Temperature Low Alarm Setting Page 79 Bias High Alarm Setting Bias Low Alarm Setting Bias High Warning Setting Bias Low Warning Setting Tx Power High Alarm Setting Tx Power Low Alarm Setting Tx Power High Warning Setting Black Box Network Services Network Management Software Version 3.4 Temperature High Warning Setting Temperature Low Warning Setting Vcc High Alarm Setting Vcc Low Alarm Setting Vcc High Warning Setting Vcc Low Warning Setting Tx Power Low Warning Setting Rx Power High Alarm Setting Rx Power Low Alarm Setting Rx Power High Warning Setting Rx Power Low Warning Setting SFP A0/A2 Hexadecimal Information Display These sections display a raw collection of SFP data. The left hand area is the Hexadecimal data and the right hand area is the ASCII equivalent display. DFCS xFF A0 Hex SFP Information window Page 80 DFCS xFF A1 Hex SFP Information window Black Box Network Services Network Management Software Version 3.4 5.1110G Fiber-Fiber Modules DFCS 10G Fiber-Fiber Module window The DFCS 10G Fiber-Fiber module is a 10 Gigabit, protocol-transparent media converter with two pluggable transceiver ports supporting the three Rs (regeneration, retiming and reshaping). By taking advantage of the wide variety of 10G pluggable transceivers, the DFCS 10G can be used as a copper-to-fiber converter, a fiber mode converter or a WDM transponder. LED Section Power LED - Monitors the power status of the module Port 1 Link LED - Monitors the link of fiber port 1 Port 1 Status LED - Indicates the installed XFP/SFP+ supports digital diagnostics or detecting an alarm Port 1 Loopback - Indicates the port is set to loopback or the port does not support loopback Port 2 Link LED - Monitors the link of fiber port 2 Port 1 Status LED - Indicates if the installed XFP/SFP+ supports digital diagnostics or detecting an alarm Port 1 Loopback - Indicates the port is set to loopback or the port does not support loopback Modes of Operation The following parameters can be monitored and configured: Link Control - supports 9 link modes and self diagnostic test Port 1 Loopback - Enable/disable loopback on port 1. Requires XFP with XFI-side Loopback Port 2 Loopback - Enable/disable loopback on port 2. Requires XFP with XFI-side Loopback 10G Speed Selection - 10 Gigabit Ethernet, SONET/SDH, 10 Gigabit Fiber and G.709 OTN After making changes to the parameters using the pull-down menus, press the Apply button for the changes to take effect. Page 81 Black Box Network Services Network Management Software Version 3.4 5.11.1 10G XFP/SFP+ Information/Block Windows The SFP window is accessed by clicking on an SFP or XFP button ( window on an DFCS module. DFCS 10G A0 SFP+ Information window ) in the Module Configuration DFCS 10G A1 SFP+ Information window SFP A0 Information Display This section displays fixed SFP Module information for the following areas. Identifier Values Extended Identifier Connector Values Transceiver Codes Encoding Rules Normal Bit Rate Link Length Vendor Name Vendor OUI Vendor Revision Number Laser Wavelength Options Vendor Serial Number Date Code Diagnostic Monitoring Type Enhanced Options SFF-8472 Compliance Part Number SFP A2 Information Display This section displays decoded SFP data collected for the following statistics (when available). Measured Temperature Measured Vcc Measured Bias Measured Tx Power Measured Rx Power Temperature High Alarm Setting Temperature Low Alarm Setting Page 82 Bias High Alarm Setting Bias Low Alarm Setting Bias High Warning Setting Bias Low Warning Setting Tx Power High Alarm Setting Tx Power Low Alarm Setting Tx Power High Warning Setting Black Box Network Services Network Management Software Version 3.4 Temperature High Warning Setting Temperature Low Warning Setting Vcc High Alarm Setting Vcc Low Alarm Setting Vcc High Warning Setting Vcc Low Warning Setting Tx Power Low Warning Setting Rx Power High Alarm Setting Rx Power Low Alarm Setting Rx Power High Warning Setting Rx Power Low Warning Setting SFP A0/A2 Hexadecimal Information Display These sections display a raw collection of SFP data. The left hand area is the Hexadecimal data and the right hand area is the ASCII equivalent display. DFCS 10G A0 Hex SFP+ Information window Page 83 DFCS 10G A1 Hex SFP+ Information window Black Box Network Services Network Management Software Version 3.4 DFCS 10G XFP A0 Block window DFCS 10G XFP Lo A0 Block window XFP Up A0 Block Information Display This section displays fixed XFP Module information for the following areas. Identifier Values 10G Ethernet Compliance 10G Fibre Channel Compliance 10G Copper Links Lower Speed Links SONET/SDH Codes - SH SONET/SDH Codes - LH SONET/SDH Codes - VLH Encoding Mechanism Support Bit Rate Min Bit Rate Max Length for SMF fiber (km) Length for 50um fiber OM3 (m) Length for 50um fiber OM2 (m) Length for 62.5um fiber OM1 (m) Link length for copper (m) Device Technology Transmitter Technology Vendor Name Page 84 CDR Support Loopback Support Vendor OUI Part Number Vendor Revision Number Laser Wavelength Laser Wavelength Tolerance Max Case Temperature Max Power Dissipation Max Power Dissipation on Pwr Dwn Max Current by +5V Supply Max Current by +3.3V Supply Max Current by +1.8V Supply Max Current by -5.2V Supply Vendor Serial Number Date Code Auxiliary Monitor Input 1 Auxiliary Monitor Input 2 Black Box Network Services Network Management Software Version 3.4 XFP Lo A0 Block Information Display This section displays fixed XFP Module information for the following areas. Measured Temperature Measure Tx Bias Measure Tx Power Measured Rx Power Auxiliary 1 Measured Auxiliary 2 Measured Temperature High Alarm Setting Temperature Low Alarm Setting Temperature High Warning Setting Temperature Low Warning Setting Bias High Alarm Setting Bias Low Alarm Setting Bias High Warning Setting Bias Low Warning Setting Tx Power High Alarm Setting Tx Power Low Alarm Setting Tx Power High Warning Setting Tx Power Low Warning Setting Rx Power High Alarm Setting Rx Power Low Alarm Setting Rx Power High Warning Setting Rx Power Low Warning Setting AUX 1 High Alarm Setting AUX 1 Low Alarm Setting AUX 1 High Warning Setting AUX 1 Low Warning Setting AUX 2 High Alarm Setting AUX 2 Low Alarm Setting AUX 2 High Warning Setting AUX 2 Low Warning Setting XFP UpA0/Lo A0 Hexadecimal Information Display These sections display a raw collection of XFP data. The left hand area is the Hexadecimal data and the right hand area is the ASCII equivalent display. DFCS 10G Up A0 Hex XFP Information window Page 85 DFCS 10G Lo A0 Hex XFP Information window Black Box Network Services Network Management Software Version 3.4 5.12100Tx/2Fx and 100Tx-2Tx Redundant Fast Ethernet Modules DFCS 100Tx/2Fx Mode of Operation window The DFCS 100Tx/2Fx Fast Ethernet Modules provide 100BASE-TX to dual-redundant 100BASE-FX conversion. The DFCS 100Tx-2Tx Fast Ethernet Modules provide single 100BASE-TX to dual-redundant 100BASE-TX connectivity. LED Section Power LED - Monitors the power status of the module Port A Select LED - Green if Port A is currently the active redundant port Port A Link LED - Monitors Port A link activity when Port A is the active redundant port Auto-Negotiation LED - Monitors the UTP negotiation mode of Port C Port C Link LED - Monitors Port C UTP link activity Full Duplex LED - Monitors the UTP duplex mode of Port C 100Mbps/10Mbps LED - Indicates the UTP speed of Port C Port B Select LED - Green if Port B is currently the active redundant port Port B Link LED - Monitors Port B link activity when Port B is the active redundant port Modes of Operation The following parameters can be monitored and configured: Link Control - (refer to this module’s User Manual for more information) Link Propagate (LP), Link Segment (LS), and Remote Fault Detection (RFD) UTP Auto-Negotiation/Manual Control UTP Full/Half-Duplex Control Return to Port A Control After making changes to the parameters using the pull-down menus, press the Apply button for the changes to take effect. Page 86 Black Box Network Services Network Management Software Version 3.4 5.1310T-10FL Module DFCS 10T-10FL Mode of Operation window The DFCS 10T-10FL provides 10BASE-T to 10BASE-FL fiber conversion. LED Section Power LED - Monitors the power status of the module Fiber Link LED - Monitors the link of the fiber port UTP Link LED - Monitors the link of the UTP port Modes of Operation The following parameters can be monitored and configured: Link Control - (refer to this module’s User Manual for more information) Link Propagate (LP), Link Segment (LS) or Remote Fault Detection (RFD) After making changes to the parameters using the pull-down menus, press the Apply button for the changes to take effect. Page 87 Black Box Network Services Network Management Software Version 3.4 5.1410BaseT-10Base2 Module DFCS 10BaseT-10Base2 Mode of Operation window The DFCS 10BaseT-10Base2 provides 10BASE-T to 10BASE-2 coax conversion. LED Section Power LED - Monitors the power status of the module Coax Collision LED - Monitors collisions on the coax port Coax Rx Activity LED - Monitors receive activity on the Coax port Backplane A Activity LED - Monitors the activity on Backplane A Backplane B Activity LED - Monitors the activity on Backplane B UTP Link LED - Monitors the link of the UTP port Modes of Operation The following parameters can be monitored and configured: Backplane A Enable/Disable Control After making changes to the parameters using the pull-down menus, press the Apply button for the changes to take effect. Page 88 Black Box Network Services Network Management Software Version 3.4 5.154Tx/L2 Module DFCS 4Tx/L2 4-Port 10/100 Ethernet Switch Module Mode of Operation window The DFCS 4Tx/L2 provides 10/100 Ethernet switching. LED Section Power LED - Monitors the power status of the module Port 1 100 Link LED - Indicates the data rate of UTP Port 1 is 100Mbps Port 1 10 Link LED - Indicates the data rate of UTP Port 1 is 10Mbps Port 2 100 Link LED - Indicates the data rate of UTP Port 2 is 100Mbps Port 2 10 Link LED - Indicates the data rate of UTP Port 2 is 10Mbps Port 3 100 Link LED - Indicates the data rate of UTP Port 3 is 100Mbps Port 3 10 Link LED - Indicates the data rate of UTP Port 3 is 10Mbps Port 4 100 Link LED - Indicates the data rate of UTP Port 4 is 100Mbps Port 4 10 Link LED - Indicates the data rate of UTP Port 4 is 10Mbps Modes of Operation The following parameters can be monitored and configured: Backplane A Enable/Disable Control Backplane B Enable/Disable Control Port 1 UTP Auto-Negotiation, 10/100 and Full/Half-Duplex Control Port 2 UTP Auto-Negotiation, 10/100 and Full/Half-Duplex Control Port 3 UTP Auto-Negotiation, 10/100 and Full/Half-Duplex Control Port 4 UTP Auto-Negotiation, 10/100 and Full/Half-Duplex Control After making changes to the parameters using the pull-down menus, press the Apply button for the changes to take effect. Page 89 Black Box Network Services Network Management Software Version 3.4 5.15.1 4Tx/L2 Port VLAN and Port Access Control Window DFCS 4Tx/L2 4-Port 10/100 Ethernet Switch Port VLAN and Port Access Control window Please refer to section 4.1.3 for information on configuring the DFCS 4Tx/L2 Port VLAN and Port Access Control window. 5.15.2 4Tx/L2 MIB Statistics Window DFCS 4Tx/L2 4-Port 10/100 Ethernet Switch MIB Statistics window Please refer to section 4.1.4 for information on configuring the DFCS 4Tx/L2 MIB Statistics window. Page 90 Black Box Network Services Network Management Software Version 3.4 5.16T1/E1-fiber Module DFCS T1/E1-fiber Mode of Operation window The DFCS T1/E1-fiber module provides T1/E1 copper to fiber conversion. LED Section Power LED - Monitors the power status of the module Fiber Link LED - Monitors the link of the fiber port Test Mode LED - Indicates whether the module is in test mode or normal mode UTP Link LED - Monitors the link of the UTP port Modes of Operation The following parameters can be monitored and configured: Line Setting Loopback and Encoding Force Fiber all 1s Force UTP all 1s After making changes to the parameters using the pull-down menus, press the Apply button for the changes to take effect. Page 91 Black Box Network Services Network Management Software Version 3.4 Phone: Fax: (724) 746-5500 (724) 746-0746 Address: Black Box Network Services 1000 Park Drive Lawrence, PA 15055-1018 Email: URL: info@blackbox.com www.blackbox.com 040-L3003-001D Page 92 6/10 Black Box Network Services