1
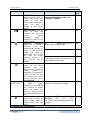
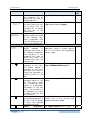
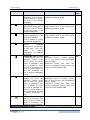
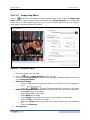
HTML USER MANUAL Statement of Confidentiality, Disclaimer and Copyright This document contains information that is proprietary and confidential to JCT Web, which shall not be disclosed, transmitted, or duplicated, used in whole or in part for any purpose other than its intended purpose. Any use or disclosure in whole or in part of this information without express written permission of JCT Web is prohibited. Any other company and product names mentioned are used for identification purpose only, and may be trademarks of their respective owners and duly acknowledged. Notice The information contained in this document is subject to change without notice. Although efforts have been made to ensure the accuracy of the document, JCT Web assumes no liability for damages incurred directly or indirectly from errors, omissions or discrepancies. HTML Module RapidVector® Content 1 1.1 1.2 PREFACE PURPOSE OF THIS DOCUMENT ASSUMPTIONS 4 4 4 2 ABOUT HTML EDITOR MODULE 5 3 ADMIN INTERFACE 6 3.1 ADD HTML MODULE 3.2 PUBLISH MODULE 3.3 MANAGE MODULE 3.4 MOVE MODULE 3.5 SHOW IN ALL PAGES 3.6 HIDE MODULE 3.7 DELETE MODULE 3.8 HTML EDITOR VIEWS 3.8.1 DESIGN VIEW 3.8.2 HTML VIEW 3.8.3 PREVIEW 3.9 INSPECTORS 3.9.1 TAG INSPECTOR 3.9.2 PROPERTIES INSPECTOR 3.10 TOOLBAR BUTTONS 3.10.1 TOOLBAR BUTTONS SUMMARY 3.10.2 INSERTING ELEMENTS 3.10.2.1 Image Manager 3.10.2.2 Image Map Editor 3.10.2.3 Flash Manager 3.10.2.4 Media Manager 3.10.2.5 Document Manager 3.10.2.6 Template Manager 3.10.2.7 Table 3.10.2.8 Symbols 3.10.2.9 Hyperlink Manager 3.10.2.10 Anchor 3.10.2.11 Email Link 3.10.2.12 Custom Link 3.10.2.13 Set Absolute Position 3.10.3 FORMATTING TEXT APPEARANCE 3.10.3.1 Bold 3.10.3.2 Underline 3.10.3.3 Italic 3.10.3.4 Strikethrough 3.10.3.5 Super Script 3.10.3.6 Sub Script 7 9 9 10 10 11 11 11 11 12 14 15 15 16 16 17 25 25 27 28 29 31 32 34 43 44 45 45 46 47 48 48 48 49 49 49 49 2 HTML Module RapidVector® 3.10.3.7 Case Conversations 3.10.3.8 Strip Formatting 3.10.3.9 Font 3.10.3.10 Apply CSS Class 3.10.4 FORMATTING PARAGRAPHS AND LISTS 3.10.4.1 Paragraph Style 3.10.4.2 Indent / Outdent 3.10.4.3 Alignments 3.10.4.4 Listing styles 3.10.4.5 Horizontal Ruler 3.10.5 WORKING WITH PORTION OF TEXT 3.10.5.1 Spell Check 3.10.5.2 Cut 3.10.5.3 Copy 3.10.6 GENERAL 3.10.6.1 Help 3.10.6.2 Redo 3.10.6.3 Undo 3.10.6.4 Show/Hide Border 3.10.6.5 Repeat Last Command 3.10.6.6 Select Module 3.10.7 OTHER KEYBOARD SHORTCUTS 3.11 VERSIONS 3.11.1 PUBLISH VERSIONS 3.11.2 RESTORE VERSIONS 3.11.3 COMPARE VERSIONS 49 49 49 54 56 56 57 58 59 59 61 61 61 62 62 62 62 62 62 62 62 63 64 65 66 67 4 68 USER INTERFACE 3 HTML Module RapidVector® 1 Preface This preface describes the document. The preface contains the following sections: Section Purpose of this Document Assumptions Page 4 4 1.1 Purpose of this Document The purpose of this document is to provide the fundamental skills necessary to productively use the site owner control panel. This document contains descriptions of definitions used in the system as well as in this document and a functional usage guide for the site owner control panel. This document is designed to provide a comprehensive, step-by-step introduction to each of the functions of the site owner control panel. 1.2 Assumptions This guide assumes you are using a mouse. At times, based on personal need or circumstances beyond your control, you may need to use the keyboard. It is assumed you are using a right-handed mouse, so the left button is the primary button. When asked to click or double click, you should use the left mouse button. If you are lefthanded use the Control Panel in Windows to reverse the primary key to the right mouse button. Refer to the Microsoft Windows documentation for additional information. The Site owner control panel is clear and simple to operate. You do not need to learn confusing concepts or possess any additional technical skills to work with the site owner control panel. Of course, you will need to be familiar with the graphical user interface and web browser. However, if you’re not accustomed to working with a web browser, mouse, windows, icons, and the other elements of a graphical environment, refer to the tutorial or reference manual for your operating system. 4 HTML Module RapidVector® 2 About HTML Editor Module HTML module is a basic HTML Editor with all the functions available to create HTML content. You have three window options available to select from: Normal View, HTML view and Preview. RapidVector also allows the administrator to add any module which is available in another page of the site. For example, if you have added the testimonial module in a page, you can duplicate it on a different page through the HTML module. It allows non-technical users and author to manage HTML content as easily as writing a document. Users can seamlessly format text, set hyperlinks, build tables and insert images, Flash, documents, etc. The HTML can work in two interfaces: User Interface and Admin Interface. In User interface, the user can only view content added by admin. In order to set HTML Editor you should have admin rights. 5 HTML Module RapidVector® 3 Admin Interface This chapter describes the HTML Module – Admin Interface from the perspective of operational and functional use. You can add basic text content in the HTML module with proper formatting, which is available in HTML. The chapter includes the following sections: Section Add HTML Module Publish Module Manage Module Move Module Show in all Pages Hide Module Delete Module HTML Editor Views Design View HTML View Preview Inspectors Tag Inspector Properties Inspector Toolbar Buttons Toolbar Buttons Summary Inserting Elements Formatting Text Appearance Formatting Paragraphs and Lists Working with Portion of Text General Other Keyboard Shortcuts Versions Page 7 9 9 10 10 11 11 11 11 12 14 15 15 16 16 17 25 48 56 61 62 63 64 6 HTML Module RapidVector® 3.1 Add HTML Module To add the HTML module to the website: Click here to Add HTML Module Figure 1 – Add Module ¾ Click on Add Module button. Add Module screen will open 7 HTML Module RapidVector® Click here to Add HTML Module Figure 2 – Add HTML Editor Module ¾ ¾ button to add module to the page Click on Once you add the module to the page, mouse-over the HTML icon. Module Functions list will appear. Note: HTML module is frequently used modules. It is on the top of the list for Quick Selection. 8 HTML Module RapidVector® 3.2 Publish Module Click on button from the dropdown list to publish module. Only once you have published the module, will it then be visible on the user side. After publishing the module button will not be available in the dropdown list. 3.3 Manage Module Click on button from the dropdown list of HTML module. HTML Module Management screen will open. Manage module allows admin to add, edit or delete various portion of text or parameters. You can view current published version content in the HTML Editor. If you are using HTML module for the first time, it will open with blank HTML Editor and only Select module button would be shown. Figure 3 – HTML Editor Note: • Please refer to “Section: 3.8 - HTML Editor Views” for more details on HTML Editor view • Please refer to “Section: 3.9 - Inspectors” for more details on inspectors • Please refer to “Section: 3.10 - Toolbar Buttons” for more details on tool bar 9 HTML Module • RapidVector® Please refer to “Section: 3.11 - Versions ” for more details on versioning HTML content. 3.4 Move Module Click on button from the dropdown list of the HTML module. Move Module To Other Page screen will open. It shows module name and current page name where module is added. Select Page and Panel to move module Click here to Move Module on selected page and panel Figure 4 – Move Module ¾ ¾ Select Page from the dropdown list where to move module Select Panel from the dropdown list to add module ¾ Click on button to move module to the selected page. 3.5 Show in all Pages Click on button from the dropdown list. Module will be added to all page of the site. Click on button to reverse the effect. 10 HTML Module RapidVector® 3.6 Hide Module Click on button from the dropdown list. Module will be hidden. Click on button to reverse the effect. 3.7 Delete Module Click on button from the dropdown list to delete module from the site. ‘Are you sure you want to delete this Module?’ message will appear. Click on Ok button to delete module other wise click on Cancel button. 3.8 HTML Editor Views You can view text content in different views. You can write it as simple text or in HTML code, and after writing you can preview the text. ¾ ¾ ¾ Design: In design view, you can edit and format the content using toolbar buttons, dropdowns, dialogs and / or modules HTML: In HTML view, you can directly access content code Preview: Using Preview, you can view how the content will look like before updating the page. 3.8.1 Design View Click on button from HTML Editor screen to edit or format content using the toolbar. By default, HTML Editor will open in Design view. In design view Toolbar is used to format text content. Toolbar contains buttons and dropdown lists of the various tools. 11 HTML Module RapidVector® Click here to Save version Click here to Save changes Figure 5 – HTML Editor: Design View ¾ Click on button to save the changes with existing version. Text will be shown on the site once you publish the version ¾ Click on button to save changes with new version. Note: Please refer to “Section: 3.10 - Toolbar Buttons” for more details on tool bar. 3.8.2 HTML View Click on button from HTML Editor screen to write content in HTML code. It is used often by the advanced users. You can format text through HTML coding. In HTML to set indent, click on the check box for Indent HTML. A Dotted line will appear before all written HTML code. This HTML code is updated and kept in synchrony in real-time with the design view. The effect is similar to the Split mode of MS FrontPage. If you make a modification in the design view or the HTML view, the other view will be automatically updated. This module is a great fine-tuning tool for advanced users. 12 HTML Module RapidVector® Click here to Save version Click here to Save changes Figure 6 – HTML Editor: HTML View ¾ Click on button to save the changes with existing version. Text will be shown on the site once you publish the version ¾ Click on button to save changes with new version. 13 HTML Module 3.8.3 Click on RapidVector® Preview button to preview text. It will show how the content will look on the user side. Click here to Save changes Click here to Save version Figure 7 – HTML Editor: Design View 14 HTML Module RapidVector® 3.9 Inspectors Inspectors are the special tools used to provide extra information for who work with HTML Editor in Design view. Currently, there are two modules shipped out-of-the box with the editor: ¾ ¾ Tag Inspector Properties Inspector. Tag Inspector Properties Inspector Figure 8 – Inspectors 3.9.1 Tag Inspector Tag Inspector shows the path of the selected item (i.e. the DOM path of the current element). It also allows you to select the last (innermost) tag in the hierarchy and remove it using the Remove Element link. When you mouse over on the tag name it will be highlighted in the editor. 15 HTML Module 3.9.2 RapidVector® Properties Inspector Properties Inspector shows the relevant properties of the currently selected element. As a result, the user can quickly configure the element (e.g. set cell width, shading, image alignment, hyperlink, etc.) without the need to open dialogs. 3.10 Toolbar Buttons HTML Editor Toolbars are a set of buttons and the dropdown lists you click to perform common tasks (e.g. make text bold, apply color, build tables, open the image dialog, etc.). Most of these buttons work in the same way as in Microsoft Word. In design view Toolbar is used to format text content. Toolbar contains buttons and the dropdown lists of the various tools. You can divide all function under below main categories: ¾ ¾ ¾ ¾ ¾ ¾ Inserting Elements Formatting Text Appearance Formatting Paragraph and Lists Working with Portion of Text General Other Keyboard Shortcuts. Toolbar Buttons / Dropdown List Figure 9 – Toolbars 16 HTML Module 3.10.1 RapidVector® Toolbar Buttons Summary HTML Editor Toolbar has below different buttons and the dropdown list. Below table shows icon, description and code in HTML for the functions. Click on page number to view more details related to function. Icon Description Inserting Elements Image Manager: allows you to insert, upload, create thumbnails and set image properties. Shortcut key is Ctrl+M Image Map Editor: allows you to create images containing one or more invisible regions which are linked to other pages, otherwise known as hotspots. Flash Manager: allows you to work with flash files to insert and upload animations. Media Manager: allows you to insert/upload media objects (AVI, MPEG, WAV, etc.) and set their properties. Document Manager: allows you to insert a predefined document at the cursor position into the editor. Template Manager: allows you to manage templates. Insert Table: allows you to Insert a table in the Tools File Declaration <img alt="" src="/Resources/images/books.jpg"> <map id= rade_img_map_Editor1_0 name=rade_img_map_Editor1_0> <area shape=CIRCLE coords=220,79,3 href=""> <area shape=CIRCLE target=_blank coords=260,139,71 href="www.jct.com"> <area shape=CIRCLE coords=20,20,10 href=""></map> <embed pluginspage= http://www.macromedia.com /go/getflashplayer align=baseline src=/Resources/media/phone_people_v 6.swf width=150 height=150 type=application/x-shockwave-flash loop="false" menu="false" quality="high"salign="LT" bgcolor=""></embed> <embed style="WIDTH: 150px; HEIGHT: 150px" pluginspage= http://download.microsoft.com/downlo ad/ winmediaplayer/nsplugin/6.4/WIN98/E N-US/wmpplugin.exe align=baseline src= /Resources/media/phone_people_v6.sw f type=application/x-mplayer2> <a href="/Resources/files/R.doc"> /Resources/files/R.doc</a> <link href="Home_files/RadDockableObject. css" type=text/css rel=stylesheet> <table> <tbody> Page No. 25 27 28 29 31 32 34 17 HTML Module Icon RapidVector® Description HTML Editor as easy as in Microsoft Word. Click on button and select the number of rows and columns you would like to create. The table is inserted at the cursor position. Insert Symbol: Click on button to show the dropdown list with the built-in special characters. Select a character to insert at the cursor position. Hyperlink Manager: allows you to create a hyperlink from the selected text, number or image. In the hyperlink dialog, you need to choose the type of link you want to insert: Hyperlink, Anchor or Email. Shortcut key is Ctrl+K Remove Hyperlink: allows you to remove hyperlink from the selected text, number or image. Select an image/text in a hyperlink, anchor or e-mail link and click on button to remove the link. Shortcut key is Ctrl+Shift+K Custom Link: allows you to create a preset hyperlink on the selected text, number or image. Select the object you want link, select the link from the dropdown list to use. Set Absolute Position: allows you to move an object (image, table or media) freely into the editor. Formatting Text Appearance Tools File Declaration Page No. <tr> <td>andnbsp;Name</td></tr> </tbody></table> NA 43 <a href="http://jct.com/" target=_blank>Vector</a> 44 <a name=Anchor></a> 45 <a href= "mailto:www.jctweb.com?subject=Corp orate Website">JCT</a> 45 NA 44 <a href="/CompanyInfo.html">Company Info</a> 46 <img style="LEFT: 1px; POSITION: absolute; TOP: 1px" alt="" src="/Resources/images/booksThumbn ail.jpg"> 47 18 HTML Module Icon RapidVector® Description Bold: Applies bold formatting to the selected text. Select the text and click on button to apply bold. Shortcut key is Ctrl+B Underline: Applies underline formatting to the selected text. Select the text and click on button to apply underline. Shortcut key is Ctrl+U Italic: Applies italic formatting to the selected text. Select the text and click on button to apply Italic. Shortcut key is Ctrl+I Strikethrough: Applies strikethrough formatting to the selected text. Select the text and click on button to apply strikethrough. Superscript: allows you to make text or numbers appear as superscript. When typing text, you can click on button to make the text that follows superscript. The button also works on selected text. Click on button again to switch to normal text typing. Subscript: allows you to make text or numbers appear as subscript. When typing text, you can click on button to make the text that follows subscript. The button also works on selected text. Click on button again to switch to normal text typing. Convert Lower to Upper: Converts selected text to upper case. When typing text and select it, Tools File Declaration <strong>Rapid Vector</strong> Page No. 48 <u>Rapid Vector</u> 48 <em>Rapid Vector</em> 49 <strike>Rapid Vector</strike> 49 Rapid Vector<sup>TM</sup> 49 Rapid Vector<sub>TM</sub> 49 <b>RAPID VECTOR</b> 49 19 HTML Module Icon RapidVector® Description you can click on button to change the text to upper case. Convert Upper to Lower: Converts selected text to lower case. When typing text and select it, you can click on button to change the text to lower case. Strip All Formatting: allows stripping all formatted text. Select text and click on button to strip all formatting. Strip CSS Formatting: allows to stripping CSS formatted text. Select text and click on button to strip CSS formatting. Strip Font Formatting: allows to stripping font element. Select text and click on button to strip font formatting. Strip Span Formatting: allows to stripping span element. Select text and click on button to strip span formatting. Strip Word Formatting: allows to stripping word formatted text. Select text and click on button to strip word formatting Font Color: Changes the color of the selected text. Select color from the pallet. Background Color: Changes the background color of the selected text. Select color from the pallet. Font Type: Sets the font typeface. Select font name from the dropdown list to change the font of the selected text. Font Size: Sets the font Tools File Declaration Page No. <b>rapid vector</b> 49 NA 49 NA 49 NA 49 NA 49 NA 49 <span style="COLOR: #ff0000">rapid vector</span> 49 <span style="BACKGROUNDCOLOR: #c71585">rapid vector</span> 49 <span style="FONT-FAMILY: Times New Roman">rapid vector</span> 49 <span 49 style="FONT-SIZE: 20 HTML Module Icon RapidVector® Description size. Select font size from the dropdown list to change the font size of the selected text. Font Real Size: Sets the font size. Select font real size in pixel from the dropdown list to change the font size of the selected text. Apply CSS Class: Applies predefined styles to the selected text. Select predefined CSS from the dropdown list to apply to the selected text. Formatting Paragraphs and Lists Paragraph Style: Applies standard or predefined text styles to the selected paragraph. Click anywhere in the paragraph you want to format and select the preferred style from the dropdown list. Indent: Indents a paragraph to the right. This button indents a paragraph to the right. Each time this button is clicked, the paragraph is indented further to the right. Outdent: Decreases the paragraph indent to the left. This button works only if indent has been applied to a paragraph beforehand. To use this button, click anywhere in the paragraph you want to indent to the left and click on button. Left Alignment: Aligns the selected paragraph to the left. Click on button to align the selected paragraph to the left. Center Alignment: Tools File Declaration Page No. 14pt">Rapid Vector</span> <span style="FONT-SIZE: 14pt">Rapid Vector</span> 49 <p class=error>Rapid Vector</p> 54 <h1>Lorem Ipsum</h1> <p>Lorem Ipsum is simply dummy text of the printing and typesetting industry.</p> 56 <blockquote dir=ltr style="MARGIN-RIGHT: 0px"> 57 <p dir=ltr style="MARGIN-RIGHT: 0px"> 57 <p align=left>Lorem Ipsum is simply dummy text of the printing and typesetting industry.</p> 58 <p 58 align=center>Lorem Ipsum is 21 HTML Module Icon RapidVector® Description Aligns the selected paragraph to the center. Click on button to center the lines in the selected paragraph. Right Alignment: Aligns the selected paragraph to the right. Click on button to right the lines in the selected paragraph. Justified: Justifies the selected paragraph to the left and to the right. Click on button to justify the selected paragraph. Remove Alignment: Remove justified paragraph to the left and to the right. Click this button to remove justification of selected paragraph. Numbered List: Creates a numbered list from the selection. Select some text or place the cursor inside a paragraph and click on button to make the text a numbered list. Click on button again to turn the numbered list into a regular paragraph of text. Bulleted List: Creates a bulleted list from the selection. Select some text or place the cursor inside a paragraph and click on button to make the text a bulleted list. Click on button again to turn the bulleted list into a regular paragraph of text. Horizontal Ruler: Inserts a horizontal line (ruler). Click on button to insert a horizontal line below the cursor position. Working with Portion of Text Tools File Declaration Page No. simply dummy text of the printing and typesetting industry.</p> <p align=right>Lorem Ipsum is simply dummy text of the printing and typesetting industry.</p> 58 <p align=justify>Lorem Ipsum is simply dummy text of the printing and typesetting industry.</p> 58 NA 58 <ol> <li>Lorem Ipsum is simply dummy text of the printing and typesetting industry.</li> <li>Lorem Ipsum has been the industry's standard dummy text ever since the 1500s.</li></ol> 59 <ul> <li>Lorem Ipsum is simply dummy text of the printing and typesetting industry.</li> <li>Lorem Ipsum has been the industry's standard dummy text ever since the 1500s.</li></ul> 59 <hr> 59 22 HTML Module Icon RapidVector® Description Tools File Declaration Spell Check: Launches either the AjaxSpellChecker. The spellchecker is a tool for checking spelling of the written text. You can check your spelling asynchronously and all your mistaken words will be highlighted inline. The context menu on every word gives you a quick and easy way to Change, Ignore or Add the word to a custom dictionary. Cut: Cuts the selected content and copies it to the clipboard. Click on button to cut selected text, image and/or table. The selected text or image is removed from the page and is stored in the clipboard for later use. Shortcut key is Ctrl+X. Copy: Copies the selected content to the clipboard. Click on button to select text, image and/or table. The content is stored in the clipboard for later use. Note that only the last copied (or cut) item is stored in the clipboard. This tool is very helpful when you need to type the same text many times: shortcut key is Ctrl+C. NA Page No. 61 NA 61 NA 62 Help: Shows help on the functionality of buttons. Click on button to open a window with a short description of each button, its functions and a keyboard shortcut if such is available. NA 62 General 23 HTML Module Icon RapidVector® Description Redo: Redoes the last undone action. Click to redo the last undone action. Expand the dropdown list to select multiple actions to redo. Shortcut key is Ctrl+Y Undo: Disregards the last action. Click to undo your last changes. Expand the dropdown list to select multiple actions to undo. Shortcut key is Ctrl+Z. Show/Hide Border: Shows/hides table borders. Toggles borders of all tables within the editor ON and OFF. The ON function works on tables with hidden borders. Repeat Last Command: Click to repeat the last action. Shortcut key is F4. Select Module: allows you to add other modules. Select the module from the dropdown list to add. Others Ctrl + A Ctrl + W Alt + F4 Selects the whole content of the editor (text, images, tables, etc.) Closes the active window. Close the active application. Tools File Declaration NA Page No. 62 NA 62 NA 62 NA 62 <span> <div staticmid="19451"><img alt="Event Manager-RSVP" src="//cp/images/moduleicon/74X48/m odule-rsvp.gif"></div></span> 62 NA 63 NA NA 63 63 24 HTML Module 3.10.2 RapidVector® Inserting Elements Inserting Elements is used to add or edit objects like images, motion pictures, media files, documents, templates, table, symbol and links. 3.10.2.1 Image Manager The Image Manager allows you to browse folders on the web server just like in a regular Windows Explorer. The folders to which you have access are pre-set by the site button from the toolbar to insert, upload and set image administrator. Click on properties. Shortcut key for image manager is Ctrl+M. Figure 10 – Image Manager ¾ ¾ ¾ ¾ ¾ Browse folders and files Sort files by name and type Preview images, zoom in and out Upload new images to the server Create new sub-folders ¾ Click on ¾ From the list you can create a folder by clicking on to refresh page button 25 HTML Module RapidVector® Select file or folder from the list and click on button to delete selected image. (if you are given permissions to delete in the respective folder ¾ Upload Image: button from Image Manager screen to add images o Click on o Click on Browse button to select the image from the folder. Selected file’s name and file path will be shown in Upload text box o Click on Upload button to insert image o Click on check box to Overwrite if file exists? with same name ¾ Image List: o List of all images will be shown. Click on image from the list to view or edit image o Selected image can be edited and its path will be shown in Image URL text box Click on column header to sort the list by extension, name or size Click on to go one level up in folder Enter Image Alt Text for disabled viewers button to fit image in the screen Click on button to view image in its original size Click on Click on button to view larger size of image Click on button to view smaller size of image ¾ Edit Image: button from Image Manager screen to edit images o Click on o Selected image will be shown in Image Editor screen Set the image Opacity between 0 to 100 percentage Resize the image and set the Proportions • Set image Width between 0 to 360 percentage • Set image Height between 0 to 360 percentage Select the Flip / Rotate options by clicking on radio button • Options for Flip can be None, Flip Horizontal, Flip Vertical and Flip Both • Options for Rotate can be None, 90, 180 and 270 Click on button to Enable/Disable Crop option • If crop option is enabled you can enter X, Y, Width and Height in pixel to crop the image Click on Restore Image button to restore the change made on the image Enter the Path to Save as image Click on check box to Overwrite if file exists? with same name ¾ Click on button to save changes Click on button to cancel the changes ¾ Click on button to insert selected image ¾ Click on button to exit from Image Manager. Note: You can upload image with maximum size 50 MB, and File extensions *.jpg, *.jpeg, *.gif, *.png are allowed. 26 HTML Module 3.10.2.2 RapidVector® Image Map Editor Click on button from the toolbar to define clickable area of the image. In Image Map Editor you will map the images which are added using Image Manager. The Image Map allows you to create images containing one or more invisible regions which are linked to other pages, otherwise known as hotspots. Figure 11 – Image Map Editor ¾ Select the image from the editor ¾ ¾ Click on button. Image Manager screen will open You can also Choose Image from the image manager. Selected image will be shown in the Image Map Editor Select Area Shape: o Click on radio button to select the shape of area. Options can be rectangle or circle ¾ button. Selected shape will be shown on the image o Click on Define Area Properties: Once you select the area of the screen set the properties: o Enter Left margin of the shape o Enter Top margin of the shape o Enter Width of the shape o Enter Height of the shape. You cannot set the height of circle shape o Enter the URL to assign link to shape o Select the Target place to open link upon clicking hotspot from the dropdown list o Enter the Comments ¾ Area Options: ¾ 27 HTML Module RapidVector® o Click on button to save the changes o Click on button to remove the changes o Click on button to remove all changes ¾ Click on button to upload image ¾ Click on button to cancel the changes. Note: A Detailed description of selecting images is mentioned in “Section: Image Manager” of this document. 3.10.2.3 Flash Manager Working with Flash Animations is quite similar to working with images. The Flash Manager allows you to perform almost the same tasks as the Image Manager. In addition, the Flash Manager allows you to set some Flash-specific properties like quality, loop, etc. Click on button from the toolbar to insert flash animated object. Figure 12 – Flash Manager to refresh page ¾ Click on ¾ From the list you can create a folder by clicking on button 28 HTML Module RapidVector® Select flash file from the list and click on button to delete selected file Upload Flash File: button from Flash Manager screen to add file o Click on o Click on Browse button to select the flash file from the folder. Selected file’s name and file path will be shown in Upload text box o Click on Upload button to insert flash file o Click on check box to Overwrite if file exists? with same name ¾ File List: o Selected animated object can be edited and its path will be shown in text box o List of all animated objects will be shown in the list Click on column header to sort the list by extension, name or size Click on animated object from the list to view or edit animated object Click on to go one level up in folder o Click on Preview button to preview the flash object o Click on Properties button to set the flash object properties Click on check box to Specify Class ID If you have selected Specify Class ID than Enter Class ID Enter object Width Enter object Height Select object Quality from the dropdown list Click on check box to Play object Click on check box to Loop the animation Click on check box to show Flash Menu Click on check box to set Transparency of animation Select HTML Alignment from the dropdown list Select Flash Alignment from the dropdown list Select Background Color from the dropdown list ¾ ¾ ¾ Click on button to insert selected flash file ¾ Click on button to exit from Flash Manager. Note: You can upload animated objects with maximum size 50 MB, and File extension *.swf is allowed. 3.10.2.4 Media Manager Working with Windows Media files is quite similar to working with images and flash. The Media Manager allows you to perform the same tasks as the Flash Manager. This includes setting Media specific properties like display size, rate, etc. you can view flash files imported from Flash Manager. Click on button from the toolbar to insert media file. 29 HTML Module RapidVector® Figure 13 – Media Manager to refresh page ¾ Click on ¾ From the list you can create a folder by clicking on ¾ ¾ button to delete selected file Select file from the list and click on Upload Media: button from Media Manager screen to add file o Click on o Click on Browse button to select the file from the folder. Selected file’s name and file path will be shown in Upload text box o Click on Upload button to insert file o Click on check box to Overwrite if file exists? with same name File List: o Selected media file can be edited and its path will be shown in text box o List of all media file will be shown in the list Click on column header to sort the list by extension, name or size Click on media file from the list to view or edit file Click on to go one level up in folder o Click on Preview button to preview the media file o Click on Properties button to set the media file properties Click on check box to Specify Class ID If you have selected Specify Class ID than Enter Class ID Enter object Width Enter object Height Select Alignment from the dropdown list Select Properties from the dropdown list ¾ button 30 HTML Module RapidVector® ¾ Click on ¾ Click on Displays Value button to insert selected file button to exit from Media Manager. Note: You can upload media files with maximum size 50 MB, and File extensions *.avi, *.mpg, *.mpeg, *.mp3, *.wav and *.flv are allowed. 3.10.2.5 Document Manager The Document Manager allows you to insert hyperlinks to document files stored on the web server by simply selecting them from a list. The dialog is similar to the Image Manager and allows you to browse, upload, and delete documents. Click on from the toolbar to insert link to the document on server. button Figure 14 – Document Manager to refresh page ¾ Click on ¾ From the list you can create a folder by clicking on ¾ ¾ button to delete selected file Select file from the list and click on Upload Document: button from Document Manager screen to add file o Click on button 31 HTML Module RapidVector® Click on Browse button to select the file from the folder. Selected file’s name and file path will be shown in Upload text box o Click on Upload button to insert file o Click on check box to Overwrite if file exists? with same name File List: o Selected file can be edited and its path will be shown in text box o List of all file will be shown in the list Click on column header to sort the list by extension, name or size Click on file from the list to view or edit file Click on to go one level up in folder Document Properties will be shown • Enter Tooltip in text box • Select Target from the dropdown list to open a file o ¾ ¾ Click on ¾ Click on button to insert selected file button to exit from Document Manager. Note: You can upload documents with maximum size 50 MB, and File extensions *.txt *.doc, *.pdf, *.zip, *.rar, *.avi, *.mpg, *.mpeg, *.swf, *.jpg, *.jpeg, *.png, *.gif, *.html and *.xls are allowed. 3.10.2.6 Template Manager HTML Editor allows you to insert external files (e.g. a file with pre-formatted tables, signatures, etc.) into the editable area. Those files are called Templates and can be in any format that your server will allow you to read. Templates are similar to code snippets the only difference being that they are obtained from individual files the user can browse, button from the toolbar to insert predefined HTML templates. upload, delete, etc. Click on 32 HTML Module RapidVector® Figure 15 – Template Manager to refresh page ¾ Click on ¾ From the list you can create a folder by clicking on ¾ ¾ button to delete selected template Select template from the list and click on Upload Template: button from Template Manager screen to add file o Click on o Click on Browse button to select the file from the folder. Selected file’s name and file path will be shown in Upload text box o Click on Upload button to insert template o Click on check box to Overwrite if file exists? with same name File List: o Selected file can be edited and its path will be shown in text box o List of all file will be shown in the list Click on column header to sort the list by extension, name or size Click on file from the list to view or edit file Click on to go one level up in folder Template Preview will be shown ¾ button ¾ Click on button to insert selected template ¾ Click on button to exit from Template Manager. Note: You can upload template with maximum size 50 MB, and File extensions *.html and *.htm are allowed. 33 HTML Module 3.10.2.7 RapidVector® Table HTML Editor offers two ways for creating tables. The best approach in each particular situation depends on your preferences and the table complexity. For simpler tables we recommend the click-and-drag Table Builder, whereas, for more complex tables the Table Wizard is more appropriate. Inserting a table from other Applications Inserting a table from applications into the HTML Editor is an easy copy-paste operation. Most of the formatting is preserved, including borders, text, numbers and cell color. Formulae, however, will not be pasted. Toggle Table Borders If you have created a table that has no borders by default, you can switch on the auxiliary borders. They are not saved in the content but only help you locate and work with your on the toolbar. table. You can toggle the auxiliary borders using the Creating Table using Table Builder Click on button from the toolbar to add table. Drag the mouse cursor to select the number of rows and columns for the table to add table with selected number of rows and column. Table created Table Builder using Figure 16 – Add Table using Table Builder 34 HTML Module RapidVector® In HTML Editor while you add a table, its basic properties will appear at the bottom of the editor. ¾ ¾ ¾ ¾ ¾ ¾ ¾ ¾ Width: Enter table Width in pixel Height: Enter table Height in pixel Cellspacing: Enter Cellspacing in pixel. Cell spacing will add space between two cells Cellpadding: Enter Cellpadding in pixel. Cell padding will remove space between two cells Alignment: Select Alignment from the list as Left, Right or Center. It will arrange the table position on the screen Background color: Select Background Color from the pallet. It will apply to table Classname: Select CSS Class from the list. It is predefined classes to design table Border Width: Enter Border Width to apply. Creating Table using Table Wizard Click on Table Wizard button to set the table properties. Table Wizard screen will open. Table wizard screen has four tabs: ¾ ¾ ¾ ¾ Table Design Table Properties Cell Properties Accessibility. Table created Table Wizard using Figure 17 – Add Table using Table Wizard 35 HTML Module RapidVector® Table Design From Table Design you can add or remove rows and columns in the table. You can also set the row spam and column spam. Figure 18 – Table: Table Design 36 HTML Module RapidVector® Table Properties From Table Properties you can set the table dimensions, layout, and border and add button from Insert Table background image and CSS in the table. You can also click on Wizard or from the bottom of the HTML editor to set the table properties. Right-click inside an existing table, select Table Properties from the context menu. Table Properties screen will open. Figure 19 – Table: Table Properties ¾ ¾ ¾ Dimensions: Enter table Width and Height pixel in percentage Layout: o Enter ID of the table o Select CSS Class from the dropdown list o Select Background Color from the color pallet o Select Back Image o Set table Alignment at left, right or center o Set Cell Spacing by clicking on arrow keys o Set Cell Padding by clicking on arrow keys Border: From Border you can set the table border o Click on different border position of sample layout o Select Border Color from the color pallet o Set Border Width by clicking on arrow keys o Set border by selecting. 37 HTML Module RapidVector® Cell Properties button from From Cell Properties you can set the cell properties. You can also click on Insert Table Wizard to set the cell properties. Right-click a table cell, select Cell Properties from the context menu. Cell Properties screen will open. Figure 20 – Table: Cell Properties ¾ Select the cell by clicking on the cell ¾ Enter cell Height ¾ Enter cell Width ¾ Enter ID of the table. Click on check box to remove word wrapping ¾ Set Content Alignment at left, right or center of the cell ¾ Select Background color from the color pallet ¾ Select Back Image ¾ Select CSS Class from the dropdown list. 38 HTML Module RapidVector® Accessibility The narrative software uses the information from the Accessibility table fields (heading rows, columns, caption alignment and summary) to produce a Tooltip message for each table cell. Users with impaired vision can see those Tooltips as they hover over the cells with the mouse. You can create a "Section 508"-compliant table with the Table Wizard. Alternatively, you can convert an existing table to a "Section 508"-compliant table using the Table Properties context menu. Figure 21 – Table: Accessibility ¾ ¾ ¾ ¾ ¾ ¾ Heading Rows: Enter number of heading row(s). A maximum of 3 heading rows can be added Heading Columns: Enter number of heading column(s). A maximum of 3 heading columns can be added Enter Caption in the text area Set Caption Alignment at left, right or center Enter Summary in the text area Click on check box to associate cells with headers. 39 HTML Module RapidVector® Inserting/Deleting Rows and Columns Once you have created a table, you can easily add or delete rows and columns from toolbar or right click menu. Insert, Delete Row and Column Figure 22 – Table: Right Click Menu To insert a new row: ¾ ¾ Click on Click on Right Click Menu button to insert row above button to insert row below To insert new column: button to insert column to the left ¾ Click on ¾ Click on button to insert column to the right To delete rows or columns, simply place the cursor in the respective row/column and select Delete Row/Column. ¾ Click on ¾ Click on button to delete row button to delete column. 40 HTML Module RapidVector® Merging/Splitting/Delete Cells To merge a cell with the adjacent cell: ¾ Select the cell ¾ Right-click to open the context menu button to merge cells horizontally ¾ From the menu, select button to merge cells vertically. ¾ From the menu, select To split a cell that has previously been merged: ¾ Select the cell ¾ Right-click to open the context menu button to split cell. ¾ From the menu, select To delete a cell: ¾ Select the cell ¾ Right-click to open the context menu button to delete cell. ¾ From the menu, select Resizing Tables You can resize an existing table in two ways: By specifying dimensions in the Table Properties tab or by direct drag-and-drop. Figure 23 – Table: Resizing Table To resize a table with a drag-and-drop: 41 HTML Module ¾ ¾ RapidVector® Click the table border to select the whole table. Eight small squares will be shown in the outer area of the table You can drag any of these handles vertically, horizontally or diagonally to resize the table. All cells that do not have exact dimensions (specified in pixels) will be resized evenly to accommodate the new table size. Formatting Tables with CSS Classes CSS class provides an easy and consistent way for formatting tables. In order to use the CSS Class, you have to first create the table and then open the Table Properties screen to apply the predefined CSS class. To apply a CSS class to a table or an individual cell: Select CSS Class to apply on table Figure 24 – Table: Apply CSS Class ¾ ¾ ¾ Click the table/cell. Right-click to open the context menu From the menu, click Set Table/Cell Properties. Table/Cell Properties screen will open Select the CSS class from the dropdown list at the bottom of the screen. 42 HTML Module 3.10.2.8 RapidVector® Symbols Click on button to insert special character from the dropdown list. You can insert special characters like € ®, ©, ±, etc. Select Symbol from dropdown list to add Figure 25 – symbols 43 HTML Module 3.10.2.9 RapidVector® Hyperlink Manager Click on button to add hyperlink on the site. Hyperlink Manager screen will open. You can mange hyperlink, anchors and email links from this screen. Shortcut key for adding hyperlink is Ctrl+K. Figure 26 – Hyperlink Manager: HyperLink Insert a Hyperlink ¾ Select the link Type from the dropdown list ¾ Enter URL name in the text box ¾ Enter the Link Text in the text box ¾ Select the link open Target from the list ¾ Select Existing Anchor from the dropdown list. If any anchor is already added, then it will appear in the list ¾ Enter Tooltip for the hyperlink in the text box. A hyperlink can be interpreted by the narrative software if you specify an additional description in the Tooltip field ¾ Select CSS Class from the dropdown list. Modifying a Hyperlink ¾ ¾ Click inside the hyperlink (or in the image if you have an image link) Right-click to open the context menu and click on Set Link Properties button. ¾ . Hyperlink Manager screen will open Alternatively, click on Modify the hyperlink attributes (URL, tooltip, etc.) Remove a Hyperlink ¾ Select the text or image that has been set as a hyperlink 44 HTML Module ¾ RapidVector® Right-click to open the context menu and click on Remove Link button. Alternatively, click on hyperlink is Ctrl+Shift+K. button from the toolbar. Shortcut key for removing 3.10.2.10 Anchor The Anchor function is particularly helpful if you have a very long web page. With this function, you can jump from one section of the page to another. In other words, the anchor is used for hyperlinks that lead to the same page or a particular place in another page. The anchor defines the destination to which a hyperlink must lead. You can create a hyperlink button to add anchor name. Hyperlink Manager and point it to that anchor. Click on screen will open. Enter anchor Name in the text box. Figure 27 - Anchor 3.10.2.11 Email Link E-mail Link opens the default e-mail application on your machine and prompts you to send a message to the provided addressee. When creating e-mail links, you can also specify default subject for the message (e.g. "Request for information"). Click on email link. Hyperlink Manager screen will open. button to add 45 HTML Module RapidVector® Figure 28 – Email ¾ ¾ ¾ ¾ Enter Address in the text box Enter Link Text in the text box Enter Subject of the email in the text box Select CSS Class from the dropdown list. 3.10.2.12 Custom Link In some cases HTML Editor may be configured to display and insert a set of frequently-used links. Such links may be all the web pages of a site (a.k.a. Internal Links). They will appear dropdown list. You can quickly assign a predefined hyperlink to an in the object and type its URL address. To add predefined Custom Link, select link from dropdown list. 46 HTML Module RapidVector® Select Custom Link from dropdown list to add Figure 29 – Custom Link 3.10.2.13 Set Absolute Position In some cases you may want to position an image absolutely. This will make the image float freely so you can move it around the content with the mouse. To Set Absolute Position of selected object, click on from the toolbar. You can move object. 47 HTML Module 3.10.3 RapidVector® Formatting Text Appearance The buttons in this section work on a selected portion of text. For some tools, it is enough to position the mouse cursor in a word to apply the necessary formatting. RapidVector provides you text appearance formatting tools as below: Click on Bold, Italic, Underline or Strikethrough button from toolbar to format text appearance Figure 30 – Formatting Text Appearance: Bold, Italic, Underline and Strikethrough 3.10.3.1 Bold To apply Bold formatting to the selected text, click on key for bold is Ctrl+B. 3.10.3.2 button from the toolbar. Shortcut Underline To apply Underline formatting to the selected text, click on Shortcut key for underline is Ctrl+U. button from the toolbar. 48 HTML Module 3.10.3.3 RapidVector® Italic To apply Italic formatting to the selected text, click on key for italic is Ctrl+I. 3.10.3.4 button from the toolbar. Shortcut Strikethrough To apply Strikethrough formatting to the selected text, click on toolbar. 3.10.3.5 Super Script To Super Script selected text click on 3.10.3.6 button from the toolbar. Sub Script To Sub Script selected text click on 3.10.3.7 button from the button from the toolbar. Case Conversations ¾ Convert to Upper Case: To convert selected text into upper case, click on button from the toolbar ¾ Convert to Lower Case: To convert selected text into lower case, click on button from the toolbar. 3.10.3.8 Strip Formatting Copying formatted text from Microsoft Word, Internet explorer and other applications is straightforward. Once you have pasted the formatted text in the editor, you can remove the Word specific formatting that is not suitable for the web. There are five different types of strip formatting available: button ¾ Strip All Formatting: To strip all formatting select text and click on ¾ ¾ button Strip CSS Formatting: To strip CSS formatting select text and click on Strip Font Elements: To strip font element select text and click on button ¾ ¾ button Strip Span Elements: To strip span element select text and click on Strip Word Formatting: To strip word formatting select text and click on button. 3.10.3.9 ¾ Font Foreground Color: To change the Font Color of the selected text click on button from the toolbar 49 HTML Module RapidVector® Select Foreground Color from pallet to apply on text Figure 31 – Foreground Color ¾ Background Colors: To change the Background Color of the selected text click on button from the toolbar 50 HTML Module RapidVector® Select Background Color from pallet to apply on background Figure 32 – Background Color ¾ Font Type: To change the Font Face Type of the selected text, select font type from dropdown list 51 HTML Module RapidVector® Select Font Type from the list to apply on text Figure 33 – Font Face Type ¾ Font Size: To change the Font Size of the selected text, select font size from dropdown list 52 HTML Module RapidVector® Select Font Size from list to apply on text Figure 34 – Font Size ¾ Real Font Size: To change the Real Font Size of the selected text, select font size from dropdown list. 53 HTML Module RapidVector® Select Real Font Size from list to apply on text Figure 35 – Real Font Size 3.10.3.10 Apply CSS Class Predefined CSS classes are used to ease the process of formatting. To apply predefined CSS Style to selected text, select CSS Class from the dropdown list. To clear an activated CSS Class is as easy as applying it. To clear the CSS class, select the text and select Clear Style from dropdown list. 54 HTML Module RapidVector® Select CSS Class from list to apply on text Figure 36 – Apply CSS Class 55 HTML Module 3.10.4 RapidVector® Formatting Paragraphs and Lists RapidVector provides you paragraph and list formatting tools as below: 3.10.4.1 Paragraph Style Predefined paragraph styles are used to ease the process of formatting paragraphs. The user can apply consistent paragraph styles to a document. The predefined styles include different heading styles, and other styles defined by the developer. To apply a paragraph style to text, place the cursor within the text, from style to apply. dropdown list, select the Select Paragraph from list to apply Style Figure 37 – Paragraph Style 56 HTML Module 3.10.4.2 RapidVector® Indent / Outdent To Indent paragraph to the right, click on paragraph to the left, click on has been applied. button from the toolbar. To Outdent button from the toolbar. The Outdent works only if Indent Click on Indent to move paragraph inside Click on Outdent to mode paragraph outside Figure 38 – Indent / Outdent 57 HTML Module 3.10.4.3 RapidVector® Alignments You can set the paragraph alignment to left, center, right or justify. Select the text and from the toolbar, click the button for the alignment you want to set. Click on Left, Right, Center or Justified to align paragraph accordingly Click on Remove Alignment to remove alignment Figure 39 – Alignments ¾ Left: To align selected paragraph to the Left, click on ¾ Center: To align selected paragraph to the Center, click on toolbar ¾ Right: To align selected paragraph to the Right, click on ¾ Justified: To Justify selected paragraph, click on ¾ Remove Alignment: To Remove Alignment of selected paragraph, click on from the toolbar. button from the toolbar button from the button from the toolbar button from the toolbar 58 HTML Module 3.10.4.4 RapidVector® Listing styles Click on Numbered List to create list with numbers Click on Bulleted List to create bulleted list Figure 40 – List Styles ¾ Number List: To create Number List of selected text, click on toolbar button from the ¾ Bullet List: To create Bulleted List of selected text, click on toolbar. button from the 3.10.4.5 Horizontal Ruler To add Horizontal Ruler, click on button from the toolbar. You can move object. 59 HTML Module RapidVector® Click on Horizontal Ruler to add ruler horizontally Figure 41 – Horizontal Ruler 60 HTML Module 3.10.5 RapidVector® Working with Portion of Text RapidVector provides you some tools to formatting text portion as below: 3.10.5.1 Spell Check You can check your spelling asynchronously and all your mistaken words will be highlighted inline. The context menu on every word gives you a quick and easy way to Change, Ignore or Add the word to a custom dictionary. The dialog spellchecker works the same way as in Microsoft Word. When launched, the check starts automatically from the beginning of the document. The misspelled words with yellow background in the spellchecker dialog where you can either Ignore the suggestion or Change Manually the word or Add to Directory. To perform Spell Checking in the paragraph, click on button from the toolbar. Click on Spell Check to find and replace misplaced spellings Figure 42 – Spell Checking 3.10.5.2 Cut To Cut the selected text and copies it to the clipboard, click on button from the toolbar. Shortcut key for cut is Ctrl+X. The selected text or image is removed from the page and is 61 HTML Module RapidVector® stored in the clipboard for later use. Only the last cut item is stored in the clipboard. This tool is very helpful when you need to relocate a word/text within the page. 3.10.5.3 Copy To Copy the selected text to the clipboard, click on button from the toolbar. Shortcut key for copy is Ctrl+C. Only the last copied item is stored in the clipboard. This tool is very helpful when you need to type the same text many. This way you do not have to type the text over and over. This procedure works for images and/or tables. 3.10.6 General RapidVector provides you some general formatting tools as below: 3.10.6.1 Click on 3.10.6.2 Help button to get help regarding toolbar buttons. Help screen will open. Redo To Redo the last action, click on button from the toolbar. Shortcut key for redo is Ctrl+Y. Expand the dropdown list to select multiple actions to redo. 3.10.6.3 Undo To Undo the last changes, click on button from the toolbar. Shortcut key for undo is Ctrl+Z. This includes but is not limited to inserting tables, moving images and formatting text. Expand the dropdown list to select multiple actions to undo. 3.10.6.4 Show/Hide Border To Show/Hide borders of all tables within the editor, click on 3.10.6.5 Repeat Last Command To Repeat Last Command performed, click on 3.10.6.6 button from the toolbar. button from the toolbar. Select Module To add used Module, select module from dropdown list. 62 HTML Module RapidVector® Select Module from the list to add Figure 43 – Select Module 3.10.7 Other Keyboard Shortcuts Some of the general keyboard shortcuts valid for Microsoft Windows and Internet Explorer will work in the HTML editor as well. ¾ ¾ ¾ Ctrl+A: Selects the whole content of the editor (text, images, tables, etc.) Ctrl+W: Closes the active window Alt+F4: Closes the active application. 63 HTML Module RapidVector® 3.11 Versions Click on Versions tab to view all version details on HTML Module. From versions you can view, version name, edited by, date and time of edition. You can restore version from here. Version number will appear as Version 1,2,3 so on. But only last three versions will appear. These versions are very useful while you need to change topics on site. You can create all different topics with different version number so whenever in future you wish to upload one of the old content, then only publish that version. Click on check box to select versions for comparison & Click here to Compare versions Click here to Restore version Figure 44 – HTML Version ¾ Click on button to save the changes with existing version. Text will appear on the site once you publish the version ¾ Click on button from HTML Editor tab to save the updates as a new version ‘Content saved as a version successfully.’ Message will appear. Click on OK button. New version will be added in the list. ¾ 64 HTML Module 3.11.1 RapidVector® Publish Versions Publish is used to publish the changes of text content. You can publish newly written content on the website or old version text. Once you publish the module it will appear at user side. Click here to Publish version Figure 45 – HTML Version: Publish Version from HTML Editor Tab ¾ In HTML Editor tab make required changes and click on HTML Editor tab. Text content will appear on the site button from 65 HTML Module RapidVector® Click here to Publish version Figure 46 – HTML Version: Publish Version from Versions Tab ¾ In Versions tab click on check box to select version to publish. Click on button from Version tab to publish selected version on the site. Note: Content will be published and shown on website only if you have published it from Editor Content screen by clicking on button. If you just save the changes and publish it, it will treat it as new version. 3.11.2 ¾ ¾ ¾ ¾ Restore Versions Click on button to restore selected version ‘Are you sure you want to restore this version?’ Message will appear for confirmation Click on OK button to restore the version otherwise click on Cancel button ‘Version restored successfully.’ Message will appear click on OK button. Selected version will appear in HTML Editor. Version numbers will be updated. 66 HTML Module 3.11.3 RapidVector® Compare Versions Click on check box for version numbers to compare two versions. Click on button. Comparison of Versions screen will open with all details of two selected versions. Figure 47 – HTML Version 67 HTML Module RapidVector® 4 User Interface This chapter describes the HTML Module – User Interface from the perspective of operational and functional use. Once admin has added any content from the admin side, after publishing module it will appear user end. Users can view text content added by admin. Figure 48 – HTML Editor: User Interface 68