1
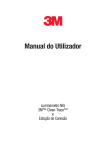
3
Important Safety
Information And
User Manual
3M™ Clean-Trace™ NGi Luminometer
and
Docking Station
Important Safety Information
3M™ Clean-Trace™ NG Luminometer and
Docking Station
1
Important Informational Reading
Read, understand, and follow all safety information contained in these instructions and the manufacturer‘s
Installation and Use Guide prior to using the 3M™ Clean-Trace™ NG Luminometer and Docking Station.
Retain these instructions for future reference.
Product Description and Intended Use:
The 3M™ Clean-Trace™ ATP System is designed for the rapid detection of biological residues in aqueous
solutions and on surfaces.
The 3M™ Clean-Trace™ NG Luminometer is a battery operated Luminometer utilized primarily for objective and
sensitive determination of the end result of 3M™ Clean-Trace™ Adenosine Tri-Phosphate (ATP) tests.
The 3M™ Clean-Trace™ NG Luminometer Docking Station is available as an optional accessory and is an
instrument holder which provides instant connection to main charger and PC communications. It has been
designed for battery charging and the transfer of data from the 3M™ Clean-Trace™ NG Luminometer.
Contact an official 3M Health Care representative for a current listing of 3M™ Clean-Trace™ Luminometers
documented for use with the 3M™ Clean-Trace™ NG Luminometer Docking Station.
3M has not designed nor documented the 3M™ Clean-Trace™ NG Luminometer Docking Station for use with
other manufacturers’ products, use with other manufacturers’ designs, or use in any other application that has
not been evaluated or documented by 3M and may lead to an unsafe condition. The 3M™ Clean-Trace™ System
is not intended to be used in potentially flammable or explosive environments. Although the 3M™ Clean-Trace™
System is very sensitive, surfaces should not be considered sterile based on results from the 3M™ Clean-Trace™
System. The 3M™ Clean-Trace™ System is not intended to be used in the diagnosis of conditions in humans or
animals. The user is responsible to know and follow applicable workplace regulations.
3M anticipates that the 3M™ Clean-Trace™ ATP tests and equipment will be utilized by technicians that have been
properly trained on the 3M™ Clean-Trace™ ATP test methods.
If this product is used in a manner not specified, the protection provided by the product may be impaired.
USER RESPONSIBILITY
When selecting a test method, it is important to recognize that external factors such as sampling methods, testing
protocols, sample preparation, handling, and laboratory technique may influence results.
It is the user‘s responsibility in selecting any test method to evaluate a sufficient number of samples with the
appropriate matrices and challenges to satisfy the user that the chosen test method meets the user‘s criteria.
It is also the user‘s responsibility to determine that any test methods and results meet its customers‘ and suppliers‘
requirements.
As with any test method, results obtained from use of this product do not constitute a guarantee of the quality of
the matrices or processes tested.
SAFETY INFORMATION
Explanation of Signal Word Consequences
WARNING:Indicates a hazardous situation, which, if not avoided, could result in death or serious injury.
CAUTION:Indicates a hazardous situation, which, if not avoided, could result in minor or moderate injury.
NOTICE:Indicates a hazardous situation, which, if not avoided, may result in property damage
Explanation of Safety Related Symbols
WARNING: Read Accompanying Documentation
CAUTION: Recycle Luminometer to avoid environmental contamination
This product contains recyclable parts for information on recycling – please contact
your nearest 3M Service Center for advice.
This system is subject to the European WEEE Directive 2002/96/EC
This product contains electrical and electronic components and must not be
disposed of using standard refuse collection. Please consult local directives for
disposal of electrical and electronic equipment
Class II: Class two insulation referred to as double insulation
Applies to NG Power Supply: Alternating current AC source
WARNING
To reduce the risks associated with hazardous voltage:
• do not service the 3M™ Clean-Trace™ Luminometer, docking station or power supply. Use only 3M authorized
service personnel.
• do not use the 3M™ Clean-Trace™ Luminometer or power supply if the enclosure is broken.
• do not use a damaged power supply or detachable power supply cord.
• replace damaged components with only the 3M designated replacement parts.
• disconnect the 3M™ Clean-Trace™ Luminometer or Docking Station from the AC power before cleaning.
To reduce the risks associated with hazardous voltage and fire:
• do not modify any part of the 3M™ Clean-Trace™ Luminometer system.
• do not use a power supply other than the one specified by 3M.
• do not allow the power supply to get wet.
• keep power supply visible and accessible at all times. The plug at the wall socket is used to disconnect the
device from the main power supply.
To reduce the risks associated with strangulation due to the carrying pouch strap:
• keep the pouch away from children.
To reduce the risks associated with entanglement due to the carrying pouch strap:
• use care when operating near machinery.
To reduce the risks associated with fire and explosion:
• do not dispose of battery or luminometer in fire.
• do not use or store the luminometer, docking station, printer or power supply in potentially flammable or
explosive environments. The 3M™ Clean-Trace™ System was not designed to be categorized as "Intrinsically
Safe".
• do not short circuit the battery.
To reduce the risks associated with illness or infection:
• do not use the 3M™ Clean-Trace™ System in the diagnosis of conditions in humans or animals.
• do not use the 3M™ Clean-Trace™ System as an indication of sterility of surfaces or solutions
CAUTION
Read, understand and follow all safety information contained in the associated kit user instruction insert
prior to use.
To reduce the risks associated with exposure to chemicals:
• always wear protective apparel and eye protection while using these products.
To reduce the risks associated with environmental contamination:
• follow applicable regulations when disposing of the luminometer, docking station, printer, power supply and battery.
• follow industry standards for disposal of contaminated waste including used or expired test kits.
NOTICE
To avoid exposure to contaminated surface, water, or beverage outside the users validated RLU
specifications:
• handle the sensitive 3M™ Clean-Trace™ Luminometer with care.
• do not use if damaged.
• do not use an out-of-calibration 3M™ Clean-Trace™ Luminometer. Contact an authorized 3M Service Center for
service and calibration.
• always remove the sample before switching OFF.
• use only reagents or accessories supplied by your local 3M distributor.
• use and store reagent test kits in accordance with the instructions provided with the kit.
• perform tests in the temperature range between 15-25°C. A lower reading will be seen at temperatures below
15°C. However, if tests are always performed at this lower temperature, consistent results can be obtained.
• do not use the 3M™ Clean-Trace™ Luminometer if liquid or a foreign objects gets inside.
• do not store in environments greater than 90% relative humidity and 40°C.
To avoid damage to luminometer:
• do not use a power supply other than the one specified by 3M.
• ensure the battery is attached to the Clean-Trace NG Luminometer before connecting to the power supply.
• do not store the 3M™ Clean-Trace™ NG Luminometer or Docking Station at temperatures above 40°C.
• do not store the 3M™ Clean-Trace™ NG Luminometer or Docking Station at temperatures below 4°C as
condensation may occur. The instrument should be allowed to warm to room temperature before use and a cloth
or tissue used to wipe dry the outer surfaces.
• do not store or use the 3M™ Clean-Trace™ Luminometer, Power Supply, or Docking Station in a location
exposed to steam high humidity, dust or strong vibration.
• Ensure that the battery charger power supply connector is in the right orientation before inserting into
luminometer. If oriented properly, it connects easily, do not use excessive force when connecting.
REGULATORY COMPLIANCE
The CE Mark denotes compliance of the Clean Trace NG Luminometer with the following European Directives
• Electromagnetic Compatibility as set out in the EMC Directive 2004/108/EC and
• Electrical Safety as set out in the Low Voltage Directive 2006/95/EC.
This device complies with part 15 of the FCC Rules. Operation is subject to the following two conditions (1) this
device may not cause harmful interference, and (2) this device must accept any interference received, including
interference that may cause undesired operation.
Note: This equipment has been tested and found to comply with the limits for a Class A digital device, pursuant to
part 15 of the FCC Rules. These limits are designed to provide reasonable protection against harmful interference
when the equipment is operated in a commercial environment. This equipment generates, uses, and can radiate
radio frequency energy and, if not installed and used in accordance with the instruction manual, may cause
harmful interference to radio communications. Operation of this equipment in a residential area is likely to cause
harmful interference in which case the user will be required to correct the interference at his own expense.
This Class (A) digital apparatus complies with Canadian ICES-003.
ENVIRONMENTAL OPERATING CONDITIONS
Environmental Condition
Altitude
Operating Temperature Range
Relative Humidity
AC Voltage (US/Canada)
AC Voltage (Europe)
AC Voltage (Japan)
Frequency
AC Current (US/Canada)
AC Current (Europe)
AC Current (Japan)
Operating Condition
Not limited
+15 to +35 (+59 to +95)
10 - 90 (Non-condensing)
120
230
100
50/60
190
110
230
Units
metres
°C (°F)
%
Volts
Volts
Volts
Hertz
mA
mA
mA
PACKAGE CONTENTS
3M Supplied Equipment:
3M™ Clean-Trace™ NG Luminometer
• Important Safety Information
• 3M™ Clean-Trace™ NG Luminometer complete with detachable Lithium-Ion Battery Pack
• Power Supply
• Quick Start Protocol Card
• 3M™ Clean-Trace™ Data Trending Software (not available with all models)
• Electronic Manual (Multi-Language)
• USB 2.0 min-B communications cable
• Certificate of Conformity
Docking Station
• 3M™ Clean-Trace™ NG Luminometer Docking Station.
Replacement of Fuses
This section applies only to the United Kingdom.
In cases where AC Mains lead power cords are fitted with a fused wall plug the following applies.
In the event of a fuse failure in the power supply AC Main power cord lead wall plug, replace the fuse with only an
approved fuse carrying the BSI or ASTA mark.
The preferred replacement part reference is to BS 1362 for example Bussmann 3A.
The fuse should only be replaced by a competent person.
LIMITED WARRANTY AND DISCLAIMER.
3M warrants that for one year from the date of shipment that the 3M™ Clean-Trace™ NG Luminometer or Docking
Station will substantially perform in accordance with the User Documentation. The terms of this Agreement do not
affect or prejudice the statutory rights of a consumer acquiring the 3M™ Clean-Trace™ NG Luminometer or 3M™
Clean-Trace™ Docking Station otherwise than in the normal course of a business.
THIS WARRANTY DOES NOT APPLY IN THE FOLLOWING CIRCUMSTANCES:
(A) THE 3M™ Clean-Trace™ NG Luminometer or Docking Station HAS BEEN REPAIRED BY PERSONS NOT
AUTHORIZED BY 3M; OR
(B) THE 3M™ Clean-Trace™ NG Luminometer or Docking Station HAS BEEN ALTERED, MODIFIED, OR
MISUSED; OR
(C) THE 3M™ Clean-Trace™ NG Luminometer or Docking Station IS USED WITH NON- 3M™ Clean-Trace™ NG
Luminometer System COMPONENTS; OR
(D) THE 3M™ Clean-Trace™ NG Luminometer or Docking Station OR A COMPONENT IS USED FOR OTHER
USES (FOR EXAMPLE USE WITH OTHER CIRCUIT BOARDS OR SOFTWARE) OR
(E) THE 3M™ Clean-Trace™ NG Luminometer or Docking Station HAS NOT BEEN MAINTAINED OR USED
IN ACCORDANCE WITH THE INSTALLATION AND USE GUIDE. UNLESS PROHIBITED BY LAW, THIS
WARRANTY IS MADE IN LIEU OF ALL OTHER WARRANTIES, EXPRESS OR IMPLIED, INCLUDING BUT
NOT LIMITED TO THE IMPLIED WARRANTY OF FITNESS FOR A PARTICULAR PURPOSE, THE IMPLIED
WARRANTY OF MERCHANTABILITY, OR ANY IMPLIED WARRANTY ARISING OUT OF A COURSE OF
DEALING OR OF PERFORMANCE, CUSTOM OR USAGE OF TRADE. 3M DOES NOT WARRANT THAT
THE 3M™ Clean-Trace™ NG Luminometer Docking Station WILL FUNCTION ERROR FREE.
If within one year after shipment, the 3M™ Clean-Trace™ NG Luminometer or 3M™ Clean-Trace™ Docking
Station does not conform to the express warranty set forth above, 3M‘s sole obligation and User‘s sole remedy
shall be, at 3M‘s option: 1. to repair or replace the non-conforming component; or, 2. refund the purchase price.
LIMITATION OF LIABILITY.
UNLESS PROHIBITED BY LAW, 3M WILL NOT BE LIABLE TO USER OR OTHERS
FOR ANY OTHER DIRECT, INDIRECT, CONSEQUENTIAL, INCIDENTAL OR SPECIAL DAMAGES INCLUDING,
FOR EXAMPLE, LOST PROFITS, BUSINESS, INVESTMENTS, OR OPPORTUNITIES EVEN IF 3M HAS BEEN
ADVISED OF THE POSSIBILITY OF SUCH DAMAGES.
The parties agree that 3M‘s total cumulative liability to User for direct damages for all causes under this
Agreement shall not exceed One Hundred Dollars, or the price paid for the 3M™ Clean-Trace™ NG Luminometer
or Docking Station, whichever is higher. Some states or countries may have laws which require liability rights
different from those stated above. In such states or countries, the minimum required liability terms shall apply.
3M Health Care - Product and Service Information
3M Product Information: www.3M.com
To obtain warranty service, call 3M Health Care Helpline (USA) 1 800 228 3957 or for outside the USA contact
your local 3M Subsidary or a 3M Health Care Representative.
Made in UK for 3M Health Care, St. Paul, MN 55144-1000
EC REP 3M Health Care
D-41453 Neuss, Germany
Trademarks
3M and Clean-Trace are trademarks of 3M or Biotrace International PLC, a 3M Company, and used under license
in Canada.
©3M 2010. All rights reserved.
3M Pkg Document ID # (rev #)
Month Year
User Manual
3MTM Clean TraceTM NGi Luminometer
and Docking Station
Index
1 Product Description
1.01 How the 3M™ Clean-Trace™ NGi Luminometer works to Measure Contamination
1.02 ATP and Surface Hygiene Testing
1.03 ATP and Water Testing
2 Instrument overview
2.01 Parts of the 3M™ Clean-Trace™ NGi Luminometer
2.02 General Features
2.03 Charging the Battery
2.04 Switching the Instrument ON
2.05 Measurement Modes
2.06 Inserting a Test
2.07 Swab Sensor
2.08 Low Power Mode
2.09 PC Communications
3 Accessories
3.01 3M™ Clean-Trace™ NGi Luminometer Docking Station
3.02 3M™ Clean-Trace™ NGi Luminometer Printer
3.03 3M™ Clean-Trace™ NGi Luminometer Soft Carry Case
4 Measure Sample
4.01 What is MEASURE SAMPLE
4.02 How to Test using MEASURE SAMPLE
5 Program Mode
5.01 What is PROGRAM MODE and how do I use it
5.02 How to Use Program Mode
5.03 Retesting
5.04 Reviewing results
5.05 Printing results
6 SETUP Menu
6.01 What the SETUP MENU allows
6.02 How to find the SETUP MENU
6.03 Setting Date Format
6.04 Setting the Time Format
6.05 Setting the Date
6.06 Setting the Time
6.07 Setting the Language
6.08 Performing a Self Check
6.09 Setting the Backlight Timeout
7 Upload Results
7.01 What is UPLOAD RESULTS used for
7.02 How to UPLOAD RESULTS
8 User Guidelines
9 Care of the 3M™ Clean-Trace™ NGi Luminometer
9.01 Cleaning
9.02 Temperature
10 Troubleshooting
10.01 General
10.02 Battery Error Screens
10.03 Communication Error screens
10.04 Self Check Error Screen
10.05 Login and Password Error Screens
10.06 Other Error Screens
10.07 Inadvertent changing of language setting
11 Appendices
11.01 Technical Specifications
11.02 Terms and Conventions
1.0 Product Description
1.01
1.02
1.03
How the 3M™ Clean-Trace™ NGi Luminometer works to Measure Contamination
ATP and Surface Hygiene Testing
ATP and Water Testing
1.01 How the 3M™ Clean-Trace™ NGi Luminometer works to Measure
Contamination
The 3M™ Clean-Trace™ NGi Luminometer is a luminometer used in conjunction with 3M reagent kits to measure
levels of contamination on surfaces and in water samples. The technology used is Adenosine Triphosphate (ATP)
bioluminescence. ATP is a substance present in all animal and vegetable matter, including most food debris,
bacteria, fungi and other micro-organisms. Measurement of ATP is performed using an enzyme reaction which
occurs naturally in the tail of fireflies.
Luciferin/Luciferase (firefly reagent) + ATP = Light
The light emitted is in proportion to the amount of ATP. The intensity of the light emitted from a sample is
measured by the 3M™ Clean-Trace™ NGi Luminometer and is displayed in Relative Light Units (RLU).
1.02 ATP and Surface Hygiene Testing.
The 3M™ Clean-Trace™ NGi Luminometer, together with the appropriate test kit, is an effective method for
monitoring the hygiene status of surfaces. ATP from both micro-organisms and product residues are detected.
Measurement of "total ATP" provides an important insight to the overall cleanliness. Product residues remaining
on surfaces after cleaning will be a source of nutrients for any remaining micro-organisms and may also protect
the micro-organisms from disinfectant action. Because of the fast results, use of the 3M™ Clean-Trace™ NGi
Luminometer allows immediate remedial action to be taken if an unacceptable result is obtained. Surfaces can be
re-cleaned before use, ensuring good sanitation and contamination control.
The test kit instructions should be read carefully before use.
1.03 ATP and Water Testing.
Test kits are available for the assessment of contamination in liquid samples. Measurement of the total ATP in
final rinse water samples is an indicator of the effectiveness of Clean in Place (CIP) processes. The total ATP in
process and waste water, water tanks and cooling towers can be used to determine and monitor the efficiency of
the biocide treatment program.
Measurement of free or non microbial ATP can be performed in addition to total ATP for further information on the
nature of the contamination.
The test kit instructions should be read carefully before use.
2.0 INSTRUMENT OVERVIEW
2.01
2.02
2.03
2.04
2.05
2.06
2.07
2.08
2.09
Parts of the 3M™ Clean-Trace™ NGi Luminometer
General Features
Charging the Battery
Switching the Instrument ON
Measurement Modes
Inserting a Test
Swab Sensor
Low Power Mode
PC Communications
2.01 Parts of the 3M™ Clean-Trace™ NGi Luminometer
The purpose of each of the Function Buttons can change according to the menu screen being displayed. Once a
menu is selected the button functions will be displayed at the bottom of the screen directly above each button.
Figure 1
Chamber cap
Cap release
Battery level indicator
Display screen
Navigation buttons
Cursor control
On/Off switch
Figure 2
RS 232 to PC (not functional on NGi Luminometer)
USB to PC
Power from Charger
2.02 General Features
The 3M™ Clean-Trace™ NGi Luminometer is a light-weight, fully portable instrument with alphanumeric LCD
display. The instrument is for use in production areas, healthcare settings and laboratories and can be supplied
with a carrying pouch. A separate internal Lithium Battery is used to retain information in the instruments memory,
with regard to sample plans, test points, data and calibration setting.
2.03 Charging the Battery
The instrument runs on a removable, rechargeable Lithium Ion battery. The sealed battery pack is supplied with
the 3M™ Clean-Trace™ NGi Luminometer and needs to be charged prior to use.
It is necessary to attach the battery pack to the instrument. Locate the battery pack into the aperture in the rear of the
3M™ Clean-Trace™ NGi Luminometer by inserting the bottom of the battery pack first and pushing the battery into
place. Secure the battery pack by turning the fixing screw clockwise using a small screwdriver. Do not over-tighten.
The 3M™ Clean-Trace™ NGi Luminometer may now be charged using the charger supplied. Plug the connector
from the charger into the 3M™ Clean-Trace™ NGi Luminometer as shown in Figure 2, then connect the charger
to an AC power outlet and switch on. Alternatively, the optional docking station is used, insert the 3M™ CleanTrace™ NGi Luminometer into the docking station, plug the connector from the charger into the docking station
then connect the charger to an AC power outlet.
The battery in the 3M™ Clean-Trace™ NGi Luminometer will charge fully in approximately 2 hours and will then
be ready for use. The battery level indicator shows the state of charge. Remove the AC power and unplug the
charger from the instrument. If a docking station is used, the charger can remain attached to the docking station
permenantly. In this way, the instrument is always being charged ready for use when it is in the docking station.
The 3M™ Clean-Trace™ NGi Luminometer will display this screen
when it is switched off and charging.
If the 3M™ Clean-Trace™ NGi Luminometer is turned on and
operating with the charger connected, the arrow next to the battery
symbol will be shown.
When switched on, the 3M™ Clean-Trace™ NGi Luminometer will display a continuous indication of battery status
at the top right of the display screen as shown in Figure 1 and as follows:
The removable battery pack is held in place by a single screw.
To remove the battery pack, turn screw counterclockwise until loose
(it is a captive screw so will remain attached to the battery pack) then
remove the battery.
This shows the battery pack removed. Note the battery contacts.
Do not touch or contaminate them as this could lead to unreliable
operation. The battery pack is only available from 3M or local
distributor.
2.04 Switching the Instrument ON
Ensure that no samples have been left in the chamber from previous tests before switching the instrument on.
The power switch is the red button on the instrument. Pressing and holding the on/off button will switch the 3M™
Clean-Trace™ NGi Luminometer on. Pressing and holding the on/off button again will switch the 3M™ CleanTrace™ NGi Luminometer off. When switching on, the 3M™ Clean-Trace™ NGi Luminometer performs a series
of self-checks, including an initial instrument background measurement and a calibration check. The following
screens will be displayed.
During initial startup and system self check.
The instrument then initializes and the following screen is
displayed:
It is possible to pause the 3M™ Clean-Trace™ NGi Luminometer
at this point in order to note the hardware and software versions
to aid diagnosis in the event of a malfunction. Press any button
while this screen is displayed and the instrument will pause.
The version numbers are displayed at the bottom of the screen.
Press any button to allow the 3M™ Clean-Trace™ NGi Luminometer to continue.
The 3M™ Clean-Trace™ NGi Luminometer will now perform an
initial background and calibration check.
If the initial background and calibration check are within limits, the
screen on the right will be displayed.
Should the initial background measurement fail, see the
troubleshooting guide in Section 10 of this manual.
Pressing the OK button will display the main system menu.
Should the 3M™ Clean-Trace™ NGi Luminometer fail the startup self check, one of several screens may be
displayed. If this occurs, see the troubleshooting guide in section 10 of this manual.
2.05 Measurement Modes
The 3M™ Clean-Trace™ NGi Luminometer instrument offers three ways to measure a sample.
MEASURE SAMPLE allows as many readings as required, but does not store the data for later use. If the 3M™
Clean-Trace™ Luminometer Printer is used, results may be printed as they are produced as long as the 3M™
Clean-Trace™ NGi Luminometer is located in its docking station and connected to the printer. (see section 4 for
further details)
PROGRAM MODE allows data to be saved on the 3M™ Clean-Trace™ NGi Luminometer and then transferred to
the 3M™ Clean-Trace™ Online Software. To use the Program Mode, sample plans will need to have been
created and downloaded to the 3M™ Clean-Trace™ NGi Luminometer. (see section 5 for further details).
2.06 Inserting a Test
Open Door
Open chamber cap by sliding the cap release button to the left.
The cap will spring open.
Insert test
Insert the 3M test device into the chamber. Lift the cap back over
the top of the device and then push down until the cap latches.
2.07 Swab Sensor
It is recommended that as soon as the measurement of a test has been completed, the test device should be
removed from the chamber of the 3M™ Clean-Trace™ NGi Luminometer. Should a 3M™ Clean-Trace™ ATP
test device be left in the chamber and the instrument be inverted or laid on its side, there could be leakage of the
contents of the test into the luminometer causing damage to the sensitive components of the instrument.
The 3M™ Clean-Trace™ NGi Luminometer has a sensor to determine if a 3M™ Clean-Trace™ ATP test device
has been left in the chamber for more than 30 seconds following the completion of a measurement. If this situation
is detected, the instrument will display a "Swab Left In Chamber" error message on the screen and provide an
audible beep to remind the user to remove the test following the measurement.
Similarly, if a measurement is attempted in Program Mode without a Clean-Trace ATP test in the chamber of
the instrument, the test sensor will notify the user that the chamber is empty with a "No Swab Detected" error
message and an audible beep. This message will not be displayed when tests are attempted in Measure Sample
mode.
2.08 Low Power Mode
If the 3M™ Clean-Trace™ NGi Luminometer is switched on but
left unattended for some time during operation, the instrument
will switch to Low Power Mode in order to conserve battery
power. During normal operation this will occur approximately 30
seconds after the backlight has switched off.
The Low Power Mode screen is displayed opposite. Low Power
Mode can also be entered by pressing and holding the top left
green function button when in ‘Main Menu’ display.
Pressing any green button (except red power button) on the
3M™ Clean-Trace™ NGi Luminometer will return the instrument to the screen displayed before the Low Power
Mode was activated.
If the backlight time is set to "On" (see section 6.09), Low Power Mode can only be entered using the "Back"
button in the ‘Main Menu’ screen.
2.09 PC Communications
In order to communicate between the 3M™ Clean-Trace™ NGi Luminometer and 3M™ Clean-Trace™ Online
Software ensure that the luminometer is connected to the PC via the USB cable or through the 3M™ CleanTrace™ Docking Station, which in turn is connected to the PC via the USB cable.
The screen shown on the right is displayed when the PC is
communicating with the 3M™ Clean-Trace™ NGi Luminometer
during the transfer of sample plans or results.
3.0 ACCESSORIES
3.01
3.02
3.03
3M™ Clean-Trace™ NG Luminometer Docking Station
3M™ Clean-Trace™ NG Luminometer Printer
3M™ Clean-Trace™ NG Luminometer Soft Carry Case
3.01 3M™ Clean-Trace™ NG Luminometer Docking Station
Available as an optional accessory, the 3M™ Clean-Trace™ NG Luminometer Docking Station is an instrument holder
which provides instant connection to the charger and PC communications. It offers the following useful facilities:
• Ability to pick instrument up and walk away without unplugging cables
• Convenient charging cradle
• Provides extra desktop stability.
• Docking station holds the 3M™ Clean-Trace™ NGi Luminometer at
an optimum working and viewing angle for desktop use.
• Ability to connect optional 3M™ Clean-Trace™ NG Luminometer
Printer
• User can either plug cables directly into instrument or docking station
To use, simply locate the 3M™ Clean-Trace™ NGi Luminometer into the aperture and apply light downward
pressure. The connectors to the printer, PC and charger can be left permanently in place if required.
* RS232 is not functional on NGi Luminometer.
3.02 3M™ Clean-Trace™ NG Luminometer Printer
It is possible to connect the 3M™ Clean-Trace™ NGi Luminometer to an external 3M™ Clean-Trace™ NG
Luminometer Printer via the 3M™ Clean-Trace™ Docking Station. Both the Docking Station and 3M™ CleanTrace™ NG Luminometer Printer are available as optional accessories. It is possible to print either individual tests
or a series of tests from one result set in a given sample plan. Before attempting to print, ensure that the printer is
connected directly to the 3M™ Clean-Trace™ NG Luminometer Docking Station with the 3M™ Clean-Trace™ NGi
Luminometer fitted in place inside the docking station. Before using the printer for the first time, insert the batteries
provided and charge them by using the charger provided. The batteries are fully charged when the charge light
stops flashing and remains constant. Ensure the printer is switched on. The printer uses thermal paper, use only
paper supplied by 3M.
Loading paper into the printer
Turn printer on by momentarily pressing the button on the
front of the printer. The status light on the front of the printer
will flash if the printer is out of paper.
Lift the cover of printer and hinge towards the rear.
Feed the paper under the black rubber roller from the bottom
of the paper roll as shown on the left.
As the paper is pushed under the roller, the roller will start to
turn, pulling the paper into the printer and stopping when the
paper feed is complete.
The status light on the front of the printer will stop flashing
and remain on permanently when the paper feed is
complete.
Place the paper roll into the holding area and close lid with
the end of the paper resting over the front of the lid.
The printer is now ready for use.
The paper may be fed between printouts by pressing and holding down the button on the front of the printer.
3.03 3M™ Clean-Trace™ NG Luminometer Soft Carry Case
The 3M™ Clean-Trace™ NGi Luminometer is a lightweight, fully portable instrument for use in production
areas, healthcare settings and laboratories and can be
supplied with an optional carry pouch for added mobility and
protection. The instrument may be removed from the carry
pouch when taking measurements but it is also possible
to perform a measure with instrument still in its pouch.
Samples may be inserted after folding back the flap at the
top of the carry pouch. To prevent the 3M™ Clean-Trace™
NGi Luminometer being dropped there is a lanyard attached
to the pouch which fixes onto the instrument.
The illustration on the left shows a convenient method of
use. Adjust the straps for the correct height and degree of
security.
WARNING: To reduce the risks associated with entanglement due to the carrying pouch strap, use care when
operating near machinery.
WARNING: To reduce the risks associated with strangulation due to the carrying pouch strap, keep the pouch
away from children.
4.0 MEASURE SAMPLE
4.01
4.02
What is MEASURE SAMPLE
How to Test using MEASURE SAMPLE
4.01 What is MEASURE SAMPLE
MEASURE SAMPLE allows as many readings as required but does not store the data for later use. If a 3M
Clean-Trace Luminometer printer is used, results may be printed as they are produced as long as the printer is
turned on and connected while the measurement is performed.
NOTE: To store the data, refer to Section 5 PROGRAM MODE.
4.02 How to Test Using MEASURE SAMPLE
Turn the 3M™ Clean-Trace™ NGi Luminometer on. When
initialized the screen will display the MAIN MENU:
The cursor will be pointing at MEASURE SAMPLE. Insert a 3M
test device into the 3M™ Clean-Trace™ NGi Luminometer (see
section 2.06)
Measuring Samples
To measure a sample, press the SELECT key. The screen will
display the word MEASURING and a series of "count-up" blocks
will appear.
The screen will then display the result in Relative Light Units
(RLU).
To measure another sample, remove the previous test, insert the
next one and press the Measure key.
When all measurements are completed press the Back key to
return to MAIN MENU.
If the light in the chamber exceeds the range of the instrument,
an Overload message will be displayed.
Press any key to continue.
Overloads occur if the rate of rise of the RLU units exceeds a pre-determined factory set rate. Accidental overload
results may occur, e.g. if the sample chamber is opened while a measurement takes place. In the case of an
overload a repeat measurement can be made once the cause has been found.
5.0 PROGRAM MODE
5.01
5.02
5.03
5.04
5.05
What is PROGRAM MODE and how do I use it
How to Use Program Mode
Retesting
Reviewing results
Printing results
5.01 What is Program Mode and how do I use it
The PROGRAM MODE of the 3M™ Clean-Trace™ NGi Luminometer is used to carry out testing and save results
against specific test points within a saved sample plan. Refer to the 3M™ Clean-Trace™ Online Software User
Guide to download the service driver to allow communication between 3M™ Clean-Trace™ Online Software and
the 3M™ Clean-Trace™ NGi Luminometer via the USB connection.:
1. Ensure the 3M™ Clean-Trace™ NGi Luminometer is connected to the PC via the USB cable or 3M™ CleanTrace™ NG Luminometer Docking Station.
2. Create a sample plan using the 3M™ Clean-Trace™ Online Software.
3. Transfer the sample plan from the 3M™ Clean-Trace™ Online Software to the 3M™ Clean-Trace™ NGi
Luminometer.
4. Transfer stored results from the 3M™ Clean-Trace™ NGi Luminometer to the 3M™ Clean-Trace™ Online
Software.
Once the sample plans have been transferred to the 3M™ Clean-Trace™ NGi Luminometer, it is ready to take
measurements.
5.02 How to Use Program Mode
From the MAIN MENU, use the navigation (▲ /▼) buttons to
highlight PROGRAM MODE and press Select
The PROGRAM MODE menu will display the current list of
sample plans as shown on the right. Use the navigation (▲/▼)
buttons to highlight the required sample plan and press Select
At this point it is possible to use the 3M™ Clean-Trace™ NGi Luminometer to perform a new series of tests for the
selected sample plan, or to perform retests on existing stored results which are shown in date order on the screen.
To make and store new measurements ensure NEW RESULTS is
highlighted and press Select
To make and store new measurements, use the navigation (▲ /▼)
buttons to highlight the test point required and press Measure.
The 3M™ Clean-Trace™ NGi Luminometer will then perform a
measurement cycle….
…and display the result. Press OK to accept and store the result.
If the result is a fail, the user must acknowledge this by pressing
OK before further measures can be taken.
NOTE: if a measurement is attempted without a 3M CleanTrace ATP Test in the chamber of the 3M™ Clean-Trace™ NGi
Luminometer, an error message stating "No Swab Detected" will
be displayed and an audible beep will sound to notify the user
that there is not a test in the chamber.
The result is now stored. The cursor will move to the next test
point automatically, or use the navigation (▲/▼) buttons to
highlight the next test point required.
Pressing the Back key will exit the testing.
5.03 Retesting
It is possible to retest a previously failed test point at any time
after remedial action has been taken. Select the correct test point
as shown above and measure.
Note that the measurement screen now displays ‘Retest’.
The new result is stored in the ‘Retest’ area of the screen. This
time the result is a pass.
It is possible to retest the point several times until a pass is
obtained. The screen will only show the first and most recent but
all previous retests are actually stored.
Note: It is possible to exit from a set of results and re-open it at a later time. For example, if not all measurements
were taken at that time or if there is a need to go back into set of results to perform retests, this may require
returning to an unfinished set of results to collect more data.
5.04 Reviewing results
It is possible to review and inspect previous results and to print to
an external 3M printer either individual tests or a series of tests
from one result set in a given sample plan. Before attempting to
print, ensure the printer is connected directly to the 3M™ CleanTrace™ NG Luminometer Docking Station with the 3M™ CleanTrace™ NGi Luminometer fitted in place inside the docking station.
Ensure the printer is switched on.
From the MAIN MENU use the navigation (▲ /▼) buttons to
highlight Review Results and press the Select button.
The list of sample plans stored on the 3M™ Clean-Trace™ NGi
Luminometer will be displayed. Use the navigation (▲ /▼) buttons
to highlight the plan to be reviewed or printed and press Select.
All results for the selected plan can be printed by using the
navigation buttons (◄ /►) to change the function button from
Select to Print.
Use the navigation (▲ /▼) buttons to highlight the required result
set to review or print and press Select.
The screen will now display all results for the result set. Use the
navigation (▲ /▼) buttons to scroll through the results.
The entire results set can be printed by using the navigation
button (◄ /►) to change the function button from Select to Print.
Press Select to view the test point in more detail or to print all
results (including each retest) for all test points.
Pressing the Print button will output the result information to the
printer.
5.05 Printing Results
When a user selects the Print option from any of the Review
Results screens (except the Test Point Details Screen), the Print
screen appears.
The Summary option will print the Test Point name, a graphical
representation of the result (i.e. 9=Pass, !=Caution, X=Fail) and
also a graphical representation of the latest Retest.
The Detail option will print all the details for each Test Point
including all retests.
Use the navigation buttons (▲ / ▼) to select the print option you
wish to use. Press Select to print the results.
6.0 SETUP MENU
6.01
6.02
6.03
6.04
6.05
6.06
6.07
6.08
6.09
What the SETUP MENU allows
How to find the SETUP MENU
Setting Date Format
Setting the Time Format
Setting the Date
Setting the Time
Setting the Language
Performing a Self Check
Setting the Backlight Timeout
6.01 What the SETUP MENU allows
The SETUP MENU allows:
• Format the date as shown below and format the time to 12/24 hour clock
• Set the current time and date
• Change the displayed language
• Check to see if the instrument performs within calibration limits
• Set the display backlight timeout period
6.02 How to find the SETUP MENU
From the MAIN MENU use the navigation (▲ /▼) buttons to select
SETUP MENU and Press the Select button
The SETUP menu can now be seen.
6.03 Setting Date Format
While in the SETUP Menu, use the navigation (▲ /▼) buttons to
select DATE & TIME and press the Select button. The DATE &
TIME menu can now be seen.
The choice of date formats are:
DD MM YY
e.g.
23-01-03
MM DD YY
e.g.
01-23-03
YY MM DD
e.g.
03-01-23
Date
e.g.
Thu 23rd
Date, M
e.g.
Thu 23rd Jan
Date, M, Y
e.g.
Thu 23rd Jan ‘03
Use the navigation (▲ /▼) buttons to select DATE FORMAT and
press the Change button repeatedly until the required format is
shown.
Press the Back button to return to the SETUP menu or use the
navigation (▲ /▼) buttons to select another item in the DATE &
TIME menu.
6.04 Setting the Time Format
While in the DATE & TIME menu, use the navigation (▲ /▼)
buttons to select TIME FORMAT. Pressing the Change button
repeatedly will cycle the time format between 12 / 24 hour clock.
When correct, press the Back button to return to the SETUP
menu or use the navigation (▲ /▼) buttons to select another item
in the DATE & TIME menu.
6.05 Setting the Date
While in the DATE & TIME menu, use the navigation (▲ /▼)
buttons to select SET DATE ‘Day’ is highlighted only after the
Select function button is pressed. Use the navigation (▲ /▼)
buttons to change the ‘Day’ until correct. Press the OK Button.
The ‘Month’ will now be highlighted on the display. Set the ‘Month’
using the navigation (▲ /▼) buttons then press OK.
The ‘Year’ will now be highlighted on the display. Set the ‘Year’ using the navigation (▲ /▼) buttons then press OK.
Now use the navigation (▲ /▼) buttons to select another item in the DATE & TIME menu or press Back to return
to the SETUP menu.
6.06 Setting the Time
While in the DATE & TIME menu, use the navigation (▲ /▼)
buttons to select SET TIME, press Select and ‘Hours’ is
highlighted on the display. Use the navigation (▲ /▼) buttons to
change the ‘Hour’ until correct. Press the OK Button.
The ‘Minutes’ will now be highlighted on the display. Set the
‘Minute’ using the navigation (▲ /▼) buttons then press OK.
The ‘Seconds’ will now be highlighted on the display. Set the
‘Second’ using the navigation (▲ /▼) buttons then press OK.
Use the navigation (▲ /▼) buttons to select another item in the
DATE & TIME menu or press Back to return to the SETUP menu.
6.07 Setting the Language
Contact your local distributor for a current list of languages available.
While in the SETUP Menu, use the navigation (▲ /▼) buttons to
select LANGUAGE and press the Select button.
The LANGUAGE menu can now be seen.
Use the navigation (▲ /▼) buttons to select the Language
required. Press either of the OK buttons to return to the SETUP
menu.
Note: The language changes automatically as navigation (▲ /▼)
buttons select a different language.
6.08 Performing a Self Check
Self Check performs both a background reading and a calibration check. Before selecting Self Check, ensure the
sample chamber is empty, the chamber cap is closed and the instrument has been at a stable temperature for at
least 15 minutes.
While in the SETUP Menu, use the navigation (▲ /▼) buttons to
select SELF CHECK.
Press Select to start the Self Check, The screen will display the
words "Performing Self Check" and a series of "count-up" blocks
If the instrument is performing within calibration limits and the
background reading is acceptable, PASS will be displayed.
If the instrument is not performing within calibration limits, one
of the three screens below will be displayed. If this is the case
the instrument should not be used as performance may be
compromised. Contact 3M or local 3M Distributor for service and
calibration.
Calibration check failed
Background failed
Calibration check failed.
6.09 Setting the Backlight Timeout
The display on the 3M™ Clean-Trace™ NGi Luminometer is fitted with a backlight to improve visibility in dark or
dim lighting conditions. The backlight may be set permanently off, permanently on; or may be set to remain on
for a preset time interval after which the backlight extinguishes. Pressing any button re-starts the backlight time
interval. This interval may be set from 5 seconds to 60 seconds in 5 second increments. It should be noted that
the instrument consumes more power when the backlight is illuminated.
Under normal ambient lighting conditions, there should be no need to use the backlight.
If the backlight is not required, set the Backlight Timeout
permanently to OFF to ensure maximum battery life. By default,
the Backlight Timeout is set to 15 seconds.
While in the SETUP Menu, use the navigation (▲ /▼) buttons to
select BACKLIGHT TIMEOUT.
Select desired timeout value using the navigation (▲ /▼) buttons.
Press the Back button to return to the MAIN menu or use the
navigation (▲ /▼) buttons to select another item in the SETUP
menu.
7.0 UPLOAD RESULTS
7.01
7.02
What is UPLOAD RESULTS used for
How to UPLOAD RESULTS
7.01 What is UPLOAD RESULTS used for
UPLOAD RESULTS allows for the transfer of results stored in
the 3M™ Clean-Trace™ NGi Luminometer to 3M™ Clean-Trace™
Online Software and the download of sample plans from 3M™
Clean-Trace™ Online Software to the Clean-Trace NGi luminometer.
In order to UPLOAD RESULTS, the 3M™ Clean-Trace™ NGi
Luminometer must be connected via the USB cable or 3M™ CleanTrace™ Docking Station to a PC, on which the 3M™ Clean-Trace™
Online Software driver has been installed.The 3M™ Clean-Trace™
Online Software driver allows communication between the 3M™
Clean-Trace™ NGi Luminometer and 3M™ Clean-Trace™ Online Software. Refer to the 3M™ Clean-Trace™
Online Software User Guide for more information.
Note: A USB symbol will only appear on the 3M™ Clean-Trace™ NGi Luminometer screen when it is connected to
the 3M™ Clean-Trace™ Online Software via the USB cable or Docking Station.
7.02 How to UPLOAD RESULTS
From the MAIN MENU, use the navigation (▲/▼) buttons to highlight UPLOAD RESULTS and press Select. As
mentioned above, the 3M™ Clean-Trace™ NGi Luminometer will need to be connected to 3M™ Clean-Trace™
Online Software via the USB cable or Docking Station.
This function can only be accessed by authorised users and
so it is necessary to login. Refer to the 3M™ Clean-Trace™ Online
Software User Guide for more information.
The USER ID screen will be displayed. The last USER ID to be
entered will be displayed on the screen, select Done if this is the
correct USER ID. If a new USER ID is required, clear the USER
ID displayed by selecting the ‘left arrow’ character and press until
display is clear. Then use the navigation (▲/▼/◄/►) buttons to
choose each character and press Select to enter that character.
Repeat until the full USER ID has been entered and press Done.
To complete the login process, the ENTER PASSWORD screen
is displayed. To enter the password, use the navigation
(▲/▼/◄/►) buttons to choose each character and press Select
to enter that character. Repeat until the full password has been
entered and press Done.
When the ENTER PASSWORD screen is displayed, the user also
has the option to Change Password. The user can select this
option before entering the current password. Select the Change
Password function using the navigation (▲/▼) buttons and press
Select.
The user is prompted to Enter Current Password. To enter the
password, use the navigation (▲/▼/◄/►) buttons to choose each
character and press Select to enter that character. Repeat until
the full password has been entered and press Done. The Enter
New Password screen is then displayed, followed by Confirm
New Password. Both screens are completed as described
above, selecting Done when finished.
Note: Passwords must contain at least 8 characters a
combination of at least 3 of the 4 following types of characters:
• Upper case letters
• Lower case letters
• Digits
• Special characters
Refer to the Troubleshooting Section of this Instruction Manual or
the 3M™ Clean-Trace™ Online Software User Guide, if there
are difficulties at the login and password stages.
After entering a current or new password and selecting Done, the
3M™ Clean-Trace™ NGi Luminometer will begin communicating
with
3M™ Clean-Trace™ Online Software. The screen opposite
will be displayed.
If the 3M™ Clean-Trace™ NGi Luminometer has not been
connected to the USB lead directly or via the 3M™ Clean-Trace™
Docking Station, a notification message will be displayed.
Once the USB lead is connected, the 3M™ Clean-Trace™ NGi
Luminometer will continue to communicate with 3M™ CleanTrace™ Online Software.
If Cancel is selected at any point during this connection phase,
the user will be returned to the MAIN MENU screen and it will be
necessary to enter the Password details again.
At the end of a successful synchronisation, a Synchronisation
completed message will be displayed. Stored results will be
uploaded to 3M™ Clean-Trace™ Online Software and
will automatically be removed from the 3M™ Clean-Trace™ NGi
Luminometer. Any adjustments to Sample Plans will be updated
on the 3M™ Clean-Trace™ NGi Luminometer. Select OK to return to
the MAIN MENU.
If you experience any problem during the synchronisation phase, please refer the Troubleshooting Section of this
instruction manual or the 3M™ Clean-Trace™ Online Software User Guide
8.0 USER GUIDELINES
WARNING: Do not service the 3M™ Clean-Trace™ NGi Luminometer, Docking Station or power supply.
Use only 3M authorized service personnel.
WARNING: Do not use the 3M™ Clean-Trace™ NGi Luminometer or power supply if the enclosure is
broken.
i
The 3M™ Clean-Trace™ NGi Luminometer is designed to be robust and easy to use but it is a sensitive
instrument which should be handled with care.
ii
The sample chamber should be kept closed or covered by the cap between readings.
iii Take care not to contaminate the inside of the chamber by spillage of liquid sample or inserting a swab without
returning it to the device.
iv Always remove to the sample before switching OFF.
v
vi
Always switch OFF after use.
WARNING: do not use a power supply other than the one specified by 3M.
vii Reagent test kits should be stored and used in accordance with the instructions provided with the kit.
viii Use only reagents supplied by 3M or local 3M distributor.
ix Results are independent of temperature over the range of 15-25°C. A lower reading will be seen at
temperatures below 15°C. However, if tests are always performed at this lower temperature, consistent results
can be obtained.
x
The sample chamber is designed to prevent access of ambient light during measurement but the instrument
has an extremely sensitive detector so some care must be exercised. It is prudent to avoid use of the
instrument in bright, direct sunlight.
xi Do not leave the 3M™ Clean-Trace™ NGi Luminometer in a location exposed to steam, high humidity, dust or
vibration.
xii Remove the batteries when the 3M™ Clean-Trace™ NGi Luminometer will not be used for an extended
period.
Read the Test Kit Instructions for complete information specific to the type of test.
9.0 CARE OF THE
3M™ Clean-Trace™ NGi Luminometer
9.01
9.02
Cleaning
Temperature
9.01 Cleaning
The external surfaces of the instrument should be wiped clean with a damp cloth and then wiped dry.
9.02 Temperature
Avoid storing the instrument at temperatures below 4°C or above 40°C. If subjected to low temperatures,
condensation may occur. The instrument should be allowed to warm to room temperature before use and a cloth
or tissue used to wipe dry the outer surfaces.
10.0 TROUBLE SHOOTING
10.01
10.02
10.03
10.04
10.05
10.06
10.07
General
Battery Error Screens
Communication Error screens
Self Check Error Screen
Login and Passwort Error Screens
Other Error Screens
Inadvertent changing of language setting
10.01 General
This section is to help overcome any problems that might be encountered when using the 3M™ Clean-Trace™
NGi Luminometer. For further detailed advice contact 3M or local 3M distributor.
Problem
Low Battery Message
Probable Cause
Battery pack requires charging.
High Backgrounds
a) Entry of external light.
(b) Sample still in chamber.
(c) Chamber has been left open for
long periods between readings.
(b) Remove sample.
(d) Chamber contaminated.
(d) Turn instrument off. Leave for 2
hours, then recheck. DO NOT
attempt to clean inside.
(e) Instrument malfunction.
No Display
(a) Battery fully discharged.
(b) Battery Contacts contaminated.
(c) Instrument malfunction.
High reagent control
(a) High Background
(b) Contamination of reagents or
consumables.
Results lower than Expected
Remedy
Turn instrument OFF. DO NOT proceed
to conduct measurements if a LOW
BATTERY warning is displayed. Charge
Battery or operate from AC power.
a) Measurement chamber not closed
securely. Check chamber is closed.
(a) Sample / reagent problem.
(b) Instrument malfunction.
(c) Recheck with chamber closed.
(e) Contact 3M or local 3M distributor.
(a) Recharge battery
(b) Remove battery and clean contacts
gently with dry tissue. DO NOT clean
with abrasive materials.
(c) Contact 3M or local 3M distributor.
(a) See High Backgrounds
(b) Repeat control to determine if
contamination of individual test.
If problem persists contact 3M or
local 3M distributor.
(a) Check correct sample and reagent
preparation as in test kit instructions.
Check with new reagents and known
positive sample such as a 3M
Positive Control Test.
(b) Contact 3M or local 3M distributor.
Note: Sunlight or static can cause swab tubes to phosphoresce and give high readings. Typically an immediate
repeat reading will be 50% of the first one if this is the cause. On further repeat readings the results will become
lower and lower approaching the normal. Avoid exposure of swab tubes to, or performing the test in bright sunlight.
10.02 Battery Low Screens
Press OK to return to Main Menu and turn instrument OFF. DO
NOT proceed to conduct measurements if a LOW BATTERY
warning is displayed. Charge Battery or operate from AC power.
10.03 Communication Error Screens
If there is a communication error between the 3M™ Clean-Trace™ NGi Luminometer and 3M™ Clean-Trace™
Online Software, follow the instructions as displayed on the instrument screen.
Ensure that correct communications are being used and that the
connectors are securely located in both the 3M™ Clean-Trace™
NGi Luminometer and the PC port. If condition persists, contact
3M or local 3M distributor.
10.04 Self Check Error Screen
This figure shows a 3M™ Clean-Trace™ NGi Luminometer that
has failed its Background or Calibration check. Do not use the
instrument to make measurements as performance may be
compromised.
Contact 3M or local 3M distributor for service or calibration.
10.05 Login and Password Error Screens
If one of the following Error Screens is observed, select OK to
return to the previous Login screen to take the action indicated.
When Change Password is selected, the new password created
much meet the password criteria set. The password must be at
least 8 characters and must contain a combination of characters,
including a minimum of 3 out of the following 4 character types:
Upper Case Letters / Lower Case Letters / Digits / Special
Characters. If the criteria are not met, or if the Confirm Password step is entered and does not match the New
Password entered, the following screens will be displayed.
10.06 Other Error Screens
There is no available memory within the instrument to store further results. Press ‘OK’, upload all stored results to
the PC and try again.
There is an internal fault with the chamber or connections to the chamber. Contact 3M or local 3M distributor.
Error Message
Unexpected error:
requesting results
Unexpected error:
authenticating
Unexpected error:
updating password
#Reason
Unexpected error:
uploading results
Not all sample plans
have been downloaded Error when deleting and
downloading sample plans
Not all sample plans have
been downloaded
User Action
Disconnect the 3M™ Clean-Trace™ NGi luminometer from the USB lead, or
remove from the docking station, then reconnect and upload the results again.
Confirm user ID and passwords are correct, disconnect the 3M™ Clean-Trace™
NGi luminometer from the USB lead, or remove from the docking station, then
reconnect and upload the results again.
Confirm user ID and passwords are correct, disconnect the 3M™ Clean-Trace™
NGi luminometer from the USB lead, or remove from the docking station, then
reconnect and upload the results again.
Disconnect the 3M™ Clean-Trace™ NGi luminometer from the USB lead, or
remove from the docking station, then reconnect and upload the results again.
Using the 3M™ Clean-Trace™ Online Software administration website, check
that sample plans have been assigned to the 3M™ Clean-Trace™ NGi
luminometer user.
Disconnect the 3M™ Clean-Trace™ NGi luminometer from the USB lead, or
remove from the docking station, then reconnect and upload the results again.
Disconnect the 3M™ Clean-Trace™ NGi luminometer from the USB lead, or
remove from the docking station, then reconnect and upload the results again.
#Please Retry Upload
Sequence
There are no Sample Plans Using the 3M™ Clean-Trace™ Online Software administration website, check
Available
that sample plans have been assigned to the 3M™ Clean-Trace™ NGi
luminometer user.
Disconnect the 3M™ Clean-Trace™ NGi luminometer from the USB lead, or
remove from the docking station, then reconnect and upload the results again.
Error received:
Disconnect the 3M™ Clean-Trace™ NGi luminometer from the USB lead, or
deleting results
remove from the docking station, then reconnect and upload the results again.
#results have not been
deleted
Error Message
No Network Connection:
Unexpected error:
authenticating
Reason:
Could not connect to
https://holly.3m.com/
cleantraceservice/
cleantracewebservice.svc.
TCP error code 10065...
Network connection issue:
Unexpected error:
Authenticating
Reason:
There was no endpoint
listening at https://holly.3m.
com/cleantraceservice/
cleantracewebservice.svc
User Action
Indicates a network connectivity issue between the 3M™ Clean-Trace™ Online
Software driver software and the internet. The normal cause of this error
is a proxy server installed on your network. Please contact your IT helpdesk for
further information.
Configuration of the 3M™ Clean-Trace™ Online Software driver can be made
to accommodate these client specific network requirements via the configuration
file CleanTraceDeviceManager.exe.config located in the installation directory,
which by default is c:\program files\3m\clean trace device manager.
If configuration changes are made the service 3MCleanTraceManager will need to
be restarted for the changes to take effect.
It is recommended to take a backup of the configuration file before any
changes are made.
Disconnect the 3M™ Clean-Trace™ NGi luminometer from the USB lead,
or remove from the docking station, then reconnect and upload the results
again. If this error persists, please try again later or contact your 3M technical
representative for more information.
10.07 Inadvertent Changing of Language Setting
In the event of the language setting being inadvertently changed, it may be difficult to return to the original
language. If this occurs, follow the following sequence of key presses to return to the original language:
1. Switch the 3M™ Clean-Trace™ NGi Luminometer off, then switch on and wait for main menu to appear.
2. Press the "up" navigation button once
3. Press Right function button once
4. Press the "down" navigation button once
5. Press Right function button once
6. Select desired language from list using navigation buttons and press Right function button once
11.0 Appendices
11.01
11.02
Technical Specifications
Terms and Conventions
11.01 Technical Specifications
User interface
• Simple structured menu system
• Buttons & menu driven LCD user interface
• 7 button user interface - UP, DOWN, LEFT, RIGHT, POWER and 2 software defined keys
• Tactile silicon rubber keypad
• Interface & software will allow user to enter text quickly.
Display
• Graphical LCD panel with 240x160 pixels
• Automatic contrast control - to compensate for temperature variations which affect the display contrast
• Backlight with timed ON/OFF options in the software
• Scroll up/down control for long list items
• Automatically scalable scroll bars to indicate size and position of list as in Microsoft® Windows applications.
• Date and time displayed when not in sleep mode and measuring
Ergonomics
• Left or right hand operation
• Screen readable in hand held position or desk top position
• Fully portable hand held, desk top, belt or shoulder carry pouch or docking station options available for maximum
user flexibility.
Sample Chamber
• Prevent measure while cap opened
Charging
• Removable sealed battery pack
• Rapid charge
• Power connector on instrument and optional docking station for charger lead.
• The instrument will automatically detect when the charger is plugged in.
• Display icon shows remaining battery life.
Intelligent Diagnostics
• Built in fault and status diagnostic
• Out of calibration
• Backgrounds too high
• Built in calibration check technology
Results Stored
• Stored files will contain the following information
• Unique results file name
• Instrument ID or serial number
• Sample plan name
• First opened date/time stamp
• Last edited date/time stamp
• Date/time stamp for every individual result
• Every result including retests appears in this file
• Pass/Caution/Fail status for each result
• Username
• Product batch number or user test reference if entered
• Other fields defined in 3M™ Clean-Trace™ Online Software
• Non volatile data memory
• Battery backed SRAM
• Greater than 5000 results storage capability
Security
• Every Instrument with unique software encoded ID number
• Password protected at instrument and user level
Accessories
• 3M™ Clean-Trace™ NG Luminometer Docking Station
– Non intelligent instrument holder with duplicated instrument
connectors
– User can either plug cables directly into instrument or
docking station
– Ability to pick instrument up and walk away without
unplugging cables
– Provides extra desktop stability.
– 3M™ Clean-Trace™ NG Luminometer Docking Station
holds the 3M™ Clean-Trace™ NGi Luminometer at optimum
working/viewing angle for desktop use.
• 3M™ Clean-Trace™ NG Luminometer Printer
• 3M™ Clean-Trace™ NG Luminometer Soft Carry Case
Dimensions: Approx 205mm x 85mm x 60mm (8.1 in x 3.3 in x 2.4 in)
Weight: 400 grams (14 oz)
Temperature
Storage Range 4°C - 40°C (39°F - 104°F)
Optimum Operating Range 15°C - 25°C (59°F - 77°F)
Built in temperature sensors
Battery: Li-Ion
11.02 Terms and Conventions
The following conventions are used to represent certain items and actions throughout this manual:
Bold capitals
Bold lower case
e.g. DATE FORMAT
e.g. Select
Single quote
e.g. ‘Month’
A menu item
A key press using one of the
function buttons
A specific item within a menu
Menu
A list of possible functions displayed on the screen where each function may be selected using
the cursor keys and function buttons.
RS232
A method of connecting to the PC. A specific cable connector is required.
Sample plan
A sample plan is a list of test points with pass and fail levels previously generated using 3MTM
Clean-TraceTM Online Software.
Self check
A means of checking that the instrument is operating within set performance limits.
USB
A method of connecting to the PC. A specific cable connector is required.