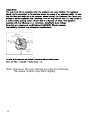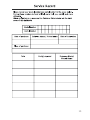
1
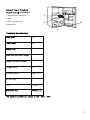
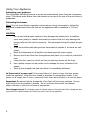
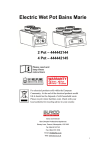
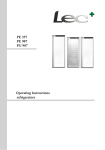
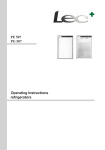
USER GUIDE
T50084W
W/S/B
Introduction
Thank you for buying this high quality appliance!
This handbook is designed to help you through each step of owning your new
appliance, from installation to use.
Please read through this entire guide carefully before you start using your
appliance, as we have endeavoured to answer as many questions as possible
and provide you with as much support as we can.
If, however, you should find something missing or not covered, please contact
the Lec Customer Care team who will be only too happy to assist you on:
0844 815 3737
Our policy is one of constant development and improvement, therefore we cannot
guarantee the strict accuracy of all of our illustrations and specifications changes
may have been made subsequent to publishing.
Contents
For your safety . . . . . . . . . . . . . . . . . . . . . . . . . . . . . . . . . 1-2
About your product . . . . . . . . . . . . . . . . . . . . . . . . . . . . . . .3
Installing your appliance. . . . . . . . . . . . . . . . . . . . . . . . . . . .4-5
Using your appliance. . . . . . . . . . . . . . . . . . . . . . . . . . . . .。6-8
Care & cleaning. . . . . . . . . . . . . . . . . . . . . . . . . . . . . . . . . . 9
Troubleshooting. . . . . . . . . . . . . . . . . . . . . . . . . . . . . . . . . . 10
Reversing the door. . . . . . . . . . . . . . . . . . . . . . . . . . . . . .. . .11-12
Changing the bulb . . . . . . . . . . . . . . . . . . . . . . . . . . . . . .. . .13
Changing the plug . . . . . . . . . . . . . . . . . . . . . . . . . . . . . .. . .13-14
Service record . . . . . . . . . . . . . . . . . . . . . . . . . . . . . . . . . . .15
Customer Care. . . . . . . . . . . . . . . . . . . . . . . . . . . . . . . . . . . Back cover
For Your Safety
Disposal of old appliances Before disposing of an old appliance, make sure that you have broken
off, or disabled any locking mechanisms to prevent children becoming accidentally locked inside.
Remove any plugs and power leads to ensure that the appliance is inoperative.
Please note: This symbol means that products bearing it may not be disposed of
with household waste. The refrigeration system contains insulating gases and refrigerant
which will require specialist disposal. Most components can be recycled. Always contact
your local council or authority for information regarding the correct disposal/removal of old
appliances, do not dispose of with household waste. Warning: When disposing of an old
appliance make sure that the pipe work does not become damaged.
Packaging
All of the packaging supplied with your appliance can be recycled, or disposed of without
any harm to the environment. Cardboard may be crushed, or cut into smaller pieces if
required for recycling or disposal. The polythene and polystyrene included contain no
CFC’s, and are environmentally friendly. For further information on recycling, contact your
local council or authority.
Before installing and using your new appliance
Read through the instructions supplied with your appliance - failure to install or use
this appliance in accordance with the instruction book may invalidate any warranty.
The manufacturer does not accept any liability for damage caused through improper
use, or incorrect installation.
Do not install this appliance if it has been damaged during transportation. This
includes the plug and power supply cord.
Always install this appliance in line with these instructions.
Always read these instructions fully before using the appliance for the first time.
1
2
T50084W/S/B
1
1 .Temperature control box
2.shelf
3.Fruit vegetable box
2
4
4.bottle rack
3
470
492
837
61
26
ST,N
30
3
Installing Your Appliance
Before you start
This appliance is intended to be used in households but is not intended to
beused in applications such as;
– Staff kitchen areas in shops, offices and other working environments;
– Farm houses and by clients in hotels, motels and other residential type
environments;
– Bed and breakfast type environments;
– Catering and similar non-retail application
This appliance must stand vertically on a flat, even surface, to level the appliance use
the leveling feet by turning them until the appliance is as level as possible. Do not
install onto carpeted surfaces as this prevent adequate ventilation.
Install the appliance in a well ventilated room. The appliance should not be placed
near to any heat heat sources (cookers, heaters etc.) or in any unheated rooms
(garages, outhouses etc.) as the ambient temperature affects the performance of the
appliance.
Do not expose the appliance to damp conditions, open air or rain.
Do not lift the appliance by the pipes or the door when moving.
Should the appliance become damaged, contact Lec Customer Care and do not use the
appliance until you are instructed to do so by a service engineer.
Installation clearances
Allow 100mm clearance at the rear of the appliance and adequate clearance on
each side and over the top to ensure proper ventilation (see figures). Use
whichever dimensions suit your installation requirements best.
4
Getting started
Once you have installed your appliance in an appropriate location, follow the start up
procedure below:
Before you plug in the appliance, clean thoroughly the inside, and any accessories
with warm water and bicarbonate of soda (0.5ml to 0.5 litres) and dry with a soft
cloth.
Leave the appliance to stand for 2 - 3 hours to allow the refrigerant to settle
following installation and cleaning. If the appliance has been transported
horizontally, it must be left to stand vertically for 12 hours before installation.
Once dry, plug the appliance into the socket.
Turn the thermostat to the required setting - a medium setting is usually suitable.
Leave the appliance for at least 4 hours before storing any food inside to allow a
sufficient temperature to be reached.
5
6
Using Your Appliance
Tips for using this appliance
Before storing cooked foods in the refrigerator, allow them to cool to room
temperature.
To maintain adequate air circulation, do not over fill the appliance. If there is too
much food inside, the compressor does not work as effectively.
Do not open the door any more than necessary - this will keep the temperature
as cold as possible inside.
When storing frozen food in the freezer, make sure that you follow the food
manufacturers guidelines.
Ices and water ices should not be consumed straight from the freezer - this can
cause ice burns to the tongue and hands.
Never touch the inside of the appliance, or any frozen items with wet hands. This
can cause injury to your hands if they stick to cold surfaces.
Wrap or cover foods well before storing. Always make sure that any packaging is
air tight and suitable for use inside a fridge or freezer.
Cooked meats and raw meats should be stored on separate shelves, and raw
meat should not be allowed to drip onto other foods. Food which is to be frozen
should not be in direct contact with already frozen food.
You may hear gurgling noises or a humming sound while the appliance is in use
and this is perfectly normal when the compressor is running and the coolant is
moving through the system.
A clicking sound may be heard, this is the thermostat and is normal.
This appliance is designed to operate in an ambient temperature between 16 and
38 ˚C.
Effervescent (fizzy) drinks should not be stored in the freezer or low temperature
compartments.
Do not exceed the storage times recommended by the food manufacturer and
always check expiry dates.
Smaller portions of fresh food freeze quicker than large portions. Divide large
portions into smaller ones. This helps to preserve the nutrients and quality of the
food.
Always allow warm food to cool down before freezing it, preferably to room
temperature.
Before you store large amounts of food in the freezer, adjust the thermostat to
the maximum (coldest) setting while the appliance freezes the food. After 24
hours, re-set the thermostat to the previous setting.
Only thaw the amount of food you need, once food has been thawed cook it
immediately.
7
Using Your Appliance
Defrosting your appliance
The refrigerator defrosting process is carried out automatically every time the compressor
stops. The defrost water drains from the cabinet into a tray at the rear of the unit where it
evaporates.
Defrosting the freezer
When? For the most efficient operation and minimum energy consumption, defrost the
appliance compartment when the frost on the appliance walls is excessive or 1/4 inch
thick.
CAUTION
Do not use boiling water because it may damage the plastic parts. In addition,
never use a sharp or metallic instrument to remove frost as it may damage the
cooling coils and will void the warranty. We recommend using the plastic scraper.
How?
A few hours before defrosting set the thermostat to position 6, so foods are well
frozen.
Reset the thermostat to off position and disconnect the power supply.
Remove the frozen food from the appliance and place it in a cooler to protect the
food.
Leave the door open for a while so that you can easy scrape off the frost.
Use a plastic scraper but be careful not to damage the inner surfaces of the
freezer.
Wipe up the scraped frost and ice before it is completely defrosted.
In the event of a power cut If the power failure is 3 hours or less, food can remain
inside the appliance. Keep the door closed to maintain the temperature inside. If the
power cut is longer than 3 hours, remove all food, wrap well and store in a cool dry place.
Important: Be aware that the storage life of the food will have been reduced. Use up
this food as soon as possible or discard. Do not re-freeze food which has thawed,
either consume or cook and re-freeze if appropriate.
The drainage channel The drainage channel collects water on the back wall of the refrigerator and
ensures that it is drained away into a drip tray at the rear of the appliance
8
Care & Cleaning
Before cleaning your appliance
You should always unplug this appliance before cleaning.
To clean your appliance
Remove the accessories inside and clean the using warm water and a neutral
detergent. Do not place them in a dishwasher.
Clean the inside of the cabinet with warm water and a neutral detergent, do not
use harsh abrasives or caustic cleaners.
Dry the inside of the cabinet with a soft, dry cloth. Always make sure the inside of
the appliance is dry after cleaning.
Avoid getting water into the electric components of the appliance (i.e. the
thermostat), or spilling water on the fridge.
When cleaning the door seals, use only warm soapy water. Please use a mild
soap and avoid damaging the door seal as this will affect the performance of your
appliance.
Clean the outside of the appliance with warm, soapy water and dry with a soft
cloth. Any accumulation of dirt and dust should be removed from the back and
bottom of the appliance to maintain adequate ventilation.
If the appliance is not in use for a long period of time, you should clean the
appliance as detailed. Make sure that it is dry, then unplug and leave the door
open to prevent unpleasant smells inside.
Clean the drainage channel regularly to prevent any build up of impurities. Use a
damp clean cloth and wipe the cannel clean, then use a pipe cleaner or similar
flexible object to clean the drainage hole to prevent blockages.
Please note: Regular turning off may shorten the life of this appliance.
9
Troubleshooting
Before calling Lec Customer Care, please check the table
below to see if the problem can be solved without calling
for a Service engineer.
Problem
Solution
The fridge / freezer doesn’t
work
Check that the appliance is switched on
Check that the plug is not damaged Check that the fuse has not
blown
Check that the voltage is correct for the appliance Turn the
thermostat up higher
Check there has not been a power cut by checking the household
lights.
Unusual noises
The temperature inside the
fridge / freezer is not cold
enough.
The temperature inside the
appliance is too cold
Check that the appliance is on a flat, level surface and is stable.
Check that nothing is coming into contact with the appliance.
Check that there is not too much stored in the appliance.
Check the frequency of door openings. If opened too often this can
cause the compressor to run for some time.
Check that the thermostat is set to a suitable temperature.
Check that the appliance is not in direct sunlight, or near a heating
source.
Check that the ventilation space has not become blocked.
Check the ambient temperature is within the operation limits of the
appliance (16˚C - 38˚C)
Change the temperature setting to a more suitable setting.
The outer surfaces of the fridge
/ freezer are wet
Caused by condensation - dry the outer of the appliance carefully.
The inner surfaces of the fridge
/ freezer are wet
The door is opened frequently, or kept open too long. Caused by
condensation - dry the inside of the appliance thoroughly.
Excess frost and ice has built up
inside the appliance.
Check that the door has not been left open.
gasket is clean and undamaged.
Check that the door
Please note: Any damage caused by not following the instructions within this handbook
may lead to a charge for a service engineer visit and any repairs carried out.
10
Reversing the doors
Warning: The appliance must always be disconnected
from the power supply when changing the direction the
doors open.
CAUTION: To avoid personal injury to yourself and/or
property, we recommend someone assist you during the
door reversal process.
1.
To access the lower hinge assembly, tilt back the
refrigerator cabinet or lay the refrigerator on its back.
2.
Remove both legs located at the front of the cabinet;
adjustable leg on hinge side, fixed leg on opposite side (Fig.A)
3.
Remove the screws holding the lower hinge assembly to
the cabinet. (Fig.A)
4.
Remove the main door assembly from the refrigerator
cabinet (open door and pull down).
5.
Remove the screws from the middle hinge assembly.
Then remove the hinge and freezer door.
And turn the middle beam over 180°.
6. Remove the top hinge pin. (Fig.C)
7.
Re-install the top hinge pin on the opposite side of
the cabinet.(Fig.C)
8.
Remove the door plugs and door bushings located on
the top and bottom of each door assembly.
9.
Interchange positions of plugs and bushings on both
doors. (ie.door plug right side, door bushing left side.)
10. Re-install freezer door assembly on cabinet.
11. Re-install the middle hinge assembly on the
opposite side. (Fig.B)
12. Make sure the door assembly is properly aligned on the
cabinet, before tightening hinge screws.
13. Re-install the main door assembly on cabinet.
14. Re-install the lower hinge assembly on the opposite side.
Making sure to change bushing and screw on opposite sides
on bottom of unit.
11
15. Make sure the door assembly is properly aligned on the
cabinet, before tightening lower hinge screws.
16. Re-install both legs (interchanged from the original
positions; adjustable leg on hinge side, fixed leg on opposite
side).
The process is now complete.
12
Changing the light bulb
Note. Light bulbs are not covered by the warranty.
Disconnect the appliance from the mains supply.
Remove the light bulb cover.
Unscrew the bulb.
Replace with a E14 screw-cap type 15 Watt (Max) bulb that is the same shape and
size.
Replace the light bulb cover.
Changing the Plug
Any electrical work required to install this appliance should be carried out by a qualified
electrician or competent person. This appliance must be earthed. The manufacturer
declines any liability should these safety measures not be observed.
Electrical Requirements
Before switching on, make sure the electricity supply voltage is the same as that indicated
on the appliance rating plate. The appliance is supplied with a 13 amp plug fitted. In the
event of having to change the fuse in the plug supplied, a 13 amp ASTA approved (BS
1362) fuse must be used. Should the plug need to be replaced for any reason. The wires in
the mains lead are coloured in accordance with the following code:
Green and Yellow: Earth Blue: Neutral Brown: Live
The wire coloured green and yellow must be connected to the terminal marked with the
letter “E“ or by the earth symbol or coloured green and yellow. The wire coloured blue
must be connected to the terminal “N“. The wire coloured brown must be connected to
the terminal marked “L“.
Upon completion there must be no cut, or stray strands of wire present and the cord clamp
must be secure over the outer sheath.
13
Note: Figures in the user manual are only for reference.
The actual product may differ slightly.
14
15
Lec Refrigeration
Stoney Lane, Prescot, Merseyside, L35 2XW
Customer Care Centre: 0844 815 3737
www.lec.co.uk
Lec Refrigeration, a division of Glen Dimplex Home Appliances
Model name: T50084W/S/B