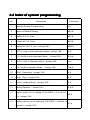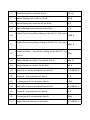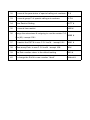
1
-1-
Chap 1 Brief Introduction & Features
1.1 System Overview ………………………………………………… 1
1.2 Features ……………………………………………………………1
Chap 2 Installation & Connection
2.1 System Appearance ………………………………………………3
2.2 Technical Parameter ………………………………………………4
2.3 Attention ……………………………………………………………4
2.4 Warning …………………………………………………………… 5
2.5 Installation procedure………………………………………………5
2.6 Direct Access when Power Failure……………………………… 6
Chap 3 System programming
3.1 Before programming……………………………………………… 7
3.2 Basic Command ……………………………………………………8
3.3 Enable/Disable C.O. Lines…………………………………………9
3.4 Setting Operating mode (except 108) ……………………………11
3.5 OGM (Outgoing Message) (except 108) ………………………… 12
3.6 Monitoring the Holding Music (except 108) …………………13
3.7 Setting Operator and Ring Ext. ……………………………… 13
3.8 Auto-attendant Mode no Answer Process (except 108)…… 14
3.9 Dialing-out Mode Setting………………………………………… 15
3.10 Call Restriction-Class Assignment ………………………… 16
3.11 Setting Restriction Item (A/B) ………………………………… 17
3.12 Assign Special Calling-out Number……………………………19
3.13 Calling Time Restriction Setting / Clear…………………… … 19
3.14 Allow Ext. to Use Certain C.O. Line / Restrict (except 108) … 20
3.15 Flexible coding………………………………………………… 21
Chap 4 Operating Instruction
4.1 Outward Call……………………………………………………23
4.2 Intercom Call……………………………………………………24
4.2 Intercom Call……………………………………………………24
4.3 Answering call ………………………………………………… 25
4.4 C.O. Line Reservation (except 108) ……………………… 26
4.5 Call Transfer…………………………………………………… 26
4.6 Secretary Function (Outgoing Call Transfer Function) …… 27
4.7 Three Way Conference (1 C.O. Line and 2 Exts) ………… 27
-2-
4.8 Call Forwarding (except 108)…………………………………28
4.9 Inquiry Functions (except 108) ………………………………29
4.10 Call All Extension (except 108) ……………………………… 30
4.11 Priority Access and Monitoring………………………..…… 30
4.12 Connect with Operator Directly (except 108) ………….. 30
4.13 Setting Don’t Disturb / Clear (except 108) …………….…31
… 32
Chap 5 Maintenance & Troubleshooting ……………………
………………………
……………………………………
……………… 34
Chap 6 Glossaries
Glossaries……………………………………
……………………………………………………
……………………………………
……… 35
Chap 7 Default Settings
Settings……………………………………
……………………………………………
…………
36
Chap 8 System Programming & Operation Instruction
Instruction…………
…………36
-3-
Chap 1 Brief Introduction & Features
1.1 System Overview
With its design and manufacture according to G.712 and G.732 protocols
of CCITT, the system integrates virtues of various KTSs with advanced functions
of PABX, and has unique advantage in innovation. As a type of new generation
with over 50 powerful functions for business and management, it has wide
application in offices, enterprises, hotels……etc. In a word, it is a ideal
equipment for users to better communication conditions, improve work efficiency,
control call fee payment, and make office intelligent come true.
1.2 Features
1.
Top-quality elements of system hardware, ISO 9000 standard,
excellent circuit design.
So a complete system is of advanced
technology and high integrated level.
2.
Programming can be made by regular phone
3.
Other normal functions:
● Direct Access when Power Failure
● Memory Protect while Power Off
● Call Transfer
● Flash Time Choice
● Auto/Operator Mode(except 108)
● Outgoing Message Recording(except 108)
● Call Forwarding(except 108)
● Auto Report Ext. Num (except 108)
● Call All Extensions(except 108)
● Priority Access and Monitoring
● Do not Disturb
(except 108)
-4-
● C.O. Line Booking (except 108)
● C.O. Line Caller ID
● Remote Programming
● Ringing Identify
● Call Pick up
● Music on holding
● Outgoing Call Transfer
● Three Way Conference
● C.O. Line Reservation(except 108)
● Operator Setting(except 108)
● Ringing Ext. Assign
● Multiple Dial-out Mode
● Call Restriction Class
● Assign Special Call out Number
● Call Duration Control
● C.O. Line Group(Assign Ext. to C.O.)
● Flexible Coding(Change Ext. No.)
-5-
Chap 2 Installation & Connection
Before Installation
For easy and quick installation and connection, it is strongly recommended
that the user read and follow the following instruction carefully so as not to
damage the system accidentally by incorrect operation.
-6-
2.1 System Apperaance
2.2 Technical Parameter
Power Supply Voltage ----------------AC 220V or AC 110V, 50-60Hz
Power Dissipation ----------------------≤20VA
Exchange Mechanism-----------------Analog spatial division
Type of Telephone-----------------------Dual Tone Multi-Frequency
-7-
Communications Lines------------------108---2(1 for Ext., 1 for CO line); 206---3;
308---7
IC Power Supply ------------------------±5V
Distortion ---------------------------------≤10%
Ringing Voltage -------------------------AC 70V±10% 50HZ
Crosstalk Attenuation -----------------≧70 dB
Transmission Loss---------------------- 0.37 dB
2.3 Attention
Please pay attention to the important items of installation:
1.
The telephone exchange shall be installed in a stable indoor place with dry,
ventilated environ ment. (Temperature Range: 0-45℃, Humidity Range:
20%-80%.Avoid straight sun shine or in the environment of flammable or
caustic gas.) Special telephone wire is preferable.
2.
A marginal space around the exchange should be remained for heat sink,
inspection and maint enance of the system.
3.
A wall bore is available at the underside of mainframe for wall installation.
Desk installation is also admitted. But the contact of wall bolt and circuit
board inside the mainframe should be avoided.
4.
Please keep the exchange away from other equipment producing large
electromagnetic disturbance (such as motor and large transformer).
5.
None of the wiring of any extension should share the pipeline with power
supply or antenna. Neither should the extension be close to antenna for air
broadcasting (including short-wave).
6.
Avoid damaging the power-supply cable. Keep it away from water.
Encountering the leakage of water cut off the power immediately.
7.
Please don't impact or shake the exchange at any situation. Don't remove
the exchange in work ing status.
8.
If the wiring pipeline of the extension is disturbed by electromagnetic wave
while substitution is unavailable in site, special insulating wire for
communication is suggested for substitution, also, the insulating net of
which should be grounded.
-8-
2.4 Warning
1.
The wiring should not be done in thundering.
2.
Avoid using telephone in thundering.
3.
Please don't use the telephone in flammable and leaking gas environment.
4.
Unless the equipment is disconnected, please don't touch the broken part
of the wiring or any connection ends.
Note: Lightning stroke is an accident, which will not be regarded as normal
maintenance.
5 Installation procedure
2.
2.5
2.5.1 Connecting C.O. lines & extensions to the unit:
1.
Please connect the monomer-crystal with EXT. line and C.O. line
separately;
2.
Make sure to avoid short circuit.
3.
Connecting extensions according to the in-dilated extension positions
and C.O. lines to the corresponding line ports on the unit.
2.5.2 Zero-load power-on inspection:
1.
The operation voltage of this product is AC220V or AC110V. Check
out the voltage of local power supply. A UPS backup is highly
recommended.
2.
Plug in the power supply line, indicating normal power supply and
working state of the machine.
3.
Pick up the handset of extension 601. A sharper internal dial tone
indicates that the system is working normally. You can start to setup
operation now.
2.6 Direct Access when Power Failure
The C.O. lines will be connected direct to the special Exts
automatically when the power failure. The No.1 C.O. line will be connected
-9-
to Ext. 601 and No.2 to Ext.602, No.3 to Ext.603, So you only can use the
(206: Only No.1 C.O.
line can be connected to Ext.601 directly, i.e. No.2 C.O. line cannot be
connected directly when there is power failure.)
Three Exts as normal phone with direct C.O. line
For example when someone call in with No.1 C.O. line at the time of
power failure, the Ext.601 will ring, you can only pick up Ext. 601 and talk
with the caller.
- 10 -
Chap 3 System programming
3.1 Before programming
●All the programming must be carried out on the extension 601, 602, 603, 604; all
the programming must be into system programming status.
●All the extensions must be of dual tone multi-frequency phone.
●You are allowed to operate one by one, and end the process by simply pressing
#. You don’t have to hang up if something wrong occurs, you could press * to
restart.
● If programming-extension (601,602,603,604) is in Direct-Dialing-Out mode, you
need to press * to enter the internal system, then start programming.
● When the setting is finished, a long beep indicates that the setting is done
correctly and saved in the system. If instead an array of short chirps is heard,
that would indicate an error occurred in the setting. You need to check it out and
reset the system. It is only after the end of the long beeps you can continue
another system operation.
●You must use “enable C.O. lines” command according to the actual trunk lines
before using this product, if you don’t enable any C.O. line, the system will
consider there is no C.O. line and doesn’t auto detect C.O. line (In default
setting: 108 is in Enable status;206/308 are in Disable status)
How to programming
At first you must according 3.2.1 instruction enter into system
programming status, and then you can begin to program as the
following instruction.
- 11 -
3.2 Basic Command
3.2.1 Enter into System Programming Status
Format:
#*
Example: For programming the system, you should enter # * first
1. You are required to dial: *#* in the Direct-Dialing-Out mode.
2. In default setting, 108 is Direct-Dialing-Out mode and 206/308 is
Indirect-Dialing-Out mode .
3. Programming telephone is EXT.601, or EXT.602, or EXT.603, or EXT. 604
3.2.2 Flash Time Setting
Format:
00F #
F=1 ---------0.8s
F=2 ---------1.0s
F=3 ---------1.2s
F=4 ---------1.5s
F=5 ---------1.8s
Explanation: F means the flash time.
Description: For active the hold and divert operating use.
In default setting: F=2 (1.0s)
Example: Set the flash time to 1.2S
- 12 -
3.2.3System Return to Default Setting
Format: 0000 #
Description: The system will restart with the default factory setting.
The command has no effect on the status of enabling/disabling C.O. line.
3.3 Enable/Disable C.O. Lines
You must use these commands according to the actual trunk lines
before using this product!!! If you don
don’’t enable any C.O. line, the system
!!!
will consider there is no C.O. line and doesn
doesn’’t auto detect C.O. line
line!!!
3.3.1 Enable All C.O. Lines
Format: 0600#
Description: Enable all C.O. lines
In default setting: 108 is in Enable status; 206/308 are in Disable status
3.3.2 Disable All C.O. Lines
Format: 0610#
Description: Disable all C.O. lines
- 13 -
except 108
3.3.3 Enable No. M C.O. Line (except
108)
Format: 060M#
Explanation:
M: C.O. line No. M = 1 - 3
Description: Enable the M C.O. line
Example:
You have 308 model product, you want use C.O. line 1 and
C.O. line 2, and the line 3 is not in use.
3.3.4 Disable No.M C.O. Line (except 108)
Format: 061M#
Explanation:
M: C.O. line No. M = 1 - 3
Description: Disable the M C.O. line
4 Setting Operating mode (except 108)
3.
3.4
4.1 Setting Auto-attendant Mode (OGM) for All
3.
3.4
s
C.O. Line
ines
Format:
10#
Description: allows all the C.O. lines in Auto-attendant Mode (DISA --Direct
Inward System Access status). In this mode, Caller will hear the
OGM recorded message, while all extensions are in MUTE mode
1. If the caller doesn’t know the extension number, he cans inquiry the
operator by dialing “0”.
- 14 -
2. Outgoing Message must be record when setting this mode.
4.2 Setting Operator Mode for All C.O. Line
s
3.
3.4
ines
Format:
11#
Description: Allows all the C.O. lines in Operator mode. In this mode, the
operator extensions and other ringing extensions will ring when
an incoming call is received.
3.4.3 Setting Auto-attendant Mode (OGM) for Certain C.O. line
Format:
10M #
Explanation: M: C.O. line No.1-No.3
Description: allows the No.M C.O. lines in Auto-attendant Mode (DISA
--Direct Inward System Access status).
Example: Set C.O. line 2 and 3 in Auto-Attendant mode, other C.O. line in
operator mode.
1. If the caller doesn’t know the extension number, he can inquiry the
operator by dialing “0”.
2. Outgoing Message must be record when setting this mode.
4.4 Setting Operator Mode for Certain C.O. line
3.
3.4
Format:
11M#
Explanation: M: C.O. line No.1-No.3
Description: allows the No.M C.O. line in Operator mode.
Example: Set C.O. line 1 and 3 in operator mode, other C.O. line in
Auto-attendant mode.
- 15 -
5 OGM (Outgoing Message) (except 108)
3.
3.5
5.1 OGM (Outgoing Message) Recording
3.
3.5
Format: 12 #
Description: Used to record an outgoing message for Direct Inward
System Access (DISA).
1. The recording time is a maximum of 12 seconds, “du” is heard to start
recording and another “du” to end recording;
2. The new message will overwrite the old one;
3. Please use high quality telephone to ensure high quality of recording;
4. If the caller dials a number before the system finishes playing the
message, the system will terminate playing the message, waiting for
the caller to complete dialing;
5. The caller will be connected to operator if he dials 0 first for inquiry;
5.2 Monitoring the recorded OGM
3.
3.5
Format: 13 #
Description: Confirms the recorded message in the OGM recording
program, you can check if the recording is satisfied or not, if
not, you can record again.
- 16 -
6 Monitoring the Holding Music (except 108)
3.
3.6
Format: 14 #
Description: Perform the music on holding melody or test the quality of
telephone unit.
7 Setting Operator and Ring Ext.
3.
3.7
3.
7.1 Setting Operator (except
except 108
3.7
108)
Format:
15N #
Explanation: N: the Ext. line No., N=1-8
Description: To assign any Ext as the operator. In the default setting,
Ext.602 is the operator.
Example: Setting Ext.602 as operator
In operator mode, this programming doesn’t change the ringing extension
assignment
- 17 -
7.2 Assign Ringing Extensions for Certain C.O.
3.
3.7
Line
Format:
3MN0#
Explanation: M: the C.O. line No. M=1 – 3; N: the Ext. line No. N= 1 - 8
Description: In operator mode when calling of No.M C.O. line come in,
Exts N will ring at the same time.
Default setting: 108---All Exts will ring; 206/308--- Ext. 601 and Ext.602 will ring.
3.7.3 Disable Ringing Ext. for Certain C.O. Line
Format:
3MN1#
Description: Disable Exts N ring when calling of No.M C.O. line come in.
3.7.4 Disable All Exts Ringing for Certain C.O.
Line
Format: 3M#
Description: Disable all Exts ring when calling of No.M C.O. line come in.
Example: Setting 606 and 607 ringing when the C.O. line 2 comes in.
1. This function must be in Operator Mode.
2. This programming only for C.O. line Incoming call. The extension
which is not set ringing will ring under Intercom Calling, Call Transfer.
3. This function is one way to set some extensions for not disturbed.
4. In Disable All status, the system will set all Exts. ringing automatically
when the C.O. line comes in.
- 18 -
8 Auto-attendant Mode no Answer Process
3.
3.8
(except 108)
3.8.1 Cut off C.O. Line
Format: 160 #
Description: In auto-attendant mode, if the C.O. line doesn't dial the
extension number over 5 seconds or more after hearing the
OGM, then the C.O. line will be cut off.
Default setting: The C.O. line will be cut off if no dialing.
3.8.2 Transfer to Operator
Format: 161 #
Description: In auto-attendant mode, if the C.O. line doesn't dial the
extension number over 5 seconds or more after hearing the
OGM, then the C.O. line will be transferred to Operator.
9 Dialing-out Mode Setting
3.
3.9
9.1 Set Indirect-Dialing-Out Mode for All Exts
3.
3.9
Format: 21#:
Description: Indirect-Dialing-Out mode for all the Exts(dialing 9 for outgoing).
9.2 Set Indirect-Dialing-Out Mode for Certain
3.
3.9
Ext.
Format: 2N1#
Explanation: N: the Ext. line No., N = 1 - 8
- 19 -
Description: Indirect-Dialing-Out mode for Ext. N (dialing 9 for outgoing).
Example: Set Indirect-Dialing-Out mode for Ext.608
In default setting, 108 is Direct-Dialing-Out mode and 206/308 is
Indirect-Dialing-Out mode
3.
9.3 Set Direct-Dialing-Out Mode for All Exts
3.9
Format: 20#
Description: set Direct-Dialing-Out mode for all the Exts.
9.4 Set Direct-Dialing-Out Mode for Certain Ext.
3.
3.9
Format: 2N0#
Explanation: N: the Ext. line No., N = 1 - 8
Description: set Direct-Dialing-Out mode for Ext.N.
Example: Set Direct-Dialing-Out mode for Ext.607
1. In Direct-Dialing-Out mode, extension make intercom call should dial
*first, then dial the extension number.
2. No need dial 9 before outgoing call.
0 Call Restriction-Class Assignment
3.1
3.10
0.1 Class Assignment for All Extensions
3.1
3.10
Format:
40 L#
Explanation: L: class number, L= 0 - 6
- 20 -
Description: Assign dialing-out class L for all Exts.
L=1:
no any restriction
L=2:
call out with restriction of International long-distance dialing
L=3:
call out with restriction of domestic long-distance dialing
L=4:
call out with restriction initial of item A.
L=5:
call out with restriction initial of item B.
L=6:
only for intercom call
L=0:
only for some special calling number
Example: Assign the calling class to be 3 for all extensions.
1. In default setting, the class for all extensions is 2
2. This command enables a user to set class restriction on extensions in a
fast and convenient way, especially when most extensions have the
same class.
For example, if you want set extension 603 to class 3 and extension
608 to class 4,and the rest extensions to class 5, then you can set the
restriction rank to be 5 for all extensions and change the restriction
class to 3 for extension 603 and 4 for 608
3.1
0.2 Class Assignment for Certain Extension
3.10
Format:
40 N L#
Explanation: N: the Ext. line No., N = 1 - 8
L : class number, L= 0 - 6
Description: Assign dialing-out class L for certain Ext. N
Example: Assign class 3 for Ext.606
- 21 -
1 Setting Restriction Item (A/B)
3.1
3.11
1.1 Setting Restriction Item A
3.1
3.11
Format: 4 1 Q ABCD#
Explanation: ABCD: the initial digits of the calling number to be locked, it
can be from 1-digit to 4-digits, it should be ended with # if less
than 4-digits.
Q --- The group series from 01 to 16.
Description: to restrict the call-out number starting with ABCD
Example: Ext.608 is be assigned dialing-out class 4, now you want
Ext.608 can’t dial the numbers with initial digits – 573,168
1. Item A can lock 16 groups of initial digits.
2. Restrict Item A only work for dialing-out class 4.
1.2 Clear Restriction Group of Item A
3.1
3.11
Format: 41 Q #
Explanation: Q: The group series from 01 to 16.
Description: to clear the call-out restriction of certain numbers of group Q.
Example: you want to clear the call-out restriction of certain numbers with
initial digits—573 of group 01,
- 22 -
1.3 Clear All Restriction of Item A
3.1
3.11
Format: 4 1 #
Description: to clear all the call-out restriction of certain numbers of item A
3.11.4 Setting Restriction Item B
Format: 4 2 Q ABCD#
Explanation: ABCD: the initial digits of the calling number to be locked, it
can be from 1-digit to 4-digits, it should be ended with # if
less than 4-digits.
Q --- The group series from 01 to 16.
Description: to restrict the call-out number starting with ABCD
Example: Ext.606 is be assigned dialing-out class 5, now you want Ext.606
can’t dial the numbers with initial digits – 575,161
1. Item B can lock 16 groups of initial digits.
2. Restrict Item B only works for dialing-out class 5.
1.5 Clear Restriction Group of Item B
3.1
3.11
Format: 42 Q #
Explanation: Q: The group series from 01 to 16.
Description: to clear the call-out restriction of certain numbers of group Q.
1.6 Clear All Restriction of Item B
3.1
3.11
Format: 4 2 #
Description: to clear all the call-out restriction of certain numbers of item B
- 23 -
2 Assign Special Callingout Number
3.1
3.12
Calling-o
2.1 Assign Special Calling-out Number for
3.1
3.12
Class 0
Format: 4 3 P ABCD#
Explanation: ABCD: the initial digits of the calling number to be locked, it
can be from 1-digit to 4-digits, it should be ended with # if less
than 4-digits.
P --- The group series from 01 to 16.
Description: Permit to dial the phone numbers starting with <ABCD> only.
Example: Ext.605 is be assigned dialing-out class 0, now you want
Ext.605 can dial the numbers with initial digits – 0592,179
1. 16 groups of initial digits can be set.
2. This function only work for dialing-out class 0.
2.2 Clear Permission of Certain Group
3.1
3.12
Format: 43P #
Explanation: P: The group series from 01 to 16.
Description: to cancel the permission of certain calling-out numbers of group P
3.1
2.3 Clear All Permission
3.12
Format: 4 3 #
Description: to cancel all the permission of special calling-out numbers.
3.13 Calling Time Restriction Setting / Clear
3.13.1 Calling Time Restriction Setting
Format: 6NTT#
- 24 -
Explanation: N: the EXT No. (N = 1 – 8)
TT: the time restriction duration (2 digits), should be in 01-99
minutes.
Description: set the Ext N outgoing call duration to within TT minutes. This
function can only limit the time of exterior call.
Example: Set Ext.604 outgoing call duration to 8 minutes
3.2 Clear Calling Time Restriction
3.1
3.13
Format: 6N00#
Explanation: N : the EXT No. (N = 1 - 8)
Description: Clear the Ext N outgoing call duration restriction.
Example: Clear the Ext.604 outgoing call duration restriction.
3.14 Allow Ext. to Use Certain C.O. Line / Restrict
(except 108)
4.1 Allow
All Exts to Use Certain C.O. Line
3.1
3.14
AllowAll
Format: 7M#
Explanation: M: C.O. line No, M = 1 - 3
Description: This function allows Every Exts. can use C.O line M.
Example: Allow every exts. can use C.O. line 3
- 25 -
1. This function is for the outgoing call and can’t change the function of
C.O line ringing assignment.
4.2 Allow Certain Ext. to Use Certain C.O. Line
3.1
3.14
Format: 7MN0#
Explanation: M: C.O. line No, M = 1 - 3
N: Ext. No, N = 1 - 8
Description: This function assigns the extensions N outgoing to use the
certain C.O. line (M).
Example: Allow Ext.606 can use C.O. line 3
4.3 Restrict Certain Ext. to Use Certain C.O.
3.1
3.14
Line.
Format: 7MN1#
Explanation: M: C.O. line No, M = 1 – 3 ;
N: Ext. No, N = 1 - 8
Description: This function restrict the Ext. N to use C.O. line M
Example: Restrict Ext.608 can use C.O. line 2
- 26 -
3.15 Flexible coding
3.15.1 Assign Extension Number
(Freely Change the Exts. Number)
Format: 9Nabcd#
Explanation: N : the extension series number, N = 1 - 8,
abcd: the new number, 1 to 4 digit number, if new Ext
number not exceeding to 4-digit number, press # in the
end.
Description: Change old Ext number to new Ext number “abcd”
Example: Change Ext 606 to 806
1. The new numbers range from 1-8999; all extensions numbers can not
be in duplicate.
2. The number can’t begin with 0 and 9,
3. The length (digits) of new number must follow the extension No.1; it
must be emphasized that if the length (digits) of new number changed,
all the extensions must be reset after setting extension No.1. All the
new numbers should be equal digits, and not in duplicate.
For example, to set the extension’s number to 4-digit number
(8001-8008),the user should dial 918001# at first ,then dial
928002#,938003#…one by one, up to 988008.
5.2 Restoring Original Extension Numbers
3.1
3.15
Format: 9000#
Description:
return to the Exts number of the default setting, that is: from
601 to 602 603… 606… 608 one by one, etc.
- 27 -
Chap 4 Operating Instruction
4.1 Outward Call
This system provides 3 dialing modes to meet the different need of
customers.
4.1.1 Outward Dialing 9 First (or Dialing Directly
Directly))
Format: Pick up the handset and dial 9 first after hearing the internal dialing
tone, then dial the desired number after hearing the C.O. line
dialing tone.
Description: When the Ext is in Indirect-Dialing-Out mode, you’ll hear the
internal dialing tone after pick up the handset, dial 9 then you
enter the C.O. line, you may dial the desired number after
hearing the C.O. line dialing tone.
Example: You call out with number 80129876 in Indirect-Dialing-Out mode
1. The user should dial 9 within 15 seconds after hearing the internal
dialing tone.
2. If Ext. is at Direct-Dialing-Out mode, pick up the handset and dial
desired number directly after hearing the C.O. line tone. In this situation
you can redial the last telephone number.
2 Outward Call by Choosing a Certain Line
4.1.
4.1.2
except 108
(except
108)
Format:
#1M
(Indirect-Dialing-Out mode, refer chap 3).
Explanation: M: C.O. line port number
Description: In some occasion, the user may make an outward call by an
exclusive line and we define it as choosing line dialing. (M = 1 -3)
Example: At Indirect-Dialing-Out mode, the user want call out by C.O. line 3
- 28 -
If the Ext is at Direct-Dialing-Out mode, you should input: * # 1M.
3 Automatically Callback when Busy
except
4.1.
4.1.3
Busy(except
108
108)
Format:
# 0 then hang up.
Description: Indirect-Dialing-Out mode, allows you to make the Ext. ring
back automatically when any C.O. line become free
1. If there is free C.O. line, the Ext will ring back automatically. The ring
duration is 10 seconds during that you should pick up the ring call,
otherwise the call cancelled.
2. If the Ext is at Direct-Dialing-Out mode, you should input: * # 0 then hang up.
4.2 Intercom Call
1 Intercom Cal
4.2.
4.2.1
alll at Indirect-Dialing-Out Mode.
Format: Dial the Ext. number directly.
Example: Call the Ext.608
Input 608
Intercom calling is free of charge.
- 29 -
2 Intercom Call at Direct-Dialing-Out Mode
4.2.
4.2.2
Format: * + Ext number
Description: Make internal call from Ext. with Direct-Dialing-Out mode.
Example: Call the Ext.608
Input 608
4.3 Answering call
4.3.1 Answering Calls at Operator Mode
The Ext (s) which is set to ring will ring when an incoming call is received,
and pick up the handset you may answer the call directly. Under the
default mode, Ext.601 and Ext.602 will ring.
4.3.2 Answering Calls at Auto-attendant Mode
except 108
(except
108)
The system use one paragraph of OGM messages, the relevant messages
will be heard automatically when a exterior caller call the C.O. line.
When a caller dials “0” for inquiry, operator extension will ring. If operator
extension is busy, you can use the function 4.9.3 “Call Forwarding When
Ext is Busy”
4.3.3 Call Pick Up
Format:
# 9 (Indirect-Dialing-Out mode)
Description: Allows you to answer an incoming call (direct or transferred)
that is ringing at another Ext.
- 30 -
1. If the Ext is at Direct-Dialing-Out mode, you should input:
* # 9.
2. Internal call also can be picked up.
4 C.O. Line Reservation (except 108
4.
4.4
108))
Format:
Pat the hook and # # (Reservation)
* # 9 (Restore)
Description: Extension N is talking with C.O. line A and at this time B calling
in , Extension N Pat the hook and press # # to make A in state
of caller On Holding( A is hearing music while waiting ). At this
moment, Extension N also can make Call Pick Up(input #9),
Call Transfer, Dialing Out etc.··· if Extension N will restore
the connection with C.O. line, just input *#9
The maximum duration time of C.O. line call holding is 2 minutes.
4.
5 Call Transfer
4.5
Format: Pat the hook (or press the FLASH button) then dial the Ext.
number.
Description: 1. Allow you to transfer an incoming call to another Ext.
2. The Flash time can be set. Example: Ext.605 is talking to
C.O. line and want to transfer the C.O. line to Ext .607. Then
Ext .605 can transfer the incoming call to Ext .607 by patting
the hook (or pressing the FLASH ) and dialing 607.
Extension 605 is talking
Input 607
There may be following 8 cases after a call is transferred from Ext. A to Ext. B:
1. A does not hang up and B picks up his handset .Then
- 31 -
communication between A and B is established while the outside
caller is on hold (music on hold). Whoever hang up (A or B), the
system will transfer outside caller to the other.
2. A does not hang up and B does not answer A within 25 seconds. Then
A will restore the connection with CO. line, and B will stop ringing.
3. A hangs up and B answer the call; B will answer the outside caller.
4. A hangs up and B does not answer the call within 25 seconds, call
will be back to A and will ring, if A never picks up the call in 30
seconds or A is busy, the system will cut off.
5. After A pat the hook then hear the error massage, that means the
system is busy, A can continue to pat the hook (or press the FLASH
button) until the error massage is disappear.
6. A make invalid operation or B is busy, After System indicate with
“du-du-du”, A can repeat the operation.
7. A hangs up and B does not pick up. A pick up again and press: # 9
(If the Ext is at Direct-Dialing-Out mode, you should input: *# 9),
then A will restore the connection with C.O. line.
8. The EXT, which transfer the call (pat the hook), has 5 seconds to
dial the Ext. number. Otherwise the incoming call will be back to
him again.
6 Secretary Function (Outgoing Call Transfer
4.
4.6
Function)
Format: Pat the hook then dial the Ext number
Description: This function let you make an outgoing call from one Ext then
divert and connect other Ext. to C.O. line
Example: Ext .605 makes an outward call then transfers the call to Ext. 601.
Extension 605 is talking
Input 601
1. You should input the Ext number within 5 seconds after patting the
hook ( or press FLASH button ) and hearing the internal dialing tone,
- 32 -
otherwise you’ll be came back to the C.O. line again .
2. You can uniform manage the system by using C.O. line Restriction
and Secretary Function, Such as: the operator uniform books the long
distance calls, then transfer to the needed.
7 Three Way Conference (1 C.O. Line and 2
4.
4.7
Exts)
Format: Pat the hook (or press FLASH button) and * and Ext .number
Description: Allows you to add a third party to a two-party conversation and
make a three-party conference. You can have only two Ext.
with one C.O. line.
Example: Ext. 605 is talking to C.O. line caller and he want to transfer the
call to 607. Then 605, 607 and C.O. line can talk at the same
time.
Extension 605 is
Input * 07
talking to CO Line
1. There may be following 2 cases after a call is transferred from A to B.
a. A does not hang up and B picks up his handset. Then
communication amount A B and C.O. line is established, whoever
hang up (A or B), the system will transfer outside call to another one.
b. A does not hang up and B does not answer A within 25 seconds. If
Ext. B does not answer A within 25 seconds, then A will restore the
connection with C.O. line, and B will stop ringing.
2. The Ext, which transfer the call, has 5 seconds to dial the Ext number
required otherwise his incoming call will be back to him again.
8 Call Forwarding (except 108)
4.
4.8
8.1 Setting Call Forwarding Directly
4.
4.8
Format: # 81 abcd then hang up
Explanation: <abcd> is desired Ext number. This is at Indirect-Dialing-Out
- 33 -
mode.
Description: Allows the Ext user to transfer incoming calls automatically to
desired Ext.
Example: The user of ext. 605 wants to go to 607 for work then he can
forward all the incoming calls of 605 to 607
Pick up Ext. 605
Input #8107
1. In Direct-Dialing-Out mode, you should set with * # 81 abcd and
clear with *#81#.
2. Pick up the handset of Ext with Call Forwarding function you will
hear nothing and can’t do any operating, you must hang up to cancel
the function first
3. When power failure, this setting will not be stored.
4.
8.2 Clear Setting Call Forwarding Directly
4.8
Format: # 81 # then hang up
Description: Clear setting call forwarding directly of this extension.
8.3 Call Forwarding When Ext is Busy or
4.
4.8
Nobody Available
Format: # 82 abcd then hang up
Explanation: <abcd> is desired Ext number. This is at Indirect-Dialing-Out
mode.
Description: If a Ext is busy or nobody available after 25 seconds, the
incoming call will be transferred to desired Ext. automatically.
Example: When the ext. 605 is busy or no answer, then he wants to
transfer the incoming calls to the operator 602
- 34 -
Pick up Exr. 605
Input #8202
1. At Direct-Dialing-Out mode, you should set with * # 82 abcd and clear
with *#82#.
2. When power failure, this setting will not be stored.
8.4 Clear Setting Call Forwarding When Ext is
4.
4.8
Busy
Format: # 82 # then hang up
Description: Clear setting of call forwarding when Ext is busy or nobody
available after 25 seconds
9 Inquiry Functions (except 108)
4.
4.9
Format:
# 61
Description: During installing and testing of the system, it is very
convenient to find the Ext number. The system use “du” for
this purpose.
Example: After input # 61 on Ext. 603 you may hear 1 “du” , at about 1.5
seconds later , at last you may hear another 3 continuous “du” ,
that mean the Ext number is 603
Pick up Exr. 603
1. 10 continuous du stands for “0”
2. If the Ext is at Direct-Dialing-Out mode, you should input: * # 61.
0 Call All Extension (except 108)
4.1
4.10
Format:
#88
If the Ext is at Direct-Dialing-Out mode, you should input:
- 35 -
*# 88
1 Priority Access and Monitoring
4.1
4.11
Format:
#7M
Explanation: M: the C.O. line port number. M = 1 - 3
Description: Establish direct connection with C.O. line regardless whether
or not this line is occupied. This feature ensures the director or
owner of a company monitor the C.O. line communication.
Example: Priority access to C.O. line 3.
Pick up Exr. 601
1. Only Ext.601 has priority access
2. If the Ext is at Direct-Dialing-Out mode, you should input: * # 7 M.
3. The monitor is responsible for the legal issues resulting from the
operation.
2 Connect with Operator Directly (except 108)
4.1
4.12
Format: 0
Description: Ext will connect with operator directly
If the Ext is at Direct-Dialing-Out mode, you should only input: * 0.
3 Setting Don
4.1
4.13
Don’’t Disturb / Clear (except 108)
3.1 Setting Don
4.1
4.13
Don’’t Disturb
Format:
#83
Description:
will not ring.
If “Don’t Disturb” is set for the extension, then this extension
- 36 -
If the Ext is at Direct-Dialing-Out mode, you should input: * # 83
3.2 Clear Don
4.1
4.13
Don’’t Disturb
Format:
Pick-up the handset
Description: To cancel “Don’t disturb’ function, you just pick up the handset.
- 37 -
Chap 5 Maintenance & Troubleshooting
1 Outgoing calls can
5.
5.1
can’’t be made
1). C.O. line is set to special Extension;
2). Extension hangs up improperly;
3). CPU and internal data is disorder caused by unstable power.
4). Call restriction class is 6.
2 Outside calls can
5.
5.2
can’’t dial in
1). The conjunction of C.O. line loose;
2). C.O. line was connected to other equipment;
3). No message recording at auto-operator mode.
3 Intercom can
5.
5.3
can’’t be made
1). Extension hangs up improperly;
2). Extension number wrong.
- 38 -
BREAKDOWN
Running
malfunction
light
No
sound
extension
from
Cacophony
Bad tone
No incoming
telephone display
CAUSE
SOLUTION
Power off
Check the power socket and
Power supply
Disconnected wiring or
malfunction of telephone.
Reconnect the wiring or try to
remove the telephone’s failure
Bad connection
Screw down the joint
The distributing of line is
not reasonable
Leave telephone
disturbing source
Mix using of non-standard
telephones
Use the standard telephones
Devoid
incoming
display
Write
application
telecommunication office
function
of
telephone
Wrong
setting
No-disturbing
and
status.
of
it
from
the
to
Rescind the No-disturbing and
set incoming telephone display
Exterior line disconnected
Connect to the exterior line
Dial-out malfunction
Exterior
line
connected well
Check whether the line is
connected well
Limited calling time
Time limited
Rescind the limit
Cannot program the
telephone
Wrong coding
Check
the
programming
extension and use the right
code
Others
Others
Refer to professional
is
- 39 -
not
Chap 6 Glossaries
Programming extension-----------------Extension No.601, 602, 603, 604
N-----------------------------------------------Series number of the extensions (1-8 with
corresponding input ports 1-8) (one digits)
abcd------------------------------------------Number of the extension(1-8999,except for
the digits with the first digit of 0 or 9,outward
code of special trunk line, in equal length)is
accordance with N.
M-----------------------------------------------Series number of the exterior line
(No.1-3with corresponding input ports of
Line
13,
thereinto,108---M=1;
206---M=1-2; 308---M=1-3)
P-----------------------------------------------Licensed Group Number (01-16)
Q-----------------------------------------------First-digit restrict group number (01-16)
ABCD-----------------------------------------Licensed or restricted number of first 1-4
digits, end for #
L-----------------------------------------------Service grade (Grade of private passwords
or outgoing call), grade 0-6
TT----------------------------------------------Time in minute for call duration control,
ranges from (01 to 99)
F------------------------------------------------Flash time class.
- 40 -
Chap 7 Default Settings
● C.O. line: 108 is in Enable status; 206/308 are in Disable status.
● Operating mode: All C.O. line in Operator mode, but 108 doesn’t has
auto-attendant mode.
● Dialing out mode: 108 is in Direct-Dialing-Out mode; 206/308 is in
Indirect-Dialing-Out mode, dialing “9” for outgoing
● All C.O. lines are ungrouped
● Operator: Ext. 602
● Ring Ext.: 108: All Exts. ring together; 206/308: Ext.601 and Ext.602 ring.
● Extension service class assignment: 2
● Time Restriction: No
● Flash time: 1.0s
● Outgoing Exts. Assign to Certain C.O. lines: No
● Original EXT number: 601 to 608
● Restrict Item A / Item B: No setting
● Special Calling-out Number: No setting
- 41 -
Chap 8 System Programming & Operation
Instruction
1 Index of Basic Operation
8.
8.1
No, Description
Indirect-Dialing-Out
mode Command
Direct –dialing-out
mode
1
Outward Dialing
9 + desired number
desired number
2
Outward Dialing by a Exclusive # 1 M
Line(except 108)
*#1M
3
Intercom calling
Ext number
*+Ext number
4
Call Transfer
Pat hook + Ext number
5
Secretary Function
Pat hook + Ext number
6
3-Party Conference Call
Pat hook +
7
Caller on holding(except 108)
Pat hook + ##
8
Call Pickup
#9
*#9
Call Forwarding Directly
setting:
#81 +Ext number
*#81+Ext Number
clear :
*#81#
9
10
11
12
13
14
(except 108)
Call Forwarding when Ext is busy or
nobody available (except 108)
*
+ Ext
#81#
Setting:
#82 +Ext number
*#82+Ext number
clear :
*#82#
Automatically Call back Busy- come # 0
#82#
*#0
on(except 108)
Automatic Reporting of Ext number # 61
* # 61
(voice)(except 108)
Connect
with
Operator
Directly 0
*0
(except 108)
Priority Access
(only Ext.601)
and
Monitoring # 7 M
- 42 -
*#7M
15 Setting Don't disturb(except 108) #83
*#83
16 Use broadcast function(except 108)#88
*#88
- 43 -
8.2 Index of system programming
No.
Description
Command
1
Start the System Programming
(*) # *
2
Return to Default Setting
0000 #
3
Enable all C.O. lines
0600 #
4
Disable all C.O. lines
0610 #
5
Enable No. M C.O. line(except 108)
060M #
6
All C.O. lines in Auto-attendant Mode(except 108)
10 #
7
C.O. line M in Auto-attendant Mode (except 108)
10 M #
8
All C.O. lines in Operator Mode(except 108)
11 #
9
C.O. line M in Operator Mode (except 108)
11 M #
10
OGM
Recording(except 108)
12 #
11
OGM
Play(except 108)
13 #
12
Monitor Holding Music(except 108)
14 #
13
Setting Operator(except 108)
15 N #
14
System option for no dialing in The DISA----Cut off C.O.
160 #
line(except 108)
15
System option for no dialing in The DISA----Transfer to
161 #
Operator(except 108)
16
Direct-Dialing-Out mode for Ext.N
2N0#
17
Indirect-Dialing-Out mode for Ext.N
2N1 #
18
Direct-Dialing-Out mode for all the Exts.
20 #
19
Indirect-Dialing-Out mode for all the Exts
21 #
Enable Exts N ring When calling of No.M C.O. line come
20
3MN0 #
in
Disable Exts N ring When calling of No.M C.O. line come
21
3MN1 #
in
Disable all Exts
ring When calling of No.M C.O. line
22
3M #
come in
23
Assign dialing-out class L for certain Ext. N
40NL #
24
Assign dialing-out class L for all Exts
40L #
25
Restrict the Certain Numbers from item A
41 Q ABCD #
26
To cancel
41 #
27
To clear group Q of restriction item A
41Q#
28
Restrict the Certain Numbers from item B
42 Q ABCD #
29
To cancel
42 #
30
To clear group Q of restriction item B
42Q#
31
Assign Special Calling-out Numbers
43 P ABCD #
the restriction of item A
the restriction of item B
32
To cancel the permission of special calling-out numbers 43 #
33
To cancel group P of special calling-out numbers.
43 P #
34
Time Restrict Setting
6N TT #
35
To cancel time restrict
6N00 #
36
assign the extensions N outgoing to use the certain C.O.
7MN0 #
line (M)(except 108)
37
To restrict the EXT.N to use C.O. line M.(except 108) 7MN1 #
38
Allow every Exts. to use C.O. line M(except 108)
7M #
39
The Exts number return to the default setting
9000 #
40
To change the Ext.N to new number "abcd"
9Nabcd #