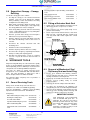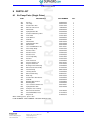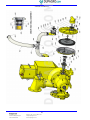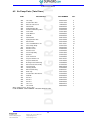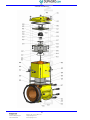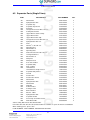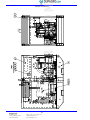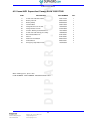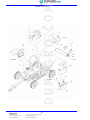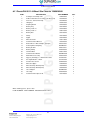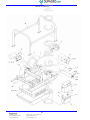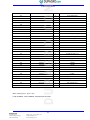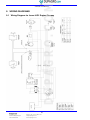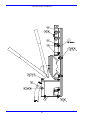
1
DUPAGRO.COM
Selwood Seltorque S150 Manual
SELWOOD SELTORQUE S150
HEALTH AND SAFETY AT WORK 1974
Operating and Service Manual
As manufacturers of pumps and associated equipment
we wish to inform you that, in compliance with Section
6 of the Act, safety precautions should be taken with
our products.
The products of Selwood Limited, are designed,
developed and produced in the company's Chandler's
Ford factory. Many features are covered by worldwide patents. Product names such as Spate, Simplite
and Seltorque, are registered trade marks.
We take every care to ensure as is reasonably
practicable that our products are safe and without risk
to health when properly used.
Nevertheless,
appropriate health and safety precautions must be
taken, and in particular you are requested to have
special regard to the operational and safety
requirements leaflet P769 which accompanies each
pump on despatch from our premises.
As all products are subject to continuous development,
the company reserves the right to alter the
specifications and information given in this manual
without prior notice.
Whilst every care has been taken in the preparation of
this publication the information it contains must not be
regarded as binding.
LI
Q UA
WARNING
This warning symbol draws attention to special
instructions or procedures that, if not strictly
observed, may result in personal injury.
WARNING
A WARNING SYMBOL WITH THIS TYPE OF
TEXT DRAWS ATTENTION TO SPECIAL
INSTRUCTIONS OR PROCEDURES WHICH, IF NOT
STRICTLY OBSERVED MAY RESULT IN SEVERE
PERSONAL INJURY, OR LOSS OF LIFE.
Additional copies of this manual are available
from Selwood Pt No 1509076000
Instructions for Ordering
Replacement Parts
1.
Always quote the pump serial number located on
the plate fastened to the bearing and air pump
mechanism housing.
2.
Always quote the part number(s) (ten digit) of the
component(s), NOT the item number(s).
3.
Always quote the description of the component(s).
Items usually supplied together as sub-assemblies will
have the sub-assembly part number printed at the
bottom of the relevant page.
Dupagro B.V.
Ooststeeg 102
6708 AX Wageningen
The Netherlands
1
Phone +31 (0) 317 840 197
info@dupagro.com
www.dupagro.com
F IR M
Our products also conform to the E.E.C. Machinery
Safety Directive and carry the C.E. mark.
CAUTION
This caution symbol draws attention to special
instructions or procedures that, if not correctly
followed, may result in damage to, or destruction of
equipment.
Published by Selwood Limited.
© Selwood Limited February 2009
A S S U RE
D
TY
Amendments to this publication will only be issued to
cover those design changes which fundamentally alter
the build or operation and servicing procedures. They
will be distributed through the company's dealers and
agencies.
Your attention is drawn to the following symbols used
throughout this manual:-
CALIFORNIA USA
PROPOSITION 65 WARNING
Diesel engine exhaust and some of its
constituents are known to the State of
California to cause cancer, birth
defects, and other reproductive harm.
WARNING
Pumps and engines may be fitted with
seals or 'O' rings manufactured from
VITON or similar material.
When temperatures reach 400°C
(720°F) a corrosive acid is produced,
which cannot be removed from the skin.
If signs of material decomposition are
evident, or if in doubt, always wear
disposable heavy-duty gloves.
DUPAGRO.COM
Selwood Seltorque S150 Manual
volumes of liquid. These lines must be isolated
and drained down before commencing work.
Sudden release of this liquid can cause serious
injury to an operator either directly or indirectly
through the rotational motion it can induce.
SAFETY PRECAUTIONS
WARNING
ALL ITEMS IN THIS SECTION, IF NOT STRICTLY
OBSERVED, COULD RESULT IN SEVERE
PERSONAL INJURY OR LOSS OF LIFE.
1.
Use only lifting equipment of suitable capacity for
the size and weight of the equipment being lifted
2.
The equipment must always be lifted using safe
working practices and in accordance with any
local and national guidelines or statutes. It is
intended for guidance only. If in doubt, consult
Selwood Pumps or a local lifting expert.
3.
Whilst lifting the unit keep personnel well away
and never allow people underneath.
4.
Personnel working on the pump must always wear
clean, correctly fitting clothing and safety footwear.
Clothing impregnated with oil or fuel can constitute
a health hazard through prolonged contact with
the skin and may also constitute a fire hazard.
5.
Check the type of liquid that the pump has been
employed on before working on them. Residues
could be hazardous to your health. If in doubt,
flush thoroughly with clean water before
commencing work.
6.
Rotating equipment presents a hazard in itself.
Alert surrounding personnel before starting and
post notifications whilst in operation.
7.
Moving parts are guarded to protect you. Guards
removed for maintenance must be replaced before
starting the pump.
8.
Never insert anything into the pump body whilst
the pump is running and the suction or delivery
hoses are disconnected.
9.
Use all flange bolt holes and ensure the correct
bolt size and quality is utilised when connecting
suction and delivery hoses.
WARNING! Delivery hose and any associated
pipe work should be capable of withstanding the
maximum system operating pressure. Selwood
recommend the minimum pressure rating of 10Bar
hose. Suction hose should be of the non-collapsible
variety.
WARNING! The pump should only be
operated within the speed and pressure limits
detailed in Section 2 of this manual.
10. Collapsible hoses must never be used on the
suction side of the pump.
11. Keep the hose end suction area free from debris.
Although the pump can handle solids up to the
size indicated in the Technical Data section of this
manual, larger or irregular solids may cause
blockage with damage to pump components.
12. Always allow adequate ventilation for the pump
driver. Diesel engines require air for both
combustion and cooling. This air must never be
allowed to re-circulate.
13. Be aware of burn and fire risks from items such as
exhaust pipes and silencers. Never place
flammable items around the unit.
14. Liquid pressure may still be present even after
shutdown of the pump. Particular attention should
be paid to delivery lines that are long, or rise
through any height, as these can contain large
Dupagro B.V.
Ooststeeg 102
6708 AX Wageningen
The Netherlands
2
Phone +31 (0) 317 840 197
info@dupagro.com
www.dupagro.com
1.
If there is a danger of freezing, the fluid, normally
retained within the pump between operating
cycles, should be drained off through the drain tap
provided.
2.
WARNING! Never start or run the pump
against a closed delivery valve (except the pump
non return valve). Failure to comply may result in
damage to the unit or personal injury.
3.
WARNING! Noise level at operator
position (Start Panel) is over 80dB(A). Hearing
protection must be worn at all times within the
canopy when the unit is running. Failure to comply
may result in hearing damage or loss.
DUPAGRO.COM
Selwood Seltorque S150 Manual
SELWOOD SELTORQUE S150
CONTENTS
Title
6.3
6.4
6.5
6.6
6.7
6.8
6.9
6.10
6.11
6.12
6.13
Page
Safety Precautions....................................................... 2
1
1.1
1.2
1.3
1.4
1.5
1.8
GENERAL INFORMATION ................................ 4
Installation .......................................................... 4
Operation............................................................ 4
Maintenance ....................................................... 4
I.C. Engines ........................................................ 4
Fitting Instructions for Centaflex Couplings
(Diesel Engines) ................................................. 4
1.5.1 Preparation of the Centaflex Coupling for
Pump Removal ................................................ 4
1.5.2 Centaflex Coupling Assembly Sequence ...... 5
1.5.3 Replacement of the Steel Hub and
Rubber Element............................................... 5
Electric Motors .................................................... 6
Fitting Instructions for Fenner Couplings
(Electric Motors).................................................. 6
Seltorque S150 Standard Data........................... 6
8.8
2
ROUTINE MAINTENANCE ................................ 6
8.9
3
3.1
3.2
LUBRICATION AND FASTENING TORQUES .. 7
Pump Lubrication................................................ 7
3.1.1 Commissioning Period .................................... 7
3.1.2 After Commissioning Period ........................... 7
Fastening Torques.............................................. 7
4
CONDITIONS OF WARRANTY ......................... 8
5
5.1
5.5
5.6
5.7
5.8
5.9
MAJOR SERVICING .......................................... 8
Air Pump Maintenance ....................................... 8
5.1.1 Delivery and Suction Valves (A07)................. 8
5.1.2 Actuator Valve (A16)........................................ 8
5.1.3 Actuator Seal (A18).......................................... 8
5.1.4 Actuator Neck Seal (A21)................................ 9
5.1.5 Drive Rod Seal Assembly and Bearing
(A25 and A28).................................................. 9
Separator Maintenance .................................... 10
5.2.1 Float (B11)...................................................... 10
5.2.2 Peel Valve (B21) ............................................ 10
5.2.3 Deposits of Solids .......................................... 11
Impeller, Mechanical Seal and Delivery
Valve Maintenance ........................................... 11
5.3.1 Impeller (C04)................................................. 11
5.3.2 Mechanical Seal (C08) .................................. 12
5.3.3 Delivery Valve (C27)...................................... 13
Maintenance of Flushing Chamber, Air
Pump Mechanism, Drive Coupling, Drive
Shaft Bearings and Lip Seal ............................. 13
5.4.1 Flushing Chamber (D33)............................... 13
5.4.2 Air Pump Mechanism .................................... 14
5.4.3 Bearings and Lip Seal (D15, D18 and
D04)................................................................. 15
Chassis Maintenance ....................................... 16
Supersilent Canopy - Canopy Removal............ 16
Supersilent Canopy -Fuel Tank Removal ......... 17
Supersilent Canopy – Fuel Tank Refitting ........ 17
Supersilent Canopy – Canopy Refitting ............ 18
6
6.1
6.2
WORKSHOP TOOLS....................................... 18
Care of Servicing Tools .................................... 18
Fitting of Actuator Neck Seal ............................ 18
1.6
1.7
5.2
5.3
5.4
Dupagro B.V.
Ooststeeg 102
6708 AX Wageningen
The Netherlands
Phone +31 (0) 317 840 197
info@dupagro.com
www.dupagro.com
7
FAULT FINDING GUIDE ..................................23
8
8.1
8.2
8.3
8.4
8.5
8.6
8.7
PARTS LIST .....................................................27
Air Pump Parts (Single Prime)...........................27
Air Pump Parts (Twin Prime).............................29
Separator Parts (Single Prime)..........................31
Separator Parts (Twin Prime)............................33
Pump Body Parts ..............................................35
Delivery Valve Parts ..........................................37
Bearing Housing and Air Pump Drive
Assembly Parts .................................................39
S150 Pump Unit – Close Coupled
1506121000 ......................................................41
Isuzu/4JG1 Pump Unit, Core Build
1506117C00......................................................43
Isuzu/4JG1 Supersilent Canopy Build
1506117S40......................................................45
Deutz/F4L2011 4-Wheel Site Chassis
1503026000 ......................................................47
Deutz/F4L2011 Skid Chassis 1503018000 .......49
Fast Tow Kit, Open Set 1503062000 ................51
8.13.1 2 - Wheel Trailer 9729-00012 .......................53
Fast Tow 4-Wheel Chassis ...............................57
8.14.1 4 Wheel Trailer 9729-00013..........................59
4-Wheel Site Chassis 1503025000 ...................65
Plastic Fuel Tank Assembly 1502478000 .........67
8.10
8.11
8.12
8.13
8.14
8.15
8.16
9
9.1
3
Removal of Mechanical Seal Stationary
Seat and Joint Ring ...........................................18
Removal of Drive Rod Seal Assembly...............19
Fit Seal Housing Sub-Assembly to Pump..........19
Remove Drive Rod Bearing Bush......................19
Fit New Drive Rod Bearing Bush.......................19
Assemble Flushing Chamber ............................20
Remove Eccentric .............................................20
Remove Impeller ...............................................20
Fit Replacement Drive End Bearing ..................21
Fit Replacement Impeller End Bearing..............21
Assembly of Drive Shaft with Bearings into
Housing .............................................................22
9.2
9.3
WIRING DIAGRAMS ........................................68
Wiring Diagram for Isuzu 4JG1
Engine/Canopy..................................................68
Fast Tow Trailer Lighting Circuit........................69
Deutz – Wiring Diagram ....................................70
10
10.1
10.2
10.3
10.4
10.5
10.6
10.7
Telemetry system ............................................72
Key Switch ........................................................72
Key Switch in OFF.............................................72
Key Switch in Manual ........................................72
Key Switch in Auto ............................................72
Alarms ...............................................................73
Remote SMS Configuration...............................73
Telemetry BASIC FAULT FINDING...................73
11
11.1
11.2
TELEMETRY KIT FOR S150 1507080000 .....77
Telemetry Kit 1504123000 ................................77
Battery Isolator Kit 1506310000 ........................79
12
Oil Drain Kit 1505230000.................................81
13
Fuel Changeover Valve Kit 1507288000 ........85
DUPAGRO.COM
Selwood Seltorque S150 Manual
system should be lagged or screened and the
outlet directed away from operators or other
persons likely to be nearby. Direct contact with
flammable materials of all types must be avoided.
The importance of adequate ventilation to ensure
removal of exhaust fumes when engines are
operated in enclosed or covered accommodation
cannot be over-stressed. Engines should not be
run in hazardous explosive atmospheres.
1 GENERAL INFORMATION
1.1 Installation
1.
The pump unit and its associated baseplate or
trolley mounting should be positioned on a firm
horizontal platform, and in the case of portable
units restrained from accidental movement.
2.
If the pump is fitted with push-on type suction and
delivery spigots the hoses must be firmly secured
on these spigots with heavy duty clamps or clips
capable of withstanding the system operating
pressure.
3.
The integrity of the hose clamping arrangements
should be checked at regular daily intervals in the
case of static installations or whenever the pump
is repositioned in the case of portable units.
4.
5.
Similar precautions should be taken with clamps
securing multiple lengths of hose on installation
where long delivery and suction lines are involved.
Delivery hose and any associated pipework
should be capable of withstanding the maximum
system operating pressure. Suction hose should
be of the non-collapsible variety.
The pump should only be operated within the
speed and pressure limits detailed in the operating
handbook for the model in question.
2.
If there is a danger of freezing, the fluid normally
retained within the pump between operating
cycles should be drained off through the drain taps
provided.
3.
Where protective caps are used to prevent
damage to the suction and delivery spigots during
storage or in transit they must be removed before
the pump is started up.
Inspection and maintenance procedures are
detailed in the operating and servicing manual for
the model in question.
2.
Replacement parts. Only the manufacturers or
factory approved components should be used as
replacement parts and where necessary they
should be fitted with the assistance of the special
purpose tools indicated in the operating and
servicing manual.
3.
All maintenance work must be carried out with the
pump and engine/motor stationary.
2.
5.
Electrical Connections. It is essential that earth
terminals are connected with an absolutely sound
earth point and care should be taken to ensure
that the correct sized conductors are selected to
suit the current and distance to be carried.
The coupling assembly consists of a central steel hub
whose outside diameter locates within a bore of a
rubber element and is secured within the element
using three cap screws that pass radially through its
outer diameter. In turn, the rubber element locates
onto three horizontal pins, equally disposed on a PCD
and each secured to the face of a steel adaptor plate
with cap screws. The cap screws securing both the
central steel hub and the horizontal pins are torque
tightened to the values shown in the table in Section
1.5.2 below.
The rubber element itself is free to slide on the
horizontal pins. It is therefore unnecessary to remove
the cap screws that secure the pins unless the pins
themselves have become damaged.
Where I.C. engines are used to power the pump
they have been mounted in accordance with the
engine manufacturers recommendations and
adequate guarding provided between the pump
and engine.
1.5.1
Preparation of the Centaflex Coupling
for Pump Removal
NOTE: Before commencing, mark the position of the
coupling assembly on the pump drive shaft. Pay
particular attention to the size of the gap between the
back of the rubber element and the face of the steel
adaptor plate. This gap has been factory set and is
Exhaust and Exhaust Pipes. If there is a risk of
accidental contact by operators, the exhaust
Dupagro B.V.
Ooststeeg 102
6708 AX Wageningen
The Netherlands
Fuel. In addition to the fire hazard associated with
fuel and lubricating oils, preventative action is
necessary with respect to leakage, contamination
and bodily contact.
The Centaflex Coupling Assembly is supplied in a preassembled state and must be fitted to the pump drive
shaft and engine flywheel in this state. On no account
should any of the components that make up the
coupling assembly be dismantled unless it has become
necessary to service one of the component parts.
Typically, the most likely component to require
replacement will be the rubber element and servicing
of this item is explained in Section 1.5.3 below.
1.4 I.C. Engines
1.
4.
IMPORTANT NOTES – OBSERVE STRICTLY:
1.3 Maintenance
1.
Access and Operation. Ensure that the operator
can start, control and stop the engine easily by
making all controls readily accessible. Fit remote
controls if access is difficult.
Follow the
instructions
laid
down
in
the
Engine
Manufacturer's Operators Handbook for starting,
operating and stopping procedures.
1.5 Fitting Instructions for
Centaflex Couplings (Diesel
Engines)
1.2 Operation
1.
3.
4
Phone +31 (0) 317 840 197
info@dupagro.com
www.dupagro.com
DUPAGRO.COM
Selwood Seltorque S150 Manual
maintained when the setscrew in the steel hub is
locked in position.
1. In order to allow the pump drive shaft to be
withdrawn from the steel hub of the coupling,
it will be necessary to loosen the setscrew
located in the outside radius of the steel hub
just in front of the rubber element. The
setscrew clamps the coupling assembly onto
the top of the pump drive shaft key and it is
not necessary to completely remove this
screw.
2.
Once the setscrew is loose the pump drive
shaft is free to be withdrawn from the hub of
the coupling.
Note too that when the
setscrew is loose the coupling assembly is
free to slide in either direction onto the pump
drive shaft or onto the horizontal pins.
1.5.3
1.5.2
1.
Centaflex Coupling Assembly
Sequence
NOTE:
Once the Centaflex coupling has been
prepared in accordance with Section 1.5.1 above, it is
free to be removed from the horizontal pins on the face
of the adaptor plate.
1. If it becomes necessary to replace either the steel
hub or rubber element, the three radial caps
screws must be removed in order to separate the
two components. When removing these cap
screws it is recommended that the coupling
assembly remain on the horizontal pins for ease of
their removal.
The radial and axial screws connecting the
rubber element to the hubs must all be
tightened to the torque given in the table
below, using a torque wrench.
Centaflex
Size
30
Screw
Size
M16
Tightening Torque
Nm
lbft
220
159
2.
Tightening with a torque wrench is particularly
important. Tightening by feel will not do as
experience has proved the tightening torques in
such cases are far too low. Tightening torques
which are too low will inevitably lead to slackening
of the screws in service and consequently to the
destruction of the coupling.
3.
Ensure that on tightening the screws, the
aluminium bushes in the rubber part are not
twisted at the same time, but sit straight. In order
to reduce friction between the screw head and the
aluminium part, a small amount of grease should
be applied under the head of the screw before
fitting.
4.
If necessary, use a suitable tool for applying
counter pressure on the element to prevent
twisting of the rubber part during tightening of the
screws. This is particularly important with radial
screws, otherwise the cylindrical faces between
the aluminium insert and the hub will not engage
on the full area, but only on two corners. This will
inevitably lead to slackening of the screws and
subsequent destruction of the coupling. If the
coupling is supplied in a pre-assembled state do
not dismantle it, but fit it in this condition.
Dupagro B.V.
Ooststeeg 102
6708 AX Wageningen
The Netherlands
5
Phone +31 (0) 317 840 197
info@dupagro.com
www.dupagro.com
Replacement of the Steel Hub and
Rubber Element
2.
Once the three radial screws are removed,
the steel hub can be separated from the
rubber element. Also at this stage the rubber
element can be removed from the horizontal
pins of the adaptor plate.
3.
Replace the rubber element and/or steel hub
as necessary to refurbish the assembly.
4.
Fit the rubber element onto the horizontal pins
of the adaptor plate.
5.
Insert the steel hub into the centre of the
rubber element and align the radial mounting
holes with tapped holes in the hub.
6.
Fit the three radial cap screws in accordance
with the instructions at Section 1.5.2.
7.
The coupling assembly is now prepared for
the replacement of the pump.
DUPAGRO.COM
Selwood Seltorque S150 Manual
8.
9.
Once the pump drive shaft is engaged in the
coupling hub bore, set the position of the
coupling assembly to that previously marked
when Section 1.5.1 was performed.
1.8 Seltorque S150 Standard Data
Tighten the setscrew that locks the steel hub
of the coupling assembly to the pumps drive
shaft key.
1.6 Electric Motors
1.
2.
3.
All electrical connections should be made through
adequately rated conductors and starters.
Isolators and other associated switchgear should
be of adequate capacity for the imposed power
loadings.
All electrical equipment should be
adequately earthed.
Isolate the power supply before carrying out any
commissioning, servicing or maintenance work on
the pump or electric motor.
Where electric motors are to be operated in
hazardous or explosive atmospheres they should
be of the flameproof enclosure type appropriate to
that atmosphere.
21.3m
70ft
Self Priming Lift (max)
8.8m H20
29ft H20
Solids Size (max)
100mm
4in
Air Handling Capacity:
Single
Prime
24l/s
3
50ft /min
Twin
Prime
48l/s
3
100ft /min
Pump Speed
1600rpm Max
Port Size BS.4504 Table 6
150mm
6in
1.
2.
1.7 Fitting Instructions for Fenner
Couplings (Electric Motors)
Adjust position of pump on chassis until the inside
faces of the coupling flanges are parallel to each
other. The distance between the faces should
measure from 24 to 29mm (15/16” to 1 1/8”).
Whilst adjusting the pump’s position, it is also
necessary to achieve alignment of the shaft
centre-lines within 1.5mm (1/16”) of each other by
laying a straight edge cross the two flanges at
several positions around their circumferences.
Fully tighten the nuts immediately the coupling
flanges are correctly aligned. Recheck alignment
after tightening.
The flexible coupling assembly should now be
completed. Open-out the tyre and fit over the
coupling flanges ensuring the tyre beads seat
properly on the flanges.
To ensure proper
seating, it may be necessary to strike the outside
diameter of the tyre with a small mallet. When
seated there should be a gap between the ends of
the tyre of about 1/8” (3mm). Tighten clamping
ring screws in flange alternately and evenly
(approximately half a turn per screw) working
round the flange until 17lbf ft (2.35kgf m) torque is
achieved.
Dupagro B.V.
Ooststeeg 102
6708 AX Wageningen
The Netherlands
Delivery Head (max)
Lack of routine maintenance is the most frequent
reason for the breakdown of pumps. We earnestly
advise users to ensure that at least the following
actions are taken.
It is our intention constantly to review our obligations
under the Act and we will be issuing from time to time
further information with regard to the safe application,
use, inspections, and service associated with our
products.
2.
320M /h
70,390 UK gal/h
2 ROUTINE MAINTENANCE
You are requested to take such steps as are
necessary to ensure that this information is made
available to all those involved with the use of our
products. This information must be made available not
only to your own employees at their workplace, but
also to anyone who may purchase or otherwise
acquire (hire) such products for use in his own
workplace.
1.
3
Capacity (max)
Phone +31 (0) 317 840 197
info@dupagro.com
www.dupagro.com
a)
Engine oil.
b)
Bearing housing oil.
c)
Flushing chamber oil.
Always drain water from the pump in cold weather
when it is not running. Drain:
a)
Pump body.
b)
Delivery valve chamber.
c)
Both sides of air pump (4 drain taps if twin
prime).
3.
Do NOT run the pump if significant quantities of
water escape through the exhaust valve of the air
pump. This pump is designed to handle moistureladen air, but not to pump a high percentage of
water. Refer to servicing instructions for further
advice.
4.
Do NOT run the pump if malfunction is suspected
in any of its parts.
In particular, it must
immediately be serviced if the level of oil in the
flushing chamber varies daily, or if the oil becomes
contaminated with the pumped fluid.
5.
A hose strainer should always be fitted to the free
end of the suction line if there is a possibility of
oversized solids entering the pump.
The
dimensions of rocks, pebbles, etc. must not
exceed 100mm (4"). Larger soft solids, however,
of the type found in abattoir duties, for example,
will pass freely through the pump. Refer to
Selwood Ltd if in need of advice in this connection.
As loss of prime and indeed loss of on-stream
performance can easily arise as the result of
leaking pipework joints, we recommend that all
line fittings associated with the pump should be
checked periodically for air-tightness.
6.
6
Check these three oil levels daily:
DUPAGRO.COM
Selwood Seltorque S150 Manual
7.
It is most Important to use the correct fuel oil in the
engine. Make sure that it is appropriate for the
weather conditions (summer or winter) and that it
is clean and free from water and foreign matter.
Unsatisfactory running performance, excessive
wear and damage can all result from the use of an
Incorrect or contaminated fuel.
8.
Periodically check the tension of all nuts and bolts,
especially those securing the engine and pump to
the chassis.
9.
Pump servicing must always be carried out in
accordance with the instructions given in this
manual. Only components supplied and approved
by Selwood Ltd should be used. It is advisable to
hold a small stock of spare parts to cover
breakdown circumstances. The Company will be
pleased to give advice in this connection.
COMPONENT
10. Engine servicing must always be carried out in
accordance with the instructions given in the
manufacturer's manual. Do not hesitate to contact
Selwood Ltd if the need for further advice arises.
11. Please contact Selwood Ltd in the event of
experiencing difficulty when servicing.
The
company will also be very pleased to give advice
in connection with the machine's installation,
operation and maintenance.
3.1 Pump Lubrication
Vanellus C5 Global
C5 Global
C5 Global
Castrol Rustilo 431
Castrol Rustilo 431
BP Energrease LS-EP2
BP Energrease LS-EP2
BP Energrease LS-EP2
Castrol Optimoly Paste
HT
SHELL GRADE
ENGINES
Bearing Housing
Flushing Chamber
Actuator Bore
Impeller Bore
Paper Gaskets
Axle Shafts
Axle Pivot Assembly
Rimula X 15w-40
Rimula X 15w-40
Rimula X 15w-40
Ensis Compound C C
Ensis Compound C C
Alvania EP LF 2
Alvania EP LF 2
Alvania EP LF 2
SERVICE/DRAIN
* ISUZU
* DEUTZ
1011
2011
Bearing Housing
Flushing Chamber
Actuator Bore
Impeller Bore
Shaft Sleeve Bore
Paper Gaskets
Axle Shafts
Axle Pivot Assembly
M10 Screws - Port
Plate to Diffuser
NOTE: If the above advice is followed, the likelihood
of an expensive break down will be greatly diminished.
The pump should give a long and trouble free life if
these measures are put into effect.
3 LUBRICATION AND
FASTENING TORQUES
ENGINES
Bearing Housing
Flushing Chamber
Actuator Bore
Impeller Bore
Paper Gaskets
Axle Shafts
Axle Pivot Assembly
M10 Screws - Port Plate
to Diffuser
COMPONENT
COMPARTMENT
12. All practical work must be carried out in
compliance with the Health and Safety at Work
Act, 1975. Always start the engine in accordance
with the manufacturer's instructions.
It is most important to maintain the correct levels of oil
in the flushing chamber and bearing housing, and to
ensure that the oil is of the recommended quality and
is free from contamination. Selwood recommend the
use of the following BP/Castrol products, which should
be applied as per the following table. In some
territories, the following grades may be known under
differing trade names, please contact Selwood if
problems occur in identifying the correct product.
BP GRADE
3.1.1
CHANGE OIL &
FILTERS
250 Hours
CHECK &
TOP UP
Daily
1000 Hours
Daily
1000 Hours
Daily
ON ASSEMBLY
ON ASSEMBLY
ON ASSEMBLY
Commissioning Period
Drain both pump chambers and engine within 100
running hours of commissioning either a new, or rebuilt
pump, and refill with new oil to level plugs.
Flushing chamber capacity about 2.3litres (4 pints).
Bearing housing capacity about 3.5litres (6¼ pints).
Engine sump – Refer to Engine Instruction Book.
3.1.2
After Commissioning Period
If the pump is driven by a diesel engine, the oil in both
pump chambers should be drained and renewed
simultaneously with the time schedule laid down by the
engine manufacturer. Under no circumstances should
the period for the pump exceed 1000 running hours.
3.2 Fastening Torques
Failure to tighten threaded fasteners correctly can
easily lead to assembly breakdown.
It is very
Dupagro B.V.
Ooststeeg 102
6708 AX Wageningen
The Netherlands
7
Phone +31 (0) 317 840 197
info@dupagro.com
www.dupagro.com
DUPAGRO.COM
Selwood Seltorque S150 Manual
are damaged, replace with new components. Pull old
valves off stud heads, and discard.
important, therefore, when carrying out the instructions
in this manual, to achieve the appropriate tensioning
torques. In some cases, specific requirements are
described in the instructions, which must always be
implemented. The following torques, in particular,
must be applied.
Tightening
Torques
Item
lbft
Nm
(F29)(F30) M16 Pump/Engine/Fuel
Tank to Chassis Fixings
180
245
(D36) Actuator Cap Screw
0015975000
60
81
(A22) Cap Screw M12
9001240-02
60
81
(C01) Impeller Screw
9000160402
80
108
Air Pump Drive rod (D37) to Small
End of Connecting Rod (D26) - M8
Fixing (D27) to (D38)
21
28
The valve assemblies can now be replaced by
reversing Instructions 1 and 2 of this procedure. It
is advisable to fit new gaskets (A30).
Actuator Valve (A16)
To inspect and service, proceed as follows:
For full terms and conditions please contact Selwood
Ltd.
1.
Remove nuts (A11), spring washers (A12),
washers (A13) and screws (A14), allowing outer
pump body (A15) to be removed complete with
attached delivery valve assembly. The actuator
valve (A16) may now be examined. If it fails to
seat efficiently on actuator (A20) or is in any way
damaged, it should be pulled off the actuator nut
and discarded.
2.
Whilst the actuator valve (A16) is removed, it is
advisable to examine the condition of the valve
seat in the actuator (A20), and also to check the
security of the actuator screw (D36). This should
be checked and tightened to 60lbf ft (8.3kgf m)
torque.
3.
To replace actuator valve (A16):
a)
Smear soft soap on the conical end and
groove of actuator screw (D36).
b)
Ease new valve rubber into position ensuring
that it seats correctly.
NOTE: It is advisable to examine the condition of
actuator seal (A18) whilst it is exposed. Refer to
Section 5.1.3 Actuator Seal (A18) for servicing
instructions.
5 MAJOR SERVICING
5.1 Air Pump Maintenance
4.
Delivery and Suction Valves (A07)
Failure of the pump set to prime quickly or to discharge
the expected volume of air, may simply be due to faulty
valve operation.
To replace outer pump body assembly, fit and
evenly tighten screws (A14), washers (A13),
spring washers (A12) and nuts (A11), by
sequentially turning each screw a small amount
until they are all fully tensioned.
NOTE: It is important that the outer diameter of the
actuator seal (A18) should be evenly clamped.
To inspect and service, proceed as follows:
5.1.3
Remove air hose (single prime item (A01), twin
prime items (A39/40)) from suction valve box
(A03/A41), after loosening relevant hose clips
(A02).
Actuator Seal (A18)
A further reason for the pump set failing to prime
efficiently or to handle the expected volume of air,
could be a faulty actuator seal (A18).
2.
Note the orientation of the suction valve box (A03)
and exhaust cover (A04) before commencing.
Remove exhaust cover (A04) and suction valve
box (A03) by releasing nuts (A05) and spring
washers (A06).
NOTE: The above actions allow the condition of the
two valve rubbers (A07) to be checked. Do NOT
attempt to remove valve studs (A08). If valve rubbers
Dupagro B.V.
Ooststeeg 102
6708 AX Wageningen
The Netherlands
4.
Another reason for the pump set failing to prime
efficiently or to handle the expected volume of air,
could be malfunction of the actuator valve (A16).
For a period of twelve months from delivery of any
Selwood pump to the first user thereof, or eighteen
months from the despatch of any such pump by
Selwood, which ever period is the shorter, Selwood will
repair or, at its option, replace any component which in
the opinion of Selwood has failed due to defective
workmanship or materials.
1.
Check and, if necessary, clean valve seats in
outer pump body (A15) and valve box (A03).
Smear heads and grooves of studs with soft soap
and push on new valves ensuring that they seat
correctly.
5.1.2
4 CONDITIONS OF WARRANTY
5.1.1
3.
To inspect and service, proceed as follows:
1.
2.
8
Phone +31 (0) 317 840 197
info@dupagro.com
www.dupagro.com
Remove outer pump body (A15) complete with
delivery valve assembly. Remove actuator screw
(D36).
Set actuator to top dead centre (maximum
distance from inner pump body), by rotating
engine shaft with starting handle. Using a tool that
will not cut the rubber (such as a blunt
DUPAGRO.COM
Selwood Seltorque S150 Manual
screwdriver) and a lubricant (soap solution),
remove actuator seal (A18) by prising it from the
inner pump body (A19).
3.
4.
Remove actuator (A20) complete with seal from
drive rod (D37).
To renew actuator seal (A18):
a)
Remove the failed component from the
actuator.
b)
Insert firstly one side and then the other into
the actuator groove, using a blunt tool that will
not cut the rubber.
NOTES: The seal is handed and will not enter the
inner pump body (A19) if fitted the wrong way round.
The correct assembly position for actuator seal (A18)
is with the smaller diameter of its conical outer surface
towards the inner pump body (A19). It will be seen
that the housing in the body is tapered in the same
direction as the external surface of the seal.
5.
At this stage it is advisable to examine the
condition of actuator neck seal (A21).
This
component should be replaced if any splits are
evident on its visible surface. Refer to Section
5.1.4 Actuator Neck Seal (A21).
6.
Smear soft soap on the outside section of new
actuator seal (A18). Lightly grease actuator bore.
Position actuator/seal assembly on drive rod
(D37), locate actuator screw (D36) and tighten to
60lb ft (8.3kgf m) torque.
7.
Replace actuator valve if removed (A16) first
smearing soft soap on the conical end and groove
of actuator screw (D36). The new valve should be
eased into position by hand.
8.
Before fitting outer pump body (A15), reciprocate
the actuator by fitting and rotating the engine's
starting handle about ten times to encourage
centralisation of the connecting rod bearings.
During this procedure, the actuator seal (A18) is
likely to rotate slightly in the inner pump body
(A19). Stop shaft rotation when actuator is at
bottom dead centre (minimum distance from inner
pump body).
9.
Release hose clip (A02) allowing air hose to be
disconnected from suction valve box (A03).
Screws (A22) should then be removed, leaving
washers (A23) in inner pump body (A19).
3.
The inner pump body can now be pulled by hand
from the bearing housing, if necessary twisting to
overcome any tendency of the seal (A21) to stick
to drive rod (D37). Remove and discard failed
seal.
4.
Smear new actuator neck seal (A21) with soft
soap to assist fitting, position in inner pump body
(A19) and push both components over drive rod
(D37) using assembly tool (Part No. 0015102000)
smeared with soft soap. Check that washers
(A23) are in place, and fit and fully tighten screws
(A22). The heads of these screws should be fully
contained within the recesses in the inner pump
body.
5.
Reassemble
remaining
components
in
accordance with Section 5.1.3 Actuator Seal (A18)
Instructions 6 to 10, inclusively.
5.1.5
To inspect and service, proceed as follows:
1.
Drain oil from bearing housing by removing filler
cap (D08) and drain plug (D13).
2.
Remove air pump components in accordance with
Section 5.1.3 Actuator Seal (A18) Instructions 1
and 2, and to Section 5.1.4 Actuator Neck Seal
(A21) Instructions 2 and 3.
3.
Being careful not to damage the flat sealing faces
of housing (A24), carefully withdraw housing
complete with its bearing and sealing components
from bearing housing (D06) and drive rod (D37).
4.
Examine condition of lip and distributor seals
together with bearing. If either are worn or
damaged, we recommend that a new housing
(Part No. 0010905000) complete with seal
assembly and bearing (A28) should be ordered
and fitted. However, individual components can
be renewed in accordance with the following
instructions.
5.
To replace drive rod bearing (A28) carefully
remove circlip (A26) allowing seal components to
be pushed from housing with blunt punch or drift
from bearing end. The drive rod bearing can now
be removed using bearing drift (Part No.
0015168000) and the new component pressed
into position so that one face is flush with the end
of the housing.
Ensure that seal components are assembled in
accordance with the following instructions.
Seat outside section of actuator seal in inner
pump body recess by gently tapping with a nonmetallic mallet.
5.1.4
Actuator Neck Seal (A21)
Another reason for the pump set failing to prime
efficiently or to handle the expected volume of air,
could be failure of the actuator neck seal (A21).
To investigate and service, proceed as follows:
6.
a)
Remove outer pump body (A15) complete with
delivery valve assembly, and actuator (A20) with
actuator seal (A18) as directed in Section 5.1.3
Actuator Seal (A18) Instructions 1 and 2.
Dupagro B.V.
Ooststeeg 102
6708 AX Wageningen
The Netherlands
9
Phone +31 (0) 317 840 197
info@dupagro.com
www.dupagro.com
Drive Rod Seal Assembly and Bearing
(A25 and A28)
If oil leaks from ports in housing (A24) it is probable
that seal assembly (A25) is excessively worn. Such a
condition may also indicate that drive rod bush (A28)
should be replaced.
10. Replace outer pump body assembly, and fit and
evenly tighten screws (A14) washers (A13) spring
washers (A12) and nuts (A11), by sequentially
turning each screw a small amount until they are
all fully tightened. It is important that the outside
diameter of the actuator seal (A18) should be
clamped evenly.
1.
2.
The wiper seal (A34) is first assembled to the
drive rod seal carrier (A32) using wiper seal
insertion tool (Part No. 0010103000) ensuring
the correct orientation.
DUPAGRO.COM
Selwood Seltorque S150 Manual
b)
7.
8.
9.
Then the internal distributor seal (A33) is
offered up to the bearing and seal housing
(A24) ensuring again the correct orientation
and pushed into place with the drive rod seal
carrier (Part No 0015195000) together with
wiper seal (A34)) and the whole pressed into
place with the wiper seal insertion tool (Part
No. 0010103000). Care must be exercised
when replacing circlip (A26) to ensure that the
lip of the wiper seal (A34) is not damaged by
the hand tools used. Refer to Section 6.4.
the float should be positioned on the rod so that
the operating plate (B15) with its associated peel
valve fasteners is just clear of the central clamp
bar screws (B16), when the float is located in the
upper diffuser cone.
6.
Before replacing bearing/seal housing assembly,
check condition of drive rod, particularly if new
bush (A28) has been fitted.
If surface is
significantly worn, the drive rod should be
replaced in accordance with instructions given in
Section 5.4 Maintenance of Flushing Chamber, Air
Pump Mechanism, Drive Coupling, Drive Shaft
Bearings and Lip Seal. Specifically Section 5.4.2.
5.2.2
To inspect and service, proceed as follows:
Reassemble remaining pump components in
accordance with Section 5.1.4 Actuator Neck Seal
(A21) Instruction 4 and 5.1.3 Actuator Seal (A18)
Instructions 6 to 10, inclusively.
10. Replace drain plug (D13) together with sealing
washer (D14) and refill bearing housing (D06) with
clean oil to level of plug (D08) and replace plug
together with ‘O’ ring (D07). Refer to Section 3.1
Pump Lubrication for details of the oil required for
the Bearing Housing.
5.2 Separator Maintenance
Float (B11)
If water in significant quantities continuously passes
through the exhaust valve (A07) of the air pump, it is
probable that the float (B11) is in need of replacement.
To inspect and service, proceed as follows:
1.
Disconnect air hose (A01) by loosening hose clip
(A02), and twin prime (A40) by loosening hose clip
(A02).
2.
Remove nuts (A11) and washers (A12) and lift off
separator cap (B01) complete with peel
valve/upper diffuser assembly (B01) to (B21),
inclusively.
3.
Examine condition of float (B11) and replace with
new component if punctured or significantly worn.
Check condition of peel valve rubber (B21) and
bush (B07) replacing them, if necessary, in
accordance with Section 5.2.2 Peel Valve (B21).
Also check for deposits of solids likely to interfere
with the smooth working of the float system.
4.
5.
1.
Remove separator cap sub-assembly (B01) to
(B21) and unscrew float (B11) and nut (B12).
2.
Release screws (B09) and spring washers (B10)
to allow upper diffuser/valve assembly to be
withdrawn.
3.
Remove screws (B04) and sealing washers (B05)
to allow upper diffuser (B06) to be removed from
the port plate sub-assembly.
4.
Examine condition of peel valve rubber (B21) and
air ports In plate (B03) which it should completely
cover when the float is fully raised. If the rubber
does not seat correctly, is distorted, or in any way
damaged, it must be removed and discarded by
releasing screws (B16).
5.
To fit new peel valve rubber (B21):
6.
When fitting a new float, ensure that it is securely
tightened against nut (B12). During this procedure
Dupagro B.V.
Ooststeeg 102
6708 AX Wageningen
The Netherlands
Peel Valve (B21)
If significant quantities of water are discharged from
the exhaust valve (A07) of the air pump, and the float
(B11) is in satisfactory condition, it is probable that a
fault exists in the peel valve assembly.
Assembly tool (Part No. 0015101000) must be
used when replacing bearing/ seal housing
assembly to ensure that the wiping edges of the
seal assembly (A25) are not damaged. The drive
rod must be smeared with clean oil to assist this
procedure. See Section 6.5. Gasket (A27) must
be renewed. Always use a component supplied
by Selwood Ltd. Ensure that ports in housing
(A24) are in the 3 and 9 o'clock positions.
5.2.1
If all components are seen to be in satisfactory
condition, replace separator cap assembly,
washers (A12) and nuts (A11). Alternately tighten
each nut a small amount to ensure that the cap is
pulled down evenly. Do not over tighten. Replace
air hose(s) and re-tension hose clip (A02).
10
Phone +31 (0) 317 840 197
info@dupagro.com
www.dupagro.com
a)
Carefully clean existing parts thoroughly,
especially surfaces of port plate (B03), and
clamp bars (B19) and position new rubber on
plate.
b)
Assemble screws (B16), clamp bar (B19),
clamp bar seal (B20), washer (B18) and nuts
(B17) in sequence shown on drawing.
Alternately tighten each nut a small amount to
ensure that even clamping pressure is
produced. Correctly tightened nuts will not
cause the clamp bar to distort the rubber.
Carefully attach the ends of the valve rubber (B21)
to the operating plate (B15), noting that the
components and method of assembly are identical
to those described in Instruction 5 of this Section
except that clamp bar seal (B20) is omitted.
Again, ensure that the nuts are not over tightened.
DUPAGRO.COM
Selwood Seltorque S150 Manual
7.
After completing Instructions 5 and 6 of this
Section, check that the peel valve rubber is
capable of closing all of the air holes in port plate
(B03) when operating rod (B13) is square to the
plate and fully lifted.
8.
Check condition of bush (B07) in upper diffuser
B06) and replace, together with clip (B08) and
nitrile washer (B37), if significantly worn.
bush (B07) and operating rod (B13), and replace if
significantly worn in accordance with Section 5.2.2
Peel Valve (B21) Instructions 3 to 11. Remove all
deposited solids that would interfere with the free
movement of the mechanism, obstruct the
passage of air across the port plate holes, or
inhibit the flow of water (through the holes in the
upper diffuser, for example).
4.
NOTE: The operating rod (B13) is normally a slack fit
in the bush.
9.
Position port plate sub-assembly on upper diffuser
(B06), fit washers (B05) after checking that they
will seal efficiently and fully tighten screws (B04).
Reassemble nut (B12) and screw float (B11) on to
operating rod and tighten securely in accordance
with Section 5.2.1 Float (B11) Instruction 5.
The fabricated separator chamber (B35) (Part No.
0015105100 is normally utilized when the pump is
fitted with Twin Prime where the larger volume allows
better separation of air from the pumped liquid.
10. Recheck operation of peel valve rubber (B21) to
ensure that it fully covers air ports in plate (B03)
when the float is located in the upper diffuser
cone. In this position there should be a gap of
3.5 mm between the heads of the centre clamp
bar screws (B16) and the operating plate (B15). If
the dimension is incorrect, adjust position of float
on operating rod.
The two top fixings attaching the separator chamber
(B35) to the pump body (C09) are located inside the
chamber necessitating (B36) M12 dome nuts and
spacer washers to protect the stud threads.
11. Examine condition of gasket (B02) and renew, if
necessary, before installing between port plate
(B03) and separator cap (B01).
Fit spring
washers (A12) and screws (A11) each of which
should be sequentially turned a small amount until
fully tightened. Gasket (B02) must be evenly
compressed.
5.3 Impeller, Mechanical Seal and
Delivery Valve Maintenance
5.3.1
†‡
Deposits of Solids
To remove and replace, proceed as follows:
When handling liquids containing solids capable of
adhering to product wetted surfaces, it is advisable
periodically to check the valve system in the separator.
To inspect and service, proceed as follows:
1.
2.
3.
Remove separator cap sub-assembly in
accordance with Section 5.2.1 Float (B11)
Instructions 1 and 2, allowing separator body
(B22) together with lower diffuser (B24), to be
lifted off the suction tube (B27).
Remove any deposits of scale from lower diffuser
(B24) and check condition of welds securing its
circular bottom to the perforated cylinder.
Remove any solids that may have accumulated in
the suction tube (B27), renew gasket (B25) and
reposition separator body/lower diffuser assembly
on suction tube.
1.
Remove air hose item (A01), twin prime item
(A39) and (A40) from separator cap (B01), after
loosening relevant hose clip (A02).
2.
Remove nuts (A11) and washers (A12), and lift off
separator cap (B01) complete with peel
valve/upper diffuser assembly, (B01) to (B21)
inclusively.
3.
Lift separator body (B22) complete with lower
diffuser (B24) off suction tube (B27) or (B35)
allowing (dome) nuts (B36) or (B29) and spring
washers (B39) or (B30) to be released.
4.
Withdraw suction tube (B27) or (B35) and gasket
(B28) after removing nuts (B29) and associated
spring washers (B30).
5.
Drain oil from flushing chamber by removing filler
cap assembly (D08) and drain plug (D34). The
condition of the oil will indicate whether or not the
mechanical seal has been functioning correctly. If
contamination is evident, the mechanical seal
must be replaced in accordance with Section 5.3.2
Mechanical Seal (C08).
6.
Remove impeller screw (C01) and washers (C02)
and (C03), and withdraw impeller (C04) from drive
shaft (D17). To remove the screw, it will be
necessary to lock the impeller by means of a
wooden block wedged between the impeller
blades and pump body (C09).
Remove deposited materials from surfaces of
upper diffuser (B06) and note, in particular,
condition of welds securing cone and disc to
perforated diffuser body. Also examine diffuser
†
Use lower Diffuser (Part No. 1594161000) for sludge
handling duties. This is recognised by holes in the base as
well as around the side.
‡
Use lower Diffuser (Part No. 00-15-038000) for other
applications where no solids are present which can adhere to
the internal surfaces.
Dupagro B.V.
Ooststeeg 102
6708 AX Wageningen
The Netherlands
11
Phone +31 (0) 317 840 197
info@dupagro.com
www.dupagro.com
Impeller (C04)
Generally speaking, it is only necessary to remove the
impeller if the existing component has become
severely abraded, or if access to other rotating parts is
required.
12. Replace separator cap sub-assembly in
accordance with Section 5.2.1 Float (B11)
Instruction 6.
5.2.3
Once it is established that all components are in a
satisfactory condition and are free from scale,
replace
separator
cap
sub-assembly
in
accordance with Section 5.2.1 Float (B11)
Instruction 6. Any re-assembly work carried out
on the peel valve assembly should be in
accordance with Section 5.2.2 Peel Valve (B21)
commencing Instruction 1.
DUPAGRO.COM
Selwood Seltorque S150 Manual
NOTE:
An impeller removal tool (Part No.
0015WRS781) is available to facilitate removal of the
impeller, refer to Section 6.10 Remove Impeller.
In the event of abrasive materials being detected in the
oil, it is likely that lip seal (D04) will have become worn
and necessitate replacement in accordance with
Section 5.4.3 Bearings and Lip Seal (D15, D18 and
D04).
Removal of the impeller will allow the mechanical seal
spring to expand. Do not touch the shaft sleeve (C06)
or spring if the mechanical seal has been functioning
correctly and only the impeller is to be replaced.
Premature failure of the mechanical seal assembly
could result if the seal's faces are disturbed by moving
the shaft sleeve.
7.
8.
9.
Daily checks on oil condition should ensure that seal
failure is detected before damage occurs to related
components.
If the mechanical seal leaks, proceed as follows:
When fitting a new impeller, ensure that key (C05)
is not a tight fit in the impeller keyway. If
necessary, remove very small amounts of metal
from the sides of the key to achieve a close sliding
fit that will not allow any perceptible rotation of the
impeller on the shaft, and yet allow the impeller to
slide into place by hand. Apply Rustilo 431 grease
(or approved equivalent) to all impeller mounting
surfaces.
Check condition of nylon patch on impeller screw
(C01). It is essential that this screw should be stiff
to turn in the thread of the shaft. On no account
use a screw that moves freely. Use a new screw
if the head of the original component is abraded or
if the screw is not a friction fit in the shaft thread.
Do NOT lubricate these threads.
Replace impeller (C04), washer (C03) two
washers (C02) with concave faces towards
impeller and impeller screw (C01), and tension
screw to 80lbf ft (11kgf m) torque. It is essential
that this screw is correctly tensioned. During this
operation, it will be necessary to lock the impeller
by means of a wooden block wedged between the
impeller blades and pump body (C09). Remove
block after use.
10. Use Rustilo 431 on inside of pump register. Fit
new gasket (B28), position suction tube on studs,
fit washers (B30) and (B39) and fully tighten nuts
(B29) and (B36). Grease should be smeared on
the inside of the dome nuts (B36), which must be
correctly positioned on studs inside suction tube.
11. Renew gasket (B25), reposition separator body
sub-assembly on suction tube, and fit separator
cap assembly. Assemble washers (A12) and nuts
(A11) and alternatively tighten each nut a small
amount to ensure that the cap is pulled down
evenly. Do NOT overtighten.
13. Replace drain plug (D34) using PTFE tape as a
sealant, and fill flushing chamber with new oil to
level of plug. Replace plug and ‘O’ ring (D08) and
(D07). Refer to Section 3.1 Pump Lubrication for
details of the oil required for the flushing chamber.
Mechanical Seal (C08)
2.
Remove impeller (C04) in accordance with
Section 5.3.1 Impeller (C04) Instructions 1 to 6
inclusively, and remove impeller key (C05).
3.
Withdraw shaft sleeve (C06) together with rotating
mechanical seal parts and spring. It is likely that
‘O’ ring (C07) will be withdrawn with the sleeve
remove it and check condition. Replace ‘O’ ring if
unsuitable for further service.
4.
Using seat removal tool (Part No. 0015166000),
withdraw mechanical seal stationary seat from its
housing in pump body (C09). Also remove the
seat's rubber joint ring. Refer to Section 6.3
Removal of Mechanical Seal Stationary Seat and
Joint Ring.
5.
The rotating parts of mechanical seal (C08) should
now be removed from the shaft sleeve and
discarded, taking care not to damage the sleeve's
surfaces. This operation should be carried out by
hand using a tool that will not scratch the sleeve.
Once removed, examine condition of sleeve and
replace with new component if unacceptably
corroded or worn.
7.
The mechanical seal should be replaced if the flushing
chamber oil continuously leaks into the pumped fluid,
or if the oil becomes contaminated with the product.
This latter condition is sometimes indicated by leakage
of fluid out of a breather cap (D12). Under extreme
conditions, pumped fluid may be seen escaping out of
the vent at the bottom of flushing chamber (D33).
Dupagro B.V.
Ooststeeg 102
6708 AX Wageningen
The Netherlands
Drain oil from flushing chamber (D33) by removing
its filler cap (D08) and drain plug (D34).
6.
12. Reposition air hose (A01) on spigot of separator
cap (B01) and tighten hose clip (A02).
5.3.2
1.
12
Phone +31 (0) 317 840 197
info@dupagro.com
www.dupagro.com
IMPORTANT ADVICE
New mechanical seal components must
be handled with great care, in
particular, the seal faces must not be
touched by hand and must only come
into contact with clean soft paper that is
free
from
abrasive
materials.
Premature seal failure is likely to occur
if this advice is not heeded.
Thoroughly clean recess in pump body (C09) and
also the surrounding surfaces. Smear lubricant
(soft soap or washing up liquid, but not grease) in
recess and also on outside diameter of rubber
joint ring. Using several layers of clean soft paper
to protect the seating face, press seat into recess
by applying even finger pressure. Make sure that
the highly polished sealing face is on the impeller
side of the recess, that the new joint ring has been
used, and that the seat is positioned directly
against the shoulder at the bottom of the recess,
the face must be absolutely clean.
Smear oil on drive shaft diameters and ‘O’ ring
(C07). Position ‘O’ ring on shaft taking care to
prevent it contacting the shaft's keyway. If a new
shaft sleeve (C06) is being used, ensure that it is
capable of sliding freely along the shaft and
correctly trapping the ‘O’ ring in the recess
provided.
DUPAGRO.COM
Selwood Seltorque S150 Manual
8.
9.
tightened screws will not cause the clamp bar to
distort the rubber. Seal screws with Loctite 572.
With clean hands, smear soft soap on outside
diameters of shaft sleeve (C06) and place flange
down on a flat, clean surface. Smear soft soap on
the inside of the rubber seal bellows and before it
dries push the bellows onto the shaft sleeve (face
upwards) with a twisting action. Make sure that the
face is protected during this procedure. The
reduced diameter of the sleeve will assist location
of the seal, which must be pushed until it rests
firmly against the sleeve flange. Apply even
pressure to the spring and carrier (Not the seal
face)..
5.4 Maintenance of Flushing
Chamber, Air Pump
Mechanism, Drive Coupling,
Drive Shaft Bearings and Lip
Seal
5.4.1
Make sure seal face is clean and lubricate with a
couple of drops of fresh oil spread with a clean
finger. Carefully place the sleeve on pre-lubricated
shaft see Section 5.3.2 instruction 7 and slide until
both faces touch together. There is no need to
compress the seal this will be done by the fitment
of the impeller.
Leakage of oil through the vent at the bottom of
flushing chamber (D33) could be due to failure of either
of the lip seals (D04). If the pumped liquid also leaks
through the vent, the mechanical seal (C08) will
require to be replaced in addition to its adjacent lip seal
(D04). In any of these events, proceed as follows:
10. Refit key and lightly grease protruding shaft and
Rustilo 431 or equivalent. Refit impeller, washers
and screw in accordance with Section 5.3.1
instructions 7 to 9. The action of tightening the
impeller screw (80 lbf/ft – 11Kgf/m torque) will
compress the seal assembly into position.
Replace remaining components in accordance
with Section 5.3.1 Impeller (C04) Instructions 10
and 13, inclusively.
5.3.3
Delivery Valve (C27)
Failure of the pump set to pump under suction lift
conditions could be due to a fault in the delivery valve
assembly.
To inspect and service, proceed as follows:
1.
Ensure that pump has been shutdown and the
delivery line has been drained.
2.
Release T-bolt (C19), swing locking bar (C22)
clear, and remove inspection panel (C24) and
gasket (C25). It now becomes possible to lift the
valve by hand to expose the valve seat (C16) so
allowing foreign matter to be removed. Also
undertake a preliminary check of the condition of
the valve rubber.
Flushing Chamber (D33)
1.
Drain oil from flushing chamber and bearing
housing by removing filler caps (D08) and drain
plugs (D13) and (D34).
2.
Remove separator assembly and suction tube
(B27) or (B35) in accordance with Section 5.3.1
Impeller (C04) Instructions 1 and 4, inclusively.
3.
Remove impeller screws (C01) and washers (C02)
and (C03), and withdraw impeller (C04)
mechanical seal spring, and shaft sleeve (C06)
complete with mechanical seal parts (C08).
Handle the sleeve and mechanical seal with great
care and store in safe place, particularly if these
parts are to be reused.
4.
Remove split guard fitted around flexible coupling,
and release all of the coupling's fasteners allowing
the rubber tyre to be removed.
5.
Attach lifting equipment to bearing housing and
pump body in compliance with requirements of
Health and Safety at Work Act, 1975.
6.
Remove nuts, bolts and washers securing pump
to chassis and hoist clear, carefully noting the
positions of any shims between pump feet and
chassis.
7.
Lower unit onto working surface and, in
compliance with Health and Safety at Work Act,
1975, tip pump onto ends of studs (C10) ensuring
that they are suitably protected from damage.
8.
Remove nuts (A11) and spring washers (A12) and
carefully separate bearing housing and flushing
chamber assembly from pump body (C09).
During this operation, be very careful not to
damage the mechanical seal stationary seat by
allowing it to contact the shaft.
It now becomes possible to remove flushing
chamber (D33) from bearing housing (D06), after
releasing screws (D31) and spring washers (A06).
3.
If further disassembly is required, remove screws
(C29) and washers (A13), allowing clamping bar
(C28) and delivery valve (C27) complete with
valve plates (C26) and (C30) to be removed.
4.
Separate upper and lower valve plates (C26) and
(C30) by removing nut (C31), and examine
condition of rubber (C27), especially along the
hinge line and seating surface.
Discard if
damaged or misshapen.
5.
To replace valve seat (C16), remove valve
chamber (C18) after releasing nuts (B31) and
spring washers (C15).
9.
6.
Reassemble components in reverse order,
renewing gaskets (C17) and (C25) if necessary.
Ensure that radiused edge of clamping bar (C28)
is adjacent to hinge line of valve rubber (C27) and
that each screw is tightened a small amount so as
to produce an even clamping pressure. Correctly
10. To replace lip seals (D04):
Dupagro B.V.
Ooststeeg 102
6708 AX Wageningen
The Netherlands
a)
13
Phone +31 (0) 317 840 197
info@dupagro.com
www.dupagro.com
Press failed components out of housings and
discard.
DUPAGRO.COM
Selwood Seltorque S150 Manual
b)
Thoroughly clean all surfaces of flushing
chamber (D33) and press new seals into
position, ensuring that they face in the correct
directions: The garter spring fitted to the lip of
the seal nearest the bearing housing, should
be visible from the bearing housing side of the
flushing chamber. The garter spring fitted to
the lip of the seal nearest the impeller, should
be visible from the impeller side of the
flushing chamber. Refer to Section 6.8.5
Assemble Flushing Chamber for disposition of
seals.
and A28) Instruction 8 and Section 5.1.4 Actuator
Neck Seal (A21) Instruction 4.
19. Replace remaining air pump components in
accordance with Section 5.1.3 Actuator Seal (A18)
Instructions 6 and 10, inclusively.
20. Replace drain plug (D34) using PTFE tape as
sealant, and fill flushing chamber with new oil to
level of plug hole. Replace plug (D08) with ‘O’
ring (D07). Refer to Section 3.1 Pump Lubrication
for details of the oil required for the flushing
chamber.
21. Repeat this procedure for bearing housing
ensuring that level plug (D08) with ‘O’ ring (D07)
are replaced after the correct oil level is attained.
11. Replacement of the flushing chamber subassembly in the bearing housing must be
undertaken very carefully to ensure that the lips of
seals (D04) are not damaged by the shoulders on
the drive shaft (D17). Use assembly tool (Part No.
0015165100) for this purpose.
A generous
quantity of oil should be applied to the shaft to
assist this operation, and a new gasket (C13)
should be fitted. Replace and tighten screws
(D31) and spring washers (A06).
5.4.2
Should actuator (A20) fail to reciprocate when the
pump is running, or if other abnormal conditions are
suspected, the air pump mechanism should be
immediately inspected to minimise the risk of
consequential damage.
Proceed as follows:
12. Position new gasket (C13) on studs (C14) and fit
bearing housing assembly to pump body, taking
great care to ensure that the shaft does not touch
the mechanical seal stationary seat. Replace and
tighten nuts (A11) and spring washers (A12).
13. Using lifting equipment in compliance with the
Health and Safety at Work Act, 1975, position
pump unit on chassis being careful to replace any
shims in their original positions. Replace nuts,
bolts and washers and assemble, but do not
tighten nuts.
14. Refer to Section 1.5 when refitting the pump to a
diesel engine. Refer to Section 1.7 when refitting
the pump to an electric motor.
15. Replace split guards around flexible coupling and
ensure that it is securely fastened, with nuts bolts
and washers. Also fasten to flywheel guard where
applicable with bolts and washers.
16. Read Instructions 19 to 21 of this Section and
Section 5.4.2 Air Pump Mechanism Instructions 1
to 3, and:
a)
Carefully remove any foreign matter from the
sleeve and mechanical seal components.
Smear clean engine oil on both the ‘O’ ring
(C07) and the drive shaft diameters.
b)
Position the ‘O’ ring on the shaft taking care
to prevent it contacting the drive shaft's
keyway, and slide the sleeve/seal assembly
onto shaft (carbon face towards stationary
seat) and press into working position using
only the sleeve's flange.
c)
Ensure that ‘O’ ring is correctly trapped in
sleeve recess.
17. Replace impeller, suction tube and separator
components in accordance with Section 5.3.1
Impeller (C04) Instructions 7 to 12, inclusively.
18. Replace bearing/seal housing assembly and
actuator neck seal in accordance with Section
5.1.5 Drive Rod Seal Assembly and Bearing (A25
Dupagro B.V.
Ooststeeg 102
6708 AX Wageningen
The Netherlands
Air Pump Mechanism
14
Phone +31 (0) 317 840 197
info@dupagro.com
www.dupagro.com
1.
Drain oil from bearing housing and flushing
chamber by removing filler caps (D08) with ‘O’ ring
(D07) and drain plugs (D13) with sealing washer
(D14) and (D34).
2.
Remove air pump components in accordance with
Section 5.1.3 Actuator Seal (A18) and Section
5.1.4 Actuator Neck Seal (A21) Instructions 2 and
3 (discard actuator neck seal if it has failed).
3.
Being careful not to damage the flat sealing faces
of housing (A24) carefully withdraw housing
complete with bearing and sealing components
from bearing housing (D06) and drive rod (D37).
4.
Carry out Section 5.3.1 Impeller (C04) Instructions
2 to 4, inclusively.
5.
Carry out Section 5.4.1 Flushing Chamber (D33)
Instructions 2 to 9, inclusively.
6.
Release nut (D38) and withdraw screw (D27),
allowing fulcrum pin (D28) to be removed. Drive
rod (D37) and connecting rod (D26) may then be
withdrawn. If second priming pump is fitted,
repeat these operations, ensuring that the
connecting rod, fulcrum pin and drive rod
components are kept as sets, and can later be
reassembled in their original positions.
7.
Remove circlip (D24). Eccentric (D23) can now
be removed by inserting M10 bolt in tapped hole
provided and tapping to loosen in an anticlockwise direction (eccentric has a right hand
thread). See Section 6.9 Remove Eccentric.
8.
Examine condition of all components and renew
failed or significantly worn items. A replacement
connecting rod, complete with bushes, should be
ordered against sub-assembly (Part No.
0015908000).
9.
To rebuild mechanism, ensure thread and abutting
shoulder is thoroughly clean and simply screw on
the eccentric, making sure it abuts against the
shaft (D17) shoulder. Refit circlip (D24).
DUPAGRO.COM
Selwood Seltorque S150 Manual
10. Position connecting rod(s) (D26) on eccentric,
thoroughly degrease tapping in drive rod(s) (D37)
and assemble drive rod(s) and fulcrum pin (D28)
in connecting rod(s).
11. Assemble lock nut(s) (D38) to new screw (D27)
locating groove in fulcrum pin (D28). Do NOT reuse old component. Fully tighten unit against
recess in drive rod(s) (D37) to 2.9kgf m (21lb. ft)
torque.
12. Replace flushing chamber and pump on chassis in
accordance with Section 5.4.1 Flushing Chamber
(D33) Instructions 11 to 15, inclusively.
2.
NOTE: It will be necessary to start at instruction
Section 5.4.1 Flushing Chamber (D33) Instruction 10 if
lip seals (D04) have to be replaced.
the seal and if damaged replace ‘O’ ring
(D05).
d)
Refit the components taking care not to
damage the seal on the sharp edges of the
keyway.
e)
Replace drain plug (D13) and sealing washer
(D14) in bearing housing (D06). Fill with oil to
correct level and replace level plug (D08) and
oil ‘O’ ring (D07).
For bearing replacement proceed as follows:
a)
Carry out Section 5.4.2 Air Pump Mechanism
Instructions 1 to 8, inclusively.
13. Read Section 5.3.2 Mechanical Seal (C08)
Instruction 8 and carefully remove any foreign
matter from the sleeve and mechanical seal
components. Smear clean oil on both the ‘O’ ring
(C07) and the drive shaft diameters. Position the
‘O’ ring on the shaft taking care to prevent it
contacting the drive shaft's keyway, and slide the
sleeve/seal assembly onto shaft (carbon face
towards stationary seat) and press into working
position using only the sleeve's flange. Ensure
that ‘O’ ring is correctly trapped in sleeve recess.
b)
Remove lipseal carrier (D03) lipseal (D04)
and ‘O’ ring (D05) by removing capscrews
(D01) and washers (A06). If lipseal (D04) is
to be utilized again ensure seal is not dragged
over sharp edge of keyway.
c)
Moving to the impeller end of the bearing
housing (D06), remove bearing carrier (D20)
by removing setscrews (D22) and washers
(A13). The bearing carrier (D20) can be
jacked free by the two screwed holes
adjacent to the fixings.
14. Replace impeller, suction tube and separator
components in accordance with Section 5.3.1
Impeller (C04) Instructions 7 to 12, inclusively.
d)
15. Replace bearing/seal housing assembly and
actuator neck seal in accordance with Section
5.1.5 Drive Rod Seal Assembly and Bearing (A25
and A28) Instruction 8 and Section 5.1.4 Actuator
Neck Seal (A21) Instruction 4.
Remove drive shaft (D17) complete with
bearings (D18) and (D15) from bearing
housing (D06) by applying pressure
(preferably with a fly-press) to the protected
coupling end of the drive shaft.
e)
16. Replace remaining air pump components in
accordance with Section 5.1.3 Actuator Seal (A18)
Instructions 6 to 10, inclusively.
Press bearings (D15) and (D18) from shaft
(D17) and discard. Thoroughly clean all
bearing housing surfaces and inspect shaft
(D17) for damage.
f)
To fit new bearings, thoroughly clean all drive
shaft surfaces and smear oil on bearing
mounting diameters. Press new bearings
onto shaft using workshop tools and method
described
under
Section
6.11
Fit
Replacement Drive End Bearing and to
Section 6.12 Fit Replacement Impeller End
Bearing, taking care to ensure that:
17. Replace drain plug (D34) using PTFE tape as
sealant and fill flushing chamber with new oil to
level of plug (D08). Replace plug and ‘O’ ring
(D07). Refer to Section 3.1 Pump Lubrication for
details of the oil required for the flushing chamber.
18. Repeat this procedure for bearing housing
ensuring that level plug (D08) and ‘O’ ring (D07)
are replaced after the correct oil level is attained.
i)
The bearings are kept in their as received
condition and do not come into contact
with foreign matter;
5.4.3
ii)
Pressure during fitting is applied directly
to the inner rings of the bearings and not
to the outer rings;
Bearings and Lip Seal (D15, D18 and
D04)
In the unlikely event of a bearing failure, or if the
bearing housing oil escapes from the engine end of the
bearing housing by passing across lip seal (D04) it
becomes necessary to undertake work on the drive
shaft assembly.
1.
To replace lip seal (D04) only proceed as follows:
a)
Remove lip seal carrier (D03) lip seal (D04)
and ‘O’ ring (D05) by removing cap screws
(D01) and washers (A06).
c)
Prise out the old lip seal and press in a new
seal. When fitting lightly lubricate the lips of
Dupagro B.V.
Ooststeeg 102
6708 AX Wageningen
The Netherlands
g)
15
Phone +31 (0) 317 840 197
info@dupagro.com
www.dupagro.com
iv) When fitted, the bearings register against
the shaft shoulders.
NOTE: Use of the workshop tools will ensure the
above criteria is fulfilled.
Remove oil from bearing housing by removing
the filler cap (D08) and drain plug (D13).
b)
iii) The bearings are square to the shaft
throughout the fitting procedure; and
Before replacing the drive shaft sub-assembly
into the bearing housing, make sure that the
bores that receive the bearings are clean and
smeared with clean oil.
Care must be
exercised when passing the drive shaft with
bearings into the bearing housing to ensure it
DUPAGRO.COM
Selwood Seltorque S150 Manual
is concentric and parallel to the mating
surfaces. This is described at Section 6.13
Assembly of Drive Shaft with Bearings into
Housing.
h)
4.
The sub-assembly should be pressed into
position by 'jacking' home the bearing carrier
(D20) by means of the setscrews (D22). Do
NOT apply shock loads such as hammer
blows.
5.
The remaining components may now be
reassembled in accordance with Section 5.4.2
Air Pump Mechanism Instructions 9 to 18,
inclusively.
It is possible to work on individual components of the
chassis without removing either the engine or the
pump unit. In all cases work should be undertaken on
level ground and care should be exercised to ensure
that the pump set is fully immobilised. If the chassis is
to be completely dismantled, both the engine and
pump unit should be removed in compliance with the
requirements of Health and Safety at Work Act, 1975.
2.
Drain the fuel by removing the drain plug and
washer.
b)
Disconnect the fuel feed and return lines.
c)
Place suitable supports beneath the tank and
remove the four nuts bolts and washers, the
access to the nuts and washers being inside
the main chassis members. The tank can
then be slid from beneath the chassis,.
To clean the fuel feed filter:
Remove the three set bolts and washers.
b)
Lift the filter from the tank, taking care not to
lose the gasket.
To remove the front axle:
b)
c)
d)
Support the chassis beneath either the fuel
tank ensuring that the weight is taken on a
suitable piece of wood extending the full width
of the tank, or underneath the main chassis
members.
Remove the split pins and washers retaining
the wheels and slide the wheels from the
axle.
Remove the split pin and washer. From one
side only of the draw bar pivot pin, slide the
pin free of the pivot and draw bar thus
allowing the draw bar to come away from the
assembly.
Remove the split pin and washer from one
end of axle pivot pin and slide the pin clear of
the pivot and axle thus freeing the axle.
Dupagro B.V.
Ooststeeg 102
6708 AX Wageningen
The Netherlands
Extract and replace spring roll pin if damaged,
from top of pivot.
To remove the rear axle:
a)
Support the chassis and remove the wheels
as described in Instruction 3 of this Section.
b)
Release the four horizontally disposed nuts,
bolts, and spring washers and the two vertical
nuts, bolts, spring and taper washers.
6.
To remove the lifting eye remove the four set bolts
and spring washers.
7.
Reassembly is a reverse of the above, ensuring
that the wheel hubs, axles, pivot, pivot turntable,
axle pivot pin and drawbar pin are thoroughly
cleaned and liberally greased. Renew the fuel
feed filter gasket if necessary.
To remove the canopy proceed as follows:
a)
a)
Drop the pivot clear of the chassis member.
5.6 Supersilent Canopy - Canopy
Removal
NOTE: The filter can be removed for cleaning without
removing the tank from the chassis.
3.
b)
NOTE: When placing pivot top cap on top of pivot,
ensure the top cap locates correctly over the spring roll
pin in top of pivot shaft. Also when placing the lock
washer with fixing bolt in place over the pivot top cap,
ensure small tab locates in second hole of the pivot top
cap - the first hole locating the spring roll pin. Always
use new lock washer. Finally bending up in one place
to lock against the flat of the setbolt hexagon.
To remove the fuel tank:
a)
Bend back lock washer and release the set
bolt lock washer and pivot topcap.
c)
5.5 Chassis Maintenance
1.
a)
NOTE: If the engine is in place on the chassis the
access to the set bolt is from beneath the engine
between the chassis members.
NOTE: 'Jack' home evenly. Protect surface of bearing
carrier (D20) with plain washers under setscrews (D22)
finally remove setscrews (D22) and fit new washers
(A13).
i)
The front axle pivot locking system is designed as
a backup to the single bolt fixing. To remove
pivot:
16
Phone +31 (0) 317 840 197
info@dupagro.com
www.dupagro.com
1.
Disconnect the battery positive and negative and
remove the battery assembly.
2.
Disconnect exhaust pipework within
having first removed insulation blanket.
3.
Disconnect emergency stop wiring plugs from stop
buttons from within canopy. Tie up onto engine to
prevent damage to wiring.
4.
Remove suction and discharge aperture cover
plates. Remove foam plugs and rubber blanking
gasket.
5.
Remove discharge fitting and extension piece
from discharge flange of pump.
6.
In each corner of the skid, working up through the
upper flange of the skid base are four M16
screws. Remove these in turn to release the
canopy from the corners of the skid base.
7.
With the corners released undo the M24 nyloc
nuts from the centre lifting studs. The studs are
locked internally and will not turn beyond a few
degrees of movement. When these are both
released the canopy is ready to be lifted clear.
canopy
DUPAGRO.COM
Selwood Seltorque S150 Manual
8
9.
In order to prevent damage to the engine radiator
and to ensure a clean lift is achieved a pair of M12
eye bolts will be required to be fitted to the roof
section on the radiator end of the canopy. The
mounting positions are blanked off with normal
hex head screws at present, remove these and
replace with eye bolts.
5.8 Supersilent Canopy – Fuel
Tank Refitting
To refit the fuel tank proceed as follows:
Use a set of three or four leg chains. Attach two
to the centre lifting eye and snag the other two to
shorten them so that they pick up the radiator end
of the canopy square. Lift the canopy up and
away from the unit, place down on timber runners
to protect the lower edge.
1.
Refit the tank as per removal taking note of the
fuel drain plug position and its relationship to the
access plug in the skid base. Orientate the tank
so that the drain is behind the larger plug.
2.
Insert the four screws to secure the tank to the AV
mounts and check the alignment of the tank in the
skid base before tightening these screws. During
the tightening procedure a twisting moment can be
applied to the rubber element of the mount which
is undesirable. If this occurs, use or make a
suitable tool to counteract this twist and tighten to
150 Nm. Recheck alignment and ensure no
mounts are twisted. Correct if required.
3.
Refit engine but do not fully tighten the mounting
to the AV mount screws at this stage, finger
tighten only. Reconnect all fuel lines, oil drain and
refit the control panel.
4.
Before refitting the pump unit slacken the grub
screw (hex socket set screw) in the pump half
coupling boss. Ensure that the hub and rubber
element are free to slide on the pump shaft. This
will be used as a guide for checking the alignment
of the coupling at a later stage. Leave the
coupling hub loose on the shaft.
5.
Lift the pump end onto the chassis and push the
unit onto the engine side coupling drive pins. With
the coupling halves engaged drop in the four
pump mounting fasteners and tighten nuts, finger
tighten only.
6.
The pump should now be visually aligned and
tighten down to 150 Nm torque. Check that the
coupling element and hub is free to move on the
shaft to confirm correct alignment. A pry bar can
be used, but it should not require any effort to
move the assembly.
7.
Move the engine on its mountings to make
alignment adjustments. Any shimming to adjust
vertical height should be added under the engine
AV mounts.
8.
When alignment is satisfactory gradually tighten
the four AV mount screws to 70 Nm, checking
element/hub movement on the shaft each time.
During this procedure it is possible for the AV
mount rubber to twist. To prevent this use a
suitable tool to counteract the applied torque on
the mount. This will maintain the mount in a
neutral condition.
9.
When complete, tighten the grubscrew in the
coupling hub into position on the pump shaft. The
element should not be fitted against the flywheel
adaptor plate but clearance should be present to
prevent end thrust transmission through the
coupling element.
5.7 Supersilent Canopy -Fuel Tank
Removal
To remove the fuel tank proceed as follows:
1.
With the canopy removed it will now be necessary
to remove the pump and engine from the tank
structure. Begin by removing the coupling guards
from the engine bell housing.
2.
Disconnect the air pump silencer hose from the
discharge elbow of the air pump. Remove the
clamps holding silencer body. Remove the air
pump silencer assembly complete.
3.
Slacken and remove the four M16 fixings holding
the pump body. Attach a suitable lifting device to
the pump and manually draw the pump backwards
off the coupling pins. When the pins are clear of
the rubber element lift the pump unit clear of the
chassis.
4.
5.
To remove the engine the following parts will need
to be removed from the tank/skid structure and
where necessary tied back to the engine to
prevent damage. Disconnect and drain fuel lines.
Undo and remove control panel from bracket.
Working beneath the engine end of the skid
slacken the bulkhead fitting lock nut on the oil
drain hose and remove the hose end from the skid
base. Tie the hose back to a suitable point on the
engine.
The last fixings to be removed are engine mount
to AV mount securing screws. Slacken and
remove each in turn.
6.
The engine is now ready to be removed from the
tank structure. Lift vertically up and away. Watch
for any danger of collision between engine and
tank. The engine will need to be placed in a
suitable frame to prevent damage to the oil drain
or sump.
7.
To remove the tank, slacken and remove four tank
to AV mount screws. With these removed use a
set of four chains to lift the tank unit from the skid
base using the four AV mount brackets.
Dupagro B.V.
Ooststeeg 102
6708 AX Wageningen
The Netherlands
17
Phone +31 (0) 317 840 197
info@dupagro.com
www.dupagro.com
DUPAGRO.COM
Selwood Seltorque S150 Manual
5.9 Supersilent Canopy – Canopy
Refitting
To refit the canopy proceed as follows:
1.
Re-sling the canopy as for removal and lift into
position. Take care not to damage the radiator
when positioning. Lower onto skid base checking
for alignment of the lifting studs.
2.
When down and before fitting any fixings check
that the radiator overflow pipe is not trapped by
the canopy bulkhead. Release if trapped.
3.
Refit canopy lifting stud nuts and four corner fixing
screws. Adjust alignment if necessary and tighten
corner screws then stud nuts.
4.
Remove eye bolts from canopy roof and replace
with fasteners to prevent water ingress.
5.
Refit the delivery extension and fittings and refit
the suction and discharge covers as the reverse of
removal.
6.
Reconnect the
insulating cover.
7.
Refit the fuel lines and control panel.
8.
Refit the air pump exhaust silencer assembly.
9.
Reconnect the emergency stop wiring and refit the
battery assembly and coupling guards.
exhaust
extension
and
10. Fill with fuel and bleed the system as required.
Test run. Inspect all fasteners after 50 hours of
running.
6 WORKSHOP TOOLS
Major Servicing will always be carried out more quickly
by the use of the following special tools and procedure.
More importantly, their use will help to ensure that new
components are not damaged whilst being fitted.
We earnestly advise all pump users to purchase a
complete set of tools.
6.1 Care of Servicing Tools
Always clean, oil and safely store tools after use.
Complete sets of tools are available by quoting:
Part No. 0015948200 - Seltorque S150 Excluding
Impeller Removal Tool Part No. 0015WRS781
Comprising:
Bearing Assembly Stud
0015172100
1
Eccentric Puller Block
0015170000
1
Impeller End Bearing Assy Tube
0015169200
1
Drive Rod Bearing Drift
0015168000
1
Mechanical Seal Seat Removal
Tool
0015166000
1
Dupagro B.V.
Ooststeeg 102
6708 AX Wageningen
The Netherlands
Drive Rod Seal Tool
0010103000
1
Actuator Neck Seal Cone
0015102000
1
Drive Rod Installation Tool
0015101000
1
1.
Lightly clamp seal installation tool against end of
drive rod by means of capscrew, as shown.
2.
Push seal into rear of inner pump body recess
(Part No 0015014000).
3.
Clean exposed shaft and tool surfaces, and smear
with soft soap. Carefully slide the actuator neck
seal onto shaft until it abuts against the conical
shoulder.
6.3 Removal of Mechanical Seal
Stationary Seat and Joint Ring
The tools are simple to employ and have been
designed for use in combination with standard fitter's
tools. For some operations, a simple press, and a
bench complete with a vice will be desirable.
1
1
6.2 Fitting of Actuator Neck Seal
refit
Drive End Bearing Assembly Tool 0015181100
Flushing Chamber Lip Seal Fitting 0015165100
Tool
1.
Ensure oil is drained from flushing chamber.
Remove impeller and shaft sleeve, complete with
rotating mechanical seal components.
2.
Engage tip of removal tool on inside face of seat.
Remove seat by pulling evenly at several
peripheral points.
3.
Joint ring can then be collapsed and discarded.
4.
To replace, the mechanical seal stationary seat
and joint ring must be assembled together with the
outer face of the joint ring smeared with soft soap,
offered up to the flushing chamber housing and
gently pressed home using a piece of wood.
IMPORTANT ADVICE
New Mechanical Seal Components
must be handled with great care. In
particular, the seal faces must not be
touched by hand and must only come
into contact with clean soft paper that is
free
form
abrasive
materials.
Premature seal failure is likely to occur
if this advice is not heeded.
18
Phone +31 (0) 317 840 197
info@dupagro.com
www.dupagro.com
DUPAGRO.COM
Selwood Seltorque S150 Manual
6.5 Fit Seal Housing SubAssembly to Pump
6.4 Removal of Drive Rod Seal
Assembly
1.
Remove internal circlip with suitable pliers and
remove seal assembly by carefully tapping with
blunt punch or drift from bush end.
2.
Replacement of all components may be aided by
smearing adjacent surfaces with soft soap.
3.
Prior to sliding home the drive rod seal carrier
(Part No. 0015195000), wiper seal (Part No. 9140
035070) must first be assembled together, using
insertion tool Part No. 0010103000. Carefully
applied pressure from a hand press or vice jaws
may be employed for this operation.
IMPORTANT ADVICE
4.
1.
Thoroughly clean exposed drive rod surfaces and
position installation tool as shown.
2.
Smear tool and drive rod surfaces with oil.
3.
Thoroughly lubricate drive rod bearing and drive
rod seal with oil and fit new gasket before pushing
seal housing assembly along drive rod until it
registers in bearing housing.
6.6 Remove Drive Rod Bearing
Bush
4.
Parts must be assembled in correct
order and orientation.
Insert shouldered end of drift into bush as shown
in upper sketch.
5.
Great care must be exercised when replacing the
circlip to ensure that the lip of the wiper seal is not
damaged by the handtools used.
Support air pump pedestal evenly on face 'X'
leaving sufficient clearance for bush to emerge
freely.
6.
Push out bearing bush by pressing or striking on
tool face 'Y'.
6.7 Fit New Drive Rod Bearing
Bush
Dupagro B.V.
Ooststeeg 102
6708 AX Wageningen
The Netherlands
19
Phone +31 (0) 317 840 197
info@dupagro.com
www.dupagro.com
1.
Position seal housing on clean flat surface and
register new bush in bore as shown in lower
drawing.
2.
Lightly oil bore and bush to prevent pick up.
3.
Insert shouldered end of drift into bush as shown
in lower sketch.
4.
Insert bush by pressing or striking on tool face 'Y'
until end of bearing is flush with face 'X'.
DUPAGRO.COM
Selwood Seltorque S150 Manual
6.9 Remove Eccentric
Check that circlip has been fitted to eccentric, and
thoroughly clean exposed shaft surfaces and
smear with oil.
2.
Check that lip seal fitting tool is internally and
externally clean, smear with oil and slide over end
of drive shaft as shown.
3.
Check that flushing chamber lip seals are correctly
orientated and generously lubricate their lips with
oil. Slide chamber along fitting tool and onto drive
shaft, taking great care to ensure that it remains
concentric to the shafts axis.
WARNING
Ensure that the lip of the leading seal does not
become deformed.
Dupagro B.V.
Ooststeeg 102
6708 AX Wageningen
The Netherlands
to
eccentric
is
2.
Insert M10 bolt plus washer into eccentric as
shown.
3.
To release tap using drift in anticlockwise
direction, i.e. in direction of arrow 'B'.
6.10 Remove Impeller
Lip seals must not be used to support
the flushing chamber.
4.
Check that circlip adjacent
removed.
NOTE:
If removing eccentric when shaft is
disassembled from pump, clamp with soft jaws on
diameter 'Z'.
6.8 Assemble Flushing Chamber
1.
1.
20
Phone +31 (0) 317 840 197
info@dupagro.com
www.dupagro.com
1.
Pump should be removed from the chassis or the
engine decoupled and the bearing housing
supported.
2.
Remove suction tube together with separator
components ensuring that the gasket between
pump body and suction tube is also removed.
3.
Remove impeller screw and washers.
4.
Remove nuts and washer (8off each) from the
studs protruding from the pump body through the
flushing chamber and bearing housing flange joint.
5.
Offer up impeller removal tool across front face of
pump body as shown ensuring the correct nose
adapter is fitted. Affix by using existing nuts and
washers.
DUPAGRO.COM
Selwood Seltorque S150 Manual
6.
Turn screw handle so that the drive shaft
connected to the bearing housing is pushed
through and out of the pump body leaving the
impeller free.
NOTE: When re assembling impeller ensure end of
shaft is coated with Shell ENSIS grease or approved
equivalent.
6.12 Fit Replacement Impeller End
Bearing
6.11 Fit Replacement Drive End
Bearing
1.
2.
Remove old bearing taking care not to damage
the shaft in any way. Fit soft jaws to vice and
clamp shaft horizontally on diameter 'Z' leaving the
abutment shoulder overhanging.
Screw assembly stud (Part No. 0015172100) into
shaft end until it bottoms. Thoroughly clean
bearing mounting surfaces of shaft and smear with
oil.
3.
Carefully register bearing on shaft, ensuring that it
is NOT contaminated by foreign matter, and
position assembly tool (Part No. 00151811000)
and puller block (Part No. 0015170000) as shown.
4.
Ensuring that the bearing is square to the shaft
and that assembly tool is concentric to the shaft's
centre line, push bearing onto shaft by applying
steady and continuous screwing torque to the M16
nut and washer.
5.
Check that inner ring of bearing is touching
abutment shoulder of drive shaft:
21
Phone +31 (0) 317 840 197
info@dupagro.com
www.dupagro.com
Remove old bearing taking care not to damage
the shaft in any way. Fit soft jaws to vice and
clamp shaft horizontally on diameter 'Z' leaving the
abutment shoulder overhanging.
2.
Screw assembly stud (Part No. 0015172100) into
shaft end until it bottoms. Thoroughly clean
bearing mounting surfaces of shaft and smear with
oil.
3.
Carefully register bearing on shaft ensuring that it
is not contaminated by foreign matter and
position assembly tool (Part No. 0015169200) as
shown.
4.
Ensuring that the bearing is square to the shaft
and that assembly tool is concentric to the shaft
centre line, push bearing onto shaft by applying
steady and continuous screwing torque to the M16
nut and washer.
5.
Check that inner ring of bearing is touching
abutment shoulder of drive shaft.
6.
Replace the bearing spacer and circlip.
NOTE: Bearings may be replaced by using the
assembly tools in conjunction with a press only, thus
eliminating stud and puller block.
NOTE: Bearings may be replaced by using the
assembly tool in conjunction with a press only, thus
eliminating stud and puller block.
Dupagro B.V.
Ooststeeg 102
6708 AX Wageningen
The Netherlands
1.
DUPAGRO.COM
Selwood Seltorque S150 Manual
6.13 Assembly of Drive Shaft with
Bearings into Housing
1.
Remove assembly by releasing the 4 x M12
fixings. The bearing carrier can be jacked free by
the two screwed holes adjacent to the fixings.
Remove the lip seal carrier (ensuring seal is not
dragged over sharp edge of keyway) together with
‘O’ ring and press or strike (with soft faced mallet)
shaft end 'Y', to withdraw bearings and bearing
carrier.
2.
When assembling, all parts should be
scrupulously clean and bearing mounting surfaces
smeared with oil.
3.
Position bearing housing in vertical attitude with
bell end upwards mounted on suitable supports so
that end of shaft can emerge through bottom.
Dupagro B.V.
Ooststeeg 102
6708 AX Wageningen
The Netherlands
22
Phone +31 (0) 317 840 197
info@dupagro.com
www.dupagro.com
4.
Ensure shaft with bearings is inserted into the
bearing housing so that it is concentric and
parallel to the mating surfaces. Assembly is
'jacked' home by tightening the M12 fixings
assembled together with the bearing carrier
60 lbs/ft (8.3 kgf m).
5.
The outer race of the drive end bearing is inserted
by carefully drifting or pressing the race into the
housing. Alternatively, the Lip Seal Carrier (Part
No. 0015200000) may be utilized, pressing the
race into the housing by making use of longer
bolts and jacking home evenly. If this latter
method is employed be sure to use large washers
beneath the bolt head to distribute pressure over a
larger area as the lipseal carrier may be
manufactured in light alloy.
6.
Finally ensure lip seal is in good condition together
with ‘O’ ring before finally bolting up the carrier.
DUPAGRO.COM
Selwood S150 Manual
7 FAULT FINDING GUIDE
This table gives the most common symptoms arising in connection with water handling duties. Please consult
Selwood Pumps for further advice if the service fault is not described, and particularly if the duty has uncommon
characteristics.
At no time should the pump be run if its bearing housing or flushing chamber contains contaminated oil. Very small
volumes of oil may be lost from these chambers during a day's normal running, but remedial action should
immediately be taken if the loss becomes excessive. The most likely causes of failure are given in the sequence in
which they should be investigated. For example, if the pump will not prime, carry out the first service instruction that
is listed and proceed to the second only if the first proves to be inappropriate.
PUMP WILL NOT PRIME, OR LOSES PRIME HAVING PUMPED PRODUCT FOR A BRIEF PERIOD OF TIME
ACTION
COMMENT
1
Check that drain taps fitted to volute and air
pumps are closed.
Drain taps are sometimes left open overnight. If okay,
try Action 2.
2
Remove inspection cover and check that
delivery valve is seating efficiently.
The delivery line MUST BE DRAINED before the cover
is removed. If okay, try Action 3.
3
Disconnect hose from air pump spigot and
attach vacuum gauge to pump - should read
29' H20 (25.6" Hg) or more, after the pump is
stopped.
If vacuum is okay, check Action 4.
Reconnect air pump hose, and check vacuum
at suction spigot of main pump. Correct
reading is given above.
If vacuum is okay, check Actions 5(a) and (b).
(a)
Check all suction side hoses, fittings
and joints for air leaks.
Priming problems are VERY often caused by faults in
supply pipework. Air must not be allowed to pass into
the system across couplings, etc.
(b)
Check strainer and suction hose for
blockages.
Do not use non-reinforced hose. Always fit a strainer of
correct size and type.
6
Examine separator assembly for air leaks or
trapped solids. Check peel valve seat for ice
in cold conditions.
Refer to Section 5.2 Separator Maintenance for
instructions. The float must be able to rise and fall
freely. The peel valve must completely shut off the air
pump when the float rises to its maximum position.
7
Check level of oil in flushing chamber.
If level is very low, mechanical seal may be admitting
air. Top up, and re-check vacuum. Substantial oil loss
indicates seal failure - refer to Section 5.3.2 Mechanical
Seal (C08) for instructions.
8
Examine valves and flexing seals in air pump
assembly and check that castings are not
cracked.
4
5
If vacuum is low or fails quickly, check Action 8.
If vacuum is slow to rise or low at terminal condition,
check Actions 6 and 7.
Refer to Section 5.1 Air Pump Maintenance for
instructions.
OUTPUT AND HEAD ARE LESS THAN PUBLISHED FIGURES
ACTION
COMMENT
1
Check strainer and suction pipework for
blockages. Also check that air is not being
pulled through a vortex created in the supply
reservoir.
Choking of the supply system by solids will increase the
flow resistance, thus increasing the head against which
the pump has to operate, and so reducing output. The
entry of air through faulty pipe joints will have a similar
effect. Reduction also occurs if air is entrained through
a vortex - to eliminate, increase strainer's submergence.
2
Check pump speed with tachometer.
Speed, off load must not exceed 1600rev/min.
3
Check that delivery valve, discharge branch of
casing, and pipework are free from blockages.
Obstructions downstream of the pump will increase the
flow resistance and thus reduce output.
4
Check condition of impeller.
Excessively worn vanes will reduce output. Also check
outside diameter of vanes:
Standard Seltorque S150
Standard Dia.
235mm
Smallest Dia.
219mm
Contact Selwood with pump number to confirm correct
impeller variant fitted.
Dupagro B.V.
Ooststeeg 102
6708 AX Wageningen
The Netherlands
23
Phone +31 (0) 317 840 197
info@dupagro.com
www.dupagro.com
DUPAGRO.COM
Selwood S150 Manual
LIQUID IS BEING PUMPED OUT OF AIR PUMP, I.E. WATER CARRYOVER IS OCCURRING
ACTION
COMMENT
1
Cheek condition of separator assembly.
No significant amounts of water should normally pass
across the air pump. The rubber peel valve may not be
seating correctly, the float may be punctured, or not be
able to rise and fall freely, etc. Also, check that bush is
correctly positioned. Refer to Section 5.2 Separator
Maintenance for instructions.
2
Check condition of valves and flexing seals in
air pump.
On rare occasions, malfunction of the air pump seals In
air pump can cause the separator float to move
erratically. Refer to Section 5.1 Air Pump Maintenance
for instructions.
WATER LEAKING OUT OF FLUSHING CHAMBER VENT BEHIND VOLUTE, OR FROM BREATHER VALVE
FITTED TO CHAMBER
ACTION
1
COMMENT
Drain flushing chamber to check contents.
The chamber should only contain oil. If the mechanical
seal has failed, water may be present in the chamber.
If so, replace seal in accordance with instructions given
in Section 5.3.2 Mechanical Seal (C08).
OIL LEAKING OUT OF FLUSHING CHAMBER VENT BEHIND VOLUTE
ACTION
1
COMMENT
Top up both oil reservoirs, and run pump under
supervision for say 30 min to determine from
which reservoir leakage is occurring.
Replace faulty lip seal in accordance with instructions
given in Section 5.4 Maintenance of Flushing Chamber,
Air Pump Mechanism, Drive Coupling, Drive Shaft
Bearings and Lip Seal.
OIL LEAKING FROM VENTS BEHIND AIR PUMP
ACTION
COMMENT
1
Check that mechanism reservoir has not been
overfilled with oil.
It is extremely difficult to overfill pumps built to latest
specifications. However, earlier machines were fitted
with oil level plugs which did not automatically limit the
oil volumes.
2
Check conditions of air pump drive rod and
associated seal.
Refer to Section 5.4 Maintenance of Flushing Chamber,
Air Pump Mechanism, Drive Coupling, Drive Shaft
Bearings and Lip Seal for instructions.
OIL LEAKING FROM ENGINE END OF PUMP ASSEMBLY
ACTION
COMMENT
1
Check that mechanism reservoir has not been
overfilled with oil.
Although unlikely, incorrect filling may be responsible
for the problem.
2
Replace lip seal between air pump mechanism
and drive shaft bearings.
Refer to Section 5.4 Maintenance of Flushing Chamber,
Air Pump Mechanism, Drive Coupling, Drive Shaft
Bearings and Lip Seal for instructions.
PUMP CANNOT BE ROTATED BY HAND BY MEANS OF STARTING HANDLE, FOR EXAMPLE
ACTION
COMMENT
1
Check for ice in air pump or volute.
In cold weather, ice can form in these chambers if they
have not been drained. Eliminate by means of hot water.
2
Check that air pump assembly is not faulty.
The actuator must be securely fastened to its drive rod,
and must be able to reciprocate freely without touching
any stationary surface. Refer to Section 5.1 Air Pump
Maintenance for instructions.
3
Check that impeller and drive shaft are free to
rotate.
Although unlikely, it is possible for fibrous solids to
restrict the impeller's movement. Also, failure of the
drive shaft bearings may have resulted in the impeller
striking the casing. Seizure of the bearings could also
produce the problem. Refer to Section 5.3 Impeller,
Mechanical Seal and Delivery Valve Maintenance for
instructions.
Dupagro B.V.
Ooststeeg 102
6708 AX Wageningen
The Netherlands
24
Phone +31 (0) 317 840 197
info@dupagro.com
www.dupagro.com
DUPAGRO.COM
Selwood S150 Manual
PUMP PRODUCES UNEXPECTED NOISES WHEN RUNNING
ACTION
COMMENT
1
Check quality and quantity of oil in mechanism
chamber and flushing chamber.
Incorrect volume and quality may result in overheating
as well as abnormal noise. Note that extensive running
under such circumstances can significantly damage
pump components.
2
Check that air pump assembly is not faulty.
The actuator must be securely fastened to its drive rod,
and must be able to reciprocate freely without touching
any stationary surface. Refer to Section 5.1 Air Pump
Maintenance for instructions.
3
Check that air pump mechanism is not faulty.
Excessively worn connecting rod bearings, or an
undersized eccentric or fulcrum pin, could cause this
problem. Refer to Section 5.4 Maintenance of Flushing
Chamber, Air Pump Mechanism, Drive Coupling, Drive
Shaft Bearings and Lip Seal for instructions.
Refer to Selwood Ltd if the above advice does not solve your problem.
Dupagro B.V.
Ooststeeg 102
6708 AX Wageningen
The Netherlands
25
Phone +31 (0) 317 840 197
info@dupagro.com
www.dupagro.com
DUPAGRO.COM
Selwood S150 Manual
NOTES: Linear seal assembly
1.
Complete assembly available as Part No. 0010905000.
2.
Linear Bearing and Seal Assembly (A25) Part Nos. 0015195000, 9140035070 and 9171044100 available as
sub-assembly Part No. 9133035380.
3.
Ensure that seal components are positioned as shown above, and are retained by the internal circlip. Great care
must be exercised when fitting the circlip to ensure that the lip of the wiper seal is not damaged by the hand tools
used. Refer to Section 5.3 Impeller, Mechanical Seal and Delivery Valve Maintenance.
4.
To safeguard the sealing lips, lubricate the bearing and seals with light oil and use seal installation tool when
fitting assembled housing unit to pump assembly. Refer to Section 5.4 Maintenance of Flushing Chamber, Air
Pump Mechanism, Drive Coupling, Drive Shaft Bearings and Lip Seal.
Dupagro B.V.
Ooststeeg 102
6708 AX Wageningen
The Netherlands
26
Phone +31 (0) 317 840 197
info@dupagro.com
www.dupagro.com
DUPAGRO.COM
Selwood S150 Manual
8 PARTS LIST
8.1 Air Pump Parts (Single Prime)
ITEM
A01
A02
A03
A04
A05
A06
A07
A08
A09
A10
A11
A12
A13
A14
A15
A16
D36
A18
A19
A20
A21
A22
A23
A24
A25
A26
A27
A28
A29
A30
A31
A35
A36
A37
B30
†A25
A32
A33
A34
DESCRIPTION
Air Hose
Hose Clip
Suction Valve Box
Exhaust Valve Cover
Full Nut M8
Spring Washer M8
Suction and Delivery Valve
Valve Stud
Valve Washer
Stud M8
Full Nut M10
Spring Washer M10
Washer M10
Hex. Head Bolt M10 x 35
Outer Pump Body
Actuator Valve
Actuator Screw
Actuator Seal
Inner Pump Body
Actuator
Conn. Rod Seal
Cap Screw M12 x 50
Cap Screw Washer
Bearing and Seal Housing
Drive Rod Seal Assembly
Internal Circlip
Housing Gasket
Drive Rod Bearing
Drain Tap
Suction Valve Box Gasket
Stud M8
Blanking Plate Gasket
Blanking Plate
Hex. Head Screw M12 x 20
Spring Washer M12
Comprises Per Housing:
Drive Rod Seal Carrier
Internal Distributor Seal
Wiper Seal
When ordering spares, please state:
PUMP NUMBER - PART NUMBER – DESCRIPTION OF PART
Dupagro B.V.
Ooststeeg 102
6708 AX Wageningen
The Netherlands
27
Phone +31 (0) 317 840 197
info@dupagro.com
www.dupagro.com
PART NUMBER
QTY
9542000000
9505007004
0015017000
1592306000
9025080004
9030080229
0015021000
0015019000
0002068000
9035080204
9025100004
9030100229
9030100024
9001100351
0015015000
0003221200
0015975000
0015023000
0015014000
0015016000
0015024000
9001240-02
0015100000
0015098000
9133035380
94D130050A
0015008000
9345035301
9520103000
0015022000
9035080554
0015089000
0015083000
9000120201
9030120229
1
2
1
1
8
8
2
2
2
4
8
8
8
8
1
1
1
1
1
1
1
4
4
1
1
1
1
1
2
1
4
1
1
4
4
0015195000
9171044100
9140035070
1
1
1
DUPAGRO.COM
Selwood S150 Manual
Dupagro B.V.
Ooststeeg 102
6708 AX Wageningen
The Netherlands
28
Phone +31 (0) 317 840 197
info@dupagro.com
www.dupagro.com
DUPAGRO.COM
Selwood S150 Manual
8.2 Air Pump Parts (Twin Prime)
ITEM
A02
A03
A04
A05
A06
A07
A08
A09
A10
A11
A12
A13
A14
A15
A16
D36
A18
A19
A20
A21
A22
A23
A24
A25
A26
A27
A28
A29
A30
A31
A38
A39
A40
A41
A42
DESCRIPTION
Hose Clip
Suction Valve Box
Exhaust Valve Cover
Full Nut M8
Spring Washer M8
Suction and Delivery Valve
Valve Stud
Valve Washer
Stud M8
Full Nut M10
Spring Washer M10
Washer M10
Hex. Head Bolt M10 x 35
Outer Pump Body
Actuator Valve
Actuator Screw
Actuator Seal
Inner Pump Body
Actuator
Conn. Rod Seal
Cap Screw M12 x 50
Cap Screw Washer
Bearing and Seal Housing
Drive Rod Seal Assembly
Internal Circlip
Housing Gasket
Drive Rod Bearing
Drain Tap
Suction Valve Box Gasket
Stud M8
Air Hose
Air Hose
Air Hose
Hose Tee
Hose Bend
When ordering spares, please state:
PUMP NUMBER - PART NUMBER – DESCRIPTION OF PART
Dupagro B.V.
Ooststeeg 102
6708 AX Wageningen
The Netherlands
29
Phone +31 (0) 317 840 197
info@dupagro.com
www.dupagro.com
PART NUMBER
QTY
9505007004
0015017000
1592306000
9025080004
9030080229
0015021000
0015019000
0002068000
9035080204
9025100004
9030100229
9030100024
9001100351
0015015000
0003221200
0015975000
0015023000
0015014000
0015016000
0015024000
9001240-02
0015100000
0015098000
9133035380
94D130050A
0015008000
9345035301
9520103000
0015022000
9035080554
9542100000
9542330000
9542720000
9566042100
9566042200
8
2
2
16
16
4
4
4
8
16
16
16
16
2
2
2
2
2
2
2
8
8
2
2
2
2
2
4
2
8
2
1
1
1
1
DUPAGRO.COM
Selwood S150 Manual
Dupagro B.V.
Ooststeeg 102
6708 AX Wageningen
The Netherlands
30
Phone +31 (0) 317 840 197
info@dupagro.com
www.dupagro.com
DUPAGRO.COM
Selwood S150 Manual
8.3 Separator Parts (Single Prime)
ITEM
A11
A12
B01
B02
B03
B04
B05
B06
B07
B08
B09
B10
B11
B12
B13
B14
B15
B16
B17
B18
B19
B20
B21
B22
B23
B24
B25
B26
B27
B28
B29
B30
B31
B32
B33
B34
B36
B37
B39
B40
B41
B42
DESCRIPTION
Full Nut M10
Spring Washer M10
Separator Cap
Separator Cap Gasket
Port Plate
Hexagon Head Screw M10 x 20.S.S.
Sealing Washer M10
Upper Diffuser Sub-Assembly
Upper Diffuser Bush
Upper Diffuser Bush Clip
Hexagon Head Screw M10 x30 S.S.
Spring Washer M10 S.S.
Float
5
Full Nut /16" B.S.W. S.S.
Operating Rod
Full Nut M8 S.S.
Operating Plate
Slotted Head Screws M4 x 20 S.S.
Locking Nut M4 S.S.
Washer M4 S.S.
Clamp Bar
Clamp Bar Seal
Peel Valve Rubber
Separator Body
Plug ½" BSPT
Lower Diffuser
Lower Diffuser Sludge Version
Separator Body Gasket
Tie Rod
Suction Tube
Suction Tube Gasket
Full Nut M12
Spring Washer M12
Full Nut M16
Stud M16
Selwood Label
Seltorque Label
Dome Nut M12
Washer - Nitrile
Spring Washer M16
Separator Handle
Socket Cap Screw M6 x 25 S.S.
Plain Washer M6
Sub-Assembly B06 includes B07, B08 and B37.
PART NUMBER
QTY
9025100004
9030100229
0015034000
0015043000
0015036000
9000100207
9030100289
0015037000
0015160000
9030130407
9000100307
9030100207
9565001000
0006741030
0015090000
9025080007
0015085000
9018040207
9025040307
9030040027
0015084000
0015183000
0015039000
0015033000
9522004000
0015038000
1594161000
0015044000
0015045000
0015035000
0015048000
9025120004
9030120229
9025160004
9035160551
0015190000
0010188000
9025120254
1590049000
9030160229
1507264000
9005060250
9030060024
4
4
Items B05, B07, B08, B16, B17, B18, B20 and B21 are available as spares kit Part No. 0015996000
When ordering spares, please state:
PUMP NUMBER - PART NUMBER - DESCRIPTION OF PART
Dupagro B.V.
Ooststeeg 102
6708 AX Wageningen
The Netherlands
31
Phone +31 (0) 317 840 197
info@dupagro.com
www.dupagro.com
1
1
1
2
2
1
1
1
4
4
1
1
1
1
1
6
6
6
3
1
1
1
1
1
1
1
4
1
1
4
6
8
8
1
1
2
1
8
2
4
4
DUPAGRO.COM
Selwood S150 Manual
Dupagro B.V.
Ooststeeg 102
6708 AX Wageningen
The Netherlands
32
Phone +31 (0) 317 840 197
info@dupagro.com
www.dupagro.com
DUPAGRO.COM
Selwood S150 Manual
8.4 Separator Parts (Twin Prime)
ITEM
A11
A12
B01
B02
B03
B04
B05
B06
B07
B08
B09
B10
B11
B12
B13
B14
B15
B16
B17
B18
B19
B20
B21
B22
B23
B24
B25
B26
B28
B29
B30
B31
B32
B33
B34
B35
B36
B37
B38
B39
B40
B41
B42
Dupagro B.V.
Ooststeeg 102
6708 AX Wageningen
The Netherlands
DESCRIPTION
Full Nut M10
Spring Washer M10
Separator Cap
Separator Cap Gasket
Port Plate
Hexagon Head Screw M10 x 20.S.S.
Sealing Washer M10
Upper Diffuser Sub-Assembly
Upper Diffuser Bush
Upper Diffuser Bush Clip
Hexagon Head Screw M10 x30 S.S.
Spring Washer M10 S.S.
Float
5
Full Nut /16" B.S.W. S.S.
Operating Rod
Full Nut M8 S.S.
Operating Plate
Slotted Head Screws M4 x 20 S.S.
Locking Nut M4 S.S.
Washer M4 S.S.
Clamp Bar
Clamp Bar Seal
Peel Valve Rubber
Separator Body
Plug ½" BSPT
Lower Diffuser
Lower Diffuser Sludge Version
Separator Body Gasket
Tie Rod
Suction Tube Gasket
Full Nut M12
Spring Washer M12
Full Nut M16
Stud M16
Selwood Label
Seltorque Label
Separator Chamber (Well Pointing) - Optional
Dome Nut M12
Washer - Nitrile
Separator Screen
Spring Washer M16
Separator Handle
Socket Cap Screw M6 x 25 S.S.
Plain Washer M6
33
Phone +31 (0) 317 840 197
info@dupagro.com
www.dupagro.com
PART NUMBER
QTY
9025100004
9030100229
0015034000
0015043000
0015036000
9000100207
9030100289
0015037000
0015160000
9030130407
9000100307
9030100207
9565001000
0006741030
0015090000
9025080007
0015085000
9018040207
9025040307
9030040027
0015084000
0015183000
0015039000
0015033000
9522004000
0015038000
1594161000
0015044000
0015045000
0015048000
9025120004
9030120229
9025160004
9035160551
0015190000
0010188000
0015105100
9025120254
1590049000
0015185000
9030160229
1507264000
9005060250
9030060024
4
4
1
1
1
2
2
1
1
1
4
4
1
1
1
1
1
6
6
6
3
1
1
1
1
1
1
1
4
1
4
4
8
8
1
2
1
2
1
1
8
2
4
4
DUPAGRO.COM
Selwood S150 Manual
Dupagro B.V.
Ooststeeg 102
6708 AX Wageningen
The Netherlands
34
Phone +31 (0) 317 840 197
info@dupagro.com
www.dupagro.com
DUPAGRO.COM
Selwood S150 Manual
8.5 Pump Body Parts
ITEM
C01
C02
C03
C04
C05
C06
C07
C08
C09
C10
A11
A12
C13
C14
C23
DESCRIPTION
Impeller Screw
Belleville Washer
Impeller Washer
Impeller
Impeller Key (12 x 8 x 50)
Shaft Sleeve
Sleeve 'O'-Ring
Mechanical Seal
Pump Body
Stud M12
Full Nut M12
Spring Washer M12
Body Gasket
Stud M12
Drain Tap
ALTERNATIVE IMPELLERS:
C04
Standard S.G. Iron Impeller - 235 Diameter
Non-Standard Impeller 232 Diameter, Suffix B
Non-Standard Impeller 229 Diameter, Suffix C
Non-Standard Impeller 225 Diameter, Suffix D
Non-Standard Impeller 222 Diameter, Suffix E
For Deutz & twin prime, Standard Impeller 219
Diameter, Suffix F
Impellers Also Available In Alternative Materials.
When ordering spares, please state:
PART NUMBER
QTY
9000160402
9030610359
0015013000
See below
9041125013
0015161001
9150001400
910166-003
0015010000
9036120401
9025120004
9030120229
0015011000
9036121054
9520003000
1
2
1
1
1
1
1
1
1
6
8
8
2
8
1
0015012000
0015012100
0015012200
0015012300
0015012400
0015012500
PUMP NUMBER - PART NUMBER - DESCRIPTION OF PART
NOTE: C01 Impeller Screw is available in stainless steel quote Part No. 9000160407
Dupagro B.V.
Ooststeeg 102
6708 AX Wageningen
The Netherlands
35
Phone +31 (0) 317 840 197
info@dupagro.com
www.dupagro.com
DUPAGRO.COM
Selwood S150 Manual
Dupagro B.V.
Ooststeeg 102
6708 AX Wageningen
The Netherlands
36
Phone +31 (0) 317 840 197
info@dupagro.com
www.dupagro.com
DUPAGRO.COM
Selwood S150 Manual
8.6 Delivery Valve Parts
ITEM
DESCRIPTION
B31
C15
C16
C17
B32
C18
C19
C20
C21
C22
C23
C24
C25
C26
C27
C28
C29
A13
C30
C31
C32
C33
Full Nut M16
Spring Washer M16
Delivery Valve Seat
Delivery Branch Gasket
Stud M16
Delivery Valve Chamber
T-Bolt
Hexagon Bolt M16 x 65
Washer M16
Locking Bar
Drain Tap
Inspection Panel
Inspection Panel Gasket
Lower Valve Plate
Delivery Valve Rubber
Delivery Valve Clamping Bar
Hexagon Head Screw M10 x 30
Washer M10
Upper Valve Plate
Locking Nut M12
Check List Label
Valve Spacer (as required)
Dupagro B.V.
Ooststeeg 102
6708 AX Wageningen
The Netherlands
37
Phone +31 (0) 317 840 197
info@dupagro.com
www.dupagro.com
PART NUMBER
QTY
9025160004
9030160229
0015046000
0015047000
9035160551
0015026000
0015031000
9001160651
9030160024
0015030000
9520003000
0015029000
0015028000
0015032000
0006604000
0015027000
9000100301
9030100024
0006698000
9025120344
0015072000
1596050000
4
4
1
2
4
1
1
1
1
1
1
1
1
1
1
1
2
2
1
1
1
A/R
DUPAGRO.COM
Selwood S150 Manual
Dupagro B.V.
Ooststeeg 102
6708 AX Wageningen
The Netherlands
38
Phone +31 (0) 317 840 197
info@dupagro.com
www.dupagro.com
DUPAGRO.COM
Selwood S150 Manual
8.7 Bearing Housing and Air Pump Drive Assembly Parts
ITEM
D01
A06
D03
D04
D05
D06
D07
D08
D09
D10
D11
D12
D13
D14
D15
D16
D17
D18
D19
D20
D21
D22
D23
D24
D25
D26
D27
D28
C13
D30
D31
A12
D33
D34
D35
D36
D37
D38
C05
DESCRIPTION
Hex. Socket Capscrew M8 x 25
Spring Washer M8
Lip Seal Carrier
Lip Seal
'O'-Ring
Bearing Housing
Bearing Housing – Close Coupled
'O'-Ring
Oil Filler/Level Plug
Label - Direction of Rotation
Hammer Drive Screw No. 2 x ¼
Label - Manufacturer
1
Breather Valve /8 – BSPT
Flanged Drain Plug ¾ - BSP
Sealing Washer ¾ - BSP
Roller Bearing
Rect Parallel Key (Pump Coupling) 14 x 9 x 56
Drive Shaft
Ball Bearing
Spacer
Bearing Carrier
Plain Washer M12
Hex. Head Setscrew M12 x 90
Eccentric
Circlip – External
Large End Bush
Connecting Rod
Hex. Socket Capscrew M8 x 35
Fulcrum Pin
Gasket
Circlip-External
Hex. Socket Capscrew M10 x 60
Spring Washer M10
Flushing Chamber
Drain Plug ½ - BSPT
Small End Bush
Actuator Capscrew
Air Pump Drive Rod
Self Locking Nut - M8
Impeller Key
SINGLE
PRIME
TWIN
PRIME
9005080250
9030080229
0015200000
9127050080
9100301200
0015001200
0015001300
9100300250
0015186000
0015078000
9045002259
00150 1000
9528001000
9521005000
9030710272
9309J31130
9041145613
0015002200
9300631332
0015004000
0015199000
9030120024
9000120901
0015009100
9401000501
0015066000
0015006100
9005080350
0015007000
0015011000
9401000651
9005100600
9030100229
0015157000
9522004000
0015065100
0015975000
0015018200
9025080344
9041125013
3
3
1
3
1
1
1
2
2
1
2
1
2
1
1
1
1
1
1
1
1
4
4
1
1
1
1
1
1
2
1
3
3
1
1
2
1
1
1
1
3
3
1
3
1
1
1
2
2
1
2
1
2
1
1
1
1
1
1
1
1
4
4
1
1
2
2
2
2
2
1
3
3
1
1
4
2
2
2
1
Items D27, D36, D37 and D38 can be supplied as Sub-Assembly Part No. 0015976000.
Items D25, D26 and D35 are supplied as Sub-Assembly Part No. 0015908000.
When ordering spares, please state:
PUMP NUMBER - PART NUMBER - DESCRIPTION OF PART
Dupagro B.V.
Ooststeeg 102
6708 AX Wageningen
The Netherlands
39
Phone +31 (0) 317 840 197
info@dupagro.com
www.dupagro.com
QTY
PART NUMBER
DUPAGRO.COM
Selwood S150 Manual
THIS PAGE INTENTIONALLY BLANK
Dupagro B.V.
Ooststeeg 102
6708 AX Wageningen
The Netherlands
40
Phone +31 (0) 317 840 197
info@dupagro.com
www.dupagro.com
DUPAGRO.COM
Selwood S150 Manual
8.8 S150 Pump Unit – Close Coupled 1506121000
ITEM
CC01
CC02
CC03
CC04
CC05
CC06
CC07
CC08
Dupagro B.V.
Ooststeeg 102
6708 AX Wageningen
The Netherlands
DESCRIPTION
S150 Body Unit – Close Coupling
Bell Housing – SAE4
Vent Cover
Socket Cap Screw M6 x 16 Long
Socket Cap Screw M10 x 25 Long
Spring Washer M6
Spring Washer M10
Dowel Pin
41
Phone +31 (0) 317 840 197
info@dupagro.com
www.dupagro.com
PART NUMBER
QTY
1508215000
1506063000
1508125000
9000641-01
9005100250
9030060229
9001079-01
9000869-01
1
1
3
6
8
6
8
1
DUPAGRO.COM
Selwood S150 Manual
Dupagro B.V.
Ooststeeg 102
6708 AX Wageningen
The Netherlands
42
Phone +31 (0) 317 840 197
info@dupagro.com
www.dupagro.com
DUPAGRO.COM
Selwood S150 Manual
8.9 Isuzu/4JG1 Pump Unit, Core Build 1506117C00
ITEM
DESCRIPTION
PART NUMBER
QTY
1506121000
1
Fuel Line, Tank to Fuel Suction Pipe & Water Trap
1502362000
1
5
Fuel Line, Leak-off to Tank
1500308000
1
6
Battery Lead, +ve
1500309000
1
7
Battery Lead, -ve
1500310000
1
9
Skid Chassis Assembly
1506118000
1
9a
Skid Baseframe
1503185000
1
9b
Chassis Fuel Tank (S150/Isuzu 4JG1)
1503186000
1
9c
Plug ¾” BSP
9522P00601
3
9d
Plug 2” BSP
9522P01601
1
9e
Plug 3” BSP
9522P02401
1
10
Fuel Filler Plate with Bayonet
1506251000
1
11
Fuel Filler Plate Gasket
1501280000
2
12
Blanking Plate
1506318000
1
13
Pump Mounting Saddle
1506138000
1
19
Centa Flywheel Coupling
9600M00013
1
21
A/V Mount – Pump
22
A/V Mount – Engine
25
Fuel Tank Filler Filter
26
Fuel Filler Gasket
27
Fuel Tank Feed Filter
28
Filler Cap
29
Fuel Tank Contents Gauge
32
Isuzu 4JG1 Diesel Engine
40
Air Pump Silencer 1½” BSP Connections
3
Seltorque S150 Pump Unit
4
0
4
2
7501252000
1
0015063000
1
1500277000
1
9550M11501
1
9590K04801
1
92024-0002
1
9510P01201
1
1
41
90 Equal Elbow 1½” BSP Female Galvanised
9517P01202
42
Socket
9517P01201
1
43
Suction Hose 50 I/D
1007411000
1
44
Worm Drive Hose Clip
9505007004
2
46
Clamp
0015509940
2
49
Engine Drain Hose Assembly (Isuzu)
92700-0185
1
53
Cable Clip Self Adhesive
9705003000
2
When ordering spares, please state:
PUMP NUMBER - PART NUMBER - DESCRIPTON OF PART
Dupagro B.V.
Ooststeeg 102
6708 AX Wageningen
The Netherlands
9680M00038
9680M00042
43
Phone +31 (0) 317 840 197
info@dupagro.com
www.dupagro.com
DUPAGRO.COM
Selwood S150 Manual
Dupagro B.V.
Ooststeeg 102
6708 AX Wageningen
The Netherlands
44
Phone +31 (0) 317 840 197
info@dupagro.com
www.dupagro.com
DUPAGRO.COM
Selwood S150 Manual
8.10 Isuzu/4JG1 Supersilent Canopy Build 1506117S40
ITEM
DESCRIPTION
4
S150/Isuzu 4JG1/Core Build
16
Battery 105 A/hr
17
Battery Clamp
18
Terminal Boot
25
Flanged Connector 150 mm
26
Flange Gasket 150 mm
33
40
QTY
1506117C00
1
92800-0049
1
9297500000
1
0006712000
2
1502336000
1
0015079000
1
Suction / Delivery Surround Gasket
1503164000
2
S150/Isuzu 4JG1 Canopy Assembly
1506295000
1
43
Black Coated Dish Pan
9728-00045
2
44
Gasket
9728-00046
2
45
Mushroom Pushbutton
92800-0054
2
46
Contact Block
92800-0055
2
50
Emergency Stop Button Loom
1503238000
1
When ordering spares, please state:
PUMP NUMBER - PART NUMBER - DESCRIPTON OF PART
Dupagro B.V.
Ooststeeg 102
6708 AX Wageningen
The Netherlands
PART NUMBER
45
Phone +31 (0) 317 840 197
info@dupagro.com
www.dupagro.com
DUPAGRO.COM
Selwood S150 Manual
Dupagro B.V.
Ooststeeg 102
6708 AX Wageningen
The Netherlands
46
Phone +31 (0) 317 840 197
info@dupagro.com
www.dupagro.com
DUPAGRO.COM
Selwood S150 Manual
8.11 Deutz/F4L2011 4-Wheel Site Chassis 1503026000
ITEM
DESCRIPTION
1
Seltorque S150 Pump Unit
2
4 Wheel Site Chassis Assembly (105 litre Tank)
3
Fuel Line, Tank to Lift Pump
5
Lifting Eye
6
Coupling Guard
7
Battery Tray
8
Battery Lead +ve
QTY
1594038000
1
1503025000
1
1503066000
1
1502237000
1
1502358000
2
1502162000
1
1500309000
1
1092173000
1
1502163000
1
1502164000
2
1589144000
1
1593119000
1
1502300000
1
1
9
Battery Lead -ve
10
Battery Box
11
Clamp
12
Spigot
13
Exhaust Guard
15
Instrument Panel Bracket
16
Deutz F4L1011 Diesel Engine 1600 rpm
92036-0002
17
Centa Flywheel Coupling
9600M00011
1
18
Battery 95 A/hr
92800-0001
1
9297500000
1
0006712000
2
9680M00006
4
9505007004
2
9510P01201
1
19
Battery Clamp
20
Terminal Boot
21
Instrument A/V Mounts
22
Worm Drive Hose Clip
23
Silencer (Air Pump) 1½” BSP Connections
0
24
90 Equal Elbow 1½” BSP
25
Suction Hose 50 I/D
9517P01202
1
9542000000
1
26
Exhaust Tailpipe
27
Exhaust Clamp Guard (Front)
1593060000
1
1005262000
2
28
Exhaust Clamp Guard (Rear)
1005263000
2
29
Hose Adaptor
9534M00201
1
30
Hose Clip
9505040004
2
31
Instrument Panel Spacer Kit
1004148000
1
When ordering spares, please state:
PUMP NUMBER - PART NUMBER - DESCRIPTON OF PART
Dupagro B.V.
Ooststeeg 102
6708 AX Wageningen
The Netherlands
PART NUMBER
47
Phone +31 (0) 317 840 197
info@dupagro.com
www.dupagro.com
DUPAGRO.COM
Selwood S150 Manual
Dupagro B.V.
Ooststeeg 102
6708 AX Wageningen
The Netherlands
48
Phone +31 (0) 317 840 197
info@dupagro.com
www.dupagro.com
DUPAGRO.COM
Selwood S150 Manual
8.12 Deutz/F4L2011 Skid Chassis 1503018000
ITEM
DESCRIPTION
1
Seltorque S150 Pump Unit
2
Fuel Tank Assembly 105 litre
3
Fuel Line, Tank to Lift Pump
5
Lifting Eye
6
Coupling Guard
7
Oil Drain Tap
8
Battery Lead +ve
QTY
1594038000
1
1502478000
1
1002218000
1
1002213000
1
1502358000
2
9520M01801
1
1503068000
1
1092173000
1
1502163000
1
1502164000
2
1589144000
1
1593119000
1
1502300000
1
1
9
Battery Lead -ve
10
Battery Box
11
Clamp
12
Spigot
13
Exhaust Guard
15
Instrument Panel Bracket
16
Deutz F4L1011 Diesel Engine 1600 rpm
92036-0002
17
Centa Flywheel Coupling
9600M00011
1
18
Battery 95 A/hr
92800-0001
1
9297500000
1
0006712000
2
9680M00006
4
9505007004
2
9510P01201
1
19
Battery Clamp
20
Terminal Boot
21
Instrument A/V Mounts
22
Worm Drive Hose Clip
23
Silencer (Air Pump) 1½” BSP Connections
0
24
90 Equal Elbow 1½” BSP
25
Suction Hose 50 I/D
26
Skid Chassis
27
Exhaust Tailpipe
28
Drip Tray (optional)
29
Guard Frame (optional)
30
Exhaust Clamp Guard (Front)
31
Exhaust Clamp Guard (Rear)
1505263000
2
32
Instrument Panel Spacer Kit
1004148000
1
33
Universal Stem Elbow
9534029205
1
34
Adaptor
9534034617
1
35
Olive
9534000305
1
36
Tube Nut
9534027905
1
37
Hose Clip
9505010004
1
When ordering spares, please state:
PUMP NUMBER - PART NUMBER - DESCRIPTON OF PART
Dupagro B.V.
Ooststeeg 102
6708 AX Wageningen
The Netherlands
PART NUMBER
49
Phone +31 (0) 317 840 197
info@dupagro.com
www.dupagro.com
9517P01202
1
9542000000
1
1503017000
1
1002334000
1
1502360000
1
1502361000
1
1505262000
2
DUPAGRO.COM
Selwood S150 Manual
Dupagro B.V.
Ooststeeg 102
6708 AX Wageningen
The Netherlands
50
Phone +31 (0) 317 840 197
info@dupagro.com
www.dupagro.com
DUPAGRO.COM
Selwood S150 Manual
8.13 Fast Tow Kit, Open Set 1503062000
ITEM
DESCRIPTION
QTY
1a
S150/Deutz F4L1011 or Skid Chassis
1503018000
1
1b
S150/Detroit 3105 or Skid Chassis
1503024000
1
2
Fast Tow Trailer
9729-00012
1
3
Lighting Board
3a
Lamp & wiring label kit
4
Front Cross Member
5
Prop Stand Bracket
6
Lighting Board Bracket
When ordering spares, please state:
PUMP NUMBER - PART NUMBER - DESCRIPTON OF PART
Dupagro B.V.
Ooststeeg 102
6708 AX Wageningen
The Netherlands
PART NUMBER
51
Phone +31 (0) 317 840 197
info@dupagro.com
www.dupagro.com
9730001000
1
1509044000
1
1503060000
1
1503061000
2
1503059000
1
DUPAGRO.COM
Selwood S150 Manual
Dupagro B.V.
Ooststeeg 102
6708 AX Wageningen
The Netherlands
52
Phone +31 (0) 317 840 197
info@dupagro.com
www.dupagro.com
DUPAGRO.COM
Selwood S150 Manual
8.13.1 2 - Wheel Trailer 9729-00012
ITEM
4
5
6
7
8
9
10
11
12
13
14
15
16
17
18
19
20
21
22
23
24
25
27
28
29
30
31
32
33
34
35
36
37
38
39
40
41
42
43
44
45
46
47
48
49
50
DESCRIPTION
Hub Cap
Split Pin
Slotted Nut
Washer
Bearing (outer)
Wheel Nut
Stud
Hub
Bearing (inner)
Seal
Shoe (reversing)
Spring (carrier spring)
Spring (top tension spring)
Expander
Shoe (fixed)
Spring (shoe steady spring)
Spring (bottom tension spring)
Carrier
Adjuster Wedges
Bolt & Nut assembly
Plug
Holder, cable
Bolt M10 x 75
Self Locking Nut
Shaft
Bush
Grease Nipple
Bracket
Setscrew
Spring Washer Square Section
Self Locking Nut
Washer
Bolt
Self Locking Nut
Damper
Frame
Lever
Bush
Washer
Self Locking Nut
Spring Store
Cable
D Shackle (1/4” Pin)
Lever, handbrake (complete)
Clip, retaining (rear)
Cover
When ordering spares, please state:
PUMP NUMBER - PART NUMBER - DESCRIPTION OF PART
Dupagro B.V.
Ooststeeg 102
6708 AX Wageningen
The Netherlands
53
Phone +31 (0) 317 840 197
info@dupagro.com
www.dupagro.com
PART NUMBER.
QTY
1061 02
1/8” X 1.1/4”
¾ UNF
1053 05
L44649/44610
1027 07
1026 15
1203 03
LM48548/48510
162262
35259-21.02
42904
42903
45309
35261-21.02
42861.01
42126
34648
45200
44826
V10.1
45146
M10 x 75
M10
1118 00
1208 00
5/16” UNF
1195 14
M10 x 30
M10
M16
M16
M10x50
M10
043311
1123 00
1127 01
CT529
M12
M12
1117 00
1050 00
¼”
1195 00
55/70
1075 04
1
1
1
1
1
4
4
1
1
1
1
2
1
1
1
1
1
1
2
1
1
1
2
2
1
2
2
1
2
2
1
1
1
1
1
1
1
1
1
1
1
1
1
1
1
1
DUPAGRO.COM
Selwood S150 Manual
Dupagro B.V.
Ooststeeg 102
6708 AX Wageningen
The Netherlands
54
Phone +31 (0) 317 840 197
info@dupagro.com
www.dupagro.com
DUPAGRO.COM
Selwood S150 Manual
51
52
53
54
55
56
57
58
59
60
61
62
63
64
65
66
67
68
68
69
70
71 – 78
79
80
81
83 – 85
OR
82
83 – 85
Bolt
Self Locking Nut
Cable
Plate (cable anchor)
Nut
Plate (compensator)
Self Locking Nut
48½” Rod
Nut
Pin
Fork (clevis)
Clip, retaining
Tube Towbar
Setscrew
Self Locking Nut
Pad
Clamp
Towing Eye 2” BSAU
Towing Hitch 50mm Ball
Bolt
Self Locking Nut
Chassis to Body Fixings
Tie Wrap 350mm
Wheel
Tyre
Cast Bracket Assembly
Jockey Wheel
Cast Bracket Assembly
When ordering spares, please state:
PUMP NUMBER - PART NUMBER - DESCRIPTION OF PART
Dupagro B.V.
Ooststeeg 102
6708 AX Wageningen
The Netherlands
55
Phone +31 (0) 317 840 197
info@dupagro.com
www.dupagro.com
½” UNF x 4 ½”
½” UNF
1165 04
1192 01
5/16” UNF
1017 03
M12
1080 09
5/16” UNF
NBI312
GK1312
SLM8F2
1137 91
M10 x 35
M10
1044 21
1041 01
1102 01
1205 00
M10 x 75
M10
2
2
2
1
2
1
1
1
1
1
1
1
1
4
4
1
1
1
1
2
2
REL250
REL250
REL250
B42C3
1
1
1
1
J348S
B48C6
1
1
DUPAGRO.COM
Selwood S150 Manual
Dupagro B.V.
Ooststeeg 102
6708 AX Wageningen
The Netherlands
56
Phone +31 (0) 317 840 197
info@dupagro.com
www.dupagro.com
DUPAGRO.COM
Selwood S150 Manual
8.14 Fast Tow 4-Wheel Chassis
ITEM
PART NUMBER
QTY
1
S150/Isuzu 4JG1/Skid Canopy Build
DESCRIPTION
1506117S40
1
2
Fast Tow Trailer
9729-00013
1
3
Side Light Mounting Bracket
4
Front Mounting Post
5
Lighting Board Bracket
6
Lighting Board
When ordering spares, please state:
PUMP NUMBER - PART NUMBER - DESCRIPTON OF PART
Dupagro B.V.
Ooststeeg 102
6708 AX Wageningen
The Netherlands
57
Phone +31 (0) 317 840 197
info@dupagro.com
www.dupagro.com
1503118000
2
1503114000
1
1503120000
1
9730001000
1
DUPAGRO.COM
Selwood S150 Manual
Dupagro B.V.
Ooststeeg 102
6708 AX Wageningen
The Netherlands
58
Phone +31 (0) 317 840 197
info@dupagro.com
www.dupagro.com
DUPAGRO.COM
Selwood S150 Manual
8.14.1 4 Wheel Trailer 9729-00013
ITEM
M&E PART NUMBER
QTY
DESCRIPTION
1-26
1290 62
1
Front axle tube assembly
1-26
1R-25
1290 63
1288 02
1
1
Rear axle tube assembly
Hub & stub axle assembly RH
1L-25
1288 01
1
Hub & stub axle assembly LH
1
2
1 1/4" table 3 LP
1053 16
1
1
Washer
Slotted nut
3
3/16"x 2"
1
Split pin
4
5
1061 02
1/8" x 1.1/4"
1
1
Hub cap
Split pin
6
3/4 UNF
1
Slotted nut
7
8
1053 05
L44649/44610
1
1
Washer
Bearing (outer)
9
1027 07
10
11
1026 15
1203 03
4
Wheel nut
4
1
Stud
Hub
12
13
14R-25
LM48548/48510
1
Bearing (inner)
162262
1281 31
1
1
Seal
Stub axle & backplate assy RH
14L-25
1281 30
1
Stub axle & backplate assy LH
14
15
35259-21.02
42904
1
2
Shoe ( Reversing )
Spring ( Carrier spring )
16
42903
17
18
45309
35261-21.02
19
42861.01
20
21
42126
34648
22
45200
23
24
44826
V10.1
25
26
45146
1290 62
26
1290 63
Not shown
Not shown
Not shown
1
Expander
Shoe ( Fixed )
1
Spring ( Shoe steady spring )
1
1
Spring ( Bottom tension spring )
Carrier
2
Adjuster wedges
1
1
Bolt & Nut assembly
Plug
1
1
Holder, cable
Front axle beam assy
1
Rear axle beam assy
33921.1.14
33921.1.07
2
2
Rear axle cables
Front axle cables
M10 x 32 ½”
1
Brake rod
1
Four way compensator
Not shown
When ordering spares, please state:
PUMP NUMBER - PART NUMBER - DESCRIPTION OF PART
Dupagro B.V.
Ooststeeg 102
6708 AX Wageningen
The Netherlands
Spring ( Top tension spring )
59
Phone +31 (0) 317 840 197
info@dupagro.com
www.dupagro.com
DUPAGRO.COM
Selwood S150 Manual
Dupagro B.V.
Ooststeeg 102
6708 AX Wageningen
The Netherlands
60
Phone +31 (0) 317 840 197
info@dupagro.com
www.dupagro.com
DUPAGRO.COM
Selwood S150 Manual
ITEM
M&E PART NUMBER
QTY
DESCRIPTION
61
1119 00
1
Shaft
62
63
1191 00
2
Bush
2
Bolt M12 x 90
1
M10 self lock nut
2
2
M12 Self lock nut
1/4” UNF grease nipple
1
Damper
1
1
Bolt M10 x 50
Coupling body
1
Overrun lever
1
1
Overun lever bush
M12 self lock nut
1
Washer ½” table 3 LP
1
Handbrake
64
65
66
67
68
69
70
485039
71
72
1124 04
73
1220 02
74
75
CT 529
76
77
78
1266 00
79
1230 00
80
81
82
1266 07
83
84
1255 05
85
86
87
88
89
90
1050 03
91
92
1232 01
93
1232 08
94
95
GKLM8
NBI312
96
SLM8F2
97
98
REL250
99
When ordering spares, please state:
PUMP NUMBER - PART NUMBER - DESCRIPTION OF PART
Dupagro B.V.
Ooststeeg 102
6708 AX Wageningen
The Netherlands
61
Phone +31 (0) 317 840 197
info@dupagro.com
www.dupagro.com
1
Spring store assy
3
1
M12 full nut
Screw M8 x 35
1
Spacer
1
1
M8 self lock nut
Peg
1
Washer ½” table 3
1
1
M12 Self lock nut
M16 Self lock nut
1
Washer M16
1
1
Breakaway cable
‘D’ shackle Ø ¼” pin
1
1
Cable bracket
M16 Self lock nut
1
Lever pin
1
1
Clevis
Clevis pin
1
Clevis clip
1
1
Rear clip 60/80
Tie wrap
1
½ UNF full nut
DUPAGRO.COM
Selwood S150 Manual
Dupagro B.V.
Ooststeeg 102
6708 AX Wageningen
The Netherlands
62
Phone +31 (0) 317 840 197
info@dupagro.com
www.dupagro.com
DUPAGRO.COM
Selwood S150 Manual
100
101
1
5/16 UNF full nut
102
1220 18
1
ADAPTOR
103
1075 05
1
BELLOWS
1
M16 Self lock nut
104
105
106
1232 15
1
Cable stop
107
1232 12
1
Cable
108
109
1
Clip ¾”
2
5/16” UNF grease nipple
110
1102 02
1
2” BSAU eye
110
1186 00
1
DIN 40 eye
110
1106 02
1
76mm NATO
110
1187 04
1
50mm Ball hitch
1138 63
1
Drawbar beam
2
Bolt M16 x 130
2
Screw 3/8 UNF x ½”
2
Washer 3/8” T6
111
112
113
114
115
116
117
1210 02
1
Coupling mount
118
1210 01
1
Peg plate
119
1180 07
1
Handle
120
1180 08
1
Handle
2
Bolt M12 x 75
2
M12 self lock nut
121
122
123
124
1180 03
1
Collar
125
1214 00
1
Collar
126
1212 01
1
Joint pin 1” UNF
127
1212 02
1
Joint pin 1 1/4” UNF
128
1177 19
1
Pin & chain assy
129
When ordering spares, please state:
PUMP NUMBER - PART NUMBER - DESCRIPTION OF PART
Dupagro B.V.
Ooststeeg 102
6708 AX Wageningen
The Netherlands
63
Phone +31 (0) 317 840 197
info@dupagro.com
www.dupagro.com
M16 Self lock nut
DUPAGRO.COM
Selwood S150 Manual
Dupagro B.V.
Ooststeeg 102
6708 AX Wageningen
The Netherlands
64
Phone +31 (0) 317 840 197
info@dupagro.com
www.dupagro.com
DUPAGRO.COM
Selwood S150 Manual
8.15 4-Wheel Site Chassis 1503025000
ITEM
PART NUMBER
QTY
1
Fuel Tank Assembly 105 Litre, Plastic
DESCRIPTION
1502478000
1
2
Chassis Frame
1502157000
1
3
Front Axle
1502158000
1
4
Rear Axle
1502159000
1
5
Pivot
6
Drawbar Pivot Pin
7
Pivot Top Cap
8
Axle Pivot Pin
9
Drawbar
10
Wheel 405 Dia. Solid Rubber Tyre
9620540525
4
11
Grease Nipple (straight) 1/8” BSP
9580P00101
1
12
Hex Head Bolt M16x55 LG
9001160551
4
13
Hex Head Setscrew M12x30 LG (Wedglok)
9000120302
1
14
Hex Head Setscrew M12x35 LG
9000120351
6
15
Hex Self Locking Nut M16
9025160344
4
16
Hex Self Locking Nut M12
9025120344
6
17
Plain Washer 1” Dia
18
Plain Washer 1¼” Dia
19
Split Pin ¼” x 1¾” LG
20
Lock Washer M12
21
Split Roll Pin 4mm Dia x 14 LG
22
Plain Washer M16
23
Plain Washer M12
When ordering spares, please state:
PUMP NUMBER - PART NUMBER - DESCRIPTON OF PART
Dupagro B.V.
Ooststeeg 102
6708 AX Wageningen
The Netherlands
65
Phone +31 (0) 317 840 197
info@dupagro.com
www.dupagro.com
1502167000
1
0015053000
1
0015054000
1
0015055000
1
1502156000
1
0003382000
6
0006666000
2
0006667000
8
9030120504
1
9042040140
1
9030160024
8
9030120024
6
DUPAGRO.COM
Selwood S150 Manual
Dupagro B.V.
Ooststeeg 102
6708 AX Wageningen
The Netherlands
66
Phone +31 (0) 317 840 197
info@dupagro.com
www.dupagro.com
DUPAGRO.COM
Selwood S150 Manual
8.16 Plastic Fuel Tank Assembly 1502478000
ITEM
DESCRIPTION
QTY
1502503000
1
1503405000
1
5
Plastic Fuel Tank (105 Ltr)
6
Fuel Tank Inspection Cover
7
Fuel Tank Inspection Cover Gasket
1503406000
1
9
Fuel Tank Feed Filter Assy
0006671000
1
10
Fuel Tank Feed Filter Gasket
0015063000
1
11
Filler Neck Filter (Plastic Tank)
1503376000
1
12
Plastic Filler Cap
9550M11503
1
15
Drain Plug, M16 x 2.00 x 25mm Long
9521M01601
1
16
Dowty Washer
9534M00301
1
19
Hex HD Setscrew M8 x 16 LG
9000080161
8
20
Hex Full Nut M6
9025060004
3
22
Spring Washer M8
9030080229
8
9030060229
3
9590K06402
1
23
optional
Spring Washer M6
Fuel tank contents gauge
When ordering spares, please state:
PUMP NUMBER - PART NUMBER - DESCRIPTION OF PART
Dupagro B.V.
Ooststeeg 102
6708 AX Wageningen
The Netherlands
PART NUMBER
67
Phone +31 (0) 317 840 197
info@dupagro.com
www.dupagro.com
DUPAGRO.COM
Selwood S150 Manual
9 WIRING DIAGRAMS
9.1 Wiring Diagram for Isuzu 4JG1 Engine/Canopy
Dupagro B.V.
Ooststeeg 102
6708 AX Wageningen
The Netherlands
68
Phone +31 (0) 317 840 197
info@dupagro.com
www.dupagro.com
DUPAGRO.COM
Selwood S150 Manual
9.2 Fast Tow Trailer Lighting Circuit
NOTE:
Front marker lights are for twin axle assembly only.
Dupagro B.V.
Ooststeeg 102
6708 AX Wageningen
The Netherlands
69
Phone +31 (0) 317 840 197
info@dupagro.com
www.dupagro.com
DUPAGRO.COM
Selwood S150 Manual
9.3 Deutz – Wiring Diagram
Dupagro B.V.
Ooststeeg 102
6708 AX Wageningen
The Netherlands
70
Phone +31 (0) 317 840 197
info@dupagro.com
www.dupagro.com
DUPAGRO.COM
Selwood S150 Manual
THIS PAGE INTENTIONALLY BLANK
Dupagro B.V.
Ooststeeg 102
6708 AX Wageningen
The Netherlands
71
Phone +31 (0) 317 840 197
info@dupagro.com
www.dupagro.com
DUPAGRO.COM
Selwood S150 Manual
10
TELEMETRY SYSTEM
Brief instructions for operation
Author:
Dave Oakes
Version:
V3
Revisions:
one
Script:
27 10 05
Firmware:
3.0.2i
Selwoods part
92800-0091
10.1 Key Switch
On the front of the panel there is a 3 position key switch. These are clearly labelled:
·
·
OFF
MANUAL
AUTO
There are also a series of LED’s to indicate the engines current status.
10.2 Key Switch in OFF
KEY SWITCH in POSITION OFF
·
In OFF the engine will not run
10.3 Key Switch in Manual
·
·
·
·
·
When turned to MANUAL the green engine run LED will flash and after 10 seconds the engine will
start.
The start sequence is automated with the glow plugs being switched on and off by the panel.
Once the engine is running the Engine Running LED will be permanently on.
The unit will continue to run until the switch is returned to the OFF position or an alarm occurs.
If the unit fails to start then it will have 2 more attempts automatically. If the engine still fails to start
then the start failure LED will illuminate and you will need to switch from MANUAL to OFF to clear
this alarm.
10.4 Key Switch in Auto
·
When turned to AUTO the unit is controlled by 2 float switches (plugged into the connection
manifold on the side or end of the Selwood unit).
·
The engine will start automatically when the HIGH level is reached and continue to run until the
LOW level is reached. In order to prevent the battery running low the unit will run for a minimum of
30 minutes after activation of the stop float.
or
the switch is moved from AUTO to OFF or an alarm occurs.
be wired normally open.
Dupagro B.V.
Ooststeeg 102
6708 AX Wageningen
The Netherlands
72
Phone +31 (0) 317 840 197
info@dupagro.com
www.dupagro.com
These float switches must
Selwood S150 Manual
10.5 Alarms
Local indication is provided on the front of the panel for High Temperature alarm, Low Oil Pressure alarm,
Service Due, High/ High Level and Start failed. As well as this local indication the unit sends text messages.
If an alarm occurs (except service due and High/ High Level) the engine will stop. In order to clear the alarm
the switch will need to be moved from the MANUAL or AUTO position, back to the OFF position, wait for
approximately 3 seconds then restart the original sequence.
In order to clear the service due indication you need to send a text message to the unit. (see below)
10.6 Remote SMS Configuration
Communicating by text message.
Text messages will be sent when a Low Oil Pressure alarm, a High Temperature Alarm, High/ High alarm,
the unit has failed to start or when a service is due. The number these are sent to can be changed by
sending the following text message to the unit:
The data number of the telemetry unit fitted to individual pumps can be obtained from the hire screen under
immobiliser details for hire fleet units or by contacting Selwood ltd for all others. Send the following message
to this number inserting the number to which you want the alarms sent where you see 07xxxxxxxxx
…;.mem 1 07xxxxxxxxx
…;.mem 2 07xxxxxxxxx
…;.mem 3 07xxxxxxxxx
(please substitute the number required)
In order to clear the Service Due LED send the following message to the unit:…;.exe 18
By default the Service Due comes up every 200 hours. At this point the internal counter automatically resets
itself to zero.
10.7 Telemetry BASIC FAULT FINDING
On the following page is a wiring schematic for the unit. This can be used for basic fault finding for individual
components. If a major failure occurs then contact Selwood Ltd for technical advice and solutions.
In most cases the faults can be traced to simple things like battery voltage being too low, Incorrect wiring of floatswhere these have been changed from those supplied or poor signal strength at the installed location. Positioning of
the pump set will affect the signal strength being received by the system and will reduce the effectiveness of the unit.
Current is drawn by the system, even when in the off position. Battery voltage should be periodically checked and the
engine run for at least 30 minutes to maintain charge. Failure to start is likely when the battery voltage reaches 11.65
volts. Adverse temperature conditions may affect this limit.
Selwood recommend operating the high/high alarm to confirm that the text alarm is working at every installation and
that signal can be sent/ received. At peak times and in built up areas delays in text messaging can occur. These are
not a fault of the unit and are entirely outside of our control.
When contacting Selwood in relation to this system please have the following data available, for reference insert the
details below.
Box data number……………
Box serial number…………..
Machine serial number……..
Fleet number (if applicable)..
73
Selwood Seltorque S150 Manual
74
Selwood Seltorque S150 Manual
THIS PAGE INTENTIONALLY BLANK
75
HIGH / HIGH
HIGH
Warning
T his pump unit can start at any time in resp onse
to signals from it's float co ntrol system and will
co ntinu e to run for 30 mi nutes after the stop float
ope rate s. An y can opy access must be made with
cau tion. Ensure th at the unit is swi tched off and
fully isolated from fl oats before servicing or repair.
Access canopy with caution.
To prevent unwanted starting,
Switch off and r emove key,
Apply emergency stop.
Warning Fully isolate from float switches.
Warning
Thi s pump u nit can start at any time in response
to signals from i t's float contro l system and will
con tinue to run for 30 minu tes after the stop fl oat
operates. Any can opy access must be made with
cauti on. Ensure that the unit is switched off and
fu ll y i sol ated from floats b efore servicing or repair.
Warning
Access canopy with caution.
To prevent unwanted starting,
Switch off and remove key,
Apply emergency stop.
Fully isolate from float switches.
Warning
Th is pump u nit can start at any time in respon se
to signals from i t's float con trol system and will
co ntinu e to run for 3 0 minutes after the s top fl oat
operates. Any can opy access must be made with
cau tion. Ensure that the unit is switched off and
fully i so lated from floats b efore servicing or repair.
Access canopy with caution.
To prevent unwanted starting,
Switch off and remove key,
Apply emergency stop.
Warning Fully isolate from float switches.
OUT
LOW
Access canopy with caution.
To prevent unwanted starting,
Switch off and remove key,
Apply emergency stop.
Warning Fully isolate from float switches.
Selwood Seltorque S150 Manual
76
Warning
This pump unit can start at any time in response
to signals from it's float control system and will
continue to run for 30 minutes after the stop float
operates. Any canopy access must be made with
caution. Ensure that the unit is switched off and
fully isolated from floats before servicing or repair.
Selwood Seltorque S150 Manual
11
TELEMETRY KIT FOR S150 1507080000
Comprising the following :- Telemetry kit complete with Mag Pickup Part Number 1504123000
Battery Isolator Kit Part Number 1506310000
11.1 Telemetry Kit 1504123000
ITEM
2
3
4
5
6
7
8
11
14
15
16
17
18
19
20
21
22
23
24
25
27
28
DESCRIPTION
Magnetic Pick-up (Not shown)
Telemetry Panel
Chassis socket 3 way
Socket Dust cap
Float switch + 20M cable
Cable Plug – 3 way
Plug Dust cap
Float Plug Panel
Washer 2BA
Domed Cap Cable Gland
Hex Hd setscrew M6 x 12
Plain washer M6
Spring Washer M6
Hex Hd Setscrew M3 x 12
Plain Washer M3
Hex self locking Nut M3
Warning Label
Low - Label
High - Label
High / High - Label
Isolation Warning Label (Self Adhesive)
Isolation Warning Label (Cable Tie)
When ordering spares, please state:
PUMP NUMBER - PART NUMBER - DESCRIPTION OF PART
77
PART NUMBER
QTY
92800-0128
92800-0091
92800-0081
92800-0082
92900-0033
92800-0083
92800-0084
1004100000
0002061A00
92800-0086
9000060121
9030060027
9000677-01
9000330-01
9000374-01
9000310-01
1505173000
1505176000
1505175000
1505174000
1506020000
1506025000
1
1
3
3
3
3
3
1
3
3
6
6
6
9
12
9
3
1
1
1
4
2
Selwood Seltorque S150 Manual
78
Selwood Seltorque S150 Manual
11.2 Battery Isolator Kit 1506310000
ITEM
3
4
5
6
7
8
9
10
11
12
13
14
15
16
17
DESCRIPTION
Battery Isolator Bracket
Battery Lead +ve:- Battery to Switch
Link Lead +ve:- Switch to Engine (Starter)
Label – Battery Isolator
Battery Isolator Switch
Terminal Boot
Battery Clamp Cover-Red, +ve
Battery Clamp Cover-Black, -ve
Hex Hd Setscrew M10 x 30
Hex Hd Setscrew M6 x 20
Hex Self Locking Nut M10
Hex Self Locking Nut M6
Label – On/Off
Plain Washer M10
Plain Washer M6
When ordering spares, please state:
PUMP NUMBER - PART NUMBER - DESCRIPTION OF PART
79
PART NUMBER
QTY
1506307000
1506308000
1507103000
1306091000
92800-0154
92800-0008
92800-0158
92800-0005
9000100301
9000060201
9025100344
9025060344
1507105000
9030100024
9030060024
1
1
1
1
1
2
1
1
2
2
2
2
1
2
2
Selwood Seltorque S150 Manual
80
Selwood Seltorque S150 Manual
12
Oil Drain Kit 1505230000
ITEM
DESCRIPTION
4
5
6
7
8
10
13
14
15
16
17
18
19
20
21
22
23
24
25
26
27
28
29
30
31
32
33
36
37
41
42
46
47
49
50
54
Oil Drain Pump Support Bracket
Instruction Label – Oil Drain Pump
Manifold Label-Oil Drain Kit
Oil Drain Hose Assy ½” Bore
Oil Drain Hose Assy ½” Bore
SD60FM Handpump
Aluminium Manifold 6 Ports – ½” BSP
Ball Valve M/F ½” BSP (Screwdriver Slot)
½” BSPP Male/Fe Swivel 90 Deg. Swept Elbow
Adaptor ½” BSPP Male/ ½” BSPT Male
Adaptor ½” BSPP Male/ ½” BSPP Male
Adaptor ½” BSPP Male/ 3/4” BSPP Male
Solid Plug ½” BSPT
½” BSPT Male/ Dia. 1” Hose Tail
½” BSPT Male/ Dia. ¾” Hose Tail
½” BSPP Fixed Female/ ½” BSPP Fixed Fe.
½” BSP Locknut
½” BSP Bonded Seal
3/4” BSP Bonded Seal
1” BSPP Male / Dia. 1” Hose Tail
1” BSP Plastic Cap
19mm I/D Oil Resistant Suction Hose
25mm I/D Oil Resistant Delivery Hose
Hex Hd Setscrew M6 x 40
Hex Hd Setscrew M6 x 25
Hex Hd Setscrew M8 x 25
Hex Hd Setscrew M8 x 16
Hex Self Locking Nut M8
Hex Self Locking Nut M6
Plain Washer M8
Plain Washer M6
Spring Washer M8
Spring Washer M6
Hose Clip
Pipe Clip Norma NOR-RSGUP-28
Engine Sump Oil Drain Fittings Kit
55
Oil Drain Hose Assy. ½” Bore
58
59
60
90 Deg Hose Elbow: ¾”bsp Fe. / 25mm Hosetail
Hose Conn. : ¾” BSP Male / 25mm Hosetail
½” BSPP Male / Fe. Swivel 135 Deg. Swept Elbow
When ordering spares, please state:
PUMP NUMBER - PART NUMBER - DESCRIPTION OF PART
81
PART NUMBER
QTY
1505208000
1505283000
1505284000
1505285000
1505286000
980257-001
9532P00401
9530P00404
9532P00402
9532P00403
9532P00404
9532P00405
9532P00406
9532P00407
9532P00408
9532P00409
9532P00410
9532P00411
9532P00603
9532P00801
9539P00801
9500K00601
9507K00801
9000060401
9000060250
9000080251
9000080161
9025080344
9025060344
9030080024
9030060024
9030080229
9030060229
9505030004
9539M02801
Supplied with
Engine
Supplied with
Engine
9516P00605
9516P00606
9532P00419
1
1
1
1
1
1
1
4
2
4
1
1
1
1
1
1
4
2
1
1
1
0.5m
2.0m
2
5
2
4
2
5
2
5
4
2
7
4
1
1
1
1
2
Selwood Seltorque S150 Manual
82
Selwood Seltorque S150 Manual
1
4
5
6
7
8
10
13
14
15
16
17
18
19
20
21
22
23
24
25
26
27
28
29
30
31
32
33
36
37
41
42
46
47
49
50
54
Oil Drain Kit
Oil Drain Pump Support Bracket
Instruction Label – Oil Drain Pump
Manifold Label-Oil Drain Kit
Oil Drain Hose Assy ½” Bore
Oil Drain Hose Assy ½” Bore
SD60FM Handpump
Aluminium Manifold 6 Ports – ½” BSP
Ball Valve M/F ½” BSP (Screwdriver Slot)
½” BSPP Male/Fe Swivel 90 Deg. Swept Elbow
Adaptor ½” BSPP Male/ ½” BSPT Male
Adaptor ½” BSPP Male/ ½” BSPP Male
Adaptor ½” BSPP Male/ 3/4” BSPP Male
Solid Plug ½” BSPT
½” BSPT Male/ Dia. 1” Hose Tail
½” BSPT Male/ Dia. ¾” Hose Tail
½” BSPP Fixed Female/ ½” BSPP Fixed Fe.
½” BSP Locknut
½” BSP Bonded Seal
3/4” BSP Bonded Seal
1” BSPP Male / Dia. 1” Hose Tail
1” BSP Plastic Cap
19mm I/D Oil Resistant Suction Hose
25mm I/D Oil Resistant Delivery Hose
Hex Hd Setscrew M6 x 40
Hex Hd Setscrew M6 x 25
Hex Hd Setscrew M8 x 25
Hex Hd Setscrew M8 x 16
Hex Self Locking Nut M8
Hex Self Locking Nut M6
Plain Washer M8
Plain Washer M6
Spring Washer M8
Spring Washer M6
Hose Clip
Pipe Clip Norma NOR-RSGUP-28
Engine Sump Oil Drain Fittings Kit
55
Oil Drain Hose Assy. ½” Bore
58
59
60
90 Deg Hose Elbow: ¾”bsp Fe. / 25mm Hosetail
Hose Conn. : ¾” BSP Male / 25mm Hosetail
½” BSPP Male / Fe. Swivel 135 Deg. Swept Elbow
When ordering spares, please state:
PUMP NUMBER - PART NUMBER - DESCRIPTION OF PART
83
1505230000
1505208000
1505283000
1505284000
1505285000
1505286000
980257-001
9532P00401
9530P00404
9532P00402
9532P00403
9532P00404
9532P00405
9532P00406
9532P00407
9532P00408
9532P00409
9532P00410
9532P00411
9532P00603
9532P00801
9539P00801
9500K00601
9507K00801
9000060401
9000060250
9000080251
9000080161
9025080344
9025060344
9030080024
9030060024
9030080229
9030060229
9505030004
9539M02801
Supplied with
Engine
Supplied with
Engine
9516P00605
9516P00606
9532P00419
1
1
1
1
1
1
1
4
2
4
1
1
1
1
1
1
4
2
1
1
1
0.5m
2.0m
2
5
2
4
2
5
2
5
4
2
7
4
1
1
1
1
2
Selwood Seltorque S150 Manual
84
Selwood Seltorque S150 Manual
13 Fuel Changeover Valve Kit 1507288000
ITEM
3
4
6
8
9
11
14
15
16
17
18
22
26
27
28
29
30
31
32
33
34
35
39
41
44
DESCRIPTION
Instructions Label
3/8” Fuel Valve Support Bracket
Diverter Valve 3/8” BSP
Griflex Hose 8mm Bore
Oil Resistant Hose 3/8” Bore
Cable Tie
3/8” Bonded Seal
3/8” BSPP x 3/8” BSPP Male Ext. B’H’D. C/W L’Nut
3/8” BSPP x 3/8” BSPP Male B’Head. C/W L’Nut
Hydraulic Coupling Connector – 3/8” BSP
Hydraulic Plug Connector – 3/8” BSP
Worm Drive Hose Clip
Swivel Nut & Hose Tail, 3/8” BSPP x 3/8” I/D
Straight Male Adaptor 3/8” BSPT x 3/8” O/D
Straight Male Adaptor 3/8” BSPT x 5/16” O/D
Universal Stem Elbow 5/16” O/D
Universal Tubing Sleeve 5/16”
Tubing Nut 5/16”
Swivel Nut & Hose Tail, 3/8” BSPP x 5/16” I/D
Universal Stem Elbow 3/8” O/D
Universal Tubing Sleeve 3/8”
Tubing Nut 3/8”
Hex Hd Setscrew M16 x 40
Hex Self Locking Nut M16
Plain Washer M16
When ordering spares, please state:
PUMP NUMBER - PART NUMBER - DESCRIPTION OF PART
85
PART NUMBER
QTY
1507255000
1507287000
9530K00301
9508001000
9508K00301
9705002000
9532P00307
9532P00303
9532P00313
9532P00301
9532P00302
9505M02001
9532P00311
9534P00310
9534P00315
9534029205
9534027805
9534027905
9532P00312
9534P00311
9534P00312
9534P00313
9000160401
9025160344
9030160024
1
1
1
3m
4m
2
4
2
2
1
1
8
2
2
2
2
2
2
2
2
2
2
2
2
2
Selwood Seltorque S150 Manual
86
Selwood Seltorque S150 Manual
ITEM
1
3
4
6
8
9
11
14
15
16
17
18
22
26
27
28
29
30
31
32
33
34
35
39
41
44
DESCRIPTION
Fuel Changeover Valve Kit
Instructions Label
3/8” Fuel Valve Support Bracket
Diverter Valve 3/8” BSP
Griflex Hose 8mm Bore
Oil Resistant Hose 3/8” Bore
Cable Tie
3/8” Bonded Seal
3/8” BSPP x 3/8” BSPP Male Ext. B’H’D. C/W L’Nut
3/8” BSPP x 3/8” BSPP Male B’Head. C/W L’Nut
Hydraulic Coupling Connector – 3/8” BSP
Hydraulic Plug Connector – 3/8” BSP
Worm Drive Hose Clip
Swivel Nut & Hose Tail, 3/8” BSPP x 3/8” I/D
Straight Male Adaptor 3/8” BSPT x 3/8” O/D
Straight Male Adaptor 3/8” BSPT x 5/16” O/D
Universal Stem Elbow 5/16” O/D
Universal Tubing Sleeve 5/16”
Tubing Nut 5/16”
Swivel Nut & Hose Tail, 3/8” BSPP x 5/16” I/D
Universal Stem Elbow 3/8” O/D
Universal Tubing Sleeve 3/8”
Tubing Nut 3/8”
Hex Hd Setscrew M16 x 40
Hex Self Locking Nut M16
Plain Washer M16
When ordering spares, please state:
PUMP NUMBER - PART NUMBER - DESCRIPTION OF PART
87
PART NUMBER
QTY
1507288000
1507255000
1507287000
9530K00301
9508001000
9508K00301
9705002000
9532P00307
9532P00303
9532P00313
9532P00301
9532P00302
9505M02001
9532P00311
9534P00310
9534P00315
9534029205
9534027805
9534027905
9532P00312
9534P00311
9534P00312
9534P00313
9000160401
9025160344
9030160024
1
1
1
3m
4m
2
4
2
2
1
1
8
2
2
2
2
2
2
2
2
2
2
2
2
2