1
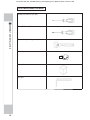
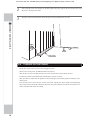
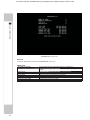
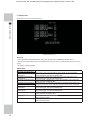
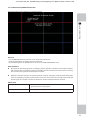
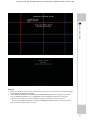
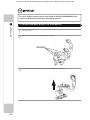
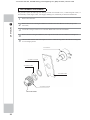
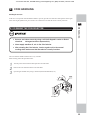
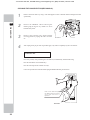
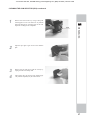
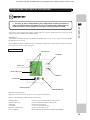
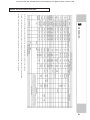
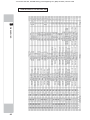
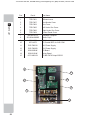
For More Product Information, Click This Page To Visit BMIGaming.com | Or Call + 561-391-7200 (USA / Global) 75$16)250(56 VW35,17,1* 2:1(5 60$18$/ 6HJD$PXVHPHQWV(XURSH/LPLWHG %DUZHOO%XVLQHVV3DUN/HDWKHUKHDG5RDG&KHVVLQJWRQ6XUUH\.71<8QLWHG.LQJGRP 7HOHSKRQH )DFVLPLOH HPDLOPDLOER[#VHJDFRXN :HEKWWSZZZVHJDDUFDGHFRP 6HJD&RUSRUDWLRQ &DQDO6LGH%OGJ+LJDVKLVKLQDJDZD6KLQDJDZDNX7RN\R-DSDQ 7HOHSKRQH )DFVLPLOH 6(*$ IMPORTANT %HIRUHXVLQJWKLVSURGXFWUHDGWKLVPDQXDOFDUHIXOO\WRXQGHUVWDQGWKH FRQWHQWVKHUHLQVWDWHG $IWHUUHDGLQJWKLVPDQXDOEHVXUHWRNHHSLWQHDUWKHSURGXFWRULQD FRQYHQLHQWSODFHIRUHDV\UHIHUHQFHZKHQQHFHVVDU\ To Purchase This Item, Visit BMI Gaming | www.bmigaming.com | (800) 746-2255 | +561.391.7200 BEFORE USING THE PRODUCT, BE SURE TO READ THE FOLLOWING: To maintain safety: To ensure the safe operation of this product, be sure to read the following before usage. The following instructions are intended for the users, operators and the personnel in charge of the operation of the product. After carefully reading and sufficiently understanding the warning displays and cautions, handle the product appropriately. Be sure to keep this manual close to the product or in a convenient place for future reference. Herein, explanations which require special attention are enclosed with dual lines. Depending on the potentially hazardous degrees, the terms of DANGER, WARNING, CAUTION, etc. are used. Be sure to understand the contents of the displays before reading the text. Indicates that mishandling the product by disregarding this pictograph will cause severe injury or death. Indicates that mishandling the product by disregarding this warning will cause a potentially hazardous situation which can result in death or serious injury. Indicates that mishandling the product by disregarding this caution will cause a slight hazardous situation which can result in personal injury and/or material damage. For the safe usage of the product, the following pictographs are used: Indicates "HANDLE WITH CARE." In order to protect the human body and equipment, this display is attached to places where the Owner's Manual, Serviceman Manual and/or Service Manual should be referred to. • Perform work in accordance with the instructions herein stated. Instructions for work are explained by paying attention to the aspect of accident prevention. Failing to perform work as per the instructions can cause accidents. In the case where only those who have technical expertise should perform the work to avoid hazardous situation, the instructions herein state that the site maintenance personnel should perform such work. • Be sure to turn off the power before working on the machine. To prevent an electric shock, be sure to turn off the power before carrying out any work that requires direct contact with the interior of the product. If the work is to be performed in the power-on status, the Instruction Manual herein always states to that effect. • Be sure to ground the Earth Terminal. (This is not required in the case where a power cord with earth is used.) • This product is equipped with the Earth Terminal. When installing the product, connect the Earth Terminal to the "accurately grounded indoor earth terminal" by using an earth wire. Unless the product is grounded appropriately, the user can be subject to an electric shock. After performing repair, etc. for the control equipment, ensure that the Earth Wire is firmly connected to the control equipment. • Ensure that the Power Supply used is equipped with an Earth Leakage Breaker. This product does not incorporate the Earth Leakage Breaker. Using a power supply which is not equipped with the Earth Leakage Breaker can cause a fire when earth leakage occurs. • Be sure to use fuses which meet the specified rating. (Only for the machines which use fuses.) Using fuses exceeding the specified rating can cause a fire and an electric shock. (Only for the machines which use fuses.)Using fuses exceeding the specified rating can cause a fire and an electric shock. To Purchase This Item, Visit BMI Gaming | www.bmigaming.com | (800) 746-2255 | +561.391.7200 • Specification changes (removal of equipment, conversion and addition) not designated by SEGA are not allowed. The parts of the product include warning labels for safety, covers for personal protection, etc. It is very hazardous to operate the product by removing parts and/or modifying the circuits. Should doors, lids and protective parts be damaged or lost, refrain from operating the product, and contact where the product was purchased from or the office herein stated. SEGA shall not be held responsible for any accidents, compensation for damage to a third party, resulting from the specifications not designated by SEGA. • Ensure that the product meets the requirements of appropriate electrical specifications. Before installing the product, check for electrical specifications. SEGA products have a nameplate on which electrical specifications are described. Ensure that the product is compatible with the power supply voltage and frequency requirements of the location. Using any electrical specifications different from the designated specifications can cause a fire and an electric shock. • Install and operate the product in places where appropriate lighting is available, allowing warning labels to be clearly read. To ensure safety for the customers, labels and printed instructions describing potentially hazardous situations are applied to places where accidents can be caused. Ensure that where the product is operated has sufficient lighting allowing the warnings to be read. If any label is peeled off, apply it again immediately. Please place an order with where the product was purchased from or the office herein stated. • When handling the monitor, be very careful. (Applies only to products with monitors.) Some of the monitor parts are subject to high tension voltage. Even after turning off the power, some portions are still subject to high tension voltage sometimes. Monitor repair and replacement should be performed only by those technical personnel who have knowledge of electricity and technical expertise. • Be sure to adjust the monitor properly. (Applies only to products with monitors.) Do not operate the product leaving on-screen flickering or blurring as it is. Using the product with the monitor not properly adjusted may cause dizziness or a headache to an operator, a player, or the customers. • When transporting or reselling this product, be sure to attach this manual to the product. • In the case where commercially available monitors and printers are used in this product, only the contents relating to this product are explained herein. Some commercially available equipment has functions and reactions not stated in this manual. Read this manual together with the specific instruction manual of such equipment. Descriptions herein contained may be subject to improvement changes without notice. The contents described herein are fully prepared with due care. However, should any question arise or errors be found, please contact SEGA. • • INSPECTIONS IMMEDIATELY AFTER TRANSPORTING THE PRODUCT TO THE LOCATION Normally, at the time of shipment, SEGA products are in a status allowing for usage immediately after transporting to the location. Nevertheless, an irregular situation may occur during transportation. Before turning on the power, check the following points to ensure that the product has been transported in a satisfactory status. • Are there any dented portions or defects (cuts, etc.) on the external surfaces of the cabinet? • Are casters and adjusters damaged? • Do the power supply voltage and frequency requirements meet with those of the location? • Are all wiring connectors correctly and securely connected? Unless connected in the correct way, connector connections can not be made accurately. Do not insert connectors forcibly. • Do power cables have cuts and dents? • Are all accessories available? • Can all doors and lids be opened with the accessory keys? Can doors and lids be firmly closed? To Purchase This Item, Visit BMI Gaming | www.bmigaming.com | (800) 746-2255 | +561.391.7200 TABLE OF CONTENTS INTRODUCTION vi 1 2 1 5 HANDLING PRECAUTIONS PRECAUTIONS REGARDING INSTALLATION LOCATION 2-1 LIMITATIONS OF USAGE 2-2 OPERATION AREA 3 PRECAUTIONS REGARDING PRODUCT OPERATION 3-1 DURING OPERATION (PAYING ATTENTION TO CUSTOMERS) 4 ASSEMBLY AND INSTALLATION 4-1 POWER SUPPLY AND OTHER CONNECTIONS 5 6 PRECAUTIONS WHEN MOVING THE MACHINE GAME DESCRIPTION 6-1 6-2 6-3 6-4 6-5 6-6 7 BOOKKEEPING INPUT TEST OUTPUT TEST GAME ASSIGNMENT CONTROLLER CALIBRATION BACKUP DATA CLEAR CONTROLLER UNIT(S), SWITCHES AND BUTTONS 7-1 ADJUSTING/REPLACING THE VOLUME POT 7-2 GREASING 8 GRAPHICS DISPLAY 8-1 SAFETY PRECAUTIONS WHEN HANDLING THE MONITOR 8-2 CLEANING THE SCREEN SURFACE 9 COIN HANDLING 9-1 CLEANING THE COIN SELECTOR 9-2 FAULT FINDING 9-3 ADJUSTING THE PRICE OF PLAY (EXCEL) 9-4 ADJUSTING THE PRICE OF PLAY (VTS) 10 11 12 13 PERIODIC CLEANING DESIGN-RELATED PARTS PARTS LIST WIRING DIAGRAMS 6 7 9 11 12 13 15 16 19 20 21 22 23 26 27 28 32 33 33 34 35 35 38 39 40 44 47 49 55 iii To Purchase This Item, Visit BMI Gaming | www.bmigaming.com | (800) 746-2255 | +561.391.7200 iv To Purchase This Item, Visit BMI Gaming | www.bmigaming.com | (800) 746-2255 | +561.391.7200 INTRODUCTION This manual is intended to provide detailed descriptions together with all necessary information covering the general operation of electronic assemblies, electromechanical, servicing control, spare parts, etc. for the product, "TRANSFORMERS" This manual is intended for the owners, personnel managers in charge of operation of this product. Operate the product after carefully reading and sufficiently understanding the instructions. Use of this product is unlikely to cause physical injuries or damage to property. However, points that require special attention are indicated by bold text, the words "STOP, IMPORTANT or CAUTION” and the symbols below. INTRODUCTION In the unlikely event that the product does not function correctly, DO NOT allow anyone other than a technician to touch the internal system. Turn off the power to the machine, making sure to unplug the electrical cord from the outlet, and contact the office listed below or the point-of-purchase for this product. Indicates important information that, if ignored, may result in the mishandling of the product and cause faulty operation or damage to the product. Indicates a warning or caution that, if ignored, may result in the mishandling of the product and cause faulty operation or damage to the product. Sega Amusements Europe Limited. 42 Barwell Business Park, Leatherhead Road, Chessington, Surrey, KT9 2NY. United Kingdom. European Sales: +44 (0) 208 391 8090 Facsimile: +44 (0) 208 391 8099 STS (Spares): +44 (0) 208 391 8060 Facsimile: +44 (0) 208 391 8096 email: mailbox@sega.co.uk Web: http://www.segaarcade.com Sega Corporation Canal Side Bldg 1-39-9 Higashishinagawa Shinagawa-ku, Tokyo, 140-8583, Japan. Telephone: +81-3-687-7133 Facsimile: +81-3-687-7134 Play It! Amusements, inc. 252 Beinoris Drive, Wood Dale, IL. 60191, USA USA Sales: +00 (1) 224 265 4287 SPECIFICATIONS Machine Dimensions (Normal): Machine Height: Machine Weight: 52.25 in.(1.33m) x 49.5 in. (1.26 cm) 103 in. (2.61m) (Installed with Topper) 587 lbs. (267 kg) Approx (Installed) Rating: AC 120V@2.8 AMP 240V@1.3A v To Purchase This Item, Visit BMI Gaming | www.bmigaming.com | (800) 746-2255 | +561.391.7200 Definition of 'Site Maintenance Personnel or Other Qualified Individuals INTRODUCTION Servicing and maintenance work of the contents herein stated should be performed by the SERVICEMAN stipulated as per IEC Standard. Those who do not have technical expertise and knowledge other than the SERVICEMAN are not allowed to perform the work herein stated. Executing aforementioned work by such non-technical personnel can cause serious accidents that may endanger life. Parts replacement, maintenance inspections and troubleshooting should be carried out by site maintenance personnel or other qualified professionals. This manual includes directions for potentially dangerous procedures which should only be carried out by professionals with the appropriate specialised knowledge. The site maintenance personnel or other qualified professionals mentioned in this manual are defined as follows: Site maintenance personnel: Individuals with experience in maintaining amusement equipment, vending machines, etc., working under the supervision of the owner/operator of this product to maintain machines within amusement facilities or similar premises by carrying out everyday procedures such as assembly, maintenance inspections, and replacement of units/expendable parts. Activities to be carried out by site maintenance personnel: Amusement equipment/vending machine assembly, maintenance inspection and replacement of units/expendable parts. Other qualified professionals: Persons employed by amusement equipment manufacturers, or involved in design, production, testing or maintenance of amusement equipment. The individual should have either graduated from technical school or hold similar qualifications in electrical/electronics/mechanical engineering. Activities to be carried out by other qualified professionals: Amusement equipment/vending machine assembly, repair/adjustment of electrical/electronic/mechanical parts. Game Version Notation Version numbers appearing in TEST MODE are displayed as asterisks. When describing sotware version upgrades, only major versions and minor version numbers are displayed. Release version numbers are for SEGA's administrative use only. If you require these numbers, please contact the office listed in this manual or the point-ofpurchase for this product. (Ver) VER.*.**.-Major version (maybe only one digit) vi Minor version Release version To Purchase This Item, Visit BMI Gaming | www.bmigaming.com | (800) 746-2255 | +561.391.7200 Waste of Electrical and Electronic Equipment (WEEE) Statement. The WEEE (Waste of Electrical and Electronic Equipment) directive places an obligation on all EU based manufacturers and importers of Electrical and Electronic Equipment to take back products at the end of their useful life. Sega Amusements Europe Ltd accepts its responsibility to finance the cost of treatment and recovery of redundant WEEE in the United Kingdom in accordance with the specified WEEE recycling requirements. For more information about where you can send your waste equipment for recycling contact your local authority office. For non-UK users contact your local authority office for information on the recycling of Waste Electrical and Electronic Equipment. INTRODUCTION The symbol shown below will be on all products manufactured from 13th August 2005, which indicates this product must NOT be disposed of with other normal waste. Instead, it is the user’s responsibility to dispose of their waste equipment by arranging to return it to a designated UK collection point for the correct recycling of waste electrical and electronic equipment. Battery Recycling Statement. The EC Directive on Batteries and Accumulators (2006/66/EC) aims to minimise the impact of batteries on the environment and encourage the recovery of the materials they contain. To achieve increased collection and recycling of waste batteries, the Directive places ‘producer responsibility’ obligations on manufacturers and importers of portable, industrial and automotive batteries. The symbol shown below will be on all equipment fitted with batteries from 26th September 2008 and indicates they must NOT be disposed of with other normal waste. Instead, it is the user’s responsibility to dispose of used batteries by arranging to return them to a designated collection point for the correct recycling. For more information about where you can send your waste batteries for recycling contact your local authority office. REGISTERED IN ENGLAND REGISTERED NO. 1711515 REGISTERED OFFICE: BLOCK C 42 BARWELL BUSINESS PARK, CHESSINGTON, SURREY KT9 2NY vii To Purchase This Item, Visit BMI Gaming | www.bmigaming.com | (800) 746-2255 | +561.391.7200 1 HANDLING PRECAUTIONS When installing or inspecting the machine, be very careful of the following points and pay attention to ensure that the player can enjoy the game safely. Non-compliance with the following points or inappropriate handling running counter to the cautionary matters herein stated can cause personal injury or damage to the machine. 1 To avoid an electric shock or short circuit, do not plug in or unplug quickly. To avoid an electric shock, do not plug in or unplug with a wet hand. Do not expose power cords or earth wires on the surface, (floor, passage, etc.) If exposed, the power cords and earth wires are susceptible to damage. Damaged cords and wires can cause an electric shock or short circuit. HANDLING PRECAUTIONS Before performing work, be sure to turn the power off. Performing the work without turning the power off can cause an electric shock or short circuit. In cases where work should be performed in the status of power on, this manual always states to that effect. To avoid causing a fire or an electric shock, do not put things on or damage the power cords. When or after installing the product, do not unnecessarily pull the power cord. If damaged, the power cord can cause a fire or an electric shock. In case the power cord is damaged, ask for a replacement through where the product was purchased from or the office herein stated. Using the cord as is damaged can cause fire, an electric shock or leakage. This product MUST be Earthed. Inappropriate Earthing can cause an electric shock. Be sure to use fuses meeting the specified rating. Using fuses exceeding the specified rating can cause a fire or an electric shock. Be sure that connections such as IC BD are made properly. Insufficient insertion can cause an electric shock. Specification changes, removal of equipment, conversion and/or addition, not designated by SEGA are not permitted. Failure to observe this may cause a fire or an electric shock. Noncompliance with this instruction can have a bad influence upon physical conditions of the players or the onlookers, or result in injury during play. SEGA shall not be held responsible for damage, compensation for damage to a third party, caused by specification changes not designated by SEGA. Do not perform any work or change parts not listed in this manual. Doing so may lead to an accident. If you need to perform any work not listed in this manual, request work from the office indicated in this manual or the point of purchase, or inquires for details. Be sure to perform periodic maintenance inspections herein stated. 1 To Purchase This Item, Visit BMI Gaming | www.bmigaming.com | (800) 746-2255 | +561.391.7200 For the IC board circuit inspections, only the use of a logic tester is recommended. Using a Multi Tester or General Purpose Tester may result in damage to IC Circuits. 1 HANDLING PRECAUTIONS Static electricity from your body may damage some electronics devices on the IC board. Before handling the IC board, touch a grounded metallic surface so that the static electricity can be discharged. Some parts are not designed and manufactured specifically for this game machine. The manufacturers may discontinue, or change the specifications of such general-purpose parts. If this is the case, SEGA cannot repair or replace a failed game machine whether or not a warranty period has expired. CONCERNING THE STICKER DISPLAY This SEGA product has stickers attached describing the product manufacture No. (Serial No.) and Electrical Specifications. It also has a Sticker describing where to contact for repair and for purchasing parts. When inquiring about or asking for repairs, mention the Serial No. and Name of Machine indicated on the Sticker. The Serial Number indicates the product register. Identical machines could have different parts depending on the date of production. Also, improvements and modifications might have been made after the publication of this manual. In order to ensure you order the correct parts, mention the Serial No. when contacting the applicable places. CONCERNING WARNING DISPLAYS This SEGA product has warning displays on stickers, labels and/or printed instructions adhered/attached to or incorporated in the places where a potentially hazardous situation could arise. The warning displays are intended for accident prevention for customers and for avoiding hazardous situations relating to maintenance and servicing work. Some portions of the cabinet contain high voltage and may cause accidents if touched. When performing maintenance, be very careful of the warning displays. It is especially important that any complex repair and replacement work not mentioned herein should be performed by those technical personnel who have knowledge of electricity and technical expertise. In order to prevent accidents, caution any customer ignoring the warnings to cease and desist immediately. VIDEO GAME-INDUCED SEIZURES (VGS) AND PHOTOSENSETIVE EPILEPSY (PSE) This SEGA product has warning displays on stickers which outline the risk of epilepticform and photosensetive seizures. These warning displays on stickers are applied close in proximity of the device which may promote symptoms of either video game-induced seizures or epilepsy. The warning displays are supplied in several languages and form part of the Installation kit supllied with this product. It is standard practice for the English version of this label to be applied during manufacture, however it is especially important for the operator to apply the same said label in the lanuguage of the country of operation. 2 To Purchase This Item, Visit BMI Gaming | www.bmigaming.com | (800) 746-2255 | +561.391.7200 STICKER DISPLAY Side Door 1 HANDLING PRECAUTIONS Top Back Door Base Back Door 3 To Purchase This Item, Visit BMI Gaming | www.bmigaming.com | (800) 746-2255 | +561.391.7200 1 HANDLING PRECAUTIONS 4 To Purchase This Item, Visit BMI Gaming | www.bmigaming.com | (800) 746-2255 | +561.391.7200 2 PRECAUTIONS REGARDING INSTALLATION LOCATION This product is an indoor game machine. Do not install it outside. Even indoors, avoid installing in places mentioned below so as not to cause a fire, electric shock, injury and/or malfunction. Places subject to direct sunlight, or places subject to high temperatures in the proximity of heating units, etc. Places filled with inflammable gas or vicinity of highly inflammable/volatile chemicals or hazardous matter. Dusty places. Sloped surfaces. Places subject to any type of violent impact. Vicinity of anti-disaster facilities such as fire exits and fire extinguishers. Areas where the temperature exceeds the applicable temperature (ambient temperature) range of 5 to 30 degrees centigrade. PRECAUTIONS REGARDING INSTALLATION LOCATION Places subject to rain or water leakage, or places subject to high humidity in the proximity of an indoor swimming pool and/or shower, etc. 2 Securing a safe area for operation as described in this manual will ensure safe operation for players and observers. SEGA shall not be held responsible for damage or compensation for damage to a third party, resulting from the failure to observe this instruction. 5 To Purchase This Item, Visit BMI Gaming | www.bmigaming.com | (800) 746-2255 | +561.391.7200 2-1 2 PRECAUTIONS REGARDING INSTALLATION LOCATION 6 LIMITATIONS OF USAGE Be sure to check the Electrical Specifications. Ensure that this product is compatible with the location's power supply, voltage, and frequency requirements. A label describing Electrical Specifications is attached to the product. Non-compliance with the Electrical Specifications can cause a fire and electric shock. This product requires a breaker and earth mechanism as part of the location facilities. Using the product without these can cause a fire and electric shock. Ensure that the indoor wiring for the power supply is rated at 15 A or higher (AC single phase 100 V ~ 120 V area), and 7 A or higher (AC 220 V ~ 240 V area). Noncompliance with the Electrical Specifications can cause a fire and electric shock. Be sure to use an independent power supply equipped with an earth leakage breaker. Using a power supply without an earth leakage breaker can cause an outbreak of fire if a power surge occurs. Putting many loads on one electrical outlet can cause generation of heat and a fire resulting from overload. When using an extension cord, ensure that the cord is rated at 15 A or higher (AC 100 V ~ 120 V area) and 7 A or higher (AC 220 V ~ 240 V area). Using a cord rated lower than the specified rating can cause a fire and electric shock. To Purchase This Item, Visit BMI Gaming | www.bmigaming.com | (800) 746-2255 | +561.391.7200 2-2 OPERATION AREA To install this product, the entrance must be at least 1.58m in width and 2.2 m in height. • For the operation of this machine, secure a minimum area of 1.6 m (W) x 1.4 m (D). These dimensions are necessary to enable the customer to walk around the machine and also to provide adequate ventilation. This machine is a ride, so there is a possibility of a player falling off. In such an event, if a player strikes his or her head, a serious accident may occur, so be sure to secure the minimum area around the machine specified in this manual. • Be sure to provide sufficient space specified in this manual. Do not allow objects to block the ventilation ports. It can cause generation of heat and a fire. • SEGA shall not be held responsible for damage or compensation for damage to a third party, resulting from the failure to observe this instruction. • If the machine does not fit through the entryway to the installation location, do not disassemble it without first consulting the instructions. The machine should only be disassembled in accordance with the instructions listed in this manual; do not attempt to disassemble it in any other way. Specific tools and adjustment procedures are required to assemble and disassemble the mechanical parts. Attempting to assemble or disassemble the machine without consulting the instructions may result in accidents during assembly/ disassembly and electric shock, short circuits, and/or personal injury during operation. If the machine still does not fit through the entryway after following the procedures in this manual, contact your retailer or the office listed in this manual. PRECAUTIONS REGARDING INSTALLATION LOCATION Do not attempt to move the product by pushing or pulling on the plastic parts. This may damage the product and my cause personal injury. 2 • If the machine is still too large to fit through the entryway after following the procedures listed in this manual, do not tip the machine on its side. Attempting to transport the machine while it is tipped on its side may cause accidents. It may also damage or warp parts of the machine, resulting in accidents during operation. • To install this product, the entrance must be at least 1.34 m in width and 2.2m in height. If the entrance is too narrow, do not tilt the product carelessly. If all the product weight is put on the casters at one side only, there could be damage or deformation, causing serious accidents such as workers getting caught underneath. 7 To Purchase This Item, Visit BMI Gaming | www.bmigaming.com | (800) 746-2255 | +561.391.7200 2 PRECAUTIONS REGARDING INSTALLATION LOCATION 8 To Purchase This Item, Visit BMI Gaming | www.bmigaming.com | (800) 746-2255 | +561.391.7200 3 PRECAUTIONS REGARDING PRODUCT OPERATION In order to prevent accidents and inappropriate behaviour, please check the following before operating the product. 3-1 BEFORE OPERATION 3 • Check if all the Leg Adjusters are in contact with the surface. (The casters should be raised approximately 5mm from the floor) If they are not the cabinet will move and may cause damage to property or injury to a player or observer. Leg Adjusters located next to wheels on each foot. PRECAUTIONS REGARDING PRODUCT OPERATION • To ensure maximum safety for the players and the customers, ensure that where the product is operated has sufficient lighting to allow any warnings to be read. Operation under insufficient lighting may result in customers bumping into each other or the product causing injury. • Do not place any heavy items on this product. Doing so may result in injury or damage to the product. • Do not climb on this product. Climbing on this product may result in injury or product damage. When checking the upper proportions of this product, always use a step/step ladder. • To avoid electric shock, always check each door or service hatch for damage and make sure that they are fitted correctly. Never operate this product with doors or service hatches removed. • Do not place any of the following objects on top of the product, nearby the product or hang them from the ceiling in close proximity to the product as doing so may result in an electric shock, short circuit or damage to parts. • Flower vases, flower pots, cups, glasses, water tanks, cosmetics and/or any receptacle/container/vessel containing liquid or chemicals. 9 To Purchase This Item, Visit BMI Gaming | www.bmigaming.com | (800) 746-2255 | +561.391.7200 • Inspect for the following items during a trial run. If there is any type of error, use the Test Mode, etc., to resolve the problem. If you continue use with an error, it can cause an accident or irreparable parts damage. - Does the ride move smoothly during the initialization operation? 3 PRECAUTIONS REGARDING PRODUCT OPERATION - Are the bellows torn or has a screw dropped out of them? • During daily cleaning, be sure to check the surface of the controllers and other parts that the player touches with his hands for damage, cracks, or loose screws. If a player uses the machine while it is damaged, cracked, or has a loose screw, the player may become injured. • During daily cleaning, be sure to check the seat for any abnormality, wetness, etc. Failure to do this may result in deliberate tampering or negligence being left undetected. • Ensure that both blower grills are free from obstructions such as pieces of paper / sweet wrappers etc. Players directly hold the controller with their bare hands so it is recommended that wet towels (paper towels) be provided. Endeavor to clean the controllers and seat frequently. Provide a container or space for storing the customers’ hand luggage, etc. To help prevent an accident and also protect parts, establish measures so that customers do not bring raingear, such as umbrellas, on rainy days, or juice or other beverages, into the area where the machine is installed. Inspect the coin insertion slots to make sure that no foreign objects have been inserted and that they have not otherwise been tampered with as this will prevent play. 10 To Purchase This Item, Visit BMI Gaming | www.bmigaming.com | (800) 746-2255 | +561.391.7200 3-1 DURING OPERATION (PAYING ATTENTION TO CUSTOMERS) In order to prevent an accident or unnecessary trouble, the attendant or operator must endeavor to always pay attention to the behavior of the players and customer. This machine has movable rides of about the same size as an automobile. Sometimes a player or a customer may behave in an unexpected way. Be adequately aware of safety, and stop any behavior that is considered dangerous. 3 • Those who have high blood pressure or a heart problem. • Those who have experienced muscle convulsion or loss of consciousness when playing video games, etc. • Those who have neck or spinal cord problems. • Those who are intoxicated or under the influence of drugs. • Pregnant women. • Those who are not in good health. • Those who do not follow the attendant’s instructions. • Those who cannot grasp the Control Unit securely because of immobility in fingers, hands or arms. • Persons who disregard the product's warning displays. • This product is intended for a single or dual players only. Having three or more persons simultaneously playing this product can result to injury to the player and possible damage to the product. • Even players who have never been adversely affected by light stimulus might experience dizziness or headache depending on their physical condition when playing the game. • PRECAUTIONS REGARDING PRODUCT OPERATION • For safety reasons, do not allow any of the following people to play the game. Small children are especially likely to experience these symptoms. Caution guardians of small children to keep watch on their children during play. • Instruct those who feel sick during play to have a medical examination. • To avoid injury from falls and electric shocks due to spilled drinks, instruct the player not to place heavy items or drinks on the product. • To avoid electric shocks and short circuits, do not allow customers to put hands and fingers or extraneous matter in the openings of the product or small openings in or around the doors. • To avoid falls and resulting injury, immediately stop the customer from leaning against or climbing on the product, etc. • To avoid electric shock and short circuit, do not allow customers to unplug the power plug without a justifiable reason. • Instruct the guardians of small children to keep an eye on their children. • Children cannot sense danger. Allowing small children to get near a player who is playing the game could result in the children being bumped, struck or knocked down. 11 To Purchase This Item, Visit BMI Gaming | www.bmigaming.com | (800) 746-2255 | +561.391.7200 TOOLS NECESSARY FOR WORK Phillips Screwdriver (for M4) 4 ASSEMBLY AND INSTALLATION Torx T20 Security Driver Spanner / Adjustable spanner (24mm) Key Master Step or Stool Hex Key 12 To Purchase This Item, Visit BMI Gaming | www.bmigaming.com | (800) 746-2255 | +561.391.7200 4-1 POWER SUPPLY AND OTHER CONNECTIONS 1 4 ASSEMBLY AND INSTALLATION • Use the power supply equipped with an earth leakage breaker. Use of power supply without such a breaker could result in fire if there is a current leakage. • Have available a securely grounded indoor ground terminal. Without proper grounding, customers could be electrocuted and product operations might not always be stable. • Do not expose the power cord or ground wire. If these are exposed, customers could stumble over them, for instance, and easily damage them. Additionally, if these lines are damaged, there could be a risk of electrical shock or short circuit. Set these lines at locations where they will not interfere with customer traffic, or attach covers to them. • After laying out the power cord on the floor, be sure to always protect it. If the power cord is left exposed, it can easily be damaged, resulting in electrical shock. Confirm that the main switch is at OFF position. Mains ON/OFF Switch IEC Inlet Mains Switch shown in OFF position 13 To Purchase This Item, Visit BMI Gaming | www.bmigaming.com | (800) 746-2255 | +561.391.7200 2 Fully insert the power cord connector on the side opposite the power plug into the AC unit IEC inlet. Insert the power cord plug into the outlet. 3 The power code is laid out indoors. Protect the power cord by attaching wire cover to it. 4 ASSEMBLY AND INSTALLATION WIRE COVER 6-6 TURNING ON THE POWER Set the main switch of the AC unit to ON and engage the power. When you turn on the power, the billboard LED’s will come on. After the start up screen is displayed on the LCD screen, the Advertise (Attract) Mode will start. The decorative LEDs will illuminate and scroll through a variation of colours. Start up sounds are output from the speakers on the left and right of the cabinet together with display of the startup screen. Even when the power source has been cut off, credit count, ranking data, game settings and bookkeeping data are kept stored in the product. However, fractional coin counts (inserted coins that do not amount to one credit) and bonus adder counts are not kept. 14 To Purchase This Item, Visit BMI Gaming | www.bmigaming.com | (800) 746-2255 | +561.391.7200 • Do not push plastic parts or any part associated with the moving mechanism. Do not lift or support the product by any plastic part. Parts can be damaged, and fragments can cause injury. • Do not push on or hold onto the LCD or controllers to move the unit. Doing so could break the parts and lead to people getting injured.. • Do not lean separated or disassembled parts against a wall or other surface indiscriminately. The parts could be deformed. Accidents could also occur should the parts fall over. • Do not hold onto the controllers to use as a lever or leverage. Doing so may cause damage resulting in injury to the player or impaired game play. If the unit is moved over floor surfaces where there is carpet, decorative panel, etc., there might be friction or soiling. 5 PRECAUTIONS WHEN MOVING THE MACHINE • Do not stack parts that have been separated or disassembled indiscriminately. The surface of the parts could be damaged or deformed. Significant deformations can result in improper operation and breakdowns. Movement by casters can damage the floor, depending on the floor material. Have a mat or thin plate available for moving casters. If rugs, for instance, have been laid out, remove them before moving. Be careful not to damage delicate parts whilst moving the product. Always push/pull the product levering from the bolted on metal parts or by the lower sections such as the base. Do not apply rope directly to the product’s surface. Use protective material at locations where rope is applied taking care not to damage components attached to the machine. 15 To Purchase This Item, Visit BMI Gaming | www.bmigaming.com | (800) 746-2255 | +561.391.7200 6 GAME DESCRIPTION 6 GAME TEST MODE IMPORTANT INFORMATION 6 GAME DESCRIPTION The setting will not take effects if the change only applies on setting window in GAME TEST MODE. Please apply normal control method and quit setting mode. Please strictly apply correct setting. Incorrect setting will cause run time error or unpredicted problem. 11-1 GAME TEST MODE Press test button to enter SYSTEM TEST MODE screen. Press service button, choose GAME TEST MODE and press test button again to enter GAME TEST MODE screen. GAME TEST MODE screen ■Control - Use the SERVICE Button to move the cursor to the desired test item. - Press the TEST Button to confirm selection of the item. - Select EXIT and press the TEST Button to return to the SYSTEM TEST MODE screen. ■Menu Item BOOKKEEPING INPUT TEST OUTPUT TEST GAME ASSIGNMENTS CONTROLLER CALIBRATION SETTING BACKUP DATA CLEAR 16 Displays all recorded game data. Tests each input device used for the game. Tests each output device used for the game. Adjusts all game settings. Adjusts aim settings for control units. Erases all types of game records. To Purchase This Item, Visit BMI Gaming | www.bmigaming.com | (800) 746-2255 | +561.391.7200 6-1 BOOKKEEPING Each game record can be viewed. 6 GAME DESCRIPTION BOOKKEEPING 1/3 screen ■Control - Press the TEST Button to move to BOOKKEEPING 2/3 screen. ■Menu Item COIN1 COIN2 TOTAL COINS COIN CREDITS SERVICE CREDITS TOTAL CREDITS Number of coins inserted in coin chute 1. Number of coins inserted in coin chute 2. Total Number of coins inserted in coin chute. Number of credits for coins inserted. Number of credits entered with the SERVICE Button. Total number of all credits. 17 To Purchase This Item, Visit BMI Gaming | www.bmigaming.com | (800) 746-2255 | +561.391.7200 6 GAME DESCRIPTION BOOKKEEPING 2/3 screen ■Control - Press the TEST Button to move to BOOKKEEPING 3/3 screen. ■Menu Item NUMBER OF GAMES NUMBER OF SINGLEPLAY FIRST PLAY CONTINUE PLAY TOTAL TIME PLAY TIME AVERAGE GAME TIME AVERAGE PLAY TIME LONGEST PLAY TIME SHORTEST PLAY TIME 18 Total number of games played by Player 1 and Player 2. Total number of single game without any other players joining from the middle. Total number of first time plays by Player 1 and Player 2. Total number of times Player 1 and Player 2 opted to continue. Amount of time the cabinet has been in operation. Amount of time the game has been played. Average control time for one game. Average play time for one game. Longest play time for one game. Shortest play time for one game. To Purchase This Item, Visit BMI Gaming | www.bmigaming.com | (800) 746-2255 | +561.391.7200 6 GAME DESCRIPTION BOOKKEEPING 3/3 screen ■Control - Press the TEST Button to return to GAME TEST MODE screen. ■Menu Item Play time will be recorded into different lines by 30 seconds intervals. All play times over 10 minutes are written into the line OVER 10M00S. 19 To Purchase This Item, Visit BMI Gaming | www.bmigaming.com | (800) 746-2255 | +561.391.7200 6-2 INPUT TEST Look up the status of each input devices. 6 GAME DESCRIPTION INPUT TEST screen ■Control - Press TEST button and SERVICE button at the same time to return to GAME TEST MODE screen. - When the corresponding menu items displays from “OFF” to “ON” or corresponding data reacts to the action, the device is then functional. ■Menu Item PLAYER1 CONTROLLER X PLAYER1 CONTROLLER Y PLAYER1 CONTROLLER TRIGGER L PLAYER1 CONTROLLER TRIGGER R PLAYER1 START BUTTON PLAYER2 CONTROLLER X PLAYER2 CONTROLLER Y PLAYER2 CONTROLLER TRIGGER L PLAYER2 CONTROLLER TRIGGER R PLAYER2 START BUTTON SERVICE TEST 20 Move the Player 1 (left side) controller to up, down, left and right, and the data (x and y axis of the controller) varies based on your movement. Pull the Player 1 controller’s left trigger, the item will display “ON”, release the trigger, the item will display “OFF”. Pull the Player 1 controller’s right trigger, the item will display “ON”, release the trigger, the item will display “OFF”. Press the Player 1 START button, the item will display “ON”, release the button, the item will display “OFF”. Move the Player 2 (right side) controller to up, down, left and right, and the data(x and y axis of the Controller) varies based on your movement. Pull the Player 2 controller’s left trigger, the item will display “ON”, release the trigger, the item will display “OFF”. Pull the Player 2 controller’s right trigger, the item will display “ON”, release the trigger, the item will display “OFF”. Press the Player 2 START button, the item will display “ON”, release the button, the item will display “OFF”. Press SERVICE button, this item will display “ON”, release the button, the item will display “OFF”. Press TEST button, this item will display “ON”, release the button, the item will display “OFF”. To Purchase This Item, Visit BMI Gaming | www.bmigaming.com | (800) 746-2255 | +561.391.7200 6-3 OUTPUT TEST Test all the output devices utilized in game. Please test all the output devices in regular term. 6 GAME DESCRIPTION OUTPUT TEST screen ■Control - Use the SERVICE Button to move the cursor to the desired test item. - Press the TEST Button to confirm selection of the item. - Select EXIT and press the TEST Button to return to GAME TEST MODE screen. ■Menu Item PLAYER1 START LAMP PLAYER2 START LAMP PLAYER1 CONTROLLER LAMP PLAYER2 CONTROLLER LAMP PLAYER1 BRAKE LAMP PLAYER2 BRAKE LAMP BILLBOARD LAMP EMBLEM LAMP LEFT SIDE LAMP RIGHT SIDE LAMP PLAYER1 CONTROLLER REACTION PLAYER2 CONTROLLER REACTION Player 1 START button to light the lamp. Player 2 START button to light the lamp. Player 1 (left side) controller top lamp is on. Player 2 (right side) controller top lamp is on. Player 1 red brake lamp at the base of the controller is on. Player 2 red brake lamp at the base of the controller is on. 2 lamps at the 2 ends of the light box above the screen are on. The lamp at the center of Autobots’ emblem. Every time the test button is pressed, the color will display in the order “RED”, “GREEN”, “BLUE”, “OFF”. The lamp at the left flank of the screen is on. Every time the test button is pressed, the color will display in the order “BLUE”, “RED”, “MAGENTA”, “GREEN”, “CYAN”, “YELLOW”, “WHITE”, “OFF”. The lamp at the right flank of the screen is on. Every time the test button is pressed, the color will display in the order “BLUE”, “RED”, “MAGENTA”, “GREEN”, “CYAN”, “YELLOW”, “WHITE”, “OFF”. Player 1 controller vibrates for a period of time. Player 2 controller vibrates for a period of time. 21 To Purchase This Item, Visit BMI Gaming | www.bmigaming.com | (800) 746-2255 | +561.391.7200 6-4 GAME ASSIGNMENTS Game setting configuration. 6 GAME DESCRIPTION GAME ASSIGNMENT screen ■Control - Use the SERVICE Button to move the cursor to the desired test item. - Press the TEST Button to confirm selection of the item. - Select EXIT and press the TEST Button to return to the GAME TEST MODE screen. ■Menu Item GAME DIFFICULTY ADVERTISE SOUND REVIVAL PLAYER1 CONTROLLER REACTION PLAYER2 CONTROLLER REACTION CONTINUE COUNTDOWN KIDS MODE SELECT STAGE SWIPE CARD TO PLAY CAMPAIGN 22 Set game difficulty. 5 options “VERY EASY”, “EASY”, “NORMAL”, “HARD”, “VERY HARD” to choose from. “NORMAL” is set by default. Set the volume of attraction movie. 5 options “NORMAL”, “3/4”, “1/2”, ” 1/4”, “OFF” to choose from. “NORMAL” is set by default. Set if Player 1 and Player 2 will die at the same time. If the setting is “OFF”, they will. If the setting is “ON”, they will not. “ON” is set by default. Set if Player 1 (left side) controller will vibrate when shooting. “ON” is set by default. Set if Player 2 (right side) controller will vibrate when shooting. “ON” is set by default. Set the continue countdown time, 3 options “10”,”20”,”30” to choose from. “20” is set by default. Set if players’ controller will display in game screen bottom. If the option is set to “ON”, it will not. If the option is set to “OFF”, it will. “OFF” is set by default. Set to open stage select function in stage 2. Set this option “ON” to open stage select. Set to ”OFF” to close stage select. “ON” is set by default. ※ Every time this option is changed, the ranking will be cleared. Change the text at the screen bottom. If the setting is set to “ON”, “SWIPE CARD TO PLAY” will be shown at the screen bottom. If the setting is set to “OFF”, “INSERT COIN(S)”/“INSERT MORE COIN(S)” will be shown at the screen bottom as usual. “OFF” is set by default. Set if the campaign will be open. If the setting is “ON”, the promotion will be displayed after the game is clear. “ON” is set by default. To Purchase This Item, Visit BMI Gaming | www.bmigaming.com | (800) 746-2255 | +561.391.7200 6-5 CONTROLLER CALIBRATION SETTING Check and calibrate the controllers’ crosshair positions. 6 GAME DESCRIPTION CONTROLLER CALIBRATION SETTING screen ■Control - Use the SERVICE Button to move the cursor to the desired test item. - Press the TEST Button to confirm selection of the item. - Select EXIT and press the TEST Button to return to the GAME TEST MODE screen. ■Check Method Red crosshair will change position according to player1 (left side) controller rotation. Blue crosshair will change position according to player2 (right side) controller rotation. The centers of the 2 crossing lines are the center position of each player’s crosshair. When the controller moves to the extreme position of top left, top right, bottom left and bottom right, if the corresponding crosshair position will be in the very corner of top left, top right, bottom left and bottom right, the crosshair is functional. Otherwise, manual calibration will be required. ■Menu Item CALIBRATION START DEFAULT SETTING Enter CALIBRATION START screen to calibrate the crosshair position of player1 and player2. Set the player1’s and player2’s crosshair position to default. 23 To Purchase This Item, Visit BMI Gaming | www.bmigaming.com | (800) 746-2255 | +561.391.7200 CALIBRATION START Calibrate the crosshair position. 6 GAME DESCRIPTION CALIBRATION START screen ■Control When entering the START CALIBRATION screen, it will follow the orders to calibrate the player controller’s crosshair position. 1. Rotate Player 1’s controller to top-left corner extreme position and press the trigger. Then in turn rotate to top-right corner, bottom-left corner and bottom-right corner extreme position and press the triggers to complete player controller calibration setting. Please note: do not push the controller too hard, just naturally rotate it to proper positions. 2. Execute the same actions above to Player 2’s controller to complete Player 2’s controller calibration setting. 3. Press the TEST button to reflect the calibration settings and go back to CONTROLLER CALIBRATION SETTING screen. ■DEFAULT SETTING Reset all the adjusted value to default value. 24 To Purchase This Item, Visit BMI Gaming | www.bmigaming.com | (800) 746-2255 | +561.391.7200 6 GAME DESCRIPTION CONTROLLER CALIBRATION SETTING screen DEFAULT SETTING screen ■Control 1. When the controller crosshair can’t calibrate to proper position, it is allowed to set to default through CONTROLLER CALIBRATION SETTING. 2. Select “DEFAULT SETTING” in CONTROLLER CALIBRATION SETTING screen and press test button to go to DEFAULT SETTING screen. “COMPLETED” will be displayed to indicate the controller calibration setting has been resumed to default, and press test button to leave the screen. Each time the DEFAULT SETTING is executed, CALIBRATION START need to be executed again to make sure the crosshair position is correct. 25 To Purchase This Item, Visit BMI Gaming | www.bmigaming.com | (800) 746-2255 | +561.391.7200 6-6 BACKUP DATA CLEAR Clear all game records. 6 GAME DESCRIPTION BACKUP DATA CLEAR screen (1/2) BACKUP DATA CLEAR screen (2/2) ■Control ・Press SERVICE button to select menu item. ・Select “YES (CLEAR) and press TEST button to clear all backup data. When “COMPLETED” is displayed, press TEST button again and return to GAME TEST MODE screen. ・Select “NO (CANCEL)” and press TEST button, no action will be executed and return to GAME TEST MODE screen directly. 26 To Purchase This Item, Visit BMI Gaming | www.bmigaming.com | (800) 746-2255 | +561.391.7200 7 CONTROLLER UNIT(S), SWITCHES AND BUTTONS • When working with the product, be sure to turn the power off. Working with the power on may cause an electric shock or short circuit. • Exercise due caution in performing soldering work. If soldering iron is handled carelessly, there could be fires or burns. 7 CONTROL UNIT • Be careful not to damage the wires. Damaged wires may cause an electric shock, short circuit or present a risk of fire. • When fastening plastic parts, be careful not to tighten screws or nuts excessively. If these are tightened to excess, parts could be damaged, resulting in injuries from fragments, etc. • After the unit has been disassembled and reassembled again, check carefully that the unit has been reassembled correctly. • Be sure to inspect the outer covers on both gun units. • Assemble so that there is no gap between the L and R covers. If there is a gap or rattling, the players could get fingers or hands caught, resulting in injury. 27 To Purchase This Item, Visit BMI Gaming | www.bmigaming.com | (800) 746-2255 | +561.391.7200 Be sure to perform volume's move value setting in the INPUT ASSIGNMENTS in the Game Test Mode after replacing or adjusting the Volume. 7 CONTROL UNIT 7-1 ADJUSTING/REPLACING THE VOLUME POT 1 2 Turn off the power. Remove the 3 screws from the undersides of the Controller. REMOVE FIXINGS 3 28 Carefully remove the Controller Cover to reveal the Volume Pots for adjusting. To Purchase This Item, Visit BMI Gaming | www.bmigaming.com | (800) 746-2255 | +561.391.7200 ADJUSTMENT PROCEDURE 1 Apply this procedure to both Horizontal and Vertical Volume Pots. Loosen the 2 screws that secure the VR Bracket and move the VR Bracket to adjust the angle and condition of the gear alignment. 7 H VOLUME BKT CONTROL UNIT LOOSEN FIXINGS V VOLUME BKT 2 Locate the central position of the pot by turning the pot in both clockwise ans counterclockwise positions. Once a central position of the pot has been determined, straighten the handle so that the gear is positioned horizontally. Slide the pot into position engaging the gears. 3 4 Tighten the 2 screws and secure the VR Bracket and refit the cover. Check to make sure the value on the Input Test screen is within the range 80H ± 8H when the steering unit is in the straight position. 29 To Purchase This Item, Visit BMI Gaming | www.bmigaming.com | (800) 746-2255 | +561.391.7200 REPLACEMENT PROCEDURE This procedure requires the following tools: Phillips screwdriver for the M4 screws, 1.5 mm hexagonal wrench, 1112 mm monkey wrench, nipper, cutter, wire stripper, soldering iron, industrial dryer and heat-shrinkable tube. 7 CONTROL UNIT 1 2 3 4 5 Remove the connectors. Remove the 2 screws securing the VR Bracket and remove the entire Bracket and V.R. (See previous instruction) Loosen the 1 hexagon socket screws on the Gear Holder and remove the Gear Holder. Remove the nut securing the VR Bracket, then separate the Volume from the VR Bracket and replace it. Check to make sure the value on the Input Test screen is within the range 80H ± 8H when the steering unit is in the straight position. VOLUME POT VOLUME POT WSHR VOLUME POT NUT VOLUME POT BKT VOLUME POT GEAR HEX SOCKET SCREW 30 To Purchase This Item, Visit BMI Gaming | www.bmigaming.com | (800) 746-2255 | +561.391.7200 6 The wire connected to the volume pot will be reused. Use a tool such as a pair of snips or cutters to remove the old heatshrink tubes which cover the contacts. 7 Use a soldering iron to melt the solder and seperated the wires from the old volume pot. Be very careful when using a soldering iron. 7 CONTROL UNIT 8 If the exposed conductive wire at the end is less than 5mm, use a tool such as a wire stripper or cutter to cut the wire insulation back to a workable length. Place new sleeving over the wire before resoldering them to the pot. 9 Once soldered, cover the bare contacts with the sleeving. If heatshrink is used, apply heat from an appropriate hot air blower to shrink the sleeving tightly over the contacts. 10 Reassemble the pot to the pot bracket by working in reverse order of these instructions. Refer to the POT VOLUME ADJUSTMENT section of this manual. 31 To Purchase This Item, Visit BMI Gaming | www.bmigaming.com | (800) 746-2255 | +561.391.7200 7-2 GREASING 7 • Be sure to use the designated grease. Using undesignated grease can cause parts damage. CONTROL UNIT • Do not apply grease to locations other than as specified. Doing so may create a risk of operational problems and deterioration of parts. • The designated periods for greasing serve only as a guide. Whenever there are squeaks or other anomalies, apply grease at designated locations. Use spray grease once every three months to grease up the gear mesh portion of the constituent parts. Use "Grease Mate" (part number 090-0066) for the spray grease. GREASING POINT GREASING POINT 32 To Purchase This Item, Visit BMI Gaming | www.bmigaming.com | (800) 746-2255 | +561.391.7200 8 GRAPHICS DISPLAY 8-1 SAFETY PRECAUTIONS WHEN HANDLING THE MONITOR 8 ● If smoke or a strange odor appears, immediately unplug the power cable from the power source. Continuing to use the product may cause a fire or an electric shock. Ensure that smoke is no longer emitted, and contact the point of purchase. ● If nothing displays on the screen, immediately unplug the power cable from the power source. GRAPHICS DISPLAY Responding to breakdown or abnormality Continuing to use the product may cause a fire or an electric shock. Contact the point of purchase and request an inspection. ● If water or a foreign object enters the monitor’s interior, immediately unplug the power cable from the power source. Continuing to use the product may cause a fire or an electric shock. Contact the point of purchase and request an inspection. ● If the monitor is dropped or the cabinet is damaged, immediately unplug the power cable from the power source. Continuing to use the product may cause a fire or an electric shock. Contact the point of purchase and request an inspection. During operation ● Do not repair, reconstruct, or disassemble the monitor. The monitors interior contains high voltage parts. A fire or an electric shock could result. For inspections, adjustments, and repair of the monitors interior, request work from the point of purchase. ● Do not insert foreign objects. If metal objects or flammable materials such as paper are inserted into the interior through ventilation openings or other apertures, an electric shock could result. ● In the event of a thunder storm, do not touch the product or the power cable. An electric shock could result. ● Make sure to perform appropriate adjustments. Do not operate the product when the screen is flickering, distorted, or experiencing other abnormalities. Images from an improperly adjusted screen could cause players and other customers to experience dizziness, headaches, and other ailments. 33 To Purchase This Item, Visit BMI Gaming | www.bmigaming.com | (800) 746-2255 | +561.391.7200 8-2 CLEANING THE SCREEN SURFACE ● Use a soft, dry cloth (flannel-type) to wipe away dirt. Do not use materials such as coarse mesh gauze. 8 GRAPHICS DISPLAY ● Alcohol (ethanol) is the recommended solvent for removing dirt. When using a cleaning agent, follow the precautions below. - Dilute neutral cleaning agents for home use with water. Soak a soft cloth in the solution, and wring it thoroughly before wiping the screen. - Do not use abrasive cleaning agents or powders, or cleaning agents containing bleach. - Do not use alkaline cleaning agents such as glass cleaners, or solvents such as thinners. ● Do not scrub or scratch the screen surface with abrasive materials such as brushes or scrub brushes. CLEAN THE SCREEN DAILY. 34 To Purchase This Item, Visit BMI Gaming | www.bmigaming.com | (800) 746-2255 | +561.391.7200 9 COIN HANDLING Handling the Coin Jam If the coin is not rejected when the REJECT button is pressed, open the coin chute door and open the selector gate. After removing the jammed coin, put a normal coin in and check to see that the selector correctly functions. 9 COIN HANDLING 9-1 CLEANING THE COIN SELECTOR ● Remove and clean smears by using a soft cloth dipped in water or diluted chemical detergent and then squeezed dry. ● Never apply machine oil, etc. to the Coin Selector. ● After cleaning the Coin Selector, insert a regular coin in the normal working status and ensure that the selector correctly functions. The Coin Selector should be cleaned once every 3 months. When cleaning, follow the procedure below: 1 2 3 Turn the power for the machine OFF. Open the Coin Chute Door Remove the Coin Selector from the Coin Chute Door Open the gate and dust off by using a soft brush (Small soft Paint Brush, etc.) GATE 12-1 FIG 1 35 To Purchase This Item, Visit BMI Gaming | www.bmigaming.com | (800) 746-2255 | +561.391.7200 CLEANING THE COIN SELECTOR (MECHANICAL). 9 COIN HANDLING 1 Remove and clean smears by using a soft cloth dipped in water or diluted chemical detergent and then squeezed dry. 2 Remove the CRADLE.. When removing the retaining ring (E ring) be very careful so as not to bend the rotary shaft. 3 Remove stain from the rotary shaft and shaft receiving portions by wiping off with a soft cloth. etc. 4 After wiping off as per previous step, further apply a dry cloth to completely dry the Coin Selector. CRADLE 12-1 FIG 2 Coin Insertion Test Once every month, when performing the Coin SW Test, simultaneously check the following: Does the Coin Meter count satisfactorily? Does the coin drop into the cashbox correctly? Is the coin rejected when inserted while keeping the REJECT Button pressed down? Insert a coin while keeping the REJECT Button pressed down and check if it is rejected. 12-1 FIG 3 36 To Purchase This Item, Visit BMI Gaming | www.bmigaming.com | (800) 746-2255 | +561.391.7200 CLEANING THE COIN SELECTOR (SR3) <continued> 1 Remove and clean smears by using a damp soft cloth dipped in water. DO NOT use any diluted chemical detergent or cleansing agent as this will impair the workings of the component. 9 2 COIN HANDLING GATE Open the reject gate to gain access to the rundown path. RUNWAY 3 4 Remove the dirt and stains from the runway by wiping off with a soft damp cloth. After wiping off as per previous step, further apply a dry cloth to completely dry the coin Selector. 37 To Purchase This Item, Visit BMI Gaming | www.bmigaming.com | (800) 746-2255 | +561.391.7200 9-2 FAULT FINDING Fault Finding The following information is presented for customers’ guidance in rectifying a fault but does not cover all possible causes. All acceptors with electronic faults should be returned to an approved service centre for repair. 9 COIN HANDLING SYMPTOM INVESTIGATE Connector POSSIBLE CAUSE Poor Contact Loose Wire Not switched on Power Supply Acceptor does not work (all coins reject) Incorrect voltage Inadequate current Rise time too slow Inhibit all inputs Acceptor Inhibited Accept gate Gate not free or dislocated Accept channel Obstruction Reject gate Not fully closed EEPROM chksm error LED on rear cover RED SR Sensor fault Credit opto fault Credit sensor blocked Reject lever pressed LED on rear cover YELLOW 38 Reinstall power To Purchase This Item, Visit BMI Gaming | www.bmigaming.com | (800) 746-2255 | +561.391.7200 9-3 ADJUSTING THE PRICE OF PLAY (EXCEL) This product comes equipped with a Money Controls SR3 Coin Acceptor. To adjust the price of play ALL credit setting are adjusted via the EXCEL CREDIT BOARD. IMPORTANT! The CREDIT SETTINGS within the SYSTEM TEST MODE must be set to 1 coin 1 credit to allow the CREDIT BOARD to function correctly. 9 COIN HANDLING ● The price of play is determined by the configuration of switches located on either an EXCEL board or VTS board. The type of board used is determined by product location. Switch settings for both types of board remain the same. The VTS BD has a built in Credit Board. This is controlled by 2 DIL Switches. These allow the operator to select the price of play, type of coin acceptor and region. EXCEL Credit Board DIP SWITCHES COUNTER 1 STATUS LED EXCEL CREDIT PCB COUNTER 2 TEST BUTTON SERVICE BUTTON VOLUME CONTROL DIL SW3 (Regional Settings) Adjust these switches to specify the type of Coin Acceptor used and currency. Default = SW1&SW2 ON - NRI in parallel mode, Sterling. TEST BUTTON SERVICE BUTTON Status LED CHANNEL 1 DIL SW1 (credit settings) VOL CONTROL Provides access to the TEST MENU when pressed. Provides a SERVICE CREDIT when pressed Flashes when functioning. To Coin Acceptor (SR3 TYPE.) Adjust to required price of pay. MAIN VOLUME ADJUSTMENT (FRONT SPEAKERS) 39 To Purchase This Item, Visit BMI Gaming | www.bmigaming.com | (800) 746-2255 | +561.391.7200 9-4 ADJUSTING THE PRICE OF PLAY (VTS) This product comes equipped with a Money Controls SR3 Coin Acceptor. To adjust the price of play ALL credit setting are adjusted via the EXCEL CREDIT BOARD. 9 IMPORTANT! The CREDIT SETTINGS within the SYSTEM TEST MODE must be set to 1 coin 1 credit to allow the CREDIT BOARD to function correctly. COIN HANDLING The VTS BD has a built in Credit Board. This is controlled by 2 DIL Switches. These allow the operator to select the price of play, type of coin acceptor and region. VTS Board COIN CHANNEL A TEST BUTTON SERVICE BUTTON DEMAG (NOT USED) DIP SW 3 VOLUME CONTROL A VOLUME CONTROL B VOLUME CONTROL C DIP SW 1 DIL SW3 (Regional Settings) Adjust these switches to specify the type of Coin Acceptor used and currency. Default = SW1&SW2 ON - SR3 in parallel mode, Sterling. TEST BUTTON SERVICE BUTTON Status LED CHANNEL A DIL SW1 (credit settings) DEMAG VOL CONTROL A VOL CONTROL B VOL CONTROL C 40 Provides access to the TEST MENU when pressed. Provides a SERVICE CREDIT when pressed Flashes when functioning. To Coin Acceptor (SR3 TYPE.) Adjust to required price of pay. NOT USED MAIN VOLUME ADJUSTMENT (FRONT SPEAKERS) SECONDARY VOL ADJUSTMENT (GUN SPEAKERS) NOT USED To Purchase This Item, Visit BMI Gaming | www.bmigaming.com | (800) 746-2255 | +561.391.7200 REGIONAL AND ACCEPTOR SETTINGS (SW3) COIN HANDLING Set SW 3 on the VTS /Excel board as shown in the table above corresponding to the country required. Set SW 1 according to the option settings found in the relevant Price of Play Settings Table on the following pages. Note: These switch settings are under constant review and may change due to world currency updates. 9 41 To Purchase This Item, Visit BMI Gaming | www.bmigaming.com | (800) 746-2255 | +561.391.7200 STERLING PRICE OF PLAY SETTINGS (SW1) 9 COIN HANDLING 42 To Purchase This Item, Visit BMI Gaming | www.bmigaming.com | (800) 746-2255 | +561.391.7200 EURO PRICE OF PLAY SETTINGS (SW1) 9 COIN HANDLING 43 To Purchase This Item, Visit BMI Gaming | www.bmigaming.com | (800) 746-2255 | +561.391.7200 10 PERIODIC INSPECTION The items listed below require periodic check and maintenance to retain the performance of this machine and to ensure safe business operation. When handling the controller, the player will be in direct contact with it. In order to always allow the player to enjoy the game, be sure to clean it regularly. Also, it is advisable to provide wet tissue, etc. available for player use. 10 PERIODIC INSPECTION • Every 6 months check to see if power cords are damaged, the plug is securely inserted, dust is accumulated between the socket outlet and the power plug, etc. Dust will accumulated if using the product regularly. Continued use with the presence of accumulated dust may result in a fire and or electric shock. • There is the danger of accidents involving electrical shorts circuits or fire caused by factors such as the deterioration of insulation in electrical and electronic equipment over time. Check that there are no abnormalities such as odors from burning. • For all normal maintenance procedures, always turn off the power before beginning. Starting the procedures with the power still on can result in electric shocks or short circuits. • When restoring power after maintenance is completed or going into or coming out of the Test Mode, be sure to verify that there are no people near the product. When the power is restored or when coming out of Test Mode, the product will automatically undergo initialization operation. If people are near the product, it could result in an accident involving the moving mechanism. • In the event that parts related to the ride mechanisms (motors or reducers, etc.) are damaged or break down, or when parts replacement or repairs are needed, request work be done by the point of purchase or the office listed in this manual. Such procedures require specialized knowledge, techniques, and tools. Improperly performed procedures can result in accidents. • Do not use a water jet (high pressure washing device) or hose to clean this product. It was not designed to be cleaned by a water jet. Water could get inside and cause electrocution or short circuits. The product could also be damaged in such a way that it is difficult to repair. • Be careful not to get your fingers caught when opening/closing or attaching/ removing doors, lids and other such parts. • When working inside the cabinet, you could get caught on parts or scratch yourself on them. Check the inside of the cabinet and be aware of where the parts are before performing the work. 44 To Purchase This Item, Visit BMI Gaming | www.bmigaming.com | (800) 746-2255 | +561.391.7200 Cleaning the Cabinet Surfaces When the cabinet surfaces are badly soiled, remove stains with a soft cloth dipped in water or diluted with a chemical detergent and squeezed dry. To avoid damaging surface finish, do not use such solvents as thinner, benzine, etc. other than ethyl alcohol, or abrasives, bleaching agent and chemical dustcloth. Some general-purpose household, kitchen and furniture cleaning products may contain strong solvents that degrade plastic components, coatings, and print. Before using any cleaning product, read the product's cautionary notes carefully and test the product first on a small area that is not highly visible. 10 When the Display LCD Screen surfaces are dirty, smudges or greasey, gently wipe the display with a dry, lint-free, soft cloth. If you see a scratch-like mark on your display, it might be a stain which has been transfered from food like matter when the screen was depressed from the outside To avoid damaging surface finish, do not use such solvents as thinner, benzine, etc. the same applies to ethyl alcohol, or abrasives, bleaching agent and chemical dustcloths. Wipe or dust the stain gently with a dry, soft cloth. If the stain remains, moisten a lint-free, soft cloth with water or a 50-50 mixture of isopropyl alcohol and water that does not contain impurities. Wring out as much of the liquid as possible and wipe the display again; do not let any liquid drip from the cloth. PERIODIC INSPECTION DISPLAY (LCD SCREEN Cleaning) Antistatic and purpose made LCD cleaning wipes are also acceptable alternatives. Isopropyl Alcohol is a flammable liquid. Do not use this cleaner near an exposed flame or clean the screen when it is powered on.. 45 To Purchase This Item, Visit BMI Gaming | www.bmigaming.com | (800) 746-2255 | +561.391.7200 PERIODIC INSPECTION TABLE PERIOD ITEMS DESCRIPTION As appropriate CABINET SURFACE Cleaning LAMPS Inspection CABINET Confirm adjusters contact floor SAFETY DEVICES Confirm bellows Daily Check rubber on finger guard 10 PERIODIC INSPECTION Weekly LCD Screen Cleaning Check monitor adjustment Monthly CONTROLLER Inspect volume pots COIN SELECTOR Coin switch inspection Coin insertion test Every 3 Months RINGWIDE Settings check CONTROLLER Inspect gear meshing Apply grease 1 year 46 COIN SELECTOR Cleaning RINGWIDE Cleaning POWER PLUG Inspection, Cleaning FRONT CABI INTERIOR Cleaning To Purchase This Item, Visit BMI Gaming | www.bmigaming.com | (800) 746-2255 | +561.391.7200 11 DESIGN-RELATED PARTS 1 11 13 DESIGN - RELATED PARTS 2 3 12 4 11 5 6 7 10 8 9 47 To Purchase This Item, Visit BMI Gaming | www.bmigaming.com | (800) 746-2255 | +561.391.7200 For the warning display stickers, refer to Section 1. 11 DESIGN - RELATED PARTS 48 Part Part # 1 2 3 4 5 6 7 8 9 10 11 12 13 600-30-100 600-30-101 600-30-102 600-30-103 600-30-104 600-30-105 600-30-106 600-30-107 600-30-108 600-30-109 600-30-110 600-30-111 600-30-112 Part Name Bumble bee POP Transformers Marquee Left Side Monitor Plexi Left Side Speaker Cover Woofer Cover Plexi Light Cover Instruction Decal Left Side Decal (not shown) Front Cabinet Decal Right Side Decal Right Speaker Decal Right Side Monitor Plexi Sega Logo Decal (under monitor) To Purchase This Item, Visit BMI Gaming | www.bmigaming.com | (800) 746-2255 | +561.391.7200 12 PARTS LIST 12 PARTS LIST 2 1 2 3 4 6 8 5 7 49 To Purchase This Item, Visit BMI Gaming | www.bmigaming.com | (800) 746-2255 | +561.391.7200 Part Part # Part Name 1 TRF-P001 Billboard cover 2 TRF-P007 Gun Muzzle Cover 12 3 TRF-P003 Gun Cover PARTS LIST 4 TRF-P005 Left Under Gun Cover 5 TRF-P006 Right Under Gun Cover 6 TRF-P004 Control Panel Cover 7 846-5001D-12 Ringwide Computer 8 253-5644-063BG 9 838-14988 30W Audio Amp 10 837-14572 I/O Control BD 3 for JVS COM 11 ELE-F00610 24V Power Supply 12 ELE-F00600 12V Power Supply 13 838-0005UK I/O Board 14 838-0012UK Driver Board 15 837-14981-01 Game Chip? I/O BD EXP8 Output RS232 9 15 14 10 13 11 12 50 To Purchase This Item, Visit BMI Gaming | www.bmigaming.com | (800) 746-2255 | +561.391.7200 PARTS LIST cont. Gun Mech parts 12 PARTS LIST 51 To Purchase This Item, Visit BMI Gaming | www.bmigaming.com | (800) 746-2255 | +561.391.7200 Part 1 Part # 601-11815 2 12 Screw, #8-32 x3/8 HEX Head PARTS LIST 3 601-11826 Bracket Coil Mounting F/Sega Analog Gun 4 601-11827 Coil with Tubing 5 601-11828 Plunger F/Solenoid 6 601-11829 Bumper Solenoid Stop 7 Screw #8-32x3/8 HEX Washer Head MS wiht SEMS 8 601-11830 Rear Bumper Pad 9 601-11831 Insulator 10 11 Coil Retaining Bracket 601-11832 Spring Compression 12 Pad Adhesive Foam Tape 13 Tube Plug .49 to .59 I.D. MMC #9283k11 14 601-11816 Grip, Right Half 15 601-11817 Grip, Left Half 16 601-11818 Trigger Red 17 601-11819 Spring, Torsion 18 601-11820 Shaft, Trigger 19 Large Thumb Button, Gray 20 601-11821 Nut, Hex #8-32 21 601-11822 Screw #8-32 x1 PBHMS 22 601-11823 Switch Assy. WMS DA3 Type 23 601-11824 Trigger Bumper 24 601-11825 Screw, 10-32 x3/8 B.H. TORX T-20 T. PRF 25 99-10-100 Disc Plastic Washer 26 99-10-100 Round AntiPinch Washer .50"ID x 3.375OD x .62THK 27 99-10-100 Rubber Bellow For Sega Analog Gun 28 52 Part Name Dual Handled Welded Painted F/Sega Analog Gun Metal Spacer for Thumb Button Anti Movement To Purchase This Item, Visit BMI Gaming | www.bmigaming.com | (800) 746-2255 | +561.391.7200 12 PARTS LIST 53 To Purchase This Item, Visit BMI Gaming | www.bmigaming.com | (800) 746-2255 | +561.391.7200 Part 29 12 Part Name Bottom & Base Brkt SubAssy with Bumper Gun Assy PARTS LIST 30 Nut, KEPS 8-32 31 Bracket Pot MTG Horizontal 32 Set Screw 6-32 x 3/16 Cup Point 33 Shaft 5/8 Diameter 34 Bracket Pot MTG Vertical 35 Lockwasher #10 External Zinc Plated 36 Nut HEX 10-32 Jame Nylock Zinc Plated 37 54 Part # 601-11839 Gear Segment W/Hub 38 3/8 SAE Flat Washer Zinc Plated 39 Nut 3/8-16 Nylock 40 Spacer Segment Gear 41 Hex Head Cap Screw 10/31x 1 1/4 To Purchase This Item, Visit BMI Gaming | www.bmigaming.com | (800) 746-2255 | +561.391.7200 (D-1/3) 13 WIRING DIAGRAMS 13 WIRING DIAGRAMS 55 To Purchase This Item, Visit BMI Gaming | www.bmigaming.com | (800) 746-2255 | +561.391.7200 (D-2/3) 13 WIRING DIAGRAMS 56 To Purchase This Item, Visit BMI Gaming | www.bmigaming.com | (800) 746-2255 | +561.391.7200 (D-3/3) 13 WIRING DIAGRAMS 57


![PDF format [User manual]](http://vs1.manualzilla.com/store/data/005732328_1-c6f560cc59c28b45e6e6b9e007201668-150x150.png)