1
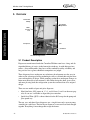
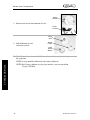
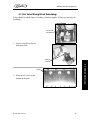
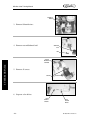
WILSHIRE JUICE
TRAINING MANUAL
✔ CARBON DIOXIDE
✔ WATER
✔ SYRUP/CONCENTRATE
✔ MECHANICAL
✔ REFRIGERATION
✔ CONTROLS & ELECTRICAL
Blank Page
Wilshire Juice Training Manual
Wilshire Juice
Training Manual
The products, technical information, and instructions contained in this manual are subject
to change without notice. These instructions are not intended to cover all details or variations of the equipment, nor to provide for every possible contingency in the installation,
operation or maintenance of this equipment. This manual assumes that the person(s) working on the equipment have been trained and are skilled in working with electrical, plumbing, pneumatic, and mechanical equipment. It is assumed that appropriate safety
precautions are taken and that all local safety and construction requirements are being met,
in addition to the information contained in this manual.
To inquire about current revisions of this and other documentation or for assistance with
any Cornelius product contact:
IMI Cornelius Inc.
Corporate Headquarters
One Cornelius Place
Anoka, MN 55303-6234
U.S.A.
Internet:
www.cornelius.com
In the U.S.A.:
Outside the U.S.A.:
phone: 763-421-6120
800-238-3600
FAX:
800-535-4235
phone: 763-421-6120
FAX:
763-422-3297
Email:
tech.service@cornelius.com
Trademarks and copyrights:
Aurora, blendanator, Cornelius, Decade, Hydro Boost, Sitco, Rancor, Spirit, UF-1, Vanguard, Venture, Olympus, and Vista are registered trademarks of IMI Cornelius Inc.
Optifill trademark is pending.
This document contains proprietary information and it may not be
reproduced in any way without permission from Cornelius.
Printed in U.S.A.
Copyright © 1999-2002, All Rights Reserved, IMI Cornelius Inc.
Wilshire Juice Training Manual
NOTES:
_______________________________________________________________________
_______________________________________________________________________
_______________________________________________________________________
_______________________________________________________________________
_______________________________________________________________________
_______________________________________________________________________
_______________________________________________________________________
_______________________________________________________________________
_______________________________________________________________________
_______________________________________________________________________
_______________________________________________________________________
_______________________________________________________________________
_______________________________________________________________________
_______________________________________________________________________
_______________________________________________________________________
_______________________________________________________________________
_______________________________________________________________________
_______________________________________________________________________
_______________________________________________________________________
_______________________________________________________________________
_______________________________________________________________________
_______________________________________________________________________
TABLE OF CONTENTS
INTRODUCTION - - - - - - - - - - - - - - - - - - - - - - - - - - - - - - - - - - - - - - - - - - - - - - 1
Preview Questions - - - - - - - - - - - - - - - - - - - - - - - - - - - - - - - - - - - - - - - - - - - - - 1
Key Things To Know / Do - - - - - - - - - - - - - - - - - - - - - - - - - - - - - - - - - - - - - - - 1
Overview - - - - - - - - - - - - - - - - - - - - - - - - - - - - - - - - - - - - - - - - - - - - - - - - - - - 2
Product Description - - - - - - - - - - - - - - - - - - - - - - - - - - - - - - - - - - - - - - - - - 2
Dimensions & Capacities - - - - - - - - - - - - - - - - - - - - - - - - - - - - - - - - - - - - - - 3
All Quantum™ Dispensers: - - - - - - - - - - - - - - - - - - - - - - - - - - - - - - - - - 3
Quantum™ 1000, Single Flavor: - - - - - - - - - - - - - - - - - - - - - - - - - - - - - - 3
Quantum™ 2000, Two Flavor: - - - - - - - - - - - - - - - - - - - - - - - - - - - - - - - 3
Quantum™ 3000, Three Flavor: - - - - - - - - - - - - - - - - - - - - - - - - - - - - - - 3
Quantum™ 4000, Four Flavor: - - - - - - - - - - - - - - - - - - - - - - - - - - - - - - - 3
SYSTEM DETAILS - - - - - - - - - - - - - - - - - - - - - - - - - - - - - - - - - - - - - - - - - - - - - 4
Water - - - - - - - - - - - - - - - - - - - - - - - - - - - - - - - - - - - - - - - - - - - - - - - - - - - - - 4
Water Quality - - - - - - - - - - - - - - - - - - - - - - - - - - - - - - - - - - - - - - - - - - - - - 4
Water Flow - - - - - - - - - - - - - - - - - - - - - - - - - - - - - - - - - - - - - - - - - - - - - - - 4
Adjusting Flow Rates - - - - - - - - - - - - - - - - - - - - - - - - - - - - - - - - - - - - - - - - 4
Concentrate - - - - - - - - - - - - - - - - - - - - - - - - - - - - - - - - - - - - - - - - - - - - - - - - - 4
Miscellaneous Concentrate Tips - - - - - - - - - - - - - - - - - - - - - - - - - - - - - - - - - 5
SLJ Units - - - - - - - - - - - - - - - - - - - - - - - - - - - - - - - - - - - - - - - - - - - - - - 5
QLT Units - - - - - - - - - - - - - - - - - - - - - - - - - - - - - - - - - - - - - - - - - - - - - 5
Setting Ratios - - - - - - - - - - - - - - - - - - - - - - - - - - - - - - - - - - - - - - - - - - - - - - - - 5
Mechanical - - - - - - - - - - - - - - - - - - - - - - - - - - - - - - - - - - - - - - - - - - - - - - - - - - 6
Concentrate Pump Disassembly: - - - - - - - - - - - - - - - - - - - - - - - - - - - - - - - - - 6
SLJ Rinse/Flush Valve Rebuilding: - - - - - - - - - - - - - - - - - - - - - - - - - - - - - - - 7
SLJ Valve Mixing Block Rebuilding: - - - - - - - - - - - - - - - - - - - - - - - - - - - - - 9
Miscellaneous Mechanical: - - - - - - - - - - - - - - - - - - - - - - - - - - - - - - - - - - - 11
Refrigeration - - - - - - - - - - - - - - - - - - - - - - - - - - - - - - - - - - - - - - - - - - - - - - - 12
Water Thermostat - - - - - - - - - - - - - - - - - - - - - - - - - - - - - - - - - - - - - - - 12
Concentrate Thermostat - - - - - - - - - - - - - - - - - - - - - - - - - - - - - - - - - - - 12
Control Relay - - - - - - - - - - - - - - - - - - - - - - - - - - - - - - - - - - - - - - - - - - 12
Refrigerant Solenoid Valve - - - - - - - - - - - - - - - - - - - - - - - - - - - - - - - - - 12
Heat Exchanger Assembly - - - - - - - - - - - - - - - - - - - - - - - - - - - - - - - - - 12
Compressor - - - - - - - - - - - - - - - - - - - - - - - - - - - - - - - - - - - - - - - - - - - 13
Condenser - - - - - - - - - - - - - - - - - - - - - - - - - - - - - - - - - - - - - - - - - - - - 13
Condenser Fan - - - - - - - - - - - - - - - - - - - - - - - - - - - - - - - - - - - - - - - - - 13
TABLE OF CONTENTS
Wilshire Juice Training Manual
TABLE OF CONTENTS
Wilshire Juice Training Manual
Dryer - - - - - - - - - - - - - - - - - - - - - - - - - - - - - - - - - - - - - - - - - - - - - - - 13
Air Flow - - - - - - - - - - - - - - - - - - - - - - - - - - - - - - - - - - - - - - - - - - - - - - - - 13
Refrigerant Charging - - - - - - - - - - - - - - - - - - - - - - - - - - - - - - - - - - - - - - - 13
Filter/Dryer Replacement - - - - - - - - - - - - - - - - - - - - - - - - - - - - - - - - - - - - 14
Condenser Cleaning - - - - - - - - - - - - - - - - - - - - - - - - - - - - - - - - - - - - - - - - 14
Miscellaneous Refrigeration: - - - - - - - - - - - - - - - - - - - - - - - - - - - - - - - - - - 15
Controls and Electrical - - - - - - - - - - - - - - - - - - - - - - - - - - - - - - - - - - - - - - - - - 16
TROUBLE SHOOTING - - - - - - - - - - - - - - - - - - - - - - - - - - - - - - - - - - - - - - - - - 17
ATTACHMENTS - - - - - - - - - - - - - - - - - - - - - - - - - - - - - - - - - - - - - - - - - - - - - - 19
REVIEW - - - - - - - - - - - - - - - - - - - - - - - - - - - - - - - - - - - - - - - - - - - - - - - - - - - - 21
Wilshire Juice Training Manual
INTRODUCTION
1. PREVIEW QUESTIONS
Check your current knowledge by taking a few minutes to answer the following questions:
1. Water and concentrate thermostats are interchangeable? _____ True _____ False
The transformer does NOT control the cooling system? _____ True _____ False
3.
Condenser airflow passes over the compressor first? _____ True _____ False
4.
”Ratio” refers to the amount of water required to dilute one part of concentrate?
_____ True _____ False
5.
O-rings may be installed dry (lubrication is not recommended)?
_____ True _____ False
2. KEY THINGS TO KNOW / DO
✔
Work Safely! Always unplug/disconnect the power to the dispenser before
servicing, and get help lifting the unit if it must be removed from the
counter.
✔
Make certain that the water line has adequate pressure at all times!
✔
Learn to use a good quality volt-ohm meter. Proper electrical trouble shooting is impossible without it!
© 1999, IMI Cornelius Inc.
-1-
INTRODUCTION
2.
Wilshire Juice Training Manual
3. OVERVIEW
Transformer
& Relay
Concentrate
Compartment
INTRODUCTION
Water
Cooling
Coil
Fan
Compressor
Condenser
Air intake through bottom
3.1 Product Description
Dispensers manufactured under the Cornelius/Wilshire name have a long and distinguished history of service in the frozen juice industry. As with their previous
names, (Alco and Reynolds) they have set the standard for utility, reliability and
long service lives against which their competitors are judged.
These dispensers have undergone an evolutionary development over the years in
order to take advantage of newer technologies and yet, retained their original character and simplicity of design. While pumping systems have undergone changes to
better meet the needs of our customers, and cabinet design has been given a new
and more pleasing look, the refrigeration system has remained true to its original
design.
There are two models of post-mix juice dispenser:
•
•
Slim Line Juice (SLJ) comes in 1, 2, 3, and 4 flavor (2 and 4 are the most popular). It can use a refillable or disposable juice container.
Quick Load Tube (QLT) is almost identical to the SLJ except for the pump and
juice pouch tray.
The one, two, and three flavor dispensers use a single frame and a separate pump
assembly for each flavor. The four flavor dispenser is two two-flavor units merged
together. Everything is interchangeable except the frames.
-2-
© 1999, IMI Cornelius Inc.
Wilshire Juice Training Manual
Each dispenser has two cooling evaporators, one for water and one for concentrate.
Each evaporator has its own thermostat. The dispensers are not self defrosting.
A lighted merchandiser is an option.
3.2 Dimensions & Capacities
All Quantum™ Dispensers:
-
-
-
-
-
- - - - - - - - - - - - - 1.6 – 2.2 oz./sec.
115 VAC, 60 cycle, single phase, 9.43 amps
- - 220 VAC, 50 cycle, single phase, 5 amps
- - - - 34 1/2” H (with 4” legs), 27 1/4” D
- - - - - - - - - - - - - 4” back, 12” top
- - - - - - - - - - - -3/8” SAE male flare
- - 100 psi max. static, 20 psi min. dynamic
Quantum™ 1000, Single Flavor:
Dimensions- - - - - - - - - - - - - - - - - - - - - - - - - 10 3/4” W
Shipping weight - - - - - - - - - - - - - - - - - - - - - - - 125 lbs.
Quantum™ 2000, Two Flavor:
Dimensions- - - - - - - - - - - - - - - - - - - - - - - - - 10 3/4” W
Shipping weight - - - - - - - - - - - - - - - - - - - - - - - 130 lbs.
Quantum™ 3000, Three Flavor:
Dimensions- - - - - - - - - - - - - - - - - - - - - - - - - 14 3/4” W
Shipping weight - - - - - - - - - - - - - - - - - - - - - - - 145 lbs.
Quantum™ 4000, Four Flavor:
Dimensions- - - - - - - - - - - - - - - - - - - - - - - - - - - 19” W
Shipping weight - - - - - - - - - - - - - - - - - - - - - - - 156 lbs.
© 1999, IMI Cornelius Inc.
-3-
INTRODUCTION
Flow Rate - - - Electrical rating- - - - - - - - - Dimensions- - - Clearance - - - Water Connection- - - - - - - - -
Wilshire Juice Training Manual
SYSTEM DETAILS
1. WATER
1.1 Water Quality
Water quality has an affect on juice dispensing systems.
• odor
• taste
• clarity/foaming
Water filtration is recommended to assure the best beverage taste.
1.2 Water Flow
Inlet water pressure should be regulated to 45 psi max. (3.1 bar) to prevent damage
to pump tubing.
1.3 Adjusting Flow Rates
SYSTEM DETAILS
Adequate water flow is necessary and should be at least 3.0 ounces per second
(89 ml) at the inlet.
2. CONCENTRATE
• Concentrate should be stored frozen and put into a cooler 72 hours before use. Rapid
cooling, such as in a sink of hot water, adversely affects flavor and leads to service
calls.
• Proper loading of concentrate is important. Improper loading is a major source of service calls.
• Concentrates vary in viscosity and mixing valves must be adjusted accordingly.
• When changing concentrate, be sure to check the concentrate container O-ring for
damage. It should be clean and wet with concentrate or a food grade lubricant.
• Shake or stir pulp based concentrates.
• When changing flavors, be sure to flush the system and reset the pump.
• Nozzles should be cleaned daily. Remove the nozzles and wash in warm soap solution.
Rinse with clean water, lubricate the O-ring, and replace nozzle.
• Flushing daily and sanitizing weekly is recommended.
-4-
© 1999, IMI Cornelius Inc.
Wilshire Juice Training Manual
2.1 Miscellaneous CONCENTRATE Tips
SLJ Units
If the concentrate causes a false refill light, the refill circuit can be
bypassed (jumped). Jumper the two probes just above the dispense-flush
lever.
QLT Units
QLT’s usually use 5 to 1 concentrate which can look thawed in the bag but
still be semi-frozen. Concentrate that is too thick to flow properly may
cause a false refill light because the syrup may not have filled the tube.
When there is no concentrate in the tube, the pump motor runs with no
drag. The concentrate sensor measures current draw on the motor and
assumes that since there is no concentrate in the tube that the concentrate
supply is empty.
3. SETTING RATIOS
• A refractometer or hydrometer must be used to measure the post-mix ratio.
• Ratios are sometimes set by taste but this is not recommended.
SYSTEM DETAILS
© 1999, IMI Cornelius Inc.
-5-
Wilshire Juice Training Manual
4. MECHANICAL
At least once a year the concentrate pumps should be checked, cleaned, and the pump tubing replaced.
4.1 Concentrate Pump Disassembly:
1. See “Installation And Service Manual” for pump platform removal procedure.
Housing
2. Remove four thumb screws,
housing cover, and impeller.
Rotor
Assembly
SYSTEM DETAILS
Thumb
Screws
3. Remove and replace clamps and pump
tubing with new ones (pump tubing and
clamps kit p/n 4509B).
Clamps
Pump Hose
4. Clean components and check that
the rollers spin freely.
Impeller
Rollers
-6-
© 1999, IMI Cornelius Inc.
Wilshire Juice Training Manual
4.2 SLJ Rinse/Flush Valve Rebuilding:
Valves should be rebuilt if they are leaking. Cornelius supplies a kit which includes all the
O-rings (p/n 45026100).
1. See “Installation And Service Manual” for pump platform removal procedure.
Valve
Assembly
2. Remove four screws and lift valve
assembly up, disconnect wires in the
back of the valve.
Screws
3. Remove two screws holding the
valve to the bracket.
SYSTEM DETAILS
Syrup
Line
Port
4. Loosen screw that holds cam-lock
washer and disconnect the syrup line.
© 1999, IMI Cornelius Inc.
Fastening
Screw &
Cam-lock
Washer
-7-
Wilshire Juice Training Manual
Bottom
Of Valve
5. Remove four screws from bottom of valve.
Screws
& Plate
Top Of
Valve
6. Pull off bottom of valve
and center section.
Bottom
of Valve
Center
Section
Of Valve
7. Rebuild the valve and reassemble. Be sure the cam-lock washer is in the groove of
the syrup line.
NOTE: O-rings should be lubricated with sanitary lubricant.
SYSTEM DETAILS
NOTE: Red O-ring at bottom of valve plate must be a tear resistant teflon.
Use p/n 31525064.
-8-
© 1999, IMI Cornelius Inc.
Wilshire Juice Training Manual
4.3 SLJ Valve Mixing Block Rebuilding:
Valves should be rebuilt if they are leaking. Cornelius supplies all the parts necessary for
rebuilding.
Loosen cam
lock-washer
1. Loosen cam lock-washer on
both water lines.
cam lockwashers
SYSTEM DETAILS
Screws
2. Remove two screws on the
bottom of the plate.
© 1999, IMI Cornelius Inc.
-9-
Wilshire Juice Training Manual
Solenoid
Wires
3. Remove Solenoid wires.
4. Remove nut and Solenoid coil.
Solenoid
Coil
Nut
SYSTEM DETAILS
Screws
On Front
Of Plate
5. Remove all screws.
Screws
6. Separate valve halves.
Flow
Control
Sleeve
- 10 -
Flow
Control
Piston
© 1999, IMI Cornelius Inc.
Wilshire Juice Training Manual
7. If necessary, remove and replace flow
control and check valve components.
Check Valve
8. Rebuild the valve and reassemble. Replace all O-rings making sure they are not
pinched or twisted. Be sure the cam-lock washers are in the grooves of the water
lines.
NOTE: O-rings should be lubricated with sanitary lubricant.
4.4 Miscellaneous Mechanical:
•
•
© 1999, IMI Cornelius Inc.
- 11 -
SYSTEM DETAILS
SLJs can be converted to QLTs (see IMI Cornelius QLT Training video).
There is one motor per concentrate pump. DC motors are used to allow variable speeds. Some juice dispensers have speed switches which change the
motor voltage from 28 to 18. This slows the motor to accommodate very low
water pressure. This is especially useful when high concentrate ratios are used.
Wilshire Juice Training Manual
5. REFRIGERATION
The two evaporators in our design are independently controlled so that they don’t both
cool at once. This prevents the cabinet or water thermostats from over-cooling one evaporator while trying to satisfy the other. This is accomplished by using two thermostats wired
parallel, a control relay to connect them to the compressor and a liquid line solenoid valve
to isolate the water cooling evaporator during cabinet cooling cycles. During a cabinet
(concentrate) cooling cycle, the water may require cooling. When this occurs, the water
thermostat closes, sending current to the control relay. At this point, the compressor is
already running, so the current is passed on via the red wire leading to the refrigerant solenoid valve. Once this valve is opened, refrigerant flow is diverted to the water coil for
cooling. The cooling cycle is relatively short for average incoming water temperatures. If
incoming water is warm, it may become necessary to hook up to a chilled water line from
a beverage system, in order to keep up with peak or high demand periods. Setting the
water thermostat to a colder temperature does not increase the efficiency of the water coil
and may result in the freeze-up of the water coil during off peak hours. Once the water
thermostat is satisfied, the refrigerant solenoid will close and cooling will be restored to
the cabinet.
Water Thermostat
Controls the refrigerant solenoid valve and the cooling of the water evaporator coil. Connects to the normally closed relay terminal.
Concentrate Thermostat
SYSTEM DETAILS
Controls cooling of the concentrate compartment and operation of the start
relay. Connects to the normally open relay terminal and the relay coil.
Note: These thermostats are of different sensitivities and must not be substituted for one another. The same two parts are used in all models
(all years).
Control Relay
Allows thermostats to individually control compressor operation without
short cycling. This relay is also used in all models (all years).
Refrigerant Solenoid Valve
Cuts off the flow of refrigerant to the water-cooling coil when the water
thermostat is satisfied.
Heat Exchanger Assembly
Consists of the capillary tubes for the concentrate compartment and the
suction line and insulation. The capillary tube is soldered to the suction line
to prevent condensation and balance system pressure. If replacement
becomes necessary, the entire assembly must be replaced as one.
- 12 -
© 1999, IMI Cornelius Inc.
Wilshire Juice Training Manual
Compressor
Moves the refrigerant through the system. Pressurizes the refrigerant for
heat dissipation in the condenser.
Condenser
Dissipates heat from the compressor and refrigeration action.
Condenser Fan
Circulates air across the compressor and condenser to facilitate heat
removal.
Dryer
Cleans and removes moisture from the refrigeration system. A standard
dryer was in use for the SLJ until recently. The dryer currently in use is a
Parker style dryer. The Parker distinguishes itself by having two inlets and
two outlets. When ordering a new dryer, it is important to specify which
dryer is needed. The dryer should be replaced any time the refrigeration
system is opened.
5.1 Air Flow
5.2 Refrigerant Charging
Charging any capillary tube controlled system requires accurate charging equipment and technique. The Cornelius/Wilshire dispenser is no exception. The
amount of refrigerant in the system actively determines the operating pressures
and temperature of its evaporators. It is because of this that it’s necessary to utilize
a refrigerant scale or graduated charging cylinder whenever charging a system.
Whenever investigating a suspect sealed system of this type, it’s important to
remember that its operating pressures are to a great degree determined by load,
ambient temperature and condition. If the unit appears to be under charged, check
first for a dirty condenser. If the unit is constantly running but not cooling, the
© 1999, IMI Cornelius Inc.
- 13 -
SYSTEM DETAILS
Airflow in earlier units such as the first revision SLJ model was brought through
louvered side panels and directed across the compressor and through the condenser. The second generation SLJ with the smooth side panels gets its airflow
from the bottom and directs it first through the condenser and then across the compressor. On all models, the airflow passes from the fan blades into the condenser.
This increases the efficiency of the refrigeration system but allows dirt to build up
where it is difficult to see or remove. On the positive side, the condenser is
designed to maximize airflow and minimize dirt buildup. Even so, the condenser
should be cleaned yearly, and checked whenever routine maintenance is performed.
Wilshire Juice Training Manual
problem may be a low charge. If a low charge is suspected, it is recommended that
the system be evaluated and leak tested by standard methods.
NOTE: Hooking up a high side hose to a system with only 6.25oz of refrigerant
causes a quarter or more of the charge to backup into the hose, immediately
resulting in an incorrect reading. It is for this reason that operating pressures are not published.
Since the initial production of the SLJ/Quantum dispenser, the amount of the
refrigerant charge has changed. Earlier units specify a 5.Ooz charge while later
units specify a 6.25oz charge. The reason for this change was driven by field service issues. While the 5oz charge produces the optimum cooling temperatures, a
slight under charge from this critical point can cause a flash freeze in the water
evaporator inlet. By increasing the charge to 6.25oz, we have increased the buffer
zone between the correct charge and an under charge without any significant performance loss. Changes to the refrigeration system were not necessary to make this
adjustment. Early units with a 5oz charge on the nameplate may be recharged to
6.25oz if refrigeration service is called for.
SYSTEM DETAILS
5.3 Filter/Dryer Replacement
The style of filter dryer utilized in the Cornelius/Wilshire juice dispenser has
recently changed. The dryer previously in use was a standard configuration Alco
dryer with one inlet and one outlet. Our new dryer is of a different configuration.
Instead of the standard configuration, this dryer has two inlets and two outlets. The
two inlets are for the refrigerant line from the condenser and a process tube. The
two outlets are for the refrigerant line leading to the liquid line solenoid valve and
the capillary tube that controls the concentrate evaporator.
5.4 Condenser Cleaning
To clean the Condenser or change the fan motor follow this procedure.
1. Disconnect the power cord then remove the drip tray, splash panel, top panel, and
both side panels.
- 14 -
© 1999, IMI Cornelius Inc.
Wilshire Juice Training Manual
2. Remove four screws on
front holding electrical box
and two screws on each side
of the fan shroud.
Remove Two
Screws On Each
Side Of Fan Shroud
Remove Four
Screws In Front
3. Pull fan shroud forward.
Fan Shroud
SYSTEM DETAILS
Fan
4. Clean condenser with brush and
compressed air.
If necessary, remove three screws
on each side of the fan and move
it out of the way.
Condenser
3 Screws On
Each Side
5.5 Miscellaneous Refrigeration:
•
•
The water inlet valve solenoid assembly should be replaced as a unit.
The water inlet valve solenoid assembly has a Y-strainer that may need
periodic cleaning.
© 1999, IMI Cornelius Inc.
Water Inlet
Valve
solenoid
- 15 -
Wilshire Juice Training Manual
6. CONTROLS AND ELECTRICAL
l
•
Transformer blue leads are 26 VAC and
go to the pumps, red leads are 24 VAC
and go to the merchandiser.
Blue leads
go to pumps
The unit’s ON/OFF switch may be on the underside of the unit or on the
inside of the door. There is also a switch on the bottom of the door that turns
on and off as the door is opened and closed. Both of these switches turn off
the pumps but not the refrigeration.
SYSTEM DETAILS
•
Red leads go to
merchandiser
ballast board
- 16 -
© 1999, IMI Cornelius Inc.
Wilshire Juice Training Manual
TROUBLE SHOOTING
TROUBLESHOOTING QLT DRINK QUALITY PROBLEMS
ACTUAL PROBLEM & SYMPTOMS
Concentrate too cold:
•
•
•
•
•
Low brix
False refill light
Poorly mixed drink
Unmixed concentrate at bottom of cup
Poor flow rate
Concentrate too warm
CUSTOMER REACTION
Decrease water flow
•
•
•
•
•
Increase water flow
• High brix
Piercing device created a “flap” when it
pierced through the pouch
• Low brix
• False refill light
• Floats higher in the cup indicating high
brix
© 1999, IMI Cornelius Inc.
NOTE: After 2-4 hours the concentrate
will match the cabinet temperature becoming less viscous
resulting in low brix
Decrease water flow
•
•
•
•
•
Might correct brix
False refill light
Poorly mixed drink
Pulsing/splashing dispense
Unmixed concentrate at bottom of cup
NOTE: Correct by rotating piercing
device 90-180°F
Increase water flow
• Might lower brix
• Drinks taste weak
- 17 -
TROUBLE SHOOTING
Warm Hydrometer
Might correct brix
False refill light
Poorly mixed drink
Pulsing/splashing dispense
Unmixed concentrate at bottom of cup
NOTE: After 2-4 hours the concentrate
will match the cabinet temperature becoming more viscous
resulting in high brix
Wilshire Juice Training Manual
TROUBLESHOOTING QLT DRINK QUALITY PROBLEMS
ACTUAL PROBLEM & SYMPTOMS
Pouch in holder wrong (flow restriction)
• Low brix
• False refill light
Pump slide not fully engaged
• Low brix
• False refill light
Sticky pump rollers
• Low brix
Ambient water to dispenser
CUSTOMER REACTION
Decrease water flow
•
•
•
•
•
Decrease water flow
• Can’t achieve good brix
• False refill light
• Poorly mixed drink
Decrease water flow
• Can’t achieve good brix
• False refill light
• Poorly mixed drink
Service call / complaint
• Drinks above 45°F during peak volume
• Exceeds drink capacity of 20 oz. per
minute
1/4” water line to dispenser
TROUBLE SHOOTING
• Poor flow rate
• High velocity dispense
- 18 -
Might correct brix
False refill light
Poorly mixed drink
Pulsing/splashing dispense
Unmixed concentrate at bottom of cup
NOTE: Must supply 3/8” chilled water
line to dispenser to generate
unlimited drink capacity.
Decrease water flow
•
•
•
•
•
Might correct brix
Poorly mixed drink
High velocity dispense
Pulsing/splashing dispense
Unmixed concentrate at bottom of cup
© 1999, IMI Cornelius Inc.
ATTACHMENTS
The following attachments should be included with this lesson:
Minute Maid Orange Juice 6L Pouch Helpful
Hints guide
SLJ1000-1 Voltage Regulator Board
Installation Instructions
Installation Instructions
Wilshire QLT180 VRB
INSTALLATION INSTRUCTIONS
WILSHIRE QLT180 VOLTAGE REGULATOR BOARD (VRB)
The VRB is located in the
front electrical box directly
behind the lower splash panel.
Remove the drip tray and
splash panel to gain access to
the electrical box.
QLT180 Voltage Regulator Board
Installation Instructions
1. Disconnect the 5 wire
harnesses from the VRB
and remove the VRB
assembly by loosening
two Phillips screws.
2. Remove the screw, lock washer, flat washer,
rectangular insulator pad, round insulator, and nut
that secure the regulator heat sink to the VRB
mounting bracket. Separate the VRB from the
bracket by gently squeezing the tips of the white
plastic standoffs.
3. Reinstall the replacement VRB by reversing the
above procedures.
4. Attach the five wire harnesses to the VRB as
shown.
IMPORTANT: The regulator mounting hardware must
be installed as shown in order to allow heat dissipation
from the regulator and to prevent the regulator from
grounding. Failure to install the hardware properly may
cause damage to the VRB.
PART NUMBER REFERENCE
45138001 .....VRB for McDonald’s QLT
45559 ...........VRB Assembly (includes VRB, bracket,
standoffs and regulator mounting. hardware)
45004 ...........Mounting Kit (regulator mounting. hardware)
© 1999, IMI Cornelius Inc.
All Rights Reserved
Do not copy without permission
-1-
Form No. TP00910
© 1999, IMI Cornelius Inc.
- 19 -
ATTACHMENTS
Wilshire Juice Training Manual
ATTACHMENTS
Wilshire Juice Training Manual
QLT Juice Dispenser Wiring
Installation Instructions
IMI Cornelius QLT Training video tape
- 20 -
IMI Cornelius
QLT Training
© 1999, IMI Cornelius Inc.
Wilshire Juice Training Manual
REVIEW
DATE: _______________________________________________
NAME: _______________________________________________
LOCATION: __________________________________________
The following questions summarize important points in this training lesson.
REVIEW
1. What function does the refrigerant solenoid valve perform?
A. Turns the compressor on/off
B. Controls refrigerant pressure.
C. Controls refrigerant flow to the water coil.
D. Controls cabinet temperature.
2.
The water and cabinet thermostats can be interchanged.
_____ True
_____ False
3.
Power for the compressor flows through?
A. The water thermostat
B. The concentrate thermostat
C. The control relay
D. All of the above.
4.
The transformer output is direct current (DC).
_____ True
_____ False
5.
Air is sucked into the unit and exhausted through the condenser?
_____ True
_____ False
6.
Ice buildup on the interior cabinet walls is:
A. a normal part of the dispenser operation
B. due to the thermostat being set too cold
C. an indication that the concentrate has not been correctly thawed
D. all of the above.
© 1999, IMI Cornelius Inc.
- 21 -
REVIEW
Wilshire Juice Training Manual
7.
The voltage regulator board provides DC power for the pump motor.
_____ True
_____ False
8.
Pump hoses should be replaced?
A. monthly
B. whenever flavors are changed
C. annually
D. when they wear out.
9.
If the juice machine has been laid down on its side, it should be allowed to stand
upright for at least one hour before starting.
_____ True
_____ False
10. Ratio is a measure of the amount of water verses concentrate in the finished juice
drink.
_____ True
_____ False
11. Brix is a measurement of the dissolved solids in the finished drink.
_____ True
_____ False
12. The knob on the mixing valve adjusts concentrate flow.
_____ True
_____ False
13. On the SLJ/Quantum series dispensers, the pump motor and solenoid valves are wired
parallel with one another.
_____ True
_____ False
14. The pump motor will rotate in the wrong direction if wired incorrectly.
_____ True
_____ False
15. The QLT circuit board may be substituted for the SLJ circuit board.
A. once the pump assembly has been updated
B. whenever the SLJ board malfunctions
C. only on dispensers that are being converted to QLT applications
D. Both A & C.
- 22 -
© 1999, IMI Cornelius Inc.
Wilshire Juice Training Manual
16. The SLJ and QLT circuit boards wire in the same way.
_____ True
_____ False
17. The SLJ circuit board uses a continuity test to check for the sold out or refill condition.
_____ True
_____ False
19. The QLT circuit board differs from the SLJ primarily in the way they sense the sold
out or refill condition.
_____ True
_____ False
© 1999, IMI Cornelius Inc.
- 23 -
REVIEW
18. The function of the speed switch is to:
A. help dispense drinks faster by increasing water velocity
B. slow down the dispense rate when ice is used
C. allow for low water pressure brixing of higher ratio concentrates
D. keep busy waitresses from overflowing drinks.
Wilshire Juice Training Manual
NOTES:
_______________________________________________________________________
_______________________________________________________________________
_______________________________________________________________________
_______________________________________________________________________
_______________________________________________________________________
_______________________________________________________________________
_______________________________________________________________________
_______________________________________________________________________
_______________________________________________________________________
_______________________________________________________________________
_______________________________________________________________________
_______________________________________________________________________
_______________________________________________________________________
_______________________________________________________________________
_______________________________________________________________________
_______________________________________________________________________
_______________________________________________________________________
_______________________________________________________________________
_______________________________________________________________________
_______________________________________________________________________
_______________________________________________________________________
_______________________________________________________________________
- 24 -
© 1999, IMI Cornelius Inc.
IMI Cornelius Inc.
One Cornelius Place
Anoka, MN 55303-1592
U.S.A.
Part No. TP00908
May 10, 2002


![Service Manual FCB Pinnacle 2 and 4 Flavor [ 005271 ]](http://vs1.manualzilla.com/store/data/006038828_1-2ffb9d6cd82d544c3f733521619945ce-150x150.png)