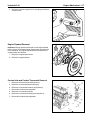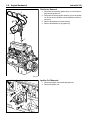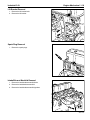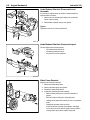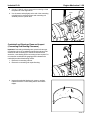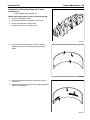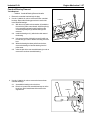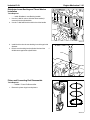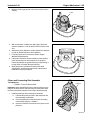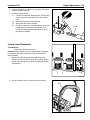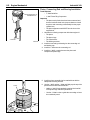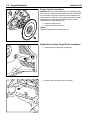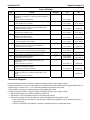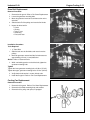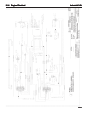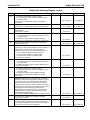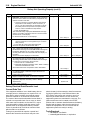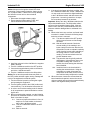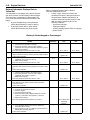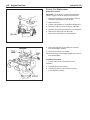
1
Original Issue Dated June 2002 Publication number 36100010 3.0L INDUSTRIAL ENGINE SERVICE MANUAL Table Of Contents General Information Section 0 Engine Mechanical Section 1 Engine Cooling Section 2 Engine Electrical Section 3 No part of this publication may be reproduced without the written permission of Power Solutions, Inc. At the time of publication, all of the information included in this publication is accurate to the best of our knowledge. Power Solutions, Inc., cannot be responsible for information that has changed after this book was published. Industrial 3.0L General Information 0-1 Section 0 General Information Fastener Notice ........................................................ 0-2 General Information - 3.0L ..................................... 0-3 Conversion - English/Metric ..................................... 0-3 Equivalents - Decimal and Metric ............................ 0-3 Arrows and Symbols ................................................ 0-4 Engine ID Location ................................................... 0-5 Labels - How to Obtain Replacement ....................... 0-5 Fasteners ................................................................. 0-5 Metric Fasteners ....................................................... 0-5 Fastener Strength Identification ................................ 0-6 Prevailing Torque Fasteners ..................................... 0-7 Prevailing Torque Specifications (Metric) .................. 0-8 Prevailing Torque Specifications (English) ................ 0-8 Thread Inserts .......................................................... 0-9 Abbreviations and Their Meanings ........................... 0-9 Maintenance and Lubrication .............................. 0-15 Initial Start Up Maintenance ................................... 0-15 Routine Maintenance ............................................. 0-15 Scheduled Preventive Maintenance ....................... 0-15 Engine Oil Level Check .......................................... 0-15 Adding Engine Oil .................................................. 0-15 Engine Oil and Filter ............................................... 0-15 Engine Oil Quality ................................................... 0-15 Engine Oil Recommendation .................................. Oil Filter .................................................................. Engine Air Cleaner ................................................. Safety Element ....................................................... Cooling System Maintenance ............................. Coolant Level ......................................................... Radiator .................................................................. Radiator Hoses ...................................................... Fan Belts ................................................................ Serpentine Belt ....................................................... V-Type Belt ............................................................. Fuel Delivery System Maintenance .................... Fuel Filter Replacement ......................................... Carbureted Engines ............................................ TBI Engines .......................................................... Zenith Z.E.E.M.S TBI Fuel Injection ..................... Ignition Systems ..................................................... Types of Ignition Systems ....................................... Ignition Timing ........................................................ Spark Plugs ............................................................ Maintenance Schedule - 3.0L Engine ................ Approximate Fluid Capacities ................................. Filter Chart - 3.0L Engine ....................................... 0-15 0-16 0-16 0-16 0-16 0-16 0-17 0-17 0-17 0-17 0-17 0-17 0-17 0-17 0-17 0-17 0-18 0-18 0-18 0-18 0-19 0-19 0-20 0-2 General Information Industrial 3.0L Fastener Notice NOTICE: Always use the correct fastener in the proper location. When you replace a fastener, use ONLY the exact part number of that application. UNLESS OTHERWISE SPECIFIED, Do Not use supplemental coatings (paints, greases or other corrosion inhibitors) on threaded fasteners or fastener joint interfaces. Generally, such coating adversely affect the fastener torque and the joint clamping force, and may damage the fastener. When you install fasteners, use the correct tightening sequence and specifications. Following these instructions can help you avoid damage to parts and systems. Industrial 3.0L General Information 0-3 General Information - 3.0L Conversion - English/Metric c«¦©¨®§ ¨« ¥¯ ´£ ª¨ ®4>¨« ®4>¨« ®4>¥¯ ®4>´£ ¢°>¨« ¢°>¨« ¢°>¨« 4¯ ¦ © ¢°>´£ ©¡ ¯¬« ¯¬« 2¦ ¬µ ©¡ ¥¯M®P ¨«M®P ©¡>¨« ©¡>¥¯ § ¨«¢§¤®>¬¥>fPm ©¡M®4>¨« `¯° ©¡>¥¯ 2u>§¬°Q d¬¬¯>a «£©¤ Conversion - English/Metric (cont’d) k°©¯¨©´>M b¨±¨£¤>¡´ j¤«¦¯§ PSLR NLQNRV k¤¯4¨¢ c«¦©¨®§ ªª ª ª§ NLWORR OLTNW _4¤ TRSLP TLRS NLNWPW ª 2ª NLVQTO t¬©°ª¤ OTJQVULN OTLQWU NLNOTR NLWRTR QLUVSR NLURT k ®® NLRSQT WNULOV NLWNU d¬4¢¤ WLVNU NLPUVN RLRRV _¢¢¤©¤4 ¯¨¬« NLQNRV NLNPSR r¬4>°¤ NLOOPWT OLQSSV n¬²¤4 NLURS n4¤®®°4¤>Fq¯4¤®®G NLPRWO TLVWS c«¤4¦´>Fu¬4EG ONSSLN OLQSSV QJTNNJNNNLN j¨¦§¯ ONLUTR ®4>ªª ®4>¢ª ®4>ª ®4>ª ¢°>ªª ¢°>¢ª j j j ¢°>ª 2¦ 2¦ ¯¬««¤>F¯G «¤²¯¬«®>FlG «¤²¯¬«®>FlG «¤²¯¬«®>FlG ªM®P ªM®P lĪ lĪ 2u 2n 2n h>Fh[>¬«¤>u®G h>Fh[>¬«¤>u®G h>Fh[>¬«¤>u®G ©ªMª P FdKQPG>M>OLV d PQPLPOSMª¦ k°©¯¨©´>M b¨±¨£¤>¡´ t¤©¬¢¨¯´ OLTNWQ r¤ª¤4 ¯°4¤ [ [ d°¤©>n¤4¥¬4ª «¢¤ [ k¤¯4¨¢ 2ªM§ a Fa>v>OLVG>I>QP jMONN>2ª Equivalents - Decimal and Metric d4 ¢¯¨¬«>F¨«G OMTR OMQP QMTR OMOT SMTR QMQP UMTR OMV WMTR SMQP OOMTR QMOT OQMTR UMQP OSMTR OMR OUMTR WMQP OWMTR SMOT POMTR OOMQP PQMTR QMV PSMTR OQMQP PUMTR UMOT PWMTR OSMQP QOMTR OMP b¤¢¨ª ©>F¨«G NLNOSTPS NLNQOPS NLNRTVUS NLNTS NLNUVOPS NLNWQUS NLONWQUS NLOPS NLORNTPS NLOSTPS NLOUOVUS NLOVUS NLPNQOPS NLPOVUS NLPQRQUS NLPS NLPTSTPS NLPVOPS NLPWTVUS NLQOPS >NLQPVOPS NLQRQUS NLQSWQUS NLQUS NLQWNTPS >NLRNTPS NLRPOVUS NLRQUS NLRSQOPS NLRTVUS NLRVRQUS NLS k¤¯4¨¢>FªªG NLQWTVV NLUWQUS OLOWNTP OLSVUS OLWVRQU PLQVOPS PLUUVOP QLOUS QLSUOVU QLWTVUS RLQTSTP RLUTPS SLOSWQU SLSSTPS SLWSQOP TLQS TLURTVU ULORQUS ULSRNTP ULWQUS VLQQRQU VLUQOPS WLOPVOP >WLSPS WLWPOVU ONLQOVUS ONLUOSTP OOLOOPS OOLSNWQU OOLWNTPS OPLQNQOP OPLU 0-4 General Information Industrial 3.0L Equivalents - Decimal and Metric (cont’d) d4 ¢¯¨¬«>F¨«G QQMTR OUMQP QSMTR WMOT QUMTR OWMQP QWMTR SMV ROMTR POMQP RQMTR OOMOT RSMTR PQMQP RUMTR QMR RWMTR PSMQP SOMTR QMOT SQMTR PUMQP SSMTR UMV SUMTR PWMQP SWMTR OSMOT TOMTR QOMQP TQMTR O b¤¢¨ª ©>F¨«G NLSOSTPS NLSQOPS NLSRTVUS NLSTPS NLSUVOPS NLSWQUS NLTNWQUS NLTPS NLTRNTPS NLTSTPS NLTUOVUS NLTVUS NLUNQOPS NLUOVUS NLUQRQUS NLUS NLUTSTPS NLUVOPS NLUWTVUS NLVOPS NLVPVOPS NLVRQUS NLVSWQUS NLVUS NLVWNTPS NLWNTPS NLWPOVUS NLWQUS NLWSQOPS NLWTVUS NLWVRQUS OLN k¤¯4¨¢>FªªG OQLNWTVU OQLRWQUS OQLVWNTP ORLPVUS ORLTVRQU OSLNVOPS OSLRUVOP OSLVUS OTLPUOVU OTLTTVUS OULNTSTP OULRTPS OULVSWQU OVLPSTPS OVLTSQOP OWLNS OWLRRTVU OWLVRQUS PNLPRNTP PNLTQUS POLNQRQU POLRQOPS POLVPVOP PPLPPS PPLTPOVU PQLNOVUS PQLROSTP PQLVOPS PRLPNWQU PRLTNTPS PSLNNQOP PSLR Arrows and Symbols This service manual uses various symbols in order to describe different service operations. You may find some or all of these symbols used in the manual. 196216 Industrial 3.0L General Information 0-5 Engine ID Location An identification label is affixed to the right side of the engine on the rocker cover when looking at the engine from the flywheel end. In addition, the GM serial number is stamped on the right side of the cylinder block, just to the rear of the distributor. 79300003 79300001 The engine serial number is also stamped into the left side of the cylinder block near the engine flywheel. The label contains the engine model number (i.e. 3.0L, 4.3L, 5.7L, etc.) and a serial number which identifies the engine from other GM Powertrain engines provided by Power Solutions, Inc. The engine model and serial number are required when seeking information concerning the engine and/or ordering replacement service parts. FASTENERS Metric Fasteners The 3.0L engine is dimensioned in the metric system. Most metric fasteners are very close in diameter to well known fasteners in the English, inch system. Replace fasteners with those of the same nominal diameter, thread pitch, and strength. A number marking identifies the OE metric fasteners except cross–recess head screws. The number also indicates the strength of the fastener material. A Posidrive R or Type 1A cross–recess identifies a metric cross–recess screw. For best results, use a Type 1A cross–recess screwdriver, or equivalent, in Posidrive R recess head screws. General Motors Engineering and North American Industries have adopted a portion of the ISO–defined standard metric fastener sizes. The purpose was to reduce the number of fastener sizes used while retaining the best thread qualities in each thread size. For example, the metric M6.0 X 1 screw. with nearly the same diameter and 25.4 threads per inch replaced the English 1/4-20 and 1/4-28 screws. The thread pitch is midway between the English coarse and fine thread pitches. 79300002 0-6 General Information Industrial 3.0L Fastener Strength Identification Legend (1) English Bolt, Grade 2 (Strength Class) (2) English Bolt, Grade 5 (Strength Class) (3) English Bolt, Grade 7 (Strength Class) 171891 (4) English Bolt, Grade 8 (Strength Class) (5) Metric Nut, Strength Class 9 (6) Metric Bolts, Strength Class Increases as Numbers Increase The most commonly used metric fastener strength property classes are 9.8 and 10.9. The class identification is embossed on the head of each bolt. The English, inch strength classes range from grade 2 to grade 8. Radial lines are embossed on the head of each bolt in order to identify the strength class. The number of lines on the head of the bolt is 2 lines less than the actual grade. For example, a grade 8 bolt will have 6 radial lines on the bolt head. Some metric nuts are marked with a single digit strength identification number on the nut face. The correct fasteners are available through the GM Service Parts Group Standard Parts Catalog. Many metric fasteners available in the aftermarket parts channels are designed to metric standards of countries other than the United States, and may exhibit the following defects: Lower strength No numbered head marking system Wrong thread pitch The metric fasteners on PSI products are designed to new, international standards. Following are the common sizes and pitches, except for special applications: M6.0 X 1 M8 X 1.25 M10 X 1.5 M12 X 1.75 Industrial 3.0L General Information 0-7 A prevailing torque nut is designed in order to develop an interface between the nut and bolt threads. Distortion of the top of the metal nut or using a nylon patch on the threads in the middle of the hex flat causes that interface. A prevailing torque bolt/nut that is clean and free of rust may be reused. If there is any doubt, replace the fastener: 1. Clean away all dirt or foreign material. 2. Inspect the fastener for signs of overtightening. 3. Hand start the fastener at the original location. 4. Inspect the fastener for torque development, referring to the table below. 5. Tighten the fastener within specifications. Prevailing Torque Fasteners 171892 0-8 General Information Industrial 3.0L Prevailing Torque Specifications (Metric–Size Fasteners) q¤¢¨¥¨¢ ¯¨¬« _©¨¢ ¯¨¬« l°¯®> «£>_©©>k¤¯ ©>`¬©¯®Mq¢Q¤²® > T>ªª > TLQ>ªª > V>ªª > ON>ªª > OP>ªª > OR>ªª > OT>ªª > PN>ªª _£§¤®¨±¤>¬Q>l´©¬«>a¬ ¯¤£>`¬©¯®Mq¢Q¤²® > T>ªª > TLQ>ªª > V>ªª > ON>ªª > OP>ªª > OR>ªª > OT>ªª > PN>ªª k¤¯4¨¢ c«¦©¨®§ NLR>lĪ NLR>lĪ NLT>lĪ OLR>lĪ PLP>lĪ QLN>lĪ RLP>lĪ ULN>lĪ R>©¡>¨« R>©¡>¨« U>©¡>¨« OP>©¡>¨« OV>©¡>¨« PU>©¡>¨« QU>©¡>¨« TP>©¡>¨« NLR>lĪ NLR>lĪ NLT>lĪ OLP>lĪ OLT>lĪ PLR>lĪ QLR>lĪ SLT>lĪ R>©¡>¨« R>©¡>¨« U>©¡>¨« OO>©¡>¨« OR>©¡>¨« PO>©¡>¨« QN>©¡>¨« SN>©¡>¨« Prevailing Torque Specifications (English–Size Fasteners) q¤¢¨¥¨¢ ¯¨¬« _©¨¢ ¯¨¬« l°¯®> «£>_©©>k¤¯ ©>`¬©¯®Mq¢Q¤²® > NLPSN>¨« > NLQOP>¨« > NLQUS>¨« > NLRQU>¨« > NLSNN>¨« > NLSTP>¨« > NLTPS>¨« > NLUSN>¨« _£§¤®¨±¤>¬Q>l´©¬«>a¬ ¯¤£>`¬©¯®Mq¢Q¤²® > NLPSN>¨« > NLQOP>¨« > NLQUS>¨« > NLRQU>¨« > NLSNN>¨« > NLSTP>¨« > NLTPS>¨« > NLUSN>¨« k¤¯4¨¢ c«¦©¨®§ NLR>lĪ NLT>lĪ OLR>lĪ OLT>lĪ PLR>lĪ QLP>lĪ RLP>lĪ ULN>lĪ R>©¡>¨« S>©¡>¨« OP>©¡>¨« OT>©¡>¨« PO>©¡>¨« PV>©¡>¨« QU>©¡>¨« TP>©¡>¨« NLR>lĪ NLT>lĪ OLN>lĪ OLR>lĪ OLV>lĪ PLT>lĪ QLR>lĪ SLP>lĪ R>©¡>¨« S>©¡>¨« W>©¡>¨« OP>©¡>¨« OT>©¡>¨« PQ>©¡>¨« QN>©¡>¨« RW>©¡>¨« Industrial 3.0L General Information 0-9 THREAD INSERTS Repair Procedure Tools Required General purpose thread repair kits. These kits are available commercially. Caution: Wear safety glasses in order to avoid eye damage. Important: Refer to the thread repair kit manufacturer’s instructions regarding the size of the drill and tap to use. Avoid any buildup of chips. Back out the tap every few turns and remove the chips. 4963 4. Thread the thread insert onto the mandrel of the installer. Engage the tang of the insert onto the end of the mandrel. Important: The insert should be flush to one turn below the surface. 5. Lubricate the insert with light engine oil, except when installing in aluminum and install the insert. 6. If the tang of the insert does not break off when backing out the installer, break the tang off with a drift. Abbreviations and Their Meanings 4962 1. Determine the size, the pitch, and the depth of the damaged thread. If necessary, adjust the stop collars on the cutting tool and tap to the required depth. 2. Drill out the damaged threads. Clean out any chips. 3. Lubricate the tap with light engine oil. Tap the hole. Clean the threads. A bbreviation A AC AC L AD A/D A/F M eaning A Am pere(s) Alternating C urrent AirC leaner Autom atic D isconnect Analog to D igital Air/Fuel(R atio) 0-10 General Information Abbreviations and Their Meanings (cont’d) A bbreviation APC M API APT ASM Auto avg AW G B+ BAR O BATT BLK BLU BP BPC M BR N BTD C BTM C C al C am C AR B cm 3 CCM CCO T CD M eaning Accessory Pow erC ontrolM odule Am erican Petroleum Institute Adjustable PartThrottle Assem bly,Acceleratorand Servo C ontrolM odule Autom atic Average Am erican W ire G age B Battery Positive Voltage Barom etric (Pressure) Battery Black Blue Back Pressure Battery Pack C ontrolM odule Brow n Before Top D ead C enter Battery Therm alM odule C D egrees C elsius C alibration C am shaft C alifornia AirR esources Board C ubic C entim eters C onvenience C harge M odule,C hassis C ontrolM odule C ycling C lutch O rifice Tube C C P C lim ate C ontrolPanel C om pactD isc Industrial 3.0L Abbreviations and Their Meanings (cont’d) A bbreviation CE C EAB cfm cg C ID C KP C KT CL C LS CM P CO CO 2 C oax CO M M C onn C PA C PS C PU CS C SFI C TP cu ft cu in D AB dB dBA DC DI dia DK M eaning C om m utatorEnd C old Engine AirBleed C ubic FeetperM inute C enterofG ravity C ubic Inch D isplacem ent C rankshaftPosition C ircuit C losed Loop C oolantLevelSw itch C am shaftPosition C arbon M onoxide C arbon D ioxide C oaxial C om m unication C onnector C onnectorPosition Assurance C entralPow erSupply C entralProcessing U nit C harging System C entralSequentialFuelInjection C losed Throttle Position C ubic Food/Feet C ubic Inch/Inches D D elayed Accessory Bus D ecibels D ecibels on Añw eighted Scale D irectC urrent,D uty C ycle D istributorIgnition D iam eter D ark Industrial 3.0L General Information 0-11 Abbreviations and Their Meanings (cont’d) A bbreviation DM M DO HC EC EC L EC M EC S EC T EEPR O M EFE EG R EG R TVV EI ELAP E/M EM F EM I Eng EO P EO T EPA EPR EPR O M ESD ESN ETC M eaning D igitalM ultim eter D ualO verhead C am shafts E ElectricalC enter,Engine C ontrol Engine C oolantLevel Engine C ontrolM odule,Electronic C ontrolM odule Em ission C ontrolSystem Engine C oolantTem perature Electrically Erasable Program m able R ead O nly M em ory Early FuelEvaporation ExhaustG as R ecirculation ExhaustG as R ecirculation Therm al Vacuum Valve Electronic Ignition Elapsed English/M etric Electrom otive Force Electrom agnetic Interference Engine Engine O ilPressure Engine O ilTem perature Environm entalProtection Agency ExhaustPressure R egulator Erasable Program m able R ead O nly M em ory Electrostatic D ischarge Electronic SerialN um ber Electronic Throttle C ontrol,Electronic Tem perature C ontrol,Electronic Tim ing C ontrol Abbreviations and Their Meanings (cont’d) A bbreviation Exh F FC FD C FED FED S FF FI FM VSS FP ft FT FW GA gal gas G en GL GM G M SPO gnd gpm G RN G RY H H 2O H arn HC H /C M PR M eaning Exhaust F D egrees Fahrenheit Fan C ontrol FuelD ata C enter Federal(AllU nited States except C alifornia) FuelEnable D ata Stream Flexible Fuel FuelInjection Federal(U .S.)M otorVehicle Safety Standards FuelPum p Foot/Feet FuelTrim FlatW ire G G age,G auge G allon G asoline G enerator G earLubricant G eneralM otors G eneralM otors Service Parts O perations G round G allons perM inute G reen G ray H H ydrogen W ater H arness H ydrocarbons H igh C om pression 0-12 General Information Abbreviations and Their Meanings (cont’d) A bbreviation HD HDC Hg H iAlt H O 2S hp Hz IAC IAT IC IC M ID I ign ILC in IN J inst ISC ISO kg kH z km km /h km /l M eaning H eavy D uty H eavy D uty C ooling M ercury H igh Altitude H eated O xygen Sensor H orsepow er H ertz I Idle AirC ontrol Intake AirTem perature Integrated C ircuit,Ignition C ontrol Ignition C ontrolM odule Integrated D irectIgnition Ignition Idle Load C om pensator Inch/Inches Injection Instantaneous,Instant Idle Speed C ontrol InternationalStandards O rganization K Kilogram Kilohertz Kilom eter Kilom eters perH our Kilom eters perLiter Industrial 3.0L Abbreviations and Their Meanings (cont’d) A bbreviation kPa KS kV L L4 lb lb ft lb in LC D LED LH LT M AF M an M AP M AT m ax M /C M DP M FI M IL m in mL mm ms M ST MV mV M eaning Kilopascals Knock Sensor Kilovolts L Liter FourC ylinderEngine,Inñline Pound Pound Feet(Torque) Pound Inch (Torque) Liquid C rystalD isplay LightEm itting D iode LeftH and Light M M ass Airflow M anual M anifold Absolute Pressure M anifold Absolute Tem perature M axim um M ixture C ontrol M anifold D ifferentialPressure M ultiportFuelInjection M alfunction IndicatorLam p M inim um M illiliter M illim eter M illisecond M anifold Surface Tem perature M egavolt M illivolt Industrial 3.0L General Information 0-13 Abbreviations and Their Meanings (cont’d) Abbreviations and Their Meanings (cont’d) A bbreviation A bbreviation NC N EG N eu N iM H N LG I Nm NO NO x N PTC N PTF O2 O 2S OC O CS OD O DM OE O EM O HC ohm OL O RC O RN O R VR O SS oz PAG PAIR PC PC B PC S PC V M eaning N N orm ally C losed N egative N eutral N ickelM etalH ydride N ationalLubricating G rease Institute N ew ton-m eter(Torque) N orm ally O pen O xides ofN itrogen N ationalPipe Thread C oarse N ationalPipe Thread Fine O O xygen O xygen Sensor O xidation C onverter(C atalytic) O pportunity C harge Station O utside D iam eter O utputD rive M odule O riginalEquipm ent O riginalEquipm entM anufacturer O verhead C am shaft O hm O pen Loop,O utofLim its O xidation R eduction C onverter (C atalytic) O range O n-Board R efueling VaporR ecovery O utputShaftSpeed O unce(s) P Polyalkylene G lycol Pulsed Secondary Air Pressure C ontrol Printed C ircuitBoard Pressure C ontrolSolenoid Positive C rankcase Ventilation PIM PM P/N PN K PO A PO S PO T PPL ppm psi psia psig pt PTC qt R ef R ev R EX RH R ly RO M M eaning Pow erInverterM odule Perm anentM agnet(G enerator) PartN um ber Pink PilotO perated Absolute (Valve) Positive,Position Potentiom eter(Variable R esistor) Purple Parts perM illion Pounds perSquare Inch Pounds perSquare Inch Absolute Pounds perSquare Inch G auge Pint Positive Tem perature C oefficient Q Q uart(s) R R eference R everse R earExchanger R ightH and R elay R ead O nly M em ory (Perm anent m em ory device,m em ory contents are retained w hen pow eris rem oved.) 0-14 General Information Abbreviations and Their Meanings (cont’d) A bbreviation R PM R PO RR s SAE SEO SFI SI sol SO 2 SP SPO sq ft,ft2 sq in,in2 SR I Sw TAC Tach TBI M eaning R evolutions perM inute (Engine Speed) R egularProduction O ption R ightR ear S Second(s) Society ofAutom otive Engineers SpecialEquipm entO ption SequentialM ultiportFuelInjection System International(M odern Version ofM etric System ) Solenoid SulfurD ioxide Splice Pack Service Parts O perations Square Foot/Feet Square Inch/Inches Service R em inderIndicator Sw itch T Throttle ActuatorC ontrol Tachom eter Throttle Body FuelInjection Industrial 3.0L Abbreviations and Their Meanings (cont’d) A bbreviation TD C TEM P Term TP TV TVV TW C TW C +O C TXV V Vac V dif VD V VIO M eaning Top D ead C enter Tem perature Term inal Throttle Position Throttle Valve Therm alVacuum Valve Three W ay C onverter(C atalytic) Three W ay + O xidation C onverter (C atalytic) Therm alExpansion Valve U V Volt(s),Voltage Vacuum Voltage D ifference Vacuum D elay Valve Violet Industrial 3.0L General Information 0-15 MAINTENANCE AND LUBRICATION nitial Start Up Maintenance The initial start-up checks must be made before putting the engine into service. Please refer to Maintenance Schedule - 3.0L Engine on page 0-19 and perform the initial start-up operations in the sequence shown in column 1. Routine Maintenance Routine maintenance provides the best solution for making sure that the engine is ready when you are. The following are some routine service points: Keep the fuel tank filled. A full tank of fuel reduces the possibility of condensation forming in the fuel tank and moisture entering the fuel system. Make frequent checks of the engine oil and coolant levels. Repair any oil or coolant leaks immediately. Check battery condition and cables frequently. Keep the engine air filter clean. Monitor engine coolant temperature. Monitor engine oil pressure. Check voltmeter and charging system. Scheduled Preventive Maintenance Refer to the Maintenance Schedule - 3.0L Engine on page 0-19 to ensure that all of the maintenance items listed are checked and replaced as recommended at the hours shown. Engine Oil Level Check The engine oil level should be checked daily. It is recommended that the oil be checked just before the engine is started for the first time for that day. The oil level should be between the ‘Add’ and the ‘Full’ marks on the dipstick. CAUTION: Do not operate the engine with the oil level below the bottom or ‘Add’ mark on the dipstick, or above the top or ‘Full’ mark on the dipstick. Adding Engine Oil It is normal to add some oil in the period of time between oil changes. The amount will vary with the severity of operation. When adding or replacing engine oil, be sure the oil meets or exceeds the recommended specification. Engine Oil and Filter The engine oil and filter must be changed every 200 hours or every 3 months whichever occurs first. Under normal operating conditions, you do not need to change them more often if you use oil and filters of the recommended quality. The oil and filter should be changed more often if the engine is operating in dusty or extremely dirty areas, or during cold weather. No oil additives or break-in oil change is required. Engine Oil Quality To achieve proper engine performance and durability, it is important that you use only engine lubricating oils of the correct quality in your engine. Proper quality oils also provide maximum efficiency for crankcase ventilation systems, which reduces pollution. Important: use only engine oils displaying the American Petroleum Institute (API) “Starburst” Certification Mark ‘FOR GASOLINE ENGINES’ on the container. Gasoline engines that are converted for LPG or NG fuels MUST use oils labeled ‘FOR GASOLINE ENGINES’. Do not use oils that are specifically formulated for Diesel Engines only. CC or CD classification oils, even when labeled Heavy Duty or for Natural Gas Engines, ARE NOT ACCEPTABLE. 0-16 General Information Industrial 3.0L Engine Oil Recommendation Multi-viscosity oils are recommended. SAE 10W30 is recommended for your engine from 0 degrees F (-18 degrees C) or above. If ambient temperatures are consistently below 0 degrees F, SAE 5W30 oil can be used. Synthetic oils are not recommended for industrial or stationary engines. Oil Filter The PSI GM Powertrain engines use an AC Delco oil filter as original equipment. An equivalent oil filter must be used when servicing the engine (see Engine Specifications for the recommended oil filter for your engine). The filter protects your engine from harmful, abrasive, or sludgy particles without blocking the flow of oil to vital engine parts. To replace the filter, use a proper filter wrench to remove the filter. Clean the filter mounting base and lightly coat the gasket surface of the new filter with engine oil. Hand tighten the filter until the gasket contacts the base, then tighten another ½ turn. Fill the engine with the correct amount of oil, run the engine and check for oil leaks at the drain plug and oil filter gasket. Tighten as necessary to stop any oil leakage noted. Engine Air Cleaner The engine air cleaner filters air entering the engine intake system and acts as a silencer and flame arrester when assembled to the intake system. Air that contains dirt and grit produces an abrasive fuel mixture and can cause severe damage to the cylinder walls and piston rings. Damage to the cylinder walls and piston rings will cause high oil consumption and shorten engine life. A restricted or dirty air cleaner will also cause a rich fuel mixture. Thus, it is extremely important that the air cleaner be serviced properly at the recommended intervals. CAUTION: Service the air cleaner more frequently under severe dusty or dirty conditions. Remove the primary air cleaner element from the air cleaner assembly and inspect the element for foreign material restrictions or signs of excessive wear or damage. Replace the element if necessary. Remove all dust and foreign matter from the air cleaner housing. Reinstall the air cleaner element. Reinstall the air cleaner cup, and securely fasten the retaining clips. Safety Element If your engine is equipped with an air cleaner which utilizes a safety element, ensure that the element is properly in place before installing the primary element. Change the safety element annually. COOLING SYSTEM MAINTENANCE Coolant Level Check the coolant level of the radiator daily and only when the engine is cool. Generally a good time to do this is just prior to starting the engine for the first time each day. Maintain the coolant level at ¾ to 1½ inches below the filler neck seat of the radiator when the coolant is cold. When ever coolant level checks are made inspect the condition of the radiator cap rubber seal. Make sure it is clean and free of any dirt particles which would keep it from seating on the filler neck seat. Rinse off with clean water if necessary. Also make sure that the filler neck seat is free of any dirt particles. Caution: Never remove the radiator cap under any conditions while the engine is operating. Failure to follow these instruction could result in damage to the cooling system, engine, or cause personal injury. To avoid having scalding hot coolant or steam blow out of the radiator, use extreme caution when removing the radiator cap from a hot radiator. If possible, wait until the engine has cooled, then wrap a thick cloth around the radiator cap and turn slowly to the first stop. Step back while the pressure is released from the cooling system. When all the pressure has been released, press down on the cap and remove it slowly. Notice: DO NOT add coolant to any engine that has become overheated until the engine cools. Adding coolant to an extremely hot engine can result in a cracked block or cylinder head. Industrial 3.0L General Information 0-17 Coolant Level - Continued Use only a permanent-type coolant when refilling or flushing the coolant system. Recommended ethylene glycol mix 52/48 is normal up to a maximum of 60% glycol, 40% water. Refer to the mixture chart on the container for additional antifreeze protection information. DO NOT use alcohol or methanol antifreeze, or mix them with the specified coolant. Plain water may be used in an emergency (except in freezing temperatures), but replace it with the specified coolant as quickly as possible to avoid damage to the system. Radiator Inspect the exterior of the radiator for obstructions. Remove all bugs, dirt or foreign material with a soft brush or cloth. Use care to avoid damaging the core fins. If available, use low pressure compressed air or a stream of water in the opposite direction of the normal air flow. Radiator Hoses Check all hoses and connections for leaks. If any of the hoses are cracked, frayed, or feel spongy, they must be replaced. Fan Belts The water pump is usually belt driven. The same belt may also drive the fan and/or the alternator. The drive belts should be properly adjusted at all times. A loose belt can cause improper alternator, fan and water pump operation, in addition to overheating. Serpentine Belt Some GM Powertrain engines utilize serpentine belts on the front of the engine. This type of belt system incorporates a belt tensioning device which keeps the belt at the proper tension. This belt should be checked routinely for cracks or ‘checking’ on the groove side of the belt. If cracks or ‘checking’ are apparent the belt must be changed. V-Type Belt V-Type belts are generally tensioned by adjusting the alternator position, or through a mechanical belt tensioner. The belt is generally correctly tensioned when there is an ½ inch of depression on the belt between the water pump and the crankshaft pulley. FUEL DELIVERY SYSTEM MAINTENANCE Fuel Filter Replacement Carbureted Engines On carbureted engines, an in-line fuel filter is incorporated into the fuel supply line. It is recommended that this filter be changed every 250 hours or every 6 months which ever occurs first. TBI Engines On PSI Fuel Injection or Fuel Injection/Dual Fuel two fuel filters are used in the gasoline fuel supply line to the engine TBI unit. A coarse fuel filter is located in the supply line between the fuel tank and the electric fuel pump. This filter protects the fuel pump from debris in the fuel tank. This filter must be changed every 200 hours or every 6 months which ever occurs first. A primary fuel filter is located between the fuel pump and the TBI unit on the engine. This filter protects the injectors from microscopic particles in the fuel which can cause plugging of the injectors. This filter MUST be changed every 500 hours or annually which ever occurs first. Zenith Z.E.E.M.S. TBI Fuel Injection Zenith Z.E.E.M.S. TBI Fuel Injection requires an in-line fuel filter in the fuel supply line from the fuel tank to the TBI unit, ahead of the electric fuel supply pump. This filter must be changed every 200 hours or every 6 months which ever occurs first. On engines equipped to run on LPG, the in-line fuel filter must be changed every 800 hours. 0-18 General Information Industrial 3.0L Fuel Delivery System Maintenance - Continued CAUTION: Failure to change the fuel system filters as recommended can result in premature failure of the TBI fuel system components. NOTE: Some original equipment manufacturers install their own fuel systems. Please refer to the manufacturers manual if the gasoline fuel system is different than described here. WARNING: Use extreme care when changing the fuel filters on gasoline engines. Gasoline is highly flammable and should not be exposed to open flame, sparks, or hot engine components. Allow the engine to cool to ambient temperatures prior to changing fuel filters. Ignition Systems Types of Ignition Systems Three types of ignition systems are used on PSI GM Powertrain engines. Solid state electronic distributor, solid state electronic distributor with ECU (Electronic Control Unit) and distributor-less electronic ignition with ECU. Please refer to the Section 2 Engine Electrical to determine the ignition system used on your particular engine. Ignition Timing Proper adjustment of the ignition timing must be obtained to provide the optimum engine power output and economy. To properly adjust ignition timing refer to Section 2 Engine Electrical. Spark Plugs Spark plugs should be replaced at the recommended intervals described in the Maintenance Schedule. Use only the recommended spark plug or an equivalent as described in the General Specifications. Spark plug gap, should be adjusted as recommended in the General Specifications. When removing spark plugs, always note which cylinder each plug came out of. Look at the porcelain around the center electrode of each plug. You can detect many engine problems from the color and type of deposits that have built up on the white porcelain. For example, if the deposits are a glossy brown, that cylinder is burning excess oil. If the deposits are a very dark gray or sooty black color, your engine is running rich, and you are burning excess fuel. The optimum color of the deposits on the porcelain is light tan or light brown. This shows optimum fuel mixture and proper engine running conditions. If the deposits are almost white, the engine may be running excessively lean. Lean running is very detrimental to your engine life, and should be corrected immediately. If one or more cylinders are burning oil, the smoke from the engine will be a blue-gray color. Most common causes are piston rings (worn out or not broken in) and valve stem seals (cut, nicked, or worn out). If the engine is running rich the exhaust smoke will be a sooty black color and it will smell like gasoline (on gasoline engines). Industrial 3.0L General Information 0-19 - 3.0L ENGINE Approximate Fluid Capacities _©¨¢ ¯¨¬« c«¦¨«¤>a¬¬©¨«¦>q´®¯¤ª > QLNj>u¨¯§¬°¯>p £¨ ¯¬9 > QLNj>u¨¯§>p £¨ ¯¬9 c«¦¨«¤>a9 «?¢ ®¤ > QLNj>²¨¯§>d¨©¯¤9 > QLNj>u¨¯§¬°¯>d¨©¯¤9 q¤¢¨¥¨¢ ¯¨¬« k¤¯.¨¢ c«¦©¨®§ QLV>j OOLR>j RLN><¯ OPLN><¯ RLQ>j QLV>j RLS><¯ RLN><¯ Industrial 3.0L Engine Mechanical 1-1 Section 1 Engine Mechanical Engine Mechanical - 3.0L ....................................... 1-4 Specifications ......................................................... 1-4 Fastener Tightening Specifications ........................... 1-4 Sealers, Adhesives and Lubricants ........................... 1-4 Engine Mechanical Specifications ............................ 1-5 Diagnostic Information and Procedures ............... 1-7 Base Engine Noise Diagnosis .................................. 1-7 Engine Compression Test ......................................... 1-8 Engine Noise Diagnosis ............................................ 1-8 Knocks Cold and Continues for 2 to 3 Minutes ......... 1-8 Knocks on Start-Up but Only Lasts a Few Seconds . 1-8 Knocks at Idle Hot .................................................... 1-8 Valve Train Diagnosis ................................................ 1-8 Oil Consumption Diagnosis ...................................... 1-8 Low or No Oil Pressure Diagnosis and Testing ......... 1-9 Oil Leak Diagnosis .................................................... 1-9 Component Locator ............................................. 1-10 Disassembled Views ............................................... 1-10 Upper Engine Block and Components .................... 1-10 Lower Engine Block and Components .................... 1-12 Cylinder Head and Components ............................. 1-14 Oil Pump and Components ..................................... 1-15 Repair Instructions ............................................... 1-16 Draining Fluids and Oil Filter Removal .................... 1-16 Engine Flywheel Removal ...................................... 1-17 Distributor Removal ................................................ 1-18 Ignition Coil Removal .............................................. 1-18 Lift Bracket Removal ............................................... 1-19 Spark Plug Removal ............................................... 1-19 Intake/Exhaust Manifold Removal ........................... 1-19 Intake/Exhaust Manifold Disassemble and Assemble .......................................................... 1-20 Intake/Exhaust Manifold Clean and Inspect ............ 1-20 Water Pump Removal ............................................. 1-20 Crankshaft Pulley Removal ..................................... 1-21 Valve Rocker Arm Cover Removal .......................... 1-21 Pushrod Cover Removal ......................................... 1-21 Valve Rocker Arm and Pushrod Removal ............... 1-22 Measuring Camshaft Lobe Lift ................................ 1-22 Valve Train Components Inspect (Cylinder Head) ... 1-23 Valve Lifter Removal ............................................... 1-23 Cylinder Head Removal .......................................... 1-24 Oil Pan Removal ..................................................... 1-24 Oil Pump Removal .................................................. 1-24 Oil Level Indicator and Tube Removal ..................... 1-25 Engine Front Cover Removal .................................. 1-25 Measuring Crankshaft and Camshaft Sprocket Runout .............................................................. 1-26 Measuring Timing Sprocket Teeth Backlash ........... 1-26 Crankshaft Sprocket Removal ................................ 1-26 Camshaft Removal ................................................. 1-27 Crankshaft and Camshaft Sprocket Inspect ............ 1-27 Timing Gear Oil Nozzle Removal ............................ 1-28 Piston, Connecting Rod and Bearing Removal ....... 1-28 Crankshaft and Bearings Clean and Inspect (Connecting Rod Bearing Clearance) ................................... 1-29 Crankshaft Rear Oil Seal and Housing Removal .... 1-31 Crankshaft , Bearings and Bearing Cap Removal ... 1-32 Crankshaft and Bearings Clean and Inspect ........... 1-33 Crankshaft and Bearings Clean and Inspect (Main Bearing Clearance) ................................. 1-35 Camshaft Bearing Removal .................................... 1-37 Distributor Lower Bushing and Thrust Washer Removal ............................................................ 1-38 Oil Filter Bypass Valve Removal and Installation .... 1-38 Cylinder Block Clean and Inspect ........................... 1-39 Cylinder Bore Measurements ................................. 1-39 Cylinder Boring and Honing .................................... 1-40 Distributor Lower Bushing and Thrust Washer Installation ......................................................... 1-41 Piston and Connecting Rod Disassemble ............... 1-41 Piston and Connecting Rod Clean and Inspect....... 1-42 Piston Selection ...................................................... 1-44 Piston and Connecting Rod Assemble .................... 1-45 Camshaft and Bearings Clean and Inspect............. 1-46 Camshaft Sprocket and Retainer Removal and Installation ......................................................... 1-48 Camshaft Bearing Installation ................................. 1-49 Oil Pump Disassemble ........................................... 1-50 Oil Pump Clean and Inspect ................................... 1-51 Oil Pump Assemble ................................................ 1-52 Cylinder Head Disassemble ................................... 1-53 Cylinder Head Clean and Inspect ........................... 1-54 Valve Guide Reaming/Valve and Seat Grinding ...... 1-57 Rocker Arm Stud Removal and Installation ............. 1-58 Cylinder Head Assemble ........................................ 1-59 Service Prior to Assembly ...................................... 1-60 Crankshaft, Bearings and Bearing Cap Installation . 1-60 Crankshaft Rear Oil Seal and Housing Installation . 1-61 Piston, Connecting Rod and Bearing Installation .... 1-62 Timing Gear Oil Nozzle Installation ......................... 1-64 Crankshaft Sprocket Installation ............................. 1-64 Camshaft Installation .............................................. 1-64 Engine Front Cover and Oil Seal Installation ........... 1-65 Oil Pump Installation ............................................... 1-66 Oil Pan Installation .................................................. 1-66 Crankshaft Pulley Installation .................................. 1-67 Cylinder Head Installation ....................................... 1-67 Valve Lifter Installation ............................................ 1-68 Valve Rocker Arm and Pushrod Installation ............ 1-68 Pushrod Cover Installation ...................................... 1-70 Valve Rocker Arm Cover Installation ....................... 1-71 Oil Level Indicator and Tube Installation .................. 1-71 Water Pump Installation .......................................... 1-71 1-2 Engine Mechanical Intake/Exhaust Manifold Installation ........................ Spark Plug Installation ............................................ Lift Bracket Installation ............................................ Ignition Coil Installation ........................................... Distributor Installation ............................................. Engine Flywheel Installation ................................... Engine Block Coolant Plug/Oil Filter Installation ..... Description and Operation ................................... Engine Component Description .............................. Engine Block ........................................................... Cylinder Head ......................................................... Crankshaft .............................................................. Industrial 3.0L 1-72 1-72 1-72 1-73 1-73 1-74 1-74 1-76 1-76 1-76 1-76 1-76 Camshaft ................................................................ Pistons and Connecting Rods ................................ Valve Train .............................................................. Lubrication .............................................................. Thread Repair ........................................................ Cleanliness and Care ............................................. Replacing Engine Gaskets ..................................... Use of RTV and Anaerobic Sealer .......................... Separating Parts ..................................................... Tools and Equipment .............................................. Special Tools and Equipment .............................. 1-76 1-76 1-76 1-77 1-77 1-78 1-78 1-78 1-79 1-79 1-80 Industrial 3.0L Engine Mechanical 1-3 Fastener Notice NOTICE: Always use the correct fastener in the proper location. When you replace a fastener, use ONLY the exact part number of that application. UNLESS OTHERWISE SPECIFIED, Do Not use supplemental coatings (paints, greases or other corrosion inhibitors) on threaded fasteners or fastener joint interfaces. Generally, such coating adversely affect the fastener torque and the joint clamping force, and may damage the fastener. When you install fasteners, use the correct tightening sequence and specifications. Following these instructions can help you avoid damage to parts and systems. 1-4 Engine Mechanical Industrial 3.0L Engine Mechanical - 3.0L Specifications Fastener Tightening Specifications Application Camshaft Retainer Bolts Coolant Inlet Housing Bolts Coolant Thermostat Housing Bolts Connecting Rod Cap Nuts Crankshaft Bearing Cap Bolts Crankshaft Rear Oil Seal Housing Retainer Nuts Cylinder Head Bolts Distributor Hold Down Bolt Flywheel Bolts Front Cover Bolts Ignition Coil Bracket Attaching Bolts Intake to Exhaust Manifold Attaching Nuts and Bolt Intake/Exhaust Manifold to Head (2 center) Intake/Exhaust Manifold to Head (outer) Lift Bracket Bolts Oil Pan Nuts (rear) Oil Pan Bolts (to crankcase) Oil Pan Bolts (to front cover) Oil Pan Drain Plug Oil Pan Studs to Oil Seal Retainer or Crankcase Oil Pump Cover Bolts Oil Pump to Block Bolts Oil Pump Pickup Bolt Pushrod Cover Bolts Rocker Arm Cover Bolts Spark Plugs Water Pump Bolts N•m 9 34-40 24-31 61 88 15 122 27 88 3.4 22 27-34 27-34 20-27 54 19 9 5 25 2 8 14 7 5 5 30 20 lb ft lb in 80 25-30 18-23 45 65 135 90 20 65 30 16 20-25 20-25 15-20 40 165 80 45 18 15 72 120 60 40 40 22 15 Sealers, Adhesives and Lubricants GM Part Number 1052080 1052080 1052914 1052365 1052080 1052080 Type of Material Sealant Sealant Sealant Lubricant Sealant Sealant Application Rear camshaft bearing hole plug Cylinder head bolt threads Oil pan sealing surfaces Valve train component prelube Valve rocker arm stud threads Oil level indicator tube Industrial 3.0L Engine Mechanical 1-5 Engine Mechanical Specifications Application Metric English General Data Engine Type Displacement L4 3.0L 181 CID Bore 101.60 mm 4.000 in Stroke 91.44 mm 3.60 in Compression Ratio 9.25:1 Firing Order Spark Plug Gap 1-3-4-2 0.9 mm 0.035 in 41.4 kPa at 1,000 engine rpm 6.0 psig at 1,000 engine rpm 124.1 kPa at 2,000 engine rpm 18.0 psig at 2,000 engine rpm 165.5 kPa at 4,000 engine rpm 24.0 psig at 4,000 engine rpm Lubrication System Oil Pressure (Minimum - Hot) Oil Capacity (With Oil Filter Change) 3.81L Oil Pump Type 4.00 qts Gear Driven Cylinder Block Bore Diameter 101.5873-101.6635 mm 3.9995-4.0025 in Bore Out-of-Round Production 0.0254 mm (Maximum) 0.001 in (Maximum) Bore Out-of-Round Service Limit 0.0508 mm (Maximum) 0.002 in (Maximum) Bore Taper Thrust Side Production 0.0127 mm (Maximum) 0.0005 in (Maximum) Bore Taper Thrust Side Service Limit 0.0254 mm (Maximum) 0.001 in (Maximum) Bore Taper Relief Side Production 0.0127 mm (Maximum) 0.0005 in (Maximum) Bore Taper Relief Side Service Limit 0.0254 mm (Maximum) 0.001 in (Maximum) 0.05 mm (Maximum) 0.002 in (Maximum) Runout - Rear Face of Block to Crankshaft Center Line Piston Piston-To-Bore Clearance Production 0.0635-0.0889 mm 0.0025-0.0035 in 0.0889 mm 0.0035 in (Maximum) Piston Compression Ring Groove Clearance Production Top 0.03048-0.07366 mm 0.0012-0.0029 in Piston Compression Ring Groove Clearance Production 2nd 0.03048-0.07366 mm 0.0012-0.0029 in 0.09906 mm (Maximum) 0.0039 in (Maximum) 0.254-0.508 mm 0.01-0.02 in Piston-To-Bore Clearance Service Limit Piston Rings Piston Compression Ring Groove Clearance Service Limit Piston Compression Ring Gap Top Production * Piston Compression Ring Gap 2nd Production * 0.4318-0.635 mm 0.017-0.025 in Piston Compression Ring Gap Top Service Limit * 0.88 mm (Maximum) 0.035 In (Maximum) Piston Compression Ring Gap 2nd Service Limit * 0.88 mm (Maximum) 0.035 in (Maximum) Piston Oil Ring Groove Clearance Production Piston Oil Ring Groove Clearance Service Limit Piston Oil Ring Gap Production * Piston Oil Ring Gap Service Limit * 0.0254-0.1524 mm 0.001-0.006 in 0.1778 mm (Maximum) 0.007 in (Maximum) 0.25-0.76 mm 0.01-0.03 in 1.016 mm (Maximum) 0.04 in (Maximum) Piston Pin Diameter 23.545-23.548 mm 0.9270-0.927 in 0.00762-0.01651 mm 0.0003-0.00065 in Clearance in Piston Service Limit 0.0254 mm (Maximum) 0.001 in (Maximum) Fit in Connecting Rod 0.02032-0.050292 mm (Interference) 0.0008-0.00198 in (Interference) Clearance in Piston Production * Measured in cylinder bore 1-6 Engine Mechanical Industrial 3.0L Engine Mechanical Specifications (cont’d) Crankshaft Crankshaft Journal Diameter (All) 58.3666-58.4047 mm 2.2979-2.2994 in Crankshaft Journal Taper Production 0.005 mm (Maximum) 0.0002 in (Maximum) Crankshaft Journal Taper Service Limit 0.0254 mm (Maximum) 0.001 in (Maximum) Crankshaft Journal Out-of-Round Production 0.005 mm (Maximum) 0.0002 in (Maximum) Crankshaft Journal Out-of-Round Service Limit 0.0254 mm (Maximum) 0.001 in (Maximum) Crankshaft Bearing Clearance Production #1 - #4 0.0254-0.06096 mm 0.001-0.0024 in Crankshaft Bearing Clearance Production #5 0.0406-0.0889 mm 0.0016-0.0035 in Crankshaft Bearing Clearance Service Limit #1 - #4 0.0254-0.0635 mm 0.001-0.0025 in Crankshaft Bearing Clearance Service Limit #5 0.0381-0.0889 mm 0.0015-0.0035 in 0.05-0.1524 mm 0.002-0.006 in 0.07 mm (Maximum) 0.003 in (Maximum) Crankshaft End Play Crankshaft Sprocket Runout Connecting Rod Connecting Rod Journal Diameter 53.2892-53.3273 mm 2.0980-2.0995 in Connecting Rod Journal Taper Production 0.00762 mm (Maximum) 0.0003 in (Maximum) Connecting Rod Journal Taper Service Limit 0.0254 mm (Maximum) 0.001 in (Maximum) Connecting Rod Journal Out-of-Round Production 0.005 mm (Maximum) 0.0002 in (Maximum) Connecting Rod Journal Out-of-Round Service Limit 0.0254 mm (Maximum) 0.001 in (Maximum) 0.04318-0.06858 mm 0.0017-0.0027 in 0.0762 mm (Maximum) 0.003 in (Maximum) 0.1524-0.4318 mm 0.006-0.017 in Journal Diameter 47.440-47.490 mm 1.8677-1.8697 in End Play 0.0762-0.2032 mm 0.003-0.008 in Camshaft Sprocket Runout 0.1 mm (Maximum) 0.004 in (Maximum) Rod Bearing Clearance Production Rod Bearing Clearance Service Limit Rod Side Clearance Camshaft Timing Sprocket Teeth Backlash 0.10-0.15 mm 0.004-0.006 in Lobe Lift Intake 6.4247 mm 0.25294 Lobe Lift Exhaust 6.4247 mm 0.25294 ±0.0254 mm ±0.001 in Lobe Lift Service Limit Valve System Valve Lifter Hydraulic Valve Rocker Arm Ratio 1.75:1 Valve Lash Half to One Turn Down From Zero Lash Face Angle 45 Degrees Seat Angle 46 Degrees Seat Runout 0.05 mm (Maximum) 0.002 in (Maximum) Seat Width Intake 1.27-1.778 mm 0.050-0.070 in Seat Width Exhaust 1.524-2.032 mm 0.060-0.080 in Stem Clearance Intake Production 0.0254-0.06858 mm 0.001-0.0027 in Stem Clearance Exhaust Production 0.01778-0.06858 mm 0.0007-0.0027 in Stem Clearance Intake Service Limit 0.09398 mm (Maximum) 0.0037 in (Maximum) Stem Clearance Exhaust Service Limit 0.1193 mm (Maximum) 0.0047 in (Maximum) 52.324 mm 2.06 in Valve Spring Pressure Closed 444-490 N at 40.89 mm 100-110 lb at 1.61 in Valve Spring Pressure Open 925-987 N at 30.99 mm 208-222 lb at 1.22 in Valve Spring Installed Height Intake 41.91 mm 1.65 in Valve Spring Installed Height Exhaust 41.91 mm 1.65 in Valve Lift Intake 11.25 mm 0.443 in Valve Lift Exhaust 11.25 mm 0.443 in Valve Spring Free Length Cylinder Head Warpage Cylinder Head Deck (measured within a 152.4 mm (6.0 in) area) 0.0762 mm 0.003 in Cylinder Head Deck (measuring the overall length of the cylinder head) 0.1778 mm 0.007 in Industrial 3.0L Engine Mechanical 1-7 Diagnostic Information and Procedures Base Engine Noise Diagnosis Step Value Yes No 1. With the engine running, try to determine if the noise is timed to the crankshaft speed or the camshaft speed. 2. Using a timing light, two knocks per flash is the crankshaft or one knock per flash is the camshaft. Is the noise timed to the crankshaft speed? — Go to Step 2 Go to Step 3 1. Remove the rod bearings and inspect the bearings and the journals for wear. 2. If the parts are OK, remove the crankshaft and inspect the main bearings and journals for wear. 3. Replace the parts as necessary. Does the engine continue to knock? — Go to Step 3 System OK 3 Check to see if the noise is timed to the camshaft speed. Is the noise timed to the camshaft speed? — Go to Step 5 Go to Step 4 4 1. Inspect for loose accessory attachments, the flywheel. 2. Tighten or adjust as necessary. Does the engine continue to knock? — Go to Step 5 System OK 1. Remove the pushrod cover. • Refer to Pushrod Cover Removal. 2. Rotate the engine and measure the lifter movement in the bore. 3. Compare the measurement with the specifications in Engine Mechanical Specifications. Is the camshaft within specifications? — Go to Step 7 Go to Step 6 Replace the camshaft. Refer to Camshaft Removal and Installation. Does the engine continue to knock? — Go to Step 7 System OK 1. Remove the rocker arms, the pushrods and the lifters. 2. Inspect the parts for excessive wear or damage. 3. Replace the parts as necessary. Are the repairs complete? — System OK — 1 2 5 6 7 Action 1-8 Engine Mechanical Engine Compression Test Perform the following steps in order to conduct a compression test: 1. Conduct the following steps in order to check cylinder compression: 1.1. Engine should be at room temperature. 1.2. Disconnect the two electrical connectors from the distributor. 1.3. Remove the spark plugs. 1.4. Throttle plates should be wide open. 1.5. Battery should be at or near full charge. 2. For each cylinder, crank engine through four compression strokes. 3. The lowest cylinder reading should not be less than 70% of the highest. 4. No cylinder reading should be less than 689 kPa (100 psi). Important: The results of a compression test will fall into the following categories: 1. Normal — Compression builds up quickly and evenly to specified compression on each cylinder. 2. Piston Rings — Compression low on first stroke. Tends to build up on the following strokes but does not reach normal. Improves considerably with addition of oil. 3. Valves — Compression low on first stroke. Does not tend to build up on the following strokes. Does not improve much with addition of oil. Use approximately three squirts from a plunger-type oiler. Engine Noise Diagnosis There are four steps to diagnosing engine noise. You must determine the following conditions: • Type of noise. • The exact operating condition under which the noise exists. • Determine the rate and location of the noise. • Compare the sounds in other engines to make sure you are not trying to correct a normal condition. Identify the type of noise. For example, a light rattle or low rumble. Remember, engine noises are generally synchronized to either engine speed (caused by the crankshaft, pistons or connecting rods) or one-half engine speed (valve train noise). Try to determine the rate at which the noise is occurring. Knocks Cold and Continues for 2 to 3 Minutes • Engine flywheel contacting the splash shield. Reposition the splash shield. • Loose or broken crankshaft balancer or drive pulleys. Tighten or replace as necessary. • Excessive piston to bore clearance. Replace the piston. Industrial 3.0L • Cold engine knock usually disappears when the specific cylinder secondary ignition circuit is grounded out. Cold engine piston knock which disappears in 1.5 minutes should be considered acceptable. Knocks on Start-Up but Only Lasts a Few Seconds • • • • • Improper oil viscosity. Install recommended oil viscosity for expected temperatures. Excessive piston to bore clearance. Excessive piston pin to piston clearance. Excessive crankshaft end clearance. Excessive crankshaft bearing clearance. Knocks at Idle Hot • • • • • • • Detonation or spark knock. Check operation of ignition controls or knock sensor circuit. Loose flywheel bolts. Exhaust leak at manifold. Tighten the exhaust manifold bolts and/or replace the gasket. Excessive connecting rod bearing clearance. Replace the bearings as necessary. Excessive piston pin clearance. Excessive crankshaft thrust bearing clearance. Bent connecting rod. Valve Train Diagnosis A light tapping at one-half engine speed or any varying frequency, can indicate a valve train problem. These tapping noises increase with engine speed. Before attempting to judge the valve train noises, thoroughly warm up the engine. By doing this you will bring all engine components to a normal state of expansion. Also, run the engine at various speeds and listen for engine noise. The causes of the valve train noise include the following conditions: • Incorrectly adjusted valve lash. • Low oil pressure. • Loose valve rocker arm attachments. • Worn valve rocker arm and/or pushrod. • Broken valve spring. • Sticking valves. • Lifters worn, dirty or faulty. • Camshaft lobes worn. • Worn valve guides. • Worn or damaged valve keys. • Bent pushrods. Oil Consumption Diagnosis Excessive oil consumption (not due to leaks) is the use of 1.9L (2 qts.) or more of engine oil within 50 hours of use. The causes of excessive oil consumption include the following conditions: Industrial 3.0L • External oil leaks. Tighten bolts and/or replace gaskets and oil seals as necessary. • Incorrect oil level or improper reading of oil level indicator. With the engine at a level surface, allow adequate drain down time and check for the correct oil level. • Improper oil viscosity. Use a recommended SAE viscosity for the prevailing temperatures. • Continuous high speed operation and/or severe usage. • Crankcase ventilation system restrictions or malfunctioning components. Possible improper PCV valve. • Valve guides and/or valve stem oil seals worn, or the seal omitted. Ream guides and install oversize service valves and/or new valve stem oil seals. • Piston rings broken, improperly installed, worn or not seated properly. Allow adequate time for rings to seat. Replace broken or worn rings as necessary. • Piston improperly installed or mis-fitted. Low or No Oil Pressure Diagnosis and Testing • • • • • • • • • Low oil level. Fill to full mark on oil level indicator. Incorrect or malfunctioning oil pressure switch. Incorrect or malfunctioning oil pressure gauge. Improper oil viscosity for the expected temperature. Oil pump worn or dirty. Malfunctioning oil pump pressure regulator valve. Plugged oil filter. Oil pump screen loose, plugged or damaged. Excessive bearing clearance. Replace as necessary. • Cracked, porous or restricted oil galleys. Repair or replace the engine block. • Oil galley plugs missing or incorrectly installed. Install the plugs or repair as necessary. • Oil diluted by moisture or unburned fuel mixtures. Oil Leak Diagnosis Most fluid oil leaks are easily located and repaired by visually finding the leak and replacing or repairing the necessary parts. On some occasions a fluid leak may be difficult to locate or repair. Use the following steps in order to find the leak: 1. Identify the fluid, determine whether it is engine oil, transmission fluid or power steering fluid. 2. At what point is the fluid leaking from?After running the engine at normal operating temperature, place a large sheet of paper under the engine. After a few minutes, you should be able to find the approximate location of the leak by the drippings on the paper. Engine Mechanical 1-9 3. Visually check around the suspected component. Check around the gasket mating surfaces for leaks. A mirror is useful for finding leaks in areas that are hard to reach. 4. If the leak still cannot be found, it may be necessary to clean the suspected area with a degreaser, steam or spray solvent. Clean the area well, then dry the area. Run the engine for several minutes at normal operating temperature and varying speeds. After running the engine, visually check the suspected area. If you still cannot locate the leak, try using the powder or black light and dye method. Perform the following steps in order to perform the powder method: 1. Clean the suspected area. 2. Apply an aerosol-type powder (such as foot powder) to the suspected area. 3. Run the engine under normal operating conditions. 4. Visually inspect the suspected area. You should be able to trace the leak path over the white powder surface to the source. Perform the following steps in order to use the black light and dye method: Tools Required J 39400 Leak Detector 1. Pour specified amount of dye into the leaking component. 2. Run the engine under normal operating conditions as directed by the J 39400. 3. Direct the light toward the suspected area. The dyed fluid will appear as a yellow path leading to the source. Repairing the Leak Once the origin of the leak has been pinpointed and traced back to its source, the cause of the leak must be determined in order for it to be repaired properly. If a gasket is replaced, but the sealing surface is damaged, the new gasket will not repair the leak. Before attempting to repair a leak, be sure that the gasket and sealing surfaces are correct. Perform the following steps in order to check for gasket leaks: 1. Inspect the fluid level/pressure for being too high. 2. Check the crankcase ventilation system for restrictions or malfunctioning components. 3. Inspect for improperly tightened fasteners or dirty/ damaged threads. 4. Look for warped flanges or sealing surfaces. 5. Check for scratches, burrs or other damage to the sealing surface. 6. Look for a damaged or worn gasket. 7. Check for cracking or porosity of the component. 8. Check for use of an improper sealant used (where applicable). 1-10 Engine Mechanical Industrial 3.0L Component Locator Disassembled Views Upper Engine Block and Components 4 1 2 3 8 INDUSTRIAL ONLY 7 9 11 10 6 5 12 13 14 51 50 49 47 15 48 16 18 17 19 46 45 20 44 39 43 40 42 41 37 22 21 36 35 23 32 38 33 34 24 25 26 27 28 33 29 31 30 VE001-3L Industrial 3.0L Legend 1 2 3 4 5 6 7 8 9 10 11 12 13 14 15 16 17 18 19 20 21 22 23 24 25 26 27 28 29 30 31 32 33 34 35 36 37 38 39 40 41 42 43 44 45 46 47 48 49 50 51 Valve Rocker Arm Cover Bolt Valve Rocker Arm Cover Reinforcement Valve Rocker Arm Cover Oil Filler Cap Valve Rocker Arm Cover Gasket EFE Valve Thermostat Intake Manifold Intake Manifold Nut Intake/Exhaust Manifold Clamp Intake/Exhaust Manifold Washer Intake/Exhaust Manifold Bolt Intake/Exhaust Manifold Gasket EFE Valve Spring EFE Valve Bushing Exhaust Manifold Intake/Exhaust Manifold Bolt Exhaust Manifold Stud Intake/Exhaust Manifold Gasket Cylinder Head Bolt Cylinder Head Cylinder Head Gasket Lift Bracket Lift Bracket Bolt Engine Block Water Pump Gasket Water Pump Water Pump Bolt Water Pump Bolt Pushrod Cover Gasket Pushrod Cover Pushrod Cover Bolt Valve Lifter Engine Block Coolant Plug Distributor Gasket Distributor Distributor Hold Down Distributor Hold Down Bolt Oil Level Indicator Tube Oil Level indicator Primary Ignition Harness Ignition Coil Bolt Ignition Coil Washer Ignition Coil Ignition Coil Wire Spark Plug Wire Retainer Spark Plug Wire Harness Spark Plug Valve Pushrod Valve Rocker Arm Valve Rocker Arm Ball Valve Rocker Arm Nut Engine Mechanical 1-11 1-12 Engine Mechanical Industrial 3.0L Lower Engine Block and Components 3 2 4 5 6 6 48 1 47 7 8 10 9 9 11 12 43 46 27 42 25 45 44 16 26 27 27 41 13 14 17 22 24 40 38 39 23 37 21 15 18 27 19 27 28 27 29 29 30 29 20 31 32 33 36 35 34 VE002-3L Industrial 3.0L Legend 1 2 3 4 5 6 7 8 9 10 11 12 13 14 15 16 17 18 19 20 21 22 23 24 25 26 27 28 29 30 31 32 33 34 35 36 37 38 39 40 41 42 43 44 45 46 47 48 Engine Block Piston Pin Piston Ring Kit Piston Connecting Rod Connecting Rod Bolt Connecting Rod Bearing Kit Connecting Rod Cap Connecting Rod Nut Oil Nozzle Camshaft Bearings Camshaft Camshaft Retainer Camshaft Retainer Washer Camshaft Sprocket Camshaft Retainer Bolt Camshaft Woodruff Key Crankshaft Pulley Engine Front Cover Seal Engine Front Cover Bolt Engine Front Cover Engine Front Cover Gasket Crankshaft Sprocket Crankshaft Keyway Oil Pump Oil Pump Bolt Crankshaft Bearing Kit Crankshaft Crankshaft Bearing Cap Crankshaft Bearing Cap Bolt Oil Pan Gasket Oil Pan Oil Pan Washer Oil Pan Bolt Oil Drain Plug Washer Oil Drain Plug Crankshaft Rear Oil Seal Housing Pin Crankshaft Rear Oil Seal Housing Crankshaft Rear Oil Seal Housing Stud Crankshaft Rear Oil Seal Housing Bolt Clutch Pilot Bearing Engine Flywheel Bolt Engine Flywheel Crankshaft Rear Oil Seal Crankshaft Rear Oil Seal Housing Bolt Crankshaft Rear Oil Seal Housing Gasket Camshaft Rear Bearing Hole Plug Engine Block Core Plug Engine Mechanical 1-13 1-14 Engine Mechanical Industrial 3.0L Cylinder Head and Components 4 2 3 3 8 5 5 1 6 6 7 7 10 9 VE003-3L Legend 1 2 3 4 5 6 7 8 9 10 Cylinder Head Valve Rocker Arm Stud Valve Stem Key Valve Spring Cap Intake Valve Stem Oil Shield Valve Spring Valve Stem Oil Seal Valve Spring Cap Exhaust Exhaust Valve Intake Valve Industrial 3.0L Engine Mechanical 1-15 Oil Pump and Components 10 1 9 8 2 7 4 3 5 6 VE004-3L Legend 1 2 3 4 5 6 7 8 9 10 Drive Gear Driven Gear Oil Pressure Relief Valve Oil Pressure Relief Valve Spring Oil Pump Screen Oil Pump Oil Pump Cover Gasket Oil Pump Cover Oil Pump Cover Washer Oil Pump Cover Bolt 1-16 Engine Mechanical Industrial 3.0L Repair Instructions Draining Fluids and Oil Filter Removal 1. Remove the oil pan drain plug and allow the oil to drain. VE005-3L 2. Remove the oil filter. VE006-3L 3. Remove right rear engine block coolant plug and allow the coolant to drain. VE007-3L Industrial 3.0L Engine Mechanical 1-17 4. Remove the left rear engine block coolant plug and allow the coolant to drain. VE008-3L Engine Flywheel Removal Important: Note the position and direction of the engine flywheel before removal. The flywheel center alignment hole is a tapered fit to the crankshaft. The engine flywheel must be reinstalled to the original position and direction. 1. Remove the engine flywheel bolts. 2. Remove the engine flywheel. VE009-3L Coolant Inlet and Coolant Thermostat Removal 1. 2. 3. 4. 5. 6. 7. Remove the two thermostat housing bolts (1). Remove the coolant thermostat housing (2). Remove the coolant thermostat (3) and gasket (4). Discard the coolant thermostat gasket. Remove the coolant inlet bolts (6). Remove the coolant inlet housing (5) and gasket (7). Discard the coolant thermostat gasket. 1 2 3 4 7 5 6 Fr o nt 79362005 1-18 Engine Mechanical Industrial 3.0L Distributor Removal 1 1. Disconnect the secondary ignition wires (1) from the spark plugs and the ignition coil. 2. Disconnect the primary ignition harness (4) from the ignition coil. Do not remove the wires from the distributor unless it is necessary. 3. Remove the distributor hold down bolt (6). 4. Remove the distributor (2) and gasket (3). 2 6 5 4 3 VE010-3L Ignition Coil Removal 1. Remove the ignition coil bracket attaching bolts. 2. Remove the ignition coil. VE011-3L Industrial 3.0L Engine Mechanical 1-19 Lift Bracket Removal 1. Remove the lift bracket bolts. 2. Remove the lift bracket. VE012-3L Spark Plug Removal 1. Remove the spark plugs. VE013-3L Intake/Exhaust Manifold Removal 1. Remove the intake/exhaust manifold bolts. 2. Remove the intake/exhaust manifold. 3. Remove the intake/exhaust manifold gaskets. VE014-3L 1-20 Engine Mechanical Industrial 3.0L Intake/Exhaust Manifold Disassemble and Assemble If necessary to replace either the intake or exhaust manifold, separate them as follows: 1. Remove the one attaching bolt and the two nuts at the center of the assembly. 2. Reassemble manifolds using a new gasket. Tighten Tighten the bolts to 27-34 N•m (20-25 lb ft). VE015-3L Intake/Exhaust Manifold Clean and Inspect Clean and inspect the following areas: • The manifold bolts and studs. • All manifold sealing surfaces. • Any old RTV from the manifold. VE016-3L Water Pump Removal Make sure the coolant is drained. 1. Remove the water pump bolts. 2. Remove the water pump and gasket. 3. Discard the water pump gasket. 4. Inspect the water pump for the following: • Gasket sealing surfaces for excessive scratches or gouges. • Excessive side-to-side play in the pulley shaft. • Leakage at the water inlet housing or rear cover gaskets areas. • Leakage at the water pump vent hole. A stain around the vent hole is acceptable. If leakage occurs at the vent hole with the engine running and the cooling system pressurized, replace the pump. VE017-3L Industrial 3.0L Engine Mechanical 1-21 Crankshaft Pulley Removal Tools Required • J 24420-C Universal Crankshaft Pulley Remover 1. Use the J 24420-C in order to remove the crankshaft pulley. J 24420-C VE018-3L Valve Rocker Arm Cover Removal 1. Remove the valve rocker arm cover bolts. 2. Remove the valve rocker arm cover. 3. Remove the gasket. VE019-3L Pushrod Cover Removal 1. Remove the pushrod cover bolts. 2. Remove the pushrod cover. 3. Remove the gasket. VE020-3L 1-22 Engine Mechanical Industrial 3.0L Valve Rocker Arm and Pushrod Removal 1. Remove the following components from the cylinder head: 1.1. The valve rocker arm nuts (1). 1.2. The valve rocker arm balls (2). 1.3. The valve rocker arms (3). 1 2 3 VE021-3L Measuring Camshaft Lobe Lift J 8520 90 0 Tools Required • J 8520 Camshaft Lobe Lift Indicator 1. Position the J 8520 with the ball socket adapter on the valve pushrod. Be sure that the valve pushrod is in the valve lifter socket. 2. Slowly rotate the crankshaft until the valve lifter roller is on the heel of the cam lobe. The valve pushrod will be in its lowest position. 3. Set the J 8520 on zero. 4. Slowly rotate the crankshaft until the valve pushrod is raised fully. 5. Compare the total lift shown on the J 8520 with the specifications. Refer to Engine Mechanical Specifications. 6. Remove the J 8520. 10 20 80 30 70 60 40 50 VE022-3L 2. Remove the valve pushrods. 3. Place the following parts in a rack so that they can be reinstalled in their original locations: • The valve rocker arms. • The valve rocker arm balls. • The valve pushrods. VE023-3L Industrial 3.0L Engine Mechanical 1-23 Valve Train Components Inspect (Cylinder Head) Inspect the following areas: • The valve rocker arms and ball at the mating surfaces. These surfaces should be smooth and free of scoring or other damage. • The valve pushrod sockets and valve stem mating surfaces. These surfaces should be smooth with no scoring or exceptional wear. • The valve pushrods for bends or scored ends. VE024-3L Valve Lifter Removal Tools Required • J 3049 Valve Lifter Remover (Plier Type) • J 9290-01 Valve Lifter Remover (Slide Hammer Type) 1. Use the J 3049 in order to remove the valve lifters. J 3049-A VE025-3L 2. If the valve lifters cannot be removed with the J 3049 use the J 9290-01 in order to remove the valve lifters. J 9290-01 VE026-3L 1-24 Engine Mechanical Industrial 3.0L Cylinder Head Removal 1. Remove the cylinder head bolts. Notice: After removal, place the cylinder head on two wood blocks to prevent damage. 2. Remove the cylinder head. 3. Remove the gasket. 4. Discard the gasket VE027-3L Oil Pan Removal 1. 2. 3. 4. Remove the oil pan bolts. Remove the oil pan. Remove the gasket. Discard the gasket. VE028-3L Oil Pump Removal 1. Remove the bolts that attach the oil pump to the engine block. 2. Remove the oil pump and gasket. 3. Discard the gasket. VE029-3L Industrial 3.0L Engine Mechanical 1-25 Oil Level Indicator and Tube Removal 1. Remove the oil level indicator from the tube. 2. Use a drift punch in order to remove the oil level indicator tube from the engine block. VE128-3L Engine Front Cover Removal 1. 2. 3. 4. Remove the engine front cover bolts. Remove the engine front cover. Remove the gasket. Discard the gasket. VE030-3L 5. Remove the oil seal from the front cover. 6. Clean the engine front cover in solvent. 7. Inspect the engine front cover for damage to the gasket surface or the oil seal surface. VE031-3L 1-26 Engine Mechanical Industrial 3.0L Measuring Crankshaft and Camshaft Sprocket Runout Tools Required • J 8001 Dial Indicator 1. Use the J 8001 in order to measure the crankshaft and camshaft sprocket runout. Refer to Engine Mechanical Specifications. 2. If the sprocket runout exceeds specifications, clean and remove any burrs from the shaft or replace the sprocket. J 8001 70 60 80 50 40 90 0 30 10 20 VE032-3L Measuring Timing Sprocket Teeth Backlash J 8001 0 Tools Required • J 8001 Dial Indicator 1. Use the J 8001 in order to measure the backlash between the timing sprocket teeth. 2. Refer to Engine Mechanical Specifications. 10 20 90 30 80 40 70 60 50 VE033-3L Crankshaft Sprocket Removal Tools Required • J 6978-E Crankshaft Sprocket Puller 1. Use the J 6978-E in order to remove the crankshaft sprocket. 2. If necessary, remove the crankshaft keys. J 6978-E VE034-3L Industrial 3.0L Engine Mechanical 1-27 Camshaft Removal 1. Remove the two camshaft retainer bolts, working through the holes in the camshaft sprocket. VE035-3L Important: All camshaft journals are the same diameter, so care must be used in removing the camshaft to avoid damage to the bearings. 2. Carefully rotate and pull the camshaft out of the bearings. VE125-3L Crankshaft and Camshaft Sprocket Inspect • • • • The camshaft and crankshaft sprockets for wear. One edge of worn teeth or that are no longer concentric. The valley between worn teeth. The keys and crankshaft keyways for wear. VE126-3L 1-28 Engine Mechanical Industrial 3.0L Timing Gear Oil Nozzle Removal 1. Remove the oil nozzle with pliers. VE127-3L Piston, Connecting Rod and Bearing Removal J 24270 Tools Required • J 5239 Connecting Rod Guide Tool • J 24270 Ridge Reamer 1. Remove the ring ridge as following: 1.1. Turn the crankshaft until the piston is at the bottom of the stroke. 1.2. Place a cloth on top of the piston. 1.3. Use the J 24270 to remove the cylinder ring ridge. 1.4. Turn the crankshaft so the piston is at the top of the stroke. 1.5. Remove the cloth. 1.6. Remove the cutting debris. VE036-3L Important: Place matchmarks or numbers on the connecting rods and the connecting rod caps. Upon removal of the piston and connecting rod assembly, install the connecting rod caps to the matching connecting rods. 2. Remove the connecting rod nuts. 3. Remove the connecting rod cap. 4. Remove the connecting rod bearings. • Keep bearings with the original connecting rod and connecting rod cap. • Wipe the oil from the bearings. • Wipe the oil from the crankpins. VE037-3L Industrial 3.0L 5. Use the J 5239 in order to remove the connecting rod and the piston out of the engine block. 6. Use a hammer and tap lightly on the end of the connecting rod guide tool to remove the piston and connecting rod assembly from the cylinder bore. Engine Mechanical 1-29 J 5239 VE038-3L Crankshaft and Bearings Clean and Inspect (Connecting Rod Bearing Clearance) Important: Connecting rod bearings are a precision insert type. Connecting rods are of a powdered metal design and cannot be shimmed or filed for bearing fit. If clearances are found to be excessive, a new bearing and/or connecting rod are required. Do not rotate the crankshaft while gauging plastic is between the crankshaft journal and the bearing surface. 1. Remove the connecting rod nuts. 2. Remove the connecting rod cap and bearing. VE037-3L 3. Inspect the crankshaft bearings for craters or pockets. Flattened sections on the bearing halves also indicate fatigue. VE039-3L 1-30 Engine Mechanical Industrial 3.0L 4. Inspect the crankshaft bearings for excessive scoring or discoloration. 5. Inspect the crankshaft bearings for dirt or debris imbedded into the bearing material. VE040-3L 6. Install the gauging plastic (1) onto the connecting rod bearing journal. Install the gauging plastic the full width of the journal. 1 VE041-3L 7. Install the connecting rod cap and bearing. Tighten Tighten the nuts evenly to 61 N•m (45 lb ft). VE037-3L Industrial 3.0L Engine Mechanical 1-31 8. Remove the connecting rod nuts. 9. Remove the connecting rod cap and bearing. VE037-3L 10. Measure the gauging plastic at its widest area using the scale supplied with the plastic gauging kit. 11. Compare the measurements to Engine Mechanical Specifications. VE042-3L Crankshaft Rear Oil Seal and Housing Removal 1. Remove the crankshaft rear oil seal housing bolts. 2. Remove the crankshaft rear oil seal housing, seal and gasket. VE043-3L 1-32 Engine Mechanical Industrial 3.0L 3. Remove the crankshaft rear oil seal from the crankshaft rear oil seal housing. VE044-3L Crankshaft , Bearings and Bearing Cap Removal 1. Remove the crankshaft bearing cap bolts. 2. Remove the crankshaft bearing caps. VE045-3L 3. Remove the crankshaft. 4. Remove the crankshaft bearings from the bearing caps and from the engine block. VE046-3L Industrial 3.0L Engine Mechanical 1-33 Crankshaft and Bearings Clean and Inspect Tools Required • J 7872 Magnetic Base Indicator Set Caution: Wear safety glasses in order to avoid eye damage. 1. Clean the crankshaft in solvent. 2. Inspect the crankshaft oil passages for restrictions. 3. Dry the crankshaft with compressed air. 4. Inspect the crankpins for scoring or wear. VE047-3L 5. Inspect the crankshaft bearings for craters or pockets. Flattened sections on the bearing halves also indicate fatigue. VE039-3L 6. Inspect the crankshaft bearings for excessive scoring or discoloration. 7. Inspect the crankshaft bearings for dirt or debris imbedded into the bearing material. VE040-3L 1-34 Engine Mechanical Industrial 3.0L 8. Inspect the crankshaft bearings for improper seating indicated by bright, polished sections of the bearing. • If the lower half of the bearing is worn or damaged, both the upper and lower halves must be replaced. VE048-3L 9. Measure the crankpins for out-of-round, taper or undersize with a micrometer. Refer to Engine Mechanical Specifications. VE049-3L 10. Support the crankshaft front and rear journals on V-blocks. 11. Measure the crankshaft run-out at front and rear intermediate journals with J 7872. Refer to Engine Mechanical Specifications. 12. Replace or recondition crankshaft if measurements are not within specifications. J 7872 VE050-3L Industrial 3.0L Engine Mechanical 1-35 Crankshaft and Bearings Clean and Inspect (Main Bearing Clearance) Important: Crankshaft main bearings are a precision insert type. Main bearing caps are machined with the engine block for proper clearance and cannot be shimmed or filed for bearing fit. Crankshaft bearing clearances are critical. If the clearances are found to be excessive, new bearings and/or engine block and cap repair may be required. Do not rotate the crankshaft while gauging plastic is between the crankshaft journal and the bearing surface. 1. Remove the crankshaft bearing cap bolts. 2. Remove the crankshaft bearing caps. VE045-3L 3. Install gauging plastic (1) onto the crankshaft journal. Install the gauging plastic the full width of the crankshaft bearing journal. 1 VE051-3L 4. Install the bearing, bearing cap and bolts. Tighten Tighten the crankshaft bearing cap bolts to 88 N•m (65 lb ft). VE045-3L 1-36 Engine Mechanical Industrial 3.0L 5. Remove the crankshaft bearing cap bolts. 6. Remove the crankshaft bearing caps. VE045-3L 7. Measure the gauging plastic at its widest area using the scale supplied with the plastic gauging kit. 8. Compare the measurements to Engine Mechanical Specifications. • If the gauging plastic shows irregularity in the journal exceeding 0.025 mm (0.001 in), remove the crankshaft and measure the journal with a micrometer. • If the clearance is greater than Engine Mechanical Specifications, select and install an undersized bearing set. Measure the clearance with gauging plastic. • If clearance cannot be brought to specifications, grind the crankshaft for use with the next undersized bearing. VE052-3L 9. Use a dial indicator or feeler gauge in order to measure end play between the front of the rear of the crankshaft bearing cap and the crankshaft thrust surface in order to determine the crankshaft end play. 10. If you use a feeler gauge, measure between the thrust surface of the crankshaft bearing and the crankshaft. Refer to Engine Mechanical Specifications. VE053-3L Industrial 3.0L Engine Mechanical 1-37 Camshaft Bearing Removal Tools Required • J 6098-01 Camshaft Bearing Remover/Installer 1. Remove the camshaft rear bearing hole plug. 2. Use the J 6098-01 in order to remove the inner camshaft bearings. Repeat the following procedure for each of the inner camshaft bearings: 2.1. With the nut (4) and the thrust washer (3) installed to the end of the puller screw threads, index the pilot (2) in the camshaf front bearing and install the puller screw through the pilot (2) and the bearing to be removed. 2.2. Install the bearing tool (1) with the shoulder toward the bearing. 2.3. Using two wrenches, hold puller screw (5) while you turn the nut (4) in order to draw the bearing out of the bore. 2.4. When the bearing has been pulled from the bore, remove the bearing tool and the bearing from the puller screw. 2.5. Index the pilot in the rear camshaft bearing in order to remove the rear inner camshaft bearing. 3. Use the J 6098-01 in order to remove the front and rear camshaft bearings. 3.1. Assemble the bearing tool to the driver. 3.2. Drive the front and rear camshaft bearings out of the block bore. Drive inward toward the center of the engine block. 2 J 6098-01 3 1 4 5 VE054-3L J 6098-01 VE055-3L 1-38 Engine Mechanical Industrial 3.0L Distributor Lower Bushing and Thrust Washer Removal J 6585 Tools Required • J 9534 Distributor Lower Bushing Remover • J 6585 Slide Hammer 1. Install the J 9534 into the distributor lower bushing. 2. Use the J 6585 in order to remove the bushing. J 9534 VE056-3L 3. Use a drift punch up through the bushing bore in order to drive the thrust washer (if installed) out of the bore. 4. Clean the bushing bore in the cylinder block and inspect for burrs or damage. VE057-3L Oil Filter Bypass Valve Removal and Installation 1. 2. 3. 4. VE058-3L Check the spring and fiber valve for operation. Inspect for a cracked or broken valve. Use a screwdriver in order to pry the valve out. Use a 9/16 in thin-wall deep socket in order to tap the new bypass valve in place. Industrial 3.0L Engine Mechanical 1-39 Cylinder Block Clean and Inspect 1. Clean the following areas: • The engine block in solvent, removing all sludge, dirt or debris Caution: Wear safety glasses in order to avoid eye damage. • Dry the block with compressed air. • The gasket surfaces. • The coolant passages. • The oil passages. • The main bearing caps. 2. Inspect the following areas: • The cylinder walls for excessive scratches, gouging or ring ridge. • The coolant jackets for cracks. • The valve lifter bores for excessive scoring or wear. • The crankshaft bearing webs for cracks. • The gasket sealing surfaces for excessive scratches or gouging. • The oil passages for restrictions. • All threaded bolt holes for thread damage. VE059-3L Cylinder Bore Measurements Tools Required • J 8087 Cylinder Bore Gauge 1. Use the J 8087 in order to check cylinder bore taper and out-of-round as follows: 1.1. Set the gauge so that the thrust pin must be forced in about 1/4 in to enter the gauge in the cylinder bore. 1.2. Center the gauge in the cylinder and turn the dial to “0.” 1.3. Work the gauge up and down to determine the taper. 1.4. Turn the gauge to different point around the cylinder to determine the out-of-round condition. Refer to Engine Mechanical Specifications. J 8087 VE060-3L 1-40 Engine Mechanical Cylinder Boring and Honing Boring Procedure 1. Before you start the honing or reboring process, measure all new pistons with the micrometer, contacting at points exactly 90° from the piston pin centerline. Refer to Piston Selection. Select the smallest piston for the piston fitting. Slightly varied pistons in a set may provide correction, in case the first piston is too loosely fitted. 2. Before you use any type of boring bar, file the top of the cylinder block in order to remove any dirt or burrs. If you do not check the cylinder block, the boring bar may be tilted, this could result in the rebored cylinder wall being at incorrect right angles from the crankshaft. 3. Carefully follow the instructions furnished by the manufacturer regarding the use of the equipment. 4. When you rebore cylinders, make sure all crankshaft bearing caps are in place. Tighten the bearing caps to the proper torque in order to avoid distortion of the bores in the final assembly. The crankshaft must be clear of the boring cutter when you bore each cylinder. Cover or tape the crankshaft bearings and other internal parts to protect during the boring or honing process. Honing Procedure 1. When honing the cylinders, follow the manufacturer’s recommendations for use, cleaning and lubrication. Use only clean, sharp stones of the proper grade for the amount of material you remove. Dull, dirty stones cut unevenly and generate excessive heat. When using coarse or mediumgrade stones, leave sufficient metal so that all stone marks may be removed with the fine stones you use for finishing in order to provide for proper clearance. 2. During the honing process, thoroughly clean the cylinder bore. Check for a correct fit of the piston you select for the individual cylinder. 3. When honing to eliminate taper in the cylinder, make full strokes of the hone in the cylinder. Repeatedly check the measurement at the top, the middle and the bottom of the bore. Notice: Handle the pistons with care. Do not force the pistons through the cylinder until you hone the cylinder to the correct size. The piston can be distorted through careless handling. 4. When finished honing a cylinder bore to fit a piston, move the hone up and down at a sufficient speed to obtain very fine, uniform surface finish marks in a cross hatch pattern at 45-65 degrees. Industrial 3.0L 5. The finish marks should be clean but not sharp. The finish marks should be free from imbedded particles and torn or folded metal. 6. By measuring the piston to be installed at the sizing point specified and by adding the average of the clearance specification, you can determine the finish hone cylinder measurement. Refer to Engine Mechanical Specifications. Measure the block and the piston at normal room temperature. 7. True up the refinished cylinder bores to have less than the specified out-of-round or taper. You must final hone each bore in order to remove all stone or cutter marks and in order to provide a smooth surface. 8. For piston-to-bore tolerance specifications, Refer to Engine Mechanical Specifications. 9. After final honing and before the piston is checked for fit, clean the bores with hot water and detergent. Scrub the bores with a stiff bristle brush and rinse the bores thoroughly with hot water. Do not allow any abrasive material to remain in the cylinder bores. This abrasive material will wear the new rings, the cylinder bores and the bearings lubricated by the contaminated oil. After you wash the bore, brush the dry bore clean with a power-driven fiber brush. 10. Permanently mark the piston for the cylinder to which the piston has been fitted. 11. Apply clean engine oil to each bore in order to prevent rusting. Industrial 3.0L Engine Mechanical 1-41 Distributor Lower Bushing and Thrust Washer Installation Tools Required • J 9535 Distributor Lower Bushing Installer 1. Use the J 9535 in order to drive the thrust washer (if removed) into the cylinder block. 2. Use the J 9535 with the driver-bolt in the driver handle. J 9535 VE061-3L 3. Install the driver into the new bushing from the large inside diameter. 4. Drive the new bushing into the cylinder block until the J 9535 bottoms against the cylinder block. J 9535 VE062-3L Piston and Connecting Rod Disassemble Tools Required • J 24086-C Piston Pin Removal Set 1. Remove the piston rings from the pistons. VE063-3L 1-42 Engine Mechanical Industrial 3.0L J 24086-C 2. Remove the pin from the piston. Notice: After the J 24086-C Installer bottoms on the support assembly, do not exceed 34,475 kPa (5000 psi) or the tool may be damaged. VE064-3L Piston and Connecting Rod Clean and Inspect 1. Clean the piston ring grooves with a groove cleaner. J 3936-03 VE065-3L VE066-3L Caution: Wear safety glasses in order to avoid eye damage. 2. Clean the connecting rod in cleaning solvent. 3. Clean the varnish from the piston skirts and the pins with cleaning solvent 4. Dry the components with compressed air. 5. Do not use a wire brush in order to clean any part of the piston. 6. Clean the piston oil ring holes and the slots. 7. Inspect the connecting rod for twisting, nicks and cracks. Replace any damaged connecting rods. 8. Inspect the pistons for the following conditions: • Cracked ring lands, skirts or pin bosses. • Nicks or spurs in the grooves that may cause binding. • Warped or worn ring lands. • Scuffed or damaged skirts. • Eroded areas at the top of the piston. • Worn piston bores and piston pins. 9. Replace pistons that are damaged or show signs of excessive wear. Industrial 3.0L Engine Mechanical 1-43 10. Measure the pin bore-to-piston clearance. 10.1. The piston pin bores and the piston pins must be free of varnish or scuffing when being measured. 10.2. Use a micrometer in order to measure the piston pin. VE067-3L 10.3. Use an inside micrometer in order to measure the piston pin bore. Replace the piston and piston pin if the clearance is in excess of 0.0254 mm (0.001 in). 10.4. Match the piston and piston pin. Do not service separately. VE068-3L 11. Measure the piston compression ring end gap. Important: Fit each compression ring to the cylinder in which it will be used. 11.1. Place the compression ring into the cylinder bore. 11.2. Push the compression ring into the cylinder bore approximately 6.5 mm (0.25 in) above the ring travel. The ring must be square to the cylinder wall. 11.3. Use a feeler gauge in order to measure the end gap. 11.4. Select another size ring set if the end gap exceeds specifications. VE069-3L 1-44 Engine Mechanical Industrial 3.0L 12. Measure the piston ring side clearance. 12.1. Roll the piston ring entirely around its ring groove on the piston. 12.2. Dress the groove with a fine cut file if the ring groove causes binding. 12.3. Replace the piston ring if a distorted piston ring causes binding. VE070-3L 12.4. Use a feeler gauge in order to measure the side clearance of the piston ring and groove. 12.5. Try another piston ring if the side clearance is too small. VE071-3L Piston Selection Important: Measurements of all components should be taken with the components at normal room temperature. For proper piston fit, the engine block cylinder bores must not have excessive wear or taper. A used piston and pin set may be reinstalled if, after cleaning and inspection, they are within specifications. 1. Inspect the engine block cylinder bore. Refer to Cylinder Block Clean and Inspect. 2. Inspect the piston and piston pin. Refer to Piston and Connecting Rod Clean and Inspect. 3. Use a boring gauge in order to measure the cylinder bore diameter at a point of 66 mm (2.5 in) from the top of the cylinder bore. J 8087 VE060-3L Industrial 3.0L Engine Mechanical 1-45 4. Measure the bore gauge with a micrometer and record the reading. J 8087 VE072-3L 5. With a micrometer or caliper at a right angle to the piston, measure the piston 11 mm (0.433 in) from the bottom of the skirt. 6. Subtract the piston diameter from the cylinder bore diameter in order to determine piston-to-bore clearance. 7. For proper piston-to-bore clearance, Refer to Engine Mechanical Specifications. 8. If the proper clearance cannot be obtained, select another piston and measure for the clearances. If the proper fit cannot be obtained, the cylinder bore may require boring or honing. Refer to Cylinder Boring and Honing. 9. When the piston-to-cylinder bore clearance is within specifications, permanently mark the top of the piston for installation to the proper cylinder. VE073-3L Piston and Connecting Rod Assemble Tools Required • J 24086-C Piston Pin Removal Set Important: When assembling the piston and connecting rod, the flange or the heavy side on the connecting rod must face toward the front of the piston (stamped arrow in top of the piston head). 1. Install the piston pin and connecting rod assembly. 1.1. Lubricate the piston pin holes in both the piston and the connecting rod assembly. 1.2. Press the piston pin into the piston and connecting rod assembly using the J 24086-C. 1.3. Inspect for freedom of movement of the piston on the piston pin. J 24086-C VE064-3L 1-46 Engine Mechanical Industrial 3.0L VE123-3L FAN END OF ENGINE B C A D B Important: When installing the piston rings onto the piston, use a ring expanding plier type tool. Do not roll the piston rings into the grooves of the piston. Use caution and care to expand the piston rings only sllightly larger than the Outside Diameter (OD) of the piston. 2. Using piston ring pliers, install the piston rings onto the piston. 2.1. Install the oil control ring spacer in the groove. 2.2. Install the lower oil control ring. The oil control rings do not have a dimple or orientation mark and may be installed in either direction. 2.3. Install the upper oil control ring. 2.4. Stagger the three oil control ring end gaps a minimum of 90 degrees. 2.5. Using piston ring pliers, install the lower compression ring. The lower compression ring has a dimple or orientation mark. This mark must face the top of the piston.The lower compression ring also has a bevel on the edge that faces the bottom of the piston. 2.6. Using piston ring pliers, install the upper compression ring. The upper compression ring has a dimple or orientation mark. This mark must face the top of the piston. The upper compression ring has a molybdenum filling and no bevelled edge. A - POSITION OF THE GAP FOR THE SPACER OF THE OIL RING B - POSITION OF THE GAP FOR THE OIL RING C - POSITION OF THE GAP FOR THE LOWER COMPRESSION RING D - POSITION OF THE GAP FOR THE UPPER COMPRESSION RING VE074-3L Camshaft and Bearings Clean and Inspect Tools Required • J 7872 Magnetic Base Indicator Set Caution: Wear safety glasses in order to avoid eye damage. 1. Clean the camshaft in solvent. 2. Dry the camshaft with compressed air. 3. Inspect the camshaft bearing journals for scoring or excessive wear. 4. Inspect the camshaft valve lifter lobes for scoring or excessive wear. 5. Inspect the camshaft retainer plate for wear. VE075-3L Industrial 3.0L Engine Mechanical 1-47 6. Inspect the camshaft bearings for proper fit in the engine block. Camshaft bearings have an interference fit to the engine block and should not be loose in their engine block bearing bores. 7. Inspect the camshaft bearings for excessive wear or scoring. Bearings with excessive wear or scoring must be replaced. VE076-3L 8. Measure the camshaft for out-of-round, taper or undersize with a micrometer. Refer to Engine Mechanical Specifications. VE077-3L 9. Support the camshaft front and rear journals on V-blocks. 10. Measure the camshaft run-out at the intermediate journal with J 7872. Refer to Engine Mechanical Specifications. 11. Replace camshaft if measurements are not within specifications. J 7872 VE078-3L 1-48 Engine Mechanical Industrial 3.0L Camshaft Sprocket and Retainer Removal and Installation Removal Tools Required • J 791 Camshaft Sprocket Remover 1. If the inspection indicated that the camshaft, gear and retainer were in good condition, the camshaft end play should be checked. Refer to Engine Mechanical Specifications. VE079-3L J 791 2. If the inspection indicated that the camshaft, gear or retainer should be replaced, the gear must be removed from the camshaft as follows: 2.1. Place the camshaft through the J 791. 2.2. Place the end of the remover on the table of a press and press the camshaft out of the gear. Important: The retainer must be positioned so that the woodruff key in the camshaft does not damage it when the camshaft is pressed out of the gear. Also, support the hub of the gear or the gear will be seriously damaged. VE080-3L Installation 1. Install the camshaft sprocket, retainer and gear spacer ring to the camshaft as follows: 1.1. Firmly support the camshaft at the back of the front journal in an arbor press. 1.2. Place the gear spacer ring and retainer over the end of the camshaft and install the woodruff key in the camshaft keyway. 1.3. Align the sprocket keyway with the woodruff key in the camshaft and press it onto the shaft until it bottoms against the gear spacer ring. VE081-3L Industrial 3.0L Engine Mechanical 1-49 Camshaft Bearing Installation Tools Required • J 6098-01 Camshaft Bearing Installer Important: • A loose camshaft bearing may be caused by an enlarged, out of round or damaged engine block bearing bore. • The outer front and rear camshaft bearings must be installed first. These bearings serve as guides for the tool pilot and help center the inner bearings during the installation process. • The camshaft bearing oil holes must align with the oil galleys in the engine block. An improperly aligned camshaft bearing oil galley hole will restrict oil flow to the bearing and camshaft journal. 1. Use the J 6098-01 in order to install the front and rear camshaft bearings: 1.1. Assemble the bearing tool to the driver handle. 1.2. Align the oil holes. 1.3. Drive the front and the rear camshaft bearings inward toward the center of the engine block. 2. Use the J 6098-01 in order to install the inner camshaft bearings. Repeat the following steps for each of the inner camshaft bearings: 2.1. With the nut (4) and the thrust washer (3) installed to the end of the puller screw threads, index the pilot in the camshaft front bearing and install the puller screw through the pilot (2). 2.2. Index the camshaft bearing in the bore. Make sure you align the oil galley holes. 2.3. Install the puller screw through the bearing bore and bearing to be installed and assemble bearing tool (1) to the puller screw with the shoulder toward the bearing. Make sure that enough threads are engaged. 2.4. Using two wrenches, hold the puller screw (5) while you turn the nut in order to draw the bearing into the bore. When the bearing has been pulled into the bore, remove the bearing tool and the puller screw and check the alignment of the bearing oil hole to the bore oil hole. 3. Install a new camshaft rear bearing hole plug. Coat the plug outside diameter with GM P/N 1052080 sealant, or the equivalent. J 6098-01 VE055-3L J 6098-01 2 3 1 4 5 VE054-3L 1-50 Engine Mechanical Industrial 3.0L Oil Pump Disassemble 1. If necessary, remove the oil pump screen. • The oil pump screen has a press fit in to the pump cover. • Do not remove the screen from the pipe. The pipe and screen are serviced as a complete assembly. VE082-3L 2. Remove the cover bolts. 3. Remove the pump cover. VE083-3L 4. Remove the drive gear (2) and the driven gear (1). Matchmark the gear teeth for assembly. 1 2 VE084-3L Industrial 3.0L Engine Mechanical 1-51 5. Remove the following items: • The retaining pin (1). • The pressure relief valve spring (3). • The pressure relief valve (2). 1 2 3 VE085-3L Oil Pump Clean and Inspect Important: The internal parts of the oil pump are not serviced separately. If the oil pump components are worn or damaged, replace the oil pump as an assembly. The oil pump pipe and screen are to be serviced as an assembly. Do not attempt to repair the wire mesh portion of the pipe and screen assembly. 1. Clean all of the parts in cleaning solvent. Caution: Wear safety glasses in order to avoid eye damage. 2. Dry the parts with compressed air. 3. Inspect the following areas: • The oil pump housing and cover for cracks, scoring, casting imperfections and damaged threads. • The drive gear shaft (If the shaft is loose in the oil pump housing, replace the oil pump). • The pressure relief valve for scoring and sticking (Burrs may be removed with a fine oil stone). • The pressure relief valve spring for loss of tension. • The oil pump screen for broken wire mesh or looseness (If the pipe is loose or has been removed from the screen, the oil pump screen must be replaced). • The gears for chipping, galling and wear. Important: If the drive gear and driveshaft are worn, replace the entire oil pump. • The drive gear and driveshaft for looseness and wear. VE086-3L 1-52 Engine Mechanical Industrial 3.0L Oil Pump Assemble Tools Required • J 21882 Oil Suction Pipe Installer Important: Replace the pressure relief valve spring when you reuse the oil pump. 1. Install the following items: • The pressure relief valve (2). • The pressure relief valve spring (3). • The retaining pin (1). 1 2 3 VE085-3L 1 2 2. Coat the drive gear, the driven gear and the housing gear surfaces with clean engine oil. 3. Install the drive gear (2) and the driven gear (1) into the pump body. Align the matchmarks on the gears. Install the smooth side of the gear toward the pump cover. VE084-3L 4. Install the pump cover. 5. Install the cover bolts. Tighten Tighten the bolts to 8 N•m (72 lb in). VE083-3L Industrial 3.0L Engine Mechanical 1-53 6. Inspect the pump for smoothness of operation by turning the oil pump driveshaft by hand. 7. Install the oil pump screen. 7.1. If removed, replace the oil pump screen. The oil pump screen must have a good press fit into the oil pump body. 7.2. Mount the oil pump in a soft jawed vise. 7.3. Apply sealer to the end of the pipe. 7.4. Use the J 21882 and a soft-faced hammer in order to tap the oil pump screen into the pump body. The screen must align parallel with the bottom of the oil pan when it is installed. J 21882 VE087-3L Cylinder Head Disassemble 1 2 3 4 Tools Required • J 8062 Valve Spring Compressor Important: Mark, organize or sort the cylinder head components for assembly. Return the components to their original location during assembly. 1. Measure the valve spring installed height using a ruler. Measure from the machined surface of the cylinder head to the top of the valve spring cap. Refer to Engine Mechanical Specifications 1.65 in VE088-3L 2. Use the J 8062 in order to compress the valve springs. J 8062 VE089-3L 1-54 Engine Mechanical Industrial 3.0L 1 6 3 2 3 4 4 5 5 8 3. Remove the valve stem keys (1). 4. Remove the cap from the valve spring ( 2&6). 5. Remove the valve stem oil shield (3). 6. Remove the valve spring (4). 7. Remove the valve stem oil seal (5). 8. Remove the valve (7&8). Important: Place the valves in a rack in the proper sequence so that you can install them in the same order. 7 VE090-3L Cylinder Head Clean and Inspect J 8089 VE091-3L Tools Required • J 8089 Carbon Remover Brush • J 9666 Valve Spring Tester • J 8001 Dial Indicator Caution: Wear safety glasses in order to avoid eye damage. 1. Use the J 8089 in order to clean the carbon from the combustion chambers and the valve ports. Be careful not to scuff the chamber. 2. Clean the following areas: 2.1. The carbon and the sludge from the valve pushrods and the valve rocker arms. 2.2. The valve stems and heads on a buffing wheel. 2.3. The cylinder head and engine block gasket surfaces. 2.4. The bolt holes and threads in the cylinder head and the engine block. 3. Inspect the following areas: 3.1. The cylinder head for cracks in the exhaust ports and the combustion chambers. 3.2. The cylinder head for external cracks in the water chamber. 3.3. The valves for burned heads, cracked faces or damaged stems. VE092-3L Industrial 3.0L 4. Use the J 9666 and a flex bar torque wrench in order to measure the valve spring pressure. • Replace the valve spring if the spring pressure is less than 444 N (100 lb.) at 40.9 mm (1.61 in). Refer to Engine Mechanical Specifications. Engine Mechanical 1-55 J 9666 VE093-3L 5. Excessive valve stem-to-bore clearance will cause excessive oil consumption and may cause a valve to break. Insufficient clearance will result in noisy and sticky functioning of the valve and will disturb the engine assembly smoothness. 5.1. Install the valve into the guide. 5.2. Install the J 8520 onto the cylinder head. 5.3. Locate the indicator so that the movement of the valve stem from side to side (crosswise to the cylinder head) will cause a direct movement of the indicator stem. 5.4. The indicator stem must contact the side of the valve stem just above the valve guide. 5.5. Drop the valve head about 1.6 mm (0.0064 in) off the valve seat. 5.6. Use light pressure and move the valve stem from side to side in order to obtain a clearance reading. 5.7. If the valve stem to guide clearance is excessive, the valve must be replaced and/or the guide must be repaired to obtain the proper clearances. Refer to Engine Mechanical Specifications. J 8520 VE094-3L 1-56 Engine Mechanical Industrial 3.0L 6. Inspect the valve springs for squareness. VE095-3L 7. Measure the valve seat runout. • Use the J 8001 in order to check the valve seat runout. • The valve seats should be concentric to within 0.0508 mm (0.002 in). J 8001 VE096-3L 8. Measure the cylinder head for warpage with a straight edge and a feeler gauge. A cylinder head with excessive warpage must be repaired or replaced. Refer to Engine Mechanical Specifications. VE097-3L Industrial 3.0L Engine Mechanical 1-57 Valve Guide Reaming/Valve and Seat Grinding 1. Ream the valve guides for oversize valves if the clearance exceeds the specifications. 2. Service valves are available in the standard and 0.038 mm (0.015 in). 3. Ream the valve guide bores for the service valves as necessary. J 4822 VE098-3L 4. Reconditioning the valve seats is very important. 5. Recondition the valve seat after reaming the valve guide bores or installing the new valve guides. • The valves must seat perfectly for the engine to deliver optimum power and performance. • Cooling the valve heads is another important factor. Good contact between each valve and its seat in the cylinder head is necessary to ensure that the heat in the valve head is properly carried away. • Regardless of what type of equipment is used, it is essential that the valve guide bores are free from carbon or dirt to ensure the proper centering of the pilot in the guide. • The valve seats should be concentric to within 0.0508 mm (0.002 in) total indicator reading. J 8001 VE096-3L 6. Reface pitted valves on a valve refacing machine in order to ensure the correct relationship between the head and the stem. • Replace the valves that show excessive wear or are warped. • Replace the valve if the edge of the head is less than 0.8 mm (0.031 in) thick after grinding. • Several different types of equipment are available for reconditioning valves and valve seats. Use the manufacturers recommendations of equipment to obtain the proper results. VE099-3L 1-58 Engine Mechanical Industrial 3.0L Rocker Arm Stud Removal and Installation J 5802-01 Tools Required • J 5802-01 Rocker Arm Stud Remover • J 6880 Rocker Arm Stud Installer Rocker arm studs with damaged threads or with loose fit in cylinder head should be replaced with new, oversize studs. 1. Remove the old stud by placing J 5802-01 over the stud, installing nut and flat washer and removing the stud by turning out. VE100-3L 2. Ream the hole for the oversize stud. Important: Do not attempt to install an oversize stud without reaming the stud hole. J 5715 or J 6036 VE101-3L Industrial 3.0L Engine Mechanical 1-59 3. Coat the press-fit area of the stud with Perfect Seal. 4. Install the new stud, using J 6880 as a guide. J 6880 VE102-3L Cylinder Head Assemble 1 6 3 Tools Required • J 8062 Valve Spring Compressor 1. Install the valve (7&8) into the proper port. 2. Lubricate oil seal (5) with clean engine oil. 3. Install the oil seal onto the valve stem. 4. Install the valve spring (4). 5. Install the valve stem oil shield (3). 6. Install the cap on the valve spring (2&6). 2 3 4 4 5 5 8 7 VE090-3L 1-60 Engine Mechanical Industrial 3.0L Caution: Wear safety glasses in order to avoid eye damage. 7. Use the J 8062 in order to compress the valve spring. 8. Install the valve stem keys. 8.1. Use grease to hold the keys in place while disconnecting the J 8062. 8.2. Make sure that the keys seat properly in the upper groove of the valve stem. 8.3. Tap the end of the valve stem with a plastic-faced hammer in order to seat the keys if necessary. J 8062 VE089-3L Service Prior to Assembly • • • • Dirt or debris will cause premature wear of the rebuilt engine. Clean all components. Refer to Cleanliness and Care. Use the proper tools to measure components when checking for excessive wear. Components that are not within the manufacturers specifications must be repaired or replaced. When components are reinstalled into an engine, return the components to their original location, position and direction. Refer to Separating Parts. During assembly, lubricate all moving parts with clean engine oil or engine assembly lubricant (unless otherwise specified). This will provide initial lubrication when the engine is first started. Refer to Sealers, Adhesives and Lubricants. Crankshaft, Bearings and Bearing Cap Installation Important • Crankshaft bearing caps must be installed to the proper location and direction. • When installing the crankshaft bearings, align the locating tabs on the bearings with the locating notches in the engine block journal bore and the bearing cap. • Always install crankshaft bearings with their machined partner. Do not file bearings or mix bearing halves. 1. Install the crankshaft bearings into the engine block and the crankshaft bearing caps. 2. Coat the crankshaft bearings with clean engine oil. 3. Install the crankshaft. VE046-3L Industrial 3.0L Engine Mechanical 1-61 4. Install the crankshaft bearing caps with the crankshaft bearings. 5. Be sure that the cap directional arrows point toward the front of the engine block and the cap is in its original position. 6. Install the crankshaft bearing cap bolts. 7. Thrust the crankshaft rearward in order to set and align the thrust bearings and the bearing caps. 8. Thrust the crankshaft forward in order to align the rear faces of the rear crankshaft bearings. Tighten Tighten all of the bolts to 88 N•m (65 lb ft). VE045-3L Crankshaft Rear Oil Seal and Housing Installation Tools Required • J 35621 Crankshaft Rear Oil Seal Installer Important: Always use a new crankshaft rear oil seal and new crankshaft rear oil seal housing gasket when you install the crankshaft rear oil seal housing. 1. Install the new gasket and the crankshaft rear oil seal housing on to the studs. 2. Install the rear oil seal housing nuts and bolts. Tighten Tighten the crankshaft rear oil seal housing nuts and bolts to 15 N•m (135 lb in). VE103-3L 3. Coat the new oil seal entirely with clean engine oil. 4. Install the seal onto the J 35621. 5. Install the J 35621 onto the rear of the crankshaft. Tighten the screws snugly in order to ensure that the seal will be installed squarely over the crankshaft. 6. Install the crankshaft rear oil seal onto the crankshaft and into the crankshaft rear oil seal housing. Tighten the wing nut on the J 35621 until the oil seal bottoms. 7. Remove the J 35621 from the crankshaft rear oil seal housing. J 35621 VE104-3L 1-62 Engine Mechanical Industrial 3.0L Piston, Connecting Rod and Bearing Installation FACING FRONT OF ENGINE BLOCK J 5239 VE124-3L Tools Required • J 5239 Guide Set • J 8037 Piston Ring Compressor Important • The piston and cylinder bore have been measured and the bore has been sized for the proper clearance. Install the piston and connecting rod assembly into the proper cylinder bore. • The piston alignment mark MUST face the front of the engine block. 1. Lubricate the following components with clean engine oil: • The piston. • The piston rings. • The cylinder bore. • The bearing surfaces. 2. Install the connecting rod bearing into the connecting rod and bearing cap. 3. Install the J 5239 onto the connecting rod. 4. Install the J 8037 or equivalent onto the piston and compress the piston rings. 5. Install the piston assembly into its matched bore with the stamped arrow facing forward. 6. Use the J 8037 and the J 5239 and lightly tap the top of the piston with a wooden hammer handle. • Hold the J 8037 firmly against the engine block until all of the piston rings enter the cylinder bore. • Use the J 5239 in order to guide the connecting rod onto the crankshaft journal. J 8037 VE105-3L Industrial 3.0L Engine Mechanical 1-63 7. Remove the J 5239. J 5239 VE038-3L 8. Install the connecting rod cap and nuts. Tighten Tighten the nuts evenly to 61 N•m (45 lb ft). VE037-3L 9. When all of the connecting rod bearings are installed, tap each connecting rod assembly lightly parallel to the crankpin in order to make sure that they have clearance. 10. Use a feeler gauge or a dial indicator in order to measure the side clearance between the connecting rod caps. Refer to Engine Mechanical Specifications. VE106-3L 1-64 Engine Mechanical Industrial 3.0L Timing Gear Oil Nozzle Installation 1. Drive the new nozzle in place (oil hole facing up) with a suitable light plastic or rubber hammer. VE127-3L Crankshaft Sprocket Installation Tools Required • J 5590 Crankshaft Sprocket Installer 1. Install the keys into the crankshaft keyways. 2. Use the J 5590 in order to install the crankshaft sprocket. J 5590 VE107-3L Camshaft Installation Important: If camshaft replacement is required, the valve lifters must also be replaced. 1. Carefully rotate and install the camshaft into the engine. 2. Install the two camshaft retainer bolts working through the holes in the camshaft sprocket. Be sure to align the camshaft and the crankshaft sprocket alignment marks. Tighten Tighten the camshaft retainer bolts to 9 N•m (80 lb in). TIMING MARKS SCREW ACCESS HOLES VE108-3L Industrial 3.0L Engine Mechanical 1-65 Engine Front Cover and Oil Seal Installation Tools Required • J 35468 Engine Front Cover Aligner and Oil Seal Installer 1. Use the J 35468 in order to install the engine front cover oil seal. J 35468 VE109-3L 2. Install the engine front cover gasket. 3. Install the engine front cover and bolts. Tighten Tighten engine front cover bolts to 3.4 N•m (30 lb in). VE030-3L 1-66 Engine Mechanical Industrial 3.0L Oil Pump Installation Important: Inspect the oil pump and engine block oil galley passages. These surfaces must be clear and free of debris or restrictions. 1. Install the oil pump. 2. Install the bolts that attach the oil pump to the engine block. Tighten Tighten the oil pump bolts to 14 N•m (120 lb in). VE110-3L Oil Pan Installation VE111-3L Important: Apply the sealer 25 mm (1.0 in) in either direction of the radius cavity of the junctions. 1. Apply a small amount of sealer, GM P/N 1052914 or equivalent, 10 mm (0.393 in) wide and 20 mm (0.787 in) long at the engine front cover to engine block junction. 2. Apply a small amount of sealer, GM P/N 1052914 or equivalent, 25 mm (1.0 in) long at the crankshaft rear oil seal housing to engine block junction. 3. Install the new oil pan gasket. 4. Install the oil pan. 5. Install the nuts and bolts to the oil pan. Tighten Tighten the rear oil pan nuts to 19 N•m (165 lb in). Tighten the oil pan bolts to the crankcase to 9 N•m (80 lb in). Tighten the oil pan bolts to the front cover to 5 N•m (45 lb in). Tighten the oil pan studs to the oil seal retainer to 2 N•m (15 lb in). Industrial 3.0L Engine Mechanical 1-67 Crankshaft Pulley Installation Tools Required • J 8792 Crankshaft Pulley Installer 1. Coat the front cover oil seal contact area of the crankshaft pulley with clean engine oil. 2. Assemble the J 8792 as shown. X8 7 9 2 - 2 DRIVER CLAMP PILOT VE112-3L 3. Install the J 8792 onto the crankshaft pulley. 4. Position the pulley on the crankshaft and drive into position until it bottoms against the crankshaft sprocket. J 8792 VE113-3L Cylinder Head Installation 1. Install the new cylinder head gasket over the locating pins. 2. Install the cylinder head over the locating pins and the gasket. VE114-3L 1-68 Engine Mechanical Industrial 3.0L 3. Install the cylinder head bolts finger tight. Tighten Tighten the cylinder head bolts in sequence to 122 N•m (90 lb ft). 10 9 6 2 3 5 1 4 7 8 GM 4-181 VE115-3L Valve Lifter Installation 1. Coat the bottom of the valve lifters with prelube, GM P/N 1052365 or equivalent. 2. If reusing the valve lifters, install in their original location. 3. Install the valve lifters. VE116-3L Valve Rocker Arm and Pushrod Installation Important: Be sure to keep parts in order. Parts must be installed from where they were removed. 1. Install the valve pushrods. Be sure that the valve pushrods seat in the valve lifter sockets. VE023-3L Industrial 3.0L 2. Install the following components: 2.1. The valve rocker arms (3). 2.2. The valve rocker arm balls (2). 2.3. The valve rocker arm nuts (1). Engine Mechanical 1-69 1 2 3 VE021-3L 3. Adjust the valve rocker arm nuts as follows: 3.1. Turn the crankshaft until the mark on the crankshaft pulley lines up with “0” on the timing tab and number 1 cylinder is at top dead center. 3.2. Place fingers on the number 1 valves as the mark approaches “0.” If the valves move as the mark approaches “0,” the engine is on number 4 top dead center and should be rotated one more revolution in order to reach number 1 top dead center. 3.3. With the engine at number 1 top dead center, adjust the following valves: – The exhaust valves 1,3 – The intake valves 1,2,4 3.4. Adjust the correct valves as follows: 3.4.1. Back off the valve rocker arm nut until the lash is felt in the valve pushrod. 3.4.2. Tighten the valve rocker arm nut until all the lash is removed. 3.4.3. Zero lash can be felt by moving the valve pushrod up and down between your thumb and forefinger until there is no more movement. 3.4.4. When all the free play is gone, tighten the valve rocker arm nut 1 additional turn (360 degrees). VE117-3L 1-70 Engine Mechanical Industrial 3.0L 3.5. 3.6. VE117-3L Turn the crankshaft 1 revolution until the mark on the crankshaft pulley lines up with “0” on the timing tab. This is number 4 top dead center. With the engine at number 4 top dead center, adjust the following valves: – The exhaust valves 2,4 – The intake valves 3 3.6.1. Back off the valve rocker arm nut until the lash is felt in the valve pushrod. 3.6.2. Tighten the valve rocker arm nut until all the lash is removed. 3.6.3. Zero lash can be felt by moving the valve pushrod up and down between your thumb and forefinger until there is no more movement. 3.6.4. When all the free play is gone, tighten the valve rocker arm nut 1 additional turn (360 degrees). Pushrod Cover Installation 1. Install the pushrod cover gasket. 2. Install the pushrod cover. 3. Install the pushrod cover bolts. Tighten Tighten the pushrod bolts to 4.5 N•m (40 lb in). VE118-3L Valve Rocker Arm Cover Installation 1. Install the valve rocker arm cover gasket. 2. Install the valve rocker arm cover. 3. Install the valve rocker arm bolts. Tighten Tighten the valve rocker arm cover bolts to 4.5 N•m (40 lb in). VE119-3L Industrial 3.0L Engine Mechanical 1-71 Oil Level Indicator and Tube Installation 1. Install the oil level indicator tube into the engine block. 2. Use a light plastic or rubber hammer in order to tap the tube until it seats in the engine block. 3. Install the oil level indicator into the tube. VE120-3L Water Pump Installation 1. Position the water pump and gasket to the engine block. 2. Install the water pump bolts. Tighten Tighten the water pump bolts to 20 N•m (15 lb ft). VE017-3L Coolant Inlet and Coolant Thermostat Installation 1. Position the coolant inlet housing (5) and NEW gasket (7) to the engine block. 2. Install the coolant inlet housing bolts (6). Tighten Tighten the coolant inlet housing bolts to 34-40 N•m (25-30 lb ft). 3. Install the coolant thermostat (3) and NEW gasket (4) on the coolant inlet housing. 4. Install the coolant thermostat housing (2). 5. Install the coolant thermostat housing bolts (1). Tighten Tighten the coolant thermostat housing bolts to 24-31 N•m (18-23 lb ft). 1 2 3 4 7 5 6 Fr o nt 79362005 1-72 Engine Mechanical Industrial 3.0L Intake/Exhaust Manifold Installation 1. Install the intake/exhaust manifold gasket over the locating pins on the cylinder head. 2. Install the bolts and clamps while holding the manifold in place. Tighten Tighten the two center bolts to 27-34 N•m (20-25 lb ft). Tighten the end bolts to 20-27 N•m (15-20 lb ft). VE014-3L Spark Plug Installation 1. Install the spark plugs. Tighten Tighten the spark plugs to 30 N•m (22 lb ft). VE013-3L Lift Bracket Installation 1. Install the lift bracket. 2. Install the lift bracket bolts. Tighten Tighten the lift bracket bolts to 54 N•m (40 lb ft). VE012-3L Industrial 3.0L Engine Mechanical 1-73 Ignition Coil Installation 1. Install the ignition coil. 2. Install the ignition coil bracket attaching bolts. Tighten Tighten the attaching bolts to 22 N•m (16 lb ft). VE011-3L Distributor Installation Important: To ensure correct ignition timing, the distributor must be installed in the correct position. Position the engine at top dead center on number one cylinder. The distributor cap must be removed in order to position the rotor when installing the distributor. 1. Install the distributor (2) and new gasket (3), making sure the distributor rotor is pointing to number one tower on the distributor cap. 2. Install the distributor hold down (5) and bolt (6). Tighten Tighten the hold down bolt to 27 N•m (20 lb ft). 3. Connect the primary ignition harness (4) to the ignition coil. 4. Connect the secondary ignition wires (1) to the spark plugs and the ignition coil. 1 2 6 5 4 3 VE010-3L 1-74 Engine Mechanical Industrial 3.0L Engine Flywheel Installation Important: Note the position and direction of the engine flywheel before removal. The flywheel center alignment hole is a tapered fit to the crankshaft. The engine flywheel must be reinstalled to the original position and direction. The engine flywheel will not initially seat against the crankshaft flange, but will be pulled onto the crankshaft by the engine flywheel bolts. 1. Install the engine flywheel. 2. Install the engine flywheel bolts. Tighten Tighten the flywheel bolts to 88 N•m (65 lb ft). VE009-3L Engine Block Coolant Plug/Oil Filter Installation 1. Install the left rear engine block coolant plug. VE008-3L 2. Install the right rear engine block coolant plug. VE007-3L Industrial 3.0L Engine Mechanical 1-75 3. Install the oil filter. VE006-3L 4. Install the oil pan drain plug. Tighten Tighten the oil pan drain plug to 25 N•m (18 lb ft). VE005-3L 1-76 Engine Mechanical Industrial 3.0L Description and Operation Engine Component Description Engine Block The engine block has four cylinders arranged in an “in-line” construction. Starting at the front of the engine, the cylinders are numbered 1-2-3-4. The firing order of the cylinders is 1-3-4-2. The cylinders are encircled by coolant jackets. Cylinder Head The cylinder head has one intake and one exhaust valve per cylinder. A spark plug is located between the valves in the side of the cylinder head. The valve guides are integral and the valve rocker arms are retained on individual threaded studs. Crankshaft The crankshaft is cast nodular iron and is supported by five crankshaft bearings. The bearings are retained by crankshaft bearing caps that are machined with the engine block for proper alignment and clearences. Camshaft A billet steel one piece camshaft is supported by three full round, sleeve-type bearings. These bearings are a press fit into the engine block. The camshaft timing gear is mounted to the front of the camshaft and is driven the crankshaft timing gear. Pistons and Connecting Rods The pistons are made of cast-aluminum alloy using two compression rings and one oil control ring assembly. The piston pins are a press fit in the connecting rods and a floating fit in the pistons. Valve Train The valve train is a ball-pivot type. Motion is transmitted from the crankshaft through the valve lifter and valve pushrod to the valve rocker arm. The valve rocker arm pivots on its ball and transmits the camshaft motion to the valve. The valve lifters keep all parts of the valve train in constant contact. Each lifter acts as an automatic adjuster and maintains zero lash in the valve train. This eliminates the need for periodic valve adjustment. Industrial 3.0L Engine Mechanical 1-77 Lubrication The oil pump is gear driven from the camshaft. Oil is drawn from the oil pan through a pickup screen and tube. The gear type oil pump has a pressure regulator valve which controls the lubrication system pressure by bypassing excess oil back to the oil pan sump. Pressurized oil from the oil pump flows to the full flow filter. A bypass valve allows oil to bypass the filter if it becomes clogged or restricted. Oil then flows into an oil passage that runs along the right side of the block and intersects the lifter bosses. Oil from this passage is routed to the crankshaft main bearings and camshaft bearings through smaller drilled passages. Oil is supplied to the connecting rod bearings by holes drilled in the crankshaft. Oil is supplied to the rocker arms through holes in the hydraulic lifters which feed oil up the pushrods to the rocker arms. The oil is metered by discs under the pushrod seat. Many internal engine parts have no direct oil feed and are supplied by either gravity or splash from other direct feed components. Timing gears are lubricated by oil supplied through a passage from the front of the camshaft to a calibrated nozzle above the crankshaft gear. Caution: Wear safety glasses in order to avoid eye damage. 1. Determine the size, pitch and depth of the damaged thread. If necessary, adjust the stop collars on the cutting tool and tap to the required depth. 2. Drill out the damaged thread. Clean out any chips. 3. Avoid any buildup of chips. Back out the tap every few turns and remove the chips. 4. Tap the hole. Lubricate the tap with light engine oil. Clean the thread. Thread Repair Tools Required General purpose thread repair kits. These kits are available commercially VE122-3L 5.Thread the insert onto the mandrel of the installer. Engage the tang of the insert onto the end of the mandrel. Important: The insert should be flush to one turn below the surface. 6. Lubricate the insert with light engine oil (except when installing in aluminum) and install the insert. 7. If the tang of the insert does not break off when backing out the installer, break the tang off with a drift. VE121-3L 1-78 Engine Mechanical Cleanliness and Care • Throughout this section, it should be understood that proper cleaning and protection of machined surfaces and friction areas is part of the repair procedure. This is considered standard shop practice even if not specifically stated. • When any internal engine parts are serviced, care and cleanliness is important. • When components are removed for service, they should be marked, organized or retained in a specific order for reassembly. Refer to Separating Parts. • At the time of installation, components should be installed in the same location and with the same mating surface as when removed. • An engine is a combination of many machined, honed, polished and lapped surfaces with tolerances that are measured in millimeters or thousandths of an inch. These surfaces should be covered or protected to avoid component damage. • A liberal coating of clean engine oil should be applied to friction areas during assembly. • Proper lubrication will protect and lubricate friction surfaces during initial operation. Replacing Engine Gaskets 1. Gasket reuse and applying sealants: • Do not reuse any gasket unless specified. • Gaskets that can be reused will be identified in the service procedure. • Do not apply sealant to any gasket or sealing surface unless specified in the service procedure. 2. Separating components: • Use a rubber mallet to separate components. • Bump the part sideways to loosen the components. • Bumping should be done at bends or reinforced areas to prevent distortion of the parts. 3. Cleaning gasket surfaces: • Remove all gasket and sealing material from the part using a plastic or wood scraper (if required). • Care must taken to avoid gouging or scraping the aluminum sealing surfaces. • Do not use any other method or technique to remove sealant or gasket material from a part. • Do not use abrasive pads, sand paper or power tools to clean gasket surfaces. – These methods of cleaning can cause damage to the component sealing surfaces. Industrial 3.0L – Abrasive pads also produce a fine grit that the oil filter cannot remove from the oil. – This grit is abrasive and has been known to cause internal engine damage. 4. Assembling components: • When assembling components, use only the sealant specified or equivalent in the service procedure. • Sealing surfaces should be clean and free of debris or oil. • Specific components such as crankshaft oil seals or valve stem oil seals may require lubrication during assembly. • Components requiring lubrication will be identified in the service procedure. • When applying sealant to a component, apply the amount specified in the service procedure. • Do not allow the sealant to enter into any blind threaded holes, as it may prevent the bolt from clamping properly or cause component damage when tightened. • Tighten bolts to specifications. Do not overtighten. Use of RTV and Anaerobic Sealer Important: Three types of sealer are commonly used in engines. These are RTV sealer, anaerobic gasket eliminator sealer and pipe joint compound. The correct sealer and amount must be used in the proper location to prevent oil leaks. DO NOT interchange the three types of sealers. Use only the specific sealer or the equivalent as recommended in the service procedure. Pipe Joint Compound • Pipe joint compound is a pliable sealer that does not completely harden. This type sealer is used where two nonrigid parts (such as the oil pan and the engine block) are assembled together. • Do not use pipe joint compound in areas where extreme temperatures are expected. These areas include: exhaust manifolds, head gasket or other surfaces where gasket eliminator is specified. • Follow all safety recommendations and directions that are on the container. • To remove the sealant or the gasket material, Refer to Replacing Engine Gaskets. • Apply a continuous bead of pipe joint compound to one sealing surface. Sealing surfaces to be resealed must be clean and dry. • Tighten the bolts to specifications. Do not overtighten. Industrial 3.0L RTV Sealer • Room Temperature Vulcanizing (RTV) sealant hardens when exposed to air. This type sealer is used where two nonrigid parts (such as the oil pan and the engine block) are assembled together. • Do not use RTV sealant in areas where extreme temperatures are expected. These areas include: exhaust manifolds, head gasket or other surfaces where gasket eliminator is specified. • Follow all safety recommendations and directions that are on the container. • To remove the sealant or the gasket material, Refer to Replacing Engine Gaskets. • Apply RTV to a clean surface. Use a bead size as specified in the service procedure. Run the bead to the inside of any bolt holes. Do not allow the sealer to enter any blind threaded holes, as it may prevent the bolt from clamping properly or cause damage when the bolt is tightened. • Assemble components while RTV is still wet (within three minutes). Do not wait for RTV to skin over. • Tighten the bolts to specifications. Do not overtighten. Anaerobic Sealer • Anaerobic gasket eliminator hardens in the absence of air. This type sealer is used where two rigid parts (such as castings) are assembled and no sealer or gasket is readily noticeable, the parts were probably assembled using a gasket eliminator. • Follow all safety recommendations and directions that are on the container. • To remove the sealant or the gasket material, Refer to Replacing Engine Gaskets. • Apply a continuous bead of gasket eliminator to one flange. Surfaces to be resealed must be clean and dry. • Spread the sealer evenly with your finger to get a uniform coating on the sealing surface. Do not allow the sealer to enter any blind threaded holes, as it may prevent the bolt from clamping properly or cause damage when the bolt is tightened. • Tighten the bolts to specifications. Do not overtighten. • After properly tightening the fasteners, remove the excess sealer from the outside of the joint. Engine Mechanical 1-79 Separating Parts Important: Many internal engine components will develop specific wear patterns on their friction surfaces. When assembling the engine, internal components MUST be separated, marked or organized in a way to ensure reinstallation to original location and position. Mark or identify the following components: • Piston and the piston pin. • Piston assembly to the specific cylinder bore. • Piston rings to the specific piston assembly and cylinder bore. • Connecting rod to the crankshaft journal. • Connecting rod to bearing cap. • Crankshaft main and connecting rod bearings. • Camshaft and valve lifters. • Valve lifters, guides, pushrods, pivot supports and rocker arms. • Valve to the valve guide. • Valve spring and shim . • Engine block main bearing cap location and direction. • Oil pump drive and driven gears. Tools and Equipment Special tools are listed and illustrated throughout this section with a complete listing at the end of the section. These tools (or their equivalents) are specially designed to quickly and safely accomplish the operations for which they are intended. The use of these special tools will also minimize possible damage to engine components. Some precision measuring tools are required for inspection of certain critical components. Torque wrenches and a torque angle meter are necessary for the proper tightening of various fasteners. To properly service the engine assembly, the following items should be readily available: • Approved eye protection and safety gloves. • A clean, well-lit work area. • A suitable parts cleaning tank. • A compressed air supply. • Trays or storage containers to keep parts and fasteners organized. • An adequate set of hand tools. • Approved engine repair stand. • An approved engine lifting device that will adequately support the weight of the components. 1-80 Engine Mechanical Industrial 3.0L Special Tools and Equipment J 791 Camshaft Sprocket Remover J 5590 Crankshaft Sprocket Installer J 3049-A Valve Lifter Remover J 5715 or J 6036 Rocker Stud Hole Reamer J 3936-03 Piston Ring Groove Cleaner J 5802-01 Rocker Arm Stud Remover J 4822 Valve Guide Reamer J 6098-01 Camshaft Bearing Remover/Installer J 5239 Connecting Rod Bolt Guide Set J 6585 Slide Hammer Industrial 3.0L Engine Mechanical 1-81 J 6880 Rocker Arm Stud Remover J 8062 Valve Spring Compressor J 6978-E Crankshaft Sprocket Puller J 8087 Cylinder Bore Gauge J 7872 Magnetic Base Dial Indicator J 8089 Carbon Remover Brush J 8001 Dial Indicator 90 0 10 20 80 30 70 60 J 8037 Piston Ring Compressor J 8520 Camshaft Lobe Lift Indicator 40 50 J 8792 Crankshaft Pulley Installer 1-82 Engine Mechanical Industrial 3.0L J 9290-01 Valve Lifter Remover (Slide Hammer Type) J 24086-C Piston Pin Remover/Installer Set J 9534 Distributor Lower Bushing Remover J 24270 Ridge Reamer J 9535 Distributor Lower Bushing Installer J 24420-C Universal Crankshaft Pulley Remover J 9666 Valve Spring Tester J 35468 Engine Front Cover Aligner and Oil Seal Installer J 21882 Oil Suction Pipe Installer J 35621 Crankshaft Rear Oil Seal Installer Industrial 3.0L Engine Cooling 2-1 Section 2 Engine Cooling Fastener Notice ...................................................... 2-2 Specifications ......................................................... 2-3 Fastener Tightening Specifications ........................... 2-3 Engine Cooling System Specifications ..................... 2-3 Diagnostic Information and Procedures .............. 2-4 Engine Overheating .................................................. 2-4 Loss of Coolant ........................................................ 2-5 Thermostat Diagnosis .............................................. 2-5 Engine Fails To Reach Normal Operating Temp ....... 2-6 Coolant Concentration Testing ................................. 2-7 Cooling System Leak Testing ................................... 2-8 Repair Instructions ................................................. 2-9 Draining and Filling Cooling System ........................ 2-9 Cooling System Flushing.......................................... 2-9 Cooling System Scale Removal ............................... 2-9 Radiator Hose Replacement .................................. 2-10 Drive Belt Replacement .......................................... 2-11 Cooling Fan Replacement ...................................... Fan Shroud Replacement ...................................... Fan Guard Replacement ........................................ Coolant Thermostat Replacement .......................... Coolant Thermostat Housing Replacement ........... Coolant Inlet Housing Replacement ....................... Water Pump Replacement ..................................... Drain Cock Replacement ....................................... Radiator Replacement ........................................... Description and Operation .................................. Cooling System Description ................................... Radiator Assembly Description .............................. Pressure Cap Description ...................................... Water Pump Description ........................................ Thermostat Description .......................................... Special Tools and Equipment .............................. 2-11 2-12 2-13 2-13 2-14 2-15 2-16 2-17 2-17 2-18 2-18 2-18 2-19 2-20 2-20 2-20 2-2 Engine Cooling Industrial 3.0L Fastener Notice NOTICE: Always use the correct fastener in the proper location. When you replace a fastener, use ONLY the exact part number of that application. UNLESS OTHERWISE SPECIFIED, Do Not use supplemental coatings (paints, greases or other corrosion inhibitors) on threaded fasteners or fastener joint interfaces. Generally, such coating adversely affect the fastener torque and the joint clamping force, and may damage the fastener. When you install fasteners, use the correct tightening sequence and specifications. Following these instructions can help you avoid damage to parts and systems. Industrial 3.0L Engine Cooling 2-3 Engine Cooling - 3.0L Specifications Fastener Tightening Specifications Application Coolant Temperature Sensor Coolant Inlet Housing Bolts Coolant Thermostat Housing Bolts Drain Cock to Radiator Fan Blade to Water Pump Bolts Fan Guard Mounting Bolts Fan Shroud Mounting Bolts Radiator Hose Clamps Radiator Mounting Bracket Bolts Water Pump to Block Bolts N•m 9 34-40 24-31 18 15-18 16-20 16-20 2.5 25 20 lb ft lb in 80 25-30 18-23 13 10-13 12-15 12-15 22 18 15 Engine Cooling System Specifications Application 3.0 L (w/o radiator) 3.0 L (w/radiator) Metric 3.78 liters 11.34 liters English 4 quarts 12 quarts 2-4 Engine Cooling Industrial 3.0L q¯¤ O _¢¯¨¬« t ©°¤F®G a§¤¢&>¯§¤>¢¬¬© «¯>©¤±¤©L g®>¯§¤>¢¬¬© «¯>©¤±¤©>©¬²] Å _££>¢¬¬© «¯>¯¬>¯§¤>®´®¯¤ª b¬¤®>¯§¤>¤«¦¨«¤>®¯¨©©>¬±¤@§¤ ¯] Å n@¤®®°@¤>¯¤®¯>¯§¤>®´®¯¤ª> «£>¢§¤¢&>¥¬@>±¨®° ©>©¤ &®L _@¤>¯§¤@¤> «´>¤³¯¤@« ©>©¤ &®>¨«>¯§¤>®´®¯¤ª] Å a§¤¢&>¯§¤>¢¬«£¨¯¨¬«>¬¥>¯§¤>£@¨±¤>¡¤©¯L g®>¯§¤>£@¨±¤>¡¤©¯>©¬¬®¤>¬@>°«®¤@±¨¢¤ ¡©¤] Å S a§¤¢&>¯§¤>§¬®¤®L f ±¤>¯§¤>§¬®¤®>¢¬©© ®¤£] Å T p¤© ¢¤>¯§¤>§¬®¤®L>p¤¥¤@>¯¬>p £¨ ¯¬@>f¬®¤>p¤© ¢¤ª¤«¯L b¬¤®>¯§¤>¤«¦¨«¤>®¯¨©©>¬±¤@§¤ ¯] Å U a§¤¢&>¯§¤>¯¤ª¤@ ¯°@¤>©¤±¤©>¬¥>¯§¤>¯§¤@ª¬®¯ ¯L g®>¯§¤>¯¤ª¤@ ¯°@¤>©¤±¤©>§¨¦§] p¤© ¢¤>¯§¤>¯§¤@ª¬®¯ ¯L>p¤¥¤@>¯¬>r§¤@ª¬®¯ ¯ p¤© ¢¤ª¤«¯L>>b¬¤®>¯§¤>¤«¦¨«¤>®¯¨©©>¬±¤@§¤ ¯] Å a§¤¢&>¯§¤>@ £¨ ¯¬@L g®>¯§¤>@ £¨ ¯¬@>¢©¬¦¦¤£] Å a§¤¢&>¯§¤>¤«¦¨«¤>¡©¬¢&L g®>¯§¤>¤«¦¨«¤>¡©¬¢&>¢©¬¦¦¤£] Å a§¤¢&>¥¬@>¡°¡¡©¤®>¨«>¯§¤>¢¬¬© «¯L _@¤>¯§¤@¤>¡°¡¡©¤®>¨«>¯§¤>¢¬¬© «¯] n¤@¥¬@ª> >a¬ª@¤®®¨¬«>r¤®¯L>>p¤¥¤@>¯¬>c«¦¨«¤>k¤¢§ «¨¢ © u¤@¤>@¤®°©¯®>miL Å a§¤¢&>¯§¤>² ¯¤@>°ªL b¬¤®>¢¬¬© «¯>¥©¬²] Å p¤© ¢¤>¯§¤>² ¯¤@>°ªL>p¤¥¤@>¯¬>u ¯¤@>n°ª p¤© ¢¤ª¤«¯L b¬¤®>¯§¤>¤«¦¨«¤>®¯¨©©>¬±¤@§¤ ¯] Å a§¤¢&>¯§¤>@ £¨ ¯¬@>¥ «L g®>¯§¤>@ £¨ ¯¬@>¥ «>¬¤@ ¯¨«¦>«¬@ª ©©´] Å a§¤¢&>¥¬@> «´>¬¥>¯§¤>¥¬©©¬²¨«¦>¢¬«£¨¯¨¬«®>¯§ ¯>ª ´ ¢¬«¯@¨¡°¯¤>¯¬>¯§¤>¤«¦¨«¤>¬±¤@§¤ ¯¨«¦X _«>¬±¤@©¬ £¤£>¢¬«£¨¯¨¬« c³¢¤®®>¤«¦¨«¤>¬¨© `©¬¢&¤£> ¨@>¥©¬²>¯§@¬°¦§>¯§¤>@ £¨ ¯¬@ c³¯@¤ª¤> ¨@>¯¤ª¤@ ¯°@¤® b¬¤®>¯§¤>¤«¦¨«¤>®¯¨©©>¬±¤@§¤ ¯] Å p¤© ¢¤>¯§¤>@ £¨ ¯¬@>¥ «L>p¤¥¤@>¯¬>a¬¬©¨«¦>d « p¤© ¢¤ª¤«¯L b¬¤®>¯§¤>¤«¦¨«¤>®¯¨©©>¬±¤@§¤ ¯] Å P Q R V W ON OO OP OQ OR OS OT OU w¤® l¬ e¬>¯¬>q¯¤>P e¬>¯¬>q¯¤>Q e¬>¯¬>q¯¤>Q q´®¯¤ª>mi e¬>¯¬>j¬®®>¬¥ a¬¬© «¯L e¬>¯¬>q¯¤>R _£J°®¯>¬@>@¤© ¢¤ ¯§¤>£@¨±¤>¡¤©¯L e¬>¯¬>q¯¤>S e¬>¯¬>q¯¤>T e¬>¯¬>q¯¤>U e¬>¯¬>q¯¤>U q´®¯¤ª>mi e¬>¯¬>q¯¤>V e¬>¯¬>q¯¤>W e¬>¯¬>q¯¤>W e¬>¯¬>a¬¬©¨«¦ q´®¯¤ª>d©°®§¨«¦ q´®¯¤ª>mi e¬>¯¬>q¯¤>ON e¬>¯¬>a¬¬©¨«¦ q´®¯¤ª>d©°®§¨«¦ e¬>¯¬>q¯¤>OO e¬>¯¬>q¯¤>OP e¬>¯¬>q¯¤>OQ e¬>¯¬>q¯¤>OQ e¬>¯¬>c«¦¨«¤ k¤¢§ «¨¢ © e¬>¯¬>q¯¤>OS e¬>¯¬>q¯¤>OR e¬>¯¬>q¯¤>OS q´®¯¤ª>mi e¬>¯¬>q¯¤>OT e¬>¯¬>q¯¤>OU Å Å Å q´®¯¤ª>mi Å q´®¯¤ª>mi . Industrial 3.0L Engine Cooling 2-5 Loss of Coolant q¯¤ O P Q R S T U V W ON OO OP OQ _¢¯¨¬« t ©°¤F®G n@¤®®°@¤>¯¤®¯>¯§¤>¢¬¬©¨«¦>®´®¯¤ª> «£>±¨®° ©©´>¢§¤¢&>¯§¤ ®´®¯¤ª>>¥¬@> >¢¬¬© «¯>©¬®®L>>a§¤¢&>¯§¤>¦@¬°«£>°«£¤@>¯§¤ ¤Z°¨ª¤«¯L g®>¯§¤@¤>¢¬¬© «¯>¬«>¯§¤>¦@¬°«£] Å a§¤¢&>¯§¤>@ £¨ ¯¬@>¥¬@>®¯ ¨«®> «£>²¤¯«¤®®L g®>¯§¤>@ £¨ ¯¬@>²¤¯>¬@>®¯ ¨«¤£] Å p¤ ¨@>¬@>@¤© ¢¤>¯§¤>@ £¨ ¯¬@> ®>«¤¢¤®® @´L>s®¤> «´>¬¥>¯§¤ ¥¬©©¬²¨«¦>@¬¢¤£°@¤®L>p¤¥¤@>¯¬>p £¨ ¯¬.>p¤© ¢¤ª¤«¯L g®>¯§¤@¤>®¯¨©©> >©¬®®>¬¥>¢¬¬© «¯] Å a§¤¢&>¯§¤>§¬®¤®>¥¬@>®¯ ¨«®>¬@>²¤¯«¤®®L _@¤>¯§¤>§¬®¤®>®¯ ¨«¤£>¬@>²¤¯] Å p¤ ¨@>¬@>@¤© ¢¤>¯§¤>§¬®¤®> ®>«¤¢¤®® @´L>p¤¥¤@>¯¬ p £¨ ¯¬.>f¬®¤>p¤© ¢¤ª¤«¯L g®>¯§¤@¤>®¯¨©©> >©¬®®>¬¥>¢¬¬© «¯] Å a§¤¢&>¯§¤>² ¯¤@>°ª>¥¬@>®¯ ¨«®>¬@>²¤¯«¤®®L g®>¯§¤>² ¯¤@>°ª>®¯ ¨«¤£>¬@>²¤¯] Å p¤ ¨@>¬@>@¤© ¢¤>¯§¤>² ¯¤@>°ªL>s®¤> «´>¬¥>¯§¤>¥¬©©¬²¨«¦ @¬¢¤£°@¤®X>p¤¥¤@>¯¬>u ¯¤.>n°ª>p¤© ¢¤ª¤«¯L g®>¯§¤@¤>®¯¨©©> >©¬®®>¬¥>¢¬¬© «¯] Å a§¤¢&>¯§¤>¢¬¬© «¯>@¤¢¬±¤@´>@¤®¤@±¬¨@J>¨¥>¤Z°¨¤£L b¬¤®>¯§¤>¢¬¬© «¯>¬±¤@¥©¬²> ¥¯¤@>´¬°>®¯¬>¯§¤>¤«¦¨«¤] Å a§¤¢&>¯§¤>@ £¨ ¯¬@>¢ >¥¬@>@¤®®°@¤>@¤¯¤«¯¨¬«L g®>¯§¤>@ £¨ ¯¬@>¢ >@¤¯ ¨«¨«¦>¯§¤>@¬¤@>@¤®®°@¤] w¤® l¬ Å e¬>¯¬>q¯¤>P e¬>¯¬>q¯¤>Q e¬>¯¬>q¯¤>R e¬>¯¬>q¯¤>R q´®¯¤ª>mi e¬>¯¬>q¯¤>S e¬>¯¬>q¯¤>T e¬>¯¬>q¯¤>T q´®¯¤ª>mi e¬>¯¬>q¯¤>U e¬>¯¬>q¯¤>V e¬>¯¬>q¯¤>V q´®¯¤ª>mi Å e¬>¯¬>q¯¤>W RV>&n FU>®¨G a§¤¢&>¯§¤>¯¤ª¤@ ¯°@¤>@¤ £¨«¦L g®>¯§¤>¯¤ª¤@ ¯°@¤>¯¬¬>§¨¦§] Å p¤© ¢¤>¯§¤>@ £¨ ¯¬@>¢ L>p¤¥¤@>¯¬>n.¤®®°.¤>a b¤®¢.¨¯¨¬«L g®>¯§¤@¤>®¯¨©©> >©¬®®>¬¥>¢¬¬© «¯] Å a§¤¢&>¯§¤>¢¬¬© «¯>¦@ ±¨¯´>¥¬@>¦©´¢¬©>¢¬«¢¤«¯@ ¯¨¬«L>p¤¥¤@>¯¬ a¬¬© «¯>a¬«¢¤«¯. ¯¨¬«>r¤®¯¨«¦L g®>¯§¤>¦©´¢¬©>¢¬«¢¤«¯@ ¯¨¬«>¯¬¬>©¬²] Å p¤© ¢¤>¯§¤>¦©´¢¬©L>r§¤>@¤¢¬ªª¤«£¤£>¤¯§´©¤«¤>¦©´¢¬©>ª¨³ SPMRV>¨®>«¬@ª ©>°>¯¬> >ª ³¨ª°ª>¬¥>TNC>¦©´¢¬©J>RNC ² ¯¤@L g®>¯§¤@¤>®¯¨©©> >©¬®®>¬¥>¢¬¬© «¯] Å e¬>¯¬>q¯¤>ON e¬>¯¬>q¯¤>OO e¬>¯¬>c«¦¨«¤ m±¤.§¤ ¯¨«¦L e¬>¯¬>q¯¤>OP e¬>¯¬>q¯¤>OP q´®¯¤ª>mi e¬>¯¬>q¯¤>OQ q´®¯¤ª>mi Å q´®¯¤ª>mi Thermostat Diagnosis Use the following procedure to check for engine overheating, boiling or poor engine cooling: Hang the thermostat on a hook in order to perform an operational check of the thermostat. Hang the thermostat in a 33 percent glycol solution at 12C (10F) below the temperature indicated on the valve. The valve will close when you submerge the valve and agitate the coolant. Use the following procedure to check for engine overheating, boiling or poor engine cooling: 1. Relieve the pressure and carefully remove the radiator cap. 2. Rub a 96.6C (206F) temperature stick on the thermostat housing. 3. Warm up the engine at a fast idle. Watch for coolant flow before the mark begins to melt. If the coolant does not flow, install a new thermostat. Recheck the system in order to ensure the system is operating properly. If there is coolant flow, the problem is caused by something other than a faulty thermostat. 2-6 Engine Cooling Industrial 3.0L Thermostat Diagnosis (Cont’d) Use the following procedure in order to check for a cold engine, slow warm–up or the engine does not reach normal operating temperature of 86.6C (188F) to 96.6C (206F): 1. Relieve the pressure and carefully remove the radiator cap. 2. Rub a 86.6C (188F) temperature stick on the thermostat housing. 3. Warm up the engine at a fast idle. Watch for coolant flow before the mark begins to melt. If the coolant flows, before the mark begins to melt, install a new thermostat. Recheck the system in order to ensure the system is operating properly. If there is coolant flow after the mark begins to melt, the problem is caused by something other than a faulty thermostat. A temperature stick is a pencil like device that has a wax material containing certain chemicals. These chemicals melt at a certain temperature. Use a temperature stick in order to determine a thermostat’s operating temperature by rubbing the 86.6°C (188°F) and the 96.6°C (206°F) sticks on the thermostat housing. The marks made by the sticks should melt when the coolant temperatures of 86.6°C (188°F) to 96.6°C (206°F) are reached. These temperatures are the normal operating range of the thermostat. If the coolant flows as indicated in the preceeding procedures, the thermostat is considered to be operating properly. Engine Fails to Reach Normal Operating Temperature q¯¤ _¢¯¨¬« t ©°¤F®G w¤® l¬ bcdglgrgmlX>r§¤>¤«¦¨«¤>¥ ¨©®>¯¬>@¤ ¢§>¯§¤>«¬@ª ©>¬¤@ ¯¨«¦>¯¤ª¤@ ¯°@¤>¬¥>VTLTa>FOVVdG>¯¬>WTLTa>FPNTdGL O a§¤¢&>¯§¤>¯§¤@ª¬®¯ ¯L g®>¯§¤>¯§¤@ª¬®¯ ¯>®¯°¢&>¬¤«>¬@>² ®>¯§¤>²@¬«¦>¯´¤>¬¥ ¯§¤@ª¬®¯ ¯>@¤±¨¬°®©´>¨«®¯ ©©¤£] Å P p¤© ¢¤>¯§¤>¯§¤@ª¬®¯ ¯L g®>¯§¤>@¬¡©¤ª>¢¬@@¤¢¯¤£] Å Å e¬>¯¬>q¯¤>P Å q´®¯¤ª>mi Industrial 3.0L Engine Cooling 2-7 Coolant Concentration Testing Hydrometer Due to changes in commercially available antifreeze, the use of a hydrometer may give an incorrect reading. The hydrometer should be used to test an ethylene glycol–based antifreeze only. Ethylene glycol–based antifreeze is recommended for year round use. Coolant Tester Use the coolant testers J 26568 with the Centigrade scale or J 23688 with the Fahrenheit scale in order to check the antifreeze protection of the coolant. Make sure that the hydrometer markings are correct. Unless J 26568 or J 23688 has a provision for temperature correction, test the temperature at which the coolant testers are calibrated. If the coolant is warmer or colder, the reading may be incorrect. Follow the manufacturer’s directions in order to use the J 26568 or the J 23688. Clean the coolant tester before each use with the following procedure: 1. Swing back the plastic cover at the slanted end of the tester in order to expose the measuring window and the bottom of the plastic cover. 13709 2. Insert the tip into the radiator filler neck. Insert the tip below the level of the coolant. 3. Press and release the bulb in order to draw a sample. 4. Bend the plastic tube around and insert the tip into the cover plate opening. 5. Press the bulb and inject a few drops of the coolant into the measuring surface. Do not open the plastic cover when you take the readings because water evaporation may change the reading. Reading the Tester 13712 2. Wipe the coolant tester dry with a tissue or a clean soft cloth. 3. Close the plastic cover. Testing Do not remove the clear plastic pump from the tester. Use the following procedure to test the coolant: 1. Release the tip of the pump from the tester housing. 13713 Point the tester toward any light source and look into the eyepiece. The antifreeze protection reading is at the point where the dividing line between the light and the dark edge of the shadow crosses the scale. The antifreeze protection is the right scale and the battery charge is on the left. 2-8 Engine Cooling The tester temperature scale is reversed from the standard thermometer scale in that below zero readings are on the upper half of the scale. Readings on the lower half of the scale, which are the above zero readings, indicate solutions without enough antifreeze concentration to provide adequate rust protection. Industrial 3.0L On–Equipment Pressure Testing Tools Required J 24460–01 Radiator Pressure Tester Tilt the tester toward the light source in order to obtain the best results. If the edge of the shadow is not defined, the measuring surfaces are not clean or dry. Wipe the tester dry and retest the coolant. Cooling System Leak Testing Notice: Pressure above 139 kPa (20psi) should not be used when pressure testing the cooling system. Pressures over 138 kPa (20) psi will damage the radiator. Some core leaks are detected by adding water to the radiator. Clean the core using the following procedure so that the damaged area can be found: 1. Remove the dirt and the insects from the fins with a common water hose that does not have a nozzle. Excessive water pressure could damage the fins. 2. Scrub the core with a soft–bristle brush using clean hot water or hot water with a mild detergent. 11658 Pressure–test the radiator with the J 24460–01. While the system is at a cool temperature, remove the radiator cap. Connect the gauge and apply the normal system operating pressure. Do not exceed 138 kPa (20 psi). Watch the gauge needle for an indication of a leak. Examine the radiator and other cooling system parts for escaping coolant. Repair the hose and the hose connections as required. Check the radiator cap in order to ensure that the cap will maintain the correct pressure. If the radiator leaks during the pressure test, mark the leak area. Industrial 3.0L Repair Instructions Draining and Filling Cooling System Draining Procedure Caution: The radiator cap should be removed from a cool engine only. If the radiator cap is removed from a hot cooling system, serious personal injury may result. Caution: As long as there is pressure in the cooling system, the temperature can be considerably higher than the boiling temperature of the solution in the radiator, without causing the solution to boil. Removal of the radiator cap while the engine is hot and the pressure is high will cause the solution to boil instantaneously and possibly with explosive force, spewing the solution over the engine, body, and person removing the cap. Under some conditions, the engine coolant is combustible. Use the following procedure in order to drain the cooling system: 1. Place a drain pan under the radiator drain cock. 2. Install a tube on the drain cock. 3. Place the end of the tube in the drain pan. 4. Ensure the cooling system is cool. Remove the radiator cap. 5. Open the drain cock completely. 6. Allow the cooling system to drain until the flow stops. 7. Place a drain pan under the engine. 8. Remove the drain plug from the engine block. 9. Allow the engine block to drain until the flow stops. There may be some more drainage from the radiator at this time. 10. Replace the engine block drain plug. 11. Close the radiator drain cock. Refilling Procedure Use the following procedure in order to refill the cooling system: 1. Check the radiator drain cock in order to ensure that the drain cock is closed. 2. Check the engine drain plug in order to ensure that the drain plug is closed. 3. Place a large funnel in the radiator fill hole. 4. Fill the system with ethylene glycol based coolant to the radiator. Do not pre–mix the coolant and water. Fill the remainder of the radiator with clean drinkable water in order to equal a 52/48 mix. Refer to Engine Cooling System Specifications for the cooling system capacity. The filling may be slowed due to the thermostat being closed. 5. Fill the cooling system to 13 mm (1/2 in) below the fill line. Engine Cooling 2-9 6. Start the engine and allow the cooling system to warm up. When the thermostat opens, the coolant level may drop. If the level drops, add coolant until the level is up to the top. 7. Replace the radiator cap. 8. Check the coolant level in the radiator surge tank, if equipped. Add coolant as needed. Flushing Notice: If the engine is damaged internally and a new engine assembly is installed, make sure all foreign material is completely flushed out of the cooling system. The oil cooler system should also be flushed out. Failure to rid the oil or cooling system of debris can result in damage to the replacement engine. Important: Remove the thermostat before you flush the cooling system. Various methods and equipment can be used in order to flush the cooling system. If you use special equipment such as a back flusher, follow the equipment manufacturer’s instructions. Cooling System Scale Removal In order to remove hardened scale, a direct chemical action is necessary. Add a flushing compound in a dissolved solution at the specified rate of 30 grams per liter (4 oz. per gallon) of radiator capacity to the coolant water. Do this while the water is running. Operate the engine for 15 minutes. Then, drain and flush the system with clean water. There are various types of flushing compounds available commercially. Obtain the compounds from a reliable source. Most compounds attack metals and should not remain in the engine block for more than a few minutes. Use a neutralizer in the cooling system immediately after you use a descaling solvent. Use a stronger solution for extremely hard, stubborn coatings, such as lime scale. The corrosive action of a stronger solution affects the thin metals of the radiator, which reduces the operating life of the radiator. A complete flush and rinse of the radiator is mandatory and must be accomplished skillfully. Drain the entire system after the solvent and neutralizer are used and the cooling system is flushed. Fill the system with a 48/52 mixture of distilled water and an ethylene glycol– based coolant. Check for coolant leaks in the radiator, the hose and the engine. 2-10 Engine Cooling Industrial 3.0L Radiator Hose Replacement Removal Procedure 1. Drain the coolant from the radiator so that the level of the coolant is below the hose that is being removed. 2. Remove the radiator hose clamps. 3. Remove the upper radiator hose from the radiator and the coolant thermostat housing. 4. Remove the lower radiator hose from the radiator and the water pump. 79362008 Installation Procedure 1. Install the lower radiator hose to the radiator and to the water pump. 2. Install the upper radiator hose to the radiator and the coolant thermostat housing. Notice: Refer to Fastener Notice. 3. Install the radiator hose clamps. Tighten Tighten the radiator hose clamps to 2.5 N•m (22 lb in). 4. Add the coolant to the proper level. Refer to Draining and Filling Cooling System. 5. Start the engine and check for leaks. 79362009 Industrial 3.0L Engine Cooling 2-11 Drive Belt Replacement Removal Procedure 1. Remove the fan guard. Refer to Fan Guard Replacement. 2. Loosen the generator mounting bolts. 3. Move the generator inward to loosen the tension on the drive belt. 4. Slide the belt off of the pulleys and over the fan blades. 5. Inspect the drive belt for: Cracks Glazing Tears or cuts Hardening Excessive wear 79362001 Installation Procedure Tools Required: 6” Steel Rule 1. Slide the belt over the fan blades and route it over the pulleys. 2. Move the generator outward until the fan belt measures approximately 1/2-inch (13 mm) deflection. Notice: Refer to Fastener Notice. 3. While maintaining tension on the drive belt, tighten the generator mounting bolts. Tighten Tighten the lower generator mounting bolt to 50 N•m (37 lb ft). Tighten the upper generator mounting bolt to 25 N•m (18 lb ft). 4. Verify that the belt tension is correct with the ruler. 5. Install the fan guard. Refer to Fan Guard Replacement. 79362001 Cooling Fan Replacement Removal Procedure 1. Remove the fan guard. Refer to Fan Guard Replacement. 2. Remove the fan blade mounting bolts and washers. 3. Remove the fan, pulley and spacer, if equipped. 79362002 2-12 Engine Cooling Industrial 3.0L Installation Procedure 1. Position fan, pulley, and spacer, if equipped, onto the water pump shaft. Notice: Refer to Fastener Notice. 2. Install the fan blade mounting bolts and washers. Tighten Tighten the lower generator mounting bolt to 30 N•m (22 lb ft). 3. Install the fan guard. Refer to Fan Guard Replacement. 79362002 Fan Shroud Replacement Removal Procedure 1. Remove the fan guard. Refer to Fan Guard Replacement. 2. Disconnect the radiator overflow hose clamps from the fan shroud. 3. Remove the fan shroud mounting bolts and washers. 4. Remove the radiator upper support brackets at the radiator. 5. Tilt the radiator forward and remove the fan shroud. 79362003 Installation Procedure 1. Tilt the radiator forward and position the fan shroud over the cooling fan blades. Notice: Refer to Fastener Notice. 2. Install the fan shroud mounting bolts and washers. Tighten Tighten the fan shroud mounting bolts to 16-20 N•m (12-15 lb ft). Notice: Refer to Fastener Notice. 79362003 3. Install the radiator upper support brackets to the radiator. Tighten Tighten the radiator upper support bracket mounting bolts to 16-25 N•m (18 lb ft). 4. Install the fan guard. Refer to Fan Guard Replacement. 5. Connect the radiator overflow hose clamps to the fan shroud. Industrial 3.0L Engine Cooling 2-13 Fan Guard Replacement Removal Procedure 1. Disconnect the upper radiator hose from the radiator. Refer to Radiator Hose Replacement. 2. Remove the fan guard mounting bolts and washers. 3. Remove the fan guard. 79362004 Installation Procedure 1. Position the fan guard over the cooling fan blades. Notice: Refer to Fastener Notice. 2. Install the fan guard mounting bolts and washers. Tighten Tighten the fan guard mounting bolts to 16-20 N•m (12-15 lb ft). 3. Connect the upper radiator hose to the radiator. Refer to Radiator Hose Replacement. 4. Fill the cooling system. Refer to Draining and Filling Cooling System. 79362004 Coolant Thermostat Replacement Removal Procedure 1. Drain the cooling system. Refer to Draining and Filling Cooling System. 2. Remove the upper radiator hose from the thermostat housing. Refer to Radiator Hose Replacement. 3. Remove the two thermostat housing bolts (1). 4. Remove the coolant thermostat housing (2). 5. Remove the coolant thermostat (3) and gasket (4). 6. Discard the coolant thermostat gasket (4). 79362005 2-14 Engine Cooling Industrial 3.0L Installation Procedure 1. Install the coolant thermostat (3), coolant thermostat housing (2), and a new gasket (4) onto the coolant inlet housing (5). Notice: Refer to Fastener Notice. 2. Install the two coolant thermostat housing bolts (1). Tighten Tighten the thermostat housing bolts to 24-31 N•m (18-23 lb ft). 3. Connect the upper radiator hose to the coolant thermostat housing (2). Refer to Radiator Hose Replacement. 4. Fill the cooling system. Refer to Draining and Filling Cooling System. 79362005 Coolant Thermostat Housing Replacement Removal Procedure 1. Drain the cooling system. Refer to Draining and Filling Cooling System. 2. Remove the upper radiator hose from the thermostat housing. Refer to Radiator Hose Replacement. 3. Remove the two thermostat housing bolts (1). 4. Remove the coolant thermostat housing (2). 5. Remove the coolant thermostat (3) and gasket (4). 6. Discard the coolant thermostat gasket (4). 79362005 Installation Procedure 1. Install the coolant thermostat (3), coolant thermostat housing (2), and a new gasket (4) onto the coolant inlet housing (5). Notice: Refer to Fastener Notice. 2. Install the two coolant thermostat housing bolts (1). Tighten Tighten the thermostat housing bolts to 24-31 N•m (18-23 lb ft). 3. Connect the upper radiator hose to the coolant thermostat housing (2). Refer to Radiator Hose Replacement. 4. Fill the cooling system. Refer to Draining and Filling Cooling System. 5. Start the engine and check for leaks. 79362005 Industrial 3.0L Engine Cooling 2-15 Coolant Inlet Housing Replacement Removal Procedure 1. Drain the cooling system. Refer to Draining and Filling Cooling System. 2. Remove the upper radiator hose from the thermostat housing. Refer to Radiator Hose Replacement. 3. Remove the two thermostat housing bolts (1). 4. Remove the coolant thermostat housing (2). 5. Remove the coolant thermostat (3) and gasket (4). 6. Discard the coolant thermostat gasket (4). 7. Remove the coolant inlet housing mounting bolts (6). 8. Remove the coolant inlet housing (5) and gasket (7). 9. Discard the coolant inlet housing gasket (7). 79362005 Installation Procedure 1. Install coolant inlet housing (5) and a new gasket (7) to the cylinder head. Notice: Refer to Fastener Notice. 2. Install the two coolant inlet housing bolts (6). Tighten Tighten the coolant inlet housing bolts to 34-40 N•m (25-03 lb ft). 3. Install the coolant thermostat (3), coolant thermostat housing (2), and a new gasket (4) onto the coolant inlet housing (5). Notice: Refer to Fastener Notice. 4. Install the two coolant thermostat housing bolts (1). Tighten Tighten the thermostat housing bolts to 24-31 N•m (18-23 lb ft). 5. Connect the upper radiator hose to the coolant thermostat housing (2). Refer to Radiator Hose Replacement. 6. Fill the cooling system. Refer to Draining and Filling Cooling System. 7. Start the engine and Check for leaks. 79362005 2-16 Engine Cooling Industrial 3.0L Water Pump Replacement Removal Procedure VE017-3L 1. Drain the cooling system. Refer to Draining and Filling Cooling System. 2. Remove the lower radiator hose from the water pump. Refer to Radiator Hose Replacement. 3. Remove the fan guard. Refer to Fan Guard Replacement. 4. Remove the drive belt. Refer to Drive Belt Replacement. 5. Remove the fan and fan pulley. Refer to Cooling Fan Replacement. 6. Remove the water pump bolts. 7. Remove the water pump and gasket. 8. Discard the water pump gasket. 9. Inspect the water pump for the following: Gasket sealing surfaces for excessive scratches or gouges. Excessive side-to-side play in the pulley shaft. Leakage at the water inlet housing or rear cover gaskets areas. Leakage at the water pump vent hole. A stain around the vent hole is acceptable. If leakage occurs at the vent hole with the engine running and the cooling system pressurized, replace the pump. Installation Procedure 1. Position the water pump and a new gasket to the engine block. 2. Install the water pump bolts. Tighten Tighten the water pump bolts to 20 N•m (15 lb ft). 3. Install the coolant fan and fan pulley. Refer to Cooling Fan Replacement. 4. Install and adjust the drive belt. Refer to Drive Belt Replacement. 5. Install the fan guard. Refer to Fan Guard Replacement. 6. Install the lower radiator hose to the water pump. Refer to Radiator Hose Replacement. 7. Fill the cooling system. Refer to Draining and Filling Cooling System. VE017-3L Industrial 3.0L Engine Cooling 2-17 Drain Cock Replacement Removal Procedure 1. Drain the cooling system. Refer to Draining and Filling Cooling System. 2. Remove the drain cock from the left-hand side of the radiator lower tank. Installation Procedure Notice: Refer to Fastener Notice. 1. Install the drain cock to the radiator. Tighten Tighten the drain cock to 18 N•m (13 lb ft). 2. Fill the cooling system. Refer to Draining and Filling Cooling System. 3. Start the engine and check for leaks. 79362010 Radiator Replacement Removal Procedure 1. Drain the cooling system. Refer to Draining and Filling Cooling System. 2. Disconnect the radiator hoses from the radiator. Refer to Radiator Hose Replacement. 3. Remove the fan guard. Refer to Fan Guard Replacement. 4. Remove the upper radiator bracket and mounting bolts. 5. Remove the lower radiator mounting bolts. 6. Remove the radiator. 7. Remove the fan shroud. Refer to Fan Shroud Replacement. Installation Procedure 1. Install the fan shroud. Refer to Fan Shroud Replacement. 2. Position the radiator on the equipment. Notice: Refer to Fastener Notice. 79362006 3. Install the lower radiator mounting bolts finger tight. 4. Install the radiator upper brackets and mounting bolts. Tighten Tighten all radiator mounting bolts to 25 N•m (18 lb ft). 5. Install the fan guard. Refer to Fan Guard Replacement. 6. Connect the radiator hoses to the radiator. Refer to Radiator Hose Replacement. 7. Fill the cooling system. Refer to Draining and Filling Cooling System. 8. Start the engine and check for leaks. 79362006 2-18 Engine Cooling Industrial 3.0L Description and Operation Cooling System Description Cooling System This equipment has a pressure-type engine cooling system. The system has thermostatic control of the coolant circulation. The cooling system is sealed by a pressure type radiator cap. The cap causes the system to operate at a pressure higher than atmospheric pressure. The high-pressure operation raises the boiling point of the coolant, which increases the cooling efficiency of the radiator. The 104 kPa (15 psi) pressure cap raises the boiling point of the coolant to about 125°C (257°F) at sea level. Engine Coolant Always fill the system with ethylene glycol based coolant to the radiator. Do not pre–mix the coolant and water. Fill the remainder of the radiator with clean drinkable water in order to equal a 52/48 mix. Refer to the mixture chart on the container for additional antifreeze protection information. DO NOT use alcohol or methanol based antifreeze, or mix them with the specified coolant. Notice: Antifreeze can be added to raise the boiling point of the coolant, but too much will affect the freezing point. Do not use a solution stronger than 60 percent glycol, 40 percent water as the freeze level rises rapidly after this point. Pure antifreeze will freeze at *22C (*8F). * Approximate values. Uncommon Cooling System Problems The following problems do not require disassembly of the cooling system: Large obstructions block the radiator. Ice, mud or snow obstructs the radiator The engine oil is overfilled. Incorrect ignition timing The following problems do require disassembly of the cooling system: An incorrect or damaged fan Incorrect radiator for the application Incorrect or faulty radiator pressure cap Check the specifications for the correct part numbers. Pressure check the cooling system while the pressure cap is installed. This shows if the pressure cap leaks due to radiator filler neck damage. Worn or damaged water pump - The impeller vanes are eroded or broken. - The bearing or the seal is worn or damaged. Check the shaft for bearing play. Plugged radiator tubes. Perform a flow check. Internal system leaks. - The cylinder head gasket - The cracked block - The timing chain cover - The intake manifold gasket Plugged coolant passages in the cylinder heads. Do a visual check. Radiator Assembly Description The radiator assembly is a downflow tube type utilizing an aluminum core with brass upper and lower tanks. It is fitted with a shroud designed to assist the cooling fan in directing airflow through the radiator cores and also serves as a fan guard. An additional fan guard is also installed to protect personnel from injury. Pressure is maintained in the system by a pressure cap. The pressure cap has two valves: one which relieves pressure, and the other to compensate for coolant contraction when the engine is off. The radiator cap on this system has a 48kPa (7 psi) rating. Radiator Maintenance Radiators need special attention to prevent leakage and airflow restrictions. Check the outside of the radiator for bent fins or leakage. Leaking radiator cores should be repaired immediately, not just sealed temporarily with a sealer-type antifreeze or coolant additive. Remove the radiator cap and look for plugging and scale on the inside of the tank. A badly plugged radiator may have to be replaced. If scale is found, remove it. Refer to Cooling System Scale Removal. Industrial 3.0L Engine Cooling 2-19 Pressure Cap Description Radiator Cap 107487 Caution: As long as there is pressure in the cooling system, the temperature can be considerably higher than the boiling temperature of the solution in the radiator, without causing the solution to boil. Removal of the radiator cap while the engine is hot and the pressure is high will cause the solution to boil instantaneously and possibly with explosive force, spewing the solution over the engine, the equipment, and person removing the cap. The pressure–vent radiator cap allows a buildup of 48 kPa (7 psi) in the cooling system. Do not remove the radiator cap to check the engine coolant level until the engine is cool. Add coolant to the radiator only after the system cools. The radiator cap contains a blow–off or pressure valve. The cap also contains a vacuum or atmospheric valve. The pressure valve is held against its seat by a spring of predetermined strength. This valve protects the radiator by relieving internal pressure when the internal pressure exceeds the cooling system design limits. The vacuum valve is held against its cap seat by a light spring. The spring permits the valve to open in order to relieve vacuum created in the system when the system cools. The radiator cap is designed to discourage inadvertent removal. In order to safely remove the cap from the radiator, rotate the cap slowly in a counterclockwise direction to the detent. Do not press down. Allow any pressure to release from the radiator. Press down on the cap. Continue to rotate the cap counterclockwise and lift the cap off the radiator. A gasket is under the diaphragm spring at the top of the cap. Embossed on the cap is a caution against opening the cap. Arrows indicating the proper closed position are also embossed on the cap. Radiator Cap Inspection Check the seal of the filler cap and the operation of the pressure valve with a conventional cooling system testing kit. 1375 2-20 Engine Cooling Water Pump Description The die–cast pump is a centrifugal vane impeller type. The impeller turns on a steel shaft that rotates in a permanently lubricated ball bearing. The pump inlet connects to the bottom of the radiator by a rubber hose. Coolant passes from the pump through the coolant passages in the block and cylinder head. This is done in order to absorb and carry away excess engine heat. Thermostat Description A pellet–type thermostat in the coolant outlet passage controls the flow of the engine coolant. This allows proper engine warm–up and regulates coolant temperature. A wax pellet element in the thermostat expands when heated and contracts when cooled. The pellet connects through a piston to a valve. When the pellet heats, the valve opens. As the pellet cools, the contraction allows a spring to close the valve. The valve remains closed while the coolant is cold. This prevents circulation of coolant through the radiator. When the engine warms and the thermostat valve opens, coolant flows through the radiator. In the radiator, heat is exchanged through the radiator into the surrounding air. This opening and closing of the thermostat permits enough coolant to enter the radiator in order to keep the engine within operating limits. Industrial 3.0L Special Tools and Equipment Illustration Tool Number/Description J 223688 Coolant Tester Fahrenheit Scale 1409 J 24460-01 Radiator Pressure Tester 1405 Industrial 3.0L Engine Electrical 3-1 Section 3 Engine Electrical Fastener Notice ........................................................ 3-2 Engine Electrical - 3.0L .......................................... 3-3 Specifications ......................................................... 3-3 Fastener Tightening Specifications ........................... 3-3 Battery Usage ........................................................... 3-3 Starter Motor Usage ................................................. 3-4 Starter Specifications................................................ 3-4 Starter Motors and Solenoid Switches ...................... 3-4 Generator Usage ...................................................... 3-4 Spark Plug Usage ..................................................... 3-4 Schematic and Routing Diagrams ......................... 3-5 Lincoln Electric - Gasoline Only ................................ 3-5 Tennant - Gasoline Only (Model 550) ....................... 3-6 Tennant - LPG Only (Model 550) .............................. 3-7 Genie S125 - Dual Fuel ............................................ 3-8 Genie S80/S85 - Dual Fuel ....................................... 3-9 Shuttle-Lift - Dual Fuel ............................................ 3-10 3.0L Generator Set Engine ..................................... 3-11 Zenith TBI Wood Chipper ........................................ 3-12 Broderson E784-83S - Dual Fuel ............................ 3-13 Landoll E784-86S - LPG Only ................................ 3-14 Component Locator ............................................. 3-15 Engine Electrical Components ................................ 3-15 Engine Electrical Component Locator Views .......... 3-15 Diagnostic Information and Procedures ............. 3-16 Charging System Check ......................................... 3-16 Starting System Check ........................................... 3-16 Battery Common Causes of Failure ........................ 3-17 Battery Cautions ..................................................... 3-17 Important Battery Diagnosis Information ................ 3-17 Battery Check ......................................................... 3-18 Battery Terminal Check ........................................... 3-19 Battery Not Operating Properly ............................... 3-20 Battery Electrical Drain/Parasitic Load .................... 3-24 Current Drain Test ................................................... 3-24 Battery Hydrometer Displays Dark or Yellow Dot .... 3-24 Battery is Undercharged or Overcharged ............... 3-24 Engine Cranks/Cranks Slowly but Does Not Start .. 3-27 Generator Noise Test .............................................. 3-28 Generator Not Operating Properly .......................... 3-28 Generator Assembly Bench Check ......................... 3-31 Starter Motor Noise Diagnosis ................................ 3-31 High-Pitched Whine During Cranking ..................... 3-29 High-Pitched Whine after the Engine Fires ............. 3-29 Loud Whoop Sound after the Engine Fires ............. 3-30 Rumble Growl or Knock .......................................... 3-30 Starter No Load Test ............................................... 3-30 Starter Solenoid Does Not Click ............................. 3-31 Starter Solenoid Clicks, Engine Does Not Crank or Cranks Slowly ................................................... 3-34 Voltmeter Gauge Displaying Higher or Lower Than Normal Voltage ................................................. 3-36 Voltmeter Gauge Inaccurate or Inoperative ............. Engine Cranks, But Fails to Start ............................ Ignition Coil not Operating Properly ........................ Spark Plug Wires Not Operating Properly ............... Spark Plug Wire Resistance Test ............................ Spark Plug Wire Routing ........................................ Testing Pick-up Coil ................................................ Repair Instructions ............................................... Battery Cable Replacement .................................... Battery Charging .................................................... Charging Procedure ............................................... Charging Time Required ......................................... Battery Charge Low or Completely Discharged ...... Battery Replacement .............................................. Jump Starting in Case of Emergency ..................... Jump Starting Procedure ........................................ Starter Motor Inspection ......................................... Cleaning Procedure ................................................ Component Electrical Testing ................................. Armature Bearing Replacement ............................. Starter Motor Replacement .................................... Generator Replacement ......................................... Ignition System Service Precautions ...................... Distributor Replacement ......................................... Ignition Coil Replacement ....................................... Distributor Module Replacement ............................. Pick-up Coil Replacement ...................................... Setting Ignition Timing ............................................ PSI Fuel Injected and Dual Fuel Engines .......... Zenith Z.E.E.M.S. Throttle Body Fuel Injected Engines .......................................................... Generator Timing ............................................... Description and Operation ................................... Starting System Description ................................... Cranking Circuit ...................................................... Starter Motor .......................................................... Starting System Circuit Description ........................ Batteries ................................................................. Built-In Hydrometer - If Equipped ...................... Charging System Description ................................. SI Series Generators .............................................. Voltage Regulator ................................................... Charging System Circuit Description ...................... Ignition System Description .................................... Ignition Switch ........................................................ Ignition Coil ............................................................. Distributor ............................................................... Spark Plugs ............................................................ Secondary Wiring ................................................... Special Tools and Equipment .............................. 3-37 3-38 3-41 3-41 3-41 3-41 3-43 3-44 3-44 3-45 3-45 3-46 3-47 3-47 3-48 3-48 3-49 3-49 3-49 3-49 3-50 3-51 3-52 3-52 3-54 3-55 3-56 3-58 3-58 3-58 3-58 3-59 3-59 3-59 3-59 3-59 3-60 3-60 3-61 3-61 3-62 3-62 3-63 3-63 3-63 3-63 3-64 3-64 3-65 3-2 Engine Electrical Industrial 3.0L Fastener Notice NOTICE: Always use the correct fastener in the proper location. When you replace a fastener, use ONLY the exact part number of that application. UNLESS OTHERWISE SPECIFIED, Do Not use supplemental coatings (paints, greases or other corrosion inhibitors) on threaded fasteners or fastener joint interfaces. Generally, such coating adversely affect the fastener torque and the joint clamping force, and may damage the fastener. When you install fasteners, use the correct tightening sequence and specifications. Following these instructions can help you avoid damage to parts and systems. Industrial 3.0L Engine Electrical 3-3 Engine Electrical - 3.0L Specifications Fastener Tightening Specifications Specification Application Battery Case Retainer Nut or Bolt Battery Case Top Bar Nut Battery Side Terminal Bolts Battery Top Terminal Nuts Coil Bracket Attaching Bolts Distributor Hold Down Bolt Generator Output (Battery) Terminal Nut Bottom Generator to Mounting Bracket Bolt Top Generator to Bracket Mounting Bolt Rear Starter Bracket Mounting Bolt Rear Starter Bracket Mounting Nuts Spark Plugs Solenoid (Starter Motor) Positive (+) Battery Cable Terminal Nut Starter Motor Mounting Bolts Starter Motor S terminal Nut Starter Shield Stud (If Used) Metric English 18 N•m 10 N•m 12 N•m 18 N•m 22 N•m 27 N•m 8 N•m 50 N•m 50 N•m 50 N•m 9 N•m 30 N•m 16 N•m 50 N•m 9 N•m 35 N•m 13 lb ft 89 lb in 106 lb in 13 lb ft 16 lb ft 20 lb ft 71 lb in 37 lb ft 37 lb ft 37 lb ft 80 lb in 22 lb ft 12 lb ft 37 lb ft 80 lb in 26 lb ft Battery Usage Cold Cranking Amperes Rating 690 Reserve Capacity 115 Load Test Amperes 340 3-4 Engine Electrical Industrial 3.0L Starter Motor Usage Starter Specifications Engine Application Part Number Series Load Test @10 Volts AMPS 3.0L 900885 or 900895 Minimum 65 PG-260L RPM Maximum 95 Minimum 2825 Maximum 3275 Starter Motors and Solenoid Switches No Load Test @11.5 Volts (Includes Solenoid Current) Amperes 900885 Minimum Maximum Minimum or 900895 35 85 2550 Use GM P/N 1960954 Grease Lubricant or the equivalent. 10456454 Winding Amperes Volts Both 30-50 11.5 12 Hold–In 5-15 11.5 Part Number Starter Solenoid Volts RPM Maximum 4150 Ohms 0.17-0.19 0.76-0.81 Generator Usage Engine Application Generator Series Rated Output (Amperes) Rotor Field Resistance (Ohms at 80F) 3.0L 7SI 70 2.1-2.4 Rotation Viewing Drive End CW Load Test (Amps) 91 Spark Plug Usage Engine Application 3.0L Industrial Spark Plug Type AC Delco R45TS Spark Plug Gap Metric English 1 mm .040 in Industrial 3.0L Engine Electrical 3-5 79363001 3-6 Engine Electrical Industrial 3.0L 79363002 Industrial 3.0L Engine Electrical 3-7 79363003 3-8 Engine Electrical Industrial 3.0L 79363004 Industrial 3.0L Engine Electrical 3-9 79363005 3-10 Engine Electrical Industrial 3.0L 79363006 Industrial 3.0L Engine Electrical 3-11 79363007 3-12 Engine Electrical Industrial 3.0L 79363008 Industrial 3.0L Engine Electrical 3-13 79363009 3-14 Engine Electrical Industrial 3.0L 79363010 Industrial 3.0L Engine Electrical 3-15 Component Locator Engine Electrical Components Name Location Battery Determined by customer usage and application Generator Ignition Switch Instrument Panel Starter Motor Starter Solenoid At the RH front of the engine Locator View — Wiring Diagram N/A Engine Electrical Component Views Pages 3-5 through Engine Electrical Component Views Pages 3-5 through Engine Electrical Component Views Pages 3-5 through At the lower RH side of the engine Engine Electrical Component Views N/A On the starter at the lower RH side of the engine Engine Electrical Component Views Pages 3-5 through Mounted to the instrument panel Determined by customer usage and application 3-10 3-10 3-10 3-10 Engine Electrical Component Locator Views 79363011 79363012 79363013 3-16 Engine Electrical Industrial 3.0L Diagnostic Information and Procedures Charging System Check Step Action Normal Result(s) Abnormal Result* / Action 1 Check the generator pulley drive belt tension. The drive belt is correctly tensioned. Refer to Drive Belt Tensioner Diagnosis in Engine Mechanical 2 Visually inspect the battery for physical damage. The battery case is not cracked or broken. Battery damaged. Replace Battery 3 Inspect the battery terminal connections. The battery terminals are clean and tight. 4 Visually inspect the built–in battery hydrometer (if equipped). The battery hydrometer displays a green dot (if equipped). Refer to Fastener Tightening Specifications; Clean or Replace Battery Cable Battery Hydrometer Displays Dark or Yellow Dot (if equipped) 5 Inspect the generator output terminal for a loose connection. The generator output terminal is clean and tight. Refer to Fastener Tightening Specifications 6 Inspect the generator connector for looseness or damaged terminals. Generator connector terminals are not loose or damaged. Connector Repairs 7 Battery Not Operating Properly The battery passes the load test. Replace Battery 8 Generator Not Operating Properly Refer to Generator Replacement 9 Start the engine and allow it to idle. The generator passes the electrical test. The volts gauge in the instrument cluster is in the normal range. The volts gauge in the instrument cluster is in the normal range. 10 *Voltmeter Displaying High or Low *Voltmeter Displaying High or Low Increase the engine speed to 2500 RPM. *Refer to the appropriate symptom diagnostic table for the applicable abnormal result. Starting System Check Step Action Normal Result(s) 1 1. Disengage any power transmission component, if applicable. 2. Turn the ignition switch to RUN, leaving the engine off. The voltmeter shows approximately 12 V. Charging System Check 2 Turn the ignition switch to START. The engine cranks normally and the starter does not make unusual noises. Starter Solenoid Does Not Click Starter Solenoid Clicks, Engine Does Not Crank Starter Motor Noise Diagnosis *Refer to the appropriate symptom diagnostic table for the applicable abnormal result. Abnormal Result(s)* Industrial 3.0L Engine Electrical 3-17 Battery Common Causes of Failure The battery may be damaged. - Cracked case - Corroded battery cable terminals - Loose battery cable connections - Loose battery hold–down - There may be a mechanical problem. - Loose or slipping drive belt - Structural failure of aftermarket mounting brackets - Misaligned pulleys There may be an electrical drain caused by a parasitic load. The electrical load may be greater than the output of the generator. There may be an electrical problem in the charging system. - Poor ground circuits - Electrical shorts - Faulty generator Battery Cautions Caution: Batteries produce explosive gases. Batteries contain corrosive acid. Batteries supply levels of electrical current high enough to cause burns. Therefore, in order to reduce the risk of personal injury while working near a battery, observe the following guidelines: Always shield your eyes. Avoid leaning over the battery whenever possible. Do not expose the battery to open flames or sparks. Do not allow battery acid to contact the eyes or the skin. - Flush any contacted areas with water immediately and thoroughly. - Get medical help. Important Battery Diagnosis Information PSI does not supply batteries to equipment manufacturers. However, on the following pages, you will find some generic methods used to diagnosis common battery problems. You may need to contact the equipment manufacturer for specific procedures for the battery you are working with. 3-18 Engine Electrical Industrial 3.0L Battery Check Step 1 2 3 Action Normal Result(s) Inspect the following areas for battery acid: The battery case The battery tray The area around and underneath the battery tray 2. Inspect the battery for a cracked, broken, or damaged case. Compare the Cold Cranking Amperage (CCA) and the Reserve Capacity (RC) of the battery or the Equipment Manufacturer' s specification Inspect the battery hydrometer for a green dot (if equipped). The battery case, the battery tray, and the surrounding area are dry. The battery is not cracked, broken, or damaged. Replace battery. The ratings of the vehicle battery meet or exceed the CCA and the RC of the original equipment specification. Replace battery. 1. 4 Turn the ignition key to START and check to see if the engine cranks normally and starts. 5 1. Inspect the battery for proper installation and retention in the battery tray. 2. Inspect the battery terminals for clean and tight connections. Abnormal Result(s)* The battery hydrometer displays a green dot. If the battery hydrometer has a dark dot (no green dot visible), test the condition of the battery. Refer to Battery Not Operating Properly. If the battery hydrometer has a yellow dot, check the battery for low electrolyte. Refer to Battery Hydrometer Displays Dark or Yellow Dot. The engine cranks normally and starts. Engine does not crank or cranks slowly, refer to Battery Not Operating Properly. Engine cranks normally but does not start, refer to Engine Cranks But Does Not Run in Engine Controls. Engine starts but does not start overnight or after a couple of days, refer to Charging System Check and Battery Electrical Drain/Parasitic Load. The battery is firmly held in place in the tray and the hold– down bolt is properly tightened. The battery terminals are clean and tight. *Refer to the appropriate symptom diagnostic table for the applicable abnormal result. Install the battery in the battery tray correctly. Refer to Battery Terminal Check. Industrial 3.0L Engine Electrical 3-19 Battery Terminal Check Step Action Value(s) Yes No Go to Step 2 Go to Step 3 Go to Step 4 Go to Step 3 Caution: Refer to Battery Cautions on page 3-15. 1 2 3 1. Turn the ignition key to the OFF position. 2. Attempt to rotate the negative (-) battery cable connector clockwise with light finger pressure. Does the negative (-) connector rotate? Use a torque wrench in order to verify the torque to loosen the negative (-) battery terminal bolt. Is the torque above the specified value? Disconnect the negative (-) battery cable. Is the cable disconnected? — 10 N•m (84 lb in) — Ensure the negative (-) battery cable is disconnected. Inspect for the following conditions and repair as needed: The cable bolt is too long or misformed at the end. There is foreign material present inside the nut in the battery terminal. Damage to the battery terminal face or cable connector ring. Is the repair complete? — 5 Rotate the positive (+) battery cable connector clockwise with light finger pressure. Does the positive (+) connector rotate? — 6 Use a torque wrench in order to verify the torque to loosen the positive (+) battery terminal bolt. Is the torque above the specified value? 10 N•m (84 lb in) — Disconnect the positive (+) battery cable. Is the cable disconnected? — 4 — Go to Step 5 — Go to Step 5 7 8 9 Go to Step 6 Go to Step 7 Go to Step 8 Go to Step 7 — Go to Step 9 1. Ensure the positive (+) battery cable is disconnected. 2. Inspect for the following conditions and repair as needed: The cable bolt is too long or misformed at the end. There is foreign material present inside the nut in the battery terminal. Damage to the battery terminal face or cable connector ring. Is the repair complete? — 1. Clean and wire brush the lead face of both battery terminals and the metal contact rings in both cable connectors. 2. Remove the bolts from the cable connectors in order to provide access to the connector rings as needed. 3. If either the battery terminals or the cable rings are excessively damaged or corroded, replace as needed. Are the metal connecting parts clean and in good condition? — — Go to Step 9 — Go to Step 10 3-20 Engine Electrical Industrial 3.0L Battery Terminal Check (cont’d) q¯¤ _¢¯¨¬« t ©°¤F®G ON OL a¬««¤¢¯>¯§¤>¬®¨¯¨±¤>FIG>¡ ¯¯¤5´>¢ ¡©¤>¯¬>¯§¤>¡ ¯¯¤5´ ¬®¨¯¨±¤>FIG>¯¤5ª¨« ©L PL r¨¦§¯¤«>¯§¤>¢ ¡©¤>¡¬©¯>¯¬>¯§¤>®¤¢¨¥¨¤£>± ©°¤L g®>¯§¤>¢ ¡©¤>¡¬©¯>5¬¤5©´>¯¨¦§¯¤«¤£] OP>lĪ FONT>©¡>¨«G OL a¬««¤¢¯>¯§¤>«¤¦ ¯¨±¤>FG>¡ ¯¯¤5´>¢ ¡©¤>¯¬>¯§¤>¡ ¯¯¤5´ «¤¦ ¯¨±¤>FKG>¯¤5ª¨« ©L PL r¨¦§¯¤«>¯§¤>¢ ¡©¤>¡¬©¯>¯¬>¯§¤>®¤¢¨¥¨¤£>± ©°¤L g®>¯§¤>¢ ¡©¤>¡¬©¯>5¬¤5©´>¯¨¦§¯¤«¤£] OP>lĪ FONT>©¡>¨«G OO w¤® l¬ Å e¬>¯¬>q¯¤>OO Å ` ¯¯¤5´>r¤5ª¨« ©® mi Battery Not Operating Properly Notice: Always turn the ignition switch OFF when connecting or disconnecting batteries, battery chargers, or jumper cables. Failure to do so may damage the electronic control unit or other electrical components. On side post batteries, use the approved terminal adapters. Do not use any common bolts or a combination of bolts, nut, and washers as adapters when testing the battery. Important: The battery test using the J 42000 Battery Tester requires correct connections to the battery terminals. A failure to obtain the correct connections during the test may result in replacing the battery unnecessarily. Adhere to the following instructions in order to avoid an incorrect diagnosis due to poor connections: Use the test adapters that are provided with the J 42000 tester or GM part number 12303040 terminal adapters. If the adapters that are provided with the J 42000 tester require replacement, only use adapters with the GM part number 12303040. Any other adapters may not contact the correct areas of the battery terminal, causing resistance that may result in an invalid battery test result. In order to test the top terminal, threaded stud batteries outside of the equipment, use GM part number 12303040 adapters. Do not connect the tester to the plain threaded terminals. When testing the equipment with the battery cables still connected, rock the J 42000 clips back and forth on the terminal bolt in order to cut through any coating or oxidation that may be present on the bolt. Even new bolts contain a protective coating that may insulate or cause a resistance in the test circuit. If it is uncertain that correct connections can be made to the battery terminal bolts in the equipment, perform the following steps: 1. Disconnect the battery cables. 2. Install the test adapters on the terminals. 3. Follow the instructions for testing the battery outside of the equipment. If a REPLACE BATTERY result is obtained for a battery tested in the equipment with the battery cables connected, perform the following steps: 1. Disconnect the battery cables. 2. Install the approved battery terminal adapters. 3. Follow the instructions for testing the battery outside of the equipment. 4. Replace the battery only if the second test shows a REPLACE BATTERY result. For warranty purposes, use the test code from the second test. Important: For warranty purposes, always place the test code displayed by the tester on the repair order. The number is a unique identifier that describes the test data for a particular battery at a particular time. While the test code may occasionally repeat when retesting the same battery, it is more likely that a different code will result each time the battery is tested. Industrial 3.0L Engine Electrical 3-21 Battery Not Operating Properly Step Action Tools Required J 42000 Battery Tester J 39200 Digital Multimeter (DMM) P/N 12303040 Battery Terminal Adapters (Side Post Batteries Only) 1 Has the Battery Check been performed? 2 3 4 5 6 7 8 Value(s) Yes No Go to Step 2 Go to Battery Check. Go to Step 4 Go to Step 3 — Is the battery in the vehicle, with the battery cables connected? — 1. Lightly wire brush the lead faces of both battery terminals. 2. Install the terminal adapters to both of the battery terminals. Refer to P/N 12303040. Are the battery terminal adapters installed? — Ensure that the battery terminals are clean, tight, and in good condition Are the terminal connections OK? — 1. Turn the ignition switch to the OFF position. 2. Turn the electrical loads and all accessory lights to the OFF position. Are all of the electrical loads and accessory lights OFF? — Important: When testing the battery on the equipment, connect the tester directly to the cable bolts. Do not connect either of the tester clamps to a remote terminal, such as a junction block or a jump start terminal. The use of a remote terminal will cause invalid test results. 1. Connect the red clamp on the J 42000 to the adapter or the cable bolt on the battery positive (+) terminal. 2. Connect the black clamp on the tester to the adapter or cable bolt on the battery negative ( -) terminal. 3. Rock both of the tester clamps back and forth in order to cut through to the bare metal. The message GM MICRO 410 should appear for a short time on the tester display, and then change to SELECT TEST. Does the display read SELECT TEST? — Does a CHECK CONNECTION message appear on the J 42000 tester display? — Inspect the tester connections to the battery terminal adapters or cable bolts for the following conditions: Both sides of each tester clamp must make the correct contact. Ensure that the red clamp is connected to the positive (+) terminal and the black clamp is connected to the negative (-) terminal. f the adapters or the bolts appear corroded, rock the clamps back and forth in order to ensure a correct connection. Use a wire brush in order to clean the adapters or cable bolts, if needed. Does the tester display now read SELECT TEST? — — Go to Step 6 Go to Step 5 Go to Battery Terminal Check. — Go to Step 6 Go to Step 10 Go to Step 7 Go to Step 8 Go to Step 9 Go to Step 17 Go to Step 12 3-22 Engine Electrical Industrial 3.0L Battery Not Operating Properly (cont’d) Step Action Value(s) 9 Use a J 39200 digital multimeter (DMM) in order to test the battery voltage with the J 42000 tester connected. Is the voltage at or below the specified value? 5.5 V Use the scroll keys on the J 42000 tester to select either IN–VEHICLE (for on-equipment testing) or OUT–OF– VEHICLE (for off-equipment testing), depending on the following conditions: Use IN–VEHICLE testing if the battery cables are connected to the battery. Use OUT–OF–VEHICLE testing if the battery cables are disconnected and the terminal adapters are installed. Was IN–VEHICLE testing selected? — 11 The display on the tester will show ALWAYS TEST AT BATTERY TERMINAL, and then change to SELECT RATING. Does the display read SELECT RATING? — 12 For off equipment testing, the display on the tester will show USE TERMINAL ADAPTERS, and then change to SELECT RATING. Does the tester display read SELECT RATING? — Important: Refer to the Battery Usage Chart or Equipment manufacturer' s specifications for the correct rating for the original equipment (OE) battery. If a battery with a lower cold cranking amperage (CCA) rating has been installed on the equipment, the battery may not perform properly during the use of the vehicle even if the battery passes the test using the J 42000 tester. 1. Use the scroll keys on the J 42000 tester to select the CCA rating on the battery label. 2. Press the ENTER key on the tester. TESTING will appear briefly on the display, followed by the results of the test. Are the results of the test displayed? — 10 13 Yes No Go to Step 25 Go to Step 29 Go to Step 11 Go to Step 12 Go to Step 13 Go to Step 37 Go to Step 13 Go to Step 37 — 14 Does GOOD BATTERY appear on the J 42000 display? — Go to Step 14 Go to Step 22 15 Does GOOD-RECHARGE appear on the tester display? — Go to Step 25 Go to Step 16 16 Does CHARGE amp RETEST appear on the tester display? — Go to Step 29 Go to Step 17 17 Go to Step 15 Does REPLACE BATTERY appear on the tester display? — Go to Step 26 Go to Step 18 18 Does BAD CELL-REPLACE appear on the tester display? — Go to Step 28 Go to Step 19 19 Does SURFACE CHARGE DETECTED appear on the tester display? — Go to Step 30 Go to Step 20 20 Does SELECT TEMP appear on the tester display? — Go to Step 33 Go to Step 21 21 Does SYSTEM NOISE-CHECK LOADS, alternating with RETESTING, appear on the tester display? — Go to Step 34 Go to Step 37 Industrial 3.0L Engine Electrical 3-23 Battery Not Operating Properly (cont’d) Step 22 23 24 25 26 27 28 29 30 31 32 Action Value(s) 1. Press the CODE button on the J 42000. 2. For warranty purposes, write the displayed code on the repair order. Is the green dot (if applicable) visible in the battery’s hydrometer? — Charge the battery. Refer to Battery Charging. Is the green dot (if applicable) visible in the hydrometer? — The battery is OK. Install the battery. Refer to Battery Replacement. Is the action complete? — 1. Press the CODE button on the J 42000 tester. 2. For warranty purposes, write the displayed code on the repair order. 3. Charge the battery. Refer to Battery Charging. Is the green dot (if applicable) visible in the hydrometer? — Was the battery tested in the vehicle with the battery cables still attached? — Notice: Always turn the ignition switch OFF when connecting or disconnecting batteries, battery chargers, or jumper cables. Failure to do so may damage the electronic control unit or other electrical components. 1. Turn the ignition switch to the OFF position. 2. Disconnect the negative (-) battery cable. 3. Disconnect the positive (+) battery cable. Are the actions complete? — 1. Press the CODE button on the J 42000. 2. For warranty purposes, write the displayed code on the repair order. 3. Replace the battery. Refer to Battery Replacement. Is the action complete? — 1. Press the CODE button on the J 42000. 2. For warranty purposes, write the displayed code on the repair order. 3. Charge the battery. Refer to Battery Charging. Is the green dot (if applicable) visible in the battery hydrometer? — Important: Surface charge removal is only necessary when the tester detects that a surface charge may affect the results of the test. The tester will not complete the testing sequence until the surface charge is removed. Follow the tester prompts in order to remove the surface charge by turning the vehicle’s headlights ON and OFF. If the sequence is followed properly, the tester will automatically complete the test. If the sequence is not followed properly, the tester will display the message DISCONNECT AND RETEST. Does the DISCONNECT AND RETEST message appear? — Disconnect the J 42000 from the battery terminals. Is the action complete? — The tester will display the word RETESTING and show the CCA rating that was selected for the test. If the test is successfully completed, the test results will be displayed. Do the test results appear on the display? — Yes No Go to Step 24 Go to Step 23 Go to Step 24 Go to Step 39 — System OK — Go to Step 24 Go to Step 27 Go to Step 28 — Go to Step 3 — Go to Step 2 — Go to Step 2 Go to Step 31 Go to Step 32 — Go to Step 2 Go to Step 14 Go to Step 36 3-24 Engine Electrical Industrial 3.0L Battery Not Operating Properly (cont’d) Step Action Value(s) 33 Important: Temperature compensation is only necessary when the tester detects that the battery temperature may affect the results of the test. 1. Use the scroll keys to indicate whether the internal temperature of the battery is above or below 0C (32F). Use the temperature of the battery to which the battery has been exposed for the past several hours in order to estimate the temperature. 2. Push the ENTER key. The tester will briefly display the RETESTING message and the CCA rating selected for the test. The test results will then show on the display. Do the test results show on the display? — 34 1. The tester detects that an electrical load is present (such as a light is on or the ignition key is not in the OFF position). 2. Turn OFF all of the system electrical loads. Are all of the system electrical loads OFF? — 35 The J 42000 automatically retests the battery. A RETESTING message and SYSTEM NOISE message on the display alternates up to 5 (Five) minutes while all circuits power down. The test results will then display on the tester. Are the test results displayed on the tester? — 36 An undetected load or parasitic drain can cause the alternating RETESTING and SYSTEM NOISE messages to continue for more than 5 (Five) minutes. 1. Disconnect the J 42000 tester. 2. Eliminate all electrical parasitic drains. Refer to Battery Electrical Drain/Parasitic Load. Are all electrical loads and parasitic drains eliminated? — 37 A J 42000 problem is indicated. Inspect the tester for correct operation. Is the tester operating properly? — Repair or replace the tester. Is the action complete? — A problem exists with the battery’s built–in hydrometer (if applicable). Replace the battery. Refer to Battery Replacement. Is the action complete? — Yes No Go to Step 14 Go to Step 37 — Go to Step 35 Go to Step 14 Go to Step 36 — Go to Step 2 38 39 Go to Step 2 Go to Step 38 Go to Step 1 — — System OK Battery Electrical Drain/Parasitic Load Current Drain Test If the equipment exhibits a low or dead battery after an overnight period, or discharges over a period of 2 or 3 days and no cause is evident, the electrical system should be checked for an excessive electrical drain. The cause of the excessive unintended current drain is referred to as a parasitic load. One or more on–board solid–state control modules, such as the ECU, may at some time exhibit a failure mode that causes a high parasitic drain on the equipment’s battery. Another source of parasitic drain could be an unnoticed load which remains on at all times. Testing for a parasitic drain requires a special tool because the excessive current drain may not occur after the battery is disconnected to install an ammeter. Cycling the ignition key to the RUN and then to the OFF position may cause such a drain to recur, but there may be drains that will not recur unless the equipment systems are reactivated in a use test. The ignition switch must not be rotated to the START position with an ammeter installed between the battery terminal and the battery cable, but the special tool enables the equipment to be run to assure that all equipment systems are ready for testing. Tools Required J 38758 Draw Test Switch J 39200 Digital Multimeter, or equivalent Industrial 3.0L Engine Electrical 3-25 Notice: Always turn the ignition switch OFF when connecting or disconnecting batteries, battery chargers, or jumper cables. Failure to do so may damage the electronic control unit or other electrical components. 1. Disconnect the negative battery cable. 2. Ensure that the ignition switch is OFF, and that all electrical accessories are OFF. 314656 3. Install the male end of the J 38758 to the negative battery terminal. 4. Turn the J 38758 test switch to the OFF position. 5. Connect the negative battery cable to the female end of the J 38758 test switch. 6. Turn the J 38758 test switch to the ON position. Notice: Do not turn the parasitic draw test switch to the OFF position with the engine running. Damage will occur to the equipment’s electrical system. 7. Test the electrical system by running the engine and operating the equipment. 8. Turn the ignition switch to the LOCK position and remove the key. Turn all electrical accessories off. 9. In order to avoid a false reading, wait 15 minutes for all components to power down before continuing this test. 10. Before connecting the ammeter, use the following procedure to determine whether or not the current drain is less than 10 amps: 10.1. Connect a jumper wire with an in–line 10amp fuse or circuit breaker to the terminals of the J 38758 test switch. 10.2. Turn the J 38758 test switch to the OFF position. 10.3. Wait 10 seconds. 11. If the fuse in the jumper wire does not blow, turn the J 38758 test switch ON, set the J 39200 to the 10–amp scale and connect the digital multimeter to the J 38758 test switch, and then remove the jumper wire. If current is greater than 10 amps, use a test lamp instead of an ammeter. Important: Always turn the J 38758 test switch to the ON position between tests. The ON position allows current to flow through the battery cable. If the test switch is left in the OFF position between tests, the ammeter could be damaged due to accidental overloading. 12. Remove the fuses one at a time, and install each one after it is tested. Perform the following steps each time a fuse is removed: 12.1. Turn the test switch to the OFF position which forces all current to flow through the meter. 12.2. Wait at least 60 seconds. Check the current reading. If the reading is at or below 2 amps, turn the test switch to the ON position in order to maintain continuity in the electrical system while switching to the 2 amp scale for a more accurate reading. Turn the test switch to the ON position between tests. 12.3. The parasitic draw is typically under 60 milliamperes. If the ammeter drops to an acceptable reading after a fuse is removed, the circuit causing the drain has been identified. 12.4. Install the fuse for the circuit which is causing the excessive drain. Using the schematic as a guide, disconnect the components of the faulty circuit one at a time until the faulty component is located. 13. When the cause of excessive current draw has been located and repaired, remove the current drain test switch and connect the negative battery cable to the negative battery terminal. 3-26 Engine Electrical Industrial 3.0L Battery Hydrometer Displays Dark or Yellow Dot The maintenance–free battery has a built–in hydrometer which consists of a ball floating in the electrolyte. The hydrometer is temperature–compensated. The color of the hydrometer indicates the condition of the battery. A green dot appearing on the hydrometer means that the battery is ready for testing. A dark hydrometer with no green visible means that the battery has a low charge. Refer to Charging System Check or Battery Electrical Drain/Parasitic Load. A clear or light yellow color means that the battery fluid level is below the bottom of the hydrometer. Replace the battery if its condition affects the cranking system. A low fluid level can be caused by any of the following conditions: - An excessive charge - Tipping the battery - A faulty charging system. Refer to Charging System Check. Battery Is Undercharged or Overcharged Step Action Value(s) 1 1. Disconnect the generator connector. 2. Probe the generator connector with a digital multimeter from the generator BAT terminal to ground. 3. Measure the voltage. Does the voltage measure less than 10 volts? 10 V Locate and repair the open in the WHITE wire between the starter solenoid S terminal and the generator BAT terminal. Is the repair complete? 1. Probe the generator connector with a digital multimeter from cavity S to ground. 2. Measure the voltage. Does the voltage measure less than 10 volts? — 2 3 4 5 6 7 8 Locate and repair the open in the RED wire between the generator BAT terminal and the generator connector cavity S. Is the repair complete? 1. Turn the ignition switch to the RUN position. 2. Probe the generator connector with a digital multimeter from cavity I to ground. 3. Measure the voltage. Does the voltage measure less than 10 volts? Locate and repair the open in the YELLOW wire between the I terminal on the ignition switch and the generator connector cavity I. Is the repair complete? 1. 2. 3. 4. 5. Turn the ignition switch to the OFF position. Connect the generator connector. Start the engine. Run the engine at fast idle. Probe the battery with a digital multimeter from the positive (+) terminal to the negative (-) terminal. 6. Measure the voltage. Does the voltage measure between 13-16 volts? 1. Do a Generator Bench Test. Refer to Generator Assembly Bench Check. 2. If the generator is OK, do a battery load test. Refer to Battery Not Operating Properly. Is the repair complete? Yes No Go to Step 2 Go to Step 3 — System OK 10 V Go to Step 4 — Go to Step 5 — System OK 10 V Go to Step 6 — Go to Step 7 — System OK 13-16 V Go to Battery Not Operating Properly. — Go to Step 8 — System OK Industrial 3.0L Engine Electrical 3-27 Engine Cranks/Cranks Slowly, But Does Not Start q¯¤ _¢¯¨¬« t ©°¤F®G O s®¤> >£¨¦¨¯ ©>ª°©¯¨ª¤¯¤.>¯¬>ª¤ ®°.¤>¯§¤>±¬©¯ ¦¤>¬¥>¯§¤ ¡ ¯¯¤.´L g®>¯§¤>±¬©¯ ¦¤>¦.¤ ¯¤.>¯§ «>¬.>¤8° ©>¯¬>¯§¤>®¤¢¨¥¨¤£>± ©°¤] OP>t P OL c«®°.¤>¯§¤>¡ ¯¯¤.´>¯¤.ª¨« ©®> «£>¯¤.ª¨« ©>¡¬©¯®> .¤ ¥.¤¤>¥.¬ª>¢¬..¬®¨¬«L PL a§ .¦¤>¯§¤>¡ ¯¯¤.´L>p¤¥¤.>¯¬>` ¯¯¤*´>a§ *¦¨«¦L QL b¨®¢¬««¤¢¯>¯§¤>¤«¦¨«¤>®§°¯¬¥¥>®¬©¤«¬¨£L RL _¯¯¤ª¯>¯¬>¢. «F>¯§¤>¤«¦¨«¤L b¬¤®>¯§¤>¤«¦¨«¤>¢. «F>«¬.ª ©©´] Å OL a¬««¤¢¯>¯§¤>¤«¦¨«¤>®§°¯¬¥¥>®¬©¤«¬¨£L PL t¤.¨¥´>¯§ ¯>¯§¤>¢§ .¦¨«¦>®´®¯¤ª>¨®>¬¤. ¯¨«¦>¢¬..¤¢¯©´L p¤¥¤.>¯¬>a§ *¦¨«¦>q´®¯¤ª>a§¤¢6L g®>¯§¤>¢§ .¦¨«¦>®´®¯¤ª>mi] Å p¤ ¨.>¯§¤>¢§ .¦¨«¦>®´®¯¤ªL g®>¯§¤>.¤ ¨.>¢¬ª©¤¯¤] Å Q R OL b¨®¢¬««¤¢¯>¯§¤>¤«¦¨«¤>®§°¯¬¥¥>®¬©¤«¬¨£L>b¬>«¬¯ ¢¬««¤¢¯>¯§¤>¤«¦¨«¤>®§°¯¬¥¥>®¬©¤«¬¨£>°«¯¨©> ©©>¢. «F¨«¦ ¯¤®¯®> .¤>¢¬ª©¤¯¤£L PL r°.«>¯§¤>¨¦«¨¯¨¬«>®²¨¯¢§>¯¬>¯§¤>qr_pr>¬®¨¯¨¬«L QL s®¤> >h>QWPNN>bkk>¯¬>ª¤ ®°.¤>¯§¤>±¬©¯ ¦¤>¡¤¯²¤¤« ¯§¤>¡ ¯¯¤.´>¯¤.ª¨« ©®>²§¨©¤>¢. «F¨«¦>¯§¤>¤«¦¨«¤>¥¬.>OS F¥¨¥¯¤¤«G>®¤¢¬«£®L l¬¯¨¢¤X>l¤±¤.>¬¤. ¯¤>¯§¤>®¯ .¯¤.>ª¬¯¬.>¥¬.>ª¬.¤>¯§ «>OS ®¤¢¬«£®> ¯> >¯¨ª¤L>_©©¬²>¨¯>¯¬>¢¬¬©> ¯>©¤ ®¯>¯²¬>ª¨«°¯¤® ¡¤¥¬.¤>¢. «F¨«¦> ¦ ¨«L>c³¢¤®®¨±¤>¢. «F¨«¦>¢ «>¢ °®¤ ¬±¤.§¤ ¯¨«¦J>²§¨¢§>²¨©©>¢ °®¤>®¤.¨¬°®>£ ª ¦¤>¯¬>¯§¤ ®¯ .¯¤.>ª¬¯¬.L b¬¤®>¯§¤>±¬©¯ ¦¤>£.¬>¡¤©¬²>¯§¤>®¤¢¨¥¨¤£>± ©°¤>²§¨©¤>¯§¤ ®¯ .¯¤.>¨®>¢. «F¨«¦>¯§¤>¤«¦¨«¤] T j¬ £>¯¤®¯>¯§¤>¡ ¯¯¤.´L>p¤¥¤.>¯¬>` ¯¯¤*´>l¬¯>m¤* ¯¨«¦ n*¬¤*©´L g®>¯§¤>¡ ¯¯¤.´>mi] Å p¤© ¢¤>¯§¤>¡ ¯¯¤.´L>p¤¥¤.>¯¬>` ¯¯¤*´>p¤© ¢¤ª¤«¯L g®>¯§¤>.¤ ¨.>¢¬ª©¤¯¤] Å p¤© ¢¤>¯§¤>®¯ .¯¤.>ª¬¯¬.L>p¤¥¤.>¯¬>q¯ *¯¤*>k¬¯¬* p¤© ¢¤ª¤«¯L g®>¯§¤>.¤ ¨.>¢¬ª©¤¯¤] Å V W ON s®¤> >£¨¦¨¯ ©>ª°©¯¨ª¤¯¤.>¯¬>ª¤ ®°.¤>¯§¤>±¬©¯ ¦¤>¡¤¯²¤¤« ¯§¤>¡ ¯¯¤.´>«¤¦ ¯¨±¤>FYG>¯¤.ª¨« ©> «£>¯§¤>¤«¦¨«¤>¡©¬¢F>²§¨©¤ ¢. «F¨«¦>¯§¤>¤«¦¨«¤L l¬¯¨¢¤X>l¤±¤.>¬¤. ¯¤>¯§¤>®¯ .¯¤.>ª¬¯¬.>¥¬.>ª¬.¤>¯§ «>OS ®¤¢¬«£®> ¯> >¯¨ª¤L>_©©¬²>¨¯>¯¬>¢¬¬©> ¯>©¤ ®¯>¯²¬>ª¨«°¯¤® ¡¤¥¬.¤>¢. «F¨«¦> ¦ ¨«L>c³¢¤®®¨±¤>¢. «F¨«¦>¢ «>¢ °®¤ ¬±¤.§¤ ¯¨«¦J>²§¨¢§>²¨©©>¢ °®¤>®¤.¨¬°®>£ ª ¦¤>¯¬>¯§¤ ®¯ .¯¤.>ª¬¯¬.L g®>¯§¤>±¬©¯ ¦¤>¦.¤ ¯¤.>¯§ «>¯§¤>®¤¢¨¥¨¤£>± ©°¤] OL g«®¤¢¯>¯§¤>¡ ¯¯¤.´> «£>«¤¦ ¯¨±¤>FYG>¡ ¯¯¤.´>¢ ¡©¤>¯¬ £¤¯¤.ª¨«¤>¨¥>¯§¤.¤>¨®> >§¨¦§Y.¤®¨®¯ «¢¤>¢¬««¤¢¯¨¬«> ¯ ¤¨¯§¤.>¤«£L PL c«®°.¤>¯§ ¯>¯§¤.¤>¨®> >¢©¤ «>¢¬««¤¢¯¨¬«>¡¤¯²¤¤«>¯§¤ ®¯ .¯¤.>ª¬°«¯¨«¦>®°.¥ ¢¤> «£>¯§¤>¤«¦¨«¤>¡©¬¢FL u ®> >§¨¦§Y.¤®¨®¯ «¢¤>¢¬««¤¢¯¨¬«>¥¬°«£] l¬ e¬>¯¬>q¯¤>S e¬>¯¬>q¯¤>P e¬>¯¬>q¯¤>Q e¬>¯¬>q¯¤>S q´®¯¤ª>mi e¬>¯¬>q¯¤>R Å q´®¯¤ª>mi S U w¤® WLS>t e¬>¯¬>q¯¤>T e¬>¯¬>q¯¤>W e¬>¯¬>q¯¤>V e¬>¯¬>q¯¤>U Å q´®¯¤ª>mi Å q´®¯¤ª>mi NLS>t e¬>¯¬>q¯¤>ON e¬>¯¬>q¯¤>OQ e¬>¯¬>q¯¤>OO e¬>¯¬>q¯¤>OP Å 3-28 Engine Electrical Industrial 3.0L Engine Cranks/Cranks Slowly, but Does Not Start (cont’d) Step 11 12 13 14 15 Action Value(s) Repair the high–resistance connection. Is the repair complete? — Replace the negative (-) battery cable. Refer to Battery Cable Replacement. Is the repair complete? — 1. Inspect the starter to determine if there is a high– resistance connection at the starter B terminal. 2. If the battery positive (+) terminal was not previously inspected, examine the positive (+) terminal and terminal bolt for corrosion which would indicate a high–resistance connection. Was there a high–resistance connection found? — 1. Repair the high–resistance connection. 2. Connect the distributor electrical connector. Is the repair complete? — Replace the positive (+) battery cable. Refer to Battery Cable Replacement. Is the repair complete? — Yes No — System OK — System OK Go to Step 14 Go to Step 15 — System OK — System OK Generator Noise Test Generator noise may be caused by the following conditions: A loose drive pulley Loose mounting bolts Worn or dirty bearings A worn stator A worn rectifier bridge If the pulley and the mounting bolts are snug and the noise continues, remove the generator for replacement or for inspection and repair. Refer to Generator Replacement. Generator Not Operating Properly Step Action Value(s) Yes No NOTE: The following procedure is generic and applies to most commercial Charging System Testers. Read the instructions in the Operator' s manual for the equipment before beginning this procedure. 1 — Go to Charging Perform the charging system check. Refer to Charging System Check. System Check. Go to Step 2 Has the charging system check been performed? 2 12 V Use a digital multimeter to check the voltage between the generator output (BAT) terminal and the generator metal case. Go to step 6 Go to Step 3 Is the voltage above the specified value? 3 12 V Use a digital multimeter to check the voltage between the battery terminals. Go to Step 5 Go to Step 4 Is the voltage above the specified value? 4 — — 1. Inspect the battery. Refer to Battery Not Operating Properly. 2. Charge or replace the battery if necessary. Go to Step 7 Is the battery OK? 5 6 1. Inspect the circuit between the generator output terminal and the battery positive (+) terminal for a loose connection or open circuit condition. 2. If a loose connection or open circuit was located, repair it. Is the circuit okay between the generator output terminal and the battery positive (+) terminal? — Repair the loose connection or open circuit between the battery negative (-) terminal and the generator housing. Is the repair complete? — — Go to Step 6 — Go to Step 7 Industrial 3.0L Engine Electrical 3-29 Generator Not Operating Properly (cont’d) Step 7 8 9 10 Action 1. Disconnect the negative battery cable from the battery. 2. Disconnect the battery (white) wire from the generator battery terminal. 3. Connect the red ammeter lead to the generator battery terminal and the black lead to the generator battery (white) wire terminal. 4. Re-connect the negative battery cable to the battery. 5. Observing polarity, connect the voltmeter leads to the positive and negative battery terminals. Is the voltage above the specified value? Value(s) — Caution: Make sure that the load is completely turned off before connecting or disconnecting the carbon pile load tester to the battery. Otherwise, sparking could ignite battery gasses which are extremely flammable and may explode violently. 1. Prior to connecting a carbon pile load tester, ensure that the load dial of the carbon pile tester is turned completely to the OFF position. Connect the cable leads of the carbon pile tester to the battery terminals. 2. Start the engine and allow it to idle briefly. 3. Increase the engine speed to 2500 RPM. 4. While maintaining the engine speed at 2500 RPM increase the load until the generator output is within 10 amps of the rated output (load test) value given in Generator Usage. As the load is increased, is the generator capable of producing the rated output value load test current specified in Generator Usage within 10 amps? 70 A Is the voltage within the specified value? No Go to Step 9 Go to Step 8 12 V 1. Recheck the connections that were made in Step 7. 2. Correct the connections if they were reversed. Maintain the engine speed at 2500 RPM and continue to operate the generator at the load test value. Yes — Go to Step 9 13.5 V to 15.1 V 11 1. Maintain the engine speed at 2500 RPM and continue to operate the generator at the load test value. 2. Connect a digital multimeter between the generator output terminal to the battery positive (+) terminal. Is the voltage above the specified value? 0.5 V 12 1. Maintain the engine speed at 2500 RPM and continue to operate the generator at the load test value. 2. Connect a J 39200 DMM from the generator metal housing to the battery negative (–) terminal. Is the voltage above the specified value? 0.5 V Go to Step 10 Replace or repair the generator Generator OK Go to Step 11 Go to Step 13 Go to Step 12 Go to Step 14 Go to Step 15 3-30 Engine Electrical Industrial 3.0L Generator Not Operating Properly (cont’d) Step Action Value(s) Yes No 13 Caution: Make sure that the load is completely turned off before connecting or disconnecting a carbon pile load tester to the battery. Otherwise, sparking could ignite battery gasses which are extremely flammable and may explode violently. 1. Disconnect the digital multimeter. 2. Turn OFF the load in the carbon pile tester. 3. Turn the ignition switch to OFF to stop the engine. 4. Disconnect the carbon pile tester cables from the battery. 5. Disconnect the battery negative terminal. 6. Inspect the circuit between the battery positive (+) terminal and the generator output terminal for a high– resistance connection. Disassemble and clean all connections in this circuit. 7. Assemble the connections and tighten to specifications. 8. Connect the battery negative (–) terminal. Tighten to specifications. Refer to Fastener Tightening Specifications. Is the repair complete? — Go to Charging System Check — 14 Caution: Make sure that the load is completely turned off before connecting or disconnecting a carbon pile load tester to the battery. Otherwise, sparking could ignite battery gasses which are extremely flammable and may explode violently. 1. Disconnect the J 39200 DMM. 2. Turn OFF the load in the carbon pile tester. 3. Turn the ignition switch to LOCK to stop the engine. 4. Disconnect the carbon pile tester cables from the battery. 5. Inspect the ground circuit for high resistance from the battery negative () terminal to the generator housing. Disassemble and clean all connections. 6. Assemble the connections and tighten to specifications. Refer to Fastener Tightening Specifications. Is the repair complete? Replace the voltage regulator. Is the repair complete? — Go to Charging System Check — — Go to Charging System Check — 15 Industrial 3.0L Engine Electrical 3-31 Generator Assembly Bench Check This test requires both a fully charged battery and a generator test stand to operate the generator. The generator can be tested quicker and easier while it is still on the equipment. Refer to Generator Not Operating Properly. 1. Ensure the carbon pile is off before making connections as shown. The ground polarity of the generator and battery must be the same. The battery must be fully charged. Use a 30-500 ohm resistor between the battery and the BAT terminal of the generator. 2. Slowly increase the generator speed and observe the voltage. 3. If the voltage is uncontrolled and increases above 16 volts, the rotor field is shorted, the regulator is not working properly, or both. A shorted rotor field coil can cause repeat regulator failure. 4. If the voltage is below 16 volts, increase speed and turn on and adjust the carbon pile to obtain maximum amperage output. Maintain the voltage above 13 volts. 5. If the output is within 15 amperes of the rated output, the generator is good. If the output is not within 15 amperes of the rated output, replace the generator. 350774 STARTER MOTOR NOISE DIAGNOSIS High–Pitched Whine During Cranking Problem Action DEFINITION: A high–pitched whine during cranking (before the engine fires), but the engine cranks and fires normally. The distance is too great between the starter pinion and the flywheel. Remove the shims at the starter mount. Refer to Starter Pinion Clearance Check. High–Pitched Whine After the Engine Fires Problem Action DEFINITION: A high–pitched whine, after the engine fires, as the key is being released. The engine cranks and fires normally. This complaint is often diagnosed as starter hang–in or solenoid weak. The distance is too small between the starter pinion and the flywheel (flywheel runout contributes to the intermittent nature of the problem). Add shims at the starter mount. Refer to Starter Pinion Clearance Check. 3-32 Engine Electrical Industrial 3.0L Loud Whoop Sound after the Engine Fires Problem Action DEFINITION: A loud whoop sound after the engine fires, but while the starter is still held engaged. The sound is similar to a siren if the engine is revved while the starter is engaged. The starter motor clutch is worn. 1. Remove the starter motor. Refer to Starter Motor Replacement. 2. Check the clutch. Refer to Starter Motor Inspection. Rumble, Growl, or a Knock Problem Action DEFINITION: A rumble, growl, or a knock (in severe cases) as the starter is coasting down to a stop after starting the engine. The starter armature is bent or unbalanced. 1. Remove the starter motor. Refer to Starter Motor Replacement. 2. Check the clutch. Refer to Starter Motor Inspection. Starter No Load Test 182233 Tools Required J 35590 Current Clamp J 39200 Digital Multimeter, or Equivalent Notice: Never operate the starter motor more than 15 seconds at a time without pausing in order to allow it to cool for at least 2 minutes. Overheating will damage the starter motor. Important: Verify that the battery is in good condition. Refer to Battery Check. 1. Disable the fuel system. Refer to Engine Controls. 2. Calculate the current draw by doing the following: 2.1. Select the 200 amp or the 2000 amp scale on the J 35590. 2.2. Zero the current clamp. 2.3. Clamp the current clamp to the battery negative cable. 2.4. Crank the engine and observe the meter readings. The reading should be 65-95 amps. If the amperage is over 95 amps, an internal starter failure may be the cause. If the amperage is under 65 amps, a battery cable or connection may be the cause. Industrial 3.0L Engine Electrical 3-33 Starter Solenoid Does Not Click Step 1 2 3 4 5 6 7 8 9 10 Action Has the Battery Check been performed? Value(s) Yes No Go to Step 2 Go to Battery Check. Go to Step 3 Go to Step 4 — 1. Probe the starter solenoid with a digital multimeter from terminal S to engine ground. 2. Turn the ignition switch to the START position. Does the voltage measure more than the specified value? 10 V 1. Ensure that the battery terminals are clean and tight. 2. Remove the starter. 3. Clean the starter motor mounting bolts, the starter motor and the mounting surface. 4. Install the starter. 5. Attempt to start the engine. 6. If the engine does not start, replace the starter motor. Refer to Starter Motor Replacement. Is the repair complete? 1. Probe the ignition switch with a digital multimeter from terminal S to engine ground. 2. Turn the ignition switch to the START position. Does the voltage measure more than the specified value? Locate and repair the open circuit in the BLUE wire between the ignition switch S terminal and the starter solenoid S terminal. Is the repair complete? Probe the starter solenoid with a digital multimeter from terminal B to engine ground. Is the voltage equal to or more than the specified value? Locate and repair the open circuit in the positive battery cable between the battery and the starter solenoid B terminal. Is the repair complete? Probe the ignition switch with a digital multimeter from terminal B to ground. Is the voltage equal to or more than the specified value? Locate and repair the open circuit in the WHITE wire between the ignition switch B terminal and the starter solenoid B terminal. Is the repair complete? Replace the ignition switch. Is the repair complete? — — System OK 10 V Go to Step 5 — Go to Step 6 — System OK 12 V Go to Step 8 — Go to Step 7 — System OK 12 V Go to Step 10 — Go to Step 9 — System OK — — System OK 3-34 Engine Electrical Industrial 3.0L Starter Solenoid Clicks, Engine Does Not Crank or Cranks Slowly Step Action Value(s) 1 Was the Starting System Check performed? 2 1. Disconnect the ignition coil connector. 2. Connect a digital multimeter from the battery positive(+) terminal to the battery negative ( - ) terminal. 3. Turn the ignition switch to the START position. 4. Crank the engine for 15 seconds. 5. Measure the voltage at the end of cranking. Notice: Never operate the starter motor for more than 30 seconds at a time. Allow it to cool at least two minutes before cranking again. Excessive cranking can cause overheating, which will cause serious damage to the starter motor. Does the voltage measure less than 9.6 volts? 9.6 V 1. Do the battery load test(s). Refer to Battery Not Operating Properly. 2. If the battery passes the load test, replace the starter motor. Refer to Starter Motor Replacement. Is the repair complete? — 3 4 5 Yes No Go to Step 2 Go to Starting System Check. Go to Step 3 Go to Step 4 — System OK 1. Ensure that the battery terminals and the battery terminal bolts are tight and are not corroded. 2. Connect a digital multimeter from the negative ( - ) battery terminal to the engine block. 3. Turn the ignition switch to the START position. 4. Observe the voltage while cranking the engine. Notice: Never operate the starter motor for more than 30 seconds at a time. Allow it to cool at least two minutes before cranking again. Excessive cranking can cause overheating, which will cause serious damage to the starter motor. Does the voltage measure more than 0.5 volts? 0.5 V 1. Inspect the battery cable for a high resistance connection at the engine block. 2. If the connection is OK, replace the negative ( - ) battery cable. Refer to Battery Cable Replacement. Caution: Before servicing any electrical component, the ignition key must be in the OFF and all electrical loads must be OFF, unless instructed otherwise in these procedures. If a tool or equipment could easily come in contact with a live exposed electrical terminal, also disconnect the negative battery cable. Failure to follow these precautions may cause personal injury and/or damage to the vehicle or its components. Is the repair complete? — Go to Step 5 System OK Go to Step 6 — Industrial 3.0L Engine Electrical 3-35 Starter Solenoid Clicks, Engine Does Not Crank or Cranks Slowly (cont’d) Step Action Value(s) 6 1. Connect a digital multimeter from the positive (+) battery terminal to starter solenoid terminal B. 2. Turn the ignition switch to the START position. 3. Observe the voltage while cranking. Notice: Never operate the starter motor for more than 30 seconds at a time. Allow it to cool at least two minutes before cranking again. Excessive cranking can cause overheating, which will cause serious damage to the starter motor. Does the voltage measure more than 0.5 volts? 0.5 V 7 8 Inspect the battery cable for a high resistance connection at the starter solenoid B terminal. If the connection is OK, replace the positive (+) battery cable. Refer to Battery Cable Replacement. Caution: Before servicing any electrical component, the ignition key must be in the OFF or LOCK position and all electrical loads must be OFF, unless instructed otherwise in these procedures. If a tool or equipment could easily come in contact with a live exposed electrical terminal, also disconnect the negative battery cable. Failure to follow these precautions may cause personal injury and/or damage to the vehicle or its components. Is the repair complete? — Replace the starter motor. Refer to Starter Motor Replacement. Is the repair complete? — Yes No Go to Step 7 Go to Step 8 — System OK — System OK 3-36 Engine Electrical Industrial 3.0L Voltmeter Gauge Displaying Higher or Lower Than Normal Voltage Step Action Value(s) Yes No DEFINITION: The voltmeter gauge in the instrument cluster is accurate, and it correctly indicates a high or low voltage condition. 1V 1 1. Turn off any electrical loads. 2. Start the engine and let it idle briefly. 3. Use a digital multimeter to measure the voltage from the battery positive (+) terminal to the battery negative ( - ) terminal. 4. Compare the digital multimeter voltage with a simultaneous reading of the voltmeter gauge in the Go to Volt Gage instrument cluster. Inaccurate or Is the difference in voltage more than the specified value? Inoperative. Go to Step 2 2 — — Perform the charging system check and make any repairs indicated by the charging system check. Refer to Charging System Check. Go to Step 3 Is the charging system OK? 3 4 5 While the engine is operating, does the voltmeter gauge indicate a higher than normal voltage? — Locate and repair the high resistance connection in the RED wire between the generator S terminal and the starter solenoid B terminal. Is the repair complete? — 1. Turn the ignition switch to the RUN position (engine not running). 2. Measure the voltage at the power side of the fuse in the instrument panel. Is the voltage lower the specified value? Go to Step 4 Go to Step 5 — System OK 12 V Go to Step 6 6 Repair the high resistance or intermittent open circuit on fuse between the alternator S terminal and the power side of the fuse. Is the repair complete? — 7 Repair the high resistance or intermittent open circuit between the voltmeter gauge and the fuse. Is the repair complete? — Go to Step 7 — System OK — System OK Industrial 3.0L Engine Electrical 3-37 Voltmeter Gauge Voltmeter Gauge Inaccurate or Inoperative Step Action Value(s) Yes No DEFINITION: The voltmeter gauge in the instrument cluster does not read the correct battery or charging system voltage. 1V 1 1. Turn off any electrical loads. 2. Start the engine and let it idle briefly. 3. Use a digital multimeter to measure the voltage from the battery positive (+) terminal to the battery negative ( - ) terminal. Go to Voltmeter 4. Compare the digital multimeter voltage with a Gauge simultaneous reading of the Voltmeter Gauge in the Displaying Higher instrument cluster. or Lower Than Is the difference in voltage more than the specified value? Go to Step 2 Normal Voltage 2 Using a digital multimeter, check the fuse in the instrument panel for continuity. Is the fuse blown? — 3 Replace the fuse in the instrument panel. Is the repair complete? — 4 1. Turn the ignition switch to the RUN position (engine not running). 2. Measure the voltage at the power side of the fuse in the instrument panel. Is the voltage lower the specified value? 5 Repair the high resistance or intermittent open circuit on fuse between the alternator S terminal and the power side of the fuse. Is the repair complete? 6 1. Turn the ignition switch to the RUN position (engine not running). 2. Measure the voltage at the Voltmeter Gauge. Is the voltage lower the specified value? Go to Step 3 Go to Step 4 — System OK 12 V Go to Step 5 — Go to Step 6 — System OK 12 V Go to Step 7 7 Repair the high resistance or intermittent open circuit between the voltmeter gauge and the fuse. Is the repair complete? — 8 Replace the voltmeter gauge. Is the repair complete? — Go to Step 8 — System OK — System OK 3-38 Engine Electrical Industrial 3.0L Engine Cranks, But Fails to Start Step Action Value(s) Yes No Important: In order to properly perform this test, the battery must be fully charged, cranking speed must be sufficient, and there must be an adequate supply of fuel in the tank. 1 2 1. Check the wires for open circuits, cracks, or improper seating of terminals at the spark plugs, ignition coil and distributor. 2. Check the spark at the #1 spark plug with a spark tester J 26792, or equivalent while cranking the engine. If there is no spark on the #1 spark plug wire, check a second wire. A few sparks, then nothing is considered no spark. Is adequate spark present while cranking? Check the spark plugs, fuel etc., replace as necessary. — 1. Remove the coil wire from the distributor. Inspect the distributor cap and check for one or more of the following conditions and replace if necessary. System OK Refer to Engine Won't Start in Section 4, Engine Controls Go to Step 4 Go to Step 9 Go to Step 5 Go to Step 6 System OK — Go to Step 7 Go to Step 8 System OK — System OK — Go to Step 11 Go to Step 10 System OK — — 2. Check the spark at the coil wire with a spark tester J 26792, or equivalent while cranking the engine. Is adequate spark present while cranking? 4 Go to Step 3 — Did replacement of the fuel or spark plugs resolve the problem? 3 Go to Step 2 — Moisture Cracks Carbon runs Physical damage Were any of these conditions found? 5 6 7 8 9 10 Clean or replace the distributor cap. Are repairs complete? — 1. With the distributor cap removed, crank the engine. 2. Observe the distributor rotor. Did the distributor rotor turn? — Replace the distributor rotor. Are repairs complete? — Remove the distributor and make the necessary repairs. Are repairs complete? — Using a digital multimeter, measure the resistance of the coil wire. The resistance should be approximately the specified value. Is the resistance approximately the specified value? Replace the coil wire. Are repairs complete? 1000/inch Industrial 3.0L Engine Electrical 3-39 Engine Cranks, But Fails to Start - Continued Step 11 12 13 14 15 16 17 Action Disconnect the electrical harness connector from the distributor. 2. Turn the ignition switch ON. 3. Probe the distributor harness connector between pin A (pink wire) and a good ground. 4. Turn the ignition switch OFF after test. Was the voltage above the specified value? Value(s) Yes No Go to Step 12 Go to Step 13 Go to Step 19 Go to Step 14 Go to Step 15 Go to Step 17 Go to Step 16 Go to Step 17 System OK — System OK — 1. Turn the ignition switch ON. Probe the distributor harness connector between pin B (white wire) and a good ground. 3. Turn the ignition switch OFF after test. Was the voltage above the specified value? 10 V 1. 2. 1. 2. 3. 4. 10 V Reconnect the distributor harness connector. Disconnect the black ignition coil electrical connector. Turn the ignition switch ON. Probe the coil electrical connector between terminal B and a good ground. 5. Turn the ignition switch OFF after test. Was the voltage above the specified value? 10 V 1. Reconnect the distributor harness connector. 2. Disconnect the black ignition coil electrical connector. 3. Turn the ignition switch ON. 4. Probe the coil cavity terminal A to a good ground. 5. Turn the ignition switch OFF after test. Was the voltage above the specified value? 10 V 1. Refer to the applicable Schematic and Routing Diagram in this section. 2. Locate and repair the open circuit in the white wire between terminal A of the ignition coil connector and terminal B of the distributor connector. 3. Reconnect the ignition coil electrical connector. Are repairs complete? — 1. — Refer to the applicable Schematic and Routing Diagram in this section. 2. Locate and repair the open circuit in the pink wire between terminal B of the ignition coil connector and terminal A of the distributor connector. 3. Reconnect the white ignition coil electrical connector. Are repairs complete? 1. 2. 3. Disconnect the gray ignition coil electrical connector. Turn the ignition switch ON. Probe the coil electrical connector between terminal B (purple wire) and a good ground. 4. Turn the ignition switch OFF after test. Was the voltage above the specified value? 10 V Go to Ignition Coil Not Operating Properly in this section. Go to Step 18 3-40 Engine Electrical Industrial 3.0L Engine Cranks, But Fails to Start - Continued Step 18 19 20 21 22 23 24 Action Value(s) Refer to the applicable Schematic and Routing Diagram in this section. 2. Locate and repair the open circuit between terminal B of the ignition coil connector and terminal I of the ignition switch. 3. Reconnect the gray ignition coil electrical connector. Are repairs complete? — 1. Connect a test light from the distributor connector, terminal B (white wire) to ground. 2. Crank the engine while observing the test light. 3. Turn the ignition switch OFF after test. Did the test light blink? — 1. 2. 3. Remove the distributor cap. Disconnect the pick-up coil electrical connector. Test the pick-up coil. Refer to Testing Pick-up Coil in this section. Were the ohmmeter reading as specified in the tests? — Check the pole piece to see if it is still magnetized. Is the pole piece still magnetized? — Replace the pick-up coil. Are repairs complete? — Replace the pole piece and shaft assembly. Are repairs complete? — 1. — 1. If a distributor module tester (J 24642) is available, test the distributor module and replace if necessary. 2. When a module tester is not available, replace the ignition coil and check for spark. If still no spark, reinstall original coil. 3. Check the distributor ground connection, if OK replace the distributor module. Are repairs complete? Yes No System OK — Go to Step 24 Go to Step 20 Go to Step 21 Go to Step 22 Go to Step 24 Go to Step 23 System OK — System OK — System OK — Industrial 3.0L Engine Electrical 3-41 Ignition Coil Not Operating Properly Testing Procedure Tools Required J 39200 Digital Multimeter or Equivalent 1. Ensure that the ignition switch is OFF. 2. Disconnect the distributer lead and the wiring from the coil. Notice: Do not insert the multimeter probe into the ignition coil electrical connectors. The female terminals could be deformed, resulting in intermittent operation. Only make contact with the front edge on each of the terminals. 3. Connect an ohmmeter as shown in (1) on the illustration. Use the high scale. If the reading is not infinite, replace the ignition coil. 4. Connect an ohmmeter as shown in (2) on the illustration. A. Scrape clean metal ground. Use the low scale. The reading should be 0.1 ohm or less. If not, replace the ignition coil. 5. Connect an ohmmeter as shown in (3) on the illustration. Use the high scale. If the reading is not 5k ohms to 25k ohms, replace the ignition coil. 7936014 Spark Plug Wire Resistance Test Tools Required J 39200 Digital Multimeter or Equivalent 6. Connect the distributer lead and the wiring to the coil. 1. Disconnect both ends of the wire that you wish to check. Important: Ensure that the wire terminals are clean before proceeding. Spark Plug Wires Not Operating Properly 2. Connect an ohmmeter lead to each end of the spark plug wire. 1. Check the routing of the wires, Improper routing can cause cross-firing. 2. Check each wire for any signs of cracks or splits in the wire. 3. Inspect each boot for signs of tears, piercing, arc through, or carbon tracking. If the boot needs to be replaced, twist it a half turn in each direction to break the seal before pulling on the boot to disconnect the wire. 3. Gently twist the wire while observing the ohmmeter reading. 4. If the ohmmeter reads above 30,000 ohms, no matter how long the wire is, or fluctuates from infinity to any value, replace the wire. Spark Plug Wire Routing Wire routing must be kept intact during service and followed exactly when wires have been disconnected or when replacement of the wires becomes necessary. Failure to route the wires can result in cross-firing of the spark plugs or shorting of the wires to ground. The correct routing of the spark plug wires in shown in the illustration on the next page. 3-42 Engine Electrical Industrial 3.0L 7936015 Industrial 3.0L Engine Electrical 3-43 Testing Pick-up Coil 1. Remove the distributer cap. 2. Remove the distributer rotor. 3. Disconnect the pick-up coil leads from the distributor module. 4. Connect an ohmmeter as shown in (1) on the illustration. 5. While watching the ohmmeter reading, flex the leads by hand to check for intermittent problems. The reading should be infinite at all times. 6. Connect an ohmmeter as shown in (2) on the illustration. 7. While watching the ohmmeter reading, flex the leads by hand to check for intermittent problems. The reading should be one steady value between 500 and 1500at all times. 8. If the pick-up coil does not match the values shown in steps 5 and 7, replace it. 9. Connect the pick-up coil leads to the distributor module. 10. Install the distributer rotor. 11. Install the distributor cap. 7936016 3-44 Engine Electrical Industrial 3.0L REPAIR INSTRUCTIONS Battery Cable Replacement Notice: Always turn the ignition switch OFF when connecting or disconnecting batteries, battery chargers, or jumper cables. Failure to do so may damage the electronic control unit or other electrical components. Removal Procedure Important: Whenever battery cables are replaced, always use a replacement cable that is the same type, diameter, and length. Always route the replacement cable in the same manner as the original cable. Always disconnect the negative (-) cable from the battery first. Caution: Refer to Battery Cautions on page 3-17. 1. Remove the negative (-) battery cable from the battery. 2. Remove the positive (+) battery cable from the battery. 3. Remove the battery cable routing ties, if applicable. 4. Remove the starter solenoid nut and the positive (+) battery cable. 5. Remove the bolt and the negative (-) battery cable from the engine block. Installation Procedure Caution: Refer to Battery Cautions on page 3-17. Notice: When installing the positive battery cable to the starter solenoid, the inner nut on the solenoid battery terminal must be tightened before the battery cable and the other leads are installed in the equipment. Failure to do so will result in damage to the solenoid terminal and/or the solenoid. Notice: Refer to Fastener Notice on page 3-2. 1. Install the positive (+) battery cable to the starter solenoid with the nut. Tighten Tighten the battery positive (+) cable starter solenoid nut to 16 N•m (12 lb ft). 2. Install the negative (-) battery cable to the engine block or cylinder head with the bolt. Tighten Tighten the battery negative cable bolt to 40 N•m (30 lb ft). 3. Install the positive (+) battery cable to the battery. Tighten Tighten the battery side terminal bolts (if applicable) to 12 N•m (106 lb in). Tighten the top terminal nuts (if applicable) to 18 N•m (13 lb ft). 4. Install the negative (-) battery cable to the battery. Tighten Tighten the battery side terminal bolts (if applicable) to 12 N•m (106 lb in). Tighten the top terminal nuts (if applicable) to 18 N•m (13 lb ft). 5. Install the battery cable routing ties, if applicable. Industrial 3.0L Engine Electrical 3-45 Battery Charging Basic Rules When charging the battery, follow these basic rules: Use a charger with an end of charge voltage of 16.0 volts. The charger should have a voltmeter that is accurate within 1 percent. Ambient temperature should be 15-38°C (60100°F). An extremely cold battery may not accept measurable current after several hours of charging. The charging area should be well ventilated. On batteries with a built-in hydrometer: Do not charge the battery if the built–in hydrometer is clear or light yellow (3). If crank ing problems exist, replace the battery. Do not charge a battery that seems to be frozen. Replace the frozen battery. A battery with a green dot showing in the hydrometer (1) does not require charging unless the battery has been discharged, such as from cranking. Charging Procedure 181056 Caution: Refer to Battery Cautions on page 3-17. Notice: Always turn the ignition OFF when connecting or disconnecting battery cables, battery chargers, or jumper cables. Failing to do so may damage the Electronic Control Module (ECU) or other electronic components. Important: Tighten the adapters against the lead terminals of the battery in order to keep the resistance between the adapters and the battery terminals to a minimum. 1. Make sure all connections to the charger are clean and tight. When charging side terminal batteries out of the equipment, install a pair of GM P/N 12303040 adapters. Important: Do not use the charger settings for jump– starting equipment in order to charge the battery. 2. Set the charger for 12–volt batteries that gives the highest charge rate. NOTE: On batteries with a built in hydrometer, charge the battery until the green dot (1) appears. Check the battery periodically while charging. Lightly tap the hydrometer on top in order to dislodge any air bubbles that may prevent a correct indication. 3. Discontinue charging, or reduce the charging rate, if the following apply: The battery feels hot, above 52°C (125°F) Violent gassing or spewing of electrolyte through the vent holes After charging, test the battery. Refer to Battery Not Operating Properly and Battery Electrical Drain/ Parasitic Load. 42433 3-46 Engine Electrical Industrial 3.0L Charging Time Required The time required to charge a battery will vary. The time depends on the following factors: Size of the battery - A completely discharged heavy–duty battery requires more than twice the recharging time as a completely discharged light–duty battery. Temperature - Colder batteries require more time to recharge. Cold batteries accept only very low current at first during charging. The cold battery will accept a higher charging rate as the battery warms. Charger Capacity - A charger with higher amperage charges batteries in less time. State–Of–Charge - A completely discharged battery requires more than twice as much charge as a one–half charged battery. The electrolyte in a completely discharged battery is nearly pure water, so the electrolyte is a very poor conductor. In this condition, the battery accepts very low current at first. Later, as the charging current increases the acid content of the electrolyte, the charging current also increases. Any battery discharged by parasitic current drain, and then allowed to stand in this condition for a period of time, may not readily accept a charge. However, recharged long enough, many batteries will return to a usable condition. Prolonged periods in a discharged state can result in permanent damage to the battery. This damage can accelerate under changing temperatures. Batteries that are extremely discharged can freeze at temperatures as high as -7C (20F). This results in permanent damage. Disconnect the negative battery cable of equipment that is not going to be in service within a 30–day period. This will remove the constant drain on the battery. This can prevent damage to the battery and recharge problems. If this is not possible, recharge the battery every 30-45 days until the green dot is visible. Industrial 3.0L Engine Electrical 3-47 Battery Charge Low or Completely Discharged Tools Required J 39200 Digital Multimeter (DMM), or Equivalent Caution: Refer to Battery Cautions on page 3-17. Notice: Always turn the ignition OFF when connecting or disconnecting battery cables, battery chargers, or jumper cables. Failing to do so may damage the Electronic Control Module (ECU) or other electronic components. Important: Tighten the adapters against the lead terminals of the battery in order to keep the resistance between the adapters and the battery terminals to a minimum. Use the following procedure in order to recharge a very low or completely discharged battery. Carefully follow the procedure in order to avoid the replacement of a usable battery. 1. Measure the battery voltage at the battery terminals using the multimeter. A reading of less than 11 volts indicates that the initial charging will be very low. It could take some time before the battery accepts current in excess of a few milliamperes. 2. Set the battery charger on the high setting. 3. If necessary, disable the polarity protection circuitry. This circuitry, available on most chargers, prevents charging unless the charger leads are properly connected to the battery terminals. A completely discharged battery may not have enough voltage to activate this circuitry, even though the leads are properly connected, implying that the battery will not accept a charge. Most chargers have an override or a bypass function so that the charger will turn ON and charge a low voltage battery. Important: If the charging current is not measurable at the end of the charging time, replace the battery. If the charging current is measurable during the charging time, the battery is good. The required battery charge time varies according to the voltage capabilities of the battery charger. Charging time at various voltages may be as follows: 16.0 volts or more - up to 4 hours 14.0-15.9 volts - 8 hours 13.9 volts or less - 16 hours 4. In order to determine the amount of hours the battery may need to be charged, the following calculation can be made: The reserve capacity rating on the battery label is the number of ampere–hours of charge required in order to produce the green hydrometer dot. After the meter on the charger starts to show current flow, note the number of amps being accepted. Determine the reserve capacity of the battery. Refer to Battery Usage. Divide the reserve capacity by the number of amps shown on the meter in order to determine how many hours of charging is needed. 5. When the green dot appears in the hydrometer, discontinue charging. 6. If the green hydrometer dot is not visible after an ampere–hour charge equal to twice the reserve capacity rating, replace the battery. Refer to Battery Replacement. 7. After charging, load test the battery. Refer to Battery Not Operating Properly. Battery Replacement Removal Procedure Caution: Refer to Battery Cautions on page 3-17. Notice: Always turn the ignition OFF when connecting or disconnecting battery cables, battery chargers, or jumper cables. Failing to do so may damage the Electronic Control Module (ECU) or other electronic components. 1. Disconnect the negative cable from the negative battery terminal. 2. Disconnect the positive cable from the positive battery terminal. 3. Remove the battery hold–down retainers. 4. Remove the battery. 5. Inspect the battery for damage. 6. Inspect the battery cables and the connections. 7. Inspect the carrier for damage or foreign objects. If damage is found, correct the cause. 3-48 Engine Electrical Industrial 3.0L Battery Replacement - Continued Installation Procedure 1. Install the battery into the carrier. Notice: Refer to Fastener Notice onpage 3-2. 2. Install the battery hold–down retainers or the top bars. Tighten Tighten the retainer bolt to 18 N•m (13 lb ft). Tighten the top bar nut to 10 N•m (89 lb in). 3. Install the positive (+) battery cable to the battery. Tighten Tighten the battery side terminal bolts (if applicable) to 12 N•m (106 lb in). Tighten the top terminal nuts (if applicable) to 18 N•m (13 lb ft). 4. Install the negative (-) battery cable to the battery. Tighten Tighten the battery side terminal bolts (if applicable) to 12 N•m (106 lb in). Tighten the top terminal nuts (if applicable) to 18 N•m (13 lb ft). Jump Starting in Case of Emergency Do not try to jump start equipment if you are unsure of the voltage or ground of the other equipment, or if the voltage and ground of the other equipment is different. Be careful of the booster battery and the discharged battery when using jumper cables. Be careful in order to avoid causing sparks. Notice: To protect the electronic control module, do jump the battery with “Hot Shot” (over 14 V) charging aids. Do not disconnect the battery while the engine is running to verify charging system operation. Jump Starting Procedure Caution: Refer to Battery Cautions on page 3-17. Notice: Always turn the ignition OFF when connecting or disconnecting battery cables, battery chargers, or jumper cables. Failing to do so may damage the Electronic Control Module (ECU) or other electronic components. 1. If equipped, check the built–in hydrometer. If the hydrometer is clear or light yellow (3), do not jump start the battery. Replace the battery. Refer to Battery Replacement. 2. Ensure the jumper cables do not have loose or missing insulation. 3. Position the equipment with the booster (good) battery so that the jumper cables will reach, but DO NOT let the equipment touch. 4. Connect one jumper cable to the positive terminal of the booster battery and the positive terminal of the discharged equipment. 5. Attach one end of the other jumper cable to the negative terminal of the booster battery. 6. Attach the remaining end of the jumper cable to a solid ground at least 450 mm (18 in) from the booster battery. 7. Start the engine of the equipment with the booster battery. Turn off all electrical accessories. 8. Start the engine of the equipment with the discharged battery. 9. Disconnect the jumper cable from the ground. 10. Disconnect the other end of the jumper cable from the negative terminal of the booster battery. 11. Remove the jumper cable connecting the positive terminals. Industrial 3.0L Engine Electrical 3-49 Starter Motor Inspection Cleaning Procedure Notice: Do not use grease dissolving solvents for cleaning the overrunning clutch or armature. Solvents dissolve the grease packed in the clutch and damage the armature and the field coil insulation. Clean all starter motor parts with a soft cloth prior to testing. Inspection Procedure Inspection in the following steps refers to visual inspection of the starter motor parts and assemblies in order to determine the serviceability of the parts. 1. Inspect all parts for cracks, distortion, or other structural damage. Replace parts and assemblies that are cracked, bent, or otherwise damaged. 2. Inspect the threaded parts for stripped, crossed, or otherwise damaged threads. Replace parts as necessary. Replace the parts with thread damage that cannot be cleaned up using a suitable tap or die. Replace any hardware items that have damaged threads. 3. Inspect the solenoid assembly for a cut or torn boot. If the boot is damaged, replace the solenoid assembly. 4. Inspect the clutch drive assembly. Replace the clutch drive assembly as necessary. Look for the following damage: The pinion gear turns roughly or turns in both directions. The pinion gear teeth are broken or show evidence of step wear. The shift lever collar shows deep scoring or other damage. Component Electrical Testing Perform the following electrical tests in order to determine the serviceability of the starter assemblies. 1. Using an ohmmeter, check the windings of the solenoid assembly for continuity using the following procedure: Check the resistance of the solenoid pull–in and hold–in windings in a series by measuring the resis tance between the motor terminal and the solenoid case. A resistance reading well above 1.95 ohms indicates a break or fault in the winding continuity. A resistance reading well below 1.95 ohms indicates a short or ground in the winding circuit. Replace the solenoid assembly if the resistance reading is extremely high or very low. 2. Check the armature for shorts, opens and grounds using the following procedure. Replace armature if it is shorted, grounded, or has any evidence of an open circuit. 2.1. Rotate the armature in a growler. 2.2. Hold a steel strip such as a hacksaw against the armature. 2.3. If the steel strip vibrates in an area, a short is present. Using a self–powered test lamp or ohmmeter, check for continuity between the armature shaft and any point on the commutator. Continuity indicates a ground. Inspect the points where the armature conductors join the commutator for signs of arcing or burning. These signs indicate opens. Armature Bearing Replacement Notice: Ball bearings that are removed from the armature must be replaced with new bearings. The removal procedure causes internal damage to the bearings. Removal Procedure Remove the commutator end or drive end bearings from the armature assembly using a suitable bearing puller. Installation Procedure 1. Install the new commutator end and/or drive end bearings to the armature assembly using a tube that bears only on the bearing inner race. 2. Press on the bearing until the inner race bottoms out against the shoulder of the armature shaft. 3-50 Engine Electrical Industrial 3.0L Starter Motor Replacement Removal Procedure Notice: Never operate the starter motor more than 15 seconds at a time without pausing to allow it to cool for at least 2 minutes. Overheating, caused by excessive cranking, will damage the starter motor. Starter motors do not require lubrication except during overhaul. Caution: Refer to Battery Cautions on page 3-13. 1. Disconnect the negative (-) battery cable. 2. Disconnect the wires and the positive (+) battery cable from the starter solenoid. 3. Remove the two mounting nuts, the mounting bolt, and the starter rear bracket. 4. Remove the two bolts, the washers (if present), and the shims that hold the starter to the engine. 5. Remove the starter from the engine. 6. Remove the starter shield, if equipped. 79363012 Installation Procedure 1. Install the shield to the starter motor, if equipped. Notice: Refer to Fastener Notice on page 3-2. 2. Install the two bolts through the washers and through the starter to the engine. Tighten Tighten the starter bolts to 50 N•m (37 lb ft). 3. Install the two mounting nuts, the mounting bolt, and the starter rear bracket. Tighten Tighten the rear bracket mounting bolt to 50 N•m (37 lb ft). Tighten the rear bracket mounting nuts to 9 N•m (80 lb in). 4. Install the positive (+) battery cable and wires to the starter solenoid with the nut. Tighten Tighten the battery positive (+) cable starter solenoid nut to 16 N•m (12 lb ft). Tighten the S terminal nut to 9 N•m (80 lb in). 5. Install the negative (-) battery cable to the battery. Tighten Tighten the battery side terminal bolts (if applicable) to 12 N•m (106 lb in). Tighten the top terminal nuts (if applicable) to 18 N•m (13 lb ft). 79363012 Industrial 3.0L Engine Electrical 3-51 Generator Replacement 79363011 Removal Procedure The removal and installation instructions serve only as a guide. Additional operations may be required on some equipment to remove other equipment in order to gain access to the generator, the drive belt, and the brackets. Caution: Failure to observe Step 1 in this procedure may result in an injury from the live battery lead at the generator. Caution: Refer to Battery Disconnect Caution in Cautions and Notices. 1. Disconnect the negative (-) battery cable. 2. Disconnect the electrical connectors from the generator. 3. Disconnect the battery lead from the back of the generator. 4. Disconnect the generator ground wire. 5. Remove the drive belt. Refer to Drive Belt Replacement in Engine Mechanical. 6. Remove the upper generator mounting bolt. 7. Remove the lower generator mounting bolt and nut. 8. Remove the generator from the generator mount ing bracket. Installation Procedure 79363011 1. Install the generator into the generator mounting bracket. Notice: Refer to Fastener Notice on page 3-2. 2. Install the generator mounting bolts. Tighten Tighten the top mounting bolt to 50 N•m (37 lb ft). Tighten the bottom mounting bolt and nut to 50 N•m (37 lb ft). 3. Install the drive belt. Refer to Drive Belt Replacement in Engine Mechanical. 4. Install the generator ground wire. 5. Connect the electrical connectors to the generator. 6. Connect the battery lead to the back of the generator. Tighten Tighten to battery terminal nut to 8 N•m (71 lb in). 7. Connect the negative (-) battery cable to the battery. Tighten Tighten the battery side terminal bolts (if applicable) to 12 N•m (106 lb in). Tighten the top terminal nuts (if applicable) to 18 N•m (13 lb ft). 3-52 Engine Electrical Industrial 3.0L Ignition System Service Precautions 1. When performing compression checks, disconnect the electrical connector at the distributor. When disconnecting the connector, do not use a screwdriver or a tool to release the locking tab as this may damage the connector. 2. No periodic lubrication of the distributor is required. Engine oil lubricates the lower bushing and an oil-filled reservoir provides lubrication for the upper bushing. 3. The A terminal on the distributer (white wire) is the tachometer (TACH) terminal on the distributor module. Notice: Never allow the tach terminal to touch ground as damage to the distributor or ignition coil is likely to occur. 4. Some tachometers, currently in use, are not compatible with the high energy ignition system. Contact the manufacturer of the tachometer if questions arise. 5. Dwell adjustment is controlled by the distributor module and is not adjustable. 6. The material used to construct the spark plug wires is very soft. The cables will withstand more heat and carry a higher voltage, but scuffing and cutting become easier. The spark plug wires must be routed correctly to prevent scuffing and cutting. When disconnecting a spark plug wire twist the boot back and forth on the spark plug while pulling directly on the boot, or use a special tool designed for that purpose. Do not pull directly on the spark plug wire. Distributor Replacement Removal Procedure 1. Disconnect the primary ignition harness (4) from the distributor electrical connector. 2. Remove the distributor cap with secondary wires (1) attached, by loosening the two mounting screws. 3. Remove the distributor hold-down clamp (5) and mounting bolt (6). 4. Noting the position of the rotor, pull the distributor upward until the rotor stops turning counterclockwise. 5. Again note the rotor position. 6. Remove the distributor (2) and gasket ( 3) from the engine block. VE010-3L Industrial 3.0L Engine Electrical 3-53 Distributor Replacement - Continued Installation Procedure Important: To ensure correct ignition timing, the distributor must be installed in the correct position. If the crankshaft has been turned with the distributor removed, position the engine at top dead center on number one cylinder. The distributor cap must be removed in order to position the rotor when installing the distributor. 1. Install the distributor (2) and new gasket (3), making sure the distributor rotor is pointing in the same position noted during removal or to number one tower on the distributor cap if the crankshaft has been moved. 2. Install the distributor hold down (5) and bolt (6). Tighten Tighten the hold down bolt to 27 N•m (20 lb ft). 3. Connect the primary ignition harness (4) to the distributor electrical connector. 4. Install the distributor cap with secondary wires (1) attached, and tighten the two mounting s crews. 5. Set the base ignition timing. Refer to Setting Ignition Timing in this section. VE010-3L 3-54 Engine Electrical Industrial 3.0L Ignition Coil Replacement Removal Procedure 1. Disconnect the primary and secondary wiring from the coil. 2. Remove the ignition coil bracket attaching bolts. 3. Remove the ignition coil. 4. If the ignition coil is being replaced, drill out the rivets holding the coil to the bracket. VE011-3L Installation Procedure Important: The replacement coil kit comes with two screws to attach the coil to the bracket. 1. Install the ignition coil to the bracket, if removed. 2. Install the ignition coil and bracket. 3. Install the ignition coil bracket attaching bolts. Tighten Tighten the attaching bolts to 22 N•m (16 lb ft). 4. Connect the primary and secondary wiring to the coil. VE011-3L Industrial 3.0L Engine Electrical 3-55 Distributor Module Replacement Removal Procedure Important: It is not necessary to remove the distributer from the engine in order to replace the distributor module. 1. Remove the distributer cap and the rotor. 2. Disconnect the primary ignition wire connector from the module. 3. Remove the two module mounting screws. 4. Remove the module from the distributor. 5. Noting color codes on leads, disconnect the pick-up coil connector from the module. Important: If the module is being re-used, do not wipe the silicone lubricant off of the module or the distributer base. 7936017 Installation Procedure Notice: If a new module is being installed, a package of silicone grease will be included with it. Spread the grease on the metal face of the module and the area on the distributor base where the module mounts. This grease is necessary for module cooling. 1. Noting color codes on leads, connect the pick-up coil connector to the module. 2. Position the module on the distributor base. 3. Install the two module mounting screws. 4. Connect the primary ignition wire connector to the module. 5. Install the distributor cap and wires. 7936018 3-56 Engine Electrical Industrial 3.0L Pick-up Coil Replacement Removal Procedure Important: It is necessary to remove the distributor from the engine in order to replace the pick-up coil. 1. Remove the distributor from the engine. Refer to Distributor Replacement in this section. 2. Remove the rotor. 3. Position the distributor in a suitable holding fixture. 4. Drive the roll pin out of the drive gear and shaft. 5. Mark the drive gear and shaft for correct assembly. 6. Remove the drive gear from the shaft. 7. Remove the drive shaft from the distributor. 7936019 8. Disconnect the pick-up coil electrical connector from the distributor module. 9. Remove the pick-up coil retainer. 10. Lift the pick-up coil assembly straight up to remove from the distributor. Installation Procedure 1. Position the pick-up coil assembly on the distributor. 2. Install the pick-up coil retainer. 3. Connect the pick-up coil electrical connector to the distributor module. 7936017 Industrial 3.0L Engine Electrical 3-57 Installation Procedure - Continued 1. Install the drive shaft into the distributor. 2. Install the drive gear onto the distributor shaft. 3. Align the marks made during disassembly on the gear and shaft, then install a new roll pin. 4. Install the rotor. 5. Remove the distributer from the holding fixture. 6. Spin the distributor shaft to ensure that there is no tooth contact between the timer core and pole piece. 7. Install the distributor to the engine. Refer to Distributor Replacement in this section. 7936019 3-58 Engine Electrical Industrial 3.0L Setting Ignition Timing Important: PSI Timing Connector Part Number 33000036 MUST be used when checking and adjusting the engine timing. 1. With the engine shut-off, plug the 33000036 Timing Connector into the distributor 4-pin connector. Notice: DO NOT connect the alligator clip to any positive or negative terminal. Connecting this wire to any battery terminal prior to starting the engine will cause the distributor module to fail when starting the engine. 2. Start the engine and run at slow idle. 800 to 1000 rpm. 3. Connect the alligator clip to a B+ terminal. (This connection cancels the programmed timing advance from the distributor module. You will notice a change in engine sound and rpm when making this connection.) 4. Connect an electronic timing light to the No.1 spark plug wire. (The front cylinder on the 3.0L engine) 5. Check and adjust the distributor as necessary viewing the timing mark on the crankshaft pulley in relation to the pointer on the engine timing cover. 6. Refer to the chart below for the initial timing specification for your engine and type of fuel being used. PSI Fuel Injected and Dual Fuel engines For engines equipped with this type of fuel system, the engine timing may be controlled by the ECM (Engine Control Module). Checking the initial timing on engines equipped with PSI fuel injected and dual fuel engines incorporating an ECM can only be accomplished when using a laptop computer or a hand held diagnostic meter. It will be necessary to contact the OEM or PSI for the necessary equipment and instructions for checking and adjusting the engine timing. Notice: Failure to follow the correct specified procedures when checking and adjusting the engine timing, can cause severe damage to the engine.) Zenith Z.E.E.M.S. Throttle Body Fuel Injected Engines Engine timing for Zenith TBI fuel injected engines is checked and adjusted following the procedures noted under Setting Ignition Timing only when the 4-wire distributor connector is not populated. Check the chart below for the correct engine timing. Generator Timing PSI/GM engines operating on generators are timed at 1800 RPM. Timing procedures are the same as for Carbureted engines. Check the chart below for the correct engine timing for the type of fuel being used. Ignition Timing in Degrees BTDC (Except Generators) Fuel Management System Timing Specification Gasoline - Carbureted 0 Dual Fuel/Gasoline - Throttle Body Injected (TBI) 0 LPG 10 (4 Europe) N.G. 10 Ignition Timing in Degrees BTDC (Generators 1800 RPM) Fuel Management System Timing Specification LPG 26 N.G. 36 Industrial 3.0L Engine Electrical 3-59 Description and Operation Starting System Description Cranking Circuit The cranking circuit consists of the following components: The battery The starter motor The ignition switch All related electrical wiring For detailed schematics of the starting system refer to Schematic and Routing Diagrams. Starter Motor The 3.0 L gas engine uses a PG-260L starter motor. This starter motor uses a gear reduction system in order to drive the pinion. The armature shaft gear drives an internal gear at the gear–reduction end of the driveshaft at a speed of one driveshaft revolution for each 3.9 revolutions of the armature. The starter has an over running roller–type clutch and an enclosed shift lever. The solenoid is sealed in order to prevent entry of foreign material. The part number is stamped on a label attached to the field frame. The shift lever mechanism and the solenoid plunger are enclosed in the drive housing in order to protect them from exposure to dirt, icing conditions, and splash. The solenoid windings energize when the ignition switch is in the START position. The resulting plunger and the shift lever movement causes the pinion to mesh with the engine flywheel ring gear, the solenoid main contacts close, and the engine cranking takes place. When the engine starts, the pinion overrunning clutch protects the armature from excessive speed until the ignition switch is released, at which time the plunger return spring causes the pinion to disengage. In order to prevent excessive overrunning, release the ignition switch immediately when the engine starts. Starting System Circuit Description Battery voltage is applied at all times to the starter solenoid B (battery) terminal through the positive battery cable. When the ignition switch is turned to the START position, battery voltage is applied from the closed contacts of the ignition switch to S terminal of the starter solenoid through the BLUE wire. 185425 With voltage applied to the starter solenoid S terminal, current flows through the hold–in coil to the mechanical ground at the solenoid. At the same time, current flows through the pull–in coil and the starter motor to the starter motor’s mechanical ground. The combined magnetic force of the coil windings overcomes the force of the return spring to pull in and hold in the plunger. The plunger moves the shift lever. This causes the drive assembly to engage with the engine flywheel. The plunger actuation also operates a contact within the starter solenoid which closes to apply battery voltage directly to the starter motor. The starter motor now cranks the engine. With battery voltage applied directly to the starter motor, the pull–in coil now has voltage applied to both ends of the coil and current ceases to flow. The starter solenoid remains engaged due to the current flow through the hold–in coil alone. The starter motor continues to operate until the ignition switch is returned to the RUN position. With the ignition switch in the RUN position, voltage is removed from the starter solenoid S terminal. Voltage is applied at the solenoid B terminal, so both coils are still energized by battery voltage through the closed motor contacts. However, the forces from these coil windings now oppose one another and the plunger returns to the disengaged position through the operation of the return spring. This opens the contact within the solenoid to remove battery voltage from the starter motor and the motor stops. Both coils also de–energize. This plunger operation also retracts the starter drive assembly from the flywheel and the engine operates on its own power. 3-60 Engine Electrical Industrial 3.0L Batteries PSI does not supply batteries to equipment manufacturers. However, on the previous pages, you will find some generic methods used to diagnosis common battery problems. You may need to contact the equipment manufacturer for specific procedures and specifications for the battery you are working with. 181056 Built–in Hydrometer–If Equipped A built–in temperature compensation hydrometer is molded into the top of some maintenance free batteries. When observing the hydrometer, make sure the battery top is clean. Use a light in poorly–lit areas. Under normal operating conditions, one of three indications can be observed: 1. Any green appearance in the hydrometer is interpreted as a green dot . This means the battery is ready for testing. 2. A dark dot is visible. If the green dot is not visible and there is a complaint about cranking, refer to Battery Not Operating Properly or Battery Electrical Drain/Parasitic Load . 3. A clear or light yellow dot means the electrolyte level is below the bottom of the hydrometer and is too low for diagnosis. When you find a battery in this condition, this may indicate high charging voltages caused by a faulty charging system. Because of this, the charging and electrical systems must be checked. Refer to Charging System Check. The yellow dot may have been caused by the following conditions: Excessive or prolonged charging A broken case Excessive tipping If the battery has a yellow or clear hydrometer, replace the battery if a cranking complaint exists. Industrial 3.0L Engine Electrical 3-61 Charging System Description The charging system consists of the following components: The battery The generator The voltmeter gauge All related electrical wiring The generator supplies the electrical power for charging the battery and for operating the accessories. SI–Series Generators All PSI 3.0 L industrial engines use a Delco-Remy Diode Rectified AC generator. Since these units have an integral voltage regulator, they are referred to as a System Integral Charging Unit, or “SI” for short. The 3.0 L engine uses a model 7-SI which provides the proper current output (up to 70 amperes) to meet the needs of various industrial applications. A terminal marked “P” on the rear of the generator is available to provide a speed input to the tachometer, if needed. The generator has an internal regulator and does not have a diode trio. The delta stator (1), the rectifier bridge (4), and the rotor with slip rings and brushes (3), are electrically similar to other Delco-Remy generators. The generator uses a conventional fan and pulley. An internal fan cools the slip rings, the end frame, the rectifier bridge, and the regulator. The voltmeter gauge indicates the battery’s state of charge in DC volts when the ignition switch is in the RUN position and the engine is not running. 7936011 When the engine is running, the voltmeter indicates the condition of the charging system. Indications between the low and high warning zones represent the normal operating range. Readings in the low warning zone may occur when a large number of electrical accessories are operating in the vehicle and the engine is left at an idle for an extended period. This condition is normal since the charging system is not able to provide full power at engine idle. As engine speeds are increased, this condition should correct itself as higher engine speeds allow the charging system to create maximum power. Continuous readings in either warning zone indicate problems if any of the following conditions occur: Any abnormal charging condition System voltage is too high or too low 181768 3-62 Engine Electrical Industrial 3.0L Voltage Regulator The integral voltage regulator protects the unit’s operating accessories from receiving high voltage and the battery from being overcharged. No current regulation is needed because it determined by the design of the generator. The regulator is an extremely reliable device composed of two circuits. One of these circuits is used to sense voltage and control the other circuit which cycles the field current “on and off” to prevent voltage from going to high. The regulator limits system voltage by controlling the rotor field current. When the field current is on, the regulator switches the rotor field on and off at a fixed rate of about 400 cycles per second. By varying the overall on/off time, correct average field current for proper system voltage control is maintained. At high speeds, the on time may be 10 percent and the off time may be 90 percent. At low speeds, and with high electrical loads, the on/off time may be 90 percent and 10 percent respectively. The regulator has four terminals, The terminals are P, L, I, and S. These letters are stamped on the regulator. Generally, in SI generators the S terminal senses the state of the battery and allows field current flow when the switch is closed. When the battery voltage rises to predetermined level, the sensing circuit tells the regulator to turn OFF. This decreases the magnetic field around the field coil and generator voltage is limited to a safe value. When the battery voltage drops below a predetermined level, the sensing circuit tells the regulator to turn ON. This increases the magnetic field around the field coil and generator voltage begins to charge the battery. 375662 Charging System Circuit Description The generator provides voltage that operates the electrical system of the vehicle and that also charges the battery and the secondary battery. A magnetic field is created when current flows through the rotor. The field rotates as the rotor is driven by the engine, creating an AC voltage in the stator windings. The rectifier bridge converts the AC voltage to DC and this goes to the electrical system at the terminal to the battery. The digital regulator of the generator uses digital techniques in order to supply the rotor current. Because of this, the digital regulator controls the output voltage. The rotor current is proportional the width of the electrical pulses supplied from the electrical system through the RED wire connected between the battery and S terminals on the generator . When the ignition switch is turned to the RUN position, current from the battery flows through the closed contacts of the switch, to the voltmeter gauge on the instrument panel, the voltage regulator, and through the field coil of the generator rotor. With current applied to the digital regulator, the regulator turns on. Narrow width pulses go to the digital rotor circuit, creating a weak magnetic field. When the engine starts, the digital regulator senses the rotation of the generator by detecting AC voltage at the stator through an internal wire. Once the engine is running, the digital regulator varies the field current by controlling the pulse width. This regulates the output voltage of the generator for proper charging of the battery and operation of the electrical system. Industrial 3.0L Engine Electrical 3-63 IGNITION SYSTEM DESCRIPTION The 3.0 liter engine uses a battery-coil ignition with a General Motors High Energy Ignition (HEI) distributor that features Electronic Spark Timing, or EST. The ignition system consists of the battery, the distributor, the ignition coil, the ignition switch, the spark plugs, and the primary and secondary ignition wiring. Ignition Switch 7936013 The ignition switch Is mounted directly to the instrument panel and has three terminals. The “B” (battery) terminal is connected directly to the battery and is “hot” at all times. The “I” (ignition) terminal is “hot” when the switch is in the RUN or START positions. This terminal provides current to the ignition system and the engine electrical components such as the gauges and the generator field circuit. The “S” terminal is “hot” in START only. It provides current to energize the starter solenoid, allowing the starter motor to operate. Ignition Coil The external ignition coil is mounted to the right-hand side of the cylinder head. Battery voltage is available at the primary ignition terminal of the coil anytime the ignition switch is in the RUN or START position. The secondary circuit is connected to the rotor by a high tension wire. It is controlled by pulses provided by the distributor. The primary side of the coil has a tach output terminal. This terminal is not used for most PSI applications. VE011-3L Distributor The distributor connects the ignition secondary current from the ignition coil to the spark plugs through the rotor, distributor cap and secondary ignition wires. There is a magnetic pick-up assembly inside the distributor which consists of a permanent magnet, a pole piece with internal teeth and a pick-up coil. This assembly sends a signal to the distributor control module to trigger the primary circuit in order to induce a voltage in the secondary circuit to fire the spark plugs. Dwell and spark timing are both controlled by the distributor control module. 7936020 3-64 Engine Electrical Industrial 3.0L Spark Plugs The 3.0 liter engine uses resistor type spark plugs. The plugs used in this engine have a tapered seat, so a gasket is not required. A spark plug must operate within certain temperature limits to provide the performance and service life expected. The plug selected for this engine is based on the normal service for which the engine was designed. Depending on operating conditions, the spark plug heat range may have to be adjusted upward or downward one range in order to match the specific engine requirements. 7936021 Secondary Wiring The secondary wires, often referred to as “spark plug wires”, carry voltage between the ignition coil, the distributor, and the spark plugs. The secondary wiring used with the 3.0 liter engine is a carbon impregnated cord conductor encased in an 8 mm (5/16-inch) diameter silicone rubber jacket. The silicone wiring will withstand very high temperatures and also provides an excellent insulator for the higher voltages of an HEI system. The secondary wire connections are covered with rubber boots and form a tight seal to prevent arcing. Notice: Because the secondary wires are designed for a tight fit, always remove the wires by pulling on the boot while exerting a gentle twisting action. This will prevent damage to the wire connectors. Pulling directly on the spark plug wires can damage them. 7936022 Industrial 3.0L Engine Electrical 3-65 Special Tools and Equipment NOTE: The diagnostic tools shown here are available from Kent-Moore. However, equvalent tools supplied by other manufacturers are permissable for use. Illustration Tool Number/Description Illustration Tool Number/Description J 34142-B Unpowered Test Light J 21008 -A Self-Powered Test Light 5382 8439 J 35590 Current Clamp 95591 P/N 12303040 Battery Terminal Adapters 3431 J 36169-A Fused Jumper Wire J 38758 Parasitic Draw Test Switch 1025 3432 J 39200 Digital Multimeter 3430 J 42000 Battery Load Test Tool 404758