1
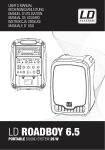
USER´S MANUAL
BEDIENUNGSANLEITUNG
MODE D´EMPLOI
Y
1
LD ROADMAN 102
PORTABLE SOUND SYSTEM 200 W
ENGLISH
Thank you for choosing LD-Systems!
We have designed this product to operate reliably over many years. Therefore LD-Systems guarantees for high
quality products with its name and many years of experience as a producer.
Please, take a few moments to read these instructions carefully, as we want you to enjoy your new LD-Systems
products quickly and to the fullest.
FRANCAIS
DEUTSCH
For information about LD-Systems check out our website WWW.LD-SYSTEMS.COM
02
LD ROADMAN 102
ENGLISH
PORTABLE SOUND SYSTEM 200 W
DEUTSCH
1
FRANCAIS
Y
03
PREVENTIVE MEASURES:
ENGLISH
1. Please read the attached safety instructions as well as the following instructions carefully.
2. Please keep all the instructions.
3. Please use the device only as intended.
4. Please respect the valid waste management rules. Please deliver the packaging divided into plastic and
paper/ cardboard to the recycling management.
5. Please refer all servicing to qualified personel only if the device is damaged, exposed to liquid/rain or if it does
not operate normally.
6. Please, do not expose to any kind of heat such as ovens, radiators, or any other devices (incl. amplifiers).
Please check for enough distance between amplifiers and walls, racks, etc. to prevent overheating.
7. After connection please check the wiring to prevent any kind of accident or damage.
Please never use any kind of damaged cable and wiring.
8. Only use authorized and stable stands, brackets, shelfs, tables etc.. for installations. Please check for
adequate stability against collapse.
CAUTION
RISK OF ELECTRIC SHOCK
DO NOT OPEN
CAUTION:
DEUTSCH
To reduce the risk of electric shock, do not remove cover (or back). No user serviceable parts inside. Refer
servicing to qualified personnel.
The lightning flash with arrowhead symbol within an equilateral triangle is intended to alert the
user to the presence of uninsulated “dangerous voltage” within the product´s enclosure that may be
of sufficient magnitude to constitute a risk to persons.
FRANCAIS
The exclamation mark within an equilateral triangle is intended to alert the user to the presence of
important operating and maintenance (servicing) instructions in the literature accompanying the
appliance.
CAUTION! HIGH VOLUME!
You will operate this system for professional use. Therefore the commercial use of this equipment is liable to the
rules and regulations of the Accident Prevention & Insurance Association of your industry sector. Adam Hall as a
manufacturer is bound to inform you formally about the existence of eventual sanitary risks.
These speakers are able to induce high acoustic sound pressure levels. 85 db is by law the maximum audio
pressure level which your ear can be exposed to during a work day. It was set according to the technical expertise of the occupational medicine as a basis for the noise rating level. Higher sound levels or longer exposition
times could damage your ear. The time of exposition by higher sound pressure levels should be shortened in
order to prevent from ear damages. Here are a few reliable warning signals which show that you have exposed
yourself for a too long period to excessive sound pressure levels:
- You hear bell- or whistling sounds!
- You have the impression that you can’t hear high tones anymore!
04
BACK PANEL:
2
3
The roadman 102 disposes of one wireless receiver
module. You can install a second receiver module if you
wish to use a second microphone simultaneously.
2 CD PLAYER
Digital Slot-In CD Player with USB Input interface. CD
Player with anti-shock function.
Supported files (CD Player and USB Player):
Audio CD, MP3, WMA
4
3 TAPEDECK
Cassette player/recorder, with tape reverse function
4 CONTROL PANEL
5
Volume Control: Master, Wired Mic 1 & 2, Line-In, Tape
EQ: Bass, Treble
Audio Link: XLR In & XLR Out (Master or Slave),
RCA Phono In & Out
Speaker Out: Switched & Unswitched
LED Indicator: Low Battery power (red), battery
charging (green blinking), battery fully charged (green).
DEUTSCH
1
5 TROLLEY
6
6 CARRY HANDLE
7
7 WIRELESS ANTENNAS THREAD
8 WHEELS
FRANCAIS
Y
1 WIRELESS RECEIVER MODULE
ENGLISH
1
8
05
SYSTEM COMPONENTS:
Roadman
Antenna
DEUTSCH
ENGLISH
Microphone
Case
FRANCAIS
Remote Control
06
Power Plug
OPTIONAL ACCESSORIES:
Transport Bag (LDRM102BAG)
ENGLISH
Tapedeck (LDRM102TDP)
DEUTSCH
Headset / Micro (WS100MH3)
FRANCAIS
Beltpack Transmitter (LDWS1616BP)
Separate Receiver TD (LDWS6216M)
07
CD PLAYER:
6
7
8
9
9
10
11
12
12
FRANCAIS
DEUTSCH
ENGLISH
Y
5
3
2
1
VOLUME BUTTON
Volume button is to control outgoing volume from CD Player to amplifier.
2
SD CARD READER
SD Card Input. Supports MP3 and WMA files. Only for SD Cards.
3
USB SOCKET
USB 1.1 Input. Supports MP3 and WMA files. Only for USB Memory Sticks.
4
IR
Infrared receiver for the remote control.
5
ENTER SHUF
Program and Shuffle mode.
6
POWER BUTTON
Press this button to turn the device on. press the button again to turn it off.
7
CD / SD / USB SWITCH BUTTON
Press this button to switch between CD Player, USB Stick and SD Card mode.
8
REPEAT
IN USB, SD, CD Mode the repeat modes are shown in this order.
PLAY ALL
REPEAT ALL
08
4
RANDOM
REPEAT TRACK
RANDOM REPEAT
PLAY ALL
REPEAT FOLDER
13
14
1
1
CD PLAYER:
In Audio CD Mode the repeat modes are shown in this order
FOLDER (LEFT/RIGHT) BUTTONS
Available in USB, MP3 CD and SD Card Mode
In Stop Mode: Use the FOLDER (LEFT/RIGHT) Buttons to go to the previous/next folder.
In Play Mode: Use the FOLDER (LEFT/RIGHT) Buttons to go to the first file of the previous/next folder.
10
MUTE
Press this button to mute the sound. Press the button again to unmute.
11
PLAY / PAUSE
Available in SD, CD and USB Mode.
In stop mode: Press Play/Pause to start playing.
In play mode: Press Play/Pause to pause playing. Press once again to resume play mode.
12
SKIP (LEFT/RIGHT) BUTTONS
In Play and Stop Mode, press SKIP (LEFT/RIGHT) to go to the previous /next track.
In Play Mode keep the SKIP button pressed to fast forward (SKIP RIGHT) or fast reverse (SKIP LEFT) a track.
13
PROG
The PROG Button allows you to program a playlist.
In Audio CD Mode: Press PROG to enter the Program Mode, use “SKIP” (Left or right) to run over the
different available files. When the desired file is shown on the LCD screen press PROG again to add this file to
the playlist. Once you added the files you wanted to the playlist press the “PLAY/PAUSE” button to play the
playlist.
In MP3 CD Mode: Press PROG to enter the Program Mode, use “SKIP” (Left or right) to run over the
different folders available on the MP3 CD. Press PROG to enter the folder, use “SKIP” (Left or right) to
run over the different MP3/WMA files available in the folder. When the desired file is shown on the LCD screen
press PROG again to add this file to the playlist. Once you added the files you wanted to the playlist press the
“PLAY/PAUSE” button to play the playlist.
IN USB / SD Mode: Press PROG to enter the Program Mode, use “SKIP” (Left or right) to run over the different
folders available on the USB Stick. Press PROG to enter the folder, use “SKIP” (Left or right) to run over
the different MP3/WMA files available in the folder. When the desired file is shown on the LCD screen press
PROG again to add this file to the playlist. Once you added the files you wanted to the playlist press the “PLAY/
PAUSE” button to play the playlist.
14
STOP/EJECT
When a CD is playing, press “STOP/EJECT” to stop the playing. By pressing a second time you will eject the CD.
When USB is playing, press “STOP/EJECT” to stop the playing.
DEUTSCH
9
ENGLISH
PLAY ALL
FRANCAIS
REPEAT TRACK
PLAY ALL RANDOM
REPEAT ALL
RANDOM REPEAT
09
CD REMOTE CONTROL:
16
ENGLISH
DEUTSCH
FRANCAIS
10
17
3
2
11
18
20
19
6
12
15
14
10
9
8
7
1
INFRARED TRANSMITTER
2
POWER ON /OFF
3
CD EJECT
4
MUTE
The Mute button allows you to completely switch
off the sound of the CD / USB Player. Press once to
turn the Mute function ON, press again to turn it OFF.
Please Note: The Mute button doesn’t stop the
playing of a song or a file. It only turns the sound off.
5
4
13
10
ESP
See CD Player (6)
11
FOLDER SKIP LEFT
See CD Player (10)
12
FOLDER SKIP RIGHT
See CD Player (10)
13
SKIP LEFT
See CD Player (9)
14
SKIP RIGHT
See CD Player (9)
5
PLAY / PAUSE
6
1-9 BUTTONS
15
REPEAT PLAYBACK MODES
7
STOP
16
SHOW SONG INFORMATION
8
PROG
See CD Player (8)
17
SWITCH TO CD MODE
18
SWITCH TO USB MODE
9
FIND
See CD Player (3)
19
VOLUME –
20
VOLUME +
1
CASSETTE RECORDER / PLAYER:
1
2
3
4
5
7
10
1
EJECT
Opens the Cassette slot.
2
COUNTER
Shows the minutes.
3
SPEED ADJ
With this button you can regulate the play speed of
the cassette reader.
4
CONTINUOUS LOOP
The player will play continuously (A and B Side
repeated) until you press stop.
5
SINGLE LOOP
The player will play the A and the B Side and then
stop from itself
6
SINGLE SIDE PLAYING
The player will read only one side of the cassette
and then stop from itself.
7
MODE
Allows you to select between Continuous Loop,
Single Loop or Single Side playing Mode.
9
8
8
STOP
9
FAST FORWARD
The cassette player features an auto search function, pressing this button during play will take you to
the next song on the cassette.
10
PLAY
The cassette player features the Auto-Reverse
Function. You do not need to turn the cassette
when one side is over. The Play button disposes of 2
directions representing both sides of the cassette.
11
FAST REVERSE
The cassette player features an auto search
function, pressing this button during play will take
you to the previous song on the cassette.
12
RECORD
Push the record button to activate the Recording
Mode, then push the play button to start recording.
DEUTSCH
11
FRANCAIS
12
ENGLISH
6
11
BACK PANEL:
19
17
18
20
13
21
14
22
15
ENGLISH
23
24
16
11
12
DEUTSCH
7
8
9
6
10
26
5
25
FRANCAIS
4
12
200-250V 50/60 Hz
1
1
AC 200-250 V POWER INPUT PLUG
2
DC 24-32V COMMUTATOR INPUT PLUG
3
FUSE 5A
4
VOICE PRIORITY
When Music is playing, turning on the Voice Priority
function will automatically decrease the volume of
the music when you speak in the microphone.
2
3
As soon as you stop talking the music volume
increases again. It is the so called “Talk Over”
function.
5
POWER SWITCH
This is the general power switch (ON/OFF for the
whole system)
8
9
15
BASS
BASS / LOW TONE Equalizer
16
LINE
Line Input (12) volume controller
UNSWITCHED OUT
Use this Output to plug a further passive speaker.
When using this output the sound comes out of both
the Roadman and the passive speaker.
17
MIC 1
Microphone 1 (20) volume controller
18
MIC2
Microphone 2 (22) volume controller
19
TAPE
Tape volume controller
20
MIC/LINE
Microphone or Line Input 1. Accepts Jack or XLR
connectors.
21
SPEECH/MUSIC
SPEECH: Microphone Input Level
Music: Line Input Level
22
MIC/LINE
Microphone or Line Input 2. Accepts Jack or XLR
connectors.
23
SPEECH/MUSIC
SPEECH = MIC: Microphone Input Level
Music = LINE: Line Input Level
24
LINK INPUT
This Input allows you to connect a Roadman to
another Roadman. The Link Input of the Slave
Roadman should be connected to the Link Output of
the Master Roadman.
25
CHARGING / LOW BATT
LED Indicator: Low Battery power (red), battery
charging (green blinking), battery fully charged
(green).
26
LED INDICATOR
When red, the system is in operation.
Turned ON.
LINK OUTPUT
This output allows you to connect the Roadman to
another Roadman.
LINK SET
MASTER / SLAVE: When connecting several
Roadman together (from 2 to max. 7) the Master /
Slave Order hast to be respected. First Roadman of
the “Chain” should be set on Master, the following
ones should be set on Slave. The Roadman that
is set on Master takes the control over all other
Roadman (Volume control, switch ON/OFF etc.)
10
VOLUME
Control of Slave Speakers
11
RCA PHONO OUTPUT
Allows line level output for recording or any other
use
12
RCA PHONO INPUT
Allows the connection of any line level device
13
MASTER
General volume control of the system
TREBLE
TREBLE / HIGH TONE Equalizer
14
DEUTSCH
7
SWITCHED OUT
Use this Output to plug a further passive speaker.
When using this output the speaker of the Roadman
102 is automatically muted and the sound only
comes out of the passive speaker.
FRANCAIS
6
ENGLISH
SYSTEM SETTINGS AND OPERATIONS:
13
ENGLISH
WIRELESS RECEIVER MODULE:
FRANCAIS
DEUTSCH
9
14
8
7
6
5
1
IR WINDOW
Sends Infra Red signals to the transmitter (handheld Mic) in order to synchronize the frequencies
2
POWER
Power switch and Volume controller
3
ASC
Begins the automatic frequency selection
(synchronization)
4
MUTE LEVEL
Noise Mute adjust. Set on Factory setting. Do not
change this setting.
4
3
2
1
5
AF
Shows if the module receives an audio signal
6
RF
Shows if the module receives a radio signal
7
UP
Channel Up
8
DIGITAL DISPLAY
Digital channel display
9
DOWN
Channel Down
4
1
MICROPHONE HEAD
2
GAIN
Use this controller to adjust the microphone sensitivity.
Left decrease, right increase.
Factory settings should give you complete satisfaction.
3
RF POWER SWITCH
H stands for High power signal, L for Low power
signal.
4
IR PORT
Receives the Infra Red frequencies sent by the
receiver in order to synchronize and find the best
transmitting frequency.
5
BATTERIES RACK
Please Insert 2 AA Alkaline batteries (LR6 1,5 V)
6
POWER/ASC
Green light: Power On
Green flash: IR transmission in progress
Red flash: battery low
7
ON/OFF SWITCH
2
3
6
7
FRANCAIS
5
DEUTSCH
1
ENGLISH
HANDHELD TRANSMITTER
CHANGING BATTERIES
Battery life is about 8 hours. If the Low Battery
indicator glows then change the batteries immediately.
15
BELTPACK TRANSMITTER:
FRANCAIS
DEUTSCH
ENGLISH
1
16
5
2
3
4
1
ANTENNA
2
ON/MUTE/OFF SWITCH
The middle position is the mute position
3
GAIN
Mic: Microphone Use
0: Guitar with passive pickup
-10 dB: Guitar with active pickups
4
MINI XLR INPUT
5
POWER INDICATOR
Battery status indicator
WEARING THE BELTPACK TRANSMITTER
Clip the receiver to a belt. For ultimate results, clip the
receiver onto a belt by pushing the receiver down onto
the belt as far as it goes.
For guitarists, attach the guitar strap ”through” the
receiver clip.
CHANGING THE BATTERIES
Expected life for two alkaline batteries is approximatively 8 hours.
When the battery status indicator flashes red the
batteries should be changed immediately as show on
the left side. Please Insert 2 AA Alkaline batteries (LR6
1,5 V)
HANDLING OF THE BATTERY:
FRANCAIS
DEUTSCH
HOW TO REPLACE THE BATTERIES
1. Make sure that the device is turned off and not connected to the power voltage
2. Unscrew the bottom panel to access the battery storage
3. Disconnect old batteries and connect the new ones. Make sure to respect the +/- order (Red + // Black -).
4. Place the new batteries in the battery storage and screw the bottom panel back.
5. Charge the new batteries at least 12 hours.
ENGLISH
Before you use your device for the first time the battery should be charged for 12 hours.
When the battery is low, the LED will glow red, when the battery is charging it will flash green.
To charge the battery simply connect the device with the power voltage cable to the AC Current.
This device is equipped with two 12 V4.5AH batteries. They can be used and recharged around 500 times, depending on the use and care.
The batteries should be charged 8 hours long. If the device stays for a long time unused make sure that you charge the battery once every 3 month or at least before the next use.
AT THE BOTTOM YOU CAN FIND
THE BATTERY STORAGE
17
FRANCAIS
DEUTSCH
ENGLISH
TECHNICAL SPECIFICATIONS:
18
BASIC SPECIFICATIONS
HANDHELD TRANSMITTER
Output power: MAX 100 W RMS / 4 Ω
Frequency response: 50Hz - 20KHz
Maximum sound pressure: 118dB
Speaker: 10“ Woofer / 1“ Tweeter
Power: 100V-240V (150W) Switching power supply
Charge battery 12V / 5AH (2 pieces)
THD: <0,5%
Size (W x H x D): 600 x 350 x 300
Weight: 21,5 kg
Receiver module: A set of UHF (470-1000MHZ)
Using time: 4-6 hours
Max Audio input level: 0dBV
Dimensions (L x Ø): 250mm x 54mm
Weight: 270 gram (without batteries)
Power Requirements: 2 “AA” size alkaline or rechargeable batteries
Battery Life: >12 hours
CD PLAYER
BODYPACK TRANSMITTER
Product type:
Compact disc digital audio system with mechanic &
electronic anti-shock CD, CD-R, CD-R/W, MP3, WMA,
USB MP3 WMA available.
Product No: EC-461HUR
Disc loading: Slot-in Type
Supply voltage: DC 12V (10~14V)
Power consumption: Within 5W
Dimensions (W x H x D): 160mm x 147,4mm x 68,5mm
Weight:1,2 kg
Max Audio input level: 0dBV to +10dBV
Gain Adjustment Range: 30 dB
Input Impedance
470KΩ
Dimensions (W x H x D): 85mm x 65mm x 23mm
Weight: 80 gram (without batteries)
Power Requirements: 2 “AA” size alkaline or rechargeable batteries
Battery Life: >10 hours
MANUFACTURER´S DECLARATIONS:
LIMITED WARRANTY
This Limited Warranty applies to the Adam Hall, LD Systems, Defender, Palmer and Eminence branded products.
The statutory warranty rights towards the seller are not affected by this guarantee. In fact, it justifies, additional
independent warranty claims towards Adam Hall.
In the unlikely event that your Adam Hall product has a recurring failure, Adam Hall, at its discretion, may elect to
provide you with a replacement unit of Adam Hall´s choice that is at least equivalent to your Adam Hall branded
product in hardware performance.
Adam Hall does not warrant that the operation of this product will be uninterrupted or error-free. Adam Hall is not
responsible for damage that occurs as a result of your failure to follow the instructions included with the Adam
Hall branded product.
This Limited Warranty does not apply,
- to wear parts (e.g. accumulator)
- to any product from which the serial number has been removed or that has been damaged or rendered defec
tive as the result of an accident
- in case of, misuse, abuse, or other external causes
- by operation outside the usage parameters stated in the user´s documentation shipped with the
product
- by use of spare parts not manufactured or sold by Adam Hall
- by modification or service by anyone other than Adam Hall
DEUTSCH
This Limited Warranty extends only to the original purchaser of this Adam Hall branded product and is not transferable to anyone who obtains ownership of the Adam Hall branded product from the original purchaser. During the
Limited Warranty Period, Adam Hall will repair or replace the defective component parts or the product. All component parts or hardware products removed under this Limited Warranty become the property of Adam Hall.
FRANCAIS
The Limited Warranty Period starts on the date of purchase. In order to receive warranty services you are required
to provide proof of the purchase date. Your dated sales or delivery receipt, showing the date of purchase, is your
proof of the purchase date. Should products of the brands named above be in need of repair within the limited warranty period, you are entitled to warranty services according to the terms and conditions stated in this document.
ENGLISH
Adam Hall warrants that the Adam Hall product you have purchased from Adam Hall or from an Adam Hall authorized reseller is free from defects in materials or workmanship under normal use for a period of 2 or 5 years from
the date of purchase.
These terms and conditions constitute the complete and exclusive warranty agreement between you and Adam
Hall regarding the Adam Hall branded product you have purchased.
19
LIMITATION OF LIABILITY
If your Adam Hall branded hardware product fails to work as warranted above, your sole and exclusive remedy
shall be repair or replacement. Adam Halls’ maximum liability under this limited warranty is expressly limited
to the lesser of the price you have paid for the product or the cost of repair or replacement of any hardware
components that malfunction in conditions of normal use.
ENGLISH
Adam Hall is not liable for any damages caused by the product or the failure of the product, including any lost
profits or savings or special, incidental, or consequential damages. Adam Hall is not liable for any claim made by
a third party or made by you for a third party.
This limitation of liability applies whether damages are sought, or claims are made, under this Limited Warranty
or as a tort claim (including negligence and strict product liability), a contract claim, or any other claim. This limitation of liability cannot be waived or amended by any person. This limitation of liability will be effective even if
you have advised Adam Hall of an authorized representative of Adam Hall of the possibility of any such damages.
This limitation of liability however, will not apply to claims for personal injury.
This Limited Warranty gives you specific legal rights. You may also have other rights that may vary from state to
state or from country to country. You are advised to consult applicable state or country laws for a full determination of your rights.
DEUTSCH
REQUESTING WARRANTY-SERVICE
To request warranty service for the product, contact Adam Hall or the Adam Hall authorized reseller from which
you purchased the product.
EG-DECLARATION OF CONFIRMITY
These products meet the essential requirements as well as the further standards of the EU Directives 199/5/EU,
89/336/EU.
CORRECT DISPOSAL OF THIS PRODUCT (ELECTRICAL WASTE)
FRANCAIS
(Applicable in the European Union and other European countries with separate collection systems)
This marking shown on the product or its literature, indicates that it should not be disposed with other household
wastes at the end of its working life. To prevent possible harm to the environment or human health from uncontrolled waste disposal, please separate this from other types of wastes and recycle it responsibly to promote the
sustainable reuse of material resources.
Household users should contact either the retailer where they purchased this product, or their local government
office, for details on where and how they can recycle this item in an enviromentally friendly manner.
Business users should contact their supplier and check the terms and conditions of the purchase contract. This
product should not be mixed with other commercial wastes for disposal
20
WEEE-DECLARATION
Your LD-Systems product was developed and manufactured with high quality materials and components wich
can be recycled and/or reused. This symbol indicates that electrical and electronic equipment must be disposed
of separately from normal waste at the end of its operational lifetime.
Please dispose of this product by bringing it to your local collection point or recycling centre for such equipment.
This will help to protect the environment in which we all live.
BATTERIES AND ACCUMULATORS
FRANCAIS
DEUTSCH
ENGLISH
The supplied batteries or rechargeable batteries can be recycled. Please dispose of them as special waste or return
them to your specialist dealer. In order to protect the environment, only dispose exhausted batteries.
Adam Hall GmbH, all rights reserved. The technical data and the functional product characteristics can be subject
to modifications. The photocopying, the translation, and all other forms of copying of fragments or of the integrality of this user’s manual is prohibited.
21
ENGLISH
Sie haben die richtige Wahl getroffen!
Diese LD-Systems Produkte werden Sie lange Jahre durch Zuverlässigkeit, Wirtschaftlichkeit und einfaches
Handling überzeugen. Dafür garantiert LD-Systems mit seinem Namen und seiner in vielen Jahren erworbenen
Kompetenz als Hersteller hochwertiger Geräte.
Nehmen Sie sich nun ein paar Minuten Zeit, diese Anleitung zu lesen. Wir möchten, dass Sie einfach
und schnell in den Genuss dieser Technik kommen.
FRANCAIS
DEUTSCH
Mehr Informationen zu LD-SYSTEMS finden Sie auf unserer Internetseite WWW.LD-SYSTEMS.COM
22
LD ROADMAN 102
ENGLISH
PORTABLE SOUND SYSTEM 200 W
DEUTSCH
1
FRANCAIS
Y
23
VORSICHTSMASSNAHMEN:
1.
2.
3.
4.
5.
6.
7.
ENGLISH
8.
Bitte beachten Sie die Sicherheitshinweise und studieren Sie diese Anleitung sorgfältig.
Bewahren Sie alle Hinweise und Anleitungen sicher auf.
Verwenden Sie das Gerät nur in der vorgesehenen Art und Weise.
Beachten die in Ihrem Land geltenden Entsorgungsgesetze. Trennen Sie bei der Entsorgung bitte Plastik und
Papier bzw. Kartonagen von einander.
Sollte Ihr Gerät nicht mehr ordnungsgemäß funktionieren, Flüssigkeiten ausgesetzt werden oder auf sonstige Art
und Weise beschädigt sein, überlassen Sie bitte jegliche Reparaturen ausschließlich autorisiertem Fachpersonal.
Halten Sie das Gerät von Hitzequellen wie z.B. Ofen, Heizkörper, oder sonstige Quellen (auch Verstärker) fern.
Sorgen Sie dafür dass das Gerät immer so installiert ist, dass es ausreichend gekühlt wird und nicht überhitzt.
Überprüfen Sie alle Verbindungen nach dem Sie das Gerät angeschossen haben um Schäden oder Unfälle zu
vermeiden.
Verwenden Sie ausschließlich stabile und passende Stative bzw. Befestigungen wenn das Gerät fest installiert
wird. Stellen Sie sicher, dass das Gerät sicher installiert ist und nicht herunterfallen kann.
CAUTION
RISK OF ELECTRIC SHOCK
DO NOT OPEN
ACHTUNG:
DEUTSCH
Entfernen Sie niemals die Abdeckung, da sonst die Gefahr eines elektrischen Schocks besteht.
Im Inneren des Gerätes befinden sich keine Teile, die vom Bediener gewartet oder repariert werden können.
Lassen Sie Reparaturen ausschließlich von qualifiziertem Servicepersonal durchführen.
Dieses Symbol warnt vor nichtisolierten, gefährlichen Spannungen im Geräteinneren,
die einen gefährlichen Schlag verursachen können.
Dieses Symbol kennzeichnet wichtige Bedienungs- und Wartungshinweise.
FRANCAIS
Vorsicht! Hohe Lautstärke!
Diese Übertragungsanlage wird von Ihnen professionell eingesetzt. Daher unterliegt der Gebrauch bei gewerblicher Nutzung den Regeln und Vorschriften der zuständigen Berufsgenossenschaft. Adam Hall als Hersteller ist
daher verpflichtet, Sie auf möglicherweise bestehende gesundheitliche Risiken ausdrücklich hinzuweisen.
Mit diesen Lautsprechern können hohe Schalldrücke erzeugt werden. 85db ist der Schalldruck, der laut Gesetz
als maximal zulässiger Wert über die Dauer eines Arbeitstages auf Ihr Gehör einwirken darf. Er wird nach den
Erkenntnissen der Arbeitsmedizin als Berurteilungspegel zu Grunde gelegt. Höhere Lautstärken oder längere
Einwirkzeit können Ihr Gehör schädigen. Bei höheren Lautstärken muss die Hörzeit verkürzt werden, um eine
Schädigung auszuschließen. Sichere Warnsignale dafür, dass Sie sich zu lange zu lautem Geräusch ausgesetzt
haben, sind:
- Sie hören Klingel- oder Pfeifgeräusche in den Ohren!
- Sie haben den Eindruck, hohe Töne nicht mehr wahrzunehmen!
24
RÜCKSEITE:
1
2
Der Roadman 102 verfügt über ein Wireless
Empfänger Modul. Um 2 Mikrofone gleichzeitig
benutzen zu können müssen Sie ein zweites
Wireless Modul einbauen.
3
Digital Slot-In CD Spieler mit USB Spieler.
CD Spieler mit Anti-Schock-Funktion.
Unterstützte Audio Formate: Audio CD, MP3, WMA
4
3 TAPEDECK
Audiokassetten Spieler / Recorder mit
Tape-Reverse Funktion.
ENGLISH
2 CD SPIELER
4 BEDIENKONSOLE
5
6
7
Lautstärkenregelung: Master, Kabelmikrofon 1 & 2,
Line-In, Tape
EQ: Bass, Treble
Audio Link: XLR In & XLR Out (Master oder Slave),
RCA Cinch In & Out
Speaker Out: Switched & Unswitched
LED Indikator: Niedriger Akku Zustand (rot), Akku
lädt (blinkt grün), Akku voll (leuchtet grün).
DEUTSCH
1
5 TROLLEY
mit Ausziehgriff
6 TRANSPORT GRIFF
7 SCHRAUBGEWINDE
für die Antennen
FRANCAIS
Y
1 WIRELESS EMPFÄNGER MODUL
8 ROLLEN
8
25
SYSTEMKOMPONENTEN:
Roadman
Antenne
DEUTSCH
ENGLISH
Microfon
Case
FRANCAIS
Fernbedienung
26
Stromkabel
OPTIONALES ZUBEHÖR:
Transporttasche (LDRM102BAG)
ENGLISH
Tapedeck (LDRM102TDP)
DEUTSCH
Headset / Micro (WS100MH3)
FRANCAIS
Beltpack Sender (LDWS1616BP)
Separater Empfänger TD (LDWS6216M)
27
CD SPIELER:
6
7
8
9
9
10
11
12
12
13
14
FRANCAIS
DEUTSCH
ENGLISH
Y
5
3
2
1
1
LAUTSTÄRKENREGELUNG
Mit diesem Drehknopf können Sie die Lautstärke vom CD Player zum Verstärker regulieren.
2
SD KARTENLESER
Unterstützt MP3 und WMA Dateien. Nur mit SD Karten kompatibel!
3
USB BUCHSE
USB 1.1 Buchse. Unterstützt MP3 und WMA Dateien. Nur mit USB Memory Sticks kompatibel!
4
IR
Infrarot Empfänger für die Fernbedienung.
5
ENTER SHUF
Programm und Zufallsmodus
6
POWER
Drücken Sie diese Taste, um das Gerät einzuschalten.
Durch erneutes drücken der Taste, schaltet sich das Gerät wieder ab.
7
CD / SD / USB
Drücken Sie diese Taste um zwischen CD / SD / USB zu wählen.
8
REPEAT
Im USB & MP3 CD Modus sind die REPEAT Modes (Wiederholungsmodus) wie abgebildet angeordnet.
PLAY ALL
REPEAT ALL
28
4
RANDOM
REPEAT TRACK
RANDOM REPEAT
PLAY ALL
1
REPEAT FOLDER
CD SPIELER:
Im Audio CD Modus sind die REPEAT Modes (Wiederholungsmodus) wie abgebildet angeordnet.
FOLDER (LEFT/RIGHT) TASTEN
Verfügbar im MP3 CD, USB und SD Modus
Im Stop-Modus: Drücken Sie auf die FOLDER Tasten (links / rechts) um zum vorigen / nächsten Ordner zu
wechseln.
Im Play-Modus: Drücken Sie auf die FOLDER Tasten (links / rechts) um zum ersten Titel des vorigem /
nächsten Ordners zu wechseln.
Im Programm-Wiedergabe-Modus: Drücken Sie auf die FOLDER Tasten (links/rechts) um zum ersten Titel der
Wiedergabeliste des vorigen / nächsten Ordners zu wechseln.
10
MUTE
Drücken Sie diese Taste zum stummschalten. Drücken Sie die Taste erneut um den Sound wieder zu aktivieren.
11
PLAY/PAUSE
Drücken Sie diese Taste um die Wiedergabe zu starten.
Durch erneutes drücken der Taste pausieren sie die Wiedergabe.
Drücken Sie die Taste noch einmal , um die Wiedergabe fortzusetzen.
12
SKIP (LEFT/RIGHT) BUTTONS
Im Play- oder Stop-Modus: drücken Sie „SKIP“ (links / rechts) um zum vorigen oder nächstem Titel zu
gelangen.
Im Play Modus: SKIP (links/rechts) länger drücken für Fast Reverse oder Fast Forward.
13
PROG
Die PROG Taste erlaubt Ihnen eine Wiedergabeliste (Playlist) herzustellen.
Im Audio CD Modus: Drücken Sie PROG um den Programm Modus zu aktivieren, drücken Sie auf „SKIP“ (links
oder rechts) um die verfügbaren Titel anzuzeigen. Wenn der gewünschte Titel angezeigt wird, drücken Sie wieder auf PROG um den Titel zur Wiedergabeliste hinzuzufügen. Wenn Sie die Wiedergabeliste fertig gestellt
haben, drücken Sie auf Play um die Wiedergabe zu starten.
Im MP3 CD Modus: Drücken Sie PROG um den Programm Modus zu aktivieren, drücken Sie auf „SKIP“ (links
oder rechts) um die verfügbaren Ordner zu durchsuchen. Wenn der gewünschte Ordner angezeigt wird, drücken
Sie wieder auf PROG um den Ordner auszuwählen. Dann drücken Sie auf „SKIP“ (links oder rechts) um die
verfügbaren Titel die in dem Ordner liegen durchsuchen. Wenn der gewünschte Titel angezeigt wird, drücken
Sie wieder auf PROG um den Titel zur Wiedergabeliste hinzufügen. Wenn Sie die Wiedergabeliste fertig gestellt
haben, drücken Sie auf Play um die Wiedergabe zu starten.
Im USB / SD Modus: Drücken Sie PROG um den Programm Modus zu aktivieren, drücken Sie auf „SKIP“ (links
oder rechts) um die verfügbare Ordner zu durchsuchen. Wenn der gewünschte Ordner angezeigt wird, drücken
Sie wieder auf PROG um den Ordner auszuwählen. Dann drücken Sie auf „SKIP“ (links oder rechts) um die ver
fügbaren Titel die in dem Ordner liegen zu durchsuchen. Wenn der gewünschte Titel angezeigt wird, drücken
Sie wieder auf PROG um den Titel zur Wiedergabeliste hinzufügen. Wenn Sie die Wiedergabeliste fertig gestellt
haben, drücken Sie auf Play um die Wiedergabe zu starten.
14
STOP / EJECT
Drücken Sie diese Taste, um die Wiedergabe zu stoppen. Im Stop Modus können Sie diese Taste drücken, um
die CD auszuwerfen.
DEUTSCH
9
ENGLISH
PLAY ALL
FRANCAIS
PLAY ALL RANDOM
REPEAT TRACK
REPEAT ALL
RANDOM REPEAT
29
CD FERNBEDIENUNG:
16
ENGLISH
DEUTSCH
FRANCAIS
30
17
2
14
10
INFRAROT SENDER
2
EIN- AUSSCHALTER
3
CD AUSWERFEN
4
STUMM SCHALTEN
Die Stumm Taste erlaubt Ihnen den Ton des CD/
USB Spielers komplett auszuschalten.
Beachten Sie: Die Stumm Taste hat keinen Einfluss
auf die Wiedergabe. Es wird nur der Ton deaktiviert.
7
STOP
8
PROG
Siehe CD Player (8)
9
FIND
Siehe CD Player (3)
10
ESP
Siehe CD Player (6)
7
5
FOLDER SKIP LEFT
Siehe CD Player (10)
12
FOLDER SKIP RIGHT
Siehe CD Player (10)
13
SKIP LEFT
Siehe CD Player (9)
14
SKIP RIGHT
Siehe CD Player (9)
15
1-9 BUTTONS
8
11
PLAY / PAUSE
6
9
4
13
1
5
3
11
18
20
19
6
12
15
1
WIEDERGABE WIEDERHOLUNGSMODUS
16
ZEIGE TITEL INFO
17
ZUR CD MODUS WECHSELN
18
ZUR USB MODUS WECHSELN
19
LAUTSTÄRKE SENKEN –
20
LAUTSTÄRKE ERHÖHEN +
KASSETTEN RECORDER / PLAYER:
1
2
3
4
5
7
10
1
EJECT
Öffnet das Kassettenfach.
2
COUNTER
Zeigt die abgespielten Minuten.
3
SPEED ADJ
Diese Taste erlaubt Ihnen die Wiedergabegeschwindigkeit der Kassette zu regeln.
4
CONTINUOUS LOOP
Der Kassettenspieler spielt ununterbrochen die A
und B Seite ab bis Sie auf Stop drücken.
5
SINGLE LOOP
Es wird einmal A und B Seite abgespielt.
Danach stoppt die Wiedergabe.
6
SINGLE SIDE PLAYING
Der Spieler spielt nur eine Seite ab.
7
MODE
Erlaubt Ihnen zwischen Continuous Loop, Single
Loop oder Single Side Wiedergabe zu wechseln.
9
8
8
STOP
9
FAST FORWARD
Dieser Kassettenspieler verfügt über eine Auto
Suchfunktion, das Drücken dieser Taste spult das
Tape automatisch zum nächsten Titel.
10
PLAY
Der Kassettenspieler verfügt über die Auto-Reverse
Funktion: Sie brauchen die Kassette nicht aus dem
Spieler nehmen wenn die Seite zu Ende gespielt
wurde. Die Play Taste verfügt über 2 Richtungen
und kann sowohl die A als die B Seite wiedergeben.
11
FAST REVERSE
Dieser Kassettenspieler verfügt über ein Auto-SuchFunktion, das Drücken dieser Taste führt die
Wiedergabe automatisch zum vorigen Titel.
12
RECORD
Drücken Sie diese Taste um den Aufnahme-Modus
zu aktivieren. Drücken Sie dann auf die Play-Taste
um die Aufnahme zu starten.
DEUTSCH
11
FRANCAIS
12
ENGLISH
6
31
RÜCKSEITE:
19
17
18
20
13
21
14
22
15
ENGLISH
23
24
16
11
12
DEUTSCH
7
8
9
6
10
26
5
25
FRANCAIS
4
32
200-250V 50/60 Hz
1
1
AC 200-250 V STROMEINGANG
2
DC 24-32V STROMEINGANG
3
SICHERUNG 5A
4
VOICE PRIORITY
Während der Musikwiedergabe senkt die “Voice
Priority” Funktion automatisch die Musiklautstärke sobald Sie in das Mikrofon sprechen.
Sobald Sie nicht mehr reden erhöht sich die
Lautstärke automatisch wieder. Das ist die
sogenannte Talk-Over Funktion.
2
3
5
EIN- / AUS- SCHALTER
Ein- / Aus- Schalter für das komplette System.
6
SWITCHED OUT
Dieser Ausgang ermöglicht es einen weiteren
Lautsprecher anzuschließen. Wenn Sie diesen
Ausgang benutzen wird der Lautsprecher vom
Roadman 102 automatisch Stumm geschaltet und
den Ton wird nur über den passiven Lautsprecher
wiedergegeben..
8
AUDIO LINK OUTPUT
Erlaubt die Verbindung zwischen 2 Roadman.
9
LINK SET
MASTER / SLAVE: Um mehrere Roadman zusammen zu verbinden (von 2 bis 7 St.) muss die Master/
Slave Anordnung respektiert werden. Das erste
Roadman von der Kette soll auf Master gesetzt
werden. Alle folgende Geräte sollen auf Salve
gesetzt werden. Das erste Roadman übernimmt
dann die Kontrolle über alle andere (Lautstärkenre
gelung, ein – ausschalten).
10
LAUTSTÄRKE
Lautstärkeregelung des Slave Lautsprechers.
11
RCA CINCH AUSGANG
12
RCA CINCH EINGANG
13
MASTER
Hauptlautstärkenregelung des Gerätes
14
TREBLE
TREBLE / Höhenklang-Regelung
15
BASS
BASS / Tiefton-Klangregelung
16
LINE
Line Eingang (12) Lautstärkenregelung
17
MIC 1
Mikrofon 1 (20) Lautstärkenregelung
18
MIC2
Mikrofon 2 (22) Lautstärkenregelung
19
TAPE
Tapedeck Lautstärkenregelung
20
MIC/LINE
Mikrofon oder Line Eingang 1. Funktioniert mit
Klinke oder XLR Verbinder.
21
SPEECH/MUSIC
SPEECH: Mikrofon Eingangspegel
Music: Line Eingangspegel
22
MIC/LINE
Mikrofon oder Line-Eingang 1. funktioniert mit
Klinke oder XLR Verbinder.
23
SPEECH/MUSIC
SPEECH: Mikrofon-Eingangspegel
MUSIC: Line-Eingangspegel
24
LINK INPUT
Ermöglicht die Verbindung von mehreren Roadman miteinander. Der Link-Ausgang des Master
Roadman soll mit dem Link- Eingang des SlaveLautsprechers verbunden werden.
25
CHARGING / LOW BATT
LED Indikator: Niedrige Akku Zustand (rot), Akku lädt
(blinkt grün), Akku voll (leuchtet grün).
26
LED INDICATOR
Wenn die LED rot leuchtet ist das System an und
bereit für den Betrieb.
DEUTSCH
UNSWITCHED OUT
Diesen Ausgang ermöglicht es ein weiterer
Lautsprecher anzuschließen. Wenn Sie diesen
Ausgang benutzen funktioniert sowohl der Lautsprecher des Roadmans als der des passiven
Lautsprecher.
FRANCAIS
7
ENGLISH
SYSTEM EINSTELLUNGEN & ANWENDUNGEN:
33
ENGLISH
WIRELESS EMPFÄNGER MODUL:
DEUTSCH
9
1
2
FRANCAIS
3
34
4
8
7
6
5
IR WINDOW
Sendet Infrarotsignale zum Sender (Handmikrofon
und Belt Pack) um die Synchronisation der
Frequenzen abzuschließen.
POWER
Ein/Aus Schalter und Lautstärkenregelung
ASC
Automatische Frequenz Auswahl
MUTE LEVEL
Noise Mute Adjust. Werkseinstellungen sollen nicht
geändert werden.
4
3
2
1
5
AF
Zeigt ob das Modul ein Audio Signal empfängt
6
RF
Zeigt ob das Modul ein Radiosignal empfängt
7
UP
Nächster Kanal
8
DIGITAL DISPLAY
Digitale Anzeige
9
DOWN
Voriger Kanal
MIKROFONKOPF
2
GAIN
Dieser Regler erlaubt Ihnen die Sensibilität des
Mikrofons einzustellen. Links senken, rechts erhöhen.
Die Werkseinstellungen sollten dennoch am besten
nicht geändert werden.
3
REGLER FÜR RADIO SIGNALSTÄRKE
Erlaubt die Stärke der Radiosignalübertragung
einzustellen. H für Hoch, und L für Niedrig.
4
IR PORT
Empfängt die Infrarot Signale des Senders während
der Frequenzsynchronisation
5
AKKUGEHÄUSE
Bitte 2 Stück AA Alkaline Batterien (LR6 1,5 V) einführen.
6
POWER/ASC
Leuchtet Grün: Gerät ist an.
Blinkt Grün: Infrarot Übertragung wird durchgeführt
Blinkt Rot: Akku niedrig
7
EIN/AUS -SCHALTER
4
2
5
3
6
7
DEUTSCH
1
FRANCAIS
1
ENGLISH
HANDHELD SENDER:
BATTERIEN / AKKUS WECHSELN
Akku Lebensdauer beträgt ungefähr 8 Stunden.
Sobald die Power/ASC LED blinkt, sollten sie die
Batterien / Akkus wechseln
35
BELTPACK SENDER:
FRANCAIS
DEUTSCH
ENGLISH
1
36
5
2
3
4
1
ANTENNE
2
EIN- / STUMM- / AUSSCHALTER
Stummschaltungsposition in der Mitte.
3
GAIN
Mic: Bedienung mit Headset (Condenser Mikrofon)
0: Gitarre mit passive pickups
-10 dB: Gitarre mit aktive Pickups
4
MINI XLR EINGANG
5
POWER INDICATOR
Zeigt den Batteriestatus
TRAGEN DES BELTPACK EMPFÄNGERS
Befestigen Sie den Empfänger mit dem Bügel an
einen Gürtel bzw. Gitarrengurt. Für den optimalen
Sitz des Empfängers am Gürtel sollte der
Empfänger stets vollständig auf den Gürtel aufgeschoben werden.
BATTERIEWECHSEL
Die durchschnittliche Betriebsdauer zweier
Alkaline-Batterien beträgt im Dauerbetrieb,
abhängig vom Fabrikat ca. 8 Stunden. Wenn die
LED für den niedrigen Batteriestand aufleuchtet,
sollten die Batterien umgehend gewechselt werden.
AKKU HANDHABUNG:
AN DER UNTERSEITE DES ROADMAN FINDEN
SIE DAS AKKU-FACH.
FRANCAIS
DEUTSCH
AKKU WECHSELN
1. Stellen Sie sicher dass Sie das Gerät ausgeschaltet und vom Stromnetz getrennt haben.
2. Untere Platte abschrauben um das Akkugehäuse zu erreichen
3. Alte Akkus abkoppeln, neue Akkus mit dem Roadman verbinden. Stellen Sie sicher dass Sie die +/- Ordnung
respektieren (Rot +//Schwarz -).
4. Stellen Sie die neuen Akkus in das Akkugehäuse und schrauben Sie die untere Platte wieder fest.
5. Laden Sie die neuen Akkus 12 Stunden lang.
ENGLISH
Bevor Sie das Gerät zum ersten Mal benutzen, sollten Sie ihn voll laden. Wir empfehlen eine Ladezeit von ungefähr
12 Stunden. Um das Akku zu laden müssen Sie einfach das Gerät mit dem Strom verbinden. Nach der ersten
Benutzung können brauchen die Akkus nur noch 8 Stunden um vollgeladen zu werden. Wenn Sie das Gerät nicht
regelmäßig benutzen sollten Sie trotzdem mindestens jede 3 Monaten die Akkus voll laden.
37
FRANCAIS
DEUTSCH
ENGLISH
TECHNISCHE SPEZIFIKATIONEN:
38
BASIC SPECIFICATIONS
HANDHELD TRANSMITTER
Output power: MAX 100 W RMS / 4 Ω
Frequency response: 50Hz - 20KHz
Maximum sound pressure: 118dB
Speaker: 10“ Woofer / 1“ Tweeter
Power: 100V-240V (150W) Switching power supply
Charge battery 12V / 5AH (2 pieces)
THD: <0,5%
Size (W x H x D): 600 x 350 x 300
Weight: 21,5 kg
Receiver module: A set of UHF (470-1000MHZ)
Using time: 4-6 hours
Max Audio input level: 0dBV
Dimensions (L x Ø): 250mm x 54mm
Weight: 270 gram (without batteries)
Power Requirements: 2 “AA” size alkaline or rechargeable batteries
Battery Life: >12 hours
CD PLAYER
BODYPACK TRANSMITTER
Product type:
Compact disc digital audio system with mechanic &
electronic anti-shock CD, CD-R, CD-R/W, MP3, WMA,
USB MP3 WMA available.
Product No: EC-461HUR
Disc loading: Slot-in Type
Supply voltage: DC 12V (10~14V)
Power consumption: Within 5W
Dimensions (W x H x D): 160mm x 147,4mm x 68,5mm
Weight:1,2 kg
Max Audio input level: 0dBV to +10dBV
Gain Adjustment Range: 30 dB
Input Impedance
470KΩ
Dimensions (W x H x D): 85mm x 65mm x 23mm
Weight: 80 gram (without batteries)
Power Requirements: 2 “AA” size alkaline or rechargeable batteries
Battery Life: >10 hours
HERSTELLERERKLÄRUNGEN:
GARANTIEBESTIMMUNGEN
Diese Garantie erstreckt sich auf die Marken Adam Hall, LD Systems, Defender, Palmer und Eminence.
Die gesetzlichen Gewährleistungsrechte gegenüber dem Verkäufer werden von dieser Garantie nicht berührt. Vielmehr begründet diese Garantie zusätzliche selbständige Ansprüche gegenüber Adam Hall.
In dem unwahrscheinlichen Fall, dass bei dem von Ihnen erworbenen Adam Hall Produkt ein Fehler wiederholt auftritt, kann Adam Hall nach eigenem Ermessen entscheiden, Ihnen dieses Produkt durch ein vergleichbares Produkt
mit mindestens derselben Leistung zu ersetzen.
Adam Hall übernimmt keine Garantie für einen störungs- oder fehlerfreien Betrieb dieses Produkts. Adam Hall
übernimmt keine Verantwortung für auf eine inkorrekte Befolgung der im Lieferumfang des Adam Hall erhaltenen
Anweisungen zurückzuführende Schäden.
Diese Garantie erstreckt sich nicht auf
DEUTSCH
Diese Garantie gilt nur für den ursprünglichen Käufer des von Adam Hall vertriebenen Produkts und ist nicht an
Personen übertragbar, denen vom ursprünglichen Käufer das Eigentum am Adam Hall Produkt übertragen wird.
Innerhalb des Garantiezeitraums werden die fehlerhaften Komponenten oder das Produkt von Adam Hall repariert
oder ersetzt. Alle im Rahmen dieser Garantie entfernten Komponenten und Hardware-Produkte gehen in das Eigentum von Adam Hall über.
FRANCAIS
Der Garantiezeitraum beginnt mit dem Datum des Kaufs.
Der Geltendmachung eines Anspruchs auf Garantieleistungen erforderliche Nachweis des Kaufdatums, erfolgt
durch die mit dem Kaufdatum versehene Quittung oder den mit dem Kaufdatum versehenen Lieferschein. Sie haben Anspruch auf den Garantieservice zu den in diesem Dokument aufgeführten Bedingungen und Bestimmungen,
falls eine Reparatur der unter den oben genanten Marken vertriebenen Produkte innerhalb des Garantiezeitraums
erforderlich ist.
ENGLISH
Mit dieser Garantie stellt Adam Hall sicher, dass das von Ihnen bei Adam Hall oder einem Adam Hall Partner
erworbene Produkt bei normalem Gebrauch während des Zeitraums von 2 bzw. 5 Jahren ab Kaufdatum frei von
Material- oder Verarbeitungsfehlern ist.
-Verschleißteile (z.B. Akkumulator).
-Geräte deren Seriennummer entfernt wurde oder die beschädigt oder fehlerhaft wurden als folge eines Unfalls
-nicht sachgerechter oder missbräuchlicher Verwendung oder anderer missbräuchlicher Verwendung oder anderer
äußerer Ursachen,
-Geräte die nicht entsprechend den Betriebsparametern betrieben wurden, die in den im Lieferumfang des Produkts enthaltenen Benutzerunterlagen festgelegt sind
-Geräte die aufgrund der Verwendung nicht von Adam Hall hergestellter oder vertriebener Teile repariert wurde
- Geräte die durch Änderung oder Wartung durch jemand anderen als Adam Hall getätigt wurde.
Diese Bestimmungen und Bedingungen stellen die vollständige und ausschließliche Garantievereinbarung zwischen Ihnen und Adam Hall für das von Ihnen erworbene Adam Hall Produkt dar.
39
HAFTUNGSBESCHRÄNKUNG
Wenn das unter der Marke Adam Hall vertriebene Produkt nicht entsprechend der obigen Garantie funktioniert,
besteht Ihr alleiniger und ausschließlicher Anspruch aus dieser Garantie in der Reparatur oder dem Ersatz.
Weitergehende Gewährleistungsansprüche bleiben hiervon unberührt. Die maximale Haftung von Adam Hall im
Rahmen dieser Garantie ist ausdrückliche beschränkt auf den jeweils niedrigeren Betrag, der sich entweder aus
dem Kaufpreis für das Produkt oder aus den Reparatur- bzw. Ersatzkosten von Hardware-Komponenten, die bei
normalem Gebrauch nicht Ordnungsgemäß funktionieren, ergibt.
ENGLISH
Adam Hall haftet aus dieser Garantie nicht für durch das Produkt oder sein versagen verursachte Schäden, einschließlich entgangener Gewinne, unterbliebener Einsparungen oder besonderer, indirekter oder Folgeschäden.
Adam Hall haftet zudem nicht für von Dritten oder von ihnen für Dritte geltend gemachte Ansprüche.
Diese Haftungsbeschränkung gilt unabhängig davon, ob Schäden gerichtlich verfolgt werden, ob Schadensersatzansprüche im Rahmen dieser Garantie oder aufgrund unerlaubter Handlungen (Einschließlich Fahrlässigkeit
und Gefährdungshaftung) oder aufgrund vertraglicher bzw. sonstiger Ansprüche gestellt werden. Diese Haftungsbeschränkung kann von keiner Person aufgehoben oder ergänzt werden. Diese Haftungsbeschränkung gilt auch
dann, wenn sie Adam Hall über die Möglichkeit derartiger Schäden informiert haben. Sie gilt jedoch nicht für
Ansprüche aus Personenschäden.
DEUTSCH
Aus dieser Garantie ergeben sich für Sie bestimmte Rechte. Möglicherweise haben Sie weitere Rechte, die Ihnen
von Staat zu Staat und von Land zu Land unterschiedlich sein können. Es ist ratsam, die entsprechenden Gesetze
des Staates bzw. Landes heranzuziehen, um Ihre Rechte umfassend zu ermitteln.
INANSPRUCHNAHME DES REPARATURSERVICE
Um den Garantieservice bzw. Reparaturservice für das Produkt in Anspruch zu nehmen, wenden Sie sich bitte an
Adam Hall oder an einen Adam Hall Partner, bei dem Sie das Produkt erworben haben.
EG-KONFORMITÄTSERKLÄRUNG
FRANCAIS
Diese Geräte entsprechen den grundlegenden Anforderungen und den weiteren Vorgaben der Richtlinien 1999/5/
EU, 89/336/EU und 73/23/EU.
KORREKTE ENTSORGUNG DIESES PRODUKTES
(Gültig in der Europäischen Union)
Dieses Symbol (entweder auf dem Gerät oder dem dazugehörigen Handbuch) weist darauf hin, dass das Gerät
nicht mit dem normalen Hausmüll entsorgt werden darf. Um mögliche Schäden an der Umwelt und an Personen zu
verhindern, entsorgen Sie dieses Gerät bitte fachgerecht bei einer entsprechenden Stelle für Elektromüll.
Als Privatkunde Informieren Sie sich bitte beim Hersteller oder bei Ihrer Gemeinde über die
Möglichkeiten der korrekten Entsorgung.
Als Geschäftskunde kontaktieren Sie bitte Ihren Lieferanten und prüfen Sie die Konditionen
zur Entsorgung der Geräte. Dieses Produkt sollte nicht mit anderem gewerblichen Abfall entsorgt werden.
40
WEEE-DEKLARATION
NOTES:
Ihr LD-Systems Produkt wurde unter der Verwendung hochwertiger Materialien und Komponenten die wiederverwertet oder wieder verwendet werden können hergestellt. Dieses Symbol weist darauf hin, dass elektronische
Geräte nicht im normalen Hausmüll entsorgt werden dürfen. Entsorgen Sie dieses Gerät bitte fachgerecht bei
einer entsprechenden Stelle für Elektromüll und helfen Sie dabei unsere Umwelt zu schützen.
BATTERIEN UND AKKUS
FRANCAIS
DEUTSCH
ENGLISH
Die mitgelieferten Batterien können wiederverwertet werden. Werfen Sie die Batterien daher nicht in den normalen Hausmüll sondern in gesonderte dafür vorgesehene Container. Helfen Sie, unsere Umwelt sauber zu halten.
Adam Hall GmbH, alle Rechte vorbehalten. Änderungen der Technischen Daten und Produktmerkmale vorbehalten. Das Erstellen von Fotokopien, Übersetzungen und anderen Reproduktionen dieser Bedienungsanleitung
oder Teilen derselben ohne vorherige Genehmigung ist untersagt.
41
FRANCAIS
DEUTSCH
ENGLISH
Merci d’avoir choisi LD-Systems!
42
Nous avons conçu ce produit afin de vous offrir un matériel fiable, qui vous accompagnera durant de longues
années. En achetant l’un des produits de la marque LD-Systems vous bénéficiez de notre compétence reconnue
et de nos nombreuses années d’expérience en tant que fabricant. Notre nom est notre garantie.
Veuillez s’il-vous-plait prendre quelques minutes pour lire attentivement ces instructions d’utilisation car nous
souhaitons que vous puissiez profiter pleinement et au plus vite de votre matériel LD-Systems.
LD ROADMAN 102
ENGLISH
SYSTÈME SONO PORTABLE 200 W
DEUTSCH
1
FRANCAIS
Y
43
PRÉCAUTIONS D’UTILISATION:
ENGLISH
1. Veuillez lire attentivement les précautions d’utilisation et les instructions suivantes.
2. Veuillez conserver ce manuel d’utilisation.
3. Veuillez utiliser cet appareil uniquement conformément à son but d’utilisation initial.
4. Veuillez respecter les règles de traitement des déchets. Veuillez s’il-vous-plait séparer les déchets plastiques
des déchets papiers et les déposer dans un bac à ordures adéquat.
5. En cas de panne, de dommage, d’exposition de l’appareil à la pluie ou autres liquides, veuillez contacter une
personne qualifiée pour le service après-vente de nos produits.
6. Veuillez ne pas exposer ce produit à des sources de chaleur, telles que les fours, les radiateurs ou tout autre
appareil produisant de la chaleur (notamment les amplificateurs de puissance). Pour éviter les risques de
surchauffe veillez à ce que l’appareil ne soit pas placé trop près d’un mur, ou enfermé dans un boitier, pour
que la circulation de l’air ne soit pas obstruée.
7. Après avoir connecté votre appareil veuillez inspecter le câblage pour éviter les risques d’accident ou
d’avarie. Veuillez ne jamais utiliser de câbles endommagés.
8. Veuillez utiliser uniquement les accessoires et supports de fixation fournis ou recommandés par le
constructeur. Assurez vous de la stabilité de votre installation avant d’utiliser votre matériel, vous éviterez les
risques de chutes et donc de dommages de l’appareil.
CAUTION
DEUTSCH
DANGER:
RISK OF ELECTRIC SHOCK
DO NOT OPEN
Pour réduire les risques de choc électrique veuillez ne pas retirer le couvercle (ou la face arrière) de l’appareil.
Les pièces situées à l’intérieur de l’appareil ne doivent pas être manipulées par l’utilisateur. Veuillez contacter
exclusivement une personne qualifiée pour le service après-vente de nos produits.
L’éclair finissant par une flèche, entouré d’un triangle équilatéral vous indique la présence à
l’intérieur du boîtier de pièces non isolées, représentant un risque de “haute tension électrique” et
pouvant par conséquent blesser les personnes.
FRANCAIS
Le point d’exclamation, entouré d’un triangle équilatéral, vous indique la présence d’instructions
importantes quant-à l’utilisation et à l’entretien dans la brochure fournie avec le produit.
ATTENTION! NIVEAU SONORE ÉLEVÉ!
Vous allez utiliser ce système de transmission sans fil à des fins professionnelles. Dans ce cas l’utilisation de ce
produit est soumise à des règles et à des directives définies par votre organisme professionnel de prévention
des accidents du travail. En tant que fabricant, Adam Hall se doit de vous mettre en garde formellement sur les
risques éventuels que cet appareil peut présenter pour votre santé.
Ce système est capable de générer une pression acoustique élevée. 85dB est la limite légale du niveau sonore
à laquelle votre ouïe peut être soumise lors d’une journée de travail. Cette valeur a été fixée par la médecine du
travail comme valeur de référence pour la mesure du niveau sonore. Vous exposer à des niveaux sonores plus
élevés, ou sur une durée plus longue peut endommager votre ouïe. Si vous vous exposez à des pressions acoustiques supérieures à la limite légale, pensez à raccourcir le temps d’exposition pour vous protéger d’éventuelles
dégradations de votre ouïe. Voici quelques signes pouvant vous alerter d’une exposition trop longue à un niveau
sonore trop élevé :
- Vous entendez des sons de cloche, de sonnerie ou des sifflements !
- Vous avez l’impression de ne plus entendre les sons aigus !
44
FACE ARRIÈRE:
1
2
Le Roadman 102 est équipé d‘un module de
réception sans fil. Vous pouvez installer un deuxième module afin de pouvoir utiliser deux micro
phones sans fil en même temps.
3
Lecteur CD avec chargement à fente SLOT-IN et
lecteur USB. Le lecteur CD dispose d‘une fonction
anti-choc (ESP). Les formats de fichiers audio
acceptés sont: CD Audio, MP3, et WMA.
4
3 PLATINE CASSETTE
Lecteur / Enregistreur Cassette avec fonction TAPE
REVERSE
ENGLISH
2 LECTEUR CD
4 PANNEAU DE CONTRÔLE
5
6
7
Contrôle du volume: Master, Micro Filaire 1 & 2,
entrée Ligne, Cassette Volume
Egaliseur: Bass, Treble
Entrées & Sorties Audio: Entrée Micro / Ligne 1
& 2, Entrée & Sortie RCA, Sortie Jack (Switched &
Unswitched), Entrée & Sortie XLR (Audio Link)
Témoin LED: Indication niveau batterie bas (rouge),
batterie en charge (clignote vert), batterie pleine
(vert)
5 POIGNÉE TÉLESCOPIQUE
6 POIGNÉE DE TRANSPORT
DEUTSCH
1
FRANCAIS
Y
1 MODULE RÉCEPTEUR SANS FIL
7 FILETAGE POUR VISSAGE DES ANTENNES
8
8 ROULETTES
45
COMPOSANTS DU SYSTÈME:
Roadman
Antenne
DEUTSCH
ENGLISH
Microphone
Valisette
FRANCAIS
Télécommande
46
Câble secteur
ACCESSOIRES EN OPTION:
Housse de transport (LDRM102BAG)
ENGLISH
Lecteur Cassette (LDRM102TDP)
DEUTSCH
Micro Casque Couleur Chair
FRANCAIS
Émetteur ceinture (LDWS1616BP)
Récepteur sans fil supplémentaire (LDWS6216M)
47
LECTEUR CD:
6
7
8
9
9
10
11
12
12
FRANCAIS
DEUTSCH
ENGLISH
Y
5
3
2
14
1
1
1
RÉGLAGE DU VOLUME
Tourner vers la gauche pour baisser le volume, vers la droite pour augmenter le volume. Chaque degré représente 1 dB. Volume min: 0 dB, max: 30 dB.
2
ENTRÉE SD
Entrée pour cartes mémoire SD, accepte les formats MP3 et WMA.
3
ENTRÉE USB
Entrée USB 1.1, accepte les formats de fichier audio MP3 et WMA. Uniquement compatible avec les clés/sticks USB.
4
IR
Récepteur Infrarouge pour la télécommande
5
ENTER SHUF
Bouton de Programme et Mode Aléatoire
6
POWER
Appuyer sur cette touche pour allumer ou éteindre le lecteur CD.
7
CD / SD / USB
Appuyer sur cette touche pour changer de source audio (CD, Carte SD ou Stick USB).
8
REPEAT
En mode USB et MP3 les modes de répétition sont définis comme suit:
PLAY ALL
REPEAT ALL
48
4
13
RANDOM
REPEAT TRACK
RANDOM REPEAT
PLAY ALL
REPEAT FOLDER
LECTEUR CD:
En mode CD Audio les modes de répétition sont définis comme suit:
10
MUTE
Touche Muet. Désactive le son. Appuyer de nouveau pour réactiver le son.
11
PLAY/PAUSE
Appuyer sur cette touche pour lancer la lecture.
Appuyer de nouveau pour mettre la lecture en pause.
Appuyer de nouveau pour réactiver la lecture.
12
SKIP (GAUCHE/DROITE)
En lecture et à l‘arrêt utiliser SKIP (Gauche / droite) pour aller au titre précédent/suivant. En lecture rester
appuyer sur cette touche pour reculer/avancer dans un fichier audio (fast reverse/fast forward).
13
PROG
Le bouton PROG permet de créer une programmation/Playlist.
En Mode CD Audio: Appuyer sur PROG pour entrer dans le mode de programmation, puis sur SKIP (gauche /
droite) pour faire défiler les différents titres audio disponibles sur le CD. Quand le titre désiré est affiché
appuyer une nouvelle fois sur PROG pour ajouter ce fichier à la playlist. Enfin appuyer sur play/pause pour
lancer la lecture de la playlist.
En Mode CD MP3, SD et en Mode USB: Appuyer sur PROG pour entrer dans le mode de programmation, puis
sur SKIP (gauche / droite) pour faire défiler les différents dossiers contenant des titres audio. Appuyer sur PROG
pour entrer dans un dossier, puis sur SKIP (gauche / droite) pour faire défiler les différents titres MP3 / WMA
disponibles dans le dossier. Quand le titre désiré est affiché appuyer une nouvelle fois sur PROG pour ajouter ce
fichier à la playlist. Enfin appuyer sur play/pause pour lancer la lecture de la playlist.
14
STOP/EJECT
Mode CD: En lecture cette touche arrête la lecture. Lorsque la lecture est stoppée appuyer sur cette touche
éjecte le CD.
En Mode USB/SD: Appuyer sur cette touche pour arrêter la lecture.
ENGLISH
FOLDER (GAUCHE/DROITE)
Disponible en Mode CD MP3, SD et USB:
À l‘arrêt: Utiliser la touche FOLDER (Gauche/Droite) pour aller au dossier précédent/suivant.
En lecture: Utiliser les touches FOLDER (Gauche/Droite) pour aller au premier fichier audio du dossier précé
dent/suivant.
En mode Programmation: Utiliser les touches FOLDER (Gauche/Droite) pour aller au premier titre de la program
mation présent dans le dossier précédent/suivant.
DEUTSCH
9
PLAY ALL
FRANCAIS
PLAY ALL RANDOM
REPEAT TRACK
REPEAT ALL
RANDOM REPEAT
49
TÉLÉCOMMANDE LECTEUR CD:
16
ENGLISH
DEUTSCH
FRANCAIS
2
14
10
9
8
7
5
4
13
1
11
FOLDER SKIP LEFT
Voir Lecteur CD (10)
12
FOLDER SKIP RIGHT
Voir Lecteur CD (10)
MUTE
La touche Mute vous permet de couper le son du
lecteur CD/USB complètement. C‘est le mode
MUET. Cette touche n‘influence pas la lecture, il ne
fait qu‘éteindre le son.
13
SKIP LEFT
Voir Lecteur CD (9)
14
SKIP RIGHT
Voir Lecteur CD (9)
5
PLAY/PAUSE
15
MODES DE RÉPÉTITION
6
TOUCHES 1-9
16
MONTRER INFOS SUR LA CHANSON
7
STOP
17
ALLER AU MODE CD
8
PROG
Voir Lecteur CD (8)
18
ALLER AU MODE USB
19
VOLUME –
9
FIND
Voir Lecteur CD (3)
20
VOLUME +
1
ÉMETTEUR INFRA ROUGE
2
INTERRUPTEUR MARCHE/ARRÊT
3
CD EJECT
4
10
50
17
3
11
18
20
19
6
12
15
ESP
Voir Lecteur CD (6)
LECTEUR / ENREGISTREUR CASSETTE:
1
2
3
4
5
7
10
1
EJECT
Ouvre le lecteur cassette
2
COUNTER
Indique le temps en minute
3
SPEED ADJ
Cette mollette vous permet d‘ajuster la vitesse de
lecture de la cassette.
4
CONTINUOUS LOOP
Le lecteur répète les faces A & B jusqu‘à ce que
vous stoppiez la lecture.
5
SINGLE LOOP
Le lecteur lit les faces A & B puis s‘arrête automatiquement.
6
SINGLE SIDE PLAYING
Le lecteur lit l‘une des deux faces puis s‘arrête
automatiquement.
7
MODE
Vous permet de sélectionner l‘un des modes de
lecture mentionnés ci-dessus.
9
8
8
STOP
9
FAST FORWARD
Avance rapide. Ce lecteur de cassette dispose d‘une
fonction de recherche automatique de silence.
En appuyant sur cette touche le lecteur passe en
avance rapide et vient se positionner au début de la
prochaine chanson.
10
PLAY
Ce lecteur dispose de la fonction Auto-Reverse.
Vous n‘avez pas besoin de retourner la cassette
quand l‘une des faces est finie. Vous pouvez lancer
la lecture dans deux directions, face A ou face B.
11
FAST REVERSE
Retour rapide. Ce lecteur de cassette dispose d‘une
fonction de recherche automatique de silence. En
appuyant sur cette touche le lecteur passe en retour
rapide et vient se positionner au début de la chanson.
12
RECORD
Appuyer une fois sur cette touche pour activer le
mode d‘enregistrement puis appuyer sur Play pour
démarrer l‘enregistrement.
DEUTSCH
11
FRANCAIS
12
ENGLISH
6
51
FACE ARRIÈRE:
19
17
18
20
13
21
14
22
15
ENGLISH
23
24
16
11
12
DEUTSCH
7
8
9
6
10
26
5
25
FRANCAIS
4
52
200-250V 50/60 Hz
1
1
AC 200-250V EMBASE POUR CÂBLE SECTEUR
2
DC 24-32V EMBASE POUR CÂBLE COMMUTA
TEUR ÉLECTRIQUE
3
FUSIBLE 5A
4
VOICE PRIORITY
Cette fonction réduit automatiquement le niveau
du volume de la musique lorsque vous parlez dans
2
3
le microphone (Filaire ou sans fil). Dès que vous
arrêtez de parler le volume de la musique augmente
de nouveau automatiquement. C‘est la fonction
connue sous le terme « Talk Over ».
5
INTERRUPTEUR MARCHE/ARRÊT
Cet interrupteur met en marche ou arrête
l‘ensemble des fonctions du Roadman. C‘est
l‘interrupteur principal.
8
9
UNSWITCHED OUT
Utiliser cette sortie Audio pour brancher une
enceinte passive supplémentaire. Cette sortie
permet d‘avoir le son sur l‘enceinte passive et sur
le Roadman.
LINK OUTPUT
Cette sortie permet de connecter votre Roadman à
un autre Roadman.
LINK SET
MASTER / SLAVE: Lorsque vous connectez plusieurs Roadman ensembles (de 2 à 7) veillez à
respecter l‘ordre Master / Slave. Le 1er Roadman
de la chaîne doit être réglé sur Master, les Roadman
suivants sur Slave. Le Roadman réglé comme
Master (Maître) prend le contrôle sur les fonctions
des Roadman Slave (Esclaves).
10
RÉGLAGE DU VOLUME DES ROADMAN ESCLAVES
11
SORTIE RCA
Sortie niveau ligne pour l‘enregistrement ou toute
autre utilisation
12
ENTRÉE RCA
Permet la connexion de toutes sortes d‘appareil
avec niveau ligne
13
MASTER
Réglage du volume général du Roadman
14
TREBLE
TREBLE / Réglage des aigus (Égaliseur)
15
BASS
BASS / Réglage des basses (Égaliseur)
16
LINE
Réglage du volume de l‘entrée ligne (12)
17
MIC 1
Réglage du volume du Microphone 1 (20)
18
MIC2
Réglage du volume du Microphone 2 (22)
19
TAPE
Réglage du volume du lecteur cassette
20
MIC/LINE
Entrée Microphone ou Ligne 1. Compatible
connecteurs Jack ou XLR
21
SPEECH/MUSIC
SPEECH: Niveau entrée Microphone
Music: Niveau d‘entrée ligne
22
MIC/LINE
Entrée Microphone ou Ligne 2. Compatible
connecteurs Jack ou XLR
23
SPEECH/MUSIC
SPEECH: Niveau entrée Microphone
Music: Niveau d‘entrée ligne
24
LINK INPUT
Cette entrée audio vous permet de connecter
un Roadman à un autre Roadman. L‘entrée LINK du
Roadman esclave doit être connectée à la sortie
LINK du Roadman maître.
25
CHARGING / LOW BATT
Voyant LED: Rouge = Niveau de batterie bas // Vert
clignotant = En charge // Vert= Batterie chargée
26
VOYANT LED
Rouge= Le système est en fonctionnement
DEUTSCH
7
SWITCHED OUT
Utiliser cette sortie Audio pour brancher une
enceinte passive supplémentaire. Cette sortie
désactive automatiquement le Haut-parleur du
Roadman. Le son ne sort que de l‘enceinte passive.
FRANCAIS
6
ENGLISH
RÉGLAGES SYSTÈME ET FONCTIONNEMENT:
53
ENGLISH
MODULE RÉCEPTEUR SANS FIL:
FRANCAIS
DEUTSCH
9
54
8
7
6
5
4
3
2
1
IR WINDOW
Fenêtre Infra Rouge
Envoie des signaux infra rouge à l‘émetteur (Micro
Main ou Émetteur Ceinture) pour synchroniser les
fréquences radio.
5
AF
Indique si le récepteur reçoit un signal audio.
6
RF
Indique si le récepteur reçoit un signal radio.
2
POWER
Interrupteur Marche/Arrêt et réglage du volume
7
UP
Un canal au dessus
3
ASC
Appuyer sur cette touche pour démarrer la sélection automatique de canal de transmission.
8
AFFICHAGE DIGITAL
Affichage digital du canal
9
4
MUTE LEVEL
Bouton d‘ajustement de la réduction du bruit. Il est
préférable de ne pas modifier les réglages d‘usine.
DOWN
Un canal en dessous
1
MICRO MAIN ÉMETTEUR:
1
1
TÊTE DU MICROPHONE
2
GAIN
Utiliser cette mollette de réglage pour ajuster
la sensibilité du microphone. Vers la gauche pour
diminuer, vers la droite pour l‘augmenter. Nous vous
conseillons toutefois de conserver les réglages
d‘usine.
3
RÉGLAGE DE PUISSANCE DU SIGNAL RADIO
H pour Haute puissance, L pour Basse puissance
4
PORT INFRA ROUGE
Reçoit les signaux infra rouges envoyés par le
récepteur de manière à synchroniser les deux
appareils et de trouver la meilleure fréquence de
transmission possible.
5
EMPLACEMENT POUR LES PILES
Veuillez insérer 2 piles alcaline LR6 1,5 V
6
POWER/ASC
Vert: En marche
Vert clignotant: Transmission Infra Rouge en cours
Rouge clignotant: Niveau de batterie bas
7
INTERRUPTEUR MARCHE/ARRÊT
4
6
7
DEUTSCH
3
FRANCAIS
5
ENGLISH
2
CHANGER LES PILES
La durée de vie des piles moyennes est de 8 heu
res. Si l‘indicateur de niveau de batterie bas cligno
te changer immédiatement les piles.
55
ÉMETTEUR CEINTURE:
FRANCAIS
DEUTSCH
ENGLISH
1
56
5
2
3
4
1
ANTENNE
2
MARCHE/ARRÊT ET POSITION MUTE
La position du milieu est la position Mute (Muet)
3
GAIN
Mic: Utilisation avec un microphone
0: Guitare avec micros passifs
-10 dB: Guitare avec micros actifs
4
ENTRÉE MINI XLR
5
INDICATEUR DU NIVEAU DE BATTERIE
COMMENT PORTER L‘ÉMETTEUR CEINTURE
Clipper le récepteur sur la ceinture jusqu’à ce que le
clip du récepteur bute sur la ceinture.
Pour les guitaristes, faire passer la sangle dans le clip
récepteur et l’attacher.
REMPLACER LES PILES
La durée de vie moyenne des piles alcalines pour cet
appareil est de 8 heures (varie selon le modèle de piles
utilisé).
Quand l’indicateur de charge des batteries clignote les
piles doivent être
remplacées immédiatement.
COMMENT ENTRETENIR LA BATTERIE :
AT THE BOTTOM YOU CAN FIND
THE BATTERY STORAGE
FRANCAIS
DEUTSCH
COMMENT REMPLACER LES BATTERIES
1. Assurez vous que l‘appareil est éteint et qu‘il n‘est pas relié au courant.
2. Dévissez le panneau se situant sous l‘appareil pour accéder aux batteries
3. Déconnectez les anciennes batteries et retirez les du Roadman, puis connectez les nouvelles batteries en
respectant l‘ordre des polarités +/- (Rouge + / Noir -)
4. Placez les nouvelles batteries dans leur emplacement et revissez le panneau de protection
5. Chargez les nouvelles batteries pendant 12 heures
ENGLISH
Avant d‘utiliser le Roadman pour la première fois vous devez charger les batteries pendant 12 heures. Pour charger la batterie, brancher l‘appareil éteint sur le secteur.
Cet appareil est équipé de deux batteries type 12 V4.5AH. Elles peuvent utilisées et rechargées environ 500
fois selon votre utilisation et le soin que vous leur porterez. La durée de vie des batteries en fonctionnement est
d‘environ 8 heures (dépend du volume d‘écoute et du nombre de fonctions utilisées). Si vous n‘utilisez pas le
Roadman régulièrement, pensez à recharger les batteries au moins une fois tous les trois mois.
57
FRANCAIS
DEUTSCH
ENGLISH
CARACTÉRISTIQUES TECHNIQUES:
58
CARACTÉRISTIQUES
MICRO MAIN ÉMETTEUR
Output power: MAX 100 W RMS / 4 Ω
Frequency response: 50Hz - 20KHz
Maximum sound pressure: 118dB
Speaker: 10“ Woofer / 1“ Tweeter
Power: 100V-240V (150W) Switching power supply
Charge battery 12V / 5AH (2 pieces)
THD: <0,5%
Size (W x H x D): 600 x 350 x 300
Weight: 21,5 kg
Receiver module: A set of UHF (470-1000MHZ)
Using time: 4-6 hours
Max Audio input level: 0dBV
Dimensions (L x Ø): 250mm x 54mm
Weight: 270 gram (without batteries)
Power Requirements: 2 “AA” size alkaline or rechargeable batteries
Battery Life: >12 hours
LECTEUR CD
ÉMETTEUR
Product type:
Compact disc digital audio system with mechanic &
electronic anti-shock CD, CD-R, CD-R/W, MP3, WMA,
USB MP3 WMA available.
Product No: EC-461HUR
Disc loading: Slot-in Type
Supply voltage: DC 12V (10~14V)
Power consumption: Within 5W
Dimensions (W x H x D): 160mm x 147,4mm x 68,5mm
Weight:1,2 kg
Max Audio input level: 0dBV to +10dBV
Gain Adjustment Range: 30 dB
Input Impedance
470KΩ
Dimensions (W x H x D): 85mm x 65mm x 23mm
Weight: 80 gram (without batteries)
Power Requirements: 2 “AA” size alkaline or rechargeable batteries
Battery Life: >10 hours
DÉCLARATIONS DU FABRICANT:
GARANTIE LIMITÉE:
Cette garantie limitée s’applique aux produits de la marque Adam Hall, LD Systems, Defender, Palmer et Eminence.
Les droits inhérents à la garantie légale vis-à-vis du revendeur ne sont pas affectés par cette garantie. En fait elle
justifie d’une garantie supplémentaire indépendante auprès de la société Adam Hall.
La période de garantie limitée débute le jour de l’achat du produit. Pour bénéficier de cette garantie vous devez
produire une preuve d’achat sur laquelle figure la date d’achat du produit (ex : ticket de caisse daté, bon de
livraison daté…). Si un produit d´une des marques citées ci-dessus venait à nécessiter une réparation durant la
période de garantie limitée, vous aurez alors le droit de bénéficier des services de la garantie selon les termes et
conditions mentionnés par ce document.
ENGLISH
La société Adam Hall garantit que le produit que vous avez acheté Adam Hall ou à l’un de ses revendeurs officiels,
est exempt de défaut matériel et d’usinage pour une durée de 2 ans (ou 5 ans pour les produits Palmer) à partir de
la date d’achat, lorsqu’il est utilisé dans des conditions normales.
Dans le cas improbable d´un défaut récurrent, Adam Hall peut, à sa discrétion, décider de vous fournir un produit
de remplacement de son choix, dont les capacités techniques sont au moins équivalentes à celles de votre produit
initial.
DEUTSCH
Cette garantie limitée ne s’applique qu’à l’acheteur initial de ce produit Adam Hall et ne peut être en aucun cas
transférée à un tiers devenu propriétaire du produit. Durant la période de garantie limitée, Adam Hall s‘engage
à réparer ou remplacer les pièces défectueuses du produit. Toutes les pièces ou éléments démontés lors d‘une
réparation par Adam Hall deviennent la propriété d‘Adam Hall.
Cette garantie limitée ne s‘applique pas,
- aux pièces d‘usure (ex: piles)
- aux produits dont le numéro de série a été effacé ou aux produits endommagés ou rendus défectueux par
accident
- dans le cas d‘une utilisation non conforme aux conditions normales d‘utilisation, dans le cas d‘abus ou
toute autre cause externe
- dans le cas d‘un usage du produit en dehors des paramètres d‘utilisation stipulés dans la documentation
fournie avec le produit
- dans le cas de l‘usage de pièces de remplacement n‘étant pas fabriquées ou vendues par Adam Hall
- dans le cas d‘une modification du produit ou d‘une réparation par quiconque autre qu‘Adam Hall
FRANCAIS
Adam Hall ne garantit pas que le fonctionnement de ce produit sera exempt d‘erreur ou ininterrompu. Adam Hall ne
peut pas être rendu responsable des dégâts résultant de votre manquement à suivre les instructions d‘utilisation
fournies avec votre produit.
Ces termes et conditions constituent l‘accord de garantie complet et exclusif entre vous et Adam Hall concernant
le produit de la marque Adam Hall que vous vous êtes procuré.
59
LIMITATION DE RESPONSABILITÉ
Si votre produit Adam Hall devait ne pas fonctionner correctement, votre seul et unique dédommagement sera
la réparation du produit ou son remplacement. La responsabilité maximale imputable à Adam Hall dans le cadre
de cette garantie limitée se limite au montant le plus bas. Ce montant découle du prix d’achat du produit ou
bien du coût de la réparation ou des pièces de remplacement qui sont tombés en panne dans des conditions
d’utilisation normales.
ENGLISH
Adam Hall n’est pas responsable des dommages causés par le produit ou par un dysfonctionnement du produit,
y compris les pertes de profits, les pertes d’épargne, et les conséquences inhérentes à ces dommages. La
responsabilité d’Adam Hall ne peut pas être engagée dans le cas d’une réclamation par un tiers ou dans le cas
d’une réclamation émanant de l’acheteur initial pour le compte d’un tiers.
Cette limitation de responsabilité est valable indépendamment du fait que les dommages commis fassent l’objet
de poursuites judiciaires, qu’ils fassent l’objet de réclamation (y compris pour négligence), de réclamations
contractuelles ou tout autre réclamation. Cette limitation de responsabilité ne peut être amendée ou dérogée par
quiconque. Elle est effective même si vous aviez avisé Adam Hall ou l’un de ses représentants officiels de la possibilité d’un tel dommage. Toutefois cette limitation de responsabilité est sans effet dans le cas de réclamations
pour dommages corporels.
DEUTSCH
Cette garantie limitée vous confère des droits légaux spécifiques. Selon votre pays, ou l’État dans lequel vous
vous trouvez, il est possible que vous disposiez d’autres droits. Veuillez consulter les lois applicables dans votre
pays ou votre État pour déterminer l’ensemble de vos droits.
FAIRE FONCTIONNER LA GARANTIE
Pour faire fonctionner la garantie sur ce produit, veuillez contacter Adam Hall ou le revendeur agréé auquel vous
avez acheté le produit.
UE-DÉCLARATION DE CONFORMITÉ
FRANCAIS
Ces produits sont conformes aux exigences essentielles des directives européennes 1999/5/EU,
89/336/EU ainsi qu’à leurs clauses additionnelles.
ÉLIMINATION CORRECTE DES DÉCHETS (DÉCHETS ÉLECTROMÉNAGERS)
(Applicable dans l’Union Européenne et dans les autres pays européens disposant d’un système de tri des déchets)
Ce signe figurant sur le produit, ou dans la brochure jointe au produit, indique qu’il ne doit pas être jeté dans le
même bac à ordures que les déchets ménagers classiques lorsqu’il arrive en fin de vie. Pour écarter les risques
de pollution de l’environnement ou les risques d’intoxication humaine dûes à un mauvais traitement des déchets,
veuillez séparer ce produit des autres types de déchets. Il sera ainsi inséré dans la boucle du recyclage et ces
composants pourront être traités puis éventuellement réutilisés.
Nous recommandons aux particuliers de contacter leur revendeur local ou les autorités locales pour s’informer de
la meilleure façon de traiter les déchets électroménagers.
Les professionnels doivent contacter leur fournisseur et examiner avec lui les termes et conditions de leur contrat
d’achat. Ce produit ne doit pas être mélangé aux déchets industriels.
60
DÉCLARATION DEEE
Votre produit LD-Systems a été développé et fabriqué avec des matériaux et des composants de haute qualité
qui peuvent être recyclés voire réutilisés. Ce signe figurant sur le produit ou dans la brochure jointe au produit
indique qu’il ne doit pas être jeté dans le même bac à ordures que les déchets ménagers classiques lorsqu’il
arrive en fin de vie.
Veuillez s’il-vous-plait disposer de ce produit auprès d’un point de collecte officiel des déchets ou d’un centre de
recyclage pour les produits de ce type.
En agissant ainsi vous participez à la préservation de l’environnement dans lequel nous vivons tous.
PILES ET BATTERIES
FRANCAIS
DEUTSCH
ENGLISH
Les piles ou les piles rechargeables fournies avec ce produit peuvent être recyclées. Veuillez les jeter dans un
bac spécialement dédié aux déchets de ce type, ou bien retournez les à un revendeur spécialisé. Pour protéger
l’environnement, ne jetez que les piles vides.
Adam Hall GmbH, tous droits réservés. Les données techniques et les caractéristiques fonctionnelles du produit
peuvent être sujettes à modification. La photocopie, la traduction ainsi que toutes autres formes de copies, de
tout ou partie, de ce manuel d’utilisation sont prohibées.
61
=
(=0=(=0===
=
=
=
"#==%"='"=#==
=
";==#""=$#!?=
#=
#=
=
."#==="=#'".=="=
=
=
"== =
=
=
""== =
=
=
&
+"== =
=
=
=
=0='=0===
=
%%%%
=
=!==
"##="#===&=!==""!=#
#
/=
#=
#==
= ";='?=&=
="
=&=:'&&/=
#"==.+==
."##==&=#%=&/=
=
%#!&%
%$$#% %
%!" %
%!" %
%!"%
%!"%
%
""!====
=
&;5=
=&&=
="=
&.&=#%=
=
=
=
=
),=0=66<=0==
7"&#=&#'"8=
7" &#=$;" 8=
=
>6=0=46=0===
7!=$"#=&8=
7
#"8=
=
2,,,090=
#=3==2,,,090==, =#?=2,,,-=
=
=
=
=
=
=
=
*#?=12-1,-411,= =
=
*#?=12-1)-411,=
%%%
%
=
=
=
%
%
$'"=0=#"=##=0==
===
62
%%
#";=:=0=#"=##=0=#"
#
=
NOTES:
63
WWW.LD-SYSTEMS.COM
Adam Hall GmbH | Daimlerstrasse 9 | 61267 Neu-Anspach | Germany
Tel. +49(0)6081/9419-0 | Fax +49(0)6081/9419-1000
web : www.adamhall.com | e-mail : mail@adamhall.com